

Page 1
SIZE:105 X148mm
Page 2

Table of content
SAFETY
IMPORTANT SAFETY INSTRUCTIONS ........................................................... 2
FEATURES AND CONTROLS.............................................................................. 4
SWITCHING YOUR RADIO ON FOR THE FIRST TIME ............................ 5
AC Operation ................................................................................................................ 5
DC (battery) operation ............................................................................................... 5
Menus ...............................................................................................................................5
SETTING THE CLOCK............................................................................................7
Set the clock in STANDBY mode........................................................................... 7
Set the clock in working mode..............................................................................7
BASIC OPERATION - GETTING STARTED.................................................... 8
DAB Auto Scan.............................................................................................................. 8
DAB Manual tune .........................................................................................................8
Prune.................................................................................................................................9
DAB display modes .....................................................................................................9
FM radio ...........................................................................................................................9
Scan setting ....................................................................................................................9
Audio setting ................................................................................................................10
FM display modes......................................................................................................10
STORING AND RECALLING STORED STATIONS ....................................10
SETTING ALARMS, SNOOZE AND SLEEP....................................................11
SETTING ALARMS.......................................................................................................11
SNOOZE ........................................................................................................................ 12
SLEEP............................................................................................................................... 12
USING HEADPHONES ........................................................................................ 13
RESET......................................................................................................................... 13
BACKLIGHT ............................................................................................................. 14
TECHNICAL SPECIFICATION........................................................................... 14
• FOR HOUSEHOLD AND INDOOR USE ONLY
• PLACE THE APPLIANCE ON A FLAT, STABLE SURFACE WITH
ADEQUATE VENTILATION AND AWAY FROM OTHER SOURCES OF
HEAT. MINIMUM DISTANCES AROUND THE APPLIANCE FOR
ADEQUATE VENTILATION IS 10CM. DO NOT COVER OR RESTRICT
VENTILATION OPENINGS.
• CHILDREN SHOULD BE SUPERVISED TO ENSURE THEY DO NOT
PLAY WITH THE APPLIANCE, AND THE APPLIANCE AND CABLE
SHOULD BE KEPT COMPLETELY OUT OF REACH OF YOUNG
CHILDREN.
• THIS APPLIANCE IS NOT DESIGNED FOR USE BY CHILDREN, OR
PERSONS WITH REDUCED PHYSICAL, SENSORY OR MENTAL
CAPABILITIES, AND SHOULD NOT BE USED BY SUCH PERSONS
UNLESS THEY CAN DO SO SAFELY. WHERE NECESSARY, SUCH
PERSONS (OR ANYONE WITH LACK OF EXPERIENCE OR
KNOWLEDGE) SHOULD FIRST BE GIVEN SUPERVISION OR
INSTRUCTION CONCERNING USE OF THE APPLIANCE BY A
PERSON RESPONSIBLE FOR THEIR SAFETY.
• FULLY UNWIND THE CABLE BEFORE PLUGGING IN AND ENSURE
THE CABLE IS POSITIONED AWAY FROM AREAS WHERE IT IS
LIKELY TO GET DAMAGED OR CAUSE A TRIP HAZARD.
• THE OUTPUT CORD OF THIS MAINS ADAPTOR CANNOT BE
REPLACED. IN THE EVENT OF DAMAGE TO THE CABLE, JACK
PLUG OR ADAPTOR, THE ENTIRE ADAPTOR UNIT SHOULD
BE REPLACED.
• CONNECTIONS MUST ONLY BE MADE VIA THE MAINS ADAPTOR
SUPPLIED, NEVER CONNECT THE APPLIANCE DIRECTLY TO THE
240V MAINS SUPPLY.
• NEVER USE THE ADAPTOR SUPPLIED WITH ANY OTHER
APPLIANCE.
• THE MAINS ADAPTOR WILL BECOME WARM IN USE; DO NOT
COVER OR PLACE ON OR NEAR SURFACES THAT COULD BE
AFFECTED BY HEAT SUCH AS TABLE TOPS AND CARPETS.
• REMOVE MAINS ADAPTOR FROM SUPPLY IF APPLIANCE IS
UNUSED FOR A LONG PERIOD OF TIME, AND DURING
THUNDERSTORMS.
• DO NOT PULL ON THE CABLE TO DISCONNECT FROM MAINS
SUPPLY.
1 2
Page 3
• KEEP APPLIANCE, CABLE, MAINS ADAPTOR PLUG DRY AND AWAY
FROM AREAS WHERE IT IS LIKELY TO GET SPLASHED. AVOID
USING IN HOT, HUMID ENVIRONMENTS.
• DO NOT PLACE ITEMS WITH NAKED FLAMES OR CONTAINERS
WITH LIQUIDS ON THIS APPLIANCE.
• SWITCH OFF AND UNPLUG WHEN NOT IN USE AND BEFORE
CLEANING OR SERVICING THE APPLIANCE. SERVICING OF THIS
APPLIANCE MUST ONLY BE CARRIED OUT BY A QUALIFIED
ELECTRICIAN.
• ALWAYS ENSURE THE MAINS ADAPTOR PLUG IS READILY
UNPLUGGABLE – DO NOT USE WITH ‘LOCKABLE’ SOCKETS OR
PERMANENTLY WIRE TO MAINS.
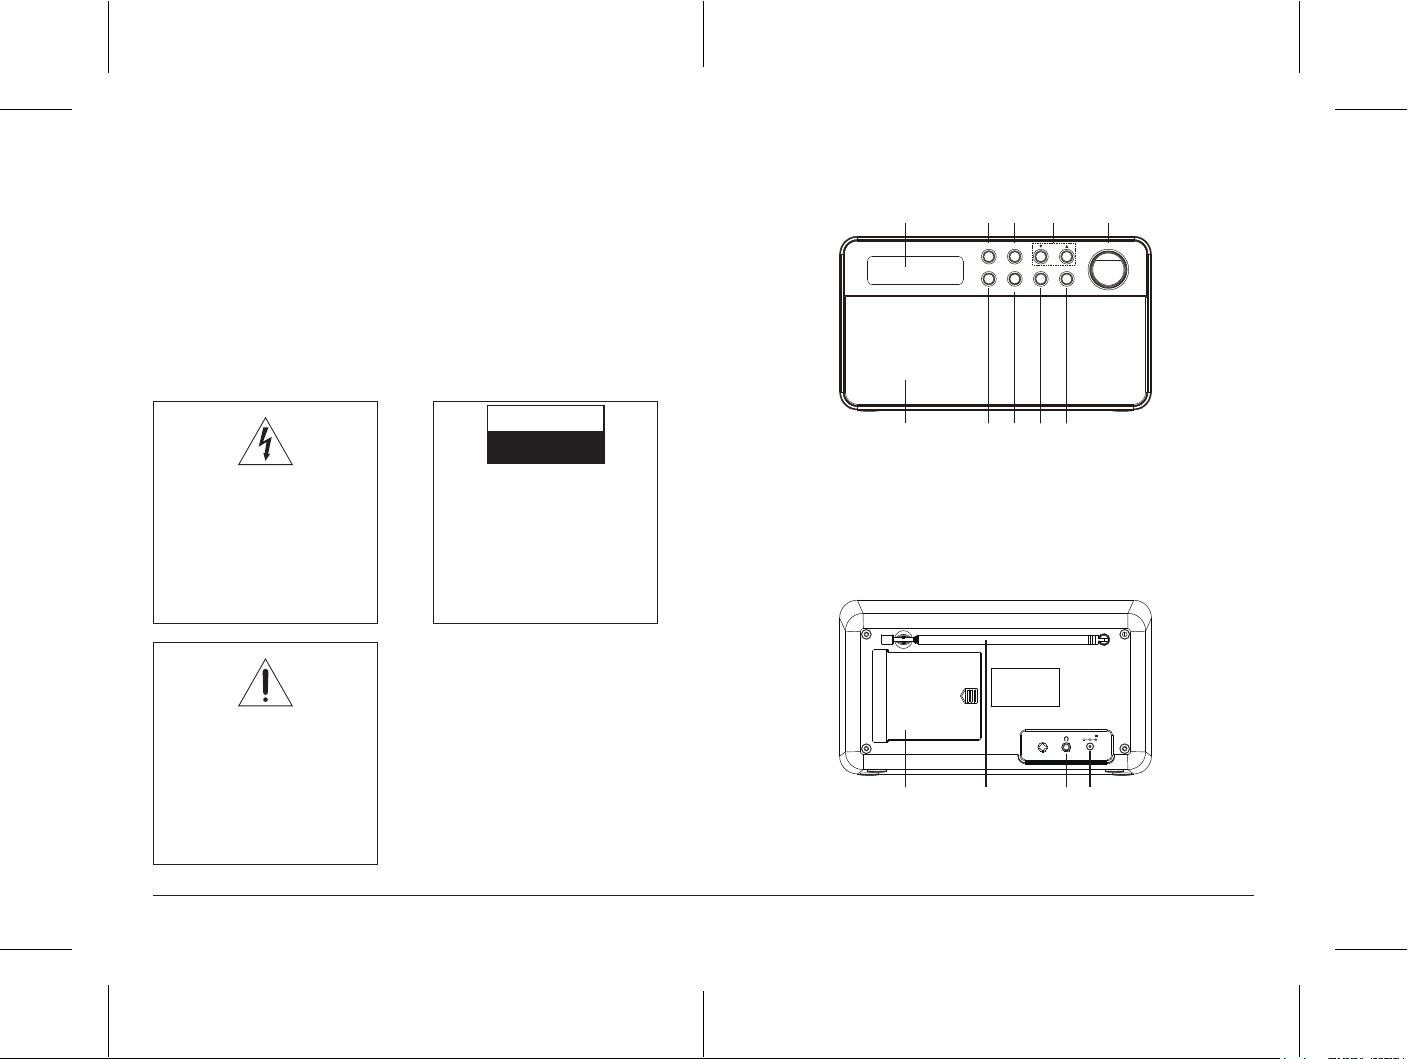
PARTS
Front view
1 2 3 4 5
STANDBY MENU/INFO
MODE PRESETSELECT
TUN/CH VOLUME
ALARM
SNOOZE
The lightning flash with arrow-head
symbol, within an equilateral triangle,
is intended to alert the user to the
presence of un-insulated "dangerous
voltage" within the product's
enclosure that may be of sufficient
magnitude to constitute a risk of
electric shock.
The exclamation point within an
equilateral triangle is intended to
alert the user to presence of
important operating and
maintenance (servicing) instructions
in the literature accompanying the
appliance.
CAUTION
RISK OF ELECTRIC SHOCK
DO NOT OPEN
WARNING: TO REDUCE THE RISK
OF ELECTRIC SHOCK, DO NOT
REMOVE COVER (OR BACK). NO
USER SERVICEABLE PARTS
INSIDE, REFER SERVICING TO
QUALIFIED SERVICE
PERSONNEL.
1. Lcd display
2. Standby button
3. Menu/info button
4. Tun/Ch button
5. Volume control
11. Battery compartment cover
12. Rod antenna
6 7 9 108
6. Speaker
7. Mode button
8. Alarm/Snooze button
9. Select button
10. Preset button
Rear view
DC 6V
11 12 13 14
14. DC in jack
15. Adaptor (not shown)
13. Earphone jack
3 4
Page 4

SWITCHING YOUR RADIO ON FOR THE FIRST TIME
AC Operation
1. Insert the DC power jack of AC/DC adaptor to the DC input socket
located at the rear of the radio.
2. Plug the AC/DC Adaptor to the AC mains outlet.
3. Press the STANDBY button to turn the radio on.
Remarks: If the AC Adaptor voltage is over than 6V, it will possible make the
line damage.
DC (battery) operation
1. Ensure the AC/DC adaptor is disconnected
from the radio and AC mains.
2. Installed the batteries (4×1.5V UM3/AA
battery) into the battery compartment.
3. Press the STANDBY button to turn the
radio on.
Remarks: To obtain the best performance in
DC operation, the use of alkaline batteries is
highly recommended.
Menus:
The following controls are used to move about the menu tree to choose and
select the required settings:
Press the SELECT button selects the currently display option, if the option has
a further sub-menu the first option of the submenu is displayed. Is the option
is a setting value, the displayed value is selected and either the next setting is
highlighted or, ifthere are no further settings. The display returns to the parent
menu for that setting.
Note:
1. Current or default values are indicated by an asterisk (*) on the right-hand
side of the top line of the character display.
2. Each of the above steps need to be completed within 5 seconds of
pressing the button, otherwise the screen will clear.
U M- 3/AA
U M- 3/AA
U M- 3/AA
U M- 3/AA
Mode Mode
DAB
Menu
DAB Menu
Full Scan
Manual Tune
Prune No/Yes
FM Menu
Scan Setting All station/Strong stations only
Audio Setting Stereo Allowed/Forced mono
System
FM
Menu
System
System Menu
Time
Backlight
Factory Reset
Backlight Menu
Backlight Low/ Medium/ High
Software Version
Sleep
Alarm
Alarm Menu
On Time hh:mm
Duration 15/30/45/60/90
Source Buzzer/DAB/FM
Interval Daily/Once/Weekends/Weekdays
Volume nnnnnooooo
On /Off On /Off
Sleep Menu
Sleep Off /15minutes/30minutes/45minutes/60minutes/90minutes
Time Menu
Set Time/Date hh:mm:dd:yy
Auto Update Update from Any/Update from DAB/Update from FM/ No Update
Set 12/24 hour 12/24
Set Date Format dd/mm/yyyy/mm/dd/yyyy
5 6
Page 5

SETTING THE CLOCK
BASIC OPERATION - GETTING STARTED
The clock in this radio is equipped to receive a DAB radio frequency time signal.
After the unit has been turned on, it will automatically tune into a DAB radio
station and update the clock. It may be necessary to wait for 1-2 minutes to allow
the unit to receive the time signal. If the area will only receive an FM signal it will be
necessary to manually set the clock.
Set the clock in STANDBY mode
1. Insert the adaptor cord into the power socket at the rear of the radio. Plug the
adaptor into the mains supply socket.
2. The display backlight will illuminate for a
few seconds, a welcome message (F1)
will appear in the display briefly and the
clock will be displayed
“00:00:00 Time is not set” will be displayed
3. In standby mode, press the ALARM button, “00:00:00 Time is not set” in the
display briefly the hour digits will flash in the display, press the ▼ TUN/CH ▲
button to set the correct hour, then press the SELECT button to confirm.
4. The minute digits will now flash, press the ▼ TUN/CH ▲ button to set the
correct minute.
5. Later you will enter to “set date 1-1-2014”. press the ▼ TUN/CH ▲ button to
set date and press SELECT button to confirm again.
F.1
Set the clock in working mode
1. Connect the radio to AC mains (via AC/DC adaptor), then press STANDBY to
turn the radio on.
2. Press MENU/INFO button, press the ▼ TUN/CH ▲ button to until the display
show “System”, then press the SELECT button confirm.
3. Continue press the ▼ TUN/CH ▲ button to until the display shows “Time’
and then press the SELECT button confirm will show “<Set Time /Date>”
press the SELECT button again confirm.
6. The hour digits will flash in the display, press the ▼ TUN/CH ▲ button to set
the correct hour, then press the SELECT button to confirm.
7. The minute digits will now flash, press the ▼ TUN/CH ▲ button to set the
correct minute.
8. Later you will enter to “set date 1-1-2014”. press the ▼ TUN/CH ▲ button to
set date and press SELECT button to confirm again.
Press the STANDY button to turn the unit
on, it will automatically enter into the DAB
mode and perform auto scan function,
During the scan the display show
“Scanning…” together with a slide bar that
indicates the progress of the scan and the amountof stations that have been
found so far.(F.1) (F.2)
Once the scan has finished, the radio will select the first alphanumerically
found station. You can now press the ▼ TUN/CH ▲ button to explore the
found stations followed by pressing the SELECT button to select listening to
the stations.
Note: If there is no stations found after auto scan, the radio will then enter
into the Tune Select Menu, you can now press the▼ TUN/CH ▲ button to
select “Manual tune” or “Full scan” for stations, and press SELECT button to
finally confirm.
F.2
DAB Auto Scan
The auto scan will search for the entire DAB Band III channels, after the scan
has finished, the first alphanumerically foundstations will be automatically
selected.
1. To activate auto scan, press
MENU/INFO button, press the
▼ TUN/CH ▲ button to enter into
the Menu to select “Full scan”, finally
press the SELECT button to confirm,
the display will show “Scanning…” and a pressing slide bar.(F.3)
2. All the stations that have been found will be stored automatically, to
explore the stations that have been found, press the ▼ TUN/CH ▲
button and when you find a station that you would like to listen to, press
the SELECT button.
DAB Manual tune
1. TO select manual tune, press
MENU/INFO button, press the
▼ TUN/CH ▲ button to enter into
the Menu to select “Manual tune”.(F.4),
finally press the SELECT button to
confirm.
F.3
Scanning . . .
F.4
DAB
< Manual tune >
7 8
Page 6

2. Press the ▼ TUN/CH ▲ button to move
through the DAB channels, the display will
show “5A to 13F” and their associated
frequencies. (F.5)
3. When your desired frequency appears in
the display, press the SELECT button to listen, the name of the station group
(ensemble/multiplex) will be displayed.
F.5
Manual tune
< 5A 174.928MHz >
Prune
You may remove all unavailable station form on the list.
1. During DAB mode, press MENU/INFO button and then press the ▼ TUN/CH
▲ button to select “Prune” finally press the SELECT button to confirm.
2. Press the ▼ TUN/CH ▲ button to select <Yes> to confirm delete. Or select
<No> to cancel. Press the SELECT button to confirm the setting.
DAB display modes
Every time you press the MENU/INFO button, the display will cycle through the
following display modes:
Signal strength, Programme Type, Ensemble Name, Channel number/frequency,
Signal error, Bit Rate, power status (Mains/Battery), Time and Date.
FM radio
1. To select FM, press the MODE button, the display will show FM and the
frequency.
2. To activate auto search, press SELECT
button or rotate and hold the SEARCH
control anticlockwise or clockwise until
the radio starts to scan the frequency
band, the display will show
“Scanning …“ (F6) and it will stop automatically once a station has been found.
3. To search manually, press the ▼ TUN/CH▲ button in the desired direction to
increment the frequency by 0.05MHz. If reception is still poor adjust the
position of the antenna or try moving the radio to another location.
F.6
92.75MHz
Scanning . . .
Scan setting
During FM mode, press and hold the MENU/INFO button and then press the
▼ TUN/CH ▲ button to select “Scan setting” finally press the SELECT button to
confirm. press the ▼ TUN/CH ▲ button to select “All stations/strong stations”.
Press the SELECT button to confirm the setting.
Audio setting
During FM mode, press and hold the MENU/INFO button and then press the
▼ TUN/CH ▲ button to select “Audio setting” finally press the SELECT button to
confirm. press the ▼ TUN/CH ▲ button to select “Stereo allowed/Forced mono”.
Press the SELECT button to confirm the setting.
Note: The radio will automatically switch between stereo and mono mode, but
you can override this and switch this function manually which is helpful for poor
signal reception.
FM display modes
Every time you press the MENU/INFO button, the display will cycle through the
following display modes: RDS Radio Text, Programme Type, Frequency,
Mono/Stereo, Power status (Mains/Battery), Time and Date.
STORING AND RECALLING STORED STATIONS
This function allows up to 10 stations to be programmed into the memory and
stored in both DAB and FM mode.
1. To store a preset, first tune to your desired station, then press and hold the
PRESET button for longer than 2 seconds ,the display will show the flashing
“Preset Store number” (F7).
2. press the ▼ TUN/CH ▲ button to select your desired station preset number.
3. Press the SELECT to confirm your selection, the station now broadcasting has
now been stored in the selected location (F8).
F.7
Preset Store
< 1 : Empty >
4. To listen to the preset stations, press the
PRESET button once and then press
the ▼ TUN/CH ▲ button to select the
desired preset location. And press the
SELECT button to confirm. (F.9) The
station name or frequency and preset location number will be displayed in the
lower half of the display. If the preset has not been allocated
‘Preset Recall #: (Empty)’,“Preset empty” will be shown in the display.
Notes: If the unit is disconnected from the mains supply for any length of time
and the batteries are not installed, theprogrammed stations will be lost.
F.8
Preset 1
Stored
F.9
Preset Recall
< 6 : BBC Radio 6 >
9 10
Page 7

SETTING ALARMS, SNOOZE AND SLEEP
SETTING ALARMS
1. Alarm will only function when the product is on (Mains or battery power) or in
Standby mode (Mains power only). Attempting to enter Standby mode when
powered only by battery will turn the product o.
2. An active alarm is indicated by its icon in
the top line of the display.
3. Alarms can be switched on or o in
standby mode (F.10). However, the
alarm parameters can only be set when
the product is on.
4. To set or change alarm 1, press
ALARM/SNOOZE button once, then press the SELECT button.
5. To set or change alarm 2, press the ALARM/SNOOZE button twice, then press
the SELECT button.
6. To exist alarm setting mode, press the ALARM/SNOOZE button again.
7. The alarm setup prompts you for the following parameters. Select a value for
each parameter in pressing the ▼ TUN/CH ▲ button and press the SELECT
button to confirm and move on to the next parameter.
8. Parameters
„ On Time –Hours and minutes
„ Duration-15/30/45/60/90 minutes
If the alarm is not cancelled product returns to standby after this time period
„ Source- Buzzer/DAB/FM
If DAB or FM is chosen as the audio source you will also be prompted to
select the last played station or one of the preset station (if set)
„ Daily/Once/Weekends/Weekdays
Choose the days on which the alarm is active
Note: if you choose “Once”, you are prompted to enter the require date.
„ Volume – Rotate the Volume control increase or decrease the volume
you desired
This is the volume the alarm will build up to. (Initially the alarm sounds at
a low volume and gradually gets louder to the set volume)
„ Alarm – O/ On
∞ In all listening modes active alarms are indicated by displaying the relevant
Alarm 1 and or Alarm 2 icons.
∞ At the set time, the alarm will sound, quietly at first, then gradually building
up to the set volume. When an alarmsounds. The bell in the display flashes.
F.10
Alarm 1 Setup
To turn alarms on or o in standby mode
∞ Press the ALARM/SNOOZE button, the display shows the current alarm
status. To switch the alarms on or o.
∞ Press the ALARM/SNOOZE button repeatedly to cycle through four states
as shown below. (F.11)
∞ To choose the display Alarm status, press the SELECT button to confirm.
F.11
Alarm 1 : Off
Alarm 1 : Off
Alarm 1 : Off
Alarm 2 : On
Alarm 1 : On
Alarm 2 : Off
Alarm 1 : On
Alarm 2 : On
SNOOZE
1. To temporarily silence a sounding alarm, press the ALARM/SNOOZE
button once, you can change the snooze period by repeatedly pressing
the ALARM/SNOOZE button, Snooze periods are 5,10,15 and 30 minutes.
The radio returns to standby for the set time period with Snooze
countdown displayed. When the countdown reaches 0(zero) the alarm
triggered again. (F.12) (F.13)
2. Press the STANDBY button or the ALARM/SNOOZE button to fully cancel
a sounding alarm and switch the ratio to standby.
F.12
5 minutes
Snooze
F.13
07:03:45
Snooze 1:05
SLEEP
To set the sleep timer while the radio is playing.
1. With the unit switched on, press and hold the MENU button and press the
▼ TUN/CH ▲ button until the display shows ‘System’ and press the
SELECT button and continue press the ▼ TUN/CH▲ button until the
display shows “sleep”. You can choose the sleep delay time from:
Sleep O /10/20/30/60/70/80/90 minutes. (F.14) press the ▼TUN/CH▲
button to cycle through the options or press the Sleep button repeatedly)
then press the SELECT button to choose the displayed option.
11 12
Page 8

F.14
Set sleep time
30 minutes
2. Once you select a sleep delay period, the display will show
S1(2/3/6/7/8/9)playing screening(what you set the sleepdelay). After the
sleep delay period the radio switches to standby mode.
3. To cancel the sleep timer, please return the MENU setting to choose
‘Sleep o’ appears in the display.
USING HEADPHONES (NOT INCLUDED)
A stereo headphone jack has been provided so that the set can be used
without disturbing others. Plug in the headphones at the point marked ‘ ’
and adjust the listening volume to your chosen level. Excessive sound
pressure from earphones and headphones can cause hearing loss. The
speakers will not operate when earphones are fitted.
RESET (AC OPERATION ONLY)
1. If moving the radio to another location in the country the pre-tuned and
stored DAB stations may no longer be available and it will be necessary
to reset the radio back to the factory settings.
2. With the unit switched on, Press and hold the MENU/INFO button and
press the ▼ TUN/CH ▲ button until the display shows ‘System’ and
press the SELECT button and continue press the ▼ TUN/CH ▲ button
until the display shows “Factory Reset <No> Yes’ and press the ▼
TUN/CH ▲ button until “<Yes>” and press the SELECT button. (F.15), (F.16)
3. The radio will display “Restarting….” and will then go into standby mode.
Note: All stored programmed stations will be lost during reset.
F.15
System
< Factory Reset >
F.16
Factory Reset ?
< No > Yes
BACKLIGHT
The product display has a backlight with three brightness setting Low/Medium/High.
With the unit switched on, press and hold the MENU button and press the
▼ TUN/CH ▲ button until the display shows ‘System’ and press the SELECT
button and continue press the ▼ TUN/CH ▲ button until the display shows
“Backlight” and ▼ TUN/CH ▲ cycle through “Low/ Medium/ High” and press
the SELECT button to confirm the setting.
TECHNICAL SPECIFICATION
Rated voltage (adaptor) AC 100 – 240V~ 50/60Hz, 0.3A
Adaptor output DC 6V 1.5A
Rated voltage (radio) DC 6V (1.5V x 4 AA)
Power consumption 9 W
Audio output 2*2W RMS
Radio DAB 174-240MHz
FM 87.5-108MHz
Operating conditions Temperature: 5°C to 35°C
Humidity 5% to 90%
Unit dimension: 210 (L) × 65 (H) × 115 (D) mm
Weight: 0.6 kg
***SPECIFICATION SUBJECT TO CHANGE WITHOUT FURTHER NOTICE.***
13 14
 Loading...