

Page 1
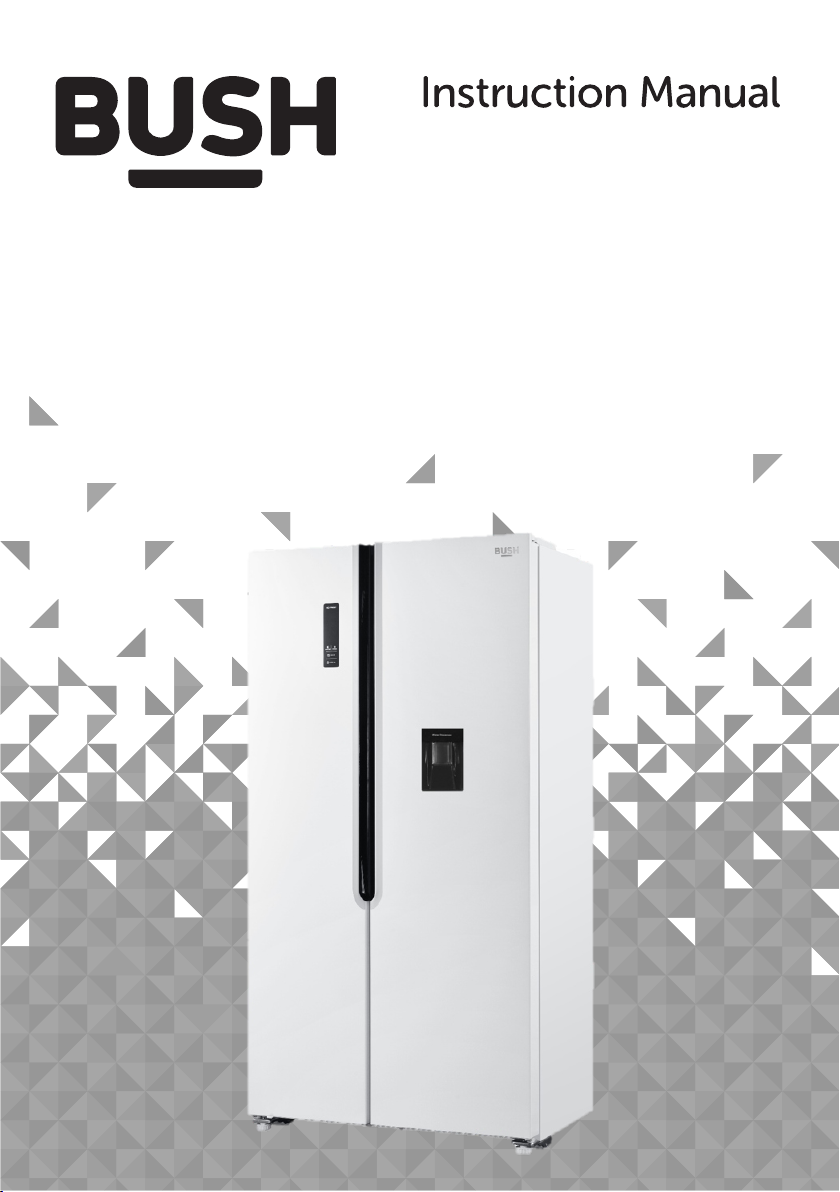
MSBSWTDB20
MSBSWTDX20
MSBSWTDW20
Page 2

You'll soon be enjoying your new refrigerator.
It all begins here,with your instructions.Don't worry,
there' s nothing too technical coming up.Just simple,
step-by-step guidance to get you up and running
quickly.Sound good?Then let's get started
Help and Guidance
We' re here to help you get the most from your refrigerator.Should you require
any guidance,a simple solution can often be found online at.
www.bush-support.com
If you assistance,call one of our experts on 0345 257 7271. still require further
Troubleshooting
2 Help and G uidance
Page 3

Contents
1 Safety i nformation
S afety in forma tion 6
Getting to know 2
your refrigerator
Rea dy?Let's beg in... 13
14Par ts
Using the water 3
dispenser
T he wat er dispenser a llows you to
get chille d water w ithout openi ng
t he fridge c ompartment door 17
Installing your4
refrigerator
Transp ortatio n 20
Installatio n 2 0
Electrical Connecti on 22
6Care and Maintenance
Genera l 31
Po wer fai lure 31
Moving your applia nce 31
Disassembly / ass emb ly the doo r 32
Techn ica l S pecifications 33
Disposa l information 33
Product support7
Trou ble Shooting 36
Help and 37assistance
Guarantee 38
5
Using
efrigerator
r
Before f irst u se
U
sing y our a pplian ce
U
sef ul i nformation
your
25
2 5
27
0345 257 7271.
Contents 3
Page 4
Troubleshooting
Page 5

Safety information 1
Page 6
Safety information
Important-Please read these instructions fully
before installing or operating
Before use
6 Safety in formation
0345 257 7271.
Page 7
Safety information
Important-Please read these instructions fully
before installing or operating
Troubleshooting
Safety information 7
Page 8
Safety information
Important-Please read these instructions fully
before installing or operating
8 Safety information
0345 257 7271.
Page 9

Safety information
Important-Please read these instructions fully
before installing or operating
Troubleshooting
Safety information 9
Page 10
Safety information
Important-Please read these instructions fully
before installing or operating
similar
and with yellow or orange
color.
10 Safety information
0345 257 7271.
Page 11

Troubleshooting
Page 12

Getting to know
your refrigerator 2
Page 13

Getting to know your refrigerator
You'll be up and running in no time
Ready?Let's begin...
Please read these instructions carefully.They contain
important information which will help you get the best
from your refrigerator and ensure safe and
correct installation and operation
If you require any further assistance,our technical
experts are happy to help.For full details,refer to
the product support section at the end of these
instructions.
0345 257 7271.
Getting to kno w your refrigerator 1 3
Page 14

Getting to know your refrigerator
You'll be up and running in no time
Parts
1
3
2
11
7
8
4
5
1.Freezer Shelve s
2.Frid ge Shelve s
3.Freezer Door Shelves
4.Freezer Dra wer Covers
5.Freezer Dra wers
Access ories includ ed
MSBSWTDB20
MSBSWTDX20
MSBSWTDW20
9
10
6
6.Leveling Feet
7.Frid ge Door She lve
8.Water Tank
9.C overs For Fridge Vegetable Containers
10.Fri dge Vegetable Co ntainers
11.LED L ight
Instructions x 1 Ic e-c ube tray x 1 Egg tray x1
14 Getting to kn ow your refrige rato r
Troubleshooting
Page 15

0345 257 7271.
Page 16

Using the water dispenser 3
Page 17

Using the water dispenser
The water disp enser allows you to get chilled water without op ening the frid ge compar tment door
Before fi rst us e
Before us ing the water dispen ser for the f irst t ime, remo ve and clea n the water tank located ins ide
the frid ge compar tment.
1. Lift an d take off tan k balcony first, then take of f wate r tank with c over. D etac h the cover to
was h and clean the ta nk and cover.
2. After cleaning , reposition w ater t ank, cover and ta nk balcony as below process.
3. Clean t he dispenser p ad outside the f rid ge door.
Fillin g the water tank wi th water
1. Open th e small lid
2. Fill th e wate r tank with d rinkabl e wate r up to 3 litre . Do not over f ill.
3. Close t he small lid on th e cover .To dispense water, pus h the dispenser pad gentl y,
using a gl ass or container.
To stop t he flow of water, pull your glass away from the dispen ser pad.
Caution! Do not fill water tank with any liquid other than drinking
water, beverages such as fruit juice, carbonated fizzy soda drinks,
alcoholic drinks are not suitable for use with water dispenser. If
such liquids are filled, the water dispenser may be malfunction
and may be damaged beyond repair. Some chemical ingredients
and additives in such drinks / beverages may also attack and
damage water tank. Only use clean pure drinking water.
Capacity of the tank is 3 L, do not over fill.
Troubleshooting
Using th e wate r dispenser 17
Page 18

0345 257 7271.
Page 19

Installing your refrigerator 4
Page 20

Installing your refrigerator
Bringing it all together
Transportation
Cautio n: 2 people are requir ed to unpac k
and hand le the applian ce, it is
rec ommended that gloves are worn .
.T he appliance s hould be transported only in an
upright position . Do not tilt the applia nce greate r
than 45 degrees . The packaging as su pplied must
be int act during transportation.
.A fter transportin g the applianc e, leave it for at
least 4 hours before switc hing on to allow the
coo ling system to settle. Fail ure to comply co uld
res ult in da mage to the applian ce.
.D o not move th e appliance by p ulling the doo r or
handle as it may d amage your floor ing an d wall
coverings etc .
.E mpty any water in the dra in tray before mov ing
.M ake sure that the defro st water pipe at the back
of the product is fixed to th e plastic e vaporating
pan on the t op of the com pressor, to avoid d efrost
watersp illage on t he floor.
.E nsure the e lectrical cable is not caught unde r
the appl iance during a nd after mo ving
.C aref ully remo ve all packaging materials
includ ing the foam ba se, di spose of correct ly
Installation
.E nsure sufficient s pacing is provided for the
applia nce to be ins talled. L eave s pace on both
sides (5 cm), back (5cm ) and above t he
applia nce (5cm) to ens ure proper vent ilation
and door o pening. See fi g. 1&2
.D o not place the ap pliance near a h eat source
or in direct sunlig ht
.D o not put any h eavy obje cts on top of the
applia nce. It will dam age the applia nce.
.D o not install the appl iance in a moist o r wet
place. I t should be installed on a sm ooth surface
to avoid excess ive vibration and no ise.
.T he appliance i s equipped wit h four castors on the
bottom side for easy m ovement . Ensure th e two
leveling feet on the front side h ave been sc rewe d
upwards. The n move the ap pliance to the r ight
location.
.S crew t he leveli ng feet downwards to fix the
applia nce in place.
50mm
Fig.1
Fig.2
50mm
50mm
50mm
20 Installing your refr igerator
Troubleshooting
Page 21

Installing your refrigerator
Bringing it all together
.Try some operatio ns, i.e. Open/close doo r to
con firm the appli ance will not mo ve under
normal u sage/op erat ion. If the appl iance
moves, adjust the l evel ing feet again un til it
is fixed and do no t move (See fig. 3).
.I f you need to reloc ate th e app liance, plea se
ensure the leveling feet on the front side have
been screwed u pwards before you move the
applia nce.
.Each ap pli ance has a climate cla ss (s hown on
the rating pla te) that indicates the operating
tem perature range of the appl iance. The
applia nce may not work properly if it is le ft for a
long per iod at a temp erat ure outsi de the
specif ied range.
.Refer to s ect ion “Care an d Mainten ance”
to pr epare your applian ce for use.
Fig.3
Cli mate Cl ass
Amb .T.( C) Amb .T. ( F)
SN
N
ST
T
10~ 32 C
16~ 32 C
16~ 38 C
16~ 43 C
50~ 90 F
51~ 90 F
61~ 100 F
61~ 110 F
0345 257 7271.
Installing your refri gerator 21
Page 22

Installing your refrigerator
Bringing it all together
Electrical connection
Any e lectrical work that is requir ed to
install this appl iance MUST be carrie d out
by a quali fied electri cian.
Warning: THI S APPLIANCE MU ST BE
EAR THED
Before makin g any el ectrical con nections,
ensure that:
.E lectrical safety is only guaranteed when the e arth
system of your house i s in accord ance with the
rel ated local regu lations.
.D o not damage the refri gera nt circuit.
.D o not bend, stretch or pull the sup ply cable to
avoid electr ic shock.
.D o not use electr ical appl iances insid e the food
sto rage compartm ents of the appl iance, unles s
they are of the type recomm end ed by the
manufacturer.
.E nsure the p ower socket is su itable for the
max imu m power of th e machine (fus es in the
power circui t must be 13 amp).
.T he supply voltage sh ould be the same a s that
indicated in t he technical specific ations an d the
applia nce rating plate.
.T he appliance s hould be earth ed and in
com pli ance with the ap plicabl e law.
.W hen installed, the p ower socket must be within
easy reach.
.I f the socket outl ets in your h ome are not s uitable
for t he plug suppli ed with this uni t check with a
qualif ied electric ian for replacement.
.T he use of adapters, mu ltiple co nnectors or
ext ension ca bles are no t recomme nded.
.T he appliance m ust be conn ected to a 220-240
vol t 50Hz AC supply b y means of a three pin
socket, suitably eart hed and pro tected by a 13
amp fuse .
.S hould the fuse n eed to be replaced, a 13 a mp
fuse app rove d to BS1362 must be used.
.T he plug con tains a removab le fuse cover that
must be refitted whe n the fuse is repl aced. If the
fuse cover is lost or damaged, the plug must not
be used un til a repla cement cover has bee n fitted
or the plu g is replac ed.
.A d amaged pl ug should be cut o ff as close to the
plug bod y as possible, t he fuse should be removed
and the pl ug disposed of s afel y.
22 Installing your refr igerator
Plug replacemen t (UK & Irela nd only)
Should you need to replace the p lug; the wires
in the power cable are colo ured in the
fol lowing way:
Blue Neu tral 'N'
Bro wn Live 'L'
Gre en & Yell ow Earth 'E '
As the col ours o f the w ires in the p ower cable
may n ot corres pond with the coloured
markin gs identi fyi ng the term inals in yo ur
plug, and proceed as follows :
The green & yell ow wire mus t be connec ted to
the terminal in the p lug that is marked wit h the
letter E or by the e arth symb ol.
The blue w ire must be connected to the
ter minal that is ma rked w ith the letter N.
The brown wire m ust be conn ected to th e
ter minal that is ma rked w ith the letter L.
If the power supply c ord is dama ged, it must be
rep laced by the man ufacturer or its ser vic e
age nt or a similar qu alified person in order
to avoid a hazard.
Troubleshooting
Page 23

0345 257 7271.
Page 24

Using your refrigerator 5
Page 25

Using your refrigerator
Getting the most from your appliance
Before first use
7
6
2
5
4
B
D
2.Disp lay
1
SMART mode, the refrige rato r sets the
tem perature of two compartments auto matical ly
according to i nternal temperature and ambient
tem perature
2
ECO m ode, the refrigerator runs in lowest energy
con sum ption setting.
3
SUPER CO OLING coo ls the fridge compartme nt to
the lowest tem pera ture as des igned. After
approx. 2.5 ho urs,the tempe ratu re set ting will be
restore d to the previous user s etting mo de.
4
SUPER FR EEZING co ols the fre ezer c ompartment
to th e lowest temperature as designed. A fter
approx. 50 hou rs, the temperature s etting wi ll be
restore d to the previous user s etting mo de.
Tips: it 's better to switch on SUPER F REEZING
mode 24 ho urs ahead b efore larg e amount of
foo d is placed in the f reezer com partment.
5
LOC K (Child safety Lock ), the symb ol will light on
if buttons are l ocke d.
Child lo ck would be failed sin ce power failure.
Child lo ck would be valid auto matical ly after 25
second s since last operation. Displ ay panel would
get t urn off automatica lly after 2 m inutes si nce
last operation.
6
Displays the s etting temperature of freezer
com par tment.
7
Displays the s etting temperature of fr idge
com par tment .
Final ch ecks before ope rati ng the applian ce
1. Good ai r circula tion arou nd the applian ce .
2. The feet have been ad justed for perfect
levelling.
3. Clean t he compartme nt per
rec ommendation in sectio n Care and “
Maintenance ”
4. Plug in t he appliance a nd the inte rior light
will come on when the door i s open.
The comp ressor starts u p and in
operation may prod uce some
background nois e .It is normal, t his is not a
defect.
Using your appliance
1. Buttons
A
Pre ss to adjust
tem perature of fre ezer
com par tment (left side)
fro m -14°C to -22°C.
B
Pre ss to adjust
tem perature of fridge
com par tment (ri ght side)
fro m 2°C to B°C and off
coo lin g.
C
Pre ss to selec t run ning mode from
SMART, ECO, SUPE R COOLING , SUP ER
FREEZI NG and USER'S SE TTI NG (no
sym bol in display).
D
Pre ss the butt on and hold for 3 second s
to lo ck other three b otto ns Press it a nd
hold for 1 secon d to unlock othe r three
botlon s.
1
3
A
C
User setting
Under Smart mode, the internal temperature will be changed
.
Can be set between
2to 8
Troubleshooting
N/A
depending on the ambient temperature.
Can be set between
-14 to -22
Using your ref rigerator 25
Page 26

Using your refrigerator
Getting the most from your appliance
Notes:
ECO m ode: Select th is mode when you
wan t to save power.
Super co oling mode: Th is mode allows you
to co ol foo d qui ckly and will be
automatica lly deactivated af ter 2.5 hou rs
of operation .
Super freezi ng mo de: This mode al lows
you t o freeze food quickly a nd will be
automatica lly deactivated af ter 50 hours
of operation .
3.Door o pen alarm
When any door is left open or not close d
com pletely for about 90 s econds, the
applia nce will sound a n alarm. Close t he
fridge d oor to stop the alarm. I f the door is
not comp lete ly cl osed, the alar m will
sound every 35 seco nds until t he do ors ar e
closed . If doors are open for 10 conti nuous
minutes, the internal LED li ght will be
turned o ff automatically.
4.C hild safety lock (LOCK MODE)
This fun ction is desig ned to prevent
children fro m operating the appl ian ce.
.To ac tivate the func tio n,press a nd hold
for a bout 3 seco nds. The lock
indicator li ght will illum inate
indicating the sa fety l ock function i s
activated.
.To de activate the fu nct ion,pre ss and hold
for a bout 1 seco nd. The unlock
indicator li ght will illum inate
indicating the sa fety l ock function i s
deacti vate d.
5. Storing fresh food
.U se the fridge compartme nt to store
fre sh food and d rinks.
.D o not exceed the food cap aci ty that the
applia nce is able to han dle.
.D o not put war m food in the a ppliance
immedi ately as it m ay cau se exc essive
coo lin g of the comp artment.
.S et the temp erat ure knob at the medium
positi on for storing fresh fo od.
.D o not mix already froze n food and fresh fo od.
6. Storing frozen fo od
.T he freezer compartment i s 4 Star
rated and s uitable for the freezing and storage of
pre f rozen food .
.C heck the food packaging fo r sug gest ion
before storage.
7. Thawi ng
Deep-f rozen or frozen food, pr ior to be used, can
be thawed in the frid ge compar tment or at room
tem perature, dep end ing on the time availa ble fo r
this ope rati on. Small piec es may even be cooked
sti ll frozen, directly from the fre ezer. In this case,
coo kin g will take lo nger.
8. Ice-c ube Tray
This app liance may be equipped wi th one or more
ice-cu be Tray to produce ice.
9. Movable com partment gla ss shelve s
The walls of the refrigerator a re equipp ed with a
series o f runners s o that the shelves can b e
positi oned as desired.
10. Positioning t he door shelves
.To pe rmit storage of food
packages of va rious sizes,
the door b alconies can be
placed at differen t heights .
To make these adju stments
pro ceed as fol lows: gradually pu ll the balcony in
the direction of th e arrows until it comes free,
then reposition a s require d.
11.Doo r
The door s hould be close d as so on as possible
after use. When the d oor is opened mo re than
90 secon ds, an alarm wil l alert you for a few
second s, and it rep eats each 3 0 seconds. The
door is al lowed to op en at a maxim um angle
of 135 .
26 Using your re frigerator
0345 257 7271.
Page 27

Using your refrigerator
Getting the most from your appliance
Useful information
The followin g gui delines and recomm endations
are s uggeste d to obtain the best results and
sto rage hygie ne.
.F requent door openi ngs can cau se intern al
tem perature to ris e so the door shou ld be
closed a s soon as possib le after us e.
.For hygiene reasons, it is al ways a good
pra ctise to pa ck, wrap an d cove r the food
before storing.
.U se a polythene b ag to store raw meat and
place on t he lowest s helf. Avoid c onta ct wi th
coo ked food to pr event contamination. For
safety re asons, st ore raw meat for two t o three
days only.
.C ooke d dishes must be stored in airtig ht
cov ered containe rs.
.Food and beverages should c ool to room
tem perature before storing .
.M ost ve geta ble s should be blan ched and
chille d befo re fre ezing.
.B ottles can be placed i n the door secti on.
.S ome fruits and vegetables like pine apples,
melons , tomatoes, and cucu mbe rs sho uld b e
wra pped in polyth ene bags.
.D o not leave frozen food at room tempe ratu re
to th aw. You could de frost the food by p utting
it in the fr idge to tha w slowly. Make sure you
avoid defrosting food dripp ing food ju ices
ont o other foo d.
Energy savin g tips
.P lace your f ridge away from direc t sunlight,
you r oven or any other heat s ources. A llow
20 cm clea r space on both si des and above,
and at least 5 cm behin d.
.C over all food stored, a nd arrange it so that
col d air can circulate freely.
.H igher col d setting w ill use more energy. Do
not set to maxim um cold if it is not n ecessary.
.C ool the hot/warm foo d to roo m temperature
before pu tting the m into your f ridge.
.F requently openin g and closing th e doo r
Using your ref rigerator 27
wou ld cause the internal temperature t o rise
and it wil l consume more energ y.
. Close th e door(s) properly, and make sure the
seals an d hinges are airtight. Check the sea ls
by putting a sheet of p aper betw een the door
and the ma in body of the fri dge. If the pape r
moves, your se als need repla cing.
.D efro st reg ularly if your refri gera tor is not a
fro st-free or cyclic defrost model.
Accumu lated ice l ayer s hould not be more
than 5 mm th ick.
.T he pre-set combination of drawers, baskets
and shel ves have alread y been set in the mo st
eff icient way for use of this product.
Defrosting
Fridge Compartm ent
.T he fridge c ompartment defro sts
automatica lly. The defrost ing water runs
through the drain port to t he drain tray at the
back of th e appliance.
.I n the case, t hat some droplets may rema in
inside t he compartme nt and re-freeze, after
the defrosti ng cycle, t his is normal. D o not
use poin ted or shar p objects, i.e . knives or
for ks, to r emove the d roplets which have
frozen.
.C heck the co llection cha nnel to ensure that
no fo od particles h ave bl ocke d the drain
channe l.
Fre ezer C ompartment
To help you make the most of the freezi ng
pro cess, here are some im portant h ints:
.t he maximu m quantity of food whi ch can be
frozen in hrs . is shown on the rating p late;24
.t he freezing pro cess takes hours. No 24
furthe r food, to be frozen shou ld be added
during t his period;
.o nly freeze top quality, fres h and t horough ly
cleane d, foodstuffs ;
.p repare foo d in sm all portions to enable it t o
be ra pidly and complete ly frozen and to make
it possi ble to thaw o nly the quanti ty required;
Troubleshooting
Page 28

Using your refrigerator
Getting the most from your appliance
28 Using your re frigerator
0345 257 7271.
Page 29

Troubleshooting
Page 30

Care and Maintenance 6
Page 31

Care and maintenance
Looking after your appliance
General
Important: Always unplug the app liance
fro m the power s ocket during clean ing
and maintena nce.
.N ever u se any shar p instruments or abrasive
substances , soap, household c leaner,
deterge nt or wax pol ish fo r cleaning.
.U se luke warm water to clean the cabi net of the
applia nce and wipe it dr y.
.N ever c lea n the applianc e with flammab le
fluids . It could ca use damage and a f ire hazard.
.C lean the ex terior of t he appliance a nd do or
seal wit h a damp cloth and d ry it t hrough.
.Avoid water going into the tem perature
con trol box.. Clean wit h a dry cloth only.
.C lean the co ndenser (loc ated a t the back of
the appl iance) with a vacuum clea ner. It is
suggested to remove the dust ev ery year.
.S helves are all re movable for cle ani ng purpose.
Important: Care must be taken while
cleani ng/carrying the a ppliance not t o
tou ch th e bottom of the conden ser metal w ires
at th e bac k of the applian ce, as this could cause
injury t o fingers and hands.
Light bulb replacement
This app liance is equi pped with an LED l ight . It
can b e use d for a lo ng time. If the LE D light is
blown, i t must be replaced by a qu alified person
to avoid any haza rd. Contact the service
age nt at 0345 25 7 7271.
Power failure
In ca se th ere is a power fail ure, you should
con tact the el ectricity su pply company and take
the followin g act ions:
If it is les s than 24 hours, ke ep the doors closed.
This wil l allow the stored food to stay c old as
long as po ssible.
If it is lasts more tha n 24 hours, i t is advised to
empty th e freezer co mpartment an d
tem poraril y store the fo od in a p ortable f reezer
or using a rtificial ic e packs. Try to use up the
foo d which is more easily peri shable.
Rem arks: A ful l appliance wi ll stay cold long er
than a par tially fille d one. If ice crystals a re still
visibl e on the food , it may be frozen aga in,
althou gh flavou r and aroma m ay be affected.
If fo od is fo und to be in a poor co ndition, it is
best to throw it away.
Short vacati on
There is no need to dis connect t he appliance
fro m the mains if you will be away fo r two to
three weeks. U se up the perish able food .
Long vacatio n
Rem ove all the food if you are away for thre e
wee ks or more. U nplug the appl iance and leave
the doors open to provide a ir circul ation to
pre vent odou r and mould.
Moving your appliance
Moving
Refer to section “Transpor tati on” un der
“Installati on”
0345 257 7271.
Using your ref rigerator 31
Page 32

Care and maintenance
Looking after your appliance
Disassembly / assembly the door
.I n case, the re is problem with a doo r, you can contact
the service a gent for a rep lacement or you can re place
it by yourself.
.T he size of the doors are, Freezer 395mm(W)x 1714mm
(H) and Fr idge 500mm(W )x1714mm(H ).
. Depth is 5 70mm afte r removin g the door.
. Warning: 2 peo ple may be required to re -align
the door.
.A P hilips sc rew driver will be req uired for this ta sk.
.P ut a pro tective l ayer o n the floor before taking off the
door.
To disasse mble the door.
1. Unscrew the screw fixing th e top hinge cover ( Fig.a).
2. Re move the top hinge cover (Fi g.b).
3. Unscrew the screw that s ecures th e top hinge ( Fig.c)
4. Press on the lock of t he cable co nnector (Fig .d) and
separate the lead wire (F ig.e).
5. One person shoul d hold the door.
6. Re move the top hinge (Fi g.f) from t he door. Take care
of the lea d wire to avoid any damage to the wire .
7. Move the door upward to release it from the bottom
hinge (F ig.g&h).
8. Lay the door on the fl oor on a protective layer to
avoid making s crat ching the surface.
To assembl e the door
1. Carefully lift t he door. Alig n the hole in the lo wer
cor ner o f the door ov er the lowe r hinge. Lo wer the
door onto the lower hinge.
2. Inser t the upper hing e into t he ho le on the upper ed ge
of the doo r.
3. One person shoul d hold the door in p lace.
4. Make sure the hinge i s level bet ween the upper h inge
hole and t he hole on the top o f the cabin et.
5. Re atta ch the hinge screws to secure the door.
6. Re connect t he lead wires an d refi t the top hinge cover.
Reattac h the hinge c over with t he screw.
Fig .a Fig .b
Fig .c Fig.d
Fig .e Fig .f
Fig .g Fig .h
32 Care and maintenance
Troubleshooting
Page 33

Care and maintenance
Looking after your appliance
Technical Specifications
Model MS BSWT DB20 /MSBS WTDX20/M SBSW TDW2 0
Energy effic iency class A+
Energy consumpt ion Kwh/ye ar 412
Net stora ge volume f resh food (litres) 341
Net stora ge volume f rozen food (litres) 177
Total n et storage (lit res) 518
Frozen food com partment rati ng 4star
Climate class SN/ N/ST
Operating no ise level d B(A) 42
Minimu m Operation Temperature 10°C
Pro duct Dimensi on 915mmx660 mmx1770 mm
Disposal information
The symbol on the product or its p ackagin g indicates that thi s product m ay not be
tre ated as hou sehold wa ste . Instead it shoul d be handed over to the ap pli cable
col lection point for the recycli ng of electrical and elec tronic eq uip ment , By
ensuri ng this pro duct is dispos ed of corre ctly, you will help prevent potential
negative consequenc es for the enviro nment and h uman health , wh ich could
otherw ise b e caused by i napprop riate waste handling of this product . For more
detailed informatio n about rec ycling th is produc t , please contact you r local
cou nci l office , your househ old waste disposal s erv ice or the shop wh ere the
pro duct was pu rchased .
Rem ember : Old frid ges must be disposed o f careful ly - older model s contain CFC gas es
that are harmf ul - if in doubt , contact y our local c ouncil fo r details o n how to disp ose of
an old fri dge .
0345 257 7271.
Care and maintenance 33
Page 34

Troubleshooting
Page 35

Product support 7
Page 36

Product support
Help is always at hand
Troubleshooting
If you have a problem with your prod uct, these quest ion s may be able to assist you?
Question- Appliance does not work.
Answer
Applia nce is not switched on - Turn on the applia nces.
Mains pl ug is not plugge d in or is loose. -I nse rt mains plug.
Fuse has b lown or is defective - Check fuse , replace i f necessary.
Socket is d efec tive - Mains mal functions are to be co rrected by an electr ician.
Question - Appliance cools to o much.
Answer
Temperature is too col d - adjust to a warmer setting.
Question - The foo d is too warm.
Answer
Temperature is not pro perly adjusted - adjust to a cool er settin g.
Door was open fo r an extend ed period - Open t he door only as lo ng as necessar y.
A large quanti ty of warm food was p laced in the app lia nce - adjust to a cooler s etting.
Cool warm food b efore placing i n the refri gerator.
The appl iance is near a he at source - Posit ion t he ref rigerator away from a heat so urce.
Question- Interior light does not work.
Answer
If the LED l ight is bro ken, please contact qual ified tec hnician.
Question-Heavy build up of frost, possibly also on the do or se al.
Answer
Door sea l is not air tight - C aref ully warm t he le aking sec tio ns of the door sea l with a
hair dry er(not hotter than a pprox 50 degree ). At th e sam e time shape the warmed doo r seal
by hand su ch that it si ts correc tly.
Question - Water on t he fl oor o r on storage she lves.
Answer
Wate r drain hol e is blocked - Remo ve foo d residue o r ice from th e entrance of the drain hole.
Question - Appliance is making unusual noises
Answers
Applia nce is not level - Readj ust the front lev elling feet.
Applia nce is in contact with w all or other obj ects. - Push app liance away a short di stan ce
A part at th e back of the appl iance,e.g. a tub e, is in contact with an other applia nce part or
wal l - - Gently bend th is part away carefull y if ne cessary
36 Product suppor t
0345 257 7271.
Page 37

Product support
Help is always at hand
Help and assiance
If yo u require a ny tec hnical gu idance or find t hat your refrigerat or is not operating as i nten ded,
a simple s olution can of ten be found in the Troubleshoot ing section of t hese inst ruction or onl ine at
www.bus h-support. com
If yo u still req uire furt her assistance,cal l one of our ex perts on 0345 25 7 7271.To help giv e us give
you a fast an d efficie nt service ple ase have th e foll owing informatio n ready.
Model Ref.
Serial number
Date of purchase
Local call rates app lies*
You can find thes e on
the rating pla te-a smal l
informatio n panel (usuall y
a sti cker o r metal plate)on
the rear of your a ppl iance
This wil l be shown on
you r receipt
Line open 8am-7pm Monday to Saturday and 10am-4pm Sunday
*Calls to Bush enquiry l ines may attract a charge and set up fee fro m residential line s depending
on yo ur call plan/tariff. Mobile an d other pro viders costs may vary, see www.b t.com/pric ing fo r details .
For s ecurity and training pu rpose,tel ephone calls to and from cu stom er service centres maybe
rec orded and m onitored.Ca ll from Republic of Ireland wil l attract internationa l call charges.
This app liance compl ies with the followi ng EEC dire ctives:
2014/3 5/EEC Low v oltage direct ive
2014/3 0/EU EMC directive
Troubleshooting
Care and maintenance 37
Page 38

Product support
Help is always at hand
Call us now and activate your 12 month guarantee
Thank you for choosing Bush. Your new product is guaranteed against
faults and breakdowns for 12 months.Don't forget to register it with us
today so we can provide you with our best possible after-sale service
and useful updates.
www.bushregistration.co.uk
FREEPHONE*
0800 597 8548
Lines are open 8am- 8pm,365 days a year.*Call may be recorded and moni tore d.
Your Bush Guarantee
This product is gua rant eed fo r twelve mo nths from t he date of original pu rchase. Any defect
that arises due to faulty material s or workmansh ip will be re paired free of charge (or if
applic able the product will be replaced or t he purcha se price re funded)where possible
during t his period by th e dealer from who your p urchase d uni t.
. The guarante e does not co ver
accide ntal dama ge,misuse c abinet
parts, k nobs or con sum able item s.
. The product must be corre ctly inst alled
and operated i n accordance with th e
instructions co ntained i n the manual
. It must be used solel y for domes tic
purpos es. The guarantee wi ll
be re ndered invali d if the prod uct is
To find out ho w we and Domestic & General Insurance Plc us e your data please refe r to the
The guarantee is subject to the following provisions:
re- sold or has been d amaged by inexpert repair.
. Specif ication s are subje ct to change
withou t notice.
. Bush dis claim any l iability for loss or dama ge
arisin g from the breakdown of the product
. This gua rant ee is in additio n to and does n ot
dimini sh your statuto ry or legal r ights
Important Data Protection Information
h guarantee regist rati on materi al or visit www.bus registration s.co.uk
38 Product suppor t
0345 257 7271.
Page 39

Troubleshooting
Page 40

Contact
www.bush-support.com
Helpline:0345 257 7271
CKBSH-D03
 Loading...