

Page 1

MSBSNFWTDW
MSBSNFWTDSS
MSBSNFWTDB
Page 2

You'll soon be enjoying your new refrigerator.
It all begins here,with your instructions.Don't worr y,
there's nothing too technical coming up.Just simple,
step-by-step guidance to get you up and running
quickly.Sound good?Then let's get sta rted
Help and Guidance
We're here to help you get the most from your refrigerator.Should you require
any guidance,a simple solution can often be found online at.
www.argos-support.co.uk
If you assistance,call one of our experts on 0345 257 7271. still require further
2 Help and Guidance
Page 3

Contents
Safety i n
1
S afety in n 6
2
to know
your refrigerator
Ready?Let's b egin... 11
Parts
12
Installing your
3
refrigerator
n 22
Using your
4
r
efrigerator
Before f
U
sing y
U
n 21
n
irst u
se
oura ppliance 27
noitamrofn ilufes
Care and Maintenance
5
Genera l 31
Moving your ap pli anc e
Technica
Disposa
Product support
6
Trouble g 36
Help and 37
Guarantee
23 Electrical
26
28
eruliaf rewoP
n
assistance
31
31
32
rood eht ylbmessa / ylbmessasiD
s
33
33
38
Contents 3
Page 4

Page 5

Safety information 1
Page 6

Safety information
Important-Please read these instructions fully
before installing or operating
Before use
6 Safety information
Page 7
Safety information
Important-Please read these instructions fully
before installing or operating
Safety information 7
Page 8
Safety information
Important-Please read these instructions fully
before installing or operating
8 Safety information
Page 9

Page 10

Getting to know
your refrigerator 2
Page 11

Getting to know your refrigerator
You'll be up and running in no time
Ready?Let's begin...
Please read these instructions carefully.They contain
important information which will help you get the best
from your refrigerator and ensure safe and
correct installation and operation
If you require any further assistance,our technical
experts are happy to help.For full details,refer to
the product support section at the end of these
instructions.
Getting to know your refrigerator 11
Page 12
g to know your refrigerator
You'll be up and running in no e
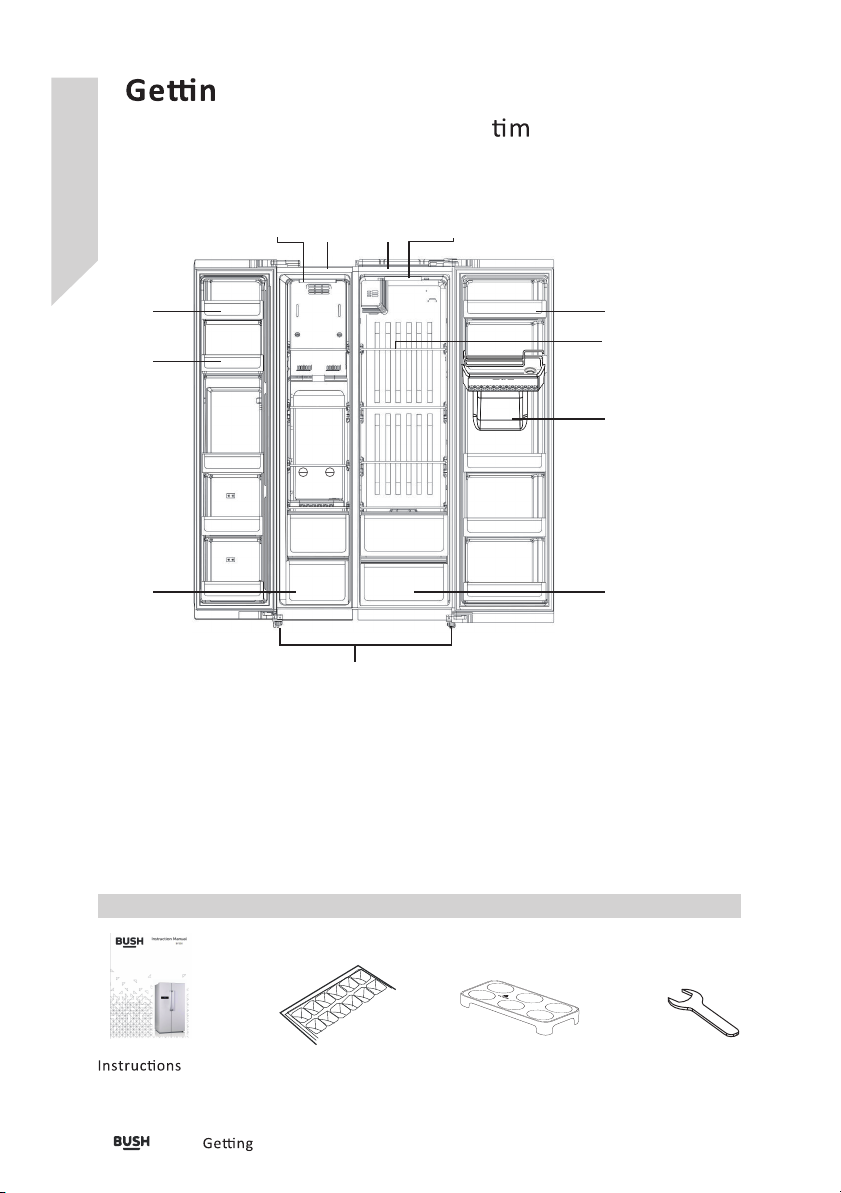
Parts
3
2
1
11
4
5
6
1.Fridge
2.Freezer
3.LED light
4.Freezer Balconies
5.Freezer Shelves
6.Freezer drawer
10
9
12
8
7
7.Leveling Feet
8.Fridge Crisper
9.Fridge Shelves
10.Fridge Balconies
11.LED light
12.water tank & dispenser
Accessories included
x 1
12 to know your refrigera tor
Ice-cube tray x 2
Egg tray x 1 Wrench x 1
Page 13

Water Dispenser
Cleaning & Assembly
Before using the water dispenser clean all parts of the
water tank and the dispenser with hot soapy water. To
clean the water tank you will need to remove it, to do
carefully away from the door at a 45ºangle.
Remove the seal ring from the water tank by gently pulling
to know your refrigerator 13
Page 14

Geng to know your refrigerator
Water Dispenser
Cleaning & Assembly
Using a flat headed screwdriver, gently insert it between the
raised edge(s) of the water valve and dispenser moulding. Then
slowly and carefully raise the edges with screwdriver on either
side of the water valve, the water valve should li and be
removed by hand at a 45ºangle.
Clean all parts (water tank and cover, seal ring and water valve
with hot soapy water, then rinse thoroughly and dry.
The water dispenser can be cleaned by dispensing hot soapy
water through it, however you must ensure to flush the hot
soapy water away by dispensing at least 6 large cups of clean
water through the dispenser.
It is recommended to clean the water tank, seal ring, water
valve and the
Note: The tank must be cleaned and dried regularly in order to
avoid the overflow water spilling on to the appliance or the
floor. Any spillages on the appliance or on the floor must be
cleaned up immediately.
14 to know your refrigera tor
dispenser in this way at least once a month.
Page 15

Geng to know your refrigerator
Water Dispenser
Re-aaching the water valve, seal ring and water tank
To re-install the water valve, ensure that nozzle of the water
valve is poinng downwards and that the groove on the body of
the water valve is aligned with the groove on the hole of the
dispenser molding. Once this is done you can insert the water
valve into place by pushing it downwards at a 45ºangle unl it
clicks into place.
Groove
Water
dispenser
Moulding
hole
Nozzle
Refit the seal ring to the boom of the water tank, ensuring there
are no creases or wrinkles.
Geng to know your refrigerator 15
Water
dispenser
moulding
Page 16

Geng to know your refrigerator
Water Dispenser
Re-aaching the water valve, seal ring and water tank
Refit the water tank back into the door. When fing the water
tank, ensure the seal ring is inserted into the water valve first,
then hold both sides of the water tank ghtly, align the slots on
the water tank with those in the door and fit it on to the door at a
45ºangle.
Water valve assemble
Should the water valve become dissembled then it must be assembled
in the below method. You must ensure all grooves are at the top of the
water valve body and nozzle.
Insert
16 to know your refrigera tor
Body
Spring
Nozzle
Fully assembled
Page 17

Water Dispenser
Filling with water
Note:
• The maximum capacity of the water tank is 3 litres, do not exceed this
maximum limit.
• Do not touch other parts when filling water, which can cause water
leakage.
• Water must be le in the water tank with the appliance door closed for at
least 4 hours to enable it to cool down.
You can either fill the water tank when it is in the appliance or has been
removed from the appliance in 2 ways:
1. Remove the water tank cap on the large water tank cover and fill water into
the tank through the opening.
Steel bracket
Water tank cap
Water tank cover
Water tank
Seal ring
Water valve
2. Remove the large cover, then fill the water directly.
Water tank cap
Water tank cover
Water tank
Seal ring
Water valve
to know your refrigerator 17
Page 18

Geng to know your refrigerator
Water Dispenser
Note:
Note: Water must be le in the water tank with the appliance
door closed for at least 4 hours to enable it to cool down.Note:
When the water tank/dispenser is empty, do not push the
dispenser lever stronglyas this can damage the
mechanism.Note: Do not touch the dispenser lever without a
cup underneath the dispenser.
Before dispensing the water you must ensure all parts are
correctly fied and that the door of the appliance is closed.
Place an appropriately sized container or cup into the dispenser
and push the dispenser lever, once a sufficient amount of water
has been dispensed remove the container or cup away from the
dispenser lever.door of the appliance is closed.
18 to know your refrigera tor
Page 19

Page 20

Installing your refrigerator
3
Page 21

Installing your refrigerator
Bringing it all together
n
2 people are required to unpack
and handle the appli anc e, it is
recommended that gloves are worn.
.The a pplian ce s hou ld be trans por ted only in an
upr igh t
be intact during .
. Do not t t he appliance greater
. g the appliance, leave it f or at
lea st 4 ho urs before swi tch ing on to allow the
coo lin g system to
res ult in dam age to the applia nce.
. Failure to c omp ly could
.Do not mo ve the appliance by pulling the door or
cov eri ngs etc.
llaw dna gniroolf ruoy egamad yam ti sa eldnah
.Empty an y water in t he drain tray before moving
.M ake sur e that the defrost water pip e at the bac k
of the product is fixed to the
pan on
waterspillage on th e flo or.
the to p of the com pre sso r, to avoid defros t
c
.Ensure t he e lec tri cal cable is not caught under
the appliance during and
moving
.C are ful ly r emove all p ack aging materials
including the foa m base, di spo se of corr ectly
n
.Ensu re s uffic ien t spacing is provide d fo r th e
appliance to be i nst alled. Leave space on both
sides (50cm), back (100cm) and abo ve the
appliance (50cm) to ensure proper v
and door opening. See fig. 1&2
n
.D o no t pl ace the app liance near a hea t so urce
or in direct sunligh t
.D o no t pu t any h eav y ob jec ts on t op of th e
appliance. It will damage t he a ppl ian ce.
.D
o not install the a ppl iance in a moi st or wet
place. It should be installed o n a s moo th surface
to avoid excessive v ibr a
and noise.
.
the two front levelling feet to fix the appliance.
50mm
50mm
tsum deilppus sa gnigakcap ehT .seerged 54 naht
50mm
100mm
Fig.1
890 mm
113 0mm
154 2mm
Fig.2
Fi
g.3
Fig.4
Installing your ref rig era tor
21
Page 22

Installing your refrigerator
Bringing it all together
.Try s ome i.e. Open/close do or t o
confirm the appliance wi ll not move under
normal
moves, adjust the leveling fee t again
is fixed and do not mov e (S ee fig.3).
.I f yo u ne ed to re loc ate the appliance , pl eas e
ensure the leveling fee t o n th e fr ont side have
been screwed upward s be for e yo u move the
appliance.
.If the doo rs of the appliance are not ali gne d
then the height of right door can be adjusted,
please follo w the be low steps.
Note: The max imum height adjustm ent is 5mm
Rotate the lo cking nut clo ckwise (a s shown in
Fig.5) with a wre nch for 2 full
it. You can now ro tate the
door. Once the
posi
rota
Fig.5)shown in to adjust th e height of the right
do or is set to your desired
on, then
ng it an
ghten the lo cking nut by
-clo ckwise.
. If the applianc e
ons to loose
rota
adjus
ng nut(a s
it
Adjusting n ut
Left
22
.Each app lia nce has a climate cla ss ( sho wn on
the
temperature range of the appliance. The
appliance may not wo rk p rop erl y if it is for a
long period at a t emp erature outside the
specified range.
plate) that indicates the ope r
.R efe r to “Care and Maintenance”
to prepare your appliance for use.
Installing your refrigerator
Locking nut
Cli mate C lass
SN
N
ST
T
Fig.5
Amb .T.( C)
10~ 32 C
16~ 32 C
16~ 38 C
16~ 43 C
Amb .T.( F )
50~ 90 F
51~ 90 F
61~ 100 F
61~ 110 F
Page 23

23
Page 24

Page 25

Using your refrigerator
4
Page 26

Using your refrigerator
the most from your appliance
Before first use
Using your appliance
1. Control panel
.
The control panel allows you to start and use all the founons of your refrigerator without opening the doors.
10 6
9 8
7
11
2.Quick freeze
3.Quick cool
1
mode icon
3
2
icon
mode icon
4
5
4.Lock/unlock icon
5. Lock/un lock
6. F rid ge com par tment temperature
adjustment
OFF mode icon7.
8. Fridge compartment tem per atu re
9.Freezer compartment temp era tur e
10. Freezer compar tme nt tem per ature adjustment buon
11.
Program mode Display Freezer temperature Fridge temperature Remarks
Normal / -18 5 For normal use, both free ze & fridge temperature can be adjusted.
Vaca on
Quick freeze
Quick freeze + cool
Quick cool
2.Lock / Unlock funcon
℃
-18 OFF For vaca on use, both freeze & fridge temperature cannot be adjus ted.
℃
-24 Unchanged For quick freeze use, only fridge temperature can be adjusted.
℃
-24 2 For quick freeze + cool use, both freeze & fridge temperature cannot be adjusted.
℃
-18 2 F or quick cool use , only fre ezer te mperature can be adjusted.
℃
℃
℃
℃
At lock state( ),press and hold Lock/unlock/confirm buon for 3 seconds,it will sound a beep and change
to unlock state( ).
It will change from unlock state to lock state if the appliance is idle for 60 seconds. Or you can press the
Lock/unlock/confirm buon for 3 seconds then it will change to lock state( ).
To change the funcon mode,the appliance must be in unlock state( ). Press the Lock/unlock/confirm
buon for 3 seconds to change to unlock state( ).
Connue to press Mode buon, it will switch the cuncon from to other as cycle in the below.
Normal
26
Using your refrigerator
Page 27

Using your refrigerator
the most from your appliance
First Use
Allow to stand for a minimum of 4 h our s b efo re
• The temperature of the refrigerator is controlled electronically by the control panel.
• It will default at -18°C (freeze) and 5°C (fridge) at 1st use.
• Seng the temperature of the fridge and the freezer can be done manually by pressing the fridge
compartment temperature adjustment buon(6) and the freezer compartment temperature adjustment
buons(10) unl the required temperatures are shown on the display.
• To change the temperature of the fridge compartment, connue to press the fridge temperature buon(6).
Unl the desired temperature is reached. Press Lock/unlock/confirm buon to confirm. The temperature of the
fridge can be set between 2°C and 8°C.
• To change the temperature of the freezer compartment, connue to press the freezer temperature buons(10),
Unl the desired temperature is reached. Press Lock/unlock/confirm buon to confirm.The temperature of the
freezer compartment can be set between -16°C and -24°C.
Hints and Tips
Storage of Fresh food
with foil, wrapped in film, placed in an
•Do not allow raw meat to come into contact with cooked foods.
•Cool hot food down to room temperature before storing.
Storage of Frozen food
•Fresh foods such as fish and meat can be frozen to maintain freshness, and keep the nutrients in the food.
•Do not allow already frozen food into direct contact with food to be frozen.
•Ready frozen food should be placed it in freezer as soon as possible.
•Do not re-freeze food once it has thawed.
plugging in to the mains
container.
Quick Freeze
Quick Freeze the original freshness and nutrion constuent of foodstuffs can be retained. Fresh meat and fish
to be stored for long me must be done by quick Freeze.(Quick freeze can connue operate for upto 26 hrs and
then it will change back to normal mode.)
Using your refrigerator
27
Page 28

28
Using your refrigerator
the most from your appliance
Useful informaon
The following guidelin es a nd
are suggested to obtain the best results and
storage hygiene.
.Frequent door openings can cause internal
temperature to rise so t he door sho uld be
closed as soon as possible
.For hygiene reasons, it is always a goo d
before storing.
to pack, wrap and cover the food
.Use a polythene bag to store raw mea t an d
place on the lowest shelf. Avoid contact with
cooked food t o pr eve nt
safety reasons, store raw meat for two to t hre e
days only.
.Cooked dishes must be stored in t
covered containers.
.Food and b eve rages should coo l to room
temperature before storing.
.Most vege tab les should be b lan ched and
chilled before free zin g.
. can be place d in the doo r .
.Some fruits and vegetables like pi nea ppl es,
melons, tomatoes, and cucumbers s hou ld be
wrapped in polythene ba gs.
.Do not lea ve f roz en food at room temperat ure
to thaw. You could defrost the food by
it in the fridge to thaw slowly. Make sure y ou
avoid
onto other food.
Energy saving tips
g food dripping f ood juic es
.Place your fridge aw ay f rom dir ect sun lig ht,
your oven or any other heat sources. Al low
20 cm clear space on both sides and above,
and a t lea st 5 cm b ehi nd.
.Cover all foo d st ore d, a nd a rrange it s o that
cold air can circulate free ly.
.Higher cold g will use more en erg y. Do
not set to maxi mum col d if it is not necessary.
.Cool the hot/warm food to room temperature
before
g t hem int o your fridge.
.Frequently opening and closing the door
Using your refrigerator
use.
For
would cause the i nte rna l te mpe rat ure to rise
and it will consume more energy.
. Close the door(s) properly, and m ake sure the
seals and hinges are
by a she et of paper be twe en t he d oor
and the main body of the fridge. If the paper
moves, your seals need replacing.
Check the s eal s
.Defrost r egu lar ly if yo ur r ef rig era tor is not a
frost-free or cyclic defrost model.
Accumulated ice layer shou ld n ot be mo re
than 5 mm thick.
.The pre-set c omb ina of drawers, baskets
and shelves have alr ead y be en set in th e most
efficient way f or u se o f this product.
Defrosting
Fridge Compartment
.The fridg e co mpa rtm ent defrosts
through the drain port to the drain tray at th e
back of the appliance.
. The g w ate r runs
.In the cas e, that some dr opl ets may remain
inside the compartment and re-freeze,
the
use pointed or sharp obj ect s, i.e. knive s or
forks, to remove
frozen.
g
.Check the n channel to e nsu re t hat
no food
channel.
Freezer Compartment
To help you make the most of the fre ezi ng
process, here are some important h int s:
g c ycl e, this is norm al. Do not
the droplets which have
s have blocked th e dr ain
.the maxim um y of food which can be
frozen in 24 hrs. is shown on the
.the freezing proces s takes 24 hou rs. No
further food, to be f rozen s hou ld b e adde d
during this period;
.only free ze top q ual ity, fr esh and thorough ly
cleaned, foodstuffs ;
.prepare food in s mal l s to enable it to
be rapidly and compl ete ly f rozen and to make
it possible to th aw o nly the
plate;
required;
Page 29

Page 30

Care and Maintenance
5
Page 31

Care and maintenance
Looking r your appliance
General
Important: Always u npl ug t he a ppl ian ce
from the power socket during cleaning
and maintenance.
.N eve r us e any sharp instruments or ab rasive
substances, soap, househo ld cleaner,
detergent or wax polish for cleaning.
.U se l uke warm water to clean the cabi net of the
appliance and wipe it dry.
.Neve r cl ean the appliance with flammable
fluids. It could cause damage and a fi re h azard .
.Clea n th e ex terior of the appliance and door
se
al with a damp cloth and dry it through.
.A voi d wa ter going into the temperature
control box.. Cl ean with a dry cloth only.
.Clea n th e co ndenser (locate d at the back of
the appliance) with a vacuum cl ean er. I t is
suggested to remove the dust every year.
.Shel ves are all removable for cl ean ing purpose.
Important: Car e must be taken while
cleaning/carrying the app lia nce no t to
touch the
at the back of the app liance, a s th is could caus e
injury to fingers and han ds.
Light bulb replacement
This appliance is equipped with a n LED ligh t . It
can be used fo r a l ong
blown, it must be rep lac ed b y a qualified person
to avoid any hazard. Contact the service
agent at 0345 257 7271.
m of the condenser metal wires
If the LED light is
Power failure
In case there is a p owe r failure, you should
contact the electricity su ppl y co mpa ny and take
the following
If it is le ss than 24 hours, keep th e do ors closed.
This will allow the stored food to stay cold as
long as possible.
If it is la sts more than 24 hours, it is advised to
empty the freeze r co mpa rtm ent and
temporarily store t he f ood in a portable f ree zer
or using l ice p ack s. Try to use up the
food which is more easily perishable.
Remarks: A full appliance w ill stay co ld l ong er
than a
visible on the fo od, it may be frozen again,
although flavour and arom a may be affected.
If food is foun d to be in a poor
best t o throw it away.
Short
There is no need to disconnect the appliance
from the mains if you wil l be away for two to
three weeks. Use up the perishable food.
Long
Remove all the
weeks or more. Unplu g th e appliance a nd l eav e
the doors open to pro vid e air
prevent odour and mould.
:
y fille d on e. I f ice c rys tal s are
it is
n
food if you are away f or t hre e
to
Moving your appliance
Moving
Refer to
n under
n
Error code
What to do in case of su ch fai lur e i s h app ene d.
Err or code Possible issue
E1
Temperatur e detec on c ircuit of cooler
E2
Temperatur e detec on c ircuit of freezer
E5
Freezer defr os ng temperature detec on circuit
E6
Communica on fault
E7
Ambient temperatur e detec on c ir cuit
Care and maintenance
Contact service provider
Contact service provider
Contact service provider
Contact service provider
Contact service provider
31
Page 32

Care and maintenance
Looking
r your appliance
Disassembly / assembly the door
.In case, t her e is problem with a door, you can contact
the service agent for a replacement or yo u ca n replace
it by yourself.
.The size o f th e do ors are, Freezer 395mm(W)x 171 4mm
(H) and Fridge 500mm(W)x1714mm(H).
. Warning: 2 people may be required to re-align
the door.
.A Philips screw d riv er w ill be required fo r this task.
.Put a ve la yer on the floor be fore taking o ff th e
door.
To disassemble the door.
1. Unscrew the screw fixing the top hinge cover (Fig.a).
2. Remove the top hinge cover (Fig.b).
3. Unscrew the screw that secures t he t op hinge (Fig. c)
4. Press on the lock of the cable connector (F ig. d) a nd
separate the lead wire (Fig.e).
5. One person shou ld hold the do or.
6. Remove the top hin ge (Fig.f) from th e do or. Tak e ca re
of the lead wire to avoid any damage to the wire.
7. Move the door u pwa rd to release it f
hinge (Fig.g&h).
8. Lay the door on t he floor on a
avoid making scratching the su rface.
To assemble the door
1. Carefully
corner of the door over the lowe r hi nge . Lower the
door onto the lowe r hinge.
2. Insert the upper hinge into t he h ole on the u ppe r edge
of the door.
3. One person shou ld hold the do or in place.
4. Make sure the hinge is le vel bet we en t he u pper h ing e
hole and the hole on the top of th e cabinet.
5.
6. Reconnect the lead wir es and refit the top hinge cover.
the door. Ali gn t he hole in the lower
h t he h ing e screws t o se cure the door.
the hi nge cover with the screw.
rom the
layer to
m
Fig .a Fig .b
Fig .c Fig.d
Fig .e Fig .f
Fig .g Fig .h
32
Care and maintenance
Page 33

Care and maintenance
Looking r your appliance
Technical s
Model
Energy efficiency class A+
Energy
Net storage volume f resh food ( lit res )
Net storage volume f roz en food (litres)
Total net s tor age (li tre s)
Frozen food compartment g 4star
Climate class
noise level dB(A) 43
Minimum
Kwh/year
Temperature 10 ℃
MSBSNFWTDW/MSBSNFWTDSS/MSBSNFWTDB
408
338
175
513
SN/N/ST
Disposal n
The symbol on the p roduct or its p ackagi ng indicates that th is p rod uct may no t be
treated as household waste . Instea d it should be handed ove r to the applicable
ensuring this product is disposed of corr ect ly, you wil l help prev ent
otherwise be caused by inappropriate was te h and ling of this product . Fo r mo re
detailed
council office , your h ous eho ld waste disposal se rvi ce or the sh op wher e th e
product was purchased .
Remember : Old fridges must be disposed of carefully - older model s contain CFC gases
that are harmful - if in doubt , contact your loc al c oun cil for details on how t o di spo se of
an old fridge .
point for the recycling of electrical a nd electronic equ ipm ent , By
consequences fo r the envi ronment and human health , w hic h could
n about recyc lin g th is product , pleas e co ntact your lo cal
Care and maintenance
l
33
Page 34

Page 35

Product support
6
Page 36

Product support
Help is always at hand
g
If you have a problem with your product, these ques may be able to ass ist you?
Appliance does not work.
Answer
Appliance is not switched on - Switch on the ap pli anc e.
Mains plug is not plugged in or is loose . -Insert mains plug.
Fuse has blown or is
Socket is de
- Mains are to be co rre cte d by an electrician.
- Applian ce cools too much.
Answer
Temperature is too c old - Change to a warmer in fr ont control panel.
- The food is too warm.
Answer
Temperature is not properly ad jus ted - Ch ange to a coo ler .
Door was open for an extended period - Open the doo r only as long as n ece ssa ry.
A large quan
Cool warm food bef ore placing in the ref rig era tor.
The appliance is near a heat source -
of warm food was p lac ed in t he appl ian ce - Change to a cooler
Q or light does not work.
Answer
Light bulb is defec - Rep lac e the LED light part by ser vic e a gen t.
ve - Check fuse , re pla ce if necessary.
n th e refrigerator away from a h eat source.
36
build up of frost, possibly also on the door seal.
Answer
Door seal is not air
hair dryer(not
by hand such that it sits correctly.
t - Car efully war m th e le aki ng s of the door seal wit h a
r than approx 50 d egr ee) . At the sam e e sh ape the warmed door s eal
- Water on the floor or on storage shelves.
Answer
Water drain hole is blocked - R emo ve food res idu e o r ic e from the e ntr anc e of the drain hole.
- Applian ce is making u nusual noises
Answers
Appliance is not level - Readjust the front levelling f eet .
Appliance is in contact with wall o r ot her obj ect s. - Pus h appliance a way a short distance
A part at t he b ack of the a ppl ian ce e g a tub e, i s in conta ct w ith another appliance part or
wall - Gently bend thi s pa rt away carefully if necessary
Product s upp ort
Page 37

Product support
Help is always at hand
Help and assiance
If you require any te chn ical guidance or find that your r efr igerator is not operang as intendeda
simple soluon can oen be found in the Troubleshooting secon of these instru co n or online
atwww.argos-support.co.uk
If you sll require f urt her ass istance call one of ou r ex per ts on 0345 257 7271.To help gi ve u s give
you a fast and efficient servi ce p lea se h ave the following in formaon ready.
Model Ref.
Serial number
Date of purchase
Local call rates app lie s*
You can find these on
the rang plate-a small
informaon panel usu all y
a scker o r me tal pla te on
the rear of your appl ian ce
This will be shown on
your receipt
Line open 8am-7pm Monday to Saturday and 10am-4pm Sunday
*Calls to Argos e nqu iry lin es may aract a charge and set up fee from res ide nal l ine s depending
on your call plan/tariff. Mobile and othe r providers costs may vary, see www.bt.com/p ric ing for detail s.
For security and trai nin g pu rpo se tel eph one calls to and from customer service centres maybe
recorded and monitored.Call from Republic of Ireland wil l a ra ct i nte rna on al call charges.
This appliance comp lie s with the follow ing EEC direcves:
2014/35/EEC Low voltage direcve
2014/30/EMC direcve
Product support
37
Page 38

38
Page 39

Contact
www.argos-support.co.uk
Helpline:0345 257 7271
 Loading...