

Bush MCS-512 Instruction manual
Micro Hi-Fi MCS-512
Set up & Operating Instructions - Please keep for future reference 332/8978
Important - Please read these instructions fully before using your product
These instructions contain important information which will help you get the very best from
your Micro Hi-Fi and ensure safe and correct set up and operation.

Micro Hi-Fi
Contents
Important safety information . . . 3
Instructions for use. . . . . . . . . . . . . 5
Check the package contents . 5
Where to put your Hi-Fi . . . . . . 5
Setting up . . . . . . . . . . . . . . . . . . . 5
Using your Micro Hi-Fi . . . . . . . . . . 6
Switch on . . . . . . . . . . . . . . . . . . . 6
Switch o . . . . . . . . . . . . . . . . . . . 6
Change the mode . . . . . . . . . . . 6
Adjusting the volume . . . . . . . . 6
Mute . . . . . . . . . . . . . . . . . . . . . . . . 6
Equalizer . . . . . . . . . . . . . . . . . . . . 7
Adjust the bass setting . . . . . . 7
Adjust the treble setting . . . . . 7
Loudness . . . . . . . . . . . . . . . . . . . 7
Using headphones . . . . . . . . . . 7
Your Micro Hi-Fi . . . . . . . . . . . . . . . . 8
Using the CD Player . . . . . . . . . . 10
CD mode . . . . . . . . . . . . . . . . . . . 10
Play a CD . . . . . . . . . . . . . . . . . . . 10
CD controls . . . . . . . . . . . . . . . . 10
Play . . . . . . . . . . . . . . . . . . . . . . . . 10
Pause . . . . . . . . . . . . . . . . . . . . . . 10
Next track . . . . . . . . . . . . . . . . . . 11
Previous track . . . . . . . . . . . . . . 11
Fast forward/Fast Backward . 11
Intro . . . . . . . . . . . . . . . . . . . . . . . 11
Repeat . . . . . . . . . . . . . . . . . . . . . 11
Random . . . . . . . . . . . . . . . . . . . 11
Programmed play mode . . . . 11
A-B music sample . . . . . . . . . . 12
Remove the CD . . . . . . . . . . . . . 12
Caring for compact discs . . . 13
USB mode . . . . . . . . . . . . . . . . . 13
USB mode controls . . . . . . . . . 13
Using the FM radio . . . . . . . . . . . 14
Wire FM aerial . . . . . . . . . . . . . . 14
FM radio mode . . . . . . . . . . . . . 14
Tuning to an FM station . . . . 14
Store an FM station preset . . 15
Tune to an FM station preset 15
Bluetooth mode . . . . . . . . . . . . . 16
Connecting or ‘Pairing’ . . . . . . 16
Listening to Music/Audio . . . 16
Line in mode . . . . . . . . . . . . . . . . . 17
Line in . . . . . . . . . . . . . . . . . . . . . 17
Audio out . . . . . . . . . . . . . . . . . . 17
Troubleshooting . . . . . . . . . . . . . . 18
General information . . . . . . . . . . 21
Guarantee . . . . . . . . . . . . . . . . . . . . 22
2
Important safety information
Your Micro Hi-Fi should be treated with care. The information
below has been provided in the interest of safety and will help you
to enjoy this product and the benets it brings for many years.
- Keep the product and all its
parts out of reach of small
children.
- This product is not intended
for use by persons (including
children) with reduced physical,
sensory or mental capabilities,
or lack of experience and
knowledge, unless they have
been given supervision or
instruction concerning the use
of the appliance by a person
responsible for their safety.
- Keep it dry. Avoid exposure
to precipitation, humidity and
liquids which could all aect the
product circuitry.
- Do NOT leave it in high
temperatures as electronic
devices and plastic parts may
warp in heat.
- Do NOT leave it in low
temperatures as moisture can
form inside the product, which
may damage the circuit board.
- Do NOT block or cover slots,
holes or openings on the
product by placing on soft
furnishings such as carpets,
rugs or beds as these are
provided for functionality and/
or ventilation to ensure safe
operation of the product
- Do NOT store in dusty or dirty
areas.
- Disconnect your Hi-Fi from the
mains power supply during
thunderstorms.
- Always check that you have
completely switched o your
Hi-Fi, before you change or
disconnect the power supply.
- Only use the power supply that
came with the product. Using
an unauthorised power supply
will invalidate your guarantee
and may irrecoverably damage
the product.
- Where the mains power plug
or an appliance coupler is used
as the disconnect device, the
disconnect device shall remain
readily operable.
3

- Do NOT attempt to open the
product. This product does not
contain any user serviceable
parts. Unauthorised handling of
the device may damage it and
will void your warranty.
- Do NOT use your Hi-Fi near
emergency/intensive care
medical equipment; if you have
a pacemaker tted or during an
electrical storm.
- Do NOT use harsh chemicals,
cleaning solvents or detergents
to clean the product. Wipe with
a damp (not wet) soft cloth to
clean.
- This is a CLASS-1 laser
product. Use of controls or
adjustments other than those
specied herein, may result
in hazardous laser light beam
exposure. Do NOT open
the cover and do NOT repair
yourself. Refer servicing to
qualied personnel.
- CAUTION: Never touch or look
into the optical lens within the
CD compartment.
- Do NOT place foreign objects
into the CD compartment.
- The underneath and sides of
this product may become warm
after a long period of use. This
is normal.
- If the Hi-Fi will not be used for
a long period of time, remove
the CD and make sure that the
mains power is unplugged.
- Only use recommended
batteries or those of the same
equivalent type.
- Do not mix old and new
batteries or batteries of dierent
types.
- Batteries are to be inserted with
the correct polarity.
- The supply terminals are not to
be short-circuited.
- Remove the batteries from the
Remote Control if they will not
be used for an extended period
of time.
- Do not attempt to recharge
non-rechargeable batteries.
- Dispose of old batteries
carefully.
- Never throw batteries in a re
or attempt to open the outer
casing.
- Batteries are harmful if
swallowed, so keep away from
young children.
- CAUTION: Danger of explosion
if batteries are incorrectly
replaced. Replace only with the
same or equivalent type.
4

Instructions for use
Check the package contents
The package contains:
• 1 x Micro Hi-Fi with attached
mains power lead and plug
• 2 x speakers
• 1 x remote control
• 1 x FM radio wire aerial
• 2 x audio cables
• 1 x Instruction manual
Where to put your Micro Hi-Fi
It is important that you consider
carefully in advance where your
Hi-Fi will be situated and make
sure that it is:
* on a at and stable surface
Note: Never place your
Hi-Fi directly onto antique or
polished surfaces.
* within 1 metre of a power
socket. Please ensure that
the mains power lead is not a
trip hazard.
* at least 1 metre away from
other electrical appliances to
avoid interference
* where you can fully extend
the wire radio aerial
* away from bright sunlight
or heat sources, such as a
radiator
* not in a humid or very damp
place such as a bathroom
Setting up
1. Plug the speakers into the left
and right speaker sockets on the
back of the Hi-Fi.
2. Unwind the FM radio aerial and
plug into FM Antenna socket on
the back of the Hi-Fi. Extend the
wire aerial in a vertical position to
receive the best radio reception.
3. Remove the cable tie from the
mains power lead and extend it
to its full length.
4. Remove the battery cover
from the back of the remote
control and insert 2 x AAA
batteries (not supplied), into the
remote control, noting the ‘+’
and ‘-’ markings and position the
batteries the correct way around.
Replace the battery cover,
making sure it ‘clicks’ shut.
5. Plug the mains power plug into
the mains power wall socket and
switch on. The red power LED to
the left of the display will switch
on.
5
Using your Micro Hi-Fi
Switch on
Press and release the power
button to the left of the display
on the Micro Hi-Fi or on the
remote control.
The red power LED to the left of
the display will switch o.
Your Micro Hi-Fi will power on in
CD mode and ‘HELLO’, followed
by ‘LOAd’ and then ‘NO Cd’ will be
displayed.
Switch o
Press and release the power
button to the left of the display
on the Micro Hi-Fi or on the
remote control.
‘OFF’ will be displayed and the
red power LED to the left of the
display will switch o.
To completely power o the
Micro Hi-Fi, switch o the mains
power at the wall socket.
Change the mode
Press and release the ‘Mode’
button on front of the Micro
Hi-Fi or on the remote control
to change modes. CD/FM
Radio/Line in and Bluetooth
are available. Please check the
display, which will conrm the
mode.
Adjusting the volume
Turn the rotary volume control
on the front of the Micro Hi-Fi,
anti-clockwise to decrease the
volume and clockwise to increase
the volume.
You can also use the ‘Vol-’ or ‘Vol+’
buttons on the remote control to
decrease or increase the volume.
When you adjust the volume,
please check the display which
will conrm the volume setting.
Mute
Press and release the ‘Mute’
button on the remote control to
turn the sound o.
Press and release the ‘Mute’
button to turn the sound on
again.
Note: The mute function will
cancelled automatically if you
use the rotary volume control on
the Micro Hi-Fi or press the ‘Vol+’
or ‘Vol-’ buttons on the remote
control.
6

Equalizer or EQ setting
You can change the sound of
your Micro Hi-Fi, using the EQ
setting, there are 4 options and
EQ o available (Rock, Classic,
Pop, Jazz and O).
Press and release the ‘EQ’ button
on the remote control to display
and change the EQ setting.
Adjust the bass setting
Use the ‘Bass +’ or ‘Bass -’ buttons
on the remote control to adjust
the bass setting. When you
adjust the bass, please check the
display, which will conrm the
setting.
Press and release the ‘Reset’
button on the remote control
to reset the Micro Hi-Fi Bass and
Treble settings.
Loudness
Press and release the ‘Loudness’
button on the remote control to
enhance the bass level.
Press and release the ‘Loudness’
button again to turn the
loudness function o.
Using headphones
You can connect headphones
with a 3.5mm plug (not included)
to your Micro Hi-Fi. The
headphone socket can be found
on the front of the Micro Hi-Fi of
the left hand side.
When you have headphones
connected the Micro Hi-Fi
speakers are switched o and all
sound is via the headphones.
Note: Always keep the volume
within reasonable limits.
Adjust the treble setting
Use the ‘Treble +’ or ‘Treble -’
buttons on the remote control to
adjust the treble setting. When
you adjust the treble, please
check the display, which will
conrm the setting.
Press and release the ‘Reset’
button on the remote control
to reset the Micro Hi-Fi Bass and
Treble settings.
7
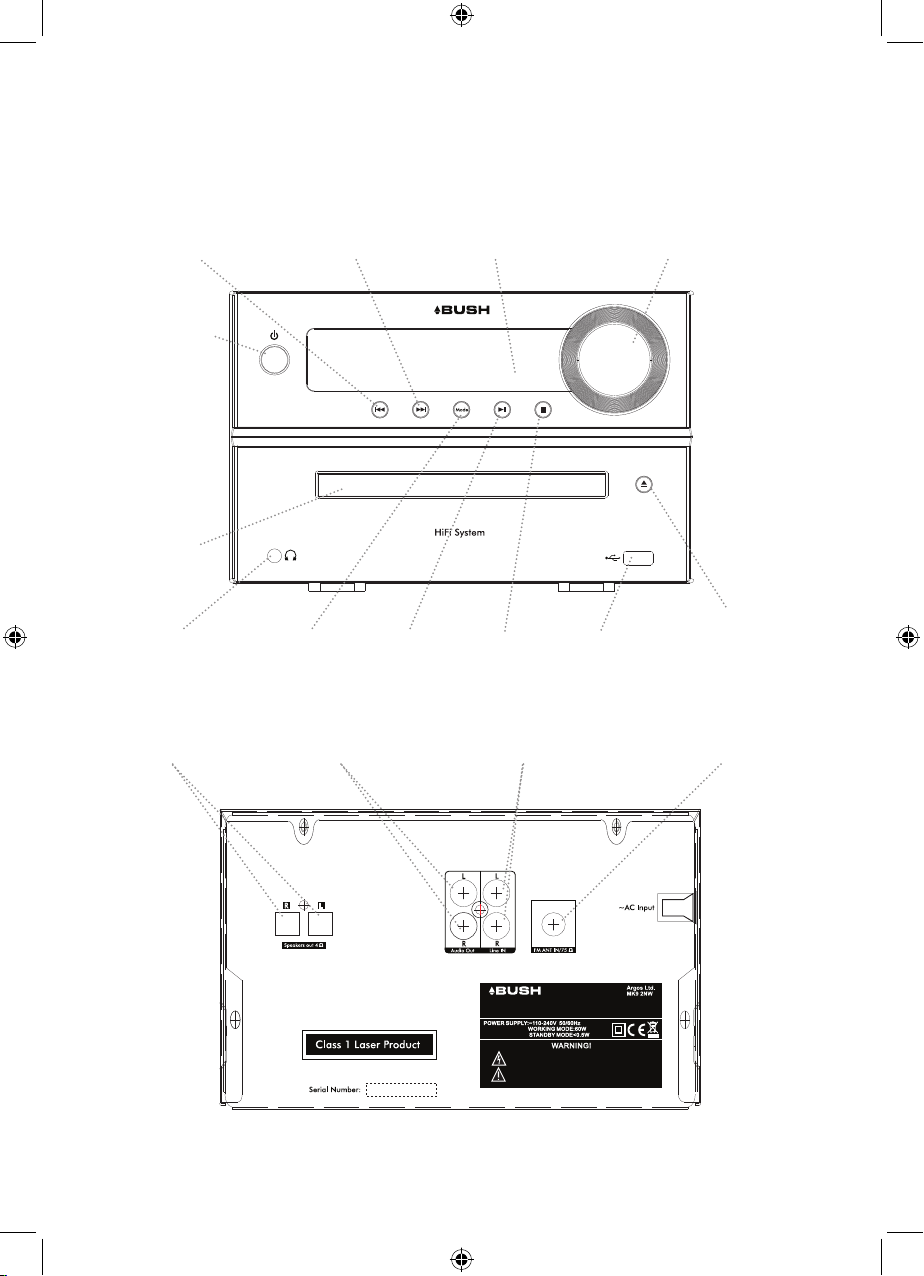
Your Micro Hi-Fi
Front view:
Previous track Next track
Display
Rotary volume control
Power On/O
CD Drawer
Play/Pause StopMode
USB socketHeadphone socket
Back view:
Speaker sockets Audio out sockets Line in audio sockets
Open/Close
the CD Drawer
Wire FM aerial socket
MICRO HIFI CHAMPAGNE
MICRO HIFI CHAMPAGNE
MADE IN CHINA
332/8978
MADE IN CHINA
332/8978
To reduce the risk of electric shock; Do not remove
To reduce the risk of electric shock; Do not remove
cover (or back). No user serviceable parts inside.
cover (or back). No user serviceable parts inside.
Refer servicing to qualified service personnel.
Refer servicing to qualified service personnel.
To reduce the risk of electric shock, grounding of the
centre pin of this plug must be maintained.
8
 Loading...