

Page 1
These instructions contain important information that will help you get the best from your
appliance, ensuring safe and correct installation, use and maintenance.
If you need help or have damaged or missing parts, call the Customer Helpline on 0345 257 7271
Issue 2 - 09/07/10
Page 2
Contents
Product code
1
Parts
Safety Information
Installation
User instructions
Using the hob
Using the oven and grill
Using the digital minute minder
Cleaning and Maintenance
Cleaning and Maintenance
Transporting the cooker
Trouble Shooting
Technical specifications
Injector table
Guarantee
2
3
6-7
8-13
8
11
13
14
14
14
15
16-17
16
18
Customer Helpline 0345 257 7271
AG56DW - AG56DA
Page 3
2
13
14
17
15
16
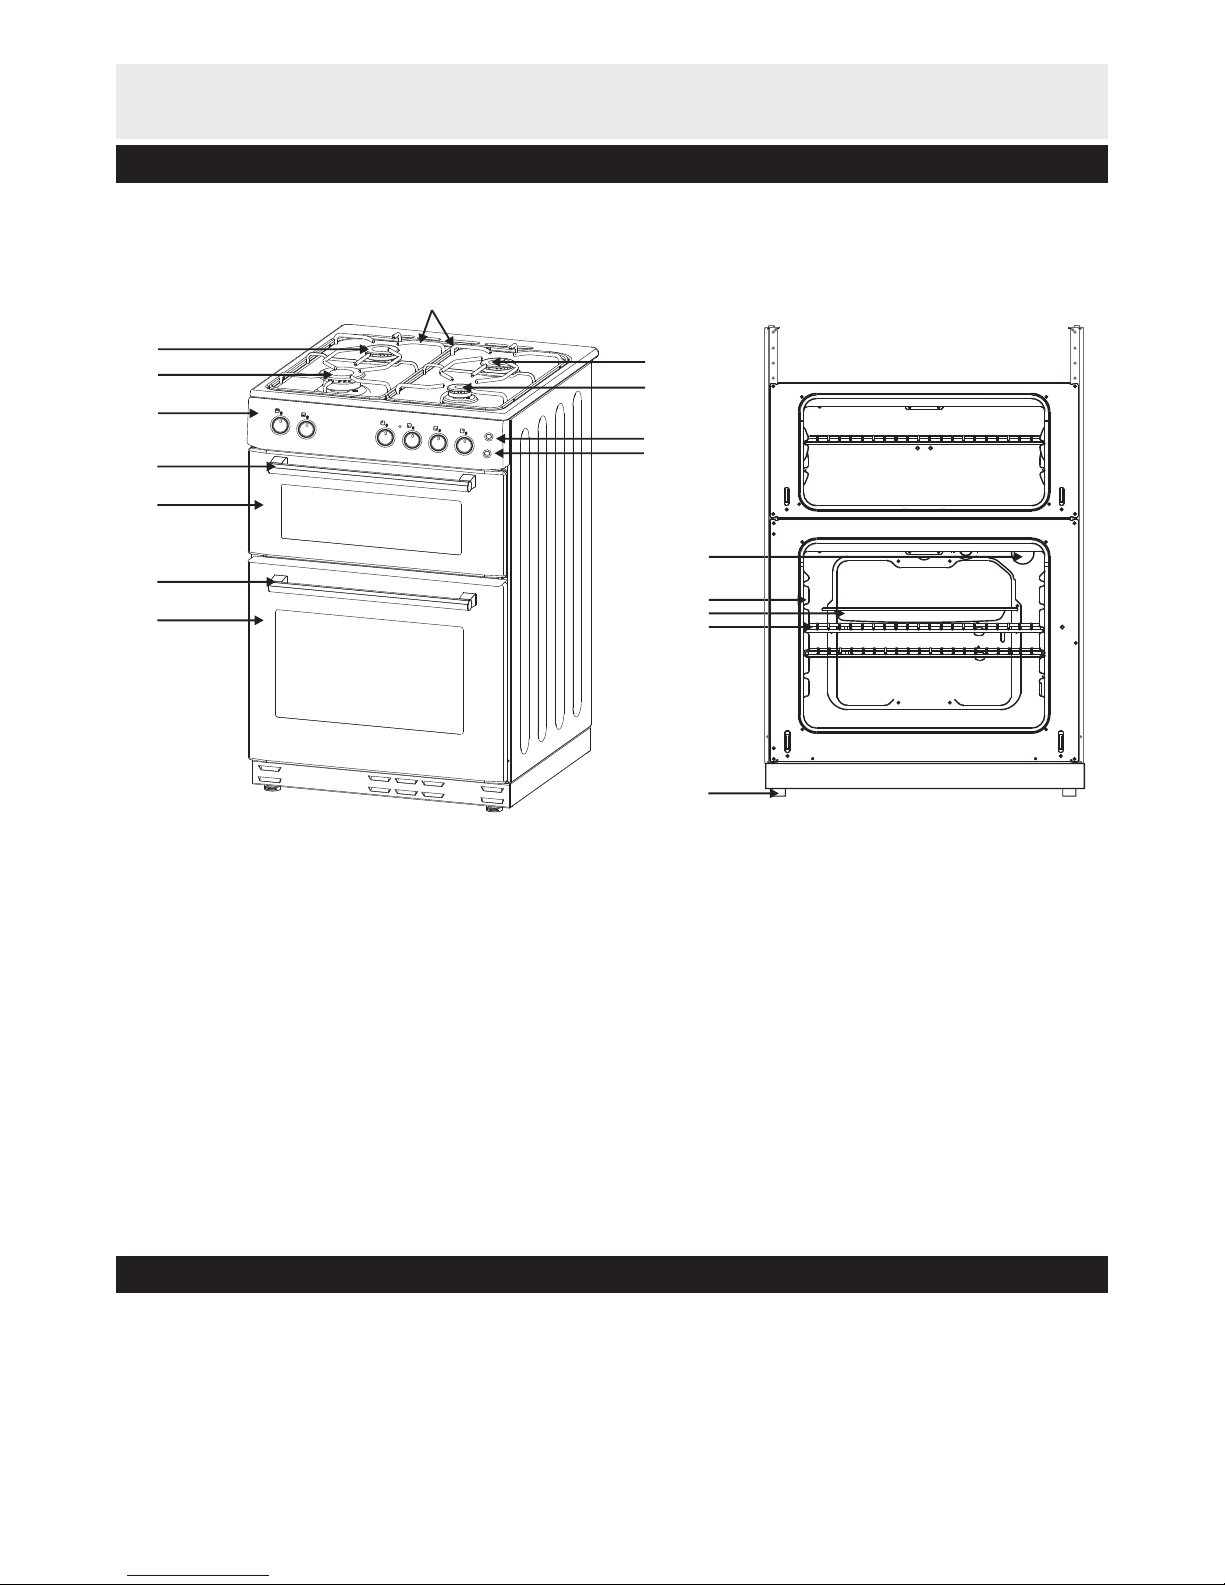
1. Pan supports x 2
2. Gas burner
3. Rapid burner
4. Control panel
5. Top oven door handle
6. Top oven door
7. Main oven door handle
8. Main oven door
9. Auxiliary burner
Accessories
Please familiarise yourself with the parts and accessories listed below
10.
11. Ignition switch
12. Light switch
13. Oven light
14. Oven rack support
15. Grill pan and handle set
16. Wire rack x 3
17. Adjustable foot x 4
Gas burner
If you have damaged or missing parts, call the Customer Helpline: 0345 257 7271
Grill pan and handle set
Parts
1
2
3
4
5
7
6
8
9
10
11
12
Page 4

Safety Information
READ THESE INSTRUCTIONS CAREFULLY
AND COMPLETELY BEFORE USING YOUR
APPLIANCE, AND KEEP IT IN A CONVENIENT
PLACE FOR REFERENCE WHEN NECESSARY.
THIS MANUAL IS PREPARED FOR MORE
THAN ONE MODEL IN COMMON. YOUR
APPLIANCE MAY NOT HAVE SOME OF THE
FEATURES THAT ARE EXPLAINED IN THIS
MANUAL. PAY ATTENTION TO THE
EXPRESSIONS THAT HAVE FIGURES, WHILE
YOU ARE READING THE OPERATING
MANUAL.
General Safety Warnings
This appliance can be used by
children aged from 8 years and above
and persons with reduced physical,
sensory or mental capabilities or lack
of experience and knowledge if they
have been given supervision or
instruction concerning use of the
appliance in a safe way and
understand the hazards involved.
Children shall not play with the
appliance. Cleaning and user
maintenance shall not be made by
children without supervision.
WARNING: The appliance and its
accessible parts become hot during
use. Care should be taken to avoid
touching heating elements. Children
less than 8 years of age shall be kept
away unless continuously supervised.
WARNING: Unattended cooking on a
hob with fat or oil can be dangerous
and may result in fire. NEVER try to
extinguish a fire with water, but
switch off the appliance and then
cover flame e.g. with a lid or a fire
blanket.
WARNING: Danger of fire: do not
store items on the cooking surfaces.
WARNING: If the surface is cracked,
switch off the appliance to avoid the
possibility of electric shock.
For hobs incorporating a lid, any
spillage should be removed from the
lid before opening. And also the hob
surface should be allowed to cool
before closing the lid.
The appliance is not intended to be
operated by means of an external
timer or separate remote-control
system.
WARNING: In order to prevent
tipping of the appliance, the
stabilizing brackets must be
installed. (For detail information
please read the anti-tilting kit set
guide.)
During use, the appliance becomes
hot. Care should be taken to avoid
touching heating elements inside the
oven.
During use, handles held for short
periods in normal use can get hot.
Do not use harsh abrasive cleaners
or sharp metal scrapers to clean the
oven door glass and other surface
since they can scratch the surface,
which may result in shattering of the
glass or damage to the surface.
Do not use steam cleaners for
cleaning the appliance.
WARNING: Ensure that the appliance
is switched off before replacing the
lamp to avoid the possibility of
electric shock.
3
Important - Please read these instructions fully before installation
Customer Helpline 0345 257 7271
Page 5

Safety Information
CAUTION: Accessible parts may be
hot when the cooking or grilling is in
use. Young children should be kept
away.
Your appliance is produced in accordance with
all applicable local and international standards
and regulations.
Maintenance and repair work must be made
only by authorized service technicians.
Installation and repair work that is carried out by
unauthorized technicians may endanger you. It
is dangerous to alter or modify the
specifications of the appliance in any way.
Prior to installation, ensure that the local
distribution conditions (nature of the gas and
gas pressure or electricity voltage and
frequency) and the requirements of the
appliance are compatible. The requirements for
this appliance are stated on the label.
CAUTION: This appliance is designed only for
cooking food and is intended for indoor
domestic household use only and should not
be used for any other purpose or in any other
application, such as for non-domestic use or in
a commercial environment or room heating.
Do not try to lift or move the appliance by
pulling the door handle.
This appliance is not connected to a
combustion products evacuation device. It
shall be installed and connected in accordance
with current installation regulations. Particular
attention shall be given to the relevant
requirements regarding ventilation.
If after 15 s the burner has not lit, stop
operating the device and open the
compartment door and/or wait at least 1 min
before attempting a further ignition of the
burner.
These instructions are only valid if the country
symbol appears on the appliance. If the
symbol does not appear on the appliance, it is
necessary to refer to the technical instructions
which will provide the necessary instructions
concerning modification of the appliance to the
conditions of use of the country.
All possible security measures have been
taken to ensure your safety. Since the glass
may break, you should be careful while
cleaning to avoid scratching. Avoid hitting or
knocking on the glass with accessories.
Ensure that the supply cord is not wedged
during the installation. If the supply cord is
damaged, it must be replaced by the
manufacturer, its service agent or similarly
qualified persons in order to prevent a hazard.
While the oven door is open, do not let
children climb on the door or sit on it.
Installation Warnings
Do not operate the appliance before it is fully
installed.
The appliance must be installed by an
authorized technician and put into use. The
producer is notresponsible for any damage
that might be caused by defective placement
and installation by unauthorized people.
When you unpack the appliance, make sure
that it is not damaged during transportation.
In case of any defect; do not use the
appliance and contact a qualified service
agent immediately. As the materials used for
packaging (nylon, staplers, styrofoam...etc)
may cause harmful effects to children, they
should be collected and removed immediately.
Protect your appliance against atmospheric
effects. Do not expose it to effects such as sun,
rain, snow etc.
The surrounding materials of the appliance
(cabinet) must be able to withstand a
temperature of min. 100°C.
During usage
When you first run your oven a certain smell
will emanate from the insulation materials and
the heater elements. For this reason, before
using your oven, run it empty at maximum
temperature for 45 minutes. At the same time
you need to properly ventilate the environment
in which the product is installed.
During usage, the outer and inner surfaces of
the oven get hot. While opening the oven
door, step back to avoid the hot steam
4
Important - Please read these instructions fully before installation
Customer Helpline 0345 257 7271
Page 6

Safety Information
coming out of the oven. There may be a risk of
burns.
Do not put flammable or combustible
materials, in or near the appliance when it is
operating.
Always use oven gloves to remove and replace
food in the oven.
Do not leave the cooker while cooking with solid
or liquid oils. They may catch fire on condition of
extreme heating. Never pour water on to flames
that are caused by oil. Cover the saucepan or
frypan with its cover in order to choke the flame
that has occured in this case and turn the cooker
off.
Always position pans over the centre of the
cooking zone, and turn the handles to a safe
position so they cannot be knocked or grabbed.
If you will not use the appliance for a long time,
plug it off. Keep the main control switch off. Also
when you do not use the appliance, keep the gas
valve off.
Make sure the appliance control knobs are
always in the "0" (stop) position when it is not
used.
The trays incline when pulled out. Be careful
not to let hot liquid spill over.
CAUTION: The use of a gas cooking appliance
results in the production of heat, moisture and
products of combustion in the room in which it
is installed. Ensure that the kitchen is well
ventilated especially when the appliance is in
use, keep natural ventilation holes open or
install a mechanical ventilation device
(mechanical extractor hood).
Prolonged intensive use of the appliance may
call for additional ventilation, for example
opening of a window, or more effective
ventilation, for example increasing the level of
mechanical ventilation where present.
While using the grill burner, keep the oven door
open and always use the grill deflector shield
supplied with the product. Never use the grill
burner with the oven door closed.
CAUTION: Glass lids may
shatter when heated. Turn
off all the burners before
shutting the lid. The hob
surface should be allowed
to cool before closing the lid.
When the door or drawer of the oven is open,
do not leave anything on it. You may
unbalance your appliance or break the cover.
Do not put heavy things or flammable or
ignitable goods (nylon, plastic bag, paper,
cloth...etc) into the drawer. This includes
cookware with plastic accessories (e.g.
handles).
Do not hang towels, dishcloths or clothes
from the appliance or its handles.
During cleaning and maintenance
Always turn the appliance off before
operations such as cleaning or maintenance.
You can do it after plugging the appliance off
or turning the main switches off.
Do not remove the control knobs to clean the
control panel.
TO MAINTAIN THE EFFICIENCY AND SAFETY
OF YOUR APPLIANCE, WE RECOMMEND
YOU ALWAYS USE ORIGINAL SPARE PARTS
AND TO CALL ONLY OUR AUTHORIZED
SERVICE AGENTS IN CASE OF NEED.
5
Important - Please read these instructions fully before installation
Customer Helpline 0345 257 7271
Page 7

Installation
IMPORTANT - All Gas installations must be
carried out by a suitably qualified person. For
information on choosing a gas installer contact
the ‘Gas Safe Register’. For specific gas
installation, refer to the separate installation
guide.
Positioning
1. Make sure that there are no combustible or
flammable materials, such as curtains, in the
vicinity of the installation.
2. Furniture and cabinets surrounding the oven
must be of material resistant to temperatures
greater than 100 °C.
3. Surrounding furniture, cabinets and extractor
fans should be positioned in accordance with
the diagram shown in figure 1.
4. There must be at least 2cm of free space
between the back wall and the rear of the
appliance to allow for ventilation and air
circulation.
5. If fitted, the extractor fan must be at least
65cm above the hob. If no fan is f tted the
minimum distance between the hob and any
cabinet or other structure must be 70cm.
Feet height adjustment
1. The height and level of the appliance can be
adjusted by rotating the feet located
underneath the appliance at each corner as
shown in figure 2.
2. Rotate in a clockwise direction to decrease
the height and anti clockwise to increase the
height.
3. Once the desired level has been achieved
make sure to lift the appliance into its
location. Do not drag it as this may cause
damage to your floor and the appliance.
6
Positioning & electrical connection
Customer Helpline 0345 257 7271
Figure 1
See detail A
Detail A
Figure 2
Page 8

Installation
IMPORTANT - Electrical connections must be
carried out by a suitably qualified person and in
accordance with all relevant local building and
installation regulations.
Electrical connections
1. This appliance is fitted with fused plug which
should be inserted into a suitable mains
socket.
2. It is recommended that the mains socket is
located behind the appliance and is switched
on and off via a separate switched Fused
Connection Unit (FCU).
3. It is recommended that the switched FCU is
located adjacent to the appliance within a
maximum distance of 2m. The switched FCU
must not be located above the appliance but
should be easily accessible in case of an
emergency.
7
Positioning & electrical connection
Customer Helpline 0345 257 7271
L
N
BROWN
YELLOW+GREEN
BLUE
Electrical connection diagram
Figure 3
Page 9

Ignition of the burners
To determine which knob controls which burner,
check the position symbol above the knob.
Manual Ignition of the Gas Burners
If your appliance is not equipped with any
ignition aid or in case there is a failure in the
electricity network, follow the procedures listed
below.
For Hob Burners: To ignite one of the burners,
press and turn its knob counter-clockwise so
that the knob is in max. position, approach a
match, taper or another manual aid to its upper
circumference. Move the ignition source away
as soon as you see a stable flame.
For Oven Burners: To ignite the oven burner,
press and turn the oven control knob counterclockwise so that the knob is in max. position,
approach a match, taper or another manual aid
to the ignition hole that is located on the front
left corner of the burner. Move the ignition
source away as soon as you see a stable flame.
For Grill Burners: To ignite the grill burner, turn
the grill valve in the clockwise position until the
marker on the knob points at the grill sign.
Then, keep the knob pressed and approach a
match, taper or another manual aid to the holes
that are situated on the burner. Move the
ignition source away as soon as you see a
stable flame.
Ignition by Spark Button
Press the valve of the burner you want to
operate and turn the valve in the counterclockwise direction so that the knob is in max.
position and with your other hand, press the
ignition button at the same time. Press the
ignition button immediately, because if you wait,
a build up of gas may cause the flame to
spread. Continue pressing the ignition button
until you see a stable flame on the burner.
1.
2.
IMPORTANT - Flame safety device:
.
Oven / Grill Burners
.
Hob Burners
Hobs equipped with flame failure device provide
security in case of accidentally extinguished
flame. If such a case occurs, the device will block
the burners gas channels and will avoid any
accumulation of unburned gas. Wait 90 seconds
before re-igniting an extinguished gas burner
Regardless of the model of your appliance, all
oven burners are equipped with a gas safety
device. For this reason, during ignition, keep the
oven knob pressed until you see stable flames. If
the flames are cut out after you release the knob,
repeat the procedure again. If the oven burner
does not ignite after you keep the burner knob
pressed for 30 seconds, open the oven door and
do not attempt re-ignition for at least 90 seconds.
When oven flames go out accidentally, repeat the
same procedure
8
User Instructions
Customer Helpline 0345 257 7271
Using the hob
Page 10
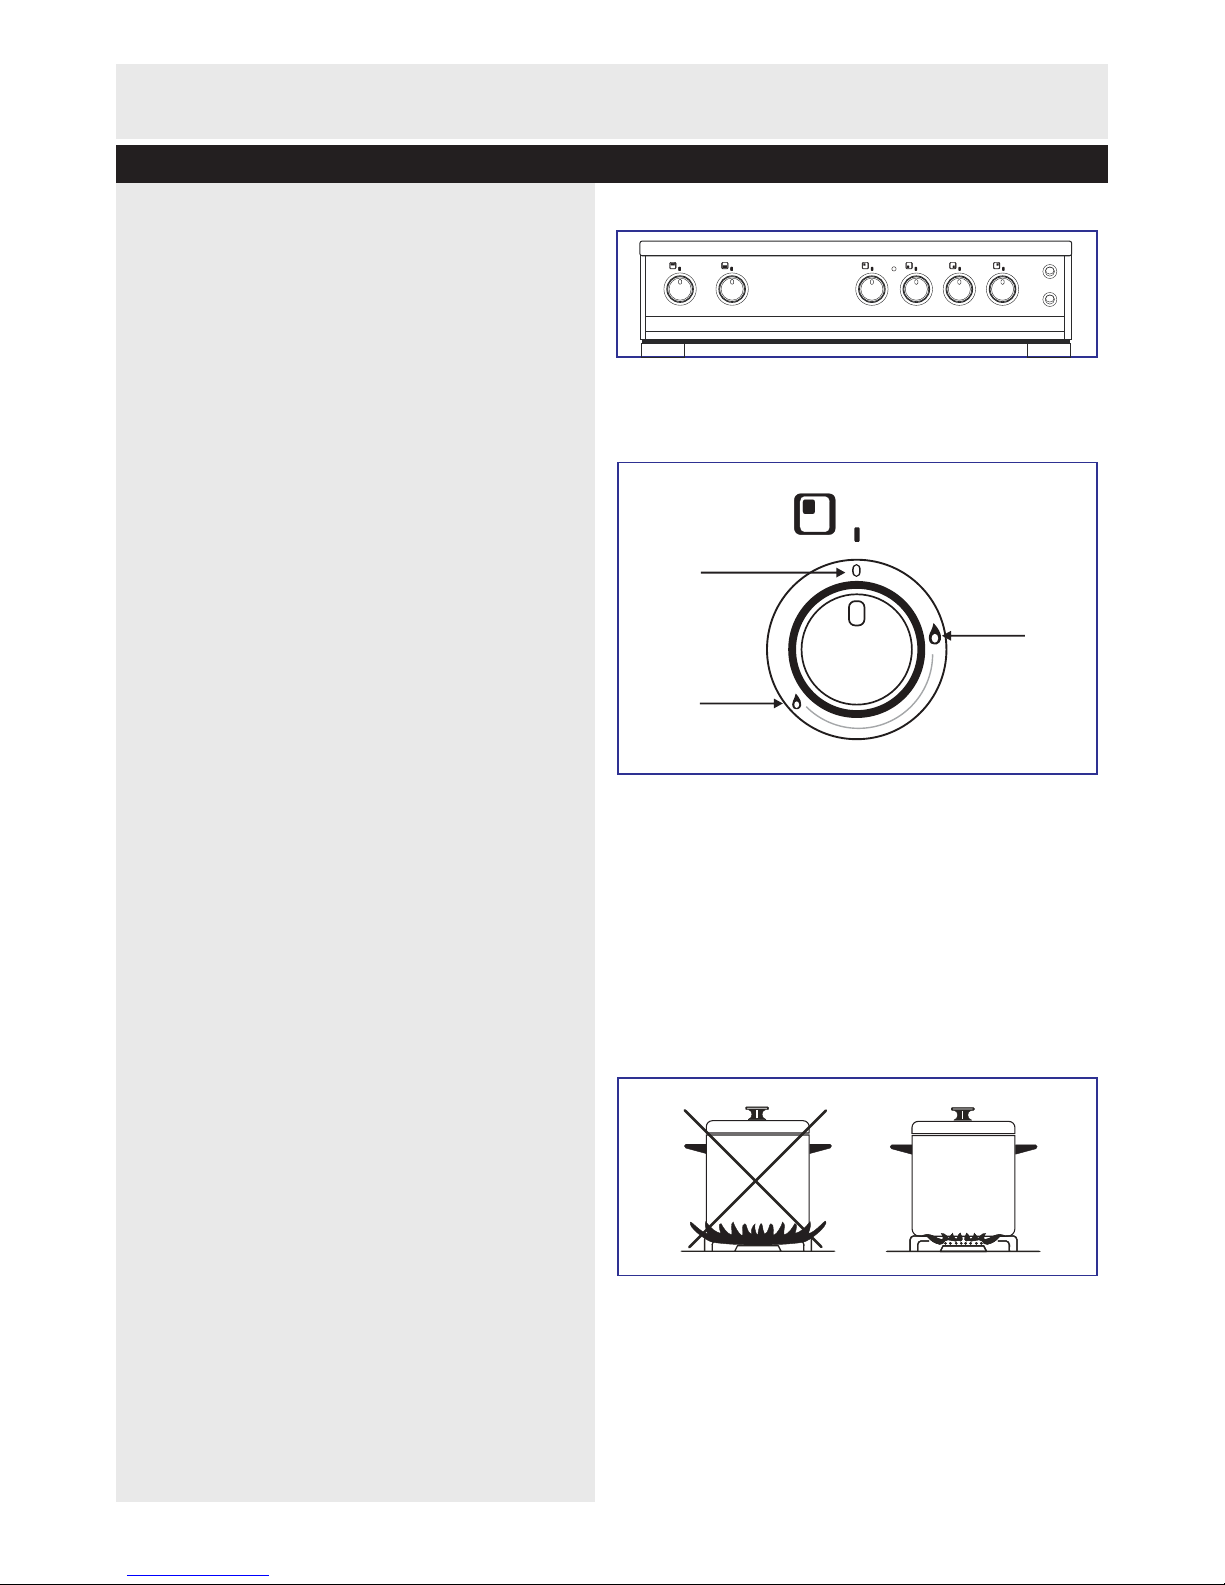
Control of the hob burners
.
.
The knob has 3 positions: Off (0), maximum (big
flame symbol) and minimum (small flame symbol).
After you ignite the burner in maximum position;
you can adjust the flame length between
maximum and minimum positions. Do not
operate the burners when the knob position is
between maximum and off positions.
After the ignition, check the flames visually. If you
see yellow tip, lifted or unstable flames; turn the
gas flow off, and check the assembly of burner
caps and crowns. Also, make sure that no liquid
has flown into the burner cups. If the burner
flames go out accidentally, turn the burners off,
ventilate the kitchen with fresh air, and do not
attempt re-ignition for 90 sec.
When turning the hob off, turn the knob in the
clockwise direction so that the knob shows "0"
position or the marker on the knob points
upwards.
Your hob has burners of different diameters. The
most economic way of using gas is too choose
the correct size gas burners for your cooking pan
size and to bring the flame to minimum position
once the boiling point is reached. It is
recommended to always cover your cooking pan.
In order to obtain maximum performance from the
main burners, use pots with the following flat
bottom diameters. Using smaller pots than the
minimum dimensions stated below will cause
energy loss.
Make sure that the tips of the flames do not
spread out of the outer circumference of the pan,
as this may also harm the plastic accessories
around the pan (handles etc.)
When the burners are not in use for prolonged
periods, always turn the main gas control valve
off
9
User Instructions
Rapid Burner: 22-26cm
Medium Burner: 14-22cm
Auxiliary Burner: 12-18cm
Customer Helpline 0345 257 7271
Using the hob
Figure 4
Figure 5
Off
Min
Max
Figure 6
Page 11

WARNING - Use only flat pans and with a
sufficiently thick base.
WARNING - Ensure that the base of the pan is
dry before placing it on the burners.
WARNING - The temperature of accessible parts
may be high when the appliance is operating. So
it is imperative to keep children and animals out of
the reach of the burners during and after cooking.
WARNING - After use, the hob remains very hot
for a prolonged period of time, do not touch it
and do not place any object on top of the hob.
WARNING - Never place knives, forks, spoons
and lids on the hob as they will get hot and could
cause serious burns.
10
User Instructions
Customer Helpline 0345 257 7271
Using the hob
Page 12

11
User Instructions
Customer Helpline 0345 257 7271
Using the oven and grill
If your appliance has a grill pan and handle set as
an accessory, refer to accessories section for its
usage.
WARNING - Ensure that the grill is turned off
before closing the door.
You can use other cooking utensils, but they must
be heat and flame resistant. You can also use
glass dishes, cake molds, special oven trays that
are appropriate for use in oven. Pay attention to
the using instructions by the manufacturer of
those accessories.
In case small size dishes are used, place the dish
onto the chrome grid, it will completely be on the
middle part of the grid.
Do not leave an oven tray or dish in a cold
environment right after cooking. Do not put onto
cold and wet surfaces. Place on a dry kitchen
cloth or dish cross, ensure it to cools slowly,
otherwise the glass tray or dish may be broken.
If you will grill in your oven; we recommend you
use the grill that was given in the tray provided (If
your product includes this material). If you use the
big wire grill; put a tray onto one of the lower
shelves for oils to be collected. Also put some
water into it for ease of cleaning.
Accessories used in oven
Using the grill pan and handle set
WARNING - Always use an oven glove to protect
your hand when using the grill as all the metal
parts can become very hot!
The grill pan has a detachable handle. Ensure
when using the grill pan handle that it is
centralized and secure as shown in the figure.
Do not leave the handle in position when grilling.
If the handle is left in position when grilling, it will
get very hot.
Figure 8
Figure 7
WARNING- Fit
the grid correctly
into any
correspondent
rack in the oven
cavity and push
it to the end.
Page 13

12
Control of the Oven Burner
Ensure the glass lid is in the upright position.After
you ignite the oven burner as explained before,
you can adjust the temperature inside the oven as
you require, using the numbers on the control
panel or knob ring: Bigger numbers mean higher
temperatures, while smaller numbers mean lower
temperatures. If your oven is equipped with an
oven thermostat; refer to the temperature table
below for the temperature references of those
numbers. Do not operate the appliance between
"Off" position and first temperature marker in the
counter-clockwise direction. Always use the oven
between max. and min. numbers on the
serigraphy. When turning the oven off, turn the
knob in the clockwise direction so that the knob
shows "0" position.
Cooking
.
Preheating
When you need to preheat the oven, we
recommend you do so for 10 minutes. For recipes
needing high temperatures, e.g. bread, pastries,
scones, soufflés etc., best results are achieved if
the oven is preheated first. For best results when
cooking frozen or cooked chilled ready meals
always preheat the oven first.
Ensure that food is placed centrally on the shelf
and there is sufficient room around the baking
tray/dish to allow for maximum circulation.
Stand dishes on a suitably sized baking tray on
the shelf to prevent spillage onto the oven base
and to help reduce cleaning.
The material and finish of the baking tray and
dishes used affect base browning. Enamel- ware,
dark, heavy or non-stick utensils increase base
browning. Shiny aluminum or polished steel trays
reflect the heat away and give less base browning.
When cooking more than one dish in the oven,
place dishes centrally on different shelves rather
than cluster several dishes on one shelf, this will
allow the heat to circulate freely for the best
cooking results
If you are cooking more than one tray of similar
items, for example cakes or biscuits, swap the
.
D
Cooking
Place the chrome grid on the topmost shelves;
provided that the food does not touch the grill
burner.
Preheat the grill on a full setting for a few minutes
before sealing steaks or toasting. The food should
be turned over during cooking as required.
Food should be thoroughly dried before grilling to
minimize splashing.
Foods should be placed on the center of the grid
to allow maximum circulation of air.
Never cover the grill pan or grid with foil as this
can lead to grill fires.
Door should be kept in open position during use
of grill.
trays during cooking or you can remove the top
tray when the food is cooked and move the lower
tray to the higher shelf to finish cooking
o not
place baking trays directly on the oven
base as it interfer
es with the oven air circulation
and can lead to base burning; use the lower shelf
position.
The grill burner can be operated with the oven
door in two positions regarding your choice:
completely open or partially open (30° position).
The grill burner can be modulated between max.
and min. positions as indicated on the control
panel serigraphy. When turning the grill burner
off, turn the knob towards the "0" position.
Control of the Grill Burner
User Instructions
Customer Helpline 0345 257 7271
Using the oven and grill
MAIN OVEN
MARK
TEMP (°C)
S
1
2
3
4
5
6
9
MAX
110
14
0
150
170
180
190
200
220
7
8
230
22470
0
TOP OVEN
MARK
TEMP (°C)
S
1
2
3
4
5
6
110
14
0
150
170
180
190
200
220
7
8
230
Page 14

Cleaning and Maintenance
Cleaning and Maintenance
13
Cleaning
Be sure that all control switches are in the off
position and your appliance has cooled down
before cleaning your oven. Turn off the appliance.
Check the cleaning products are recommended by
the manufacturer. As they may damage the
surfaces. Do not use caustic creams, abrasive
cleaning powders, thick wire wool or hard tools.
Enamelled parts of the oven can be damaged if
excess cleaning liquids are not immediately
removed.
Cleaning of Inside of Your Oven
Take the plug of the oven out before starting
cleaning. The inside of enameled oven is best
cleaned best when the oven is warm. Wipe the
oven with a soft cloth that had been soaked in
soapy water after each use. Later wipe it with a
wet cloth once more and then dry. It may be
required to use a liquid cleaning material from time
to time and for a complete cleaning. Do not clean
with dry/powder cleaners or steam cleaners.
Cleaning of Gas Cooker - Hob Part
Lift up the saucepan supports, caps and crowns of
hob burners.
Wipe and clean the back panel with a soapy cloth.
Wash the caps and crowns of hob burners and
rinse them. Do not leave them wet, immediately
dry them with paper cloth.
After cleaning, make sure that you re-assemble the
parts correctly.
Do not clean any part of the hob with metal
sponge. It cause the surface to be scratched.
The pan support top surfaces may be scratched in
time due to usage.
During cleaning of the hob plate, make sure that no
water flows inside the burner cups, as this may
block the injectors.
Customer Helpline 0345 257 7271
Page 15

Cleaning and Maintenance
Cleaning and Maintenance
14
If it does not have the original case; prepare a
carriage box so that the appliance, especially
external surfaces (glass and painted surfaces) of
oven is protected against external forces.
Burner Caps
Periodically, enameled pan support, enameled
covers, burner heads must be washed with soapy
warm water rinsed and dried. After drying them
thoroughly, replace them correctly.
Enamelled Parts
In order to keep them in good condition, it is
necessary to clean them frequently with warm
soapy water and then dry with cloth. Do not wash
them while hot and never use abrasive powders or
abrasive cleaning materials. Do not leave vinegar,
coffee, milk, salt, water, lemon, or tomato juice in
contact with enamelled parts for long periods of
time.
Maintenance
Change of Oven Lamp
Unplug the appliance and make sure that the oven
is cool. Remove the lamp protective cover and
then remove the bulb. Ensure the new bulb is
resistant to 300°C (230 V, 25 Watt, Type E14).
Replace the lamp protective cover. Your oven will
be ready for use after this process.
Other Controls
Periodically check the gas connection pipe. Even
if any simple abnormality is felt, inform the
technical service to have it changed. Call 0345
257 7271. We recommend the gas connection
parts to be changed once a year. If any
abnormality is felt while operating the control
knobs of cooker and oven, contact the authorised
service.
Information related to transport
If you need to transport your cooker, keep the
original case of product and carry in its original case
when needed to be carried. Follow the transport
signs on case. Tape the cooker on upper parts, caps
and crowns and pan supports to the cooking
panels. Place a paper between the upper cover and
cooking panel, cover the upper cover, then tape it to
the side surfaces of oven. Tape cardboard or paper
onto the front cover on interior glass of oven as it will
be suitable to the tray.
Transporting the cooker
Customer Helpline 0345 257 7271
Page 16

15
Trouble Shooting
Customer Helpline 0345 257 7271
Problem Possible cause Solution
- Oven does not turn on.
- Gas ring does not ignite.
- Power is turned off.
- Gas supply is turned off.
- FSD has just operated.
- Make sure both the electrical and gas
connections are operational and that the
gas tap and switches are set to the open/
on positions.
- Wait for 90 seconds and re-ignite
following the procedure on page 6.
No heat or oven does not
warm up.
- Gas burner has extinguished.
- Oven temperature control is
incorrectly set.
- Oven door has been left open.
- Follow the re-ignition procedure
on page 6.
- Check the oven temperature control
knob is set correctly.
- Make sure oven door is closed.
Avoid opening frequently during cooking.
Oven light does not operate. L-amp has failed.
- Electrical supply is
disconnected or switched off.
- Replace lamp according to the
instructions on page 12.
- Make sure the electrical supply is turned
on at wall socket outlet.
Gas rings have an
uneven flame or flame is
discoloured.
- Hob assembly is misaligned.
- Dirt or moisture ingress inside
the ring assemblies.
- Gas supply is interrupted.
- Turn off and adjust the ring assemblies to
make sure they are correctly seated.
- Clean and dry the ring assemblies
thoroughly and realign.
- Call the customer helpline on
0 3600 4632 or consult a qualified gas
installation engineer.
Cooking is uneven within
the oven.
- Oven shelves are incorrectly
positioned.
- Gas burner is dirty or
obstructed.
- Position the shelves towards the top or
bottom of the oven following cooking
guidelines. The top of the oven will be
hotter than the bottom.
- Clean the Gas burner carefully using a
soft wet cloth and dry thoroughly before
re-igniting.
Important If problems persist call an
authorised installation engineer or the
customer helpline on 0845 600 4632.
Basic troubleshooting before contacting service
WARNING – If you smell gas, immediately turn of the gas supply at the mains and open all windows
and doors to ventilate the area. Do not operate any electrical appliances including lighting switches
and wall sockets. Call your authorised gas engineer.
- Hob lid is closed.
- Move hob lid to upright position to allow
gas to flow to the hob burners.
Page 17

16
Customer Helpline 0345 257 7271
Technical Specifications
Injector Table
Total Cons umpti o n:
G30 28~30 mba r
12,3 kW 894 g/h
Ga s Category: II2H3+
Destination:GB Class:1
G20 20 mba r G30/G31 28-30/37 mba r
LARGE BURNER
DI A. of I NJECTOR (1/100mm)
115
85
NOMINAL RATI NG (KW)
3
3
CONSUMPTI ON
285.7 l/h
218,1 g/h
MEDIUM BURNER
DI A. of I NJECTOR (1/100mm)
97
65
NOMINAL RATI NG (KW)
1,75
1,75
CONSUMPTI ON
166.7 l/h
127,2 g/h
SMALL BURNER
DI A. of I NJECTOR (1/100mm)
72
50
NOMINAL RATI NG (KW)
1
1
CONSUMPTI ON
95.2 l/h
72,7 g/h
MAIN OVEN BURNER
DI A. of I NJECTOR (1/100mm) 115 75
NOMINAL RATI NG (KW) 2,4 2,4
CONSUMPTI ON 228,6 l/h 174,5 g/h
TOP OVEN BURNER
DI A. of I NJECTOR (1/100mm) 115 75
NOMINAL RATI NG (KW) 2,4 2,4
CONSUMPTI ON 228,6 l/h 174,5 g/h
GRILL BURNER
DI A. of I NJECTOR (1/100mm) 110 70
NOMINAL RATI NG (KW) 2,2 2
CONSUMPTI ON 209,5 l/h 145,4 g/h
NG LPG
Page 18

Technical Specifications
By ensuring this product is disposed of correctly,
yo u wi ll help p revent potential negative
consequences for the environment and human
health, which could otherwise be caused by
inappropriate waste handling of this product. For
more detailed information about recycling of this
product, please contact your local city office, your
household waste disposal service or the shop
where you purchased the product.
The symbol on the product or on
its packaging indicates that this
product may not be treated as
household waste. Instead it shall
be handed over to the applicable
collection point for the recycling
of electrical and electronic
equipment.
Disposal information
We apologise for any inconvenience caused by any minor inconsistencies in these
instructions , which may occur as a result of product improvemenst and development.
Model/Item
Power supply
Maximum gas consumption
Size(H x W x D)
AG56DW
230-240V~
12.3 kW
900x600x600 mm
AG56DA
230-240V~
12.3 kW
900x600x600 mm
Customer Helpline 0345 257 7271
Page 19

Page 20

52113538 R003 05/15
Customer Helpline: 0345 257 7271.
 Loading...