

Bush DVD154TVX User Manual
User Guide
DVD154TVX
15” (visible screen size 37 CMS)
Colour TV DVD Combi
with remote control

Please read this manual carefully before using this TV set and keep it for future
reference.
1
CONTENTS
Before Operation
Basic operation
ADDITIONAL INFORMATION
..........................................2
Warning and cautions..................................................................................3
Using the remote control.............................................................................6
Function buttons and external sockets......................................................7
Front panel of the TV set............................................................................7
Rear panel of the TV set.............................................................................7
Installation....................................................................................................8
Aerial connection........................................................................................8
Preparation of the remote control...............................................................8
Switching on/off the TV set........................................................................9
TV Set up.....................................................................................................10
Blue Back...................................................................................................10
Game.........................................................................................................10
Calendar.....................................................................................................11
Searching for channels............................................................................12
Manual search........................................... ..............................................12
Program skip ............................................................................................13
Program Exchange...................................................................................14
Manual fine tune.......................................................................................15
Auto search...............................................................................................16
Watching TV................................................................................................17
Watching TV program...............................................................................17
Program swap..........................................................................................18
Teletext........................................................................................................19
DVD System Setup.....................................................................................20
Basic Playback...........................................................................................21
Special Function Playback........................................................................25
Advanced Playback....................................................................................26
Convenient picture control functions.......................................................27
Playable Discs............................................................................................28
Disc Protection and DVD Characteristics................................................29
Others
Connection to the external audio and video equipment.........................30
Troubleshooting guide...............................................................................31
Specifications.............................................................................................32
DVD154TVX

2
DVD154TVX
Warning and cautions
CAUTION: TO REDUCE THE RISK OF ELECTRIC SHOCK. DO NOT REMOVE COVER (OR
BACK). NO USER SERVICEABLE PARTS INSIDE. REFER SERVICING TO QUALIFIED SERVICE
PERSONNEL.
The graphic symbols on the back cover of the set mean the following:
WARNING: TO REDUCE THE RISK OF FIRE OR ELECTRIC SHOCK, DO NOT EXPOSE THIS
APPLIANCE TO RAIN OR MOISTURE.
INSTALLATION
LOCATE the receiver in the room where direct light does not strike the screen. Total darkness or
a reflection on the picture screen can cause eyestrain. Soft and indirect lighting is recommended
for comfortable viewing. ALLOW enough space between the receiver and the wall to permit
proper ventilation. AVOID excessive warm locations to prevent possible damage to the cabinet or
component failure.
CONNECTION
This TV receiver can be connected to 230V- 50Hz, NEVER connect to DC supply or any other
power.
The lightning flash with arrowhead symbol within an equilateral triangle is intended to
alert the user to the presence of uninsuiated "dangerous voltage" within the product's
enclosure that may be of sufficient magnitude to constitute a risk of electric shock to
persons.
The exclamation point within an equilateral triangle is intended to alert the user to the
presence of important operating and maintenance (servicing) instructions in the literature
accompanying the appliance.
AUTOMATIC DEGAUSSING
All colour television receivers are sensitive to magnetic influences, usually caused by either
moving the receiver from one place to another or using certain electrical appiiances near the
receiver. This residual magnetism as it is called, sometimes causes distortion which gives rise to
"blotchy" areas of colour in the picture. To avoid these effects the receiver incorporates an
automatic degaussing circuit which operates for a short while immediately each time the receiver
is switched on using the mains switch. This circuit removes any residual magnetism in the metal
parts of the picture tube and therefore ensures that each time the receiver is switched "ON"
using the Mains switch, the purity of the colours displayed on the screen remain true and lifeiike.
If the set is moved or faced in a different direction, the mains switch must be switched off at least
10 minutes in order that the automatic degaussing circuit operates properly.
3
Warning and cautions
CAUTION
Never tamper with any components inside your set, or any other adjustment controls not mentioned
in this manuai. All television receivers are high voltage instruments. Your PICTURE TUBE is highly
evacuated. Ifbroken, glass fragments will be violently expelled. Scratching, shipping or undue
pressure is dangerous and should be avoided. When you dust or wipe the PICTURE TUBE FACE
or CABINET, the power cord should be pulled out from the wall then wipe the receiver with a dry
soft cloth. Ali "inside work" on your receiver should be performed only by Professional Service
Personnel.
DANGER
LASER SAFETY
This unit employs an optical laser beam system in the
CD mechanism, designed with built in safeguards. Do
not attempt to disassemble, refer to qualified service
personnel. Exposure to this invisible laser light light
beam may be harmful to the human eye.
THIS ISA CLASS-1 LASER PRODUCT. USE OF
CONTROLS, OR ADJUSTMENTS OR PROCEDURES
OTHER THAN THOSE SPECIFIED HEREIN, MAY
RESULT IN HAZARDOUS LASER LIGHT BEAM
Invisible laser radiation when open
and interlock failed or defeated. avoid
direct exposure to laser beam.
CLASS 1
LASER PRODUCT
Manufactured under license from Dolby Laboratories "Dolby", "Pro Logic" and the double-D symbol
are trademarks of Dolby Laboratories. Confidential unpublished works. c.1992-1997 Dolby
Laboratories, Inc. All rights reserved.
4
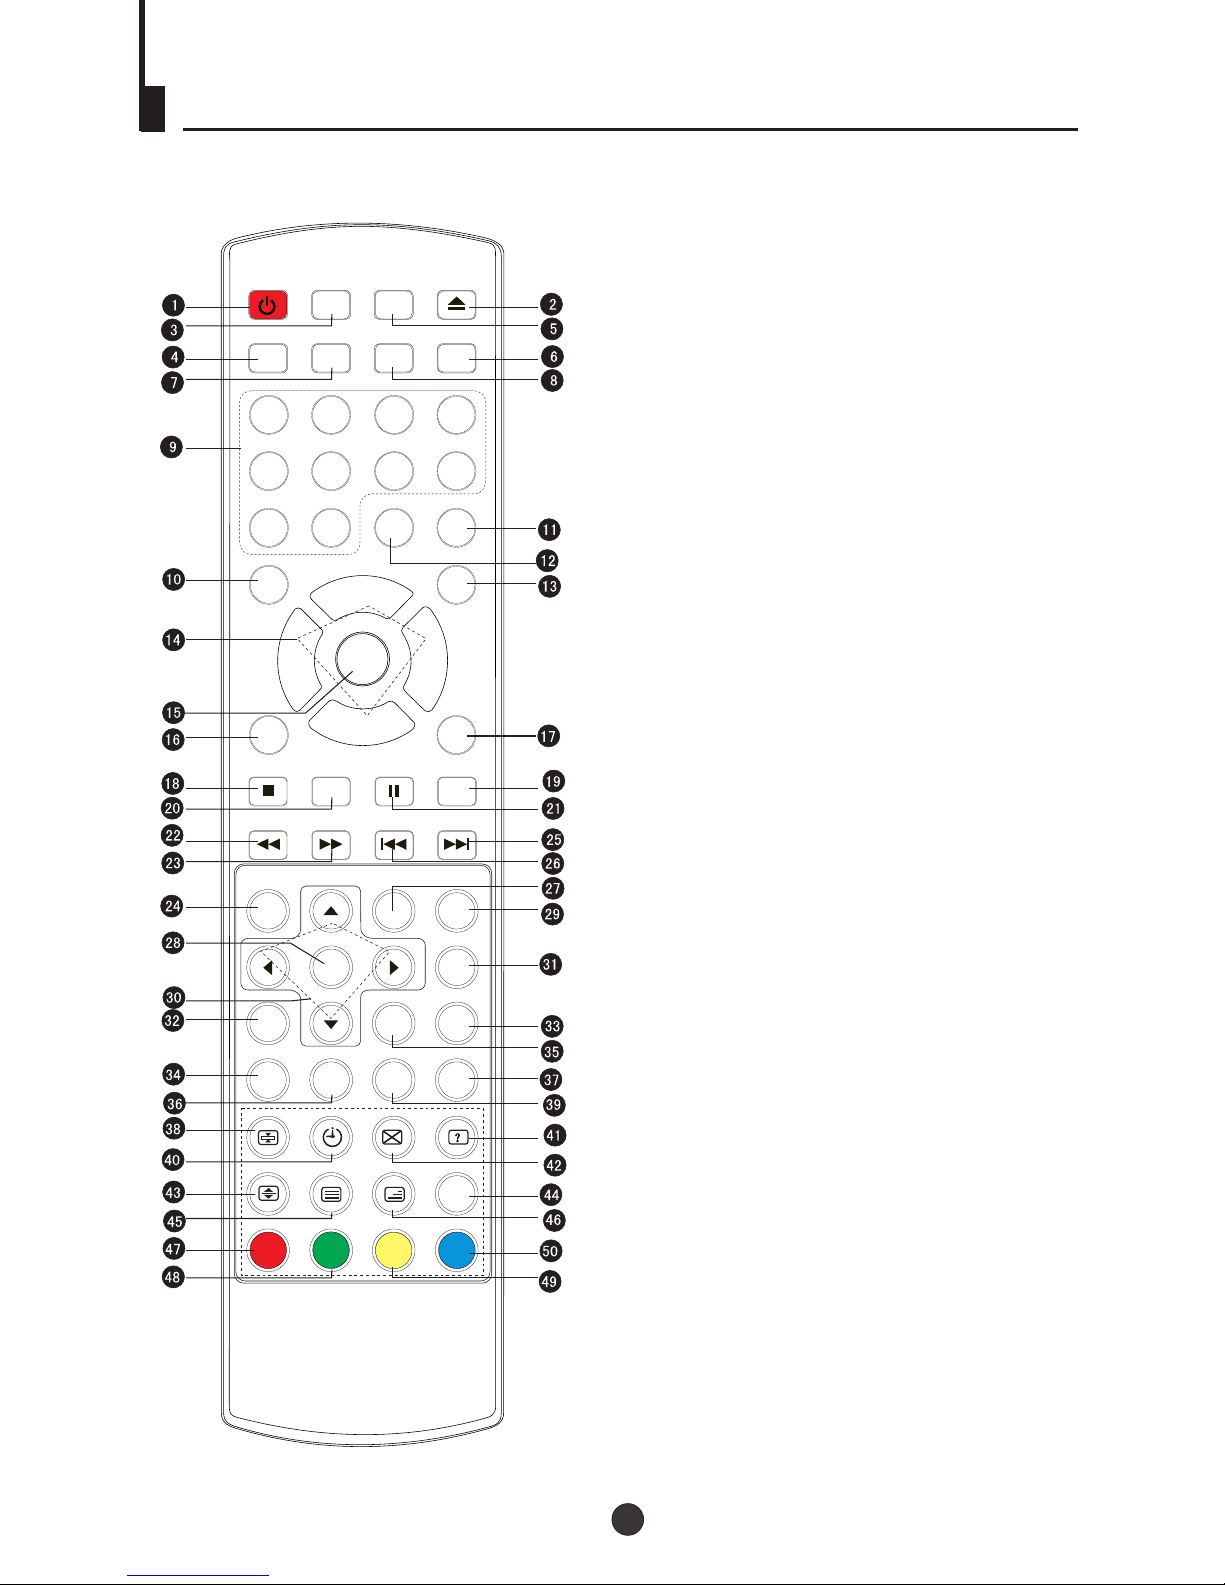
Using the Remote Control
POWER
OPEN/CLOSE
PP SLEEP RECALL
MUTE
1 2 3 4
5 6 7 8
99 00
-/---/--
TV/AV
TV/DVD
P+
P-
V- V+
MENU
DISPLAY
PROG
STOP
SETUP
PAUSE/STEP
F.REV
F.FWD .
PREV NEXT
D.MENU
REPEAT
ENTER/PLAY
SLOW PLAY
ANGLE
TITLE/PBC
SEARCH
SUBTITLE
INDEX
ZOOM
AUDIO ST/D/I/II
CLEAR
REPEAT A-B
TXT MODE/SWAP
1. Standby Button
2. Open/Close Button
3. (NO FUNCTION)
4.PP Button
5.(NO FUNCTION)
6.Mute Button
7.Sleep Button
8.Recall Button
9.Numeric Buttons
10.DVD Audio Button
11.TV/AV Button
12.Multi Digit Button
13.TV/DVD Button
14.Volume /Channel Button
15.TV Menu Button
16. DVD Display Button
17.DVD Program Button
18.DVD stop Button
19.DVD Clear Button
20.DVD Enter/Play Button
21.DVD Pause/Step Button
22.DVD Fast reverse Button
23.DVD Fast forward Button
24.DVD Menu Button
25.DVD Next Button
26.DVD Previous Button
27. DVD Repeat Button
28.DVD Setup Button
29.DVD Repeat A-B Button
30.DVD Navigation Button
31.DVD Slow Button
32.DVD Angle Button
33.DVD Search Button
34.DVD Subtitle Button
35.DVD Title/PBC Button
36.DVD Zoom Button
37.Index
38.Hold
39.Teletext Mode/Swap Button
40.Time / Subcode
41.Reveal
42.Cancel
43.Enlarge
44.(NO FUNCTION)
45.Teletext On / Off
46.Mix
47.Red Button / TV Sound Menu
48.Green Button / TV Picture Menu
49.Yellow Button / TV Sleep Time Menu
50.Blue Button
SOUND PICTURE SLEEP TIME
6
TV/DVD/AV
MENU
OPE N/C LO SE
PLAY/ PAUS E
CHA NNE L
VOL UME
STO P
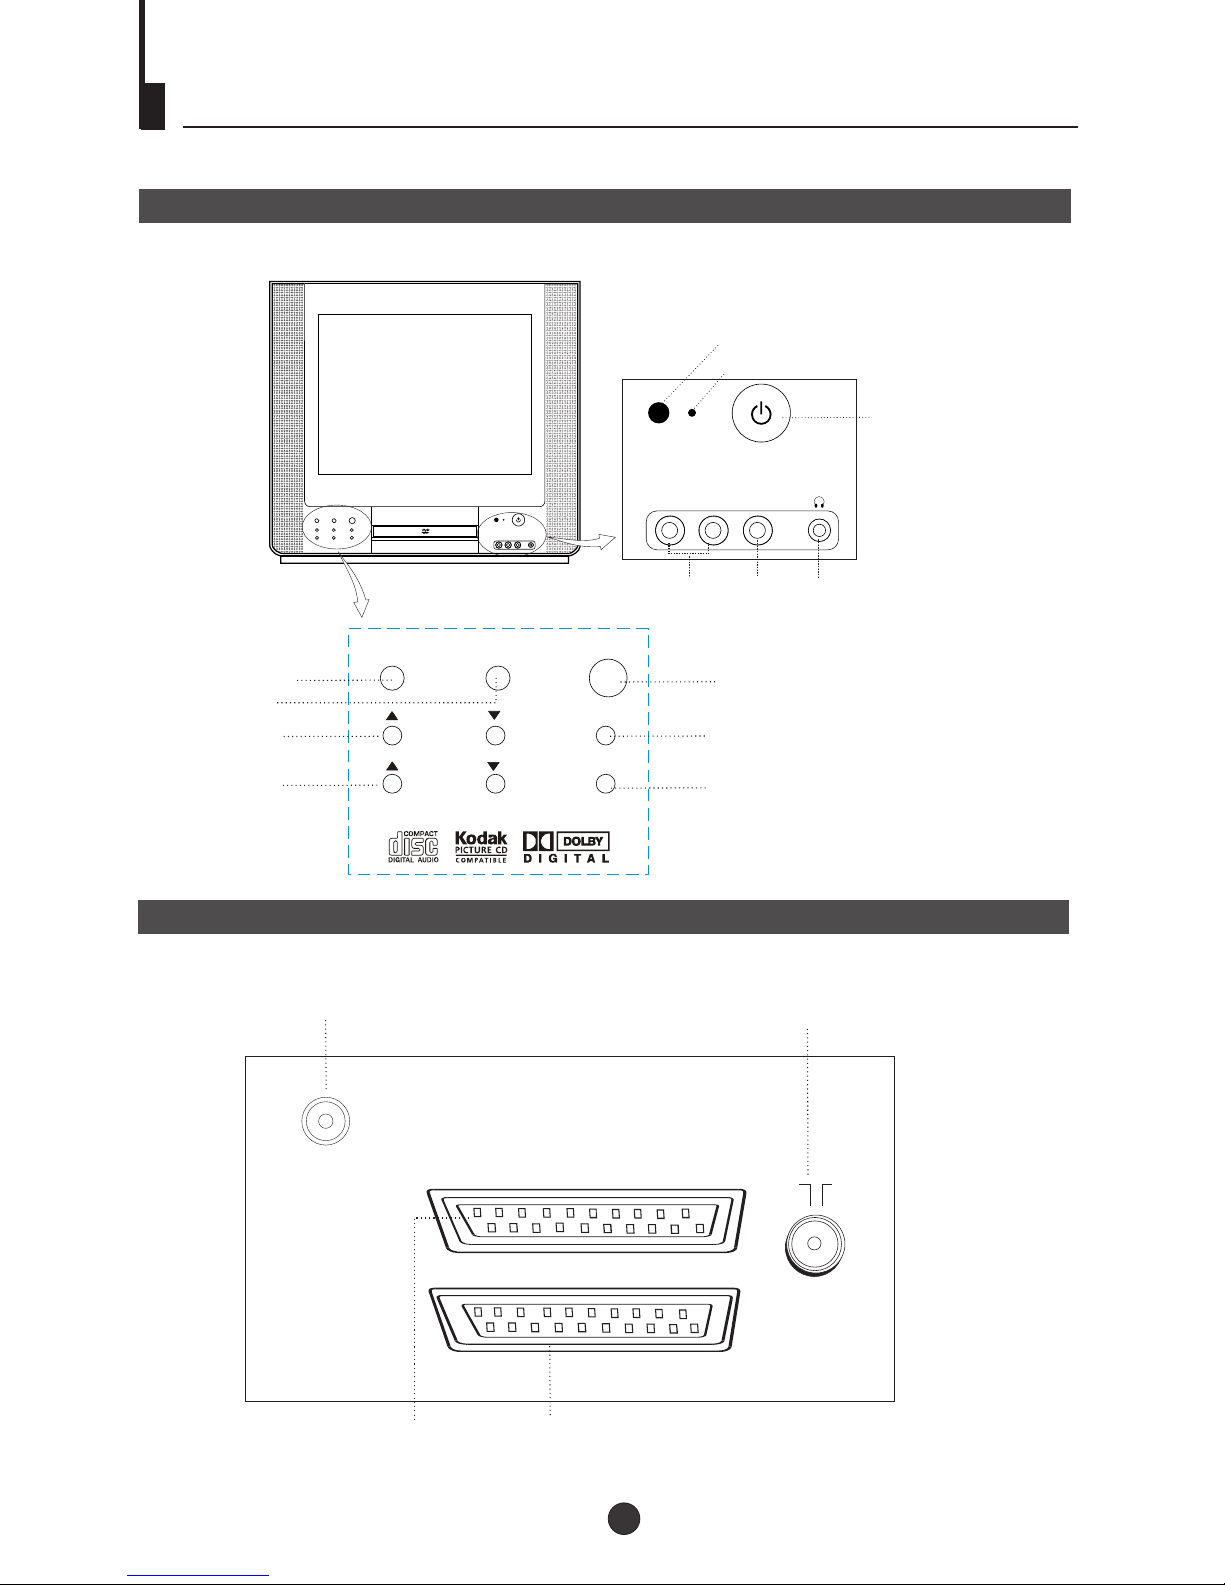
Function Buttons and External Sockets
Front panel the TV set
Rear panel of the TV set
DVD EXT
TV SCART
COAXIAL
OUTPUT
DVD SCART Terminal
TV SCART Terminal
Digital audio coaxial output terminal
Antenna terminal
Video
Audio
Earphone
Power Indicator
Signal Receiver
Power Switch
Open/close
the DVD
Menu
Channel Position
up/down
Volume up/ down
Stop the DVD
TV/AV/DVD
Play /Pause
the DVD
R-AUDIO-L VIDEO
7
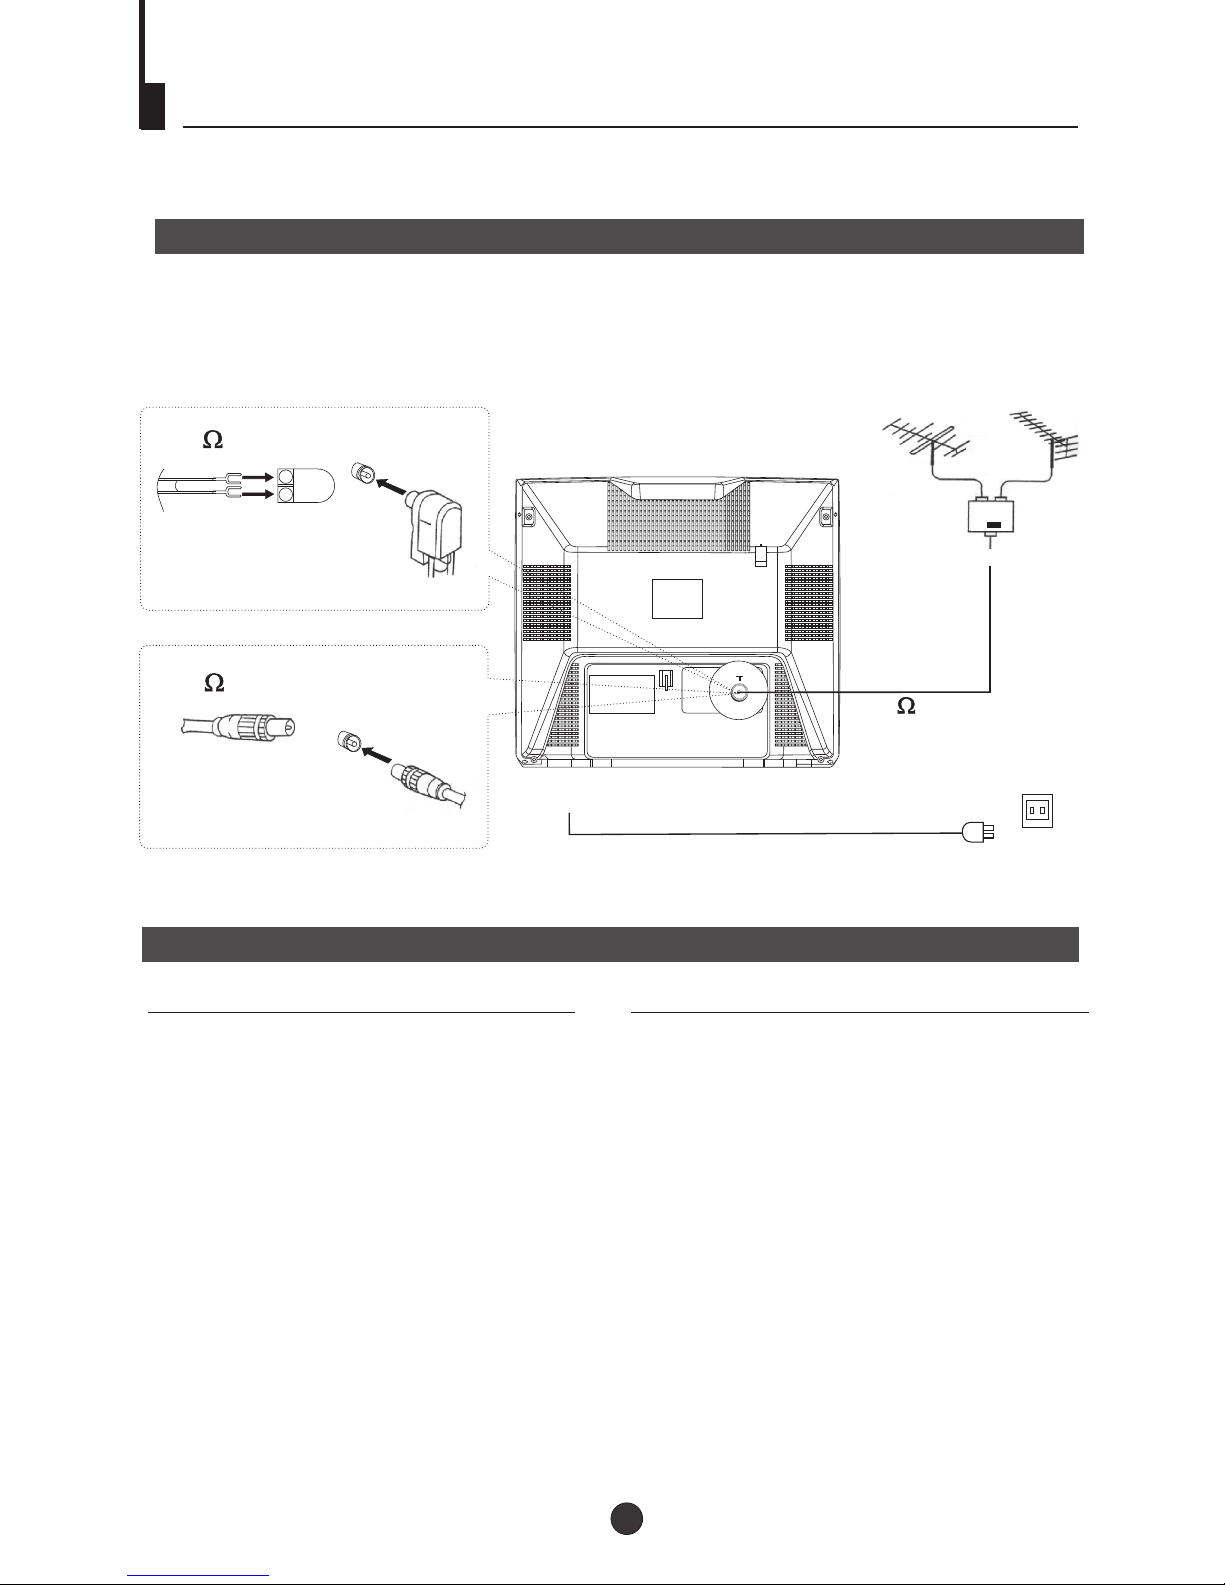
Installation
Aerial connection
To connect the aerial, plug the aerial lead into the aerial socket on the rear of the unit.
You can use an outdoor aerial. However, if you use an indoor aerial the quality of the
reception may be reduced and adjustment of the aerial may be required when changing
programmes.
Preparation for the remote control
Battery installation Tips for remote operation
Remove the batteries cover.
! When the remote control will not be used for a
long period of time or when the batteries are
worn out, remove the batteries to prevent the
leakage.
! Do not throw the batteries into fire. Dispose of
used batteries in the specified manner.
! Do not drop, dampen or disassemble the
remote control.
Insert two size AA batteries matching
the +/-polarities of the battery to the +/marks inside the battery compartment.
!
!
VHF UHF
+
+
300 twin-lead cable
Antenna adapter
(Not supplied)
75 coaxial cable
Plug
(Not supplied)
AC power socket
AERIAL INPUT
75 STANDARD
COAXIAL TYPE
8
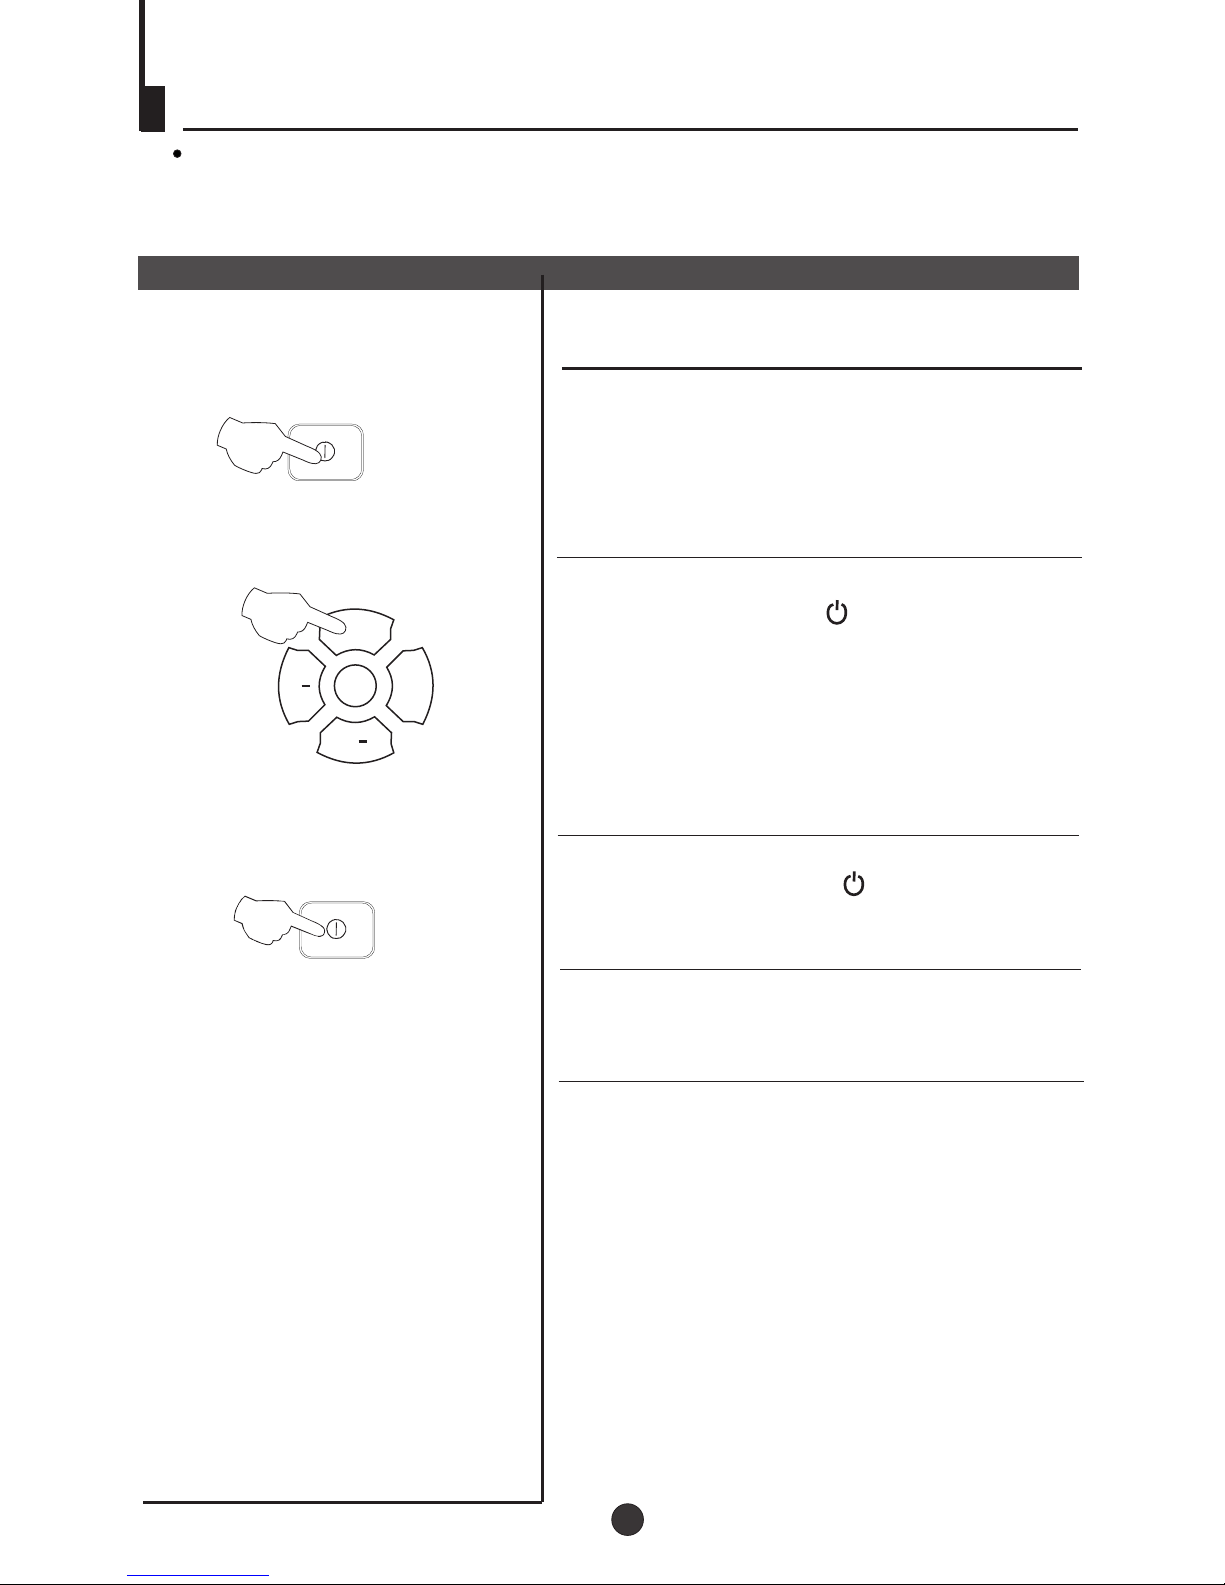
Switching on/ off the TV set
Preparation
Insert the AC cord plug into a 230 50Hz AC outlet.
Note: When not in use, disconnect the mains plug from the mains power supply.
Switching on/ off the TV set
Switching on/ off the TV set
1 To turn on the TV/DVD, press the Power button
on the front panel.
2 If the indicator is lit in red, press the P+/P-
button on the panel or on the remote
control, the power indicator will become green.
After several seconds the TV will start normal
operation.
3 If you want to change to standby status,
please press the button on the remote
control. The power indicator will become red.
Auto switch-off function
If a channel with no boardcast is selected, the
sound will automatically be mute. If a station
stops broadcasting, the TV will automatically
switch to standby mode after 5 minutes.
POWER
MENU
V+
PP
VV
P+
POWER
1
2
3
9
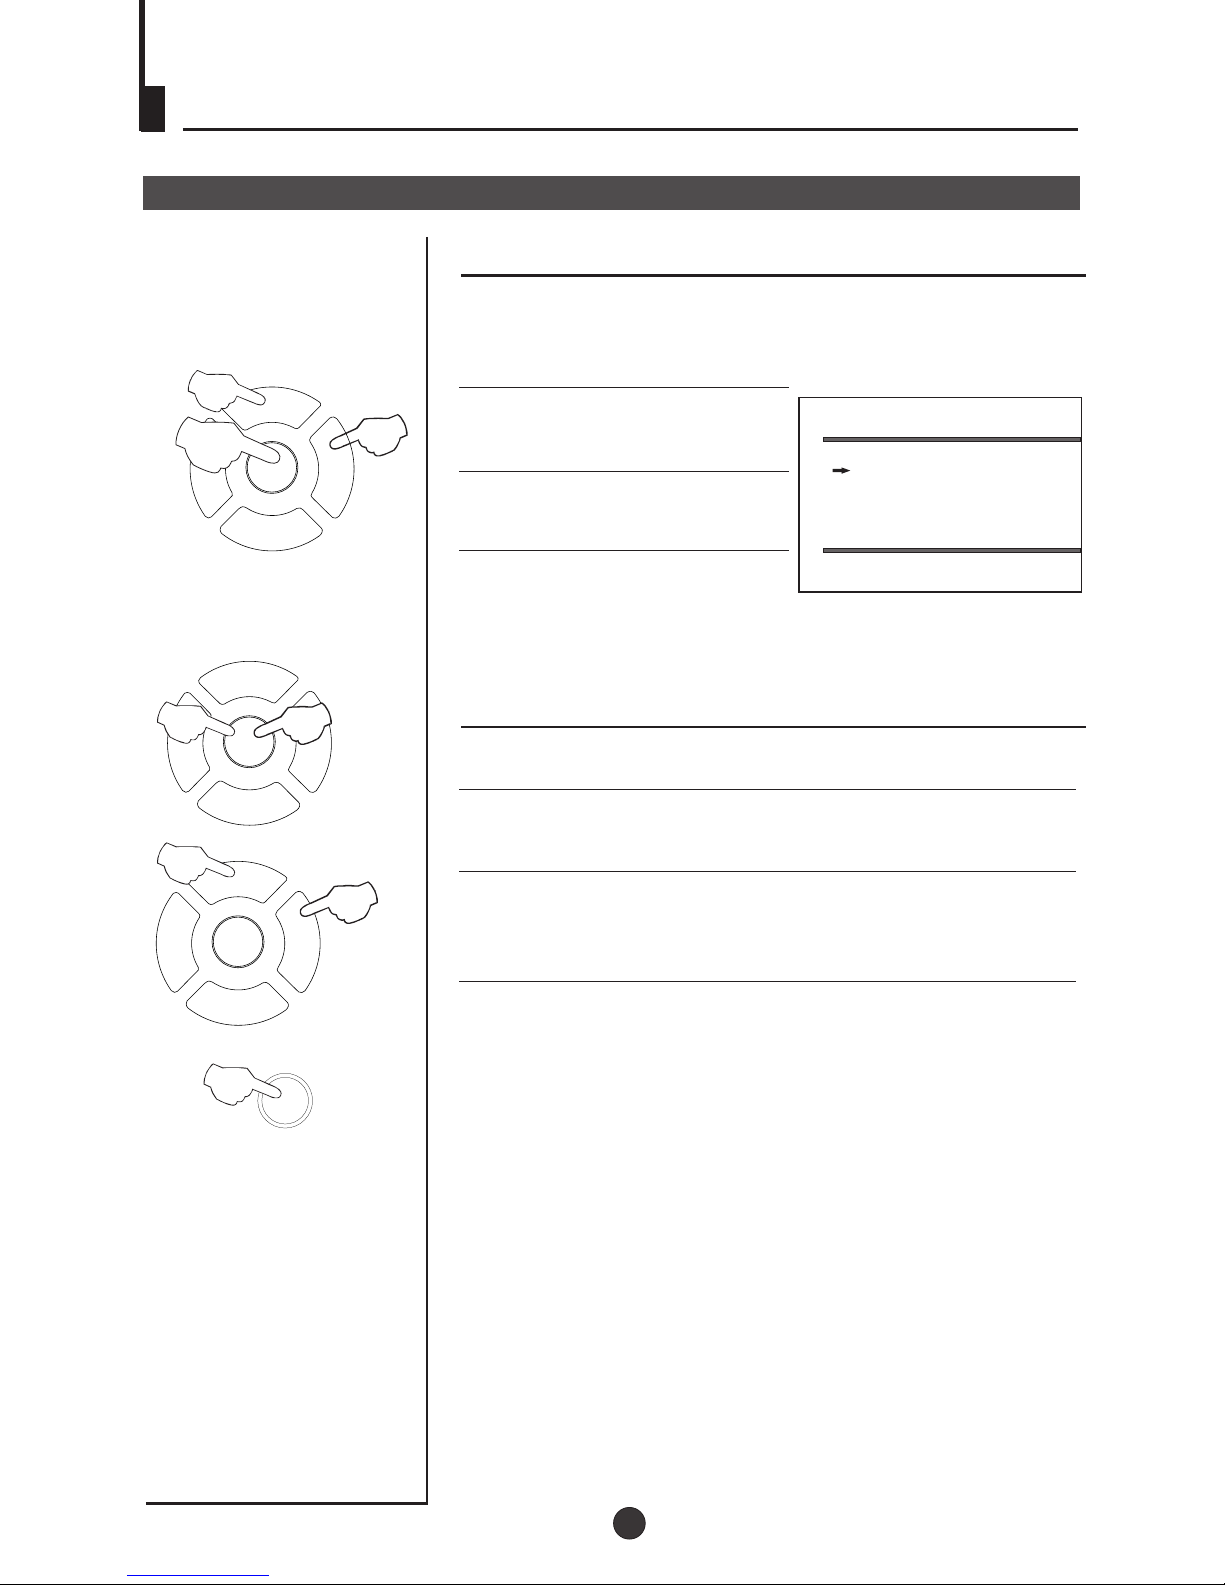
Set up function
TV Set Up
Game
1. Press TV MENU until SETUP menu appears.
2. Press P+/- buttons to select GAME, then press V-/+
buttons to enter game.
3. Use MENU to rotate clockwise, P+ button to rotate
anti-clockwise.
Use V- button to move left, V+ button to move right.
4. Press TV/AV button to quit the game.
3 times
Blue Back
When there is no broadcasting
signal, the screen will be blue
colour when this function is on.
1. Press TV MENU until
SETUP menu appears.
2. Press P+/- buttons to select
BLUE BACK.
3. Press V-/+ buttons to toggle
through on and off.
3 times
SETUP
BLUE BACK ON
GAME
CALENDAR
P+
P-
V- V+
MENU
P+
P-
V- V+
MENU
P+
P-
V- V+
MENU
TV/AV
4
1
3
2
3
1
2
3
10
 Loading...