

Page 1

Digital Photo Frame
Operating Manual
DPF801/DPF1001
Page 2

Page 3

Page 4

TABLE OF CONTENTS
TABLE OF CONTENTS
1.Connection 3
2.Supported Interfaces
3.Illustration of button layout on the remote control
4.System Settings
4.1 Photo Setting
4.1.1 Interval Time
4.1.2 Transition Effect
4.1.3 Show Type
4.1.4 Slide Mode
4.1.5 Browse
4.1.4 Auto Play
4.2 Display Setup
4.2.1 Brightness
4.2.2 Contrast
4.2.3 TFT Brightness
4.2.4 TFT Contrast
4.2.5 TFT Saturation
4.3 Custom Setup
4.3.1 OSD Language
4.3.2 Encoding
4.3.3 Repeat mode
4.3.4 USB Source
4.3.5 Default
4.4 Exit
5.Photo
6.Music
7.Photo+Music
8.Movie 10
9.Calendar
9.1 Display
9.2 Set Date
9.3 Exit
10.Clock
10.1 Display
10.2 Set Time
1-2
4-5
6-8
8-9
10-11
11-12
12
3
6
6
6
6
6
6
7
7
7
7
7
7
8
8
8
8
8
8
8
8
9
9
11
11
11
11
1
Page 5

TABLE OF CONTENTS
10.3 Exit
11.Alarm
11.1 Enable
11.2 Set Time
11.3 Exit
12.Auto-Power
12.1 Power On Enable
12.2 Power off Enable
12.3 Set Time
12.4 Exit
13.Edit
13.1 Select Source
13.2Copy
13.3 Delete
13.4 New Folder
13.5 Format Photo Frame
14.Ebook
15.Basic Operations
15.1 STANDBY: Turn on the photo frame or turn it to stand-by mode
15.2 Function: main menu
15.3 Basic Playback Functions
STOP:
PLAY/PAUSE:
Fast-forward play:
Fast rewind:
NEXT: Go to the next file.
PREV: Go to the previous file.
Repeat: Repetitive Playback
DISPLAY: Information Display
Zoom: Enlarge Images
VOL+/-: Volume
MUTE:
Rotate JPG Images:
JPG Browse Mode:
Media Manager:
Connecting to your PC••
12
13
13
13
13
13-14
13
13
14
14
14-17
14
15
15
16
17
17
17-23
17
17
18
18
18
18
18
18
18
18
18
19
19
20
20
21
21
21
2
Page 6

1 Connection
Connect the DC plug of the AC-DC power adapter to the DC IN (9V)
socket at the back of the photo frame. Connect the power adaptor
to a AC 230/240V mains socket.
Caution:
Only connect the mains adapter to a properly installed wall socket
with a voltage matching to the"Technical data" of the mains adapter.
Using an incorrect adaptor could damage your photo frame or adaptor.
The remote's battery is factory installed, Open the battery compartment
door and remove the protective battery sheet before use. When the
battery becomes weak, replace the battery with a type CR2025 3V
Lithium battery. When installing the new battery make sure to install
the battery with the "+" side up.
2 Supported Interfaces
SD/MMC: with dimensions of 24mm x 32mm x 2.1mm (about the size of a postage stamp) as shown in
the illustration:
MS: dimensions for the MS Card are 50mm x 21.5mm x 2.8mm, which is the exclusive memory card format
for Sony's digital products, as shown in the illustration:
USB: supports 1.1 and 2.0
CF:
Note: This unit has been designed where possible to be compatible with most makes of USB device and
memory cards. Due to the many varied types available, we cannot guarantee that all makes and models
are able to be used.
3
Page 7
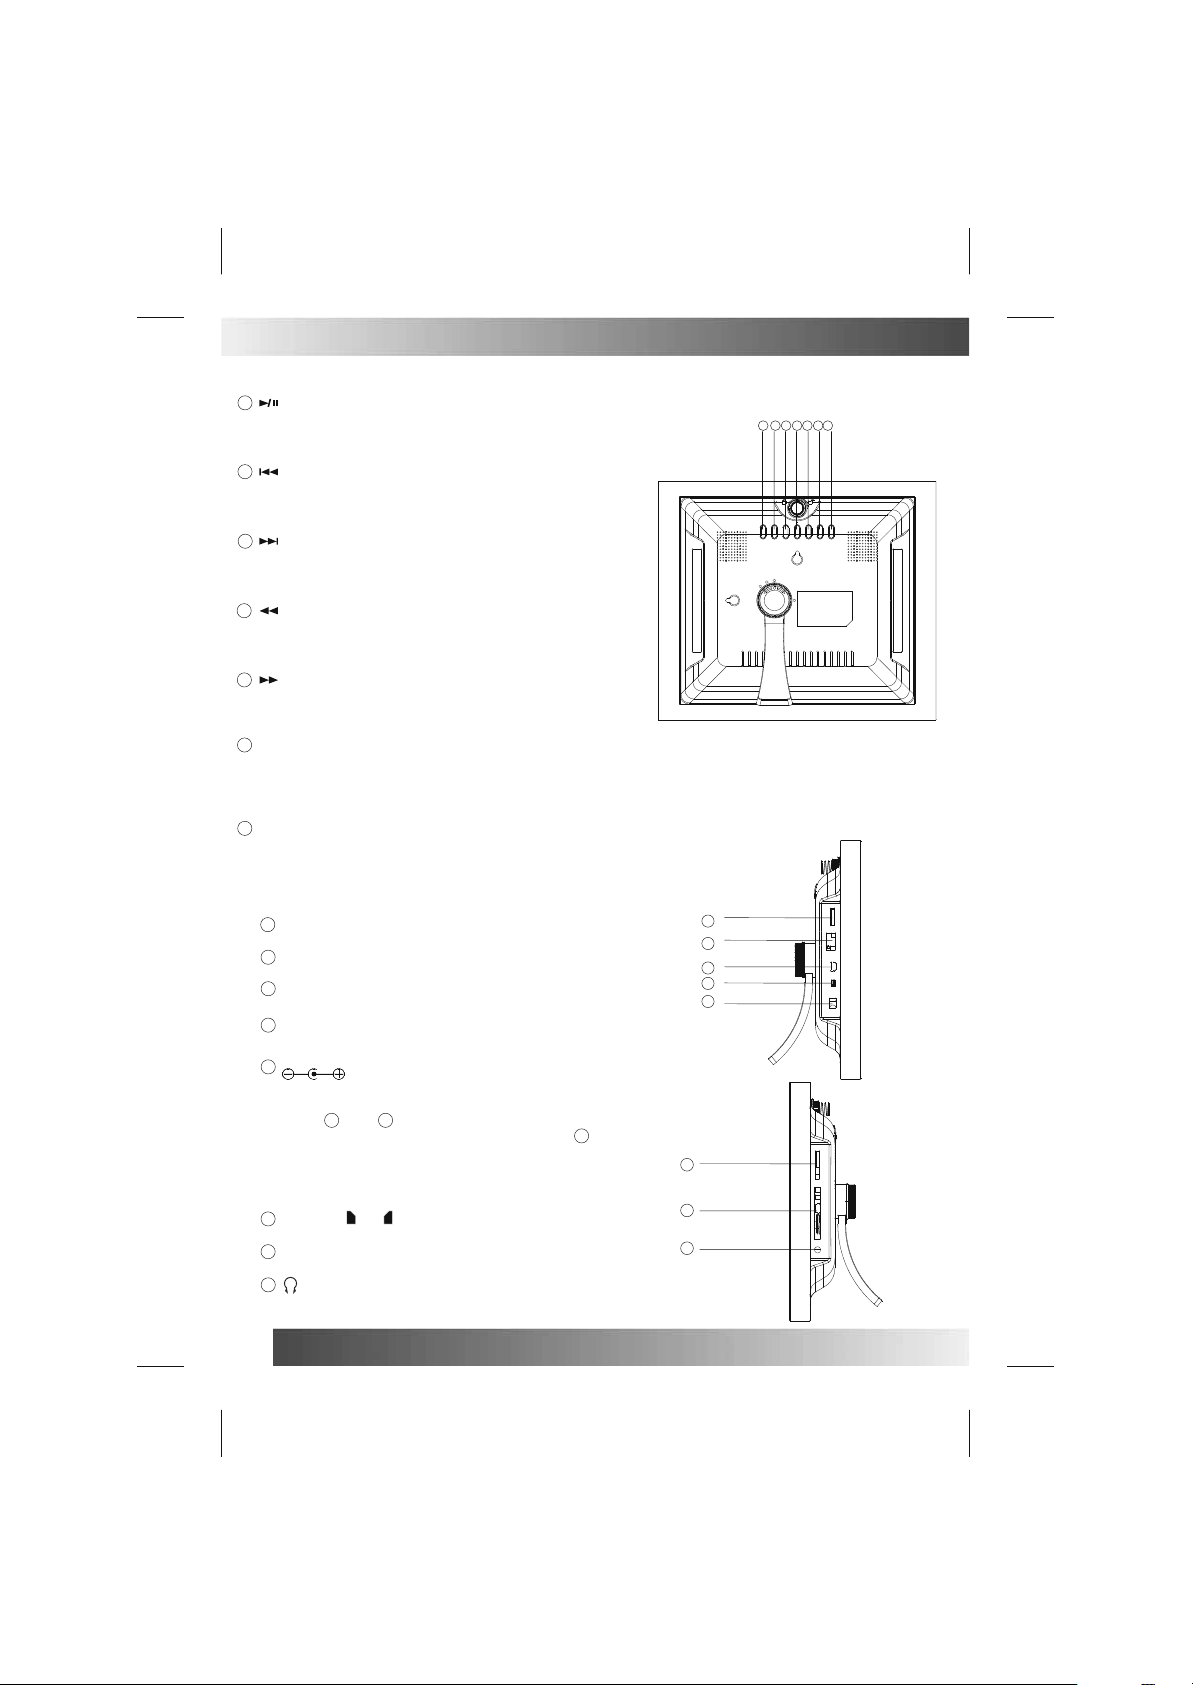
3 Illustration of button layout on the remote control
3.1 Top side appearances
1
: PLAY/PAUSE button, use this button to start
playback, pause or resume playback.This
button also use as ENTER in menus and in
File manger.
2
: PREVIOUS button, use this button to skip to
last photo, song or video or scroll up when
reading eBook.Press this button to move
cursor up in File Manager.
3
: NEXT button, use this button to skip to next
photo, song or video or scroll down when
reading eBook.Press this button to move
cursor down in File Manager.
4
: LEFT button, use this button to fast backward
during playback of song or video or rotate left
90 degrees.Press this button to move cursor to
the right in File Manager.
5
: RIGHT button, use this button to fast forward
during playback of song or video or rotate right
90 degrees.Press this button to move cursor to
the left in File Manager.
6
SETUP: SETUP button,press once to enter into
SETUP mode.Press and hold for 3 seconds
to stop during playback of song or video;
or to enter thumbnail or file management
mode during playback of photo.
7
RETURN: RETURN button, press once to return to
last mode.Press and hold for 3 seconds
will return to main menu.
5
3
7
6
4
12
3.2 Left interface
1
VOLUME: Adjusting volume.
2
USB: For connect to USB devices.
3
PC: For connect to PC.
POWER
4
ON-OFF
DC IN 9V
5
NOTE:
Do not use and at the same time.
Please go back to main menu before connecting to PC.
:Power On/Off switch.
: External DC 9V jack.
3
2
3
3.3 Right interface
1
SD/MMC MS : SD/MMC/MS card slot.
2
CF: CF card slot.
3
: Earphone jack.
4
1
2
3
4
5
1
2
3
Page 8
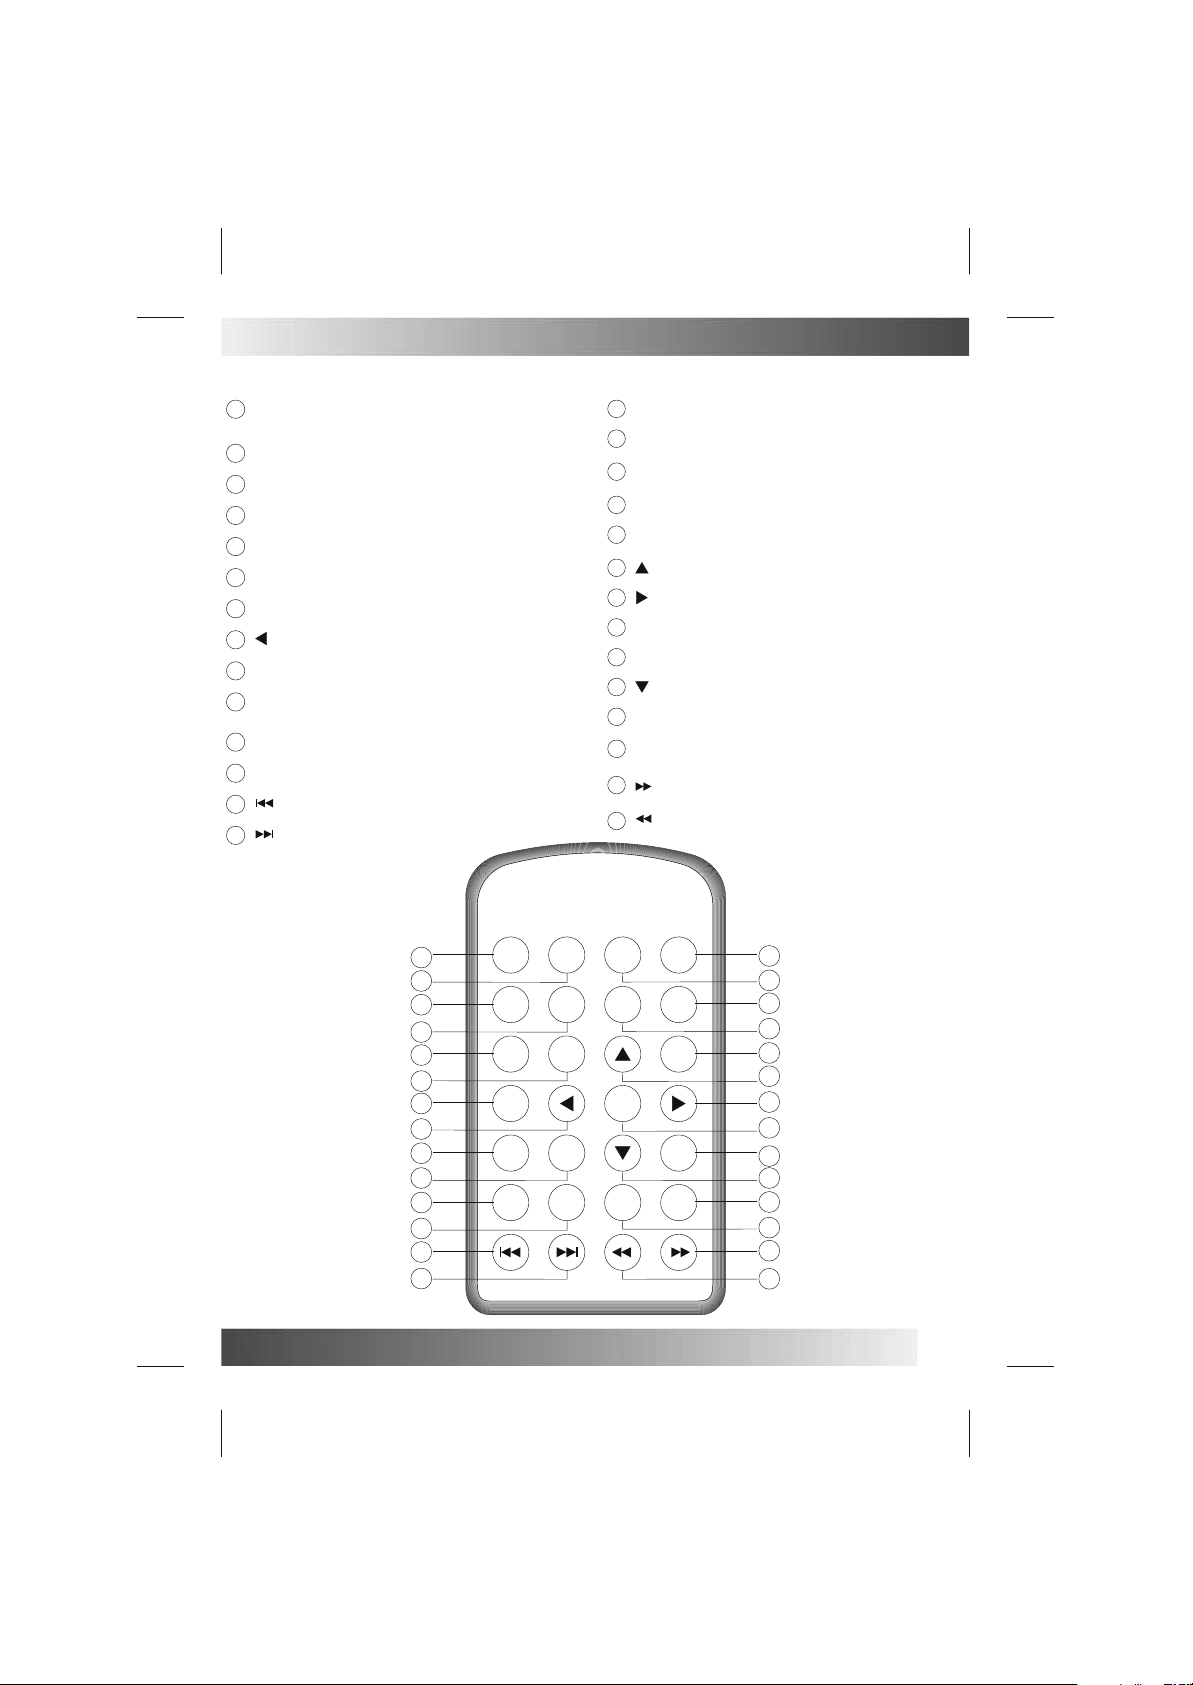
3 Illustration of button layout on the remote control
3.4 Remote controller instruction
STANDBY: Press this button, to enter into
1
STANDBY mode or start up from standby mode.
FILE: Press this button, to read ebook.
2
PHOTO+ MUSIC: Press this button, to play photo+music.
3
PHOTO: Press this button, to view photo.
4
VOL-: Press this button, to turn down volume.
5
VOL+: Press this button, to turn up volume.
6
CALENDAR: Press this button, to show real time and date.
7
:Press this button, move cursor
8
90 degree.
HOME: Press this button, to return to main interface.
9
RETURN: Press this button, to back to last interface.
10
11
12
13
14
or go to File Manager when viewing photo or
during video playback.
PLAY/PAUSE: Press this button, to play or pause.
STOP: Press this button, to stop playing.
:Press this button,
:Press this button,
to skip backward or previous photo
to skip forward or next photo.
left, or rotate photo left
Digital Photo Frame
SETUP: Press this button, to enter SETUP mode.
15
PHOTO MODE: Press this button,
16
original size of photos.
VIDEO: Press this button, to play movie.
17
And change audio channel while playing movie.
MUSIC: Press this button, to play music.
18
ZOOM: When playing photo, press this button, to
19
zoom in picture.
:Press this button, move cursor
20
horizontally.
:Press this button, move cursor
21
right 90 degree.
ENTER: Press this button, enter current selected object.
22
MUTE: Press this button, to turn off sound.
23
:Press this button, move cursor
24
vertically.
DISPLAY: Press this button, to display relevant
25
information in different mode.
REPEAT: Press this button, to different
26
repeated mode.
27
:Press this button, to fast forward in playing
movie or song.
:Press this button, to fast backward in playing
28
Movie
or song
.
to fit to screen or keep
up or flip photo
right, or rotate photo
down or flip photo
select
10
11
12
13
14
PHOTO
1
STANDBY
2
3
PHOTO+
MUSIC
4
5
6
7
CALENDAR
8
9
FILE
PHOTO
VOL- VOL+
RETURN
HOME
MODE
MUSIC
ENTER
SETUP
VIDEO
ZOOM
MUTE
15
16
17
18
19
20
21
22
23
24
PLAY/
PAUSE
STOP REPEAT
DISPLAY
25
26
27
28
5
Page 9

4 System Settings
To power on the photo frame, set the POWER switch to ON position.
The following operations are using remote control.
Select[Setup] from the main menu, press the ENTER button or press the SETUP button in any other mode
to enter setup mode. Below illustration shows the screen of the setup menu. Use navigation buttons to
select decided item followed by ENTER button. Use button to select between options then press
ENTER to confirm. The following illustration shows the initial screen in the settings mode, and in the
following section
Setup Menu
Interval Time
Transition Effect
Show Type
Slide Mode
Browse
:Select :Confirm
The adjustment operation for the SETUP menu is as follows:
4.1 Photo Setting
4.1.1 Interval Time
This option can be used to set the length of time for display of each image. There are seven options: 5
seconds, 10 seconds, 15 seconds, 30 seconds, one minute, three minutes,or off the function.
4.1.2 Transition Effect
This option is used to set the transition effect as images change.
4.1.3 Show Type
This option is used to set the photo fit to screen or keep its original size.
4.1.4 Slide Mode
This option is used to set the slide mode while photos showing. Include 3 options as :Normal, Motion
and Date & Time.
4.1.5 Browse
There are two kinds of "Photo" modes, one is the "Thumbnail" mode, and the other is the "File Manager"
mode.
Thumbnail mode:
Thumbnail Mode
Photo Setting
Page:1/24
6
427x640 2006/02/24
Rotate
Slide Show
Page 10

4 System Settings
File Manager mode:
File Number:9-111
/dev/usb0/1
Beauty
MP3
BMP
Video
450x676 2008/3/29
4.1.4 Auto Play
4.1.4.1Photo
Slide show will be automatically started if auto-play for photo is set to on when Photo is selected in Main
menu or PHOTO button is pressed.
Either Thumbnail mode or File Manager will be display if auto-play for photo is set to off.
4.1.4.2 Music
Music playback will be automatically started if auto-play for music is set to on when MUSIC is selected in
Main menu or MUSIC button is pressed.
File Manager will be display if auto-play for music is set to off. Select decided music file using 4 navigation
buttons followed by ENTER button or PLAY/PAUSE button.
4.1.4.3 Movie
Movie playback will be automatically started if auto-play for movie is set to on when Movie is selected in
Main menu or VIDEO button is pressed.
File Manager will be display if auto-play for music is set to off. Select decided video file using 4 navigation
buttons followed by ENTER button or PLAY/PAUSE button.
200601-1 9
200601-2 10
200601-3 11
4.2 Display Setup
4.2.1 Brightness
This option allows the user to set the brightness of the television screen. They can choose from three
different options: normal, bright, and soft.
4.2.2 Contrast
This option can be used to set the screen contrast. The contrast is divided into 15 different levels,
from -4~0~+4, with larger numbers representing greater contrast.
4.2.3 TFT Brightness
This option can be used to set the screen brightness. The brightness is divided
into 15 levels, from -7~0~7, with the larger (positive) numbers representing greater brightness.
4.2.4 TFT Contrast
This option can be used to set the screen contrast. The contrast is divided into
15 different levels, from -7~0~7, with larger numbers representing greater contrast.
7
Page 11

4 System Settings
4.2.5 TFT Saturation
This option can be used to set the saturation of the display. The saturation
from -7~0~7, with larger numbers representing a higher degree of saturation.
Setup Menu
Display Setup
is divided into 15 levels,
Brightness
Contrast
TFT Brightness
TFT Contrast
TFT Saturation
:Select :Confirm
4.3 Custom Setup
4.3.1 OSD Language
This option can be used to set the language for the OSD (on screen display). The user can choose from:
English.
4.3.2 Encoding
This option sets the character encoding of the filenames. There are two types of encoding to choose from,
Western European and Central European.
Repeat mode
4.3.3
This option allows the user to set the play repeat mode. There are four available options: Off, One,
Folder, and All.
Off: turns off the repeat mode.
One: repeats the file that is currently playing.
Folder: repeats the folder that is currently playing.
All: repeatedly plays all of the files inside the storage medium.
4.3.4 USB Source
Select storage device connected to PC
4.3.5 Default
By setting this option, all settings will be reset to the original system settings.
4.4 Exit
Leaves the setup menu, and goes back to the main menu.
-4
-3
-2
-1
0
5 Photo
After choosing [Photo] from the main menu, press the ENTER key, and the system will automatically
playback found image file stored in external storage device (SD/MMC, USB, CF) or internal memory. If no
supported file is found, "No Playable File" will appear on the display then return to Main menu.
To playback image from a different storage device, press HOME button in any mode then select Photo in
Main menu then press ENTER button. Use buttons to select decided device followed by
ENTER button to start playback image.
Note:The photo frame can support image files in JPG format.
8
Page 12

5 Photo
File Number:9-111
/dev/usb0/1
Beauty
MP3
BMP
Video
450x676 2008/3/29
200601-1 9
200601-2 10
200601-3 11
Thumbrianll Mode
427x640 2006/02/24
Rotate
Page:1/24
Slide Show
6 Music
After choosing [Music] from the main menu, press the ENTER key, and the system will automatically
playback found audio file stored in external storage device (SD/MMC, USB, CF) or internal memory. If no
supported file found, "No Playable File" will be appears on the display then return to Main menu.
To playback audio in different storage device, press HOME button in any mode then select Music in Main
menu then press ENTER button , use to select decided device followed by ENTER button to start
playback audio
decided file then press ENTER button to start
Note:The photo frame can support audio files in MP2, MP3 and WMA format.
file if auto-play is set to on. If File Manager appears, use navigation buttons to select
File Number:1/7
.
/dev/usb0/1
Beauty
MP3
BMP
Video
09.PYEP 1
01.YOBV 2
06.DUHPI 3
7 Photo+Music
After choosing [Photo+Music] from the main menu, press the ENTER key, and the system will automatically
playback found image file and audio file in external storage device (SD/MMC, USB, CF) or internal memory.
If no supported file found, "No Playable File" will be appears on the display then return to Main menu.
To playback image file and audio files in different storage device, press HOME button in any mode then
select [Photo+Music] in Main menu then press ENTER button to start playback if Auto-play is set to on.
If file Manager appears, use navigation buttons to select decided device followed by ENTER button
to start playback audio file.
9
Page 13

8 Movie
After choosing [Movie] from the main menu, press the ENTER key, and the system will automatically
playback found video file stored in external storage device (SD/MMC, USB, CF) or internal memory. If no
supported file found, "No Playable File" will be appears on the display then return to Main menu.
To playback audio in different storage device, press HOME button in any mode then select [VIDEO] in Main
menu then press ENTER button , use to select decided device followed by ENTER button to start
playback video
decided file then press ENTER button to start
Note:The photo frame can support audio files in DAT, MPG, VOB and AVI format.
This unit has been designed where possible to be compatible with most video formats. Due to the many
varied video encoder available, we cannot guarantee that all formats are able to be playback
file if auto-play is set to on. If File Manager appears, use navigation buttons to select
File:Number:1/4
.
/dev/usb0/1
Beauty
Mp3
BMP
Video
.
Motion Jpep
Avi+srt
EB EQH 1
VXZ-HNB 2
VTS-05-0 3
9 Calendar
After selecting [Calendar] from the main menu, press the ENTER button, and you will enter the date
setting mode.
Catendar
Display
Set Date
Exit
:Select :Confirm
10
Page 14

9 Calendar
9.1 Display
This option provides the [Calendar]display
function. The date displayed in the calendar is the
current date set in
9.2 Set Date
This function allows users to set the system date.
Use buttons to move between Year,
Month and day.Use buttons to set year,
month and day.After the date is set, use
buttons to select OK then press ENTER button to
confirm or select Cancel the press ENTER button
to quit.
9.3 Exit
Exits date settings and goes back to the main menu.
the system.
2008.4.7
Mon Tue Wed Thu
23222120 24 25 26
30292827
Fri SatSun
5
4321
12
11109876
19
181716151413
In addition to displaying the current date, the user
can use the keys to browse different months,
or use the keys to browse different years.
2009.4.7
Mon Tue Wed Thu
23222120 24 25 26
30292827
Catendar
Display
Set Date
Exit
Set Date
2008/04/01
Cancet
OK
:Select :Confirm
Fri SatSun
5
4321
12
11109876
19
181716151413
10 Clock
After selecting [Clock] from the main menu, press
the ENTER key, and the system will enter time
setting mode.
Clock Setting
Display
Set Date
Exit
Clock
Analog Clock
Clock&Calendar
:Select :Confirm
10.1 Display
This option allows the user to choose if they want to
display [Clock]or[Clock & Calendar]or
Clock]. Select[Clock], and press the ENTER key.
[Analog
00:12:09
Apr-7-2008 Monday
11
Page 15

10 Clock
Select [Analog Clock], and press the ENTER key.
12
1
11
10
2008.4.7
Mon Tue Wed Thu
23222120 24 25 26
30292827
10.2 Set Time
This function allows the user to set the system time.
Use buttons to move between Hour,
Minute and second.Use buttons to set
Hour, Minute and second.After the time is set, use
buttons to select OK then press ENTER
button to confirm or select Cancel then press ENTER
button to quit.
Clock Setting
9
Fri SatSun
4321
5
11109876
12
8
181716151413
19
7
2
3
4
5
6
Select [Clock & Calendar], and press the ENTER key.
2008.4.7
Mon Tue Wed Thu
23222120 24 25 26
30292827
00:13:08
10.3 Exit
Exits the time settings, and goes back to the main
menu.
Alarm Setting
Fri
181716151413
SatSun
5
4321
12
11109876
19
12
Display
Set Time
Exit
Set Time
00:13:29
Cancet
OK
:Select :Confirm
Enable
Set Time
Exit
On
Off
:Select :Confirm
Page 16

11 Alarm
After selecting [Alarm] from the main menu,
the alarm settings mode.
11.1 Enable
This function allows users to activate(On) or de-activate(Off) the alarm.
press theENTER button, and the system will enter
11.2 Set Time
This function allows users to set the alarm time. When the alarm function has been activated, a prompt
will Appear.
Use buttons to move between Hour and Minute.
Use buttons to set Hour and Minute.
After the alarm time is set, use buttons to select OK then press ENTER button to confirm or
select Cancel then press ENTER button to quit.
When the alarm sound, press any button to stop.
Alarm Setting
Enable
Set Time
Exit
11.3 Exit
Exits the alarm settings, and goes back to the main menu.
Set Time
00:00
Cancet
OK
:Select :Confirm
Alarm
Press any key stop the alarm.
12 Auto-Power
After selecting [Auto-Power] from the main menu, press the ENTER button, and the system will enter
the automatic power-on/power-off settings mode.
12.1 Power On Enable
This option allows the user to either activate (On) or
de-activate (Off) the automatic power-on function.
Off Setting
Power On Enable
Power Off Enable
Set Time
Exit
:Select :Confirm
On
Off
12.2 Power off Enable
This function allows the user to activate (On) or
de-activate (Off) the automatic power-off function.
Off Setting
Power On Enable
Power Off Enable
Set Time
Exit
:Select :Confirm
On
Off
13
Page 17

12 Auto-Power
12.3 Set Time
This function allows users to set the automatic power-on/power-off times. The user can choose to set the
[Power-on]time or the [Power-off]time.
Use buttons to select Power On or Power Off then press ENTER button.
Use buttons to move between Hour and Minute.
Use buttons to set Hour and Minute.
After the Power On time or Power Off time is set, use buttons to select OK then press
ENTER button to confirm or select Cancel then press ENTER button to quit.
Off Setting
Power On Enable
Power Off Enable
Set Time
Exit
:Select :Confirm
12.4 Exit
Exits the automatic power-on/power-off settings, and goes back to the main menu.
Set Time
00:00
OK
Power On
Power Off
Cancet
13 Edit
After selecting [Edit] from the main menu, press the ENTER button, and the system will enter Edit mode.
In Edit mode, the user can choose Copy Photo••Music•• Photo/Music••Movie.
13.1 Select Source
Use to jump to device list.
Use buttons to select device listed on the left then press button to the file/folder list.
Use buttons to select a file then press ENTER button to confirm or a folder then press ENTER
button to enter this folder until decided file is selected. The selected file is enclosed by a yellow frame.
File:Number:1-3
/Dev/nand1/1
/dev/usb0/1
IMAGE01 1
IMAGE02 2
IMAGE03 3
Total Files:0
/Dev/nand1/1
/dev/usb0/1
Beauty
BMP
Mp3
Video
GVTTHV
14
2016x1512 2001/01/08
Edit
2016x1512 2001/01/08
Edit
Page 18

13 Edit
13.2Copy
To copy a file, select the source file as described in page 14.
Press button to select Edit then press ENTER button.
Use buttons to select Copy then press ENTER button.
Use NAVIGATION buttons to select decided location / folder then press ENTER button.
Use button to select Edit again then press ENTER button.
Use buttons to select Paste then press ENTER button to start copy.
After the file is copied, will return to File Manger.
File Number:3/35
Beauty
BMP
Mp3
Video
GVTTHV
20050602974 1
20050602975 2
20050602976 3
20050602977 4
20050602978 5
20050602979 6
Beauty
BMP
Mp3
Video
GVTTHV
Copy
Delete
New Folder
Return
20050602974 1
20050602975 2
20050602976 3
20050602977 4
20050602978 5
20050602979 6
640x480 2008/4/29 Edit
/Dev/nand1/1
/dev/usb0/1
Paste
New Folder
Return
13.3 Delete
To delete a file, use NAVIGATION buttons to select decided file then press ENTER button.
Use button to select Edit then press ENTER button.
Use buttons to select Delete then press ENTER button.
Use button to select Yes then press ENTER button to confirm or No to return to last stage.
File Number:3/35
Beauty
BMP
Mp3
Video
GVTTHV
640x480 2008/4/29 Edit
IMAGE01 1
IMAGE02 2
IMAGE03 3
Edit
20050602974 1
20050602975 2
20050602976 3
20050602977 4
20050602978 5
20050602979 6
640x480 2008/4/29 Edit
/Dev/nand1/1
/dev/usb0/1
/Dev/nand1/1
/dev/usb0/1
Copy File
Please wait...
2/3
Copy
Delete
New Folder
Return
000%
IMAGE01 1
IMAGE02 2
IMAGE03 3
4555555222 4
4422255555 5
4425555555 6
Edit
Edit
15
Page 19

13 Edit
2/3
IMAGE01 1
IMAGE02 2
IMAGE03 3
4555555222 4
063%
4422255555 5
4425555555 6
Edit
/Dev/nand1/1
/dev/usb0/1
13.4 New Folder
This function allows users to create a new folder in the device you selected.
To add a new folder, use NAVIGATION buttons to select decided location then press ENTER button.
Use buttons to select Edit then press ENTER button.
Use buttons to select New Folder then press ENTER button, Use on screen keyboard to enter
folder name., Press ENTER button following to each selected character. Select the Enter then press
ENTER button to complete.
Delete
Delete the files ••
Yes No
IMAGE01 1
IMAGE02 2
IMAGE03 3
4555555222 4
4422255555 5
4425555555 6
Edit
/Dev/nand1/1
/dev/usb0/1
Delete File
Please wait...
Note:Should not use symbols••\ / : * ? < > ••for new folder name.
/dev/usb0/1
Beauty
BMP
MP3
Video
1222255527 1
200406-1 2
200407-1 3
200409-1 4
200410-1 5
200412-1 6
200413-1 7
/dev/usb0/1
Beauty
BMP
MP3
Video
Copy
Delete
New Folder
Return
1222255527 1
200406-1 2
200407-1 3
200409-1 4
200410-1 5
200412-1 6
200413-1 7
/dev/usb0/1
Beauty
1234
BMP
ABCDEFGH I
MP3
J
KLMNOPQR
Video
S
TUVWX Y Z,-
Space
16
Edit
1222255527 1
200406-1 2
7
6
200407-1 3
89
Back
0
!
200409-1 4
.
200410-1 5
Enter
200412-1 6
Cancel
ABC
200413-1 7
Edit
5
640x480 2008/4/29
/dev/usb0/1
Beauty
BMP
MP3
Video
11
122555222 1
200407-1 3
200409-1 4
200410-1 5
200412-1 6
200413-1 7
Edit
Edit
Page 20

13 Edit
Format Photo Frame
13.5
This function allows users to format Nand.
In File Manager, use buttons to select Edit the press ENTER button.
Use buttons to select Format Photo Frame then press ENTER button to start.
When format completed, will return to File Manager.
/Dev/nand1/1
/dev/usb0/1
New Folder
Format Photo Frame
Return
640x480 2008/4/29 Edit
200502052556 1
200502052547 2
200502052457 3
/Dev/nand1/1
/dev/usb0/1
Format Photo Frame
640x480 2008/4/29 Edit
14 Ebook
After selecting[EBook], press the ENTER
storage device then press ENTER button. Use NAVIGATION buttons to select
decided file then press ENTER button to start.
button. Use buttons to select
the text like doing it on PC.
15 Basic Operations
15.1 STANDBY: Turn on the photo frame or turn it to stand-by mode.
15.2 Function: main menu
Press HOME to directly enter the main menu. The user can then press the buttons to
select the desired function. Press ENTER button to enter.
200502052556 1
200502052547 2
200502052457 3
Please wait...
037%
17
Page 21

15 Basic Operations
15.3 Basic Playback Functions
STOP:
When the system is playing, pressing STOP will stop the playback. If you were displaying
images, then you will enter Thumbnail mode or File Management mode; if you were playing a
movie, then the movie will cease playing and you will enter the File Management mode.
PLAY/PAUSE:
If you wish to pause during playback, you can press PLAY/PAUSE .
If you are playing images, pressing
Fast-forward play:
Press and the playback speed will increase to search forward. Speed settings: from x2
(double normal speed) all the way to x32 (32 times normal speed). Under x32, you can go back to
normal playing speed by pressing once again.
Press PLAY/PAUSE under any speed and you will return to normal playing speed.
Note:This function not suitable for image file playback.
Fast rewind:
Press and the playback speed will increase and the system will search backwards. Speed
settings: from x2(double the original speed) to x32(32 times the original speed). Under x32, you
can go back to normal playing speed by pressing once again. Press PLAY/PAUSE under any
speed and you will return to normal playing speed.
Note:This function not suitable for image file playback.
NEXT: Go to the next file.
During playback or when the system is stopped, press and the system will jump to
the next file and play it.
PREV: Go to the previous file.
During playback or when the system is stopped, press and the system will jump back
to the previous file and play it.
Repeat: Repetitive Playback
Press REPEAT once and the file that is currently playing will be repeated.
Press REPEAT for a second time and the folder that is currently playing will be repeated.
Press REPEAT for a third time and all the files in the storage device will be repeated.
Press REPEAT for a fourth time to exit the repeat mode.
PLAY/PAUSE will cause the images to stop playing.
DISPLAY:Information Display
DISPLAY provides you with information on the file that is currently playing. The background
color will be set according to the interface style set by the user,
When you are playing JPG images:
The first time you press DISPLAY , the following information will be displayed:[menu \file name],
[The order of this file inside the folder directory / the total number of files in this folder directory].
Note:This function not suitable for audio file playback.
18
Page 22

15 Basic Operations
Photo/41 14/14
The second time you press DISPLAY , the following information will be dis
played:[resolution], [date].
Resolution:800x600
The third time you press DISPLAY , you will go back to the original display, and no information will
be displayed.
When you are playing DAT / MPG / VOB / MP4 videos:
The first time you press DISPLAY , the following information will be dis
[the order of this file inside the folder directory / the total number of files in this folder directory],
and [Time]. However, after three seconds, the system will
When only the[Time]is displayed, press DISPLAY again to display the complete information.
The second time you press
on will be displayed.
Zoom: Enlarge Images
When you are playing DAT / MPG / VOB videos:
The first time you press ZOOM , the image will be enlarged 2X.
The second time you press ZOOM , the image will be enlarged 4X.
The third time you press ZOOM , the image will return to normal size.
When zooming in, you can use the direction buttons to select the zoom location.
When you are playing JPEG images:
The first time you press ZOOM , the image will be enlarged to 150%.
The second time you press ZOOM , the image will be enlarged to 200%.
The third time you press ZOOM , the image will be shrunk to 25%.
The fourth time you press ZOOM , the image will be shrunk to 50%.
The fifth time you press ZOOM , the image will be restored to normal size (100%).
When the image is enlarged, you can use the direction buttons to select the area on display.
Note:This function not suitable for audio file playback.
VOL+/-: Volume: To increase / decrease volume level.
Maximum 16, minimum 0
DISPLAY , you will go back to the original display, and no informati
Date:2003/5/6
played:[menu \file name] ,
Automatically display only the[Time].
19
Page 23

15 Basic Operations
MUTE:
Press MUTE once and the system will mute, press it again and sound will be restored.
Rotate JPG Images:
By pressing the button on the remote control ,you can rotate JPG images 90 degrees to the
left (counter-clockwise)
By pressing the button on the remote control, you can rotate the image 90 degrees to the
right (clockwise)
By pressing the button on the remote control ,you can flip the image horizontally, reversing
the left and right sides of the image.
By pressing the button on the remote control ,you can flip the image vertically, reversing
the top and bottom sides of the image.
The left arrow button on the remote control can be used to rotate a JPG image[90 degrees to
the left (counter-clockwise)]. As shown in the sequential figures below, the front of the car is
rotated
counter-
clockwise in the directions.
Rotate left 90 Rotate left 90
Rotate left 90
The right arrow button on the remote control can be used to rotate [90 degrees to the right
(clockwise)]. As shown in
the directions.
Rotate right 90
the sequential figures below, the front of the car is rotatedclockwise in
Rotate right 90 Rotate right 90
20
Page 24

15 Basic Operations
The up button on the remote control can be used to [flip horizontally], resulting in an image with
left and
right sides reversed. As shown in the figure below, the front of the car switches from to , and
the
entire image
the car is still
The down button on the remote control can be used to [shift vertically], resulting in an image
that is reversed in
originally
the
front of the car is still pointing towards the left.
JPG Browse Mode:
When viewing images, press STOP and the system will enter the browse mode. After the system
enters the [Thumbnail mode], fifteen 3x5 thumbnail clips will appear, making it easy for the user
To view the images in the folder directory. After selecting the images that you wish to view, you
can press to enter the Slide Show mode. After pressing RETURN , the user can select to ENTER
the Rotate function, and then select the image that they wish to rotate and then press ENTER
Rotate the selected image 90 degrees to the right. After the image has been rotated, you can
press RETURN to return to the browse mode, or you can select the Reset function to cancel
all rotation actions.
Media Manager:
When the user inserts a storage device such as a portable drive or SD card, after the system
analyzes the file format, the user will be able to conduct playlist management through the File
Manager. The recognizable multimedia file types include: JPEG, MP2, MP3, WMA, DAT, MPG,
VOB, and MP4.
The window on the left of the File Manager is used to manage the folders inside the storage
medium. The window on the right displays the files inside the particular folders.
Connecting to your PC:
Connecting the Photo Frame to your PC
If your PC is running Windows XP or later version this photo frame does not require a driver. When it is
connected to your PC it will appear as a mass storage device (Removable Disk).
The following procedure is an example based on a PC running Windows XP. It assumes that your PC
is already powered on. the photo frame is in Main menu.
1. Select storage device you want to connect to PC in setup menu(Please refer to••4.3.4••)
2. Using a USB cable (not supplied), connect the USB Mini B (smaller) end to the "PC" connector on the
photo frame. Then connect the USB A (larger) end to your PC.
3. When connected successfully, "Connected to PC" will blanking on the display of the photo frame.
4. It is ready to transfer file in the same way as any removable disk.
5. Once the files have been transferred, wait for a few seconds before disconnecting your photo frame
from your PC in the same way as any removable disk.
has been reversed from left to right, but the vertical sides do not change, the top of
on top.
Flip Horizonta
on top, but ends up on the bottom. But the left and right sides of the car are not changed,
terms of top and bottom sides. As shown in the figure below, the top of the car was
Flip Verticall
21
Page 25

Page 26

•••• •• ••
•• •• •• • •
 Loading...