

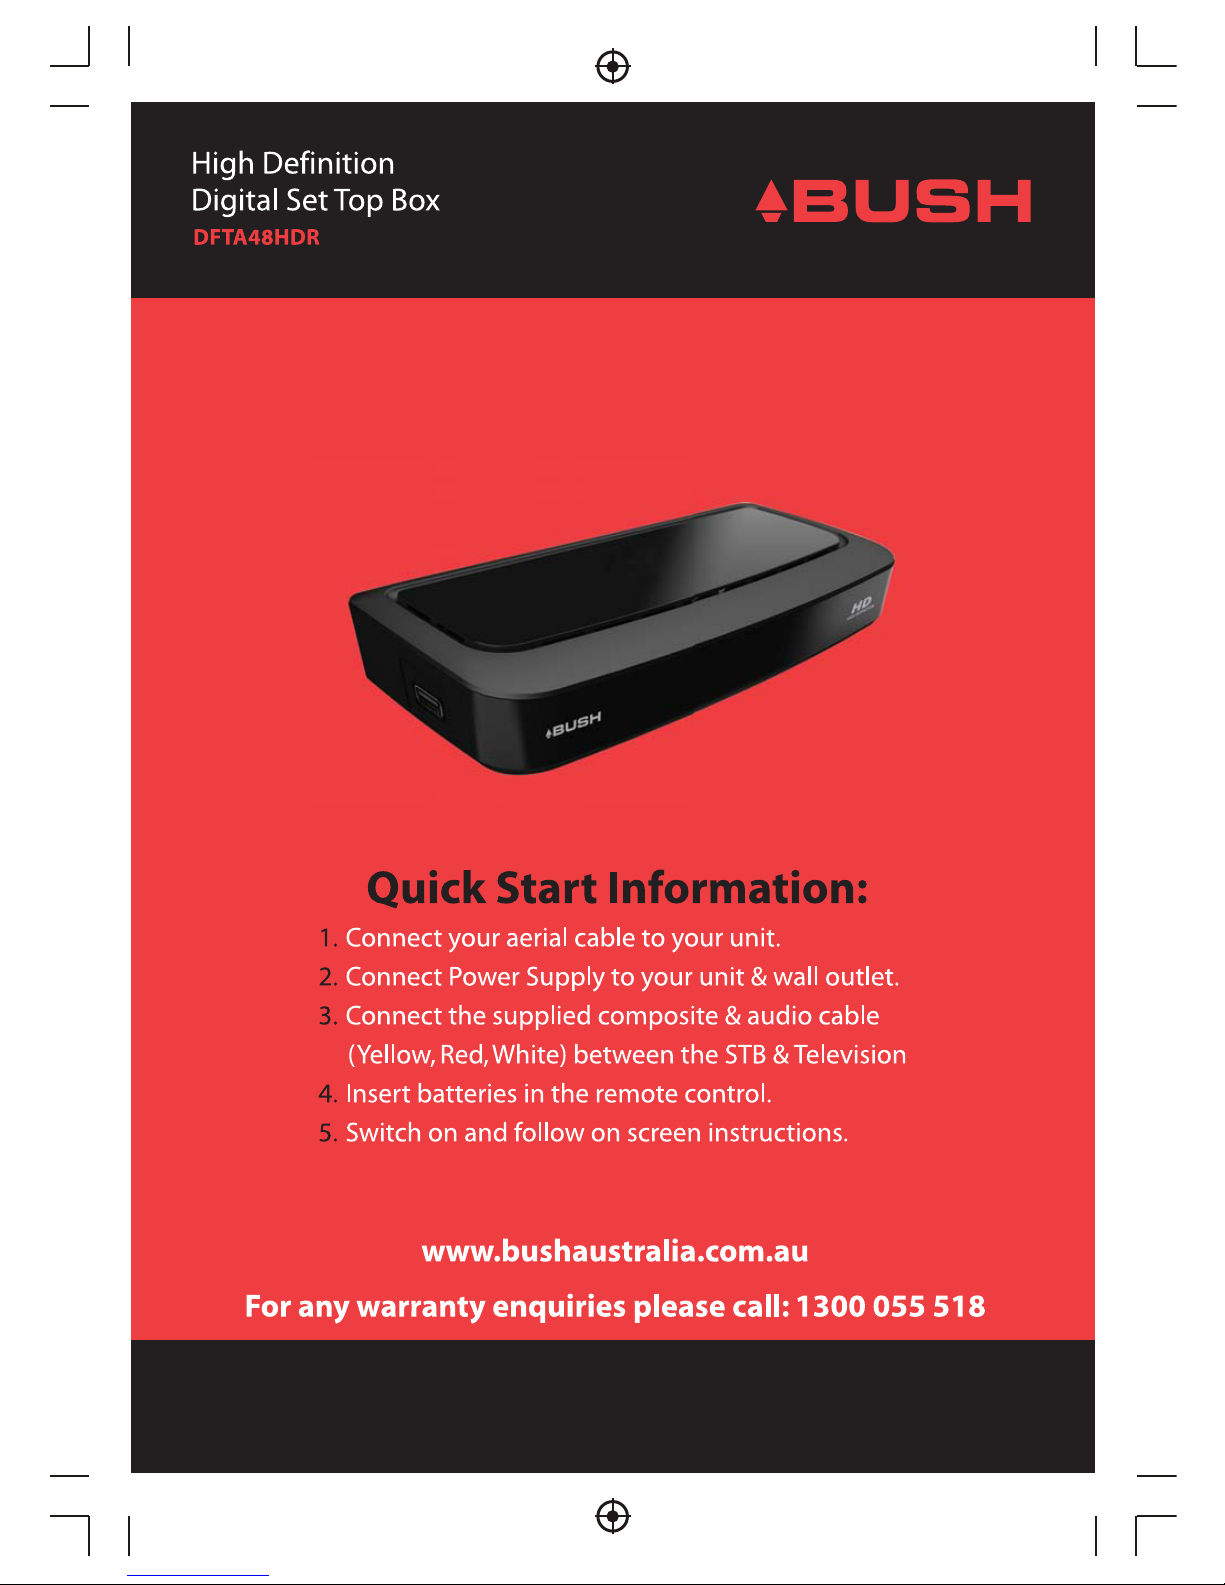
Bush DFTA48HDR Quick Start Manual
Size: 90x128mm

Size: 90x128mm

Important Safety Instructions
The symbol indicates that dangerous voltages constituting a risk of electric
shock are present within this unit.
The symbol indicates that there are important operating and maintenance
instructions in the literature accompanying this unit.
This symbol indicates that this product incorporates double insulation
between hazardous mains voltage and user accessible parts.when
servicing use only identical replacement parts.
1
Please note there are no user serviceable parts in this unit.
Do not remove the cover or back for any reason. Refer all servicing to qualified
Guundig Service agent.
Do not expose the unit to rain or moisture, to prevent fire or electric shock hazards.
Do not expose the unit to any liquid or water (dripping or splashing) and no objects
filled with water, such as vases, should be placed on the unit.
Keep the product away from direct sunlight and any heat sources such as radiators
or stoves.
Do not block any of the ventilation openings. The openings on the unit are provided
for ventilation. The openings should never be blocked by placing your product on a
cushion, sofa or other similar surface.
Do not place the product on unstable cart, stand, tripod, bracket or table. The unit
may fall, resulting in possible damage or injury.
Only use the AC adapter included with product. Using any other adapter will void
your warranty.
Unplug the power from the outlet when the unit is not in use.
Only use attachments/accessories specified provided by the manufacturer.
This marking indicates that this product should not be disposed with other
household wastes. To prevent possible harm to the environment or human
health from uncontrolled waste disposal, recycle it responsibly to promote
the sustainable reuse of material resources. Contact your retailer where the
product was purchased.

Thank you for buying this Bush product, which is designed to give you many
years of trouble-free service.
You may already be familiar with using a similar unit, but please take time to
read these instructions. They are designed to familiarise you with the unit s
m any features and to ensure you get the very best from your purchase.
Safety is important
Your safety and the safety of others is important. Please therefore, ensure you
read the Safety Instructions before you operate this unit.
Warranty
In the unlikely event that your product fails to work normally, please call the
below Bush warranty number for support.
Bush Warranty: 1300 055 518
Introduction
2

3
About the Set Top Box
Main Features
Receives All High Definition Channels
Play, Pause and Record Live TV via USB Memory (USB Not Included)
USB Multi File Support Including(MP3, MP4, JPEG) Photos, Music and Video
Formats
HDMI Supports 1080P Video Output
7 Day Electronic Program Guide
Connect to TV via Composite & HDMI Video Output
Digital Audio via SPDIF Coaxial Output
Easy Menu System
Simple To Use Automatic Set Up System
Teletext (where applicable) with Subtitle Support for the Hard of Hearing
Parental Control
Remote Control
Package Contents
Before installation, please check the items of the package.
The package should contain the following items:
~ Set Top Box x1 pc
~ Remote Control x1 pc
~ AAA Battery for the Remote Control x1 pair
~ Instruction Manual x1 pc
~ Composite RCA Cable x1 pc
This Set Top Box Receiver allows you to access Digital TV Channels and Radio
Broadcasts, you can also record your favourite TV programs via an external USB
or Hard Disk drive device whilst watching TV.

Table of Contents
Front and Rear Panel ...................................................................................... 5
Remote Control...............................................................................................6
Connections..................................................................................................8
First Time Installation......................................................................................9
Troubleshooting.............................................................................................17
Technical Specifications.................................................................................18
Warranty......................................................................................................19
4
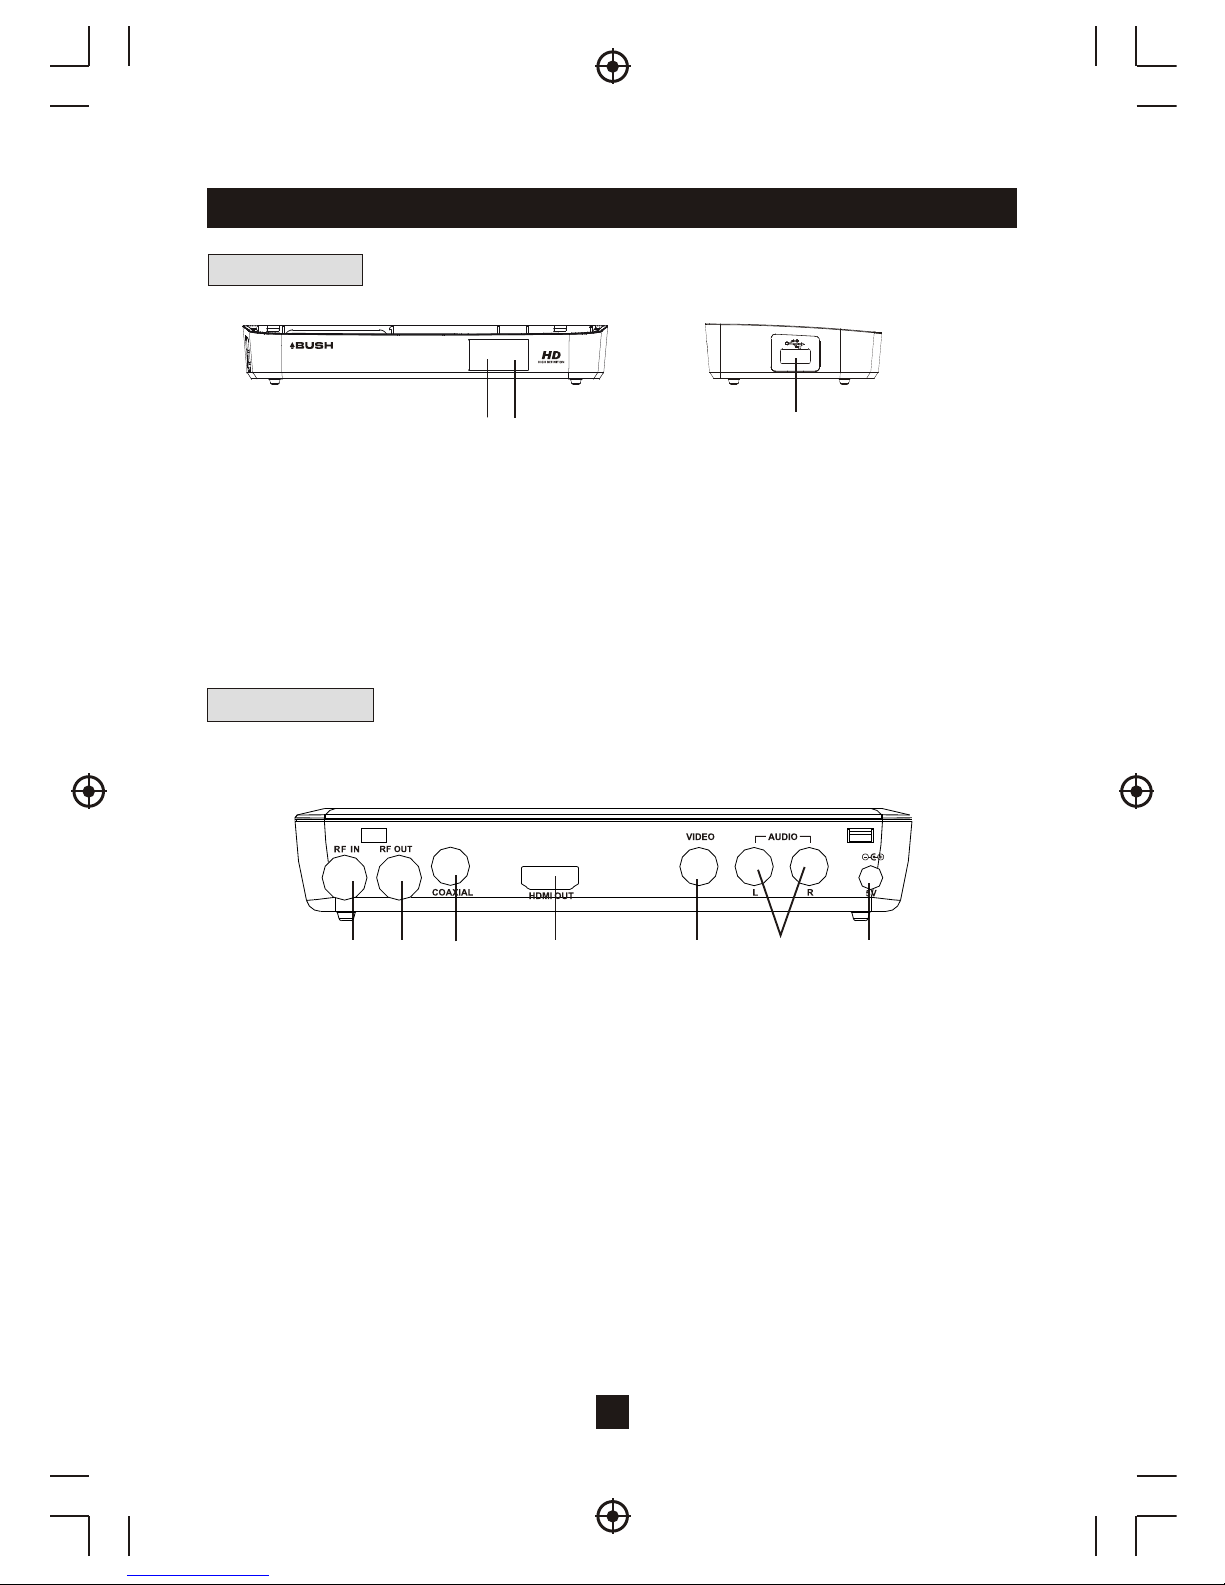
Front and Rear Panel
1. Front panel
2. Rear panel
1. RF IN: This socket allows you to connect your external aerial.
2. RF LOOP THROUGH: This socket will by pass the RF signal to either your TV or
another video system.
3. COAXIAL: This socket allows you to connect the Set Top Box to on your surround
sound system.
4. HDMI OUT: This socket allows you to use your HDMI cable for a premium high
definition connection.
5. VIDEO: This socket allows you to connect your Set Top Box via Composite Video
Signal.
6.AUDIO L/R: This socket allows you to connect your Set Top Box to receive the Audio
L/R signal.
7.POWER INPUT: This socket is where you connect your main power to the unit.
5
1 32
4
5 6 7
1. STANDBY INDICATOR: Displays when the unit is in Power mode and Standby mode.
The indicator will show as green when the unit is on and red when in standby.
2. REMOTE CONTROL SENSOR: Receives the signal from your remote control.
3. USB Input: The USB Input allows the unit to Record Live TV, Play multi-media files and
Upgrade software when available.
2
1
3
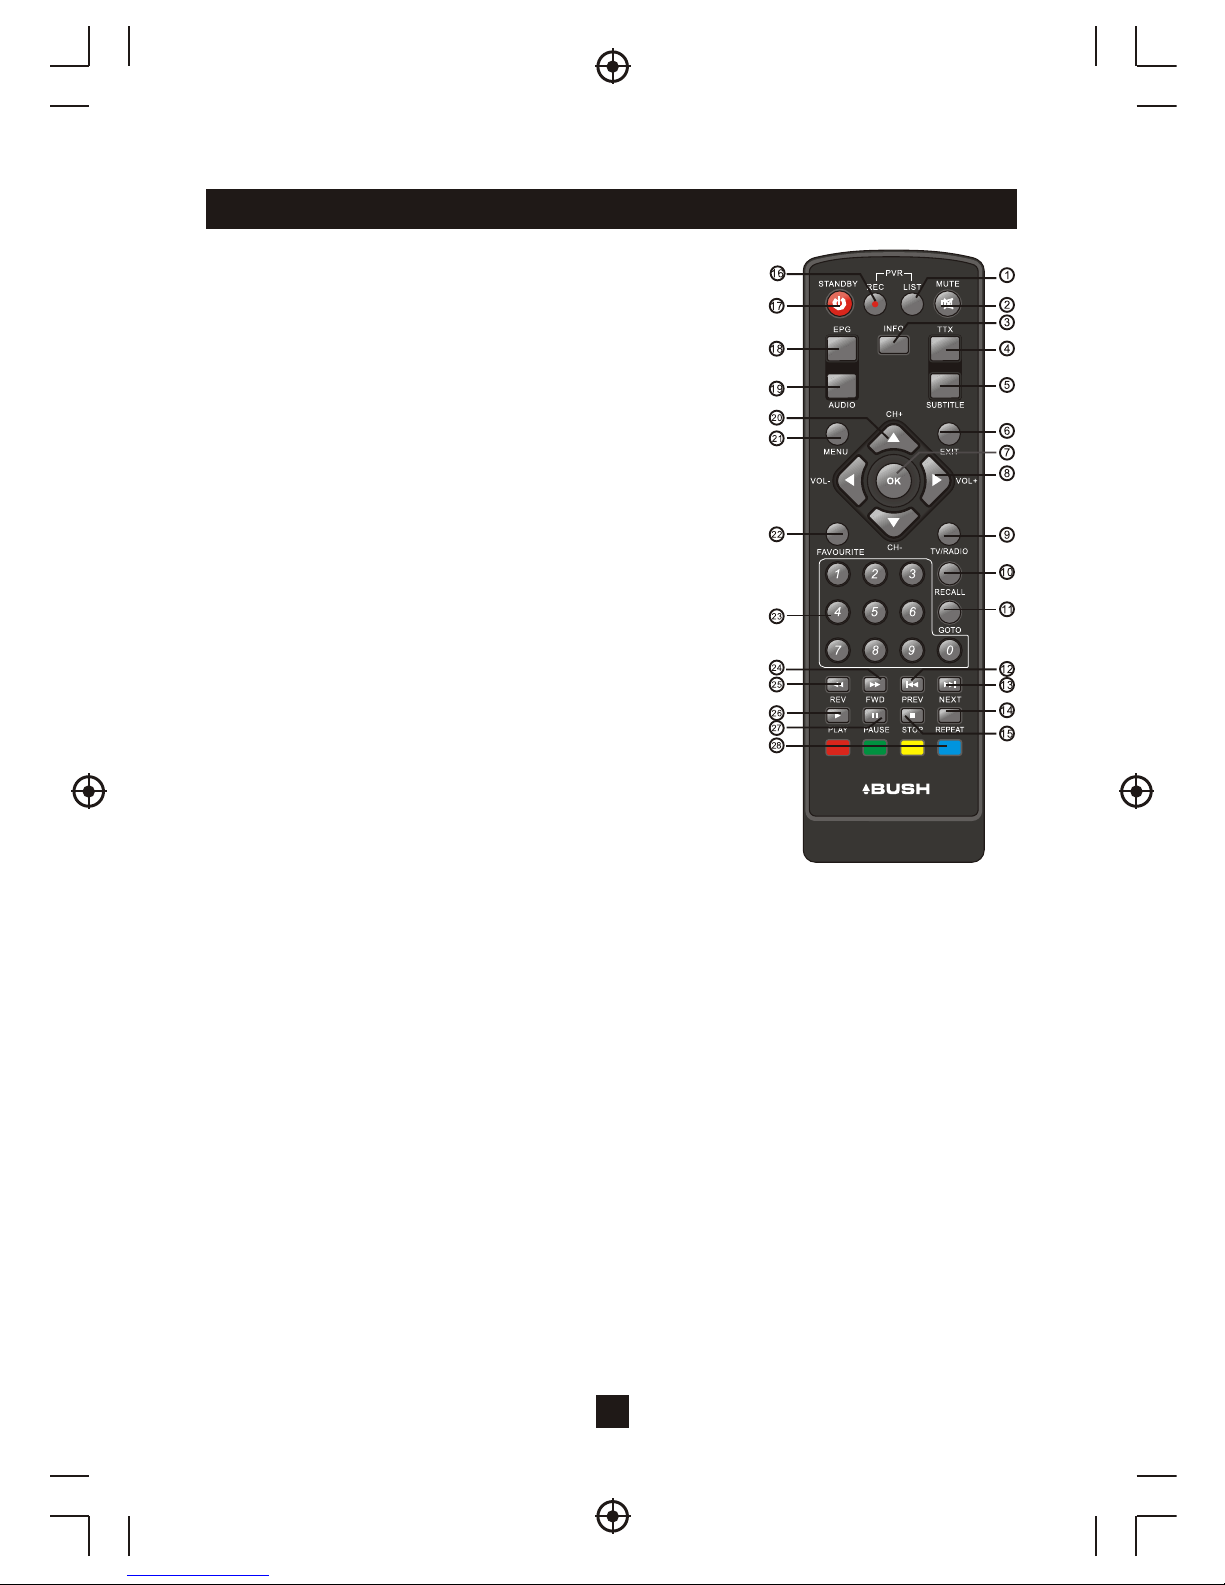
Remote Control
6
1. LIST: Press the List Button to display your recorded
programs list.
2. MUTE: Press the Mute Button to switch off the Sound only.
Press again to restore audio output.
3. INFO: Press the INFO Button to display the current channel
information.
4. TTX: Press the TTX to enter the Teletext Menu.
5. SUBTITLE: Press the Subtitle Button to select the subtitle
setting.
6. EXIT: Press the Exit button to exit the current Menu or return
to the previous Menu.
7. OK: Press the OK Button to confirm settings or menu
selections. Also press to display the channel list.
8. RIGHT/LEFT: Press the Navigate Buttons to move through the
Menu options or to increases or decreases the volume.
9. TV/RADIO: Press the TV/Radio Button to switch between
from TV and Radio mode.
10. RECALL: Press the Recall Button to go back to the previous
channel you were watching.
11. GOTO: Press the GOTO Button to select the multimedia
option.
12. PREV: Press the Prev Button to skip to the previous track in
multimedia mode or timeshift in DTV mode.
13. NEXT: Press the Next Button to skip to the Next track in
multimedia mode or timeshift in DTV mode.
14. REPEAT: Press the Repeat Button to repeat play in multimedia mode.
15. STOP: Press the Stop Button to stop play in Multimedia.
16. REC: Press the Rec Button to record the program you are watching.
17. STANDBY: Press the Standby Button to turn the unit to standby.
18. EPG: (Electronic Program Guide) Press the EPG Button to enter the EPG
menu.
19. AUDIO: Press the Audio Button to change the audio settings.
20. UP / DOWN: Press the Navigate Buttons to scroll through the Menu or to scroll through the
channel list.
21. MENU: Press the Menu Button to enter the Main Menu.
22. FAVOURITE: Press the Favourite Button to enter the Menu.
23. 0-9 (Numeric Buttons): Press the Numeric Buttons to enter a channel directly or setting
information.
24. FWD: Press the FWD Button to Fast Forward in Multimedia or timeshift mode.
25. REV: Press the Rev Button to Rewind in Multimedia or timeshift mode.
26. PLAY: Press the Play Button to begin or resume play in multimedia mode.
27. PAUSE: Press the Pause Button to pause play in multimedia mode or to pause live TV.
28. COLOUR BUTTONS: Press the Colour Buttons to operate different functions in the Teletext
modes.
 Loading...