

Page 1

Standard Definition Digital Set Top Box
DFTA2
The Gold Technical Support Line: 1902 215 259
(Charges will apply at $2.95 per minute)
INSTRUCTION MANUAL
Page 2

Page 3

Introduction
Thank you for buying this Bush product, which is designed to give you
many years of trouble-free service.
You may already be familiar with using a similar unit, but please take time
to read these instructions. They are designed to familiarise you with the
unit s m any features and to ensure you get the very best from your
purchase.
Safety is important
Your safety and the safety of others is important. Please therefore, ensure
you read the Safety Instructions before you operate this unit.
Warranty
In the unlikely event that your product fails to work normally, please call the
below Bush warranty number for support.
Australia
Bush Warranty: 1800 509 394
New Zealand
Bush Warranty: 0800 450 259
Page 4
Safety Instructions
Always read the safety instructions carefully
Keep this Instruction Manual for future reference
Keep this device away from humidity
Lay this device on a reliable flat surface before setting it up
Do not stand it on soft furnishings
If any of the following situation arises, get the Set Top Box checked by
a service technician:
It has been exposed to moisture
It has been dropped and damaged
It has obvious signs of breakage
It has not been working well or you cannot get it to work according
to the Instruction Manual
Warning
To prevent the risk of electric shock, do not open the cover or the
back of the receiver.
Do not block the ventilation holes of the device. Leave appropriate
gap above and around it to allow for adequate ventilation.
Do not place the device in an unventilated cabinet or on top of a unit
which emits heat.
Copyright Statement
No part of this publication may be reproduced in any form by any means
without the prior written permission. Other trademarks or brand names
mentioned herein are trademarks or registered trademarks of their
respective companies.
Disclaimer
Information in this document is subject to change without notice.
The manufacturer does not make any representations or warranties
(implied or otherwise) regarding the accuracy and completeness of this
document and shall in no event be liable for any loss of profit or any
commercial damage, including but not limited to special, incidental,
consequential, or other damage.
Page 5

About the Set Top Box
This Set Top Box allows you to access Standard Definition Free-to
-Air Digital TV Channels and Radio Broadcasts on your TV set. Its
digital reception covers VHF & UHF band. Digital TV eliminates
noise and interference and offers high quality video and audio.
An easy to use on-screen installation guide is provided. In addition,
a fully featured Remote Control is included that offers you access
to every feature with a simple press of a button.
Main Features
Standard Definition Digital TV Ready
Composite Video Output
RF Loop Through
Simple To Use Automatic Set Up System
7 Day Manufacturers Program Guide
Automatic Channel Search
DVB Compliant
Easy Menu System
Teletext
Remote Control
Parental Control
Package Contents
Before installation, please check the items of the package.
The package should contain the following items:
~ Set Top Box x1 pc
~ Remote Control x1 pc
~ AAA Battery for the Remote Control x1 pair
~ Instruction Manual x1 pc
~ Composite RCA Cable x1 pc
Page 6

Table of Contents
Panel Illustration..................................................1
Remote Control ..........................................................2
Connections................................................................... 4
Basic Operation ................................................................. 6
Quick Installation....................................................... 6
Menu Operations........................................................ 7
Normal Play.............................................................. 12
Troubleshooting ...........................................................14
Specifications....................................................................15
Page 7
Panel Illustration
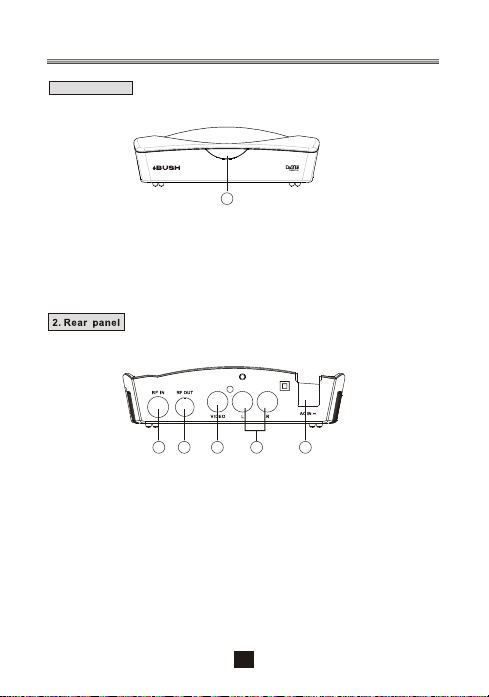
1. Front panel
1
1. REMOTE CONTROL SENSOR: The remote control sensor receives the
signal from your remote control.
1 2 4
3 5
1. RF IN: The RF IN allows you to connect your external aerial.
2. RF LOOP THROUGH: The RF Loop Through Input allows you to connect to
your aerial through either your TV or other home entertainment device.
3.COMPOSITE VIDEO Out: The Composite Video Output allows you to
connect the Set Top Box to your TV . Providing you with digital picture.
4. AUDIO L/R: The Audio L/R Output allows you to connect the Set Top Box to
your TV. Providing you with digital Audio.
5. MAINS POWER INPUT: The Mains Power input allows you to connect the
Set Top Box your main power supply.
1
Page 8

Remote Control
Remote Control Functions:
1. MUTE: Press the Mute Button to turn the sound
on or off.
2. NUMERIC BUTTONS: Press the Numeric
Buttons to select a channel directly or to enter
your password or Teletext options.
3. RECALL: Press the Recall Button to return
back to the last program you were watching.
4. INFO: Press the INFO Button to display the
program information of the channel you are
watching.
5. SUBTITLE: Press the Subtitle Button to turn on
or off the Subtitle feature.
6. EXIT: Press the EXIT Button to cancel and exit
any menu options.
7. CH+: Press the CH+ Button to scroll up through
the channel list or menu options.
8. VOL+: Press the VOL+ Button to increase the
volume or navigate through the menu.
9. OK: Press the OK Button to confirm a selection
within the menu.
10. RED/ GREEN/ YELLOW/BLUE BUTTON:
Press the Red/Green/Yellow/Blue Button to
operate different functions in the Teletext menu.
Press the Yellow Button to also switch between TV
and Radio mode.
11. STANDBY Button: Press the Standby Button
to turn the unit on or off.
12. FAV: Press the FAV Button to enter your favourite channels list.
13. AUDIO: Press the Audio Button to select and set the sound output. You can select
Stereo, Left, Right, Mono.
14. MENU: Press the Menu Button to enter the Main Menu.
15. EPG: Press the EPG Button to enter the 7 Day Manufacturers Electronic Program
Guide to display the week's channel information.
16. VOL-: Press the Vol- Button to decrease the volume or to navigate the menu.
17. CH- : Press the CH- Button scroll downwards through the channel list or navigate
the menu.
18. TEXT: Press the Teletext Button to enter the Teletext OSD Menu.
19. PAUSE: Press the Pause Button to pause or playback the program being viewed.
Note: SUBTITLE/TEXT/LANGUAGE may not be available for all channels
2
Page 9

Installing the Batteries
Remove the battery cover from the remote control and put 2XAAA
size batteries inside the compartment. The diagram inside the
battery compartment shows the correct way to install
the batteries.
1.Open the cover
N
PE
O
2.Install batteries
3.Close the cover
N
E
OP
Using the Remote Control
To use the remote control, point it towards the front of the digital set
top box. The remote control has a range of up to 7 metres from the
set top box at an angle of up to 60 degrees.
The remote control will not operate if its path is blocked.
Sunlight or very bright light will decrease the sensitivity
of the remote control.
3
Page 10
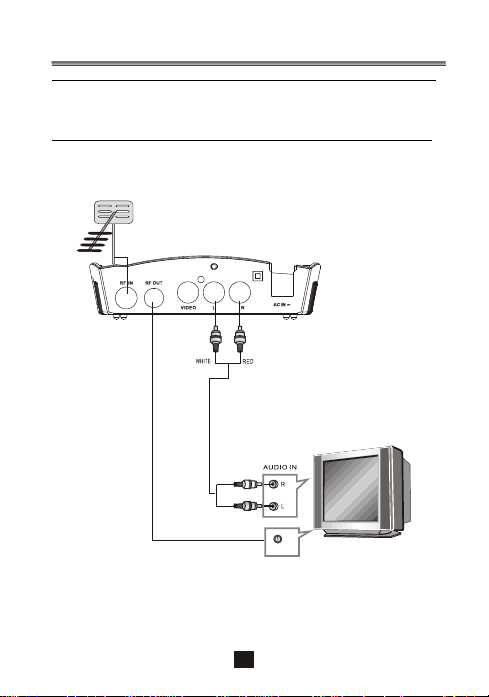
Connections
Caution: Make sure to check the voltage specification of the wall
outlet is the same rating with the receiver. To prevent the risk of
electric shock, do not open the cover or the back of the receiver.
TV Aerial
Composite
audio
(Optional)
RFIN
4
Page 11

Connections
TV Aerial
5
Page 12

Basic Operation
1.Quick Installation
1.1 Setting Country and Language
After you have connected the Set Top Box follow the below steps to
begin the Installation Guide:
1. Press the Menu Button to enter the Main Menu.
2. Use the Navigation Buttons to select the SETUP sub-menu.
3. Then use the Navigation Buttons to select the Installation option.
4. Press the OK Button to then confirm.
When you have entered the Installation menu you will be asked to
set the Country and Language you desire. Follow the below steps to
confirm.
1. In the Installation option use the Navigation Buttons to select the
Country option.
2. Then use the Navigation Buttons to select the Country Setting.
3. Press the Navigation Buttons to select the OSD Language option.
4. Then use the Navigation Buttons to select and set a language.
1.2 Updating your Channel List?
You can update your channel list by conducting either an Auto Scan
or Manual Scan. Follow the below instructions on how to update
your channel list.
1.2.1 Auto Scan
Auto Scan will erase the channel list and scans for all available
stations. To conduct an Auto scan follow the steps 1-8 of section 1.1
and then press the Red Button on the remote control to check the
channel list is clear. Press the OK Button to confirm clear action and
start Auto Scan. Press the Exit Button to cancel and exit the Auto
Scan menu.
Figure 1. Clear database message
6
Page 13
Basic Operation
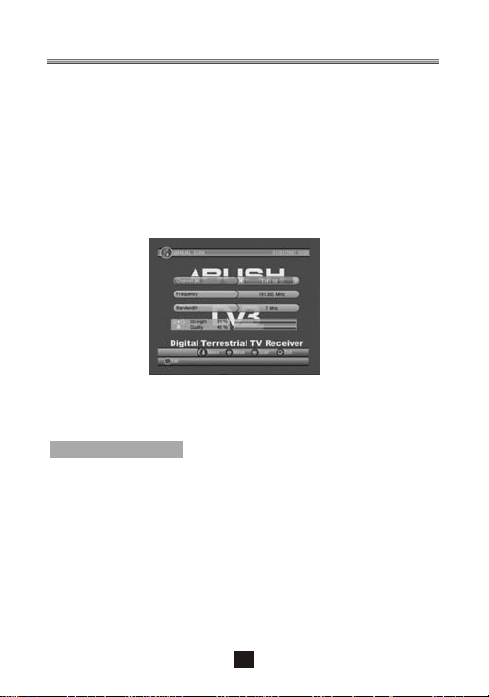
1.2.2 Manual Scan
You can Manually scan for available stations via Manual Scan
without deleting the current list. To conduct a Manual Scan follow
the steps 1-8 in section 1.1.
Then press the Green Button to enter Manual Scan Menu.
Press the Up/Down Button to select the Frequency option.
Use the Numeric Buttons to put in the Frequency/station you would
like to search for.
Then select the Bandwidth by using the Navigation Buttons.
Press the OK Button to confirm and begin scan.
Press the Exit Button to exit.
Figure 2. Manual Scan edit
2.Menu Operations
Once the channel scan is finished and all the channels are stored
into the database, you can start to watch the digital terrestrial TV
channel or listen to the radio broadcast, some typical operations are
given in this chapter.
2.1 Main Menu
To view the Main Menu, press the Menu Button, then follow the
prompts to the relevant sub-menus and settings.
7
Page 14

Basic Operation
2.2. LCN
Set the Logical Channel Number to on or off.
Note: LCN is a number that uniquely identifies a logical channel,
which is popular in some european countries such as England, France.
2.2.1 Daylight Saving/Region Setting/Time Zone
Allow you to enable or disable daylight saving. If you know the region of
your location,select an appropriate Region Setting or set the Time Zone
offset manually.
2.2.2 TV Setup
Setup the display mode for TV. See Figure 3.
Flesh Tone
Black/White Expansion
Figure 3. TV Setup
2.2.2.1 TV Format
Set display format for watching program, such as 4:3LB, 4:3PS,
16:9PB,16:9 FIT.
4:3LB(LetterBox): Typically for wide screen content displays on
conventional 4:3 TV with black bars above and below the picture.
4:3PS(PanScan): Typically for wide screen content displays on
conventional 4:3 TV with left and right edges cropped.
16:9PB(PillarBox)/16:9 FIT: Typically for wide screen 16:9 TV.
2.2.2.2 OSD Transparency
You can change the On Screen Display transparency with this
setting. Use the Navigate Buttons to adjust.
Figure 4. Video Enhancement
OFF
OFF
Switch
Move
Exit
8
Page 15

Basic Operation
2.2.2.3 Banner Display Time
You can set the Banner Display Time with this setting. Use the
Navigate Buttons to adjust.
2.2.3 Password
Set or change the password select Password setting and enter the
default pin code 6666 and then enter the new password using the
Numeric Buttons.
2.2.3.1 Menu Lock
Lock the menus by password.
2.2.3.2 Channel Lock
Lock the channel which has been set to lock status when turning on
the
Channel Lock. Please see section 2.3.1.2 for details.
2.2.3.3 Censorship Lock
Lock the program by password and censorship threshold.
The censorship info is in program content. Under the censorship
rating,
user has to enter the right password for watching program.
2.2.4 Advance Timer
You can set a scheduled program reminder manually or via the
TV/Radio EPG.
2.2.5 Factory Reset
When you restore your Set Top Box to the factory default settings,
all settings will be deleted and you will need to rescan for all
available channels.
2.3 TV/RADIO
To switch between TV and Radio mode press the TV/Radio Button.
The operation of the List and Guide of TV and Radio work and follow
the same steps.
9
Page 16

Basic Operation
2.3.1 List
Favorites
To set a program to your favourite list press the FAV Button. There
are 8 groups of favorites for you to set your favourite program to
(News, Sport, Movie, Music, Shopping, Travel, Boy and Girl). Use
the Numeric Buttons to select to Favourite group you wish to set.
Lock
If a program is password protected you will need to enter the set
password to unlock before watching when the Lock Function is
activated.
Rename
Rename will allow you to change the name of a program in the
program list. The maximum length is 20 characters. Use the
Navigate Buttons and Numeric Buttons to select to the characters to
change the program name. To save press the Red Button and OK
Button. Press the Exit Button then exit the setting.
Move
Move will allow you move the position of a channel in the list.
Note: This option will not appears in this list when SETUP>Installation ->LCN is set to ON.
Sort
You can sort the program list as desired. You can sort by A<->Z or
Pay<->Free.
Note: This option will not appears in this list when SETUP-
Figure 5. TV List
10
Page 17

Basic Operation
Skip
To set a program to Skip in the program list, press the OK Button on
a selected program and a skip status will be activated.
Delete
To delete a program from the program list, press the Green Button
when the program has been selected. Then press the OK Button to
confirm. The program will now be removed from the program list.
Search
You can search for a program by name using the search function. In
the Program Menu press the Left/Right Buttons to select Search
option and press the OK Button. In the Search menu, press the
Navigate and Numeric Buttons to input the search term. Press the
OK Button to confirm and begin search.
2.3.2 Manufacturer Electronic Program Guide (EPG)
The EPG provides you with program information about the
programs scheduled for the next 7 days. To enter the EPG Menu,
press the EPG Button on your remote control. The use the Navigate
Buttons to scroll through the information displayed. Press the OK
Button to show detailed information of the program selected. To exit
press the Exit Button.
Figure 6. Guide - Event
(1) Press <RED> button to enter Book page and <YELLOW> button
to save after edited. If it conflict with itself or other event, a conflict
message will be displayed. The successful booking will be added to
Main Menu-> SETUP-> Advance Timer(see section 2.2.4).
11
Page 18

Basic Operation
3. Daily Operation
3.1 Information
To view the information of the program you are watching, press the
Info Button and the information will be displayed.
Figure7. Normal Play - Radio
3.2 Changing the Channel
To change the channel, press the CH+/- Buttons or use the Numeric
Buttons to input the program number directly. You can also press
the Recall Button to return to the last program you viewed.
3.3 Volume
To adjust the volume while watching TV, press the Vol-/Vol+Buttons.
To turn the sound of completely press the Mute Button. To turn
sound back on press the Mute Button again or the Vol-/Vol+Buttons.
3.4 Program List
To view the Program List, press the OK Button. Then use the
Up/Down/Left/Right Buttons to scroll through the list. Press the OK
Button to confirm and selections or press the Exit Button to exit the
list.
3.5 Audio
To change the Audio set up, press the Audio Button to display the
audio channel page. Then use the Up/Down Buttons to select you
Audio set up you wish to use. Press the Left/Right Buttons to adjust
and press OK to confirm.
Figure 8. Program Info
12
Page 19

Basic Operation
3.6 Pause
Press the Pause Button to pause the play of video and audio. Press
again to resume play.
3.7 Teletext
To enter the Teletext Menu, press the Text Button. Press the
Numeric Buttons to select the Teletext page you wish to view. To
confirm press the OK Button. You can change the language by using
the Up/Down Buttons. To exit press the Exit Button.
TELETEXT
Teletext Language
eng
OFF
Figure 9. Audio Channel
3.9 Subtitle
To display the subtitle screen, press the Subtitle Button. Then press
the Up/Down Button to select your desired subtitle language. This
may depend on the program you are watching and the program
broadcaster. To confirm your subtitle setting press the OK Button. To
exit, press the Exit Button.
3.10 Teletext Subtitle
To display subtitle through the Teletext function, press the
Text/Subtitle Button to display teletext or subtitle setting page. Then
press the Left/Right and Up/Down Button to select TTX Subtitle.
Press the OK Button to confirm and press the Exit but to Exit option.
Press <GUIDE> button at normal play state, see section 2.3.2 for
Details.
Figure 10. Teletext Setting Page
SUBTITLE
Subtitle Language
eng
OFF
Figure 15. Subtitle Setting Page
13
Page 20

Troubleshooting
If you experience problems with this receiver or its installation, in the
first instance please read carefully the relevant sections of this User
Manual and this Troubleshooting section.
The unit will not
turn on
Can't access locked
settings
After moving the
Set Top Box to
another room, you
are unable to find
reception
The power is not connected
The Mains fuse may be blown
Audio Cables and/or Video
Cables are not connected.
Broadcaster has lost signal
Forgotten password
14
Check the Mains power
is firmly connected and
switched on.
Check your power source
and fuse.
Check that the aerial is
connected correctly,
properly aligned and is
not damaged.
Check the cables are
connected correctly and
firmly and turn on the unit.
Check another channel
Run a factory reset and
rescan for all available
channels.
retailer
Enter the default
password to unlock and
reset password.
Page 21
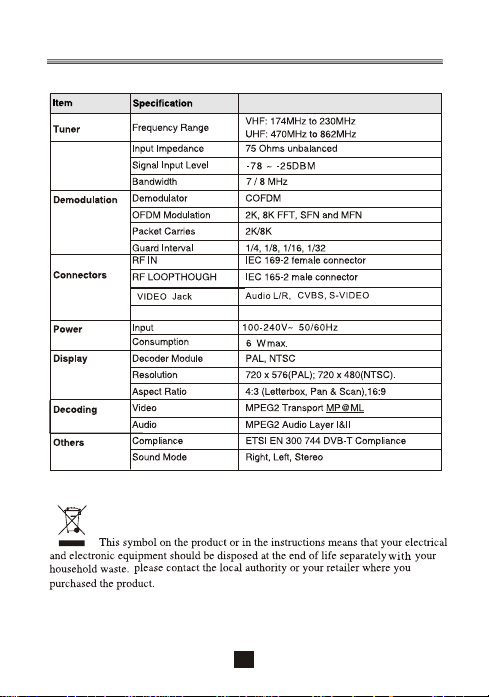
Specifications
15
Page 22

Warranty
Please keep your receipt as proof of purchase. This product is
warranted for any defect in materials or workmanship for one year
after the original date of purchase. This product is for normal
domestic and office use only. This warranty does not cover damage
from misuse or neglect, accidental damage, vermin infestation,
excessive voltages such as lightning or power surges or any
alteration that affects the performance or reliability of the product.
In the unlikely event that your product fails to work normally, please
contact the Bush Warranty on 1800 509 394 (Australia) or 0800 450
259 (New Zealand) and have your receipt of purchase on hand.
This is subject to the following provisions:warranty
This w is in addition to, and does not diminish, arranty
your statutory or legal rights.
PO BOX 6287,
SILVERWATER NSW 1811
www.bushaustralia.com.au
Bush : 1800 509 394 Australia
Warranty
Bush : 0800 450 259 New Zealand
Warranty
Page 23

PO BOX 6287,
SILVERWATER NSW 1811
www.bushaustralia.com.au
 Loading...