

Page 1

Instruction Manual
BTL60170W
Page 2

Contents
Safety
Safety
Safety
SafetyInformation
P arts
Parts
Parts
Parts3
Installation
Installation
Installation
Installation4-6
User
User
User
UserInstructions
Care
Care
Care
Careand
Trouble
Trouble
Trouble
TroubleShooting
Information
Information
Information2
Transportation4
Installati on4
DoorReverse5
ElectricalConnection6
Instructions
Instructions
Instructions7-8
Beforefirstuse7
Usingyourap pliance7
Usefulinformation8
and
Maintenance
and
Maintenance
andMaintenance
M aintenance9
Gener al9
Lightbulbreplacement9
Vacation9
Movingyourappliance9
Shooting
Shooting
Shooting1
2
2
2
3
3
3
4-6
4-6
4-6
7 -8
7-8
7-8
9
9
9
1
0
1
0
10
0
Te chnical
Technical
Technical
TechnicalSpecifications
Guarantee
Guarantee
Guarantee
Guarantee1
Specifications
Specification s
Specifications1
Disposalinformation11
1
1
1
1
11
1
1
2
1
2
12
2
Product
Product
Product
Productcodes
BTL60170W –White
codes
codes
codes
Important
Important
Important
Important
These
These
These
Theseinstructions
appliance
appliance
appliance
applianceand
If
If
If
Ifyou
1
instructions
instructions
instructionscontain
and
and
andensure
you
need
you
youneed
help
need
help
needhelp
helpor
–Pleasereadtheseinstructionsfullybeforeinstallingorusing
contain
contain
containimportant
ensure
ensure
ensuresafe
or
have
or
have
orhave
havedamaged
important
important
importantinformation
safe
and
safe
safeand
damaged
damaged
damagedor
correct
and
correct
andcorrect
correctinstallation,
or
or
ormissing
information
information
informationwhich
installation,
installation,
installation,use
missing
missing
missingparts,
which
which
whichwill
parts,
parts,
parts,call
will
help
will
help
willhelp
helpyou
use
and
use
useand
call
call
callthe
maintenance.
and
maintenance.
andmaintenance.
maintenance.
Customer
the
Customer
the
theCustomer
CustomerHelpline:
you
you
youget
get
the
get
the
getthe
thebest
Helpline:
Helpline:
Helpline:03
best
best
bestfrom
from
your
from
your
fromyour
your
45
257 7271
Issue2–05/02/15
Page 3

SafetyInformation
Important
Important
Important
Important–Pleasereadtheseinstructionsfullybeforeinstallation
Beforeuse Duringuse
Theinstallationofthisapplianceisbestcarriedout
by2people.
Disposeofallpackagingcarefullyand
�
responsibly.
indoor
Theapplianceisdesignedforindoor
�
andmustbeprotectedfromrain,moistureand
extremetemperaturevariations.
�Thisapplianceisdesignedforhouseholduse.
Do
not
Do
not
Do
Donot
notusetheapplianceforindustrialand
commercialuse,oranyoth erpurpose.
MUST
�TheapplianceMUST
levelbase.
Do
no t
Do
not
�Do
Donot
notsplashwaterontheappliance.Itmay
causeelectricalpartstof ailandresultinan
electricshock.
Leavetheapplianceinitsintendedplaceof
�
installationandinitscorrectorientationforat
least4hoursbeforeswitchingontoallowthe
coolingsystemtosettlebeforefirstuseorafter
anytransportation.
MUST
MUSTbepositionedonafirm
indoor
indooruse
use
only
use
only
useonly
only
�Yourapplianceisanenvironmentalfriendly
productanditcontainsnonCFC/HFCgas
substancesinthecoolingsystem(CalledR600a)
andintheinsulation(Calledcyclopentane)which
arepotentiallyflammableifexposedtofire.
Therefore,takecarenottodamage,thecooling
circuit/pipesoftheapplianceintransportation
andinuse.Incaseofdamagedonotexposethe
appliancetofire,potentialignitionsourceand
immediatelyventilatetheroomwherethe
applianceissituated.
Do
not
Do
not
�Do
Donot
notsit,standorplaceanyotherheavy
objectsontopofthe app liance.Thiscouldresult
ininjuryordamagetotheappliance.
Do
not
Do
not
Do
Donot
notallowchildrentoplaywiththeappliance
�
toavoidtheriskofentr apmentandsuffocation.
Keepventilationopening,intheappliance
�
enclosureorinthebuilt-instructure,clearof
obstruction.
Thisapplianceisnotintendedforusebypersons
�
(includingchildren)withreducedphysical,
sensoryormentalcapabilities,orlackof
experienceandknowledge,unlesstheyhave
beengivensupervisionorinstructionconcerning
useoftheappliancebyapersonresponsiblefor
theirsafety.Childrenshouldbesupervisedto
ensurethattheydonotplaywiththeappliance.
Thisapplianceisnotintendedforusebyyoung
�
childrenorinfirmpersonsunlesstheyhavebeen
adequatelysupervisedbyaresponsiblepersonto
ensurethattheycanusetheappliancesafely.
Youngchildrenshouldbesupervisedtoensure
thattheydonotplaywiththeappliance.
Do
not
Do
not
�Do
Donot
notusemechanical,electricalorchemical
waytospeedupthede fro stprocessnot
recommendedbythemanufacturer.
Do
not
Do
not
Do
Donot
notuseorplaceotherelectricalproducts
�
insidetheappliancenot recommendedbythe
manufacturer.
Do
not
Do
not
�Do
Donot
notstoreliquidsinglasscontainersinthe
freezercompartmentas thesemayshatter.
Do
not
Do
not
�
�
Do
Donot
notstoreflamma blematerialssuchas
�
�
alcohol,gasoline,LPga sorglueetcinthe
appliance.
�
�
�
�Incasethereisaninflammablegasleaking,
openthewindowforaircirculationanddonot
pullouttheplugorturnthetemperatureknob.
Do
not
Do
not
Do
Donot
nottouchtheapplianceuntilthevalveof
gasisturnedoff.Othe rwise,sparksmay
happen.
This appliance can be used by children aged
from 8 years and above and persons with
reduced physical,sensory or mental capabilities
or lack of experience and knowledge if they
have been given supervision or instruction
concerning use of the appliance in a safe way and
understand the hazards involved.Children shall not
play with the appliance.Cleaning and user
maintenance shall not be made by children without
supervision.
�
Do
not
�
D
o
not
�
�Do
Donot
notattempttorepairtheapplianceyourself.
ContacttheCustomerHelpline:0345 257 7271.
2
Page 4
Ifyou ha vedamagedormissingparts,
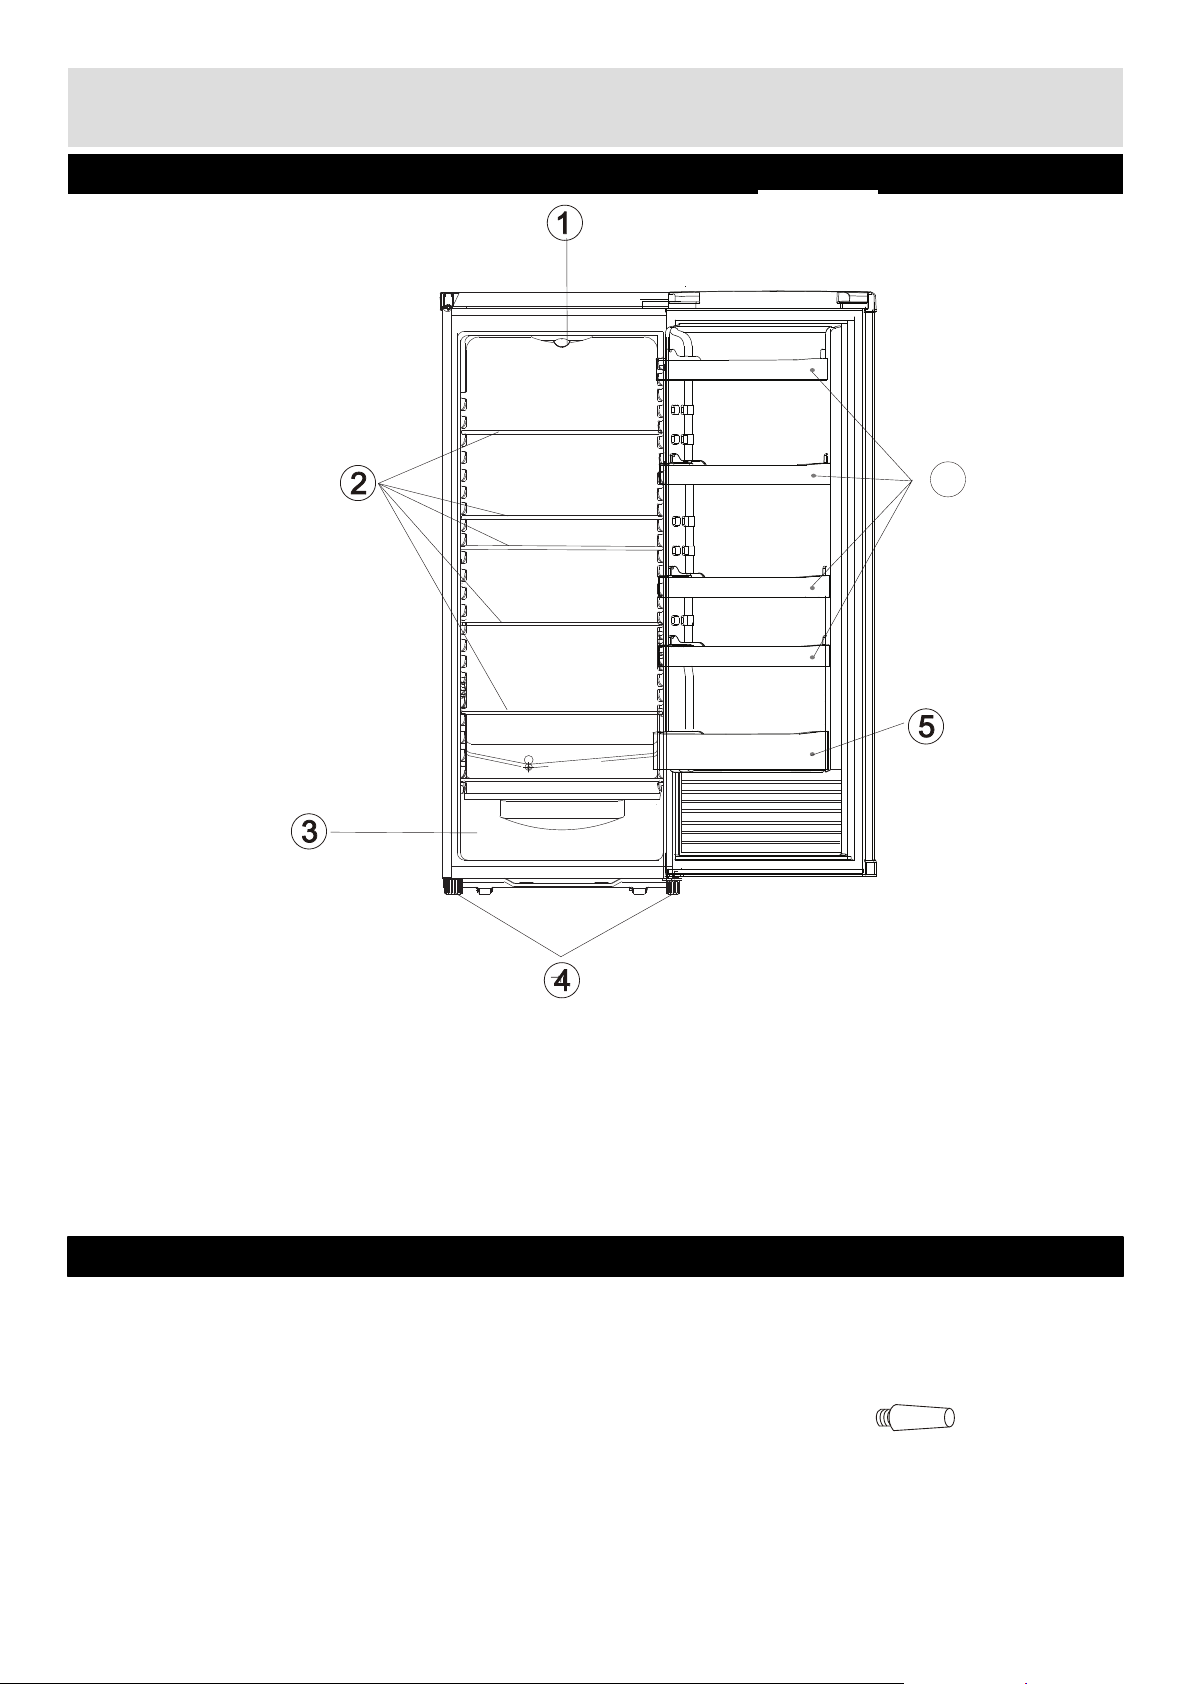
Parts
Pleasefamiliarizeyourselfwiththepartsandaccessorieslistedbelow
calltheCustomer
Customer
Customer
CustomerHelpline:
Helpline:
Helpline:
Helpli ne:345
257 7271
0
6
Accessoriesincluded
Instructionsx1
3
1.
1.
1.
1.Thermostat and Light
2.
2.
2.
2.Glass shelves
3.
3.
3.
3.Crisper
4.
4.
4.
4.Leveling feet
5.
5.
5.
5.Bottom.balcony
6.
6.
6.
6.Upper balconies
Hinge cover
Spacersx2
Page 5

Installation
Transportation
Caution:
Caution:
Caution:
Caution:2peoplearerequiredto
unpackandhandletheappliance,itis
recommendedthatglovesareworn.
�Theapplianceshouldbetransportedonlyin
anuprightposition.Donottilttheappliance
greaterthan45°.Thepackagingassupplied
mustbeintactduringtransportation.
�Aftertransportingtheappliance,leaveitforat
least4hoursbeforeswitchingontoallowthe
coolingsystemtosettle.Failuretocomply
couldresultindamagetotheappliance.
Donotmovetheappliancebypullingthedoor
�
orhandleasitmaydamageyourflooringand
wallcoveringsetc.
Emptyanywaterinthedraintraybefore
�
moving.
�Makesurethatthedefrostwaterpipeatthe
backoftheproductisfixedtotheplastic
evaporatingpanonthetopofthecompressor,
toavoiddefrostwaterspillageonthefloor.
�Ensurethesupplycableisnotcaughtunder
theapplianceduringandaftermoving.
Carefullyremoveallpackagingmaterials
�
includingthefoambase,disposeofcorrectly.
Installation
�Ensuresufficientspacingisprovidedforthe
appliancetobeinstalled.Leavespaceon
bothsides(15cm),back(20cm)andabovethe
appliance(30cm)toensureproperventilation.
Screw in the two spacers at the back of the
appliance.
Donotplacetheappli
�
orindirectsunlight.
�Donotputanyheavyobjectsontopofthe
appliance.Itwilldamagetheappliance.
Donotinstalltheapplianceinmoistandwet
�
place.
�Adjustthefeetatfronttoleveltheappliance.
Itshouldbeinstalledonasmoothsurfaceto
avoidexcessivevibrationandnoise.
�Eachappliancehasaclimateclass(shownon
theratingplate)whereitindicatesthe
temperaturerangeoftheapplianceoperation
inplace.Theappliancemaynotworkproperly
ifitisleftforalongperiodatatemperature
outsidethespecifiedrange.
�Refertosection“CareandMaintenance”to
prepareyourapplianceforuse.
ancenearaheatsource
ClimateClass
SN
N
ST
T
Amb.T.(°C)Amb.T.(°F)
10~32°C50~90°F
16~32°C61~90°F
16~38°C61~100°F
16~43°C61~110°F
4
Page 6

Installation
Door Reverse
Warning: Remove the main plug before reversing
the door. 2 people may be required to reverse the door.
1, Remove the screw ○1 from the hinge cover ○2. Put
the hinge cover on the soft pad for future use.
2,Open the door and remove the screw ○5 on the top
hinge plate ○3 from the front side. Then remove the
hinge plate ○3 carefully. Take out the door from the
cabinet and place it on the ground protected with soft
pad to avoid any damage.
3,Remove plastic cover ○7 and screws at the top left
side ○6 and fix it to the right side.
4, Put the plastic soft pad on the floor and Lie down the
whole product to the rear side to the pad carefully.
Remove the two front adjustable feet ○10○14. Take out
the bottom hinge ○11 from the bottom of right side.
Record down all the position of the screws on the
bottom hinge. Then remove all the screws from the
bottom hinge. Turn the hinge over to ensure the
protruded area is pointing to the right side. Put the
bottom hinge to the bottom of left side and fix all the
screws back to the hinge according to the previous
record. Then add the two adjustable level feet back
to the bottom side.
5, Remove the screw from the right side of top hinge
plate to left side. Move the unit stand upright. Put the
door to the left side. Ensure the hole on the lower side
has fully entered to the pin on the bottom hinge plate.
Put the top hinge plate, Use the alternative cover ○9
(with hole) provided and fit to the left side. and fix to the
door. Fix the screw to the top hinge plate to the cabinet.
Turn the door to ensure the door can be open and
closed without any problem.
6, Refit the top hinge cover ○2 by fixing the screw ○1.
11
14
12
FIGURE1
Door opening from left side
11
13
14
5
5
13
12
FIGURE1
Door opening from
right side
Page 7

Installation
Electricalconnection
Any
electrical
Any
electrical
Any
Anyelectrical
electricalwork
install
install
i nst all
i nstallthis
a
a
a
a qualified
this
appliance
this
applian ce
thisappliance
applianceMUST
quali fied
qu alified
qualifiedelectrician.
electrician.
electrician .
electrician.
wor k
that
work
that
workthat
thatis
MUST
MU ST
MUSTbe
is
required
is
requi red
isrequ ired
requiredto
be
carried
be
carrie d
becarried
carriedout
out
out
ou tby
Plug
replacement
Plug
repla cement
Plug
Plugreplacement
replacement(UK
to
to
to
by
by
by
Shouldyouneed toreplacetheplug;thewiresin
thepowercablearecolouredinthefollowing
way:
( UK
(UK
(UK&
&
Ireland
&
Ireland
&Ireland
Irelandonly)
onl y)
only)
o nly)
Warning:
Warning:
Warning:
Warning:THIS
EARTHE D
EARTHED
EARTHED
E ARTHED
Before
Before
Before
Beforemaking
ensure
ensure
ensure
ensurethat:
�Electricalsafety isonlyguaranteedwhenthe
�Donotdamagetherefrigerantcircuit.
�Donotbend,stretchorpullthesupplycableto
�
�Ensurethepowersocketissuitableforthe
�Thesupplyvoltageshouldbethesameasthat
�Theapplianceshouldbeearthedandin
�Wheninstalled,thepowersocketmustbe
�
�Theuseofadapters,multipleconnectorsor
�Theappliancemustbeconnectedtoa220-
�
�Theplugcontainsa removablefusecoverthat
�Adamagedplugshouldbecutoffascloseto
making
making
makingany
that:
that:
that:
earthsystemofyourhouseisinaccordance
withtherelatedlocalregulations.
avoidelectricshock.
Donotuseelectricalappliancesinsidethe
foodstoragecompartmentsoftheappliance,
unlesstheyareofthetyperecommendedby
themanufacturer.
maximumpowerofthemachine(fusesinthe
powercircuitmustbe13amp).
indicatedinthetechnicalspecificationsand
theapplianceratingplate.
compliancewiththeapplicablelaw.
withineasyreach.
Ifthesocketoutletsinyourhomearenot
suitablefortheplugsuppliedwiththisunit
checkwithaqualifiedelectricianfor
replacement.
extensioncablesarenotrecommended.
240volt50HzACsupplybymeansofathree
pinsocket,suitablyearthedandprotectedbya
13ampfuse.
Shouldthefuseneedtobereplaced,a13
ampfuseapprovedtoBS1362mustbeused.
mustberefittedwhenthefuseisreplaced.If
thefusecoverislostordamaged,theplug
mustnotbeuseduntilareplacementcover
hasbeenfittedortheplugisreplaced.
theplugbodyaspossible,thefuseshouldbe
removedandtheplugdisposedofsafely.
THIS
APPLIANCE
THIS
APPLIAN CE
THISAPPLIANCE
APPLIANCEMUST
any
electr ical
any
electric al
anyelectrical
electricalconnections,
con nections,
connections ,
connections,
MUST
MU ST
MUSTBE
BE
BE
BE
Blue–Neutral‘N’
Brown–Live‘L’
Green&Yellow–Earth‘E’
Asthecoloursofthewiresinthepowercable
maynotcorrespondwiththecolouredmarkings
identifyingtheterminalsinyourplug,and
proceedasfollows:
Thegreen&yellowwiremustbeconnectedto
theterminalintheplugthatismarkedwiththe
letterEorbytheearthsymbol.
Thebluewiremustbeconnectedtotheterminal
thatismarkedwiththeletterN.
Thebrownwiremustbeconnectedtothe
terminalthatismarkedwiththeletterL.
Ifpowersupplycordisdamaged,itmust
replacedbythemanufactureroritsservice
agentorasimilarqualifiedpersoninorderto
avoidahazard.
Page 8

UserInstructions
Beforefirstuse
Final
checks
Final
checks
l
Finalchecks
checksbefore
Fina
1.Go odaircirculationaroundtheappliancepositioned.
2.Thefeethavebeenadjustedforperfectlevelling.
3.Cleanthecompartmentperrecommendationinsection“CareandMaintenance”.
4.Plugintheapplianceandinteriorlightwillcomeonwhenthedoorisopen.
Thecompressorstartsupandinoperationmayproducesomebackgroundnoiseanditisnormal,
thisisnotadefect.
Usingyourappliance
1.
Temperature
1.
Temperature
1.
1.Temperature
T emperatureadjustment
Th ecompartmenttemperaturecanbesetbythetemperatureknobbetween“1”and“7”(coldest
�
setting).Werecommendsettingthetemperatureknobmidwayfirst.
�Toensurethecompartmentismaintainedatthedesiredtemperature,itisadvisedtomonitorthe
temperatureperiodicallybyathermometerandadjustthetemperatureknobaccordingly.
�Loadtheapplianceafterswitchonforawhiletoallowthetemperaturereachthedesiredsetting.
before
befor e
beforeoperating
operating
op erating
operatingthe
adjustment
adjustment
adjustment
the
appliance
th e
applianc e
theappliance
appliance
2.
Storing
2.
Storing
2.
2.Storing
Storingfresh
�Usethe fridgecomp artmenttostorefreshfoodanddrinks.
Donotexceedthefoodcapacitythattheapplianceabletohandle.
�
�Donotputwarmfoodtotheapplianceimmediatelyasitmaycauseexcessivecoolingofthe
compartment.
�Setthetemperatureknobatmediumpositionforstoringfreshfood.
�Donotmixalreadyfrozenfoodandfreshfood.
fresh
fres h
freshfood
food
food
food
76
Page 9

UserInstructions
Usefulinformation
Thefollowingguidelinesandrecommendationsaresuggestedtoobtainthebestresultsandstorage
hygiene.
�Frequentdooropeningscancauseinternaltemperaturerisesothedoorshallbeclosedassoonas
possibleafteruse.
�Forhygienereasons,itisalwaysagoodpractisetopack,wrapandcoverthefoodbeforestoring.
�Useapolythenebagtostorerawmeatandplaceonthelowestshelf.Avoidcontactwithcookedfood
topreventcontamination.Forsafetyreason,storerawmeatfortwotothreedaysonly.
�Cookeddishesmustbestoredinairtightcoveredcontainers.
Foodandbeveragesshallcooltoroomtemperaturebeforestoring.
�
�Mostvegetablesshouldbeblanchedandchilledbeforefreezing.
Bottlescanbeplacedinthedoorsection.
�
�Somefruitsandvegetableslikepineapples,melons,tomatoes,andcucumbersshallbewrappedin
polythenebags.
Donotleavefrozenfoodatroomtemperaturetothaw.Youcoulddefrostthefoodbyputtingitinthe
�
fridgetothawslowly.Makesureyouavoiddefrostingfoodorfoodjuicesdripontootherfood.
Energy
Energy
Energy
Energysaving
•Placeyourfridgeawayfromdirectsunlight,yourovenoranyotherheatsources.Allow20cmclear
•Coverallfoodstored,andarrangeitsothatcoldaircancirculatefreely.
•Highercoldsettingwillusemoreenergy.Donotsettomaximumcoldifitisnotnecessary.
•Coolthehot/warmfoodtoroomtemperaturebeforeputthemintoyourfridge.
•Frequentlyopenandclosedoorwouldcauseinternaltemperatureriseanditwillconsumemore
•Closethedoor(s)properly,andmakesurethesealsandhingesareairtight.Checkthesealsby
•Defrostregularlyifyourrefrigeratorisnotafrost-freeorcyclicdefrostmodel.Accumulatedicelayer
•Thepre-setcombinationofdrawers,basketsandshelveshavealreadysetinthemostefficientuseof
saving
saving
savingtips
spaceonbothsidesandabove,andatleast5cmbehind.
energy.
puttingasheetofpaperbetweenthedoorandthemainbodyofthefridge.Ifthepapermoves,your
sealsneedreplacing.
shouldnotbemorethan5mmthick.
thisproduct.
tips
tips
tips
8
Page 10

CareandMaintenance
General
Important:
Important:
Important:
Important:Always
maint enance.
maintenance.
m aintenance.
maintenance.
�Neveruseanysharpinstrumentsorabrasivesubstances,soap,householdcleaner,detergentorwax
polishforcleaning.
�Uselukewarmwatertocleanthecabinetoftheapplianceandwipeitdry.
�Nevercleantheappliancewithflammablefluids.Itcouldcauseadamageandfirehazard.
Cleantheexterioroftheapplianceanddoorsealwithadampclothanddryitthrough.
�
Avoidwatergoesinthetemperaturecontrolbox.Cleanwithadryclothonly.
�
Cleanthecondenser(locatedatthebackoftheappliance)withavacuumcleaner.Itissuggestedto
�
removethedusteveryyear.
�
�
�
�
Shelvesareallremovableforcleaningpurpose.
Important:
Important:
Important:
Important:Caremustbetakenwhilecleaning/carryingtheappliancenottotouchthebottomof
thecondensermetalwiresatthebackoftheappliance,asthiscouldcauseinjurytofingersandhands.
Lightbulbreplacement
Proceedthefollowingtoreplaceafailurebulb
1.
Switch
1.
Switch
1.
1.Switch
Switchoff
2.R emovethel ightdiffusercoverbypullingtherecessattheedge.
3.
The internal light is a LED type. To replace the lamp, please contact qualified technician.
4.Assemblethelightdiffusercoverandswitchon.
off
off
offat
Always
Always
Alwaysunplug
at
the
at
att he
socket
the
soc ket
thesocket
socketoutlet
unplug
unplu g
unplugthe
ou tle t
outle t
outletand
the
appli ance
the
applianc e
theappliance
appliancefrom
and
pull
and
pu ll
andpull
pullout
out
out
outthe
from
the
f rom
the
fromthe
thepower
the
main s
th e
mains
themains
mainsplug.
power
power
p owersocket
pl ug.
plu g.
plug.
socket
so cket
socketduring
d uring
durin g
duringcleaning
cleaning
cle aning
cleaningand
and
and
and
Vacation
Short
Short
Short
Shortvacation
Therei snoneedtodisconnecttheappliancefromthemainsifyouwillbeawayfortwotothreeweeks.
Useuptheperishablefood.
Long
Long
Long
Longvacation
Remove allthefoodifyouareawayforthreeweeksormore.Unplugtheapplianceandleavethedoors
opentoprovideaircirculationtopreventodourandmould.
Moving
Moving
Moving
Moving
Refertosection“Transportation”under“Installation”
vacation
vacation
vacation
vacation
vacation
vacation
Movingyourappliance
9
Page 11

TroubleShooting
Intheunlikelyeventofdifficultieswithyourappliancepleasefollowthetroubleshootingguidebelow.If
theproblempersists,contacttheretailerifthemachineisstillunderguarantee.Ifthemachineisoutof
guarantee,contactanapprovedserviceagenton0345 257 7271
.
Problem
Problem
Problem
Problem Possible
Appliancedoesnot
start
Lightdoesnotwork
Appliancenotcool
enough
Foodfrozeninfridge
compartment
Noisyappliance�Notpositiononevensurface
Possible
Possible
Possiblecause
�Themainsplugisnotpluggedin.
Protectiondevicesorfusesofthe
�
electricalsystemathomeopen
Failurebulb
�
Coolingsystemnotsettleafter
�
transportation
�Doorsnotcloseproperly
�Frequentlydoorsopen
�Loadingfoodtoomuch
�Lowtemperaturesetting
�Doorsealdirtyorsticky
�Hightemperaturesetting�Adjustthetemperatureknob
�Applianceistouchingobjectsaround
�Bottlesandcontainersarecontacting
witheachother
cause
cause
cause Solution
Solution
Solution
Solution
�Insertthemainsplug.
Checktheprotectiondevicesand
�
fuses.
Replacethebulbpersection“Care
�
andMaintenance”
Leavetheapplianceatleast4hours
�
beforeswitchingon
�Checkanyfoodblockage
�Reducethefrequency
�Reducethefoodquantity
�Adjustthetemperatureknob
�Cleanpersection“Careand
Maintenance”
�Installonevensurfaceandleveling
theappliance
�Ensurespacingatbothsidesand
abovetheappliance
�Separatethem
10
Page 12

TechnicalSpecifications
Model
Model
Model
Model
Energyefficie ncycla ssA+
EnergyefficiencyclassA+
Energyconsumpt ion–Kwh/year1
Energ yconsumpt ion–Kwh/year135
Netstorage–volumefreshfood(litres) 335
Netstorage–volumefreshfood(litres)
Netstorage–volumefrozenfood(litres)/
Netstorage–volumefrozenfood(litres)/
Totalnetstorage(litres)
Totalnetstorage(litres) 335
Frozenfoodcompartmentrating/
Frozenfoodcompartmentrating/
Climateclass
Climateclass ST
OperatingnoiseleveldB(A)42
OperatingnoiseleveldB(A)42
Mimmum Operation Temperature 16°C
Weapologizeforanyinconveniencecausedbyanyminorinconsistenciesintheseinstructions,whichmay
occurasaresultofproductimprovementsanddevelopment.
BTL60170W
ThisappliancecomplieswiththefollowingEECdirectives:
2006/95/EECLowvoltagedirective
2004/108/EECEMCdirective
Disposalinformation
Thesymbolontheproductoritspackagingindicatesthatthisproductmaynotbetreatedas
householdwaste.Insteaditshouldbehandedovertotheapplicablecollectionpointforthe
recyclingofelectricalandelectronicequipment.Byensuringthisproductisdisposedof
correctly,youwillhelppreventpotentialnegativeconsequencesfortheenvironmentand
humanhealth,whichcouldotherwisebecausedbyinappropriatewastehandlingofthis
product.Formoredetailedinformationaboutrecyclingthisproduct,pleasecontactyourlocal
counciloffice,yourhouseholdwastedisposalserviceortheshopwheretheproductwas
purchased.
Remember:
Remember:
Remember:
Remember:Old
harmful
ha rmful
harm ful
harmfu l-
11
-
if
-
if
-if
if in
in
in
indoubt,
Old
fridges
Old
fridges
Oldfridges
fridgesmust
doubt,
doubt,
doubt,contact
contact
contact
contact you r
must
must
mustbe
be
dispo sed
be
disposed
bedis posed
disposedof
your
local
your
local
yourlo cal
localcou ncil
of
carefu lly
of
c arefully
ofcareful ly
carefully-
council
council
councilf or
for
d etails
for
details
fordetails
detail son
-
older
-
-older
models
older
models
old ermodel s
modelscontain
on
how
on
how
onhow
howto
contain
contain
cont ainCFC
to
di spose
to
dispose
to dispose
disposeof
CFC
g ases
CFC
gases
CFCgases
gasesthat
of
an
old
of
an
ol d
ofa n
anold
oldfr idge.
th at
that
thatare
f ridge.
fridge.
fridge.
are
are
are
Page 13

Guarantee
PRODUCT
PRODUCT
PRODUCT
PRODUCTGUARANTEE
Thisprodu ctisguaranteedagainstmanufacturingdefectsforaperiodof
Thisproductisguaranteedfortwelvemonthsfromthedateoforiginalpurchase.
Anydefectthatarisesduetofaultymaterialsorworkmanshipwilleitherbereplaced,
refundedorrepairedfreeofchargewherepossibleduringthisperiodbythedealerfrom
whomyoupurchasedtheunit.
Theguaranteeissubjecttothefollowingprovisions:
�Theguaranteedoesnotcoveraccidentaldamage,misuse,cabinetparts,knobsor
consumableitems.
Theproductmustbecorrectlyinstalledandoperatedinaccordancewiththeinstructions
�
containedinthismanual.
�Itmustbeusedsolelyfordomesticpurpose.
�Theguaranteewillberenderedinvalidediftheproductisre-soldorhasbeendamagedby
inexpertrepair.
Specificationsaresubjecttochangewithoutnotice.
�
Themanufacturerdisclaimsanyliabilityfortheincidentalorconsequentialdamages.
�
�Theguaranteeisinadditionto,anddoesnotdiminishyourstatutoryorlegalrights.
�IntheeventofaproblemwiththeproductwithintheguaranteeperiodcalltheCustomer
Helplineon0345 257 7271.
GUARANTEE
GUARANTEE
GUARANTEE
Year
Guarantor:Argos Ltd
489- 499AveburyBoulevard
CentralMiltonKeynes
MK92NW
12
 Loading...