

Page 1
DAB+ CD Mico System
with Universal Dock for iPod
The Gold Technical Support Line: 1902 215 259
Personal Product Support
(Charges will apply at $2.95 per minute)
BMS05DABIP
Page 2

BMS0 5D ABIP
Int r oductio n
Than k yo u for buy in g this Bu sh p roduc t, w hich is d es igned t o gi ve you ma ny y ears of t ro uble
free s er vice.
You ma y already b e familia r with usin g a similar u nit, but pl ease take t im e to read t he se
inst ru ction s. T he y are des ig ned to fami liarise y ou with the u nit's man y feature s and to ensu re
you ge t th e very be st f rom you r pu rchas e.
Safe ty i s impor ta nt
Your s afety and t he safety o f others is i mportan t.
Plea se t heref or e, ensu re y ou read t he “ Safet y In struc ti ons” befo re you oper ate this un it.
War ranty
In the u nl ikely e ve nt that y ou r produ ct f ails to w or k norma ll y, pl ease call t he below fr ee phone
numb er t o discu ss t he prob le m with on e of o ur qual if ied ser vi ce engi ne ers.
Australia.
Bush Warranty: 1800 509 394
New Zealand
Bush Warranty: 0800 450 259
2
Page 3

BMS0 5D ABIP
SA F ETY PREC AUTI ONS
To achieve the utmost in enjoyment, performance and in order to become familiar with its features, please
read this manual carefully before attempting to operate the unit.
The below safety and operating instructions should be retained for future reference.
* Do n ot e xposed this M ic ro S ys te m to a ny t ypes of l iq ui d as t he y wi ll c ause serious da ma ge t o th e un it . Do
not place any objects filled with water on or near the unit.
* Do no t p la ce th e u ni t i n areas with direct s un li gh t o r c lo se to he at ra di at in g appliances, such as; he at er s
etc. Th is m ay c au se t he u ni t to o ve rh ea t an d da ma ge t he u ni t.
* Keep the unit in area that is well ventaliated and is not dusty.
* P la ce th e u ni t on a clean fl at su rf ac e t ha t d oe s n ot expe ri en ce vibration or is ex po se d t o h um id or mo is t
conditions.
* Do not place any candles on or near the unit.
* Make sure you dispose of your old batteries in a safe and eco-friendly way.
* D o not a ll ow anything t o co ve r or ob st ru ct t he units ve nt il at io n openings. A m in im um of 1 0c m should be
kept around the unit for ventilation.
* Please o pe ra te a ll f ea tu re s an d fu nc ti on s as outl in ed in t hi s ma nu al . A ny modi fi ca ti on s or non- ou tl in ed
activities will make the warranty void.
* Make sure you co nn ec t the power cord co rr ec tl y and turn the po we r on at the mai ns po we r before
operating the unit.
Make su re yo u use the iP od Do ck connectors t o c on ne ct your iPod t o t he unit. This will pr ot ec t b ot h the
*
unit and you iPod.
* Store your CDs in a cool area to avoid any damage.
* T he re a re n o serviceable parts i n th is unit . If you have any i ss ue s wi th the op er at io n of this unit pl ea se
contact the Bush Service and Wa rr an ty n um be r pr ov id ed o n th e fr on t pa ge o f th is m an ua l.
Important Notes
CAUTION:
USER SERV IC EA BL E PAR TS I NS ID E, R EF ER S ERVICING TO Q UA LI FI ED S ERVICE PERSONNEL.
WARNING :TO PR EV EN T FI RE O R SH OC K HA ZA RD , DO N OT E XP OS E TH IS APPLIANCE TO DRIPPING
Note:
a p ro bl em with t he unit. This un it includes m ic ro -p ro ce ss or s w hi ch m ay ma lf un ct io n as a result of external
electrical interference/noise or e le ct ro st at ic d is ch ar ge . If the un it is not working properly, di sc on ne ct the
power source and then reconnect it.
TO REDUCE THE RISK OF ELECTRIC SHOCK DO NOT REMOVE COVER (OR BACK), NO
DANGEROUS VOLTAGE
This unit i s a conductor of da ng er ou s v ol tage, do no t o pe n or modify th is un it to a vo id an y r is k
of electric shock to persons within this product's enclosure.
ATTE NT IO N
The owner's man ua l co nt ai ns i mp or tant operating an d ma in te na nc e in st ru ct io ns , for your
safety, it i s ne ce ss ar y to r ef er t o th e ma nu al .
OR SPLASHING WATE R OR L IQ UI D .
This u ni t wi ll become w ar m when us ed f or a lo ng p er io ds of t im e. T hi s is normal a nd does n ot i nd ic at e
3
Page 4

BMS0 5D ABIP
Co n tents
FEATURES AND CON TR OL S… ….... .. ...…… …… ………………… ………………… .……………. ... 5
REMO TE C ON TR OL…………. .. ..... .. …………… …… ………………… ..…………… .……………. .. 6
REMO TE B ATTERY OPERATIO N........ .. .. .. ......... .. .. .. ........... .. .… …………... ...………… ………… 6
LIST EN IN G TO YO UR RADIO
STATI ON P RE SETS (remot e co nt ro l only)
FACTORY RE SE T
LIST EN IN G TO YO UR COMPAC T DI SC S
LIST EN IN G TO YO UR iPod
CHAR GI NG U P YOUR iPo d
AUX IN PU T… ………………… ………………… …… …………… .. .…... .. ..... .. ....... ......… ……….. 11
ON TIMER FUNCT IO N
SLEE P FUNCTI ON
PRES ET EQ (rem ot e co nt rol only)
X-BA SS F UN CT ION (remote c on tr ol o nly)
MUTE F UN CT IO N (remote con tr ol o nl y)
BACK LI GH T FU NC TI ON …………… …… …...……… ……..... ....... .. ..... .. ..... .. ..... .. ....... ....... ..... 12
HEAD PH ON E IN PUT
COMPACT DI SC…………… ………...… …… ..... .. ..... .. ..... .. ....... ....... ....... .. ..... .. ..... .. ....……. .. 13
SPEC IF IC ATI ON
SUPP ORTED iP od D EV IC ES…………. .. ..... .. ..... .. ..... .. ....... ....... ....... .. ..... .. ..... .. …………... ... 14
WAR RA NT Y……………… ………………… ………...… ……….……… …… ...…… …… …………… 1 5
………… …… …………… …… …………… …… ……... …… ….... .. ....... .....…… .. 9
………… …… …………… …… …………… …… ...…. .. ....... ....... ....……… ….. 12
………… …… …...… …. ..... .. ..... .. ....... ....... ....... .. ..... .. ..... .. ....... ……….. 12
………… …… ……... .. ..... .. ..... .. ....... ....... ....... .. ..... .. ..... .. ....... ..…………… .. 13
…….. …… …………… …… …….…… …… ….... .. ....... ...………… . 7-8
………. .. ..... .. ..... .. ....... ....... ....... .. ..... .. ..... .. ...…… .… 9
…….… …… ……... …… ……... .. ..... .. ....... ....... …….. 9-11
………… …… …………… …… …...… …… ..... .. ....... ....... ....... .… ….. 11
………… …… …………… …… …………. .. ..... .. .....…. ..…………… .. 11
………… .… …………… …… …………… …… ..... .. ....... ....... …………….. 11
………… …… …………… …… ……….. .. ..... .. …...……… …….. 12
………… …… ……….. .… ….... .. ..... .. ....... .....…… ….. 12
………… …… ……... …… ….... .. ..... .. ....... ....... ....……. . 12
4
Page 5
BMS0 5D ABIP
FE AT URES AND C O NTRO L S
1 234 5 6 7 8 91011
12 1 3 14 15 16 17
18
19
23 24
21 2 2
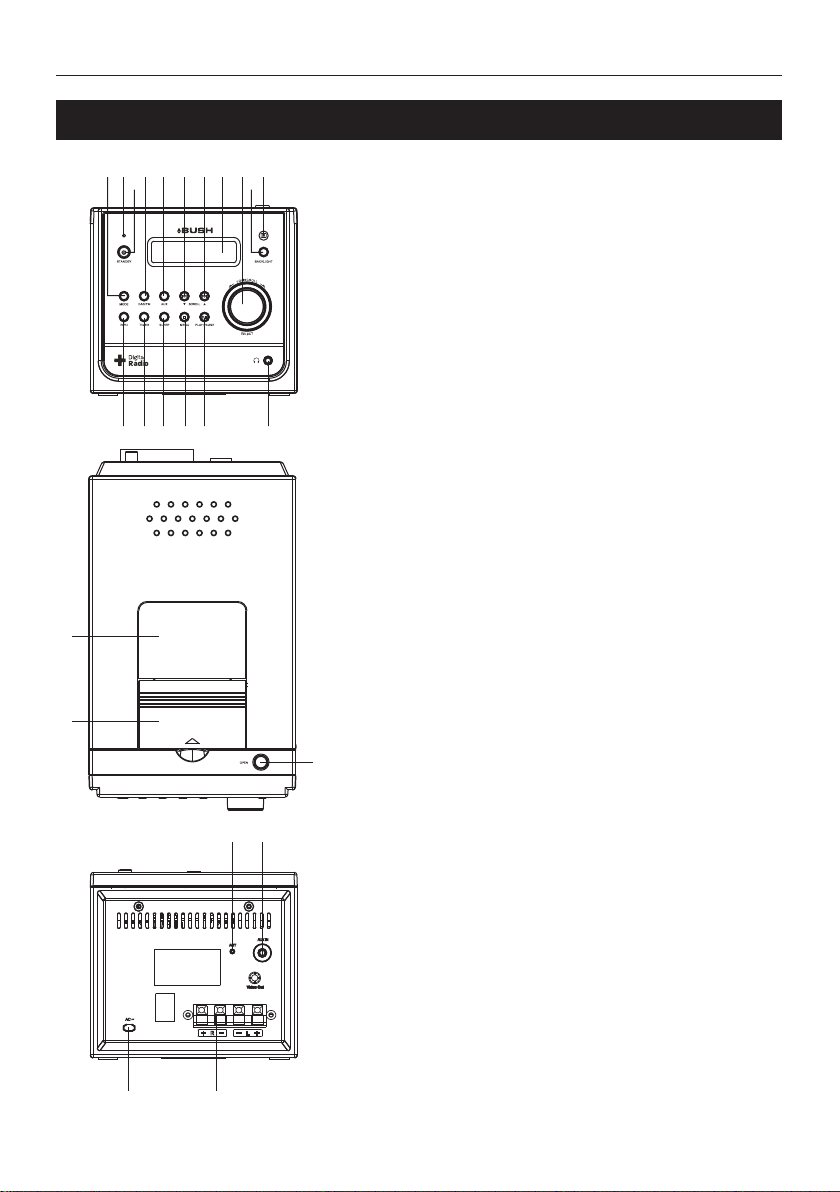
1. iPod/ CD B UT TON:
Press to s el ec t iP od o r CD f un ction.
2. STANDBY IND IC ATOR:
This wil l li gh t up w he n th e un it is in Standby mode .
3. STANDBY BUT TO N:
Press to t ur n th e un it o n or o ff .
4. DAB+/ FM BUTTON:
Press to s wi tc h be tw ee n DA B+ and FM Radio mode.
5. AUX BUTTON:
Press to s el ec t Aux I np ut m od e.
I◀◀/ ▼
6. SCROLL BU TT ON :
Press to s cr ol l do wn t hr ou gh the menu setting s or t o
skip bac kw ar ds t hr ou gh i Pod/CD/AUX In mod es .
▶▶I / ▲
7. SCROL L BU TTON:
Press to s cr ol l up t hr ou gh t he menu settings or t o sk ip
forwar ds t hr ou gh i Po d/ CD/AUX In modes.
8. LCD DIS PL AY:
The LCD Di sp la y wi ll s ho w yo ur Menu, Radio, Mus ic e tc
inform at io n.
9. VOL/S CR OL L CONTROL & SEL EC T BUTTON:
Rotate t he c on tr ol t o ad ju st the volume or to scr ol l th ro ug h
the menu . Pr es s th is b ut to n to confirm any sele ct io ns .
10. BACK LI GH T BUTTON:
Press to t ur n th e LC D Di sp la y backlight on or off.
11. IR SENSOR:
This is wh er e yo ur r em ot e co ntrol signal is rec ei ve d.
12. DISP LAY/INFO BUTTON:
Press to s cr ol l th ro ug h DA B+ scrolling text i nf or ma ti on .
13. TIMER BUTTO N:
Press to s et t he o n ti me r fu nc tion.
14. SLEE P BUTTON:
Press to s et u ni t sl ee p ti me f unction.
15. STOP/MENU BUTTON:
Press to s to p pl ay i n iP od /C D/Aux In Mode or pres s to
access t he M ai n Me nu .
16. PLAY/PAUS E BU TTON :
Press to p la y or p au se i n iP od /CD/Aux in mode.
20
17. HEAD PH ON E JA CK :
This inp ut a ll ow s yo u to c on nect your headpho ne s fo r
person al l is te ni ng .
18. CD DOO R:
CD Door wi ll o pe n wh en y ou p ress the open butto n th en
load or re mo ve d is c.
19. iPod D OC KI NG S TATION DOOR:
Slide do or t o op en a nd t he n co nnect your iPod.
20. OPEN B UT TON:
Press to o pe n th e CD D oo r.
21. ANTEN NA :
This is th e Ant en na I np ut . En sure the Antenna wir e is
straig ht t o re ce iv e th e be st reception.
22. AUX IN JA CK :
The Aux Inp ut a ll ow s yo u to c on nect your other aud io s
source s i. e. M P3 P la ye r.
23. AC CORD :
The AC Cord i np ut a ll ow s yo u to c onnect your uni t to y ou r
main pow er s ou rc e.
24. SPEA KE R TERMIN AL S:
Extend t he s pe ak er w ir es a nd connect them to th e
speake r te rm in al s.
5
Page 6

BMS0 5D ABIP
REMOTE CONTROL
1. STANDBY BUTTO N:
2. iPo d/ CD B UT TO N:
3. SEL EC T/ RE PEAT BUTTON:
in CD/iP od /A ux In mode.
I◀◀/ ▼
4. S CR OL L BU TT ON :
throug h iP od /CD/AUX In mo de s.
NAVIGATE DO WN/FOLDER B UT TO N: P re ss t o recall stor ed s ta ti on presets or t o sc ro ll
5.
down wa rd s in t he MP3 folder.
6. PROGR AM B UT TO N:
7. X-BAS S BU TT ON :
8. VOLUM E - BU TT ON :
9. MUTE BU TTON :
10. DA B+ /F M BU TTON :
11. AUX BUTTO N:
▶▶I / ▲
12. S CR OL L BUTTON:
settin gs o r to s kip forward s th ro ug h iPod/CD/A UX I n mo de s.
13. PL AY/PAUSE BUTTON:
Mode or pr es s to a ccess the Mai n Me nu .
NAVIGATE UP / FO LD ER BUTTO N: Press to rec al l st or ed
14.
statio n pr es ets or to scrol l up wa rd s in the MP3 fold er.
15. STOP/MEN U BU TTON :
Mode or pr es s to a ccess the Mai n Me nu .
16. RA ND OM B UT TO N:
17. BA CK LI GH T BU TTON :
on or off.
18. DI SP LAY/I NF O BU TT ON :
scroll in g te xt informat io n.
19. EQ B UT TON:
20. VO LU ME + B UT TO N:
Pres s to t ur n th e unit on or off.
Pres s to s el ec t iPod or CD func ti on .
Pres s to c on fi rm selectio ns i n th e ma in menu or pres s to r ep ea t play
Pres s to s cr ol l down throug h th e me nu s ettings or to s ki p ba ck wards
Pres s to s to re s tation pres et s or t o pr ogram song pl ay li st .
Pr es s t o tu rn X -B as s f un ct ion o n or o ff.
Pres s to d ec re ase the volum e.
Pres s to t ur n th e sound off completel y.
Pres s to s wi tc h between DAB + an d FM R ad io modes.
Pres s to s el ec t Aux Input mode .
Pres s to s cr ol l up through th e me nu
Pres s to s to p pl ay in iPod/CD /A ux I n
Pres s to s to p pl ay in iPod/CD /A ux I n
Pres s to s el ec t random play f un ct io n.
Pres s to t ur n th e LCD Display b ac kl ig ht
Pres s to s cr ol l through DAB +
Pres s ti s cr ol l through the E Q Pr es et o ptions.
Pres s to i nc re ase the volum e.
1
2
3
4
5
6
7
8
11
13
14
15
16
17
18
19
20
10
12
9
REMOTE BATTERY OPERATION
Pres s downwards on the compartment cover of the remote control to
1.
open battery compartment.
2. Place the battery (CR2032) into the battery compartment according
to the polarity marking(place the “+” sign upwards).
lace the cover by inserting the cover and pressing downwar ds.
3. Rep
Make sure it snaps in.
Note: Remove the battery from the remote control if not in use for a long
period of time. Do not mix normal batteries with rechargeable batteries.
When the battery becomes weak, the remote control will not function to the
best of its ability. Be sure to replace with a new battery if that happened.
BATTERY PRECAUTIONS
1. Please only use the battery type outlined in this manual.
2. Place the battery into the remote as outlined above only.
Be sure to follow the correct polarity when installing the battery as indicated in the battery compartment.
3.
Do not expose battery to heat.
6
** Battery Included **
Page 7

BMS0 5D ABIP
LI S TENING TO YOUR RAD IO
Hints fo r be tt er reception
This uni t is fitted w it h a si ng le lea d wire D AB +/ FM antenna, to o btain the bes t perf or mance, y ou
shou ld fully extend th e wir e antenna and ad ju st th e posit io n as we ll as the di rection u ntil yo u find the
best r ec ep ti on. For i de al D AB+ recepti on , al ways main ta in t he lead wir e an te nna in a ve rt ic al
posi ti on i s hi ghly recomm en de d.
Gettin g st ar ted DAB+ mode
When t he unit is powered up f or the fi rs t time, i t wi ll be in stand by mode . Th e display w il l show as
“00: 00 ”. P ress th e STAND BY B utton t o tu rn the on a nd it w il l automat ic al ly e nter in to t he DA B+ m ode
and perform full station scan . D ur in g t he scan th e d is pl ay will show “S ca nning … ” t og et he r w it h a
slid e b ar th at in di cates the progr es s o f t he sc an an d t he amount of stati on s t ha t h av e b een found so
far. (F. 1) ( F. 2) (F. 3)
F1
Once th e scan has fin is he d, the ra di o will You can no w wit h the
F2
F3
sele ct th e first sta ti on found.
VOL/SC RO LL Co nt rol or p ress the SCROLL ▲ o r ▼ Butto ns ex pl or e t he ne w D AB+ s tations. Press
the SELE CT B ut ton to select
the st at io n yo u wish to liste n to .
Note: I f there a re no s tations f ou nd af te r the f ull s ca n, the ra dio w il l ent er into t he Tune Select Me nu
and you c an p re ss t he S CR OL L ▲ or ▼ Button s and the S ELECT Button to Ma nu ally S can fo r th e
DAB+ stations in your a re a. Visit www.digita lr ad ioplus.co m. au to che ck you r p os tc odes receive s
digi ta l ra di o.
Clock
The c lo ck i f you can receive DAB + sign als in y ou r
will onl y be shown and aut om atically u pd ated
loca ti on . Wh ile the clock s yn ch ro nises to the cu rr en t lo cal time plea se k ee p the unit in DAB + mo de .
DAB+ Ful l Sc an
When yo u cond uc t a F ul l Scan th e unit wi ll sea rc h for a ll avail ab le DAB+ s ta ti ons. O nc e the s ca n is
comp le te , th e stations wi ll b e st or ed in alphanu me ri ca l order.
1. To co nduct a D AB + Fu ll Scan, pr es s the MENU Bu tt on a nd scro ll t o the Tune S el ec t Menu. Then
pres s the SCROLL ▲ or ▼ Butt ons to s el ect “Full sca n” and press t he SELECT But to n to
conf ir m. The d is pl ay w ill show “Sca nn in g...” and a pro gr es si ng slide bar. (F.4 ) (F.5 )
2. All the statio ns f ou nd w il l be s to re d au to matically. To scr ol l th ro ug h th e
the
VOL/SC RO LL C ontrol or p re ss t he S CROLL ▲ or ▼ Button s an d pr ess the SELEC T Bu tt on
stor ed sta ti on s ro ta te
to con fi rm a nd p lay selecte d st at io ns.
F4
F5
DAB+ Man ua l Sc an
1. To con du ct a M an ual Station Sca n, p re ss t he M EN U Bu tton and enter th e Tun e Se le ct M en u.
Then press th e SCROL L ▲ o r ▼ Bu tt on s to select “M anual t un e”. P re ss th e SELECT Button to
conf ir m. ( F. 6)
2. Rota te the VOL/SCROLL Contro l or pr ess th e SC RO LL ▲ or ▼ Button s to mo ve t hr ough t he
DAB+ stati on fre qu en ci es. “5A t o 13 F” w il l di sp la y on t he s cr ee n wi th t he ir a ss oc iated
freq ue nc ie s (F. 7)
3. When your des ir ed fre qu en cy app ea rs on the display, pres s t he SELECT But to n t o c on firm.
The na me o f th e st ation group ( en se mb le/multip le x) w il l also be displ ay ed .
4. To liste n to t he s ta tion select ed , pr es s on the SELECT B ut to n ag ain.
F6 F7
7
Page 8

BMS0 5D ABIP
LI S TENING TO YOUR RAD IO
DAB+ Dis pl ay M odes
Ever y t im e y ou press the DIS PL AY/INFO Bu tt on , t he display wi ll cy cl e through t he fo ll owing displa y
info rm at io n:
Time/Date
Freque nc y
Audio Bi t Ra te
DLS
Ensemb le /Multiple x (G roup name )
Time and date
The ti me an d date wi ll be t he time and da te provid ed by t he broadc as te r. In th e unl ik el y eve nt that n o
cloc k in fo rm ation is rece iv ed , th e display wil l sh ow “ [N o Time]”.
Freque nc y
The fr eq ue nc y of the presen t st at io n will be displ ay ed .
Audio bi t ra te
The di sp la y wi ll show the dig it al a ud io bit rate bei ng r ec eived.
Signal s tr en gth
The disp la y wi ll s ho w a sl id e ba r to i nd ic ate the signal streng th , th e st ro nger the signal, the long er
the ba r wi ll b e fr om left to righ t.
DLS
DLS sta nds fo r Dynamic Lab el Seg me nt which is the sc rolling te xt infor ma ti on pro vi de d by th e
broa dc as te r. Th e in fo rmation dis pl ay ed may includ e so ng t it les, album in fo rm at ion etc.
Progra mm e ty pe
This d escribes the s ty le of t he prog ra mm e tha t is be in g broad ca st . If th e inf or ma ti on is not av ai lable,
the di sp la y wi ll show “[No PT Y] ”.
Ensemb le /M ultiplex (Gro up n am e)
The En se mb le /Multiple x is t he s ta tion broadc as te r in formation .
Note: Pre ss and hold t he DIS PL AY/INFO Butto n f or lon ge r than 2 se co nds to view the softwar e
info rm at io n.
FM Radio
1. To switch to FM, press the DAB+ /FM Button. (F. 8)
2. To search fo r th e ne xt a vailable frequenc y, press and hold the I◀ ◀ o r ▶ ▶I But tons. T he s earch
wil l stop automatical ly once a station has been found.
3. To manuall y se arch fo r th e ne xt available frequency, press the I◀ ◀ or ▶ ▶I Butt ons or press th e
SELECT But ton the n rotat e the VOL/SCROLL Control until t he desi red fre quency is displayed on
the screen.
4. To select audio m od e, p re ss the PLAY/PAUSE Bu tt on t o toggle betw ee n th e “Stereo” or “ Mo no ”
sele ct io n.
Note: The rad io will automaticall y swi tch betwee n stereo and mono mode, but you can overr ide t his
and switch this funct ion manually which is helpfu l for poor signal reception.
Progra mm e Typ e
Signal s tr ength
F8
8
Page 9

BMS0 5D ABIP
STATION PRESETS (remote control only)
You can store 10 DAB+ or 10 FM Station s Pre sets for easy access to your favo urite station s.
1. To stor e a Station Pres et, tun e to t he desired statio n and press a nd hold t he PROG RAM But ton on
the remote contr ol un til the di splay shows the preset numbe r. (F. 9)
2. Pre ss the SCROLL ▲ or ▼ Button to sel ect the de sired Station Pres et nu mber.
3. Pre ss the PROGRAM Button again to confirm you r selecti on, the display wil l show “Pr eset #
sto red”. (F.10)
4. To r ecall a Station Preset that y ou have store d, press the Bu ttons on the
rem ote control, the display will show the preset numbe r and the associated in formation. (F.11)
NAVIGATE/FOLDER
F9
FACTORY RESET
To conduct a Factory Reset, please foll ow th e bel ow in structio ns. Please note this will clear all se ttings.
1. Press and hold the MEN U But ton until the display shows “Pres s SELECT to confirm reset” .
2. Release the MENU Button and press the SELECT Button , the displ ay will sho w “Resta rting …”
and once reset is complete it will then perform full statio n sca n.
3. After the scan has fin ished, the radio will select and displ ay the first
Note: All of your stor ed DAB+ & FM pr esets will be lost once the reset has taken place.
LISTENING TO YOUR COMPACT DISCS
NOTE : Alth ough this CD/MP3 pla yer can r ead CD-R and CD-RW di scs in ad dition to normal CDs , the
pla yability of CD -R and CD-RW di scs may be affected by the type of sof tware that was us ed to create
the discs, as well as the quality and con dition of the blank media you are usin g.
Thi s is not an ind ication of a problem wi th th e pla yer.
Playing a CD
1. Press the iPod/CD Butto n to selec t CD function . The display will show “CD” and “NO DISC” if you
hav e not yet inserted your CD. (F.12) (F.13)
2. Pre ss the OPEN B utton on the top panel to op en the CD door, load the di sc wit h the printe d labe l
sid e facin g up a nd then close the CD door. The di splay will fi rst sho w “READ ING” and then the
tot al track numb er an d tim e. (F.14)
3. To start playb ack from the be ginni ng, press the PLAY/PAUSE Button, the disp lay will sh ow the
cur rent track nu mber and the el apsed time. (F.15)
4. If a CD/MP3 di sc is bein g played, the displ ay will show “MP 3” togeth er with th e current folder and
tra ck number. To see the ID 3 tag if availa ble, press the DIS PLAY/INFO Button.
5. Pre ss th e PLAY/PAUSE Button to pla y or pa use the CD. The d isplay will sho w “ II ” when the uni t is
pau sed. (F.16)
6. To resume playba ck, press the PLAY/PAUSE Bu tton again.
7. To stop playback , pre ss the ■ Butt on.
F10
F11
sta tion found.
F12 F13 F14
F15 F16
9
Page 10

BMS0 5D ABIP
LI S TENING TO YOUR COM PACT D I SCS
Select in g a di fferent track d ur in g play
1. To select a different tra ck d ur ing play, press the I◀◀ o r ▶▶I B uttons unti l yo ur d es ired track
numb er i s di sp layed. Rele as e th e bu tton for play ba ck .
2. To select othe r fold er s in t he M P3 d is c, p re ss t he Button s on the remot e
cont ro l.
3. To play th e ne xt t ra ck, press the ▶ ▶I Bu tt on.
4. To play th e cu rr en t track again f ro m th e be ginning dur in g pl ay, p re ss t he I◀◀ Butto n.
5. To play th e pr ev io us track, pre ss t he I◀ ◀ Button twic e.
Repeat p la y (r emote control o nl y)
Duri ng no rm al pl ay back, you can press the REPEAT Button on the remote cont ro l to sel ec t the
repe at p la y fu nction:
1. To repeat the sam e tr ac k, p ress the REPEAT Button o nc e, t he display wi ll s ho w “ 1 ” (F. 17 )
2. To repea t th e en ti re disc, pres s th e RE PE AT Bu tt on a gain, the dis pl ay w ill show “ ”. (F. 18)
3. If you a re p la yi ng a MP3 disc, an a dd it io nal “ ” option wi ll a pp ea r. Th is w ill repeat th e
curr en t fo ld er. (F. 19)
4. To cancel repeat play, re pe atedly press the R EP EAT Bu tt on until the repe at ic on di sappears
from t he d is pl ay.
Random p la y (r emote control o nl y)
1. During C D oper ation, p re ss the RAN DO M Button t o start rando m play, the dis play w il l show
“RAN DO M” a nd t he tracks wil l be p la ye d randomly. (F.20)
2. To r es um e norma l playback, pres s the R AN DOM B ut to n again a nd “RAN DO M” will di sa pp ea r
from t he d is pl ay.
3. To cance l ra nd om p lay, pr es s the ■ Button.
Progra m pl ay ( remote contro l on ly )
You can use the p rogram play feature to play u p t o 2 0 track s on a d isc i n a ny de si re d o rd er. You may
also p ro gr am a p articular t ra ck t o pl ay several ti me s wi th in a programm ed s eq uence.
1. Loa d yo ur d is c as usual and wa it u nt il t he display sh ow s th e to tal number of t ra ck s on t he disc.
2. Ensu re it is in CD mode, press the PROGR AM B ut to n on t he r em ot e co ntrol once, the displ ay
will s ho w “M EM ” and “P-01”. (F.2 1)
3. Pres s the I◀ ◀ or ▶ ▶ I Bu tt ons to s elect the first track numbe r to be progra mm ed . Wh en t he
desi re d tr ack numbe r ap pe ars in th e di sp lay, press the P RO GR AM Button t o co nfirm and i t is
prog ra mm ed . Th e pr og ram memory nu mb er w ill advance t o “P -0 2” a nd ready for th e ne xt e nt ry.
4. If a MP3 d is c is b ei ng loaded, pr es s th e B ut to ns to select th e fo ld er.
5. Repe at the ab ov e st ep s to pr og ram ot he r trac ks , a max im um num be r of 20 tra ck s can be
prog ra mm ed . When yo u have co mp le ted pro gr am mi ng, pre ss t he PLAY/PAUS E Button to b eg in
prog ra m p la y, pla yb ac k w il l b e s tarted on the firs t t ra ck yo u p ro grammed and wil l c on ti nu e u ntil
the la st p ro gr ammed track h as p la ye d.
6. When th e program pla y is complete d, th e player st op s and “PR OG ” will be di sp la ye d. The
play er rem ai ns i n the progra m pl ay mod e. Pre ss the PLAY/ PAU SE B ut to n wi ll p la y th e
prog ra mm ed s equence aga in .
7. To erase t he p rogram, in CD s to p mode, pre ss t he ■ Button o nc e; i n CD play m od e, p ress the ■
Butt on t wi ce . “PROG” will d is ap pe ar in the displ ay.
NAVIGATE/ FOLDER
NAVIGATE/ FOLDER
F20 F21
F19F18F17
10
Page 11

BMS0 5D ABIP
LI S TENING TO YOUR COM PACT D I SCS
Repeat p ro gr am play (remote c on tr ol only)
You may use the program play and the repea t play fe atures tog ether to con ti nu ously re pe at a
prog ra mm ed p layback. Fi rs t pr ogram the des ir ed p la yback seq ue nc e, t hen press the R EP EAT
Butt on t o se le ct repeatin g th e cu rr ent track or th e en ti re p rogrammed s eq ue nce.
LI S TENING TO YOUR iPod
This u ni t al lo ws you to play al l yo ur f av orite songs f ro m yo ur i Pod through t he i Po d dock.
1. To select iPod op er at io n, press the iPod /C D Bu tton until th e di sp lay shows “In se rt i Po d”.
Slid e the d oo r
2. of iPod do ck in g stati on loca ted o n the t op of the un it , ins er t your iP od into th e
dock in g tr ay, o nc e co nn ected the dis pl ay w ill show “iPo d” o n th e di splay.
3. Pres s th e ►I I Bu tton to Play or P au se t ra cks on your iPo d.
4. Pres s th e ▶▶I o r I◀ ◀ Butt on s to s ki ps to the next or p re vi ou s iPod track.
5. To acces s th e “i Po d Menu”, pres s th e ME NU b utton.
6. To sc ro ll up o r down in the “i Po d Menu”, pr ess th e B ut to ns on t he remot e
cont ro l.
7. To confi rm t he s el ection in the “ iP od M en u”, press the SEL EC T Bu tton on the rem ot e co nt rol.
CH A RGING U P YO UR iPo d
You can cha rg e your iPod when you d oc k your iPod i n both stan dby or on m od es. It will c ha rge
auto ma ti ca lly when it is do ck ed .
NAVIGATE/ FOLDER
AUX INPU T
A 3.5mm S te re o AUX I N is located at t he b ac k of t he unit, you ca n co nn ec t any other mus ic p la ye r
(MP3 P la ye r) to lis te n to .
1. You wil l ne ed a n Aux ilary Cable ( no t in cl uded) to conn ec t yo ur other audi o so ur ce s.
2. Press t he A UX B utton to sele ct t he AU X In put mode, the d is pl ay w ill show “AUX ”.
3. Adju st t he v ol ume control f or y ou r de sired sound o ut pu t le vel.
devi ce s yo u wi sh
ON T I MER FUNC T ION
You ca n se t th e unit to turn on a t a se le cted time
1. P ress t he TIMER Bu tt on to s el ec t betw ee n “On” an d “Off”, y ou r sele ct io n will be display ed on
the sc re en .( F.22)
2. To set the timer, ensure the unit is in standb y mod e, pr es s a nd ho ld th e T IM ER Bu tt on until the
disp la y sh ow s “Timer S et ” an d the “hour” di gi t of t he t imer clock on t he d is pl ay will flash . (F.2 3)
3. Pres s th e ▲ or ▼ B ut tons to set the t im e an d pr ess the TIMER B ut to n to c onfirm.
4. When the ti me to switch on t he sy st em is set, p ress th e ▲ or ▼ B ut to ns to select the mo de yo u
wish t he u ni t tu rn on to (FM/DA B/ CD /i Pod). Press t he T IM ER B utton to conf ir m.
5. The displ ay wi ll th en fl as h t he vo lume level. Press th e ▲ or ▼ Bu ttons to select the on volume
leve l an d th en p ress the TIMER Bu tt on t o confirm and t he t im er s etting is now c om pl et ed.
F22 F23
11
Page 12

BMS0 5D ABIP
SL E EP FUNCT I ON
This f un ct io n allows you to p ro gr am t he system to sw it ch o ff a ft er a s et period of ti me .
1. To activate the s le ep f un ction, repe at ed ly p ress the SLEE P Bu tt on to select one of t he s le ep
time s be lo w.
90 80
70 60 30 10
Off
2. W hen the d is pl ay shows yo ur desired sl ee p time, r el ea se the butt on an d the sle ep ti mer will be
acti va te d. T he d is pl ay will show “ ” wi th t he t im e selected.
3. To can ce l the s le ep func ti on , repea te dl y press t he SLEEP Button un ti l the d is play sh ow s “Sleep
Off”.
PR E SET EQ (remo te contr ol o nl y)
Pres s the EQ Button on the remote co nt rol t o select di ff er ent p re se t EQ mo des, th e displ ay will s ho w
in the b el ow. P re ss the EQ Butto n re pe at edly to selec t de si re d mode.
X- BASS FUN CTION (rem ote contr o l o nly)
Pres s t he X-BASS B ut to n on th e r em ote cont ro l to turn th is functio n o n or off. The dis pl ay will s ho w
“X-B AS S ON ” or “ X-BASS OFF” . Wh en t he X -BASS is on, th e ba ss s ou nd is enhance d.
MU T E FUNCTI O N (remote c o ntrol only)
Pres s the MUTE Butt on on the remot e con tr ol to tu rn th e s ou nd off compl et el y. The displa y w il l f la sh
“MUT E” to show the functio n has been turned on. To ca nc el m ut e an d re st or e th e so un d, p re ss t he
MUTE B ut to n ag ain or the VOLUME + /- B ut tons and the “M UT E” w il l disappear f ro m th e di splay.
BACKLI GHT FUNCT ION
Pres s the B AC KLIGHT Bu tton to turn the di sp lay b ac kl ight on or o ff . The b ac kl ight wi ll au to ma ti cally
be off in standb y mo de .
HE A DPHONE I N PUT
A 3.5m m s te re o headph on e i np ut is loc at ed on the fron t p an el. Connec t a se t of stereo he ad phones
(not inclu de d) t o th is i np ut f or pri va te l is te ning. Th e ex te rnal speakers will be automat ic al ly
disc on ne ct ed when the hea dp ho ne s are in use.
IMPORTANT: When using he ad ph on es always set the volume to a l ow le ve l bef or e you pu t the
head ph on es o n. The n gr adually i nc re as e the volume to a c om fo rt able listen in g le ve l.
12
Page 13

BMS0 5D ABIP
CO M PACT D I SC
1. Alwa ys u se c om pact discs be ar in g th e mark as shown .
2. Not es o n ha nd ling discs
Removi ng t he d isc from its st or ag e ca se.
* Do not tou ch t he r eflective r ec or de d surface.
* Do not sti ck p ap er or write any th in g on t he
surfac e.
* Do not ben d th e di sc.
3. Stora ge
* Store th e di sc i n its case.
* Do not exp os e di scs to direct sun li gh t or high tempe ra tu re s, high humid it y or d us ty places.
4. Cle an in g a di sc
* Should t he d is c become soil ed , wipe off dust,
dirt and fingerprints w it h a so ft c loth.
* The disc shoul d be c le an ed from the cen tr e
to the edg e.
FROM THE CENTRE TO THE EDGE
CORRECT
INCORRECT
* Never us e be nz ene, thinne rs , re co rd cleaner fl ui d or a nt i static spra y.
* Be sure to c lo se t he CD door so the l en s is n ot c ontaminat ed b y du st .
* Do not tou ch t he l ens.
SP E CIFICAT ION
POWE R SU PP LY: 230V ~ 50 Hz
OUTP UT POWER : 5W X2
UNIT DIMENSI ON : 145
SPEA KE R DI ME NSION: 125
WEIG HT: 2.71 k g
RADIO SE CT IO N
FREQ UE NC Y RA NG E: D AB + 174 - 240 MHz
FM 87.5 – 108 MH z
COMPACT DISC SECT IO N
CD MED IA : CD -D A, C D-ROM, CD-R , CD -RW
DISC F OR MATS: CD- DA Di gi ta l Audio, ISO96 60 ( CD -R), ISO133 46 UD F (C D-RW )
Mixed mode a nd E nh an ced CD
MP3/WM A SECTION
BIT RATE : MP 3: 3 2-128kbps , WM A: 3 2, 4 8-192kb ps ,
Constant & V BR ( Var ia bl e Bi t Rate)
DISP LAY: MP3/WMA Tag (V1.0, V1. 1& V 2. 3) – Title, Artis t, Al bu m
(Up to 32 char ac te rs d isplayed fo r ea ch t ag)
TOTAL NO. OF TR ACKS /ALBUM : 99 9
AUX INPU T
INPU T VOLTAGE R AN GE: 350-500mV
IMPE DA NC E: 4 7K Ω
** SPECI FI CATIO N SU BJ ECT TO C HANGE WITHOUT F UR TH ER NOTICE
(L) x 23 5 (W ) x 13 0 (H ) mm
(L) x 16 8 (W ) x 13 0 (H ) mm
13
Page 14

BMS0 5D ABIP
SUP PORTED i Pod DE V ICES
14
Page 15

BMS0 5D ABIP
War ran t y
Plea se k eep you r re ceipt a s pr oof of pu rc hase. This pr oduct is wa rranted f or any defe ct in
mate ri als or wo rk mansh ip f or one ye ar a fter th e or igina l da te of pur ch ase. This pro duct is for
norm al d omest ic a nd office u se o nly. Th is w arran ty d oes not c ov er dama ge f rom mis us e or
negl ect, acci de ntal da ma ge, ver mi n infes ta tion, e xc essiv e vo ltage s su ch us lig ht ning or pow er
surg es o r any alt er natio n th at affects th e perform ance or rel iabilit y of the prod uct.
In the u nl ikely e ve nt that y ou r produ ct f ails to w or k norma ll y, pl ease cont act the Bus h
War ranty on 18 00 509 394 (A ustrali a) or 0800 45 0 259 (New Ze al and) an d ha ve your r ec eipt
of pur ch ase on ha nd .
This w ar ranty is su bject to th e followi ng provis ions:
● It is on ly v alid wi th in boun da ries of t he c ountr y of p urcha se ;
● The prod uc t must be c or rectly as sembled a nd operat ed in accor dance wit h the
inst ru ction s co ntain ed i n the man ua l;
● This pro du ct must b e us ed sole ly f or domest ic purpos es;
● The warr an ty does n ot c over acci dental da mage;
● The warr an ty will b e re ndere d in valid i f th e product i s resold or h as been dam aged by
inex pe rt repa ir ;
● The manu fa cture r di sclai ms a ny liabil ity for inc idental o r consequ ential da maged.
This w ar ranty is in a ddition t o, and does n ot dimini sh, your st atutory o r legal rig ht s.
PO BOX 6 28 7
Silv er water N SW 1 811
www.b ushaust ra lia.c om .au
Bush Warrant y: 1800 509 3 94 Austr alia
Bush Warrant y: 0800 450 2 59 New Zeal and
15
Page 16

BMS0 5D ABIP
16
PO BOX 6 28 7
Silv er wa te r NSW 1811
www.b us ha us tralia.co m. au
 Loading...