

Page 1
Instruction manual
Built-In Combi Fridge-Freezer
BIFFC55177
Page 2

You’ll soon be enjoying your new Built-In Combi Fridge-Freezer.
It all begins here, with your instructions. Don’t worry, there’s nothing too
technical coming up. Just simple, step-by-step guidance to get you up and
running quickly. Sound good? Then let’s get started.
Help and Guidance
We’re here to help you get the most from your Built-In Combi Fridge-Freezer. Should you require any
guidance, a simple solution can often be found online at:
www.argos-support.co.uk
If you still require further assistance, call one of our experts on 0345 257 7271.
If you require any technical guidance or find that your product is not operating as intended, a simple solution can often be found in the Troubleshooting section of these instructions,
2
Page 3

Contents
Safety information 5
1
General warnings 6
Safety warnings 7
2
Getting to know your Built-In
Combi Fridge - Freezer 9
Installing your Built-In Combi
3
Fridge - Freezer 13
Installing and Operating Your Fridge Freezer 14
Before Using Your Fridge - Freezer 14
Shipment and Repositioning 14
Electrical Connection (For UK type
plug) 15
Installation 16
7Product support 35
Help and assistance 37
Disposal 38
Guarantee 39
4
Functions 23
Thermostat settings 24
Super switch and Low ambient
switch 24
Warnings about Temperature
Adjustments 25
5
Using your Built-In Combi
Fridge - Freezer 27
Arranging Food in the Appliance 28
Tips for Saving Energy 29
Accessories 29
6
Care and maintenance 31
Cleaning and maintenance 32
Defrosting 32
Replacing the LED 33
Technical specification 34
or online at www.argos-support.co.uk If you still require further assistance, call one of our experts on 0345 257 7271.
3
Page 4

If you require any technical guidance or find that your product is not operating as intended, a simple solution can often be found in the Troubleshooting section of these instructions,
4
Page 5

Safety information
1
or online at www.argos-support.co.uk If you still require further assistance, call one of our experts on 0345 257 7271.
5
Page 6

Safety information
Important - Please read these instructions fully before installing or
operating
General warnings
WARNING: Keep ventilation openings, in the
appliance enclosure or in the built-in structure,
clear of obstruction.
WARNING: Do not use mechanical devices
or other means to accelerate the defrosting
process, other than those recommended by the
manufacturer.
WARNING: Do not use electrical appliances inside
the food storage compartments of the appliance,
unless they are of the type recommended by the
manufacturer.
WARNING: Do not damage the refrigerant circuit.
WARNING: To avoid a hazard due to the instability
of the appliance, it must be fixed in accordance
with the instructions.
•If your appliance uses R600a as
a refrigerant – you can learn this
information from the label on the
cooler- you should be careful during
shipment and installation to prevent
your appliance’s cooler elements from
being damaged. Although R600a is an
environmentally friendly and natural gas.
As it is explosive, in the event of a leak due
to damage to the cooler elements, move
your fridge - freezer from open flame
or heat sources and ventilate the room
where the appliance is located for a few
minutes.
•While carrying and positioning the fridge
- freezer, do not damage the cooler gas
circuit.
•Do not store explosive substances such as
aerosol cans with a flammable propellant
in this appliance.
- staff kitchen areas in shops, offices and
other working environments
- farm houses and by clients in hotels,
motels and other residential type
environments
- bed and breakfast type environments;
- catering and similar non-retail
applications
•If the socket does not match the fridge freezer plug, it must be replaced by the
manufacturer, its service agent or similarly
qualified persons in order to avoid a
hazard.
•A specially grounded plug has been
connected to the power cable of your
fridge - freezer. This plug should be used
with a specially grounded socket of 13
amperes. If there is no such socket in
your house, please have it installed by an
authorized electrician.
•This appliance can be used by children
aged from 8 years and above and persons
with reduced physical, sensory or mental
capabilities or lack of experience and
knowledge if they have been given
supervision or instruction concerning
use of the appliance in a safe way and
understand the hazard involved. Children
shall not play with the appliance. Cleaning
and user maintenance, shall not be made
by children without supervision.
•If the supply cord is damaged, it must be
replaced by the manufacturer, its service
agent or similar qualified persons in order
to avoid a hazard.
•This appliance is intended to be used in
household and similar applications such
as;
If you require any technical guidance or find that your product is not operating as intended, a simple solution can often be found in the Troubleshooting section of these instructions,
6
Safety information
Page 7
Safety information
Important - Please read these instructions fully before installing or
operating
Old and out-of-order fridges and/or freezers
• If your old fridge and/or freezer has a lock,
break or remove the lock before discarding
it, because children may get trapped inside it
and may cause an accident.
• Old fridges and freezers contain isolation
material and refrigerant with CFC. Therefore,
take care not to harm environment when you
are discarding your old fridge and/or freezer.
Please ask your municipal authority
about the disposal of the WEEE for the
reuse, recycle and recovery purposes.
Notes:
• Please read the instruction manual carefully
before installing and using your appliance.
We are not responsible for the damage
occurred due to misuse.
• Follow all instructions on your appliance and
instruction manual, and keep this manual in a
safe place to resolve the problems that may
occur in the future.
• This appliance is produced to be used in
homes and it can only be used in domestic
environments and for the specified purposes.
It is not suitable for commercial or common
use. Such use will cause the guarantee of the
appliance to be cancelled and our company
will not be responsible for the losses to be
occurred.
• This appliance is produced to be used in
houses and it is only suitable for cooling /
storing foods. It is not suitable for commercial
or common use and/or for storing substances
except for food. Our company is not
responsible for the losses to be occurred in
the contrary case.
Safety warnings
• Do not use multiple receptacles or extension
cord.
• Do not plug in damaged, torn or old plugs.
• Do not pull, bend or damage the cord.
• This appliance is designed for use by adults,
do not allow children to play with the
appliance or let them hang off the door.
• Do not plug-in or out the plug from the
receptacle with wet hands to prevent
electrocution!
• Do not place glass bottles or beverage cans in
the freezer department. Bottles or cans may
explode.
• Do not place explosive or flammable material
in your fridge - freezer for your safety. Place
drinks with higher alcohol amount vertically
and by closing their necks tightly in the fridge
department.
• When taking ice made in the freezer
department, do not touch it, ice may cause
ice burns and/or cuts.
• Do not touch frozen goods with wet
hands! Do not eat ice-cream and ice cubes
immediately after you have taken them out of
the freezer department!
• Do not re-freeze frozen goods after they have
melted. This may cause health issues like food
poisoning.
• Do not cover the body or top of fridge freezer with lace. This affects the performance
of your fridge - freezer.
• Fix the accessories in the fridge - freezer
during transportation to prevent damage to
accessories.
or online at www.argos-support.co.uk If you still require further assistance, call one of our experts on 0345 257 7271.
Safety information
7
Page 8

If you require any technical guidance or find that your product is not operating as intended, a simple solution can often be found in the Troubleshooting section of these instructions,
8
Page 9

Getting to know your Built-In Combi
Fridge - Freezer
2
or online at www.argos-support.co.uk If you still require further assistance, call one of our experts on 0345 257 7271.
9
Page 10

Getting to know your Built-In Combi Fridge-Freezer
You’ll be up and running in no time
Ready? Let’s begin...
Please read these instructions carefully. They
contain important information which will help
you get the best from your Built-In Combi Fridge
Freezer and ensure safe
and correct installation and operation.
If you require any further assistance, our technical
experts are happy to help. For full details, refer to
the product support section at the end of these
instructions.
10
If you require any technical guidance or find that your product is not operating as intended, a simple solution can often be found in the Troubleshooting section of these instructions,
Getting to know your Built-In Combi Fridge-Freezer
Page 11
Getting to know your Built-In Combi Fridge-Freezer
You’ll be up and running in no time
A
11
3
4
5
6
7
8
10
9
B
1
2
12
13
14
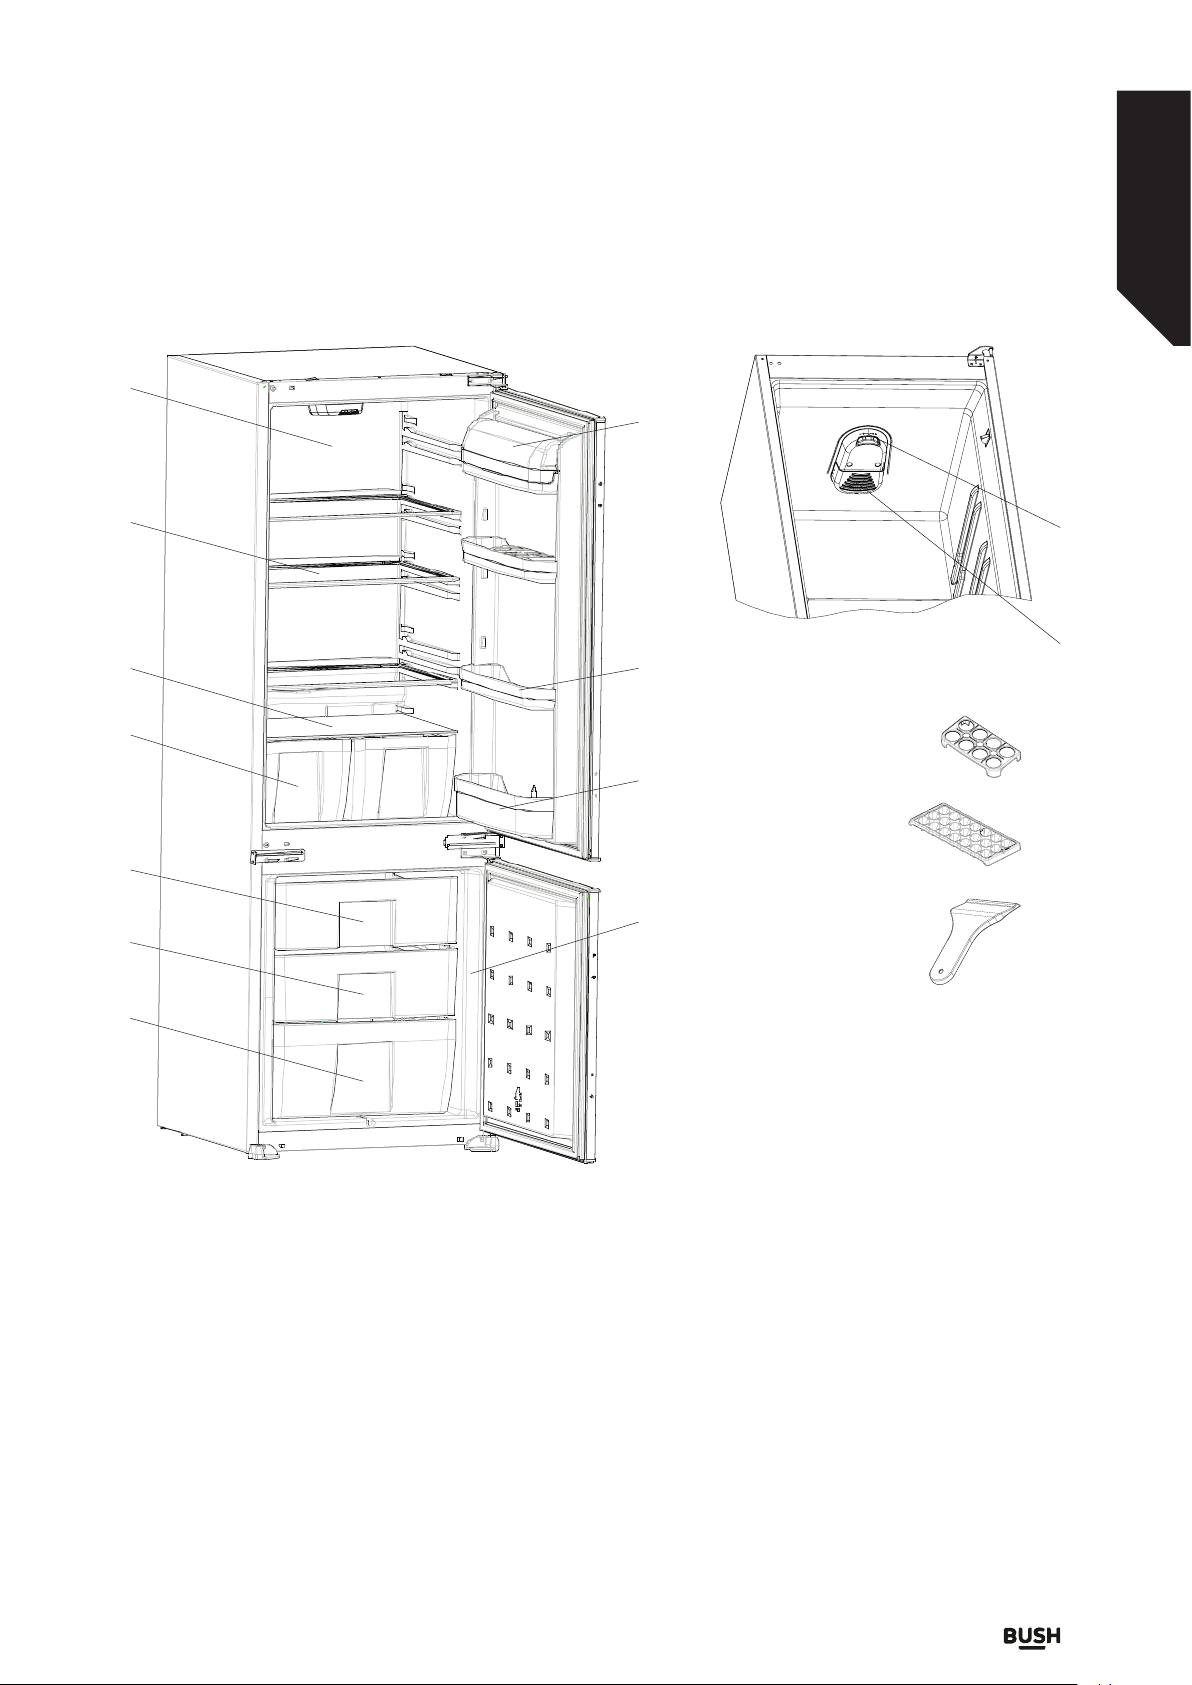
A) Refrigerator compartment
B) Freezer compartment
or online at www.argos-support.co.uk If you still require further assistance, call one of our experts on 0345 257 7271.
Getting to know your Built-In Combi Fridge-Freezer
1) Thermostat dial
2) Refrigerator light and cover
3) Refrigerator shelves
4) Crisper cover
5) Crispers
6) Freezer room cover
7) Freezer upper basket
8) Freezer bottom basket
9) Bottle shelf
10) Door shelves
11) Upper door shelf cover
12) Egg tray
13) Ice tray
14) Plastic ice blade
11
Page 12

12
If you require any technical guidance or find that your product is not operating as intended, a simple solution can often be found in the Troubleshooting section of these instructions,
Page 13

Installing your Built-In Combi Fridge
- Freezer
3
or online at www.argos-support.co.uk If you still require further assistance, call one of our experts on 0345 257 7271.
13
Page 14

Installing your Built-In Combi Fridge - Freezer
Bringing it all together
Installing and Operating Your Fridge
- Freezer
Before starting to use your fridge - freezer, you
should pay attention to the following points:
• Operating voltage for your fridge - freezer is
220-240 V at 50Hz.
• We do not take the responsibility of the
damages that occur due to ungrounded
usage.
• Do not place your appliance in direct sunlight.
• Your appliance should be at least 50 cm away
from stoves, gas ovens and heater cores, and
should be at least 5 cm away from electrical
ovens.
• Your fridge - freezer should never be used
outdoors or left under the rain.
• When your fridge - freezer is placed next to
a deep freezer, there should be at least 2 cm
between them to prevent humidity on the
outer surface.
• Do not place anything on your fridge freezer, and install your fridge - freezer in
a suitable place so that at least 15 cm is
available on the upper side.
• The adjustable front legs should stabilized in
an appropriate height to allow your fridge freezer operate in a stable and proper way.
You can adjust the legs by turning them
clockwise (or in the opposite direction). This
should be done before placing food in the
fridge - freezer.
• Before using your fridge - freezer, wipe all
parts with warm water added with a tea
spoonful of sodium bicarbonate, and then
rinse with clean water and dry. Place all parts
after cleaning.
• Install the distance adjustment plastic (the
part with black vanes at the rear) by
turning it 90° as shown in the figure
to prevent the condenser from
touching the wall.
• Fridge - freezer should be placed against a
wall with a free distance not exceeding 75
mm.
If you require any technical guidance or find that your product is not operating as intended, a simple solution can often be found in the Troubleshooting section of these instructions,
14
Installing your Built-In Combi Fridge - Freezer
Before Using Your Fridge - Freezer
• Before switching on your appliance for the
first time, ensure it is positioned in it’s desired
final location and is in it’s upright position
for at least 3 hours before plugging in and
switching on the power. Otherwise you may
damage the compressor.
• You may experience a odour from the
appliance when it is operated for the first
time. This is normal and will fade when your
appliance starts to cool.
Shipment and Repositioning
• Original package and foam may be kept for
retransportation (optionally).
• You should fasten your fridge - freezer with
thick package, bands or strong cords and
follow the instructions for transportation on
the package for retransportation.
• Remove movable parts (shelves, accessories,
vegetable bins etc.) or fix them into the fridge
- freezer against shocks using bands during
repositioning and transportation.
Carry your fridge - freezer in the upright position.
Page 15

Installing your Built-In Combi Fridge - Freezer
Bringing it all together
Electrical Connection (For UK type
plug)
For your safety please read the following
information
Warning: This appliance must be earthed.
This appliance operates from 220-240 volts and
should be protected by a 13 amp fuse in the plug.
The appliance is supplied with a standard 13 amp
3-pin mains plug fitted with a 13-amp fuse.
Should the fuse require replacement, it must be
replaced with a fuse rated at 13 amp and approved
to BS1362.
If the mains plug which is fitted is unsuitable for
the socket outlet in your home or is removed for
any other reason, please follow the instructions
below on how to wire a 13 amp 3 pin plug.
The wires in the mains lead on this appliance are
coloured in accordance with the following code:
Green and Yellow – Earth
Blue – Neutral
Brown – Live
As the colours may not correspond with the
markings identifying the terminals in your plug
proceed as follows.
The green and yellow wire must be connected to
the terminal in the plug which is marked with the
letter E or with the earth symbol or coloured green
and yellow.
The blue wire must be connected to the terminal
marked N.
The brown wire must be connected to the
terminal marked L.
You must make sure the lead is firmly secured
under the cord clamp.
Blue
Neutral
Green / Yellow
Earth
Brown
Live
E
L
FUSE
13 Amps
N
Cord Clamp
or online at www.argos-support.co.uk If you still require further assistance, call one of our experts on 0345 257 7271.
Installing your Built-In Combi Fridge - Freezer
15
Page 16

Installing your Built-In Combi Fridge - Freezer
Bringing it all together
Installation
Installation kit contents
A. Trim flap
B. Trim gasket
Tools required
Philips screwdriver
C. Guide
D. Rail
E. 17mm screw E. 9,5mm screw
16
If you require any technical guidance or find that your product is not operating as intended, a simple solution can often be found in the Troubleshooting section of these instructions,
Installing your Built-In Combi Fridge - Freezer
Page 17

Installing your Built-In Combi Fridge - Freezer
Bringing it all together
Tools required
a: Check the installation dimensions according to
(1). The position of the joint between the kitchen
unit doors must be level with the position of the
joint between the appliance doors.
b: There can be an odour when you first switch
on the appliance. It will disappear after the
appliance starts to cool.
1
Installing trim flap
a: Insert the trim flap (A) into the slot on the top of
the appliance.
b: Secure the trim flap (A) with screws (F).
or online at www.argos-support.co.uk If you still require further assistance, call one of our experts on 0345 257 7271.
Installing your Built-In Combi Fridge - Freezer
F
A
2
17
Page 18

Installing your Built-In Combi Fridge - Freezer
Bringing it all together
Routing the power cord
a: Pass the power cord through the ventilation
shaft, as shown in (3), and position it so that the
appliance can be easily plugged in once it has
been installed.
3
Installing the gasket
a: Take out the trim gasket (B) located on the side
of the appliance and stick it on the appliance on
the opposite side to the door hinges.
4
18
If you require any technical guidance or find that your product is not operating as intended, a simple solution can often be found in the Troubleshooting section of these instructions,
Installing your Built-In Combi Fridge - Freezer
Page 19

Installing your Built-In Combi Fridge - Freezer
Bringing it all together
Position the appliance
Caution: Two people are required to handle the
appliance. It is recommended that gloves are
worn.
a: Carefully move the appliance into position into
the kitchen unit.
b: Push the appliance back to the reverse side
of the door hinges, and make sure that the
trim gasket (B) covers the space between the
appliance and the kitchen unit.
c: Align the front feet with the front surface of the
kitchen unit.
d: Screw the front feet with screws (E), as shown in
(5).
5
5
Securing the appliance
a: Secure the trim flap (A) to the kitchen unit using
screws (E), as shown in (6).
Continued on next page
6
or online at www.argos-support.co.uk If you still require further assistance, call one of our experts on 0345 257 7271.
Installing your Built-In Combi Fridge - Freezer
19
Page 20

Installing your Built-In Combi Fridge - Freezer
Bringing it all together
Securing the appliance
b: Secure the fixing bracket (G) to the kitchen unit
using screws (E), as shown in (7). Repeat for the
opposite side.
7
Installing the doors
a: Secure the guides (C) to the appliance doors
using screws (E), as shown in (8).
b: Open the appliance doors to right angles and
position the unit door against the appliance
door.
c: Raise the rails (D) onto the guides (C) aligning
with the groove.
d: Secure the rails (D) to the unit doors using
screws (E).
e: Set a 1-2mm gap on the handle side between
the unit itself and the unit doors by adjusting
guides (C) and screws (F) as necessary.
8
20
If you require any technical guidance or find that your product is not operating as intended, a simple solution can often be found in the Troubleshooting section of these instructions,
Installing your Built-In Combi Fridge - Freezer
Page 21

Installing your Built-In Combi Fridge - Freezer
Bringing it all together
Reversing the doors
a: Unscrew the upper door hinge (L) and move the
upper door (K) to a safe location.
b: Unscrew the door hinge pin (M) and firmly
screw it into the opposite side. Keep in a safe
location.
c: Unscrew the middle door hinge (H) and move
the lower door (Q) to a safe location.
d: Screw back the fixing bracket (G) to the original
position without the middle hinge (H).
e: Install the door lower pin (P) on the opposite
side.
f: Move the hole plugs (N) to the empty holes on
the opposite side.
g: Position the lower door (Q) over the door lower
pin (P) and close.
h: Unscrew fixing bracket (J).
i: Position the middle door hinge (H) onto the
lower door (Q).
j: Position the fixing bracket (N) onto the middle
door hinge (H) and firmly screw together onto
the appliance.
k: Position the upper door (K) over the middle door
hinge (H), and position the upper door hinge (L)
over the upper door.
l: Firmly screw the upper door hinge (L) onto the
opposite side of its original position.
9
or online at www.argos-support.co.uk If you still require further assistance, call one of our experts on 0345 257 7271.
Installing your Built-In Combi Fridge - Freezer
21
Page 22

22
If you require any technical guidance or find that your product is not operating as intended, a simple solution can often be found in the Troubleshooting section of these instructions,
Page 23

Functions
4
or online at www.argos-support.co.uk If you still require further assistance, call one of our experts on 0345 257 7271.
23
Page 24

Functions
Simple everyday use
Thermostat settings
The fridge-freezer thermostat automatically
regulates the inside temperature of the
compartments. By rotating the knob from
positions 1 to 5, colder temperatures can be
obtained.
Important note: Do not try to rotate knob beyond
1 position it will stop your appliance.
Fridge-Freezer Thermostat Setting;
1-2: For short-term storage of food in the freezer
compartment, set the knob between the
minimum and medium position.
3-4: For long-term storage of food in the freezer
compartment, set knob to the medium
position.
5: For freezing fresh food. The appliance will run
for colder temperatures.
Thermostat knob
Super switch and Low ambient
switch
a) Super freezing: If ambient temparature is
more than 18 oC, this switch can be used as
superfreeze switch.
The appliance will work longer when
superfreeze button is switched on for freezing
the fresh food. So after you get the cold
condition (minimum 24 hours later) superfreeze
button should be switched off because of
energy saving.
b) Low ambient performance: If ambient
temparature is less than 18 oC, this button
should be switched on for improving low
ambient performence.
If ambiant temparature is more than 18 oC
this button should be switched off because of
energy saving (except freezing fresh food)
Please note that:
For energy saving do not switch on “I” position, If
you do not need.
M
A
1
W
5
X
Low ambient switch
24
If you require any technical guidance or find that your product is not operating as intended, a simple solution can often be found in the Troubleshooting section of these instructions,
Functions
Page 25

Functions
Simple everyday use
Warnings about Temperature
Adjustments
• It is not recommended that you operate your
fridge in environments colder than 10 oC in
terms of its efficiency.
• Temperature adjustments should be made
according to the frequency of doors openings
and the quantity of food kept inside the
fridge-freezer.
• Your fridge-freezer should be operated
up to 24 hours according to the ambient
temperature without interruption after being
plugged in to be completely cooled. Do not
open doors of your fridge-freezer frequently
and do not place much food inside it in this
period.
• During power cut, to prevent any compressor
problem you should unplug the fridgefreezer. You should delay pluging in 5 – 10
minutes after your power supply returns. 0f
you plug out the fridge-freezer for a reason
you should wait at least 5 min to replug. It
is important for avoiding damage to fridgefreezer's components.
• Your fridge-freezer is designed to operate in
the ambient temperature intervals according
to the climate class stated on the information
label. In terms of cooling effectiveness, we do
not recommend operating your fridge-freezer
outside of the stated temperature values.
• This equipment is designed for use at an
ambient temperature within the 16°C - 32°C
range.
Climate Class Ambient Temperature oC
T Between 16 and 43 (°C)
ST Between 16 and 38 (°C)
N Between 16 and 32 (°C)
SN Between 10 and 32 (°C)
or online at www.argos-support.co.uk If you still require further assistance, call one of our experts on 0345 257 7271.
Functions
25
Page 26

26
If you require any technical guidance or find that your product is not operating as intended, a simple solution can often be found in the Troubleshooting section of these instructions,
Page 27

Using your Built-In Combi Fridge -
Freezer
5
or online at www.argos-support.co.uk If you still require further assistance, call one of our experts on 0345 257 7271.
27
Page 28

Using your Built-In Combi Fridge-Freezer
Getting the most from your appliance
Arranging Food in the Appliance
Food storage in the fridge compartment
• The refrigerator compartment is used for
storing fresh food for a few days.
• Do not place food in direct contact with the
rear wall of the refrigerator compartment.
Leave some space around food to allow for
the circulation of air.
• Do not place hot food or evaporating liquids
in the refrigerator.
• Always store food in closed containers or
wrapped.
• To reduce humidity and avoid the formation
of frost, never place liquids in unsealed
containers in the refrigerator.
• Meat of all types, wrapped in packages, is
recommended to be placed on the glass shelf
just above the vegetable bin, where the air is
colder.
• You can put fruits and vegetables into the
crisper without packaging.
• To prevent cold air escaping, try not to open
the refrigerator door too often, and do not
leave the door open for long periods.
Food storage in the freezer compartment
The freezer compartment is used for freezing fresh
foods and for storing frozen foods for the period
of time indicated on the packaging, and for making
ice cubes.
• For freezing fresh food; wrap and seal fresh
food properly - the packaging should be
airtight and should not leak. Special freezer
bags, aluminium foil (heavy grade; if in doubt
double-wrap), polythene bags, and plastic
containers are ideal.
• Do not allow fresh food to be frozen to come
into contact with already frozen food.
• Always mark the date and the content on the
pack and do not exceed the stated storage
time.
• In case of a power failure or malfunction,
the freezer compartment will maintain a
sufficiently low temperature for food storage.
However, avoid opening the freezer door
in order to slow down the temperature rise
within the freezer compartment.
• The maximum amount of fresh foods that
can be loaded in the freezer within 24 hours
is indicated on the name plate (see Freezing
Capacity).
• Never place warm food in the freezer
compartment.
• When purchasing and storing frozen food
products, ensure that the packaging is not
damaged.
• Storage time and recommended temperature
for storing frozen food is indicated on the
packaging. For storing and usage, follow the
manufacturer's instructions. If no information
is provided, food should not be stored for
more than 3 months.
• Following purchase, place frozen food in the
freezer compartment as soon as possible.
• Once food is thawed it must not be refrozen;
you must cook it as quickly as possible for
consumption or freeze once again.
Additional Storage: if you want to use the freezer's
maximum net capacity, remove the drawers and
store items directly on the cooling tubes. This will
enable you to make use of the entire volume of
the compartment.
28
If you require any technical guidance or find that your product is not operating as intended, a simple solution can often be found in the Troubleshooting section of these instructions,
Using your Built-In Combi Fridge-Freezer
Page 29

Using your Built-In Combi Fridge-Freezer
Getting the most from your appliance
Tips for Saving Energy
1. Install the appliance in a cool, well ventilated
room, but not in direct sunlight or near heat
sources (radiators, cooker, etc....).
2. Allow warm food and drinks to cool down
before placing in the appliance.
3. When thawing frozen food, place it in the
refrigerator compartment. The frozen food
will help to cool the refrigerator compartment
when it is thawing.
4. When placing liquids in the appliance they
must be covered.
5. When placing food and drinks, open the
appliance door as briefly as possible.
6. Keep closed the covers of any different
temperature compartments in the appliance
(crisper, chiller ...etc ).
7. Door seals should be kept clean and
undamaged.
Accessories
Ice tray
• Fill the ice tray with water and place in freezer
compartment.
• After the water has completely frozen , you
can twist the tray as shown below to get the
ice cubes.
Plastic scraper
After a period of time, frost will build up in certain
areas in the freezer compartment. The frost,
accumulated in the freezer, should
be removed periodically. Use the
plastic scraper provided if necessary.
Do not use sharp metal objects for
this operation. They could puncture
the refrigerator circuit and cause
irreparable damage to the unit.
or online at www.argos-support.co.uk If you still require further assistance, call one of our experts on 0345 257 7271.
Using your Built-In Combi Fridge-Freezer
29
Page 30

30
If you require any technical guidance or find that your product is not operating as intended, a simple solution can often be found in the Troubleshooting section of these instructions,
Page 31

Care and maintenance
6
or online at www.argos-support.co.uk If you still require further assistance, call one of our experts on 0345 257 7271.
31
Page 32

Care and maintenance
Looking after your appliance
Cleaning and maintenance
General
• Do not pour water over the appliance.
• Clean the accessories separately with
soap and water. Do not put them in the
dishwasher.
• Do not use abrasive products, detergents
or soaps. After washing, rinse with clean
water and dry carefully. When the cleaning
operations have been completed, reconnect
the plug with dry hands.
• Warning: never use sharp metal tools for
this operation unless recommended by
the manufacturer, as they can damage the
freezing circuit.
To remove the butter shelf, first take out the butter
shelf cover, then remove the shelf. Do not try to
remove butter shelf and cover together.
butter shelf cover
Defrosting
Defrosting the Refrigerator compartment
• Defrosting occurs automatically in refrigerator
compartment during operation; the defrost
water is collected by the evaporating tray and
evaporates automatically.
• The evaporating tray and the defrost water
drain hole should be cleaned periodically with
defrost drain plug to prevent the water from
collecting on the bottom of the refrigerator
instead of flowing out.
• You can also pour ½ glass of the water to
drain hole to clean inside.
32
Defrosting the Freezer compartment
• The frost, which covers the shelves of the
freezer compartment, should be removed
periodically.
• Do not use sharp metal objects for this
operation. They could puncture the
refrigerator circuit and cause irreparable
damage to the unit. Use the plastic scraper
provided.
• When there is more than 5 mm of frost on the
shelves, defrosting must be done.
• Before defrosting operation, place the frozen
food in a cool place after wrapping them in
sheets of newspaper in order to obtain its
temperature steady for long time.
• To accelerate the defrosting process place
one or more basins of warm water in the
freezer compartment.
If you require any technical guidance or find that your product is not operating as intended, a simple solution can often be found in the Troubleshooting section of these instructions,
Care and maintenance
Page 33

Care and maintenance
Looking after your appliance
• Dry the inside of the compartment with a
sponge or a clean cloth.
• Once the unit has been defrosted, place the
food into freezer and remember to consume
them in a short period of time.
Replacing the LED
Contact the Bush helpline.
or online at www.argos-support.co.uk If you still require further assistance, call one of our experts on 0345 257 7271.
Care and maintenance
33
Page 34

Care and maintenance
Looking after your appliance
Technical specification
Supplier’s name or trademark
Model / Item BIFFC55177
Type of appliance BGN3200S
Energy efficiency class A+
Voltage 220-240V / 50 Hz
Energy consumption 0.715 kWh/24h - 261 kWh/year
Net storage volume of fresh food 189 lt.
Net storage volume of frozen food 72 lt.
Star rating of frozen food storage compartment 4 (****)
Power cut failure safe storage 11 hours (25°C)
Freezing capacity 4 Kg
Climate class N (16°C - 32°C)
Size (mm) (W x D x H) 540 x 545 x 1770
Noise 41 dB (A)
We apologise for any inconvenience caused
by minor change or inconsistencies in these
instructions that may occur as a result of product
improvements and development.
34
If you require any technical guidance or find that your product is not operating as intended, a simple solution can often be found in the Troubleshooting section of these instructions,
Care and maintenance
Page 35

Product support
7
or online at www.argos-support.co.uk If you still require further assistance, call one of our experts on 0345 257 7271.
35
Page 36

Product support
Help is always at hand
If your freezer is not working properly there may be a minor problem, therefore check the following
Problem Possible Causes Possible Solutions
The appliance does not
operate
The appliance performs
poorly
There is a noise The cooling gas which circulates in
There is a power failure
The mains plug is not properly plugged
in, or is loose
The thermostat setting is on position " "
You have overloaded the appliance
The doors are not closed perfectly
the cooling circuit may make a slight
noise (bubbling sound) even when the
compressor is not running. Do not
worry, this is quite normal. If these
sounds are different check if;
• The appliance is installed firmly
as described in the section of this
instruction manual
• Objects on the appliance are
vibrating
The socket is defective. To check
this, plug in a fully operable
appliance into the same socket
There is not sufficient ventilation
around the appliance
Important notes:
• During power cut, to prevent any compressor
problem you should unplug the fridge freezer. You should delay pluging in 5 – 10
minutes after your power supply returns. 0f
you plug out the fridge - freezer for a reason
you should wait at least 5 min to replug. It
is important for avoiding damage to fridge freezer's components.
• If you will not be using your freezer for a long
time (holiday, etc...), disconnect the plug from
the socket. Clean your freezer as per chapter
6 of this document and leave the door open
to prevent any humidification or odour
formation.
36
If you require any technical guidance or find that your product is not operating as intended, a simple solution can often be found in the Troubleshooting section of these instructions,
Product support
Page 37

Product support
Help is always at hand
Help and assistance
If you require any technical guidance or find that your Built-In Combi Fridge-Freezer is not operating as
intended, a simple solution can often be found in the Troubleshooting section of these instructions or
online at www.argos-support.co.uk
If you still require further assistance, call one of our experts on 0345 257 7271*. To help give us give you
a fast and efficient service please have the following information ready:
Model Ref.
Serial number
Date of purchase
Local call rates applies*
You can find these
on the rating plate - a
small information panel
(usually a sticker or
metal plate) on the rear
of your appliance
This will be shown on
your receipt
Lines open 8am-7pm Monday to Saturday and 10am-4pm Sunday.
*Calls to Argos enquiry lines may attract a charge and set up fee from residential lines depending on your
call plan/tariff . Mobile and other providers costs may vary, see www.bt.com/pricing for details.
For Security and training purposes, telephone calls to and from customer service centres maybe
recorded and monitored. Calls from Republic of Ireland will attract international call charges.
or online at www.argos-support.co.uk If you still require further assistance, call one of our experts on 0345 257 7271.
Product support
37
Page 38

Product support
Help is always at hand
Disposal
• The symbol on the product or on its
packaging indicates that this product may not
be treated as household waste. Instead it shall
be handed over to the applicable collection
point for the recycling of electrical and
electronic equipment.
• By ensuring this product is disposed of
correctly, you will help prevent potential
negative consequences for the environment
and human health, which could otherwise be
caused by inappropriate waste handling of
this product.
• For more detailed information about recycling
of this product, please contact your local
city office, your household waste disposal
service or the shop where you purchased the
product.
38
If you require any technical guidance or find that your product is not operating as intended, a simple solution can often be found in the Troubleshooting section of these instructions,
Product support
Page 39

Product support
Help is always at hand
Guarantee
Call us now and activate your 12 month guarantee
Thank you for choosing Bush. Your new product is guaranteed against faults and
breakdowns for 12 months. Don’t forget to register it with us today so we can provide
you with our best possible after-sales service and useful updates.
www.bushregistration.co.uk
FREEPHONE*
0800 597 8548
Lines are open 8am - 8pm, 365 days a year. *Calls may be recorded and monitored.
Your Bush Guarantee
This product is guaranteed for twelve months from the date of original purchase. Any defect that arises
due to faulty materials or workmanship will be repaired free of charge (or if applicable the product will be
replaced or the purchase price refunded) where possible during this period by the dealer from who your
purchased the unit.
The guarantee is subject to the following provisions:
• The guarantee does not cover accidental
damage, misuse, cabinet parts, knobs or
consumable items.
• The product must be correctly installed and
operated in accordance with the instructions
contained in the manual.
• It must be used solely for domestic purposes.
The guarantee will be rendered invalid if the
product is re-sold or has been damaged by
inexpert repair.
• Specifications are subject to change without
notice.
• Bush disclaim any liability for loss or damage
arising from the breakdown of the product.
• This guarantee is in addition to and does not
diminish your statutory or legal rights.
Important Data Protection Information
If you provide us with information about another
person, you confirm that they have appointed you
to act for them, to consent to the processing of
their personal data including sensitive personal
data and that you have informed them of our
identity and the purposes (as set out in the
Important Data Privacy notice displayed overleaf)
for which their personal data will be processed.
You are entitled to ask for a copy of the
information we hold about you (for which we may
charge a small fee) and to have any inaccuracies in
your information corrected.
For quality control and training purposes, we may
monitor or record your communications with us.
If your personal details change, if you change your
mind about any of your marketing preferences or
if you have any queries about how we use your
information, please let us know by contacting
our Data Protection Officer, Domestic & General,
Leicester House 17 Leicester Street, Bedworth,
Warwickshire CV12 8JP.
Guarantor: Argos Limited - 489 - 499 Avebury Blvd. - Milton Keynes - MK9 2NW
or online at www.argos-support.co.uk If you still require further assistance, call one of our experts on 0345 257 7271.
Product support
39
Page 40

Contact:
www.argos-support.co.uk
Helpline: 0345 257 7271
52197462
 Loading...