

Page 1
Instruction manual
BD-1728
Page 2

You’ll soon be enjoying your new Internet DAB Radio.
It all begins here, with your instructions. Don’t worry, there’s
nothing too technical coming up. Just simple, step-by-step
guidance to get you up and running quickly. Sound good? Then
let’s get started.
Help and Guidance
We’re here to help you get the most from your Internet DAB Radio. Should you require
any guidance, a simple solution can often be found online at:
www.argos-support.co.uk
If you still require further assistance, call one of our experts on 0345 600 3021.
If you require any tec hnical guidance or find that you r product is not operating as inten ded, a simple solution can oft en be found in the
Tro ub l es ho ot i ng
Page 3

Contents
Safety information
1
Help and Guidance 2
General safety information 8
Power source 8
Positioning the Internet DAB Radio 9
Moisture and water 9
Ventilation 9
Heat sources and flames 9
Getting to know your Internet DAB Radio
2
Ready? Let’s begin... 12
Connection 15
Initial set-up 15
Power on 19
Power off 19
Change the mode 19
Adjusting the volume 20
Using headphones 20
Using your Internet DAB Radio
3
Internet Radio mode 24
Selecting an Internet radio station 24
Search for an Internet radio station 25
Podcasts 26
Last listened 27
Storing Internet radio station presets 28
Internet radio information 29
section of these instructions, or online at www.argos-support.co.uk If you still require further assistance, call one of our e xperts on 0345 600 3021.
3
Page 4

If you require any tec hnical guidance or find that you r product is not operating as inten ded, a simple solution can oft en be found in the
Tro ub le s ho ot in g
Contents
My favourites 30
Registering on the Frontier Silicon Portal 31
Music player mode 32
Setting up your Windows computer to allow access to your audio files 33
Playing audio files using Music player mode 33
DAB Radio mode 34
Changing DAB stations 34
Scanning for DAB stations 35
Prune DAB stations 35
Storing a DAB station preset 35
DAB display information 37
Dynamic range control (DRC) 38
FM Radio mode 38
Tuning to an FM station 39
Changing the Scan setting 39
Audio mode 40
Storing an FM station preset 40
FM display information 42
AUX in mode 42
System Settings available in the Menu 43
Other information
4
Technical specification 48
4
Page 5

section of these instructions, or online at www.argos-support.co.uk If you still require further assistance, call one of our e xperts on 0345 600 3021.
Contents
Product support
5
Troubleshooting 52
Help and assistance 54
Disposal 55
Your Bush Guarantee 56
Important Data Protection Information 56
5
Page 6

This page is left intentionally blank
Page 7

1Safety information
Page 8
Safety information
Important - Please read these instructions fully before
installing or operating
General safety information
Keep the product and all its parts out of reach of small children.
This product is not intended for use by persons (including children) with reduced physical,
sensory or mental capabilities, or lack of experience and knowledge, unless they have
been given supervision or instruction concerning the use of the appliance by a person
responsible for their safety.
• Do not attempt to open the product. This product does not contain any user
serviceable parts. Unauthorised handling of the device may damage it and will void
your warranty.
• Do not use your Radio near emergency/intensive care medical equipment or during
an electrical storm.
To avoid possible hearing damage, do not listen to this radio at high volume
levels for long periods of time. Always keep the volume within reasonable
limits.
Power source
• Only use the power supply that came with the product. Using an unauthorised power
supply will invalidate your guarantee and may irrecoverably damage the product.
• Disconnect your Radio from the mains power supply during thunderstorms.
• Always check that you have completely switched off your Radio, before you change
or disconnect the power supply.
• Where the mains power plug or an appliance coupler is used as the disconnect
device, the disconnect device shall remain readily operable.
• If the Radio will not be used for a long period of time, make sure that the mains power
is unplugged.
If you require any tec hnical guidance or find that you r product is not operating as inten ded, a simple solution can oft en be found in the
Safety information8
Tro ub l es ho ot i ng
Page 9
Safety information
Important - Please read these instructions fully before
installing or operating
Positioning the Internet DAB Radio
It is important that you consider carefully in advance where your Radio will be situated and
make sure that it is:
• on a flat and stable surface.
• within 1.4 metres of a power socket. Please ensure that the mains power lead is not a
trip hazard.
• at least 1 metre away from other electrical appliances to avoid interference.
• where it will be within range of your router for WiFi connectivity.
• where you can fully extend the telescopic aerial.
• Never place your Radio directly onto antique or polished surfaces.
Moisture and water
• Keep it dry. Avoid exposure to precipitation, humidity and liquids which could all affect
the product circuitry.
• Do not leave it in low temperatures as moisture can form inside the product, which
may damage the circuit board.
Ventilation
• Do not block or cover slots, holes or openings on the product by placing on soft
furnishings such as carpets, rugs or beds as these are provided for functionality and/or
ventilation to ensure safe operation of the product.
Heat sources and flames
• Do not leave it in high temperatures as electronic devices and plastic parts may warp
in heat.
• Keep it away from bright sunlight or heat sources, such as a radiator.
• Never place any type of candle or naked flame on top of, or near the product.
section of these instructions, or online at www.argos-support.co.uk If you still require further assistance, call one of our e xperts on 0345 600 3021.
Safety information
9
Page 10

This page is left intentionally blank
Page 11

Getting to know your Internet
DAB Radio
2
Page 12
Getting to know your Internet DAB Radio
You’ll be up and running in no time
Ready? Let’s begin...
Please read these instructions carefully. They contain important information which will
help you get the best from your product and ensure safe and correct installation and
operation.
If you require any further assistance, our technical experts are happy to help. For full
details, refer to the product support section at the end of these instructions.
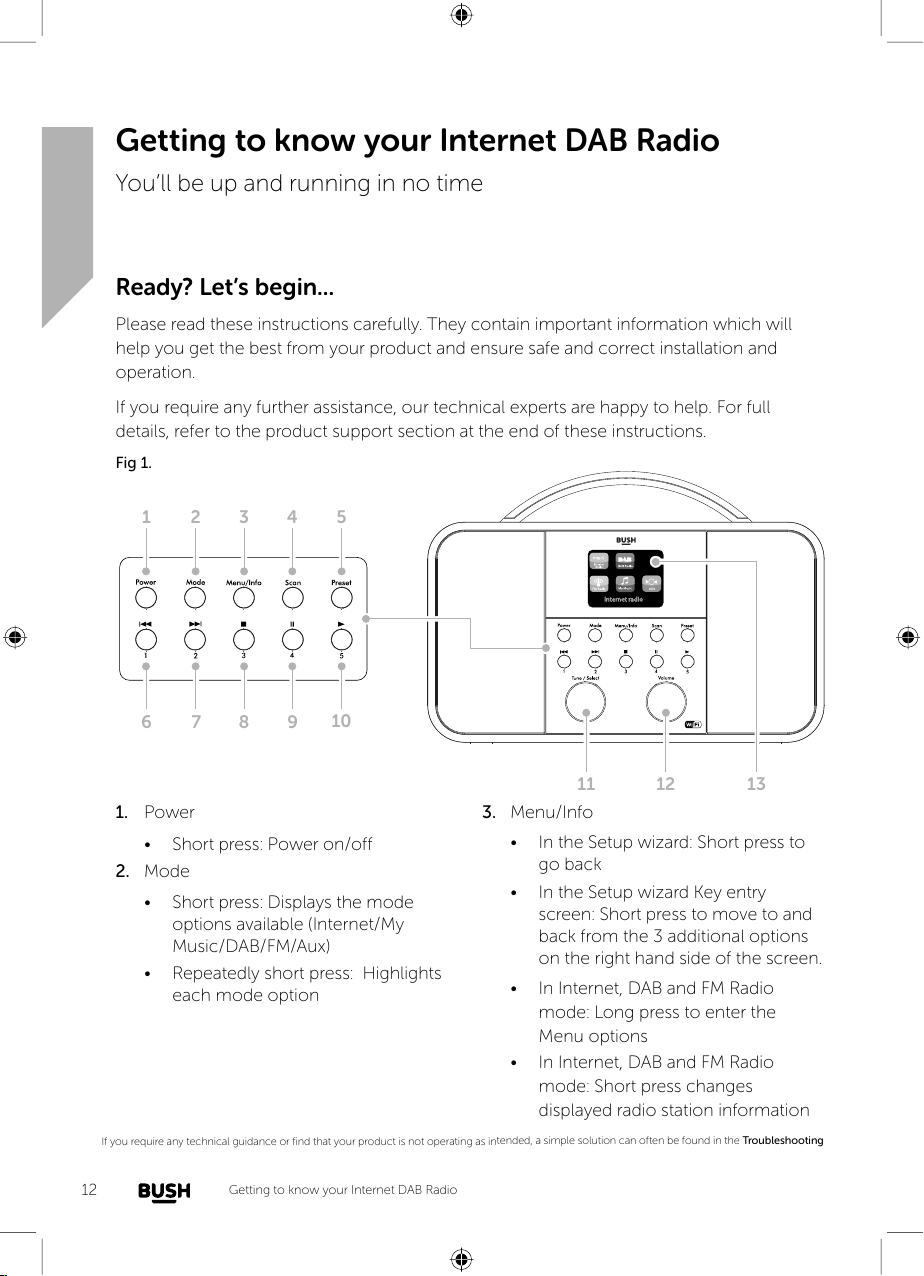
Fig 1.
1 2 3
54
10
96 7 8
11 12
1. Power
• Short press: Power on/off
2. Mode
• Short press: Displays the mode
options available (Internet/My
Music/DAB/FM/Aux)
• Repeatedly short press: Highlights
each mode option
3. Menu/Info
• In the Setup wizard: Short press to
go back
• In the Setup wizard Key entry
screen: Short press to move to and
back from the 3 additional options
on the right hand side of the screen.
• In Internet, DAB and FM Radio
mode: Long press to enter the
Menu options
• In Internet, DAB and FM Radio
mode: Short press changes
displayed radio station information
If you require any tec hnical guidance or find that you r product is not operating as inten ded, a simple solution can oft en be found in the
13
Tro ub l es ho ot i ng
12
Getting to know your Internet DAB Radio
Page 13

Getting to know your Internet DAB Radio
You’ll be up and running in no time
4. Scan
• In DAB mode: Short press scans for
DAB radio stations
• In FM mode: Short press scans up
the frequency band
• In FM mode: Long press scans
down the frequency band
5. Preset (Internet/DAB/FM mode)
• Short press: Radio preset recall
• Long press: Radio preset store
6. Skip back/Radio preset 1
• In My Music mode: Short press to
Skip back
• In Internet/DAB/FM mode: Long
press to store a preset
• In Internet/DAB/FM mode: Short
press to recall a preset
7. Skip forward/Radio preset 2
• In My Music mode: Short press to
Skip forward
• In Internet/DAB/FM mode: Long
press to store a preset
• In Internet/DAB/FM mode: Short
press to recall a preset
8. Stop/radio preset 3
• In My Music mode: Short press to
Stop
• In Internet/DAB/FM mode: Long
press to store a preset
• In Internet/DAB/FM mode: Short
press to recall a preset
9. Pause/Radio preset 4
• In My Music mode: Short press to
Pause
• In Internet/DAB/FM mode: Long
press to store a preset
• In Internet/DAB/FM mode: Short
press to recall a preset
10. Play/Radio preset 5
• In My Music mode: Short press to
Pause
• In Internet/DAB/FM mode: Long
press to store a preset
• In Internet/DAB/FM mode: Short
press to recall a preset
11. Rotary Tune/Select control
• Rotate to scroll and highlight
options on screen
• Short press to Select an option
12. Rotary Volume control
• Clockwise to increase the volume
• Anti-clockwise to decrease the
volume
13. Colour display
• Displays available options
section of these instructions, or online at www.argos-support.co.uk If you still require further assistance, call one of our e xperts on 0345 600 3021.
Getting to know your Internet DAB Radio 13
Page 14
Getting to know your Internet DAB Radio
You’ll be up and running in no time
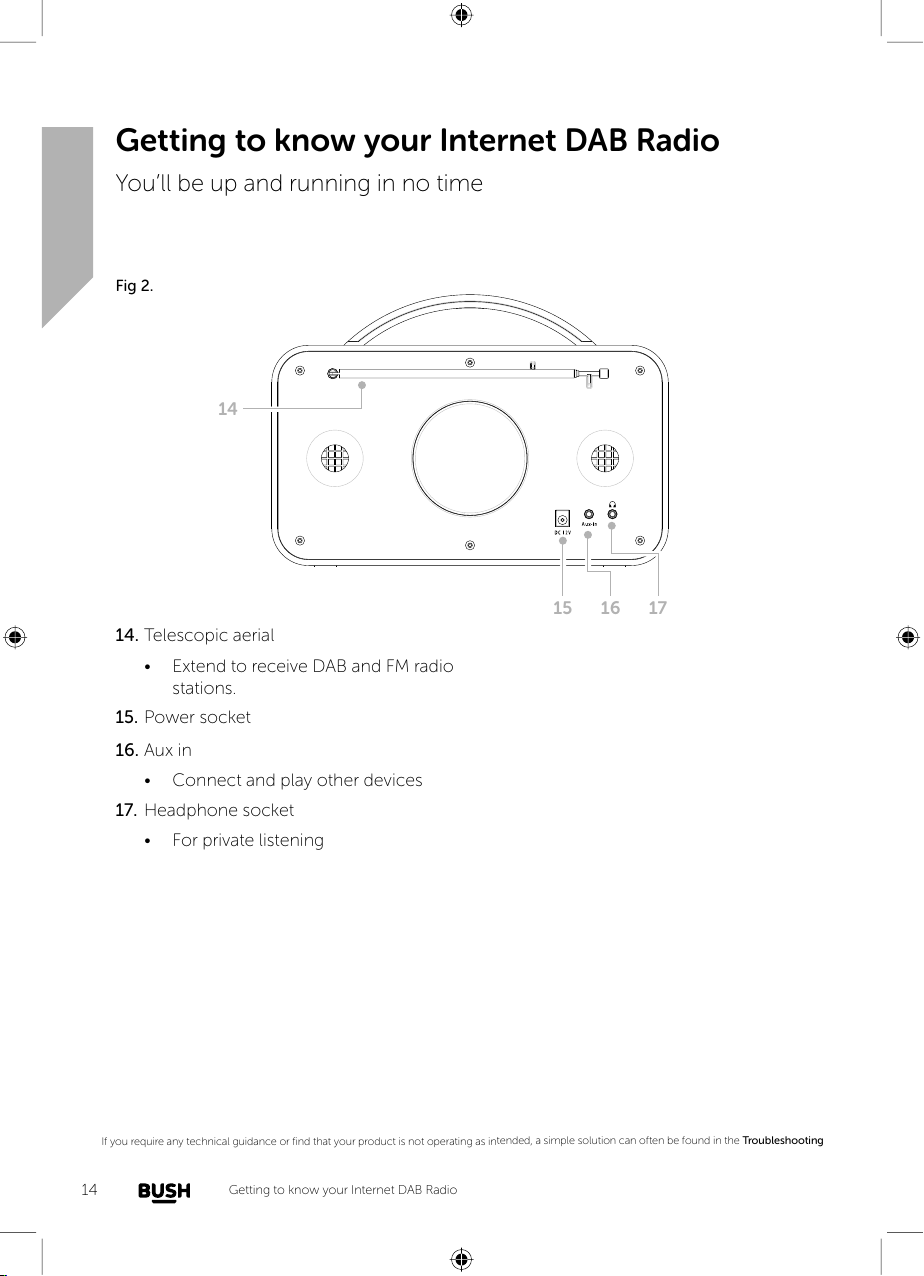
Fig 2.
14
1615
17
14. Telescopic aerial
• Extend to receive DAB and FM radio
stations.
15. Power socket
16. Aux in
• Connect and play other devices
17. Headphone socket
• For private listening
If you require any tec hnical guidance or find that you r product is not operating as inten ded, a simple solution can oft en be found in the
14
Getting to know your Internet DAB Radio
Tro ub l es ho ot i ng
Page 15
Getting to know your Internet DAB Radio
Setup wizard
You’ll be up and running in no time
Connection
1. Connect the mains power lead into the socket on the back of the Radio.
2. Plug the power adaptor into the mains power wall socket and
switch on. The Radio will switch on, the BUSH logo will be
displayed for a few seconds.
3. Please wait, the Setup wizard screen will then be displayed for
you to enter the settings required to connect to your home
router for WiFi internet Radio and MyMusic access.
Initial set-up
On first use your Radio will display the Setup wizard screen for you enter the settings
to connect to your home router for WiFi internet Radio and MyMusic access. We
recommend that you do proceed with this Setup and we have included the steps to do
this below.
Alternatively, if you would prefer to run the Setup wizard to connect to your router later,
use the rotary Tune/Select control to highlight ‘NO’ and short press to select. A further
screen will be presented to check if you would like to run the Setup wizard the next
time you power on your radio. Use the Tune/Select control to highlight YES or NO as
appropriate and short press the Tune/Select control. The main menu screen for your
radio will then be displayed.
Note: If at any point during the Setup wizard process, you wish to go back to change a
setting, just short press the Menu/Info. button.
1. The Setup wizard screen will be displayed, with the ‘YES’ option
highlighted, short press the Tune/Select control.
2. The Date/Time screen will be displayed, with the 24 hour option
already highlighted. Use the Tune/Select control to highlight the
time format that you would prefer for your radio and then short press the Tune/Select
control to select.
section of these instructions, or online at www.argos-support.co.uk If you still require further assistance, call one of our e xperts on 0345 600 3021.
Getting to know your Internet DAB Radio 15
Start now?
YES NO
Page 16
Getting to know your Internet DAB Radio
Auto update
SSID
You’ll be up and running in no time
3. The Auto update screen will be displayed. This will enable your
radio to update its clock settings automatically, from the DAB
radio signal, the FM radio signal, to update from the Network or
Update from DAB
Update from FM
Update from Network
No update
No update, if you wish to set the time and date manually and do
not want your product to automatically update.
Use the Tune/Select control to highlight your preferred option and press to select.
The steps are included here for if you select the highlighted option of ‘Update from
the Network’.
4. The Set Timezone screen is displayed and UK timezone of UTC +00:00: Dublin,
London is the first option highlighted at the top of the display. Use the Tune/Select
control to highlight your preferred option and press to select.
5. The Daylight savings screen is displayed and the OFF option is highlighted. Use the
Tune/Select control to highlight your preferred option and press to select.
6. The Network settings screen is displayed Please select ‘YES’ if you would like to keep
your radio connected to the Network all of the time. This is the recommended option.
If you prefer to turn off the network connection when you are using DAB or FM Radio
or Aux in mode, you will need to remember to reconnect to your network manually
each time you wish to use the Internet radio or MyMusic features.
Use the Tune/Select control to highlight your preferred option and press to select.
7. The Wlan region screen is displayed. There is only 1 option of ‘Europe’. Press the
Tune/Select control to select.
8. The Network settings screen is displayed whilst your radio scans for available WiFi
networks.
After a few seconds a list the Network Names or (also know as
SSIDs), for the WiFi networks found during the scan will be
displayed. If your router supports WiFi Protected Setup, then
[WPS} will be shown just before the Network name or SSID.
Airport Extreme_Soaks
[WPS]Another IR2.5 so...
[WPS]DLNA_3586
HomeRouter-582
Use the Tune/Select control to highlight the WiFi Network that the Radio should
connect to and press to select.
If you require any tec hnical guidance or find that you r product is not operating as inten ded, a simple solution can oft en be found in the
16
Getting to know your Internet DAB Radio
Tro ub l es ho ot i ng
Page 17
Getting to know your Internet DAB Radio
WPS Menu
You’ll be up and running in no time
Note: If your WiFi network is not listed, if may be because your router has been set not
to broadcast its Network Name or SSID. Please check your router settings; you can opt
to change your router to broadcast its network name, or you can enter the Network
settings into the radio manually. Long press Menu/Info, then select Network, then
Manual settings from within the Internet radio menu.
Note: If your router is set to broadcast its Network name or SSID, but it has not been
found, please first try to scan again for WiFi networks. Short press the Menu/Info
button to go back and then proceed through the previous two screens to scan for WiFi
networks again. If your network is still not found, please try moving your Radio closer
to your router and then scan for WiFi networks again.
9. If your router supports WiFi Protected Setup (WPS), the WPS
Menu screen will be displayed at this point. If your router does
not support WPS, then please go to step 10.
Push Button
PIN
Skip WPS
Push button - If you highlight and select this option, the WPS
Setup screen will be displayed and you will be prompted to ‘Push WPS button at the
other end’ (on your router). Then short press the Tune/Select control to SELECT. The
router encryption key will be sent automatically to your radio.
PIN - If you highlight and select this option, the WPS Setup PIN screen will be
displayed. Please enter the PIN displayed on your radio into your router using a web
browser (please refer to your router instructions). Then short press the Tune/Select
control to SELECT. The router encryption key will be sent automatically to your radio.
Skip WPS - If you highlight and select this option, you can enter your router
encryption key manually.
section of these instructions, or online at www.argos-support.co.uk If you still require further assistance, call one of our e xperts on 0345 600 3021.
Getting to know your Internet DAB Radio 17
Page 18
Getting to know your Internet DAB Radio
Network settings
:
DEFGHIJKLMNOPQR
You’ll be up and running in no time
Note: If you selected either the Push Button or PIN option, the
display will change to show that your radio is ‘Connecting ...’ to
your router. After a short delay, ‘Connected’, then ‘Setup wizard
completed’ will be displayed. Short press the Tune/Select control
to SELECT and display the Main Menu. Your radio is now
connected via your router to the internet.
10. If your router does not support WPS and does not have an encryption key,
‘Connecting...’, followed by ‘Connected’, then ‘Setup wizard completed’ will be
displayed. Short press the Tune/Select control to SELECT and display the Main Menu.
Your radio is now connected via your router to the internet.
11. If your router requires an encryption key, the Key screen will be
displayed.
You will need to enter the correct wireless password or
encryption key, either Wired Equivalent Privacy (WEP) or WiFi
Protected Access (WPA) into your radio, to enable it to connect to your router.
Some wireless routers already have an encryption key or password that has been
set by the manufacturer, this will be shown either on the router itself or within the
documentation provided with it.
Please wait
Connecting.
Key
0123456789 . - @
abcdefghijklmn
opgrstuvwxyzABC
,
BKSP
OK
Cancel
18
To enter the wireless password or encryption key into your radio, use the Tune/Select
control to move around the key screen and press to select each letter or number
required.
On the right hand side of the key screen are three additional options:
BKSP - to delete a number or character that you have just entered.
OK - When you have correctly entered the complete wireless password or encryption
key.
CANCEL - To cancel the wireless password or encryption key entry and rescan for
wireless networks.
Short press the Menu/Info button to move from the number and letters part of the
screen to the three options on the right hand side. Use the Tune/Select control to
move up and down the options and press to select. Short press the Menu/Info button
again to move back to the numbers and letters part of the screen.
If you require any tec hnical guidance or find that you r product is not operating as inten ded, a simple solution can oft en be found in the
Getting to know your Internet DAB Radio
Tro ub l es ho ot i ng
Page 19

Getting to know your Internet DAB Radio
Network settings
Please wait
Connecting.
Connected
Setup wizard
Completed
Setup wizard
Press SELECT to exit
Main menu
Music player
DAB
FM
Internet radio
You’ll be up and running in no time
Note: You must enter the wireless password or encryption key ‘exactly’, as it appears on
your router or router documentation, including upper or lower case letters, to enable
your radio to connect successfully to your router.
After you have entered your wireless password or encryption key and selected OK,
‘Connecting...’, followed by ‘Connected’, then ‘Setup wizard completed’ will be
displayed. Short press the Tune/Select control to SELECT and display the Main Menu.
Your radio is now connected via your router to the internet.
Power on
Short press the Power button.
Power o
Short press the Power button. The Standby screen will be displayed with the current date
and time.
Change the mode
1. Short press the Mode button. The 5 mode options of Internet Radio, My Music, DAB
Radio, FM Radio and Aux are displayed.
2. Short press the Mode button to highlight each option in turn or use the rotary Tune/
Select control.
3. Short press the Tune/Select control to select an option.
section of these instructions, or online at www.argos-support.co.uk If you still require further assistance, call one of our e xperts on 0345 600 3021.
Getting to know your Internet DAB Radio 19
Page 20

Getting to know your Internet DAB Radio
You’ll be up and running in no time
Adjusting the volume
• Turn clockwise to increase the volume.
• Turn anti-clockwise to decrease the volume.
Using headphones
You can connect headphones with a 3.5mm plug (not included) to your radio. The stereo
headphone socket can be found on the back of the Radio, next to the Aux in socket.
When you have headphones connected the Radio speakers are switched off and all
sound is via the headphones.
Note: Always keep the volume within reasonable limits.
If you require any tec hnical guidance or find that you r product is not operating as inten ded, a simple solution can oft en be found in the
20
Getting to know your Internet DAB Radio
Tro ub l es ho ot i ng
Page 21

This page is left intentionally blank
section of these instructions, or online at www.argos-support.co.uk If you still require further assistance, call one of our e xperts on 0345 600 3021.
Page 22

This page is left intentionally blank
Page 23

Using your Internet DAB
Radio
3
Page 24

Using your Internet DAB Radio
Let’s get started
Internet Radio mode
Check that you are in internet radio mode. If you are not already in Internet radio mode,
short press the Mode button. Use the rotary tune control to highlight Internet radio and
press to select.
With your BUSH Internet DAB Radio you can listen to thousands of radio stations and
podcasts from around the world; you just need to connect to your home router via WiFi
for an Internet Broadband connection. If you did not run the Setup up wizard when you
first powered on your radio (see page 18), you will need to do this now.
To start the Setup wizard:
1. Press and hold the Menu/Info button to enter the menu options.
2. Use the rotary Tune/Select control to scroll to System settings and press to select.
3. Use the rotary Tune/Select control to scroll to Network and press to select.
4. Network wizard will be highlighted. Press the rotary Tune/Select control to select.
5. Follow the steps on page 18 to connect your Radio with your home router for Internet
radio access.
Selecting an Internet radio station
There are several different ways of selecting Internet Radio stations to listen to on your
radio. Such as:
Location - find a radio station by its location in the world.
Genre - search for stations worldwide broadcasting the type of music you like to listen to.
Search stations - Search by station name.
Popular stations - lists the most listened to, popular stations on the internet.
New stations - lists the latest stations broadcasting.
If you require any tec hnical guidance or find that you r product is not operating as inten ded, a simple solution can oft en be found in the
Using your Internet DAB Radio24
Tro ub l es ho ot i ng
Page 25

Using your Internet DAB Radio
Internet radio
Internet radio
Podcasts
New stations
Stations
Stations
Let’s get started
In internet radio mode:
1. Press and hold the Menu/Info button to enter the menu options.
Last listened
2. Use the Tune/Select control to highlight Station list. Press to
select.
Station list
System settings
Main menu
Note: Depending on where your radio is being used and your IP
address, other local internet radio options may be presented on
this screen. In the UK, Local United Kingdom and BBC will also
be displayed.
My Favourites
Local United Kingdom
BBC
Stations
3. Use the Tune/Select control to highlight Stations. Press to select.
4. You can now use the Tune/Select control to highlight the
option you would like and press to Select.
5. Continue to use the Tune/Select control to highlight each
Location
Genre
Search stations
Popular stations
option you would like and press to Select. When you select an
Internet radio station to tune in and listen to, ‘Connecting...’, followed by ‘Loading...’
with a progress bar will be displayed. After a short delay the station should start to play.
Search for an Internet radio station
In internet radio mode:
1. Press and hold the Menu/Info button to enter the menu options.
2. Use the Tune/Select control to highlight Station list. Press to select.
3. Use the Tune/Select control to highlight Search stations. Press to select.
4. Use the Tune/Select control to move around the Search stations
screen and press to select each letter or number required to
enter the name of the radio station that you would like to search
for.
BA
0123456789 ABCD
EFGHIJKLMNOPQRS
TUVWXYZ
BKSP
OK
Cancel
section of these instructions, or online at www.argos-support.co.uk If you still require further assistance, call one of our e xperts on 0345 600 3021.
Using your Internet DAB Radio
25
Page 26

Using your Internet DAB Radio
Let’s get started
On the right hand side of the key screen are three additional options:
BKSP - to delete a number or character that you have just entered.
OK - When you have finished entering the Station name that you would like to search
for.
CANCEL - To cancel the search and return to the previous screen.
Short press the Menu/Info button to move from the number and letters part of the
screen to the three options on the right hand side. Use the Tune/Select control to
move up and down the options and press to select.
Short press the Menu/Info button again to move back to the numbers and letters part
of the screen.
5. When you have entered the station name that you would like to search for, short
press the Menu/Info button to move to the three options on the right hand side of the
screen.
6. Use the Tune/Select control to highlight OK. Press to select. Please wait, Loading...
will be displayed.
7. Use the Tune/Select control to highlight a station from the search list and press to
select.
Podcasts
Some radio stations enable you to listen to programmes that have already been broadcast.
There are also programmes available that have been created for download onto a
computer or portable device, such as a tablet or mobile phone.
These are commonly known as Podcasts. You can search for Podcasts to listen to on
your Internet DAB radio.
In internet radio mode:
1. Press and hold the Menu/Info button to enter the menu options.
2. Use the Tune/Select control to highlight Station list. Press to select.
3. Use the Tune/Select control to highlight Podcasts. Press to select.
If you require any tec hnical guidance or find that you r product is not operating as inten ded, a simple solution can oft en be found in the
Using your Internet DAB Radio26
Tro ub l es ho ot i ng
Page 27

Using your Internet DAB Radio
Internet radio
Let’s get started
4. You can now choose to search for Podcasts by Location or Genre, or to search using
the name of the Podcast. Use the Tune/Select control to highlight the option you
would like and press to select.
5. If you select to search using the name of the podcast, this works the same way as
when you are searching for an internet radio station. See page 25, Searching for an
Internet Radio Station, point 4.
6. When you have entered the podcast name that you would like to search for, short
press the Menu/Info button to move to the three options on the right hand side of the
screen.
7. Use the Tune/Select control to highlight OK. Press to select. Please wait, Loading...
will be displayed.
8. Use the Tune/Select control to highlight a podcast from the search list and press to
select.
Last listened
Your radio will store up to 10 of the most recent Internet radio stations or Podcasts that
you have listened to and there is a very quick and easy way to access these stations.
In internet radio mode:
1. Long press the Menu/Info button to enter the Internet radio
menu. Last listened is highlighted at the top of the list.
2. Short press the Tune/Select control to display up to 10 of the
Last listened
Station list
System settings
Main menu
most recent Internet radio stations or Podcasts that you have
listened to.
Note: As you listen to each new internet radio station or podcast, these are added
to the top of this list and the older stations and podcasts are then deleted from the
bottom of the list.
3. Use the rotary Tune/Select control to highlight the Station or Podcast that you would
like to listen to and press to select.
4. Your radio will now connect to that Station or Podcast, if it is still available, and begin
to play.
section of these instructions, or online at www.argos-support.co.uk If you still require further assistance, call one of our e xperts on 0345 600 3021.
Using your Internet DAB Radio
27
Page 28

Using your Internet DAB Radio
Let’s get started
Storing Internet radio station presets
Your Radio can store up to 40 Internet radio stations in its preset memories for instant
access to your favourite stations. Presets 1-5 can be stored and quickly recalled using the
one-touch access buttons on the front of your radio.
Note: When you store your Internet radio station presets, these do not overwrite your
DAB or FM radio station presets.
Storing the one-touch presets 1-5.
In internet radio mode:
1. Tune your radio to the Internet station that you wish to preset.
2. Long press the one-touch button (1-5) on the front of your radio, that you would like
to store the Internet station to. ‘Preset stored’ is displayed.
Note: If there is already an existing Internet station stored under a preset, it will be over
written when you store the new station.
Recall a stored one-touch preset 1-5.
In internet radio mode:
1. Short press the one touch button on the front of your radio (1-5), where the station
you would like to listen to has been stored.
2. Your radio will connect to that station and begin to play.
Note: If no Internet station has been stored under the preset button, ‘Preset empty’ will
be displayed. The radio will revert to the previously selected radio station.
Storing Internet station presets 1-40
1. Tune your radio to the Internet station that you wish to preset.
2. Long press the Preset button. Use the rotary Tune/Select control to move to the
preset location that you would like to store the radio station to (1-40).
If you require any tec hnical guidance or find that you r product is not operating as inten ded, a simple solution can oft en be found in the
Using your Internet DAB Radio28
Tro ub l es ho ot i ng
Page 29

Using your Internet DAB Radio
Let’s get started
Note: When you store a radio station to Preset location 1-5 using this method, this will
also be saved under the 1-5 one-touch buttons on the front of your radio.
3. Short press the Tune/Select control. The display will confirm Preset stored.
Note: If there is already an existing Internet station stored under a preset, it will be over
written when you store the new station.
Recalling Internet station presets 1-40
In internet radio mode:
1. Short press the Preset button. Use the rotary Tune/Select control to move to the
Preset location and station that you would like to listen to (1-40).
2. Short press the Tune/Select control.. The radio will tune to that station and begin to
play.
Note: If no Internet station has been stored under the preset button, ‘Preset empty’ will
be displayed, then the radio will revert to the previously selected radio station.
Internet radio information
When listening to an internet radio station you can change the information that will
appear on the display. There are several different types of information that may be
available, depending on the station that you are listening to.
• Description - This is text information which could be the name of an artist or music
title, DJ’s name, contact details etc.
• Genre - Displays programme type information e.g. Rock, Pop, Talk, News, etc. and the
location of the current radio station.
• Reliability - Displays the reliability of the data stream for the station you are listening to,
e.g. Reliability: Excellent.
• Bit rate, Codec and Sampling rate - e.g. Bit rate: 320kbps, Codec: AAC and Sampling
rate: 48.0 kHz.
section of these instructions, or online at www.argos-support.co.uk If you still require further assistance, call one of our e xperts on 0345 600 3021.
Using your Internet DAB Radio
29
Page 30

Using your Internet DAB Radio
Internet radio 4:28PM
Let’s get started
• Playback buffer - When playing an internet radio stream, your
radio downloads a small amount of the stream before it starts to
play, this is called ‘buffering’. The playback buffer indicates the
BBC radio 2
2
Playback buer
status of the buffer when connected to an internet radio station.
If there are not many or no bars, then there are likely to be
interruptions to the playback of that particular internet radio
station.
• Today’s Date
1. Repeatedly short press the Menu/Info button to cycle through the different
information options.
My favourites
As well as storing radio stations to your presets, you can also save to a My Favourites
listing.
Saving to the My Favourites list
In internet radio mode:
1. Tune your radio to the Internet station that you wish to save to My Favourites.
2. Long press the rotary Tune/Select control until ‘Favourite added’ is displayed.
Select a station in the My Favourites list
In internet radio mode:
1. Long press the Menu/Info button to enter the menu options. Use the rotary Tune/
2. My Favourites will be highlighted at the top of the list. Press the rotary Tune/Select
3. Use the rotary Tune/Select control to highlight the Favourite station you would like to
If you require any tec hnical guidance or find that you r product is not operating as inten ded, a simple solution can oft en be found in the
Select control to highlight the Station list and press to select.
control. Stations will be highlighted. Press the rotary Tune/Select control.
listen to and press to select. The radio will tune to that station and begin to play.
Tro ub l es ho ot i ng
Using your Internet DAB Radio30
Page 31

Using your Internet DAB Radio
Let’s get started
Registering on the Frontier Silicon Portal
If you register your product on the Frontier Silicon Portal, you can organise your Favourites
listings and also add your own internet radio stations to the portal, so that they can be
listened to on your radio.
To register on the portal you will need the following:
• A computer or other device with a web browser to access the www.wifiradio-frontier.
com website.
• An Access code from your radio. This will only be valid for a few minutes, so please
make sure that your radio is already connected to your router and you are in internet
radio mode before you begin the registration process.
• Your e-mail address.
• A passphrase of your choosing, which must have a minimum of 6 characters.
• Your radio model, which is the ‘Jupiter 6.5’.
To generate your radio access code:
1. Long press the Menu/Info button to enter the menu options. Use the rotary Tune/
Select control to highlight ‘Station list’ and press to select.
2. Use the rotary Tune/Select control to scroll and highlight ‘Help’. Press to select.
3. Get access code will be highlighted. Short press the rotary Tune/Select control.
4. Your access code will be displayed. Please make a note of it and then enter it on the
Frontier Silicon registration screen.
Note: Your radio access code will only be valid for a few minutes, so you will need to
enter it onto the Frontier Silicon registration screen quickly, or follow the steps above to
generate a new access code.
5. Once you have successfully registered on the Frontier Silicon portal, you can organise
your favourites and added new stations easily and then play them on your radio. Just
long press the Menu/Info button to enter the internet radio menu options. Select
‘Station list’ and then ‘My Favourites’ or ‘My Added Stations’ as appropriate.
section of these instructions, or online at www.argos-support.co.uk If you still require further assistance, call one of our e xperts on 0345 600 3021.
Using your Internet DAB Radio
31
Page 32

Using your Internet DAB Radio
Let’s get started
Music player mode
If you are not already in Music player mode, short press the Mode button until My Music is
highlighted, then short press the rotary Tune/Select control.
In music player mode, you can listen to audio files that are stored on your computer via
your radio. MP3, WMA, AAC and WAV audio file types are supported.
UPnP media sharing enables your radio to play music from a shared media library. If you
are using a suitable server system such as a computer with Windows Media Player 10 or
later (WMP), and your music library is well tagged, only the UPnP server needs to be set
up.
Note: If you are an Apple Mac user, iTunes does not currently work as a UPnP media
server, but there are add-ons available to work with an iTunes library, such as Plex
Media Server. These are not covered within this guide.
In order to play the audio files on your radio, you must first ensure the following:
• Your radio has the ‘Keep Network Connected’ option turned on. See page 19, point 6.
• Your computer is connected to the same router and network as your radio.
• The audio files are stored in the correct location on your computer.
• The audio files are not ‘protected’.
• Your computer has the correct type of audio files and playlists stored on a networked
computer.
• Your computer has file sharing turned on.
• The audio files can be shared on the network.
• You know the name of your computer.
If you require any tec hnical guidance or find that you r product is not operating as inten ded, a simple solution can oft en be found in the
Using your Internet DAB Radio32
Tro ub l es ho ot i ng
Page 33

Using your Internet DAB Radio
Let’s get started
Setting up your Windows computer to allow access to your
audio files
1. Ensure that your computer is connected to the same router and network as your
radio.
2. Check that your radio is connected to the same router and network as your computer
and has the ‘Keep Network Connected” option turned on. See page 19, point 6.
3. On your computer, in the Windows Media Player, add to the media library the audio
files and folders that you would like to share with your radio.
4. In Windows Media Player, enable media sharing, select Library > Media sharing..
5. Ensure that your radio will be able to access the shared media by selecting it within the
Windows Media Player and clicking ‘Allow’. You can also choose a name for the shared
media in ‘Settings’. Click ‘OK’ to close the dialogue boxes.
6. Your computer is now ready to stream the music to your radio.
Playing audio files using Music player mode
In music player mode:
1. Short press the rotary Tune/Select control to highlight Shared media and press to
select.
2. Your radio will now load and display the names of the computer(s) on your network
that have shared media available. Use the rotary Tune/Select control to highlight and
select the computer which has the audio files that you would like to play.
3. The menus presented to you on your radio are now generated by the media server,
such as the Windows Media Player. Your radio can play Music and Playlists and there is
also a search option available.
4. Use the rotary Tune/Select control to highlight and press to select to play your music
choices
5. You can also use the skip back, skip forward, play, Pause and Stop
buttons on your radio, when streaming music from your computer.
section of these instructions, or online at www.argos-support.co.uk If you still require further assistance, call one of our e xperts on 0345 600 3021.
Using your Internet DAB Radio
33
Page 34

Using your Internet DAB Radio
Let’s get started
DAB Radio mode
• Please make sure that the aerial is fully extended before you attempt to tune to a DAB
station (a vertical position is recommended). This will ensure that the maximum signal
strength is available when the radio begins to scan. Extending the aerial also ensures
the best possible sound quality.
• If you are not already in DAB mode, short press the Mode/info button until DAB is
highlighted, then short press the rotary Tune/Select control to go to DAB mode (check
the display).
• The first time you select DAB mode or if the station list is empty, your radio will
automatically begin to scan for DAB radio stations. A progress bar will show the
progress of the scan and the number of stations found during the scan will also be
displayed.
• If you were listening to a DAB station when you switched the radio off, then this station
will automatically be selected when you switch the radio back on.
Changing DAB stations
1. When the station list is displayed, use the rotary Tune/Select control to scroll through
the available stations. When the station that you would like to listen to is displayed,
short press the Tune/Select control.
2. If the station list is not currently displayed, long press the Menu/Info button to enter
the menu options. Station list is highlighted. Short press the rotary Tune/Select
control.
3. Use the rotary Tune/Select control to scroll through the available stations. When the
station that you would like to listen to is displayed, short press the Tune/Select control.
4. There will be a short delay whilst your radio tunes to your selected station.
If you require any tec hnical guidance or find that you r product is not operating as inten ded, a simple solution can oft en be found in the
Using your Internet DAB Radio34
Tro ub l es ho ot i ng
Page 35

Using your Internet DAB Radio
Let’s get started
Scanning for DAB stations
With DAB radio additional stations and services regularly become available, so it’s a good
idea to carry out a manual scan every now and then to make sure that you have the most
up to date station listing stored within the memory of your Radio. If you have moved your
Radio to another location, e.g.: if you go on holiday, then it’s also a good idea to carry out
a manual scan.
In DAB mode:
1. Short press the Scan button to begin a search for stations. The display will change
to ‘Scanning...’. A progress bar will show the progress of the scan and the number of
stations found during the scan will also be displayed.
2. When the scan is complete, the updated station list will be displayed.
Prune DAB stations
You can remove the DAB stations in the station list that cannot be received in your area.
These are listed with a ‘?’ prefix.
In DAB mode:
1. Long press the Menu/Info button to enter the menu options.
2. Use the rotary Tune/Select control to highlight to Prune invalid and press to select..
3. This removes all invalid stations, continue? YES NO is displayed. Use the rotary Tune/
Select control to highlight to YES and press to select.. Stations with a ‘?’ prefix will now
no longer be displayed.
Storing a DAB station preset
Your Radio can store up to 40 DAB radio stations in its preset memories for instant access
to your favourite stations. Presets 1-5 can be stored and quickly recalled using the onetouch access buttons on the front of your radio.
Note: When you store DAB radio station presets, these do not overwrite your Internet
or FM station presets.
section of these instructions, or online at www.argos-support.co.uk If you still require further assistance, call one of our e xperts on 0345 600 3021.
Using your Internet DAB Radio
35
Page 36

Using your Internet DAB Radio
Let’s get started
Storing the one-touch presets 1-5.
In DAB radio mode:
1. Tune the Radio to the DAB radio station that you wish to preset.
2. Long press the one-touch button (1-5) on the front of your radio, that you would like
to store the DAB station to. ‘Preset stored’ is displayed.
Note: If there is already an existing DAB station stored under a preset, it will be over
written when you store the new station.
Recall a stored one-touch preset 1-5.
In DAB radio mode:
1. Short press the one touch button on the front of your radio (1-5), where the station
you would like to listen to has been stored.
2. Your radio will tune to that station and begin to play.
Note: If no DAB station has been stored under the preset button, ‘Preset empty’ will be
displayed. The radio will revert to the previously selected radio station.
Storing DAB station presets 1-40
1. Tune your radio to the DAB station that you wish to preset.
2. Long press the Preset button. Use the rotary Tune/Select control to move to the
preset location that you would like to store the radio station to (1-40).
Note: When you store a radio station to Preset location 1-5 using this method, this will
also be saved under the 1-5 one-touch buttons on the front of your radio.
3. Short press the Tune/Select control. The display will confirm Preset stored.
Note: If there is already an existing DAB station stored under a preset, it will be over
written when you store the new station.
If you require any tec hnical guidance or find that you r product is not operating as inten ded, a simple solution can oft en be found in the
Using your Internet DAB Radio36
Tro ub l es ho ot i ng
Page 37

Using your Internet DAB Radio
Let’s get started
Recalling DAB station presets 1-40
In DAB radio mode:
1. Short press the Preset button. Use the rotary Tune/Select control to move to the
Preset location and station that you would like to listen to (1-40).
2. Short press the Tune/Select control.. The radio will tune to that station and begin to
play.
Note: If no DAB station has been stored under the preset button, ‘Preset empty’ will be
displayed, then the radio will revert to the previously selected radio station.
DAB display information
When listening to a DAB station you can change the information that will appear on the
display. There are several different types of information that are sent by the broadcaster.
• Dynamic Label Segment (DLS) - this is text information supplied by the broadcaster.
Information could be the name of an artist or music title, DJ’s name, contact details
for the radio station etc.
• Program Type (PTY) - such as ‘Rock’, ‘Pop‘, Talk’ or ‘News’
• Multiplex Name - displays the broadcasting area and collection of radio stations on
this frequency e.g.: BBC National DAB, Digital 1 Network.
• Signal error - This is displayed as a number between 0-99. It would not be possible
to satisfactorily listen to a ratio station with a signal error rate of 30 or above. Try
adjusting the aerial or relocating your radio to improve reception.
• Today’s date - supplied by the broadcaster.
• Signal information - The data rate at which the signal is being transmitted.
1. Repeatedly short press the Menu/Info button to cycle through the different
information options.
section of these instructions, or online at www.argos-support.co.uk If you still require further assistance, call one of our e xperts on 0345 600 3021.
Using your Internet DAB Radio
37
Page 38

Using your Internet DAB Radio
Let’s get started
Dynamic range control (DRC)
In DAB mode:
The dynamic range for each radio programme is set by the broadcaster for each radio
station and may be different for the types of programme broadcast, such as pop or
classical music or a chat show. The dynamic range control signal is transmitted in parallel
with the audio signal for each programme and with your radio you can use this control
signal to expand or compress the dynamic range (the difference between the loudest and
quietest sounds) of the reproduced audio signal. Changing the dynamic range can affect
the ‘loudness’ and/or ‘quality of sound’ of the programme that you hear so that it will be
more suited to your listening conditions and your own personal listening requirements.
e.g. in a noisy environment, where quiet sounds might be swamped, setting the
compression to maximum will ‘boost’ the quiet sounds, whilst keeping the loudest sounds
at their original level.
There are 3 levels of compression:
• DRC off - no compression. This is the default setting.
• DRC low - medium compression.
• DRC high - maximum compression.
1. Long press the Menu/Info button to enter the menu options.
2. Use the rotary Tune/Select control to scroll to DRC. Press to select.
Note: The current DRC setting will have an ‘*’ in the display.
3. Use the rotary Tune/Select control to scroll through the options and press to select.
FM Radio mode
• Please make sure that the aerial is fully extended before you attempt to tune to an FM
station (a vertical position is recommended). This will ensure that the maximum signal
strength is available when the radio begins to scan. Extending the aerial also ensures
the best possible sound quality.
• If you are not already in FM mode, short press the Mode button until FM is highlighted,
then short press the rotary Tune/Select control (check the display).
If you require any tec hnical guidance or find that you r product is not operating as inten ded, a simple solution can oft en be found in the
Using your Internet DAB Radio38
Tro ub l es ho ot i ng
Page 39

Using your Internet DAB Radio
Let’s get started
• If you were listening to a FM station when you switched the radio off, then this station
will automatically be selected when you switch the radio back on.
Tuning to an FM station
Use the rotary Tune/Select control to scroll through the FM frequency band. Alternatively,
you can:
• Press and release the Scan button to scan up the frequency band.
• Press and hold the Scan button to scan down the frequency band.
Note: If reception is still poor try adjusting the aerial or moving the radio to another
location.
Changing the Scan setting
In FM mode:
1. Long press the Menu/Info button. Scan setting is highlighted. Short press the rotary
Tune/Select control to select.
2. Strong stations only? YES NO will be displayed and the NO option will be highlighted.
In you select YES: Your radio will scan for Strong stations only. The scan will
only stop when a strong signal strength is received which
should also result in a better audio quality. It is possible that the
station you are scanning for may be missed using this option.
If you select NO: Your radio will scan for All stations. The scan will stop for
every station it receives, even if the signal strength is poor.
3. Use the rotary Tune/Select control to choose from the two options available and press
to select.
section of these instructions, or online at www.argos-support.co.uk If you still require further assistance, call one of our e xperts on 0345 600 3021.
Using your Internet DAB Radio
39
Page 40

Using your Internet DAB Radio
Let’s get started
Audio mode
The radio will automatically switch between Stereo and Mono, depending on the quality
of the signal being received but you can override this function and manually switch to
Mono only.
1. Long press the Menu/Info button to enter the menu options.
2. Use the rotary Tune/Select control to scroll to Audio setting and press to select.
3. Listen in Mono only? YES NO will be displayed and the NO option will be highlighted.
4. Use the rotary Tune/Select control to choose from the options available and press to
select.
Storing an FM station preset
Your Radio can store up to 40 FM radio stations in its preset memories for instant access
to your favourite stations. Presets 1-5 can be stored and quickly recalled using the onetouch access buttons on the front of your radio.
Note: When you store FM radio station presets, these do not overwrite your Internet or
DAB station presets.
Storing the one-touch presets 1-5.
1. Tune the Radio to the FM radio station that you wish to preset.
2. Long press the one-touch button (1-5) on the front of your radio, that you would like
to store the FM station to. ‘Preset stored’ is displayed.
Note: If there is already an existing FM station stored under a preset, it will be over
written when you store the new station.
Recall a stored one-touch preset 1-5.
In FM radio mode:
1. Short press the one touch button on the front of your radio (1-5), where the station
you would like to listen to has been stored.
If you require any tec hnical guidance or find that you r product is not operating as inten ded, a simple solution can oft en be found in the
Using your Internet DAB Radio40
Tro ub l es ho ot i ng
Page 41

Using your Internet DAB Radio
Let’s get started
2. Your radio will tune to that station and begin to play.
Note: If no FM station has been stored under the preset button, ‘Preset empty’ will be
displayed. The radio will revert to the previously selected radio station.
Storing FM station presets 1-40
1. Tune your radio to the FM station that you wish to preset.
2. Long press the Preset button. Use the rotary Tune/Select control to move to the
preset location that you would like to store the radio station to (1-40).
Note: When you store a radio station to Preset location 1-5 using this method, this will
also be saved under the 1-5 one-touch buttons on the front of your radio.
3. Short press the Tune/Select control. The display will confirm Preset stored.
Note: If there is already an existing FM station stored under a preset, it will be over
written when you store the new station.
Recalling FM station presets 1-40
In FM radio mode:
1. Short press the Preset button. Use the rotary Tune/Select control to move to the
Preset location and station that you would like to listen to (1-40).
2. Short press the Tune/Select control.. The radio will tune to that station and begin to
play.
Note: If no FM station has been stored under the preset button, ‘Preset empty’ will be
displayed, then the radio will revert to the previously selected radio station.
section of these instructions, or online at www.argos-support.co.uk If you still require further assistance, call one of our e xperts on 0345 600 3021.
Using your Internet DAB Radio
41
Page 42

Using your Internet DAB Radio
Let’s get started
FM display information
When listening to an FM station you can change the information that will appear on the
display.
• Radiotext (RT) - This is text information supplied by the broadcaster. Information could
be the name of an artist or music title, DJ’s name, contact details for the radio station
etc.
• Program Type (PTY) - Such as ‘Rock’, ‘Pop‘, Talk’ or ‘News’
• Station name or frequency - Such as BBC R4 or 93.30MHz
• Today’s date - Supplied by the broadcaster.
1. Repeatedly short press the Menu/Info button to cycle through the different
information options.
AUX in mode
There is an AUX in 3.5mm socket on the rear or your radio,next to the headphone socket.
Using a 3.5mm audio input connection cable (not supplied), AUX in allows for a quick and
easy connection to an external sound source, such as MP3 or CD players, tablets or other
mobile products.
Check that your Radio is in AUX in mode. If you are not already in AUX in mode, short
press the Mode button until AUX is highlighted, then short press the rotary Tune/Select
control to go to AUX in mode (check the display).
1. Connect one end of the 3.5mm audio connection cable to the headphone (or
auxiliary out) socket of your secondary device, connect the other end to the AUX in
socket on the back of your Radio.
2. Press the Play button on your external device to start playback through the Radio
speakers.
To gain optimal volume levels, adjust the output volume level on both the secondary
device and on your radio.
Note: Please remember to unplug the Audio cable from the AUX in socket on the back
of your radio, after you have finished listening to your external device.
If you require any tec hnical guidance or find that you r product is not operating as inten ded, a simple solution can oft en be found in the
Using your Internet DAB Radio42
Tro ub l es ho ot i ng
Page 43

Using your Internet DAB Radio
Let’s get started
System Settings available in the Menu
There are a range of features and settings available to you within the Menu of your radio.
You can access the Menu system settings, when the radio is on (not in Standby mode),
from any mode:
1. Long press the Menu/Info button.
2. Use the rotary Tune/Select control to scroll and highlight System settings, press to
select.
3. A list of features and options will be displayed. Use the rotary Tune/Select control to
scroll and highlight a feature or option and press to select or confirm. You can short
press the Menu/Info button if you need to go back a step.
Available features and options in the Menu, System settings list are:
• Sleep
You can set your radio to turn off automatically using the sleep timer. You can choose
from Sleep OFF, 15, 30, 45, 60 and 90 minutes.
• Equaliser
The sound on your radio can be adjusted to suit the type of music or programme
you are listening to using the Equaliser settings. If you prefer, you can also choose to
set the bass and treble settings within the My EQ profile set up option. The Equaliser
options available are:
Normal, Flat, Jazz, Rock, Movie, Classic, Pop, News, My EQ and My EQ profile setup.
Note: If you need to go back a step when using the Menu, System settings, just short
press the Menu/Info button.
• Network
The settings you entered when you ran the Setup Wizard to connect the Radio to your
router are listed here, together with additional options for you to manually enter your
router settings or clear your current network settings.
section of these instructions, or online at www.argos-support.co.uk If you still require further assistance, call one of our e xperts on 0345 600 3021.
Using your Internet DAB Radio
43
Page 44

Using your Internet DAB Radio
Let’s get started
• Time/Date
You can manually set the time and date, select the Auto update source, set 12 or 24
hour time format, set the timezone and also set Daylight saving on or off.
• Alarms
Set Alarm 1 and Alarm 2.
• Language
You can change the display language of your radio, there are 13 options available;
English, Danish, Dutch, Finnish, French, German, Italian, Norwegian, Polish,
Portuguese, Spanish, Swedish and Turkish. English is the default setting.
• Backlight
You can change the backlight timeout settings. Permanently On, 10, 20, 30, 45, 60,
90, 120 and 180 seconds are available.
You can also set the display brightness of the On Level and Dim Level (Standby). High,
Medium and Low settings are available.
• Factory reset
Restores the original factory default settings.
Note: All of the radio settings, including your internet radio router settings, the DAB
station list and all of the Internet, DAB and FM radio station presets will be deleted when
you Factory reset your radio.
• Radio SW & ID
The software version, individual Radio ID and Friendly name for your radio can be
found under this option.
If you require any tec hnical guidance or find that you r product is not operating as inten ded, a simple solution can oft en be found in the
Using your Internet DAB Radio44
Tro ub l es ho ot i ng
Page 45

This page is left intentionally blank
section of these instructions, or online at www.argos-support.co.uk If you still require further assistance, call one of our e xperts on 0345 600 3021.
Page 46

This page is left intentionally blank
Page 47

Other information 4
Page 48

Other information
Helpful technical information
Technical specification
Please use only the specified external adaptor, (OBELIEVE, Model Name: OBL-1201500B)
Power adaptor. Output DC 12V 1.5A
Input AC 100-240V, 50/60Hz, 0.5A max.
Audio output: 2 x 5W RMS
WiFi: 802.11 b/g/n. Supports WEP and WPA/WPA2 encryption.
Frequency range:
DAB: Band III, 174 MHz to 240 MHz
FM: 87.5 MHz to 108 MHz
Headphone socket: 3.5mm stereo
AUX in socket: 3.5mm stereo
If you require any tec hnical guidance or find that you r product is not operating as inten ded, a simple solution can oft en be found in the
Other information48
Tro ub l es ho ot i ng
Page 49

This page is left intentionally blank
section of these instructions, or online at www.argos-support.co.uk If you still require further assistance, call one of our e xperts on 0345 600 3021.
Page 50

This page is left intentionally blank
Page 51

Product support 5
Page 52

Product support
Help is always at hand
Troubleshooting
Unable to connect wirelessly to your router:
• Check that you are able to connect successfully to your router using WiFi with another
device, such as a computer, tablet or mobile phone.
• Ensure that your Radio is within range of your router for WiFi connectivity, move it
closer to the router, if necessary.
• Check that you do not have other electrical or WiFi products too close to your Radio,
which could interfere with the WiFi signal.
• Check that you have entered the encryption key or passphrase for your router, ‘exactly’
as it appears, including upper and lower case characters.
• Check that your router has not been set up to restrict access to specific MAC
addresses. The person who set up your network will be able to advise if you need
to enter the MAC address of your radio to the list of allowed devices on your
router. You can find the MAC address of your radio within the Menu, under System
Settings>Network>View settings.
• Check that your network’s firewall is not blocking the connection from your Radio.
Some internet radio stations are not available:
• The station may not be broadcasting at the time of day that you have tried to listen to
it. (Depending on the particular radio station if may be in a different time zone)
• The station may have too many people trying to connect to its servers and their server
capacity may not be enough to enable everyone to connect.
• The station is not broadcasting any more.
• The internet connection between the server (often located in another country) and
you is slow. Some Internet Service Providers may fail to provide service in some
geographical areas. You could use a computer to check if the internet radio station
can be received.
• If the radio station connection is intermittent or keep stopping. Check your internet
broadband connection and speed.
If you require any tec hnical guidance or find that you r product is not operating as inten ded, a simple solution can oft en be found in the
Product support52
Tro ub l es ho ot i ng
Page 53

Product support
Help is always at hand
• If you are experiencing an intermittent service or high error rate on your broadband
connection your radio will not be able to continuously connect and play in internet
radio mode.
No sound / power:
• Adjust the volume.
• You may have headphones connected. Please unplug the headphones or use them
to listen to your radio.
Radio reception is poor:
• Make sure that you have fully extended the telescopic aerial.
• Rescan for radio stations, see pages 35 and 39.
• Try moving your radio to another location to see if reception improves.
• Check that you do not have other electrical equipment too close to your Radio,
causing interference.
• Visit www.digitalradionow.com for information about DAB reception in your area.
The function buttons do not respond:
• Check that the mains power lead is connected at the back of your radio and the mains
power wall socket is switched on. Press and release the Power button..
• Try a reset to factory defaults.
Note: All of the radio settings, including your internet radio router settings, the DAB
station list and all of the Internet, DAB and FM radio station presets will be deleted when
you factory reset your radio.
section of these instructions, or online at www.argos-support.co.uk If you still require further assistance, call one of our e xperts on 0345 600 3021.
Product support 53
Page 54

Product support
Help is always at hand
Help and assistance
If you require any technical guidance or find that your Internet DAB Radio is not operating
as intended, a simple solution can often be found in the Troubleshooting section of these
instructions or online at www.argos-support.co.uk
If you still require further assistance, call one of our experts on 0345 600 3021*. To help
give us give you a fast and efficient service please have the following information ready:
You can find these
on the rating plate - a
Model Ref.
Serial number
small information
panel (usually a sticker
or metal plate) on the
base or rear of your
product.
Date of purchase
Local call rates applies*
This will be shown on
your receipt
Lines open 8am-7pm Monday to Saturday and
10am-4pm Sunday.
*Calls to Argos enquiry lines may attract a charge and set up fee from residential lines depending on
your call plan/tari. Mobile and other providers costs may vary, see www.bt.com/pricing for details.
For security and training purposes, telephone calls to and from customer service centres may be
recorded and monitored. Calls from Republic of Ireland will attract international call charges.
If you require any tec hnical guidance or find that you r product is not operating as inten ded, a simple solution can oft en be found in the
Product support54
Tro ub l es ho ot i ng
Page 55

Product support
Help is always at hand
Disposal
• Disposal of your old product. Your product is designed and manufactured with
high quality materials and components, which can be recycled and reused.
• When this crossed out wheeled bin symbol is attached to a product it means
the product is covered by the European Directive 2012/19/EC..
• Please make yourself aware of the local collection system for electrical and
electronic products.
• Please act according to your local rules and do not dispose of your old
products with your normal household waste.
• The correct disposal of your old product will help prevent potential negative
consequences for the environment and human health.
This product is intended for use within the UK. This equipment complies with the essential
requirements of the Radio Equipment Directive 2014/53/EU.
Declaration of Conformance
Hereby, Argos Ltd, declares that this Band II LPD device is in compliance with the essential
requirements and other relevant provisions of the Radio Equipment Directive 2014/53/
EU. The complete declaration of conformity can be obtained by contacting http://www.
argos-support. co.uk/
section of these instructions, or online at www.argos-support.co.uk If you still require further assistance, call one of our e xperts on 0345 600 3021.
Product support 55
Page 56

Product support
Help is always at hand
Call us now and activate your 12 month guarantee
Thank you for choosing Bush. Your new product is guaranteed against faults and breakdowns for 12 months.
Don’t forget to register it with us today so we can provide you with our best possible after-sales service and
useful updates.
www.bushregistration.co.uk
FREEPHONE*
0800 597 8548
Lines are open 8am - 8pm, 365 days a year. *Calls may be recorded and monitored.
Your Bush Guarantee
This product is guaranteed for twelve months from the date of original purchase. Any defect that arises due to
faulty materials or workmanship will be repaired free of charge (or if applicable the product will be replaced or the
purchase price refunded) where possible during this period by the dealer from who your purchased the unit.
The guarantee is subject to the following provisions:
• The guarantee does not cover accidental damage,
misuse, cabinet parts, knobs or consumable items.
• The product must be correctly installed and
operated in accordance with the instructions
contained in the manual.
• It must be used solely for domestic purposes. The
guarantee will be rendered invalid if the product is
Important Data Protection Information
If you provide us with information about another person,
you confirm that they have appointed you to act for
them, to consent to the processing of their personal
data including sensitive personal data and that you have
informed them of our identity and the purposes (as
set out in the Important Data Privacy notice displayed
overleaf) for which their personal data will be processed.
You are entitled to ask for a copy of the information
we hold about you (for which we may charge a small
fee) and to have any inaccuracies in your information
corrected.
Guarantor: Argos Limited - 489 - 499 Avebury Blvd. - Milton Keynes - MK9 2NW
If you require any tec hnical guidance or find that you r product is not operating as inten ded, a simple solution can oft en be found in the
re-sold or has been damaged by inexpert repair.
• Specifications are subject to change without
notice.
• Bush disclaim any liability for loss or damage arising
from the breakdown of the product.
• This guarantee is in addition to and does not
diminish your statutory or legal rights.
For quality control and training purposes, we may
monitor or record your communications with us.
If your personal details change, if you change your mind
about any of your marketing preferences or if you have
any queries about how we use your information, please
let us know by contacting our Data Protection
Officer, Domestic & General, Leicester House
17 Leicester Street, Bedworth, Warwickshire
CV12 8JP.
Tro ub l es ho ot i ng
Product support56
Page 57

This page is left intentionally blank
section of these instructions, or online at www.argos-support.co.uk If you still require further assistance, call one of our e xperts on 0345 600 3021.
Page 58

This page is left intentionally blank
Page 59

This page is left intentionally blank
Page 60

Contact:
www.argos-support.co.uk
Helpline: 0345 600 3021
 Loading...