

Page 1
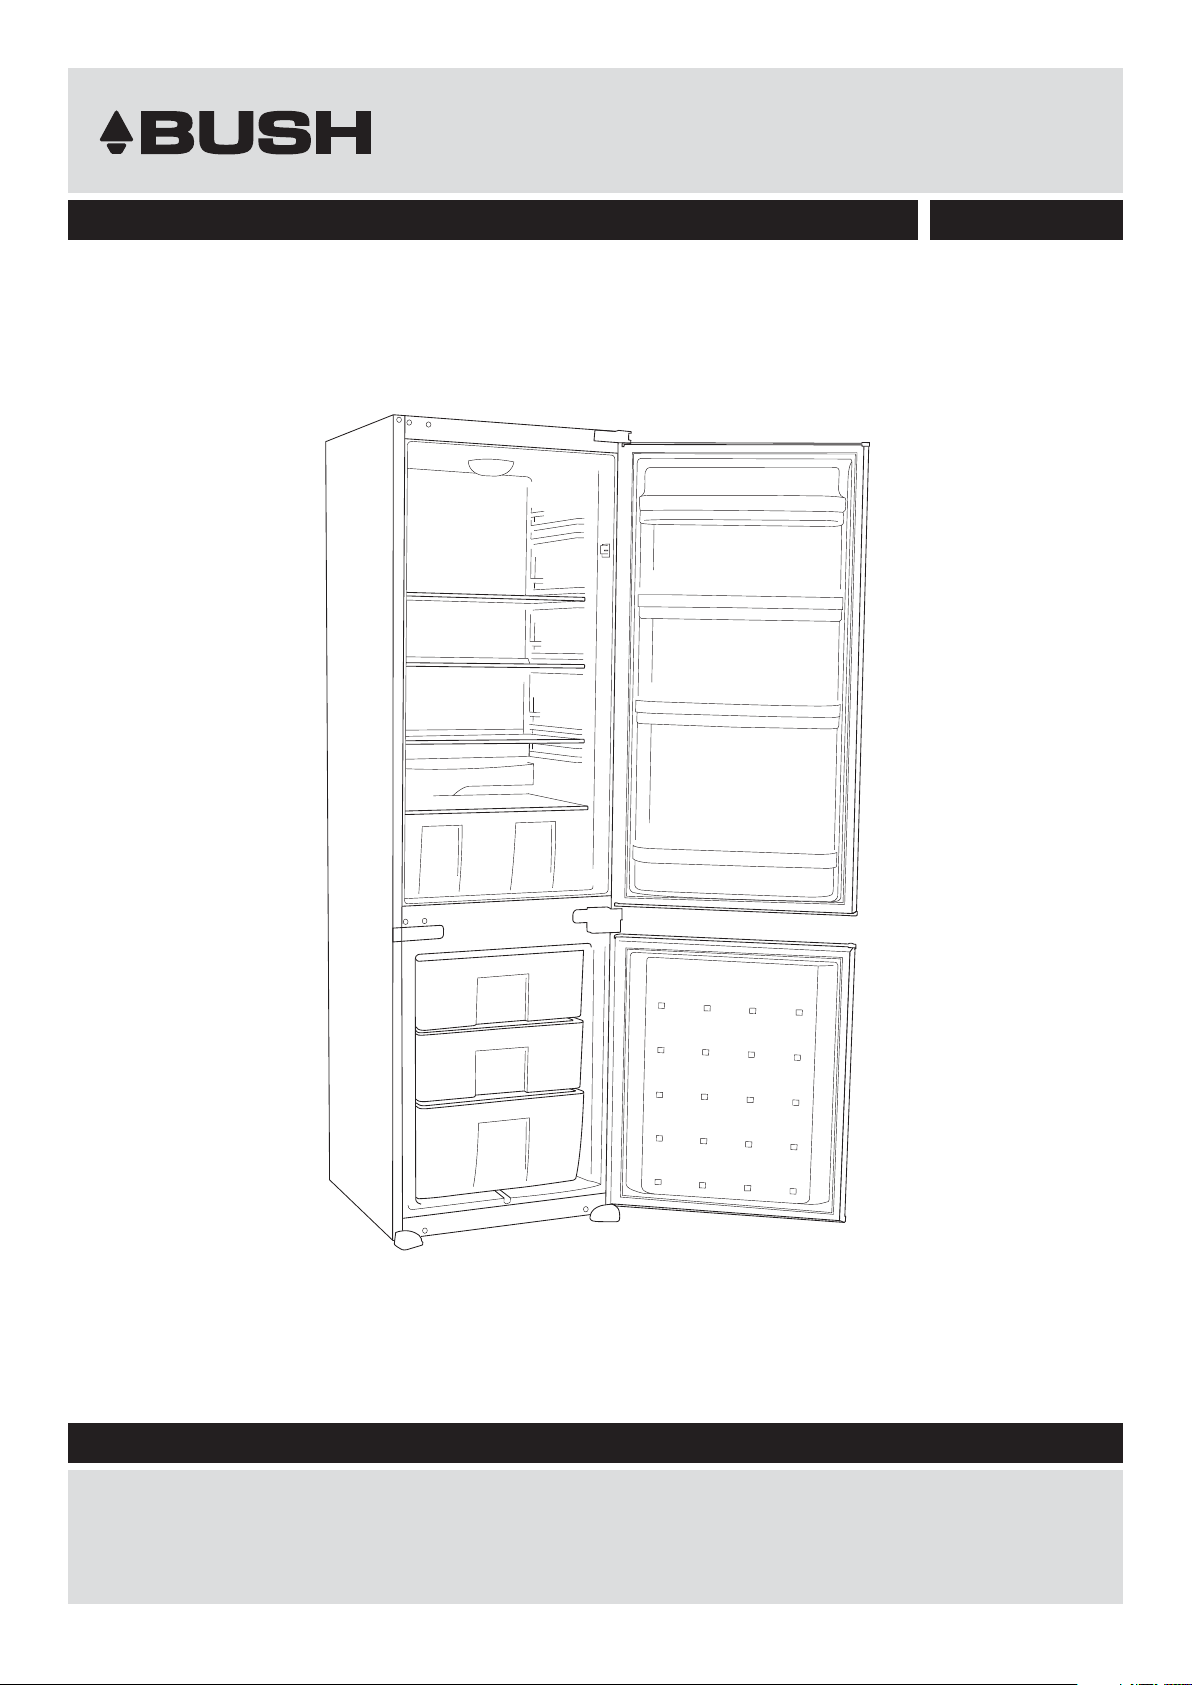
Built-in Combi Refrigerator
Installation & User Instructions – Please keep for future reference
AB320
Important – Please read these instructions fully before installing or using
These instructions contain important information that will help you get the best from your
appliance, ensuring safe and correct installation, use and maintenance.
If you need help or have damaged or missing parts, call the Customer Helpline on 0845 600 4632
Issue 1 - 08/06/10
Page 2
Contents
Presentation and description of the product 3
Safety Information 4
Before using the appliance 5
Recommendations 5
Switching on the appliance 5
Parts 6
Installation 7
Dimensions for installation 7
Installing trim fl ap 7
Routing the power cord 8
Installing the gasket 8
Position the appliance 9
Securing the appliance 9
Installing the doors 10
Reversing the doors 11
User Instructions 12
Thermostat setting 12
Display panel 12
Super freeze and low ambient switch 13
Accessories 13
Refrigerator compartment 14
Freezer compartment 14
Cleaning and Maintenance 15
Cleaning 15
Replacing the refrigerator light bulb 15
Defrosting the freezer compartment 16
Shipment and Repositioning 17
Trouble Shooting 18
Technical Specifi cations 19
Disposal Information 19
Tips for Energy Saving 20
Guarantee 21
2
Product code
AB320
Customer Helpline 0845 600 4632
Page 3
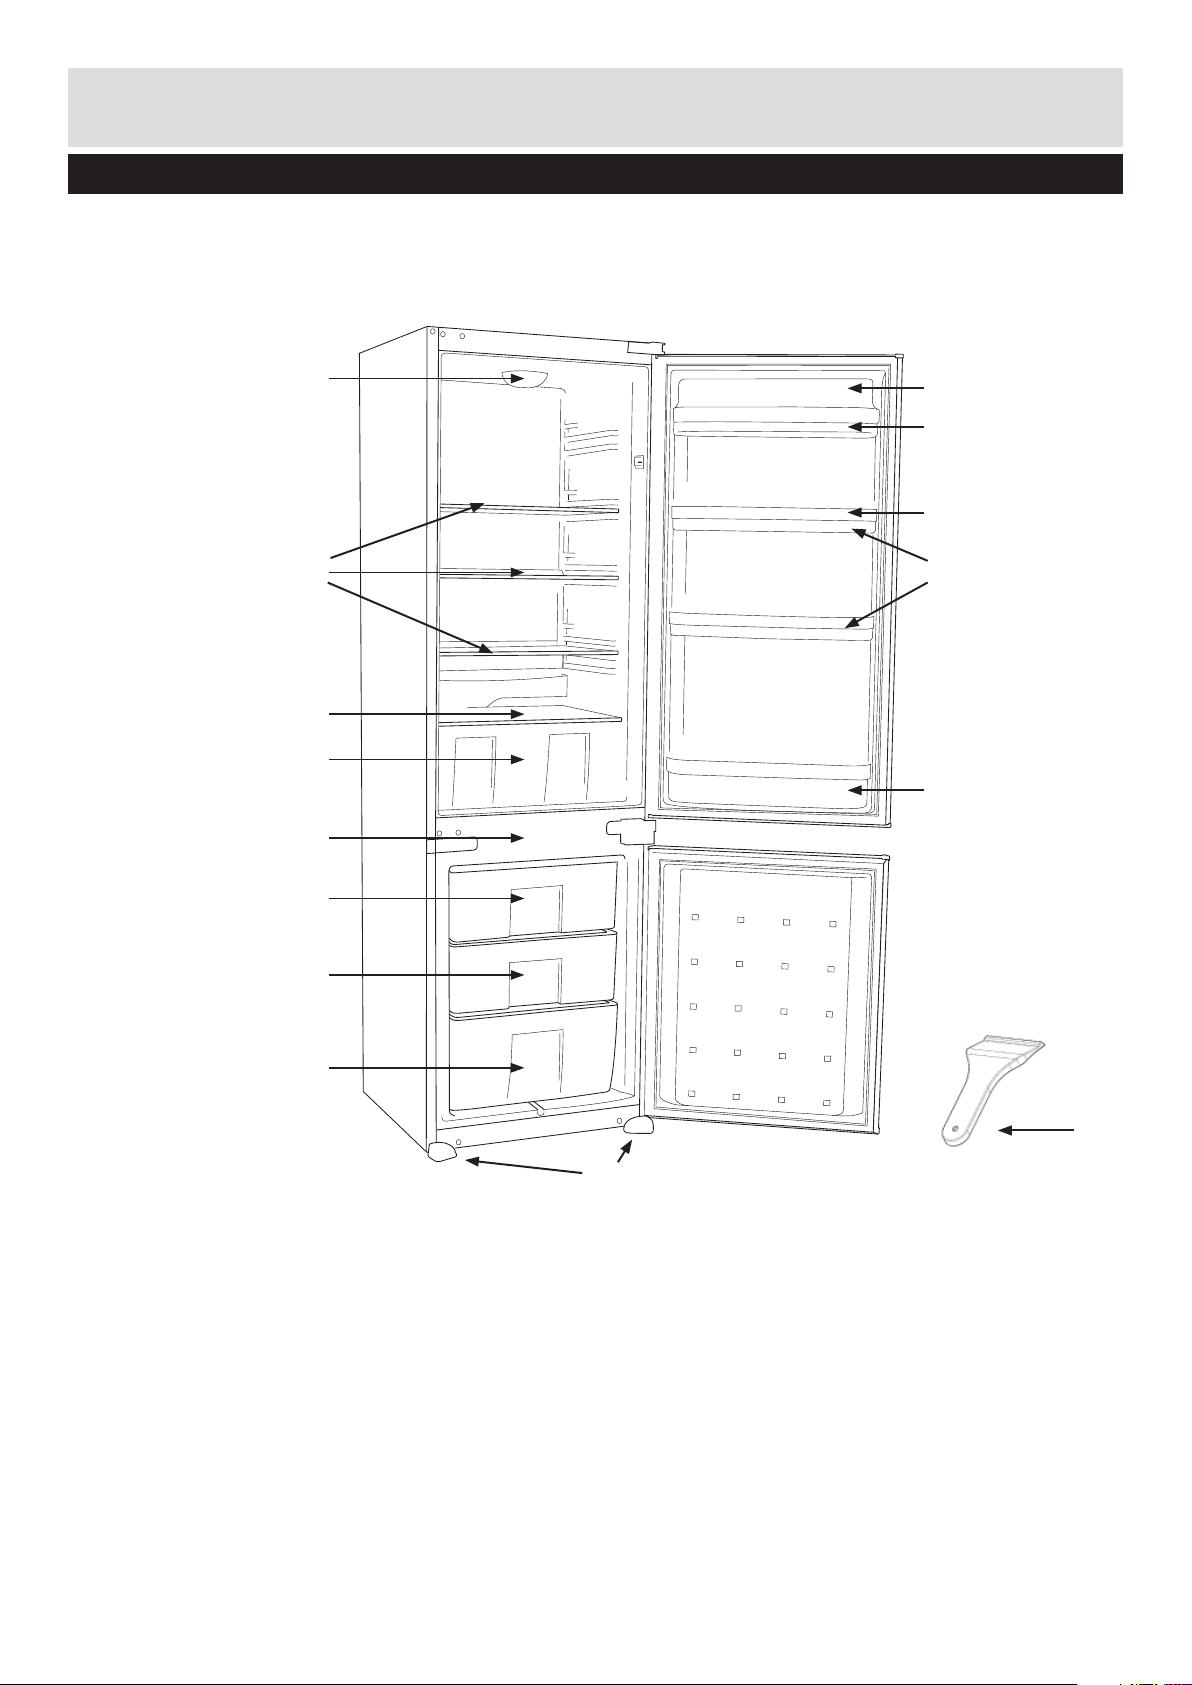
Presentation and Description of Product
J
B
C
D
A
K
H
G
I
F
E
L
M
This presentation is only for
information concerning the
parts of the appliance. Parts
may vary according to the
appliance model.
N
A. Display panel
B. Refrigerator shelf
C. Crisper shelf
D. Crisper
E. Bottle shelf
F. Middle shelf
G. Butter shelf
O
I. Egg shelf
J. Refrigerator lamp & cover
K. Freezer room cover
L. Freezer compartment
drawer
M. Freezer compartment
bottom drawer
N. Foot hinge
H. Butter shelf cover
3
Customer Helpline 0845 600 4632
O. Ice scraper
Page 4

Safety Information
IMPORTANT - Please read this booklet before
installing and switching on this appliance. The
manufacturer assumes no responsibility for incorrect
installation and usage as described in this booklet.
IMPORTANT - Do not place bottles (glass or tin)
containing liquids (especially sparkling liquids) into
the freezer as they could burst during freezing.
IMPORTANT - If the supply cord is damaged it
must be replaced by the manufacturer, service
agent or appointed person.
WARNING - keep ventilation openings (in appliance
enclosure or building) clear from obstruction.
WARNING - Do not use electrical appliances in the
refrigerator.
WARNING - If this appliance is to replace an old
refrigerator with a lock, break or remove the lock to
protect children from locking themselves inside.
WARNING - Old refrigerators and freezers contain
insulation gases and refrigerant, which must be
disposed of properly. Entrust the disposal of a
scrap unit to your local waste disposal service and
contact your local authority or dealer if you have any
questions. Please ensure that the refrigerator pipe
is not damaged prior to collection by an appropriate
waste disposal service.
WARNING - Do not eat ice that has just been
removed from the freezer.
WARNING - This appliance is not intended for use
by people (including children) with reduced physical,
sensory or mental capabilities, or lack of experience
and knowledge, unless they have been given
supervision or instruction concerning use of the
appliance by a person responsible for their safety.
Children should be supervised to ensure that they
do not play with the appliance.
CAUTION - If the model contains R600a (see name
plate - coolant is isobutane) then it is environmentally
friendly but also combustible. When transporting
and installing the unit, care must be taken to ensure
that none of the refrigeration circuit components
become damaged. In the event of damage, avoid
naked fl ames or ignition sources and ventilate the
room in which the unit is placed for a few minutes.
CAUTION - Do not use mechanical devices or
other artifi cial means to accelerate the defrosting
process.
CAUTION - Do not use electrical appliances in the
food storage of the appliance and keep ventilation
openings free.
CAUTION - Do not damage the refrigerator’s
refrigerant circuit.
WARNING - Do not allow children to play with the
appliance. Children must never sit in the drawers or
hang from the door.
WARNING - Do not use adapters or shunts, which
could cause overheating or burning.
WARNING - Do not connect old, warped power
supply cables.
WARNING - Do not twist and bend the cables,
and keep them away from hot surfaces.
WARNING - Do not connect the power supply
with wet hands.
WARNING - After installation, make sure that
the power cable is not trapped underneath the
appliance.
Customer Helpline 0845 600 4632
4
Page 5

Before Using the Appliance
Recommendations
• Insert the plug into a socket with an effi cient ground
connection. If the socket has no ground contact or
• Before installation, read the instructions
carefully.
the plug does not match, we suggest you to call an
authorised electrician for assistance.
• Fit the refrigerator/freezer in stable kitchen
units only.
• If necessary, reverse the door according to
instructions.
Switching on the appliance
• Before switching on, place the appliance in
an upright position and wait at least three
hours without moving the appliance. This will
give the freezing circuit time to settle and
operate effi ciently.
• Clean the appliance thoroughly, especially
the interior, before use (see Cleaning and
Maintenance).
• Installation of the appliance and electrical
connections must be carried out by a qualifi ed
technician in accordance with the installation
manual and local regulations.
• In order to avoid a hazard, if the supply cord is
damaged it must be replaced by an appointed
service agent or similarly qualifi ed person.
• The manufacturer is not responsible for failure to
complete the ground connection as described in this
booklet.
• There can be an odour when you fi rst switch on the
appliance. It will disappear after the appliance starts
to cool.
• The procedure for installing the appliance into
the kitchen unit is given in the installation manual.
This product is only intended to be used in proper
kitchen units.
• The appliance must be connected with a properly
installed fused socket. Power supply (AC) and
voltage at the operating point must comply with
the details on the name plate of the appliance
(the name plate is located on the inside-left of the
appliance).
5
Customer Helpline 0845 600 4632
Page 6
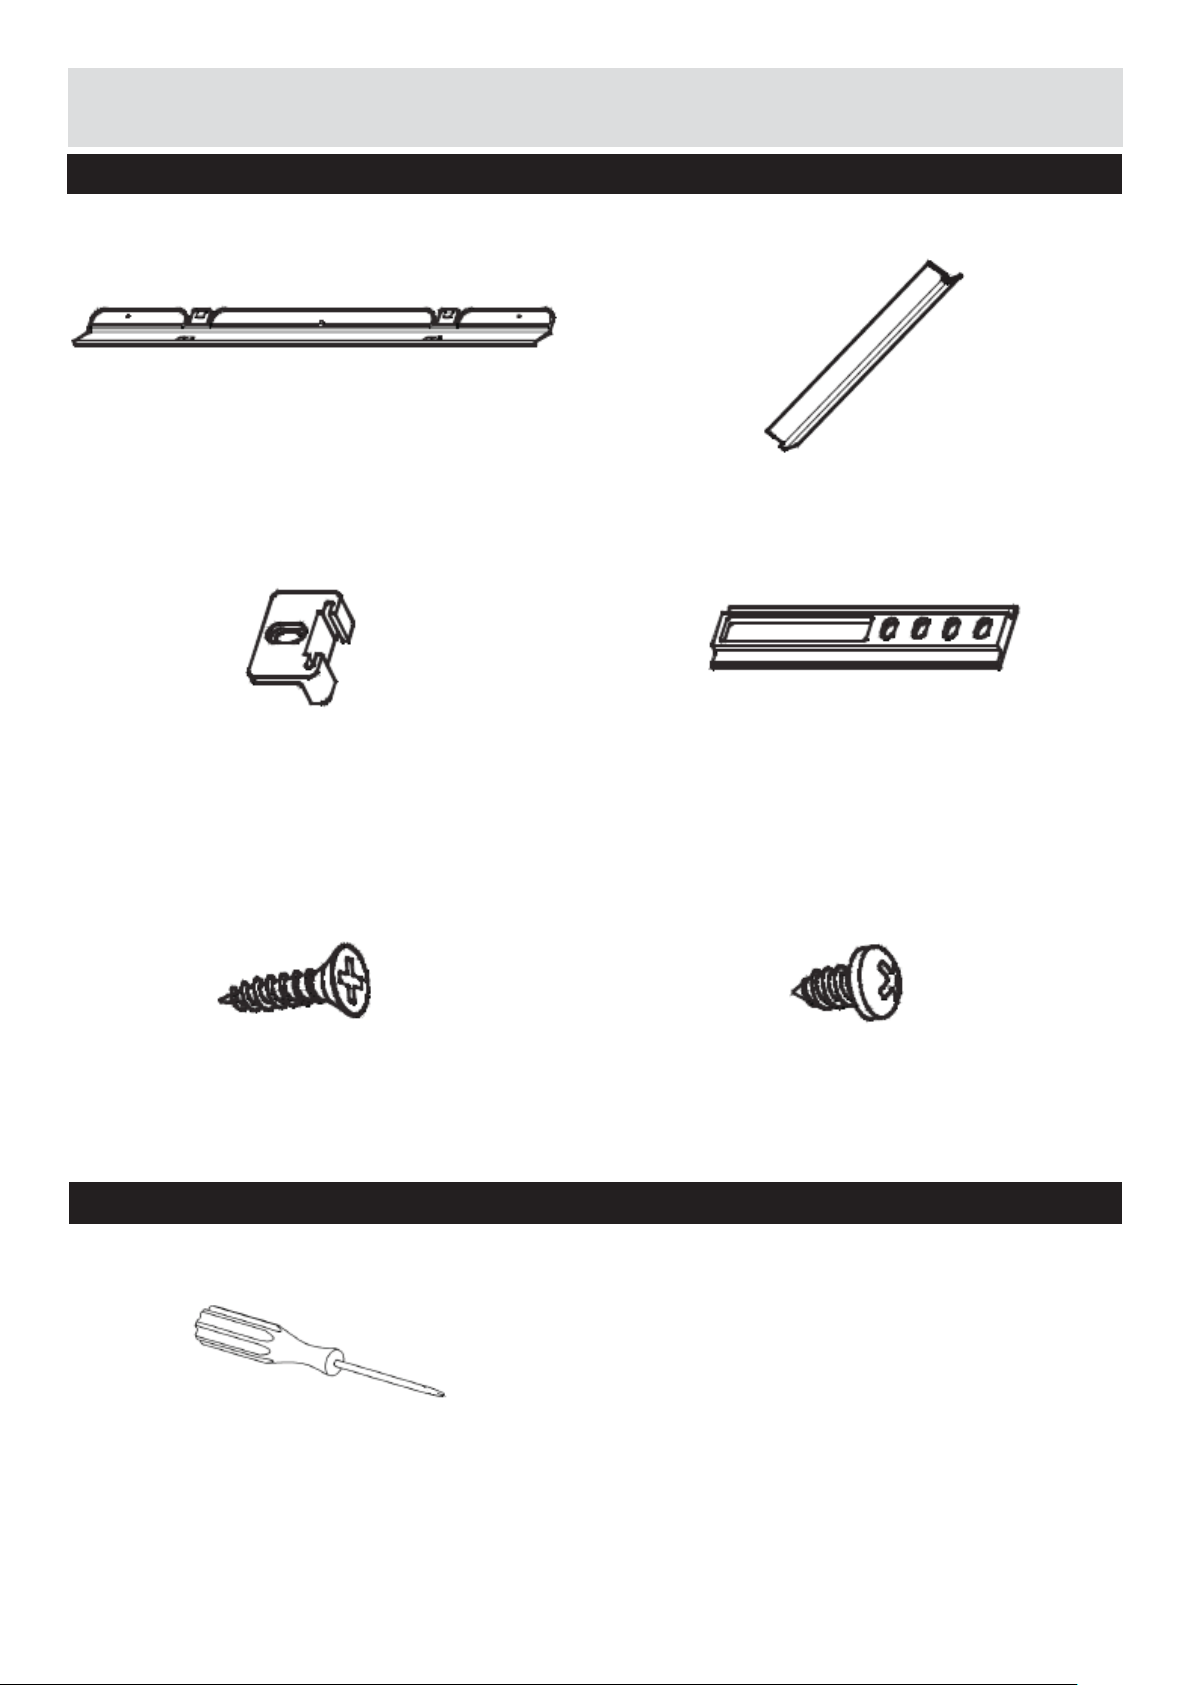
Parts
Please check you have all of the parts listed below
A. Trim fl ap
C. Guide
B. Trim gasket
D. Rail
E. 17mm Screw
Tools required
Philips screwdriver
Customer Helpline 0845 600 4632
F. 9.5mm Screw
6
Page 7
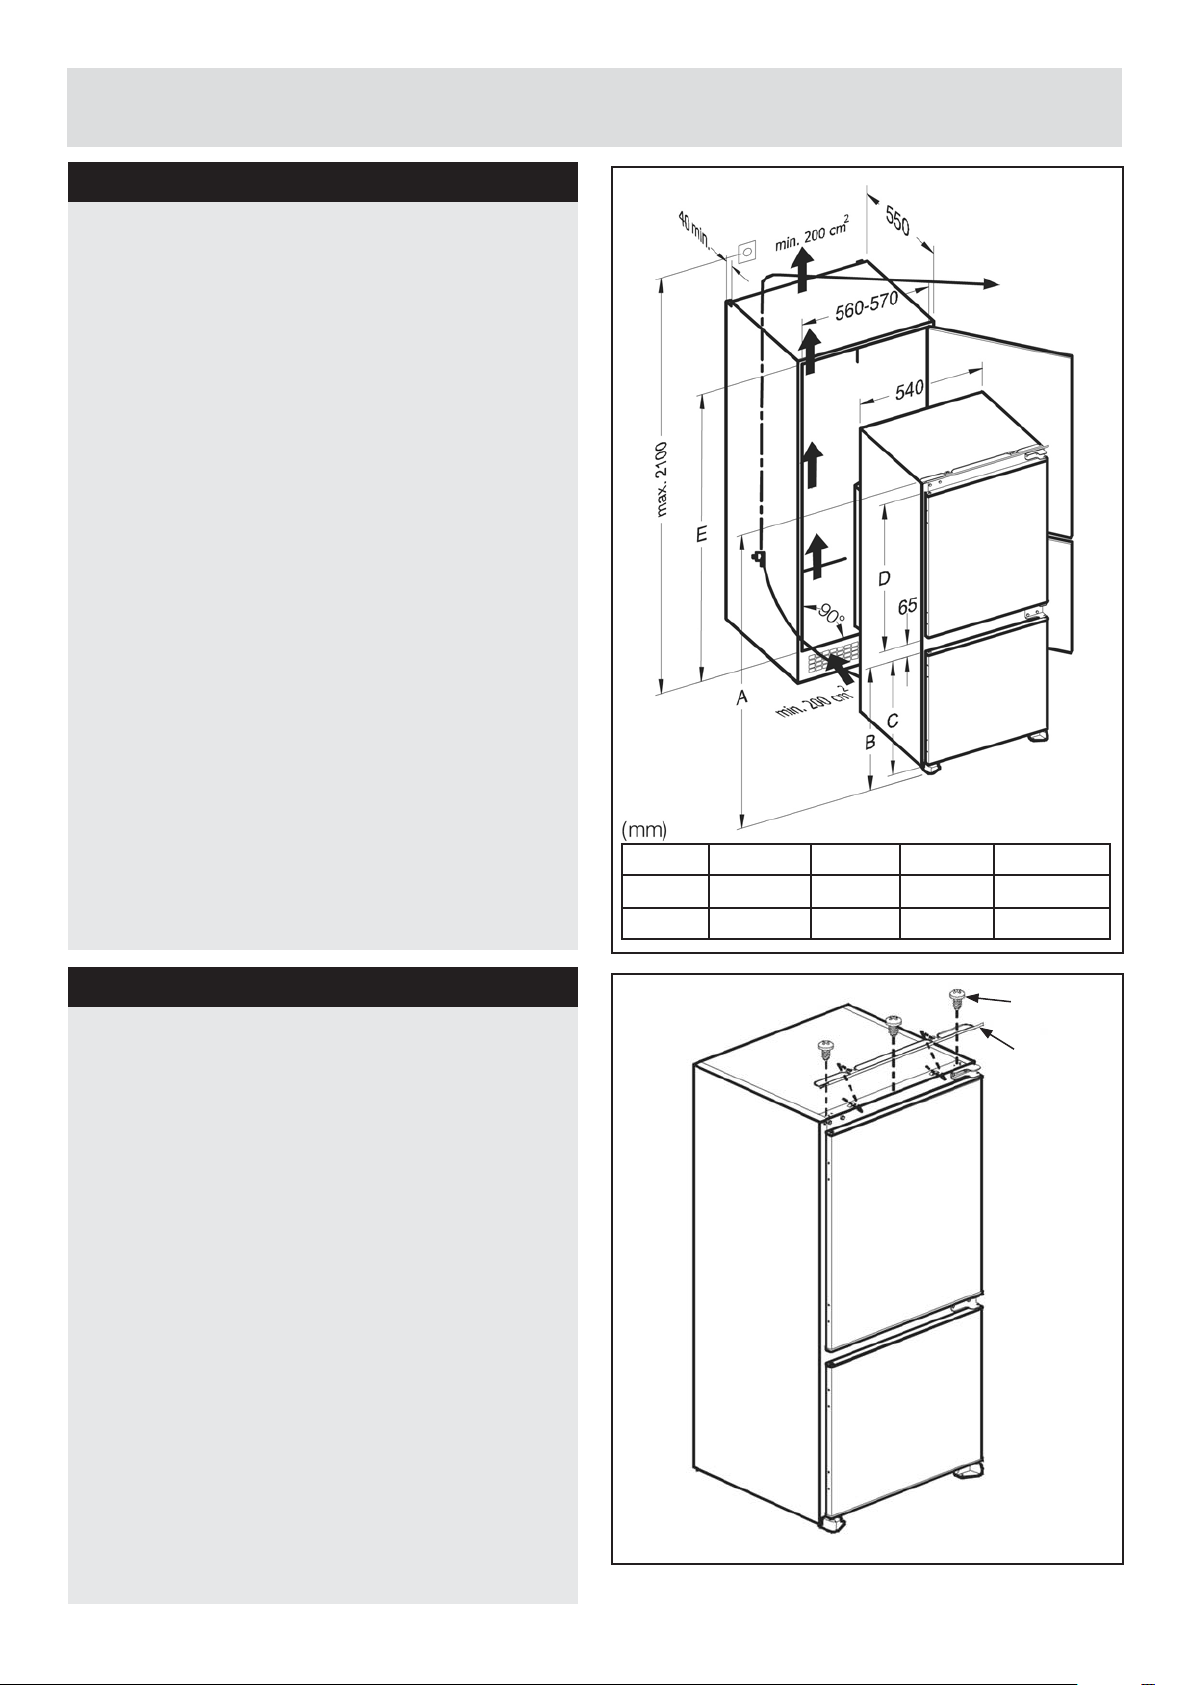
Installation
Dimensions for installation
a: Check the installation dimensions according to
(1). The position of the joint between the kitchen
unit doors must be level with the position of the
joint between the appliance doors.this booklet.
• There can be an odour when you fi rst switch on the
appliance. It will disappear after the appliance starts
to cool.
1
Installing trim fl ap
a: Insert the trim fl ap (A) into the slot on the top of
the appliance.
b: Secure the trim fl ap (A) with screws (F).
ABC
1770 660 622
1445 1025 987
2
DE
1011 1770-1790
310 1445-1465
F
A
7
Customer Helpline 0845 600 4632
Page 8
Installation
Installation
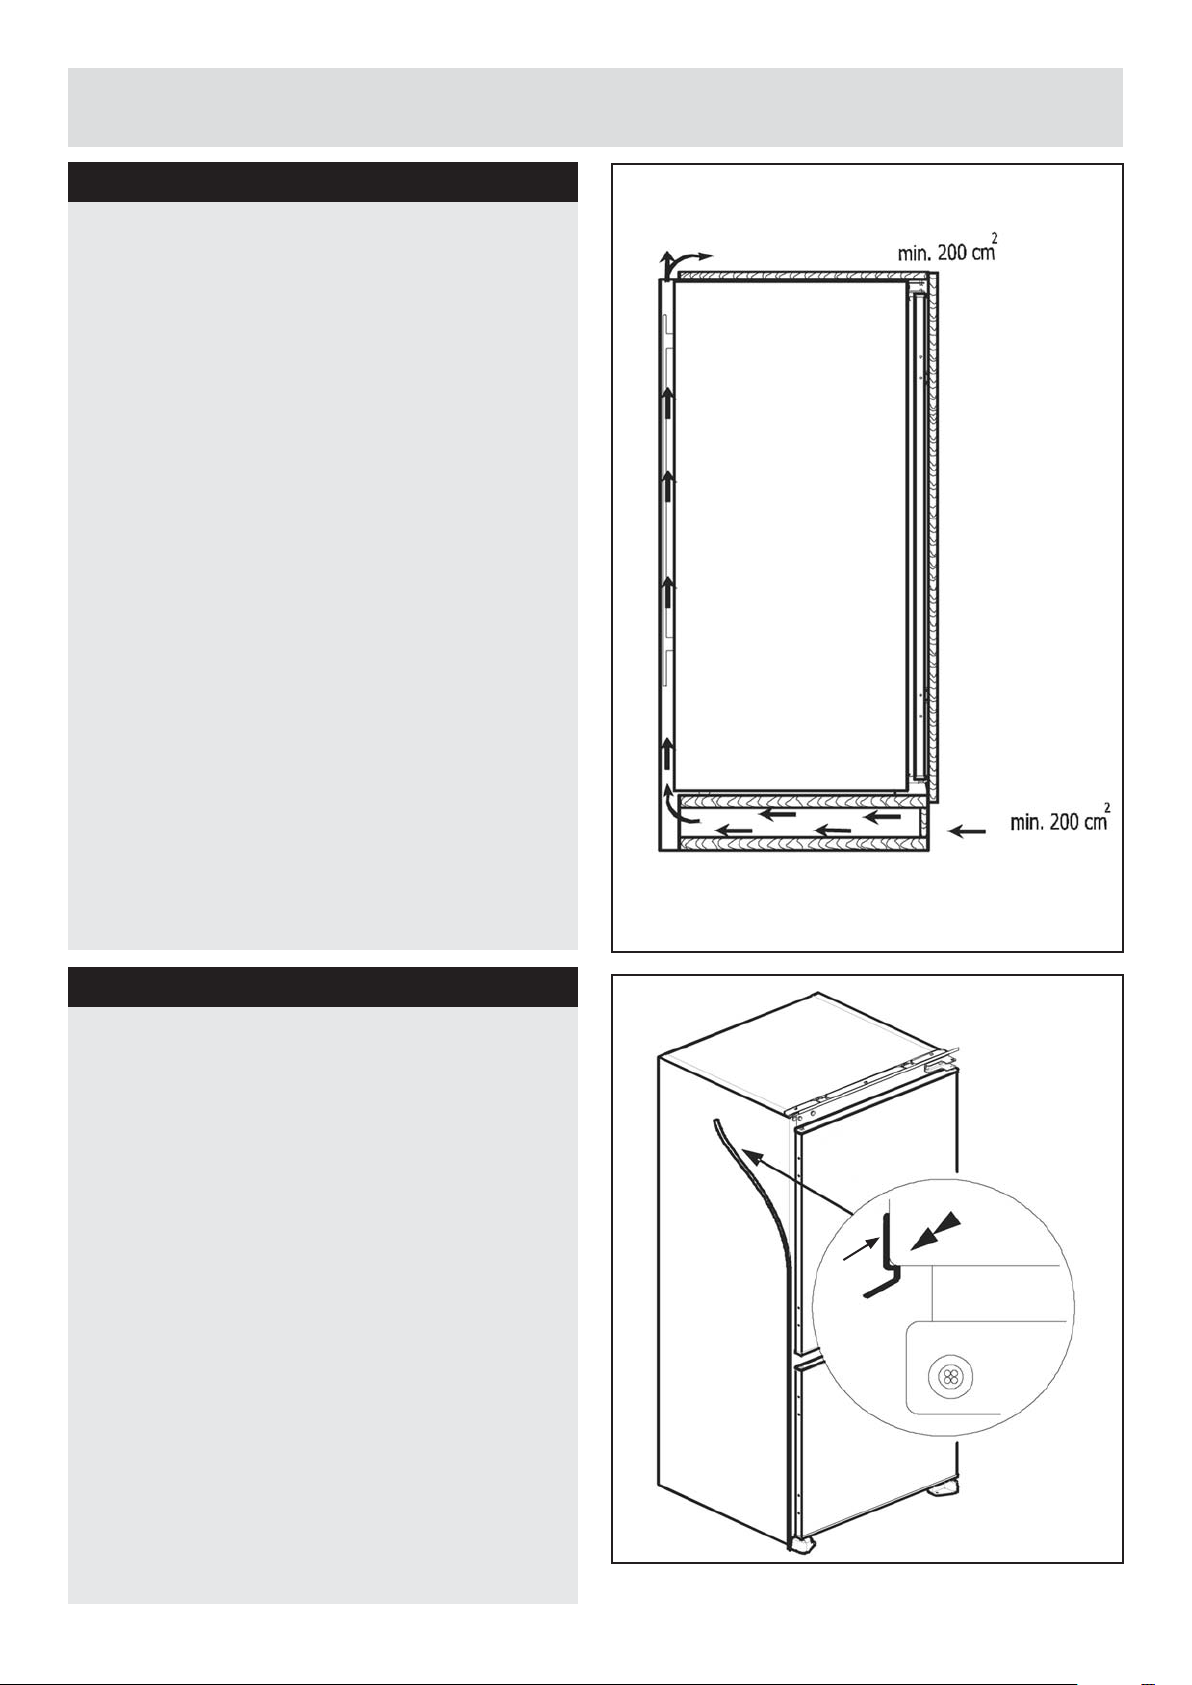
Routing the power cord
a: Pass the power cord through the ventilation
shaft, as shown in (3), and position it so that the
appliance can be easily plugged in once it has
been installed.
3
Installing the gasket
a: Take out the trim gasket (B) located on the side
of the appliance and stick it on the appliance on
the opposite side to the door hinges.
4
B
Customer Helpline 0845 600 4632
8
Page 9
Installation
Installation
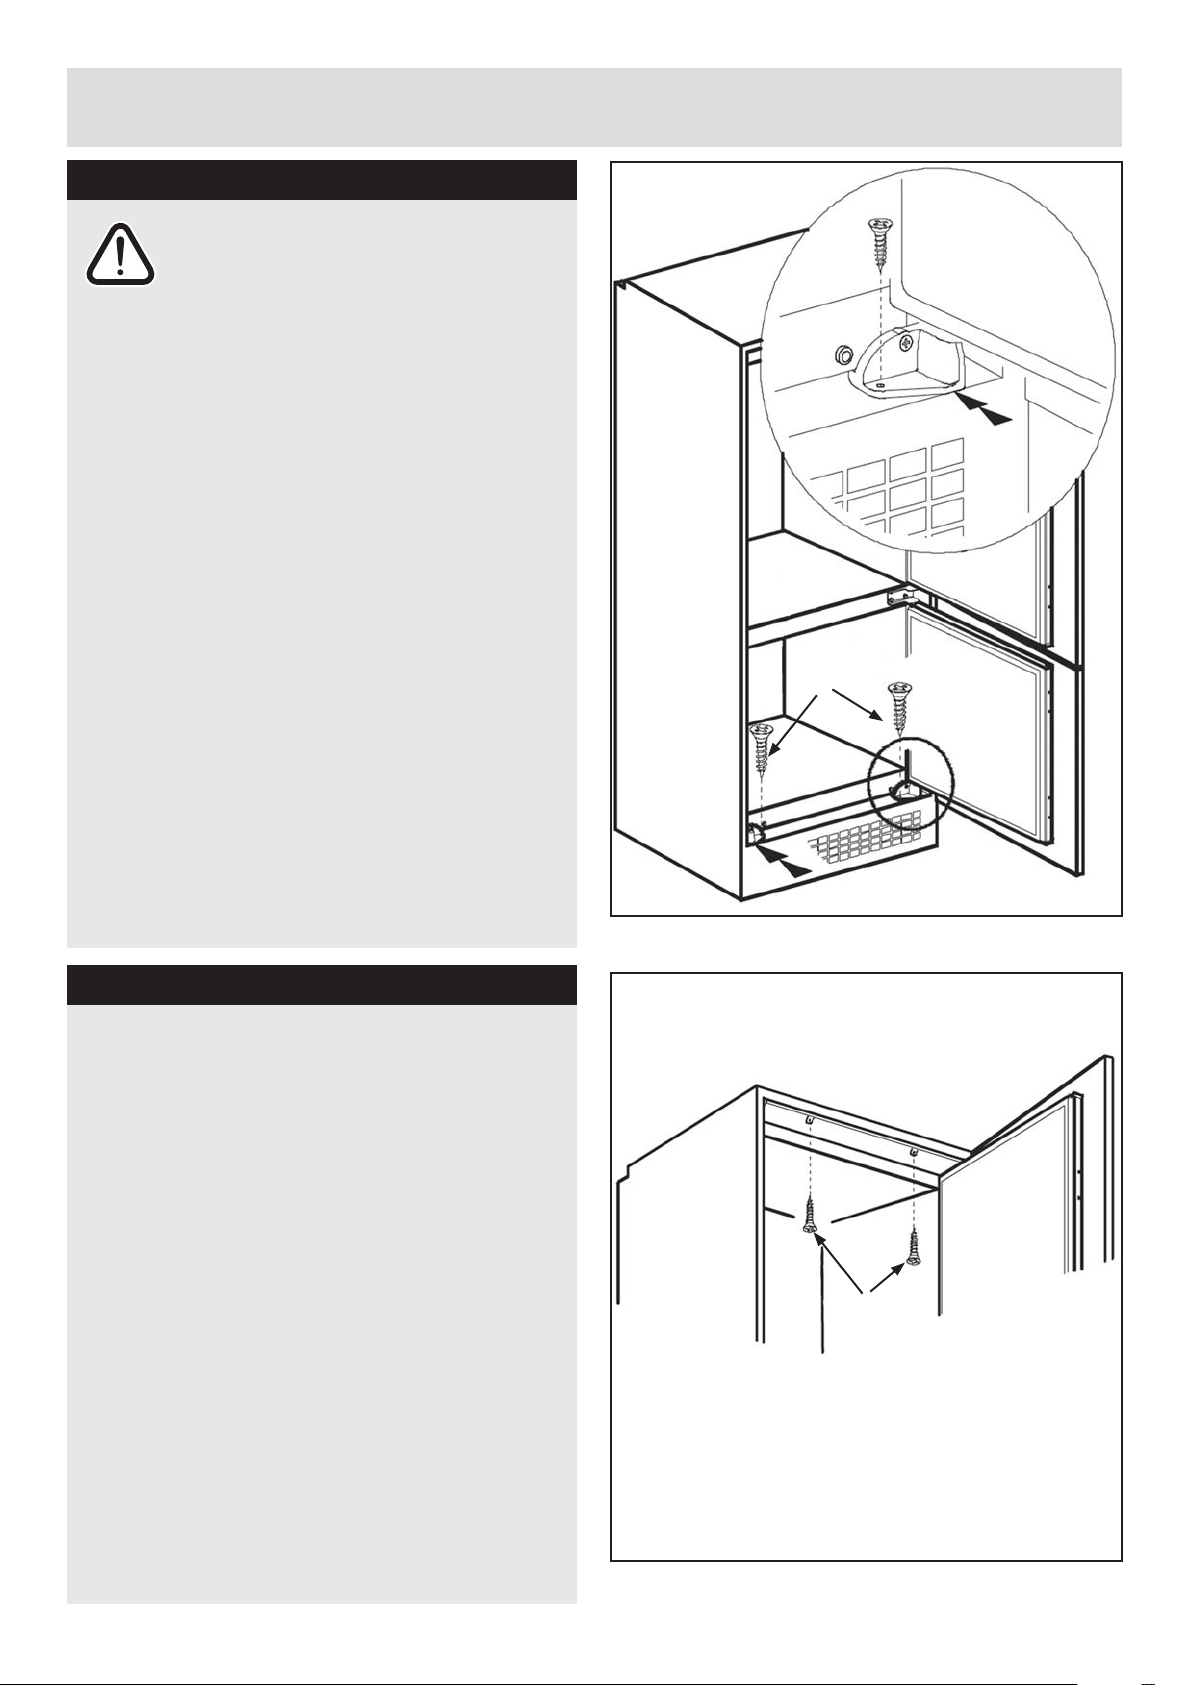
Position the appliance
Caution: Two people are required to
handle the appliance. It is recommended
that gloves are worn.
a: Carefully move the appliance into position into the
kitchen unit.
b: Push the appliance back to the reverse side
of the door hinges, and make sure that the
trim gasket (B) covers the space between the
appliance and the kitchen unit.
c: Align the front feet with the front surface of the
kitchen unit.
d: Screw the front feet with screws (E), as shown in
(5).
5
E
Securing the appliance
a: Secure the trim fl ap (A) to the kitchen unit using
screws (E), as shown in (6).
6
E
Continued on next page.
9
Customer Helpline 0845 600 4632
Page 10
Installation
Installation
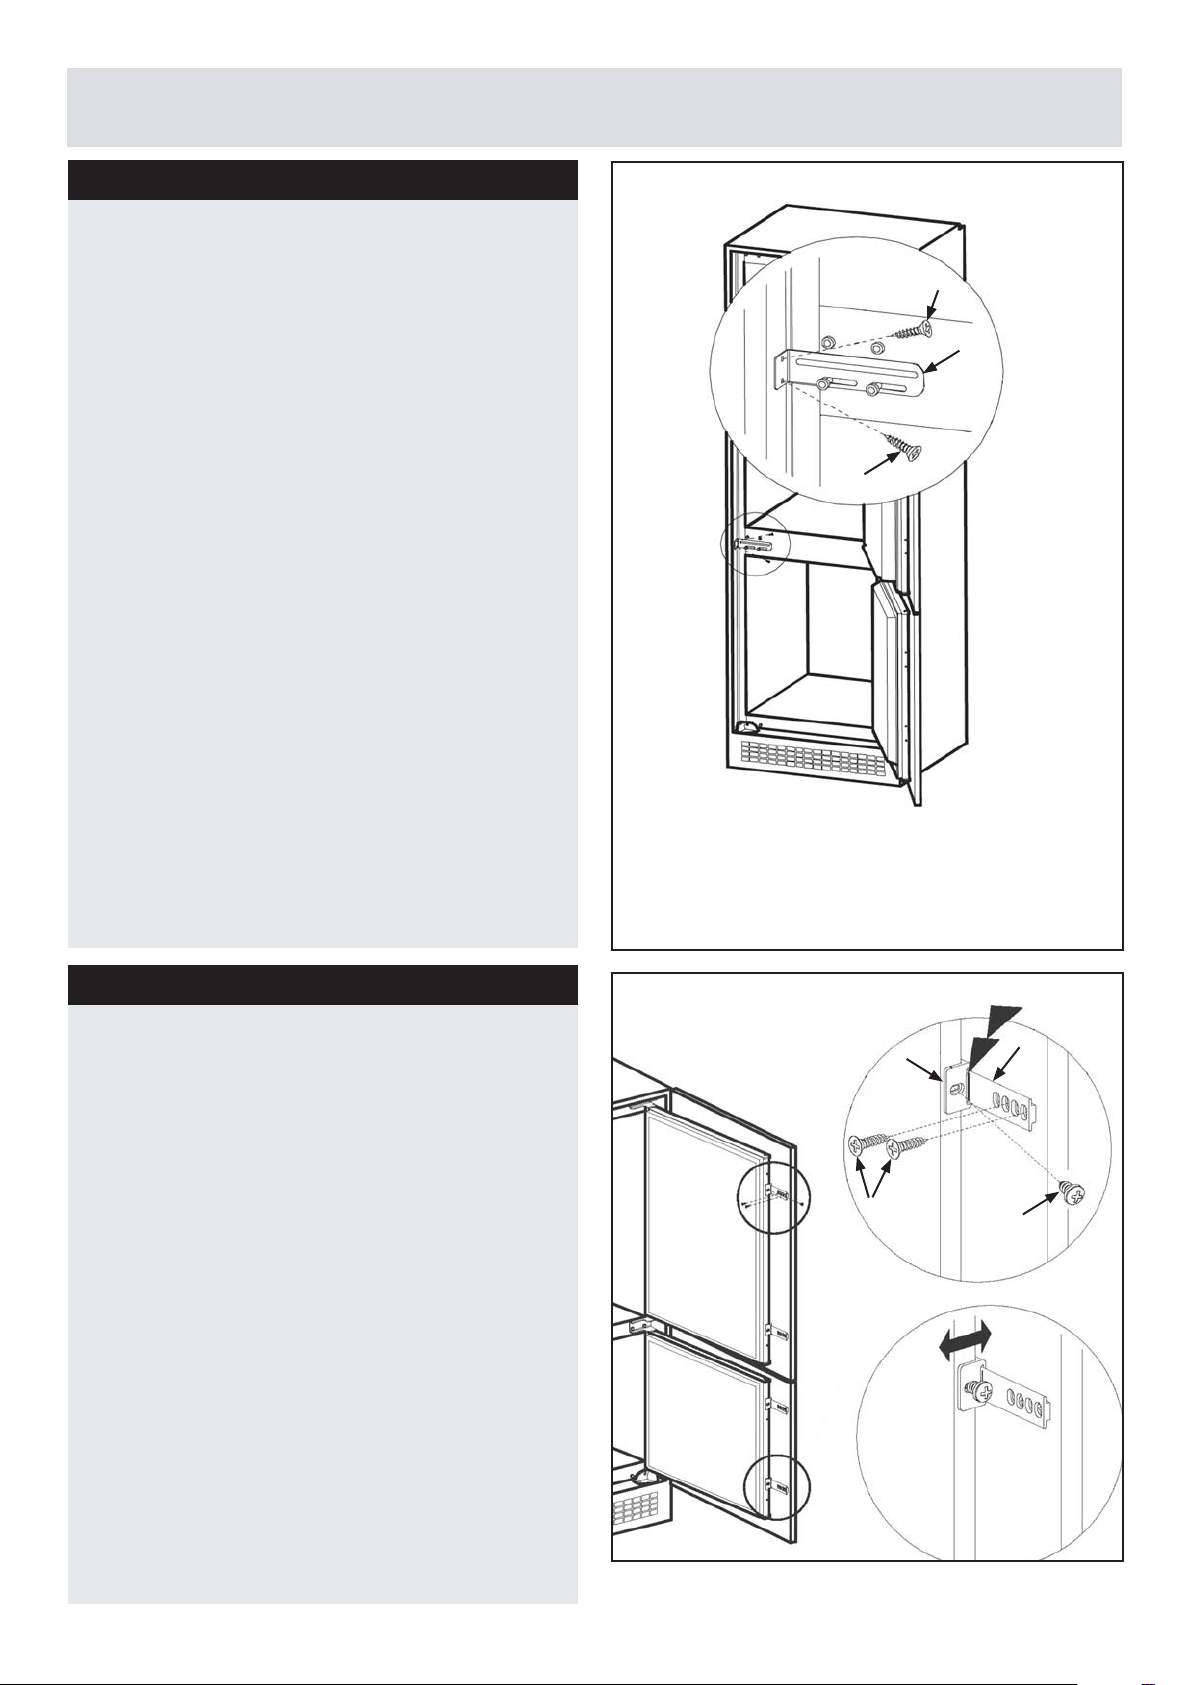
b: Secure the fi xing bracket (G) to the kitchen unit
using screws (E), as shown in (7). Repeat for the
opposite side
7
E
G
E
Installing the doors
a: Secure the guides (C) to the appliance doors
using screws (E), as shown in (8).
b: Open the appliance doors to right angles and
position the unit door against the appliance door.
c: Raise the rails (D) onto the guides (C) aligning
with the groove.
d: Secure the rails (D) to the unit doors using screws
(E).
e: Set a 1-2mm gap on the handle side between the
unit itself and the unit doors by adjusting guides
(C) and screws (F) as necessary.
8
C
E
D
F
Customer Helpline 0845 600 4632
10
Page 11
Installation
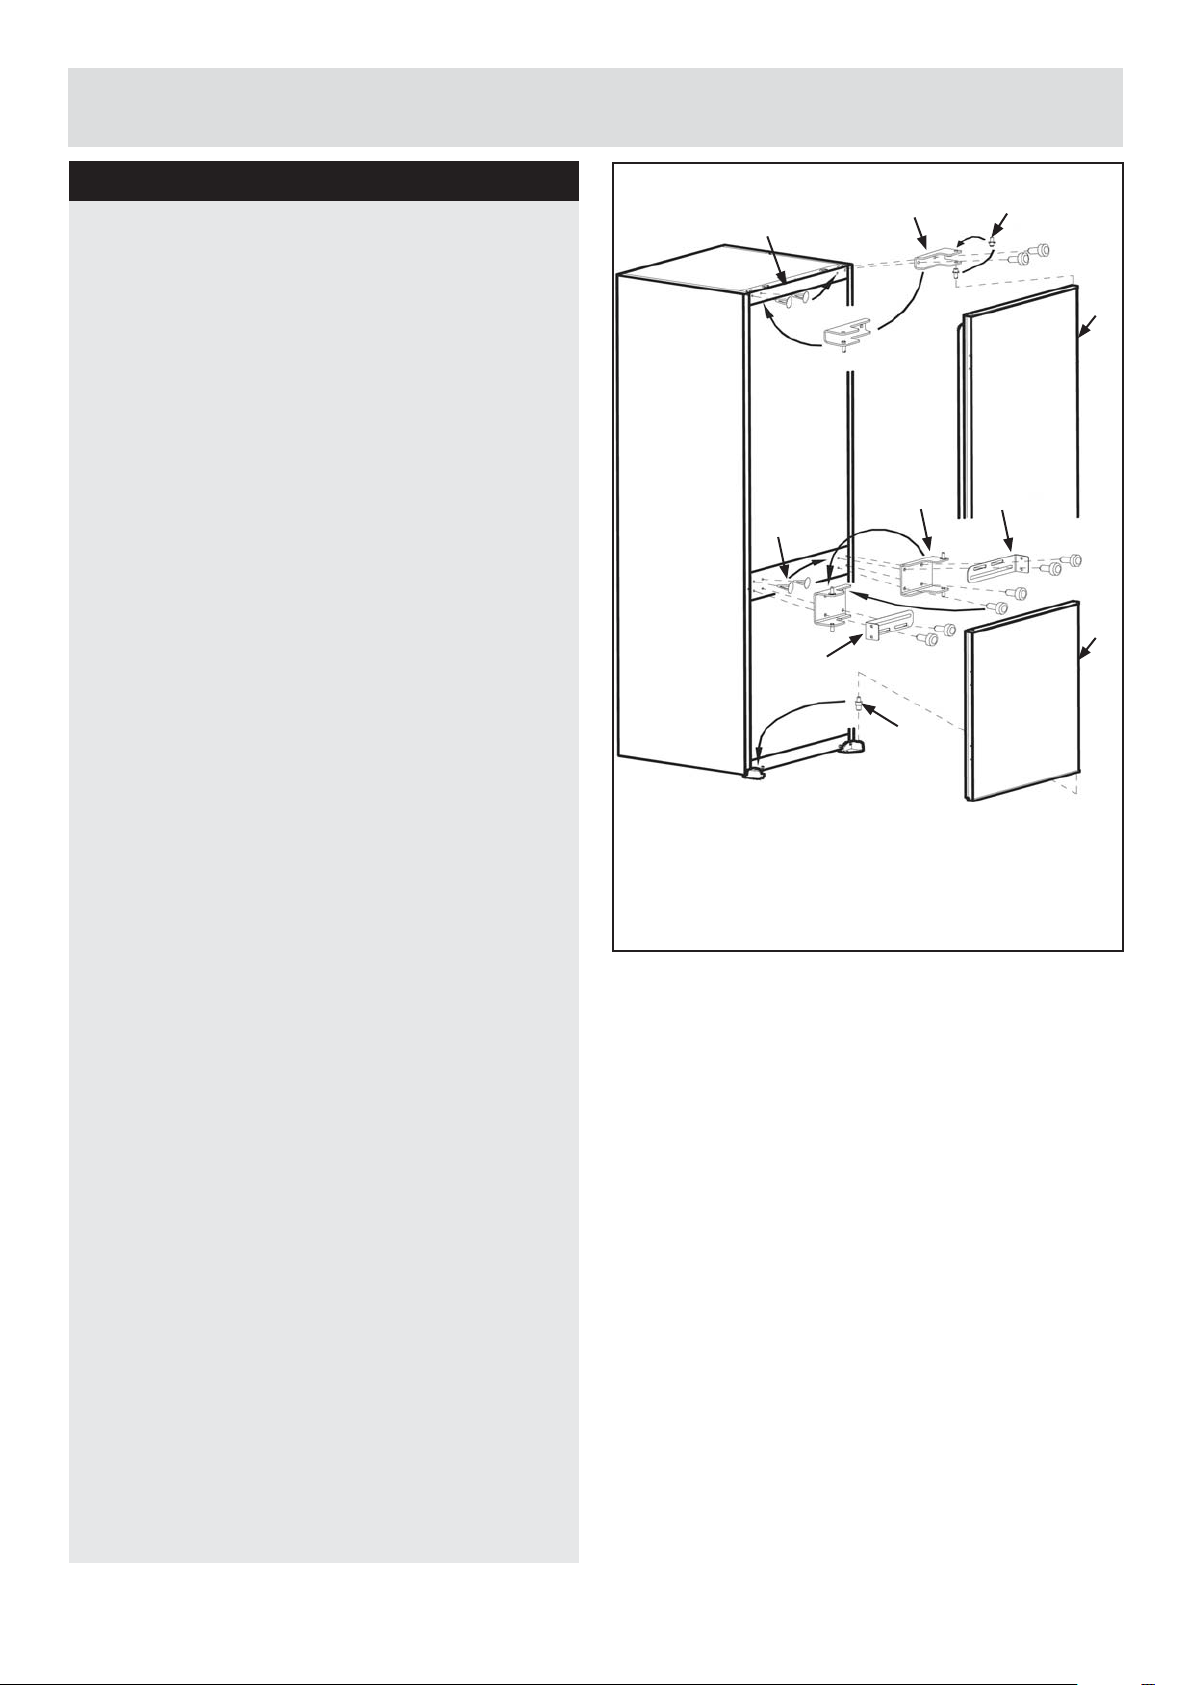
Reversing the doors
a: Unscrew the upper door hinge (L) and move the
upper door (K) to a safe location.
b: Unscrew the door hinge pin (M) and fi rmly screw
it into the opposite side. Keep in a safe location.
c: Unscrew the middle door hinge (H) and move the
lower door (Q) to a safe location.
d: Screw back the fi xing bracket (G) to the original
position without the middle hinge (H).
e: Install the door lower pin (P) on the opposite side.
f: Move the hole plugs (N) to the empty holes on the
opposite side.
g: Position the lower door (Q) over the door lower
pin (P) and close.
h: Unscrew fi xing bracket (J).
i: Position the middle door hinge (H) onto the lower
door (Q).
9
N
L
H
N
J
P
M
K
G
Q
j: Position the fi xing bracket (N) onto the middle
door hinge (H) and fi rmly screw together onto the
appliance.
k: Position the upper door (K) over the middle door
hinge (H), and position the upper door hinge (L)
over the upper door.
l: Firmly screw the upper door hinge (L) onto the
opposite side of its original position.
11
Customer Helpline 0845 600 4632
Page 12
User Instructions
Combi models with single compressor
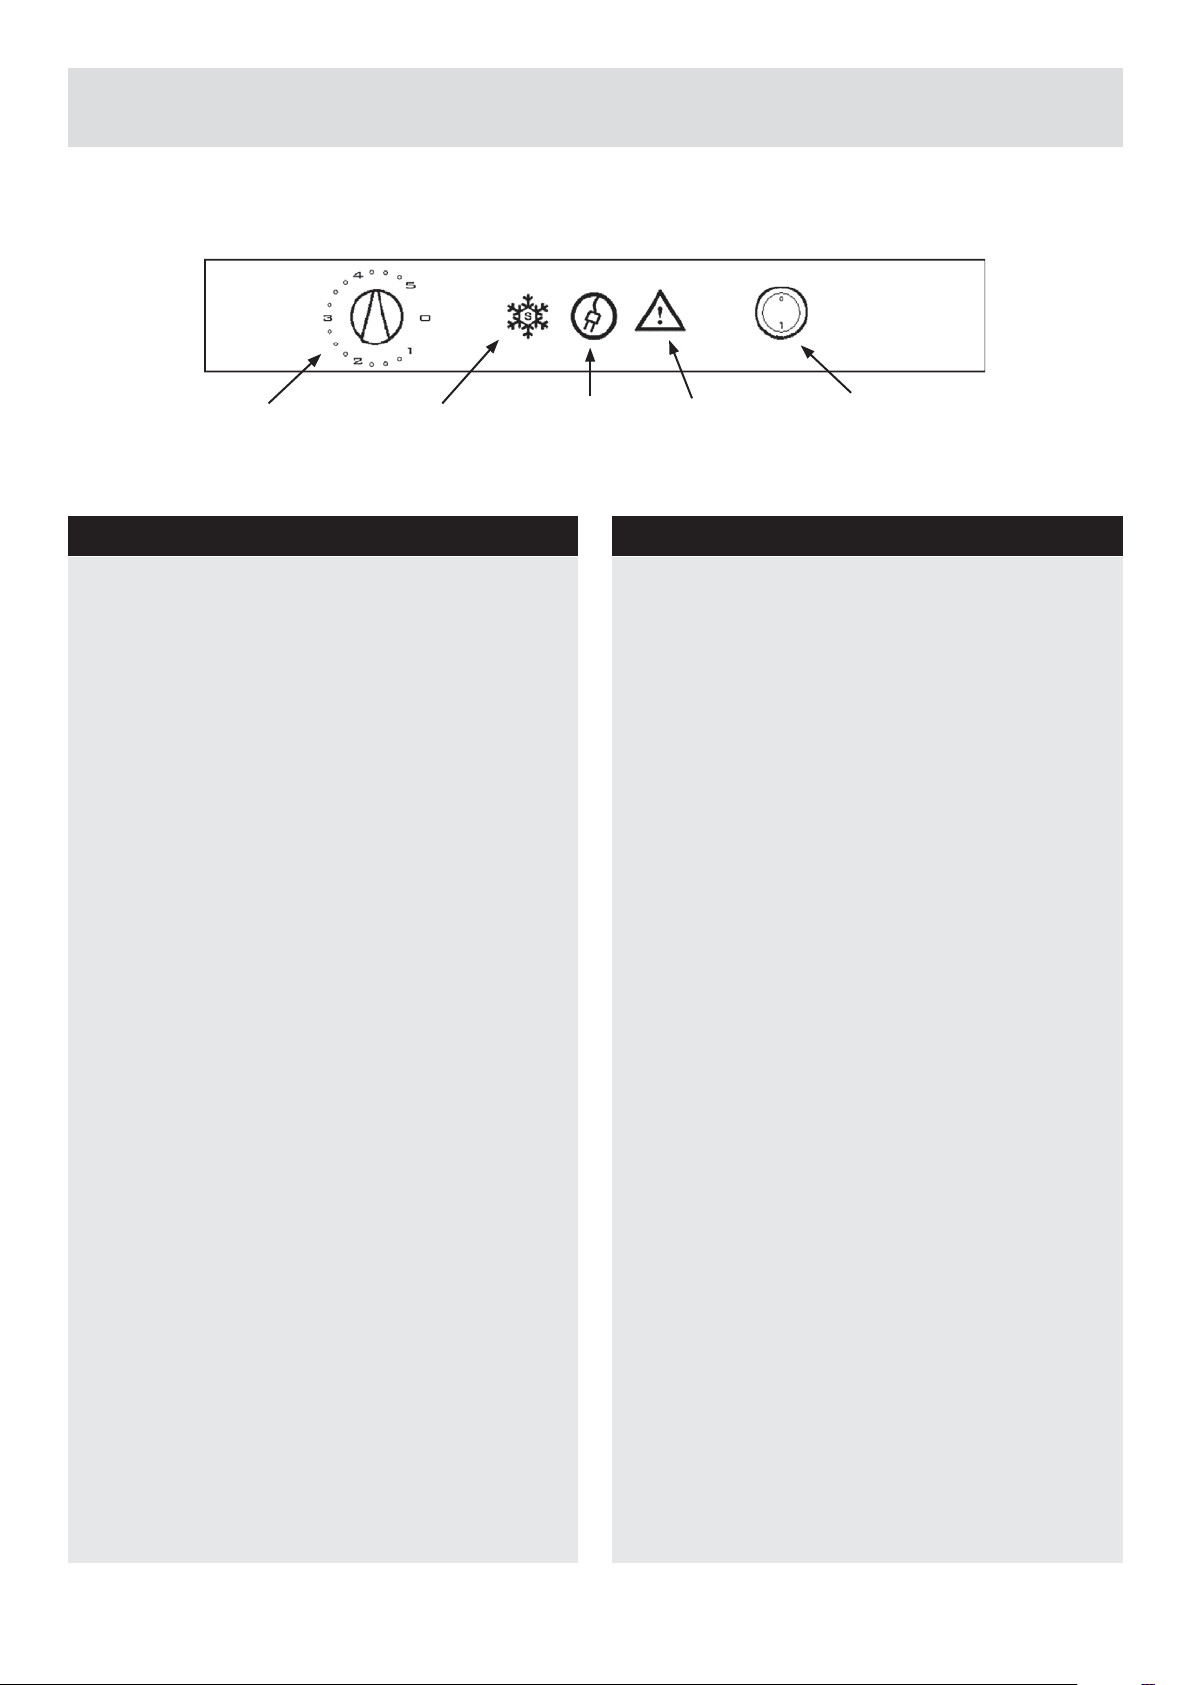
Thermostat knob
The freezer and refrigerator thermostats
automatically regulate the inside temperature of the
compartments. By rotating the knob from positions
1 to 5, colder temperatures can be obtained. The
‘0’ position denotes the thermostat is closed and
no cooling is available.
Freezer thermostat setting;
0: The appliance is switched off.
1-2: For short-term storage of food in the freezer
compartment, set the knob between the
minimum and medium position.
3-4: For long-term storage of food in the freezer
compartment, set knob to the medium
position.
5: For freezing fresh food. The appliance will run
for colder temperatures.
Freezing with super freeze (SF button):
Press the SF button whereupon the freezer
will start to run continuously with maximum
performance (observe that the SF lamp will light
orange when you press the SF button). The freezer
temperature will decrease and the appliance will
switch to the lowest temperature.
Place the food to be frozen inside the freezer
quickly, preferably in the top drawers. Once the
food is frozen, you must turn off the SF button and
set the thermostat knob to the desired position.
Super freeze Power Alarm Alarm
Display panelThermostat setting
Super Freeze Light (SF Light): Lights orange when
the SF button is turned on.
Power Light: Automatically lights green when the
appliance is connected to the power supply.
Alarm Light: Lights red when the temperature rises
to a critical point inside the appliance.
Turning on the appliance
Once the appliance has been connected to the
power supply, make sure that the green lamp is
on - then turn the refrigerator thermostat dial and
the freezer thermostat dial between positions
2-4. It should be noted that for the best internal
temperature, the indicator in the refrigerator and
freezer thermostat should be positioned between 2
and 4).
• When you fi rst switch on the appliance (to enable
suitable cooling), the appliance should operate
for 24 hours continuously until it cools to a
suffi cient temperature.
• During this time, do not open the door frequently
and do not place a lot of food inside the
appliance.
• If the unit is switched off or unplugged, you
must allow at least 5 minutes before restarting or
re-connecting the unit to prevent damage to the
compressor.
Customer Helpline 0845 600 4632
12
Page 13
User Instructions
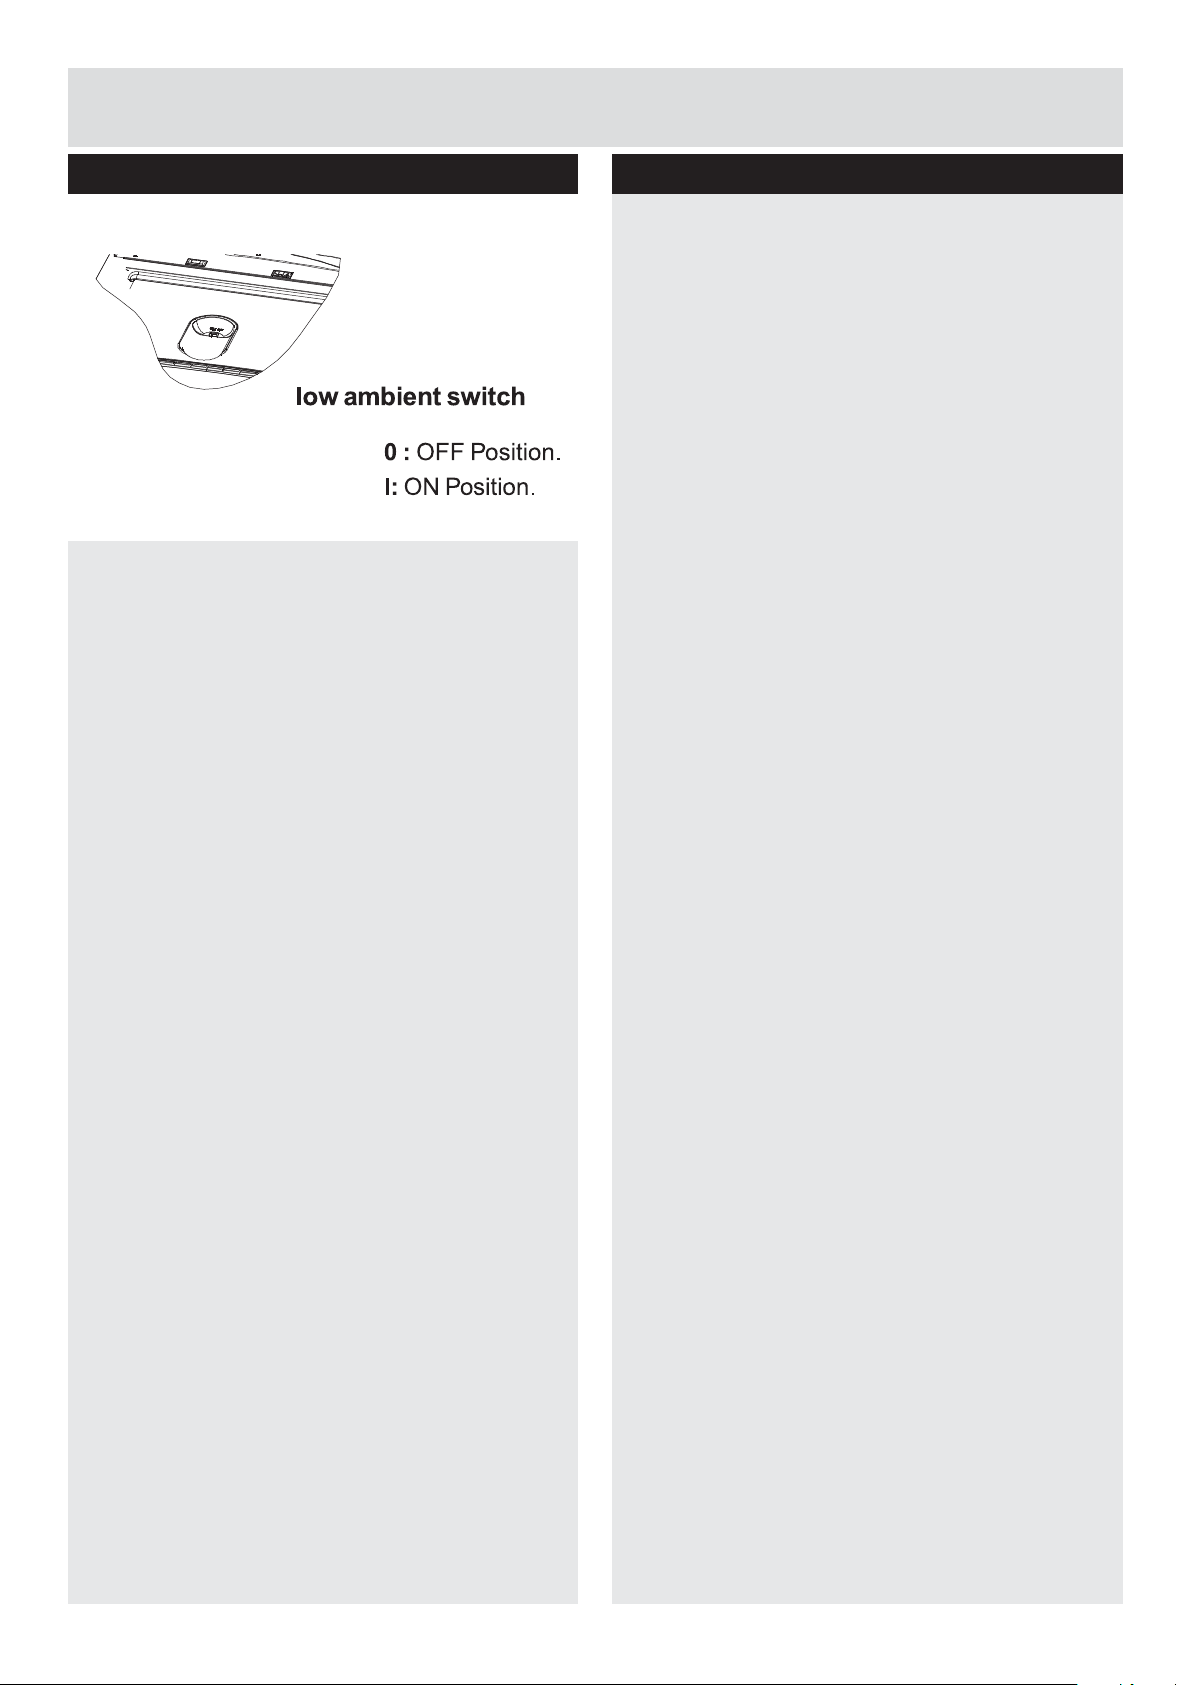
Super freeze and low ambient switch
(In some models)
a: Super Freezing: If the ambient temperature is
more than 18°C, this switch can be used as the
super freeze switch.
The super freeze switch should be used for
freezing fresh food or when the RED lamp on the
head panel is ON (RED lamp on the head panel
becomes ON when there is insuffi cient cooling).
Accessories
Ice tray
• Fill the ice tray with water and place in the
freezer compartment.
• After the water has completely turned into
ice, twist the tray to get the ice cubes out.
Bottle holder
• In order to prevent bottles slipping or falling over,
use the bottle holder. Please see image below.
The appliance will work for longer when you
activate this switch, therefore after you get the
cold condition (or the RED lamp on the head
panel is off) you must return to the previous
position.
If the ambient temperature is more than
18°C, and you do not want to use the super
freeze function, it must always be set to the
OFF position.
b: Low Ambient Performance: If the ambient
temperature is less than 18°C, this switch can
also be used as a low ambient switch for good
low ambient performance.
In low ambient temperatures, this switch heats
the fridge part to prevent extra cooling/freezing.
13
Customer Helpline 0845 600 4632
Page 14

User Instructions
Refrigerator compartment
The refrigerator compartment is used for storing
fresh food for a few days.
• Do not place food in direct contact with the
rear wall of the refrigerator compartment.
Leave some space around food to allow for the
circulation of air.
• Do not place hot food or evaporating liquids in
the refrigerator.
• Always store food in closed containers or
wrapped.
• To reduce humidity and avoid the formation of
frost, never place liquids in unsealed containers
in the refrigerator.
• Meat of all types, wrapped in packages, is
recommended to be placed on the glass
shelf just above the vegetable bin, where the
air is colder.
• You can put fruits and vegetables into the
crisper without packaging.
• To prevent cold air escaping, try not to open the
refrigerator door too often, and do not leave the
door open for long periods.
• The maximum amount of fresh foods that can be
loaded in the freezer within 24 hours is indicated
on the name plate (see Freezing Capacity).
• Never place warm food in the freezer
compartment.
• When purchasing and storing frozen food
products, ensure that the packaging is not
damaged.
• Storage time and recommended temperature for
storing frozen food is indicated on the packaging.
For storing and usage, follow the manufacturer’s
instructions. If no information is provided, food
should not be stored for more than 3 months.
• Following purchase, place frozen food in the
freezer compartment as soon as possible.
• Once food is thawed it must not be refrozen;
you must cook it as quickly as possible for
consumption or freeze once again.
Additional Storage: if you want to use the freezer’s
maximum net capacity, remove the drawers and
store items directly on the cooling tubes. This will
enable you to make use of the entire volume of the
compartment.
Freezer compartment
The freezer compartment is used for freezing fresh
foods and for storing frozen foods for the period of time
indicated on the packaging, and for making ice cubes.
• For freezing fresh food; wrap and seal fresh food
properly - the packaging should be airtight and
should not leak. Special freezer bags, aluminium foil
(heavy grade; if in doubt double-wrap), polythene
bags, and plastic containers are ideal.
• Do not allow fresh food to be frozen to come into
contact with already frozen food.
• Always mark the date and the content on the pack
and do not exceed the stated storage time.
• In case of a power failure or malfunction, the
freezer compartment will maintain a suffi ciently
low temperature for food storage. However, avoid
opening the freezer door in order to slow down the
temperature rise within the freezer compartment.
Customer Helpline 0845 600 4632
14
Page 15
Cleaning and Maintenance
Cleaning
WARNING: Disconnect the appliance
from the power supply before cleaning.
• Do not pour water over the appliance.
• Clean the accessories separately with soap and
water. Do not put them in the dishwasher.
• Do not use abrasive products, detergents or
soaps. After washing, rinse with clean water
and dry carefully. When the cleaning operations
have been completed, reconnect the plug with
dry hands.
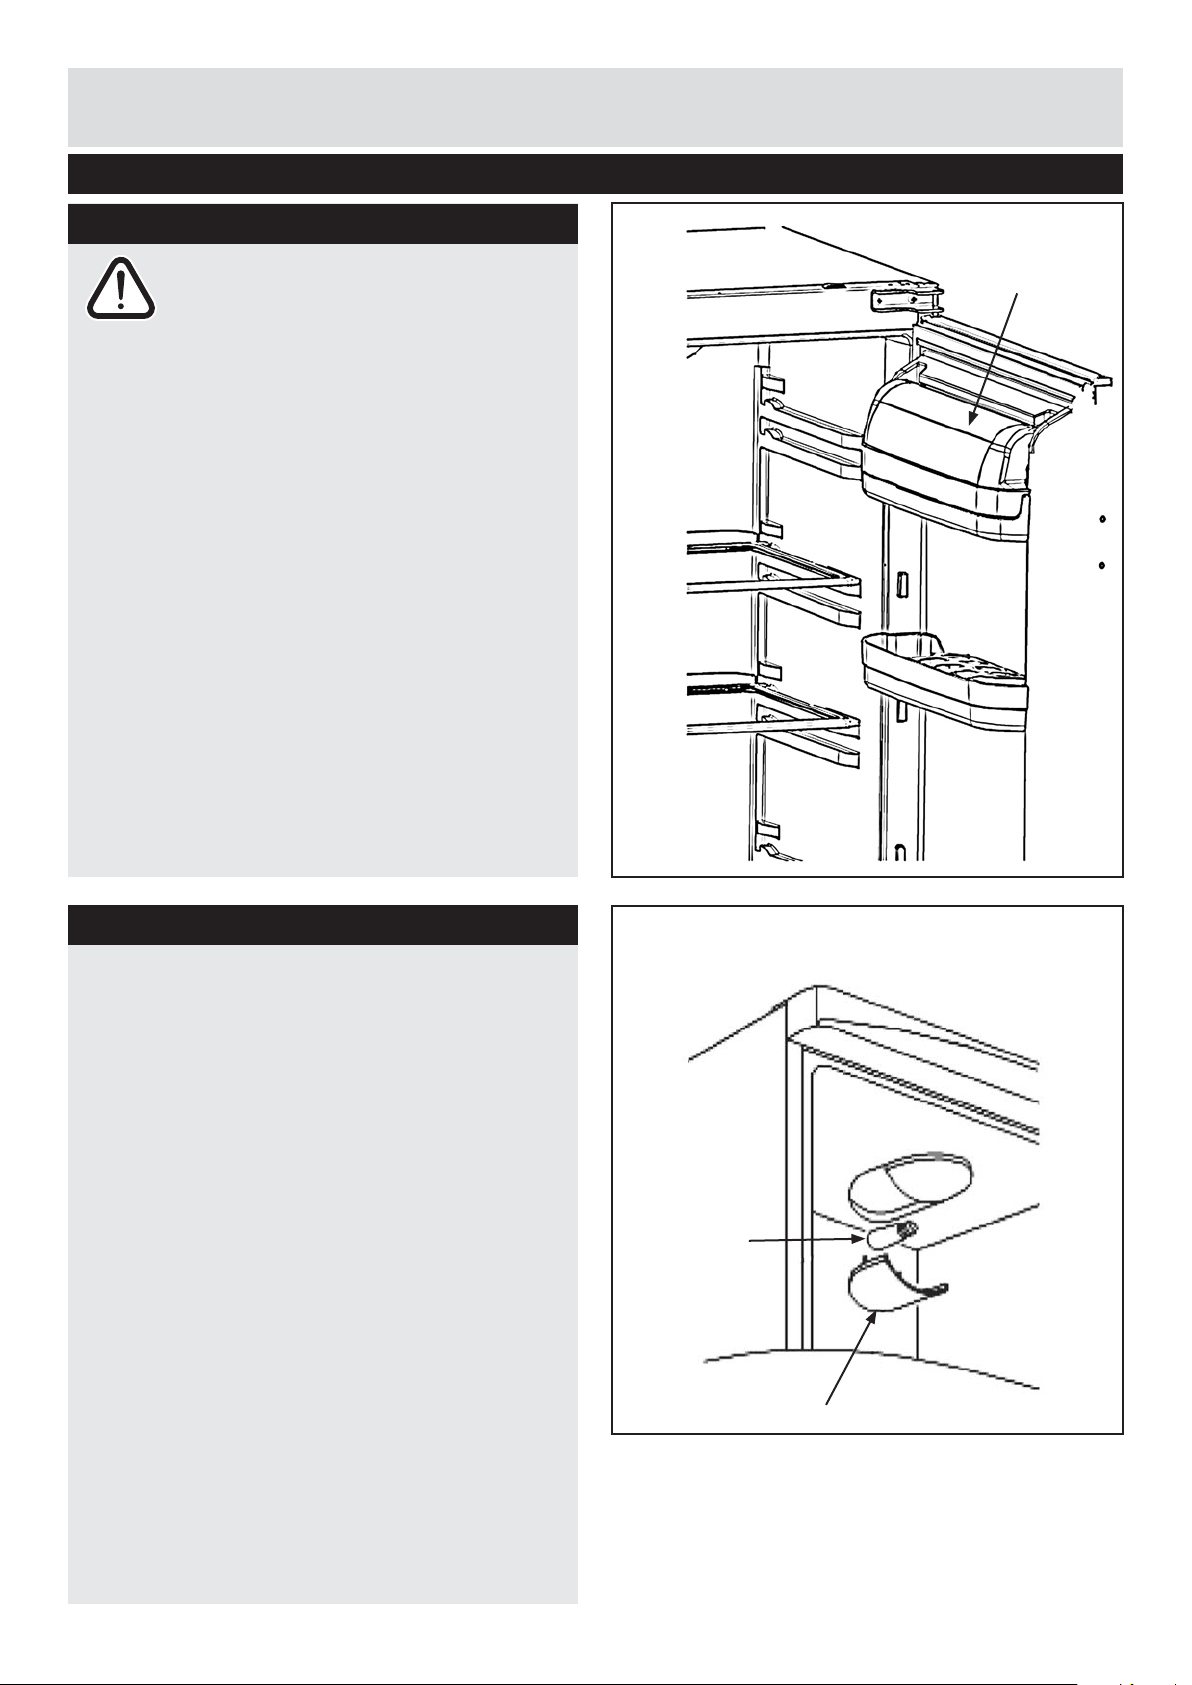
• To remove the butter shelf, fi rst take out the
butter shelf cover, then remove the shelf. Do not
try to remove butter shelf and cover together.
10
Butter shelf
cover
Replacing the refrigerator light bulb
a: Unplug the unit from the power supply.
b: Remove the refrigerator light cover (1) by pressing
the hooks placed on both sides of the cover. Press
the hook in front of the light cover to remove it (see
Figure 11).
c: Replace the light bulb (2) with a new one; maximum
power 15w.
d: Replace the light cover and plug the unit back into
the power supply.
11
2
1
15
Customer Helpline 0845 600 4632
Page 16
Cleaning and Maintenance
Defrosting the freezer compartment
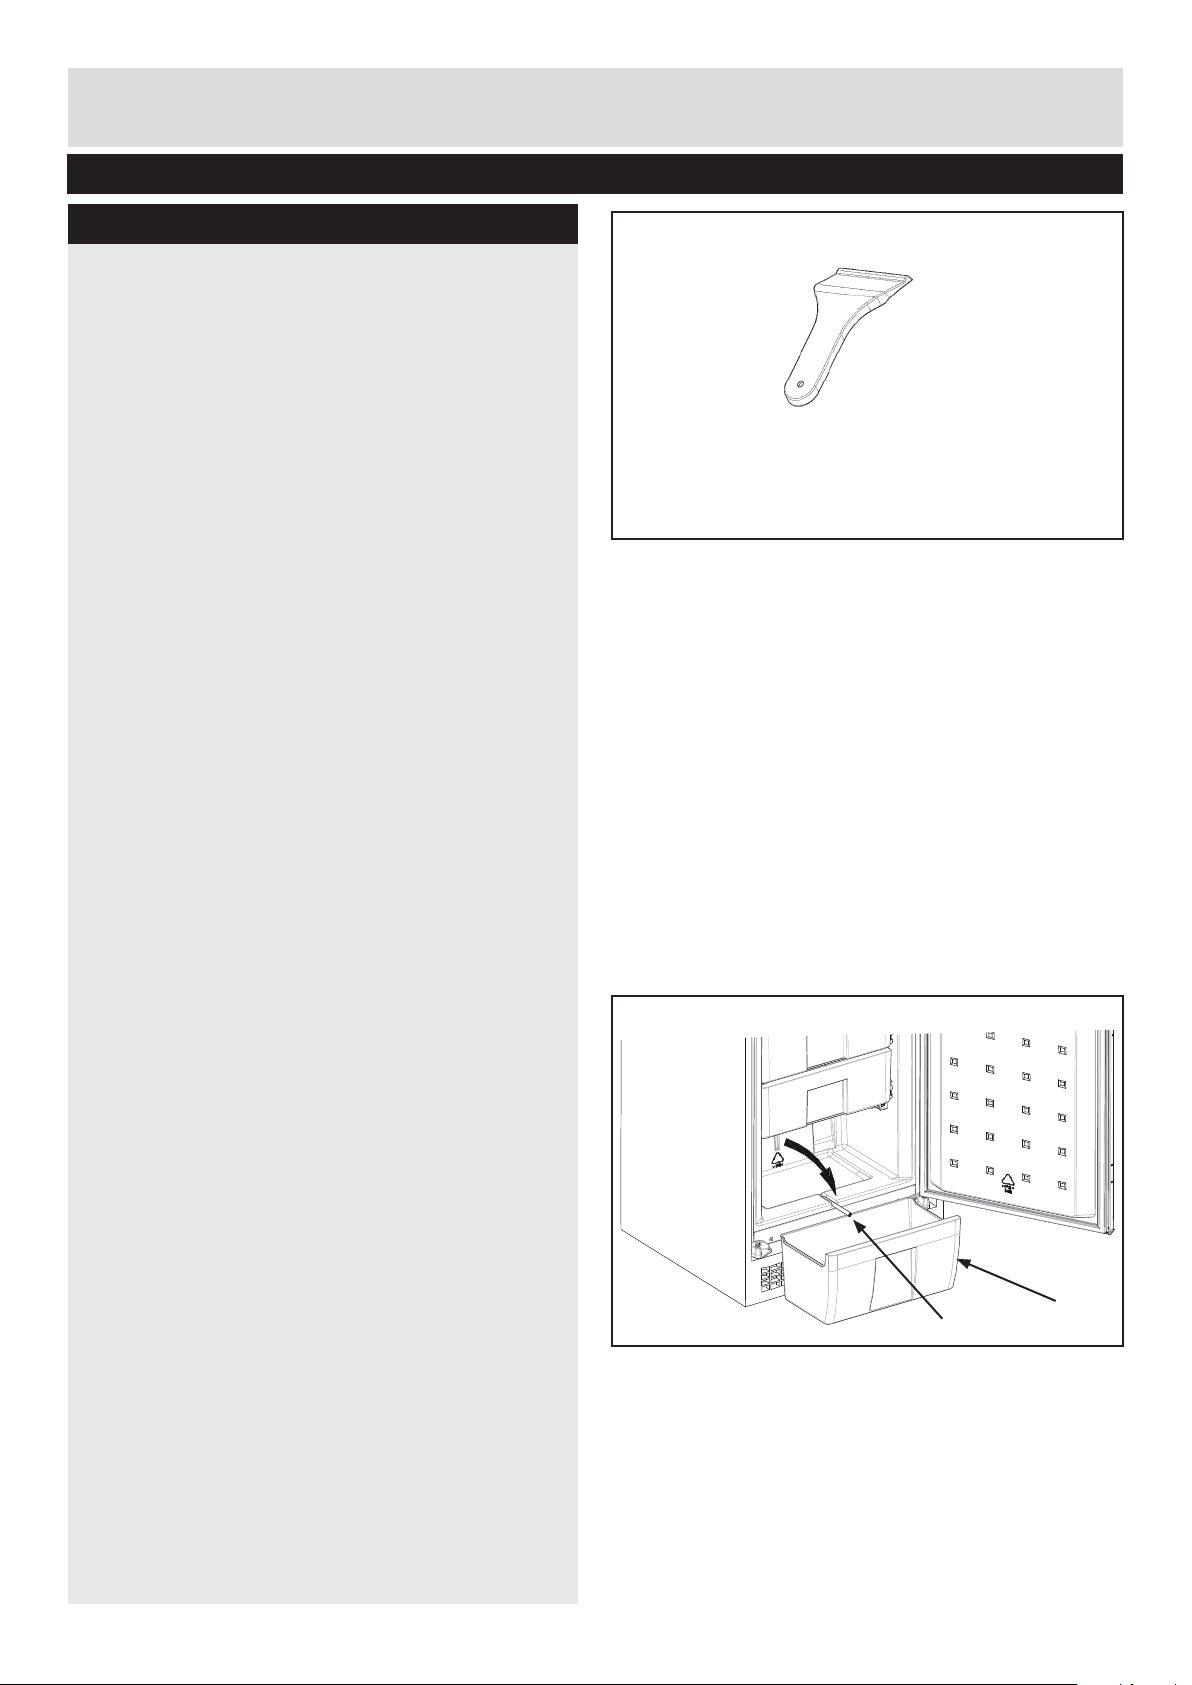
WARNING: Plastic scraper is provided for scraping
ice in defrost process. Do not use sharp metal
objects for this operation. They could puncture the
refrigerator circuit and cause irreparable damage
to the unit.
To maintain the effi ciency of the freezer, complete
defrosting will become necessary if the frost layer
exceeds 3-5mm.
• The day before you defrost, set the thermostat
dial to position “5” to freeze the foods
completely.
• During defrosting, frozen foods should be
wrapped in several layers of paper and kept in
a cool place. The inevitable rise in temperature
will shorten their storage life. Remember to use
these foods within a relatively short period of
time.
• Set the thermostat knob to position “0” and
switch off the appliance.
12
Ice scraper
• Leave the door open to accelerate defrosting.
Remove the defrosted water from the
compartment.
• This appliance is provided with a special drain
system – as described in three steps below:
a: Pull out the bottom drawer (1) of the freezer
compartment and put it on the fl oor aligned to
the front of the cabinet (see Figure 13).
b: Pull out the drain pipe (2) placed on the back
wall of the freezer compartment.
c: If there is still defrosted water on the freezer fl oor,
clear it away by using a sponge.
• Clean the interior by hand with lukewarm water
and a little detergent.
Never use abrasive products or aggressive
cleaning agents.
• Dry the inside of the unit, plug it into the mains,
and set the thermostat knob to position “5”. After
24 hours, reset the thermostat to the desired
position.
13
1
2
Customer Helpline 0845 600 4632
16
Page 17

Shipment and Repositioning
• Original packaging and foam may be kept for
re-transportation (optional).
• You should fasten your fridge with thick
packaging, bands or strong cords and follow the
re-transportation instructions on the packaging.
• To protect the appliance during repositioning
and/or transportation, remove movable parts
(shelves, accessories, vegetable bins, etc.) or fi x
them securely into the fridge.
• Always carry your fridge in the upright position.
17
Customer Helpline 0845 600 4632
Page 18

Trouble Shooting
If your refrigerator is not working properly there may
be a minor problem, therefore check the following.
If the appliance does not operate, check if;
• There is a power failure,
• The mains plug is not properly plugged in,
or is loose
• The thermostat setting is on position “0”
• The socket is defective. To check this, plug in a
fully operable appliance into the same socket
If the appliance performs poorly, check if;
• You have overloaded the appliance
• The doors are not closed perfectly
• There are not enough ventilation ducts on
the kitchen unit as mentioned in the safety
instructions section of this instruction manual
(Page. 4)
If there is noise;
• If you will not be using your refrigerator for a
long period (holiday etc.), disconnect the plug
from the socket. Clean your refrigerator as per
page 13 of this document and leave the door
open to prevent any humidifi cation or odour
forming. If there is still a problem with your
refrigerator despite following the instructions
in this manual, please consult your nearest
authorised service centre, or contact the
Customer Helpline on 0845 600 4632
The life-cycle of this product, as determined and
proclaimed by the Ministry of Industry (the period
for making spare parts available for the product
to be able to fulfi l its function), is 10 years.
Conformity Information
• Normal Class is defi ned as environment
temperatures between 16°C and 32°C in
accordance with TS EN ISO 15502 standards.
• The appliance is designed in compliance
with EN15502, IEC60335-1/IEC60335-2-24,
2004/108/EC standards.
The cooling gas which circulates in the refrigerator
circuit may make a slight noise (bubbling sound)
even when the compressor is not running. Do not
worry, this is quite normal. If these sounds are
different check if;
• The appliance is installed fi rmly as described in
the Installation section of this manual (Page. 6)
• Objects on the appliance are vibrating
If there is water in the lower part of the refrigerator,
check if;
The drain hole for the defrost water is clogged up
(use the defrost drain plug to clean the drain hole).
IMPORTANT NOTES
• In case of a sudden power loss or disconnecting
reconnecting of the plug to the electrical socket,
the compressor’s protective thermal element
will be opened as the pressure of the gas in
the cooling system of your refrigerator has not
yet been balanced. 4 or 5 minutes later, your
refrigerator will start to operate; this is normal.
Customer Helpline 0845 600 4632
18
Page 19
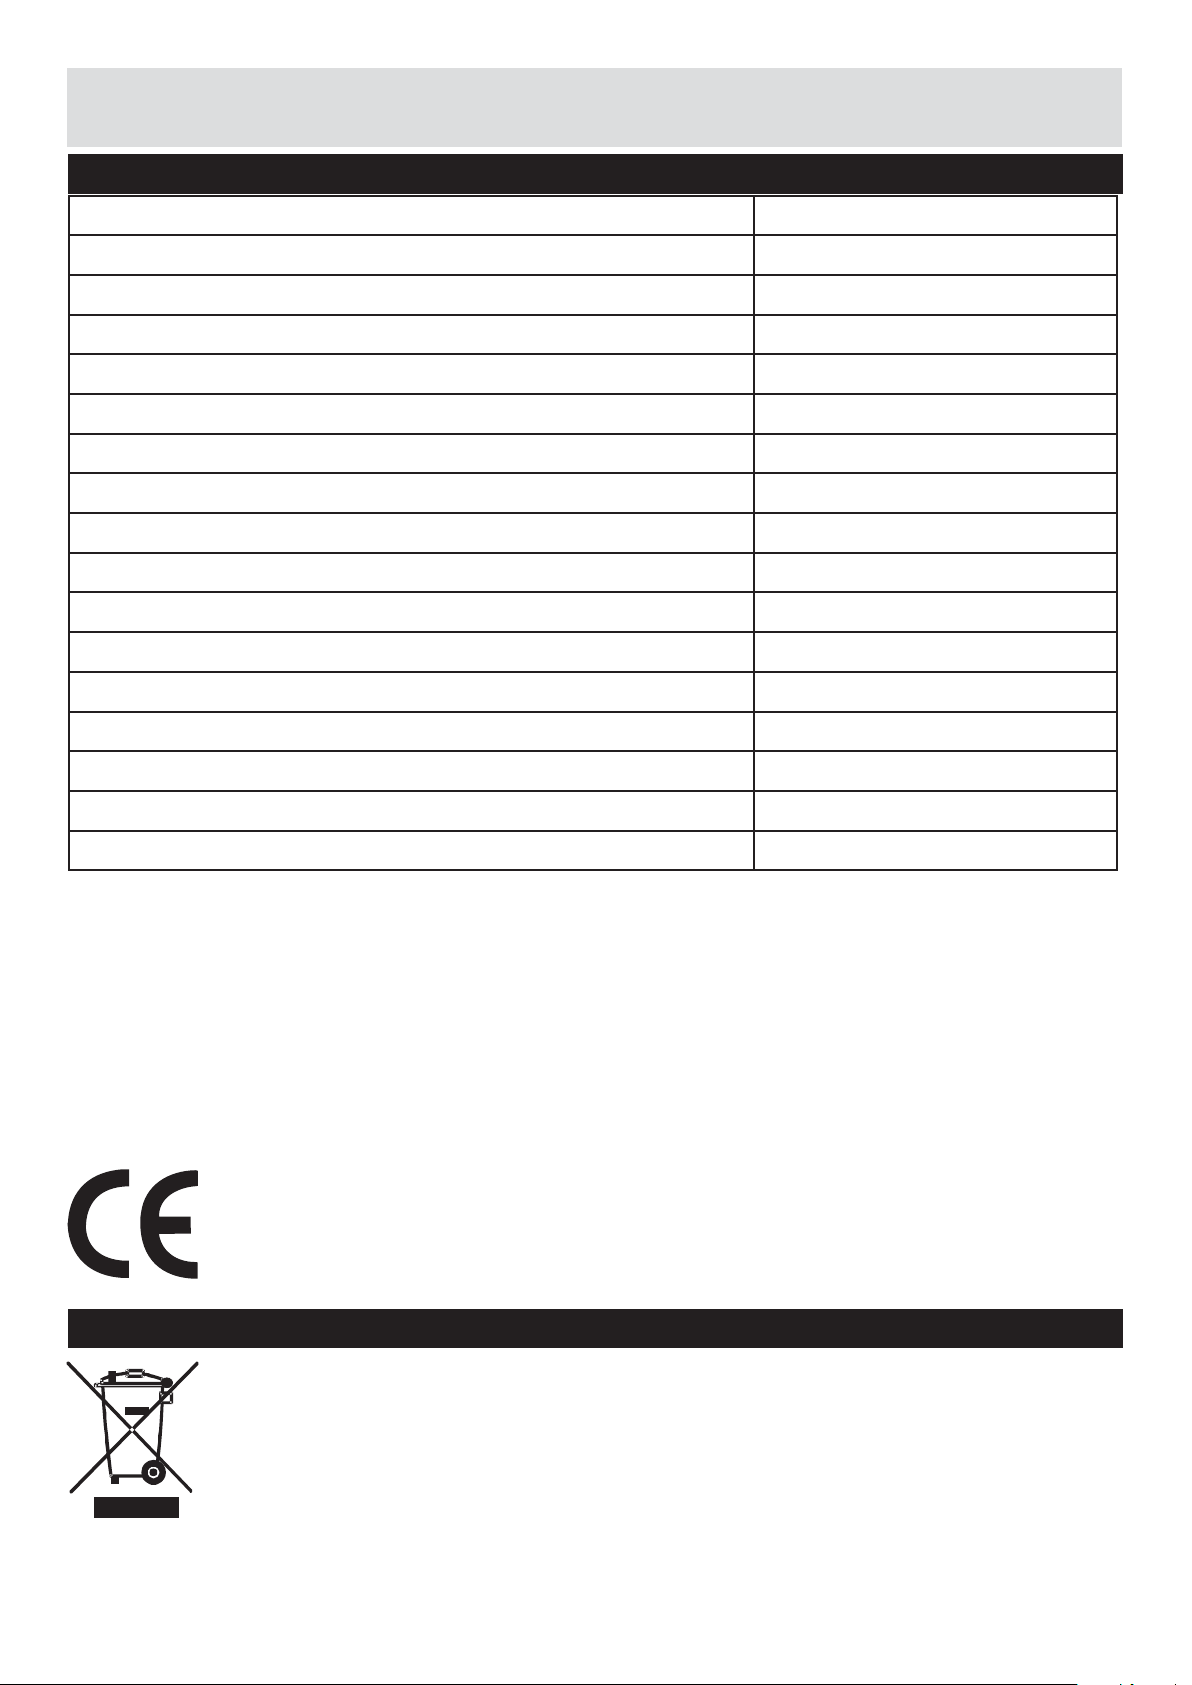
Technical specifi cations
Model/Item AB320
Supplier’s name or trademark BUSH
Supplier’s model AB320
Type of appliance BGSN3200S
The energy effi ciency class A
Voltage 220-240V/50HZ
Power 0,8A
Energy consumption 0,86kwh/24h
Net storage volume of fresh food 189 lt.
Net storage volume of frozen food 75 lt.
Star rating of frozen food storage compartment 4
Refrigeration system Static
Power cut safe Z h 600 mins
Freezing capacity 5 lt.
Climate class N
Size 1770 x 540 x 545
Net weight 56 Kg
Noise 40 db (A)
We apologise for any inconvenience caused by minor inconsistencies in these instructions that may occur as a
result of product improvements and development.
Disposal information
The symbol on the product or
on its packaging indicates that
this product may not be treated
as household waste. Instead,
it should be handed over to
applicable collection locations
for the recycling of electrical and
electronic equipment.
19
By ensuring this product is disposed of correctly,
you will help prevent potential negative
consequences for the environment and human
health, which could otherwise be caused by the
inappropriate waste handling of this product. For
more detailed information about the recycling of this
product, please contact your local city offi ce, your
household waste disposal service or the shop where
you purchased the product.
Customer Helpline 0845 600 4632
Page 20

Tips for Saving Energy
1. Install the appliance in a cool, well-ventilated
room, but not in direct sunlight and not near a
heat source (radiator, cooker etc.). Otherwise,
use an insulating plate.
2. Allow food and drink to cool down outside of
the appliance.
3. When thawing frozen food, place it in the
refrigerator compartment. The low temperature
of the frozen food will help to cool the refrigerator
compartment when it is thawing, thus saving
energy. If frozen food is put out side of the
appliance it causes energy wastage.
4. When placing drinks and other liquids inside the
larder they must be covered; otherwise humidity
increases in the appliance and working time
increases. Covering drinks and other liquids also
helps to preserve their smell and taste.
5. When placing food and drink inside the larder
open the appliance door as briefl y as possible.
6. Keep the different temperature compartment
covers closed (crisper, chiller etc.).
7. The door gasket must be clean and pliable.
Replace gaskets if worn.
8. Occasionally clean the rear of the appliance
with a vacuum cleaner or paint brush to prevent
increased power consumption.
Customer Helpline 0845 600 4632
20
Page 21
Guarantee
This product is guaranteed against manufacturing defects for a period of
Product guarantee
Year
This product is guaranteed for twelve months from the date of original purchase. During this
period, any defect that arises due to faulty materials or workmanship will be replaced, refunded
or repaired free of charge where applicable by the dealer from whom the unit was purchased.
The guarantee is subject to the following provisions:
• The guarantee does not cover accidental damage, misuse, cabinet parts, knobs or
consumable items.
• The product must be correctly installed and operated in accordance with the instructions
contained in this manual.
• It must be used solely for domestic purposes.
• The guarantee will be rendered invalided if the product is re-sold or has been damaged by
inexpert repair.
• Specifi cations are subject to change without notice.
• The manufacturer disclaims any liability for incidental or consequential damages.
• The guarantee is in addition to, and does not diminish, your statutory or legal rights.
• In the event of a problem with the product within the guarantee period, please contact:
Customer Helpline: 0845 600 4632.
Guarantor: Argos Ltd
489 - 499 Avebury Boulevard
Central Milton Keynes
MK9 2NW
 Loading...