

Page 1
Instruction manual
A3S Soundbar
Page 2

You’ll soon be enjoying your new Soundbar.
It all begins here, with your instructions. Don’t worry,
there’s nothing too technical coming up. Just simple,
step-by-step guidance to get you up and running
quickly. Sound good? Then let’s get started.
Help and Guidance
We’re here to help you get the most from your Soundbar. Should you require any
guidance, a simple solution can often be found online at:
www.argos-support.co.uk
If you still require further assistance, call one of our experts on 0345 600 3021 .
If you require any technical guidance or find that your product is not operating as intended, a simple solution can often be found in the Troubleshooting section of these instructions,
Page 3

Contents
Safety information
1
Safety information 6
Getting to know your Soundbar
2
Ready? Let’s begin 8
Accessories 8
Control panel and remote control 9
Making the connections 11
Installing the remote battery 12
Using your Soundbar
3
Standby mode 14
Switching inputs 14
Adjusting the volume 14
LED status table 14
EQ presets 14
Product support
5
Troubleshooting 22
Help and assistance 23
Disposal 24
Guarantee 25
Bass enhancement 14
Mute function 14
Voice message feedback 15
Pairing a bluetooth device 15
Bluetooth LED status table 15
Controlling a paired device 15
Bluetooth notes 15
Other information
4
Wall mounting the soundbar 18
Technical specification 19
Care & maintenance 19
or online at www.argos-support.co.uk If you still require further assistance, call one of our experts on 0345 600 3021 .
3
Page 4

This page is left intentionally blank
Page 5

Safety information
1
Page 6
Safety information
Important - Please read these instructions fully before
installing or operating
Power source
• This symbol means that this unit is double
insulated. An earth connection is not
required.
• The appliance must be connected to
a 100-240 volt 50/60Hz AC supply by
means of a three pin socket.
• Unplug this apparatus during lightning
storms or when unused for long periods of
time - to prevent damage to this product.
• Opening or removing covers may expose
you to dangerous voltages or other
hazards.
• To prevent risk of fire or electric shock,
avoid overloading wall outlets, extension
cords, or integral convenience receptacles.
• Use suitable power sources - Plug the
product into a suitable power source, as
described in the operating instructions or
as marked on the product.
• The supply voltage should be the
same as that indicated in the technical
specifications and the appliance rating
plate.
• If the socket outlets in your home are not
suitable for the plug supplied with this
unit check with a qualified electrician for
replacement.
• In order to disconnect the apparatus from
the mains completely, switch off the outlet
and remove the mains plug completely.
Heat build up
• During use the unit will heat up, this is not a
malfunction. If the unit is used continuously at
high volume levels, the unit temperature will
rise considerably. Do not touch the unit to avoid
potential burns.
Colour irregularity on TV screen
Colour irregularities may be seen on certain types of
TV.
• If such an irregularity is seen turn off the TV, then
turn on again after 15 to 30 minutes.
• If the colour irregularity is still seen place the
soundbar unit further away from the TV.
Moisture and water
• Do not use this apparatus near water or moisture.
• Do not use this product near a bathtub, washbowl,
kitchen sink, and laundry tub, in a wet basement,
near a swimming pool, or anywhere else that water
or moisture is present.
Heat sources and flames
• Batteries shall not be exposed to excessive
heat such as sun, fire or the like
• To prevent risk of fire or electric shock,
avoid overloading wall outlets, extension
cords, or integral convenience receptacles.
• Do not bend, stretch or pull the supply
cable in order to avoid electric shock.
• When installed, the power socket must be
within easy reach.
• Do not install the unit in a confined space.
Allow adequate ventilation to prevent heat
build-up.
• For indoor use only.
If you require any technical guidance or find that your product is not operating as intended, a simple solution can often be found in the Troubleshooting section of these instructions,
Safety information6
Servicing and repairs
• Refer all servicing to qualified service personnel
• Servicing is required when the apparatus has been
damaged in any way: such as liquid has been
spilled or objects have fallen into the apparatus; the
apparatus has been exposed to rain or moisture,
does not operate normally, or has been dropped.
Page 7

Getting to know your Soundbar
2
Page 8
Getting to know your Soundbar
You’ll be up and running in no time
Ready? Let’s begin...
Please read these instructions carefully. They contain
important information which will help you get the
best from your Soundbar and ensure safe and correct
installation and operation.
If you require any further assistance, our technical
experts are happy to help. For full details, refer to
the product support section at the end of these
instructions.
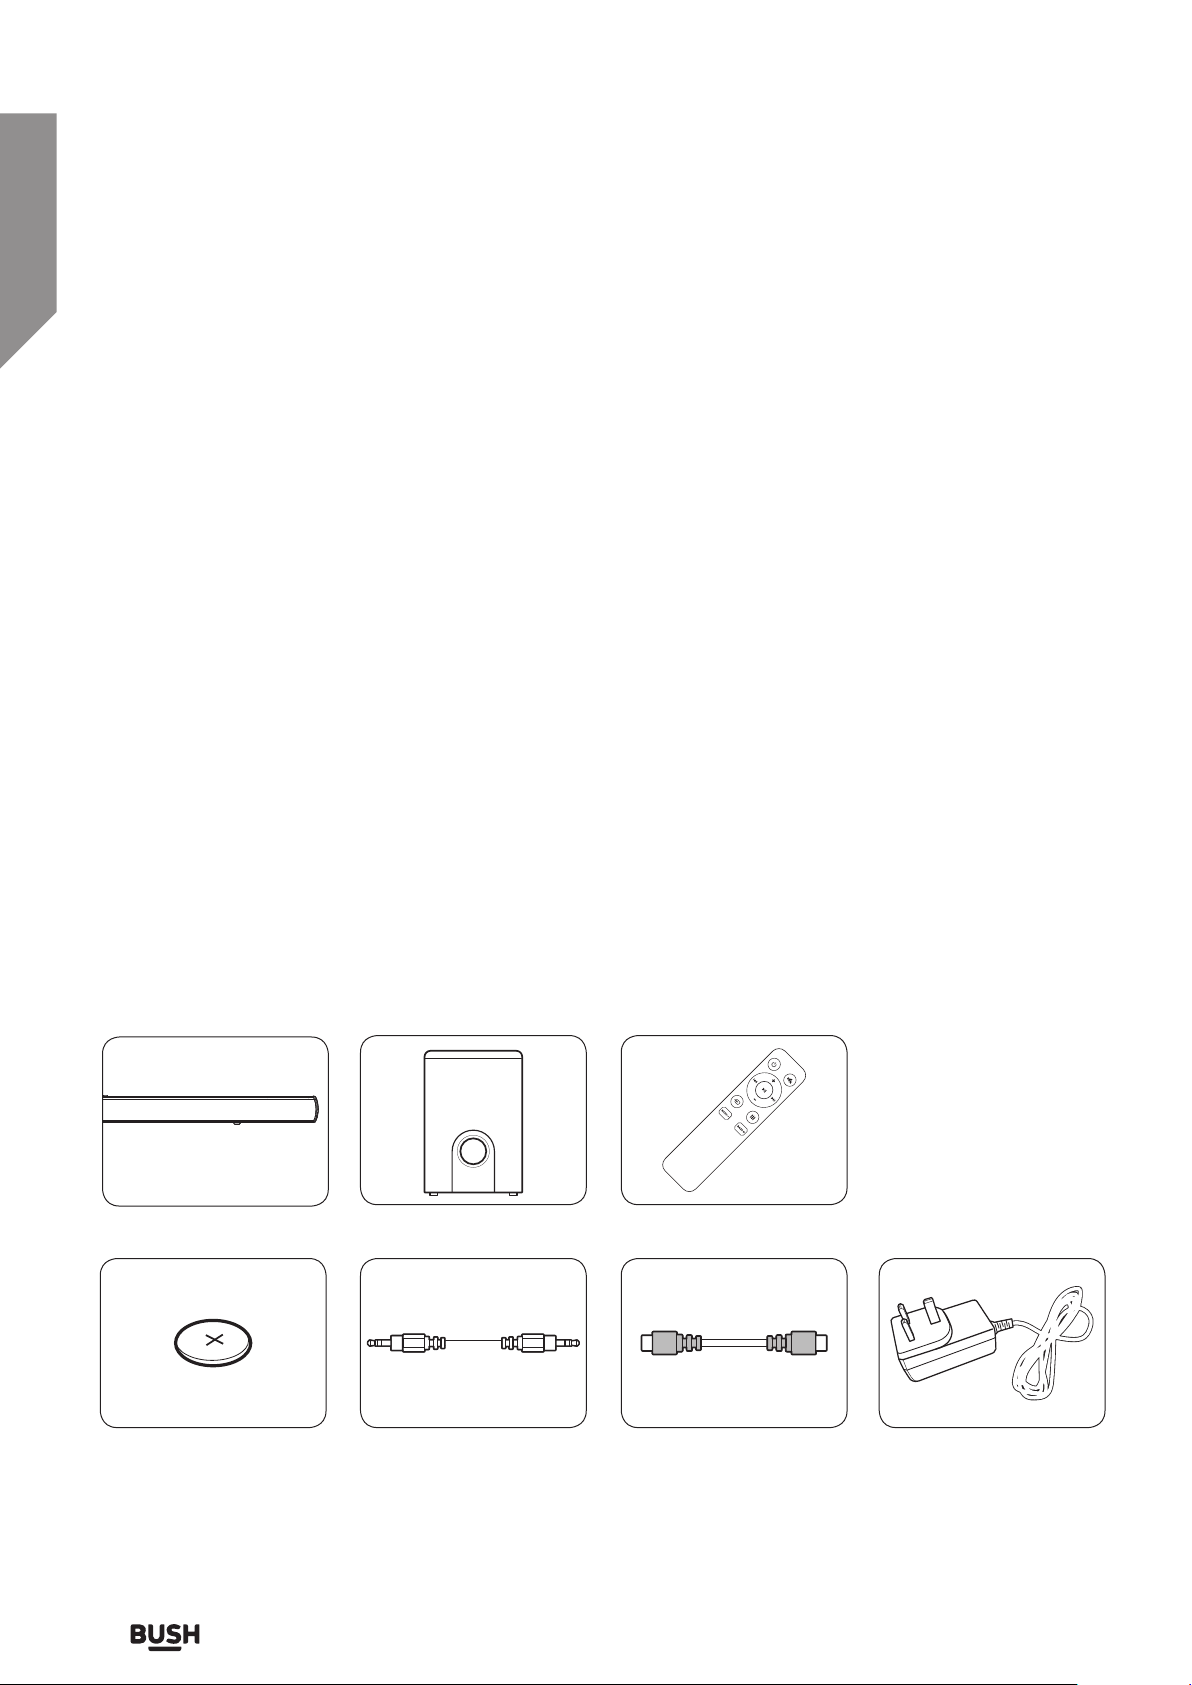
Accessories
1. A3S Soundbar
2. Sub woofer
3. Remote control
4. CR2032 battery
5. Digital optical cable
6. 3.5mm to 3.5mm audio cable
7. Mains adapter
8. Instruction manual
A3S Soundbar Sub woofer Remote control
CR2032 battery
8
3.5mm to 3.5mm cable Digital Optical cable
If you require any technical guidance or find that your product is not operating as intended, a simple solution can often be found in the Troubleshooting section of these instructions,
Getting to know your Soundbar
Mains adapter
Page 9
Getting to know your Soundbar
You’ll be up and running in no time
1
5 5
12
2 3
4
To SUB
6 7 8 9 10 11
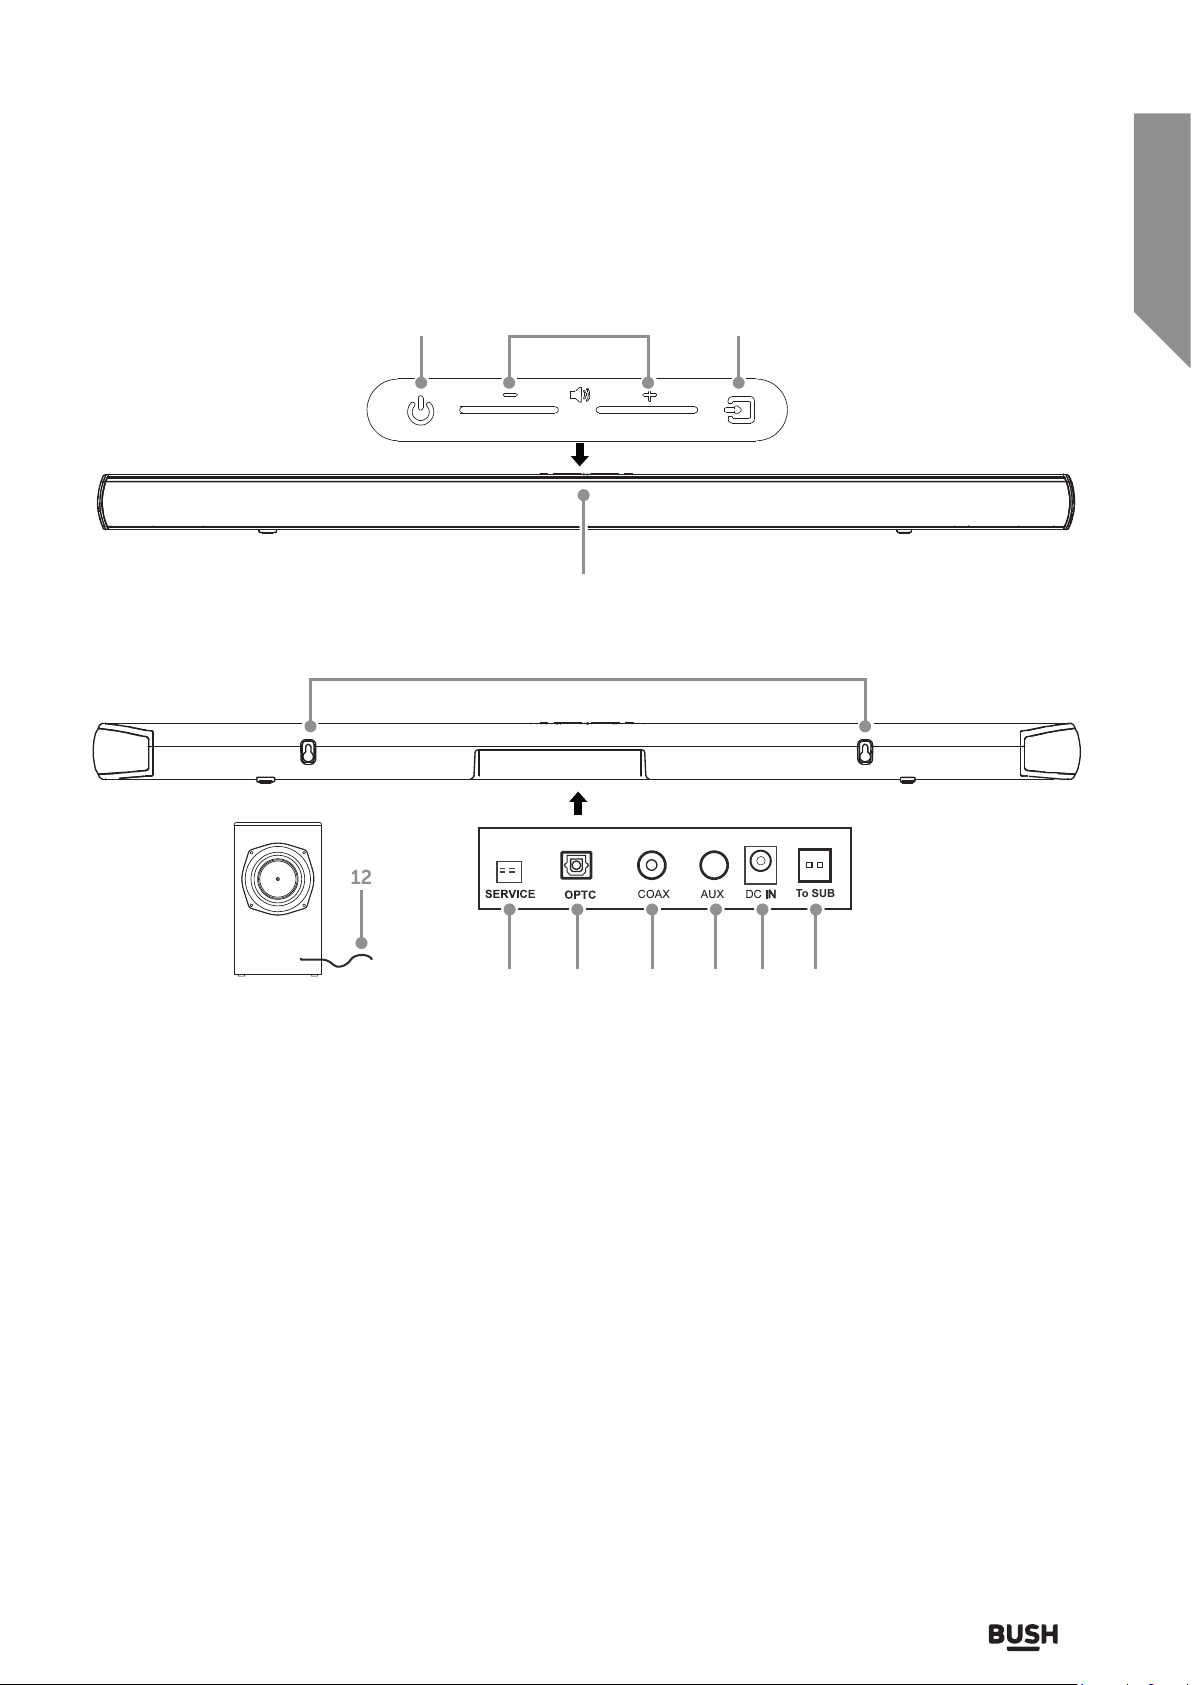
1. STANDBY button: Switch on the Sound bar or
switch to STANDBY mode.
2. VOLUME + / - buttons: Increase or decrease the
output volume.
3. SOURCE touch button: Select an audio source
from AUX, BLUETOOTH, COAXIAL or OPTICAL
inputs.
4. STATUS LED: Input mode and standby status.
5. WALL-MOUNT BRACKETS: Use these brackets to
fix the Sound bar to a wall.
6. SERVICE PORT: Not for user use.
7. OPTICAL DIGITAL AUDIO INPUT: Connect the
digital audio output from a TV, DVD/ Blu-ray player
or games console.
8. COAXIAL DIGITAL AUDIO INPUT (RCA): Connect
the digital audio output from a TV, DVD or Blu-ray
player.
9. AUX AUDIO INPUT (3.5mm): Connect the
analogue audio output from an MP3 player or
similar using a 3.5mm audio cable.
10. MAINS POWER DC INPUT: Connect the supplied
power adapter.
11. SUB WOOFER CONNECTION SOCKET: Connect
the sub woofer cable from No 12.
12. SUB WOOFER CONNECTION CABLE: Connect to
the soundbar.
or online at www.argos-support.co.uk If you still require further assistance, call one of our experts on 0345 600 3021 .
Getting to know your Soundbar
9
Page 10

Getting to know your Soundbar
You’ll be up and running in no time
Power: Standby mode ON/ OFF
button
Volume +: Press to increase the
volume level
: Skip to the previous track
(Bluetooth)
PLAY/PAUSE: Begin or pause
playback (bluetooth), Voice
message enable/disable & Unpair a
bluetooth device.
Source: Press to cycle between
AUX, OPTICAL, BLUETOOTH &
COAX modes
Bass -: Press to decrease the bass
level
Mute: Press to mute the sound
output
: Skip to the next track
(Bluetooth)
Volume -: Press to decrease the
volume level
Sound EQ modes: Press repeatedly
to assign different sound EQ
modes: STANDARD or MOVIE
Bass +: Press to increase the bass
level
10
If you require any technical guidance or find that your product is not operating as intended, a simple solution can often be found in the Troubleshooting section of these instructions,
Getting to know your Soundbar
Page 11

Getting to know your Soundbar
You’ll be up and running in no time
Making the connections
Follow the below connection guide to connect the A3S Soundbar to a TV, DVD/Bluray or games console with a
digital coaxial OR optical output, a non-digital TV or external audio source such as an MP3 player or smartphone.
Only one digital connection to a TV is required. Use either the coaxial or optical connections.
DO NOT power on the mains until all connections are made.
Digital connections will give higher quality sound output. Analogue connection will have slightly lower
sound quality but in the case of connection to a TV headphone socket will allow the use of the TVs remote
to adjust the volume output from the sound bar
or online at www.argos-support.co.uk If you still require further assistance, call one of our experts on 0345 600 3021 .
Getting to know your Soundbar
11
Page 12

Getting to know your Soundbar
You’ll be up and running in no time
Installing the remote battery
1. Turn the battery cover counter clockwise using a
coin to open the battery compartment.(Fig 1)
Fig 1.
2. Insert the CR2032 battery into the battery
compartment with the + symbol facing upwards.
(Fig 2)
3. Replace the battery compartment cover and turn
clockwise using the a coin to close. (Fig 3)
Fig 3.
Battery disposal advice
• Dispose of used batteries with regard to the
recycling regulations in your area.
Fig 2.
• Do NOT short circuit batteries or throw them into
water, the general rubbish or in a fire. Weak batteries
can leak and damage the remote control. Replace
them in good time!
• Keep coin-sized button batteries out of sight and
out of the reach of children. Coin lithium batteries
can cause serious injury when swallowed.
12
If you require any technical guidance or find that your product is not operating as intended, a simple solution can often be found in the Troubleshooting section of these instructions,
Getting to know your Soundbar
Page 13

Using your Soundbar
3
Page 14

Using your Soundbar
Let’s get started
Standby mode
This unit is designed to enter STANDBY mode
automatically after 20 MINUTES (approximately) of
inactivity. Press the STANDBY button to wake the
unit.
1. Press the STANDBY button on the unit (1) or press
the STANDBY button on the remote to put the
system into standby mode.
2. To resume normal operation press either button
again.
Switching inputs
Follow the below steps to switch inputs between :
Auxiliary, Coaxial, Bluetooth or Optical.
1. Ensure the Sound bar is powered ON. If not press
the STANDBY button on the unit (1) or remote.
2. Press the SOURCE button on the unit (3) or remote
repeatedly until you reach the required input
mode.
• Auxiliary input GREEN LED
• Coaxial input WHITE LED
• Optical input PURPLE LED
LED status table
The below table explains the LED indications.
Operation Description Action
Standby Standby RED (Solid)
Source Aux GREEN (Solid)
Coaxial WHITE (Solid)
Optical PURPLE (Solid)
Bluetooth paired BLUE (Solid)
Bluetooth ready
for pairing
Vol +/- Adjust volume Current input
Bass +/- Adjust bass level Current input
Sound EQ Assign EQ mode Current input
Mute Mute sound RED (Flash)
BLUE (Flash)
colour (blink once)
colour (blink once)
colour (blink once)
EQ presets
1. Press the SOUND EQ button on the remote
control repeatedly to cycle through the EQ sound
modes. The status LED will blink accordingly.
Choose between :- STANDARD (STD) or MOVIE.
• Bluetooth input BLUE LED
When switching inputs there will be a 2 second
pause after selecting BT while the unit scans for
paired devices.
Adjusting the volume
1. To increase the volume level press the VOLUME+
button on the main unit (2) or remote repeatedly
or press and hold for fast adjustment. The status
LED will blink accordingly.
2. To decrease the volume level press the VOLUME-
button on the main unit (2) or remote repeatedly
or press and hold for fast adjustment. The status
LED will blink accordingly.
If you require any technical guidance or find that your product is not operating as intended, a simple solution can often be found in the Troubleshooting section of these instructions,
14
Using your Soundbar
Bass enhancement
1. To increase the bass press the BASS + button on
the remote. The status LED will blink accordingly.
2. To decrease the bass press the BASS - button on
the remote. The status LED will blink accordingly.
The BASS levels range from -3 to +3.
Mute function
1. Pressing the MUTE button on the remote will
temporarily silence the audio output. The status
LED will blink accordingly.
2. Press the MUTE button again to resume the audio
output. The status LED will blink accordingly.
Page 15

Using your Soundbar
Let’s get started
Voice message feedback
Follow the below steps to enable the voice message
when performing tasks.
1. Enter STANDBY mode if not already.
2. Press and hold the
remote for 5 seconds.
3. Repeat the same process to disable the voice
message when enabled.
PLAY/PAUSE button on the
Pairing a bluetooth device
Before you can use the sound bar with your phone or
other bluetooth capable device you will need to pair
the device to the sound bar.
1. Press the SOURCE button on the main unit (3) or
remote repeatedly until you see the blue LED.
2. When selected the status LED will flash while the
unit tries to connect to previously paired devices.
If no devices are found the status LED will remain
flashing to indicate it is ready for pairing a new
device.
3. Enable the Bluetooth function on your audio
device and search for a device labelled ‘BUSH A3S’
in the available list.
Bluetooth LED status table
Status LED Reason
Solid blue (No flash) Connected
Blue flashing Auto reconnecting with the
last paired device.
Pairing mode.
Controlling a paired device
Once connected you can either use the controls on
the audio device to begin playback, skip tracks etc.
Or you can use the control buttons on the sound bar &
remote.
1. The
2. To skip to the next track press the SKIP
3. To skip to the previous track press the SKIP
4. Any further operations must be done from the
PLAY/PAUSE button on the remote when
pressed will begin playback of the selected
track on the audio device. Press again to pause
playback.
button
on the remote.
button on the remote.
audio device.
4. Select and enable pairing for the ‘BUSH A3S’
device. If prompted for a password enter ‘0000’.
5. If pairing is successful the sound bar will beep and
the STATUS LED will stop flashing.
6. If the connected device goes out of range, the
sound bar will attempt to connect for 2 minutes.
When the device comes into range the sound bar
will reconnect again automatically.
7. To remove a paired device using only the sound
bar, press and hold the PLAY/PAUSE button on the
remote control for 5 seconds. The STATUS LED
will begin flashing once more.
or online at www.argos-support.co.uk If you still require further assistance, call one of our experts on 0345 600 3021 .
The volume output is effected by the volume level
on the audio source EG: Phone or laptop, so make
sure that is set to about 70-80% ( not too loud to
avoid distortion).
Bluetooth notes
• The operation range of bluetooth is approximately
10 meters (30 Feet). Any obstacles in the path
between devices may reduce this range.
• Only one Bluetooth device can be paired at a time.
• Not all Bluetooth devices are compatible.
Using your Soundbar
15
Page 16

This page is left intentionally blank
Page 17

Other information
4
Page 18

Other information
Helpful technical information
Wall mounting the soundbar
1. Align the Soundbar in the chosen location.
Use a pencil to mark the drilling positions 520mm
(20.47”) apart. (Fig 4)
520mm/20.47"
Fig 4.
The Soundbar should be located at least 75mm (3”)
below the bottom of the TV.
3. Insert 2 screws (not supplied) into the holes and
tighten. Take care to leave 5mm between the
screw heads and the wall. (Fig 6)
Fig 6.
You will need to ensure the screws are long enough
to sufficiently grip the wall while allowing 5mm
between screw head & wall.
4. Hook the Soundbar into the screws. For secure
mounting ensure the screw heads slide firmly into
the narrow part of the brackets. (Fig 7)
TV
3 inches (7.5 cm) or more
2. Drill holes as marked in STEP 1. (Fig 5)
Fig 5.
Fig 7.
• In order to avoid damage to the unit and personal
injury you should get a qualified person to drill the
fixing surface and fit the appropriate wall fixings.
• Take care not to allow the main unit to fall while
attempting to hook onto the wall mount brackets.
• Before mounting, check the wall strength, if it is not
clear then consult relevant qualified personnel.
• When drilling into walls, always check that there are
no hidden wires or pipes etc.
• Make sure the screws & wall plugs are suitable for
supporting the unit.
If you require any technical guidance or find that your product is not operating as intended, a simple solution can often be found in the Troubleshooting section of these instructions,
Other information18
Page 19

Other information
Helpful technical information
Technical specification
Amplifier
Power output 200W MAX
Frequency response 20Hz - 20KHz ± 3dB
Input sensitivity 1200 mV
Main unit
Power supply INPUT: 100-240V ~ 50-60Hz
OUTPUT: 24V
Power consumption 35W
Standby power consumption ≤ 0.5W
Full range speaker drivers
Subwoofer
Dimensions Soundbar: 920 x 55 x 85mm
Mains cable length 1.5M
Remote control
Battery 1 x CR2032
Bluetooth
Bluetooth compatibility EDR, A2DP, AVRCP
Bluetooth version 2.1
Impedance: 4 Ohm, 45mm (1.75”)
Frequency response: 250Hz ~ 20KHz
Impedance: 4 Ohm, 116mm (5.25”)
Frequency response: 45~250Hz
Sub woofer: 178 x 296 x 221mm
2.7A
Care & maintenance
After using the Soundbar
Set to Standby.
Switch the unit off at the mains and unplug it if you are
leaving it unattended for a long period (holidays etc).
Avoid leaving the battery fitted in the remote control if
you leave the unit unattended for long periods. It may
leak and damage the remote control.
or online at www.argos-support.co.uk If you still require further assistance, call one of our experts on 0345 600 3021 .
Care & cleaning
All care and cleaning operations should be carried out
with the unit unplugged from the mains power.
Occasionally wipe the cabinet with a lint free duster.
Never clean the unit with liquids or solvents.
Other information 19
Page 20

This page is left intentionally blank
Page 21

Product support
5
Page 22

Product support
Help is always at hand
Troubleshooting
No power.
• Ensure the mains plug is connected to a power supply, and is switched ON.
• Make sure there is power to the mains socket.
Optical cable does not fit well
• Remove the clear rubber cap from each end before use.
No sound?
• Make sure if playing from the AUX input, the external source has the volume turned up and is playing a track.
• Make sure the volume is turned up.
• If using the digital coaxial or optical connection ensure the source DIGITAL output is set to PCM, LPCM, PCM
2Ch stereo or PCM downmix.
• Bluetooth device not paired. Check ‘Pairing a bluetooth device’.
No response from the A3S Soundbar.
• Unplug the power cable for 1 minute then plug back in again.
Remote control does not work.
• Reduce the distance between the remote and main unit
• Check the batteries are installed correctly.
• Replace the batteries
• Aim the remote directly at the Sound bar
Unit powers o after 20 minutes.
• This unit is designed to enter STANDBY mode automatically after 20 MINUTES of inactivity. Press the STANDBY
button to wake the unit.
22
If you require any technical guidance or find that your product is not operating as intended, a simple solution can often be found in the Troubleshooting section of these instructions,
Product support
Page 23

Product support
Help is always at hand
Help and assistance
If you require any technical guidance or find that your A3S Soundbar is not operating as intended, a simple solution
can often be found in the Troubleshooting section of these instructions or online at
www.argos-support.co.uk
If you still require further assistance, call one of our experts on 0345 600 3021 *. To help give us give you a fast
and efficient service please have the following information ready:
Model Ref.
Serial number
Date of purchase
Local call rates applies*
A3S
You can find these on
the rating plate - a small
information panel (usually
a sticker or metal plate) on
the rear of your product
This will be shown on
your receipt
Lines open 8am-7pm Monday to Saturday and 10am-4pm Sunday.
*Calls to Argos enquiry lines may attract a charge and set up fee from residential lines depending on your call plan/tari. Mobile and other
providers costs may vary, see www.bt.com/pricing for details.
For Security and training purposes, telephone calls to and from customer service centres maybe recorded and monitored. Calls from
Republic of Ireland will attract international call charges.
or online at www.argos-support.co.uk If you still require further assistance, call one of our experts on 0345 600 3021 .
Product support
23
Page 24

Product support
Help is always at hand
Disposal
• Disposal of your old product. Your product
is designed and manufactured with high
quality materials and components, which
can be recycled and reused
• When this crossed out wheeled bin
symbol is attached to a product it means
the product is covered by the European
Directive 2002/96/EC.
• Please make yourself aware of the local
collection system for electrical and
electronic products.
• Please act according to your local rules
and do not dispose of your old products
with your normal household waste.
• The correct disposal of your old product
will help prevent potential negative
consequences for the environment and
human health.
The Bluetooth® word mark and logos are registered
trademarks owned by Bluetooth SIG, Inc. and any use
of such marks is under license.
This product is intended for use within the UK.
Declaration of Conformance
Hereby Argos LTD declares that the radio equipment
type Bush A3S is in compliance with Directive
2014/53/EU.
The full text of the EU declaration of conformity is
available at the following internet address:
http://www.argos-support.co.uk
Bluetooth Frequency Band 2.4Ghz.
Maximum radio-frequency power transmitted within
above frequency band: 20dBm EIRP
If you require any technical guidance or find that your product is not operating as intended, a simple solution can often be found in the Troubleshooting section of these instructions,
24
Product support
Page 25

Product support
Help is always at hand
Call us now and activate your 12 month guarantee
Thank you for choosing Bush. Your new product is guaranteed against faults and
breakdowns for 12 months. Don’t forget to register it with us today so we can provide you
with our best possible after-sales service and useful updates.
www.bushregistration.co.uk
FREEPHONE*
0800 597 8548
Lines are open 8am - 8pm, 365 days a year. *Calls may be recorded and monitored.
Your Bush Guarantee
This product is guaranteed for twelve months from the date of original purchase. Any defect that arises due to
faulty materials or workmanship will be repaired free of charge (or if applicable the product will be replaced or the
purchase price refunded) where possible during this period by the dealer from who your purchased the unit.
The guarantee is subject to the following provisions:
• The guarantee does not cover accidental damage,
misuse, cabinet parts, knobs or consumable items.
• The product must be correctly installed and
operated in accordance with the instructions
contained in the manual.
• It must be used solely for domestic purposes. The
guarantee will be rendered invalid if the product is
re-sold or has been damaged by inexpert repair.
• Specifications are subject to change without notice.
• Bush disclaim any liability for loss or damage arising
from the breakdown of the product.
• This guarantee is in addition to and does not
diminish your statutory or legal rights.
Important Data Protection Information
If you provide us with information about another
person, you confirm that they have appointed you
to act for them, to consent to the processing of their
personal data including sensitive personal data and
that you have informed them of our identity and the
purposes (as set out in the Important Data Privacy
notice displayed overleaf) for which their personal data
will be processed.
You are entitled to ask for a copy of the information
we hold about you (for which we may charge a small
fee) and to have any inaccuracies in your information
corrected.
Guarantor: Argos Limited - 489 - 499 Avebury Blvd. - Milton Keynes - MK9 2NW
For quality control and training purposes, we may
monitor or record your communications with us.
If your personal details change, if you change your
mind about any of your marketing preferences or if you
have any queries about how we use your information,
please let us know by contacting our Data Protection
Officer, Domestic & General, Leicester House
17 Leicester Street, Bedworth, Warwickshire
CV12 8JP.
or online at www.argos-support.co.uk If you still require further assistance, call one of our experts on 0345 600 3021 .
Product support
25
Page 26

Page 27

Page 28

Contact:
www.argos-support.co.uk
Helpline: 0345 600 3021
 Loading...