

Page 1
VS8x8
Crosspoint Video Switch
8 by 8 Configuration
Manual Version 2.11
BURST ELECTRONICS INC
ALBUQUERQUE, NM 87109 USA
(505) 898-1455 VOICE
Made in USA
(505) 890-8926 TECH SUPPORT
(505) 898-0159 FAX
www.burstelectronics.com
Hardware, software and manual copyright by Burst Electronics. All rights reserved. No part
of this publication may be reproduced or distributed in any form or by any means without the
written permission of Burst Electronics.
Page 2
Crosspoint Video Switch
8 by 8 Configuration
Product Description
The VS8x8 Vertical Interval Video Crosspoint
Switch is a digitally controlled matrix of 64 TSwitches that can connect any one of eight video
inputs to any, or all, of eight video outputs. The
switch matrix utilizes a monolithic, CMOS matrix
IC for minimal crosstalk.
The VS8x8 can be manually controlled using the
front panel controls or remotely controlled via a
standard, asynchronous RS232 Serial Interface.
The eight video inputs are buf fered and DC
clamped. A DIP switch on the rear panel allows
for 75 Ohm terminations on each input channel.
The eight outputs are driven by high speed, unitygain stable video amplifiers that are capable of
driving a 75 Ohm load with a bandwidth of
16MHz.
The system features a unique and simple
programming operation which allows the user to
specify various operation parameters, i. e., mode
of operation, baud rate, unit ID code, etc.
Programmed information is stored in internal
EEPROM to prevent inadvertent loss of data
caused by the loss of power.
VS8x8 Crosspoint Video Switch 2
Page 3

Installation
Power Supply
The VS8x8 is shipped with a wall mount DC
power supply rated at 12 volts, 500mA. Other
suitable power supplies in the range of 9 to 15
volts may also be used. The unit has an internal
bridge rectifier on the power supply input so that
the user need not be concerned with the polarity
of the power connector being used.
Video Connections
BNC connectors for composite video, Mini-DIN
for Y/C video. The eight video inputs and eight
video outputs are located on the rear panel of the
device. An eight position DIP switch is also
located on the rear panel to terminate the video
inputs with 75 Ohm 1% resistors. Setting the
switches in the down position will terminate the
appropriate channel.
Serial Interface
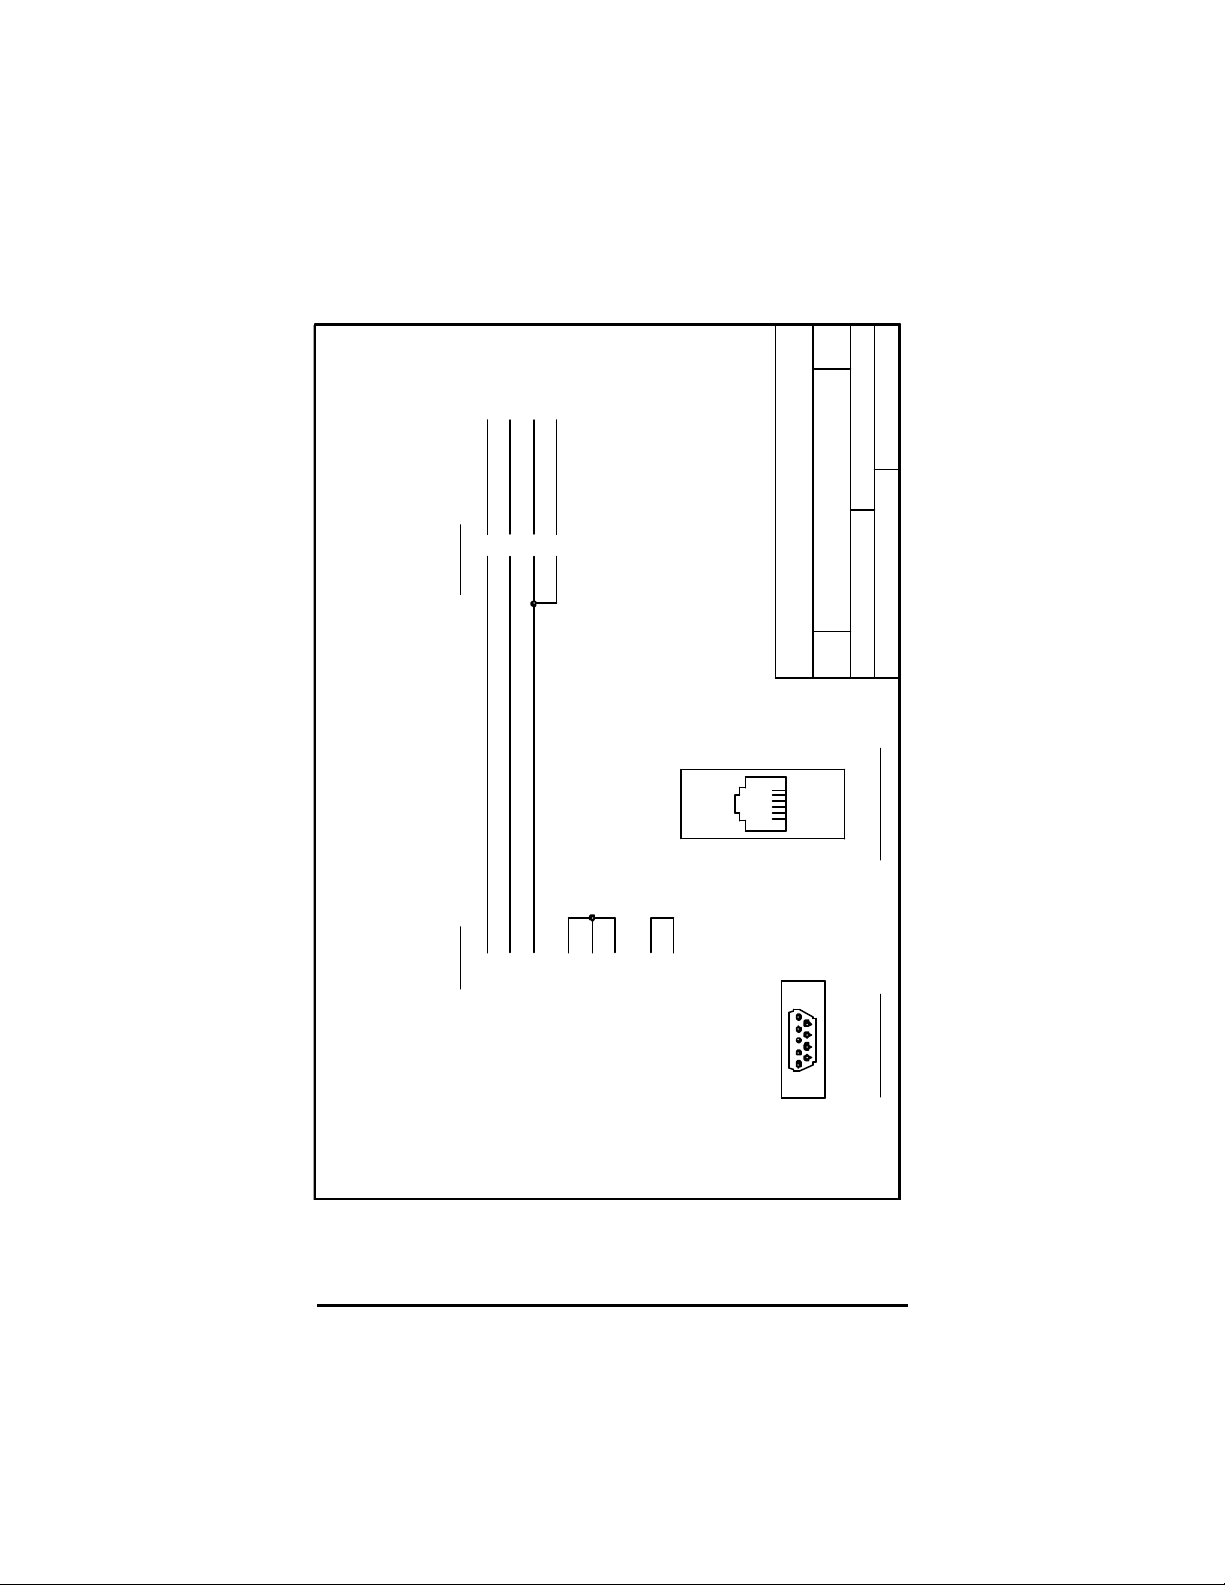
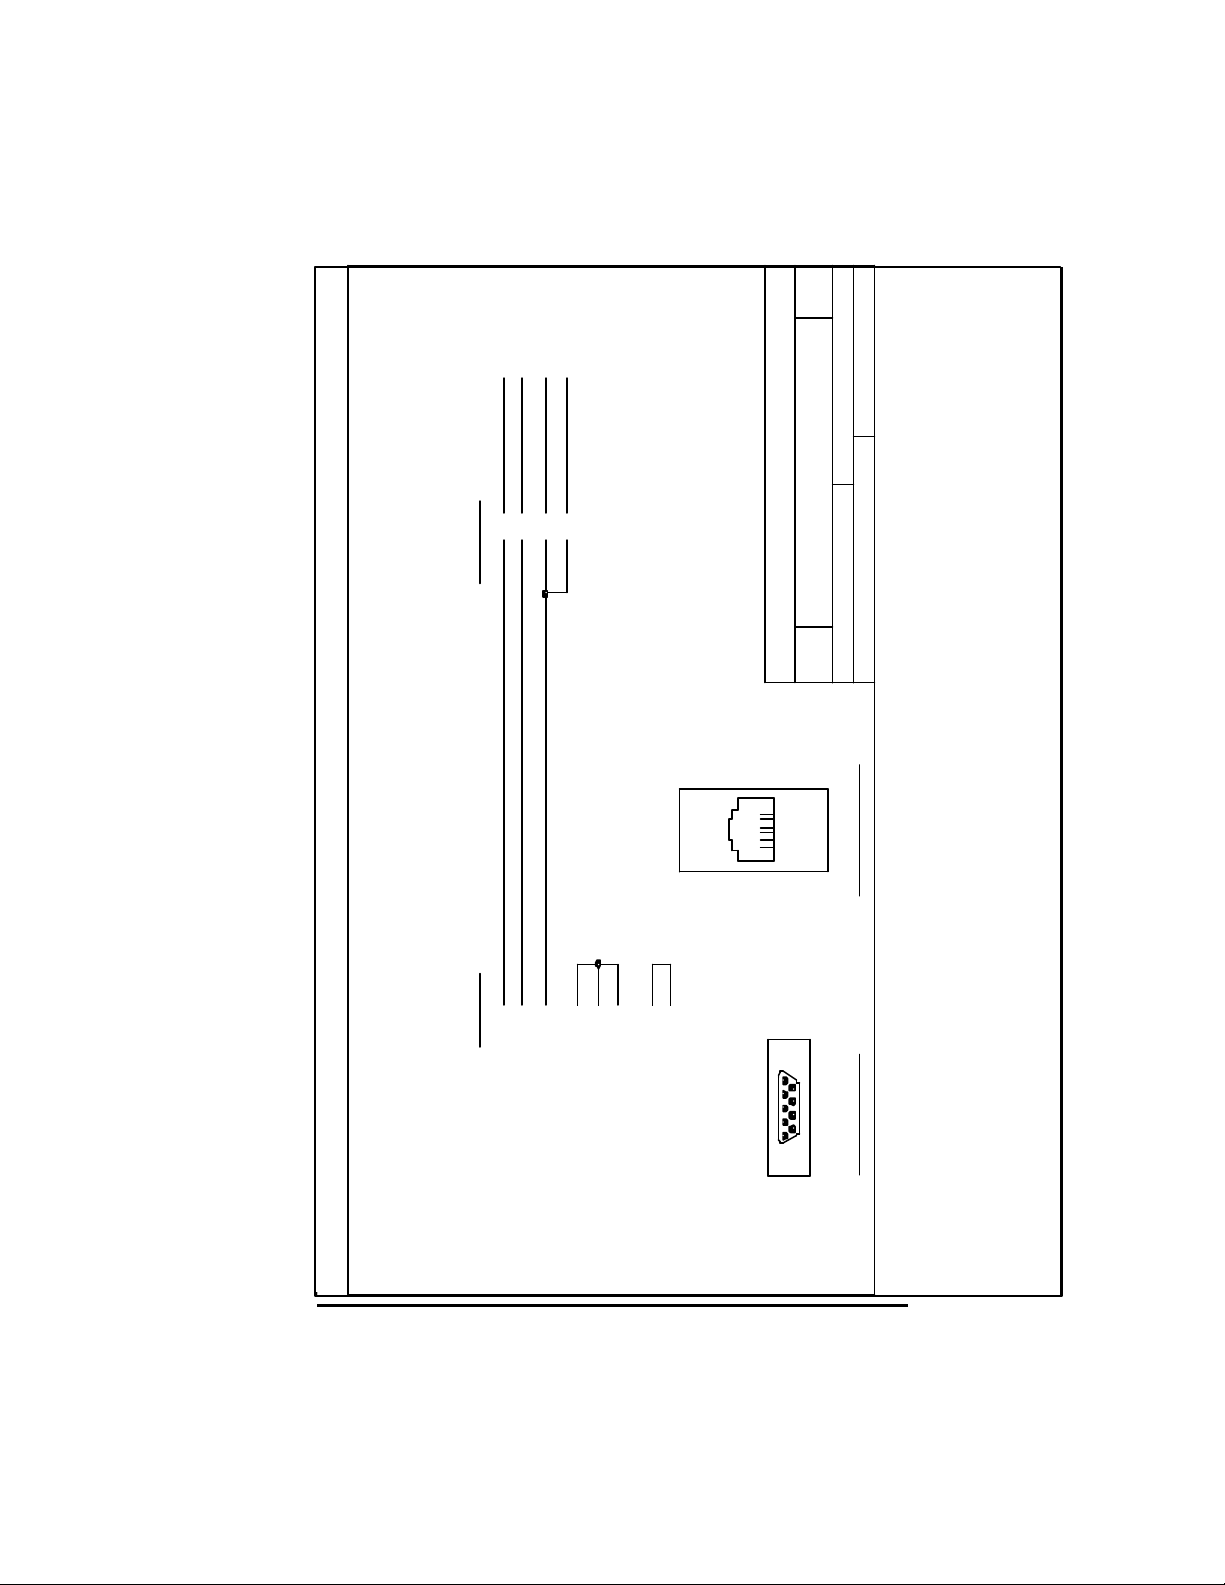
The RS232 Interface connections use RJ11 type
connectors located on the rear panel. The unit is
supplied with a cable adapter for connecting the
system to standard DB9 Serial Port. The two
RJ11 connectors on the rear panel of the system
are labeled HOST and LOOP. The cable adapter
is configured for connection to a standard DTE
Serial Interface common to most personal
computers. Refer to the Appendix section for
detailed information on the serial interface
VS8x8 Crosspoint Video Switch 3
Page 4

connections. For systems employing a single
VS8x8 unit, the serial cable is connected to the
rear panel RJ11 connector labeled HOST. For
systems using multiple VS8x8’s, the systems are
“daisy-chained” by connecting the LOOP (RS232
Out) connector of each un it to the HOST (RS232
In) connector of the next successive unit.
Operating Modes
Burst Electronics’ default setting is Mode 1.
Confirmation of the mode setting is accomplished
by noting the number of flashes of the SET LED.
Mode 1; the SET LED flashes once, then the LED
stays on. Mode 2; the SET LED flashes twice,
then the LED stays on. Mode 3; the SET LED
flashes three times, the n the LED turns off. Mode
4; the SET LED flashes four times, then the LED
turns off. The unit can be easily programmed
using the front panel switches by adjusting the
following parameters:
1. Operating Mode
2. Serial Port Baud Rate
3. Unit Identification Code
Setting Operating Mode
Upon power up, the VS8x8 will flash the SET
LED to indicate the currently programmed
operating mode. The SET LED will flash either
one, two, three, or four times to indicate the
programmed operating mode. If the VS8x8 is not
programmed, or an improper mode is selected,
the SET LED will flash at a 5Hz rate continuously.
VS8x8 Crosspoint Video Switch 4
Page 5

There are four operating modes:
Manual Mode (Mode 1)
Manual Triggered Mode (Mode 2)
Remote Control, single unit (Mode 3)
Remote Control, multiple units (Mode 4)
The operation mode is selected by setting
Channel 1 thumbwheel switch. The unit supports
two Manual Modes and two Remote Modes. In
Manual Mode, the unit switches the video signals
under control of the front panel thumbwheel
switches. In Remote Mode, all video switching is
controlled by commands sent to the unit using the
RS232 interface.
The mode settings are as follows:
Mode 1: Manual Mode
In this mode, the front panel thumbwheel
switches are continuously scanned for any
changes. When a switch change in detected, the
unit automatically switches the video during the
next vertical interval.
Mode 2: Triggered Manual Mode
This mode is similar to Mode 1, in that the unit
continuously checks the front panel switches for
any change. When a change is detected, the unit
VS8x8 Crosspoint Video Switch 5
Page 6

then waits for the operator to press the LOAD
pushbutton before switching the video. The
switch is done on the next vertical interval.
Mode 3: Single Unit Remote Mode
In this mode, all video switching is accomplished
by sending commands via RS232 Serial
Interface, the front panel thumbwheel switches
are disabled in this mode. See the section on
Command Description for a detailed description
of the remote commands.
Mode 4: Multiple Unit Remote Mode
This mode is the same as Mode 3, but also
supports multiple units (up to 99 units) on the
same RS232 interface. Each unit must have a
specific Unit Identification Code, and requires a
Wake command to be sent from the host
computer. See the section on Command
Description for a detailed description of the
remote commands.
Baud Rate
The Channel 2 thumbwheel switch is used to
program the baud rate for the RS232 interface.
The serial interface parameters are 8 data bits, 1
stop bit and no parity bit (8N1). The VS8x8
supports the following baud rates:
Switch Setting Baud Rate
1 9600
2 4800
3 2400
VS8x8 Crosspoint Video Switch 6
Page 7

4 1200
5 600
6 300
7 110
Unit Identification Code
The next two front panel thumbwheel switches,
Channels 3 and 4, are used to program the Unit
Identification Code. In multiple unit remote
configurations (Mode 4), this value can be any
number from 00 - 99, but care must be taken to
insure that all units have a different code. In a
single unit system (Mode 3), Channels 3 and 4
have no effect.
Example of Switch Setting
With the thumbwheel switches set to 4101000 the
VS8x8 is configured for Mode 4 operation at 9600
Baud with an ID of 01.
Storing Mode Settings
Storing the configuration information into internal
EEPROM is accomplished by first setting the
front panel thumbwheel switches, (Channel 1-4)
to the desired settings. The unit is then powered
up while depressing the front panel LOAD
pushbutton. Upon power up, the internal
microprocessor detects the depression of the
LOAD switch and then programs the internal
EEPROM memory with the selected values. The
unit will flash the front panel SET LED for a few
seconds to indicate that it is programming the
system EEPROM, and will then enter that
VS8x8 Crosspoint Video Switch 7
Page 8

operating mode. The unit will now enter the
appropriate operating mode whenever it is
powered up. The unit can be reprogrammed any
time and the internal EEPROM is rated for an
excess of 10,000 write operations.
Operation
The following paragraphs detail th e operating
procedures for each of the four operating modes
that can be programmed into the VS8x8 Video
Crosspoint Switch.
Manual Mode (Mode 1)
When operating in this mode, the operator sets
the front panel thumbwheel switches
corresponding to the specific output channel.
Setting the thumbwheel switch to the values of 1
through 8 will connect that video input to the
specified output. Setting the thumbwheel switch
to a value of 0 or 9 will turn off the output. When
the unit detects a change on the front pan el
thumbwheel switches, it will wait for the vertical
sync interval of the current setting before turning
off the output, and will then wait for the sync
interval of the new input channel before activating
the new selection. In this mode, the front panel
SET LED is always on, indicating that the video
outputs are always set to correspond with the
thumbwheel settings.
Triggered Manual Mode (Mode 2)
This mode is similar to the Scanned Manual
Mode with one exception. When a change is
VS8x8 Crosspoint Video Switch 8
Page 9

detected on the thumbwheel switches, the
system will turn off the SET LED to indicate a
disparity between the thumbwheel switches, and
the actual video signal routing. The unit then
waits for the operator to initiate the new selection
by pressing the front panel LOAD button. This
mode prevents erratic video outputs caused by
scrolling the thumbwheel switches through the
selections. Once the LOAD button is pressed, the
unit then sets the new selection (waiting for the
vertical sync intervals) and then reactivates the
SET LED to indicate that the new selection has
been activated.
Single Unit Remote Mode (Mode 3)
In this mode, the unit is controlled exclusively by
the serial RS232 interface. Routing of the video
signals is accomplished by using a host computer
to transmit simple command to set the video
outputs. The channel thumbwheel switches are
disabled and have no effect on video switching.
To configure the VS8x8 for Mode 3, set the
thumbwheel switches to: 31xxxxxx (x = any
number available). This selects Mode 3 at 9600
baud.
Step by Step Procedure:
1. Set Channel 1 switch to 3.
2. Set Channel 2 switch to the desired baud rate.
3. Depress and hold the LOAD button while
turning power on. The SET LED will blink 3
times then stays off.
VS8x8 Crosspoint Video Switch 9
Page 10

The VS8x8 is now set for single unit remote at
9600 baud. See Command Description on how to
communicate to the VS8x8.
Multiple Unit Remote Mode (Mode 4)
In this mode, two or more units are controlled
exclusively by the serial RS232 interface. Routing
of the video signals is accomplished by using a
host computer to transmit simple commands to
set the video outputs. The channel thumbwheel
switches are disabled and have no effect on
video switching.
To configure the VS8x8 for Mode 4, set the
thumbwheel swit ches to : 4101xxxx (x = any
number available). This selects mode 4 at 9600
baud and unit ID of 01.
Step by step procedure
1. Set Channel 1 switch to 4.
2. Set Channel 2 switch to the desired baud rate.
3. Set Channels 3 and 4 to the desired unit ID
number (01 to 99).
4. Depress and hold the LOAD button while
turning power on. The SET LED will blink 4
times then stay off.
The VS8x8 is now set for multiple unit remote
control at your desired baud rate and ID number.
See Command Description on how to
communicate to the VS8x8.
VS8x8 Crosspoint Video Switch 10
Page 11

Command Description
Each command (unless otherwise stated) must
be terminated by a carriage return (0Dh) (<CR>).
All characters that are transmitted to the unit are
echoed back to the hosting computer (except for
the initial Wake command in mode 4).
Sio (Set Input to Output)
This command routes an input channel specified
by “i” to an output channel specified by “o”. The
“i” and “o” characters are single digit values from
0 to 9 (0 and 9 being channel off). There are no
spaces allowed. The command is case
insensitive, but must be followed by a carriage
return. The unit switches immediately after
receiving the carriage return, using the same
vertical sync detection scheme as previously
described. Example: S35<CR> connects input
channel 3 to output channel 5.
R (Read)
This command causes the VS8x8 to transmit the
current settings of all 8 video outputs to the host
computer. No carriage return required.
L (Lock)
When received, this command locks the current
video settings to prevent inadvertent changes of
the video settings. Once locked, the unit will then
ignore any subsequent SET commands and will
display an appropriate error message. The video
setting can still be viewed using the “R”
command. The unit will stay in the locked mode
VS8x8 Crosspoint Video Switch 11
Page 12

until an ESC (1Bh) code is received.
M (Manual)
This command is used to place the unit in the
Triggered Manual Mode (Mode 2) fr om the
Remote Mode. Once initiated, the unit will remain
in the Triggered Manual Mode. To return to the
remote mode, transmit an ESC (1Bh) to the unit.
SA (Set All Channels)
All eight channels are set with this command.
Example: SA43215678<CR> will cause output
Channel 1 to connect to input Channel 4, output
Channel 3 to input Channel 2, etc.
If a “X” is placed in a output chann el location, that
channel will not change from its previous setting.
Example: SA43XX5678<CR>, output Channels 3
and 4 will stay at their previous setting and the
other six channels will switch.
ESC (Escape)
The ESC (Escape) command is used during
Mode 3 and Mode 4. If the Lock command or the
Manual Mode command has been sent, the ESC
key on your computer’s keyboard will recover th e
VS8x8 back to the standard functions of the
Remote Modes.
WK (Wake) and SP (Sleep)
The Wake (WK) and Sleep (SP) commands allow
for selection of which VS8x8 is responding to the
VS8x8 Crosspoint Video Switch 12
Page 13

RS232 data in a multi unit (Mode 4) environment.
Example:
SP (sp) Puts all units to sleep
WK,01 (wk,01) Wakes up unit ID 1
SA12345678 Set All command for unit ID 1
SP (sp) Puts all units to sleep
WK,02 (wk,02) Wakes up unit ID 2
SA87654321 Set All command for unit ID 2
SP (sp) Puts all units to sleep
When VS8x8’s are in Mode 4, they always power
up in the Sleep state. Before any unit will respond
to RS232 commands, a Wake command must be
sent. Setting two or more VS8x8’s to the same ID
will control each unit together, but the data
returning to the computer will be jumbled.
VS8x8 Crosspoint Video Switch 13
Page 14

Specifications:
Video Inputs
Standard NTSC/PAL (Color or Monochrome)
Level: 1V p-p nominal
Impedance: 75 Ohm, terminated
10k Ohm, unterminated
Video Outputs
Level: 1V p-p nominal
Impedance: 75 Ohm
Serial Interface:
Standard RS232 (3-wire)
Baud: 110,300,600,1200,2400,4800,9600
Data Format: 1 start bit, 8 data bits, no parity
Performance
Crosstalk: 60dB at 5Mhz
Gain: Unity
Differential Gain: <0.5%
Differential Phase: <1°
Bandwidth: 16MHz (-1dB)
Electrical
Power supply: 9-12 Vdc @ 275mA
Dimensions
H: 1.75”
W: 16.5”
D: 6.0”
Rack Mount (optional)
RM-Ear
VS8x8 Crosspoint Video Switch 14
Page 15
D
GND
GND
DATA IN
DATA OUT
3
5
4
2
RJ11
Device
Controlled
RJ11
Cable
1 1db9_d.scm
RJ11W
532
Yel
4
Blk
Grn
Red
BURST ELECTRONICS
Corrales, New Mexico 87048
SERIAL INTERFACE ADAPTOR
3-5-98 WJK
A
Filename Sheet of
Date Drawn by
Size Rev
Title
1 6
( DB9 TYPE )
SERIAL INTERFACE ADAPTER
325
7
8
1
6
4
DB9S
69
GROUND
RECEIVE DATA
TRANSMIT DATA
CLEAR TO SEND
DATA SET READY
CARRIER DETECT
REQUEST TO SEND
DATA TERMINAL READY
5 1
DB9 VIEW RJ11 VIEW
Socket (Female) Type
VS8x8 Crosspoint Video Switch 15
Page 16
E
GND
GND
DATA IN
DATA OUT
3
5
4
2
RJ11
Device
Controlled
RJ11
Cable
1 1db9_e.scm
RJ11W
532
Yel
4
Blk
Grn
Red
BURST ELECTRONICS
Corrales, New Mexico 87048
SERIAL INTERFACE ADAPTER
1.21.03 WJK
A
Filename Sheet of
Date Drawn by
Size Rev
Title
1 6
( DB9 TYPE )
SERIAL INTERFACE ADAPTER
325
781
6
4
DB9S
69
GROUND
RECEIVE DATA
TRANSMIT DATA
CLEAR TO SEND
DATA SET READY
CARRIER DETECT
REQUEST TO SEND
DATA TERMINAL READY
5 1
DB9 VIEW RJ11 VIEW
Socket (Female) Type
Do not print these notes.
Notes: Plot 0.95
Small arc placed at top left to control printer
VS8x8 Crosspoint Video Switch 16
Page 17

Notes
VS8x8 Crosspoint Video Switch 17
Page 18

VS8x8 Crosspoint Video Switch 18 VS8x8 Crosspoint Video Switch 19
Page 19

Page 20

VS8x8 Crosspoint Video Switch 20
 Loading...