


Eliminator III™ LaserScope User’s Guide
The Eliminator III LaserScope is the most innovative and effective hunting riflescope in the world.Combining outstanding optics, pinpoint laser range finding, and precision trajectory compensation for the exact ammunition you choose for your hunt, it eliminates most of the variables and guesswork that often cause hunters to go home empty-handed. In one fast sequence the Eliminator III determines the distance to your target, factors in your trajectory and illuminates the perfect holdover. It’s that simple.
The Eliminator III significantly extends the range and accuracy of long range capable gun and ammo combinations, making it the perfect optic for your favorite long range rifle. No other riflescope combines this level of quality, technology, accuracy, repeatability, speed, and effectiveness. It will greatly increase the distance at which you can make an ethical shot. Congratulations and thank you for choosing the Eliminator III LaserScope by Burris.
Mounting & Sighting-In
Mounting The Eliminator III™ LaserScope
1. Select a Weaver-style or Picatinny-style mounting base. If a two-piece base is selected for a long action bolt rifle, the front base should be a reversible base
which will need to be mounted with the extension pointed to the rear. W recommend the use of Burris Xtreme T Bases as they were designed to acc Eliminator III LaserScope.
2. Read the manufacturer’s directions regarding the installation of mounts before beginning.
3. Clean the mounting area of the rifle with a chemical that removes grease and oil. Pay special attention to screw holes. Use the same chemical to clean the mounts. Do not allow the cleaning chemical to come in contact with the stock or scope lenses.
4. After installing the base, position the scope so it offers the proper eye relief. To do this, shoulder the rifle as you would in the field. Position the scope as far forward as possible while achieving a full field of view.
5. Note the two slots in the base or basses you will use to attach the scope. With the mount clamps open fully, place the Mount Bolts into those slots on the base. Now match up the Eliminator III scope slots and place over the two
mount bolts - rocking the scope side to side until the scope is flush with the base. The mount clamps should grip the lip of the base and the lip of the rail on the underside of the scope, as shown at right. Finger-tighten only.
6.With hex nuts slightly loosened, push the scope forward and then firmly tighten both hex nuts to 50 to 70 inch/pounds.
Eyepiece Focusing
1. Aim the Eliminator III LaserScope in a safe direction toward the sky or a light colored wall. Glance through the scope and notice if the reticle or crosshair is sharply focused. Most users will find that no adjustment is necessary. If the reticle is not in sharp focus, rotate the eyepiece focus ring until the reticle appears in sharp focus. Double check your focus by taking quick glances through the scope and make any fine tuning adjustments as necessary.
Sighting In
Do all shooting in a safe, authorized area. Use proper eye and hearing protection and follow all safe shooting rules. Select the ammunition you intend to use in the field and use it to sight in the firearm as well.
1.Bore sight your scope, OR place a target about two feet square at 25 yards. Fire a shot at the bull’s-eye. Make the necessary adjustments to the Windage and Elevation knobs. Remember, with a click adjustment value of 1/8 inch at 100 yards it will require four clicks to move the same 1/8 inch distance at 25 yards (32 clicks will move bullet strike 1 inch at 25 yards). Note the click value indicated on a label under one of the adjustment caps.
2.Make adjustments on the scope by turning the adjusting screws the necessary number of clicks. NOTE: The reticle is centered at the factory. This permits adjusting the reticle equally in all directions from the center position. Three shot groups are suggested to determine the actual point of impact.
3.After the first group is fired, adjust the scope again. This adjustment should bring the approximate center of the group to coincide with the bullseye. Shoot additional groups as necessary.
4.Place the target at 100 yards or (meters if you will be using meters.) Make the necessary adjustments so your group coincides with the bull’s-eye. It is important that you sight in exactly dead center at 100 yards for accurate calibration. DO NOT sight in one, two, or three inches high at 100 yards.
5.Align the dial to read “0” without allowing the knob top to turn.
6.After making the adjustments, replace the adjustment caps. They protect your scope from dust and moisture..
1

ELIMINATOR III™ LASERSCOPE
On/Range Switch (One on each side)
1. Battery Installation or Replacement
Unload the gun. Unscrew the battery cap on the left side of the scope. Install a lithium CR123 battery. Reinstall the battery cover. NOTE: A sticker on the underside of the battery cover contains basic set-up instructions.
2. LaserScope Battery Life:
Battery life is nominally rated at 5000 cycles. This will vary depending on the quality of the battery and the temperatures at which the unit is operated. Batteries lose a good deal of their power potential in colder temperatures.
3. Start the electronics
Press one of the main switch buttons (On/Range buttons) on the lower front of the scope. There is one on either side, just behind the Objective Bell. Either button will work. Look through the scope. It should show two things: the Yards (Y) or Meters (M) indication illuminated along with the battery status indicator. The indicators will stay on for 8 seconds.
4. Electronic Basics
Having started the electronics, aim at a target. Press either On/Range button again and you will get one of the following 3 displays sets:
1.The scope will display the range to your target, and a 10 MPH windage offset at the top. The scope will also illuminate a hold over dot on the lower crosshair post. The dot display will be corrected for the actual magnification setting. After 10 seconds the unit, range, and battery status will go off, but the Hold Over Dot and Windage will continue to be displayed for an additional 80 seconds, or until you press an On/Range button again.
2.A range is successfully taken, but the distance is beyond the limits of the selected Cartridge. The scope displays the “Too Far” code along with the correct range. The “Too Far” code is; the Center (“Zero”) Dot on steady, and bottom most 4 Dots will be flashing. Everything except the Dots will go out after ten seconds. The Dots will remain for the entire 90 sec.
Setup and Brightness
Control Switches
Battery Cover
|
|
|
|
|
|
X96 Reticle |
||||||||||||||||||||||||||
Distance |
|
|
|
|
|
|
|
|
|
|
|
|
|
|
|
|
|
|
|
|
|
Windage |
||||||||||
|
|
|
|
|
|
|
|
|
|
|
|
|
|
|
|
|
|
|
|
|
Offset |
|||||||||||
|
|
|
|
|
|
|
|
|
|
|
|
|
|
|
|
|
|
|
|
|
|
|
|
|
|
|
|
|
|
|
|
|
|
|
|
|
|
|
|
|
|
|
|
|
|
|
|
|
|
|
|
|
|
|
|
|
|
|
|
|
|
|
|
|
|
|
|
|
|
|
|
|
|
|
|
|
|
|
|
|
|
|
|
|
|
|
|
|
|
|
|
|
|
|
|
|
|
|
|
|
|
|
|
|
|
|
|
|
|
|
|
|
|
|
|
|
|
|
|
|
|
|
|
|
|
|
|
|
|
|
|
|
|
|
|
|
|
|
|
|
|
|
|
|
|
|
|
|
|
|
|
|
|
|
|
|
|
|
|
|
|
|
|
|
|
|
|
|
|
|
|
|
|
|
|
|
|
|
|
|
|
|
|
|
|
|
|
|
|
|
|
|
|
|
|
|
|
|
|
|
|
|
|
|
|
|
|
|
|
|
|
|
|
|
|
|
|
|
|
|
|
|
|
|
|
|
|
|
|
|
|
|
|
|
|
|
|
|
|
|
|
|
|
|
|
|
|
|
|
|
|
|
|
|
|
|
|
|
|
|
|
|
|
|
|
|
|
|
|
|
|
|
|
|
|
|
|
|
|
|
|
|
|
|
|
|
|
|
|
|
|
|
|
|
|
|
|
|
|
|
|
|
|
|
|
|
|
|
|
|
|
|
|
|
|
|
|
|
|
|
|
|
|
|
|
|
|
|
|
|
|
|
|
|
|
|
|
|
|
|
|
|
|
|
|
|
|
|
|
|
|
|
|
|
|
|
|
|
|
|
|
|
|
|
|
|
|
|
|
|
|
|
|
|
|
|
|
|
|
|
|
|
|
|
|
|
|
|
|
|
|
|
|
|
|
|
|
|
|
|
|
|
|
|
|
|
|
|
|
|
|
|
|
|
|
|
|
|
|
|
|
|
|
|
|
|
|
|
|
|
|
|
|
|
|
|
|
|
|
|
|
|
|
|
|
|
|
|
|
|
|
|
|
|
|
|
|
|
|
|
|
Hold Over Dot
2
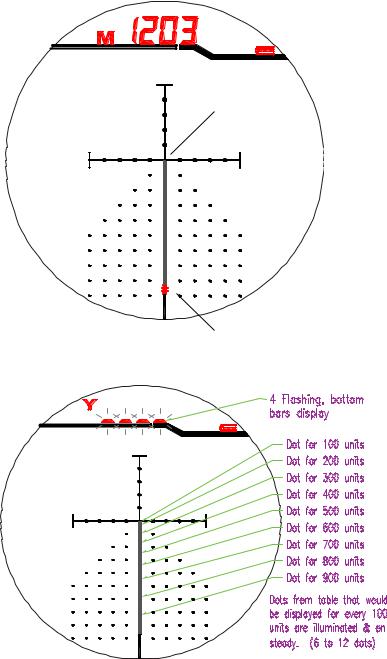
3.A range is not successfully taken (RANGE FAULT). This may happen because the target is beyond the range capability of the scope on either the high side or the low side, or the range cannot be correctly determined for other reasons. To indicate this result the scope will flash the bottom segments of the four range digits (_ _ _ _) and display the “Range Fault, Dot Pattern” for the selected table. The “Range Fault, Dot Pattern” is a display of the Dots that would be illuminated for measurements of 100 unit intervals out to 1200 units (100, 200, 300, 400, 500, 600, 700, 800, 900, 1000, 1100, and 1200 yards or meters) using the currently selected Table. Many Tables are not capable of reaching 1200 units. If this is the case, the Dot list will end at the highest 100 unit available. This display also will be corrected for the actual magnification setting. Again, everything except the Dots will go out after ten seconds. All the Dots will remain for the entire 90 sec.
The range displayed is the Line Of Sight (LOS) distance to the target. The Eliminator III LaserScope has a built-in angle sensor and it internally converts the LOS to horizontal distance for drop compensation (Rifleman’s rule). The horizontal distance is mostly what affects a bullet’s trajectory, so no matter what the uphill or downhill angle, the Eliminator III automatically calculates the correct aiming point.
In the Eliminator III, both the hold over and windage are corrected for your actual magnification setting. The best aiming accuracy and resolution is at maximum magnification (as on any variable power scope). If however, you are moving around and want to use a lower magnification for finding targets quickly in the larger Field Of View (FOV), the scope will still function: giving the correct hold over and windage hold for your specific magnification setting, range, and cartridge’s ballistics.
5. Set Up the Eliminator For Your Specific Cartridge
There are well over 4000 ballistic curves or Tables available for use in the scope. You will need to select the correct one. This is not as difficult as it sounds. We designate a ballistic curve by specifying the drop in inches at 750 yards when zeroed at 100 yards and the Ballistic Coefficient (BC) for your chosen bullet. A bullet’s BC is a number used in ballistic equations to specify how fast the bullet slows down. Essentially it tells how slippery it is. Long pointy front ends and boat tails give a bullet a higher BC. The Sectional Density of the bullet (grains per unit area of the bore) also affects its BC. Heavier bullets of a given diameter tend toward better, higher, BCs. This scope accommodates BCs down to .15 and up to .9 BC. There is more information on the affect of BC at the end of these instructions in the section called For Those New To Shooting Beyond 750 Yards and on our website.
Center Dot
4 Flashing Dots
3
 Loading...