

Page 1
Eliminator III™LaserScope User’s Guide
The Eliminator III LaserScope is the most innovative and effective hunting
riflescope in the world. Combining outstanding optics, pinpoint laser range
finding, and precision trajectory compensation for the exact ammunition
you choose for your hunt, it eliminates most of the variables and guesswork
that often cause hunters to go home empty-handed. In one fast sequence
the Eliminator III determines the distance to your target, factors in your
trajectory and illuminates the perfect holdover. It’s that simple.
Mounting & Sighting-In
Mounting The Eliminator III™LaserScope
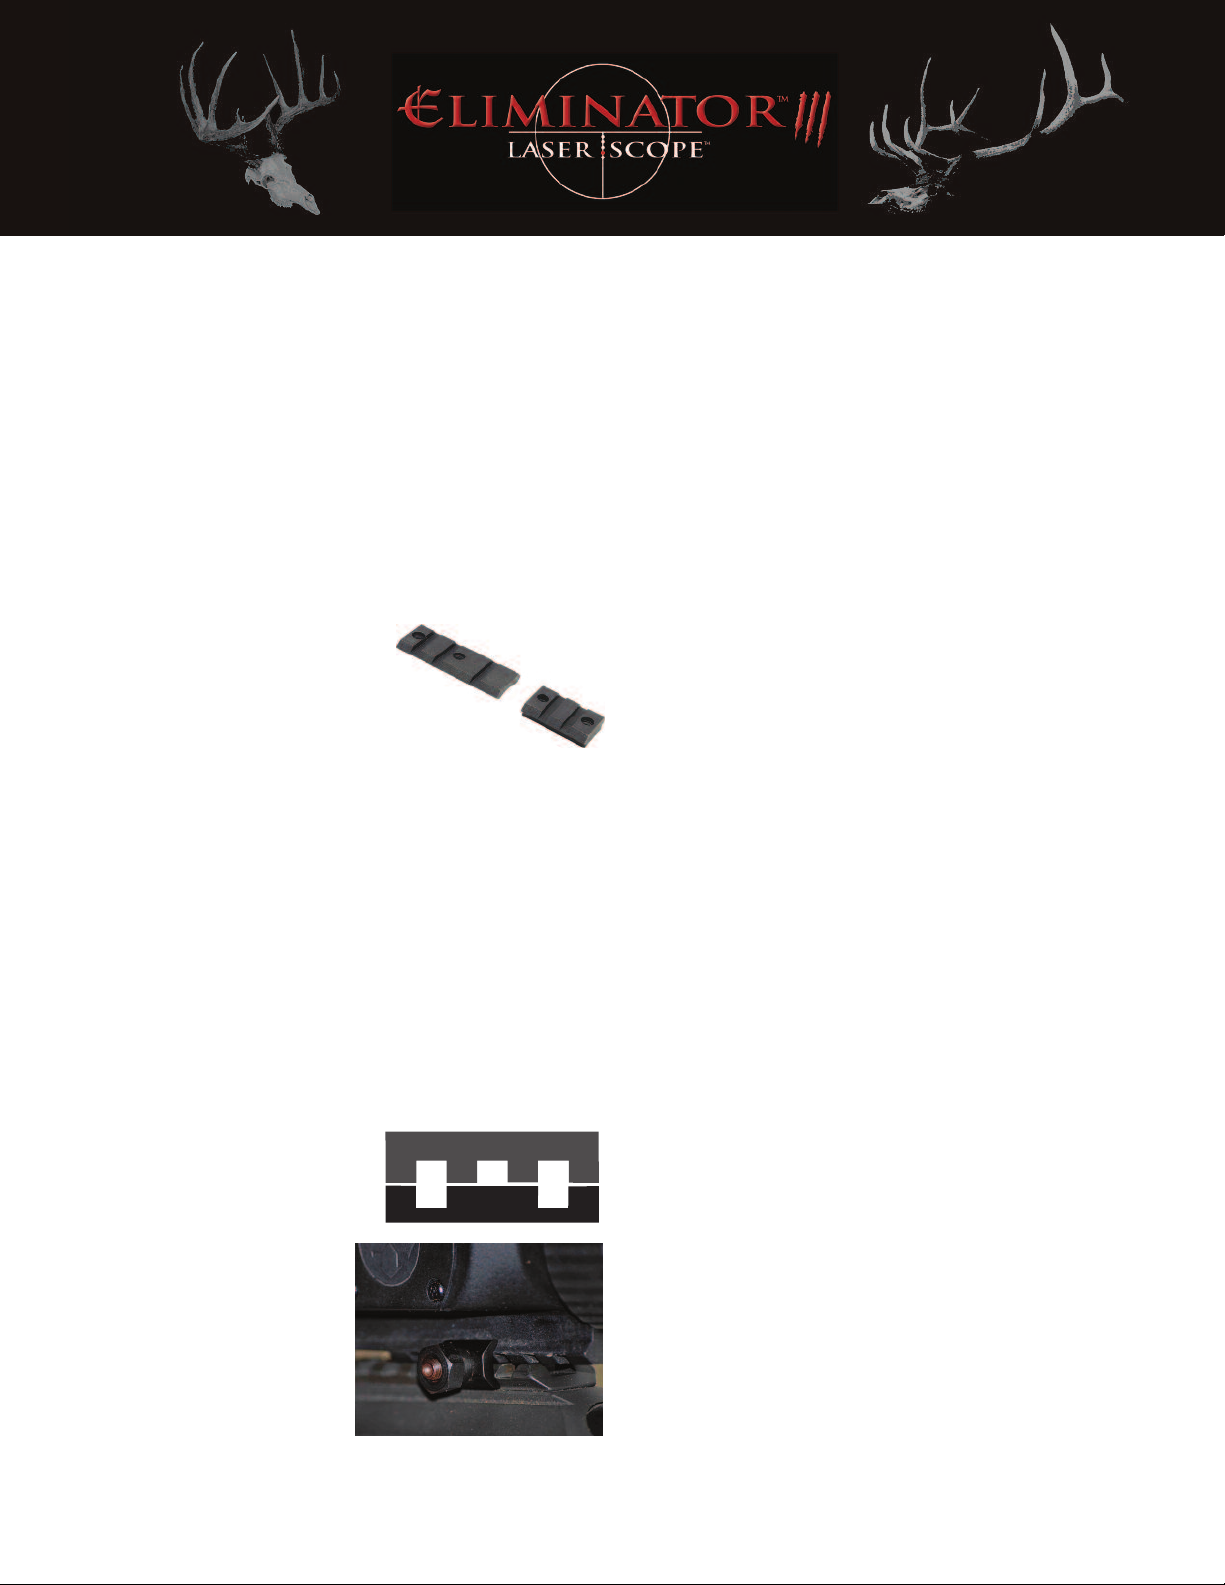
1. Select a Weaver-style or Picatinny-style mounting base. If a
two-piece base is selected for a long action bolt rifle, the front
base should be a reversible base
which will need to be mounted with
the extension pointed to the rear. We
recommend the use of Burris Xtreme Tactical
Bases as they were designed to accommodate the
Eliminator III LaserScope.
2. Read the manufacturer’s directions regarding the installation of
mounts before beginning.
3. Clean the mounting area of the rifle with a chemical that removes
grease and oil. Pay special attention to screw holes. Use the same
chemical to clean the mounts. Do not allow the cleaning
chemical to come in contact with the stock or scope lenses.
4. After installing the base, position the scope so it offers the proper
eye relief. To do this, shoulder the rifle as you would in the field.
Position the scope as far forward as possible while achieving a full
field of view.
5. Note the two slots in the base or basses you will use to attach the
scope. With the mount clamps open fully, place the Mount Bolts
into those slots on the base. Now match up the Eliminator III
scope slots and place over the two
mount bolts - rocking the scope side
to side until the scope is flush with
the base. The mount clamps should
grip the lip of the base and the lip of
the rail on the underside of the
scope, as shown at right.
Finger-tighten only.
6. With hex nuts slightly loosened,
push the scope forward and
then firmly tighten both hex
nuts to 50 to 70 inch/pounds.
LaserScopeTMRail (rear)
Rear Mount
Base
The Eliminator III significantly extends the range and accuracy of long
range capable gun and ammo combinations, making it the perfect optic
for your favorite long range rifle. No other riflescope combines this level
of quality, technology, accuracy, repeatability, speed, and effectiveness. It
will greatly increase the distance at which you can make an ethical shot.
Congratulations and thank you for choosing the Eliminator III
LaserScope by Burris.
Eyepiece Focusing
1. Aim the Eliminator III LaserScope in a safe direction toward the
sky or a light colored wall. Glance through the scope and notice if
the reticle or crosshair is sharply focused. Most users will find that
no adjustment is necessary. If the reticle is not in sharp focus,
rotate the eyepiece focus ring until the reticle appears in sharp
focus. Double check your focus by taking quick glances through
the scope and make any fine tuning adjustments as necessary.
Sighting In
Do all shooting in a safe, authorized area. Use proper eye and hearing
protection and follow all safe shooting rules. Select the ammunition
you intend to use in the field and use it to sight in the firearm as well.
1. Bore sight your scope, OR place a target about two feet square
at 25 yards. Fire a shot at the bull’s-eye. Make the necessary
adjustments to the Windage and Elevation knobs. Remember,
with a click adjustment value of 1/8 inch at 100 yards it will require
four clicks to move the same 1/8 inch distance at 25 yards (32
clicks will move bullet strike 1 inch at 25 yards). Note the click
value indicated on a label under one of the adjustment caps.
2. Make adjustments on the scope by turning the adjusting screws
the necessary number of clicks. NOTE: The reticle is centered at
the factory. This permits adjusting the reticle equally in all
directions from the center position. Three shot groups are
suggested to determine the actual point of impact.
3. After the first group is fired, adjust the scope again. This adjustment should bring the approximate center of the group to
coincide with the bullseye. Shoot additional groups as necessary.
4. Place the target at 100 yards or (meters if you will be using
meters.) Make the necessary adjustments so your group
coincides with the bull’s-eye. It is important that you sight in
exactly dead center at 100 yards for accurate calibration. DO
NOT sight in one, two, or three inches high at 100 yards.
5. Align the dial to read “0” without allowing the knob top to turn.
6. After making the adjustments, replace the adjustment caps. They
protect your scope from dust and moisture..
1
Page 2
IMINATOR
EL
1. Battery Installation or Replacement
Unload the gun. Unscrew the battery cap on the left side of the
scope. Install a lithium CR123 battery. Reinstall the battery cover.
NOTE: A sticker on the underside of the battery cover contains
basic set-up instructions.
2. LaserScope Battery Life:
Battery life is nominally rated at 5000 cycles. This will vary
depending on the quality of the battery and the temperatures at
which the unit is operated. Batteries lose a good deal of their
power potential in colder temperatures.
III™LA
SERSCOPE
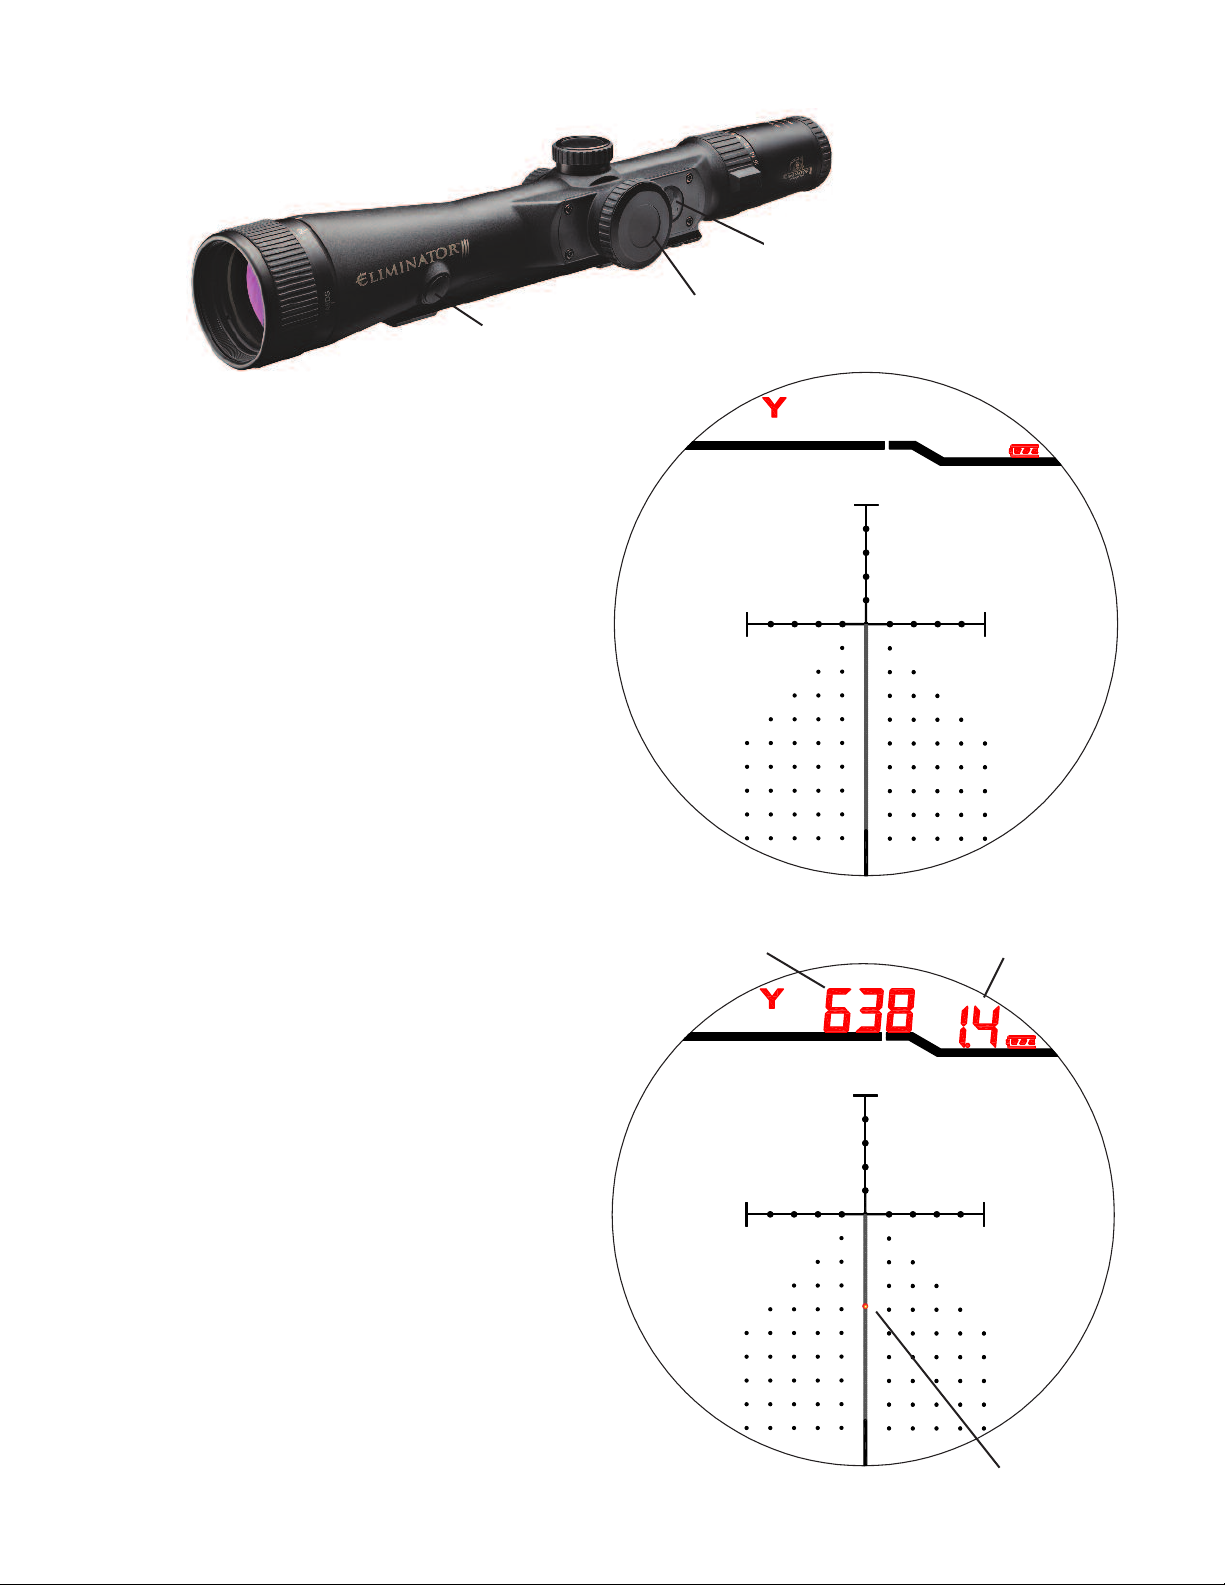
On/Range Switch
(One on each side)
Battery Cover
Setup and Brightness
ontrol Switches
C
3. Start the electronics
Press one of the main switch buttons (On/Range buttons) on the
lower front of the scope. There is one on either side, just behind
the Objective Bell. Either button will work. Look through the
scope. It should show two things: the Yards (Y) or Meters (M)
indication illuminated along with the battery status indicator. The
indicators will stay on for 8 seconds.
4. Electronic Basics
Having started the electronics, aim at a target. Press either
On/Range button again and you will get one of the following 3
displays sets:
1. The scope will display the range to your target, and a 10
MPH windage offset at the top. The scope will also illuminate
a hold over dot on the lower crosshair post. The dot display will
be corrected for the actual magnification setting. After 10
seconds the unit, range, and battery status will go off, but the
Hold Over Dot and Windage will continue to be displayed for an
additional 80 seconds, or until you press an On/Range button
again.
2. A range is successfully taken, but the distance is beyond
the limits of the selected Cartridge. The scope displays the
“Too Far” code along with the correct range. The “Too Far”
code is; the Center (“Zero”) Dot on steady, and bottom most 4
Dots will be flashing. Everything except the Dots will go out
after ten seconds. The Dots will remain for the entire 90 sec.
Distance
X96 Reticle
Windage
Offset
Hold Over Dot
2
Page 3
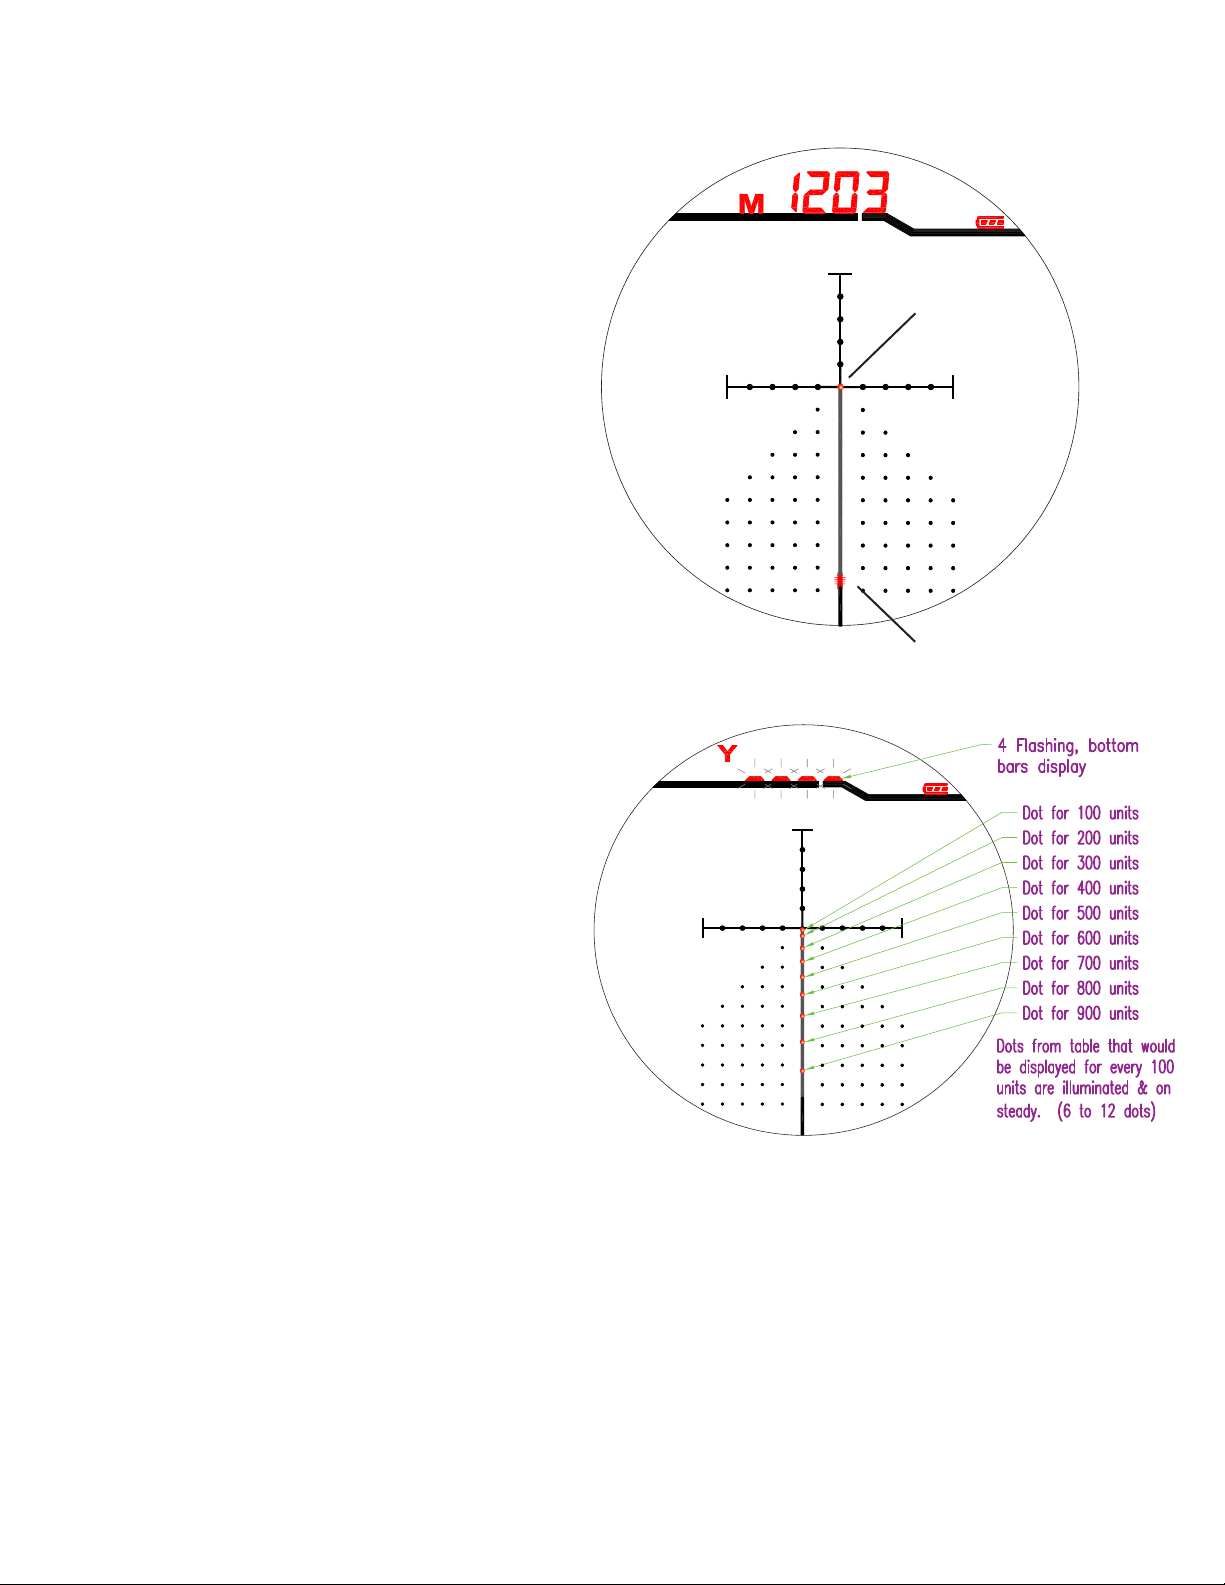
. A range is not successfully taken (RANGE FAULT). This
3
may happen because the target is beyond the range
capability of the scope on either the high side or the low side,
or the range cannot be correctly determined for other
reasons. To indicate this result the scope will flash the
ottom segments of the four range digits (_ _ _ _) and display
b
the “Range Fault, Dot Pattern” for the selected table. The
“Range Fault, Dot Pattern” is a display of the Dots that
would be illuminated for measurements of 100 unit intervals
out to 1200 units (100, 200, 300, 400, 500, 600, 700, 800,
900, 1000, 1100, and 1200 yards or meters) using the
currently selected Table. Many Tables are not capable of
reaching 1200 units. If this is the case, the Dot list will end at
the highest 100 unit available. This display also will be
corrected for the actual magnification setting. Again,
everything except the Dots will go out after ten seconds. All
the Dots will remain for the entire 90 sec.
The range displayed is the Line Of Sight (LOS) distance to the
target. The Eliminator III LaserScope has a built-in angle sensor
and it internally converts the LOS to horizontal distance for drop
compensation (Rifleman’s rule). The horizontal distance is
mostly what affects a bullet’s trajectory, so no matter what the
uphill or downhill angle, the Eliminator III automatically calculates the correct aiming point.
Center Dot
4 Flashing Dots
In the Eliminator III, both the hold over and windage are
corrected for your actual magnification setting. The best aiming
accuracy and resolution is at maximum magnification (as on
any variable power scope). If however, you are moving around
and want to use a lower magnification for finding targets quickly
in the larger Field Of View (FOV), the scope will still function:
giving the correct hold over and windage hold for your specific
magnification setting, range, and cartridge’s ballistics.
5. Set Up the Eliminator For Your Specific Cartridge
There are well over 4000 ballistic curves or Tables available for
use in the scope. You will need to select the correct one. This
is not as difficult as it sounds. We designate a ballistic curve by
specifying the drop in inches at 750 yards when zeroed at 100
yards and the Ballistic Coefficient (BC) for your chosen bullet.
A bullet’s BC is a number used in ballistic equations to specify
how fast the bullet slows down. Essentially it tells how slippery
it is. Long pointy front ends and boat tails give a bullet a higher
BC. The Sectional Density of the bullet (grains per unit area of
the bore) also affects its BC. Heavier bullets of a given diameter
tend toward better, higher, BCs. This scope accommodates BCs
down to .15 and up to .9 BC. There is more information on the
affect of BC at the end of these instructions in the section called
For Those New To Shooting Beyond 750 Yards and on our
website.
3
Page 4

ere is the Selection and Setup process:
H
First decision - What units do you want to work in, Yards or
Meters? Y/M
ext, Info Needed – You need to know the bullet drop, in inches,
N
at 750 yards when zeroed at 100 yards. This figure will be your
Drop Number. You will also need to know your bullet’s Ballistic
Coefficient (BC). We use the commonly available G1 BCs. What
you see published in advertisements and loading manuals is
assumed to be G1 unless stated otherwise. See our website for
more explanation.
There are several ways to determine your correct Drop Number
and BC:
1. For factory loads, the Cartridge List that came with your scope
will show the sea level drop number and BC for most of the
currently available factory ammo.
2. Factory ammo web sites sometimes provide this information.
3. Hand loading manuals always provide bullet BC data.
4. The drop number and or BC may appear on the ammo box.
5. Ballistics Software Programs can provide this info.
6. Measure your actual bullet drop at 750 yards, when sighted
in at 100 yards.
7. Use the Cartridge List to estimate your drop number and BC by
finding similar loads.
8. Check the Burris website: www.burrisoptics.com.
Note: the correct Drop Number is best determined by actually
measuring your drop. All other methods provide approximate
numbers that will get you “on paper” at 750 yards — typically
correct ±3 inches at that distance. Then, just correct the few
inches needed from there. See “Verifying your drop-BC Table
Selection” below. The BC published in the Cartridge List is a sea
level value. The section on Altitude Compensation further
explains how to adjust at elevations other than sea level.
ltitude Compensation:
A
Your bullet’s flight will be affected by air pressure, which is primarily
determined by altitude. Both the drop at 750 and the BC number
need to be corrected for altitude changes of more than 1000 feet.
The Drop and BC numbers in the Cartridge List are sea level values.
here is a compensation number for 750 yard Drop and for BC for
T
every 1000 ft of elevation change (Change/K Ft.). As altitude
increases and air gets thinner, the effective BC gets larger while the
effective Drop Number gets smaller.
Determining Your Altitude-Adjusted Drop Number and BC
Sea Level Change/K Ft
DROP BC D
132 0.41 -2.1 .016
rop (-) BC (+)
This example shows how to adjust a Sea Level Drop Number of
132 and a BC of .41 to an altitude of 4,500 feet:
Drop Number
Altitude (4.5) x Change/K Ft. (-2.1) = -9.45
Altitude Adjusted DROP Number: 132 - 9 = 123
BC Number
Altitude (4.5) x Change/K Ft. (.016) = .072
Altitude Adjusted BC: .41 + .07 = .48
Altitude Adjusted Starting Point = 1 123 and 48
How to set the scope to use the selected Table
Button B2: (Up)
Generally, Increase
Values.
Button B1: (Left)
Generally, Advance
with Save Through
Selection Process or
Modes.
Button B4: (Right)
Generally, Exit with Save.
Button B3: (Down)
Generally, Decreases
Values.
NOTE:
1. No matter what units you chose to work in (yards or meters),
the Ballistic Tables are selected based on drop at 750 Yards
when zeroed at 100 yards.
2. See the altitude compensation section of the manual to
correct your initial setting Drop and BC values.
Your selected unit, Drop Number and BC are combined to give
you a setup Table Number. We put a 1 after the unit letter, then the
Drop Number (using three digits), followed by the BC (without the
decimal). For example:
A Table selection for Yards, with a 92 in drop at 750 Y and a BC
of .47 would combine like this: Y1 092 47
A Table for Meters, with a 132 in drop at 750 Y and a BC of .53
would combine like this: M1 132 53
Now you need to set the scope to use the Table you selected.
There are four arrows on the Set-up button on the left of the
scope. These buttons are basically used only for Scope Set-up.
Enter Set-up Mode
1. Push the On/Range button to turn on the scope. Push the
On/Range Button once more to get the four dashes (_ _ _ _) or
a range display in the range area.
2. Push and hold the B1 (Left Arrow) button first, then also press
one of the On/Range buttons and hold them both down
simultaneously for 6 seconds. Release the buttons when the
display changes. This is called “Set-Up” Mode. The first number
that appears for two seconds is the firmware version. Next, the
display shows the currently selected Y (Yards) or M (Meters)
and previously selected Table. On new scopes the reading will
be “Y 1137 42” which is the factory-shipped table. If another
Table has been previously selected, the designation for that
table is displayed.
4
Page 5

3. With the currently selected table displayed you have 30
3490
Y
47
3
seconds to click the B1 (Left Arrow) button again to enter the
Table Select mode. The “T” (for Table Select) will be on steady;
the unit (Y or M) is flashing when you enter Table Select mode.
Press the B2 (Up Arrow) to select Y (yards) or the B3 (Down
Arrow) to select M (meters).
When the measurement unit you want is flashing, press and
release the B1 (Left Arrow) button to load your units choice, and
advance to Drop Number selection.
the BC number, or the B3 (Down Arrow) to decrease it. When
the BC Number you want is flashing in the display, press and
release the B4 (Right Arrow) button to load your choice of BC
umber. The scope will automatically return to shooting mode
n
with your choice of Tables in operation and stored permanently
(until you select another). The scope will remember your selection
even if it is turned off or the battery gets removed and replaced.
Incidentally, hitting the B4 (Right Arrow) at anytime in the
rocess will return you to shooting mode.
p
6. You are now ready to go shooting. For optimum accuracy,
verify point of impact by shooting groups at long range.
Depending on the exact ammo performance, your gun’s barrel
length, the elevation, and any extreme temperatures, you might
need to increase or decrease your Drop Number, sometimes
significantly, for exacting performance. See Verifying your
Drop-BC Table Selection below.
Verifying your Drop-BC Table Selection:
Published velocities can be significantly faster than what you may
experience with your rifle. This can be the result of ammunition
lots, temperature, internal barrel dimensions, and barrel length
difference between your barrel and the ammo manufacturer’s test
barrel. Small velocity changes can have a large effect on trajectory
at long range distances. For optimum calibration and accuracy,
shoot at long distance to verify proper calibration. The ideal range
to verify is at 750 yards because the Drop Number for your
ammunition represents the drop at 750 yards when sighted in at
100 yards.
Often it is difficult to find a suitable place to target shoot at 750
yards, whereas 400, 500 or 600 yards may be easier to locate. Use
the chart (below) to make adjustments to your Drop Number when
verifying calibration at these distances.
4. The “T” is still on steady, your (Y or M) and a 1 in the first
numeric position is on and steady, previously selected Drop
Number should be flashing. Press the B2 (Up Arrow) button to
increase the number, or the B3 (Down Arrow) to decrease it.
When the Drop Number you want is flashing in the display, press
and release the B1 (Left Arrow) button to load your Drop
Number selection and advance to BC selection.
5. The “T” is still on steady, your (Y or M) and a 1 in the first
numeric position is on and steady, the selected Drop Number is
also on steady. The two digits in the windage area or BC will be
flashing. Your real BC is preceded by a decimal point, but the
decimal is not entered here. Press the B2 (Up Arrow) to increase
Verifying Trajectory Calibration at Long Range
For each inch bullet For each inch bullet
impact is LOW, impact is HIGH,
Target INCREASE Drop DECREASE Drop
Distance Number by: Number by:
750 1" -1"
600 2" -2"
500 3" -3"
400 6" -6"
You will want to record the altitude at which you sight-in and verify
your Table selection. Record the Table Number also. It is easy to reset
the Table values before your hunt starts in the morning or other
convenient time. You will also want to record the Drop Number and
BC correction per 1000 ft. Use the stick on labels provided with your
scope.
Write your values on the label after they are verified. Then peel off
the label and stick it to the shelf above the battery cap. Note you
will want one decimal place for the drop and three places on the
BC adjustments. Just round to the last decimal place after doing
your arithmetic. Note that - / K ft↑ translates to minus per
thousand feet up.
5
Page 6

indage compensation with the Eliminator III
W
Ranging and calculating the correct holdover for your cartridge
are done automatically. The scope also calculates the correct
windage offset for your specific cartridge at the measured range.
After a range is obtained, two numbers separated by a decimal
ill appear at the top right of the display. That is your correct
w
windage hold-off for a 10 MPH crosswind. On the reticle there
are a series of horizontal dots that do not illuminate. At full
magnification the dots are MILs, but think of the Windage Offset
number as horizontal windage Dots. At lower magnification you
still use the dots to compensate for windage. Your Windage
Offset still reads in horizontal Dots. To use the Windage
compensation number divide the actual average crosswind by 10
(just move the decimal point one digit to the left) then multiply our
offset number by that value.
For example:
Actual average crosswind = 15 MPH
15÷10=1.5
Displayed 10 MPH offset = 1.4
Correct windage offset = 1.5 X 1.4 = 2.1 dots
liminator III Essentials
E
1. The hold over and windage features of this scope work at
magnification settings.
all
2. The crosshair center must be used for ranging.
3. An illuminated aiming dot will remain lit for approximately 90
econds. If you fail to shoot before the dot goes out, you will
s
need to re-range using the center crosshair.
4. During normal operation, the brightness of the reticle
illumination can be increased by pressing the up arrow button
and decreased by pressing the down arrow.
5. As with all rangefinders, several things can cause the Eliminator
III to be unable to determine the distance to a target. They
include obstacles between the scope and the target such as
grass, twigs, or leaves; rain, snow, mist or other airborne
debris; dirty objective lens; poor target quality for reflecting the
laser back to the scope, an unsteady hold, Long distances, or
low battery (or any combination of the above).
6. The parallax adjustment does affect range finding reliability a
little. Set parallax for the approximate range for best result at
long ranges.
7. If you have programmed the scope for a particular cartridge,
and the range to the target cannot be determined, the scope
will display four horizontal lines in the range display area, and
up to 12 illuminated dots that serve as a ‘custom’ Ballistic Plex
that is accurately calibrated to your cartridge. There will be
a dot for every 100 units of range available, starting at 100.
8. If the Eliminator III ever seems to be working improperly, there
is a good chance that it needs a new battery. First, simply
disconnect the existing battery and reinstall it and check for
function. If this doesn’t solve the issue, install a new battery.
9. If the Eliminator III LaserScope gets a distance reading that is
beyond the capability of the reticle’s drop compensation, the
bottom four dots will flash signifying to you that the target is out
of range. To estimate how far out you can expect drop and
wind compensation to work, see the following chart:
So, range the target, read the 10MPH wind value and do your
arithmetic, find the illuminated hold over Dot along the lower post.
Follow horizontally along the sets of windage dots, (2.1 dots
in this example), into the wind, and squeeze off your shot.
Remember that all this works regardless of the magnification
setting of the scope.
Note: Compensating for wind is one of the most difficult tasks of
long range shooting. Wind changes from moment to moment and
the wind between you and your target is not necessarily the same
as where you are. Beyond wind meters, art and experience are
still very much involved in deciding on the average crosswind
value. Don’t forget that only the portion of the wind perpendicular
to your line of sight counts as crosswind.
BCs Approximate Max Range
0.90 750 800 825 860 890 930 955 990 1025 1090 1135 1200 1200 1200 1200 1200 1200
0.85 750 800 825 850 885 925 950 985 1020 1085 1130 1200 1200 1200 1200 1200 1200
0.80 750 800 825 850 880 920 945 980 1015 1075 1125 1190 1200 1200 1200 1200 1200
0.75 750 795 820 850 875 915 940 975 1010 1065 1120 1175 1200 1200 1200 1200 1200
0.70 750 795 820 850 875 910 935 970 1005 1055 1110 1150 1200 1200 1200 1200 1200
0.65 750 795 820 845 870 905 930 965 1000 1045 1095 1140 1200 1200 1200 1200 1200
0.60 750 795 820 845 870 900 925 960 995 1030 1080 1135 1190 1200 1200 1200 1200
0.55 750 790 815 840 865 890 920 955 990 1020 1070 1120 1175 1200 1200 1200 1200
0.50 750 790 815 840 860 880 915 950 985 1010 1060 1100 1155 1200 1200 1200 1200
0.45 750 790 810 835 855 875 910 940 970 1000 1050 1090 1130 1200 1200 1200 1200
0.40 750 790 810 830 850 870 900 930 955 980 1020 1070 1110 1165 1200 1200 1200
0.35 750 785 805 825 845 865 885 915 945 955 1000 1040 1080 1130 1180 1200 1200
0.30 750 785 800 820 840 855 875 900 925 945 980 1015 1050 1090 1135 1200 1200
0.25 750 780 795 815 830 845 865 885 910 930 960 985 1020 1050 1088 1200
0.20 750 780 790 805 825 840 855 870 890 910 930 960 980 1015 1050
0.19 750 780 790 805 820 835 850 865 885 905 925 950 970
0.18 750 775 785 800 815 835 850 865 880 900 920 940
0.17 750 775 785 800 815 830 845 860 875 895 915
0.16 750 775 780 800 810 825 840 855 870 890
0.15 750 770 780 795 805 820 835 850 865
230 220 210 200 190 180 170 160 150 140 130 120 110 100 90 80 70
Drop Numbers
6
Page 7

Technical Notes
What calibers will the scope accommodate?
Most commercially available cartridges that will work with the
scope are listed in the Cartridge List that comes with the scope.
For low velocity cartridges with high Drop Numbers, your rifle
ust be able to shoot a projectile with 230 inches of drop or less
m
at 750 yards when zeroed at 100yards. Virtually all modern rifle
chamberings can do this. For hand loaders, here is a list (at the
bottom of the page) of sea level Ballistic Coefficients Minimum
Muzzle Velocity combinations that drop less than the maximum
230 inches when zeroed at 100 yards.
The minimum amount of drop the scope is capable of is 65 inches
which is a far flatter trajectory than any commercially available
ammunition at the time of this writing and allows a lot of room for
handloaders and developers to reach for flatter trajectories.
Extreme Range Shooting (Beyond 750 yards)
The factors that influence a bullet in flight at extreme range are
many and their relationships are complex. Ballistics software
programs are of great benefit to get you close, but nothing beats
firing five shot groups with the actual ammo at 750 yards to
provide you with the most precise information possible in order to
perfectly program your Eliminator III LaserScope.
If you intend to shoot at game at 1,000 yards and beyond, it
would be irresponsible to not confirm accuracy at range for your
entire shooting system. If you need to change Point of Impact
(POI) at a range beyond 750 yards, try changing your BC.
Increasing BC will raise your point of impact (POI). Consider
changing the scope Zero for small changes at extreme distance.
A click of elevation will only change the POI .125 inches at 100
yards. It will change the POI 1.25 inches at 1,000 yards. Note that
a click also changes the POI .94 inches at 750 yards.
For Those New To Shooting Beyond 750 Yards
Here are a few additional things to keep in mind:
1. High BC is much more important than high muzzle velocity
at long range. The concept of Point Blank Range uses a long
Zero distance and very high Muzzle Velocity (MV) to shoot flat
enough to stay within 3 or 4 inches of your aiming line of sight.
That technique breaks down somewhere around 350 yards. No
cartridge shoots flat enough at these longer distances to even
consider not compensating for drop. High BC bullets are
usually a little heavier and have a little lower MV than low BC
loads for the same caliber. The lower MV gives them a little
more arc and puts them at a disadvantage in point blank range
discussions. The Eliminator III LaserScope handles drop for you
better and quicker than you could enter the data into a computer.
At distances of 750 yards and longer, high BC bullets have
everal important advantages:
s
a. Higher BCs will actually shoot flatter at extended ranges than
a low BC /high MV ones. This will, extend the range the scope
can compensate for the bullet’s drop.
b. The high BC bullet is also less affected by the wind. Even with
the solid knowledge of the effects of a 10 mph crosswind that
the scope provides, wind will be the limiting factor for field
accuracy. For example: a .30-06 -190 gr. bullet with a .6 BC
launched at 2,700 FPS has 74 inches of drift from a 10 MPH
crosswind at 1,000 yards. That is about a 1/3 of what a 125 gr
bullet with a .25 BC launched at 3,200 FPS has with its 193
inches of drift. Whatever your error in estimating average
crosswind, you will have only 1/3 as much error on the target.
A 150 gr. bullet with a .4 BC at 3,000 FPS will drift 110 inches.
That is about half as much as that .25 BC load. Varmint shooters
can expect similar results going from a .15 to a .20 BC.
c. High BC bullets also retain more energy to bring game down.
From the above combinations at 1,000 yards, the .6 BC bullet
hits with 877 Ft-Lb; the .4 BC with 470 Ft-Lb; and the .25 BC
has only 221 Ft-Lb. Go for those high BC bullets if you have not
already done so.
2. Use good ammo. Everything affects bullet flight at these
ranges. Once you find a load that shoots well in your rifle, buy
or reload a good quantity. Odds are you will need to buy
“premium” ammo or hand load very carefully. If you change
bullets, even to one of the same weight and manufacturer you
need to re-zero and re-verify at range. Even the lot number
could make a noticeable difference beyond 1,000 yards.
Bullets with dented or dinged points should be used for
fowling shots, close-in work and practice.
3. Practice shooting in crosswind conditions.
4. Consider getting and carrying a good wind/pressure gauge.
7
Page 8

Specifications
Operating Temperature:
o
+14
to +122oFahrenheit
o
o +50
t
o
elsius
C
10
-
Laser Effective Range:
Deer: 50 yards to 700 yards
Reflective Target: 50 yards to
1000 yards
Storage Temperature:
o
-13
to +158ofahrenheit
o
-25
to +70ocelsius
Ranging Accuracy:
Less than 100 yards: +/-1 yard
00 - 550 yards: +/-2 yards
1
More than 550 yards: +/-3 yards
Angle Ranging Compensation:
± 45°
certain legal rights, and possibly other rights which may vary from
state to state. Under the guidelines of the Consumer Protection
Agency, this is considered a limited warranty.
Burris, Eliminator III, Ballistic Plex and LaserScope are trademarks of
Burris Company Inc. Patents Pending. All specifications are subject
to change without notice. © Copyright 2012 Burris Company.
Checklist before returning a scope
A significant number of scopes are returned to Burris each year that
are found to function perfectly. To avoid unnecessary delays and
xpenses we encourage you to check for the following conditions.
e
Laser Information: Model #200116, 200117, 200120 and 200121
Class 1 Laser Product IEC60825-1:2007
DC 3 V
Complies with FDA performance standards for laser products
except for deviations pursuant to Laser Notice N. 50, dated June 24,
2007. Burris Company. Made in Philippines
Storage:
As with any electronic device, it is always a good idea to remove the
battery when storing for a long period of time. During storage or
transportation, be sure that the Main Switch on the Eliminator III is
not inadvertently depressed thereby running the battery down when
not in use.
Scope Use, Service, & Care
Your Burris scope will provide a lifetime of service if given the
reasonable care and treatment it deserves. The only maintenance
required is occasional cleaning of the outside of the scope and the
exterior lenses.
All moving assemblies are permanently lubricated. Use lens covers
to protect the scope from dirt, dust, lint, and moisture. The adjustment system is waterproof even without the turret caps in place, but
keep these caps tight to keep dust and dirt out of the mechanical
system. Before cleaning the lenses, brush them with a photographer’s
brush or blow them clean, ideally with “canned air”. This removes
large particles which can scratch the surface if wiped under
pressure. Never disassemble your scope. Disassembly by anyone
other than our factory will void the warranty.
Insufficient windage adjustment
1. Base mounting holes drilled out of alignment with center of bore
2. Barrel threaded into receiver at an angle
Insufficient elevation adjustment
1. Receiver diameter out of specification
2. Barrel threaded in at an angle
Grouping or accuracy
1. Barrel or chamber throat erosion
2. Stock warpage
3. Stock Bedding problem
4. Loose mount
5. Heavy trigger pull Solution - Consult with a gunsmith
Focus or image not clear
1. Object too close
2. Eyepiece out of focus
When returning the scope be sure to include:
1. Make yourself a note of your scope’s serial number for use when
calling to check on your in-service scope.
2. Include your complete name, full address and contact information.
3. A short note describing the nature of the problem as accurately as
possible.
4. Ship the scope prepaid and Insured by mail, UPS, or other parcel
service. Burris can’t be responsible for your scope until we
physically receive it. Burris pays for shipping back to you.
5. Insure the shipment against loss.
Burris Warranty
If your LaserScope’s optics or mechanical systems are ever found to
have defects in materials or workmanship, Burris will, at our option,
repair or replace it at no charge. The ranging system and electronics
are warranted for 3 years from the date of purchase. If a repair is
needed, send the product to Burris Company, 331 East 8th Street,
Greeley, Colorado, 80631
Shipping charges to Burris must be prepaid by the owner. Insure the
shipment. Burris can’t be responsible for your product until we
receive it. There are no other warranties, either expressed or implied,
contained herein except for such that may arise under certain state
laws. In that event, said implied warranties are limited in scope and
duration to the terms of this warranty. Burris is not liable for incidental
or consequential damages including but not limited to lost profits or
other economic or commercial losses. This warranty gives the owner
Send the scope to the following address:
Burris Company, Inc.
331 E. 8th Street
Greeley, Colorado 80631
For additional information about riflescope operations, go to our
website:: www.burrisoptics.com
8
INSTR-1100
 Loading...