

Page 1
User Guide
This user guide includes information for the
entire AR riflescope line. Please review
thoroughly, and pay close attention to the details
pertaining to your specific riflescope model.
AR
Riflescopes
™
AR user guide_Layout 1 11/18/13 10:49 AM Page 1
Page 2
Congratulations on purchasing a Burris®ARRiflescope™!
AR Riflescopes feature the Burris C4 Plus
™
System
(Cartridge Calibrated Custom Clicker – plus wind), giving
shooters the ability to match elevation adjustment to
their favorite cartridge and bullet, making pinpoint
accuracy easier to achieve.
AR Riflescopes are delivered to you with one custom
knob calibrated for a popular tactical cartridge. You are
eligible to receive another custom knob for FREE. Send us
your cartridge information online and we’ll provide a
custom elevation knob that matches your favorite load.
PLUS, we’ll provide a customized WindMap that shows, in
MOA, a 10 MPH wind hold-off value for your cartridge at
100-yard increments. The simple-to-use C4 Wind MOA
Reticle works seamlessly with your customized WindMap,
featuring MOA tick marks that extend out to 10 MOA in
each direction, making it quick and easy to calculate
hold-off for wind.
You’ll also enjoy the following AR Riflescope features:
• Low Profile Adjustment Knobs. The finger-adjustable,
low profile adjustment knobs create a sleek profile.
Turret indications always reflect a change in the point
of impact, resulting in pinpoint accuracy.
• High Performance Glass. Provides excellent brightness
and clarity with lasting durability – exactly what you
expect from Burris.
• Index-Matched, Hi-Lume® Multi-Coated Lenses.
Enhanced low-light performance and glare elimination,
making more shots possible and increasing your
success rate.
1
AR user guide_Layout 1 11/18/13 10:49 AM Page 2
Page 3
4= 5.0
™
1= 1.0 4= 5.0
2= 2.2 5= 6.5
3= 3 . 5 6= 8.5
5.56X45 NATO 55GR FMJ
3200FPS 2000FT
The C4 Plus custom knobs eliminate the guesswork for
holdover. Just dial in the known distance and use the
customized MOA WindMap to determine the hold-off
for a 10 MPH wind. In the example above, at 400 yards
you simply hold 2.9 tick marks into a 10 MPH wind for
pinpoint accuracy.
Note: It is important that you provide Burris with the most accurate
load and environmental information as possible when requesting your
free Custom Clicker. Burris warrants that each Custom Clicker will be
calibrated mathematically correct for the data you provide. Burris is
not responsible for any inaccuracy to the actual trajectory realized by
velocity,ballistic coefficient, or environmental variances in field conditions
compared to the data provided by you or an ammo/bullet manufacturer
for preparing a Custom Clicker.
How to Receive Your Free Custom Clicker
1. Determine precisely the load you will shoot - either a
factory load or handload.
2. If choosing a factory load and if you have access
to a chronograph, measure the actual velocity of the
factory load. If you do not have access to a chronograph
and/or do not provide a muzzle velocity to us, we
will use the advertised velocity for your factory load.
3. If choosing a handload, either obtain the actual
muzzle velocity or estimate the muzzle velocity
based on your reloading manual(s).
2
AR user guide_Layout 1 11/18/13 10:49 AM Page 3
Page 4

4. Make note of the scope serial
number on the bottom portion
of the adjustment turret.
5. Log on to www.BurrisOptics.com
,
enter the Ballistic Services section
and choose the C4 Clickers option.
6. Follow the prompts for providing Burris with all the
necessary information for Burris to produce a perfected
Custom Clicker for you. You qualify for one FREE Custom
Clicker with the purchase of your AR Riflescope.
Use this Product Key Code:
Installing Your Custom Clicker Elevation Knob
1. It is best to sight-in your riflescope prior to installing
your Custom Clicker.
2. Being careful not to rotate the
elevation knob, loosen the
three set screws that hold the
elevation knob in place. Lift the
knob up and off of the scope.
3. Place the Custom Clicker onto
your scope, aligning your
sight-in yardage number to the
reference mark on the scope.
4. Apply a small amount of
downward pressure onto the
Custom Clicker and then
evenly tighten the three set
screws. Turn your Custom
Clicker about a half-turn
counter-clockwise and then
clockwise back to your sightin distance to get a feel for the amount of resistance
to turn the clicker. If you desire more or less resistance,
loosen the three set screws and apply more or less
downward pressure onto the Custom Clicker, then
retighten the set screws. Retest and reset the resistance
until satisfied.
Place Product Key Code Here
3
AR user guide_Layout 1 11/18/13 10:49 AM Page 4
Page 5

4
Parallax/Focus Adjustment
– Not available on all models –
Parallax is the apparent movement of the reticle in
relation to the target when the eye is not directly in
line behind the center of the scope. Images from
different distances focus in front of or behind the
scope’s reticle. Parallax is more noticeable with higher
magnification scopes.
Parallax is adjusted by rotating the parallax adjustment
ring located on the objective bell. When the scope is
set parallax-free for the distance you are viewing, you
should be able to move your head side-to-side or up
and down without seeing the reticle move appreciably
in relation to the target.
Windage/Elevation Adjustment
The low profile adjustment knobs feature a finger
adjustment for both windage and elevation. Once you
have successfully zeroed your scope, you can set the
zero on your dials with these simple steps:
1) With turret caps removed, grip knob top firmly to
keep knob from turning.
2) Put pen or other small
object into the small hole
located on the dial.
3) Keeping firm grip on the
knob, use the pen to turn
the dial back to zero,
lining up the number
zero with the white
indicator dot. Only the
numbered dial should
move – do not allow the
entire knob to move or else you will alter your
windage and elevation zero settings.
NOTE: You do not have to set the zero on your dials for
your scope to function properly. Doing so can give you
peace of mind that your zero is set, plus you can easily
confirm if it has moved at any time, but this step is
optional.
AR user guide_Layout 1 11/18/13 10:49 AM Page 5
Page 6

How to Use Your AR Riflescope
Calculating Holdover/Hold-Off
The C4 Plus Custom Clicker ensures that elevation
adjustment perfectly matches the ammunition you
are shooting, and when used properly eliminates the
need to calculate holdover. Determining an accurate
distance to your target is key, and Burris recommends
using a rangefinder in the field for optimum accuracy.
Once the distance to your target is confirmed, turn the
dial on your Custom Clicker elevation knob to match
that distance. For example, if your target is 250 yards
away, turn your Custom Clicker until 250 is aligned
with the reference mark on your scope. Since the
scope is calibrated to your cartridge, dialing the
yardage to your target allows you to use the center
point of the reticle crosshairs as your aiming point –
no holdover or under is needed.
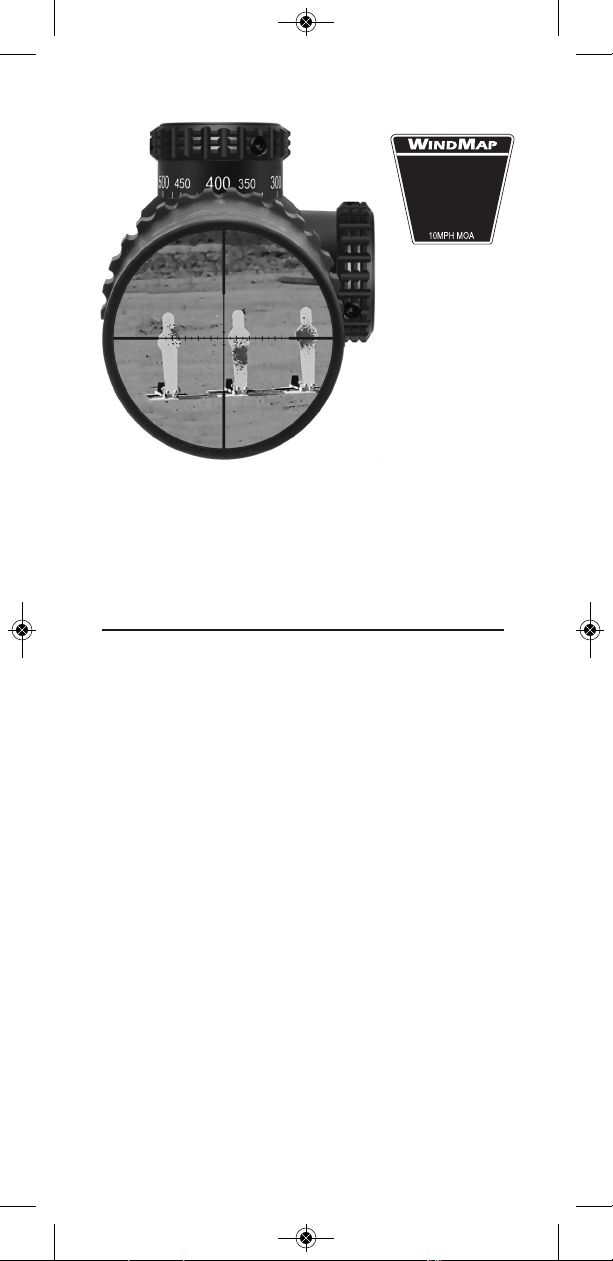
To correctly determine hold-off for wind, first determine
as best as you can the wind speed at your target. Refer
to the customized WindMap provided by Burris that
shows, in MOA, the accurate hold-off value for a 10
MPH wind at a specific 100-yard increment distance.
Using this customized WindMap as an example, if your
target is 200 yards away and the wind is blowing 10
MPH, you will hold-off 1.3 reticle tick marks into the
wind. The wind is blowing 20 MPH? Double the value
and hold-off 2.6 reticle tick marks into the wind.
It’s blowing only 5 MPH? Cut the value in half and
hold-off .65 tick marks into the wind.
™
1= 1.0 4= 5.0
2= 2.2 5= 6.5
3= 3 . 5 6= 8.5
5.56X45 NATO 55GR FMJ
3200FPS 2000FT
5
AR user guide_Layout 1 11/18/13 10:49 AM Page 6
Page 7

Eyepiece Focusing
The eyepiece can be focused so that the reticle appears
sharp and black. Adjusting the focus is quick and easy
to do, just follow this procedure:
1. Point the scope at the sky or a plain wall and take a
quick glance through the scope. If the reticle appears
sharp and black, no further adjustment is necessary.
2. If the reticle does not appear sharp and black, take
quick glances through the scope while rotating the
focus ring until the reticle pattern is sharp and black.
NOTE: Do not look through the eyepiece as you turn
the focus ring. Your eyes will adjust to the out-of-focus
condition.
Mounting the Scope
We recommend high- quality rings and bases, like the
Burris Xtreme Tactical Rings and Xtreme Tactical Bases.
Quality components ensure that your scope will remain
safely and securely mounted, and will provide the
maximum accuracy. Use care when mounting your
scope as damage caused by improper mounting is not
covered by the Burris Forever Warranty.
Care & Maintenance
AR Riflescopes are fully waterproof and fogproof. In the
event that the lenses are subjected to dust, dirt or mud,
follow these steps to clean and protect the lens surface.
Failure to remove grit before final cleaning is sure to
damage lens coatings.
Coarse dirt/debris must be removed from the lens
surface. The most convenient way to clean a lens
surface is to use a Lens Pen. Position the scope so
particles will fall away from the lens, and then use the
Lens Pen or soft brush to gently whisk away the debris
while blowing on the lens to dislodge the particles. For
heavy dirt, like dried mud, use a spray of clean water or
lens cleaning fluid to remove the dirt.
Your Burris riflescope will provide a reliable performance
given reasonable care and treatment. All moving
assemblies are permanently lubricated. Only occasional
cleaning of the outside of the scope and the exterior
lenses is required. Never disassemble your scope.
Disassembly by anyone other than our factory will void
the warranty. If you have any other problems with your
riflescope, return it to the Burris factory for repair.
6
AR user guide_Layout 1 11/18/13 10:49 AM Page 7
Page 8

Warranty
This AR Riflescope is covered by the
Burris Forever Warranty!
Thank you for choosing Burris. You can be confident
that the optic you purchased is built to the most
exacting standards. You can count on Burris to perform
every time you use it.
We’re so confident in the craftsmanship of our products
that we back them with a warranty that covers defects
in the workmanship and materials.
TO ACTIVATE YOUR WARRANTY, register your new
product online at www.burrisoptics.com/warranty
.
Forever Warranty: Protects Burris products from any
defects in materials or workmanship – even if you are
not the original owner. Burris will, at our option, repair
or replace the item at no charge.
Burris is not responsible for physical damage to products.
This is “not” a defect in materials or workmanship. Visit
our website to at www.burrisoptics.com/warranty
to
view a list of warranties by product.
Note: For warranty service on products purchased in
North America, download theRepair Authorization
Form at www.burrisoptics.com/warranty
and send the
product to our repair facility in Colorado:
Burris Company
331 East 8th St.
Greeley, CO 80631
Products purchased outside North America may not
be covered by the warranties listed above. If you
purchased your optic outside North America, contact
the retailer or distributor in the country where you
purchased the product. To find a local retailer or more
information, visit www.burrisoptics.com
, click on your
country and visit the “Services” tab.
7
331 East 8th St., Greeley, CO 80631
(970) 356-1670
BurrisOptics.com
Facebook.com/BurrisOptics
INSTR-9003
AR user guide_Layout 1 11/18/13 10:49 AM Page 8
 Loading...