

Page 1
nonoitamrofnignikeesnehW.rotcartnocgnitaehruoyllac,reliobotsriaperroecivresroF
.lebaLgnitaRnonwohssarebmuNlaireSdnarebmuNledoMrelioBedivorp,reliob
rebmuNledoMrelioB
2SE
rebmuNlaireSrelioB etaDnoitallatsnI
rotcartnoCgnitaeH rebmuNenohP
sserddA
INSTALLATION, OPERATING AND
SERVICE INSTRUCTIONS FOR
ES2™
ENHANCED SERIES 2
Gas - Fired Boiler
As an ENERGY STAR
STAR® guidelines for energy efciency established by the United States Environmental Protection Agency (EPA).
102538-01R4-2/10
®
Partner, Burnham Hydronics has determined that this boiler meets the ENERGY
Page 2
WARNINGS FOR THE HOMEOWNER
FOLLOW ALL INSTRUCTIONS and warnings
printed in this manual and posted on the boiler.
INSPECT THE BOILER ANNUALLY. To keep your
boiler safe and efcient, have a service technician
follow the Service checklist near the end of this
manual.
IF YOU ARE NOT QUALIFIED to install or service
boilers, do not install or service this one.
THE BOILER MAY LEAK WATER at the end of
its useful life. Be sure to protect walls, carpets,
and valuables from water that could leak from the
boiler.
PROTECT YOUR HOME IN FREEZING
WEATHER. A power outage, safety lockout, or
component failure will prevent your boiler from
lighting. In winter, your pipes may freeze and cause
extensive property damage. If you must leave
your home unattended for an extended time when
outdoor temperatures are below 32°F, rst turn off
your home’s main water supply and drain the water
from all pipes.
DO NOT BLOCK AIR FLOW into or around the
boiler. Insufcient air may cause the boiler to
produce carbon monoxide or start a re.
KEEP FLAMMABLE LIQUIDS AWAY from the
boiler, including paint, solvents, and gasoline.
The boiler may ignite the vapors from the liquids
causing explosion or re.
KEEP CHILDREN AND PETS away from hot
surfaces of the boiler, boiler piping, and vent pipe.
CARBON MONOXIDE (CO) is an odorless, deadly
gas that may be introduced into your home by
any malfunctioning fuel-burning product or vent
system failure. Consider installing CO alarms near
bedrooms in all levels of the building to warn you
and your family of potential CO exposure.
WARNINGS FOR THE INSTALLER
READ THIS ENTIRE MANUAL before attempting
installation, start-up, or service. Improper
installation, adjustment, alteration, service, or
maintenance may cause serious property damage,
personal injury, or death.
DO NOT DISCONNECT PIPE FITTINGS on the
boiler or in the heating system without rst verifying
that the system is cool and free of pressure and
that your clothing will protect you from a release
of hot water or steam. Do not rely solely on the
boiler’s temperature and pressure gage when
making this judgment.
USE PROPER PERSONAL PROTECTION
EQUIPMENT when servicing or working near the
boiler. Materials of construction, ue products, and
fuel contain alumina, silica, heavy metals, carbon
monoxide, nitrogen oxides, and/or other toxic or
harmful substances that can are hazardous to
health and life and that are known to the State of
California to cause cancer, birth defects, and other
reproductive harm.
INSTALL ALL GUARDS, cover plates, and
enclosures before operating the boiler.
SIZE THE BOILER PROPERLY relative to the
design heat load or, if using domestic hot water
priority, the peak hot water load, whichever
is larger. A grossly oversized boiler will cycle
excessively and this will lead to premature failure
of the boiler and its components. Our warranty
does not apply to damage from excessive cycling.
ADHERE TO ALL LOCAL CODE
REQUIREMENTS. Contact your local code
inspector prior to installation. In the absence of
a local code, adhere to the National Fuel Gas
Code ANSI Z223.1/NFPA 54 or CAN/CSA B149.1,
Natural Gas and Propane Installation Code.
ALL WIRING must comply with the National
Electrical Code ANSI/NFPA 70 (in the USA) or the
Canadian Electrical Code CSA C22.1 (in Canada)
and any local regulations.
2
Page 3
5
2
1
3
4
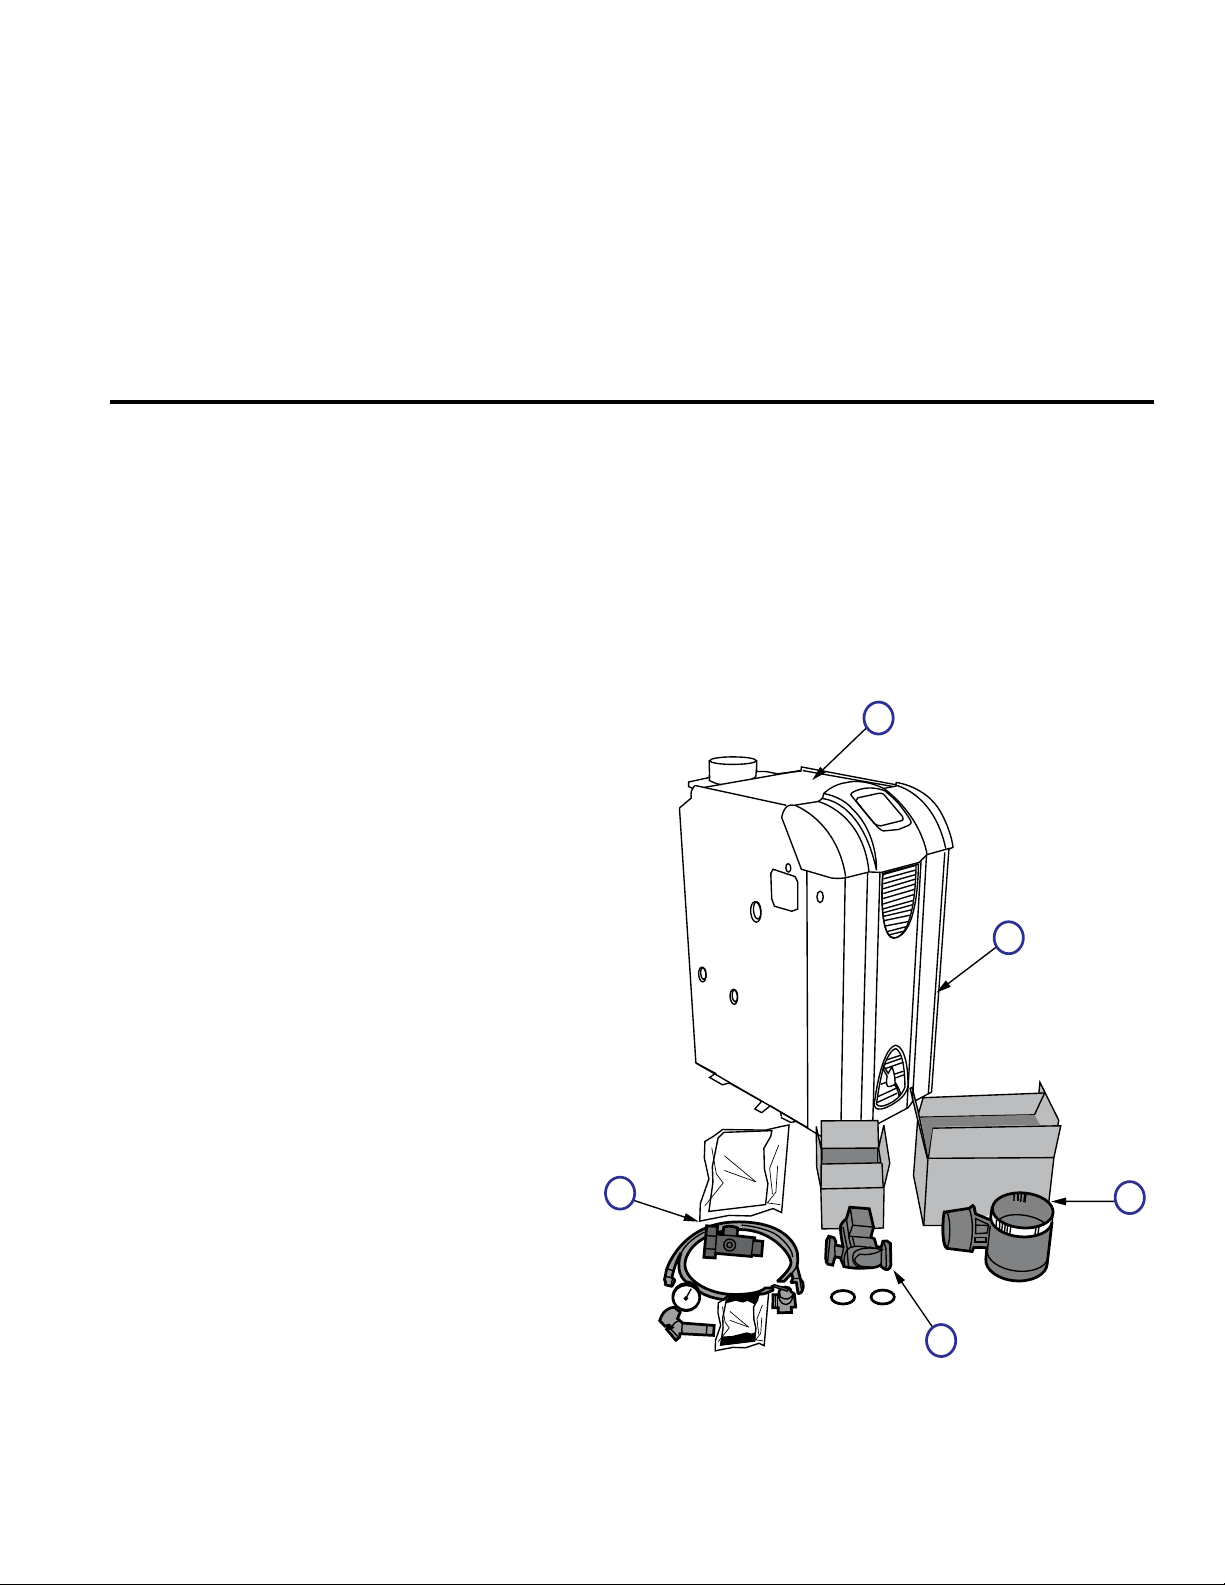
Congratulations on your purchase of a new Burnham® boiler—designed and constructed to provide you
with years of reliable service.
•
•
ENERGY STAR™ efficiency – friendly on the environment and your wallet.
Cast iron heat exchanger – for reliability and durability, nothing beats a cast iron heat exchanger.
Ours is made proudly by our foundry in Zanesville, Ohio.
•
IQ Control™ – the most advanced and easiest to use control available.
• System-friendly – built-in protection from condensation and thermal shock.
What's in the crate?
1. q ES2™ Boiler
q Vent Damper w/ Carton
2.
4” Damper ES23 (102284-01)
5” Damper ES24 (102284-02)
6” Damper ES25 & ES26 (102284-03)
7” Damper ES27 & ES28 (102284-04)
8” Damper ES29 (102284-05)
3. q
Taco 007-2 (8056170)
4.
q Temperature/Pressure Gage; ¼” NPT
(100282-01)
Circulator & Gasket Kit
Grundfos UP-15 (8056173)
B & G NRF-22 (8056174)
q Miscellaneous Parts Bag (102627-01)
5. q Instruction Envelope (102625-01)
q
Instruction & Operation Manual
(102538-01)
q
Hydronics Institute Instructions
(81460061)
q Boiler Warranty Sheet (102198-01)
q Equipment List (102620-01)
q Circulator Mounting Hardware Kit, 1-
1/4” NPT (6056007)
q Circulator Wiring Harness (6130701)
q
Drain Valve; ¾” NPT (806603012)
q Pressure Relief Valve; 30 psi
(81660363)
q Water Manifold for Pressure Relief/
Temp. Gage (80607001)
3
Page 4
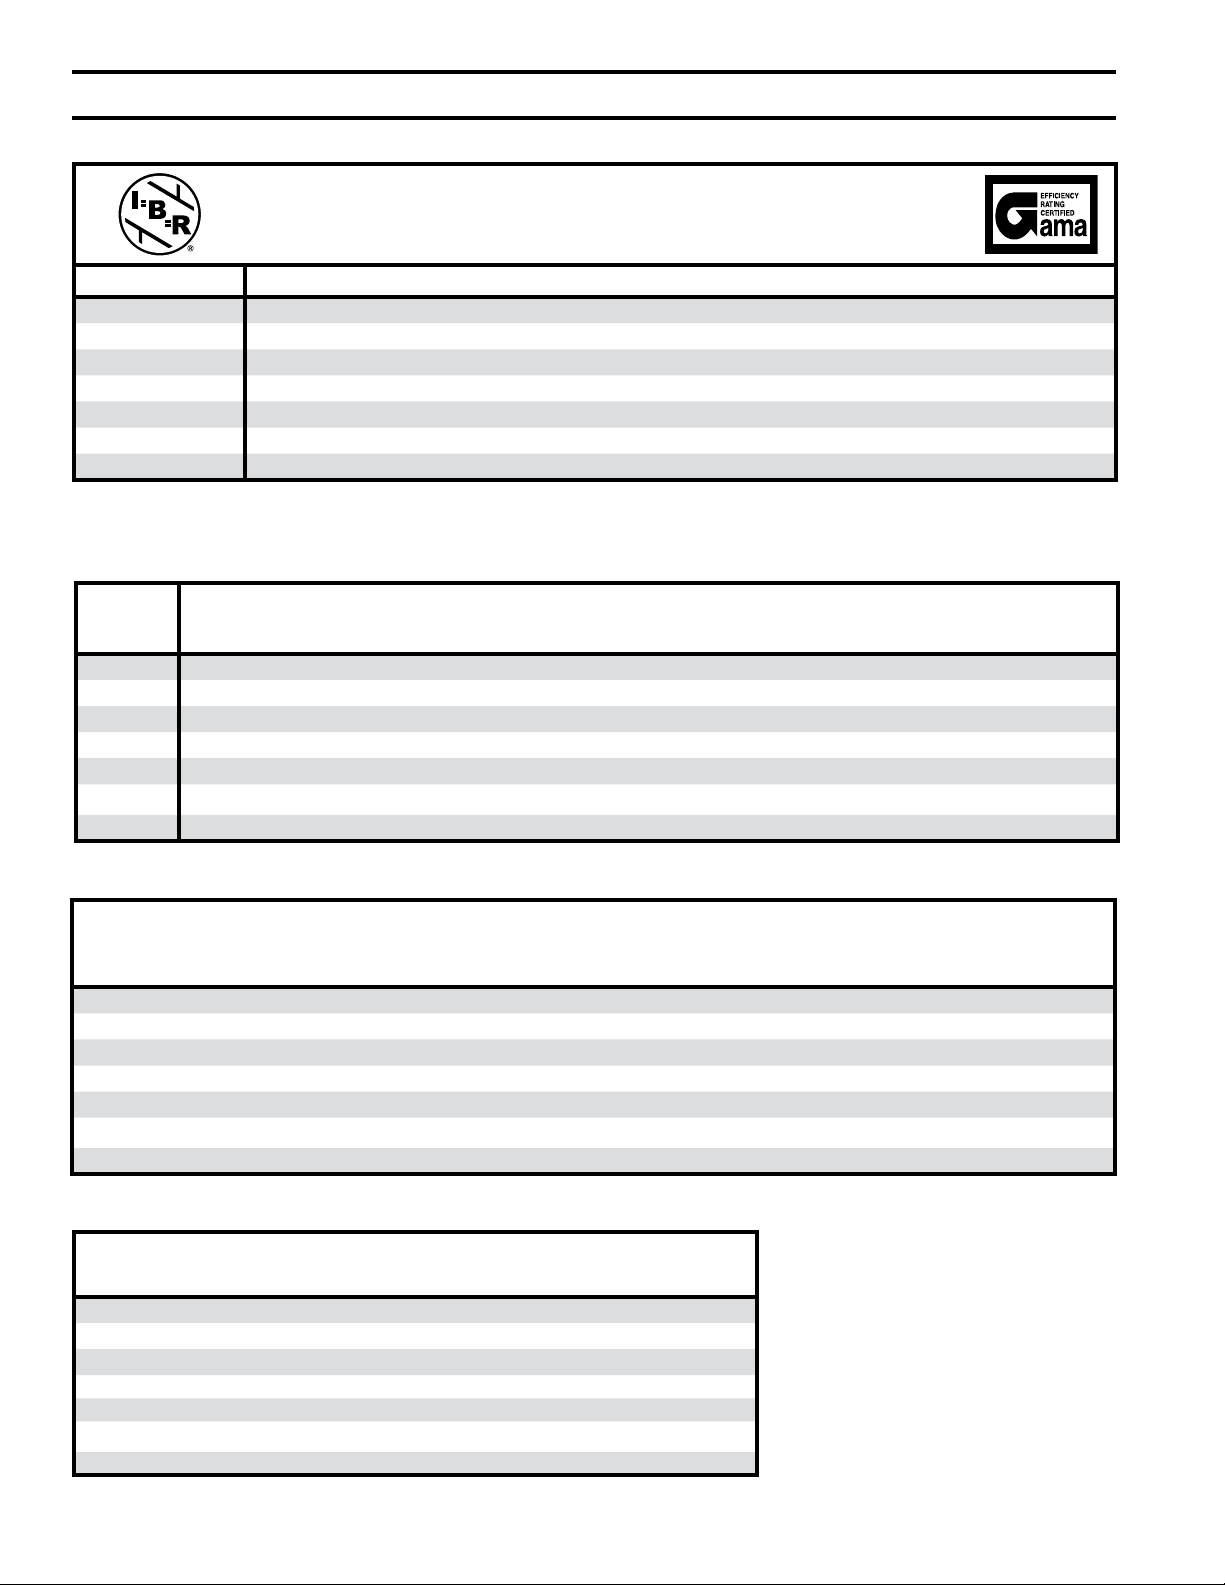
Ratings
SPECIFICATIONS
ES2 Series
Boiler Model
ES23 70 59 51 85
ES24 105 88 77 85
ES25 140 118 102 85
ES26 175 147 128 85
ES27 210 176 153 85
ES28 245 206 179 85
ES29 280 235 205 85
Input (MBH) DOE Heating Capacity (MBH) Net I=B=R Rating (MBH) AFUE (%)
Electrical Requirements: 120VAC, 60 Hz, 1-ph, 15A
Dimensions and Connections
Boiler
Model
ES23 33 12¾ 41 1¼ 1¼ 4 ½ ¾ ¾
ES24 33 15½ 41 1¼ 1¼ 5 ½ ¾ ¾
ES25 33 18½ 41 1¼ 1¼ 6 ½ ¾ ¾
ES26 33 21½ 41 1¼ 1¼ 6 ½ ¾ ¾
ES27 33 24¾ 41 1¼ 1¼ 7 ¾ ¾ ¾
ES28 33 27¾ 41 1¼ 1¼ 7 ¾ ¾ ¾
ES29 33 30¾ 41 1¼ 1¼ 8 ¾ ¾ ¾
Depth Width Height
Supply NPT
(inch)
Return NPT
(inch)
Vent
(inch)
Gas NPT
(inch)
Relief Valve
NPT (inch)
Drain
NPT (inch)
Water Temperatures and Flows
Allowable Supply
Boiler Model
Water Temperature
(°F)
ES23 130-220 110 None <1
ES24 130-220 110 None <1
ES25 130-220 110 None <1
ES26 130-220 110 None <1
ES27 130-220 110 None <1
ES28 130-220 110 None <1
ES29 130-220 110 None <1
Minimum Return
Water Temperature
(°F)
Weights and Volume
Boiler
Model
ES23 250 170 2
ES24 300 220 3
ES25 350 270 4
ES26 410 320 5
ES27 460 370 5
ES28 510 420 6
ES29 560 470 7
4
Shipping Weight
(lbs)
Empty Weight
(lbs)
Minimum Flow
Water Content
(gal)
(GPM)
Waterside Pressure Drop
at 20°F DT
(Ft. of Head)
Page 5
SPECIFICATIONS (continued)
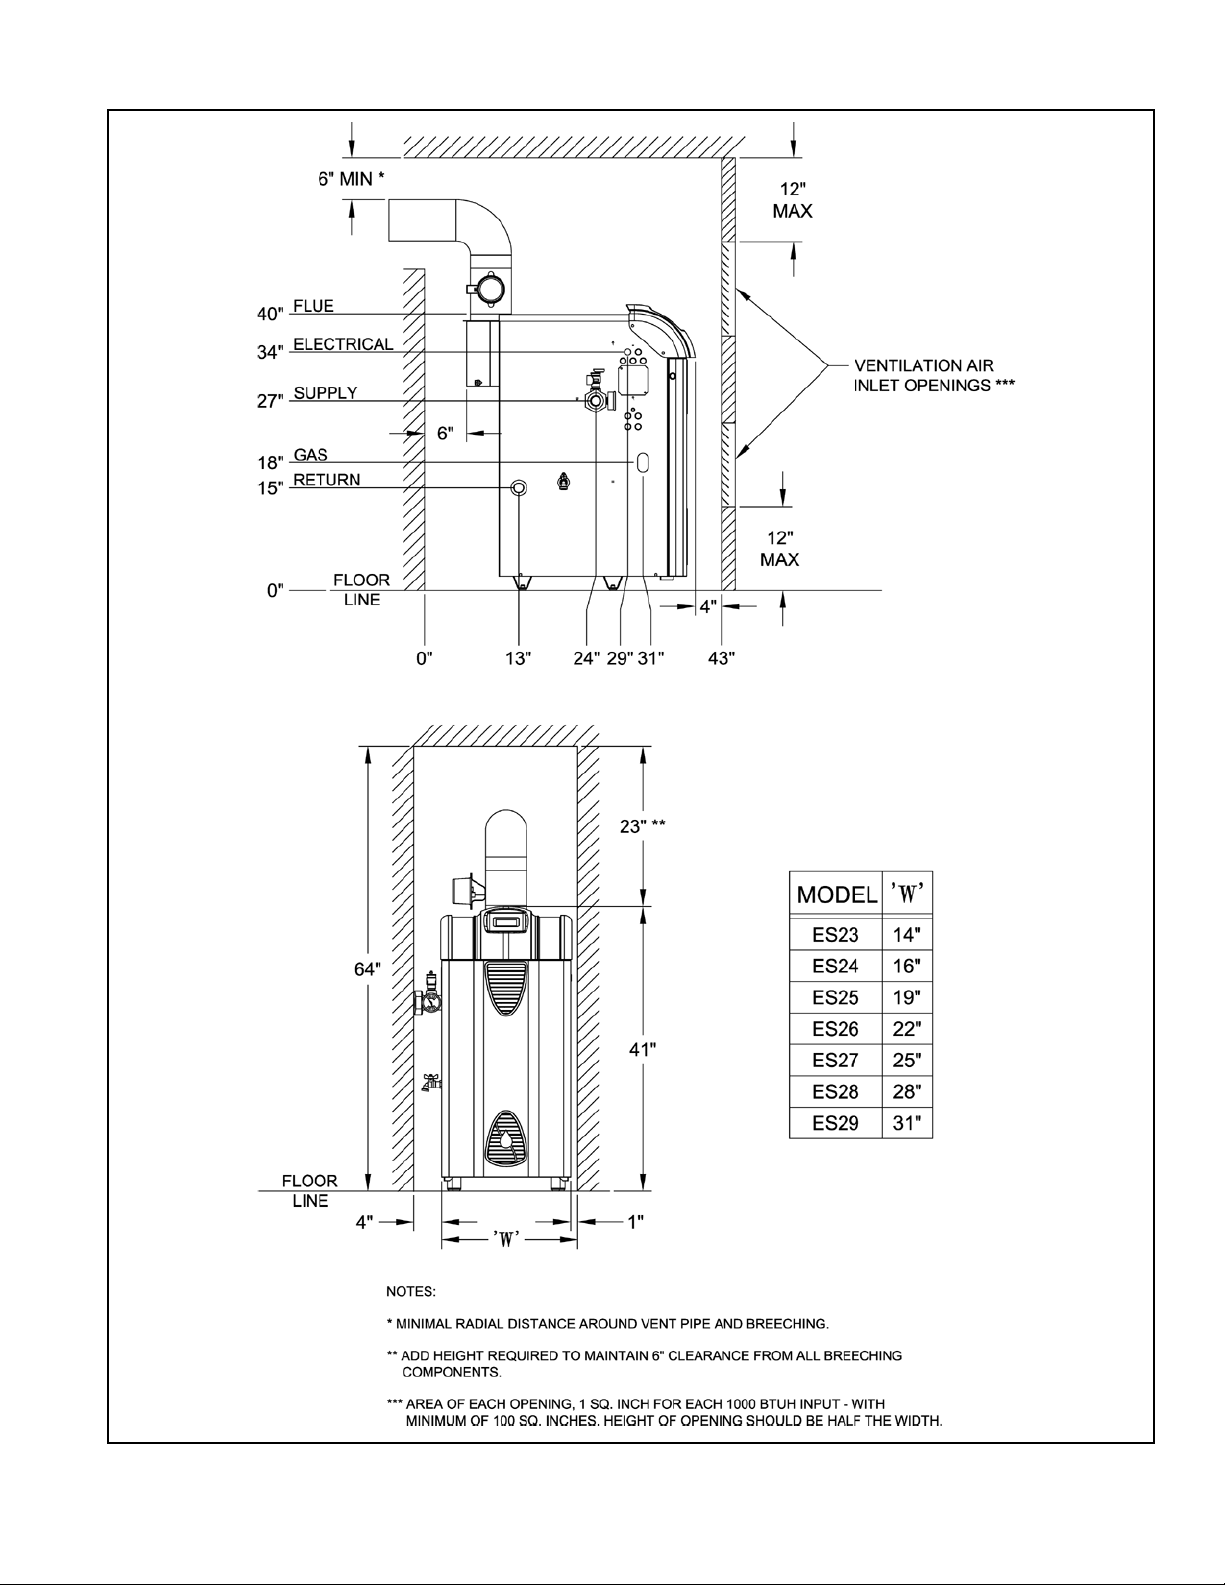
Figure S-1: Minimum Clearances to Combustibles and Closet Dimensions
5
Page 6

Boiler Quick-Start
Installation:
1. Unpack the crate ............................................................................................. 7
2. Position the boiler ............................................................................................ 7
3. Provide combustion air .................................................................................... 8
4. Connect venting ............................................................................................... 8
5. Connect gas piping ........................................................................................ 10
6. Connect boiler water piping ........................................................................... 10
7. Connect electrical wiring ................................................................................ 12
8. Program the controls ..................................................................................... 13
9. Check for gas and water leaks ...................................................................... 15
10. Perform startup checks and adjustments ...................................................... 16
Annual Maintenance Checklist ............................................................................ 17
Troubleshooting ....................................................................................
Repair Parts List ................................................................................................... 21
Internal Wiring ....................................................................................
................ 18
................... 27
Appendices:
A – Combustion Air.................................................................................................. 32
B – Venting ..............................................................................................................33
C – Gas Piping ........................................................................................................36
D – System Piping ...................................................................................................37
E – Filling the System and Checking for Leaks .......................................................43
F – Adjusting Gas Input Rate ..................................................................................44
G – Checking Draft and Combustion ....................................................................... 46
H – IQ Control System............................................................................................. 47
Warranty ....................................................................................
.............. Back Cover
6
Page 7
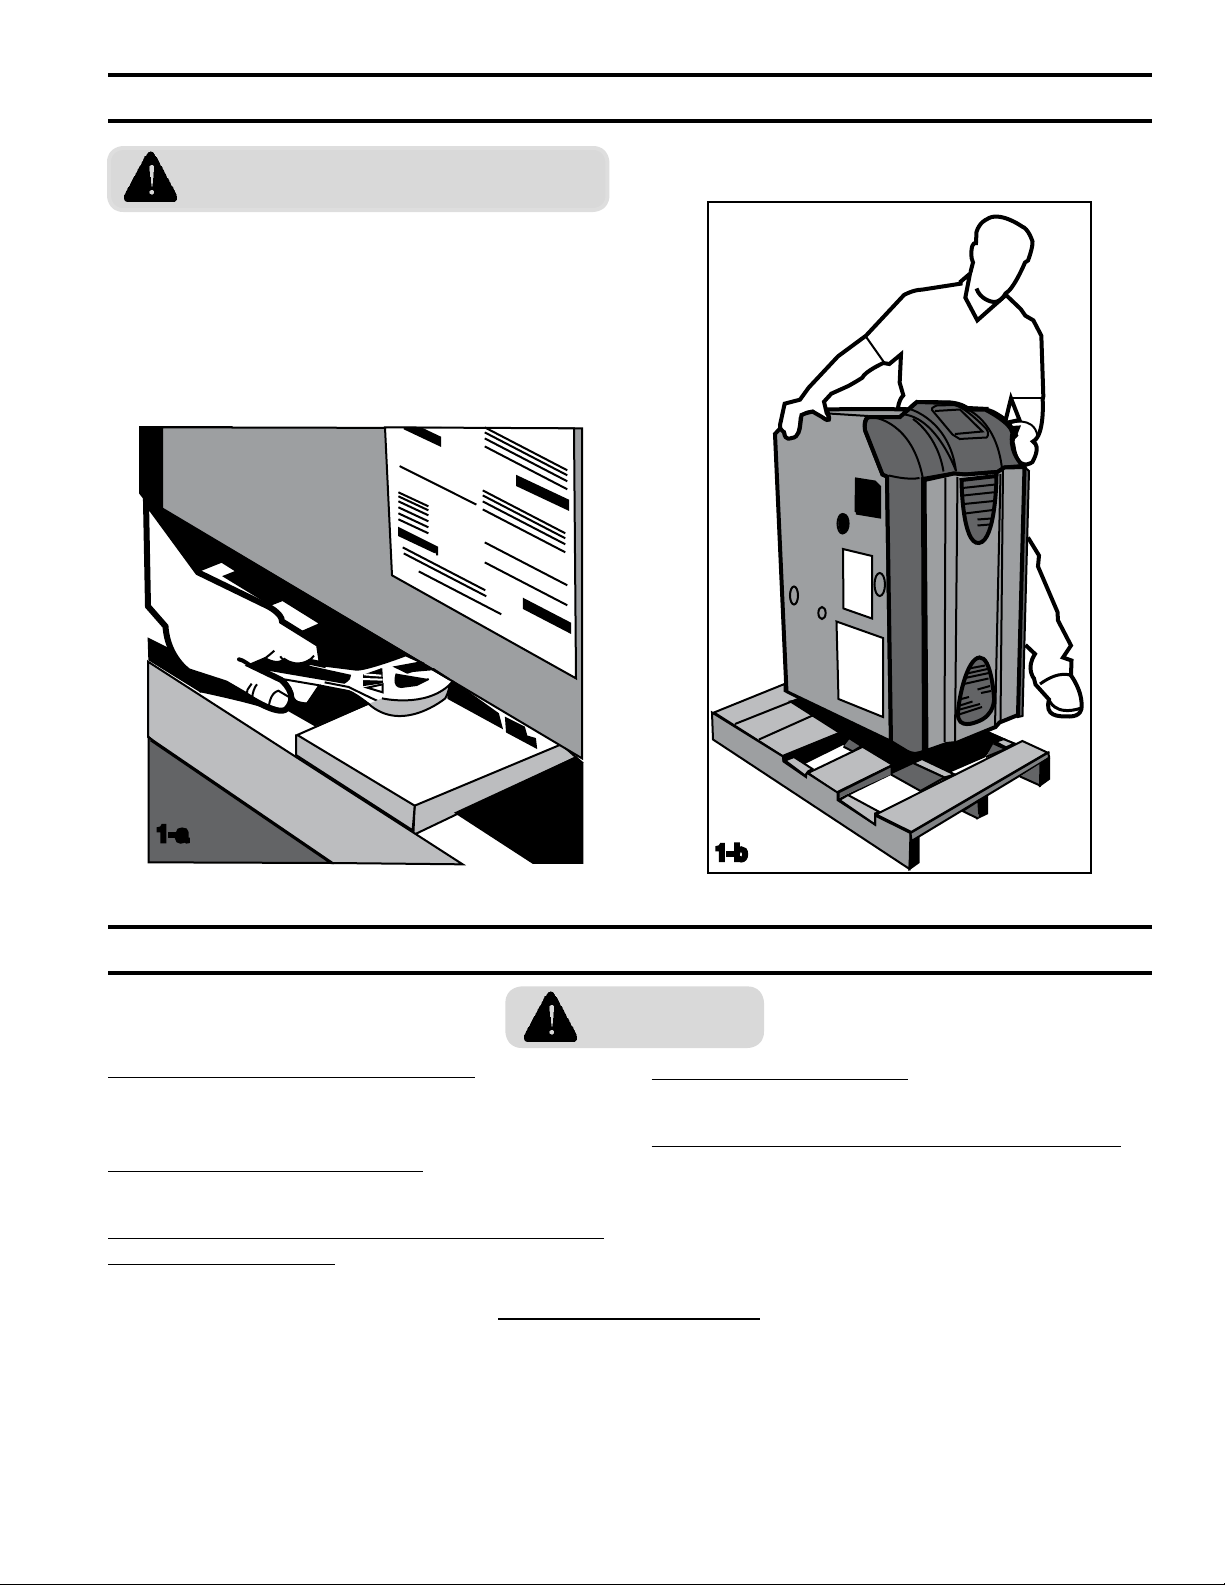
1. UNPACK THE CRATE
THE BOILER IS TOP-HEAVY. Do not
allow it to tip over.
1. Remove the sleeve.
2. Remove the contents from the skid, except
the boiler.
3. Remove the four (4) hex-drive lag screws
holding the boiler to the skid (Figure 1-a).
4. Tip the boiler and shimmy it off the skid.
1-a
2. POSITION THE BOILER
WARNINGS
OBSERVE MINIMUM CLEARANCES to
combustible walls and ceilings to avoid potential
re hazard.
DO NOT INSTALL ON CARPET. This may cause
a re.
INSTALLING THE BOILER NEAR A SOURCE OF
FLAMMABLE LIQUIDS or gases may cause re or
explosion.
1. Slide the boiler into desired location.
2. Meet the minimum clearances to
combustible construction per the
Specification Section of this manual.
1-b
CLEAN BURNERS DAILY if operating the boiler in
a dusty environment.
PROTECT IGNITION SYSTEM COMPONENTS
from sources of water that may spray, drip, or rain
on them during installation or service.
3. Allow 24" service clearance in front and on
the left side of the boiler.
4. Level the boiler, using shims as necessary.
7
Page 8
3. PROVIDE COMBUSTION AIR
INSUFFICIENT COMBUSTION AIR
SUPPLY may result in the production and
release of deadly carbon monoxide (CO) into the
home which can cause severe personal injury or
death.
4. CONNECT VENTING
IMPROPER VENTING may result in
property damage and the release of ue
gases which contain deadly carbon monoxide (CO)
into the home, which can cause severe personal
injury, death or substantial property damage.
The vent system shall be designed and
constructed in accordance with NFPA 54 and
applicable local codes to develop a positive ow
adequate to convey ue or vent gases to the
outdoors, while ensuring that ue gases do not
cool prematurely.
Observe all general venting guidelines provided in
Appendix B—Venting. Additionally:
1. This appliance shall be vented into a listed
gas vent, masonry, metal, or factorybuilt chimney as required by NFPA 54
and applicable local codes for Category I
appliances. If venting this appliance into
a masonry chimney, the chimney must be
lined with a listed chimney lining system
Like all fuel-burning appliances, boilers need air to
operate reliably and safely.
Provide combustion air using the instructions in
Appendix A—Combustion Air.
(i.e. Type B gas vent or exible metal) as
required by NFPA 54 and applicable local
codes. Clay ue lined masonry chimneys do
not meet the venting requirements for this
appliance.
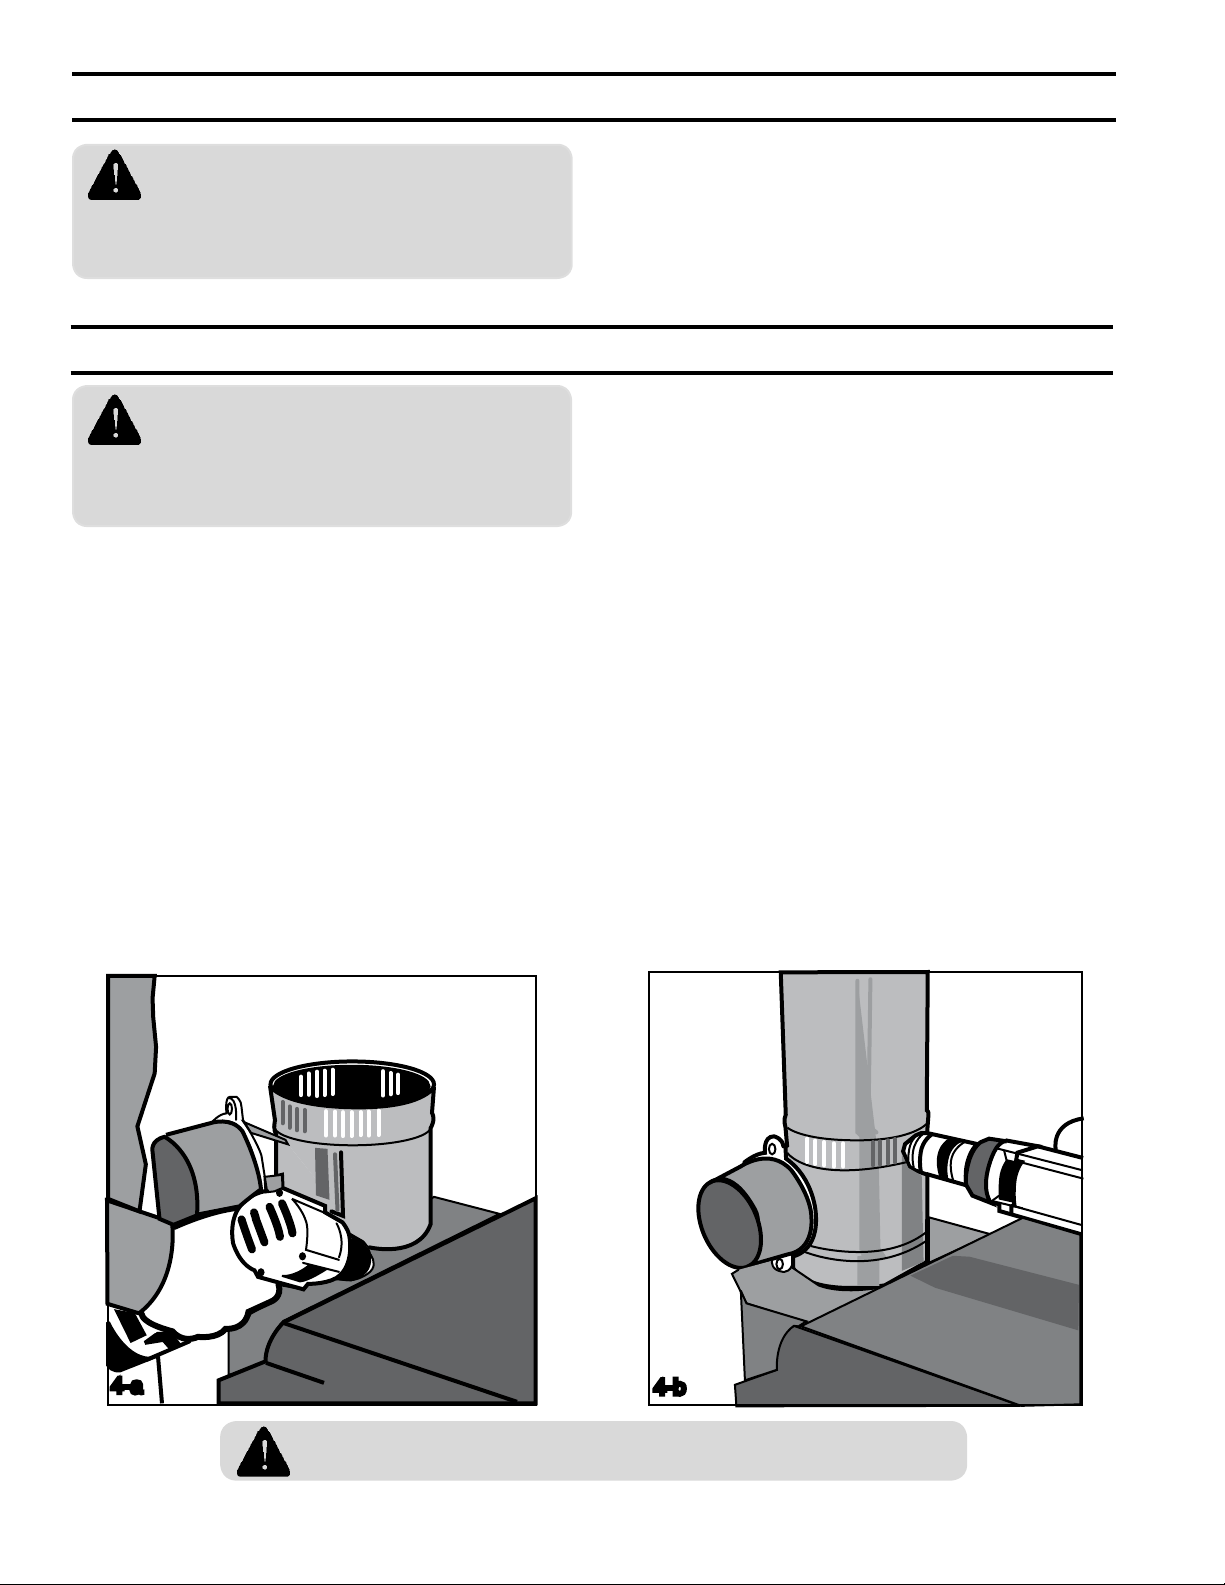
2. Attach the vent damper with three
sheetmetal screws around the perimeter of
the ue collar (Figure 4-a), oriented so that
the position indicator is visible. The vent
damper may also be mounted anywhere
between the ue outlet and the chimney
within reach of the electrical harness.
3. Vent connector shall be double-wall
insulated gas vent as supplied with this
boiler or Type B (double-wall) gas vent only.
Using sheetmetal screws, attach the vent
connector between the vent damper and
the vertical chimney (Figure 4-b). Do not
exceed the maximum vent connector length
in Table 4.1.
4-a
DAMPER MUST BE OPEN when the main burner is ring.
8
4-b
Page 9

4. CONNECT VENTING (continued)
Table 4.1: ES2 Vent Connector - Horizontal Length Restrictions (ft)
Model ES23 ES24 ES25 ES26 ES27 ES28 ES29
Input (MBH) 70 105 140 175 210 245 280
Minimum Vent
Diameter (in)
Vent Height (ft) With B-Vent (double wall) Vent Connector
6 0 0 6 0 4 0 2
8 8 8 8 2 8 2 8
10 10 10 10 10 10 10 10
15 15 15 15 15 15 15 15
20 20 20 20 20 20 20 20
30 20 30 30 30 30 30 30
50 20 30 30 30 30 30 30
100 20 30 30 30 50 50 50
4 5 6 6 7 7 8
9
Page 10
5. CONNECT GAS PIPING
RV
S
R
O
G
D
Size gas piping according to Appendix C – Gas
Piping
SHUT OFF GAS SUPPLY before
servicing the boiler.
ALL GAS PIPING MUST BE GAS
TIGHT. Use gas rated thread compound
on all threaded joints to avoid leaks, which may
result in re or explosion.
SIZE GAS PIPING, regulators, valves,
and meters so as to provide an adequate
gas ow and pressure to the boiler during
operation. Failure to do so may cause poor
combustion, noise, injury, or death.
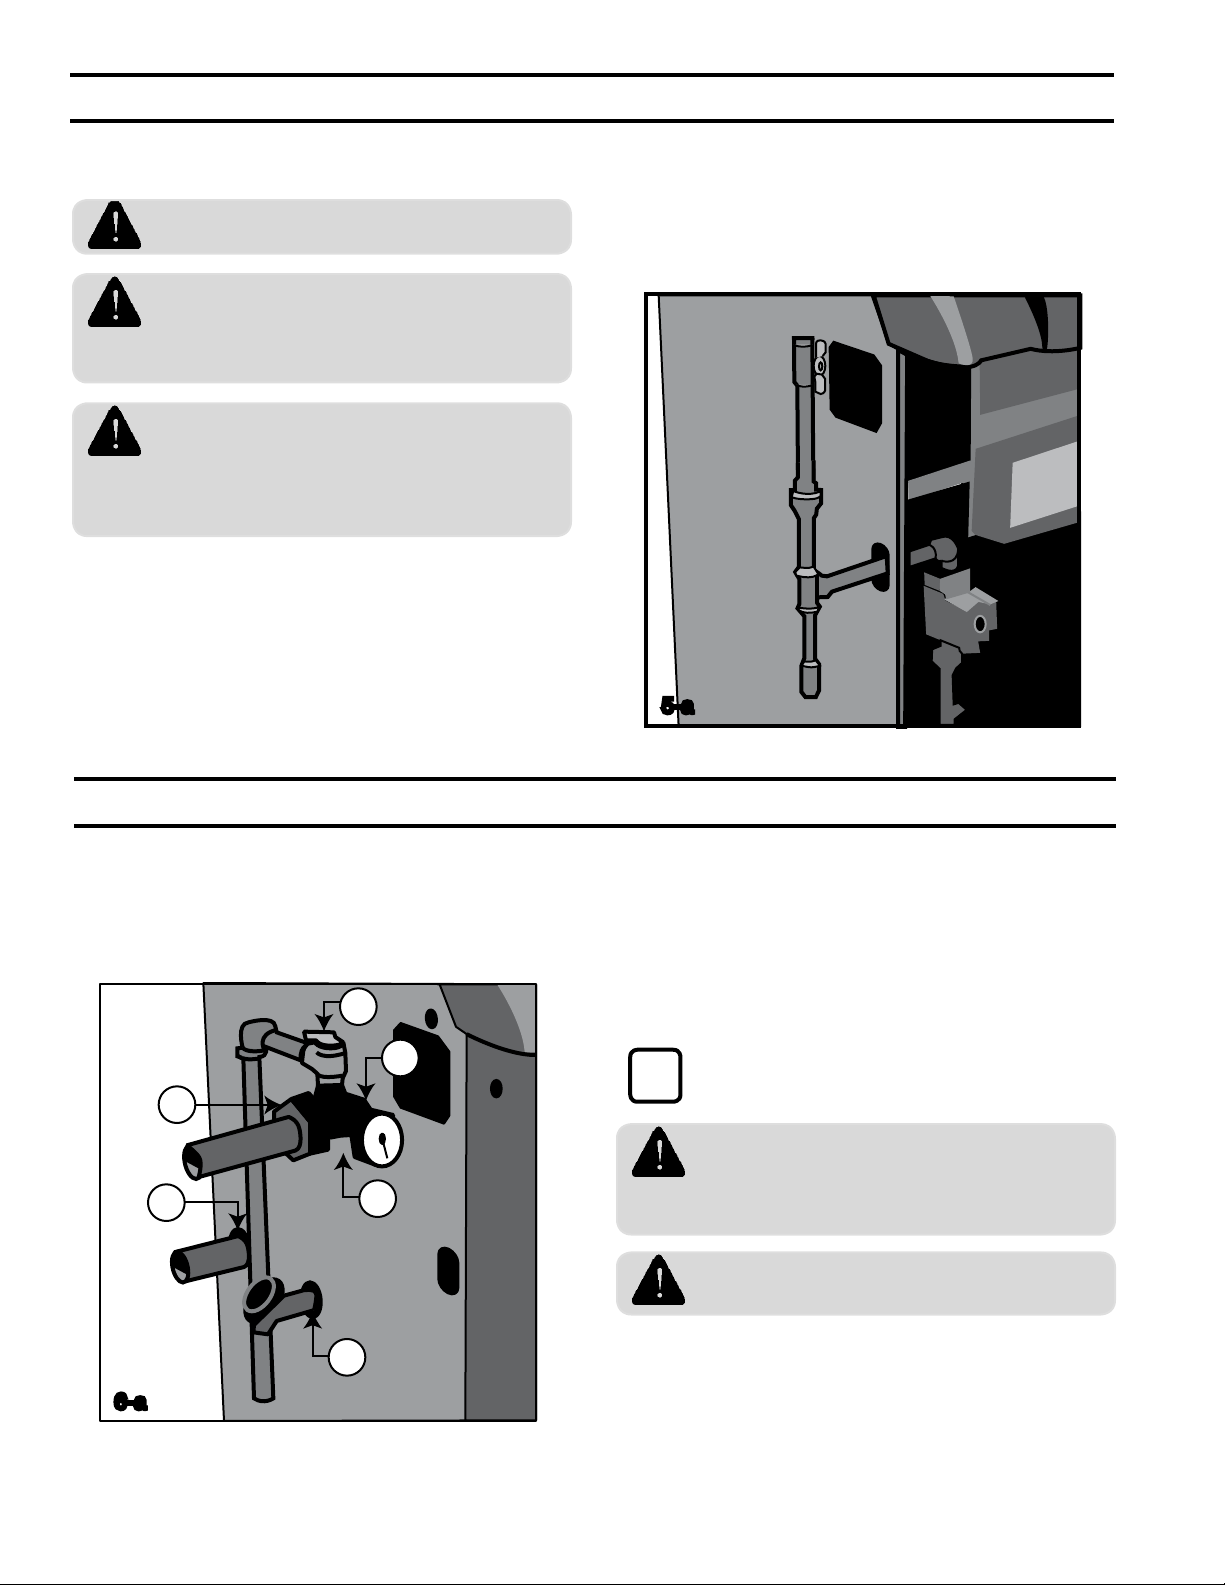
1. Remove boiler door, locate gas valve and
remove plastic shipping plug.
2. Thread a ¾" x 1½" nipple, a 90° street
elbow, or a Honeywell ange onto the gas
valve and pipe through the slot in the left
jacket panel (Figure 5-a). In Canada, close
nipples and street ells are not approved for
use as gas piping.
3. Pipe through the left jacket panel, and
complete drip leg as shown (Figure 5-a).
5-a
6. CONNECT BOILER WATER PIPING
General system piping guidelines are included in
Appendix D—System Piping.
Additionally, for this particular boiler install piping
shown below (Figure 6-a).
6-a
1. Apply sealant to all threads.
10
2. Screw the water supply manifold into the
boiler outlet tapping “O.”
3. Orient the manifold with the relief valve on
top.
4. Screw the relief valve into manifold tapping
“RV”.
relief valve is installed.
to a location where it will not harm
people or damage property. The relief valve may
discharge scalding hot water or steam.
result in boiler explosion.
This installation is not complete until the
i
PIPE THE RELIEF VALVE DISCHARGE
BLOCKING THE RELIEF VALVE may
5. Screw the temperature-pressure gage into
manifold tapping “G”.
6. Connect the system supply to the open end
of the manifold "S" using a 1¼” male NPT
tting.
Page 11
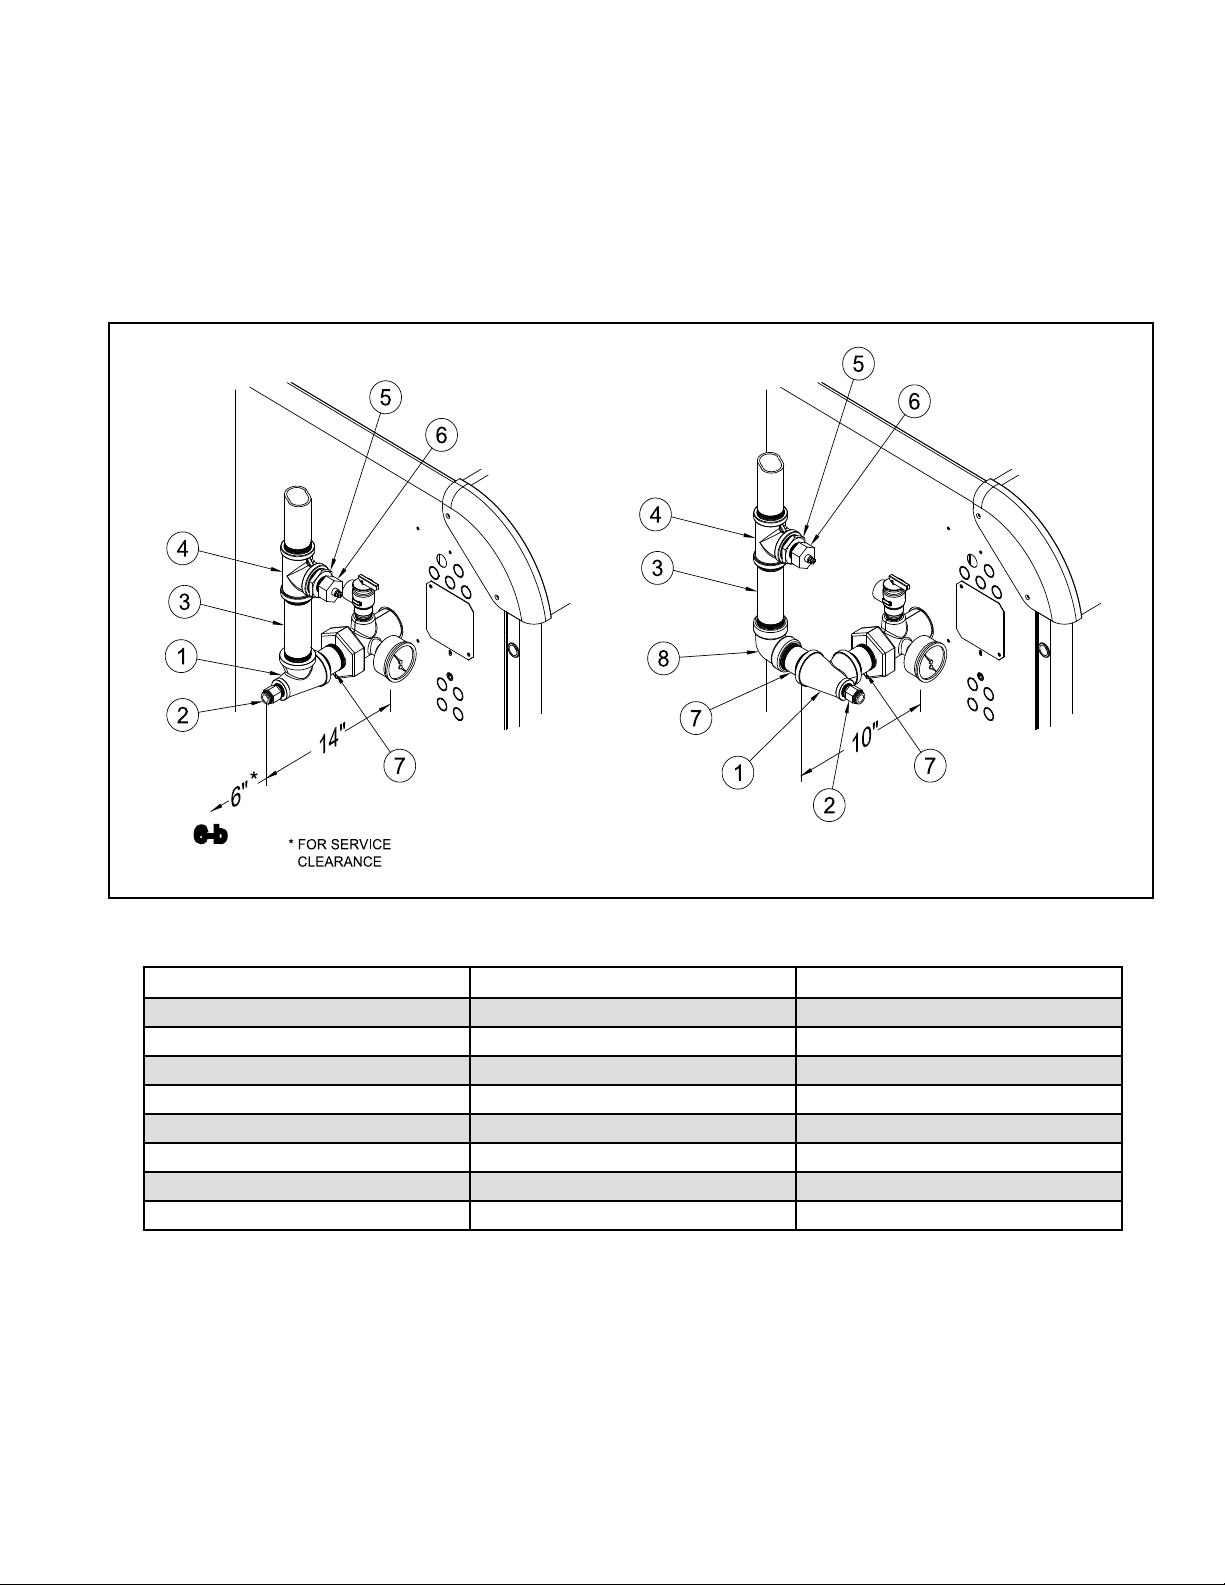
6. CONNECT BOILER WATER PIPING (continued)
7. Screw an installer-supplied 1¼” pipe or
nipple into the water return tapping “R”.
8. Screw the supplied drain valve into tapping
“D”.
9. See Figure 6b for suggested near boiler
piping of IQ Options.
6-b
Item Description Burnham Part Number
1 1¼ x 1¼ x ½ Tee 806601021
2 Immersion Well, ½ NPT 80160456
3 1¼ x 6 Nipple 806600029
4 1¼ Tee 806601030
5 1¼ x ¾ Bushing 806600504
6 LWCO Sensor, ¾ NPT 102305-01
7 1¼ x 3 Nipple 806600005
8 1¼ Elbow 806601528
11
Page 12
7. CONNECT ELECTRICAL WIRING
1
1
2
3 T
T
DISCONNECT ELECTRICAL POWER
to the boiler and heating system before
servicing. Positively assure that no voltage is
present. Lock electrical boxes to prevent someone
from inadvertently restoring power before the
heating system is safe to operate.
NEVER DEFEAT OR JUMP OUT safety
devices.
PROTECT EACH BOILER circuit with a
properly sized over-current protection
device.
MAKE ELECTRICAL CONNECTIONS
CAREFULLY according to the boiler’s
wiring diagram and instructions
Refer to the Internal Wiring diagrams later in this
manual.
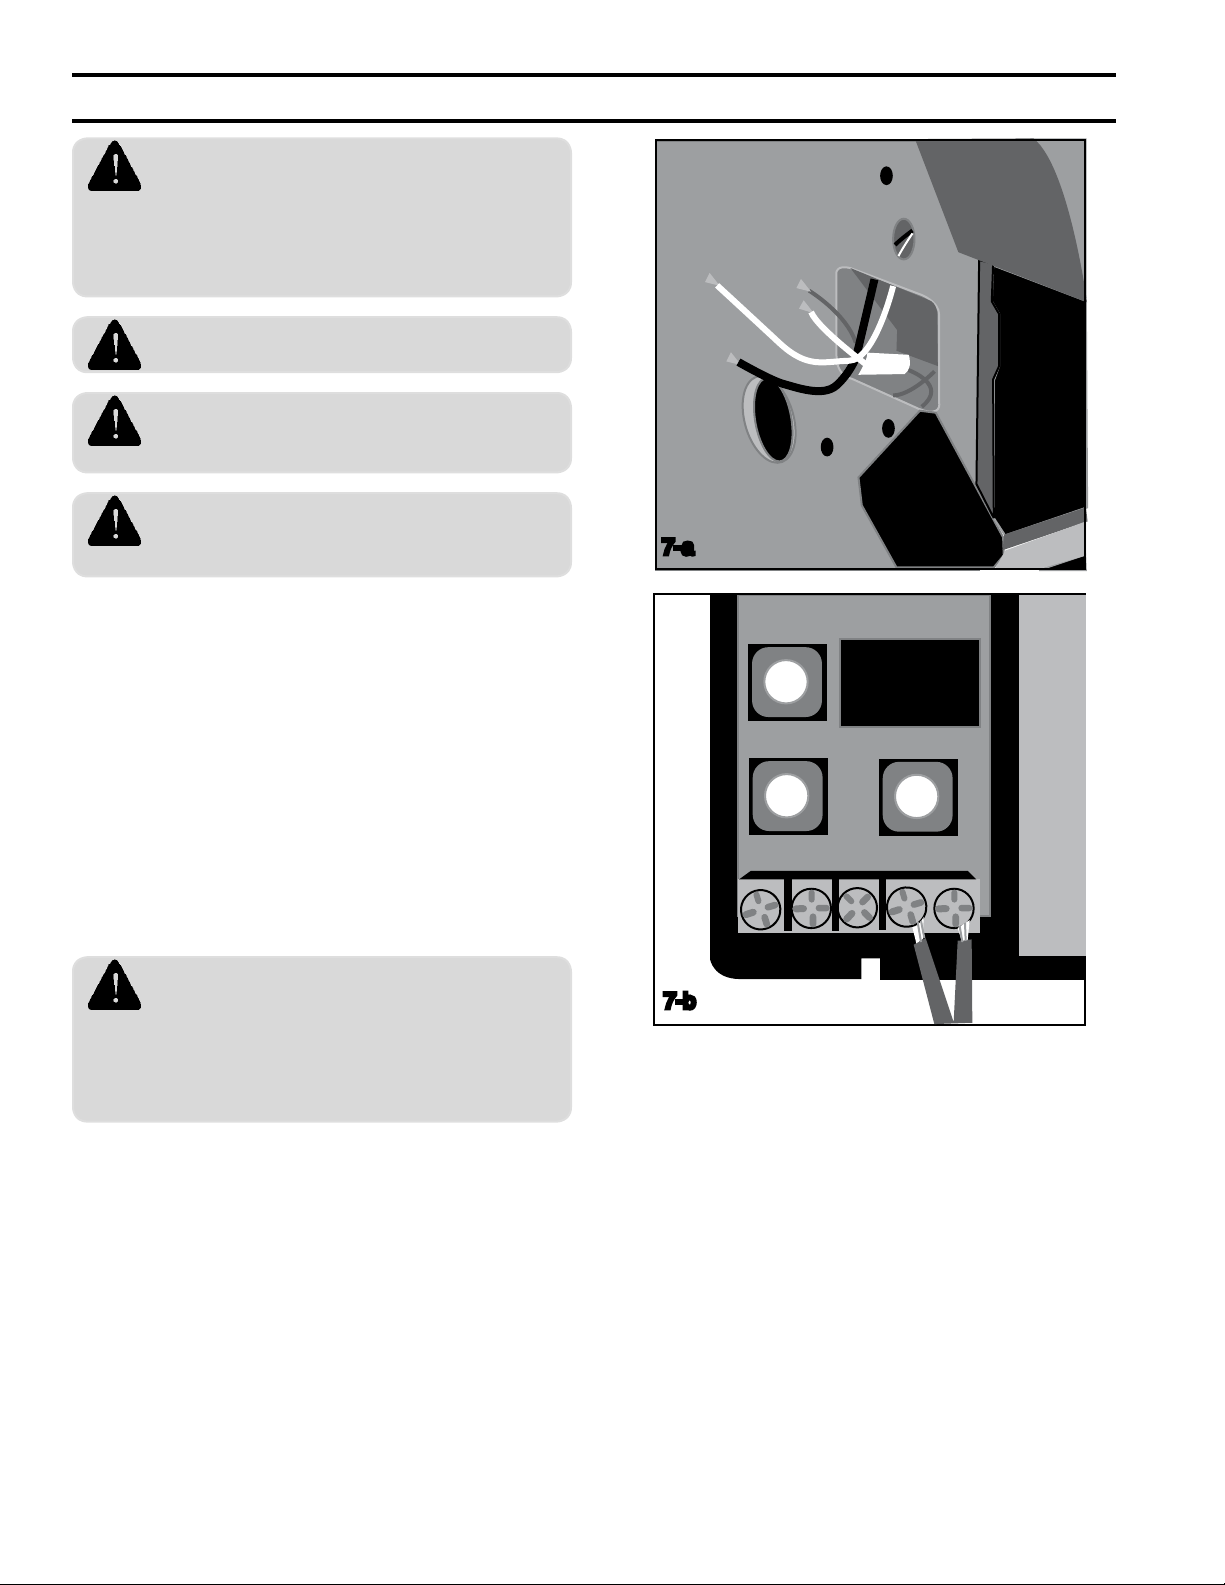
1. Locate the wiring box on the left side of the
boiler and open the cover (Figure 7-a).
2. Install a 120V disconnect near the boiler.
3. Connect the 120V wiring from the disconnect
to the boiler's white (neutral), black (hot),
and green (ground) labeled "120VAC Power
supply". Do not reverse polarity.
4. Connect the 120V wiring from the circulator
to the white (neutral) yellow (hot) wires
marked "circulator".
7-a
WIRE AN ADDITIONAL SAFETY LIMIT
such as a low water cutoff or temperature
limit device, other than an IQ™ Control device,
in series with the 120V circuit used to power the
boiler. Do not alter the boiler’s factory wiring when
adding an additional limit.
12
7-b
5. Connect the 24V wiring from the thermostat
to the "T-T" terminals on the Option Control
Panel.
6. To connect other external devices, refer to
the instructions included with these devices.
Page 13
8. PROGRAM THE CONTROLS
1
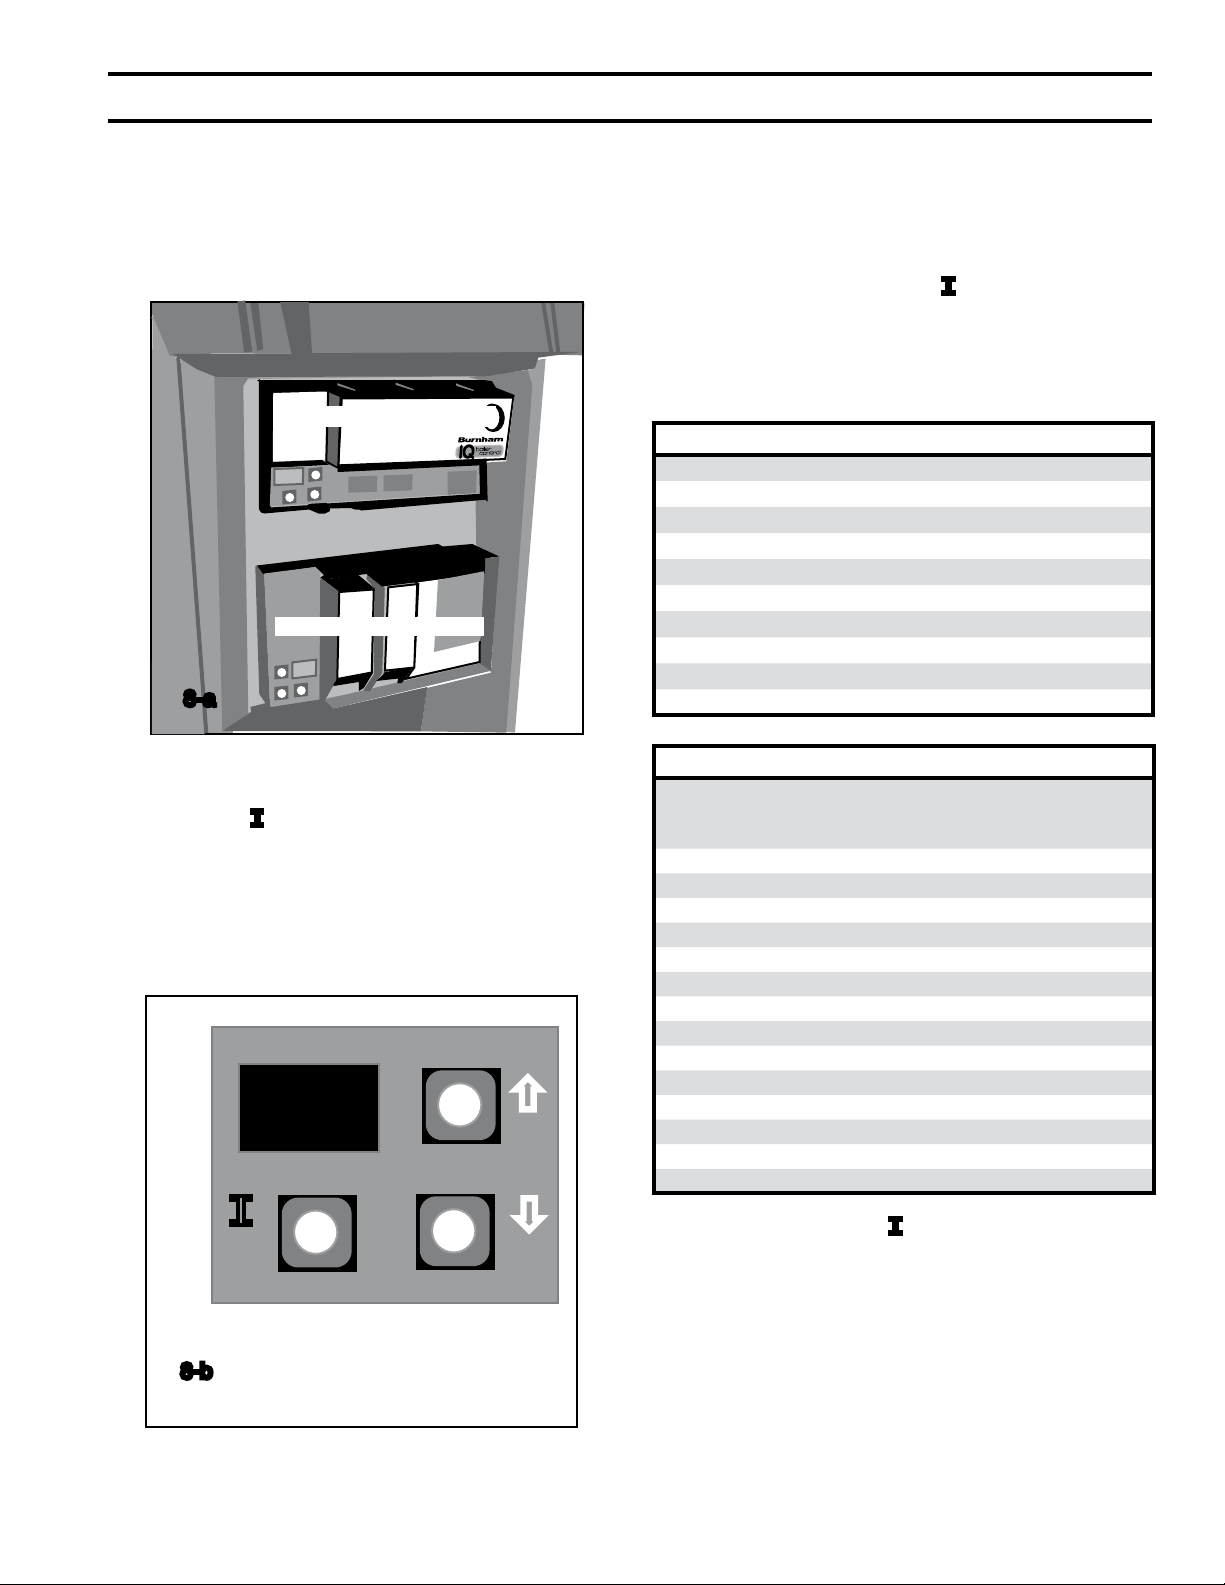
Using IQ Boiler Control Display
The IQ Boiler Control is located inside the boiler
front door, just above the IQ Option Panel (Figure
8-a).
IQ Boiler Control
IQ Option Panel
8-a
Viewing the Operating Mode Options
In operating mode the user may view (but not
change) boiler operating status, settings and
troubleshooting information. To view IQ Boiler
Control display information:
1. Press and release the “I” key on the IQ
Boiler Control to change from one parameter
to the next. Each setting will alternately ash
between the relevant display code and its
corresponding value.
Operating Mode Options
StA Status
bt Boiler Temperature
SP Operating Setpoint (Outdoor Reset)
HL High Limit Setting
HdF High Limit Differential
hr Heat Request Status
FLA Flame Current
rUn Run Time Hours
CYC Boiler Cycles
Err Error (see Error Numbers)
The IQ Boiler Control display, along with Up ñ,
Down ò, and “I” keys may be used to view boiler
operating status (Figure 8-b). Please note that
these keys look similar to the keys on the IQ
Option Panel but are in a different orientation, and
they perform different functions.
ñ
I
ò
IQ Boiler Control
8-b
Status Code Displayed in STA Mode
1 Standby:
Either TT Open or TT Closed and Boiler Temperature
within Setpoint & Differential with circulator running.
4 Prepurge
6 Spark
7 Flame Proving
8 Running
10 Retry/Recycle Delay
13 Soft Lockout
14 Hard Lockout
15 Waiting for Limit to Close
16 Flame Present Out of Sequence
17 Self Test
18 Waiting for Damper to Open
19 Waiting for Damper to Close
20 Damper Failure to Open
21 Damper Failure to Close
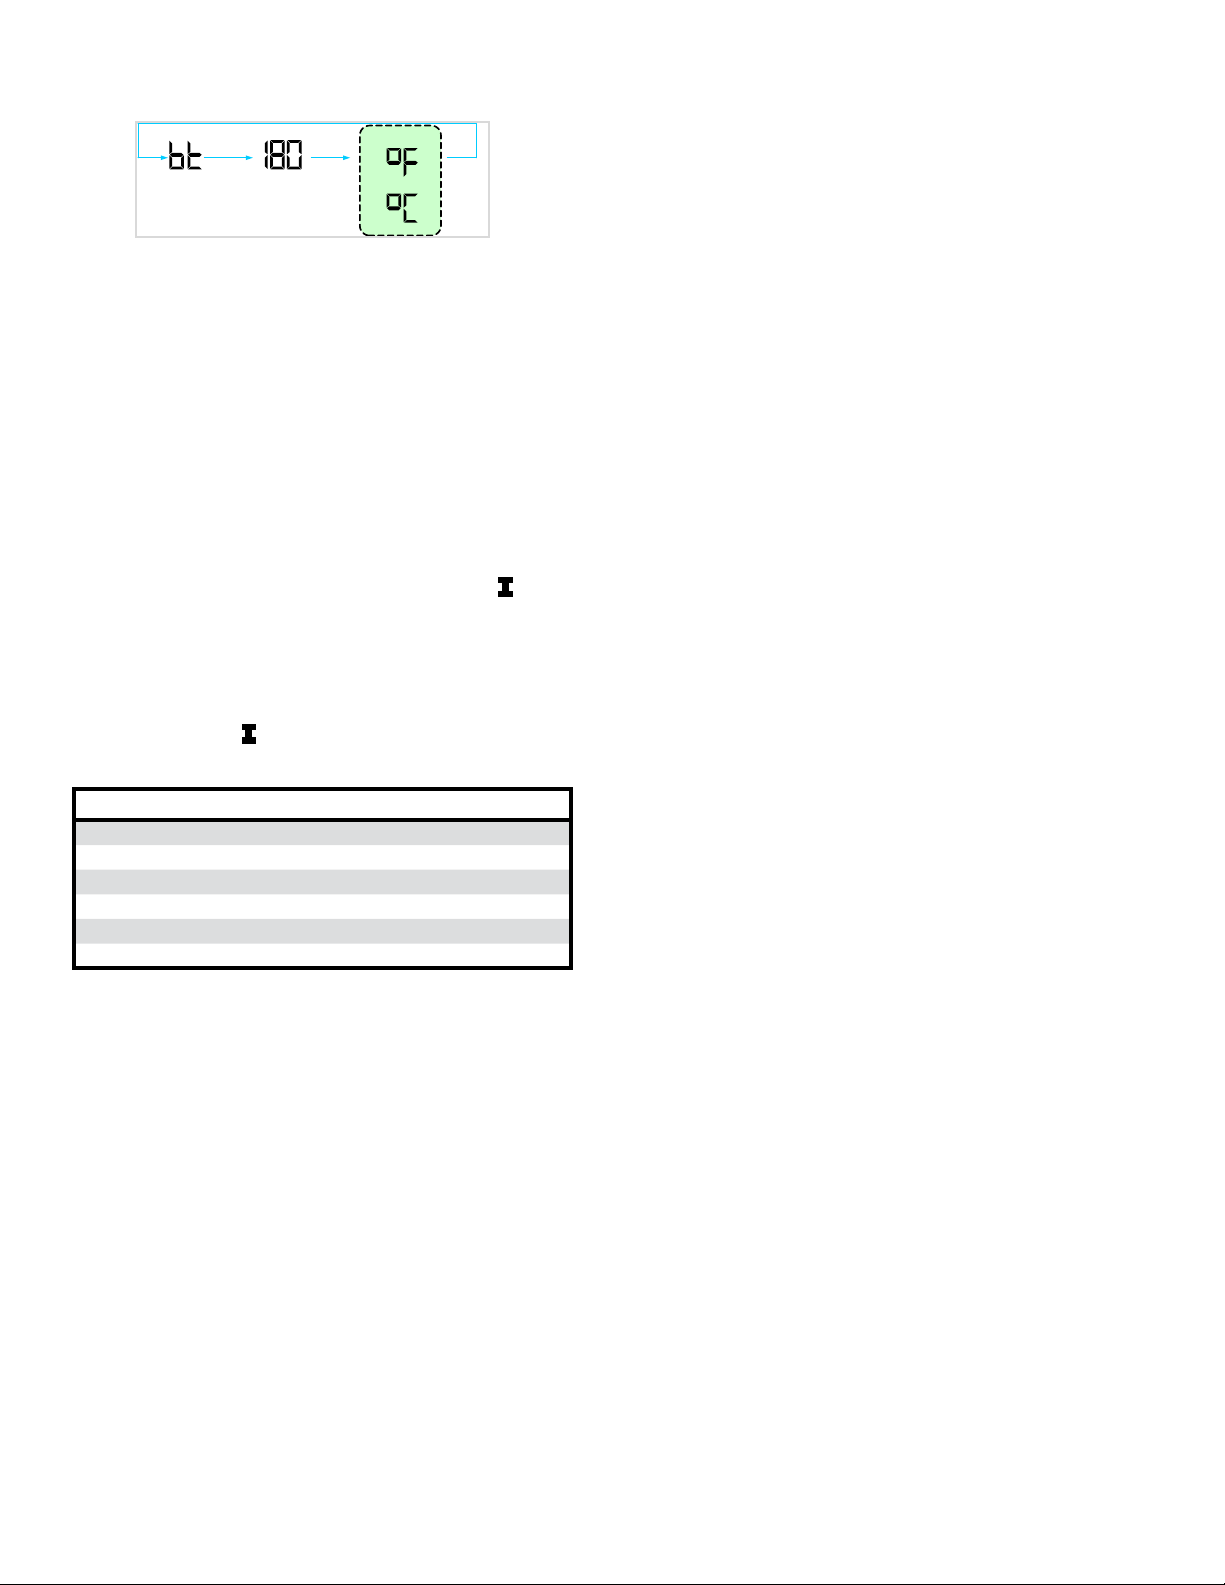
For example, when the “I” key is pressed on the
IQ Boiler Control until “bt” is displayed, it will then
ash a three digit number (such as “180”) followed
by either “F” (or “C”). This indicates that the boiler
water temperature is 180°F. Other operating
parameters display the information in a similar
fashion.
13
Page 14
Unit D isplay
OR
Sample
Display
1 sec
1 sec
1 sec
8. PROGRAM THE CONTROLS (continued)
Please note that in operating mode to hold the
display on the value the user can press and hold
either the Up ñ or Down ò keys and the value
will be continuously shown. This may be helpful in
watching a value “live”.
Changing the Adjustable Parameters
To adjust the High Limit setpoint, High Limit
Differential or Pump Overrun time settings or
setting the display for either °F or °C temperature
readings:
1. Access the adjustment mode by pressing
and holding the Up ñ, Down ò, and “I”
keys simultaneously for three (3) seconds.
This procedure is intended to discourage
unauthorized changes or accidental changes
to limit settings.
2. Press the "I" key to display available
Adjustment Mode options. Select an option.
Adjustment Mode Options
HL_ Adjust High Limit Setting
dF_ Adjust High Limit Differential
Or_ Pump Overrun Time (minutes)
rst Reset Lockout
f-C Select degrees F or C Mode
bac Back to Operating Mode
3. Press the Up ñ and Down ò keys to adjust
the displayed setpoint to the desired value.
4. To return to the normal operating mode
from the Adjustment Mode, when the "bAc”
option is displayed, press either the Up ñ or
Down ò key. If no keys are pressed, after
ve (5) minutes the IQ Boiler Control will
automatically return to the Operating Mode.
More Information about Adjustable Parameters
1. High Limit (HL_)
The IQ Control is factory programmed
with a High Limit Setpoint of 180°F. The
boiler turns "off" when the supply water
temperature is above this value. The High
Limit setpoint is adjustable between 130°
and 220°F. The Operating Setpoint (SP) will
equal the High Limit Setpoint unless an IQ
Outdoor Reset IQ Option Card is installed.
The Outdoor Reset IQ Option Card reduces
the Operating Setpoint to regulate heat
delivery, increase home comfort and
save energy. Refer to the Appendix H for
additional information.
2. Differential (df_)
The IQ Boiler Control is factory programmed
with a Differential of 15°F. The Differential
is the number of degrees the supply
temperature must decrease below the
Operating Setpoint before the boiler can
restart. The differential is adjustable
between 10° through 30°F.
3. Pump Overrun Time (OR_)
The IQ Boiler Control is factory programmed
with a Pump Overrun Time of 0 minutes.
Pump Overrun Time (also called “off delay”
or “post purge”) continues pump operation
after a call for heat has ended, sending
excess heat from the boiler into the priority
zone. Ensure system piping and zone panel
settings allow water ow to the priority zone
after the call for heat ends. The Pump
Overrun Time is adjustable between 0
through 10 minutes.
Using the IQ Option Panel
IQ Option Cards are available from Burnham
distributors and are the simplest way to add
functionality, safety and efciency to your heating
system. The IQ Option Panel provides an easy and
convenient means to "plug-in" an Auxiliary High
Limit, Low Water Cut-off and/or Outdoor Reset
function.
For installation, programming, and troubleshooting
instructions, refer to the instructions supplied with
those cards.
14
Page 15

8. PROGRAM THE CONTROLS (continued)
Using the Optional LCD Display Kit
The LCD Display is an easy to use touch screen
type display that allows a technician to monitor
and adjust the IQ Boiler Control and connected
IQ Option Cards. All boiler settings, status and
error codes are displayed in full text. All Outdoor
Reset IQ Option Card parameters are adjustable
with graphic and help information screens. The
LCD Display Kit includes a mounting bracket
and wiring harness to allow mounting in the ES2
plastic hood above the front door. For installation,
programming, and troubleshooting instructions,
refer to the instructions supplied with the display.
GAS LEAKS may result in re or
explosion.
WATER LEAKS may cause extensive
property damage.
9. CHECK FOR GAS AND WATER LEAKS
Refer to Appendix E – Filling the System and
Checking for Leaks
15
Page 16
10. PERFORM STARTUP CHECKS AND ADJUSTMENTS
FAILURE TO PERFORM THESE
CHECKS of the boiler's combustion and
safety systems may result in serious property
damage, injury, or death.
IF YOU SMELL GAS, STOP and repair
the leak. Lighting the boiler when gas is
leaking may cause explosion or re.
Follow the checklist below:
1. Verify that the venting, water piping, gas
piping, and electrical systems are properly
installed and checked.
2. Apply power to the boiler.
3. Adjust zone thermostat to maximum setting.
4. Allow gas line to purge of air.
10-b
q Boiler lights cleanly within 60 seconds.
5. Adjust gas input rate. See Appendix F
– Adjusting Gas Input Rate
10-a
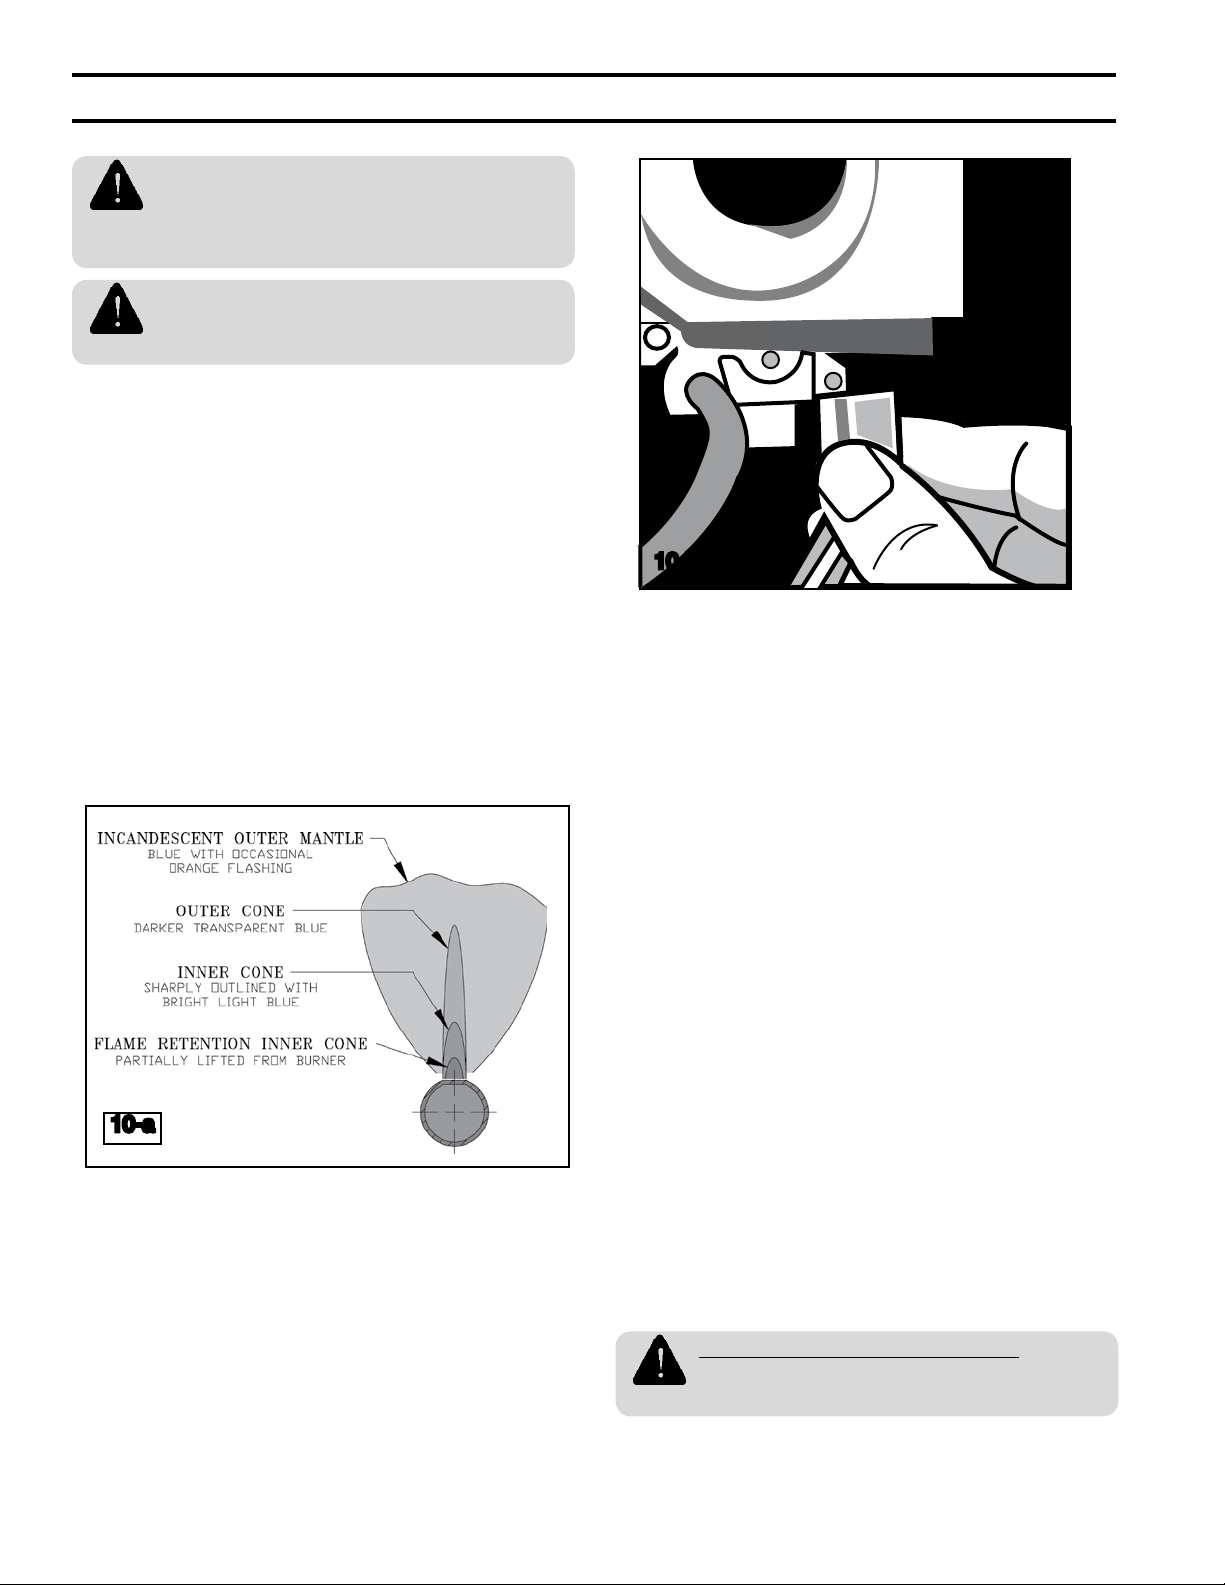
q Pilot and main burner flames appear
clean and blue.
6. Disconnect pilot lead wires from gas valve
(Figure 10-b).
q Boiler shuts off.
7. Reconnect pilot lead wires to gas valve.
q Boiler restarts.
8. Adjust zone thermostat to minimum setting.
q Boiler shuts off.
9. Adjust zone thermostat to maximum setting.
10. Observe temperature gage as boiler heats.
11. Adjust the high limit setting to its minimum
level (see "Programming High Limit" in
Section 8).
q Boiler shuts off when temperature gage
reads within 15°F of high limit setting.
12. Return high limit to the desired setting (see
"Programming High Limit" in Section 8).
13. Check draft. See Appendix G
– Checking Draft and Combustion.
q No spillage observed.
14. Check combustion in the vent stack and
record results in the spaces provided below.
_____ CO
_____ O
(less than 7%)
2
(more than 9%)
2
_____ CO (less than 100 ppm, air free)
ANY FAILED STARTUP CHECK
Must be corrected before placing the
boiler in service.
16
Page 17

ANNUAL MAINTENANCE CHECKLIST
WARNINGS
THE BOILER CONTAINS REFRACTORY
CERAMIC FIBER, a possible human carcinogen
Use a NIOSH approved respirator when servicing
high-temperature insulation and gasket materials.
Wash exposed skin gently with soap and water
after contact Wash exposed clothing separate
from normal laundry.
LABEL ALL WIRES prior to disconnection when
servicing controls. Wiring errors can cause
improper and dangerous operation
FAILURE TO MAINTAIN THE BOILER in proper
working condition may lead to re, explosion,
Equipment you will need:
q Soft bristle brush
q Bristle ue brush
q Vacuum with brush attachment
Perform these tasks each year:
1. Clean low water cutoff probe (if applicable).
personal injury or death, and extensive property
damage.
TURN OFF ALL GAS AND ELECTRIC power
supplies to the boiler before servicing. Contact with
or release of dangerous ammable gas, electrical
voltage, moving parts, and very hot water under
pressure may cause serious personal injury,
property damage, or death.
LOCK ELECTRICAL BOXES AND GAS VALVES
CLOSED to prevent someone from inadvertently
restoring power or gas before the heating system is
safe to operate.
(7) Hold burner at throat. Lift front of burner
to clear orice (Figure AM-1). The
burner that holds the pilot can only be
removed by rst lifting the burner
adjacent to its right.
6. Perform Startup Checks and Adjustments
described earlier in this manual.
2. Inspect vent for obstruction and signs of
condensation, distortion, overheating or gas
leakage.
3. Clean vent terminal and air intake screens.
4. Inspect boiler ue passages:
(1) Remove vent pipe, damper.
(2) Remove top panel and hood.
(3) Remove blocked vent switch and
canopy.
(4) Examine all ue passageways. Using
bristle ue brush and vacuum,
remove any soot or obstructions.
5. Remove and clean main burners:
(1) Remove jacket front panel.
(2) Disconnect pilot tubing at gas valve.
(3) Disconnect pilot lead wires at gas valve.
(4) Remove wires from ame roll-out switch.
(5) Remove burner access panel.
(6) Mark location of the pilot main burner on
the manifold if the marking on manifold
is missing or obliterated.
7. Check operation of airow sensing switches.
8. Check for water leaks on the boiler or water
pooling around boiler.
9. Manually operate the relief valve. If the
water is grey or black, there is excessive
oxygen in the system. Oxygen is corrosive
to boilers. Eliminate any source of oxygen.
10. Verify proper operation after servicing.
AM-1
17
Page 18

TROUBLESHOOTING
When a problem occurs with the boiler operation, the Burnham IQ Control System easily provides specic,
valuable information to help resolve the issue quickly. The display on the IQ Boiler control should be the
rst place to check.
If "Err" IS NOT displayed on the IQ Boiler Control: Use the following table to determine the problem
and possible causes.
IQ Boiler Control Status Codes (when "Err" is not displayed)
Display Status Boiler / Control Action(s)
Blank
Boiler and
Circulator off
Boiler not
responding to
1
Heat Request
Boiler Running
but Circulator
8
is not Running
10
10
13
14
15
16
18
19
Retry Delay
Recycle Delay
Soft Lockout
Hard Lockout
Wait for Limit
to Close
Flame Out of
Sequence
Waiting for
Damper to Open
Waiting for
Damper to Close
No 120 Vac power at boiler, check breaker and wiring between breaker panel and boiler.
Boiler is not seeing Heat Request. Check thermostat or zone wiring for loose connection,
miswiring, or defective thermostat or zone control.
Check wiring for loose connection, miswiring. When there is a Domestic Hot Water Heat Request
wired to the Outdoor Air Reset card the Circulator will be off for the duration of the priority time.
This to allow all of the boiler output to be provided for fast Indirect Water Heater recovery. Check
Priority Time (pt_) function using Outdoor Air Reset IQ Option Card Adjustment Mode (see Reset
Card Adjustment Mode instructions).
The burner failed to light (no ame signal).
After a 5 minute delay, IQ Control will attempt to light the burner again.
There is no limit to the number of retries.
The burner loses ame during running mode ( code "8").
After a 10 second delay, IQ Control will attempt to light the burner again.
If the burner loses ame during running mode ( code "8") during the next six recycles, IQ
Control will progress to a soft lockout.
When a soft lockout occurs, boiler will shut down.
Boiler automatically restarts once condition that caused the lockout is corrected and the one-hour
time delay is completed.
Boiler can be restarted sooner than the time delay by using Adjustment Mode function and
manually resetting boiler (see Adjustment Mode instructions).
When a hard lockout occurs boiler shuts down.
Boiler will NOT automatically restart once the condition that caused the lockout is corrected.
It will be necessary to go to Adjustment Mode function to manually reset the boiler (see
Adjustment Mode instructions).
Heat Request occurs and start of operating sequence is halted due to an open limit.
Open limits may include Flame Roll Out Switch, Blocked Vent Switch, or Auxiliary.
Limit or Low Water Cutoff IQ Option Cards (when installed), refer to IQ Option Panel display for
additional information.
Flame Signal is still present when expected to be 0 (no ame).
Heat Request occurs and the IQ control is waiting for the damper to open (end switch to close).
The damper end switch is closed and the control waits for the damper end switch to open (*end
switch is open when damper is closed). This is checked at the beginning of a heat cycle before
opening the damper. If the damper doesn't close in 60 seconds, the IQ Control goes to Status 21.
18
Page 19

TROUBLESHOOTING (continued)
IQ Boiler Control Status Codes (when "Err" is not displayed) - continued
Display Status Boiler / Control Action(s)
Damper Failed
20
Damper Failed
21
Open
Closed
The damper end switch has not closed (damper end switch is open) at the beginning of
the heat cycle. An alarm message is sent but the control is not in lockout.
The damper end switch has not opened (damper end switch is closed) at the
beginning of the heat cycle. An alarm message is sent but the control is not in lockout.
If "Err" IS displayed on the IQ Boiler Control: "Err" ashes on the IQ Boiler control display followed
by a number. Use the following table along with this error number to determine the problem and possible
causes:
IQ Boiler Control Error Codes (when "Err" is ashing)
Display Status Boiler / Control Action(s)
Blank
Err
Err
Err
Err
Err
Err
Err
Err
Err
Err
Err
Err
Err
Err
Boiler and Circulator off No 120 Vac power at boiler, check breaker and wiring between breaker panel and boiler.
Flame Current Lower
4
6
18
24
32
55
56
57
58
59
60
61
63
64
than Threshold
Flame Sensed Out of
Normal Sequence
Electronics Failure Replace Control .
Flame Sensed During
Post-Purge
Temperature Sensor
Failure
Damper Failed
to Open
Damper Failed to Close Atmospheric Damper End Switch failed to open (end switch contacts stuck closed).
Flame Rod Shorted to
Burner Ground
AC Line Frequency Error AC Signal is too noisy or frequency is incorrect.
Line Voltage Error AC voltage out of specication high or low.
Thermostat Input Higher
than Threshold
Line Voltage Unstable Possibly too many heavy loads switching on and off cause erratic supply voltage.
Soft Lockout - Maximum
Recycles Exceeded
Soft Lockout - Internal
Failure
Check pilot assembly.
Flame sensed out of normal sequence (before opening gas valve or after closing gas
valve).
Flame sensed during post-purge (after gas valve signaled closed).
Temperature sensor or interface failure (open or short connection, increased connection
resistance, dual sensor mismatch) or control hardware failure.
Atmospheric Damper End Switch failed to close (end switch contacts stuck open).
Flame Rod shorted to burner ground, this can result from excessive ue gas
condensation.
Check thermostat wiring.
Maximum number of recycles exceeded.
Caused by general electronics failure such as relay open or shorted contacts, ame
sensing circuit error, or A to D error.
19
Page 20

TROUBLESHOOTING (continued)
If IQ Boiler Control Shows Status Code “STA 15": The IQ Boiler Control is “Waiting for Limit to Close”
and the display on the IQ Option Panel should be the rst place to check. The IQ Option Panel display
(lower display) will show one of the following status codes:
IQ Option Panel Display Shows “ERR"
Display Status Boiler / Control Action(s)
Err 1 Low Input Voltage AC voltage is too low
Whenever a new IQ Option Card is rst installed into the IQ Option Panel, the IQ Option
Panel automatically “Learns” the card. This means it detects the specic card and lists
it as a card number (C1, C2, or C3). However, to help avoid errors or unauthorized
IQ Option Card
Err 2 - card #
Err 3 - card #
Err 4 - card #
Err 5
Err 6 Incorrect Wiring Check boiler wiring.
Err 7
Err
8
8
Type Change
without Re-Learn
IQ Option Card
Communications
Error
IQ Option Card
Hardware
Interface Error
Limit Output OFF
in ON State
Limit Output ON
in OFF State
Internal IQ Option
Panel Error
option card changes, once an IQ Option Card is initially installed, the IQ Option Panel
will not automatically “Learn” a different card in the same slot. In this situation, the IQ
Option Panel has to “Learn” about the new card manually. To have the IQ Option Panel
recognize or “Learn” about a different card, the user must press the “I” key on the IQ
Option Panel until “Lrn” is displayed. Then press and hold either the Up ñ or Down ò
key for at least three (3) seconds. The IQ Option Panel will then recognize and “Learn”
the new IQ Option Card.
The IQ Option Card is not installed properly or has an internal fault. Remove the card
and check for bent IQ Option Panel card interface pins. Straighten bent or misaligned
pins or choose another card slot and reinstall card. If problem persists, replace card.
The IQ Option Card is not installed properly, there is a option card or IQ Option Panel
fault. Remove the card and check for bent IQ Option Panel card interface pins.
Straighten bent or misaligned pins or choose another card slot and reinstall card. If
problem persists, replace card.
Check limit string wiring, replace the IQ Option Panel.
Check limit string wiring, replace the IQ Option Panel.
Replace the IQ Option Panel.
If IQ Option Panel Display Shows “OL": The OL- “card number” indicates the card slot causing the Open
Limit. For example, “OL-C1" means open limit in the card located in card slot 1. To determine the cause
of the open limit the user must switch the display on the IQ Option Panel to show the view mode of the IQ
Option Card installed in Slot 1.
For example, if, while the boiler has a Heat Request, and the Aquastat IQ Option Card installed in Slot 1
has a sensor failure the IQ Option Panel displays OL-C1 (Open Limit Card Slot 1). To investigate the status
of option card C1:
1. Press the “I” key on the IQ Option Panel. The display will go from “OL-C1” to C1 .
2. When the display shows C1, press either the Up ñ or Down ò keys to switch the display to show the
view mode of the Aquastat Limit Control IQ Option Card inserted in Slot 1. The display will now read
Err -119, Sensor Failure.
3. Check the sensor connections and when required replace the sensor.
4. When the sensor failure is corrected the IQ Option Panel will return to the “O.C.P" display and the IQ
Boiler Control start sequence will continue.
For additional information refer to the instruction manual supplied with the IQ Option Card.
If IQ Option Panel Display Shows “
O.C.P": The Option Panel is in normal run or operating mode, the IQ
Option Panel display will show “O.C.P" (Option Card Panel) along with a oating decimal point that ashes
on and off (the “heartbeat” ash indicating the panel is functioning properly and there are no open limits or
errors). The Option Panel or the card installed in the option panel are not causing the open limit.
1. Check for loose boiler wiring and check ame roll out & blocked vent switches.
20
Page 21

REPAIR PARTS LIST
Key
No.
1A Block Assembly 102287-03 102287-04 102287-05 102287-06 102287-07 102287-08 102287-09
1B Canopy Gasket Kit 6206001
1C Canopy Assembly 102554-03 102554-04 102554-05 102554-06 102554-07 102554-08 102554-09
1D Flue Bafe
Description
Blocked Vent Switch
(not shown)
ES23 ES24 ES25 ES26 ES27 ES28 ES29
[2]
102678-01
[3]
102678-01
[Quantity] Part Number
[4]
102678-01
[5]
102678-01
80160157
[6]
102678-01
[7]
102678-01
[8]
102678-01
21
Page 22

REPAIR PARTS LIST (continued)
Key
No.
2A Base Wrapper 71807031 71807041 71807051 71807061 71807071 71807081 71807091
2B Base Tray 102543-03 102543-04 102543-05 102543-06 102543-07 102543-08 102543-09
2C Burner Tray Assembly 61807031 61807041 61807051 61807061 61807071 61807081 61807091
2D Base Front Panel 71807035 71807045 71807055 71807065 71807075 71807085 71807095
2E Burner Access Panel 71807036 71807046 71807056 71807066 71807076 71807086 71807096
2F Base Gasket Kit 6206002
2G Base Side Insulation [2] 72007001
2H Base Rear Insulation 72007031 72007041 72007051 72007061 72007071 72007081 72007091
2J Base Front Insulation 72007032 72007042 72007052 72007062 72007072 72007082 72007092
2K Base Leg Assembly [4] 6186001
2L Flame Roll-out Switch 80160044
2M Manifold Support Bracket 71807001
Description
ES23 ES24 ES25 ES26 ES27 ES28 ES29
[Quantity] Part Number
22
Page 23

REPAIR PARTS LIST (continued)
Key
No.
Gas Valve (Natural Gas),
Honeywell VR8204P1171
Gas Valve (Natural Gas),
Honeywell VR8304P4496
3A
Gas Valve (LP Gas), Honeywell
VR8204C3015
Gas Valve (LP Gas), Honeywell
VR8304P4314
½" Gas Manifold 82207031 82207041 82207051 82207061 N/A
3B
¾" Gas Manifold N/A 82207071 82207081 82207091
Burner Orices - Natural Gas #47
3C
Burner Orices - LP Gas 1.20mm
3D Pilot Burner 100147-01
Pilot Assembly - Natural Gas 102592-01
3E
Pilot Assembly - LP Gas 102593-01
3F Main Burner
3G Pilot Tubing 8236122
Description
ES23 ES24 ES25 ES26 ES27 ES28 ES29
81660282 N/A
N/A 81660283
81660146 N/A
N/A 81660160
[4]
822710
[4]
822792
[3]
100146-01
[6]
822710
[6]
822792
[5]
100146-01
[Quantity] Part Number
[8]
822710
[8]
822792
[7]
100146-01
[10]
822710
[10]
822792
[9]
100146-01
[12]
822710
[12]
822792
[11]
100146-01
[14]
822710
[14]
822792
[13]
100146-01
[16]
822710
[16]
822792
[15]
100146-01
23
Page 24

REPAIR PARTS LIST (continued)
Key
No.
4A IQ Boiler Control 102289-01
4B IQ Option Panel 102291-01
4C Transformer 102516-01
4D Temperature Sensor 102411-01
Description
ES23 ES24 ES25 ES26 ES27 ES28 ES29
[Quantity] Part Number
24
Page 25

REPAIR PARTS LIST (continued)
Key
No.
5A Jacket Left Side Panel 102566-01
5B Jacket Right Side Panel 102567-01
5C Jacket Rear Panel 102569-03 102569-04 102569-05 102569-06 102569-07 102569-08 102569-09
5D Jacket Vestibule Panel 102565-03 102565-04 102565-05 102565-06 102565-07 102565-08 102565-09
5E Jacket Top Panel 102568-03 102568-04 102568-05 102568-06 102568-07 102568-08 102568-09
5F Jacket Front Door 102576-03 102576-04 102576-05 102576-06 102576-07 102576-08 102576-09
5G Jacket Rear Discharge 102549-03 102549-04 102549-05 102549-06 102549-07 102549-08 102549-09
5H Jacket Poly Front Cover 102600-03 102600-04 102600-05 102600-06 102600-07 102600-08 102600-09
5J Upper Poly Grille 102621-01
5K Lower Poly Grille 102622-01
Description
ES23 ES24 ES25 ES26 ES27 ES28 ES29
[Quantity] Part Number
25
Page 26

REPAIR PARTS LIST (continued)
Key
No.
6A Supply Water Manifold 80607001
6B Temperature/Pressure Gauge 100282-01
6C Circulator Wiring Harness 6130701
6D 30 PSI Relief Valve 81660363
6E Drain Valve 806603012
6F Vent Damper 102284-01 102284-02 102284-03 102284-04 102284-05
Circulator (not shown):
Taco 007-2 8056170
Grundfos UP-15 8056173
B & G NRF-22 8056174
Description
ES23 ES24 ES25 ES26 ES27 ES28 ES29
[Quantity] Part Number
26
Page 27

INTERNAL WIRING
Figure IW-1: Wiring Diagram
27
Page 28

INTERNAL WIRING (continued)
28
Figure IW-2: Wiring Schematic
Page 29

INTERNAL WIRING (continued)
Figure IW-3: Single Zone System with Domestic Hot Water Tank
Figure IW-4: Multiple Zone System with Zone Circulators
29
Page 30

INTERNAL WIRING (continued)
Figure IW-5: Multiple Zone System with Zone Valves
30
Figure IW-6: Multiple Zone System with Zone Circulator Panel
Page 31

T STAT 1
VALVE 1
T STAT 2
VALVE 2
T STAT 3
OFF
ON
ZONE 4PRIORITY
TACO ZVC 404 (OR EQIV.)
FOUR ZONE ZONE VALVE CONTROL
WITH OPTIONAL PRIORITY
THERMOSTAT
BOILER JACKET
PANEL
1 23T T
1
1
4
2
3
5
6
7
8
2
3
LINE VOLTAGE FACTORY WIRINGSIZE 14 AWG TYPE TWOR TEW/AWM WIRE
LINE VOLTAGE FIELDWIRING
VALVE 3
T STAT 4
VALVE 4
POWER
POWER IN
T T
ZONE 1
T T
ZONE 2
T T
ZONE 3
T T
ZONE 4
MODE
NORMAL
RESET
THERMOSTAT THERMOSTAT
ZONE 1
1 2 3 4
ZONE 2
1 2 3 4
ZONE 3
1 2 3 4
ZONE 4
1 2 3 4
N/O COM N/C
ZONE 4RELAY
DHW
CIRCULATOR
(SUPPLIED BY
OTHERS)
JUMPER
3 &4
2 WIREZONE
VALVE
(NO ENDSWITCH)
2 WIREZONE
VALVE
(NO ENDSWITCH)
1
4 WIREZONE
VALVE
(POWER OPEN,
SELF CLOSING)
JUMPER
3 &4
PRIORITY
ZONE
FUSE (3AMP MAX.)
24V
TRANSFORMER
L1
POWER
SUPPLY
120/60/1
L2
DHW AQUASTAT
(L4006, L4080)
(SUPPLIED BY OTHERS)
DOMESTIC HOT WATER PRIORITY IS
SELECTED USING ZONE PANEL SWITCH
SYSTEM
CIRCULATOR
(SUPPLIED BY OTHERS)
WIRING USED WHEN DOMESTIC
HOT WATER PRIORITY ISDESIRED
N/O COM N/C
ZONE 4RELAY
MAIN
END
SWITCH
EXTRA
END
SWITCH
DHW
CIRCULATOR
(SUPPLIED BY
OTHERS)
L1
L2
SYSTEM
CIRCULATOR
(SUPPLIED BY OTHERS)
WIRING USED WHEN DOMESTIC
HOT WATER PRIORITY NOTDESIRED
IQ OPTION PANEL
MAIN
END
SWITCH
EXTRA
END
SWITCH
2
3
INTERNAL WIRING (continued)
Figure IW-7: Multiple Zone System with Zone Valve Panel
31
Page 32

APPENDIX A – COMBUSTION AIR
PROVIDE ENOUGH AIR to ventilate the
boiler room, dilute the ue gases, and
sustain combustion. Ignition failure, overheating,
re, carbon monoxide, and spillage of ue gases
may result from poor air supply.
If the boiler is a Direct Vent boiler and exchanges
all combustion air and combustion products
directly with the outdoors, there are no special
requirements for providing combustion, ventilation,
and dilution air.
If the boiler is chimney vented, power vented or
induced draft and draws combustion air from within
the building, follow the steps below to determine
how to provide air to the boiler.
Is the boiler located in a conned space?:
1. Calculate the oorspace (in square feet) of
the boiler room and all rooms connected
to the boiler room by passageways not
furnished with doors.
___________ floorspace (sq. ft.)
2. Add up the input rates of all the combustion
appliances installed in the same oorspace.
combined appliance
___________ input (BTU/hr)
3. In the table below, nd the Minimum
Allowable Floorspace based on the
Combined Input Rate from Step 2 and the
ceiling height. If the Combined Input Rate
is between two rates, use the next highest
rate.
minimum allowable
___________ floorspace (sq. ft.)
Minimum Allowable Floorspace in the Boiler Room
and Freely Connected Rooms (sq. ft.)
Ceiling Height
7’ 8’ 9’ 10’
50,000 357 313 278 250
Combined
Appliance
Input Rate
(see Step 2)
(BTU/hr)
100,000 714 625 556 500
150,000 1071 938 833 750
200,000 1429 1250 1111 1000
250,000 1786 1563 1389 1250
300,000 2143 1875 1667 1500
350,000 2500 2188 1944 1750
400,000 2857 2500 2222 2000
32
4. If the Floorspace from Step 1 is less than the
Minimum Floorspace from Step 3, then you
must provide outdoor air to the boiler room.
Proceed to Step 6.
Is the boiler located in a building of unusually tight
construction?
5. If the answer to all of the three questions
below is “yes”, then you must provide
outdoor air to the boiler room.
Do the walls and ceilings exposed to the
outside atmosphere have a continuous
water vapor retarder with a rating of 1 perm
or less, with openings gasket or sealed?
Yes No
Are operable windows and doors
weatherstripped?
Yes No
Are exterior wall joints caulked or sealed?
Yes No
6. If you must provide outdoor air to the boiler
room, the top of the permanent opening
into the boiler room must be within 12” of
the ceiling, and the free area of the opening
(sq. in.) must be no less than the Combined
Appliance Input (from Step 2) divided by
3000 BTU/hr/sq. in.
combined appliance
__________ input (Step 2)
÷ 3000 BTU/hr/sq. in.
Minimum Opening Size
_____ (sq. in.)
7. Duct this opening vertically or horizontally
directly to the outdoors, or directly to a
space that communicates directly with the
outdoors, such as an attic or crawlspace.
For more details and options, refer to your local
building code, the National Fuel Gas Code (NFPA
54 and ANSI Z223), and the Canadian Natural Gas
Installation Code CAN/CGA-B149.1 or Propane
Installation Code CAN/CGA-B149.2.
Page 33

APPENDIX B – VENTING
VENT THIS BOILER according to the instructions. Failure to do so may cause products of
combustion to enter the building resulting in severe property damage, personal injury or death.
Install this boiler according to this manual and the National Fuel Gas Code, ANSI Z223.1/NFPA 54,
i
the Natural Gas and Propane Installation Code, CAN/CSA B149.1, or applicable provisions of the
local building codes. Contact local building or fire officials about restrictions and installation
inspection in your area.
If you are removing an existing boiler from a gas
vent or chimney that is also used to vent other gas
appliances:
1. Seal any unused openings in the
common venting system.
2. Visually inspect the venting system
for proper size and horizontal pitch
and determine there is no blockage or
restriction, leakage, corrosion, and other
deciencies which could cause an
unsafe condition.
3. Resize the common venting system
to approach the minimum size as
determined using the National Fuel Gas
Code, ANSI Z223.1 and/or CAN/CSA
B149.1, Installation Codes.
4. Check the draft of each remaining
appliance using the procedure described
in Appendix G, checking draft and
combustion.
5. Correct any draft problems before
placing the gas appliances back into
service.
In addition to previously mentioned vent
i
codes of the main general guidelines,
atmospheric vented installations must
also be in accordance with the Standard for
Chimneys, Fireplaces, Vents and Solid Fuel
Burning Appliances, ANSI/NFPA 211. For Canada
installations, refer to the Natural Gas and LP
Installation Code, CAN/CSA- B149.1.
33
Page 34

APPENDIX B1 – ATMOSPHERIC VENTING
GENERAL WARNINGS FOR ATMOSPHERIC VENTING SYSTEMS
USE ATMOSPHERIC VENTING only with
boilers approved for atmospheric venting as
noted in the Specifications Section of this
manual.
INSPECT EXISTING CHIMNEY for obstructions
and deterioration and repair or line the chimney
prior to placing the boiler in service.
UNLINED MASONRY CONSTRUCTION is
prohibited for use as a chimney.
FIREPLACES AND FAN-ASSISTED GAS
APPLIANCES must not be vented into the same
chimney space as this boiler.
Install vent and vent connector (Figure B-1). Comply with all design and installation requirements in the
Connect Venting Section of this manual, local code, and the National Fuel Gas Code or Can/CSA B149.1.
Clay ue lined masonry chimneys do not meet the venting requirements for this appliance.
DO NOT REDUCE THE DIAMETER of the vent
connector between the boiler and the chimney.
It must not be smaller than the outlet on the
drafthood, damper, or vent reducer supplied with
the boiler.
UNLISTED VENT DAMPERS AND
OBSTRUCTIONS in the vent pipe are prohibited.
THE VENT DAMPER supplied with the boiler
shall not be used to block the vent of any other
appliance.
34
Figure B-1: Typical Atmospheric Vent Installation
Page 35

THIS PAGE INTENTIONALLY LEFT BLANK
35
Page 36

APPENDIX C – GAS PIPING
ASSURE GAS PIPING IS LEAK FREE
AND OF PROPER SIZE and type for the
connected load.
SHUT OFF MAIN GAS SUPPLY prior to
installing or servicing boiler gas piping.
1. Determine the boiler’s maximum gas
demand and minimum gas supply pressure
(printed on the boiler’s rating label) and the
demand of other gas appliances served by
the same gas meter.
2. Ensure that gas piping, ttings, and gas
meter capacities can supply the maximum
gas demand of all appliances at pressures
above their minimum allowable gas
pressure. Tables C-1 and C-2 provide typical
capacities of gas pipes and ttings.
3. Derate the gas ow through pipes by
multiplying by a correction factor in Table
C-3 based on the specic gravity of the gas.
4. For materials or conditions other than those
listed above, refer to the National Fuel Gas
Table C-3: Specic Gravity Correction Factors For
Natural Gas
Specic
Gravity
0.50 1.10 0.85 0.81
0.55 1.04 0.90 0.82
0.60 1.00 1.00 0.78
0.65 0.96 1.10 0.74
0.70 0.93 1.20 0.71
0.75 0.90 1.30 0.68
0.80 0.87 1.40 0.66
Correction
Factor
Specic
Gravity
Correction
Factor
Code, NFPA54/ANSI Z223.1, or size the
system using standard engineering methods
acceptable to authority having jurisdiction.
USE PROPER THREAD COMPONENTS
on all gas connectors.
USE THREAD (JOINT) COMPOUNDS
(pipe dope) rated for liqueed petroleum
gas.
Table C-1: Maximum Capacity of Schedule 40 Pipe in Cubic Feet Per Hour (CFH)
Length
(Feet)
10 132 278 520 1050 175 360 680 1400
20 92 190 350 730 120 250 465 950
30 73 152 285 590 97 200 375 770
40 63 130 245 500 82 170 320 660
50 56 115 215 440 73 151 285 580
60 50 105 195 400 66 138 260 530
70 46 96 180 370 61 125 240 490
80 43 90 170 350 57 118 220 460
90 40 84 160 320 53 110 205 430
100 38 79 150 305 50 103 195 400
½ ¾ 1 1¼ ½ ¾ 1 1¼
0.3” w.c. Pressure Drop 0.5” w.c. Pressure Drop
*
*1 CFH of Natural Gas is approximately equal to 1000 BTU/hr; 1 CFH of LP is approximately equal to 2500 BTU/hr.
Table C-2: Equivalent Lengths (ft) Of Standard Pipe Fittings & Valves
Pipe
Size
½” 0 19 9 4 2 1 1 3
¾” 0 23 12 5 2 1 1 4
1” 1 29 15 7 3 1 2 5
1 ¼” 1 39 20 9 4 2 2 7
1 ½” 1 45 22 11 5 3 3 8
Gate Globe Angle
Swing
Check
90°
Elbow
45°
Elbow
90° ‘T’, Flow
Through Run
90° ‘T’, Flow
Through Branch
36
Page 37

APPENDIX C – Gas Piping (continued)
5. Bond all above-ground gas piping to a
grounding electrode and ensure the piping is
electrically continuous.
DO NOT USE GAS PIPING AS A
GROUNDING ELECTRODE. Refer to
National Electrical Code, NFPA 70.
6. Install sediment trap, ground-joint union and
manual shut-off valve upstream of boiler gas
control valve and outside jacket.
7. When the piping is completed, test it for
leaks.
(1) When testing over ½ psig, disconnect
(2) When testing at ½ psig or less, isolate
boiler from gas supply piping by closing
boiler’s individual manual shut-off valve.
(3) Locate leaks using approved
combustible gas detector or
nonammable, non-corrosive leak
detection solution.
DO NOT CHECK FOR LEAKS USING
OPEN FLAMES such as matches or
candles or devices that spark.
8. Repair any detected leaks.
the boiler and its individual shut-off valve
from the gas supply piping.
APPENDIX D – SYSTEM PIPING
USE PROPER DESIGN AND INSTALLATION PRACTICES and observe all local codes when
installing system piping. Property damage and injury may result from an improperly piped or
designed heating system.
Boiler damage caused by flawed system design or operation is excluded from our warranty.
i
Training and experience is required to design and install a piping system that will protect the boiler and
provide many years of comfort to the building occupants. Be sure to protect the boiler from the following
problems:
1. Corrosion
(1) Comply with the boiler’s specic
water quality requirements. See the
Specifications Section of this manual.
(2) Pressurize the system above the highest
net positive suction head (NPSH)
required for each circulator and ensure
positive pressure at the uppermost point
in the system.
(3) Maintain a closed boiler system using
heat exchangers to transfer heat to
open systems, such as domestic hot
water systems.
(4) Purge the system completely of
dissolved oxygen by bleeding all
radiators and installing a properly
(5) Repair leaking pipes, ttings, and vents
to minimize the need to add makeup
water.
(6) Do not ll the boiler with softened water
unless makeup water is extremely hard
and it is not possible to eliminate all
system leaks. If lling the boiler with
softened water, test regularly the water
softener regularly to ensure that brine
solution is not entering the boiler’s water
supply.
2. Lime scale
(1) Repair leaking pipes, ttings, and vents
to minimize the need to add makeup
water.
installed air scoop or air vent.
37
Page 38

APPENDIX D – System Piping (continued)
(2) Comply with the boiler’s specic
water quality requirements. See the
Specifications Section of this manual.
(3) Comply with the boiler’s specic
requirements for minimum water ow
through the boiler, installing a system
bypass or primary-secondary loop if
necessary to maintain ow through the
boiler when serving small zones.
3. Overpressure
(1) Install a properly sized expansion tank.
(2) Do not exceed the boiler’s specic
requirements for maximum allowable
working pressure.
(3) Do not plug or block the relief valve.
4. Freezing
(1) Run all portions of the system piping
inside a heated space unless the system
is properly protected with an inhibited
antifreeze solution.
5. Overheating
(1) Comply with the boiler’s specic
requirement for minimum water ow
through the boiler. See the
Specifications Section of this manual.
(2) Install a low-water cutoff device
whenever the boiler is installed above
the level of the lowest heat emitter
or radiator. Also add a low-water
cutoff when required by local code
requirements.
6. Thermal shock
(1) Do not over-pump. Adhere to the design
ow requirements for each zone.
(2) Install a boiler bypass, system bypass,
or primary-secondary loop when needed
to avoid returning large volumes of cold
water directly to a hot boiler.
7. Condensation
(1) Do not over-pump. Adhere to the design
ow requirements for each zone.
(2) Adhere to the boiler’s specic
minimum return water and supply water
temperature requirements. Install a
boiler bypass, system bypass, or
primary-secondary loop when needed to
maintain water temperatures and ows
within the specied limits.
(3) Do not allow chilled water to enter the
boiler during the heating cycle, or heated
water to enter chilled water coils during
the cooling cycle.
8. Dry Fire
Install a low-water cutoff when the boiler
is installed above the level of the lowest
radiator and when required by local code.
The following system diagrams are intended to provide a minimum level of guidance for a
successful and trouble-free installation of the boiler in common applications. They do not substitute
i
for proper design, evaluation, and installation by a trained and qualified installer using the proper
tools, techniques, and design expertise. Not all options are available with every boiler.
Hot Water Boilers, Non-Condensing
See
Diagram
Indirect Tank?
D-W1
D-W2
D-W3 Tankless Coil
D-W4
D-W5
D-W6
Two or more
zones of
the same
temperature?
Two or more
zones of
different
temperatures?
Two or
more
boilers?
38
Page 39

APPENDIX D – System Piping (continued)
Figure D-0: Piping Schematic Symbols
39
Page 40

APPENDIX D – System Piping (continued)
Figure D-W1: Water Boiler, Series Loop
40
Figure D-W2: Water Boiler, Two or More Zones
Page 41

APPENDIX D – System Piping (continued)
Figure D-W3: Water Boiler, Tankless Coil, Two or More Zones
Figure D-W4: Water Boiler, Indirect Water Heater, Two or More Zones
41
Page 42

APPENDIX D – System Piping (continued)
Figure D-W5: Water Boiler, Indirect Water Heater
42
Figure D-W6: Multiple Water Boilers, Indirect Water Heater, Two or More Zones
Page 43

APPENDIX E – FILLING THE SYSTEM AND CHECKING FOR LEAKS
Fill entire heating system with water and vent air from system. Use the following procedure on a
Series Loop or multi-zoned system installed as per the gure below. Remove air from system when lling.
1. Close full port ball valve located between
vertical hose bib and air scoop in boiler
supply piping (see Appendix D – System
Piping.
2. Isolate all zones by closing zone valves or
shut-off valves in supply and return of each
zone(s).
3. Attach a hose to the vertical hose bib located
prior to the full port ball valve in the system
supply piping.
Terminate hose in five-gallon bucket at
a suitable floor drain or outdoor area.
i
4. Starting with one circuit at a time, open zone
valve or shut-off valve in system supply and
return piping.
5. Open hose bib.
6. Open ll valve (Make-up water line should
be located directly after full port ball valve in
system supply piping between air scoop and
expansion tank).
7. Allow water to overow from bucket until
discharge from hose is bubble free for 30
seconds.
8. Close hose bib, continue lling the system
until the pressure gauge reads 12 psi. Close
ll valve.
9. Starting with the rst convector in the loop,
open air vent to purge air until a steady
stream of water ows into container for
approximately 5 seconds. Proceed to next
convector and repeat procedure until all
convectors in the loop are purged of air
10. Close the opened zone valve or shut-
off valve for the zone being purged of
air.
11. Open the zone valve or shut-off valve
for the next zone to be purged. Repeat
the previous steps until all zones have
been purged. At completion, open all
zone valves or shut-off valves.
12. Close hose bib, continue lling the system
until the pressure gauge reads 12 psi.
Close ll valve.
If make-up water line is equipped
i
with pressure reducing valve, system
will automatically fill to 12 psi. Follow fill
valve manufacturer’s instructions.
13. Open isolation valve in boiler supply piping.
14. Remove hose from hose bib.
Confirm that the boiler and system have no
water leaks.
1. Check Rating Label for maximum operating
pressure of this boiler. Never exceed this
pressure during leak test. Do not plug or
change pressure relief valve. Perform visual
inspection for leaks or weeping joints after
initial ll and during boiler warm-up period.
Repair all leaks before placing boiler into
permanent operation.
2. If it is required to perform a long-term
pressure leak test of the hydronic system,
the boiler should rst be isolated to avoid
a pressure loss due to the escape of air
trapped in the boiler.
3. To perform a long-term pressure test
including the boiler, all trapped air must
be removed from the boiler and system as
prescribed above. A loss of pressure during
such a test, with no visible leakage, is an
indication that the boiler or system contained
trapped air.
43
Page 44

APPENDIX F – ADJUSTING GAS INPUT RATE
Natural Gas Boilers:
1. Turn off gas supply to all appliances other
than gas-red boiler.
2. Note the rated manifold gas pressure listed
on the boiler’s rating label.
3. Connect Manometer to manifold pressure
tapping on Gas Valve (Figure F-1).
F-2
8. Determine gas ow rate in Cubic Feet
per Hour based on elapsed time for two
revolutions. (Example: 70 Seconds for (2)
Revolutions = 102.8 Cu. Ft.
F-1
4. Light main burners by adjusting thermostat
to highest setting.
5. If required, adjust gas manifold pressure to
the rated setting by turning the gas valves
adjustment screw clockwise to decrease
manifold pressure or counterclockwise to
increase manifold pressure (Figure F-2).
Several turns may be required.
Do not force the adjustment screw.
6. On models using more than one gas valve,
turn “off” the gas valve not having pilot
control and rst adjust the gas valve with
pilot control. Then, turn “on” both gas valves
and adjust the gas valve without pilot control.
7. Clock gas meter for at least two (2)
revolutions of the dial typically labeled ½ or
1 cubic foot per revolution on a residential
gas meter.
44
9. When the clocked time falls between two
table values (Table F-1), add the table
values shown above and below your clocked
reading and divide by 2 (Example: 68
Seconds for (2) Revolutions = (110.7+102.8)
/2 = 106.7 Cu. Ft./Hr.).
10. Obtain gas-heating value (Btu per cubic
foot) from gas supplier or use nominal
value of 1000 Btu per cubic foot.
11. Multiply gas ow rate by gas heating value.
(Example: 70 Seconds for (2) Revolutions
= 120.8 Cu. Ft./Hr. X 1027 Btu/Cu. Ft. =
124,061 Btu/ Hr.
12. Compare measured input rate to input rate
stated on rating label.
DO NOT EXCEED the boiler’s rated gas
input.
13. If input is too high, reduce input rate by
decreasing manifold pressure. Do not
reduce more than 0.3” w.c. Instead, contact
Burnham for an orice replacement kit.
14. If input is below 98% of Rating Label input,
increase manifold gas pressure no more
than 0.3 inches w.c. If measured rate is still
less than 98% of rated input, replace or re drill existing main burner gas orices:
Page 45

APPENDIX F – Adjusting Gas Input Rate (continued)
Table F-1: Gas Flow Rate in Cu. Ft. / Hr.
Size of Gas Meter Dial
Seconds for Two
(2) Revolutions
24 150.0 300.0 450.0
26 138.4 276.9 415.3
28 128.5 257.1 385.7
30 120.0 240.0 360.0
34 105.8 211.7 317.6
38 94.7 189.4 284.2
42 85.7 171.4 257.1
46 78.2 156.5 234.7
50 72.0 144.0 216.0
55 65.4 130.9 196.3
60 60.0 120.0 180.0
65 55.3 110.7 166.1
70 51.4 102.8 154.2
80 45.0 90.0 135.0
90 40.0 80.0 120.0
100 36.0 72.0 108.0
120 30.0 60.0 90.0
140 25.7 51.4 77.1
160 22.5 47.0 67.5
180 20.0 40.0 60.0
200 18.0 36.0 54.0
One-Half
Cu. Ft.
One
Cu. Ft.
Two
Cu. Ft.
15. Recheck Main Burner Flame.
16. Return other gas-red appliances to
previous condition of use.
LP/Propane Gas Boilers:
1. Follow the procedure for gas boilers, except:
2. Adjust tank regulator for gas valve inlet
pressure of 13.5 inches w.c. or less, but not
less than 11.5 inches w.c.
3. Gas valve has step-opening regulator, which
initially opens to 1.4 to 2.5 inches w.c. and
steps to full pressure after approximately 30
seconds. Check manifold pressure after step
has occurred.
Leak Test Gas Piping:
THE BOILER AND ITS GAS
CONNECTIONS must be leak tested and
leak free before placing boiler in operation.
FOR LEAK TESTING OVER ½ PSIG,
disconnect boiler and its individual shutoff valve from gas supply piping.
1. For testing at ½ psig or less, isolate boiler
from gas supply piping by closing boiler’s
individual manual shut-off valve.
(1) Remove Main Burners per procedure in
Boiler Service instructions in Section (X).
(2) Remove gas orices. Drill each orice
one (1) drill size larger (drill size is
stamped on orice).
(3) Reinstall gas orices and main burner.
Repeat procedure to measure input rate.
2. Check for gas leaks in all piping joints,
valves, and ttings using a non-corrosive
leak detection solution or an electronic leak
detector.
3. Repair any leaks.
45
Page 46

APPENDIX G – CHECKING DRAFT AND COMBUSTION
CHECK DRAFT (GAS BOILERS WITH DRAFT HOODS)
1. Insofar as is practical, close all doors and
windows in the building.
2. Turn on all appliances not connected to the
same venting system as the boiler being
checked.
3. Turn on all exhaust fans (such as range
hoods and bathroom exhausts) to their
maximum speed. Do not turn on any
summer exhaust fans.
4. Close all replace dampers.
5. Operate the appliance being checked.
Follow lighting instructions.
CHECK DRAFT (OIL BOILERS)
1. Use a manometer precise to 0.01” water
column.
2. Fire the boiler until the chimney/vent reaches
normal operating temperature.
3. Locate the pressure sensing tapping on the
boiler.
6. After 5 minutes of main burner operation,
test for spillage at the draft hood relief
opening, using a lighted match, candle,
cigarette, etc.
7. Repeat this test for each appliance
connected to the common venting system.
8. If any appliance does not vent properly, per
the above test, make corrections, so that the
installation conforms to the National Fuel
Gas Code, NFPA 54/ANSI Z223.1, and/or
Installation Codes, CAN/CSA B149.1.
9. Return doors, windows, exhaust fans,
replace dampers, and any other gasburning appliance to their previous condition
of use.
4. While the boiler is still ring, use the
manometer to measure the draft at the
pressure tapping.
5. Conrm that the draft measurement matches
the required draft specied for the boiler.
6. If the required draft is not present, make any
necessary adjustments and check again.
1. Use a ue gas analyzer that accurately
measures CO2, O2, CO, and ue gas
temperature.
2. For oil boilers, also use a smoke tester with
smoke test paper.
3. Operate the boiler at its rated (high re)
input.
4. With the analyzer, check the CO
(or O2),
2
CO and temperature of the ue gases
exiting the boiler.
5. For two-stage or modulating boilers, also
check the CO2 (or O2), CO and temperature
of the ue gases at low re.
6. Conrm that the measured CO
(or O2)
2
matches the required CO2 (or O2) specied
for the boiler.
46
CHECK COMBUSTION
7. For oil boilers, also take a smoke
measurement of the ue gases. Smoke
should not exceed #1.
If CO2, O2, or CO fall outside of the
range specied for the boiler, review the
installation and startup instructions and make
any necessary adjustments to the boiler or
associated venting or piping systems.
Note the gross flue gas temperature for
future reference. Significant changes in
i
flue gas temperature can indicate changes
in the boiler’s operating efficiency.
Page 47

APPENDIX H – IQ CONTROL SYSTEM
IQ Control System Overview
The “IQ Control System” consists of an IQ Boiler
Control and an IQ Option Panel with optional “plug
in” cards:
• Fully integrates both factory and eld
installed components, simplifying installation
and troubleshooting.
• Efciently operates the entire boiler system
to save energy.
IQ Boiler Control:
The heart of Burnham’s IQ Control System is the
IQ Boiler Control. The IQ Boiler Control replaces
the traditional separate ignition control, primary
boiler aquastat, as well as the fan and circulator
relays.
The IQ Boiler Control stores two boiler supply
temperature setpoints in its memory; one setpoint
is for the High Limit Setting and the second is for
the Operating Setpoint.
• Ensures adequate heat and supply of
domestic hot water.
• UL / CSA Listed or Recognized and tested
as part of a complete system.
• Communicate with other EnviraCom™
enabled components to provide a complete
system solution to maximize comfort and
energy efciency.
When the optional Outdoor Air Reset Card is
installed in the IQ Option Panel, the Operating
Setpoint temperature is automatically adjusted
according to the outdoor temperature. For
example, as the outdoor temperature increases
the Operating Setpoint temperature is reduced
from the High Limit Setting to save energy
while improving home comfort. By better
matching boiler heat supply to actual home
heat demand, room air temperatures are more
closely maintained. In addition, when there is
a domestic hot water (DWH) heat request, the
Operating Setpoint temperature is automatically
adjusted to a DHW Setpoint to satisfy the DWH
heating requirements. When the Outdoor
Air Reset Card is not installed the Operating
Setpoint equals High Limit Setting.
IQ Option Panel:
The IQ Option Panel works together with the IQ
Boiler Control to provide an easy and convenient
means to “plug-in” additional functionality to a
boiler system.
The IQ Option Panel is a standard component
provided along with the IQ Boiler Control. The
IQ Option Panel functions as a “motherboard”
to accept up to three (3) IQ Option Cards and
provides the necessary mechanical connections
(with no screws required), along with the power
and interconnection wiring into the IQ Boiler
System. Only wiring from eld-installed sensors
is required. The IQ Option Panel includes a
dedicated digital readout that provides option card
status information, diagnostics and setup functions
when necessary.
47
Page 48

IQ Option Cards:
APPENDIX H – IQ Control System (continued)
A variety of IQ Option Cards are
available to enhance the features of
a standard boiler.
Outdoor Reset IQ Option Card:
The Outdoor Reset IQ Option Card regulates
hydronic heating system heat delivery rate to
match the home heat demand and building heat
loss. This is accomplished by continuously
adjusting the boiler supply water temperature
setpoint based on outside air temperature,
domestic hot water demand and “sleep” or “leave”
period selections, when a Honeywell EnviraCOM
enabled programmable thermostat is connected.
Refer to the Outdoor Reset IQ Option Card
instructions for additional information.
For example, if additional safety limits are required,
select Manual or Automatic Reset Aquastat or
Low Water Cutoff IQ Option Cards. Additionally,
if energy savings and improved home comfort is
desired, select an Outdoor Reset IQ Option Card.
Benets of the Outdoor Reset Card: Increased
comfort through smooth, continuous, regulated
heat delivery and reduced indoor air temperature
uctuations.
Energy Savings through:
(1) reducing room overheating
(2) reducing boiler temperature and
(3) increasing combustion efciency
Aquastat IQ Option Card:
The Aquastat IQ Option Card provides electronic
temperature sensing in a UL limit-rated control with
a single sensing probe. The Aquastat IQ Option
Card replaces auxiliary high limits such as the
L4006.
The Aquastat IQ Option Cards are available in
automatic or manual reset models. Automatic
reset versions automatically reset when
temperature return to safe levels. Manual reset
Low Water Cutoff (LWCO) IQ Option Card:
The Low Water Cutoff (LWCO) IQ Option Cards are
advanced devices that detect the absence of water
in the boiler. LWCO IQ Option Cards use patented
signal processing to identify when the probe signal
levels have decreased due to fouling, permitting
extended operation for probe impedances up to
40K Ohms. The LWCO IQ Option Cards function
longer without requiring probe cleaning and can
operate in the presence of foam.
Fully compliant with CSD-1 requirements for water
level controls.
The LWCO IQ Option Card is available with
automatic and manual reset. Automatic reset
48
models require user intervention to reset a
temperature condition after the temperature returns
to safe levels.
Listings/Approvals:
• UL353 Limit Controls for both US (UL) and
Canada (CUL)—Component Recognized
• UL 1998 Software Safety Standards as a
Class 2 device.
versions automatically reset when water levels
return to safe levels. Manual reset models require
user intervention to reset a low water condition
after water levels return to safe levels. Manual
reset models will not “lock out” upon power loss
provided water still covers the probe when power
returns.
Listings/Approvals:
• UL GUIDE (MBPR2) for Limit Controls per
UL Standard 353 Limit Controls–Component
• UL GUIDE (MBPR8) Controls, Limit Certied
for Canada–Component per CSA Standard
C22.2
Page 49

IQ Display Kit:
APPENDIX H – IQ Control System (continued)
The LCD Display is an easy to use touch screen
type display that allows a technician to monitor
and adjust the IQ Boiler Control and connected IQ
Option Cards.
EnviraCOM Thermostats:
Standard EnviraCOM thermostats provide “heat
demand” to the IQ Boiler Control and alerts the
home owner of a boiler control faults.
The LCD Display kit includes a mounting
bracket and wiring harness to allow simple
physical installation and “plug-in” style electrical
connection. This intuitive display reduces
setup and troubleshooting time by providing the
user adjustment and alarm focused “help” and
“information” screens.
Connected thermostats provide a red LED
and display the IQ Boiler Control or IQ
Option Card Error Codes. A home owner
is alerted to a problem even before the
water is cold. When an Outdoor Reset card
is installed, thermostat “leave” or “sleep”
modes are used to shifts the reset curve to
save energy while the home is in a reduced
room temperature mode.
49
Page 50

APPENDIX H – IQ Control System (continued)
System Parts List
Factory Mounted Components
Burnham Part
Number
IQ Boiler Control, Vent Damper, 24 Vac Ignition Control, with Prepurge, Continuous Retry, 90 Second Ignition
102289-01
102291-01
102411-01 Limit Rated Temperature Sensor, 24 inch length
Trail, Aquastat Limit Control, 130-220 Deg F, 15 Deg F Adjustable Differential, Auto Reset, less Well, less
Sensor, 120 Vac Circulator Control Relay
IQ Option Panel with three slots “plug-in” option card slots, suitable for gas or oil red boiler applications,
accepts a variety of plug-in cards including limit rated cards
Item Description
Optional Components
Burnham Part
Number
102723-01
102294-01 Outdoor Reset IQ Option Card, Domestic Hot Water Priority, for use with IQ Option Panel, less Sensor.
102439-01 Outdoor Air Temperature Sensor, 12k ohm, 60 inch lead.
102711-01
102714-01
102301-01 LWCO IQ Option Card, Hot Water LF Module, Automatic Reset, for use with IQ Option Panel, less Probe.
102302-01 LWCO IQ Option Card, Hot Water LF Module, Manual Reset, for use with IQ Option Panel, less Probe.
102305-01 LWCO ¾ inch NPT Probe.
102720-01
102717-01
102292-01 Aquastat IQ Option Card, 130-220 Deg F, Manual Reset for use with IQ Option Panel, less well, Less Sensor.
102293-01
102295-01 Limit Rated Temperature Sensor, 36 inch length.
102296-01 Limit Rated Temperature Sensor, 48 inch length.
102728-01
102725-01
102495-01
Outside Reset IQ Option Card, Domestic Hot Water Priority, for use with Option Control Panel, with Outside
Air Temperature Sensor with 60 inch lead, Instructions, Unit Pack. No additional pipe ttings required.
LWCO IQ Option Card kit, Hot Water LF Module, Automatic Reset, for use with Option Control Panel, with
¾ inch NPT Probe, Instructions, Unit Pack. Additional pipe ttings are required.
LWCO IQ Option Card kit, Hot Water LF Module, Manual Reset, for use with Option Control Panel, with ¾ inch
NPT Probe, Instructions, Unit Pack. Additional pipe ttings are required.
Aquastat IQ Option Card, 130-220 Deg F, Manual Reset for use with Option Control Panel, Temperature
Sensor with 36 inch lead, Well, Sensor Clip, Instructions, Unit Pack. Additional pipe ttings are required.
Aquastat, IQ Option Card, 130-220 Deg F, 15 Deg F Adjustable Differential, Auto Reset, for use with Option
Control Panel, Temperature Sensor with 36 inch lead, Well, Sensor Clip, Instructions, Unit Pack. Additional
pipe ttings are required.
Aquastat, IQ Option Card, 130-220 Deg F, 15 Deg F Adjustable Differential, Auto Reset, for use with IQ Option
Panel, less Well, less Sensor.
IQ LCD Display, Boiler Exterior Mounted, STN Monochrome, White/Red backlight, 5Vdc Power Supply,
RS422 (RS485) Communication, Pure Black Bezel with Gateway, Wire Harness, Mounting Bracket, Logo Plate
and Instructions.
IQ LCD Display, Boiler Exterior Mounted, STN Monochrome, White/Red backlight, 5Vdc Power Supply,
RS422 (RS485) Communication, Pure Black Bezel.
Enviracom/Modbus RS422 Gateway and 5 Vdc Power Supply for Communication Between the IQ Controls
and LCD Display, 24 Vac Power Supply Input.
Item Description
Additional Information List
Aquastat IQ Option Card Instruction Sheet - part number 102715-01
Outdoor Reset IQ Option Card Instruction Sheet - part number 102721-01
Low Water Cut-off IQ Option Card Instruction Sheet - part number 102709-01
LCD Display Kit - part number 102727-01
50
Page 51

SERVICE RECORD
DATE SERVICE PERFORMED
51
Page 52

LLiim
miitteedd
W
Waarrrraannttyy
FFoorrRReessiiddeennttiiaallGGrraaddeeWWaatteerraannddSStteeaammBBooiilleerrs
s
Using Cast Iron, Carbon Steel, Cast Aluminum,
or Stainless Steel Heat Exchangers
aannddPPaarrttss//AAcccceessssoorriiees
s
Subject to the terms and conditions set forth below, U.S. Boiler Company, Inc.
Lancaster, Pennsylvania hereby extends the following limited warranties to the original
owner of a residential grade water or steam boiler or U.S. Boiler Company, Inc. supplied
parts and/or accessories manufactured and shipped on or after July 1, 2008:
ONE YEAR LIMITED WARRANTY ON RESIDENTIAL GRADE BOILERS
AND PARTS / ACCESSORIES SUPPLIED BY U.S. BOILER COMPANY, INC.
U.S. Boiler Company, Inc. warrants to the original owner that its residential grade
water and steam boilers and parts/accessories comply at the time of manufacture with
recognized hydronic industry standards and requirements then in effect and will be
free of defects in material and workmanship under normal usage for a period of one
year from the date of original installation. If any part of a residential grade boiler or
any part or accessory provided by U.S. Boiler Company, Inc. is found to be defective
in material or workmanship during this one year period, U.S. Boiler Company, Inc.
will, at its option, repair or replace the defective part.
HEAT EXCHANGER WARRANTIES
U.S. Boiler Company, Inc. warrants to the original owner that the heat exchanger of its
residential grade boilers will remain free from defects in material and workmanship
under normal usage for time period specified in the chart below of the original owner at
the original place of installation. If a claim is made under this warranty during the “No
Charge” period from the date of original installation, U.S. Boiler Company, Inc. will, at its
option, repair or replace the heat exchanger. If a claim is made under this warranty after
the expiration of the “No Charge” period from the date of original installation, U.S. Boiler
Company, Inc. will, at its option and upon payment of the pro-rated service charge set
forth below, repair or replace the heat exchanger. The service charge applicable to a
heat exchanger warranty claim is based upon the number of years the heat exchanger
has been in service and will be determined as a percentage of the retail price of the heat
exchanger model involved at the time the warranty claim is made as follows:
NOTE: If the heat exchanger involved is no longer available due to product obsolescence
or redesign, the value used to establish the retail price will be the published price as
shown in the Burnham
Repair Parts Pricing where the heat exchanger last
appeared or the current retail price of the then nearest equivalent heat exchanger.
*MegaSteam Waterside Corrosion Warranty: U.S. Boiler Company, Inc. warrants the
cast iron sections of the MegaSteam boiler to resist Temperature Induced Chloride
Activated Graphitic Corrosion for a period of five years from the date of original
installation. In the event that any cast iron section of a Mega Steam boiler fails due to
this corrosion mechanism during this period, U.S. Boiler Company, Inc. will repair or
replace, at its option, the cast iron section assembly.
LIFETIME NIPPLE LEAKAGE WARRANTY
U.S. Boiler Company, Inc. warrants the cast iron and steel nipples that join the cast iron
boiler sections to be free of defects in material and workmanship for the lifetime of the
original owner at the original place of installation. In the event that such nipples are
found to be defective in material and workmanship during this period, U.S. Boiler
Company, Inc. will repair or replace at its option, the cast iron section assembly.
ADDITIONAL TERMS AND CONDITIONS
1. Applicability: The limited warranties set forth above are extended only to the
original owner at the original place of installation within the United States and
Canada. These warranties are applicable only to boilers, parts, or accessories
designated as residential grade by U.S. Boiler Company, Inc. and installed in a
single or two-family residence and do not apply to commercial grade products.
2. Components Manufactured by Others: Upon expiration of the one year limited
warranty on residential grade boilers, all boiler components manufactured by
others but furnished by U.S. Boiler Company, Inc. (such as oil burner, circulator
and controls) will be subject only to the manufacturer’s warranty, if any.
3. Proper Installation: The warranties extended by U.S. Boiler Company, Inc.
are conditioned upon the installation of the residential grade boiler, parts, and
accessories in strict compliance with U.S. Boiler Co., Inc. installation
instructions. U.S. Boiler Company, Inc. specifically disclaims liability of any
kind caused by or relating to improper installation.
4. Proper Use and Maintenance: The warranties extended by U.S. Boiler Company,
Inc. conditioned upon the use of the residential grade boiler, parts, and
accessories for its intended purposes and its maintenance accordance with U. S.
Boiler Company, Inc. recommendations and hydronics industry standards. For
proper installation, use, and maintenance, see all applicable sections of the
Installation and Operating, and Service Instructions Manual furnished with the unit.
5. This warranty does not cover the following:
a. Expenses for removal or reinstallation. The homeowner will be responsible
for the cost of removing and reinstalling the alleged defective part or its
replacement and all labor and material connected therewith, and
transportation to and from U.S. Boiler Company, Inc.
b. Components that are part of the heating system but were not furnished by
U.S. Boiler Company, Inc. as part of the residential boiler.
c. Improper burner adjustment, control settings, care or maintenance.
d. This warranty cannot be considered as a guarantee of workmanship of an
installer connected with the installation of the U.S. Boiler Company, Inc.
boiler, or as imposing on U.S. Boiler Company, Inc. liability of any nature for
unsatisfactory performance as a result of faulty workmanship in the
installation, which liability is expressly disclaimed.
e. Boilers, parts, or accessories installed outside the 48 contiguous United
States, the State of Alaska and Canada.
f. Damage to the boiler and/or property due to installation or operation of the
boiler that is not in accordance with the boiler installation and operating
instruction manual.
g. Any damage or failure of the boiler resulting from hard water or scale
buildup in the heat exchanger.
h. Any damage caused by improper fuels, fuel additives or contaminated
combustion air that may cause fireside corrosion and/or clogging of the
burner or heat exchanger.
i. Any damage resulting from combustion air contaminated with particulate
which cause clogging of the burner or combustion chamber including but
not limited to sheetrock or plasterboard particles, dirt, and dust particulate.
j. Any damage, defects or malfunctions resulting from improper operation,
maintenance, misuse, abuse, accident, negligence including but not limited to
operation with insufficient water flow, improper water level, improper water
chemistry, or damage from freezing.
k. Any damage caused by water side clogging due to dirty systems or
corrosion products from the system.
l. Any damage resulting from natural disaster.
m. Damage or malfunction due to the lack of required maintenance outlined in
the Installation and Operating Manual furnished with the unit.
6. Exclusive Remedy: U.S. Boiler Company, Inc. obligation for any breach of
these warranties is limited to the repair or replacement of its parts in
accordance with the terms and conditions of these warranties.
7. Limitation of Damages: Under no circumstances shall U.S. Boiler Company, Inc.
be liable for incidental, indirect, special or consequential damages of any kind
whatsoever under these warranties, including, but not limited to, injury or damage
to persons or property and damages for loss of use, inconvenience or loss of time.
U.S. Boiler Company, Inc. liability under these warranties shall under no
circumstances exceed the purchase price paid by the owner for the residential
grade boiler involved. Some states do not allow the exclusion or limitation of
incidental or consequential damages, so the above limitation or exclusion may not
apply to you.
8. Limitation of Warranties: These warranties set forth the entire obligation of U.S.
Boiler Company, Inc. with respect to any defect in a residential grade boiler, parts,
or accessories and U.S. Boiler Company, Inc. shall have no express obligations,
responsibilities or liabilities of any kind whatsoever other than those set forth
herein. These warranties are given in lieu of all other express warranties.
ALL APPLICABLE IMPLIED WARRANTIES, IF ANY, INCLUDING ANY
WARRANTY OF MERCHANTABILITY OR FITNESS FOR A PARTICULAR
PURPOSE ARE EXPRESSLY LIMITED IN DURATION TO A PERIOD OF ONE
YEAR EXCEPT THAT IMPLIED WARRANTIES, IF ANY, APPLICABLE TO
THE HEAT EXCHANGER IN A RESIDENTIAL GRADE BOILER SHALL
EXTEND TO THE ORIGINAL OWNER FOR THE TIME SPECIFIED IN THE
HEAT EXCHANGER SECTION SHOWN ABOVE AT THE ORIGINAL PLACE
OF INSTALLATION. SOME STATES DO NOT ALLOW LIMITATION ON HOW
LONG AN IMPLIED WARRANTY LASTS, SO THE ABOVE LIMITATION MAY
NOT APPLY TO YOU.
PROCEDURE FOR OBTAINING WARRANTY SERVICE
In order to assure prompt warranty service, the owner is requested to complete
and mail the Warranty Card provided with the product or register product online
at www.burnham.com within ten days after the installation of the boiler, although
failure to comply with this request will not void the owner’s rights under these
warranties. Upon discovery of a condition believed to be related to a defect in
material or workmanship covered by these warranties, the owner should notify
the installer, who will in turn notify the distributor. If this action is not possible or
does not produce a prompt response, the owner should write to U.S. Boiler
Company, Inc.,
C/O Burnham, P.O. Box 3079, Lancaster, PA 17604, giving
full particulars in support of the claim. The owner is required to make available
for inspection by U.S. Boiler Company, Inc. or its representative the parts
claimed to be defective and, if requested by U.S. Boiler Company, Inc. to ship
these parts prepaid to U.S. Boiler Company, Inc. at the above address for
inspection or repair. In addition, the owner agrees to make all reasonable efforts
to settle any disagreement arising in connection with a claim before resorting to
legal remedies in the courts.
THIS WARRANTY GIVES YOU SPECIFIC LEGAL RIGHTS AND YOU MAY
ALSO HAVE OTHER RIGHTS WHICH VARY FROM STATE TO STATE.
Years in Service 1-5 6 7 8 9 10 11 12 13 14 15 16 17 18 19 20 21 22 23 24 25+
Cast Iron Water 5 15 20 25 30 40 45 50 55 60 65 70 75
Cast Iron Steam*
Carbon Steel 5 15 20 25 30 40 45 50 55 60 65 70 75
Cast Aluminum 30 40 50 60 70
Stainless Steel 30 40 50 60 70
Service Charge as a % of Retail Price
No Charge 10
No Charge 10
No Charge 100
No Charge 100
No Charge 100
52
 Loading...