


d'LITE
d’Lite
Owner’s
Instruction
Safety
Manual
Contents
Introduction 2
I. Hardware Bag Contents and Tool List 3
II. Mounting the Refl ectors 3
III. Installing the Quick-Release Levers 4
IV. Attaching the Wheels 5
V. Unfolding and Folding Your Burley d’Lite 6
VI. Using the Seat Harness 11
VII.
Padded Seat & Shoulder Harness,
Child Seat Recliner™, Recessed Helmet
Pocket™, and Child Seat Divider™
VIII. Completing Assembly 15
IX. Hitching a Burley d’Lite to Your Bicycle 17
X. Trailer Main te nance and Care 18
XI. Safety Guidelines 19
XII. Safety Checklists 25
XIII. Parts List and Drawing 26
Warranty 28
13
&

Congratulations!
You’ve just purchased a Burley® trailer, the leading choice of dis crim i nat ing
bicycle trailer owners world wide. Every ef fort has been made to ensure your purchase is of top quality and proven design, ready to provide you with many years
and miles of happy, safe trailering.
IMPORTANT: Because some of the features and guidelines for using
the Burley d’Lite merit close attention, it is very important that you
fa mil iar ize yourself with the trailer by reading this entire manual before
use. If you have any questions, we en cour age you to con tact your
authorized Burley dealer.
Introduction
Your Burley d’Lite is shipped almost completely assembled from the factory. This
manual is written sequentially to assist initial setup. You need only to:
- Install the quick-release levers
- Mount the re fl ec tors
- Attach the wheels
- Un fold the trailer
- Install the safety fl ag and snap on the cover
Once you've read the safe ty guidelines, you're ready to go! Before trailering,
be sure you have a thorough understanding of the safe ty harness and of trailer
hitch operation. Practice folding and un fold ing your trailer; it can eas i ly be done
in less than a minute after practice, no tools required. Check to see that the trailer
wheels and hitch are securely attached. We again request that you read this
manual from start to fi nish before use, and then refer to it as nec es sary in the
future.
NOTE: Any reference to left or right is made in the direction of travel,
as if you were sitting in the child seat looking forward.
When Loaning or Selling Your Trailer
If you loan or sell your Burley d’Lite, supply the new user with this manual. They
must familiarize them selves with all sec tions—especially sections “XI. Safety
Guidelines” and “XII. Safety Check lists” prior to use. It is es sen tial that they understand the differences between riding a bicycle with a trailer and without one. It
is also essential that they understand correct wheel at tach ment, folding, and use
of the har ness, safety fl ag, cover, and hitch. Always ensure that both adult and
children are wear ing helmets. Never loan your trailer if it is need of maintenance
or repair.
2
Burley d’Lite Owner’s Instruction and Safety Manual
I. Hardware Bag Contents and Tool List
IMPORT ANT: Please verify that you have received all of the con tents
listed. Do not proceed with as sem bly if any parts are miss ing; contact
Burley im me di ate ly for replacement parts.
Hardware Bag Contents
Refl ectors: Quick-Release Levers:
(2) Front refl ector, clear (2) Quick-release lever
(2) Rear refl ector, red
(4) Self-tapping screw, refl ector
Envelope: Tools Required:
Trailer Checklist 5/16", 8mm or small adjustable wrench
Warranty Card Small, straight blade screwdriver
Burley d’Lite Owner’s Instruction & Safety Manual
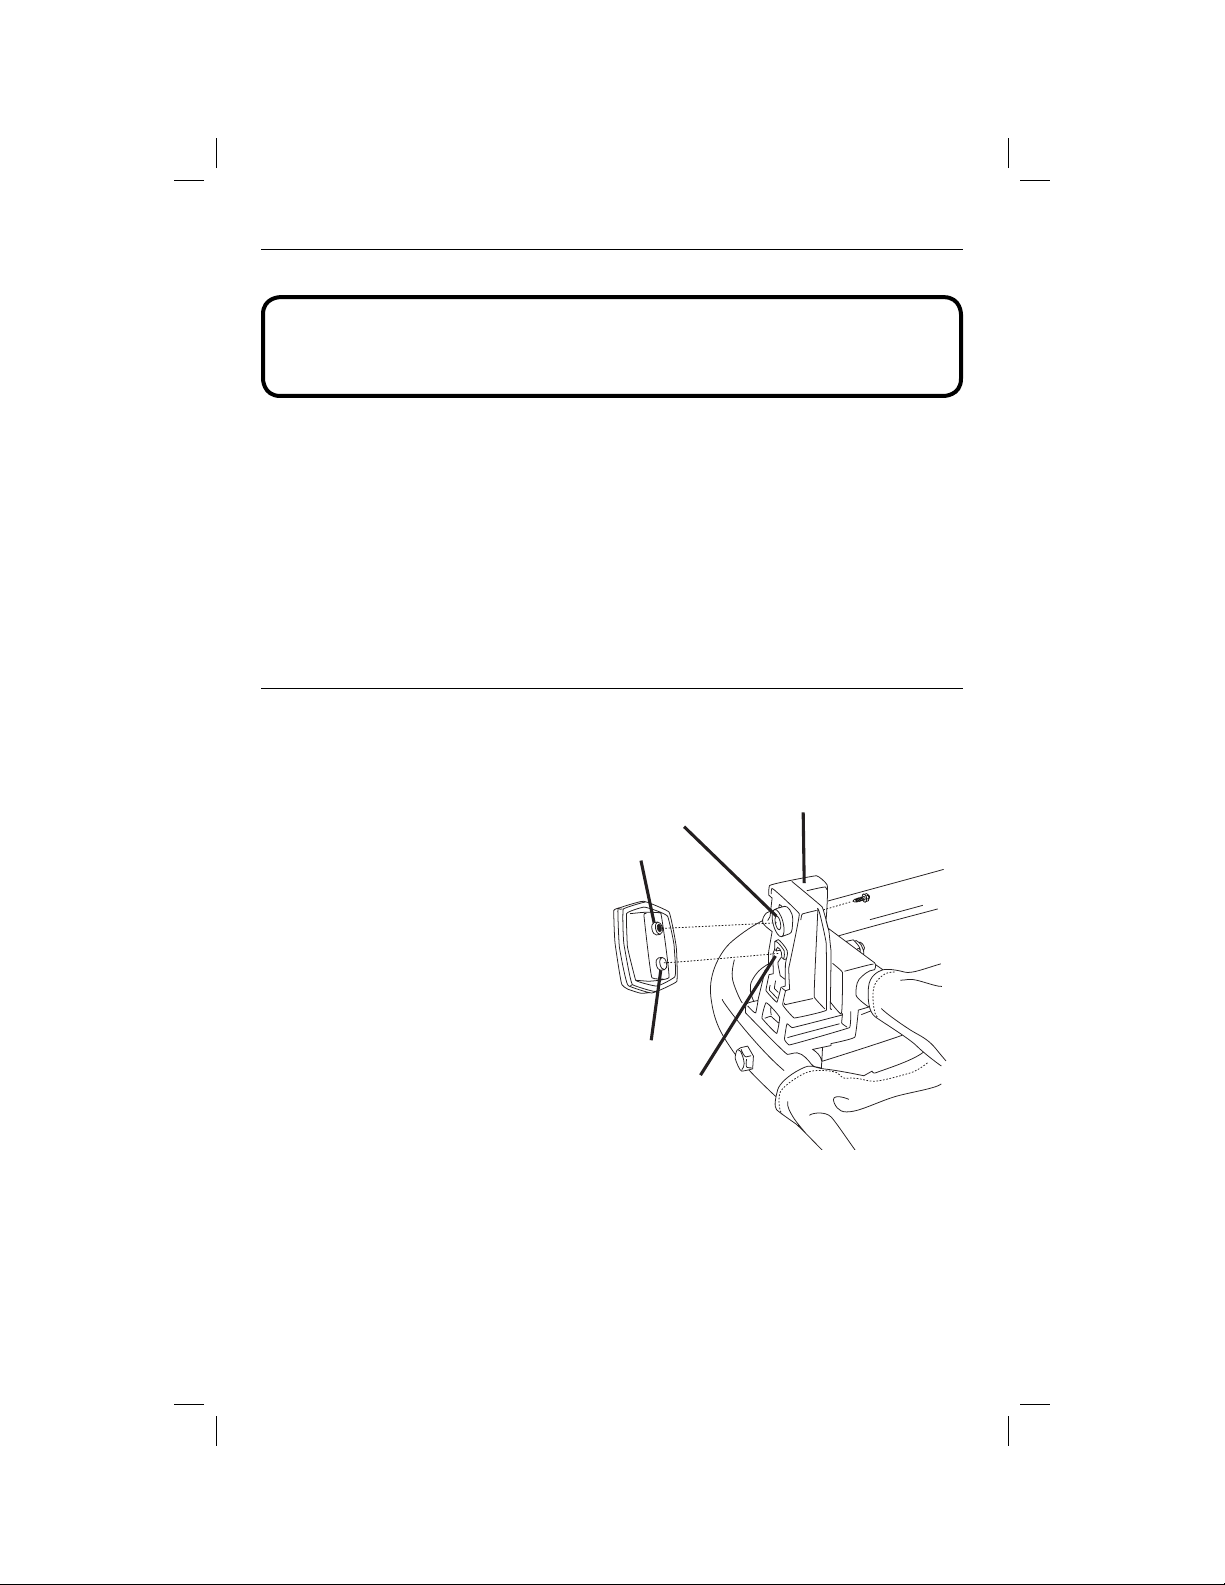
II. Mounting the Refl ectors
REAR REFLECTORS:
1. With the trailer side panels in
folded position locate one of the
black molded hinges (A) at the rear
trailer corner.
2. At the top of the hinge locate the
screw hole (B) and re fl ec tor locating
boss (C). Each refl ector has a screw
hole (D) and a location stub (E).
3. Take a red re fl ec tor and screw it
to the hinge as shown in the fi g ure
below. Line the refl ector hole (D) up
with the hinge screw hole (B) and
the refl ector stub (E) with the hinge
lo cat ing boss (C).
4. Repeat the pro ce dure with the
sec ond red re fl ec tor, on the other
rear trailer hinge.
B
D
E
C
Burley d’Lite Owner’s Instruction and Safety Manual
A
3
A
FRONT REFLECTORS:
1. Locate one of the front
tongue mounts (A). Locate
the screw hole (B) and the
locating boss (C) on the front
tongue mount. Each refl ector has a screw hole (D) and a
location stub (E).
D
2. Position the back face of
the refl ector onto the front
B
of the tongue mount. Line
up the tongue mount screw
E
C
hole (B) with the refl ector
screw hole (D) and the refl ector stub (E) with the tongue
mount locating boss (C).
3. Insert the mounting screw thought the screw hole (B) in the rear of the tongue
mount and then into the refl ector screw hole (D). Tighten the screw until it is
snug. Do not overtighten.
4. Repeat for the other side of the trailer.
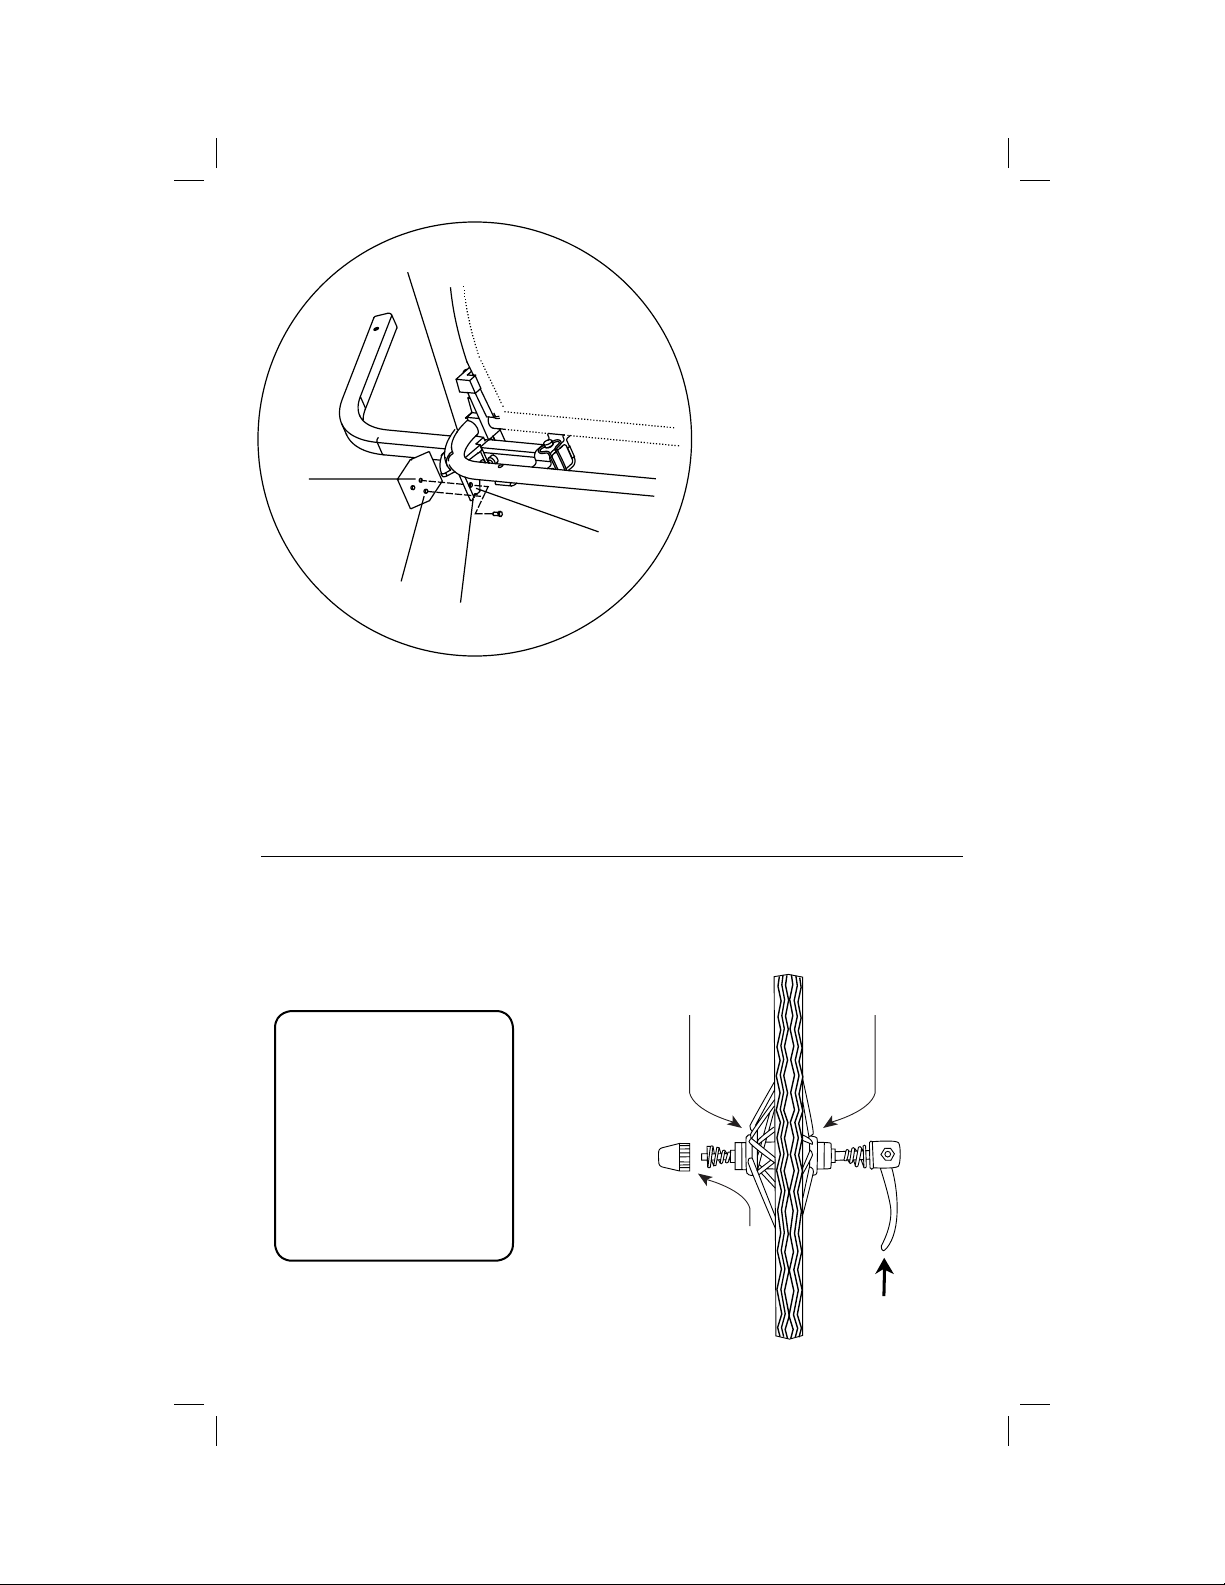
III. Installing the Quick-Release Levers
In the bag with the refl ectors you’ll fi nd two quick-re lease levers. Install these
through the hollow axle of the wheel. Make sure the lever is on the fl at side of the
wheel, the thumb nut is on the deep-dished side, and the springs are mounted
on each side as shown in the illustration below.
Flat
Quick Release Lever
The quick-release
lever must be on
flat side of wheel
and thumb nut on
deep-dished side.
This ensures that the
lever will be on the
outside when wheel
is properly installed.
4
Burley d’Lite Owner’s Instruction and Safety Manual
Deep Dish
Thumb Nut
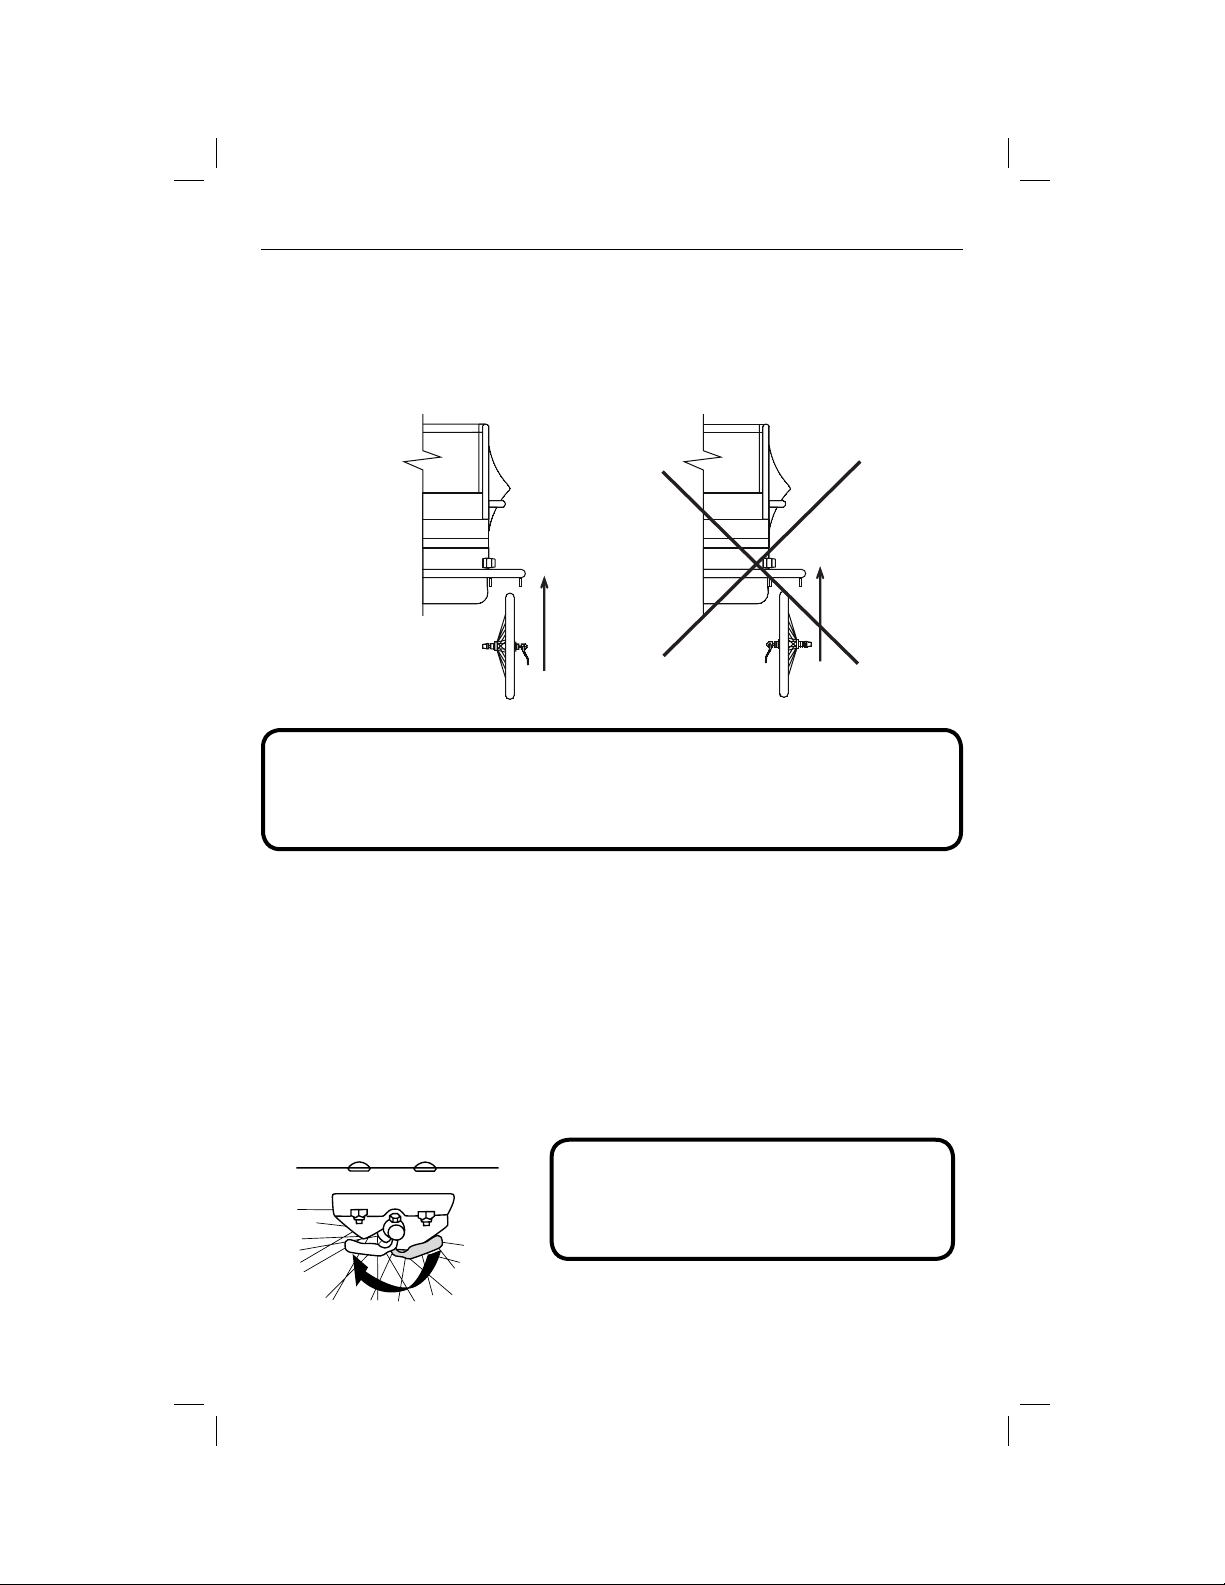
IV. Attaching the Wheels
First, verify that the tires are infl ated to 30–35 P.S.I. Next, tip the trailer frame on its
back end. If you are work ing on a rough or dirty sur face, lay down a cloth or other
protective barrier to avoid damage to your trailer. Move the quick-release lever
to the unlocked position and place the wheels into the dropouts, making certain
that the axles go all the way into the slots.
Correct
Wrong
IMPORTANT: Wheels are dished off-center and must be in stalled so
that tires are offset away from side panels, closest to outer frame.
Dished wheels are a unique feature from Burley; they create a wider
track, and thus a more stable trailer.
Once the wheels are fully seated in the dropout slots, the quick-release lever
should be positioned so that it operates in the fore and aft direction. The lever
is marked for open or closed po si tions. Tighten the right-hand wheel by moving
the lever from the front (open) to the rear (closed) position. Tighten the left-hand
wheel by moving the lever from the rear (open) to the front (closed) position. Use
the thumb nut to adjust for correct spacing of the quick-release lever.
When properly ad just ed, you will feel re sis tance halfway through tight en ing the
lever (when the lever is pointing straight out away from the trailer). If you are
unfamiliar with the use of quick-release levers, contact your Burley dealer for a
demonstration.
The quick-release lever op er ates in
fore-aft di rec tion (with lever below
the axle). The drawing shows lefthand wheel in the closed po si tion.
closed
open
5
Burley d’Lite Owner’s Instruction and Safety Manual
Make sure wheels are held securely; you should not be able to rock
or shift wheels. Improperly installed wheels can fall off, causing accident and serious injury.
Only use dished, 20 x 1.75 wheels supplied with Burley d’Lite. Do not
operate with tires in fl at ed above 35 P.S.I. Failure to comply can cause
trailer tip over, resulting in accident and serious injury to cyclist or
pas sen gers.
V. Unfolding and Folding
Your Burley d’Lite
Your Burley d’Lite is designed with a lightweight
alu mi num frame, com plete roll cage, and brightcolored polyester soft ware. Setting it up or folding it down is ac com plished in a few easy steps
as follows:
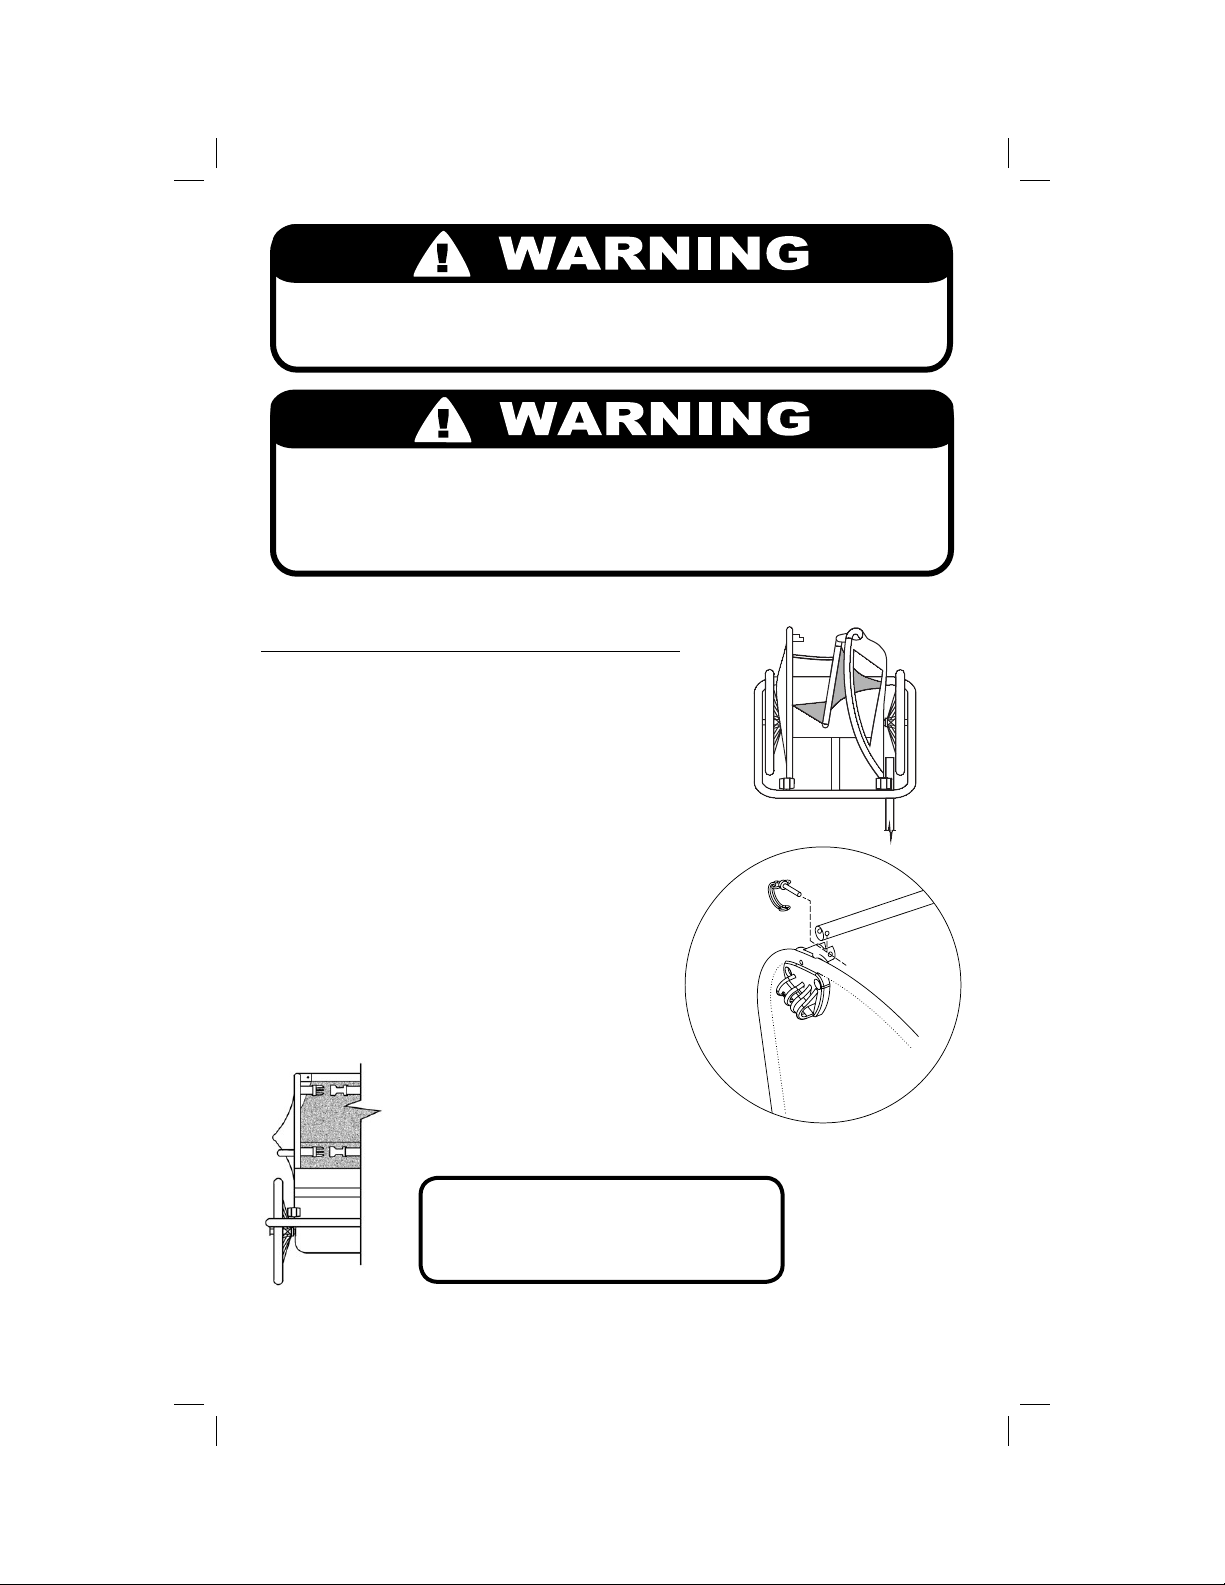
Raise the Side Panels
With the trailer frame lying fl at, un fold the two
side pan els so that they are vertical. You will fi nd
the roll bar lying against the left side panel. Raise
it to a hor i zon tal po si tion and pull it into the
right roll-bar re cep ta cle at the top of the right
side rail. Slip the safety pin through the hole
in the roll-bar re cep ta cle to lock the roll bar in
place. Refer to the illustration on the fol low ing
page showing the locked position of the safety pin. Connect
the buckles at the back of
the child seat and tighten the
straps.
IMPORTANT: Always fas ten up per
and lower buck les be hind child
seat when using trail er.
6
Burley d’Lite Owner’s Instruction and Safety Manual
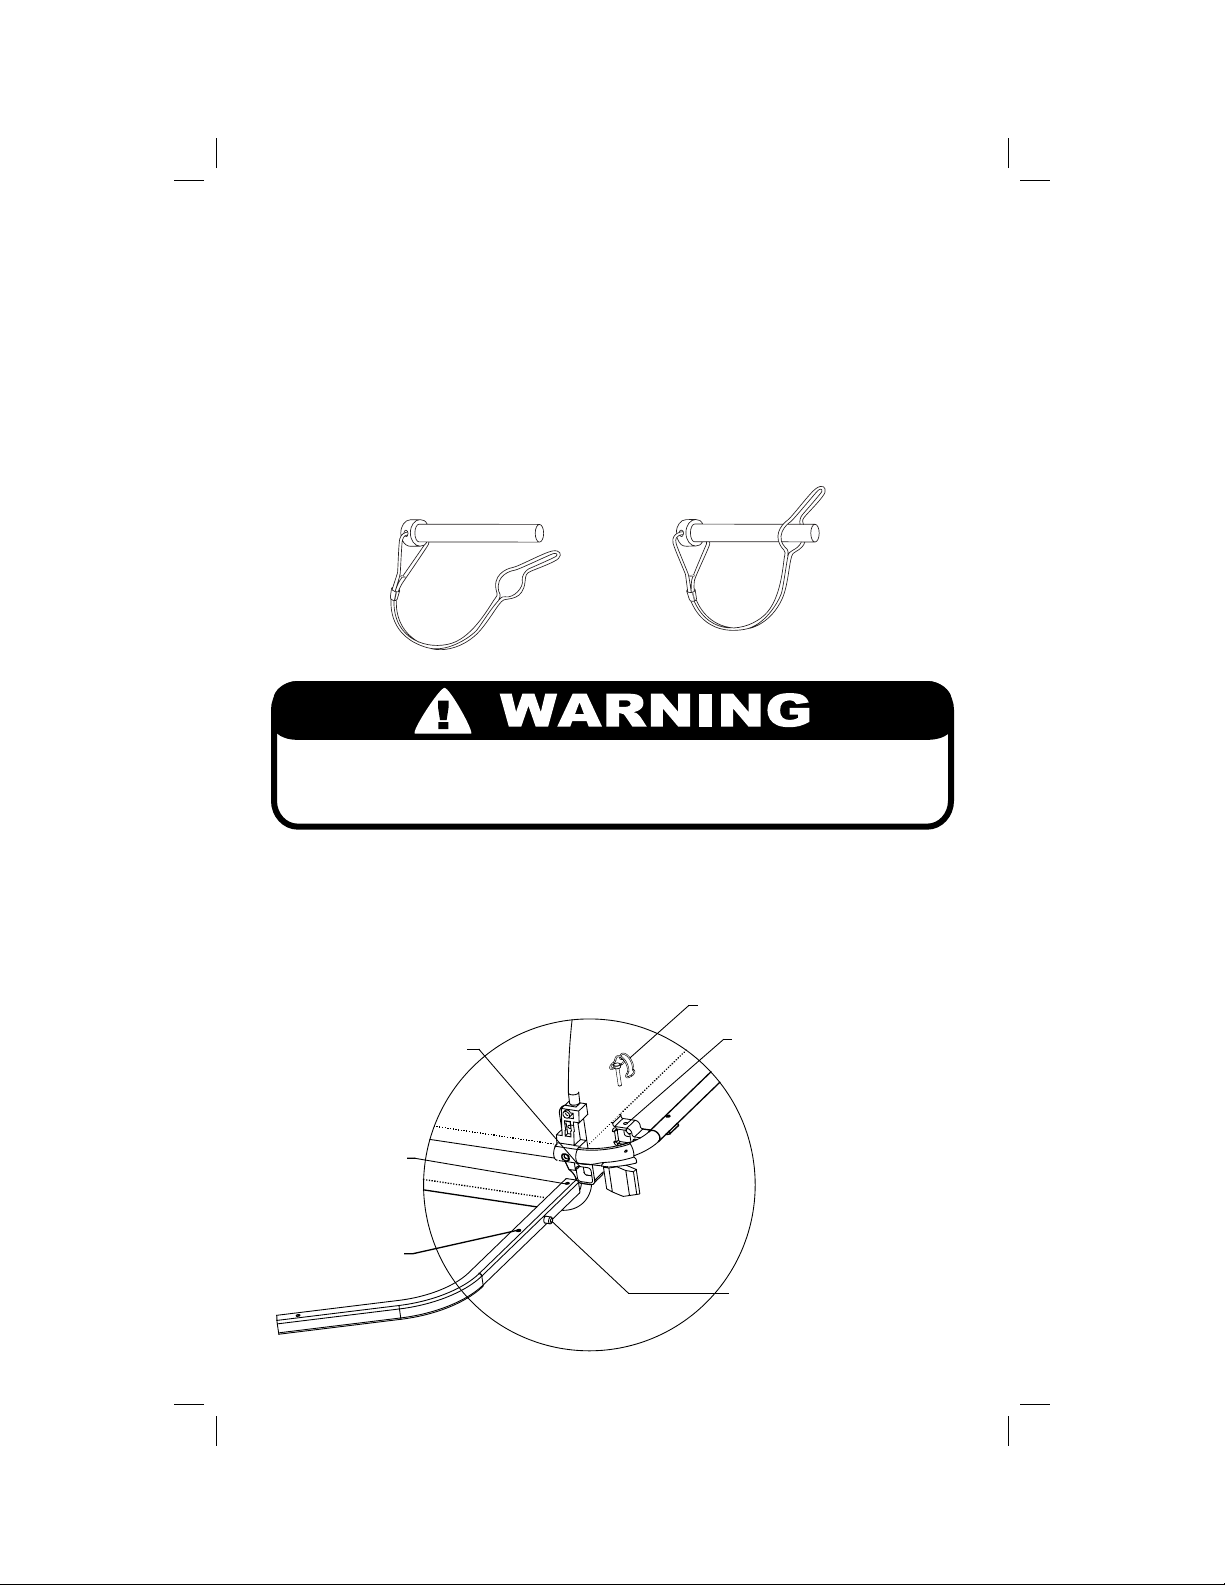
Tongue Installation and Operation
The tongue is the structure that connects the trailer to the bicycle hitch. It is
designed to be removed for storage and to adjust for either trailer or stroller use.
Tip your trailer frame on its back end. If you are working on a rough or dirty
surface, lay down a cloth or other protective barrier to avoid damage to your
trailer. To insert the tongue, slide it through the front and rear tongue mounts as
shown below. Depress the safety button to allow the tongue to insert past the
front tongue mount. The safety button will spring back out once it is completely
behind the front tongue mount.
Open Locked
Both safety pins must be locked in place before using trailer, oth er wise roll bar or tongue could shift and cause an accident or serious
injury.
Trailer Use
For use as a trailer, line up the rearmost hole on the tongue with the hole in the
rear tongue mount. Insert the pin through both holes. Once inserted, rotate the
pin’s spring clip to engage the pin underneath the tongue mount. Always check
to ensure the tongue is properly installed before using trailer.
Pin
Trailer Pin
Hole
Stroller Pin
Hole
Front Tongue
Mount
Burley d’Lite Owner’s Instruction and Safety Manual
Rear Tongue
Mount
Button
7
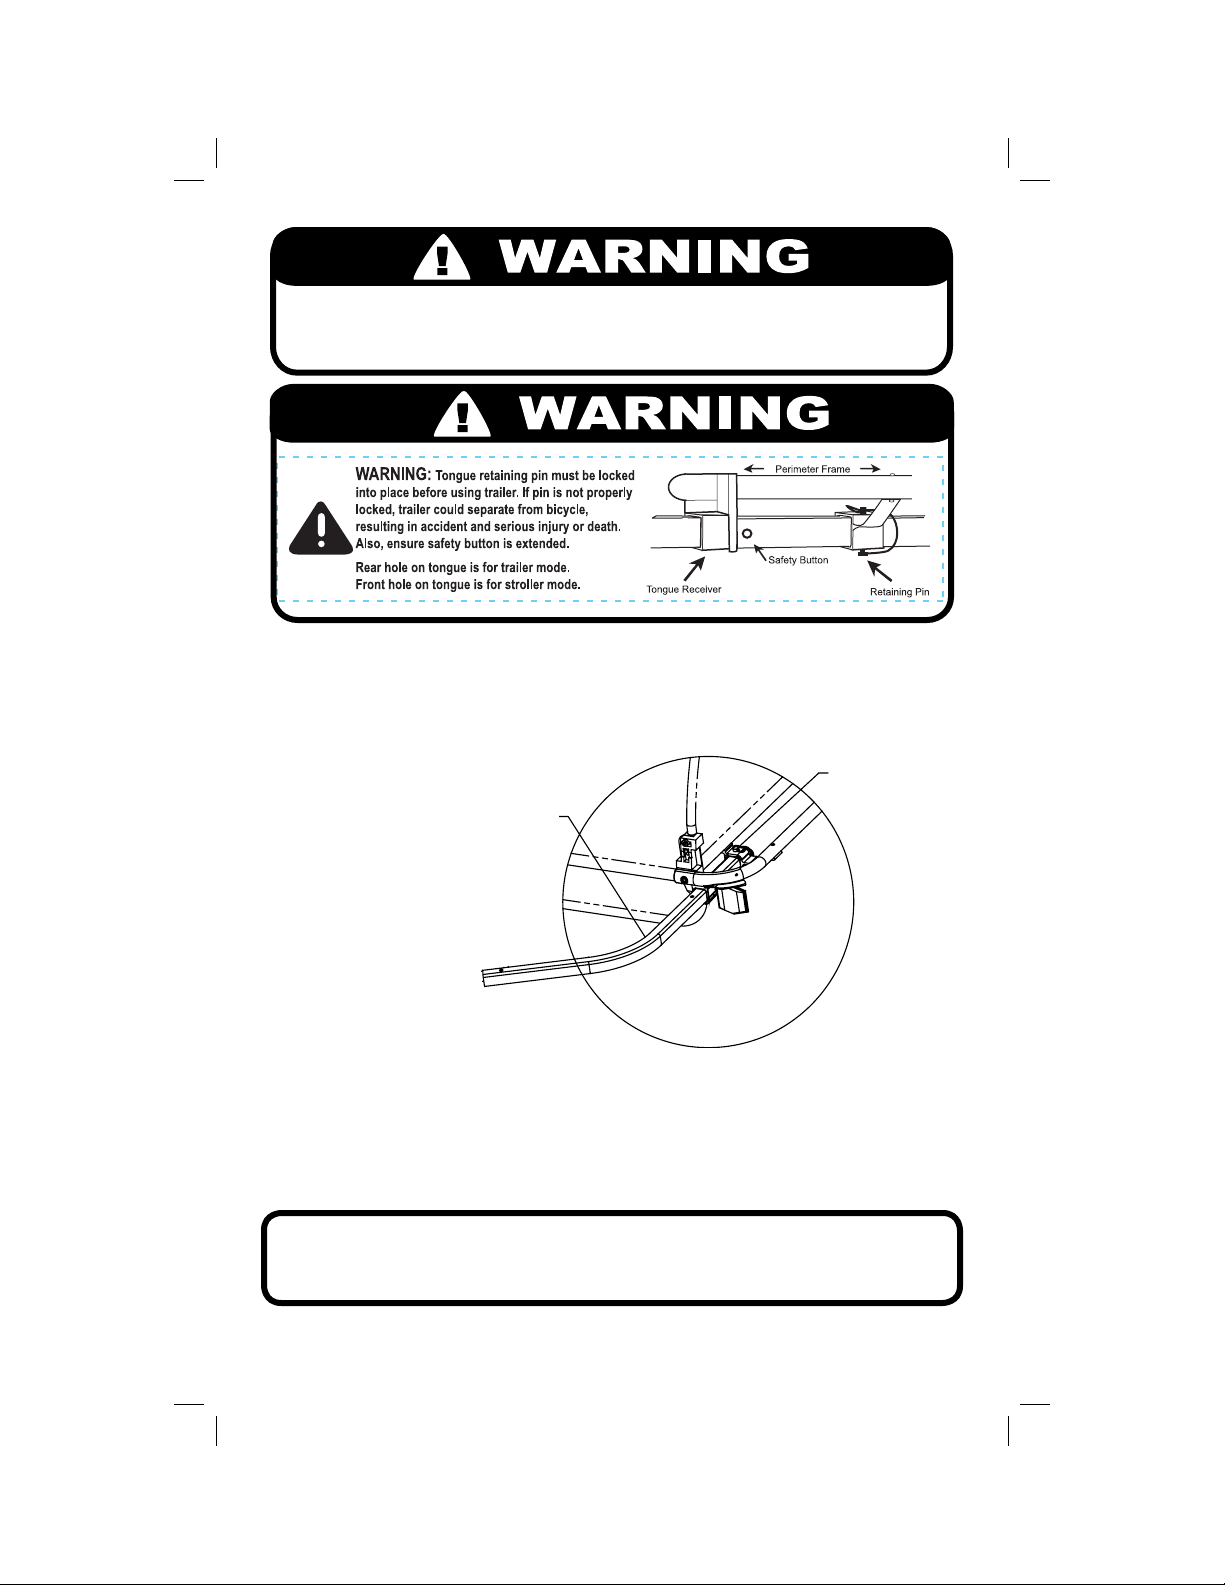
Always check that the tongue is properly installed before each use.
Failure to do so can result in serious injury or death.
Stroller Use (requires optional Walk n’ Roller™ kit)
Your Burley d’Lite is
ready for stroller use
with the purchase
Tongue in Trailer
position
Pin locked through
Rear Tongue Mount
and Trailer Pin hole
of the optional Walk
‘n Roller™ kit from
your local bike shop.
For strolling, slide the
tongue back until the
stroller pin hole on the
tongue lines up with
the hole in the rear
tongue mount. Depress
the safety button a
second time to allow the tongue to slide past the rear tongue mount. Be sure to
replace the pin through the rear tongue mount and the tongue, and then engage the pin’s clip. This option brings the stroller wheel closer to the main body
to stroller easily in tight spaces.
DO NOT attempt to attach the bicycle with the tongue in the
stroller position. There will not be adequate clearance for a bicycle
wheel.
8
Burley d’Lite Owner’s Instruction and Safety Manual

Installation and Use of the Handle
Your Burley d’Lite comes with a two-position handle that allows for easier maneuvering of the trailer when it is not attached to your bicycle. The handle is also
an important part of the optional Burley Jogger Kit ™ and the optional Walk ‘n
Roller™ kit. Both of these accessories are available at your local bike shop.
The handle for the d’Lite is installed quite easily. Simply depress the buttons on
either side of the handle and slide the handle into the handle bar receivers as
shown in the illustration below. The handle is designed for either a high or low
position depending on the height and comfort of the user. This position can be
changed by fl ipping the handle over and installing it as described above.
Parking Brake Operation
The pre-installed parking brake on your Burley d’Lite is used to keep the trailer
stationary when you park your bike or when using the optional Burley Jogger
Kit™ or Burley Walk ‘n Roller Kit™.
To engage the brake,
move the handle to
the left.
Burley d’Lite Owner’s Instruction and Safety Manual
Simply move the
handle to the right to
disengage the brake.
9
 Loading...