

Page 1
VELOCITY BREW
10 CUP COFFEE BREWER
®
USE & CARE
MANUAL
BX STNHS GR BT
For NHS, GR , BX, BT and ST Coffee Brewers
Page 2

BLANK
(remove text before printing)
Page 3
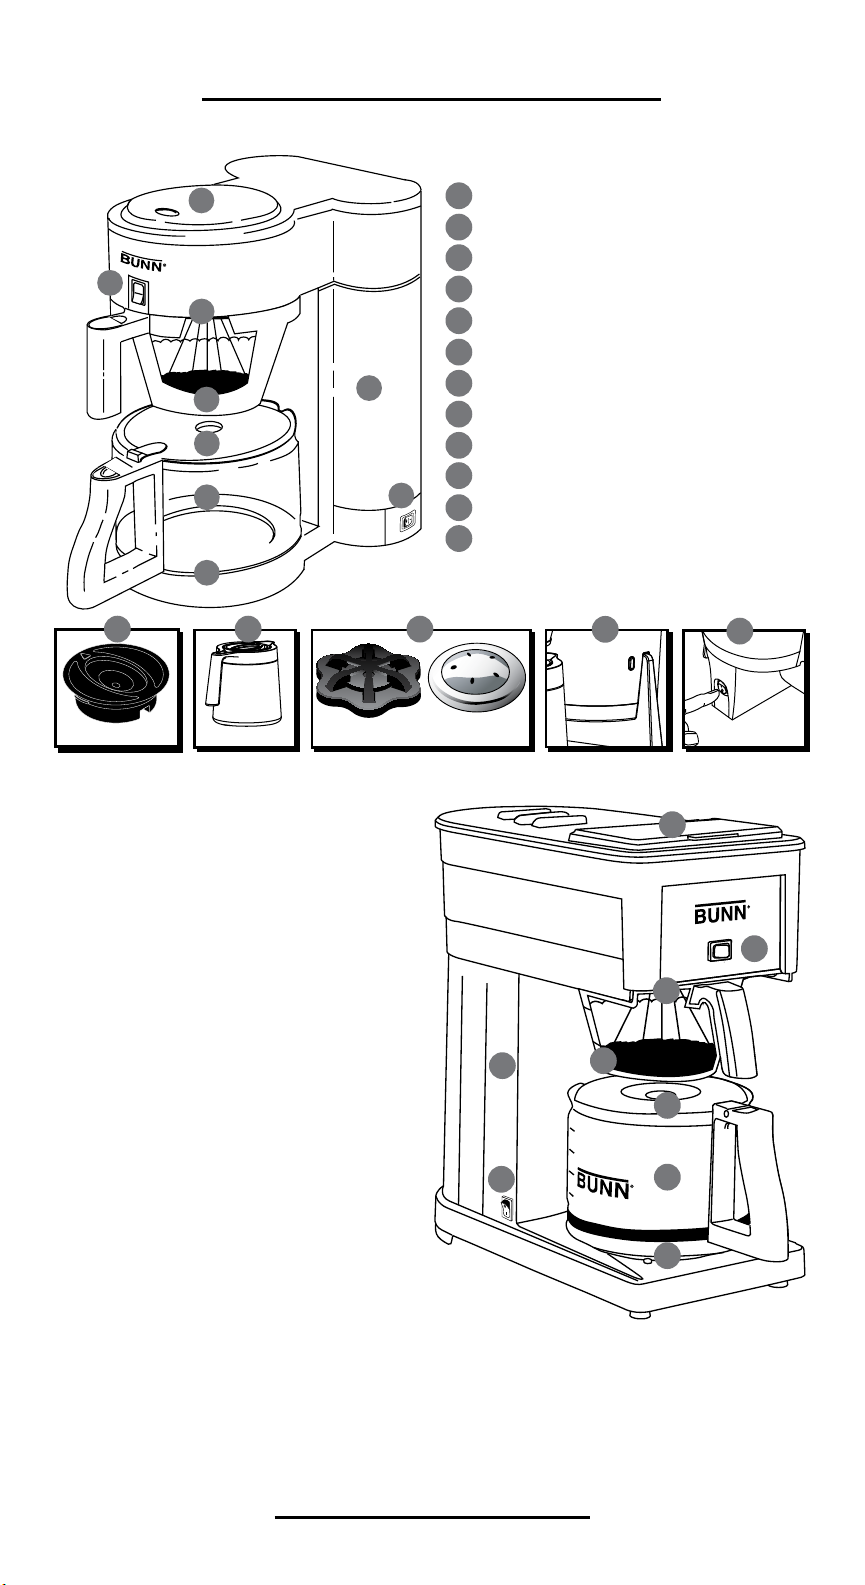
GET TO KNOW YOUR BREWER
BUNN VELOCITY BREW
Brew Funnel
2
11
9
1
4
5
6
3
12
NHS
1
Lid (spin or flip to open)
2
Internal Hot Water Tank)
3
Glass Carafe Lid (GR, BX, NHS)
4
Glass Carafe (GR, BX, NHS)
5
Warmer Plate (GR, BX, NHS)
6
Thermal Carafe Lid (BT, ST)
7
Thermal Carafe (BT, ST)
8
Sprayhead
9
10
Power On Light (ST)
Warmer Switch (GR, BX, NHS)
11
Vacation Switch
12
(location varies depending on model)
BT/ST
BT/ST
specifications
electrical: UL and C-UL Listed for
Household Use Only. Brewer has an
attached, 3-prong grounded cord set and
requires 2-wire service with ground, rated
120 volts AC.
NHS: 7.9 amps, single phase, 60 Hz.
947-watts total.
ST: 7 amps, single phase, 60 Hz.
850-watts total.
BX: 7 amps, single phase, 60 Hz.
900-watts total.
GR: 7.5 amps, single phase, 60 Hz.
900-watts total.
BT: 7.5 amps, single phase, 60 Hz.
850-watts total.
97 8
NHS/BT/BX/GRST
10
Side of ST
12
Back of ST
2
O
I
11
WARMER/RECHAUD
9
3
1
4
12
GR
5
6
brew capacity: 4 to 10 five ounce (5 oz.) cups per batch.
high altitude use: Water boils at a lower temperature in high altitude environments
(over 4,000 feet). At high altitude, use a model with “D” designation as the thermostat has
been preset for these environments.
The BUNN logo is a trademark of Bunn-O-Matic Corporation.
43097.0002D 10/12 © 2011 BUNN-O-MATIC CORPORATION
1
Page 4
IMPORTANT SAFEGUARDS
Follow basic safety precautions when using electrical appliances to reduce the risk of fire,
electric shock, and/or personal injury:
• READ ALL INSTRUCTIONS.
• Do not touch hot surfaces. Use handles.
• Do not place cord, plugs, or brewer in
water or liquid.
• Close supervision is necessary when
brewer is used by or around children.
• Unplug brewer when not in use for 3 or
more days and before cleaning. Allow
brewer to cool before removing or
replacing parts, and before cleaning.
• Do not operate brewer with a damaged
cord or plug or if the brewer malfunctions
or is damaged in any way. Return brewer
to an Authorized Service Facility for
examination, adjustment or repair (see
page 11).
• Using an accessory not evaluated for use
with this brewer may cause injury.
• For indoor household use only.
• Do not place brewer on or near a hot gas
or electric burner or in a heated oven.
• Do not use brewer for any purpose other
than its intended use.
• Do not remove brew funnel or carafe
while brewing.
• Do not use the carafe on a range top or in
a microwave.
• Do not set a hot carafe on a cold surface.
• Do not use a cracked carafe or a carafe
with a loose or weakened handle.
• Do not pour any liquid into the water tank
other than water or vinegar for cleaning,
as specified in this manual.
• Do not clean carafe with cleansers, steel
wool pads, or other abrasive materials.
• When brewer is not in use, keep lid in the
closed position.
• Do not let cord hang over edge of table or
counter or touch hot surfaces.
note : The shor t power-supply cord supplied reduces the risk of becoming entangled in or tripping
over a longer cord. If an extension cord is used, its marked electrical rating must be at least as great
as the electrical rating of the brewer. Make sure the extension cord does not hang over the edge of a
table or counter and that it cannot be pulled on by children or tripped over. The extension cord must
be a 3-wire cord of the 3-pronged, 3-socketed, grounding type (including grounding conductor).
SAVE THESE INSTRUCTIONS
Record the Model and Date Code before using:
(three possible locations: 4 digits are etched on
each side of the metal prongs of your power
cord. Ex. 9999 99CH, the bottom of your
brewer or lower back of your brewer).
model:
date code:
Questions?
Visit www.bunn.com or call
USA 1-800-352-BUNN (2866)
Canada 1-800-263-2256
Please have your Model and Date Code
ready when calling for service.
WARNING
RISK O F FIRE OR EL ECTRIC AL SHOCK
TO REDUCE RISK OF FIRE OR ELECTRIC SHOCK
DO NOT DISASSEMBLE THE BREWER
NO USER-SERVICEABLE PARTS INSIDE
REPAIR SHOULD BE DONE BY AUTHORIZED
SERVICE PERSONNEL ONLY
This symbol alerts
you to important
operating and
service instructions.
This symbol alerts you to
the risk of fire or electric
shock in the accompanying
message.
2
Page 5
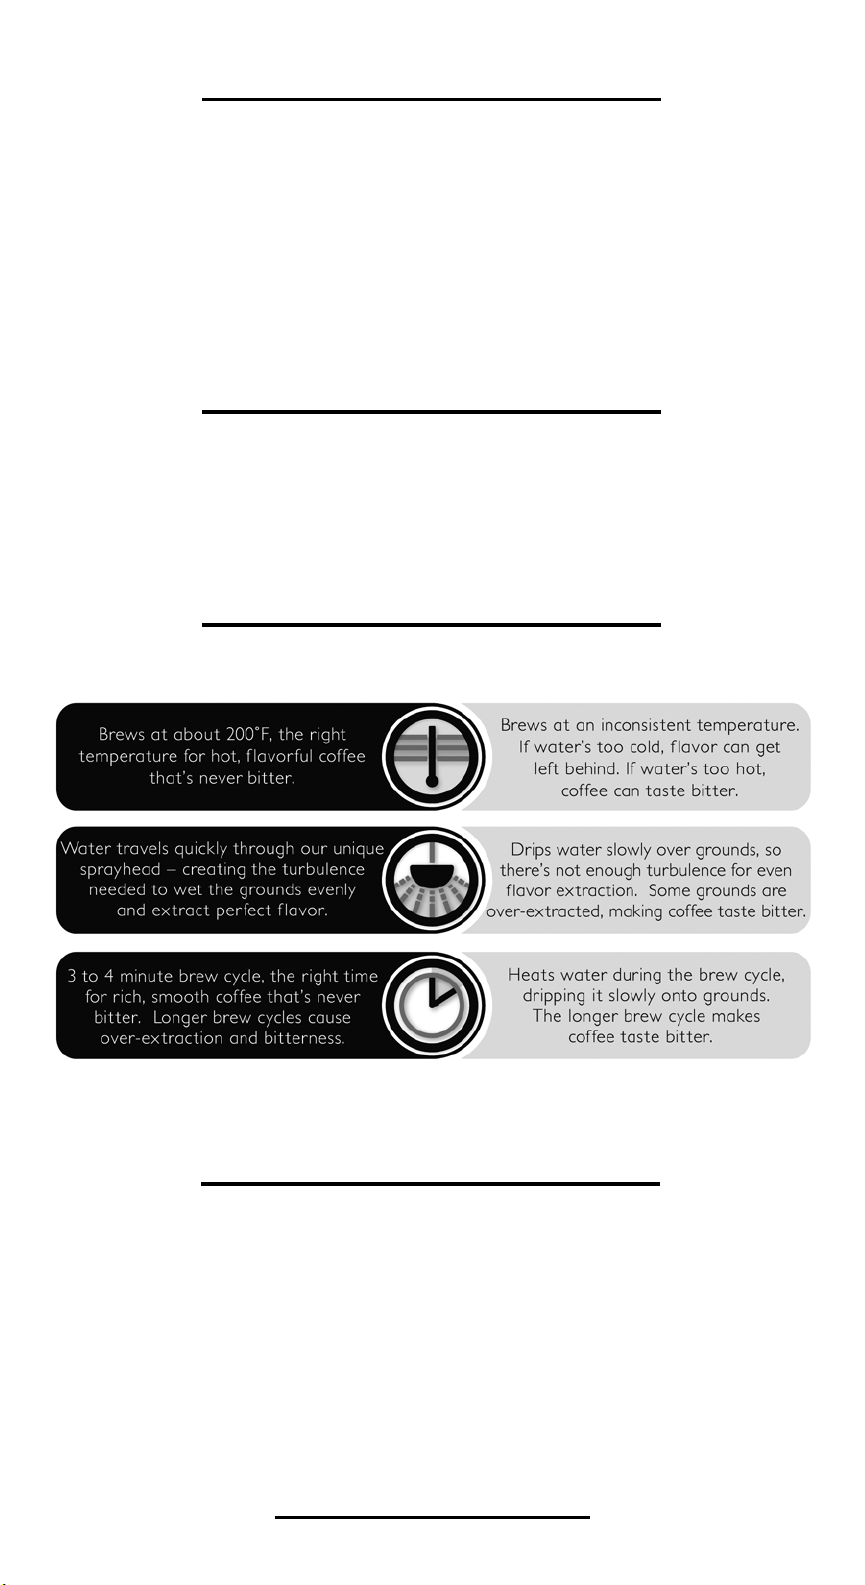
TABLE OF CONTENTS
Why BUNN Brews Better ....................... 3
BUNN Velocity Brew Initial Setup .......3-4
How to Brew Better ................................. 5
Brew Better Tips ....................................... 6
Cleaning and Maintenance ................... 7-8
Draining the Brewer ................................. 8
More About Your Brewer ........................ 9
Troubleshooting ........................................10
Authorized Service and Accessories ......11
Limited Warranty .....................................12
WELCOME
BUNN® Velocity Brew™ is different from any brewer you’ve used before. Unlike ordinary
coffee makers, it features an internal hot water tank that keeps water at the right brewing
temperature – so it’s always ready to brew a perfect pot of coffee in just 3 to 4 minutes.
WHY BUNN BREWS BETTER
BUNN VELOCITY BREW VS. TYPICAL DRIP
BUNN VELOCITY BREW INITIAL SETUP
Before you brew coffee for the first time, you must fill the internal hot water tank with water
and let it heat to the correct brewing temperature. To prevent damage to your brewer, DO
NOT PLUG IN before completing these simple steps.
WARNING: DO NOT PLUG IN BREWER UNTIL STEP 5!
Improper setup will result in permanent damage to your
brewer and void the limited warranty.
Before filling brewer with water, record its Model Number and Date Code in the Use &
Care Manual. This information is located on the lower back, bottom of your brewer or
etched on each side of the metal prongs of the power cord.
3
Page 6
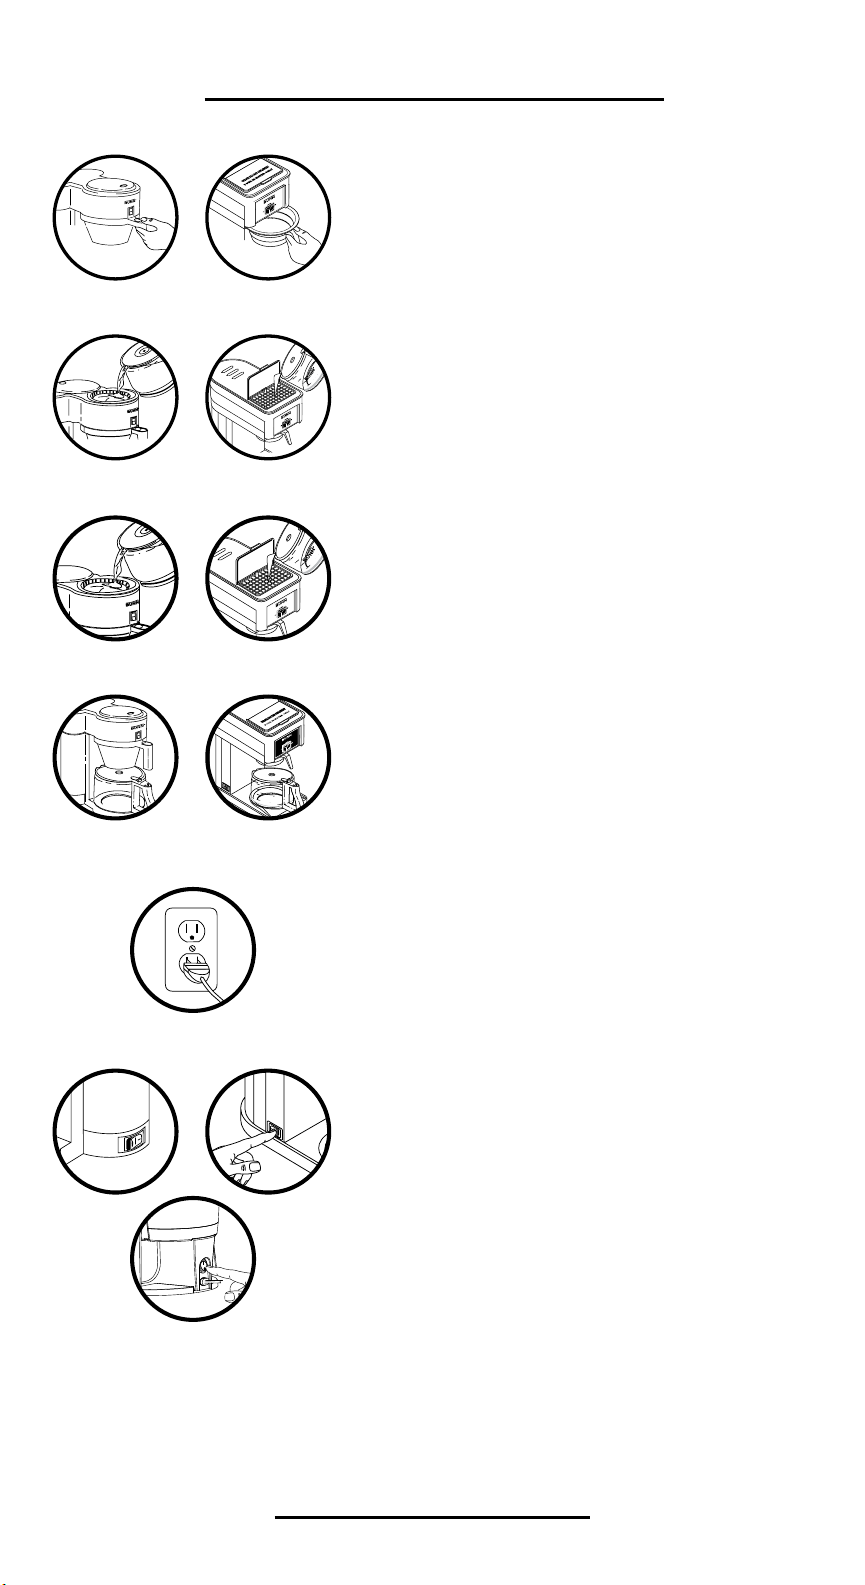
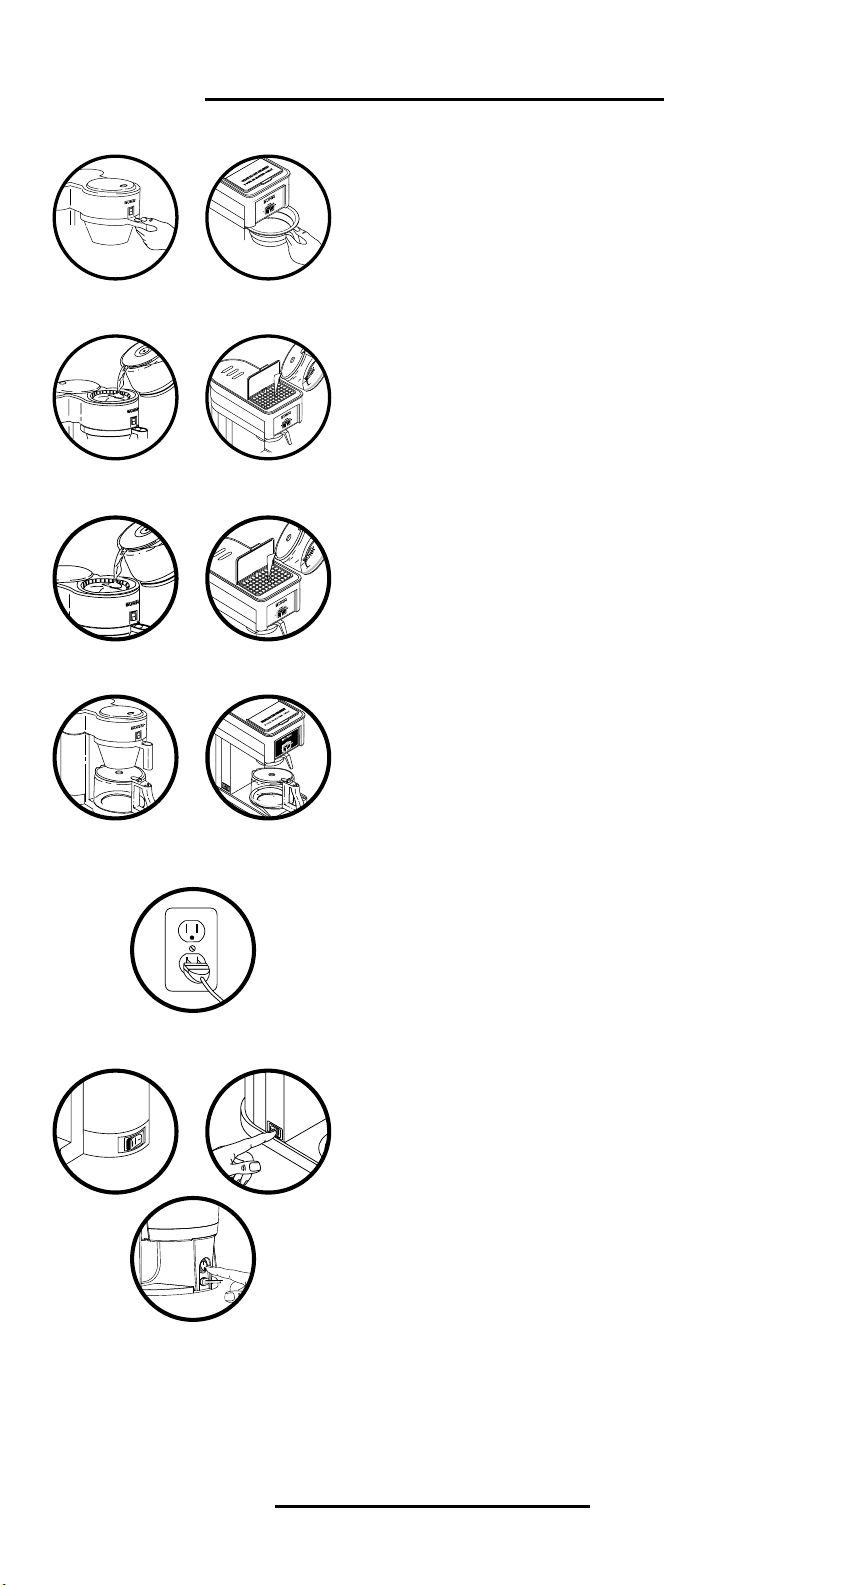
FILL THE HOT WATER TANK
B
U
N
N
6
4
8
1
0
B
U
N
N
6
4
8
1
0
B
U
N
N
6
4
8
1
0
B
U
N
N
6
4
8
1
0
NHS/ST
BT/BX/GR
1. Slide empty brew funnel into funnel guides
as shown.
2. Fill carafe with cold water.
Spin or flip brewer lid open and pour water
into brewer. Position carafe on base below
brew funnel. Close lid and wait 3 minutes
while internal tank partially fills.
3. Repeat step 2.
Open the brewer lid. Remove the carafe and
fill with cold water again. Pour water into
brewer. Position carafe on base below brew
funnel. Close lid.
4. Wait until water flows from the brew
funnel.
If any water flows, the tank is full. When water
flow stops, pour out water that has collected in
the carafe. Replace carafe on base below brew
funnel. NOTE: It takes two full carafes to fill
the internal hot water tank completely.
5. Plug in the brewer.
6. Turn on the brewer.
Press the vacation switch located on the side
(NHS, GR, BT, BX) or back (ST) of the brewer
NHS
(press I to turn ON; press O to turn OFF). If
you see red on the end of the switch, machine
is ON. Wait 15 minutes for water in the tank
to heat. NOTE: Your brewer is designed to
remain on at all times following initial setup,
ST
except when cleaning or if brewer will not be
used for 3 or more days.
You have now filled the hot water tank and are ready to brew
your first pot of coffee! See the brewing instructions that follow.
4
Page 7
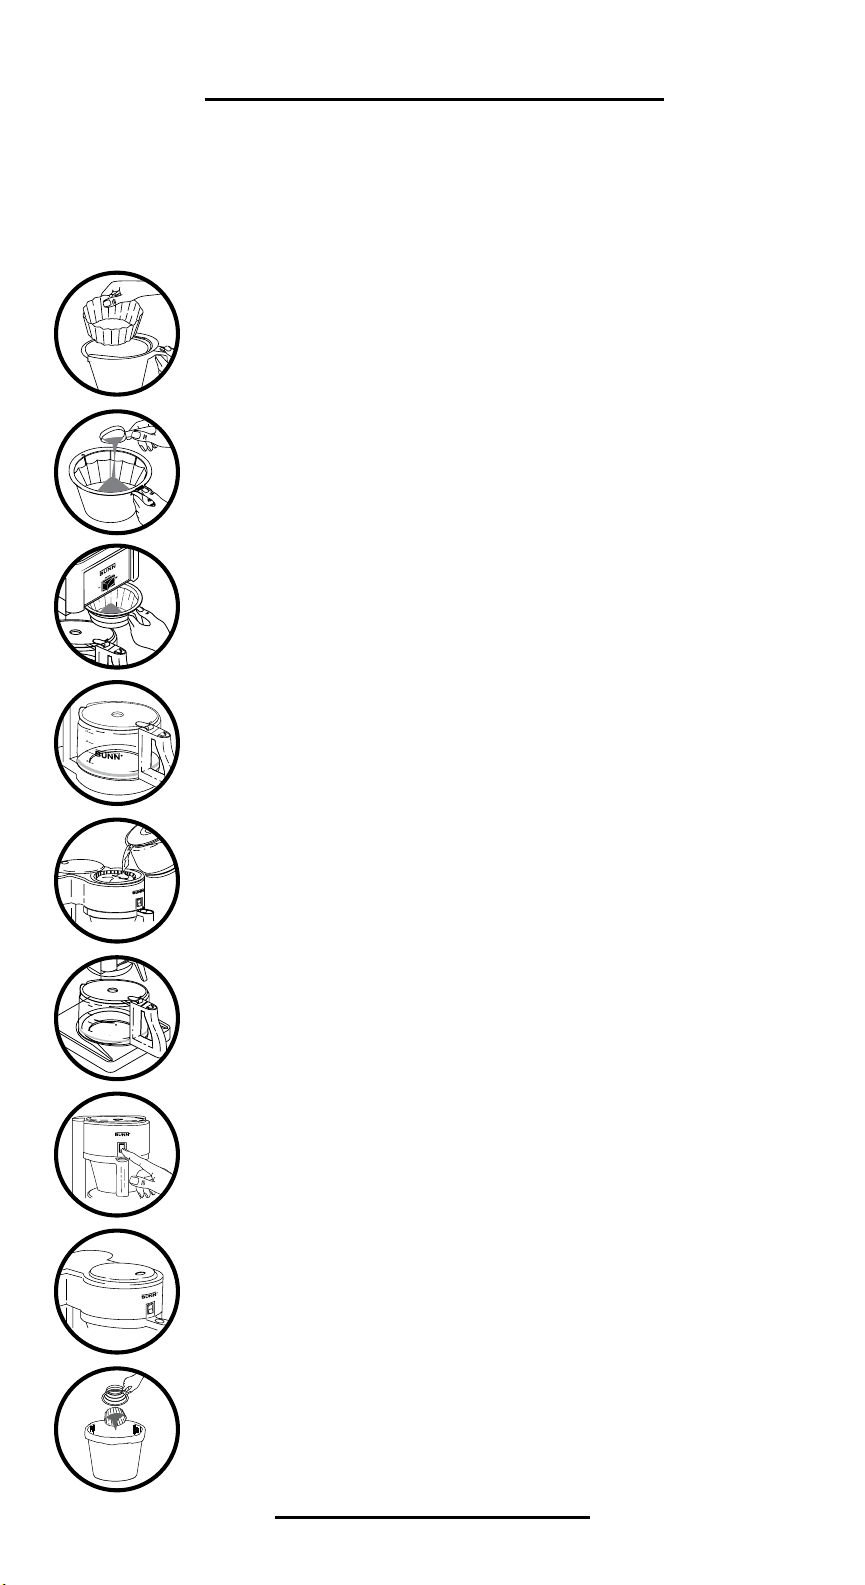
BREWING BETTER
OF
F
O
N
B
U
N
N
01
8
6
4
w
w
w
.
b
u
n
n
o
m
a
t
i
c
.
c
o
m
O
N
WA
R
M
E
R
NN
UB
O
F
F
B
U
N
N
6
4
8
1
0
B
U
N
N
6
4
8
1 0
O F F
O
N
O
F F
WITH VELOCITY BREW
See previous page for Initial Setup before brewing the first time.
NOTE: Decaffeinated, fine grind coffee and/or softened water may cause an overflow
of grounds into your carafe. Visit www.bunn.com or call BUNN Customer Service at
1-800-352-2866 to request a flow restrictor sprayhead free of charge.
1. Place BUNN coffee filter into the brew funnel.
2. Measure fresh coffee into the filter, shaking gently to
level the grounds.
We recommend 1-2 heaping Tbsp. of drip
grind per cup.
3. Slide brew funnel into filter guides and open lid.
4. Fill carafe with cold water (minimum 4 cups
(20 oz), maximum 10 cups (50 oz.)).
5. Pour cold water into brewer.
DO NOT close lid unless brew funnel and carafe are in place.
Closing lid releases hot water.
6. Position carafe on base under brew funnel.
With BT or ST, pre-heat carafe with hot water.
See page 6 for instructions.
7. Turn on warmer (not applicable with BT or ST).
8. Close the lid to start brew cycle.
9. When brew cycle is complete, remove brew funnel and
discard filter and grounds.
Do not touch hot grounds.
5
Page 8
BREW BETTER TIPS
You’ll always brew better with BUNN! Our BREW BETTER TIPS will help
you get the most flavor from every cup!
• Use BUNN paper filters – they’re made with a special grade of paper to extract
the purest coffee flavor. And they’re taller, so you won’t end up with overflow
and grounds in your coffee.
• Decaffeinated, fine grind coffee and/or softened water may cause an overflow
of grounds into your carafe. Visit www.bunn.com or call BUNN Customer
Service at 1-800-352-2866 to request a flow restrictor sprayhead free of charge.
• For the best coffee flavor, grind beans just before brewing and be sure to use
enough coffee. We recommend 1-2 heaping Tbsp. of drip grind per cup, or about
1.5 inches of coffee in a flat-bottom filter.
number of cups (5 oz.) number of tbsp.
4
6
8
• Dispose of filter and grounds immediately after brewing to prevent drip-through
of bitter flavors trapped in used coffee grounds.
• For best coffee flavor, coffee can be held in a glass carafe for up to 30 minutes
or in a thermal carafe for about 2 hours.
• Preheat a thermal carafe for best results. Fill with hot water for about 30
seconds, then empty before brewing coffee into carafe. Preheating the thermal
carafe prevents coffee from losing temperature when it enters the carafe.
• For maximum freshness, store coffee in a clean, dry place away from heat, vents
or extreme cold.
• Fresh, good-tasting water is essential for a perfect cup. If your water contains
excessive sediment, or has an ‘off’ taste or odor, we recommend using filtered
wa ter.
• Your BUNN Velocity Brew is designed to remain plugged in, and the vacation
switch on, at all times, except during initial setup, when cleaning, or if it won’t
be used for 3 or more days.
4 – 8
6 – 12
8 – 16
BUNN ACCESSORIES
BUNN offers a complete line of brewer accessories, including paper filters, carafes,
thermal carafes, replacement funnels and more.
Visit www.bunn.com to order parts and accessories or call the BUNN Retail Division
at 1-800-352-BUNN (2866)
6
Page 9

CLEANING AND MAINTENANCE
BASIC CLEANING
Wash the brew funnel and glass carafe after each use – they’re top rack
dishwasher safe. Hand wash the thermal carafe and lid after each use.
Occasionally wipe the outside of the brewer, including the area above the funnel,
with mild, no citrus added dish soap and a damp cloth. Every 2 to 4 weeks remove
the sprayhead and clean. While cleaning your brewer, check the glass carafe
handle and tighten with a standard screwdriver if it’s loose.
DELIMING
Deliming your brewer clears any deposits that have accumulated due to impurities
in the water source. The frequency of deliming depends on the mineral content of
your water.
NOTE: Unplug the brewer and let it cool before deliming!
1. Remove the sprayhead by turning with your fingertips; set aside.
2. Insert all but two inches of the flexible deliming tool into the sprayhead tube.
Different models use different deliming tools. Please use the one supplied to
prevent damage to your brewer. Call 1-800-352-2866 or visit www.bunn.com
for a replacement deliming tool.
3. Slide deliming tool in and out of the sprayhead tube five or six times to loosen
lime. You may need to twist, push and use some force when inserting the tool.
Remove tool.
4. Prior to replacing the sprayhead, pour one carafe of fresh water into the
brewer. Position empty carafe on the brewer and close the lid. Water will flow
into the carafe.
5. Check the sprayhead holes. If they’re plugged with mineral deposits or
white flakes, clear with a toothpick. Clean sprayhead with a cloth and mild
detergent, rinse with water, then reinstall. Empty water from carafe.
6. Plug in brewer and allow approximately 15 minutes for the water in the tank to
reach brewing temperature.
DEEP CLEANING
You should clean your brewer at least every 3 months. The frequency of cleaning
depends on the mineral content of your water.
1. Slide empty brew funnel into the funnel guides under the sprayhead and place
empty carafe on the base plate.
2. Open lid and pour 1 quart of white vinegar into the top of the brewer; close
lid. Empty the carafe when liquid stops flowing from the brew funnel.
3. Allow brewer to sit plugged in with the Vacation Switch on for 2 hours.
4. Unplug the brewer. Remove brew funnel and sprayhead from the brewer.
Clean sprayhead with a cloth and mild detergent.
7
Page 10

CLEANING AND MAINTENANCE (cont .)
5. To clear vinegar out of brewer, pour a carafe of fresh, cold water through the
brewer. With brew funnel in place, position carafe on base plate, then close
the lid to allow the water to run through the brewer. After it has run through,
empty carafe and repeat the process approximately 8-10 times
6. Replace sprayhead and brew funnel. Pour additional carafes of fresh, cold
water into the brewer as needed until water has no vinegar smell or taste.
7. Place carafe on base plate and plug in the brewer. Allow the water in the tank
to reach brewing temperature before using (approximately 15 minutes).
THERMAL CARAFE CLEANING (BT & ST)
To disassemble the thermal carafe for cleaning, rotate the lid
counterclockwise to remove. Occasionally, the brew through
valve should be removed and cleaned. Lift at the edge and
pull up. Use a mild, non-abrasive detergent to wash the lid
thoroughly – paying particular attention to the passage where
the brew through valve is located. After rinsing, replace the
brew through valve into the carafe lid. Do not use a scrub pad or other abrasive
cleaning device to clean the carafe, as this will scratch the stainless steel surface.
To remove coffee stains from inside the thermal carafe, place a paper filter in the
brew funnel and pour 2 teaspoons of Cascade
the paper filter. Slide brew funnel onto the funnel guide and open brewer lid. Pour
one carafe of cold water into brewer. Position carafe on brewer base plate and
close lid. When brewing cycle stops, remove brew funnel and discard the filter and
detergent; rinse funnel thoroughly. Allow carafe to sit for 10-15 minutes. Using a
long handled, soft bristled brush, clean inside of carafe as well as the outer rim to
remove any coffee stains or debris. Occasionally scrub the carafe pour lip and the
area around it, including the lid, with a mild detergent and warm water. Use a soft
cloth and scrub hard. When finished, pour out solution into sink and thoroughly
rinse carafe and lid with clean water.
®
powder dishwasher detergent into
DRAINING YOUR BREWER
The water in your brewer should be emptied whenever the brewer is taken on a
trip, shipped, stored in an unheated location with a chance of freezing, or will not
be used for an extended period of time. To drain your brewer:
1. Unplug brewer. Remove the brew funnel and sprayhead and set them aside.
2. Cool brewer by pouring a full carafe of fresh, cold water into the top. Place
the carafe on the base plate and close the lid. When water has stopped
flowing from the brewer, empty the carafe. Repeat this process and set the
carafe aside.
3. Grasp the back of the brewer and carefully turn it upside down over a sink.
Most of the water in the tank will flow from the sprayhead tube opening. Some
water may flow from the area around the top lid. Continue tipping the brewer
until the flow stops.
4. Replace the sprayhead and funnel after the water has been drained.
8
Page 11

MORE ABOUT YOUR BREWER
HOT WATER TANK
• Brewer is designed to be plugged in at all times, except during initial setup or
when cleaning.
• The stainless steel hot water tank is designed to keep water at the proper
brewing temperature at all times. During a brew cycle, the newest water added
to the tank is heated to proper brewing temperature and held until needed.
• Use vacation switch to completely shut off all electrical components when
brewer will not be used for 3 or more days. Safety features built into the
BUNN Velocity Brew make daily use of the vacation switch unnecessary.
• If brewer is shut off or unplugged for an extended period of time, allow water
to heat to the proper temperature before using (about 15 minutes or until the
heating sound stops).
• If brewer has been shut off and drained of all water, follow Initial Setup (page 4)
before brewing again. Improper setup will result in permanent damage to your
brewer and void the limited warranty.
GLASS AND THERMAL CARAFES
• NHS, GR, BX – Brewed coffee flows into a glass carafe and is kept at serving
temperature by the porcelain carafe warmer. Warmer is controlled by the on/off
switch at the front of the brewer. NOTE: The warmer switch controls only the
carafe warmer. It is NOT the vacation switch.
• ST, BT – Brewed coffee flows into an unheated thermal carafe. The double wall
stainless steel construction holds coffee at serving temperature for about 2
hours at maximum flavor. Pre-heating (instructions on page 6) carafe with hot
water increases the time coffee stays warm.
ADDITIONAL INFORMATION
• When brewer is not in operation, the spin or flip lid should be closed. If lid is left
open, water can drip from the sprayhead when cold water is poured in.
• Hot water for cooking may be dispensed through the brewer when there are no
coffee grounds in the filter basket. Use caution when dispensing hot water from
the brewer. The water is approximately 50°F hotter than a hot water faucet.
• If the sprayhead becomes loose and needs to be retightened with your
fingertips, make sure it has cooled sufficiently to avoid burning your fingers.
9
Page 12

TROUBLESHOOTING
PROBLEM SUGGESTION
Coffee doesn’t
come out
Brewed only
partial carafe
Funnel is overflowing
Coffee is cold
• Go through Initial Setup (page 4).
• Close lid.
• Evaporation can occur over time, so tank may need to be
refilled (see Initial Setup, page 4). Brewer requires a minimum
of 4 cups (20 oz.) to begin brewing.
• Check sprayhead holes. If they’re clogged, clean. See deliming
instructions (step 5) on page 7.
• Evaporation can occur over time, so tank may need refilled (see
Initial Setup, page 4).
• Coffee grounds and filter absorb some water. You may need to
increase water input.
®
• Use BUNN
• Check to make sure sprayhead is in place.
• If you use decaffeinated, fine grind coffee or softened water,
see page 11 to request a flow restrictor sprayhead or order
BUNN paper filters.
• Plug in brewer and turn on vacation switch on side or back
of brewer. Allow 15 minutes for water to heat to proper
temperature.
paper filters.
Coffee is not
staying hot
Loud rumbling noise
Water flow begins
before lid is closed
Deliming tool doesn’t
go in all the way
Brewer leaks
• Make sure warmer switch is in the ON position (NHS, GR, BX).
• Pre-heat the thermal carafe (BT, ST). See page 6.
• Normal while water is heating.
• Brewer may need deliming. See page 7.
• Make sure lid is completely open.
• Brewer is not designed to hold water in upper tray for
extended periods.
• Remove top lid to ensure rocker arm is in place and rubber
stopper area is thoroughly cleaned.
• Follow deliming instructions (step 3) on page 7.
• For repair information, visit www.bunn.com (Home Coffee
Brewers) or call 1-800-352-2866.
Do not disassemble.
There are no user serviceable parts inside the brewer.
10
Page 13

AUTHORIZED SERVICE
www.bunn.com
-o -matic corporation
bunn
th e united states:
in
1400 Stevenson Drive, Springfield, IL 62703
900 E. Townline Rd., Creston, Iowa 50801
1-800-352-BUNN (2866)
in canada :
280 Industrial Parkway S., Aurora, Ontario L4G 3T9
1-800-263-2256
To receive full assistance, have Model and Date Code
(three possible locations: 4 digits are etched on each side of the metal prongs
of your power cord. Ex. 9999 99CH, the bottom of your brewer or
lower back of your brewer) ready when calling.
NOTES:
________________________________________________________
________________________________________________________
________________________________________________________
________________________________________________________
________________________________________________________
________________________________________________________
________________________________________________________
________________________________________________________
________________________________________________________
________________________________________________________
________________________________________________________
________________________________________________________
________________________________________________________
________________________________________________________
________________________________________________________
11
Page 14

LIMITED WARRANTY
BUNN® Batch Brewers for Home
Models: GR (GRX), BX, NHS, BT (BTX), ST (STX), HT, HG
Bunn-O-Matic® Corp (“BUNN”) warrants the BUNN Home Batch Coffee Brewers
(“Brewers”) to be free from defects in materials and workmanship existing at the time of
manufacture and appearing within one of the following warranty periods:
a) Three (3) years from the date of original purchase of a NEW BREWER with
delivery of a valid receipt evidencing such purchase or, in the absence of such a
receipt, from the date of manufacture as determined by date code of the machine
b) Three (3) years from the date of customer’s receipt of a REPLACEMENT BREWER,
if the original warranty on the replaced Brewer warranty has not expired.
c) One (1) year from the date of purchase of a REMANUFACTURED BREWER.
If such a defect appears during the warranty period, we will (at our sole option) repair or
replace the defective Brewer with no charge for service or parts, provided the Brewer is
delivered at the customer’s expense to one of our authorized service centers.
Warranty does not cover claims resulting from misuse, failure to follow instructions on
installation and use, use with having a high mineral content, neglect, use of unauthorized
attachments, commercial use, use of a current or voltage other than specified on the
Brewer, or unauthorized service during the warranty period on conditions otherwise covered
by warranty.
THIS WARRANTY SHALL BE EXCLUSIVE AND SHALL BE IN LIEU OF ANY OTHER
EXPRESS WARRANTY, WRITTEN OR ORAL, INCLUDING BUT NOT LIMITED TO
ANY EXPRESS WARRANTY OF MERCHANTABILITY OR FITNESS FOR A PARTICULAR
PURPOSE. THE DURATION OF ANY IMPLIED WARRANTIES OF MERCHANTABILITY
OR FITNESS FOR A PARTICULAR PURPOSE IS EXPRESSLY LIMITED TO THE PERIOD OF
DURATION OF THIS LIMITED WARRANTY.
Some states do not allow limitation on how long an implied warranty lasts, so the above
limitations may not apply to you.
THE CUSTOMER’S EXCLUSIVE REMEDY FOR BREACH OF THIS WARRANTY OR
OF ANY IMPLIED WARRANTY OR OF ANY OTHER OBLIGATION ARISING BY
OPERATION OF LAW OR OTHERWISE SHALL BE LIMITED AS SPECIFIED HEREIN TO
REPAIR OR REPLACEMENT, AT OUR SOLE OPTION. IN ANY EVENT, RESPONSIBILITY
FOR SPECIAL, INCIDENTAL AND CONSEQUENTIAL DAMAGES IS EXPRESSLY
EXCLUDED.
Some states do not allow the exclusion or limitation of incidental or consequential damages,
so the above limitation or exclusion may not apply to you.
This warranty gives you specific legal rights, and you may have other rights which vary from
state to state.
The BUNN logo is a trademark of Bunn-O-Matic Corporation.
43097.0002D 02/12 ©2011 BUNN-O-MATIC CORPOR ATION
www.bunn.com
12
Page 15

CAFETERA DE VELOCIDAD
CAFETERA DE 10 TAZAS
MANUAL DE USO
Y CUIDADO
BX STNHS GR BT
Para modelos NHS, NHS, GR, BX, BT y ST
Page 16

BLANK
(remove text before printing)
Page 17

CONOZCA MEJOR A SU CAFETERA
CAFETERA VELOZ DE BUNN
Embudo para colar
1
2
11
9
1
3
4
5
6
12
NHS
Tapa (gire o levante para abrir)
2
Tanque interno para agua caliente
3
Tapa para jarra de vidrio
4
(modelos GR, BX, NHS)
Jarra de vidrio (modelos GR, BX, NHS)
5
Placa calentadora
6
Tapa de jarra térmica
7
Jarra térmica
8
Cabeza roceadora
9
10
Luz de encendido (modelo ST)
Interruptor para calentar
11
(modelos GR, BX, NHS)
Interruptor para modo de vacacionar
12
(Sitio para localizarlo según el modelo)
BT/ST
BT/ST
especificaciones
elÉ ctric a s: Los modelos UL y C-UL
son solo para uso en casa. La cafetera
tiene una extensión de tres clavijas con
conexión a tierra y requiere de una
conexión de dos entradas con entrada a
tierra de 120 voltios AC.
NHS: 1.9 amperios, de una fase, 60Hz.
947-watts en total.
ST: 7 amperios, de una fase, 60 Hz.
850-watts en total.
BX: 7 amperios, de una fase, 60Hz,
900-watts en total.
GR: 7.5 amperios, de una fase, 60Hz
900-watts en total.
BT: 7.5 amperios, de una fase, 60 HZ
850-watts total.
97 8
NHS/BT/BX/GRST
10
Costado del modelo ST
12
Parte trasera del
modelo ST
2
O
I
11
WARMER/RECHAUD
9
3
1
4
12
GR
5
6
CAPACIDAD DE COLADO: de 4 a 10 tazas de cinco onzas (5oz)
USO EN LUGARES DE ALTITUD: El agua hierve a temperatura más baja en lugares de
gran altitud (sobre 4,000 pies). En gran altitud, use el modelo designado como “D” ya que el
termostato se ha preestablecido para estos estados.
El logo de Bunn es una marca registrada de Bunn-O-Matic® Corporation.
43097.0002D 10/12 © 2011 BUNN-O-MATIC CORPORATION
1
Page 18

MEDIDAS DE SEGURIDAD IMPORTANTES
Siga las precauciones básicas de seguridad para reducir el riesgo de incendio, shock eléctrico
y/o daños personales, cuando use electrodomésticos.
• LEA TODAS LAS INSTRUCCIONES
• No toque las superficioes calientes, use
las asas.
• No deje la extensión eléctrica, la
conexión o la cafetera en agua o en
líquido.
• Es necesario se supervice de cerca
cuando la cafetera sea usada o haya
niños en el área.
• Desconecte la cafetera cuando no se
este usando por 3 o más días y antes
de limpiarle. Permita que la cafetera
se enfríe antes de remover o cambiar
partes, al igual que antes de limpiarle.
• No trabaje la cafetera si el cable
eléctrico o la conexión están dañados,
o si la cafetera no esta funcionando
correctamente de alguna manera.
Regrese la cafetera a un Centro
Autorizado de Servicio para su revisión,
ajuste o reparación (véase página 11).
• Usar accesorios no evaluados para su
uso con esta cafetera puede resultar en
heridas.
• Exclusivamente para uso en casa.
• No permita al cable eléctrico que
cuelgue por la orilla de la mesa, del
estante o que toque áreas calientes.
• No ponga la cafetera en o cerca de
gas caliente, comal eléctrico u horno
encendido.
• No use la cafetera con ningún otro
propósito que para el que está destinada.
• No quite el embudo o la jarra mientras
se este conlando.
• No caliente la jarra sobre una hornilla
encendida o con microondas.
• No ponga la jarra caliente en superficies frías.
• No use la jarra si esta quebrada, o si el
asa esta suelta o floja.
• No sirva ningún líquido en el tanque
para agua, que no sea agua o vinagre
para su limpieza, tal como se especifíca
en el manual.
• No limpie la jarra con limpiadores
abrasivos o jergas de acero
• Cuando la cafetera no se este usando,
mantenga la tapa cerrada.
NOTA: El cable corto para corriente que se provee reduce el riesgo de enredarse o tropezar. Si un
cable de extensión se utiliza, su rango eléctrico deberá ser por lo menos tan potente como el rango
eléctrico de la cafetera. Asegúrese de que el cordón eléctrico no cuelgue en el borde de una mesa o
del estante, y que no pueda ser estirado o convertirse en fuente de tropiezo para niños, la extensión
eléctrica deberá ser de tres entradas para una conexión, con un de ellas a piso.
CONSERVE ESTE INSTRUCCIONES
Registre la fecha código antes de usar la
cafeteria: tres posiciones posibles: 4 dígitos son
inscrito en cada lado de las clavijas metales
(ejemplo 9999 99CH), abajo, o en la par te baja
trasera de su cafeteria.
MODELO:
FECHA CÓDIGO:
¿Preguntas?
Visite www.bunn.com o llame
En EUA 1-800-352-BUNN (2866)
o en Canadá 1-800-263-2256
ADVERTENCIA: PARA DISMINUIR EL RIESGO DE FUEGO O
LA REPARACIÓN DEBE SER EFECTUADA POR PERSONAL
ADVERTENCIA
RIESGO DE FUEGO O DESCARGA ELÉCTRICA
DESCARGA ELÉCTRICA NO DESARME LA CAFETERA
NO CONTIENE PIEZAS QUE EL USUARIO
Este símbolo le advierte
de importantes
instrucciones operativas
y de servicio.
PUEDA REPARAR
AUTORIZADO SOLAMENTE
Este símbolo le advierte
del riesgo de incendio o
descarga eléctrica en el
mensaje que lo acompaña
Por favor tenga su modelo y fecha código a la
mano cuando llame al servicio.
2
Page 19

TABLA DE CONTENIDOS
Por qué BUNN cuela mejor? ................... 3
Programación inicial de su
cafetera Veloz Bunn ...............................3-4
Como colar mejor ..................................... 5
Consejos para colar mejor ...................... 6
Limpieza y mantenimiento ....................7-8
Drenando la cafetera ............................... 8
Más sobre su cafetera .............................. 9
Resolución de problemas ........................ 10
Servicio Autorizado y Accesorios ...........11
Garantía limitada .....................................12
BIENVENIDO
La cafetera Veloz de BUNN® cuela diferente a cualquier cafetera que haya usado con
anterioridad. A diferencia de una cafetera normal, cuenta con un tanque interno para agua
caliente que mantiene al agua a la temperatura correcta para colar, de modo que siempre
esta lista para colar la taza perfecta de café en 3 o 4 minutos.
POR QUÉ CUELA MEJOR
CAFETERA VELOZ DE BUNN VS. CAFETERA COMÚN
PROGRAMACIÓN INICIAL PARA
SU CAFETERA VELOZ DE BUNN
Antes de colar su café por primera vez, deberá llenar el tanque de agua caliente interno con
agua y permitirle calentarse a la temperatura correcta para colar. Para prevenir daños a la
cafetera, NO LA CONECTE hasta que no termine estos simples pasos.
ADVERTENCIA: ¡NO CONECTE LA CAFETERA HASTA
COMPLETAR EL PASO 5! El programarla de manera erronea
puede resultar en daños permamentes para su cafetera y
cancelación de su garantía limitada.
Antes de llenar la cafetera con agua, registre el número de modelo y la fecha código en su
manual de Uso y Cuidado. Esta información se encuentra en la parte trasera baja o abajo
de su cafetera.
3
Page 20
LLENE EL TANQUE DE AGUA CALIENTE
B
U
N
N
6
4
8
1
0
B
U
N
N
6
4
8
1
0
B
U
N
N
6
4
8
1
0
B
U
N
N
6
4
8
1
0
NHS/ST
BT/BX/GR
1. Deslice el embudo vacío por las líneas
guías, tal como se muestra.
2. Llene la jarra con agua fría.
Gire o levante la tapa de la cafetera y vierta
el agua dentro de la cafetera. Posicione la
jarra en la base abajo del embudo para colar.
Cierre la tapa y espere 3 minutos mientras
que el tanque interno se llena parcialmente.
3. Repita el paso 2
Abra la tapa de la cafetera. Remueva la jarra
y llene con agua fría de nuevo. Vierta el agua
en la cafetera. Posicione la jarra en la base
abajo del embudo de colado. Cierre la tapa.
4. Espere a que el agua corra por el
embudo de la cafetera.
Si algo de agua fluye, el tanque esta lleno.
Cuando la corriente de agua se detenga, tire
el agua que se haya almacenado en la jarra.
Reacomode la jarra sobre la base debajo del
embudo para colar. NOTA: Toma dos jarras
completas de agua para llenar por completo
el tanque interno de agua caliente.
5. Conecte la cafetera.
6. Encienda la cafetera.
Presione el interruptor para el modo de
vacacionar localizado en el costado (en los
NHB/NHS
modelos NHS, GR, BT, BX) o atrás (ST) de la
cafetera (presione el botón I para encender
y O para apagar). Si ve rojo en el final del
interruptor, la máquina esta encendida. Espere
15 minutos para que el agua en el tanque se
ST
caliente. NOTA: Su cafetera esta disenada
para mantener su programación inicial en todo
momento, excepto cuando se le limpia o si la
cafetera no se usará por 3 días o más.
Usted ha llenado el tanque de agua caliente y esta listo para
colar su primer café!, vea las instrucciones de colado siguientes.
4
Page 21

COLANDO MEJOR
OF
F
O
N
B
U
N
N
01
8
6
4
w
w
w
.
b
u
n
n
o
m
a
t
i
c
.
c
o
m
O
N
WA
R
M
E
R
NN
UB
O
F
F
B
U
N
N
6
4
8
1
0
B
U
N
N
6
4
8
1 0
O F F
O
N
O
F F
CON LA CAFETERA VELOZ
Véase la página anterior para la programación inicial antes de
colar por primera vez.
NOTA: El café descafeinado, el grano molído muy fino o el agua ligera puede causar
que granos pasen a su jarra. Visite www.bunn.com o llame el Servicio al Cliente BUNN al
1-800-352-2866 para pedir una cabeza roceadora que restrinja el flujo sin costo alguno.
1. Ponga el filtro BUNN en el embudo para colar.
2. Vierta el café fresco en el filtro, moviendolo
cuidadosamente para acomodar los granos de café.
Le recomendamos usar de 1 a 2 cucharadas bien llenas de café
por taza.
3. Deslice el embudo dentro de las guías del filtro y abra la
tapa.
4. Llene la jarra con agua fría (mínimo 4 tazas (20 oz) o
máximo 10 tazas (50 oz)).
5. Vierta agua fría en la cafetera.
NO cierre la tapa de la cafetera a menos que el embudo y
la jarra esten en su lugar. Al cerrar la tapa se libera agua
caliente.
6. Posicione la jarra en la base bajo el embudo.
Con los modelos BT y ST, pre caliente la jarra con agua
caliente, véase la página 6 para las instrucciones.
7. Encienda el calentador.
(no aplica para los modelos BT o ST)
8. Cierre la tapa para que comience el ciclo de colado.
9. Cuando el ciclo de colado este completo, remueva el
embudo y deseche el filtro y los residuos.
No toque los residuos, estan calientes.
5
Page 22

CONSEJOS PARA COLAR MEJOR
¡Usted siempre colará mejor con BUNN!, ¡Nuestros tips para colar mejor
le ayudarán a obtener el mejor sabor de cada taza!
• Use los filtros de papel de BUNN - Estan hechos con un papel de un nivel
especial para extraer el sabor más puro de café. Son más altos, de modo que no
se le desborda ni se cuelan residuos en su café.
• Café descafeinado, granos de café molído muy fino o agua dulce pueden
causar que se desborde y residuos caigan en su jarra. Visite www.bunn.com o
llame al Servicio al Cliente de BUNN al 1-800-352-2866 para pedir una cabeza
roceadora que restrinja el flujo sin costo alguno.
• Para un mejor sabor del café, muela los granos justo antes de colar y use
suficiente café. Le recomendamos sirva de 1 a 2 cucharadas cargadas por taza,
o un aproximado de 4cm de café en un filtro de fondo plano.
NUMERO DE TAZAS (5 oz.) NUMERO DE CUCHARADAS
4
6
8
• Deseche el filtro inmediatamente despues de haber colado para prevenir captar
gotas de los granos de cafe ya extraidos.
• Para un mejor sabor del café, el café puede mantenerse en una jarra de vidrio
por un tiempo de hasta 30 minutos, mientras que si le tiene en una jarra termal
se mantiene hasta por 2 horas.
• Precaliente una jarra termal para obtener mejores resultados. Llenela con agua
caliente por alrededor de 30 segundos, después vacíe antes colar el café en la
jarra. El precalentar la jarra termal previene al café de perder temperatura
cuando entra en la jarra termal.
• Para una máxima frescura, guarde el café en un sitio limpio, seco y alejado de
las ventilas de la calefacción o del frío extremo.
• Agua fresca, de buen sabor es esencial para obtener una taza perfecta. Si su
agua contiene un exceso de sedimentos, o tiene un sabor u olor extraño, le
recomendamos utilice agua filtrada.
• Su cafetera Veloz de Bunn esta diseñada para permanecer conectada con
el interruptor de modo de vacacionar encendido en todo momento, excepto
durante su programación inicial, o cuando se le esta limpiando o si no se le
estará usando por 3 días o más.
4 – 8
6 – 12
8 – 16
ACCESORIOS BUNN
BUNN ofrece una línea completa de accesorios, incluyendo filtros de papel, jarras,
jarras térmicas, embudos de extra y más.
Visite www.bunn.com para ordenar partes y accesorios o llame BUNN la División de
Ventas al 1-800-352-BUNN (2866)
6
Page 23

LIMPIEZA Y MANTENIMIENTO
LIMPIEZA BÁSICA
Limpie el embudo para colar y la jarra de vidrio después de cada uso - son
resistentes al cajón superior de la lavadora de trastes. Lave a mano la jarra térmica
y la tapa después de cada uso. Ocasionalmente limpie el exterior de la cafetera,
incluyendo el área sobre el embudo con un jabón para platos suave sin cítricos y con
una tela húmeda. De cada 2 a 4 semanas remueva la cabeza roceadora y limpiela.
Al estar limpiando su cafetera, revise el asa de la jarra de vidrio y aprietela usando
un desarmador tama–o estándar si ésta se encuentra suelta.
DESCALCIFICACIÓN
Descalcificar su cafetera libera cualquier depósito acumulado debido a las
impurezas de la fuente de agua. La frecuencia de decalcificación depende en los
contenidos minerales de su agua.
NOTA: ¡Desconecte la cafetera y deje que se enfríe antes de descalcificar!
1. Remueva la cabeza roceadora con la punta de sus dedos; déjela a un lado.
2. Inserte casi completamente, menos cinco centímetros de la herramienta flexible
para descalcificar en el tubo de la cabeza roceadora. Diferentes modelos utilizarán
diferentes herramientas para descalcificar. Por favor utilice la herramienta que se le
proporcionó para evitar dañar su cafetera. Llame al 1-800-352-2866 o visite www.
bunn.com para un reemplazo de su pieza para descalcificar.
3. Deslice la herramienta para descalcificar de cinco a seis veces hacia adentro
y fuera de la cabeza roceadora para aflojar el sarro. Quizás necesite rotarlo,
empujarlo y usar una poca de fuerza al insertar la herramienta. Finalmente
remueva la herramienta.
4. Antes a remplazar la cabeza roceadora, vierta una jarra de agua fresca en la
cafetera. Posicione la jarra vacía en la cafetera y cierre la tapa. Agua correrá
hacia la jarra.
5. Revise los agujeros de la cabeza roceadora. Si están tapados con depósitos
minerales o hojuelas blancas, limpielos con un palillo dental. Limpie la
cabeza roceadora con una jerga y un detergente suave, enjuague con agua y
reinstale. Vacíe el agua de la jarra.
6. Conecte la cafetera y permita un aproximado de 15 minutos para que el agua
del tanque llegue a una temperatura adecuada para colar.
LIMPIEZA A FONDO
Deberá limpiar su cafetera por lo menos cada 3 meses. La frecuencia de su
limpieza depende del contenido mineral del agua que se usa.
1. Deslice el embudo para colar vacío en las líneas guía bajo la cabeza
roceadora y ponga la jarra vacía en la placa base.
2. Abra la tapa y sirva 1 cuarto de vinagre blanco en el borde de la cafetera; cierre
la tapa. Vacíe la jarra cuando el líquido deje de correr por el embudo para colar.
3. Permita a la cafetera quedarse conectada con el interruptor de modo de
vacacionar encendido por dos horas.
4. Desconecte la cafetera. Remueva el embudo para colar y la cabeza roceadora de
la cafetera. Limpie la cabeza roceadora con una jerga y con detergente suave.
7
Page 24

LIMPIEZA Y MANTENIMIENTO (continuación)
5. Para quitar el vinagre de la cafetera, vierta una jarra de agua fresca y fría a
través de la cafetera. Con el embudo para colar en su sitio, posicione la jarra
en la base y luego cierre la tapa para permitir el agua correr a través de la
cafetera. Después de que haya corrido el agua, vacíe la jarra y repita el proceso
de 8 a 10 veces.
6. Reemplace la cabeza roceadora y el embudo para colar. Vierta jarras
adicionales de agua fresca y fría en la cafetera tal como sea necesario, hasta
que el olor o sabor a vinagre desaparezca.
7. Ponga la jarra sobre el plato base y conecte la cafetera. Permita que el agua
en el tanque alcance a la temperatura necesaria para colar antes de usar
(aproximadamente 15 minutos).
LIMPIEZA DE JARRA TÉRMICA (MODELOS BT Y ST)
Para desensamblar la jarra térmica para su limpieza, rote la tapa
en contra de las manecillas del reloj y remueva. Ocasionalmente,
la válvula para colar se deberá remover y limpiar. Levante de
una orilla y estire hacia arriba. Utilice un detergente suave,
no abrasivo para limpiar la tapa a fondo - poniendo atención
especial al area donde esta situada la válvula para colar. Después
de enjuagar, reacomode la válvula para colar en la tapa de la jarra. No utilice una
jerga para tallar o ningun otro utencilio abrasivo para limpiar la jarra, ya que esta
se puede rayar en su cubier ta de acero inoxidable.
Para remover manchas de café de la parte interior de la jarra térmica, ponga un filtro de
papel en el embudo para colar y sirva en el dos cucharadas de Cascade detergente para
lavaplatos. Deslice el embudo para colar en las guías para el embudo y abra la tapa de la
cafetera, vierta una jarra de agua fría en la cafetera. Acomode la jarra en el plato base
de la cafetera y cierre la tapa. Cuando el ciclo de colado se detenga, remueva el embudo
de la cafetera y deseche el filtro con detergente; enjuague el embudo a fondo. Permita a
la jarra asentarse por 10-15 minutos. Utilizando un cepillo de mango largo y cerdas suaves
limpie dentro de la jarra, al igual que el borde exterior para remover cualquier mancha
de café en el área, incluyendo la tapa con un detergente suave y agua tibia. Use una tela
suave para tallar. Cuando termine, tire la solución que hay dentro de la jarra en el lavabo
y enjuague a fondo la jarra y la tapa con agua limpia.
DRENANDO SU CAFETERA
El agua en su cafetera deberá de vaciarse cuando se desee llevar a la cafetera en
un viaje, cuando se envíe por correo, cuando se guarde en un sitio sin calefacción y
tenga probabilidades de congelarse o si no será utilizada por un periodo largo.
Para drenar su cafetera:
1. Desconecte la cafetera. Remueva el embudo para colar y la cabeza roceadora y
dejelos a un lado.
2. Enfríe la cafetera virtiendo una jarra completa de agua fresca y fría en la parte
superior. Ponga la jarra en el plato base y cierre la tapa. Cuando el agua ha dejado
de correr de la cafetera, vacíe la jarra. Repita este proceso y deje la jarra a un lado.
3. Coja la parte trasera de la cafetera y con cuidado volteela boca abajo en el
lavabo. La mayor parte del agua en el tanque va a correr a través de la abertura
del tubo de la cabeza roceadora. Algo de agua puede salir por el área alrededor
de la tapa. Continúe inclinando a la cafetera hasta que deje de salir agua.
4. Reacomode la cabeza roceadora y el embudo después de que toda el agua haya salido.
8
Page 25

MÁS SOBRE SU CAFETERA
TANQUE PARA AGUA CALIENTE
• La cafetera esta diseñada para quedarse conectada en todo momento excepto
en el momento de la programación inicial o cuando se limpia.
• El tanque de acero inoxidable esta diseñado para mantener el agua caliente a la
temperatura adecuada para colar en todo momento. Durante el ciclo de colado
el agua nueva que se agrega al tanque es calentada a la temperatura necesaria
y retenida hasta que se le necesite.
• Use el interruptor del modo para vacacionar para apagar por completo todos
los componentes eléctricos cuando la cafetera no se vaya a usar por 3 o más
días. La cafetera Veloz de BUNN tiene características de seguridad que hacen
que el uso diario del interruptor de modo para vacacionar sea innecesario.
• Si la cafetera está apagada o desconectada por un tiempo prolongado permita
al agua calentarse a la temperatura adecuada antes de usar (cerca de 15
minutos o hasta que el sonido de calentamiento se detenga).
• Si la cafetera ha sido apagada y se le ha drenado toda el agua siga las instrucciones
de programación inicial (página 1) antes de colar de nuevo. El programarle de manera
inadecuada puede resultar en daño permamente a su cafetera y en cancelación de su
garantía limitada.
JARRAS TÉRMICAS DE VIDRIO
• Modelos NHS, GR, BX - El café colado cae en una jarra de vidrio y se mantiene
a la temperatura para servirse gracias al calentador de porcelana. El calentador
está controlado por interruptor de encendido/ apagado localizado al frente
de la cafetera. Éste NO es el interrptor para activar / desactivar el modo de
vacacionar.
• Modelos BT y ST - El café colado cae en una jarra térmica sin calentar. La
doble pared de acero inoxidable mantiene el café a la temperatura adecuada
para servir por alrededor de 2 horas con un máximo sabor. Pre calentar
(instrucciones en página 6) la jarra con agua caliente aumenta el tiempo el café
se mantiene caliente.
INFORMACIÓN ADICIONAL
• Cuando la cafetera no este operando, la tapa giratoria o levantable deberá
estar cerrada. Si la tapa se deja abierta el agua puede escurrirse de la cabeza
roceadora cuando agua fría se este virtiendo.
• Agua caliente para cocinar puede ser vertida por la cafetera cuando no hay
granos de café en la canasta del filtro. Tenga precaución cuando sirva agua
caliente desde la cafetera. El agua está a un aproximado de 10C más caliente
que el agua caliente de la llave.
• Si la cabeza roceadora se afloja y necesita que sea apretada con sus dedos,
asegúrese de que se haya enfriado lo suficiente para de este modo evitar
quemarse los dedos.
9
Page 26

RESOLUCIÓN DE PROBLEMAS
PROBLEMA SUGERENCIA
No sale café
Coló sólo parte
de la jarra
El embudo se esta
desbordando
El café está frío
• Repase la programación inicial (página 4).
• Cierre la tapa.
• Con el calor se puede evaporar el agua, por lo que el tanque
puede requerir ser rellenado (véase programación inicial
página 4). La cafetera requiere un mínimo de 4 tazas (20 oz)
para comenzar a colar.
• Revise los agujeros de la cabeza roceadora. Si están tapados,
límpiela. Vea las instrucciones para la descalcificación (paso 5)
en la página 7.
• Con el calor se puede evaporar el agua, por lo que el tanque
puede requerir ser rellenado (véase programación inicial
página 4).
• El filtro y los granos de café, en sí absorben algo de agua.
Quizás sea necesario vertir más agua.
®
• Use los filtros de papel de BUNN
• Asegúrese de que la cabeza roceadora está en su sitio.
• Si usted usa café descafeinado, molido fino o agua dulce, vea
la página 11 para pedir una cabeza roceadora que restrinja el
flujo u ordene filtros de papel de BUNN.
• Conecte la cafetera y encienda el interruptor para el modo de
vacacionar en el costado o en la parte trasera de la cafetera.
Dé 15 minutos al agua para llegar a la temperatura adecuada.
.
El café no se queda
caliente
Sonidos Fuertes de
retumbar
El agua comienza a
correr antes de cerrar
la tapa
La herramienta para
descalcificar no entra
por completo
La cafetera gotea
• Asegúrese de que el interruptor del calentador este encendido
(NHS, GR, BX).
• Precaliente la jarra térmica (BT, ST). Véase página 6.
• Es normal mientras el agua se esta calentando.
• La cafetera puede necesitar descalcificación. Véase página 7
• Asegúrese de que la tapa este completamente abierta.
• La cafetera no esta diseñada para retener agua en la charola
superior por periodos largos.
• Remueva la tapa superior para asegurar que el rocker arm
esta en su lugar y el área donde va el empaque retenedor este
limpia.
• Siga las instrucciones para descalcif icar en página 7.
• Para información para repararle por favor visite www.bunn.
com (Home Coffee Brewers) o llame al 1-800-352-2866
No desarme la cafetera.
No hay partes amigables para el usuario dentro de la cafetera.
10
Page 27

SERVICIO AUTORIZADO
www.bunn.com
-o -matic corporation
bunn
en
los estados unidos:
1400 Stevenson Drive, Springfield, IL 62703
900 E. Townline Rd., Creston, Iowa 50801
1-800-352-BUNN (2866)
en canadá :
280 Industrial Parkway S., Aurora, Ontario L4G 3T9
1-800-263-2256
Para recibir asistencia completa tenga el Modelo y la fecha código
(tres posiciones posibles: 4 dígitos son inscrito en cada lado de las clavijas metales de cable
eléctrico. Ejemplo 9999 99CH, abajo, o en la parter baja trasera de su cafeteria).
NOTAS:
________________________________________________________
________________________________________________________
________________________________________________________
________________________________________________________
________________________________________________________
________________________________________________________
________________________________________________________
________________________________________________________
________________________________________________________
________________________________________________________
________________________________________________________
________________________________________________________
________________________________________________________
________________________________________________________
________________________________________________________
11
Page 28

GARANTÍA LIMITADA
Cafeteras por Lotes BUNN® para el Hogar
Modelos: GR (GRX), BX, NHS, BT (BTX), ST (STX), HT, HG
Bunn-O-Matic® Corp (“BUNN”) garantiza que las Cafeteras por Lotes BUNN para el
Hogar (“Cafeteras”) están libres de defectos en materiales y mano de obra al momento de
su fabricación y que surgieran dentro de uno de los períodos de garantía siguientes:
a) Tres (3) años a partir de la fecha de la compra original de una CAFETERA NUEVA
con la entrega de un recibo válido de dicha compra o, a falta de tal comprobante,
de la fecha de la fabricación según se determine por el código de fecha de la
máquina.
b) Tres (3) años a partir de la fecha del recibo del cliente por un REEMPLAZO DE
CAFETERA, si la garantía original en la Cafetera reemplazada no ha expirado.
c) Un (1) año a partir de la fecha de compra de una CAFETERA
REMANUFACTURADA.
Si tal defecto apareciera durante el período de garantía, nosotros (a nuestra única
discreción) repararemos o reemplazaremos la Cafetera defectuosa sin cargo alguno por
servicio o partes, siempre y cuando la Cafetera sea entregada por cuenta del cliente a uno
de nuestros centros de servicio autorizados.
La garantía no cubre los reclamos que surjan a causa del mal uso, falta de seguir
instrucciones de instalación y uso, uso al haber un contenido alto de minerales, negligencia,
uso de accesorios no autorizados, uso comercial, uso de un voltaje o corriente diferente al
que se especifica en la Cafetera, o servicio no autorizado durante el período de garantía
sobre condiciones cubiertas por la garantía.
ESTA GARANTÍA ES EXCLUSIVA Y ESTARÁ EN LUGAR DE CUALQUIER OTRA
GARANTÍA EXPRESA, ORAL O POR ESCRITO, INCLUYENDO PERO NO LIMITADA A
CUALQUIER GARANTÍA EXPRESA DE COMERCIALIZACIÓN O IDONEIDAD PARA UN
PROPÓSITO PARTICULAR. LA DURACIÓN DE CUALQUIER GARANTÍA IMPLÍCITA DE
COMERCIALIZACIÓN O IDONEIDAD PARA UN PROPÓSITO PARTICULAR SE LIMITA
EXPRESAMENTE AL PERÍODO DE DURACIÓN DE ESTA GARANTÍA LIMITADA.
Algunos estados no permiten la limitación en la duración de una garantía, por lo tanto, las
limitaciones anteriores pueden no aplicarle.
EL RECURSO EXCLUSIVO DEL CLIENTE CONTRA EL INCUMPLIMIENTO DE ESTA
GARANTÍA O CUALQUIER OTRA GARANTÍA IMPLÍCITA O CUALQUIER OTRA
OBLIGACIÓN QUE SURJA POR EFECTO DE LA LEY O DE OTRA MANERA, SE
LIMITARÁ COMO SE ESPECIFICA AQUÍ, A LA REPARACIÓN O REEMPLAZO A
NUESTRA ÚNICA DISCRECIÓN. EN CUALQUIER CASO, LA RESPONSABILIDAD POR
DAÑOS ESPECIALES, INCIDENTALES O CONSECUENTES ESTÁ EXPRESAMENTE
EXCLUIDA.
Algunos estados no permiten esta exclusión o limitación de los daños incidentales o
consecuentes, así que la limitación o exclusión anterior pueden no aplicarle.
Esta garantía le otorga derechos legales específicos, y usted podrá tener derechos que
varían de estado a estado.
The BUNN logo is a trademark of Bunn-O-Matic Corporation.
43097.0002D 02/12 ©2011 BUNN-O-MATIC CORPOR ATION
www.bunn.com
12
 Loading...