

Page 1
USE & CARE INSTRUCTIONS for ULTRA-2 COLD DRINK DISPENSER WITH PAF DISPENSER
NOTICE - This guide is for quick reference only and is not intended to replace the information in the Operation Manual!
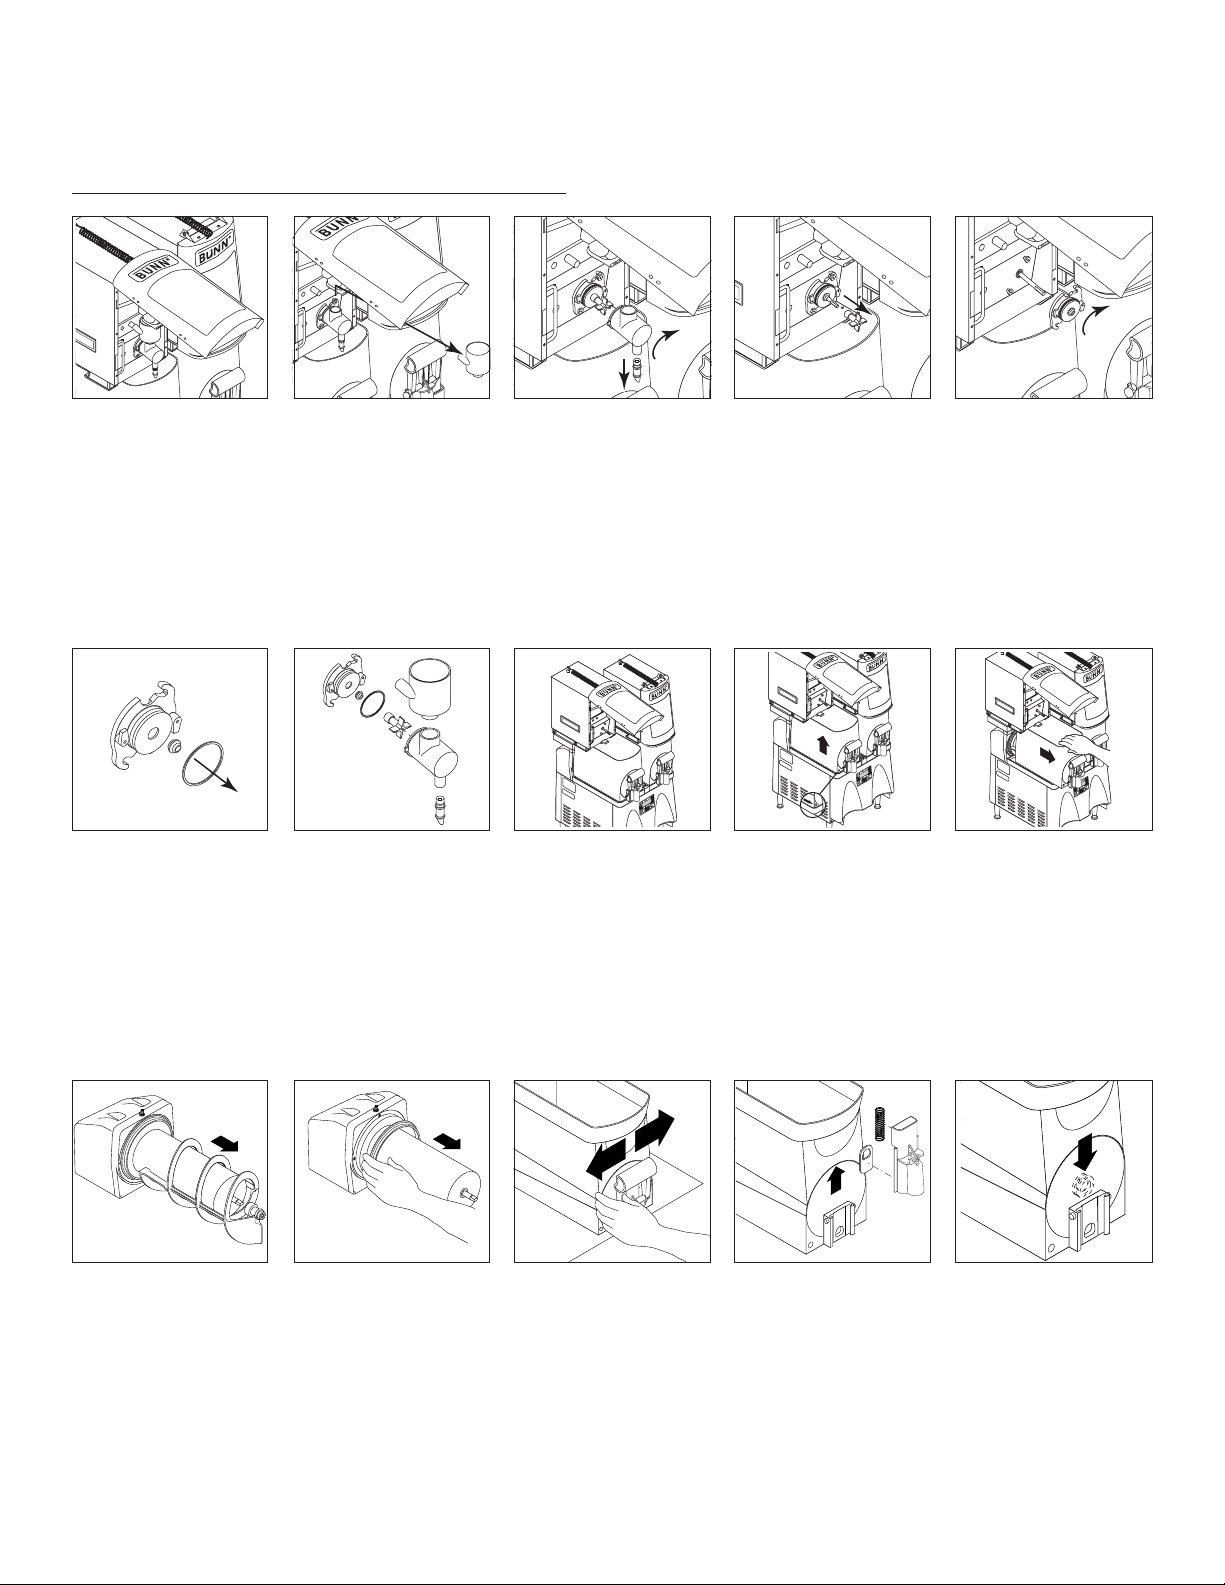
DISASSEMBLY & CLEANING
Empty all product from the ULTRA hoppers before proceeding!
1. Open the Cabinet Door
and allow the support
arms to lock in place.
6. Slip the O-ring off the
Whipper Chamber Receptacle and remove the shaft
seal.
2. Pull the Mixing Chamber out of the Whipper
Chamber.
7. Wash components in a
mild solution of dish detergent using a bristle
brush.
3. Twist the Whipper
Chamber clockwise and
pull it off the Whipper
Chamber Receptacle.
8. Slide PAF assembly
back until it latches before
removing ULTRA Hoppers.
4. Pull the Frother off the
Motor Shaft. Notice the
flat keyway on the shaft
and the matching keyway
inside the Frother. It is
important that these two
keyways are lined up
when reassembling.
9. Depress the Hopper
Lock Plunger, lift slightly.
5. Twist Whipper Chamber Receptacle clockwise
and pull it off the Motor
Shaft.
10. Pull the Hopper assembly forward and remove.
11. Pull the Auger from
the Cooling Drum.
35113.0000A 11/02 ©2002 Bunn-O-Matic Corporation
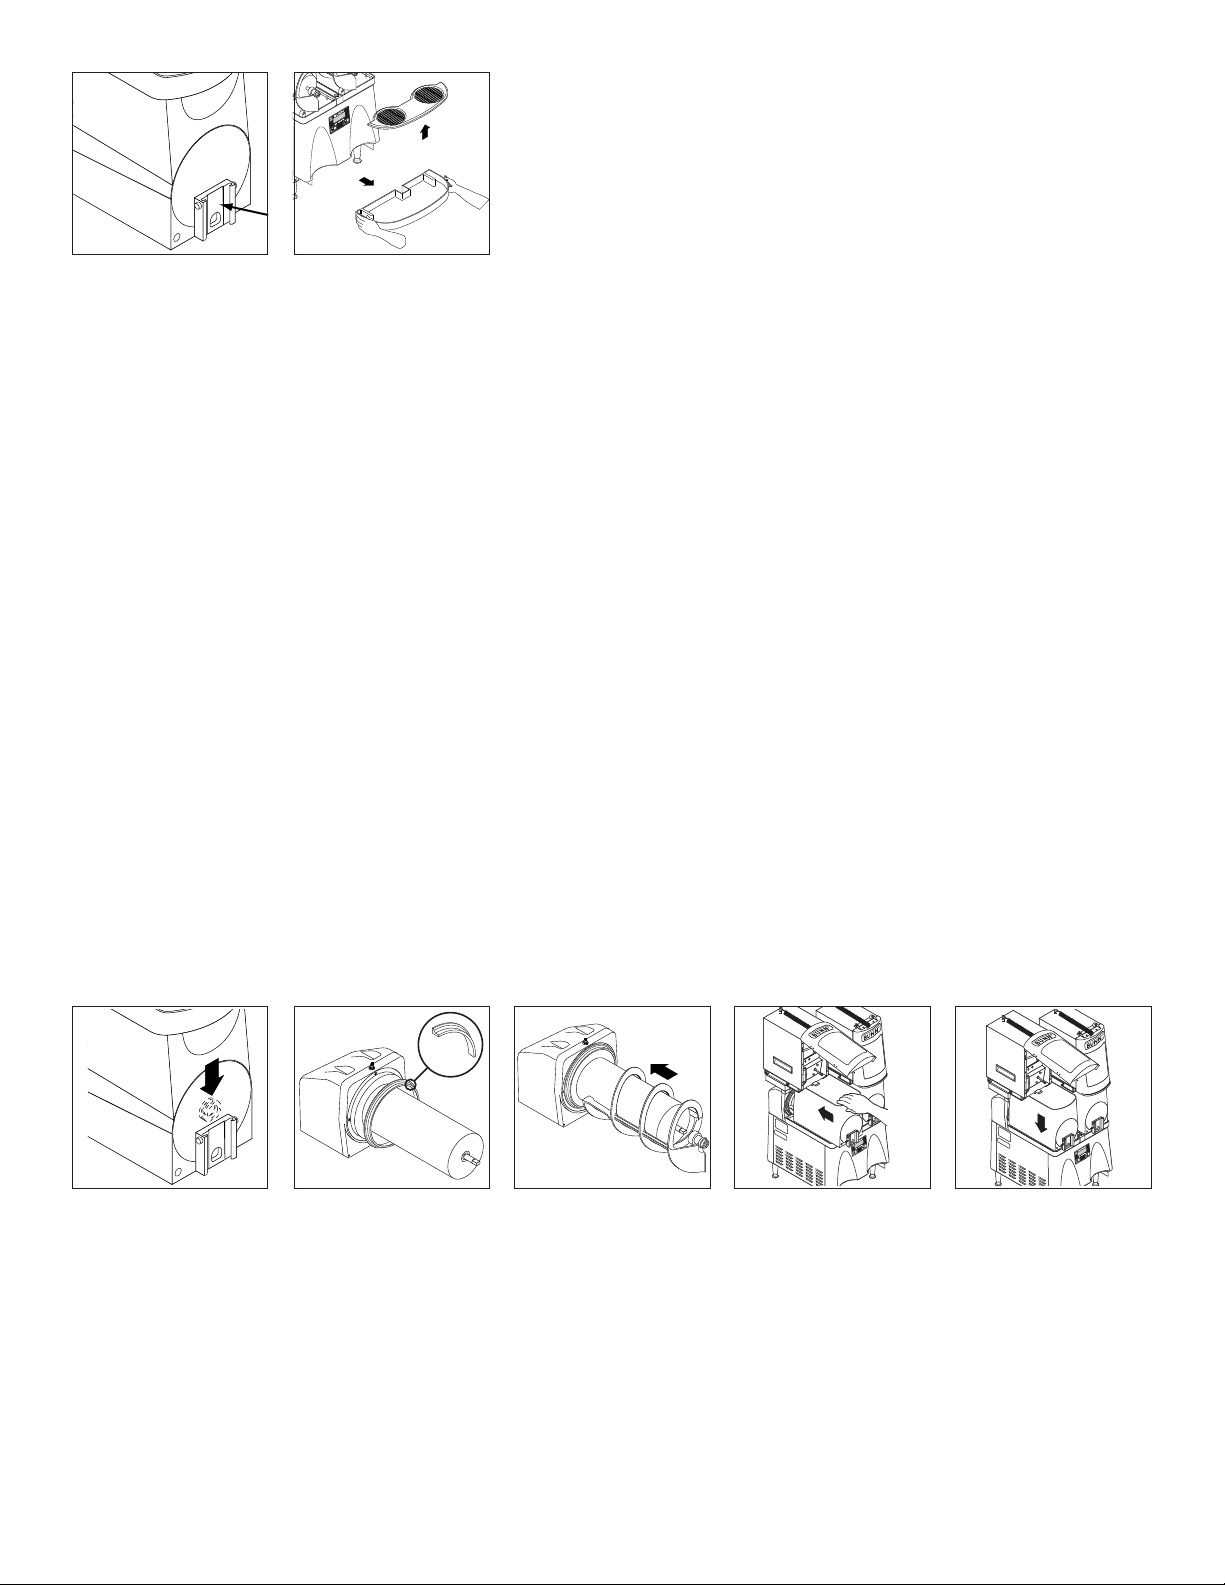
12. Remove the Hopper
Seal from the flange on
the Cooling Drum.
13. CAUTION: Faucet
Valve is under spring tension. Spread one side of
the Handle first, then the
other and disconnect
from the Hopper.
14. Carefully slide Valve
up to remove Spring and
Faucet Seal. Extra care
should be taken when
handling the Seal to prevent damage.
15. Remove the Auger
Nose Bushing from inside
the front of the Hopper.
Page 2
16. Do not scratch this
surface when cleaning.
17. Remove the Drip Tray
and Cover.
Deep scratches could
cause leakage around the
seal.
18. Place all parts in a clean sink with mild hot water (120°F) and sanitizer solution. Allow parts to soak for at least 5 minutes. Carefully wash
all components with a clean wash cloth in the hot water and sanitizer solution. Use a clean, soft bristle brush as needed for the smaller
components and tight areas. Do not immerse hopper lids. Use a commercial sanitizer that has 100 ppm of available chlorine with a concentration level of at least 3% available chlorine (KAY-5 Sanitizer). Follow the sanitizer’s mixing instructions to ensure 100 ppm of available
chlorine.
19. Wash the Drum, Hopper Drip Trays, Top Covers, and outer enclosure using a clean wash cloth that has been dampened in the hot water
and sanitizer solution. Pat particular attention to the shaft area and make sure it is thoroughly cleaned and sanitized.
20. Thoroughly rinse all surfaces with a clean wash cloth that has been dampened with hot water. Wipe dry with a clean dry wash cloth
before reassembling the dispenser.
NOTE: Although most parts are dishwasher safe, they may be affected by the chemicals in some commercial sanitizing agents. Do not place
the Hopper or Hopper Lids in a dishwasher. Rinse thoroughly before reassembly.
21. Replace the Auger
Nose Bushing inside the
front of the Hopper.
22. Install the Hopper Seal
over the flange at the rear
of the Cooling Drum as
shown.
23. Align the Auger Shafts
with the Augers. Push the
Augers as far as they will
go and rotate them so the
flat face of the Auger Shaft
is aligned with the flat face
of the Auger nose.
24. Install the Hopper
over the Auger and Cooling Drum and slide it into
place.
25. Push down until the
Hopper Lock Plunger
snaps into place.
35113 111302
Page 3

26. Slide PAF assembly
forward.
31. Install the Drip Tray
and Cover.
27. Reassemble and install all PAF parts. Close
Door.
28. Position the Faucet
Seal and Return Spring in
the Faucet Valve.
THOROUGH CLEANING OF THE PAF HOPPER (Once a week)
29. Slide the Faucet Valve
assembly into place on
the Hopper.
30. Press down on the
Valve to compress the
Spring. Position the Faucet Handle over the Faucet Valve one side at a
time and snap into place
on the Hopper.
1. Open the Cabinet Door
and allow the support
arms to lock in place.
6. Remove the Auger
Drive Shaft by removing
Retaining Clip from Auger
Drive Shaft.
2. Remove the Hopper/
Base Assembly from the
Cabinet. Remove the
Cover and empty the contents.
7. Wash all components in a
mild solution of dish detergent using a bristle brush
when needed. Rinse and dry
each item thoroughly before
reassembling.
3. Pull the Ejector Elbow
off the Hopper Base. Remove the Slide Gate from
the Ejector Elbow.
4. Remove the Wiper
Blade and Drive Gear by
removing the Retaining
Ring from the Wiper
Blade Shaft.
5. Remove Auger by pulling it out the front of Hopper Base.
35113 111302
 Loading...