

Page 1

Review this Quick Reference Guide for an overview of some important features in your Buick Enclave.
More detailed information can be found in your Owner Manual. Some optional equipment described in
this guide may not be included in your vehicle.
If you have additional questions about the features and controls in your vehicle, press the blue OnStar
button to speak with a customer assistance representative who can provide more information.
www.buick.com
Getting to Know Your
2 0 1 0 E n cla v e
Page 2
2
Cruise Control
B uttons
Instrum ent
Cluster
A ud io S teering
W h eel Controls
Instrum ent P a nel Illum ina tion
Control/D om e L a m p O ff B utton
E x terior L a m p s
Control
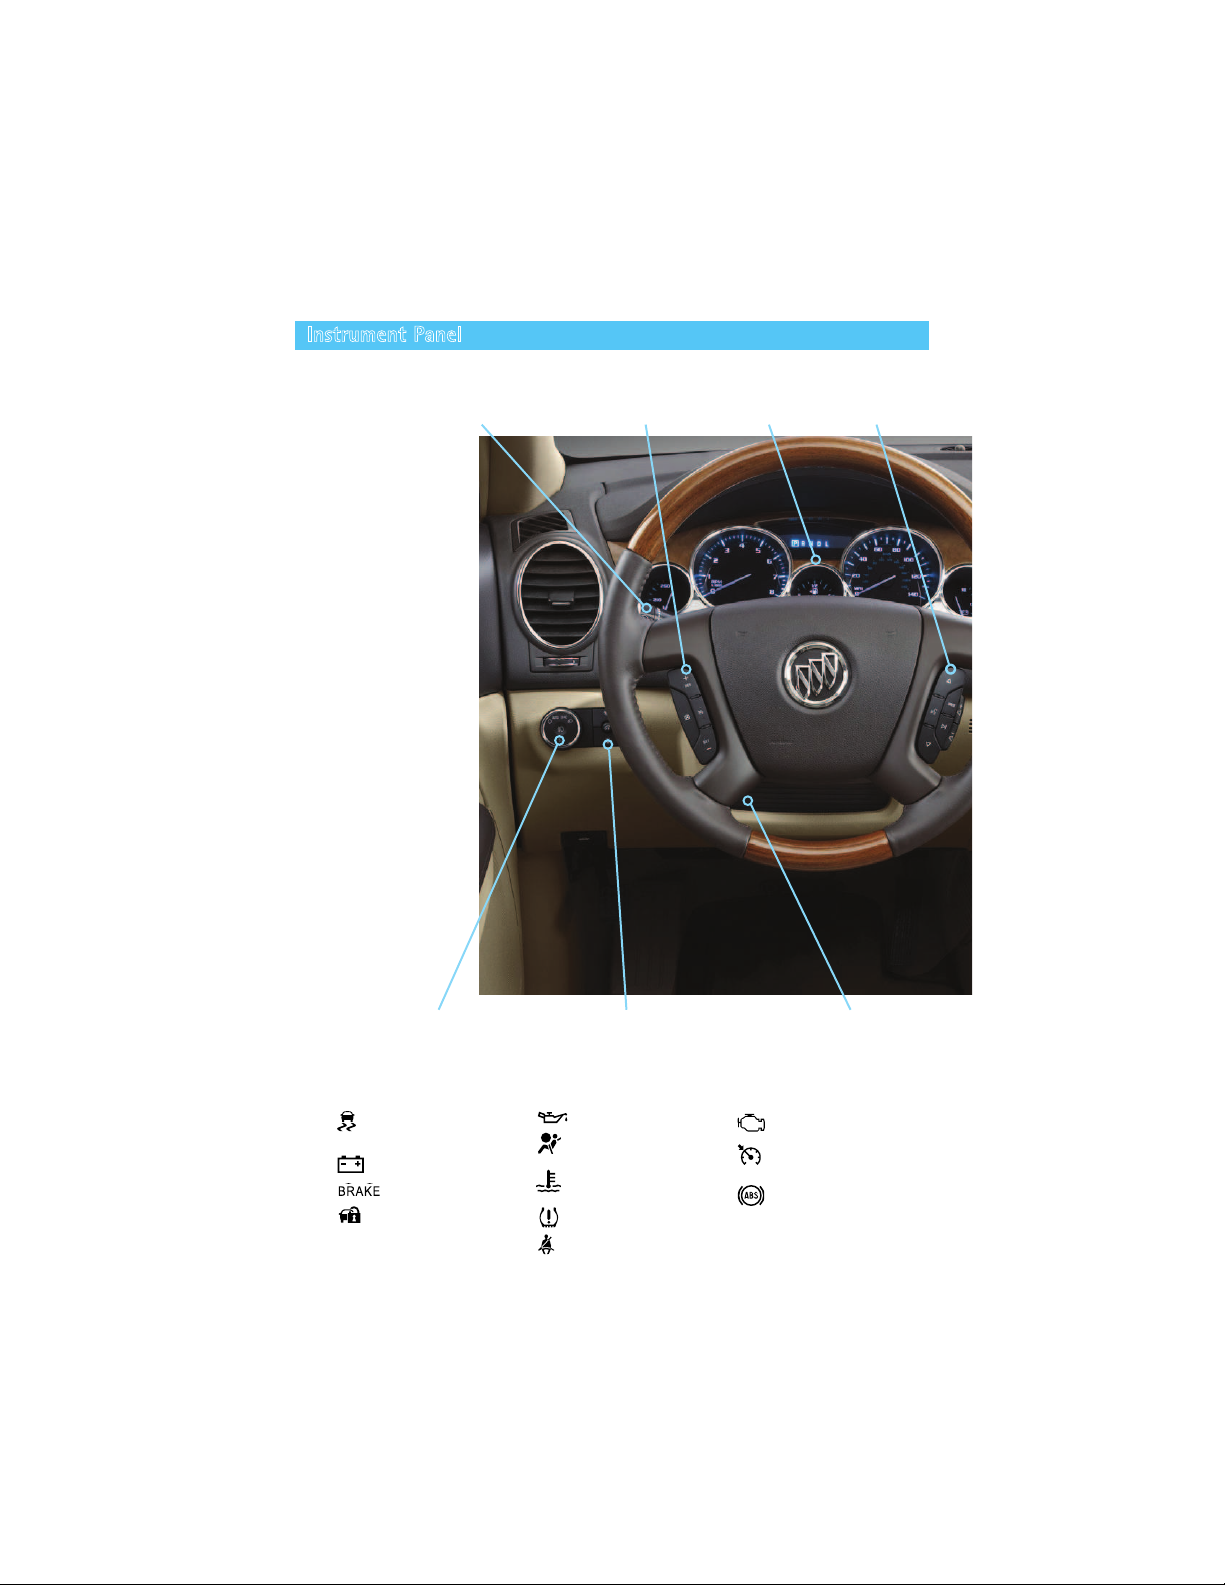
Instrument Panel
S ta b iliT ra k /
T ra c tion Control
Ch a rg ing S y stem
B ra k e S y stem
S ec urity
O il P ressure
A irb a g R ea d iness
E ng ine Coola nt
T em p era ture
L ow T ire P ressure
S a fety B elt R em ind er
Ch ec k E ng ine or
T ig h ten G a s Ca p
Cruise Control S et
A ntiloc k B ra k e
S y stem
T ilt/T elesc op ic S teering
W h eel Control
S y m b o ls
T urn S ig na l L ev er/
W ind sh ield W ip ers L ev er
Page 3

3
Note: Refer to your Owner Manual to learn about the information being relayed by the lights, gauges
and indicators of the instrument cluster, as well as what to do to ensure safety and prevent damage.
See Instruments and Controls in your Owner Manual.
D riv er Inform a tion
Center B uttons
A ud io S y stem /
N a v ig a tion S y stem F
A c c essory
P ow er O utlet
D riv er’s
H ea ted /Cooled
S ea t B uttonsF
R ea r W ip er S w itc h /
T ra c tion Control O ff B utton/
T ow /H a ul M od e B uttonF/
P ow er L iftg a te S w itc h
Clim a te
Controls
H a z a rd W a rning
F la sh ers B utton
P a sseng er’s
H ea ted /Cooled
S ea t B uttonsF
F op tiona l eq uip m ent
Page 4

4
Driver’s Seat
A . S e a t A d ju s tm e n t
M ov e th e h oriz onta l c ontrol to m ov e
th e sea t forw a rd or rea rw a rd a nd to
ra ise, low er or tilt th e sea t.
B . S e a tb a c k R e c lin e A d ju s tm e n t
(optional)
M ov e th e v ertic a l c ontrol to rec line or
ra ise th e sea tb a c k .
C . L u m b a r A d ju s tm e n t (optional)
P ress th e sw itc h to a d just th e a m ount
of lum b a r sup p ort.
D . S e a tb a c k R e c lin e A d ju s tm e n t
L ift th e lev er on th e low er outb oa rd
sid e of th e sea tb a c k (b eh ind th e sa fety
b elt) to m a nua lly rec line or ra ise th e
sea tb a c k .
E . L u m b a r A d ju s tm e n t
P ull up /p ush d ow n th e lev er on th e
inb oa rd sid e of th e sea tb a c k to a d just
th e a m ount of lum b a r sup p ort.
P o w e r C o n tr o ls
D
H e a d R e s tr a in t
T h e h ea d restra int is in a forw a rd p osition to m eet th e Insura nc e Institute for H ig h w a y
S a fety (IIH S ) p erform a nc e c riteria for rea r im p a c ts.
• T o ra ise th e h ea d restra int, p ull it up .
• T o low er th e h ea d restra int, p ress th e relea se b utton on th e h ea d restra int p ost a nd
p ush it d ow n.
See Seats and Restraints in your Owner Manual.
M a n u a l L u m b a r
M a n u a l S e a tb a c k R e c lin e
A B C
E
Page 5

5
A
2nd-Row Seats
S lid e th e S e a t
1 . M a k e sure noth ing is on th e 2 nd -row
sea t or th e floor in front of or b eh ind
th e sea t.
2 . F old up th e a rm rest(s).
3 . R ota te th e relea se lev er (A ) on th e
up p er-outb oa rd sid e of th e sea tb a c k
forw a rd .
4 . P ush th e top of th e sea tb a c k forw a rd .
T h e sea t c ush ion w ill fold a nd th e entire
sea t w ill slid e forw a rd .
5 . A fter entering /ex iting , p ush th e top of
th e sea tb a c k rea rw a rd until th e sea t-
b a c k a nd floor tra c k s loc k.
6 . P ush d ow n a t th e rea r of th e sea t
c ush ion to loc k it in p la c e.
1 . M a k e sure noth ing is on th e floor in
front of or b eh ind th e 2 nd -row sea t.
2 . P ull outw a rd on th e h a nd le (B ) on th e
outb oa rd sid e of th e sea t c ush ion a nd
slid e th e sea t forw a rd or rea rw a rd .
3 . R elea se th e h a nd le.
1 . M a k e sure th e sea t is a ll th e w a y
rea rw a rd (w h en fold ing th e sea t) a nd
th e a rm rest(s) a re up rig h t.
2 . P ull forw a rd on th e stra p (C) on th e
outb oa rd sid e of th e sea tb a c k .
3 . F old d ow n or rec line th e sea tb a c k .
B
F o ld /R e c lin e th e S e a tb a c k
C
See Seats and Restraints in your Owner Manual.
E n te r o r E x it th e 3r d -R o w S e a ts
Page 6

6
Exterior/Interior Lighting
O ff/O n
A U T O A u to m a tic H e a d la m p S y s te m
A c tiv a tes th e D a y tim e R unning L a m p s
(D R L s) in th e d a y tim e a nd th e h ea d la m p s
a nd oth er ex terior la m p s a t nig h t or w h en
nec essa ry.
P a rk in g L a m p s
M a nua l op era tion of th e p a rk ing la m p s.
H e a d la m p s
M a nua l op era tion of th e h ea d la m p s.
F o g L a m p s
P ress th e k nob to turn th e fog la m p s on
or off.
In s tru m e n t P a n e l B rig h tn e s s
T urn th e sm a ll k nob to inc rea se or
d ec rea se th e instrum ent p a nel lig h ting .
T urn th e k nob fully to turn on th e d om e
la m p s w h en a ll d oors a re c losed .
D o m e L a m p O ff
P ress th e b utton to turn off th e d om e
la m p s. W ith th e b u tto n d e p r e s s e d , th e
d o m e la m p s w ill n o t tu rn o n w h e n a
d o o r is o p e n .
P ress th e b utton a g a in to h a v e th e d om e
la m p s turn on w h en a d oor is op en.
See Lighting in your Owner Manual.
A u to m a tic H e a d la m p S y s te m
In s tru m e n t P a n e l L ig h tin g
D o m e L a m p
Page 7

7
Rear Seat Climate Controls
F r o n t S e a t C o n tr o l
P ress th e R E A R b utton (A ) on th e front
c lim a te c ontrol p a nel to c y cle th roug h
th ree rea r c ontrol setting s — F ront, R ea r,
a nd O ff.
F r o n t: P rov id es c ontrol to th e front sea t
oc c up a nts; th e rea r setting s a re th e sa m e
a s th e d riv er’s setting s.
R e a r : P rov id es c ontrol to th e rea r sea t
oc c up a nts; th e rea r setting s a re c ontrolled
b y th e rea r c ontrols.
O ff: T urns off th e rea r c lim a te c ontrols
sy stem .
A ir d eliv ery m od es:
V ent
B i-lev el
F loor
T em p era ture
c ontrols
F a n c ontrols
See Climate Controls in your Owner Manual.
Rear climate controls with rear seat audio (optional) shown.
R e a r s e a t o c c u p a n ts c a n a d ju s t th e re a r s e ttin g s a t a n y tim e b y u s in g th e re a r
c o n tr o ls , r e g a r d le s s o f th e fro n t c o n tro l p a n e l R E A R s e ttin g .
• T o turn on th e rea r sy stem , p ress a ny rea r c ontrol.
• T o turn off th e rea r sy stem , turn th e left k nob to th e O ff p osition, or p ress th e d ow n
F a n C o n tr o l rep ea ted ly (rear climate controls with rear seat audio).
R e a r S e a t C o n tr o l
A
Page 8
8
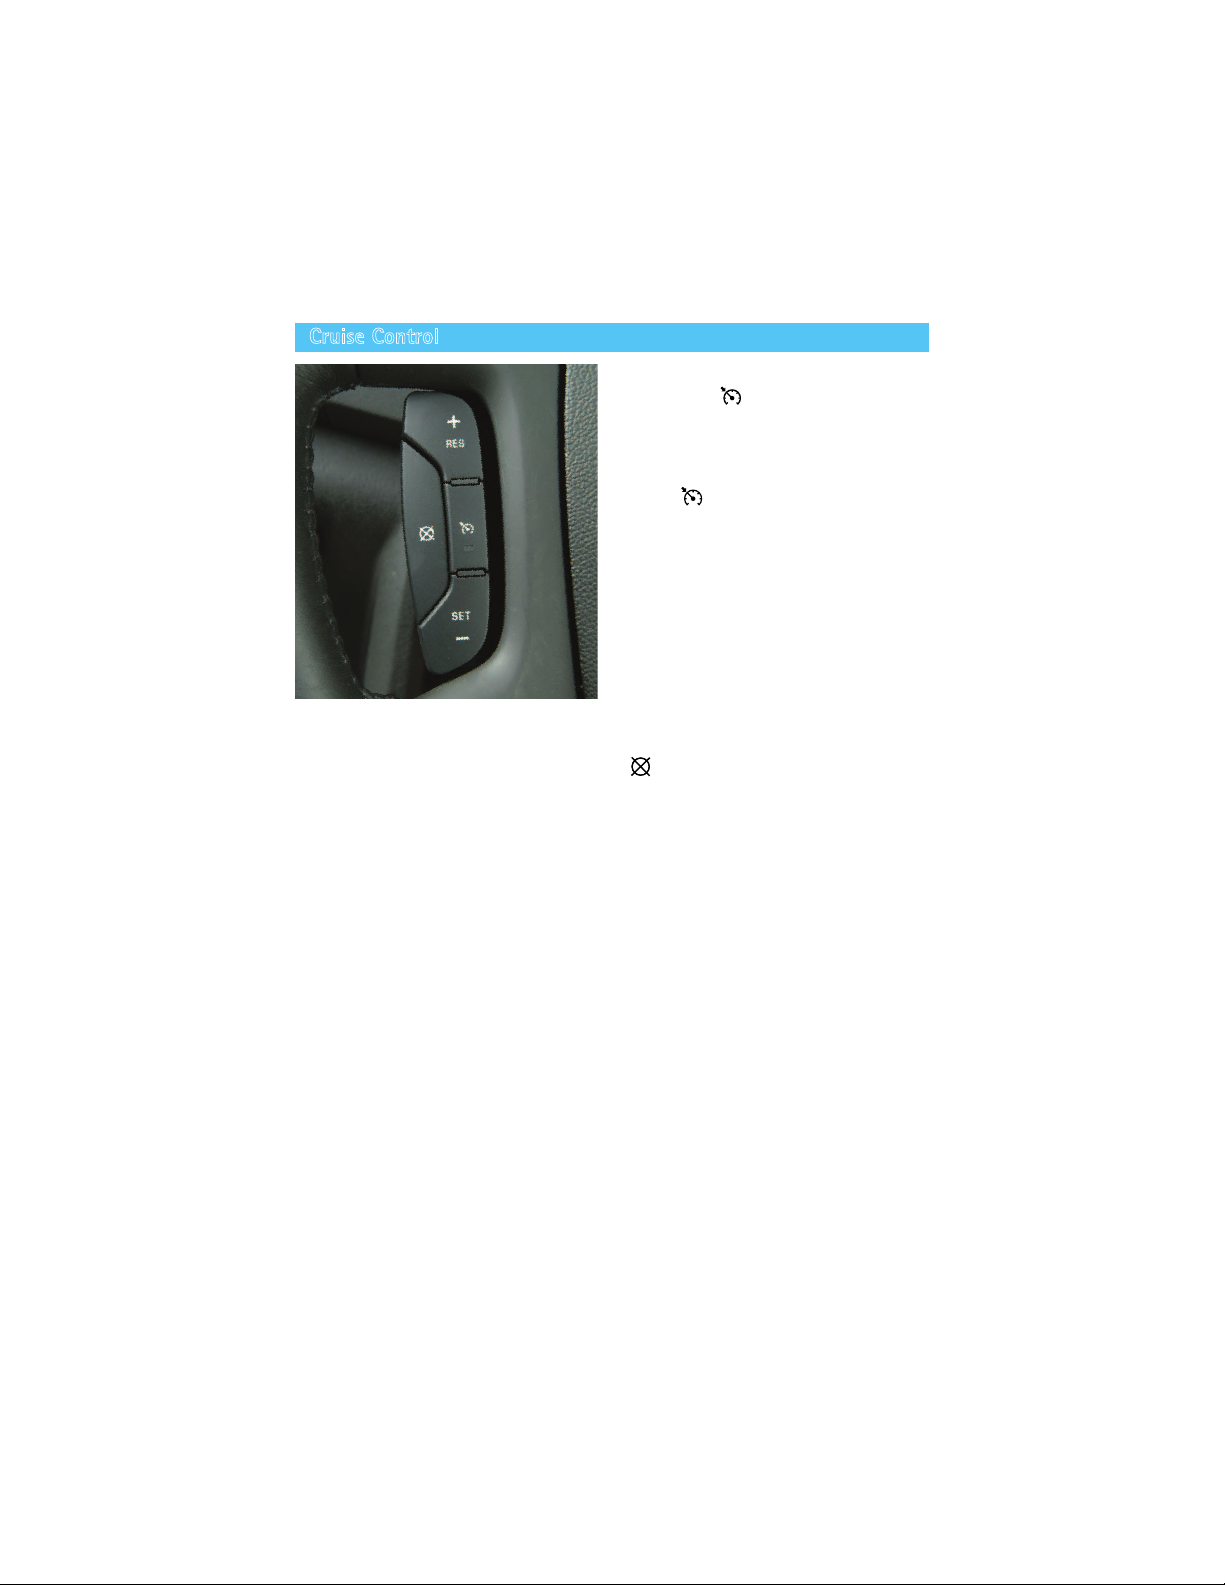
Cruise Control
S e t C r u is e C o n tr o l
1. Press the O n /O ff button. The
button indicator will illuminate when the
system is on.
2. When traveling at the desired speed,
press the S E T – button to set the speed.
The C r u is e C o n tro l symbol will
illuminate on the instrument cluster.
A d ju s t C r u is e C o n tro l
R E S + R e s u m e /A c c e le r a te
Press to resume a set speed.
When the system is active, press to
increase speed.
S E T – S e t/C o a s t
When the system is active, press to
decrease speed.
C a n c e l
Press to cancel the cruise control
but retain the set speed in memory.
The cruise control set speed is erased
when cruise control or the vehicle ignition
is turned off.
See Driving and Operating in your Owner Manual.
Page 9

9
Audio Steering Wheel Controls
+ –V o lu m e
P ull up th e + or – b utton to inc rea se or
d ec rea se th e v olum e.
N e x t/P r e v io u s
P ress th e up or d ow n a rrow to g o to th e
nex t or p rev ious fa v orite ra d io sta tion,
CD tra c k , or D V D c h a p ter (optional).
S R C E S o u r c e
P ress to selec t a n a ud io sourc e.
P ress a nd h old for one sec ond to initia te
v oic e rec og nition on th e na v ig a tion sy stem
(optional).
S e e k
P ress to g o to th e nex t ra d io sta tion on th e
sa m e b a nd , CD tra c k or D V D c h a p ter
(optional).
M u te /P u s h to T a lk
P ress to m ute th e v eh ic le sp ea k ers.
P ress a nd h old for tw o sec ond s to intera c t
w ith th e O nS ta r or B luetooth sy stem .
E n d
P ress to end or rejec t a n O nS ta r or
B luetooth c a ll.
B lu e to o th
®
S y s te m
A B luetooth -ena b led c ell p h one m ust b e
p a ired w ith th e in-v eh ic le B luetooth sy stem
b efore it c a n b e used in th e v eh ic le. N ot a ll
p h ones w ill sup p ort a ll func tions.
V isit w w w .g m .c o m /b lu e to o th for m ore
inform a tion.
See Instruments and Controls in your Owner Manual.
Page 10

1 0
Rear Wiper/Washer
R e a r W ip e r
P ress th e top of th e sw itc h to turn th e rea r
w ip er on or off.
W a s h e r F lu id
P ress th e b ottom of th e sw itc h to sp ra y
w a sh er fluid on th e rea r w ind ow .
See Instruments and Controls in your Owner Manual.
Power Liftgate
P o w e r L iftg a te S w itc h
• P ress th e P o w e r L iftg a te O F F sw itc h
to turn off th e p ow er liftg a te. T h e
liftg a te c a n only b e op era ted m a nua lly
w h en th e p ow er liftg a te sw itc h is in th e
O ff p osition.
• P ress th e top of th e P o w e r L iftg a te
sw itc h to turn on th e p ow er liftg a te.
Note: If the power liftgate does not open or
close, mak e sure the power liftgate switch is not
in the Off position.
O p e n /C lo s e th e P o w e r L iftg a te
• P ress a nd h old th e P o w e r L iftg a te
b utton on th e R em ote K ey less E ntry
tra nsm itter until th e liftg a te sta rts
m ov ing .
• P ress th e top of th e P o w e r
L iftg a te sw itc h on th e c enter c onsole.
• P ress th e touc h p a d (A ) a b ov e th e
liftg a te h a nd le to op en.
• P ress th e touc h p a d (B ) nex t to th e
liftg a te la tc h to c lose.
See Keys, Doors and Windows in your Owner Manual.
A
B
Page 11

1 1
Wind Noise
Towing
Battery Location
If a rea r w ind ow is op en, th ere m a y b e a b uffeting w ind noise insid e th e v eh ic le. O p ening
a front w ind ow slig h tly w h en a rea r w ind ow is op en w ill p rev ent th is noise from oc c urring .
See Keys, Doors and Windows in your Owner Manual.
T h e E nc la v e b a se tow ing c a p a c ity is 2 ,0 0 0 lb s. V eh ic les eq uip p ed w ith th e T ra iler T ow ing
P a c k a g e h a v e a tow ing c a p a c ity of 4 ,5 0 0 lb s.
U se th e T ow /H a ul m od e (optional) w h en p ulling a h ea v y tra iler to red uc e th e freq uenc y of
tra nsm ission sh ifts a nd im p rov e th e c ontrol of v eh ic le sp eed .
• T o turn th e T ow /H a ul m od e on or off, p ress th e T o w /H a u l b utton on th e c enter
c onsole.
See Vehicle Care in your Owner Manual.
T h e b a ttery is loc a ted b enea th th e floor b eh ind th e front p a sseng er sea t.
J um p -sta rt p ositiv e a nd neg a tiv e p osts a re loc a ted und er th e h ood on th e p a sseng er’s
sid e of th e v eh ic le.
See Vehicle Care in your Owner Manual.
Tire Pressure Monitor
T h e T ire P ressure M onitor a lerts y ou w h en th e tire p ressure in a ny tire b ec om es too low
b y illum ina ting th e L o w T ir e P r e s s u re w a rning lig h t on th e instrum ent c luster. T h e
w a rning lig h t w ill rem a in on until th e tire p ressure is c orrec ted b y a d d ing th e p rop er
a m ount of a ir to th e tire(s). R efer to th e T ire & L oa d ing Inform a tion la b el in th e d riv er’s
d oor op ening for th e rec om m end ed tire p ressures. O nc e th e tires a re p rop erly filled w ith
a ir, d riv e th e v eh icle a nd th e w a rning lig h t w ill turn off.
Y ou m a y notic e d uring c ooler outd oor tem p era tures th a t th e low tire p ressure w a rning lig h t
w ill turn on w h en th e v eh ic le is first sta rted a nd th en turn off a s y ou d riv e a nd tire p ressure
ex p a nd s. T h is m a y b e a n ea rly ind ic a tor th a t y our tire p ressures a re g etting low a nd th e
tires need to b e infla ted to th e c orrec t p ressure.
Note: T he T ire P ressure Monitor can alert you about low tire pressure, but it doesn’t replace normal
monthly tire maintenance. It is the driver’s responsibility to maintain correct tire pressures.
See Vehicle Care in your Owner Manual.
Page 12
1 2
Roadside Assistance
1 -8 0 0 -252-1 1 1 2 T T Y U s e rs : 1 -8 8 8 -8 8 9-2438
A s th e ow ner of a new B uic k , y our v eh ic le is a utom a tic a lly enrolled in th e B uic k R oa d sid e
A ssista nc e p rog ra m for 5 y ea rs/1 0 0 ,0 0 0 m iles a t no ex p ense to y ou. T h is v a lue-a d d ed
serv ic e is intend ed to p rov id e y ou w ith p ea c e of m ind a s y ou d riv e in th e c ity or tra v el th e
op en roa d .
B uic k ’s R oa d sid e A ssista nc e toll-free num b er is sta ffed b y a tea m of tec h nic a lly tra ined
a d v isors w h o a re a v a ila b le 2 4 h ours a d a y , 3 6 5 d a y s a y ea r, to p rov id e m inor rep a ir
inform a tion or m a k e a rra ng em ents to tow y our v eh ic le to th e nea rest B uic k d ea ler.
R o a d s id e A s s is ta n c e a n d O n S ta r
If y ou h a v e a c urrent O nS ta r sub sc rip tion, p ress th e O nS ta r b utton a nd th e v eh ic le w ill
send y our c urrent G P S loc a tion to a n O nS ta r A d v isor w h o w ill sp ea k to y ou, a ssess y our
p rob lem , c onta c t R oa d sid e A ssista nc e a nd rela y y our ex a c t loc a tion so y ou w ill g et th e
h elp y ou need .
Buick Owner Center
T h e B uic k O w ner Center, a c om p lim enta ry serv ic e for B uic k ow ners, is a one-stop
resourc e d esig ned to enh a nc e y our B uic k ow nersh ip ex p erienc e. E x c lusive m em b er
b enefits inc lud e:
• O nline serv ic e rem ind ers
• V eh ic le m a intena nc e tip s
• O nline ow ner m a nua l
• S p ec ia l p riv ileg es
S ig n up tod a y a t w w w .g m o w n e r c e n te r.c o m /b u ic k .
Certa in restric tions, p rec a utions a nd sa fety p roc ed ures a p p ly to y our v eh ic le. P lea se rea d y our O w ner M a nua l for
c om p lete instruc tions. A ll inform a tion c onta ined h erein is b a sed on th e la test inform a tion a v a ila b le a t th e tim e of
p rinting a nd is sub jec t to c h a ng e w ith out notic e. Cop y rig h t 2 0 0 9 b y G enera l M otors Com p a ny . A ll rig h ts reserved .
A lw a y s d e m a n d g e n u in e G M P a r ts
1 0 E N CL A V E G T K A
 Loading...