

Buick Enclave Owner's Manual

Seats and Restraint
System
............................... 1-1
Head Restraints
.............. 1-2
Front Seats
.................... 1-3
Rear Seats
.................... 1-8
Safety Belts
.................. 1-12
Child Restraints
............. 1-26
Airbag System
.............. 1-45
Restraint System
Check
...................... 1-58
Features and Controls
...... 2-1
Keys
............................. 2-2
Doors and Locks
............ 2-8
Windows
...................... 2-14
Theft-Deterrent
Systems
................... 2-16
Starting and Operating Your
Vehicle
..................... 2-20
Mirrors
......................... 2-31
Object Detection
Systems
................... 2-34
OnStar
®
System
............ 2-41
Universal Home Remote
System
..................... 2-44
Storage Areas
............... 2-49
Sunroof
........................ 2-53
Instrument Panel
............... 3-1
Instrument Panel
Overview
.................... 3-4
Climate Controls
............ 3-20
Warning Lights, Gages, and
Indicators
.................. 3-28
Driver Information
Center (DIC)
............. 3-41
Audio System(s)
............ 3-64
Driving Your Vehicle
......... 4-1
Your Driving, the Road,
and the Vehicle
........... 4-1
Towing
........................ 4-21
Service and
Appearance Care
............... 5-1
Service
.......................... 5-3
Fuel
.............................. 5-5
Checking Things Under
the Hood
.................... 5-9
All-Wheel Drive
............. 5-32
Headlamp Aiming
.......... 5-33
Bulb Replacement
......... 5-33
Windshield
Replacement
............. 5-35
Windshield Wiper Blade
Replacement
............. 5-36
Tires
........................... 5-36
Appearance Care
.......... 5-83
Vehicle Identification
...... 5-90
Electrical System
........... 5-91
Capacities and
Specifications
............ 5-98
Maintenance Schedule
...... 6-1
Maintenance Schedule
..... 6-1
Customer Assistance
Information
........................ 7-1
Customer Assistance and
Information
................. 7-1
Reporting Safety
Defects
..................... 7-12
Vehicle Data Recording
and Privacy
............... 7-14
Index
....................................i-1
2009 Buick Enclave Owner Manual M
GENERAL MOTORS, GM, the GM
Emblem, BUICK, the BUICK
Emblem are registered trademarks;
and the name ENCLAVE is a
trademark of General Motors
Corporation.
This manual includes the latest
information at the time it was
printed. GM reserves the right to
make changes after that time
without further notice. For vehicles
first sold in Canada, substitute
the name “General Motors of
Canada Limited” for Buick Motor
Division wherever it appears in this
manual.
This manual describes features that
may or may not be on your
specific vehicle.
Read this manual from beginning to
end to learn about the vehicle’s
features and controls. Pictures,
symbols, and words work together
to explain vehicle operation.
Keep this manual in the vehicle for
quick reference.
Canadian Owners
A French language copy of this
manual can be obtained from your
dealer/retailer or from:
Helm, Incorporated
P.O. Box 07130
Detroit, MI 48207
1-800-551-4123
helminc.com
Propriétaires Canadiens
On peut obtenir un exemplaire de
ce guide en français auprès de
concessionnaire ou à l’adresse
suivante:
Helm Incorporated
P.O. Box 07130
Detroit, MI 48207
1-800-551-4123
helminc.com
ii Preface
Litho in U.S.A.
Part No. 15919283 A First Printing
©
2008 General Motors Corporation. All Rights Reserved.

Index
To quickly locate information about
the vehicle use the Index in the
back of the manual. It is an
alphabetical list of what is in the
manual and the page number where
it can be found.
Safety Warnings and
Symbols
A circle with a slash through it is a
safety symbol which means “Do
Not,” “Do not do this” or “Do not let
this happen.”
A box with the word CAUTION is
used to tell about things that
could hurt you or others if you were
to ignore the warning.
{ CAUTION
These mean there is something
that could hurt you or other
people.
Cautions tell what the hazard is and
what to do to avoid or reduce the
hazard. Read these cautions.
A notice tells about something that
can damage the vehicle.
Notice: These mean there is
something that could damage
your vehicle.
Many times, this damage would not
be covered by the vehicle’s
warranty, and it could be costly. The
notice tells what to do to help
avoid the damage.
There are also warning labels on
the vehicle which use the same
words, CAUTION or Notice.
Vehicle Symbols
The vehicle has components and
labels that use symbols instead
of text. Symbols are shown along
with the text describing the operation
or information relating to a specific
component, control, message,
gage, or indicator.
M : This symbol is shown when
you need to see your owner manual
for additional instructions or
information.
* : This symbol is shown when
you need to see a service manual
for additional instructions or
information.
Preface iii

Vehicle Symbol Chart
Here are some additional symbols
that may be found on the vehicle
and what they mean. For more
information on the symbol, refer to
the index.
9 : Airbag Readiness Light
# : Air Conditioning
! : Antilock Brake System (ABS)
g : Audio Steering Wheel
Controls or OnStar
®
$ : Brake System Warning Light
" : Charging System
I : Cruise Control
B : Engine Coolant Temperature
O : Exterior Lamps
# : Fog Lamps
. : Fuel Gage
+ : Fuses
i : Headlamp High/Low-Beam
Changer
j : LATCH System Child Restraints
* : Malfunction Indicator Lamp
: : Oil Pressure
g : Outside Power Foldaway
Mirrors
} : Power
/ : Remote Vehicle Start
> : Safety Belt Reminders
7 : Tire Pressure Monitor
_ : Tow/Haul Mode
F : Traction Control
M : Windshield Washer Fluid
iv Preface

Seats and
Restraint System
Head Restraints
Head Restraints
..................1-2
Front Seats
Power Seats
.......................1-3
Manual Lumbar
..................1-3
Power Lumbar
....................1-4
Heated Seats
.....................1-4
Heated and Cooled Seats
...1-4
Memory Seat and Mirrors
...1-5
Reclining Seatbacks
...........1-6
Rear Seats
Rear Seat Operation
...........1-8
Third Row Seats
...............1-10
Safety Belts
Safety Belts: They Are for
Everyone
.........................1-12
How to Wear Safety Belts
Properly
..........................1-16
Lap-Shoulder Belt
.............1-20
Safety Belt Use During
Pregnancy
.......................1-25
Safety Belt Extender
.........1-25
Child Restraints
Older Children
..................1-26
Infants and Young
Children
..........................1-28
Child Restraint Systems
....1-31
Where to Put the
Restraint
.........................1-32
Lower Anchors and
Tethers for Children
(LATCH)
..........................1-34
Securing a Child
Restraint in a Rear Seat
Position
...........................1-40
Securing a Child
Restraint in the Right
Front Seat Position
.........1-42
Airbag System
Airbag System
..................1-45
Where Are the
Airbags?
..........................1-47
When Should an Airbag
Inflate?
............................1-48
What Makes an Airbag
Inflate?
............................1-50
How Does an Airbag
Restrain?
........................1-50
What Will You See After
an Airbag Inflates?
..........1-51
Passenger Sensing
System
............................1-52
Servicing Your
Airbag-Equipped
Vehicle
............................1-56
Adding Equipment to
Your Airbag-Equipped
Vehicle
............................1-57
Restraint System Check
Checking the Restraint
Systems
..........................1-58
Replacing Restraint
System Parts After
a Crash
...........................1-59
Seats and Restraint System 1-1
Head Restraints
The vehicle’s front seats have
adjustable head restraints in all
outboard seating positions.
{ CAUTION
With head restraints that are not
installed and adjusted properly,
there is a greater chance that
occupants will suffer a neck/spinal
injury in a crash. Do not drive until
the head restraints for all
occupants are installed and
adjusted properly.
Adjust the head restraint so that the
top of the restraint is at the same
height as the top of the occupant’s
head. This position reduces the
chance of a neck injury in a crash.
Pull the head restraint up to raise it.
To lower the head restraint, press
the release button, located on
the head restraint post on the top of
the seatback, while you push the
head restraint down.
Push down on the head restraint
after the button is released to make
sure that it is locked in place.
1-2 Seats and Restraint System
Front Seats
Power Seats
A. Power Seat Adjustment Control
B. Reclining Seatbacks on
page 1-6.
C. Power Lumbar on page 1-4.
If the vehicle has power seats, the
controls are located on the
outboard side of the seats.
Move the seat forward or rearward
by sliding thepowerseat adjustment
control (A) forward or rearward.
The vehicle may have additional
features to adjust the power seat:
• Raise or lower the entire seat
by moving the power seat
adjustment control (A) up
or down.
• Raise or lower the front part of
the seat cushion by moving
the front of the control up
or down.
• Raise or lower the rear part of
the seat cushion by moving
the rear of the control up
or down.
The vehicle may have a memory
function which allows seat settings
to be saved and recalled. See
Memory Seat and Mirrors on
page 1-5 for more information.
Manual Lumbar
If the vehicle has this feature, the
handle is located on the inboard side
of the seatback.
Turn the handle rearward to
decrease lumbar support. Turn
the handle forward to increase
lumbar support.
The lumbar support may need to be
adjusted when changing the
seating position.
Driver Seat with Power Seat
Control, Power Recline, and
Power Lumbar shown
Seats and Restraint System 1-3

Power Lumbar
If the seats have power lumbar, the
controls used to operate this
feature are located on the outboard
side of the seats. See “Power
Lumbar” under Power Seats on
page 1-3 for more information.
To increase or decrease lumbar
support, press and hold the front or
rear of the control (C).
Release the control when the
seatback reaches the desired level
of lumbar support.
The lumbar support may need to be
adjusted when changing the
seating position.
Heated Seats
On vehicles with heated front seats,
the controls are located on the center
console. To operate the heated seats
the engine must be running.
I (Heated Seatback): Press to
turn on the heated seatback.
J (Heated Seat and Seatback):
Press to turn on or off the heated
seat and seatback.
The light on the button will come on
to indicate that the feature is on.
Each time the button is pressed, the
temperature settings change from
high, to medium, to low, to off.
Indicator lights above the button will
show the level of heat selected:
three for high, two for medium, and
one for low.
The passenger seat may take
longer to heat up.
If the vehicle has remote vehicle
start and is started using the remote
keyless entry transmitter, the front
heated seats will be turned on to the
high setting if it is cold outside. See
“Remote Vehicle Start” under
Remote Keyless Entry (RKE)
System Operation on page 2-3.
When the ignition is turned on, the
heated seat feature will turn off.
To turn the heated seat feature back
on, press the desired button.
Heated and Cooled Seats
If the front seats have the heated
and cooled seat feature, the buttons
used to control this feature are
located on the front doors near the
door handle.
{ (Cooled Seat): To cool the
entire seat, press the button with the
cooled seat symbol.
This symbol will appear on the
climate control display to indicate
that the feature is on. Press
the button to cycle through the
temperature settings of high,
medium, and low and to turn the
cooled seat off. Indicator bars next
to the symbol designate the
1-4 Seats and Restraint System

level of cooling selected: three for
high, two for medium, and one
for low.
H (Heated Seat and Seatback):
To heat the entire seat, press
the button with the heated seat and
seatback symbol.
This symbol will appear on the
climate control display to indicate
that the feature is on. Press the
button to cycle through the
temperature settings of high,
medium, and low and to turn the
heated seat off. Indicator bars next to
the symbol designate the level of
heat selected: three for high, two for
medium, and one for low.
The heated and cooled seats will be
canceled after the ignition is
turned off. To use the heated and
cooled seat feature after the vehicle
is started, you will need to press
the appropriate seat button again.
Memory Seat and Mirrors
On vehicles with the memory
package, the controls are located on
the driver door.
1: Saves the seating position for
driver 1.
2: Saves the seating position for
driver 2.
S : Recalls the easy exit position.
To save a position in memory:
1. Adjust the driver seat, including
the seatback recliner, both
outside mirrors, and the power
steering column to a comfortable
position.
See Outside Power Mirrors on
page 2-32 for more information.
Not all vehicles will have the
ability to save and recall
the mirror positions.
2. Press and hold button 1 until
two beeps sound to let you
know that the position has
been stored.
A second seating and mirror
position can be programmed by
repeating the above steps and
pressing button 2.
To recall the memory positions, the
vehicle must be in P (Park). Press
and release either button 1 or 2. The
seat, outside mirrors, and power
steering column will move to the
position previously stored. You will
hear a single beep.
If a Remote Keyless Entry (RKE)
transmitter is used to enter the
vehicle and the remote recall
memory feature has been turned
on, automatic seat and mirror
movement will occur. See
“MEMORY SEAT RECALL” under
DIC Vehicle Customization on
page 3-57 for more information.
To stop recall movement of
the memory feature at any time,
press one of the power seat
controls, memory buttons, or power
mirror buttons.
Seats and Restraint System 1-5
If something has blocked the driver
seat while recalling a memory
position, the driver seat recall may
stop working. If this happens,
remove the obstruction and press
the appropriate control for the
area that is not recalling for
two seconds. Try pressing the
memory button again. If the memory
position is still not being recalled,
see your dealer/retailer for service.
Easy Exit Seat
S : With the vehicle in P (Park),
press the exit button. You will hear
a single beep. The driver seat
will move back into the exit position.
If the easy exit seat feature has
been turned on in the Driver
Information Center (DIC), automatic
seat movement will occur when
the key is removed from the ignition.
For programming information, see
DIC Vehicle Customization on
page 3-57 for more information.
Reclining Seatbacks
Manual Reclining Seatbacks
{ CAUTION
You can lose control of the
vehicle if you try to adjust a
manual driver’s seat while the
vehicle is moving. The sudden
movement could startle and
confuse you, or make you push a
pedal when you do not want to.
Adjust the driver’s seat only when
the vehicle is not moving.
{ CAUTION
If either seatback is not locked, it
could move forward in a sudden
stop or crash. That could cause
injury to the person sitting there.
Always push and pull on the
seatbacks to be sure they are
locked.
On vehicles with seats that have
manual reclining seatbacks, the lever
used to operate them is located on
the outboard side of the seat.
To recline the seatback:
1. Lift the recline lever.
2. Move the seatback to the desired
position, then release the lever to
lock the seatback in place.
3. Push and pull on the seatback to
make sure it is locked.
1-6 Seats and Restraint System
To return the seatback to an upright
position:
1. Lift the lever without applying
pressure to the seatback and
the seatback will return to
the upright position.
2. Push and pull on the seatback to
make sure it is locked.
Power Reclining Seatbacks
On vehicles with seats that
have power reclining seatbacks, the
control used to recline them is
located on the outboard side of the
seat behind the power seat
control. See “Reclining Seatbacks”
under Power Seats on page 1-3
for more information.
• To recline the seatback, tilt the
top of the control (B) rearward.
• To bring the seatback forward, tilt
the top of the control forward.
{ CAUTION
Sitting in a reclined position when
the vehicle is in motion can be
dangerous. Even if when buckled
up, the safety belts cannot do
their job when reclined like this.
The shoulder belt cannot do its
job because it will not be against
your body. Instead, it will be in
front of you. In a crash, you could
go into it, receiving neck or other
injuries.
The lap belt cannot do its job
either. In a crash, the belt could
go up over your abdomen. The
belt forces would be there, not at
your pelvic bones. This could
cause serious internal injuries.
For proper protection when the
vehicle is in motion, have the
seatback upright. Then sit well
back in the seat and wear the
safety belt properly.
Do not have a seatback reclined if
the vehicle is moving.
Seats and Restraint System 1-7
Rear Seats
Rear Seat Operation
A. Seat Adjustment Handle
B. Reclining Seatback Strap
C. Sliding Seat Lever
Entering and Exiting the
Third Row
{ CAUTION
Using the third row seating
position while the second row is
folded, or folded and tumbled,
could cause injury in a sudden stop
or crash. Be sure to return the seat
to the passenger seating position.
Push and pull on the seat to make
sure it is locked into place.
Notice: Folding a rear seat with
the safety belts still fastened may
cause damage to the seat or the
safety belts. Always unbuckle the
safety belts and return them to
their normal stowed position
before folding a rear seat.
To access the third row:
1. Remove objects on the floor in
front of or on the second row
seat, or in the seat tracks on
the floor.
2. Move the front center console
armrest completely forward.
See Center Console Storage
on page 2-49.
3. Place folding armrests in the
upright position.
4. Ensure that the safety belt are
unfastened and in the stowed
position.
1-8 Seats and Restraint System

5. Pull the sliding seat lever (C)
forward and move the seatback
forward. The seat cushion
will fold, and the entire seat will
slide forward.
Returning the Seat to the
Seating Position
To return the second row seat to its
normal seating position:
1. Remove objects on the floor
behind the second row seat
or in the seat tracks on the floor.
2. Pull the seatback rearward until it
is locked in place.
3. Slide the seat rearward by
pushing on the seatback until it is
locked into place.
4. Push down on the rear of the
seat cushion until it is locked
in place.
5. Push and pull on the seatback
and seat cushion to make sure
they are locked in place.
6. Check that the safety belt is not
under the seat cushion.
Reclining the Seatbacks
To recline the seatback:
1. Leaning forward in the seat, pull
the reclining seatback strap (B).
2. Move the seatback to the desired
position, then release the strap
to lock the seatback in place.
3. Push and pull on the seatback to
make sure it is locked.
Folding the Rear Seat
To fold the second row seats:
1. Remove anything on or under
the seat.
2. Place the armrest in the upright
position, and unfasten the
safety belt.
3. Pull forward on the reclining
seatback strap (B) and push
down on the seatback.
If the headrest hits the front seat,
slide the second row seat
rearward.
To return the seatback to the
seating position, lift the upper corner
of the seatback and push it
rearward until it locks into place.
Push and pull on the seatback
to make sure it is locked.
Adjusting the Seats
To adjust the second row seats, pull
outward on the seat adjustment
handle (A). Slide the seat forward or
rearward to the desired position.
Release the handle and push
and pull on the seat to make sure it
is locked.
Seats and Restraint System 1-9
Third Row Seats
{ CAUTION
Using the third row seating
position while the second row is
folded, or pushed forward in the
entry position, could cause injury
in a sudden stop or crash. Be
sure to return the seat to the
passenger seating position. Push
and pull on the seat to make sure
it is locked into place.
The third row seats can be folded
forward or removed.
Notice: Folding a rear seat with
the safety belts still fastened may
cause damage to the seat or the
safety belts. Always unbuckle the
safety belts and return them to
their normal stowed position
before folding a rear seat.
To fold the seatback:
1. Remove anything on or under
the seat.
2. Disconnect the rear safety belt
mini-latch, using a key in the
slot on the mini-buckle, let
the belt retract into the headliner.
Stow the mini-latch in the
holder located in the headliner.
3. Pull up on the release lever
located on the back of the
seat. The headrest moves
forward automatically.
4. Push the seatback forward to
lay flat.
1-10 Seats and Restraint System
To return the seatback to the
seating position:
1. Raise the seatback into place by
using the pullstrap from the rear
of the vehicle, or by pushing
it into place from inside the
vehicle.
2. The headrest must be locked
into place before sitting in
the seat.
{ CAUTION
If either seatback is not locked, it
could move forward in a sudden
stop or crash. That could cause
injury to the person sitting there.
Always push and pull on the
seatbacks to be sure they are
locked.
3. Push and pull on the seatback to
make sure it is locked in place.
{ CAUTION
A safety belt that is improperly
routed, not properly attached, or
twisted will not provide the
protection needed in a crash. The
person wearing the belt could be
seriously injured. After raising the
rear seatback, always check to be
sure that the safety belts are
properly routed and attached, and
are not twisted.
4. Reconnect the center safety belt
mini-latch to the mini-buckle. Do
not let it twist.
5. Pull on the safety belt to be sure
the mini-latch is secure.
Removing the Third
Row Seats
1. Remove the cargo management
system, if it is in the vehicle. See
Cargo Management System
on page 2-52.
2. Remove anything on or under
the seat.
Notice: Folding a rear seat with
the safety belts still fastened may
cause damage to the seat or the
safety belts. Always unbuckle the
safety belts and return them to
their normal stowed position
before folding a rear seat.
3. Fold the seatback down. See
“Folding the Seatback” earlier
in this section.
4. Remove the rear bolts located on
the floor on each side of the seat.
5. Remove the seat by tilting it
slightly upward, and then
pulling it out of the rear of the
vehicle in one motion.
Seats and Restraint System 1-11
6. Put the bolts back into the holes
on the floor so they do not get
misplaced.
Installing the Third Row Seats
1. Before installing the seat the
seatback must be folded
forward. See “Folding the
Seatback” earlier in this section.
The seats must be placed in
the proper locations for the legs
to attach correctly. The wider
seat must be installed on
the driver side and the narrower
seat on the passenger side.
Remove the bolts from the holes
in the floor before installing
the seats.
2. Place the seat on the vehicle
floor so that the front seat
hooks are on the vehicle bars.
3. Reinstall the bolts, and torque to
55 Y (41 lb ft). Pull up on the
seat to make sure it is locked
in place.
4. Raise the seatback to its upright
position. Push and pull on the
seatback to make sure it is
locked into place.
5. Push the headrest up into
position. Push and pull on
the headrest to make sure it is
locked into place.
6. Reconnect the center safety belt
mini-latch to the mini-buckle. Do
not let it twist.
Safety Belts
Safety Belts: They Are
for Everyone
This section of the manual describes
how to use safety belts properly.
It also describes some things not to
do with safety belts.
{ CAUTION
Do not let anyone ride where a
safety belt cannot be worn
properly. In a crash, if you or your
passenger(s) are not wearing
safety belts, the injuries can be
much worse. You can hit things
inside the vehicle harder or be
ejected from the vehicle. You and
your passenger(s) can be
seriously injured or killed. In the
same crash, you might not be, if
you are buckled up. Always fasten
your safety belt, and check that
your passenger(s) are restrained
properly too.
1-12 Seats and Restraint System
{ CAUTION
It is extremely dangerous to ride
in a cargo area, inside or outside
of a vehicle. In a collision, people
riding in these areas are more
likely to be seriously injured or
killed. Do not allow people to ride
in any area of your vehicle that is
not equipped with seats and
safety belts. Be sure everyone in
your vehicle is in a seat and using
a safety belt properly.
This vehicle has indicators as a
reminder to buckle the safety belts.
See Safety Belt Reminders on
page 3-30 for additional information.
In most states and in all Canadian
provinces, the law requires
wearing safety belts. Here is why:
You never know if you will be
in a crash. If you do have a crash,
you do not know if it will be a
serious one.
A few crashes are mild, and some
crashes can be so serious that even
buckled up, a person would not
survive. But most crashes are
in between. In many of them, people
who buckle up can survive and
sometimes walk away. Without
safety belts they could have been
badly hurt or killed.
After more than 40 years of safety
belts in vehicles, the facts are clear.
In most crashes buckling up does
matter... a lot!
Why Safety Belts Work
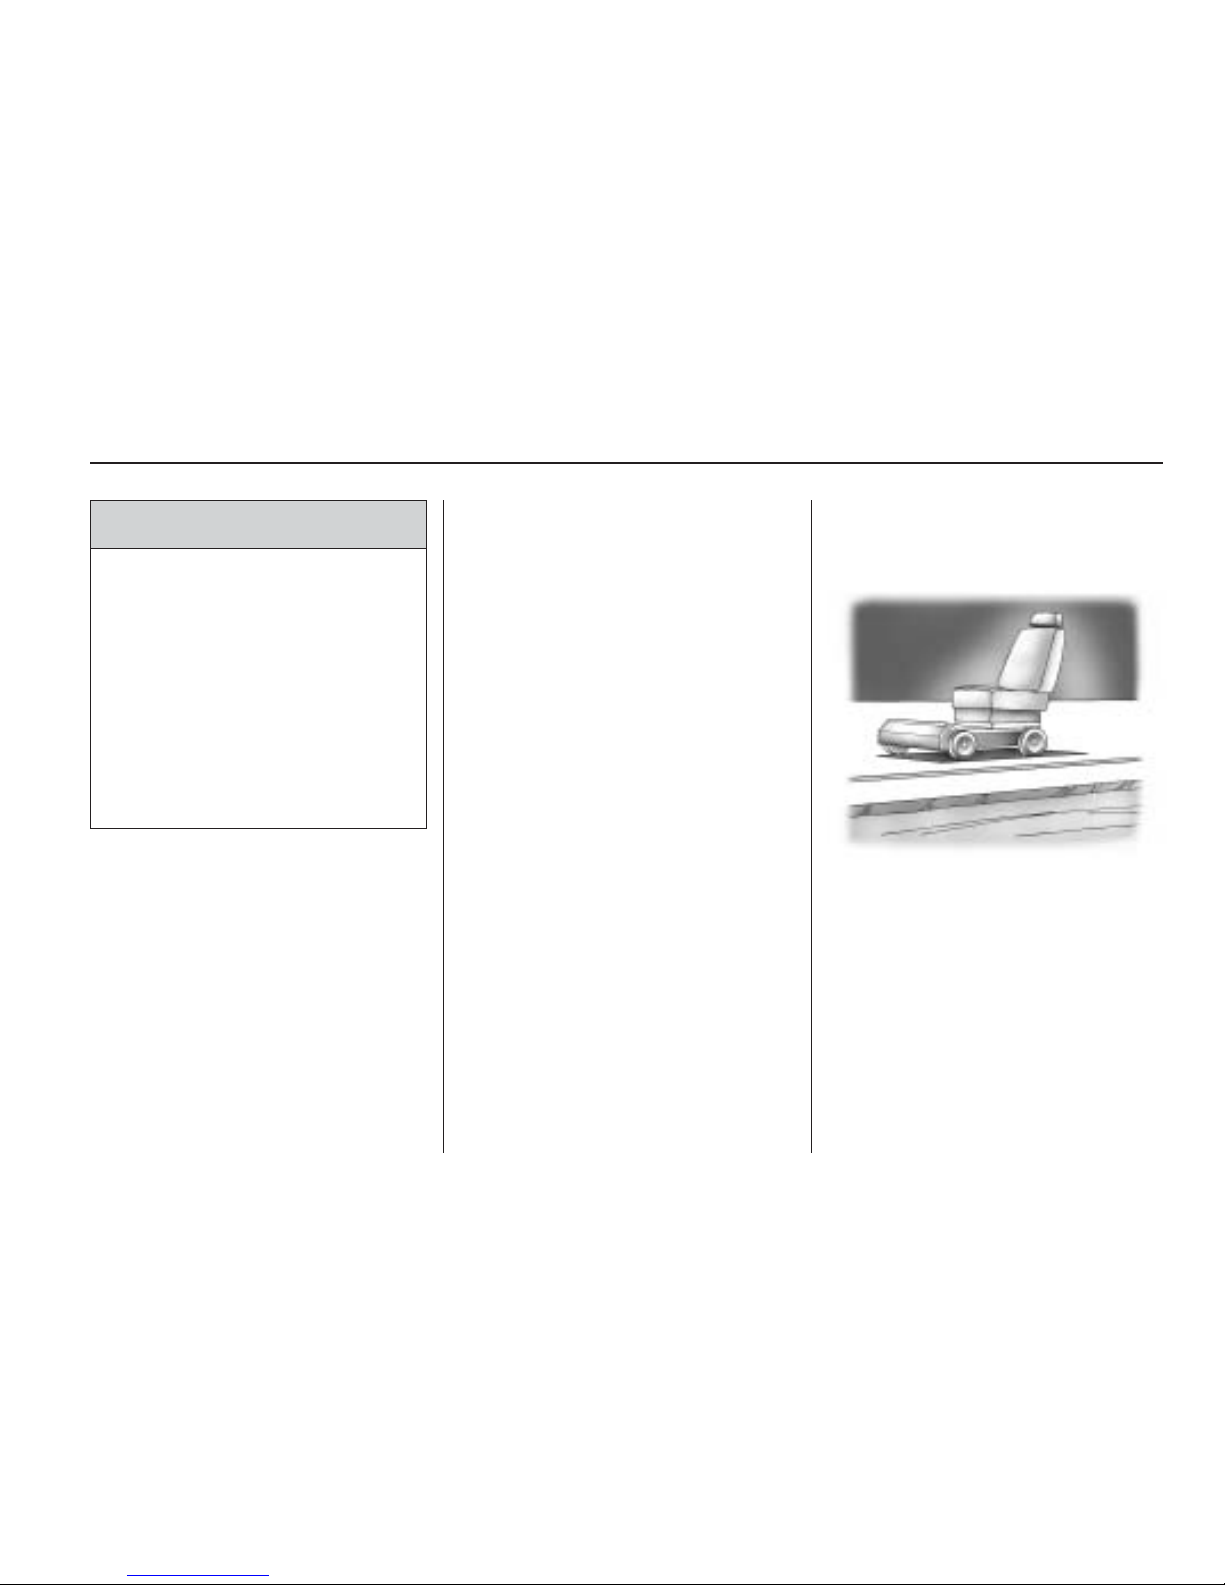
When you ride in or on anything,
you go as fast as it goes.
Take the simplest vehicle. Suppose
it is just a seat on wheels.
Seats and Restraint System 1-13
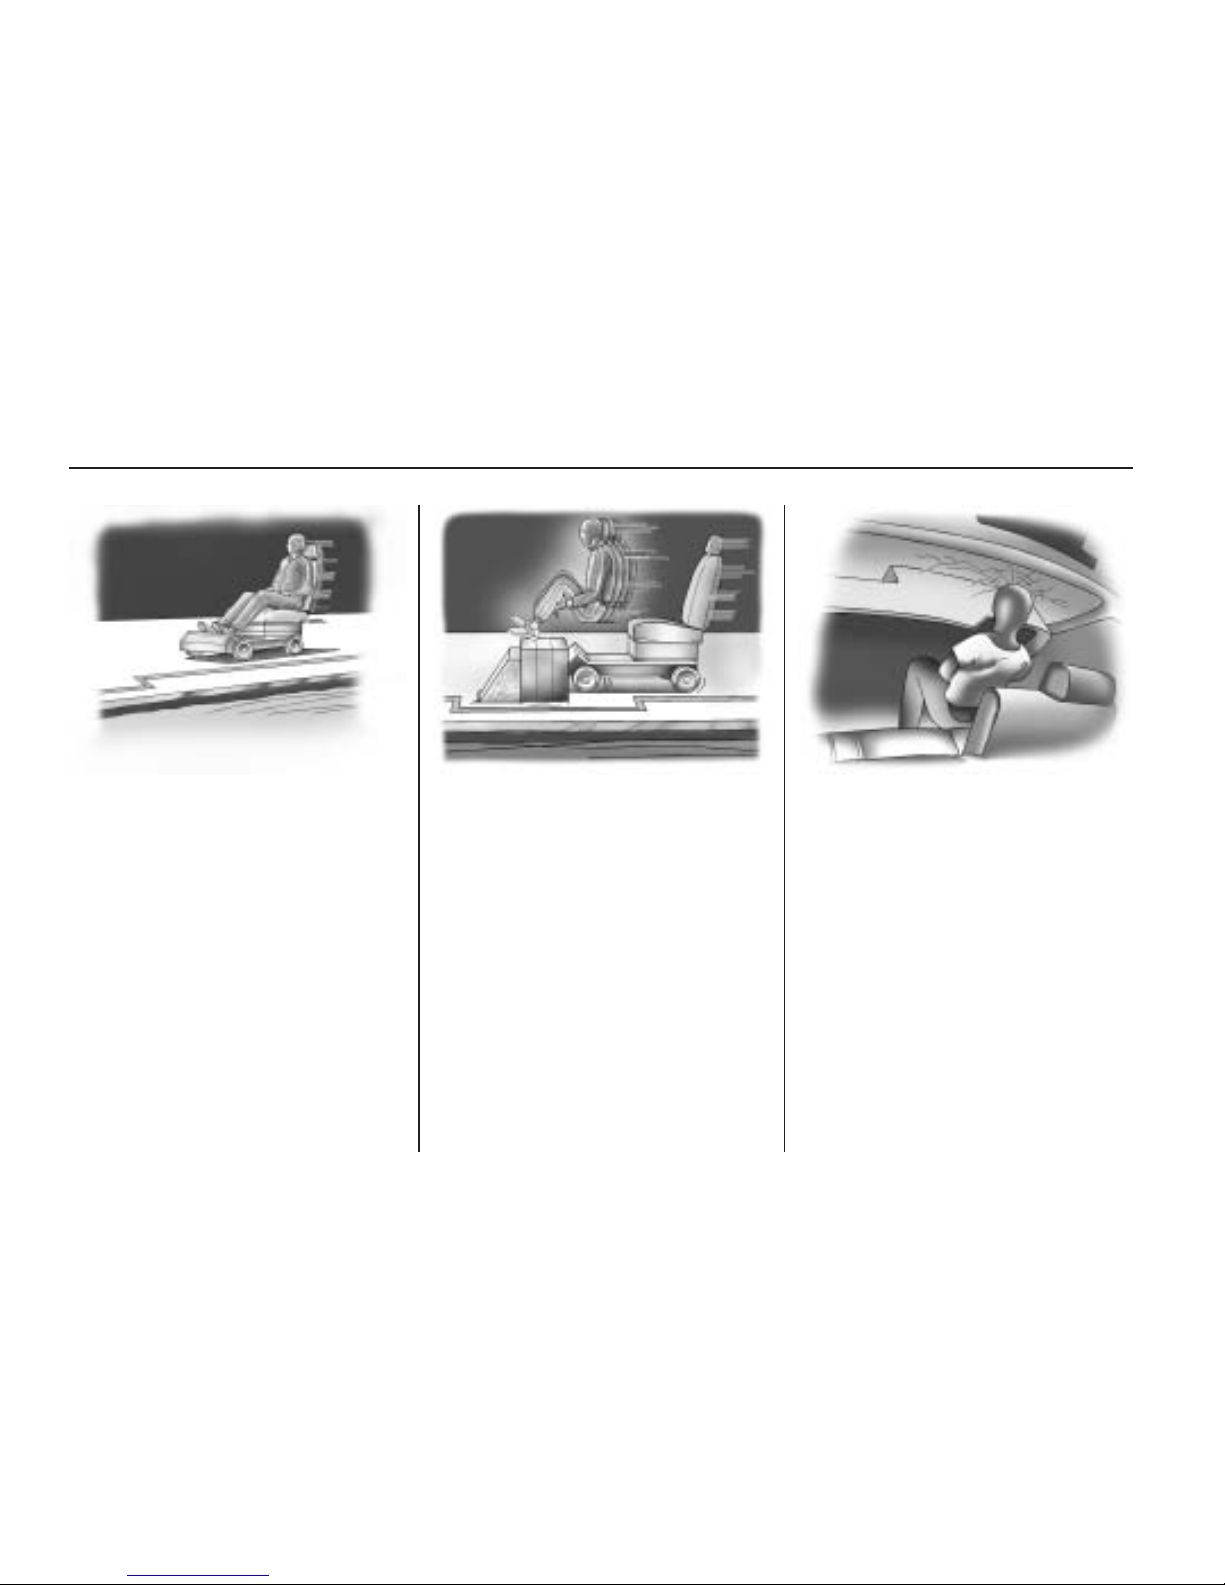
Put someone on it. Get it up to speed. Then stop the
vehicle. The rider does not stop.
The person keeps going until
stopped by something. In a real
vehicle, it could be the windshield...
1-14 Seats and Restraint System
or the instrument panel...
or the safety belts!
With safety belts, you slow down as
the vehicle does. You get more
time to stop. You stop over more
distance, and your strongest bones
take the forces. That is why
safety belts make such good sense.
Questions and Answers
About Safety Belts
Q:
Will I be trapped in the vehicle
after a crash if I am wearing a
safety belt?
A: You could be — whether you are
wearing a safety belt or not. But
your chance of being conscious
during and after an accident,
so you can unbuckle and get out,
is much greater if you are
belted. And you can unbuckle a
safety belt, even if you are
upside down.
Q: If my vehicle has airbags, why
should I have to wear safety
belts?
A: Airbags are supplemental
systems only; so they work with
safety belts — not instead of
them. Whether or not an airbag
is provided, all occupants
still have to buckle up to get the
most protection. That is true
not only in frontal collisions, but
especially in side and other
collisions.
Seats and Restraint System 1-15
Q: If I am a good driver, and I
never drive far from home,
why should I wear safety
belts?
A: You may be an excellent driver,
but if you are in a crash — even
one that is not your fault — you
and your passenger(s) can be
hurt. Being a good driver does not
protect you from things beyond
your control, such as bad drivers.
Most accidents occur within
25 miles (40 km) of home. And
the greatest number of serious
injuries and deaths occur at
speeds of less than 40 mph
(65 km/h).
Safety belts are for everyone.
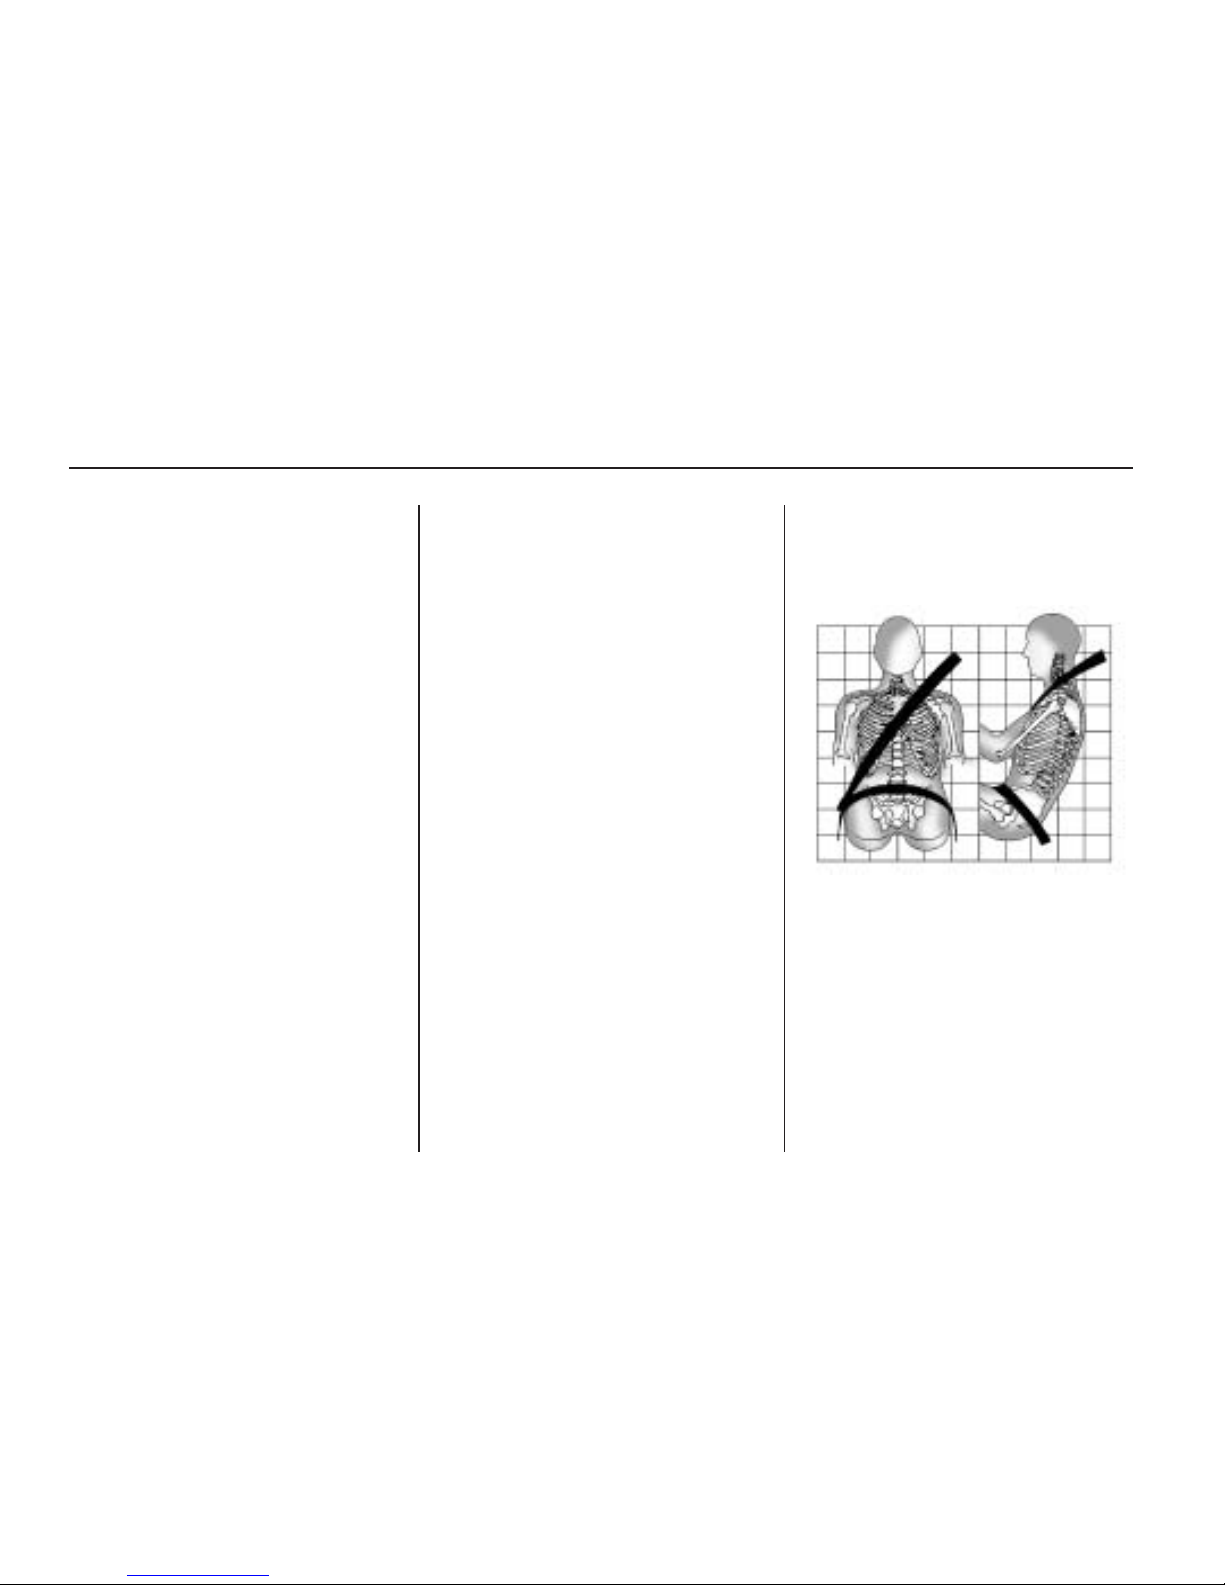
How to Wear Safety Belts
Properly
This section is only for people of
adult size.
Be aware that there are special
things to know about safety
belts and children. And there are
different rules for smaller children
and infants. If a child will be riding in
the vehicle, see Older Children on
page 1-26 or Infants and Young
Children on page 1-28. Follow those
rules for everyone’s protection.
It is very important for all occupants
to buckle up. Statistics show that
unbelted people are hurt more often
in crashes than those who are
wearing safety belts.
Occupants who are not buckled up
can be thrown out of the vehicle
in a crash. And they can strike
others in the vehicle who are
wearing safety belts.
First, before you or your
passenger(s) wear a safety belt,
there is important information
you should know.
Sit up straight and always keep your
feet on the floor in front of you.
The lap part of the belt should be
worn low and snug on the hips, just
touching the thighs. In a crash,
this applies force to the strong pelvic
bones and you would be less
likely to slide under the lap belt. If
you slid under it, the belt would
apply force on your abdomen. This
could cause serious or even
1-16 Seats and Restraint System

fatal injuries. The shoulder belt
should go over the shoulder
and across the chest. These parts
of the body are best able to take belt
restraining forces.
The shoulder belt locks if there is a
sudden stop or crash.
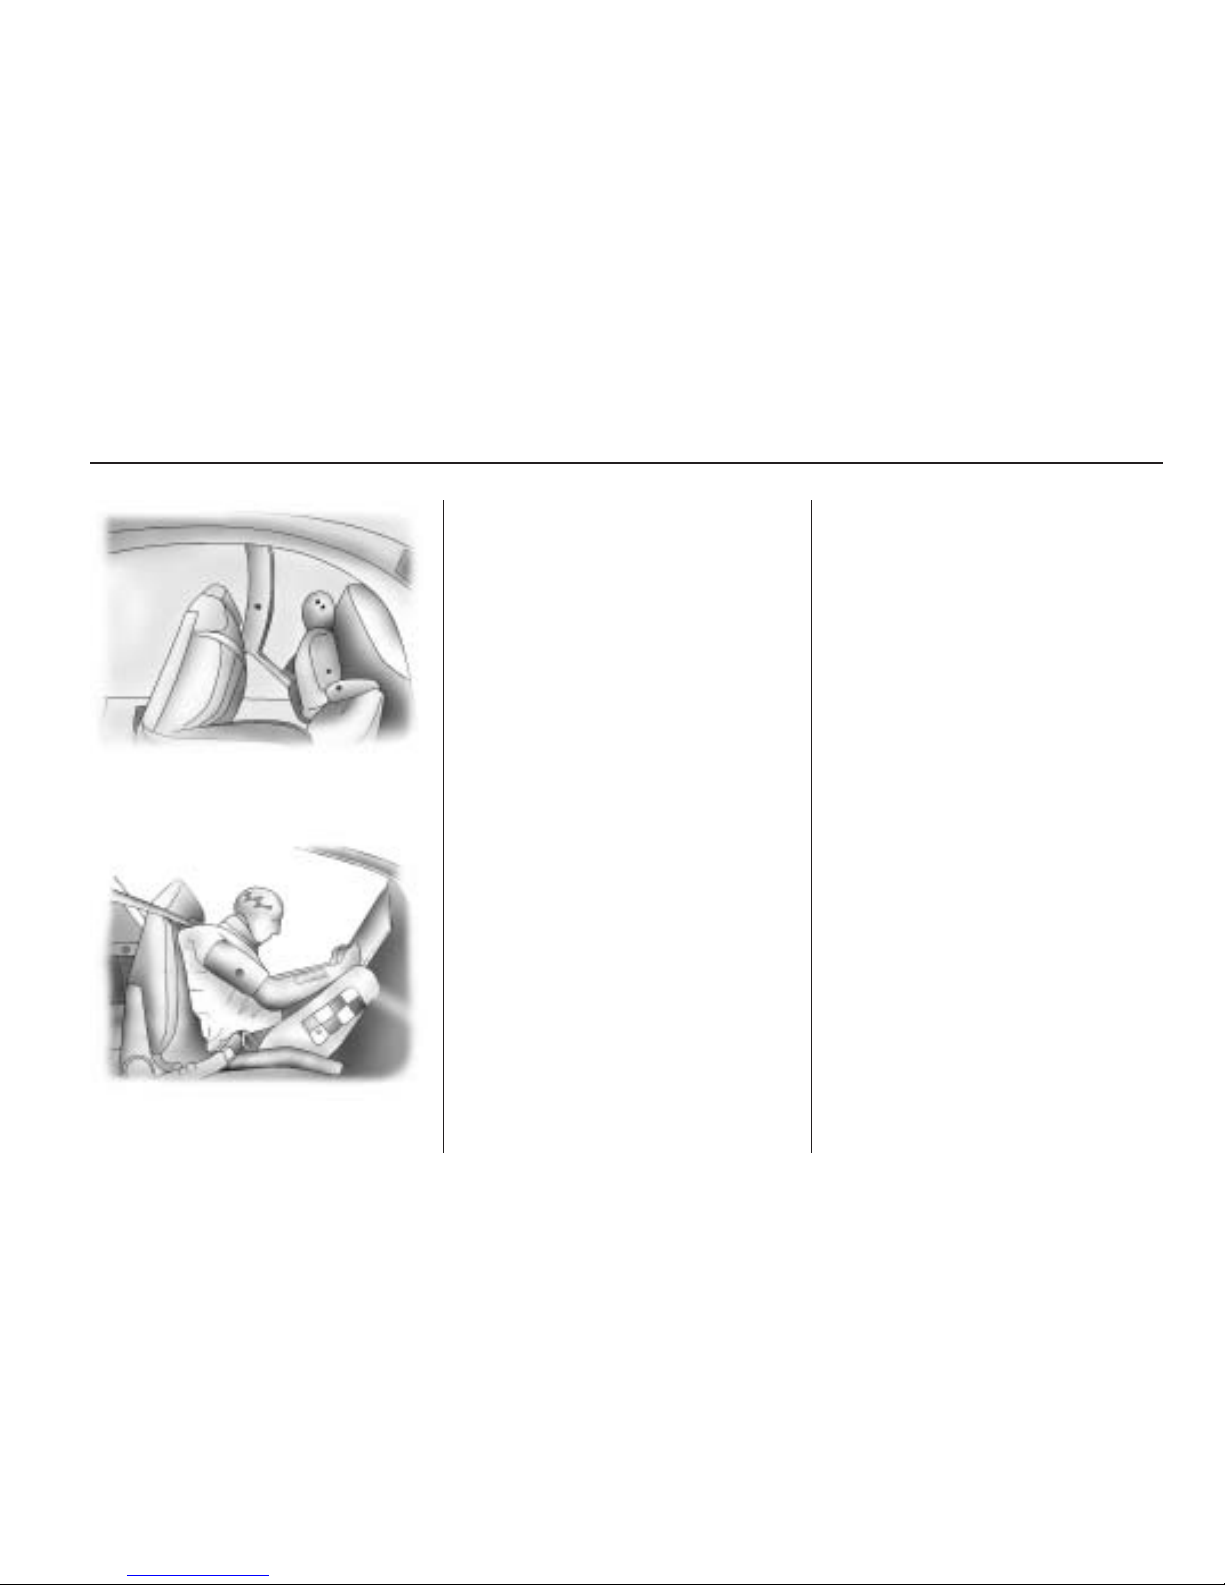
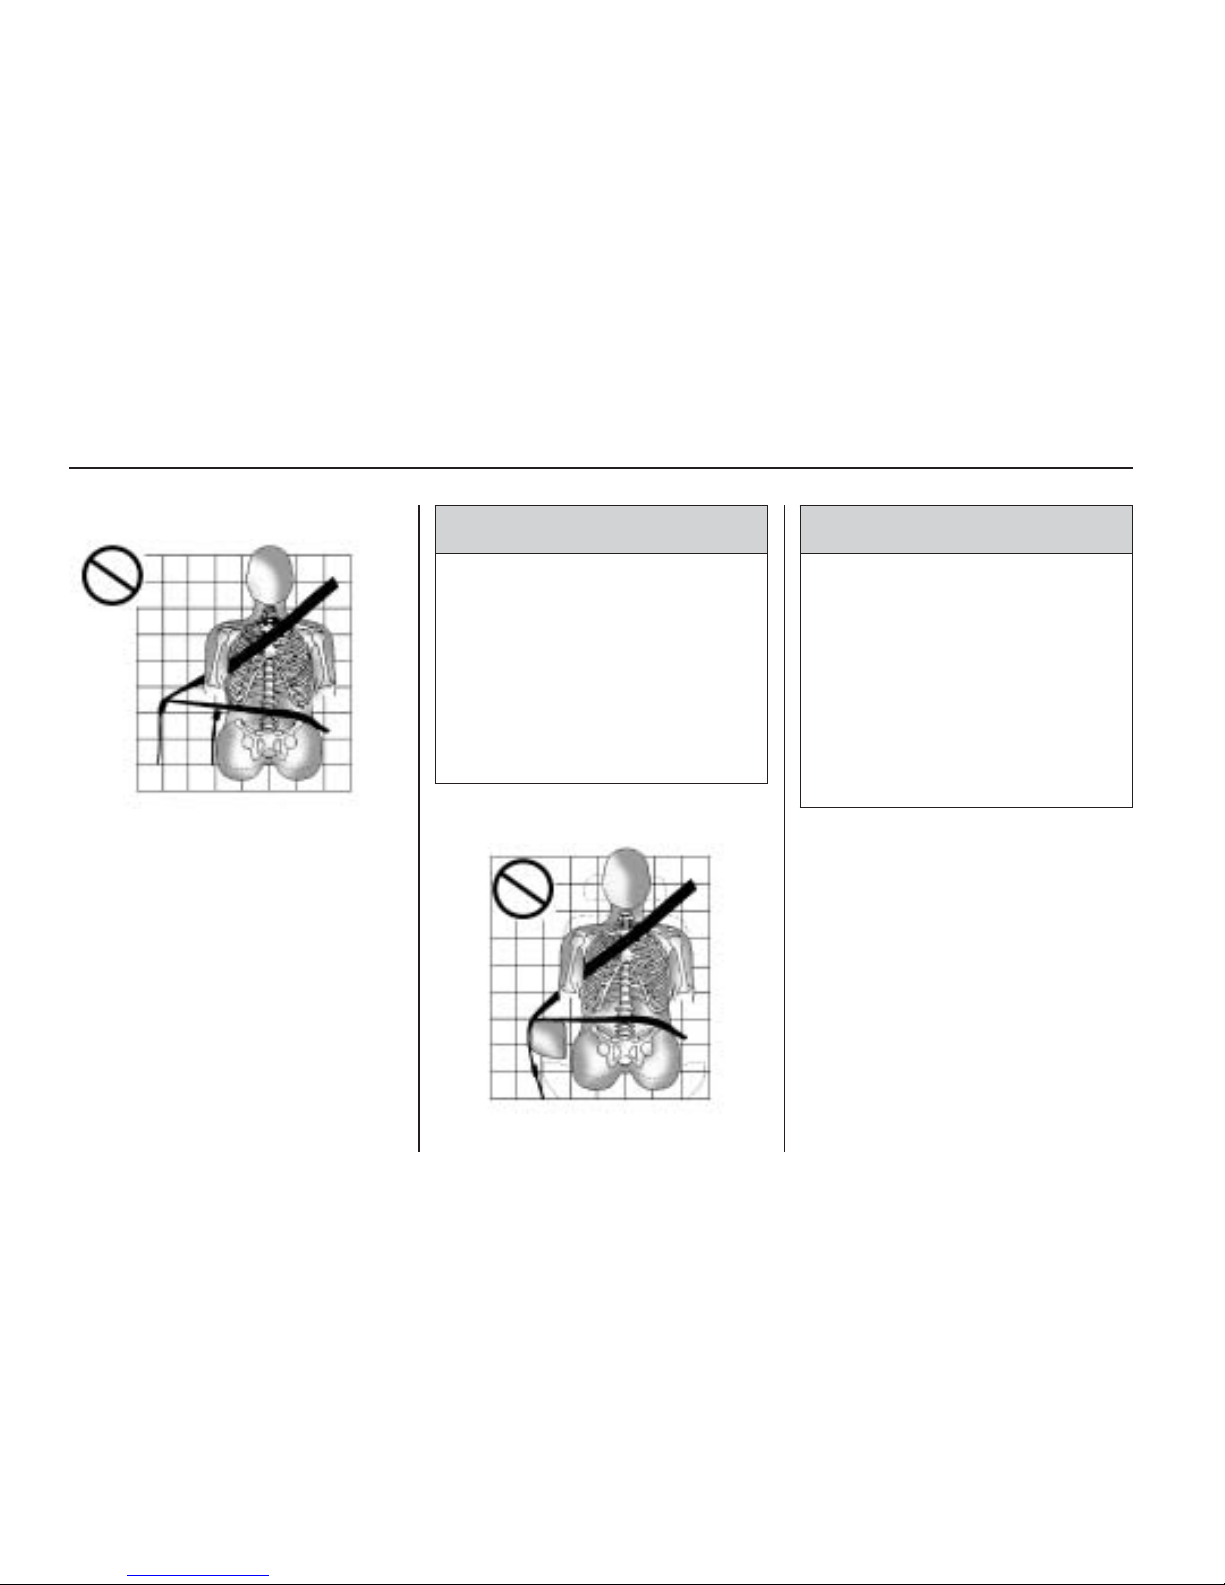
Q: What is wrong with this?
A: The shoulder belt is too loose. It
will not give as much protection
this way.
{ CAUTION
You can be seriously hurt if your
shoulder belt is too loose. In a
crash, you would move forward
too much, which could increase
injury. The shoulder belt should fit
snugly against your body.
Q: What is wrong with this?
A: The lap belt is too loose. It will
not give nearly as much
protection this way.
{ CAUTION
You can be seriously hurt if your
lap belt is too loose. In a crash,
you could slide under the lap belt
and apply force on your abdomen.
This could cause serious or even
fatal injuries. The lap belt should
be worn low and snug on the
hips, just touching the thighs.
Seats and Restraint System 1-17
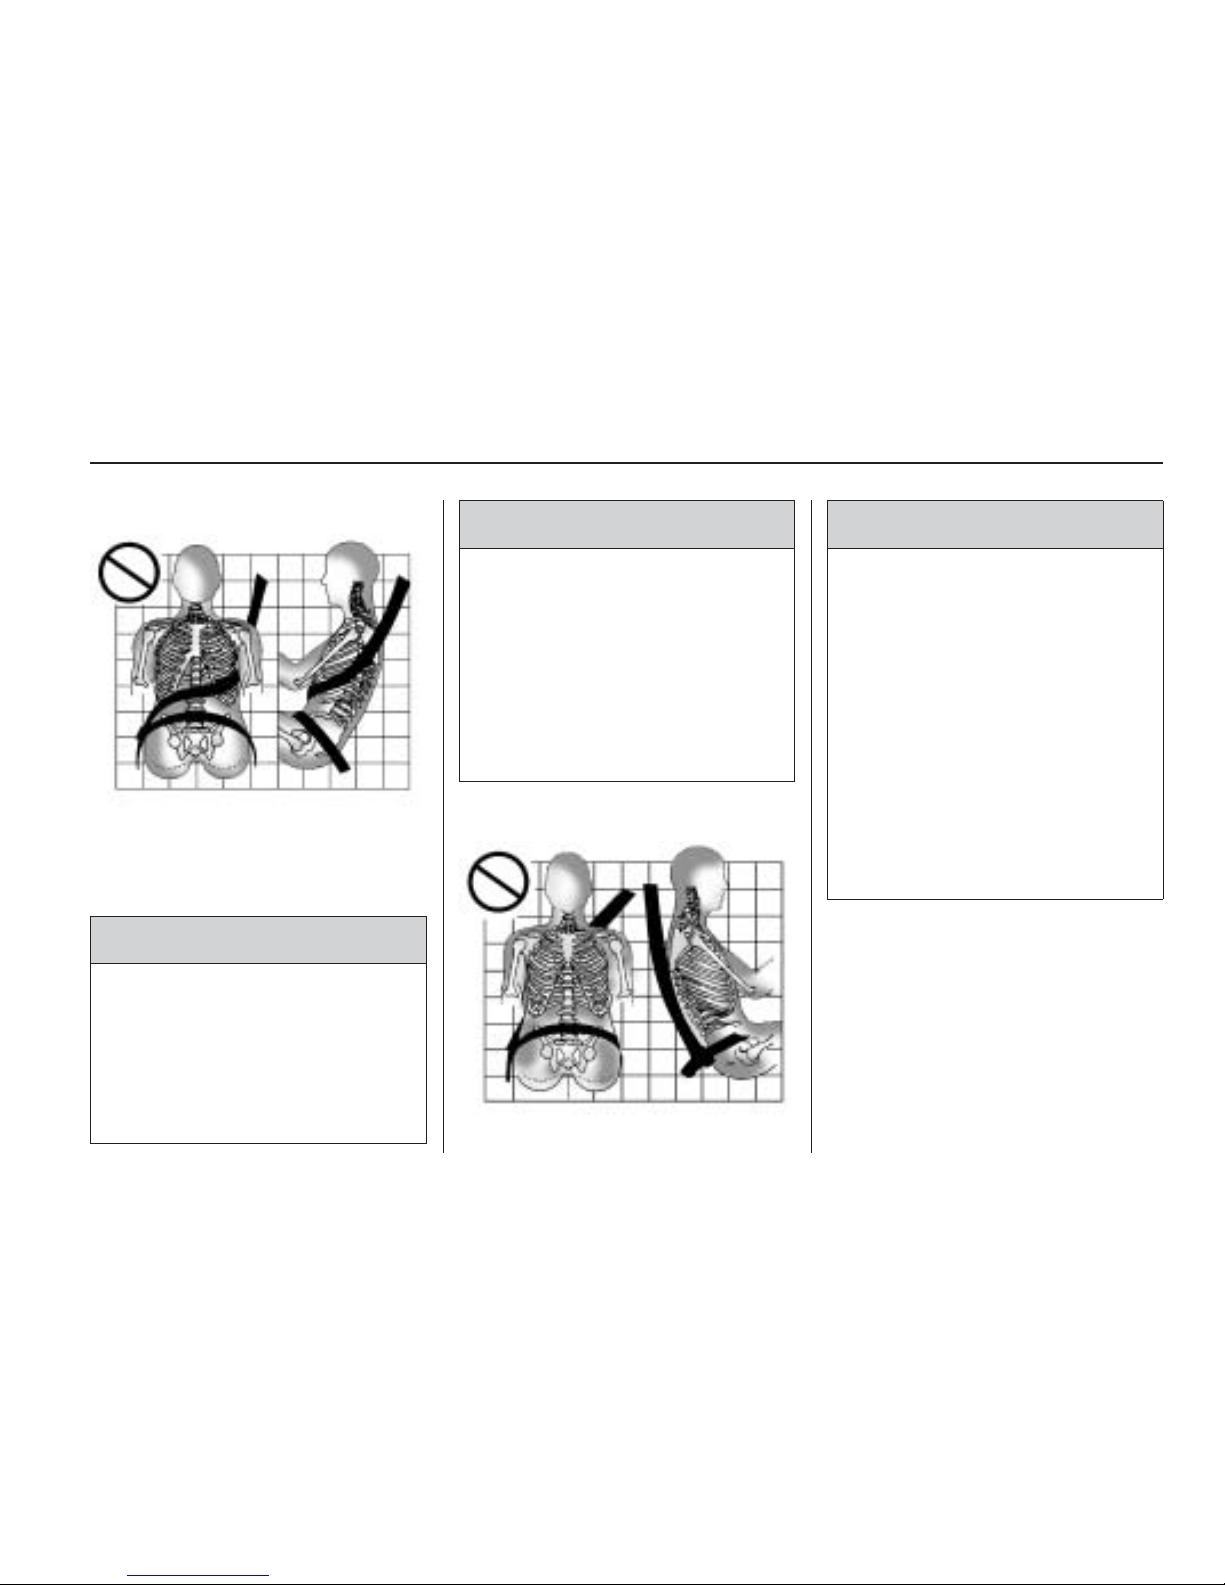
Q: What is wrong with this?
A: The belt is buckled in the wrong
buckle.
{ CAUTION
You can be seriously injured if
your belt is buckled in the wrong
place like this. In a crash, the belt
would go up over your abdomen.
The belt forces would be there,
not on the pelvic bones. This
could cause serious internal
injuries. Always buckle your belt
into the buckle nearest you.
Q: What is wrong with this?
A: The belt is over an armrest.
{ CAUTION
You can be seriously injured if
your belt goes over an armrest
like this. The belt would be much
too high. In a crash, you can slide
under the belt. The belt force
would then be applied on the
abdomen, not on the pelvic
bones, and that could cause
serious or fatal injuries. Be sure
the belt goes under the armrests.
1-18 Seats and Restraint System
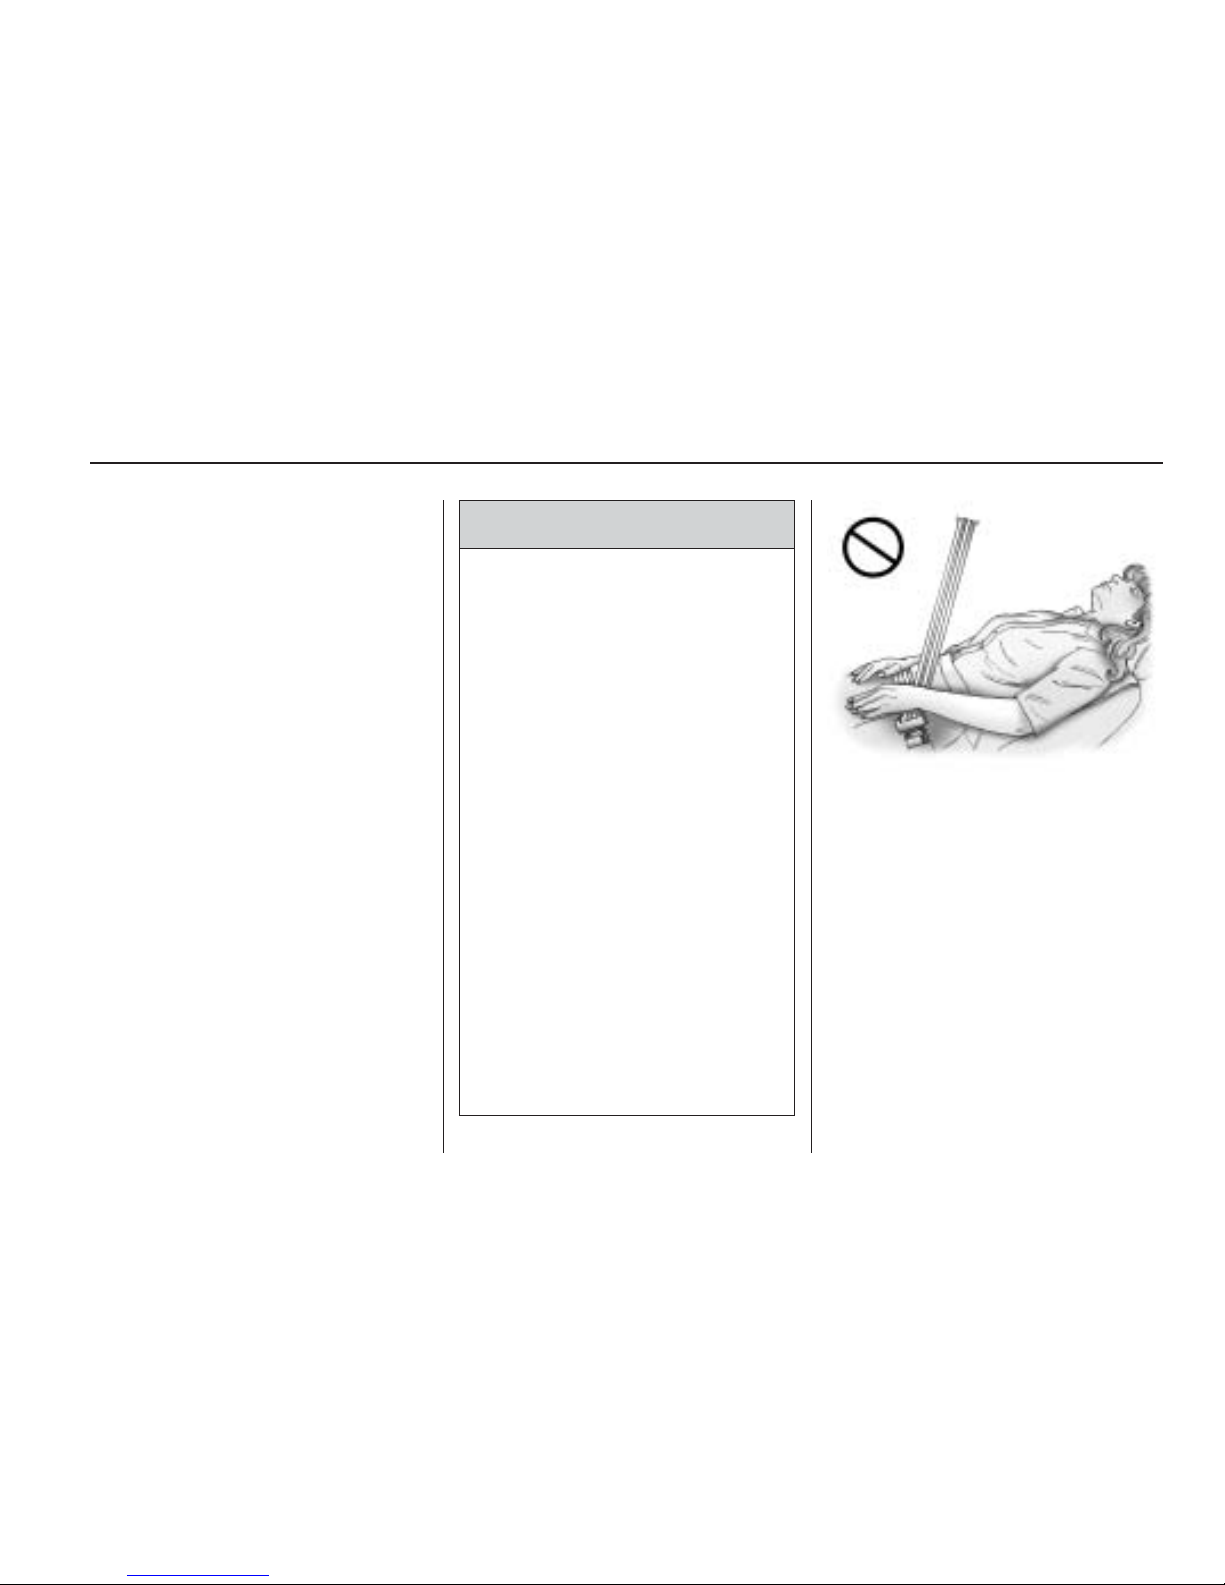
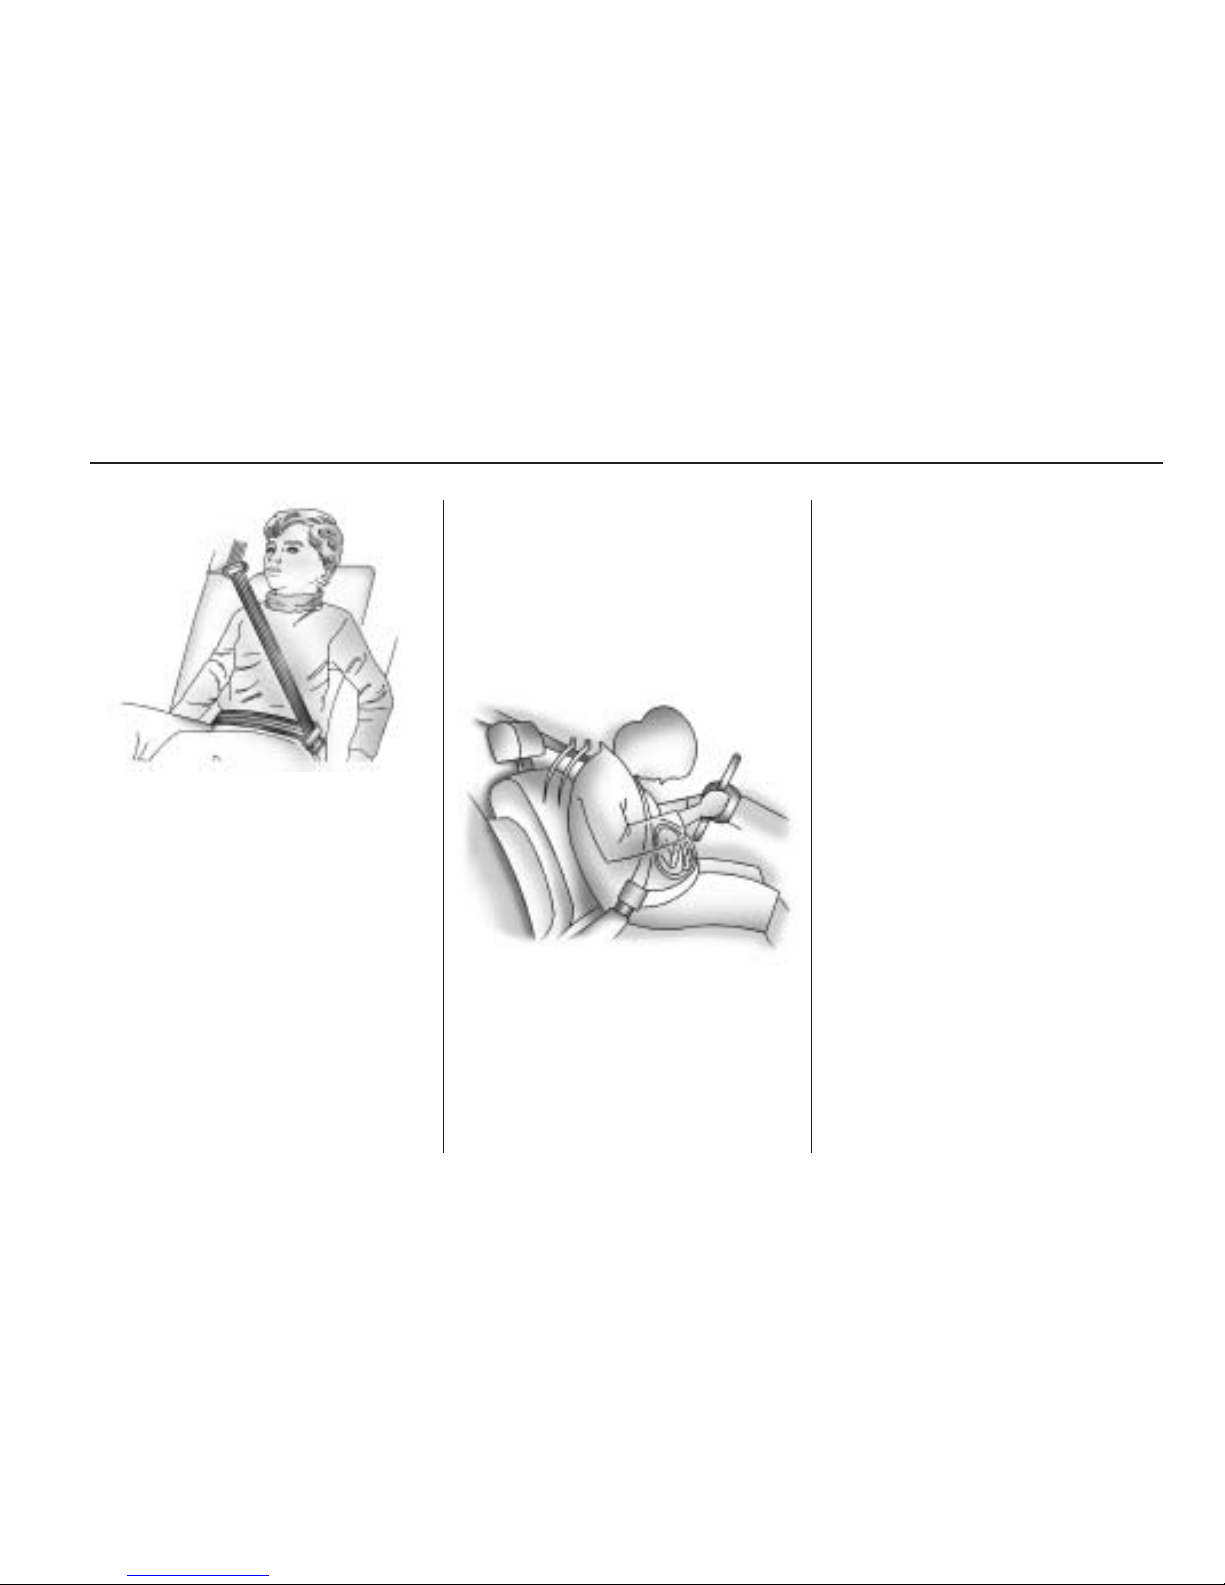
Q: What is wrong with this?
A: The shoulder belt is worn under
the arm. It should be worn over
the shoulder at all times.
{ CAUTION
You can be seriously injured if
you wear the shoulder belt under
your arm. In a crash, your body
would move too far forward, which
would increase the chance of
(Continued)
CAUTION (Continued)
head and neck injury. Also, the
belt would apply too much force
to the ribs, which are not as
strong as shoulder bones. You
could also severely injure internal
organs like your liver or spleen.
The shoulder belt should go over
the shoulder and across the
chest.
Q: What is wrong with this?
A: The belt is behind the body.
{ CAUTION
You can be seriously injured by
not wearing the lap-shoulder belt
properly. In a crash, you would
not be restrained by the shoulder
belt. Your body could move too
far forward increasing the chance
of head and neck injury. You
might also slide under the lap
belt. The belt force would then be
applied right on the abdomen.
That could cause serious or fatal
injuries. The shoulder belt should
go over the shoulder and across
the chest.
Seats and Restraint System 1-19
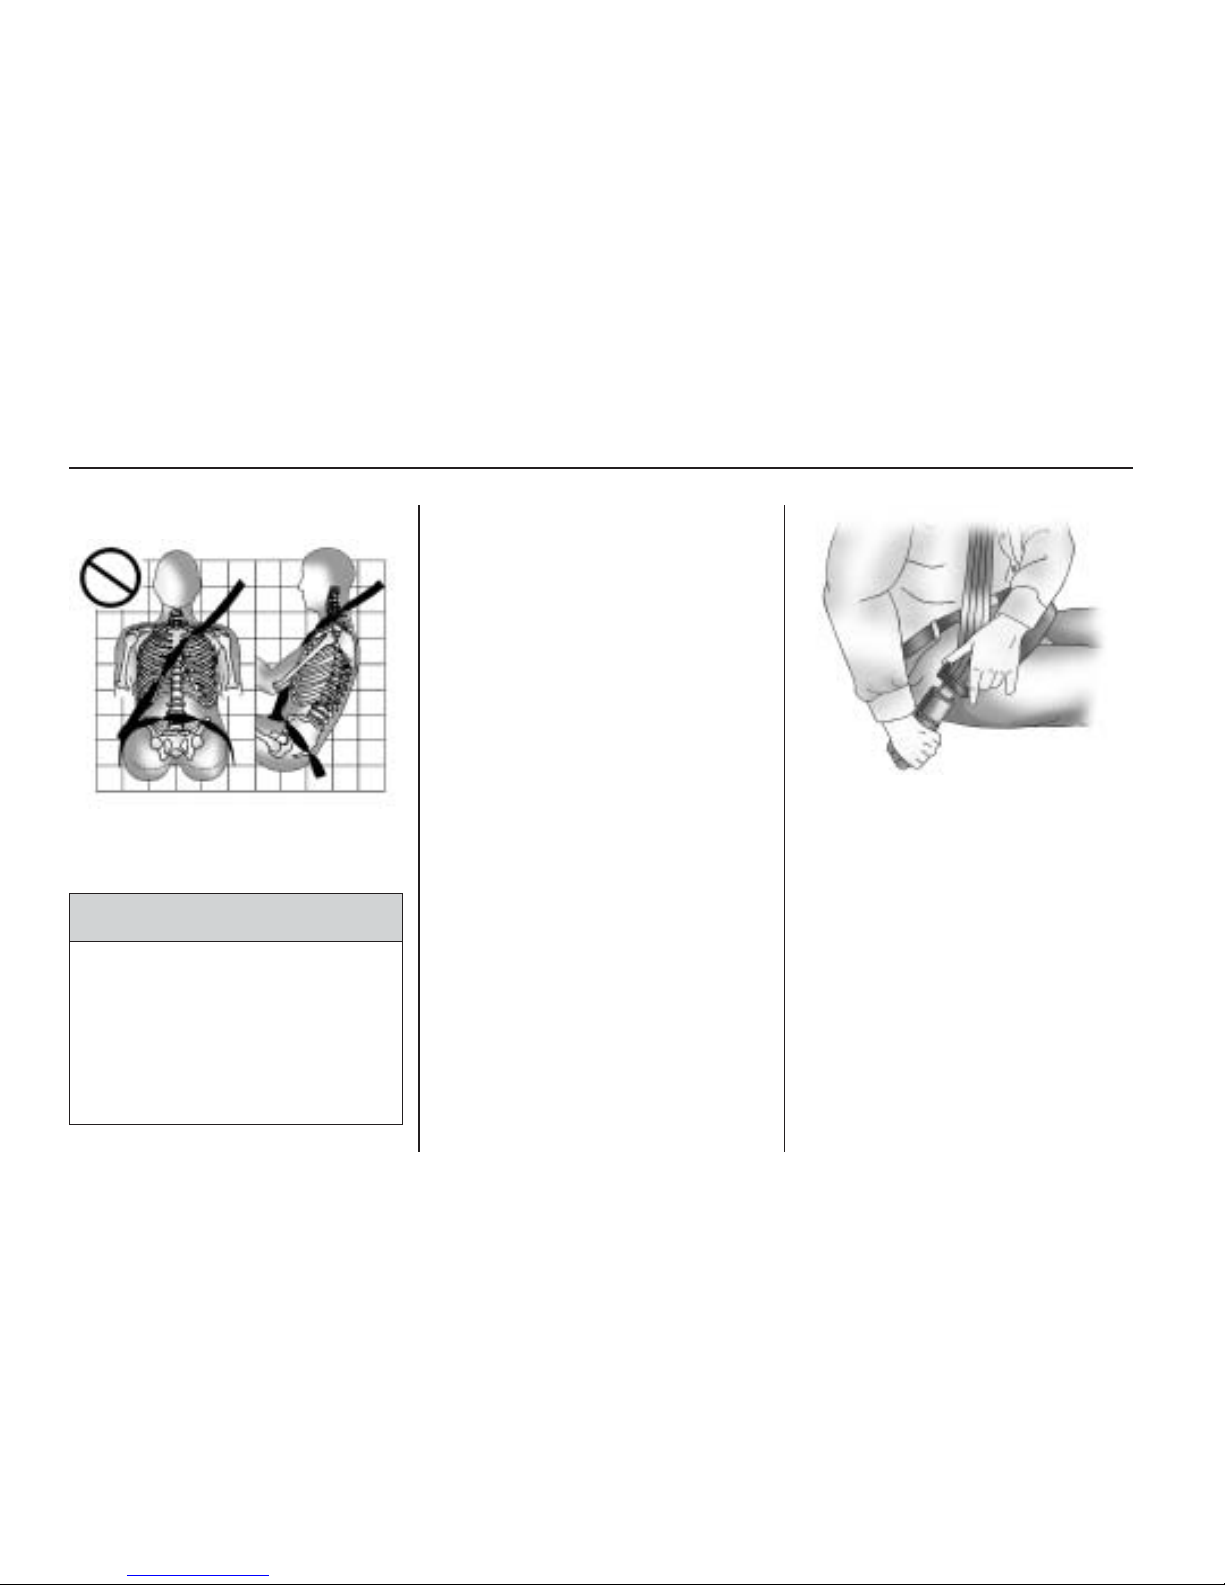
Q: What is wrong with this?
A: The belt is twisted across
the body.
{ CAUTION
You can be seriously injured by a
twisted belt. In a crash, you would
not have the full width of the belt
to spread impact forces. If a belt
is twisted, make it straight so it
can work properly, or ask your
dealer/retailer to fix it.
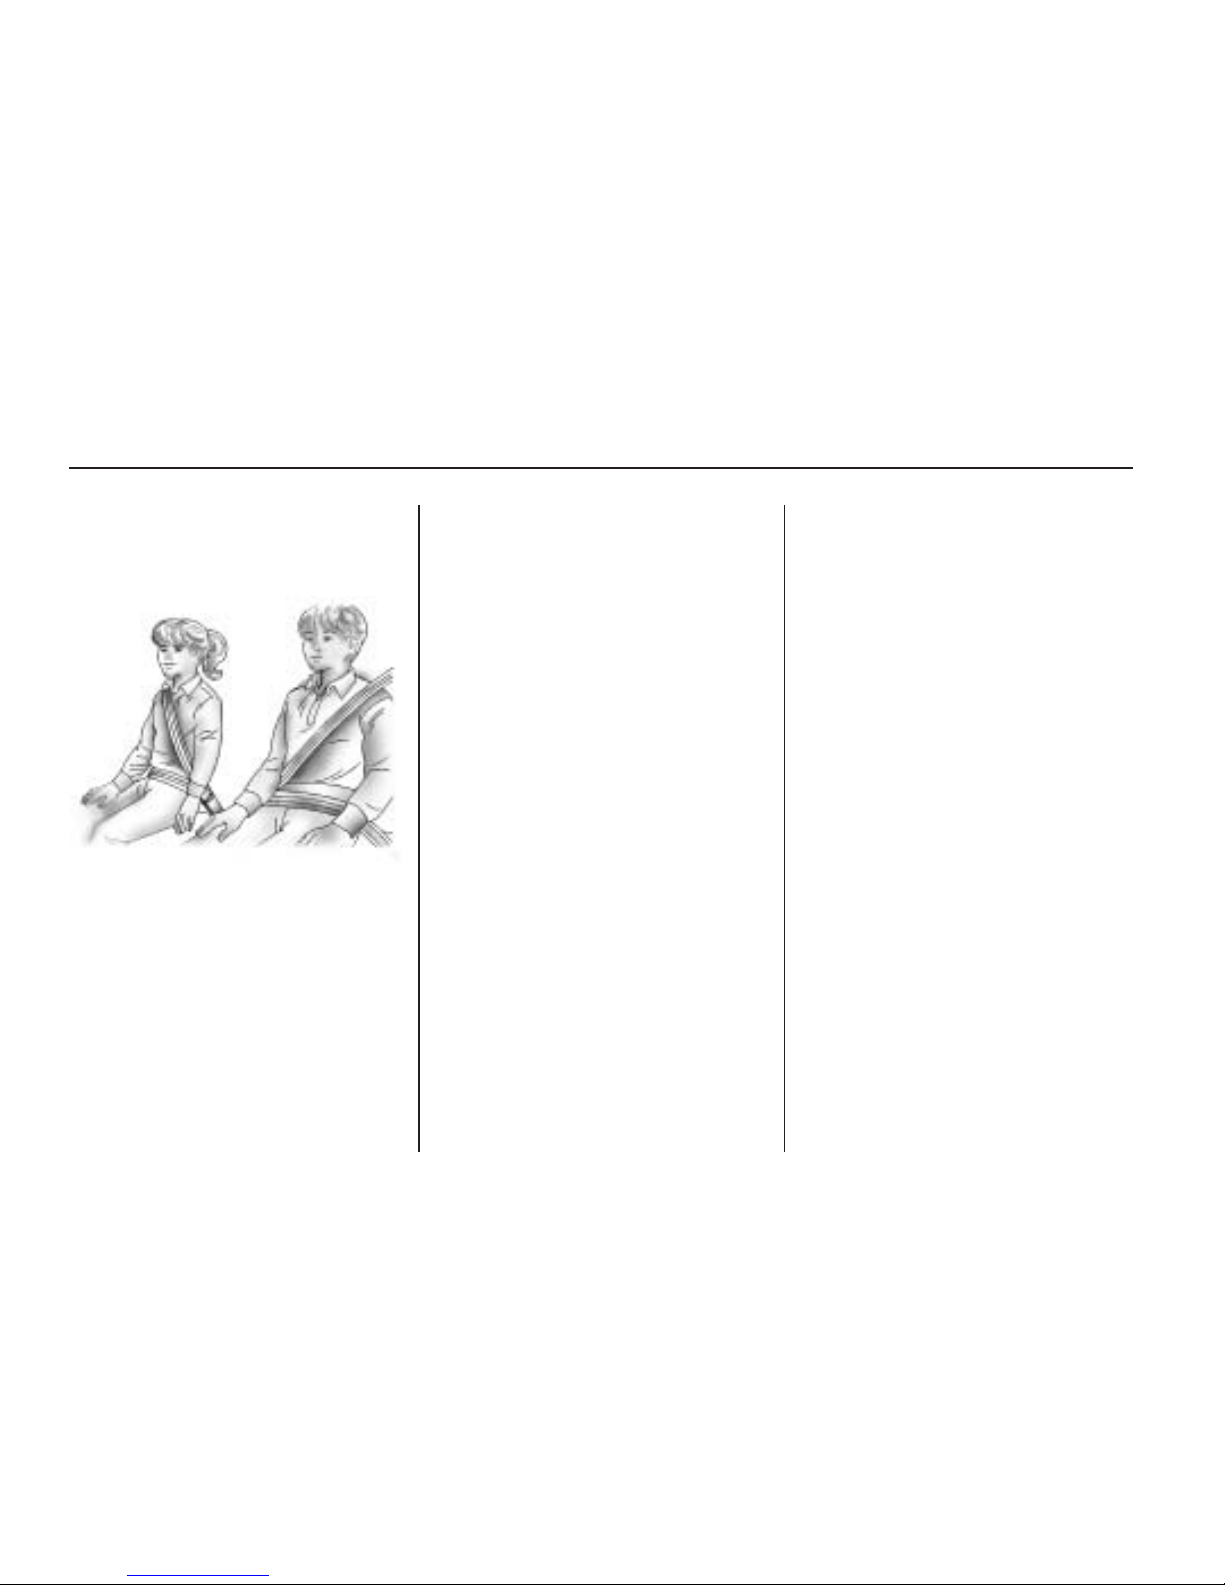
Lap-Shoulder Belt
All seating positions in the vehicle
have a lap-shoulder belt.
If you are using a rear seating
position with a detachable safety
belt and the safety belt is not
attached, see Third Row Seats on
page 1-10 for instruction on
reconnecting the safety belt to the
mini-buckle.
The following instructions explain
how to wear a lap-shoulder belt
properly.
1. Adjust the seat, if the seat is
adjustable, so you can sit up
straight. To see how, see “Seats”
in the Index.
2. Pick up the latch plate and pull
the belt across you. Do not let
it get twisted.
The lap-shoulder belt may lock if
you pull the belt across you
very quickly. If this happens, let
the belt go back slightly to
unlock it. Then pull the belt
across you more slowly.
If the shoulder portion of a
passenger belt is pulled out all
the way, the child restraint
locking feature may be engaged.
If this happens, let the belt go
back all the way and start again.
1-20 Seats and Restraint System
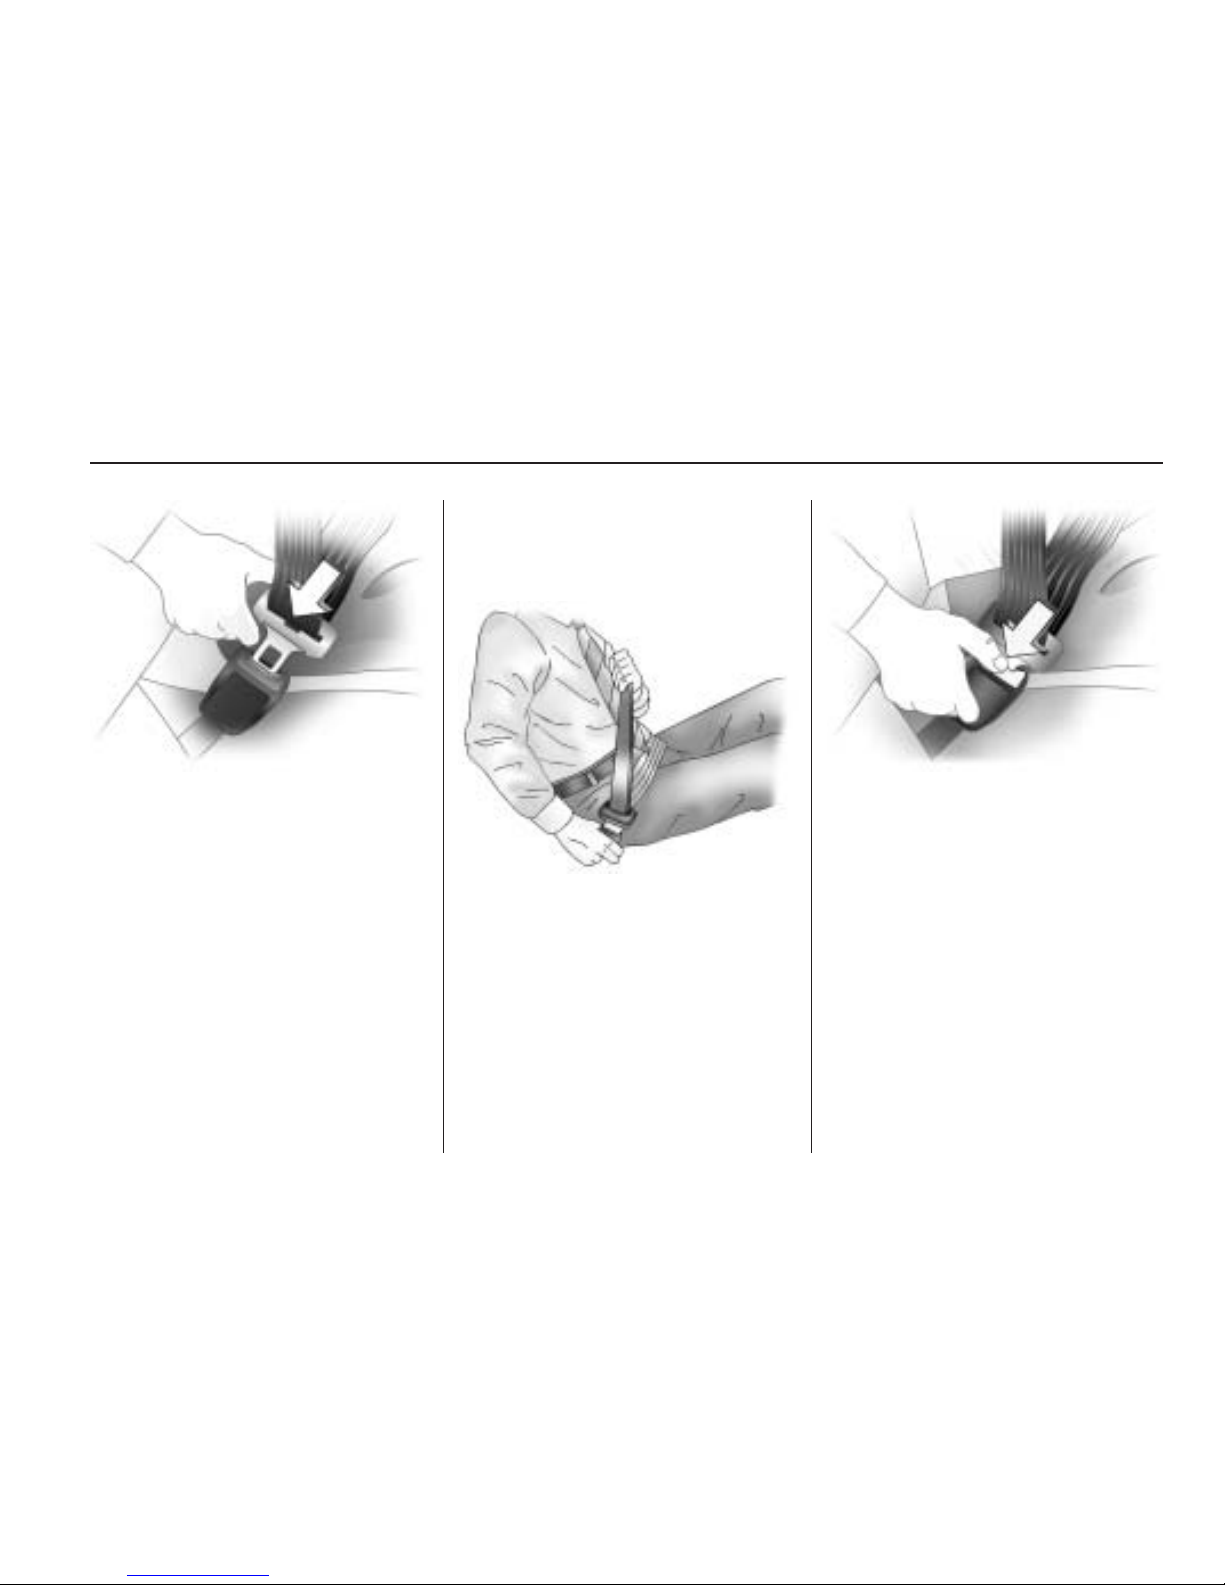
3. Push the latch plate into the
buckle until it clicks.
4. Pull up on the latch plate to
make sure it is secure. If the belt
is not long enough, see Safety
Belt Extender on page 1-25.
Position the release button on
the buckle so that the safety belt
could be quickly unbuckled if
necessary.
5. If equipped with a shoulder belt
height adjuster, move it to the
height that is right for you.
See “Shoulder Belt Height
Adjustment” later in this section
for instructions on use and
important safety information.
6. To make the lap part tight, pull
up on the shoulder belt.
It may be necessary to pull the
stitching on the safety belt
through the latch plate to fully
tighten the lap belt on smaller
occupants.
To unlatch the belt, push the button
on the buckle. The belt should return
to its stowed position. Slide the latch
plate up the safety belt webbing
when the safety belt is not in use.
The latch plate should rest on the
stitching on the safety belt, near the
guide loop on the side wall.
Before a door is closed, be sure the
safety belt is out of the way. If a
door is slammed against a safety
belt, damage can occur to both the
safety belt and the vehicle.
Seats and Restraint System 1-21

Shoulder Belt Height Adjuster
The vehicle has a shoulder belt
height adjuster for the driver
and right front passenger seating
positions.
Adjust the height so that the
shoulder portion of the belt is
centered on the shoulder. The belt
should be away from the face
and neck, but not falling off of the
shoulder. Improper shoulder
belt height adjustment could reduce
the effectiveness of the safety
belt in a crash.
To move it down, push down on
the button (A) and move the height
adjuster to the desired position.
You can move the height adjuster
up by pushing up on the shoulder
belt guide.
After the adjuster is set to the
desired position, try to move it down
without pushing the button to make
sure it has locked into position.
Safety Belt Pretensioners
This vehicle has safety belt
pretensioners for the front outboard
occupants. Although the safety
belt pretensioners cannot be seen,
they are part of the safety belt
assembly. They can help tighten the
safety belts during the early
stages of a moderate to severe
frontal, near frontal, or rear crash if
the threshold conditions for
pretensioner activation are met.
And, for vehicles with side impact
airbags, safety belt pretensioners
can help tighten the safety belts in a
side crash or a rollover event.
Pretensioners work only once. If the
pretensioners activate in a crash,
they will need to be replaced,
and probably other new parts for the
vehicle’s safety belt system. See
Replacing Restraint System
Parts After a Crash on page 1-59.
1-22 Seats and Restraint System
Rear Safety Belt Comfort
Guides
Rear shoulder belt comfort guides
may provide added safety belt
comfort for older children who have
outgrown booster seats and for
some adults. When installed on a
shoulder belt, the comfort guide
positions the shoulder belt away
from the neck and head.
There is a guide for each outboard
passenger position in the second row
seat and all passenger positions in
the third row. Here is how to install a
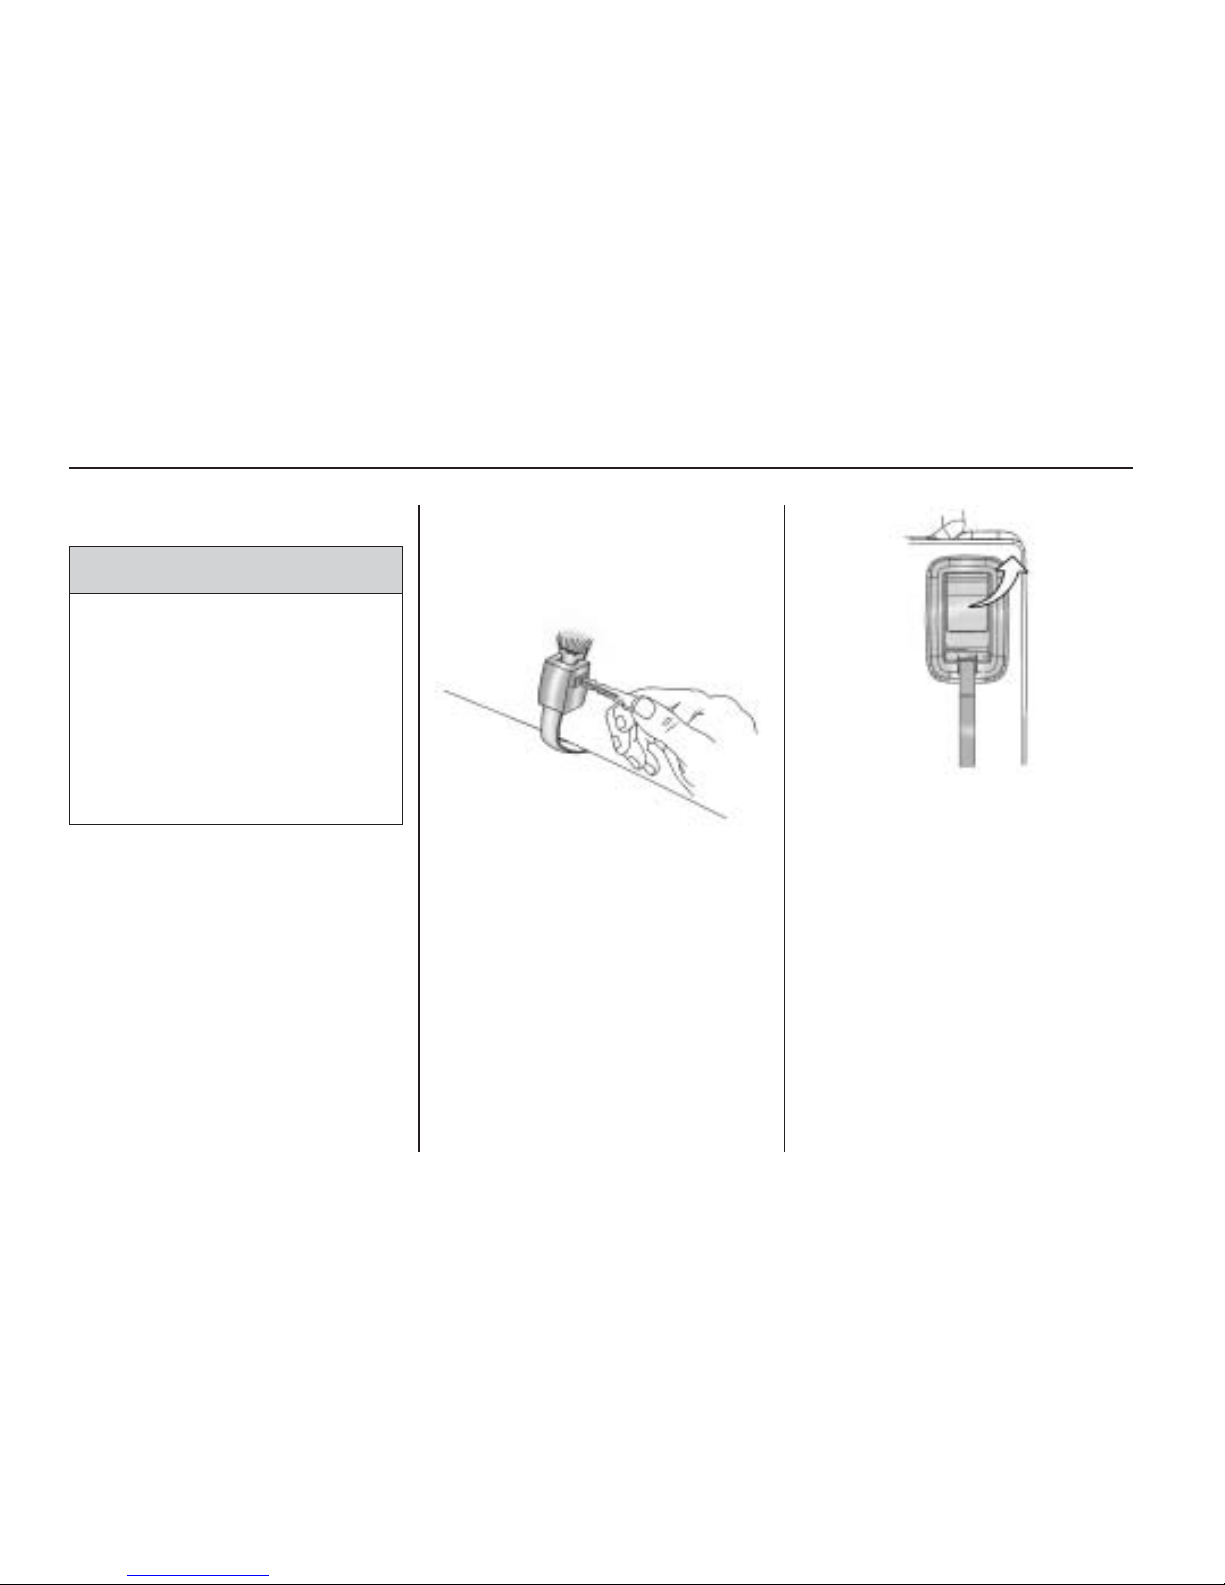
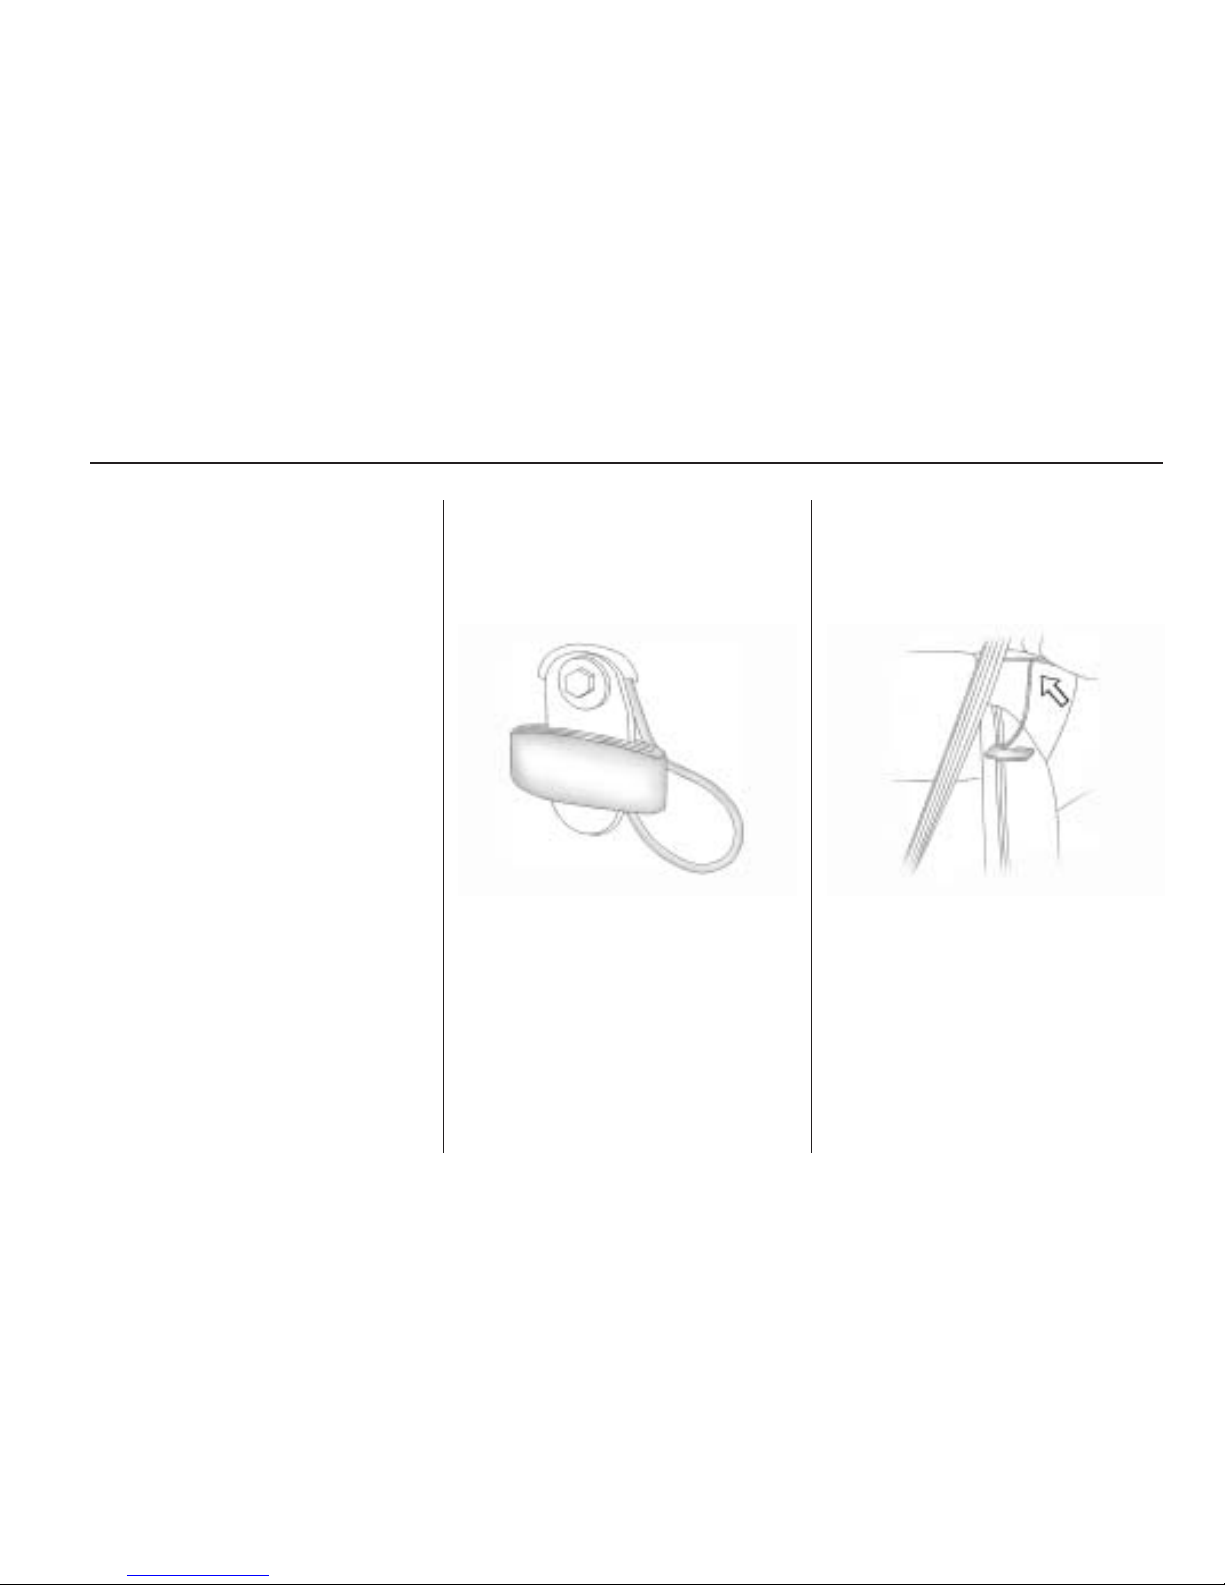
comfort guide to the safety belt:
1. For the outboard positions,
remove the guide from its storage
clip on the interior body.
For the third row center position,
locate the comfort guide which
is located in a storage pocket, at
the top of the seat, under the
headrest on the driver’s side of
the vehicle. To access the
comfort guide, you will first need
to move the headrest forward
by pulling on the handle behind
the seatback. The comfort
guide will now be accessible.
Pull the comfort guide out of
its storage location and then
return the headrest to its upright
position.
The elastic cord on the comfort
guide is adjustable. You can
make it longer or shorter by
squeezing both ends of the
plastic adjuster.
Outboard Positions
Third Row Center Position
Seats and Restraint System 1-23
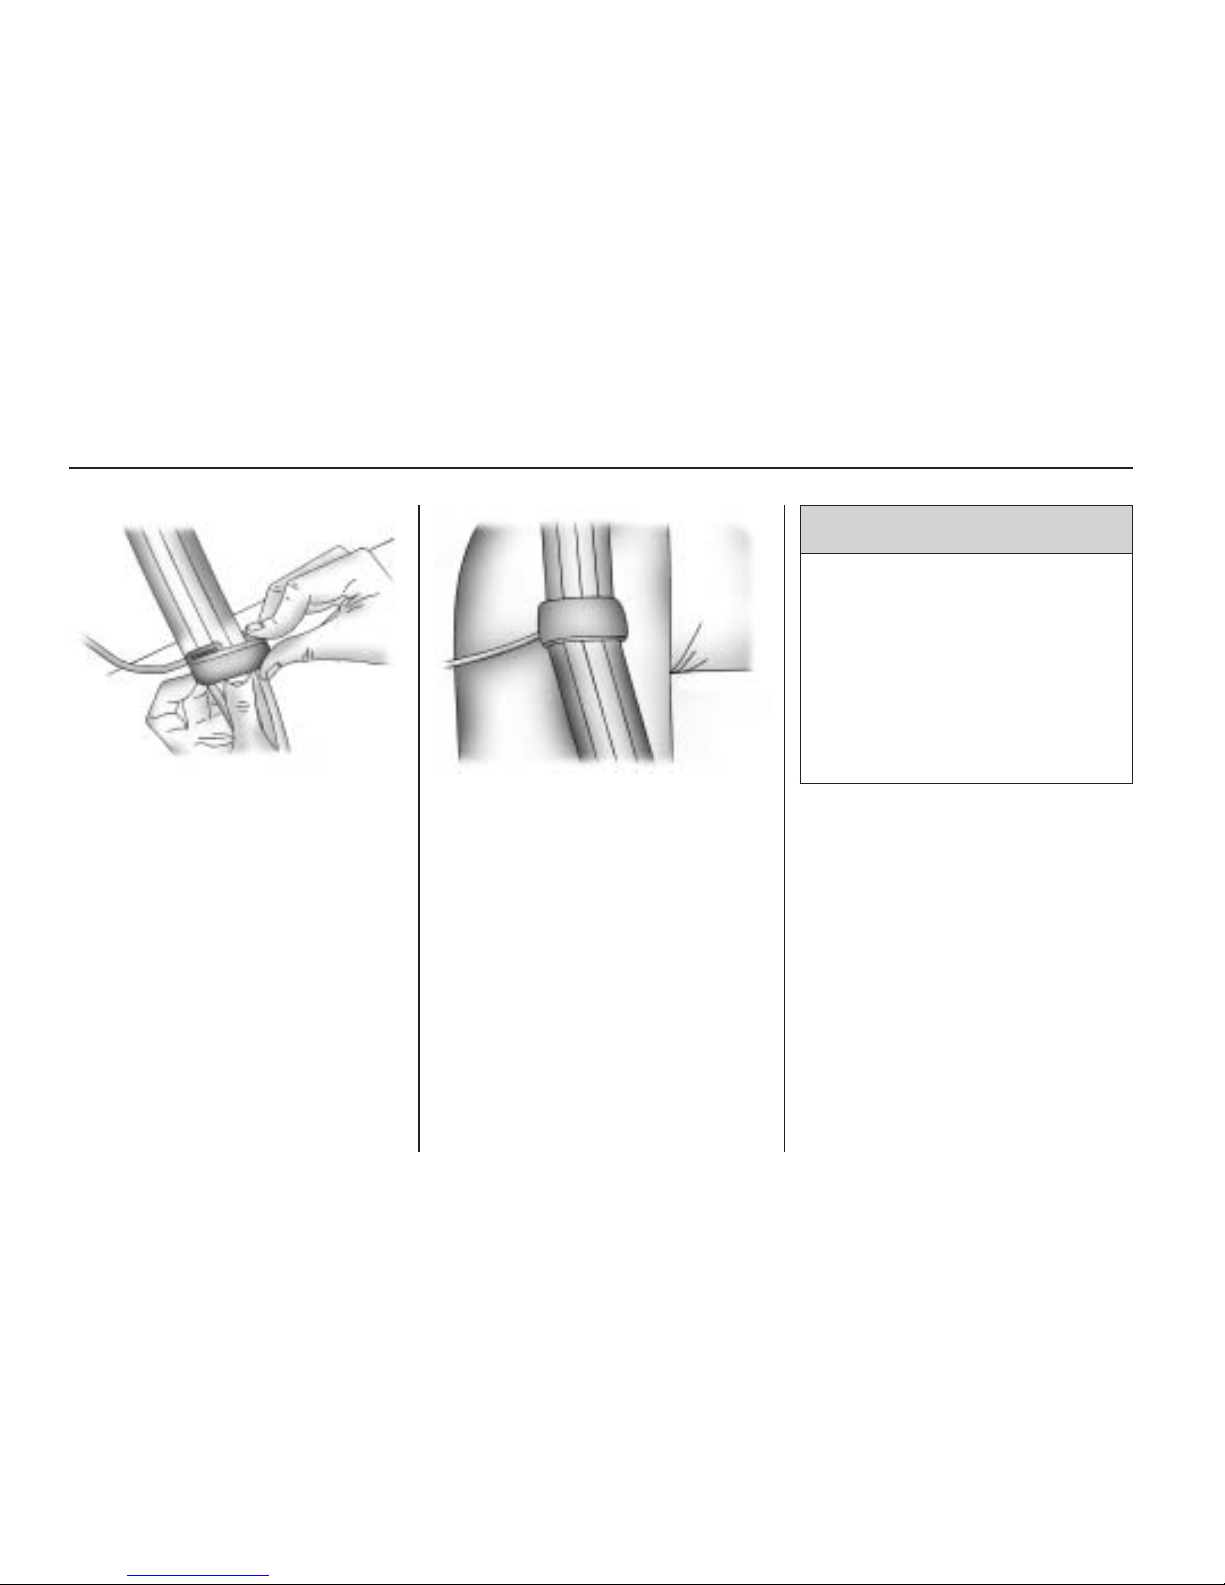
2. Place the guide over the belt and
insert the two edges of the belt
into the slots of the guide.
3. Be sure that the belt is not
twisted and it lies flat. The elastic
cord must be under the belt
and the guide on top.
{ CAUTION
A safety belt that is not properly
worn may not provide the
protection needed in a crash. The
person wearing the belt could be
seriously injured. The shoulder
belt should go over the shoulder
and across the chest. These parts
of the body are best able to take
belt restraining forces.
1-24 Seats and Restraint System
4. Buckle, position, and release the
safety belt as described
previously in this section. Make
sure that the shoulder belt
crosses the shoulder.
To remove and store the comfort
guide, squeeze the belt edges
together so that the safety belt can
be removed from the guide.
Slide the guide into its storage
location or on its storage clip.
Safety Belt Use During
Pregnancy
Safety belts work for everyone,
including pregnant women. Like all
occupants, they are more likely
to be seriously injured if they do not
wear safety belts.
A pregnant woman should wear a
lap-shoulder belt, and the lap portion
should be worn as low as possible,
below the rounding, throughout
the pregnancy.
The best way to protect the fetus is
to protect the mother. When a
safety belt is worn properly,
it is more likely that the fetus will not
be hurt in a crash. For pregnant
women, as for anyone, the key to
making safety belts effective is
wearing them properly.
Safety Belt Extender
If the safety belt will fasten around
you, you should use it.
But if a safety belt is not long
enough, your dealer/retailer will
order you an extender. When you go
in to order it, take the heaviest
coat you will wear, so the extender
will be long enough for you. To
help avoid personal injury, do not let
someone else use it, and use it
only for the seat it is made to fit. The
extender has been designed for
adults. Never use it for securing
child seats. To wear it, attach it to
the regular safety belt. For more
information, see the instruction
sheet that comes with the extender.
Seats and Restraint System 1-25
Child Restraints
Older Children
Older children who have outgrown
booster seats should wear the
vehicle’s safety belts.
The manufacturer’s instructions that
come with the booster seat, state
the weight and height limitations for
that booster. Use a booster seat
with a lap-shoulder belt until
the child passes the below fit test:
• Sit all the way back on the
seat. Do the knees bend at the
seat edge? If yes, continue.
If no, return to the booster seat.
• Buckle the lap-shoulder
belt. Does the shoulder belt rest
on the shoulder? If yes,
continue. If no, try using the rear
safety belt comfort guide. See
“Rear Safety Belt Comfort
Guides” under Lap-Shoulder Belt
on page 1-20 for more
information. If the shoulder belt
still does not rest on the shoulder,
then return to the booster seat.
• Does the lap belt fit low and
snug on the hips, touching
the thighs? If yes, continue. If no,
return to the booster seat.
• Can proper safety belt fit be
maintained for the length of
the trip? If yes, continue. If no,
return to the booster seat.
1-26 Seats and Restraint System
 Loading...