

Page 1
Review this Quick Reference Guide for an overview of some important features in your Buick Enclave.
More detailed information can be found in your Owner Manual. Some optional equipment described in
this guide may not be included in your vehicle.
If you have additional questions about the features and controls in your vehicle, press the blue OnStar
button to speak with a customer assistance representative who can provide more information.
www.buick.com
Page 2
2
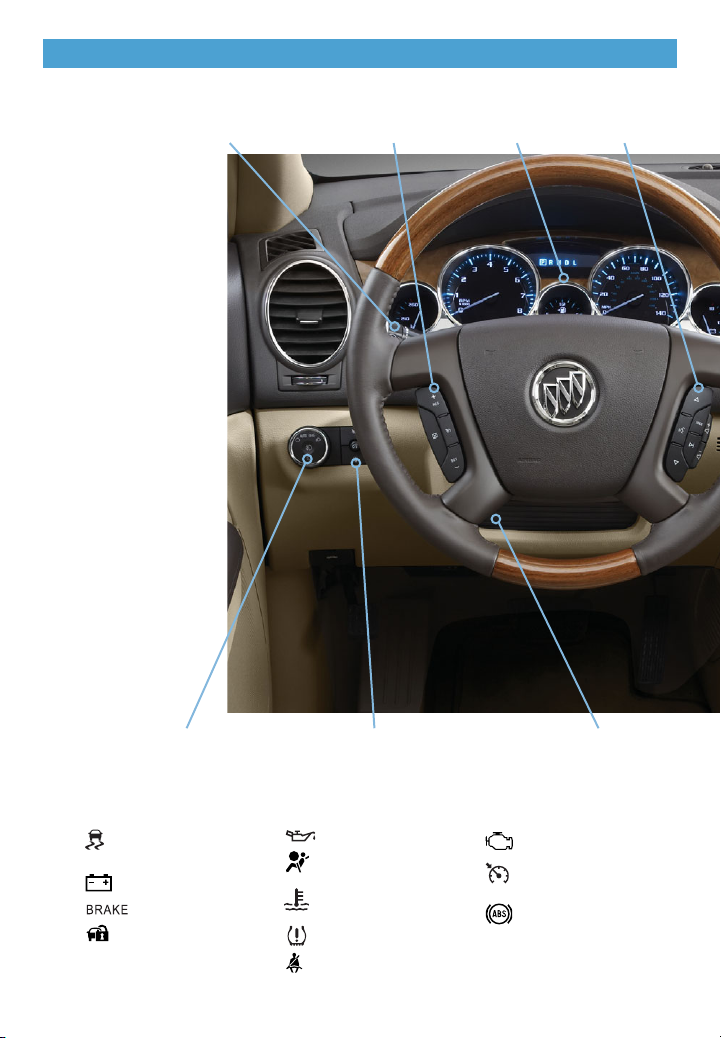
Cruise Control
Buttons
Instrument
Cluster
Audio Steering
Wheel Controls
Instrument Panel Illumination
Control/Dome Lamp Off Button
Exterior Lamps
Control
Instrument Panel
StabiliTrak/
Traction Control
Charging System
Brake System
Security
Oil Pressure
Airbag Readiness
Engine Coolant
Temperature
Low Tire Pressure
Safety Belt Reminder
Check Engine or
Tighten Gas Cap
Cruise Control Set
Antilock Brake
System
Tilt/Telescopic Steering
Wheel Control
Symbols
Turn Signal Lever/
Windshield Wipers Lever
Page 3
3
Note: Refer to your Owner Manual to learn about the information being relayed by the lights, gauges
and indicators of the instrument cluster, as well as what to do to ensure safety and prevent damage.
See Instruments and Controls in your Owner Manual.
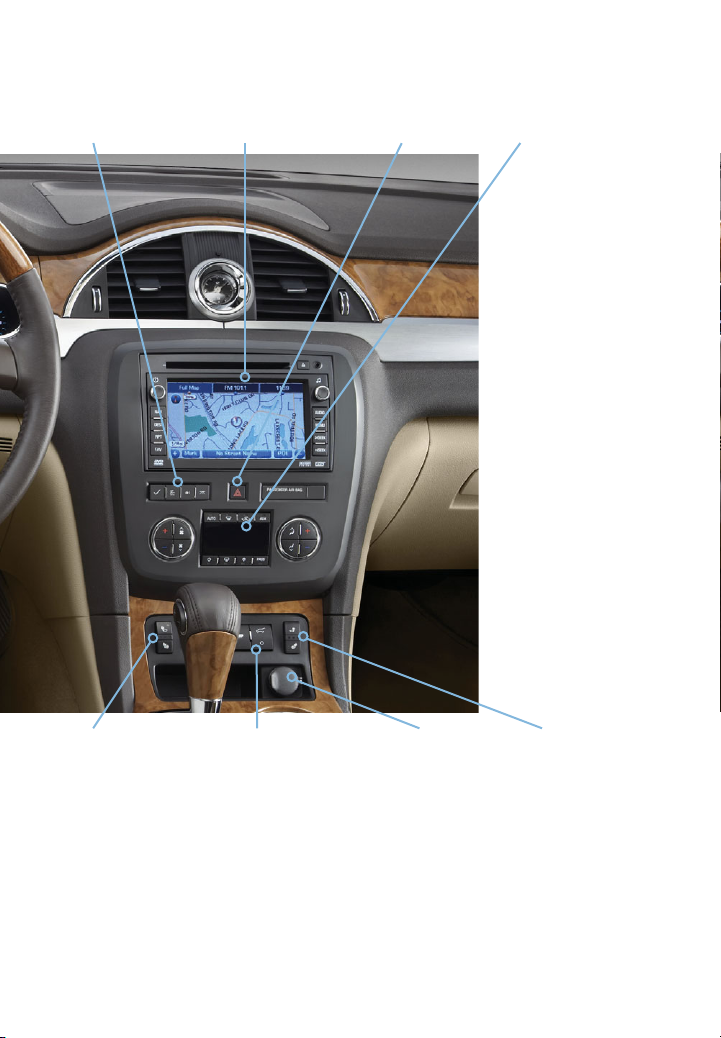
Driver Information
Center Buttons
Audio System/
Navigation System✦
Accessory
Power Outlet
Driver’s
Heated/Cooled
Seat Buttons✦
Rear Wiper Switch/
Traction Control Off Button/
Tow/Haul Mode Button✦/
Power Liftgate Switch
Climate
Controls
Hazard Warning
Flashers Button
Passenger’s
Heated/Cooled
Seat Buttons✦
✦ optional equipment
Page 4

4
Driver’s Seat
A. Seat Adjustment
Move the horizontal control to move
the seat forward or rearward and to
raise, lower or tilt the seat.
B. Seatback Recline Adjustment
Move the vertical control to recline or
raise the seatback.
C. Lumbar Adjustment (optional)
Press the switch to adjust the amount
of lumbar support.
D. Lumbar Adjustment
Pull up/push down the lever on the
inboard side of the seatback to adjust
the amount of lumbar support.
Power Controls
Head Restraint
The head restraint is in a forward position to meet the Insurance Institute for Highway
Safety (IIHS) performance criteria for rear impacts.
• To raise the head restraint, pull it up.
• To lower the head restraint, press the release button on the head restraint post and
push it down.
See Seats and Restraints in your Owner Manual.
Manual Lumbar
AB C
D
Page 5

5
A
2nd-Row Seats
Slide the Seat
1. Make sure nothing is on the 2nd-row
seat or the floor in front of or behind
the seat.
2. Fold up the armrest(s).
3. Rotate the release lever (A) on the
upper-outboard side of the seatback
forward.
4. Push the top of the seatback forward.
The seat cushion will fold and the entire
seat will slide forward.
5. After entering/exiting, push the top of
the seatback rearward until the seatback and floor tracks lock.
6. Push down at the rear of the seat
cushion to lock it in place.
1. Make sure nothing is on the floor in
front of or behind the 2nd-row seat.
2. Pull outward on the handle (B) on the
outboard side of the seat cushion and
slide the seat forward or rearward.
3. Release the handle.
1. Make sure the seat is all the way
rearward (when folding the seat) and
the armrest(s) are upright.
2. Pull forward on the strap (C) on the
outboard side of the seatback.
3. Fold down or recline the seatback.
B
Fold/Recline the Seatback
C
See Seats and Restraints in your Owner Manual.
Enter or Exit the 3rd-Row Seats
Page 6

6
Exterior/Interior Lighting
Off/On
AUTO Automatic Headlamp System
Activates the Daytime Running Lamps
(DRLs) in the daytime and the headlamps
and other exterior lamps at night or when
necessary.
Parking Lamps
Manual operation of the parking lamps.
Headlamps
Manual operation of the headlamps.
Fog Lamps
Press the knob to turn the fog lamps on
or off.
Instrument Panel Brightness
Turn the small knob to increase or
decrease the instrument panel lighting.
Turn the knob fully to turn on the dome
lamps when all doors are closed.
Dome Lamp Off
Press the button to turn off the dome
lamps. With the button depressed,
the dome lamps will not turn on
when a door is open.
Press the button again to have the dome
lamps turn on when a door is open.
See Lighting in your Owner Manual.
Automatic Headlamp System
Instrument Panel Lighting
Dome Lamp
Page 7

7
Rear Seat Climate Controls
Front Seat Control
Press the REAR button (A) on the front
climate control panel to cycle through
three rear control settings — Front, Rear,
and Off.
Front: Provides control to the front seat
occupants; the rear settings are the same
as the driver’s settings.
Rear: Provides control to the rear seat
occupants; the rear settings are controlled
by the rear controls.
Off: Turns off the rear climate controls
system.
Air delivery modes:
Vent
Bi-level
Floor
Temperature
controls
Fan controls
See Climate Controls in your Owner Manual.
Rear climate controls with rear seat audio (optional) shown.
Rear seat occupants can adjust the rear settings at any time by using the rear
controls, regardless of the front control panel REAR setting.
• To turn on the rear system, press any rear control.
• To turn off the rear system, turn the left knob to the Off position, or press the down
Fan Control repeatedly (rear climate controls with rear seat audio).
Rear Seat Control
A
Page 8
8
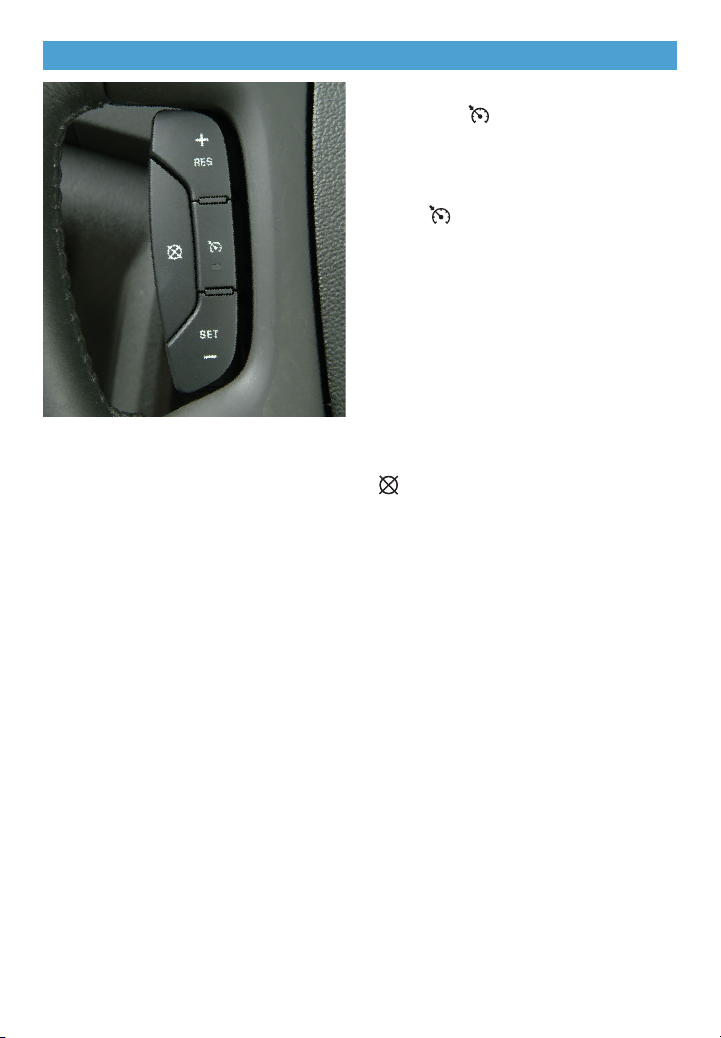
Cruise Control
Set Cruise Control
1. Press the On/Off button. The
button indicator will illuminate when the
system is on.
2. When traveling at the desired speed,
press the SET– button to set the speed.
The Cruise Control symbol will
illuminate on the instrument cluster.
Adjust Cruise Control
RES+ Resume/Accelerate
Press to resume a set speed.
When the system is active, press to
increase speed.
SET– Set/Coast
When the system is active, press to
decrease speed.
Cancel
Press to cancel the cruise control
but retain the set speed in memory.
The cruise control set speed is erased
when cruise control or the vehicle ignition
is turned off.
See Driving and Operating in your Owner Manual.
Page 9

9
Audio Steering Wheel Controls
+ –Volume
Pull up the + or – button to increase or
decrease the volume.
Next/Previous
Press the up or down arrow to go to the
next or previous favorite radio station,
CD track or DVD chapter (optional).
SRCE Source
Press to select an audio source.
Press and hold for one second to initiate
voice recognition on the navigation system
(optional).
Seek
Press to go to the next radio station on the
same band, CD track or DVD chapter
(optional).
Mute/Push to Talk
Press to mute the vehicle speakers.
Press and hold for two seconds to interact
with the OnStar or Bluetooth system.
End
Press to end or reject an OnStar or
Bluetooth call.
Bluetooth
®
System
A Bluetooth-enabled cell phone must be
paired with the in-vehicle Bluetooth system
before it can be used in the vehicle. Not all
phones will support all functions.
Visit www.gm.com/bluetooth for more
information.
See Instruments and Controls in your Owner Manual.
Page 10
10
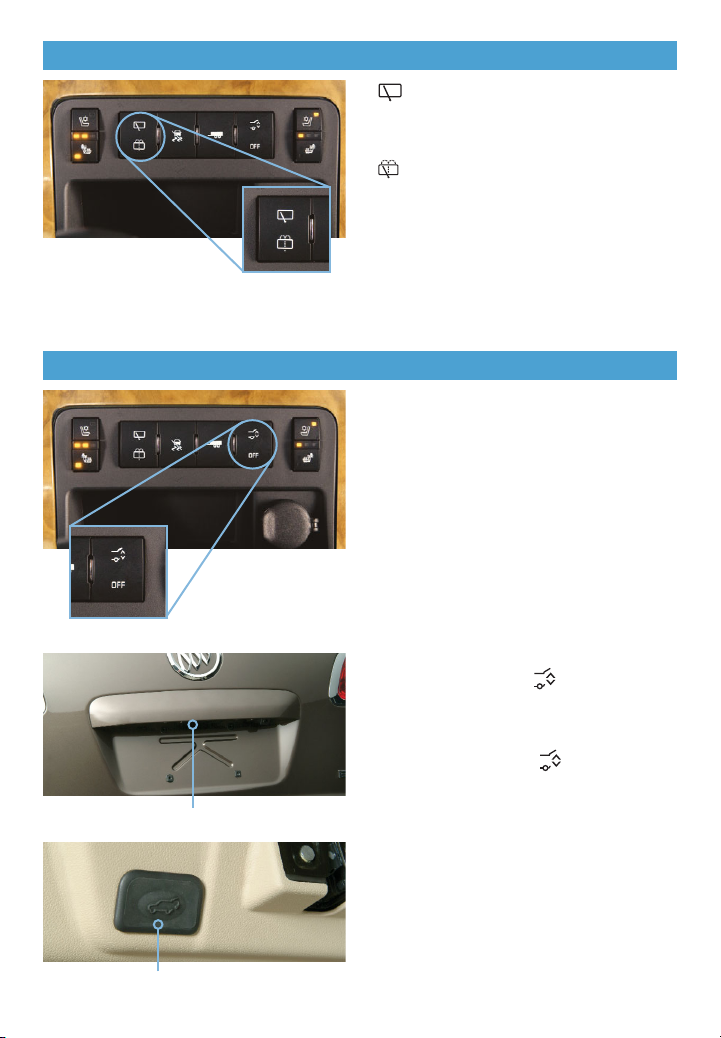
Rear Wiper/Washer
Rear Wiper
Press the top of the switch to turn the rear
wiper on or off.
Washer Fluid
Press the bottom of the switch to spray
washer fluid on the rear window.
See Instruments and Controls in your Owner Manual.
Power Liftgate
Power Liftgate Switch
• Press the Power Liftgate OFF switch
to turn off the power liftgate. The
liftgate can only be operated manually
when the power liftgate switch is in the
Off position.
• Press the top of the Power Liftgate
switch to turn on the power liftgate.
Note: If the power liftgate does not open or
close, make sure the power liftgate switch is not
in the Off position.
Open/Close the Power Liftgate
• Press and hold the Power Liftgate
button on the Remote Keyless Entry
transmitter until the liftgate starts
moving.
• Press the top of the Power
Liftgate switch on the center console.
• Press the touchpad (A) above the
liftgate handle to open.
• Press the touchpad (B) next to the
liftgate latch to close.
See Keys, Doors and Windows in your Owner Manual.
A
B
Page 11
11
Wind Noise
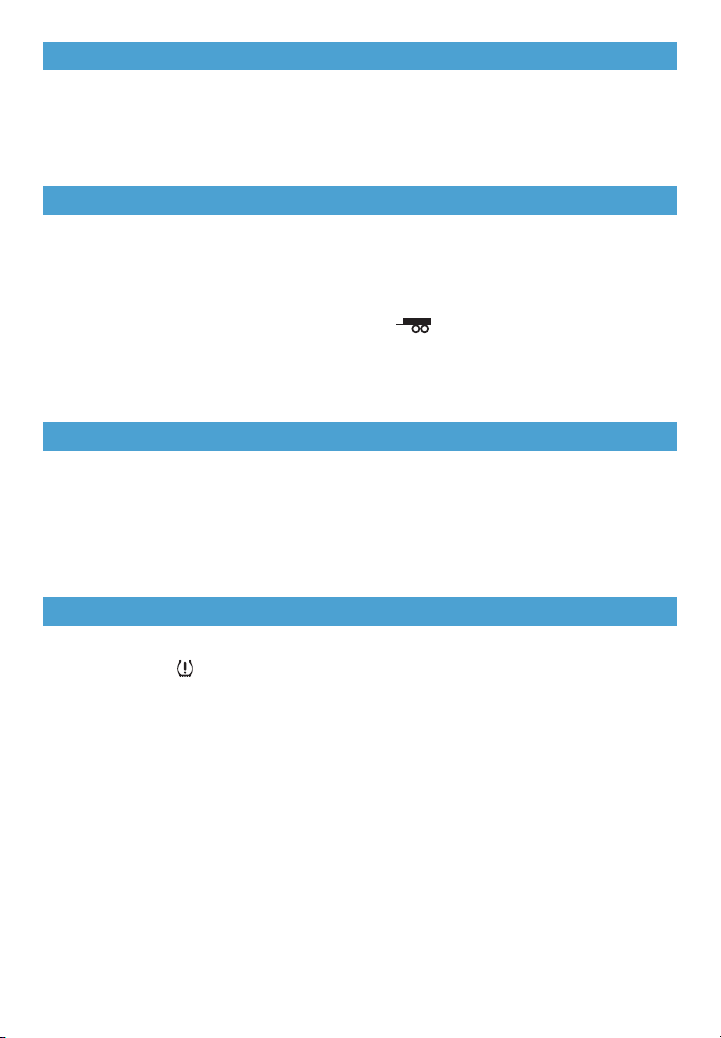
Towing
Battery Location
If a rear window is open, there may be a buffeting wind noise inside the vehicle. Opening
a front window slightly when a rear window is open will prevent this noise from occurring.
See Keys, Doors and Windows in your Owner Manual.
The Enclave base towing capacity is 2,000 lbs. Vehicles equipped with the Trailer Towing
Package have a towing capacity of 4,500 lbs.
Use the Tow/Haul mode (optional) when pulling a heavy trailer to reduce the frequency of
transmission shifts and improve the control of vehicle speed.
• To turn the Tow/Haul mode on or off, press the Tow/Haul button on the center
console.
See Vehicle Care in your Owner Manual.
The battery is located beneath the floor behind the front passenger seat.
Jump-start positive and negative posts are located under the hood on the passenger’s
side of the vehicle.
See Vehicle Care in your Owner Manual.
Tire Pressure Monitor
The Tire Pressure Monitor alerts you when the tire pressure in any tire becomes too low
by illuminating the Low Tire Pressure warning light on the instrument cluster. The
warning light will remain on until the tire pressure is corrected by adding the proper
amount of air to the tire(s). Refer to the Tire & Loading Information label in the driver’s
door opening for the recommended tire pressures. Once the tires are properly filled with
air, drive the vehicle and the warning light will turn off.
You may notice during cooler outdoor temperatures that the low tire pressure warning light
will turn on when the vehicle is first started and then turn off as you drive and tire pressure
expands. This may be an early indicator that your tire pressures are getting low and the
tires need to be inflated to the correct pressure.
Note: The Tire Pressure Monitor can alert you about low tire pressure, but it doesn’t replace normal
monthly tire maintenance. It is the driver’s responsibility to maintain correct tire pressures.
See Vehicle Care in your Owner Manual.
Page 12

12
Roadside Assistance
1-800-252-1112 TTY Users: 1-888-889-2438
As the owner of a new Buick, your vehicle is automatically enrolled in the Buick Roadside
Assistance program for 5 years/100,000 miles at no expense to you. This value-added
service is intended to provide you with peace of mind as you drive in the city or travel the
open road.
Buick’s Roadside Assistance toll-free number is staffed by a team of technically trained
advisors who are available 24 hours a day, 365 days a year, to provide minor repair
information or make arrangements to tow your vehicle to the nearest Buick dealer.
Roadside Assistance and OnStar
If you have a current OnStar subscription, press the OnStar button and the vehicle will
send your current GPS location to an OnStar Advisor who will speak to you, assess your
problem, contact Roadside Assistance and relay your exact location so you will get the
help you need.
Buick Owner Center
The Buick Owner Center, a complimentary service for Buick owners, is a one-stop
resource designed to enhance your Buick ownership experience. Exclusive member
benefits include:
• Online service reminders
• Vehicle maintenance tips
• Online owner manual
• Special privileges
Sign up today at www.gmownercenter.com/buick.
Certain restrictions, precautions and safety procedures apply to your vehicle. Please read your Owner Manual for
complete instructions. All information contained herein is based on the latest information available at the time of
printing and is subject to change without notice. Copyright 2010 by General Motors. All rights reserved.
Always demand genuine GM Parts
20977794 A
!20977794=A!
 Loading...