

Page 1

Before Operation
1
Installation
Windows98/95 Settings
WindowsNT4.0 Settings
Installing Client Manager
Connection to Network
Troubleshooting
When You Want To...
Appendix
Thank you for purchasing MELCO INC.’s
wireless LAN card (WLI-PCM). This manual
describes precautions for handling of the wireless LAN card. Read this carefully before
using the wireless LAN card to ensure correct
operation.
2
3
4
5
6
7
8
9
Page 2

Precautions for radio wave
● Never use the WLI-PCM near the magnetic field around a microwave oven or
in an area where static electricity and/or radio noise is generated. The radio
waves may not be transmitted in these areas.
* When the WLI-PCM is used near a wireless print er buffer (MELCO INC.’s
RYP-G or similar products by other manufacturers) that use ra dio waves at
around 2.4 GHz, the processing speed of both devices may be affected.
● As the WLI-PCM has been approved for conformity to the engineering standards, the following may be regarded unlawful.
• Disassembling/remodeling the WLI-PCM
• Removing the approval label attached to the rear of the WLI-PCM
■All rights for this manual are owned by MELCO INC. No part of this manual may be
transmitted, reproduced, or revised without permission from MELCO INC.
■Product names of other companies used in this manual are trademarks or registered
trademarks of the respective companies. Trademark symbols (,,, etc.) are not indicated in this manual.
■Specifications, design, and other descriptions included in this manual are subject to
change without notice.
■This manual is carefully prepared, however, feel free to contact your nearest sales representative if you have any questions or problems.
In addition, note that MELCO INC. shall not be liable for any expenses incurred due to
damage or loss arising from the use of the WLI-PCM, although MELCO INC. has been
advised of the possibility of such damage.
Page 3

Be sure to follow the instructions given
below for your safety.
Follow the instructions described here to avoid harming yourself, other people,
and property, and to ensure safety. Be sure to read and understand them t horoughly before using this product. This manual contains in structions concerning
general operation of the computer to which this product is connected as well as
those concerning th e p ro d u ct.
Please take note that our warranty will not cover any failures and problems of the
computer, any l osses and f ailures of da ta , or fail ures and prob lems of this produc t
caused by misuse.
■SIGNS AND SYMBOLS USED IN THIS MANUAL
Warning signs;
WARNING
CAUTION
Failure to follow the instructions shown with this
sign may result in a hazard or the serious injury of
the user.
Failure to follow the instructions shown with this
sign may result in the injury of the user or pro perty
damage.
Symbols;
Specific instructions are given in or around , , and .
This indicates warnings and cautions.
(Ex. , Exercise care to avoid an electric shock.)
This indicates prohibited matters.
(Ex. , Do not disassemble.)
This indicates compulsory rules.
(EX. , Disconnect the plug from the receptacle.)
WLI-PCM User’s Manual 1
Page 4

Unplugging
Keep dry
Compulsory
Compulsory
Compulsory
No
disassembly
WARNING
Turn off the power to the computer and peripheral devices
immediately and unplug them if any liquid or foreign substance gets into the device.
If you continue using them under such circumsta nces, a short circuit resulting in a fire or an electric shock may occur.
Never use the this product near water or in humid area s, such
as a bathroom.
Failure to follow this instruction may cause fire, electric shock, and/
or mechanical damage.
Adults knowledgeable about this product must attend and
supervise children using the electr ic al appl ia nc es.
Keep the internal components, cables and connectors of the
electrical appliances out of the reach of children.
Children may be injured if they touch them.
Be sure to observe instructions by manufacturers of personal
computers and peripherals when installing and using this
product.
Do not disassemble or modify the product.
It may cause a fire or on electric shock.
WLI-PCM User’s Manual2
Page 5
Unplugging
Unplugging
Prohibited
Compulsory
Compulsory
Turn off the power to the computer and peripheral devices
immediately and unplug them if smoke or an unpleasant smell
is generated.
If you continue using them under such circumstances, a short circuit resulting in a fire or an electric shock may occur.
Turn off the power to the computer and peripheral devices
immediately and unplug them if you drop the product or it
receives a severe physical shock.
If you continue using them under such circumstances, a short circuit resulting in a fire or an electric shock may occur.
CAUTION
Never touch this product with wet hands.
It may cause an electric shock when the powe r plugs of personal
computers and peripheral devices are connecte d to the AC outlet.
If the plug is not connected, mechanical failure may occur.
Touch something made of metal (a door knob or aluminum
window frame, for example) and release static electricity
before touching the product to av oid damage caused by static
electricity.
Static electricity generated from the human body may damage the
product.
Back-up any important data on your computer (hard disk, etc.)
onto appropriate media such as an MO disk or floppy disk
before making any environment changes, for example, when
installing/removing this product or installing the required software.
Having back-up data files can minimize the loss if the data on the
personal computer is deleted or damaged due to incorrect operation or mechanical failure. Note t hat MELC O INC. sh all not be liable for any damages due to loss or damage of digital data.
WLI-PCM User’s Manual 3
Page 6

Compulsory
Prohibited
Prohibited
Be sure to create back-up files on other media (floppy disk,
MO disk, etc.) for your data on the hard disk.
MELCO INC. recommends that you create two back-up copies of
data before and after the original data is updated for any critical
data. Data may be deleted or damaged when:
• Incorrect operation is performed.
• Data is affected by static electricity or electrica l noise .
• Hardware is mechanically damaged or repaired.
• Your computer is turned on immediately after being turned off.
• The battery is expired because the device is not used for a long
time.
• Hardware is damaged in a natural disaster.
Note that MELCO INC. shall no t be liable fo r any damages arising
from loss or damage of digital data in any cases.
Never turn off or reset the computer or other de vices while
accessing data storage devices such as the hard disk, MO
drive, or floppy disk drive.
Doing so may delete or damage data. Note that MELCO INC. shall
not be liable for any damages arising from loss or damage of digit al
data in any cases.
Never turn off or reset the computer or other devices while any
software is running.
Doing so may delete or damage data. Note that MELCO INC. shall
not be liable for any damages arising from loss or damage of digit al
data in any cases.
WLI-PCM User’s Manual4
Page 7

Prohibited
Do not place the product in the following areas.
Placing the product in the following areas w ill cause an electric shock, a fire or a failure.
• Area where strong magnetic
fields are generated: It causes
a failure.
• Area where static electricity is
generated: It causes a failure.
• Unstable area: The unit may
fall or drop and cause an injury
or failure.
• Area where the temperature or
humidity does not conform to
• Area where the product is in
direct sunlight: It causes a failure or deformation.
• Area in the proximity of fire or
which contains hot air: It
causes a failure or deformation.
• Area where a short circuit is
likely to occur: It causes a failure or electric shock.
the operation environment
specified in the manual of the
computer, or area where condensation occurs: It causes a
failure.
WLI-PCM User’s Manual 5
Page 8

Table of Contents
1 Before Operation 8
Using this manual 8
Product outline 11
Contents of package and section names 13
Setup flow 14
2 Installation 15
Before installing the WLI-PCM 16
Installing the WLI-PCM 21
3 Windows98/95 Settings 24
Check before installation 24
Driver installation 26
Checking after installation 40
Removing the WLI-PCM 47
Uninstalling the driver 48
Preparing for connection to network 49
4 WindowsNT4.0 Settings 60
Driver installation 60
Changing settings 70
Checking after installation 72
Installing the ESS ID Driver 73
Preparing for connection to network 76
WLI-PCM User’s Manual6
Page 9

5 Installing Client Manager 79
Installation 79
Uninstallation 82
6 Connection to Network 83
Connection to network 83
Checking connection to network 91
Connection to other computers 97
7 Troubleshooting 99
8 When You Want To... 112
Change target access point 112
Check connection using PING command 114
Assign IP address 115
Check MAC address 116
9 Appendix 118
Terminology 118
Product specifications 123
WLI-PCM User’s Manual 7
Page 10

Before Operation
1
This manual is created according to the following editorial points. Please remember these points when using this manual.
■Editorial points
CAUTION mark
are not observed, injuries or mechanical damage may occur.
NOTE mark
stood when handling the WLI-PCM.
REFERENCE mark
NEXT mark
COLUMN mark
■Terminology
• Descriptions enclosed by double quot ation marks " " are software or dialog box
names.
• This product (Wireless LAN Card WLI-PCM) is generally referred to as "the
WLI-PCM".
• A computer equipped with the WLI-PCM is generally referred to as the "wireless LAN PC".
This chapter contains important information you should fully understood before starting operation. Be sure to carefully read the following pages.
Using this manual
Describes cautions when handling the WLI-PCM. If thes e instructions
Describes supplementary information or it ems which should be under-
Indicates page(s) containing related information.
Indicates page(s) containing the next step is described.
Provides convenient tips.
Continued on next page
WLI-PCM User’s Manual8
Page 11

• All operation procedures are described assuming the following drive configuration.
A: 3.5-inch floppy disk drive
C: Hard disk drive
D: CD-ROM drive
■Handling precautions
The WLI-PCM is a high-precision device. Be sure to read this manual carefully to
ensure correct operation.
MELCO INC. shall not be liable for any failures or problems of the computer, or
any failures and problems of the access point caused by misuse.
Wired LAN and wireless LAN
The following terms are used in this manual to distinguish between a 10BASET/100BASE-TX LAN connected by cables and a LAN using no cables.
Wired LAN ..........LAN connected by cables
Wireless LAN...... LAN using wireless communication
Note that these are not general terms and are used only for descriptions in this
manual.
Typical configuration of a wired LAN Typical configuration of a wireless LAN
Continued on next page
WLI-PCM User’s Manual 9
Page 12
ESS-ID
The ESS-ID is an identification code required for communication in a wireless
LAN.
The same ESS-ID must be set to the access point and the wireless LAN PC to
enable communication.
The ESS-ID is upper/lower case sensitive and can consist of up to
32 alphanumeric characters including the under bar (_). The factory default
ESS-ID for the WLI-PCM is "RoamLAN".
The factory default is effective when using the WLI-PCM in a network consist ing of only wireless LAN PC’s, however, this may allow unauthorized access
by an external computer equipped with the same model LAN card. We recommend that you change the ESS-ID to your own personal ID.
DS channel
Select the DS channel from channels A, B, or C.
Selecting a channel sets the frequency used to transfer data.
The target access point and the wireless LAN PC must be set to the
same DS channel to enable access.
WLI-PCM User’s Manual10
Page 13

Product outline
Features and operating environment of the WLI-PCM are described below.
■Features
The WLI-PCM is a wireless LAN card for use in computers equipped with a PC
card slot (type II).
The main features are listed below.
• 2.4 GHz low power data communication system (certification not required).
• Direct sequence spread spectrum (DS-SS) technology ensures high noise
resistance.
• Diversity antenna (2 built-in antennas, with data received by the more se nsitive
of these).
• IEEE802.11 compliant, with a data rate of 2 Mbps even on a wireless LAN.
• Effective range of 150 ft indoors or 450 ft outdoors (ma y vary depending on
operating environment).
• ESS ID prevents unauthorized access.
Continued on next page
WLI-PCM User’s Manual 11
Page 14

Wireless LAN network configuration
Network configurations for wireless LANs can be classified into two main
groups.
• Wireless LAN only network
• Wired and wireless LAN network
Typical configurations of each type are described below.
■Wireless LAN only network
One wireless LAN card is required for
each computer. All LAN cards must have
the same ESS-ID to enable communication.
The factory default ESS-ID ca n
be used, however, we recommend that
you change the default to ensure security.
Refer to "ESS-ID" on page 10
for details.
■Wired and wireless LAN network
MELCO INC.’s access point WLA-T1
(provided separately) is required to connect a wireless LAN to a wired LAN.
Computers on the wireless LAN communicate with those on the wired LAN via
the access point.
Access is only possible when
the wireless LAN is configured using
MELCO INC.’s wireless LAN products
(Access Point WLA-T1, Wireless LAN
ISA Bus Board WLI-ISA, and WLIPCM).
■Operating environment
IBM AT compatible computer equipped with a PC card slot (type II)
Operating system
Windows 98/95, WindowsNT4.0
* The ACPI feature in Windows98 is not supported.
WLI-PCM User’s Manual12
Page 15
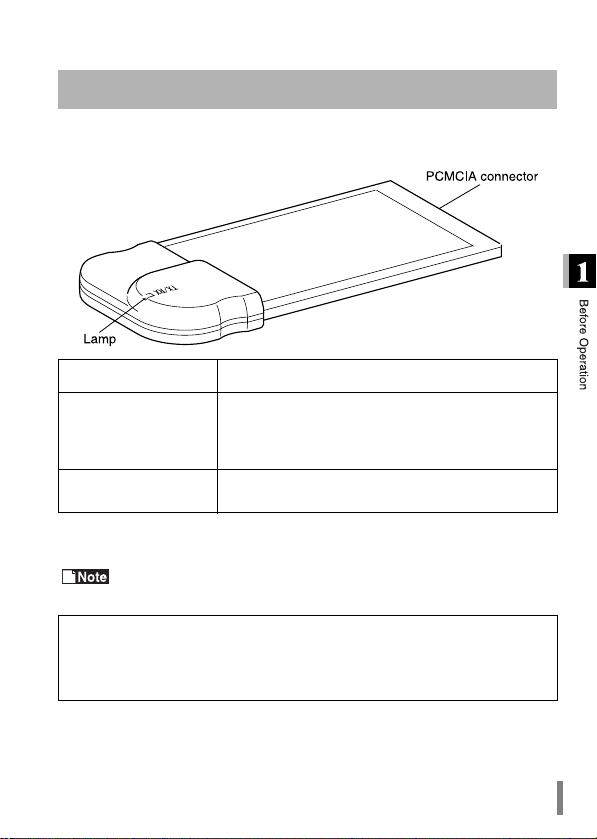
Contents of package and section names
The items listed below are included in th e package. Please check the package
and contact your nearest sales representative if any items are missing .
WLI-PCM .. ............................................... ........................ .............................. 1
Name Function
Terminal connected to the PCMCIA slot of the com-
PCMCIA connector
Lamp
LAN Card Utility for WLI-PCM disk (3.5" floppy disk)..................................... 1
User’s Manual (this manual).......................................................................... 1
Be sure to read any additional informatio n sh ee ts provided in the pack-
age.
Disk back-up
Be sure to back-up the "LAN Card Utility for WLI-PCM" disk, and use the backup disk to install the utility.
puter. Never touch the terminal with your bare
hands. Touching the terminal may cause a malfunction.
Lights green or red when sending or re ceiving data
respectively.
WLI-PCM User’s Manual 13
Page 16

Setup flow
Follow the procedures below to connect the WLI-PCM. Read the entire operation
flow carefully and understand it before starting setup.
WLI-PCM User’s Manual14
Page 17
Installation
2
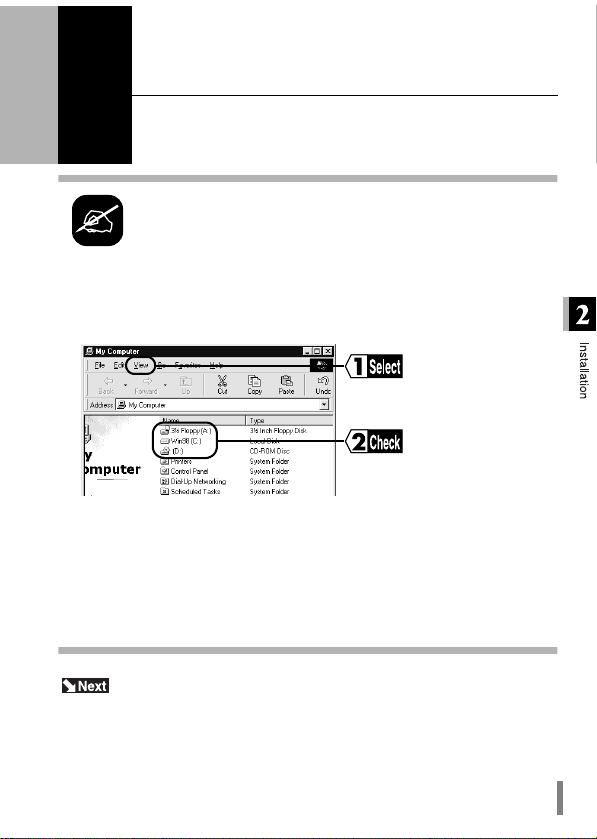
Double-click the My Computer icon.
1
Select View → Details.
2
Check the drive names listed in the window.
Note the drive names listed here. These will be
required in the following steps.
e.g.The drive configuration for the example screen
shown above
A: Floppy disk drive
C: Hard disk drive
D: CD-ROM drive
This chapter describes the procedure to insert the WLI-PCM into
your computer. If you are using Windows98/95, c heck th at the 32bit PC card driver is installed.
Drive configuration
Check the drive configuration of your computer before installing the
driver.
When using Windows98/95, go to "Before installing the WLI-PCM" on page 16.
When using WindowsNT4.0, go to "Installing the WLI-PCM" on page 21.
WLI-PCM User’s Manual 15
Page 18

Before installing the WLI-PCM
When you are using Windows98/95, be s ure to check that the 32-bit PC card
driver is correctly installed before inserting the WLI-PCM into the computer.
Checking 32-bit PC card driver
The 32-bit PC card driver must be installed in order to install the WLI-PCM driver.
Follow the procedure below to chec k tha t th e 32-bit P C ca rd driv er is installed.
The procedure described below is for Windows98. Note that different windows
appear for Windows95.
Click the Start button and select Settings → Control Panel.
1
Double-click the System icon.
2
Click the Device Manager tab and then the + mark on the left of "PCMCIA
3
socket".
The device
names listed for "PCMCIA socket" vary on
some computers.
Continued on next page
WLI-PCM User’s Manual16
Page 19
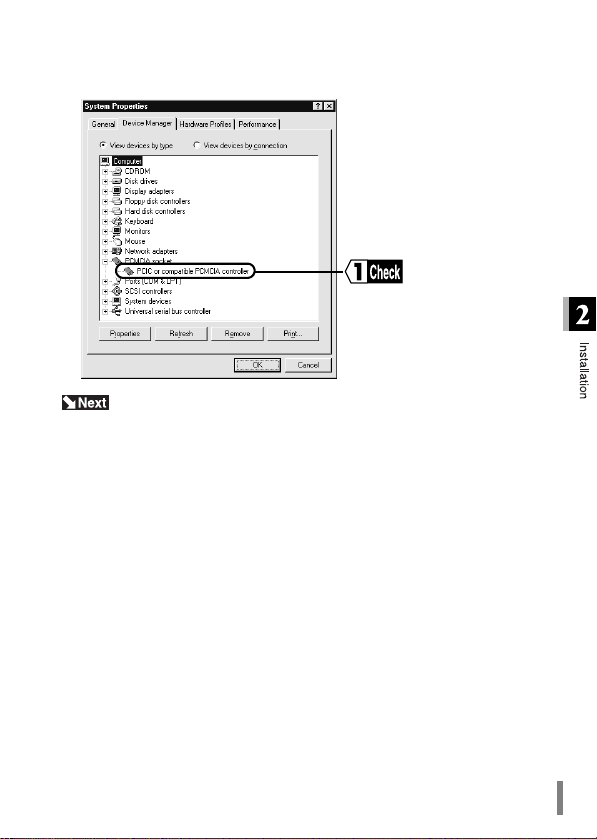
Check that no marks indicating a problem ("!" or "X" ) are displa ye d for any of
4
the devices listed for "PCMCIA socket".
If an error mark is displayed, go to "Troubleshooting for PC card driver" on page
18.
If no error marks are displayed, go to "Installing the WLI-PCM" on page 21.
WLI-PCM User’s Manual 17
Page 20
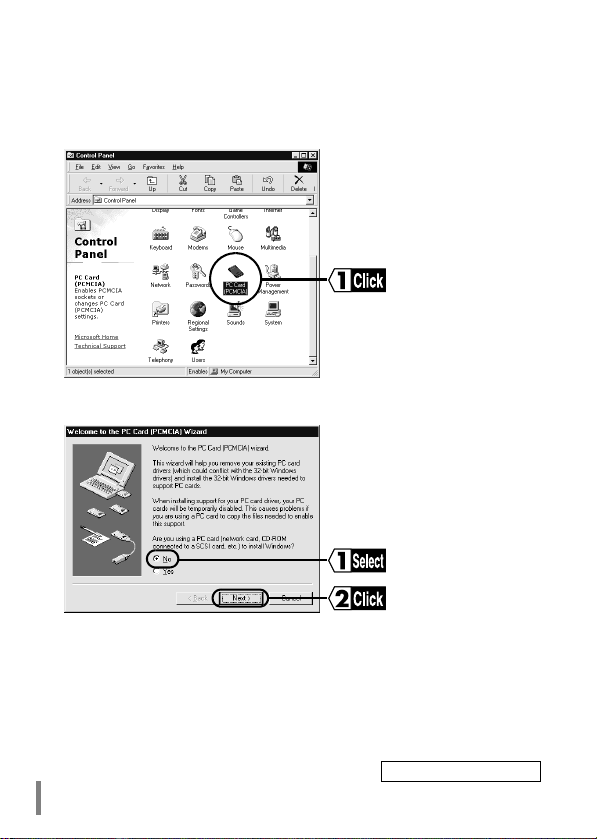
Troubleshooting for PC card driver
If an error mark ("!" or "X") is displayed for any of the devices listed for "PCM-
1
CIA socket" in the "System Properties" dialog box, double-click the PC Card
icon in the Control Panel window.
Select No and click the Next button.
2
Continued on next page
WLI-PCM User’s Manual18
Page 21
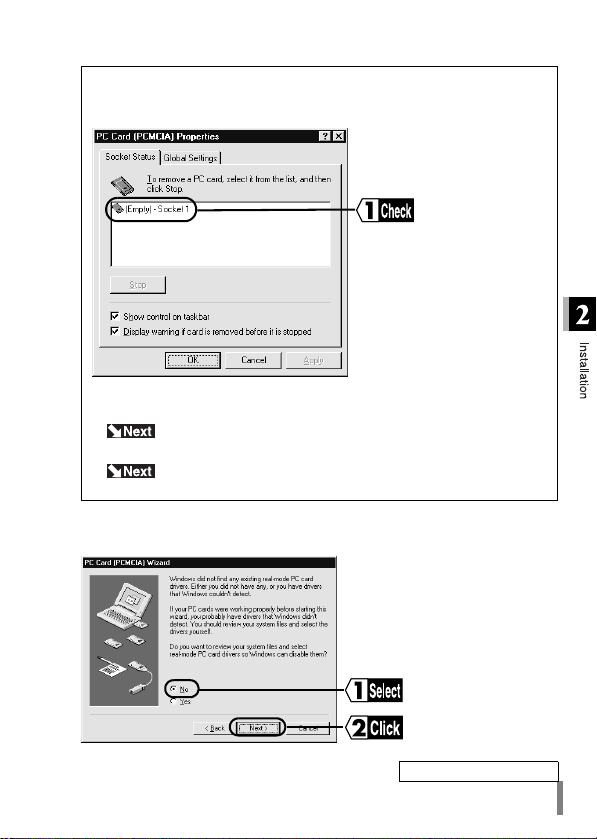
The following screen (PC Card (PCMCIA) Properties window) may
appear instead of the screen shown in step 2 (PC card (PCMCIA) Wizard). In this case, follow the steps below.
Check the status of the sockets.
• The "Empty" socket is available.
Go to "Installing the WLI-PCM" on page 21.
• Sockets without an "Empty" mark cannot be used.
Select No and click the Next button.
3
Refer to the instructio n manual for your comput er or consult
the manufacturer.
Continued on next page
WLI-PCM User’s Manual 19
Page 22
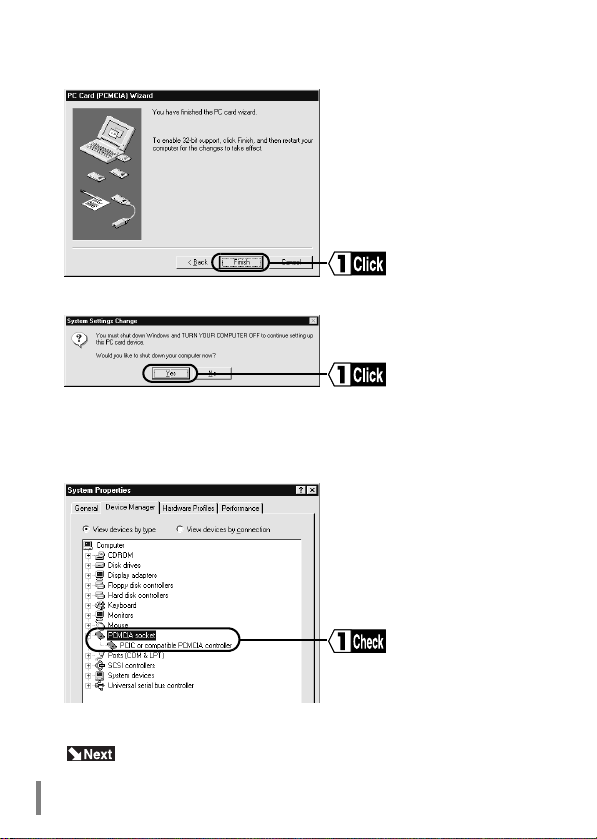
Click the Finish button.
4
Click the Yes button.
5
The 32-bit card driver can be installed after th e computer is restarted.
Check the PC card driver, following the steps desc ribed in "Checking 32-bit
6
PC card driver" on page 16.
If the PC card driver cannot be installed, refer to th e instruction manual for
your computer or consult the manufacturer.
Go to "Installing the WLI-PCM" on page 21.
WLI-PCM User’s Manual20
Page 23

Installing the WLI-PCM
The installation position varies depending on the model of your computer. Be
sure to refer to the manual provide d by the man u fa ct urer
■Precautions before installing the LAN card
If your computer is equipped with a power management function that automatically cuts power supply to the computer when it is left idle for a certain period,
turn the function off. The WLI-PCM cannot be used if the power management
function starts.
Refer to the manual provided for the computer for details on the power
management function.
■Precautions when installing the LAN card
• Be sure to follow the handling instructions in the man uals provided with your
computer and peripheral equipment.
• Remove dust from connectors.
• Never touch the connector s of the WLI-PCM.
• Carefully check the direction of the connectors when installing the WLI-PCM to
your computer. The connector may be damaged if it is forced.
■Precautions when removing the LAN card
The LAN card can be inserted and removed with the computer turned on, provided Windows98/95 is running. Refer to "Removing the WLI-PCM" on page 47.
When installing the WLI-PCM to a notebook computer, go to "Installa-
tion to a notebook comput er" o n pa g e 22.
WLI-PCM User’s Manual 21
Page 24
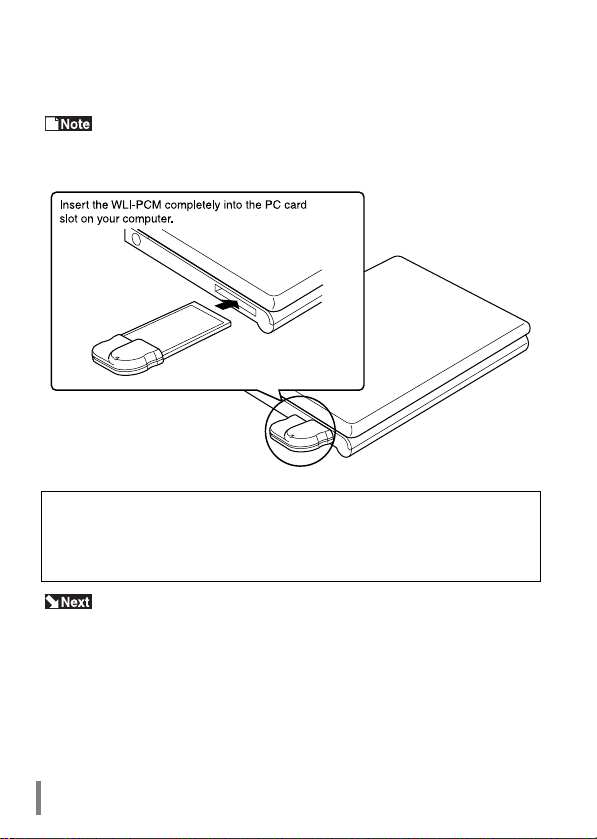
Installation to a notebook computer
Follow the steps below when installing the WLI-PCM to a note book comp ut er.
When using Windows98/95, the WLI-PCM can be installed and
removed with the computer turned on. However, be sure to turn the computer off
when using WindowsNT4.0.
When your computer is equipped with two card slots
As the WLI-PCM has a protruding section fo r the built-in antenna, th e upper
slot may be blocked when the lower one is occupied with the WLI-PCM. Place
the WLI-PCM in the upp er slot.
When using Windows98/95, go to "Windows98/95 Settings" on page 24.
When using WindowsNT4.0, go to "WindowsNT4.0 Settings" on page 60.
WLI-PCM User’s Manual22
Page 25

Installation to a desktop computer
(when using WLI-ISA)
The PCMCIA/ISA board included with the WLI-ISA must be installed in a desktop
computer before installing the WLI-PCM.
Refer to "WLI-ISA I nstall Gu ide" in clude d wit h the WLI -ISA f or inst alla-
tion procedures for the PCMCIA/ISA board.
When using Windows98/95, the WLI-PCM can be installed and
removed with the computer turned on. However, be sure to turn the computer off
when using WindowsNT4.0.
Refer to the illustration below to install the WLI-PCM to a desktop computer.
Avoid any impact or force on the antenna section. This may affect
operation of the WLI-PCM.
When using Windows98/95, go to "Windows98/95 Settings" on page 24.
When using WindowsNT4.0, go to "WindowsNT4.0 Settings" on page 60.
WLI-PCM User’s Manual 23
Page 26

Windows98/95 Settings
3
installing the driver.
The following window appears when the WLI-PCM is inserted correctly.
Windows98
The Add New Hardware Wizard appears on the screen.
Wizard does not appear when the WLI-PCM is inserted (Windows 98/95). Or,
an error mark "!" appears next to "MELCO WLI-PCM 802.11 Network
Adapter"." on page 100.
This chapter describes the setting procedures for the WLI-PCM
when using Windows98/95.
Check before installation
Be sure to check that the WLI-PCM is inserted corre ctly before
Turn the computer on if it is off.
Go to "Windows98" on page 26.
If the above wizard does not appear, refer to "Add New Hardware
Continued on next page
WLI-PCM User’s Manual24
Page 27

Windows95
Different screens may appear depending on the version of Windows95.
Work through the wizard windows displayed when Windows95 starts.
When Update Device Driver Wizard appears
The above window appears for version "4.00.950 B" or "4.00.950 C".
Go to "When using Windows95 version 4.00.950 B or 4.00.950 C" on
page 31.
If the above wizard does not appear, refer to "Add New Hardware
Wizard does not appear when the WLI-PCM is inserted (Windows98/95). Or,
an error mark "!" appears next to "MELCO WLI-PCM 802.11 Network
Adapter"." on page 100.
When New Hardware Found window appears
The above window appears for version "4.00.950" or "4.00.950a".
Go to "When using Wi ndows 95 ve rsi on 4 .0 0.9 50 o r 4.00. 95 0a " on p age 36 .
If the above wizard does not appear, refer to "Add New Hardware Wizard
does not appear when the WLI-PCM is inserted (Windows98/95). Or, an error mark
"!" appears next to "MELCO WLI-PCM 802.11 Network Adapter"." on page 100.
WLI-PCM User’s Manual 25
Page 28

Driver installation
Work through the messages displayed by the Add New Hardwa re Wizard (page
24) to install the driver.
Windows98
Click the Next button.
1
Select "Search for the best driver for your device. (Recommended)." and click
2
the Next button.
Insert the “LAN Card Utility for WLI-PCM” disk into the floppy disk drive.
3
Continued on next page
WLI-PCM User’s Manual26
Page 29

Select "Floppy disk drives" and click the Next button.
4
Click the Next button.
5
Continued on next page
WLI-PCM User’s Manual 27
Page 30

Follow the steps below if requested to insert the “LAN Card Utility for WLIPCM” disk.
Click the OK button.
The error
message "The file
winnt\wlipcm.sys’ on
LAN Card Utility for
WLI-PCM cannot be
found" appears.
Change "C:\WINDOWS\CATROOT" shown in the "Copy files from:" field to
"A:\" (when the floppy disk drive is "A") and click the OK button.
A window prompting you to insert the Windows98 CD-ROM may appear.
Follow the steps below before proceedin g to step 6.
Set the Windows98 CD-ROM in the CD-ROM drive and click the OK button.
Enter "D:\WIN98" (when CD-ROM drive is "D") and click the OK button.
Continued on next page
WLI-PCM User’s Manual28
Page 31
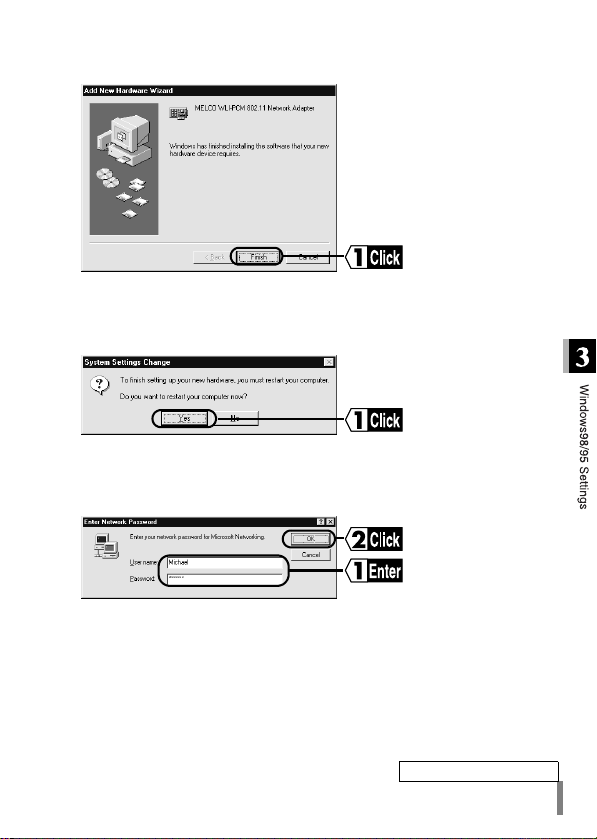
Click the Finish button.
6
Eject the “LAN Card Utility for WLI-PCM” disk from the floppy disk drive.
7
Click the Yes button.
8
The computer restarts.
9
Enter your user name and password, and click the OK button.
10
This completes driver installation.
Check that the WLI-PCM is operating correctly.
Continued on next page
WLI-PCM User’s Manual 29
Page 32
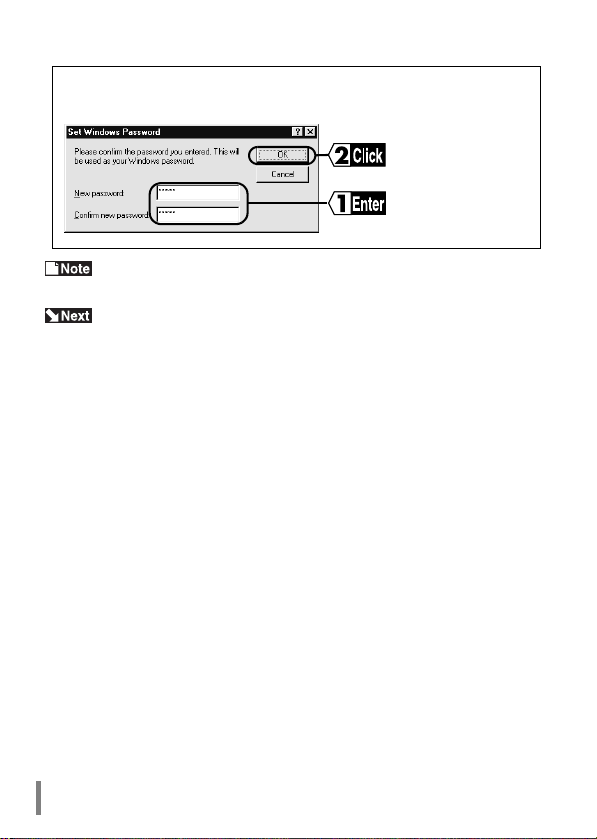
The Set Windows Password window may appear when you click the OK
button on the Enter Windows Password window.
If it does, enter the password again and click the OK button.
If the error message "The DHCP client could not obtain an IP address"
appears, consult the network administrator and set the IP address.
Go to "When using Windows98 or Windows95 version 4.00.950 B /
4.00.950 C" on page 40.
WLI-PCM User’s Manual30
Page 33
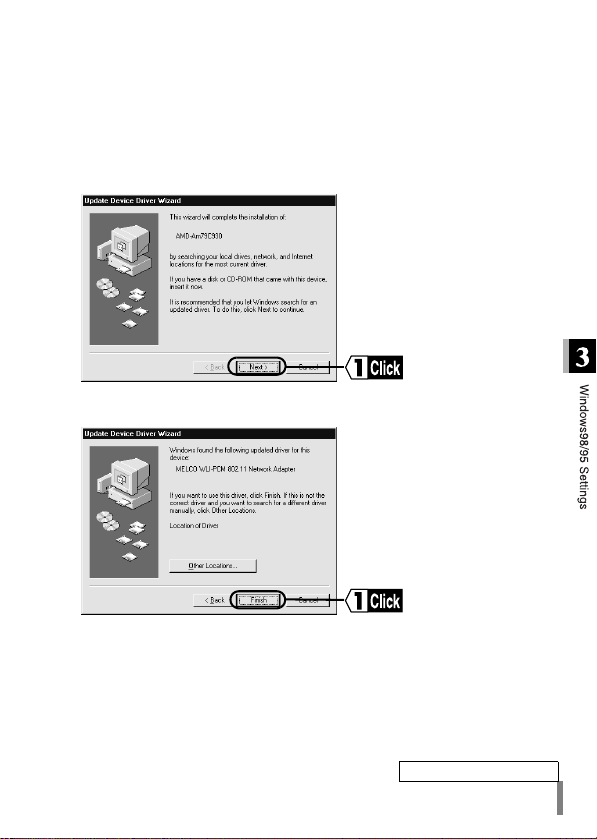
When using Windows95 version
4.00.950 B or 4.00.950 C
Insert the “LAN Card Utility for WLI-PCM” disk into the floppy disk drive.
1
Click the Next button.
2
Click the Finish button.
3
Continued on next page
WLI-PCM User’s Manual 31
Page 34
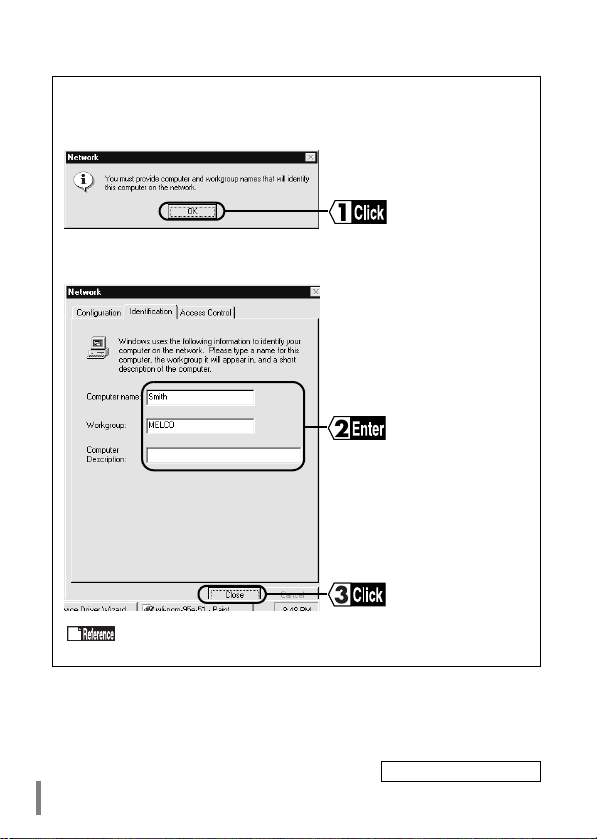
The following Network window may appear when you click the Finish button.
Follow the steps below before proceedin g to step 4.
Click the OK button.
Enter the Computer name, Workgroup, and Computer Description, and
click the Close button.
Refer to "Identification window of Windows98/95" on page 121,
for details of the computer name, workgro up, an d co mp uter description
Continued on next page
WLI-PCM User’s Manual32
Page 35
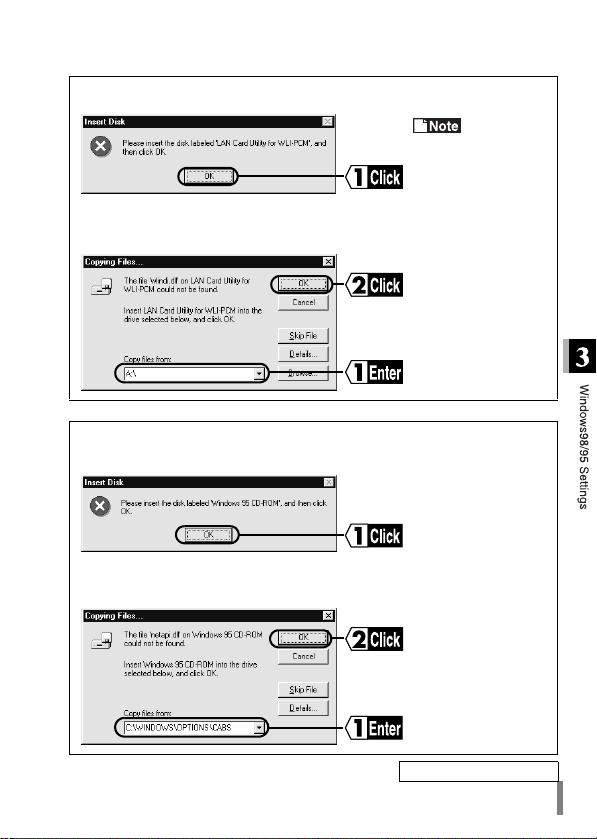
Follow the steps below if requested to insert the “LAN Card Utility for WLIPCM” disk.
The error
message "The file
winnt\wlipcm.sys’ on
LAN Card Utility for
WLI-PCM cann o t be
found" appears.
Change "C:\WINDOWS\OPTIONS\CABS" shown in the "Cop y files from:"
field to "A:\" (when the floppy disk drive is "A") and click the OK button.
A screen prompting you to insert the Windows95 CD-ROM may appear.
Follow the steps below before proceeding to step 4.
Set the Windows95 CD-ROM in the CD-ROM drive and click the OK button.
Change "A:\" shown in the "Copy files from:" field to "C:\WINDOWS\OPTIONS\CABS" (when Windows95 is installed on "C") and click
the OK button.
Continued on next page
WLI-PCM User’s Manual 33
Page 36
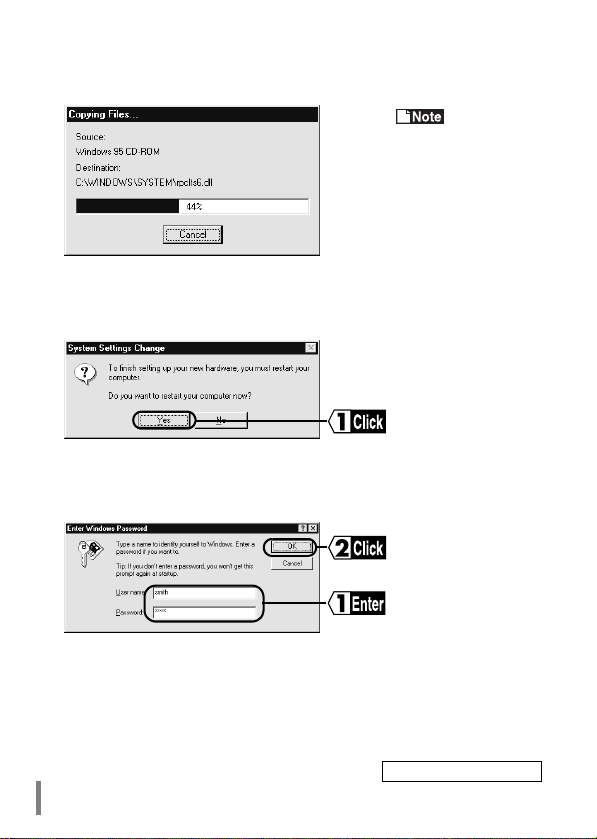
Files are copied.
4
Eject the “LAN Card Utility for WLI-PCM” disk from the floppy disk drive.
5
Click the Yes button.
6
Windows95 restarts.
7
Enter your user name and password, and click the OK button.
8
This completes driver installatio n.
Check that the WLI-PCM is operating correctly.
Dialog boxes
may appear to notify
you of the version of the
files being copied.
Click the Yes button to
use the existing file.
Continued on next page
WLI-PCM User’s Manual34
Page 37
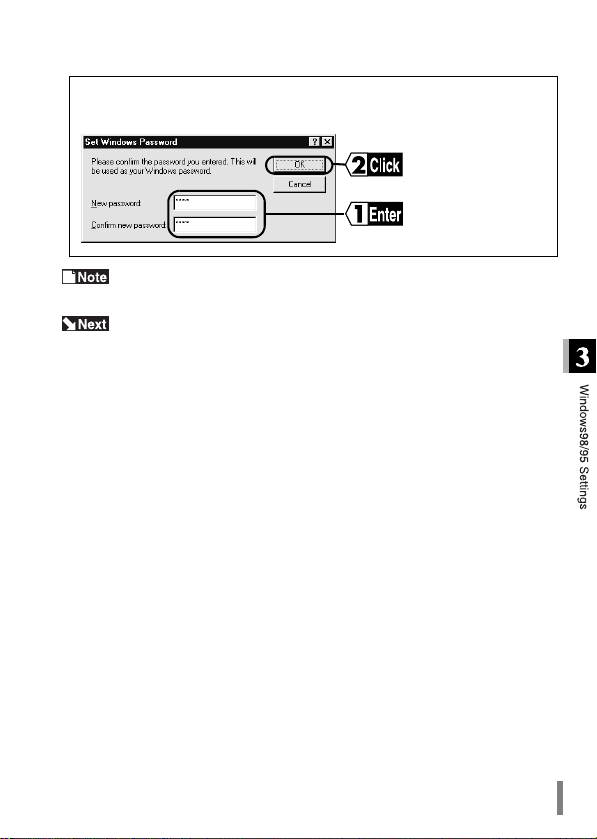
The Set Windows Password window may appear when you click the OK
button on the Enter Windows Password window.
If it does, enter the password again and click the OK button.
If the error message "The DHCP client could not obtain an IP addre ss"
appears, consult the network administrator and set the IP address.
Go to "When using Windows98 or Windows95 version 4.00.950 B /
4.00.950 C" on page 40.
WLI-PCM User’s Manual 35
Page 38
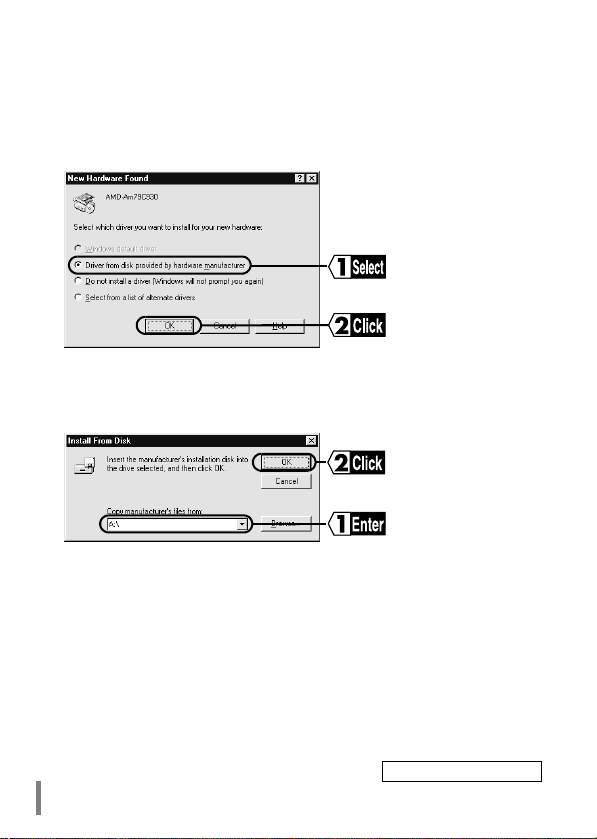
When using Windows95 version
4.00.950 or 4.00.950a
Select "Driver from disk provided by hardware manufacturer" and click the
1
OK button.
Insert the “LAN Card Utility for WLI-PCM” disk into the floppy disk driver.
2
Enter "A:\" (when floppy disk drive is "A") and cl ic k the OK button.
3
Continued on next page
WLI-PCM User’s Manual36
Page 39
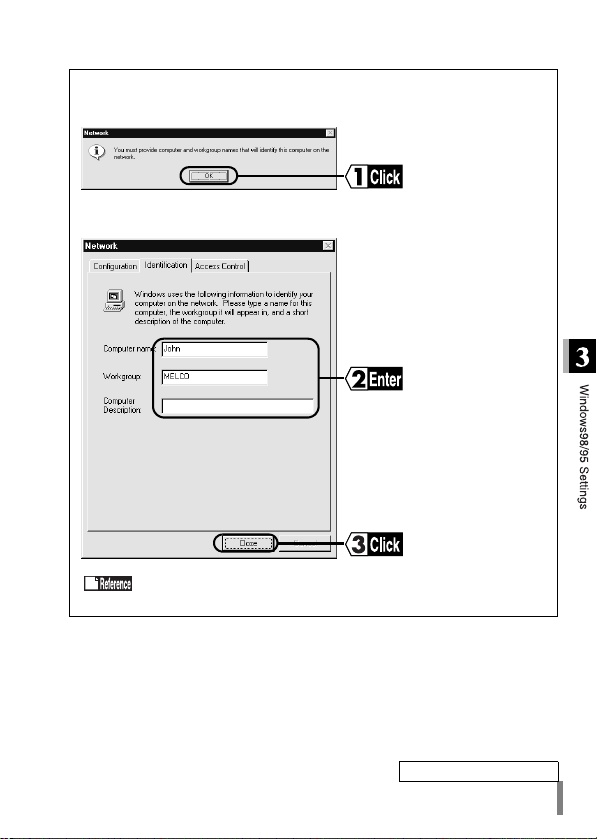
The following Network window may appear when you click the OK button.
Follow the steps below before proceeding to step 4.
Click the OK button.
Enter the Computer name, Workgroup, and Computer Description, and
click the Close button.
Refer to "Identification window of Windows98/95" on page 121,
for details of the computer name, workgroup, and computer description.
Continued on next page
WLI-PCM User’s Manual 37
Page 40
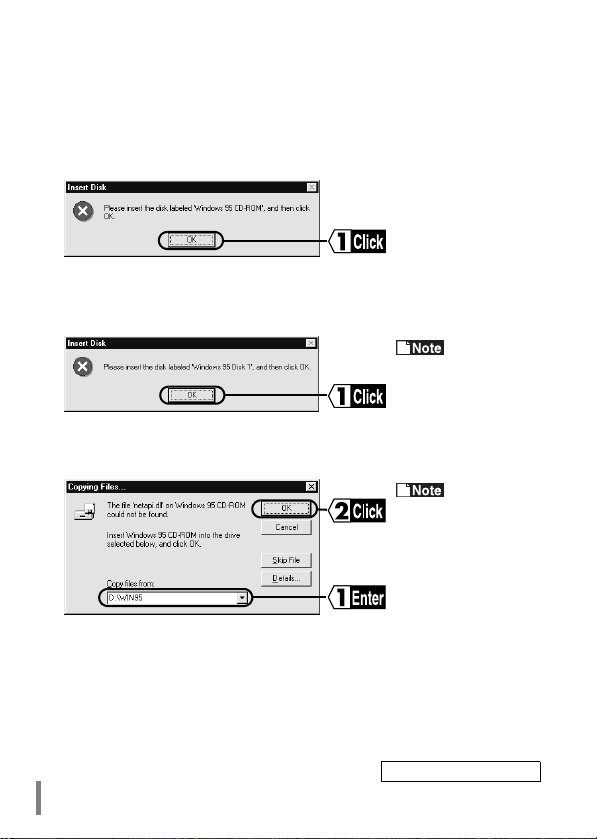
A message prompting you to insert the Windows95 CD-ROM or floppy disk
4
appears.
CD-ROM
Insert the Windows95 CD-ROM into the CD-ROM drive and click the OK button.
Floppy disk
Insert the designated floppy disk into the floppy disk drive and click the OK
button.
Insert the
appropriate floppy disk
as instructed by each
screen.
Change "A:\" shown in the "Copy file s from:" field to "D:\WIN95" (when the
5
CD-ROM drive is "D") and click the OK button.
If Windows95 is
pre-installed and the computer does not have a CDROM drive, enter "C:\WINDOWS\OPTIONS\CABS"
(when Windows95 is
installed on the C drive).
Eject the “LAN Card Utility for WLI-PCM” disk from the floppy disk drive.
6
Continued on next page
WLI-PCM User’s Manual38
Page 41
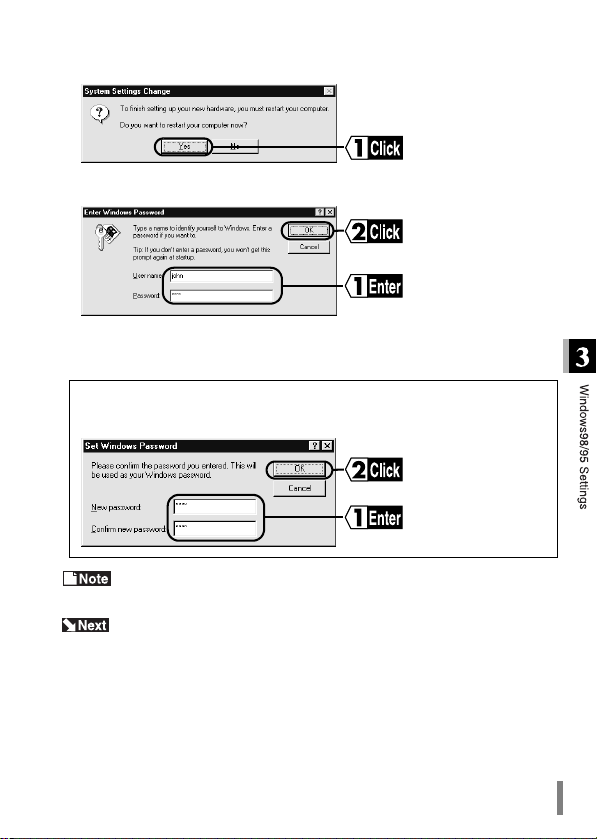
Click the Yes button and restart Windows95.
7
Enter your user name and password, and click the OK button.
8
This completes driver installation.
Check that the WLI-PCM is operating correctly.
The Set Windows Password window may appear when you click the OK
button on the Enter Windows Password window.
If it does, enter the password again and click the OK button.
If the error message "The DHCP client could not obtain an IP addre ss"
appears, consult the network administrator and set the IP address.
Go to "When using Wi ndows 95 ve rsi on 4 .0 0.9 50 o r 4.00. 95 0a " on p age 36 .
WLI-PCM User’s Manual 39
Page 42
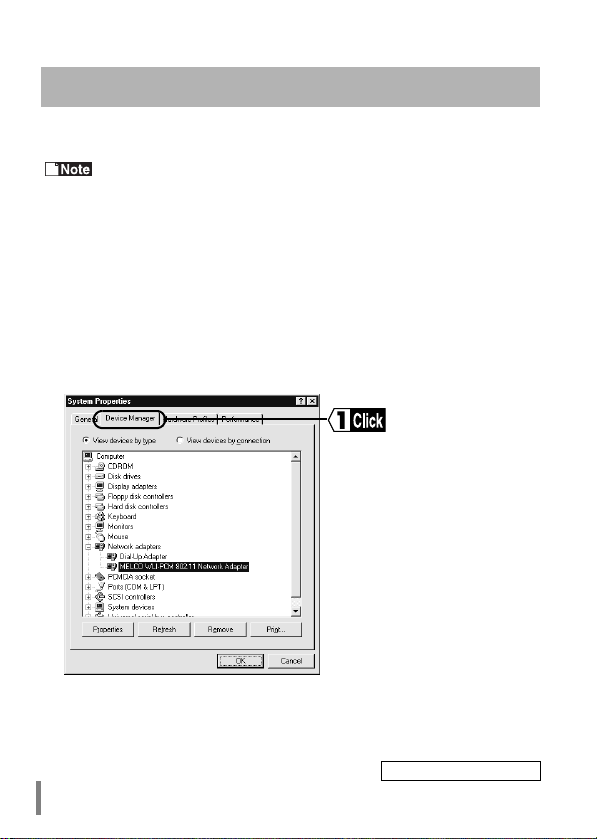
Checking after installation
After installing the driver, follow the steps below to check that the WLI-PCM is
operating correctly.
Different screens may appear after installation depending on the ver-
sion of Windows95.
When using Windows98 or Windows95
version 4.00.950 B / 4.00.950 C
Click the Start button and select Settings → Control Panel.
1
Double-click the System icon.
2
Click the Device Manager tab.
3
Continued on next page
WLI-PCM User’s Manual40
Page 43
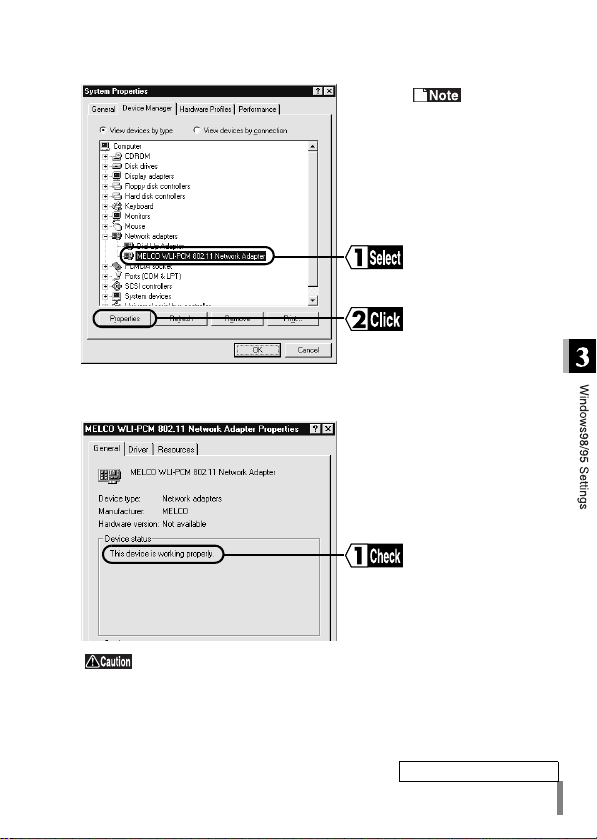
Select "MELCO WLI-PCM 802.11 Network Adapter" and click the Properties button.
4
Check that the message "This device is working properly" is displayed for
5
Device status.
• If "MELCO WLI-PCM
802.11 Network
Adapter" is not listed,
click the + mark on
the left of "Network
adapters".
• "PCMCIA card service" may be included
in "Other devices",
however, this does
not imply any problem.
If the above message is not displayed, the WLI-PCM is not
operating correctly. Uninstall and re-install the driver, referring to "Add
New Hardware Wizard does not appear when the WLI-PCM is ins erted
(Windows98/95). Or, an error mark "!" appears next to "MELCO WLIPCM 802.11 Network Adapter"." on page 100.
Continued on next page
WLI-PCM User’s Manual 41
Page 44
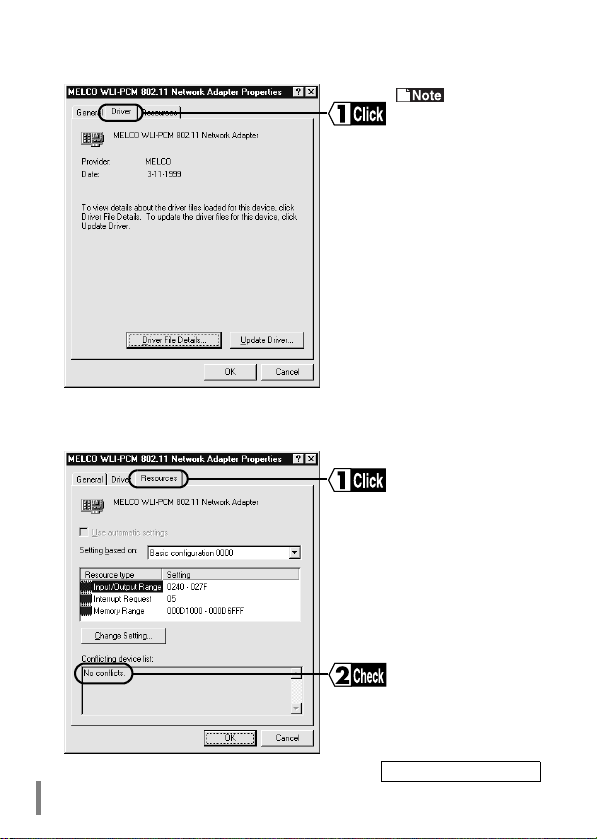
Click the Driver tab.
6
Click the Resource tab and check that "No conflicts." is disp layed in the Con-
7
flicting device list.
When using
Windows95, the message "The driver file is
not required or installed
for this device"
appears. However, this
does not imply any
problem.
Continued on next page
WLI-PCM User’s Manual42
Page 45
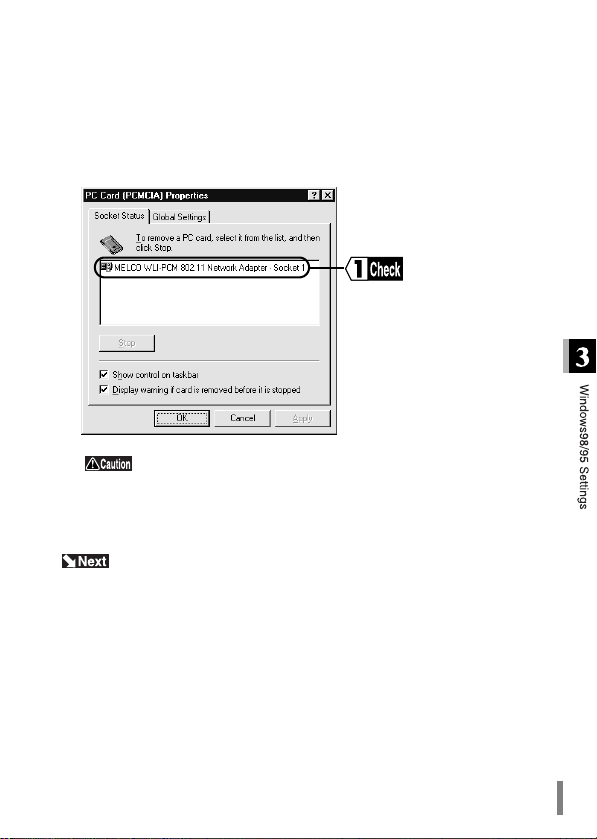
Click the Start button and select Settings → Control Panel.
8
Double-click the PC Card (PCMCIA) icon.
9
Check that "MELCO WLI-PCM 802.11 Network Adapter" is displayed for
10
Socket Status.
When the above message does not appear, the WLI-PCM is not
operating correctly. Refer to "Add New Hardware Wizard does not
appear when the WLI-PCM is inserted (Windows98/95). Or, an error mark
"!" appears next to "MELCO WLI-PCM 802.11 Network Adapter"." on
page 100.
When the WLI-PCM is operating correctly, go to "Preparing for connection to network" on page 49.
When the WLI-PCM is not operating correctly, go to "Add New Hardware Wizard
does not appear when the WLI-PCM is inserted (Windows98/95). Or, an error
mark "!" appears next to "MELCO WLI-PCM 802.11 Network Adapter"." on page
100.
WLI-PCM User’s Manual 43
Page 46
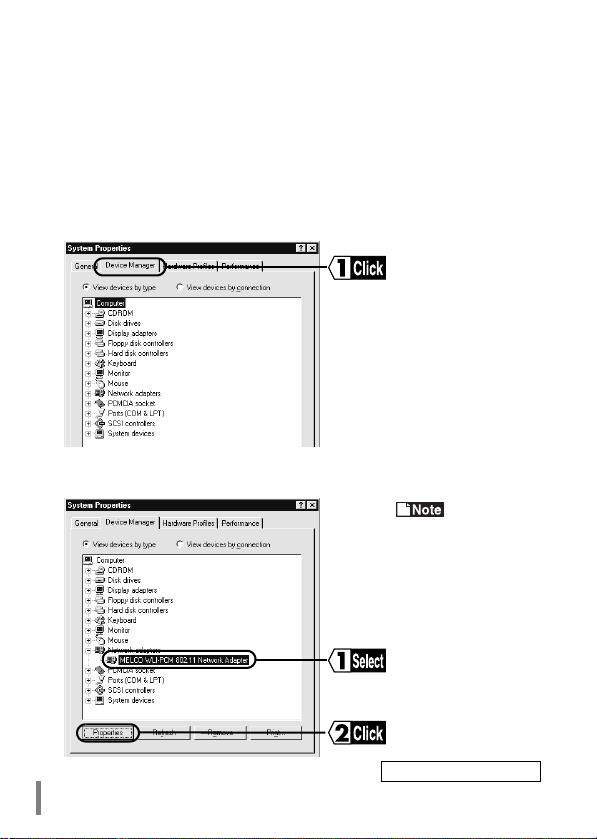
When using Windows95 version
4.00.950 or 4.00.950a
Click the Start button and select Settings → Control Panel.
1
Double-click the System icon.
2
Click the Device Manager tab.
3
Select "MELCO WLI-PCM 802.11 Network Adapter" and click the Properties
4
button.
If "MELCO
WLI-PCM 802.11 Network Adapter" is not
listed, click the + mark
on the left of "Network
adapters".
Continued on next page
WLI-PCM User’s Manual44
Page 47
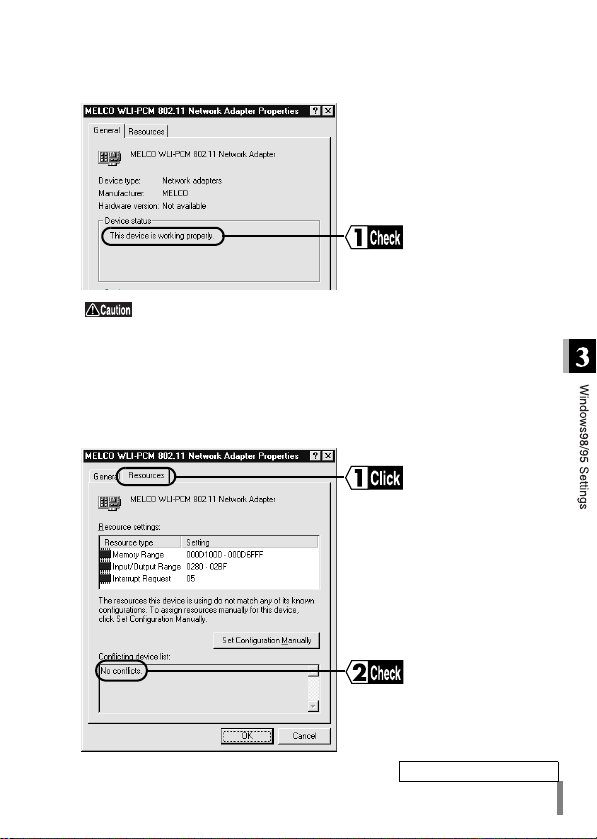
Check that the message "This device is working properly" is displayed for
5
Device status.
If the above message is not displayed, the WLI-PCM is not
operating correctly. Uninstall and re-install the driver, referring to "Add
New Hardware Wizard does not appear when the WLI-PCM is ins erted
(Windows98/95). Or, an error mark "!" appears next to "MELCO WLIPCM 802.11 Network Adapter"." on page 100.
Click the Resources tab.
6
Check that "No conflicts." is displayed in the Conflicting device list.
Continued on next page
WLI-PCM User’s Manual 45
Page 48
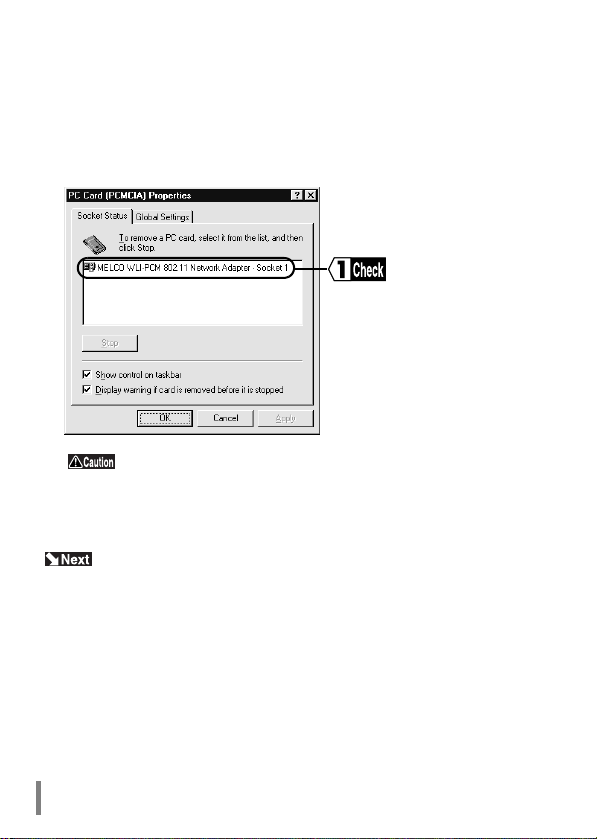
Click the Start button and select Settings → Control Panel.
7
Double-click the PC Card (PCMCIA) icon.
8
Check that "MELCO WLI-PCM 802.11 Network Adapter" is displayed for
9
Socket Status.
When the above message does not appear, the WLI-PCM is not
operating correctly. Uninstall and re-install the driv er, referring to "Add
New Hardware Wizard does not appear when the WLI-PCM is inserte d
(Windows98/95). Or, an error mark "!" appears next to "MELCO WLIPCM 802.11 Network Adapter"." on page 100.
When the WLI-PCM is operating correctly, go to "Preparing for connection to network" on page 49.
When the WLI-PCM is not operating correctly, go to "Add New Hardware Wizard
does not appear when the WLI-PCM is inserted (Windows98/95). Or, an error
mark "!" appears next to "MELCO WLI-PCM 802.11 Network Adapter"." on page
100.
WLI-PCM User’s Manual46
Page 49
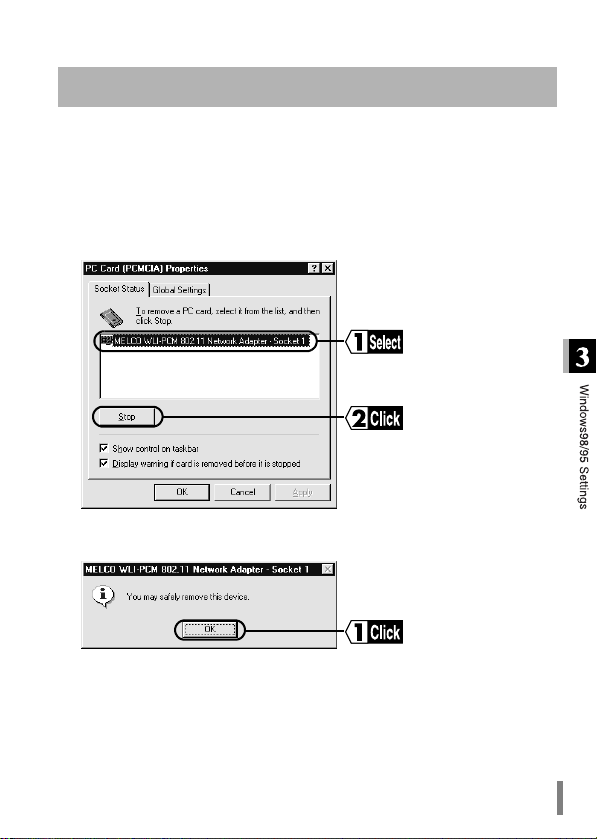
Removing the WLI-PCM
Follow the steps below to remove the WLI-PCM while Windows98/95 is running.
Click the Start button and select Settings → Control Panel.
1
Double-click the PC Card (PCMCIA) icon.
2
Select "MELCO WLI-PCM 802.11 Network Adapter" and click the Stop
3
(Windows98) or Finish (Windows95) button.
When the following dialog box appears, click the OK bu tton.
4
Remove the WLI-PCM.
5
WLI-PCM User’s Manual 47
Page 50
Uninstalling the driver
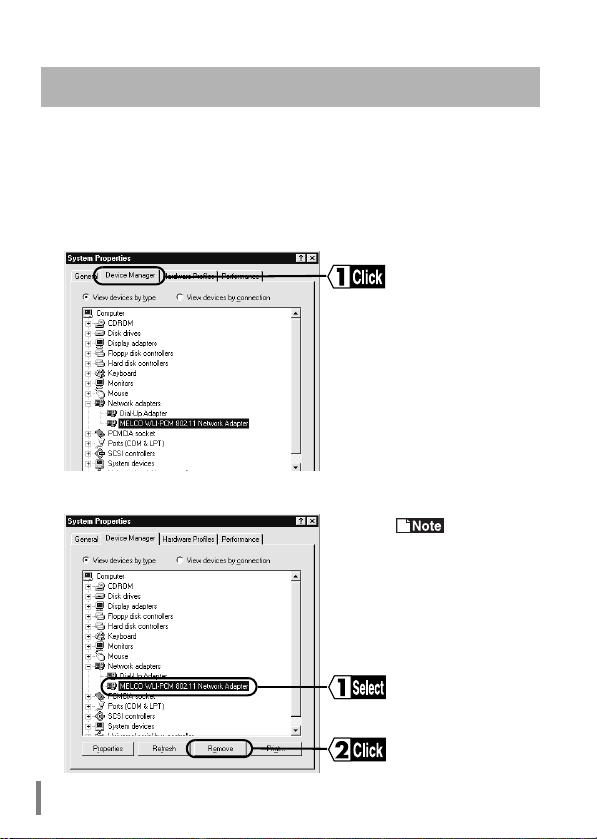
Follow the steps below to uninstall the driver.
Click the Start button and select Settings → Control Panel.
1
Double-click the System icon.
2
Click the Device Manager tab.
3
Select "MELCO WLI-PCM 802.11 Network Adapter" and click the Remove
4
button.
If "MELCO
WLI-PCM 802.11 Network Adapter" is not
listed, click the + mark
on the left of "Network
adapters".
WLI-PCM User’s Manual48
Page 51
Preparing for connection to network
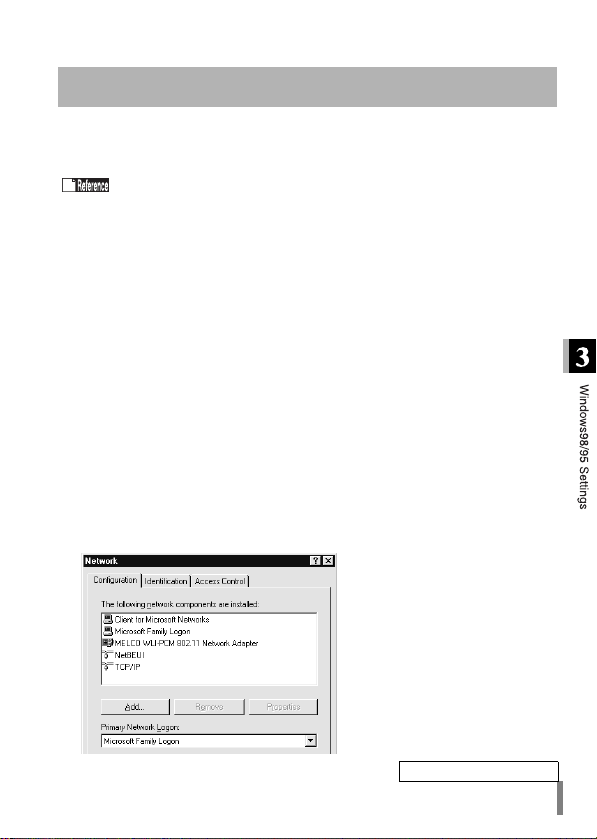
After checking that the WLI-PCM is operating correctly, you can try connecting to
the network. Refer to the procedure below to make the required settings for the
computer to be connected. Screens from Windows98 are used in this example.
Refer to the manual provided for Windows98/95 for details.
The following is required for all computers.
• Check NetBEUI, TCP/IP, and Microsoft Network Client
• Add File and printer sharing for Microsoft Networks
• Check computer name and workgroup name
• Set sharing
• TCP/IP setting
Checking NetBEUI, TCP/IP, and
Microsoft Network Client
Click the Start button and select Settings → Control Panel.
1
Double-click the Network icon.
2
Check that "NetBEUI", "TCP/IP", and "Microsoft Network Clien t" are listed in
3
"The following network c omp onents are inst alled:" . When usin g Win dows98,
check that "Microsoft Network Client" is selected for Primary Netwo rk Logon.
■If the only network adapter is the WLI-PCM
Continued on next page
WLI-PCM User’s Manual 49
Page 52
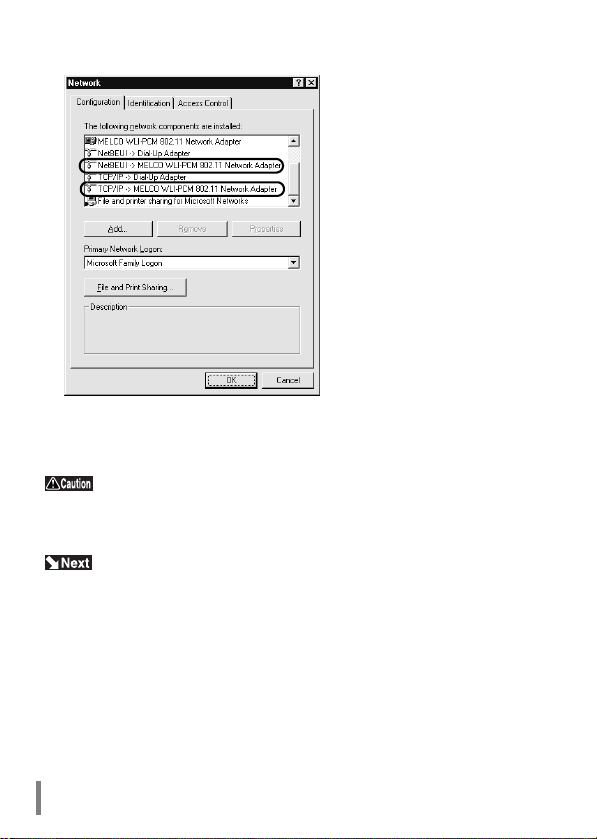
■If multiple network adapter s are installed
"NetBEUI -> MELCO WLI-PCM 802.11 Network Adapter" and "TCP/IP ->
MELCO WLI-PCM 802.11 Network Adapter" appear in "The following network
components are installed:". However, this does not imply any problem.
When the network adapters are not listed as shown above
add Microsoft Network Client, NetBEU I, and TCP/IP, refe rring to "Adding
Microsoft Network Client (page 57)", "Adding NetBEUI (page 58), and "Adding TCP/IP (page 59).
Go to "Adding File and printer sharing for Microsoft Networks" on page 51.
WLI-PCM User’s Manual50
Page 53
Adding File and printer sharing for
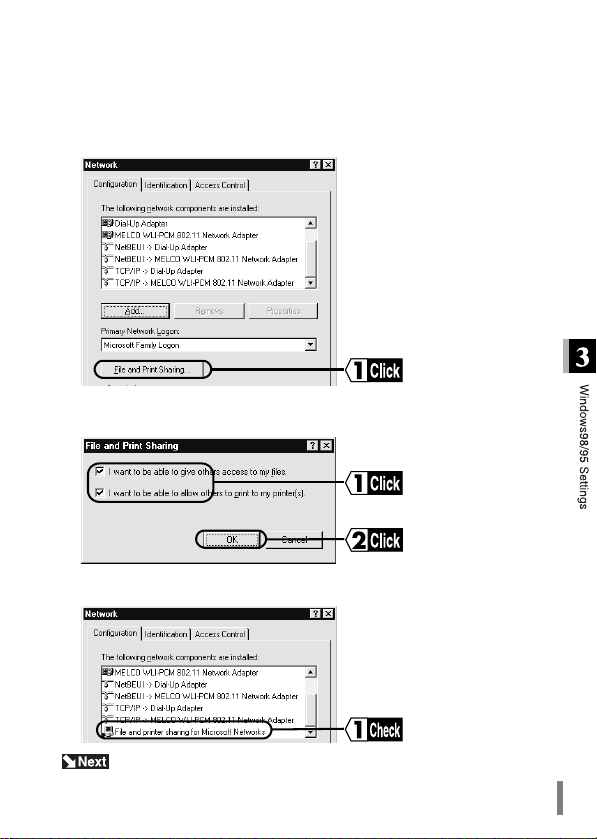
Microsoft Networks
Click the File and Print Sharing... button.
1
Check "I want to be able to give ot hers access to my files" and "I want to be
2
able to allow others to print to my printer(s)", and click the OK button.
File and printer sharing for Microsoft Networks is added.
3
Go to "Checking computer name and workgroup name" on page 52.
WLI-PCM User’s Manual 51
Page 54
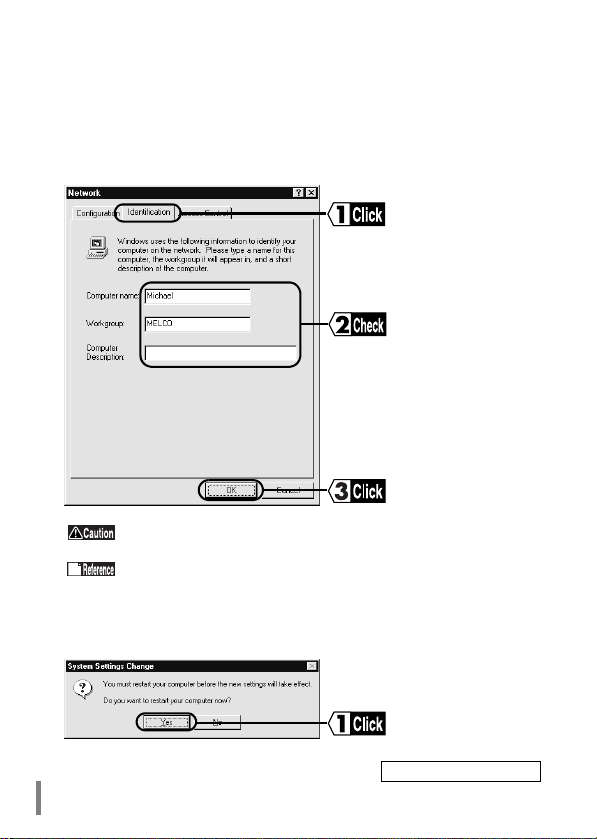
Checking computer name and workgroup name
Click the Identification tab (Windows98) or User Information tab
1
(Windows95). Check the Computer name, Workgroup, and Computer
Description, and click the OK button.
The same workgroup must be assigned to all the computers
included in the network.
Refer to "Identification window of Windows9 8/95" on page 121, for
details of the computer name, workgroup, and computer description.
Click the Yes button to restart Windows98/95. The Enter Network Password
2
window appears.
Continued on next page
WLI-PCM User’s Manual52
Page 55
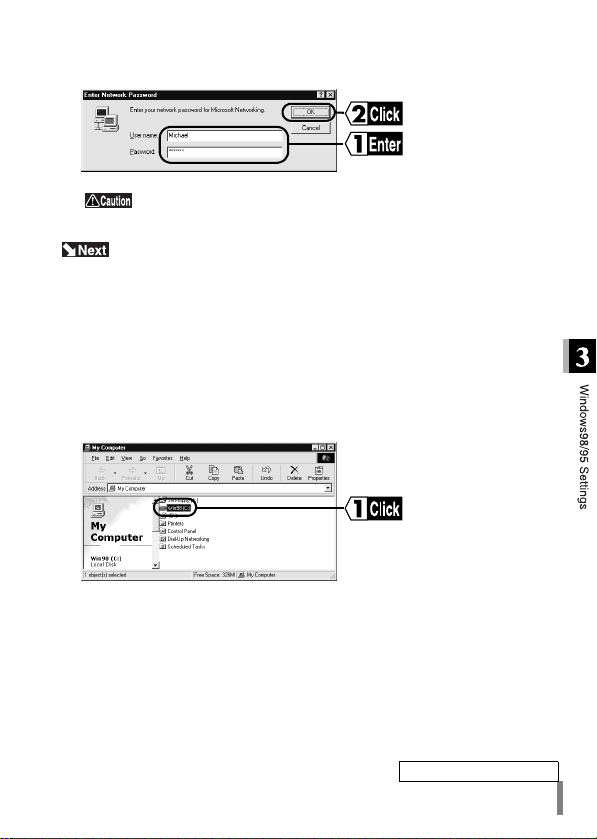
Enter your user name and password, and click the OK button.
3
Be sure to enter your user name and p assword whene ver this
window appears, or you will not be able to access the network.
Go to "Sharing settings" below.
Sharing settings
Make settings for sharing drives and fo lders. The example here describes the
procedure for sharing the C drive in My Computer.
Double-click the My Computer icon on the desk top.
1
Click the icon for the C drive with the right mouse button and select Sharing.
2
Continued on next page
WLI-PCM User’s Manual 53
Page 56
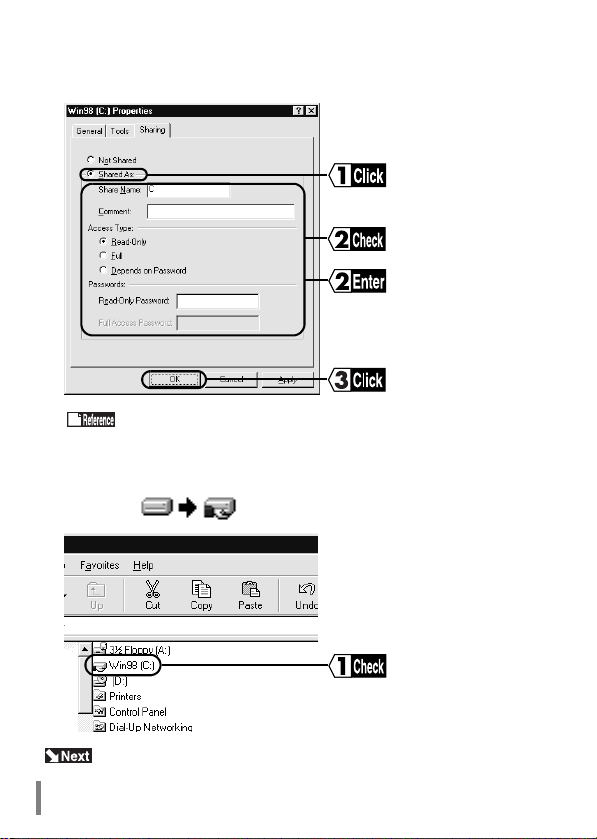
Select "Shared As:", and check or change Shared Name, Comme nt, Access
3
Type, and Password. Click the OK button.
Refer to "Sharing in Windows98/95" on page 120, fo r details of
Shared Name, Comment, Access Type, and Password.
The icon for the C drive changes as shown be low.
4
Go to "Setting TCP/IP" on page 55.
WLI-PCM User’s Manual54
Page 57
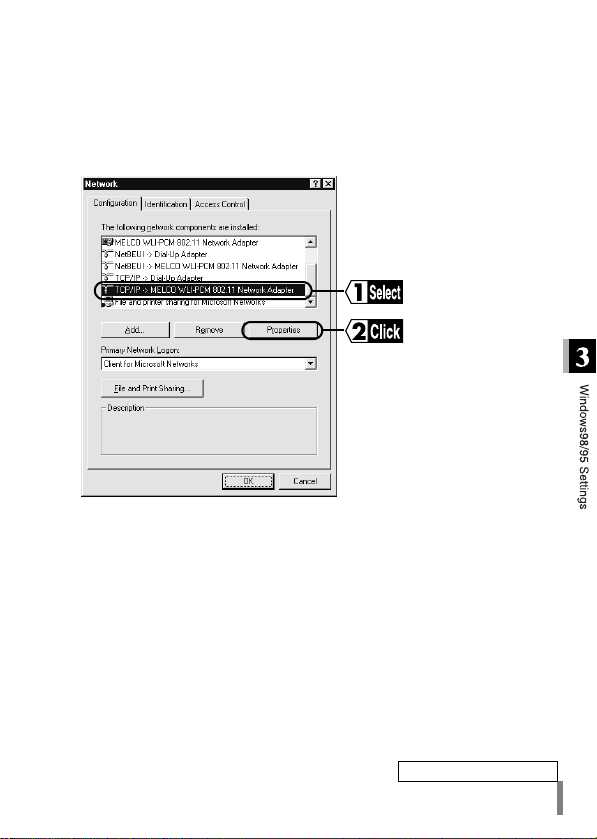
Setting TCP/IP
Click the Start button and select Settings → Control Panel.
1
Double-click the Network icon.
2
Select "TCP/IP" and click the Properties button.
3
Continued on next page
WLI-PCM User’s Manual 55
Page 58
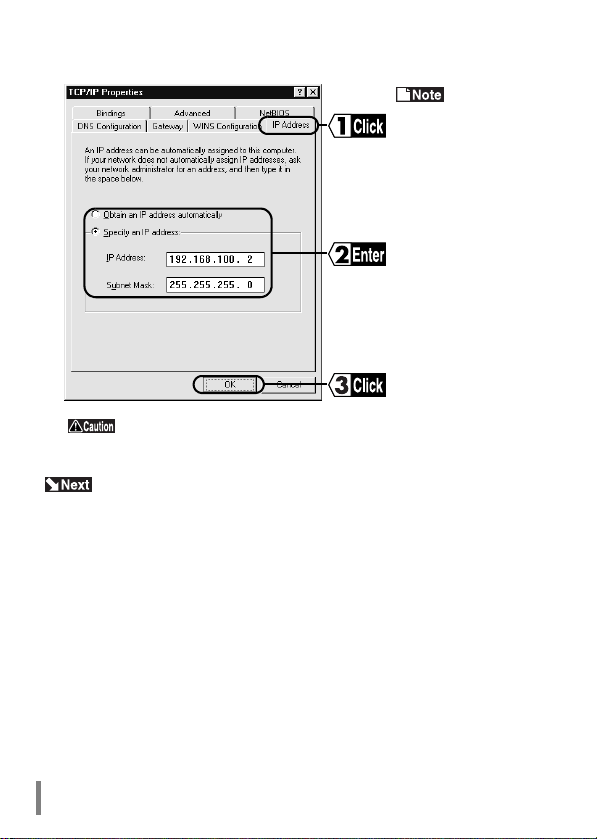
Click the IP address tab. Set the IP address and click the OK button.
4
"Assign IP address" on
page 1 15 for IP address
settings.
Contact the network administrator and check the IP address.
Windows98/95 restarts and TCP/IP settings are completed.
Go to "Installing Client Manager" on page 79.
Refer to
WLI-PCM User’s Manual56
Page 59
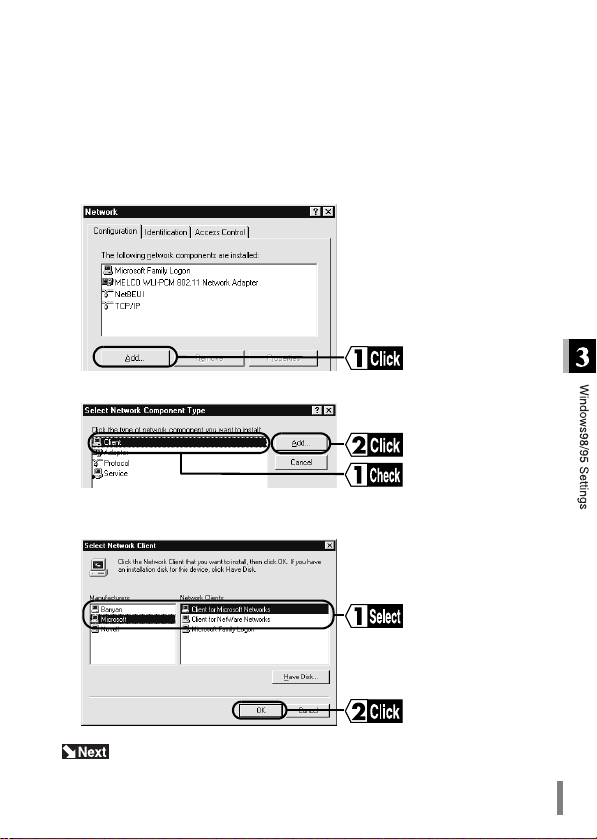
Adding Microsoft Network Client
Click the Start button and select Settings → Control Panel.
1
Double-click the Network icon.
2
Click the Add button.
3
Select "Client" and click the Add button.
4
Select "Microsoft" for Manufacturer and "Microsoft Network Client" for Net-
5
work Clients, and click the OK button to return to the Network screen (step 3).
Go to "Checking NetBEUI, TCP/IP, and Microsoft Network Client" on
page 49.
WLI-PCM User’s Manual 57
Page 60
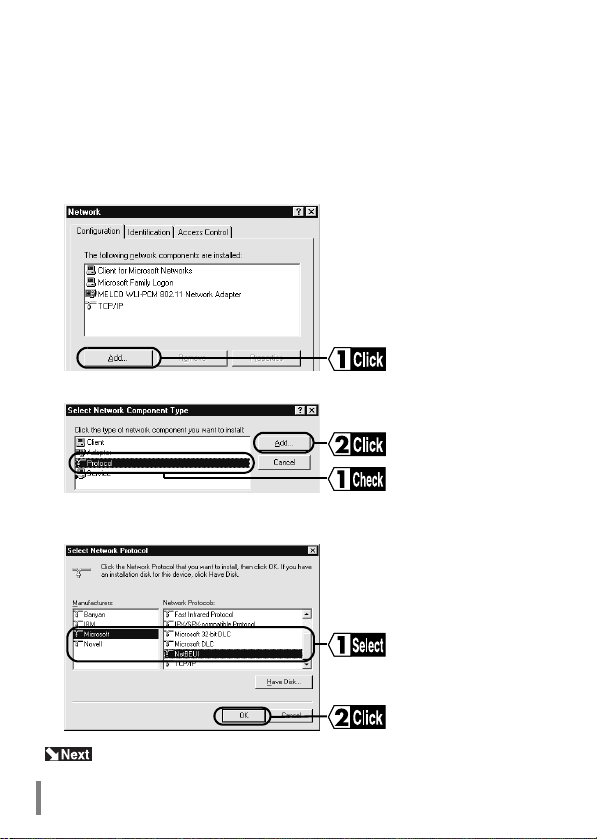
Adding NetBEUI
Click the Start button and select Settings → Control Panel.
1
Double-click the Network icon.
2
Click the Add button.
3
Select "Protocol" and click the Add button.
4
Select "Microsoft" for Manufacturer and "NetBEUI" for Network Client s, and
5
click the OK button to return to the Network screen (step 3).
Go to "Checking NetBEUI, TCP/IP, and Microsoft Network Client" on
page 49.
WLI-PCM User’s Manual58
Page 61
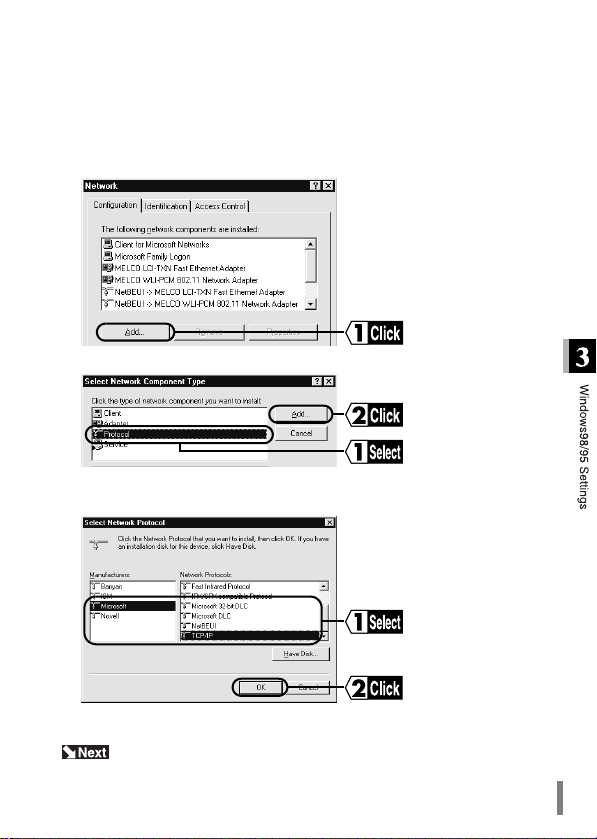
Adding TCP/IP
Follow the steps below when TCP/IP is not already on your computer.
Click the Start button and select Settings → Control Panel → Network.
1
Click the Add button.
2
Select "Protocol" and click the Add button.
3
Select "Microsoft" for Manufacturer and "TCP/IP" for Net work Protocol, and
4
click the OK button.
The Network window (step 2) appears.
5
Go to "Checking NetBEUI, TCP/IP, and Microsoft Network Client" on
page 49.
WLI-PCM User’s Manual 59
Page 62

WindowsNT4.0 Settings
4
Before installing driver
• Check that the WLI-PCM is correctly inserted into your computer.
• The PC card driver for WindowsNT4.0 must be operating correctly. Select
Control Panel → Devices and check that the status for "pcmcia" is "start".
• The WLI-PCM cannot be inserted or removed with the computer on.
There is no resume function for WindowsNT4.0.
The installation procedure for the driver differs depending on the operating environment of your computer. Select the applicable case.
When installing the driver to a computer with WindowsNT4.0 already set up,
When installing the driver during WindowsNT4.0 setu p,
This chapter describes the setting procedures for the WLI-PCM
when using WindowsNT4.0.
Driver installation
go to "When WindowsNT4.0 is already set up" on page 61.
go to "When WindowsNT4.0 is to be set up" on page 69.
WLI-PCM User’s Manual60
Page 63
When WindowsNT4.0 is already set up
Different procedures apply depending on whether the driver has been installed
before, when WindowsNT4.0 is already set up.
When installing the driver for the first time, go to "When installing driver for first
time" below.
* When a LAN card driver has been installe d before, go to "When LAN card
driver has been installed before" on page 66.
When installing driver for first time
Follow the steps below when installing the driver for the first time af ter se tt ing up
WindowsNT4.0.
Start WindowsNT4.0 and log-on as "administrator".
1
Click the Start button and select Settings → Control Panel.
2
Double-click the Network icon.
3
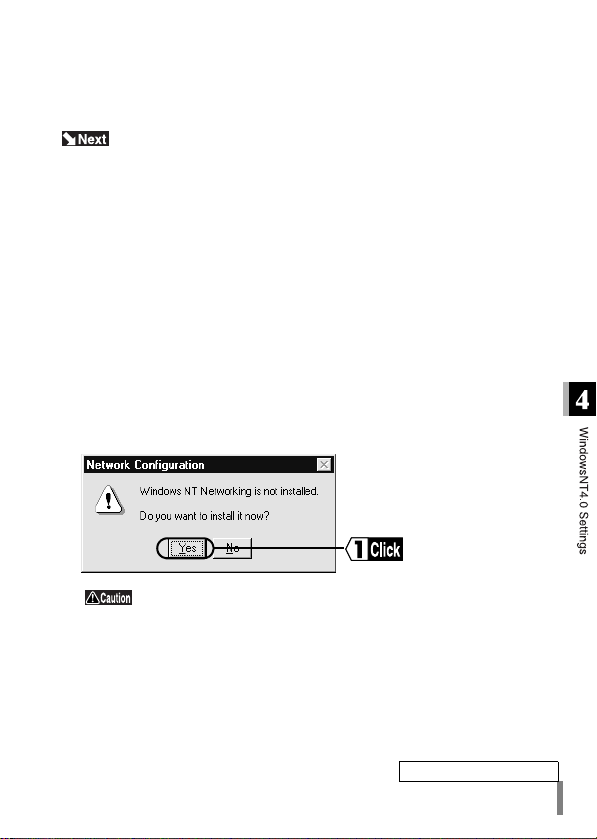
Click the Yes button. The message "Please wait while WindowsNT pre pare s
4
Network Setup..." is displayed.
If the above message does not appear, go to step 4 in "When
LAN card driver has been installed before" on page 66.
Continued on next page
WLI-PCM User’s Manual 61
Page 64
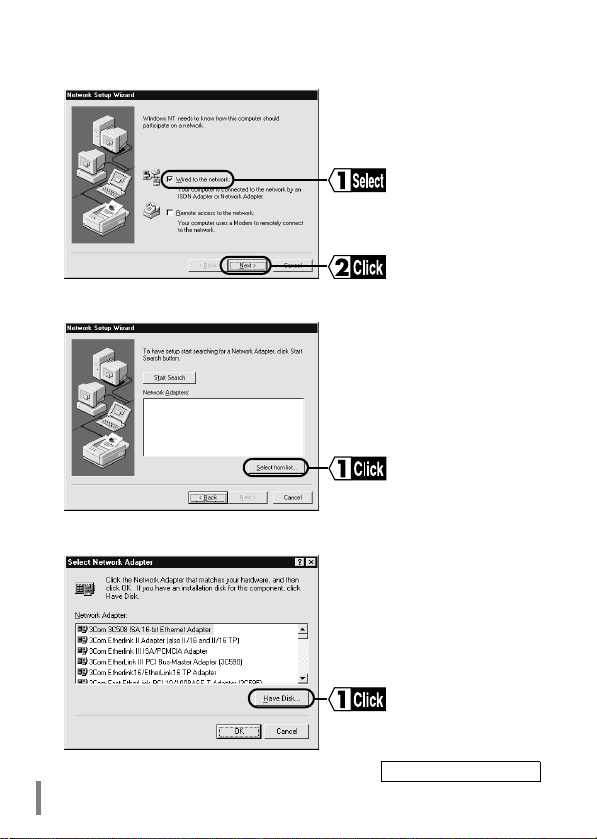
Select "Wired to the network" and click the Next button.
5
Click the Select from list... button.
6
Click the Have Disk... button.
7
Continued on next page
WLI-PCM User’s Manual62
Page 65
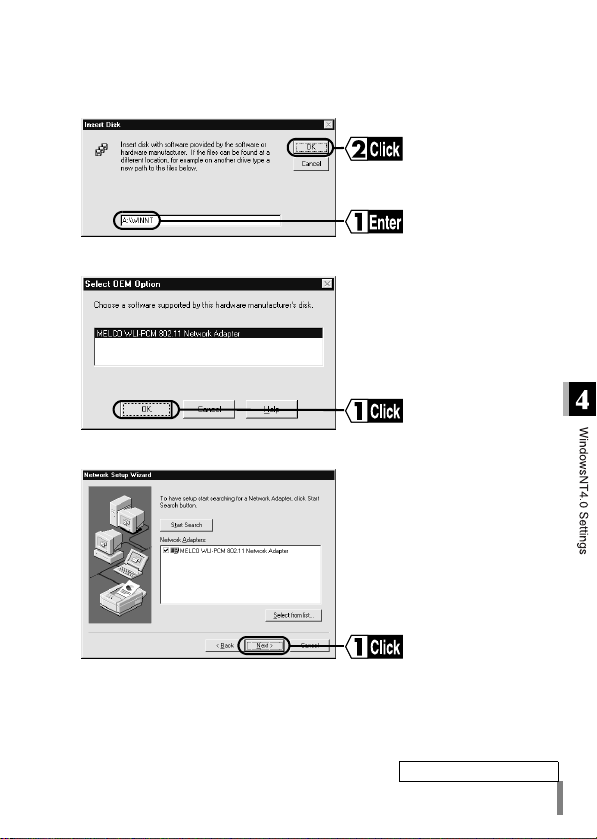
Insert the “LAN Card Utility for WLI-PCM” disk into the floppy disk drive.
8
Enter "A:\WINNT" (when the floppy disk drive is "A") and click the OK button.
9
Click the OK button.
10
Click the Next button.
11
Continued on next page
WLI-PCM User’s Manual 63
Page 66
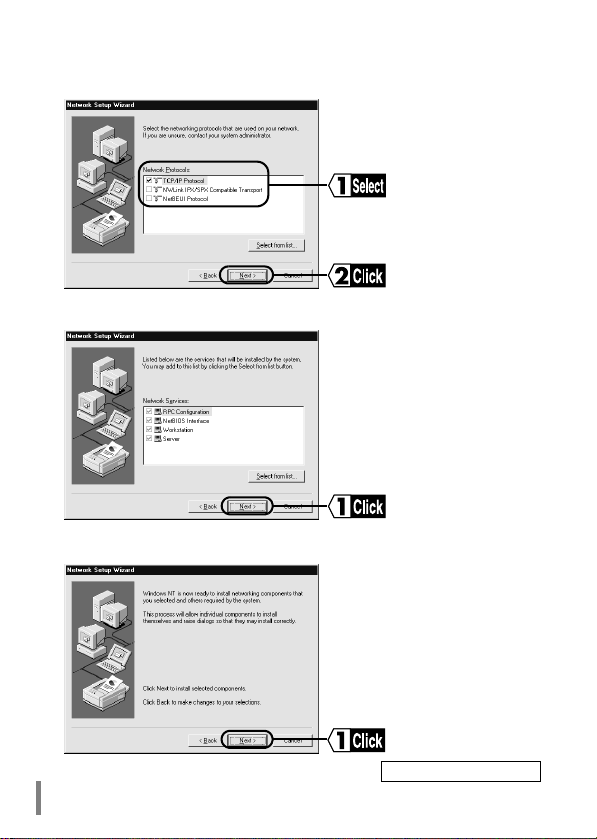
Select the network protocol to be used for the network and click the Next but-
12
ton.
Click the Next button.
13
Click the Next button.
14
Continued on next page
WLI-PCM User’s Manual64
Page 67
Set the WindowsNT CD-ROM in the CD-ROM drive.
15
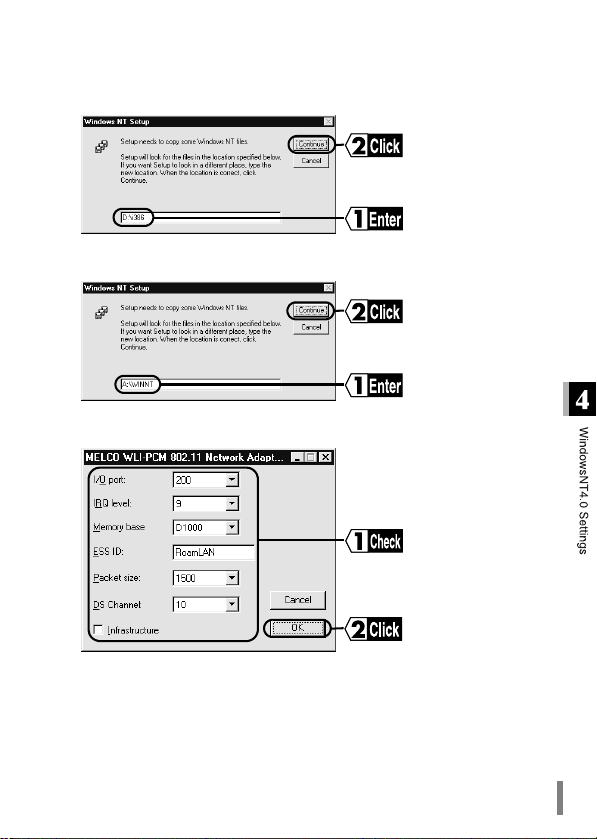
Enter "D:\I386" (when the CD-ROM drive is "D") and clic k the Conti nue button.
16
Enter "A:\WINNT" (when the floppy disk drive is "A") and click the Continue
17
button.
The current settings for the WLI-PCM (IRQ leve l, I/O port address, Memory
18
base) are displayed. Check the settings and click the OK button.
WLI-PCM User’s Manual 65
Page 68
When the message "This IRQ level (I/O port address, Memory base) is used
by another board. Please select another value." appears, change the settings.
Setting items
ESS-ID: To be set later from Client Manager
DS channel: Do not change.
Packet size: Maximum packet size (usually set to 1500)
Infrastructure: Delete the check mark if present.
Install the driver as instructed by the wizards.
Go to "Changing settings" on page 70.
When LAN card driver has been
installed before
Follow the steps below when WindowsNT4.0 is already set up and a driver has
been installed before.
Start WindowsNT4.0 and log-on as administrator’.
1
Click the Start button and select Settings → Control Panel.
2
Double-click the Network icon.
3
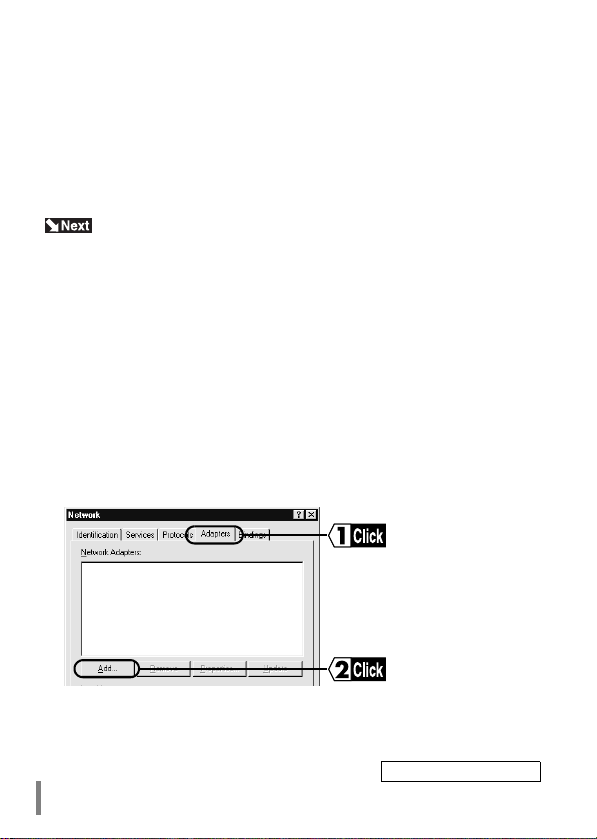
Click the Adapters tab and the Add button.
4
Continued on next page
WLI-PCM User’s Manual66
Page 69
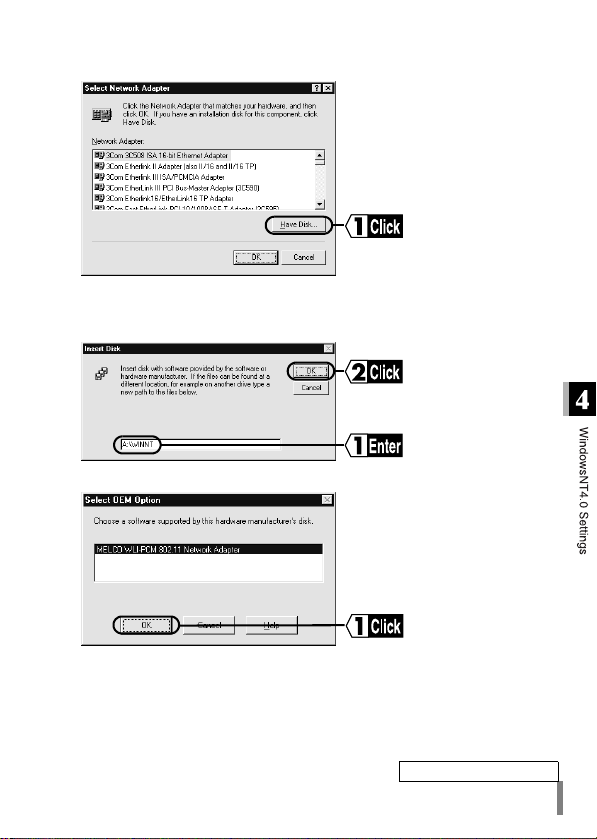
Click the Have Disk... button.
5
Insert the “LAN Card Utility for WLI-PCM” disk into the floppy disk drive.
6
Enter "A:\WINNT" (when the floppy disk drive is "A") and click the OK button.
7
Click the OK button.
8
Continued on next page
WLI-PCM User’s Manual 67
Page 70
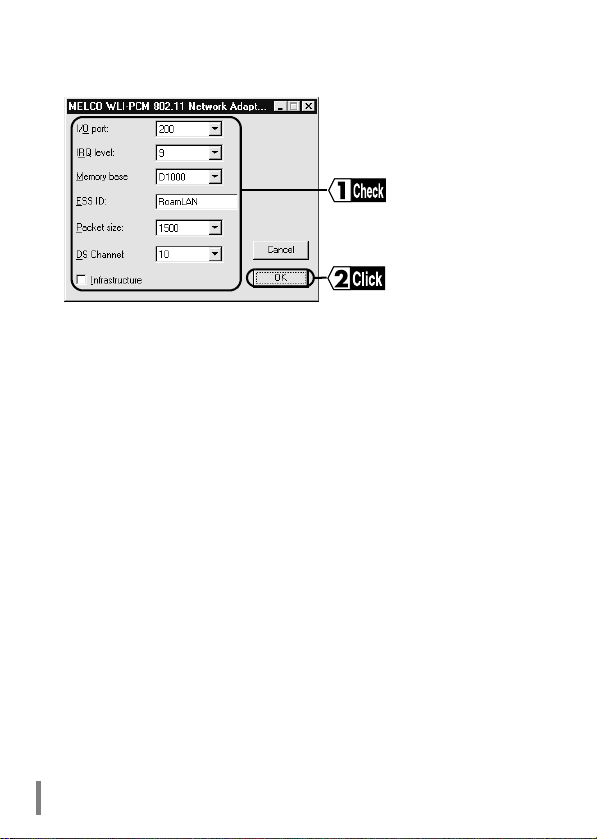
The current settings for the WLI-P CM (IRQ level, I/O port address, Memory
9
base) are displayed. Check the settings and click the OK button.
When the message "This IRQ level (I/O port address, Memory base) is used
by another board. Please select another value." appears, change the settings.
Setting items
ESS-ID: To be set later by Client Manager
DS channel: Do not change.
Packet size: Maximum packet size (usually set to 1500)
Infrastructure: Delete the check mark if present.
WLI-PCM User’s Manual68
Page 71
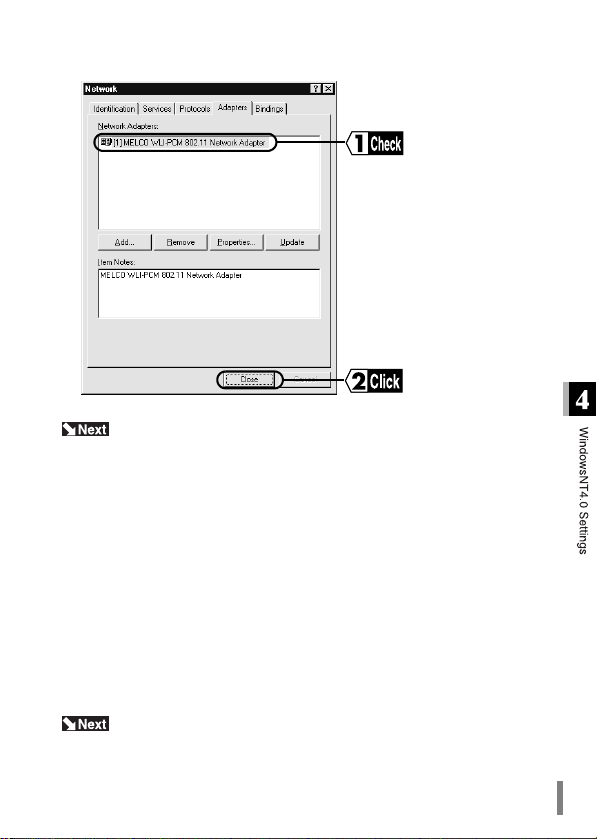
"MELCO WLI-PCM 802.11 Network Adapter" is added. Click the OK button.
10
Install the driver as instructed by the wizards.
Go to "Changing settings" on page 70.
When WindowsNT4.0 is to be set up
Refer to the following items when installing the driver during WindowsNT4.0
setup. Follow the setup procedures described in the WindowsNT4.0 manual.
Select the driver
Specify the driver name "MELCO WLI -PCM 802.11 Network Adapter". Refer to
steps 6 to 11 in "When installing driver for first time" (page 61)" for details.
WLI-PCM settings
Check the current settings for the WLI-PCM (IRQ level, I/O port address, Memory
base) and click the OK button.
Go to "Changing settings" on pag e 70 .
WLI-PCM User’s Manual 69
Page 72
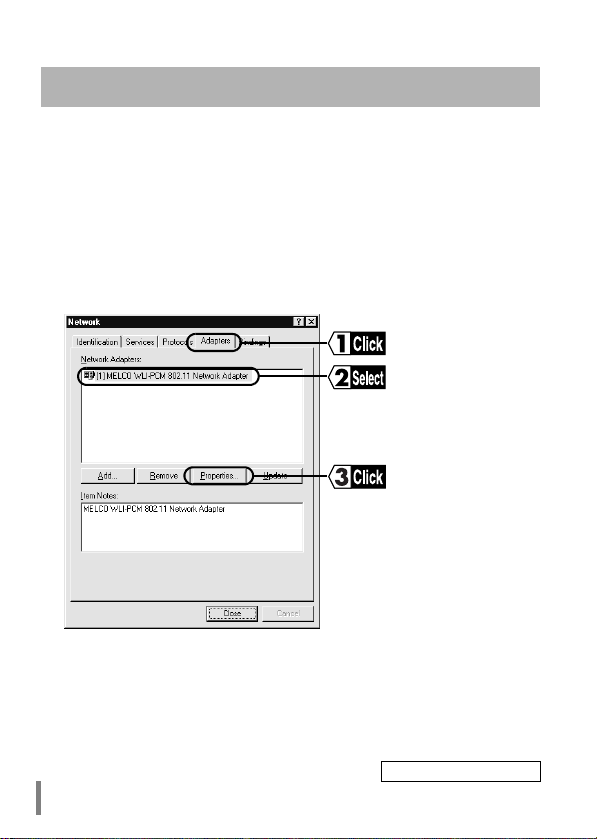
Changing settings
Follow the steps below to change the settings for the WLI-PCM (IRQ le vel, I/O
port address, Memory base).
Start WindowsNT4.0 and log-on as administrator’.
1
Click the Start button and select Settings → Control Panel.
2
Double-click the Network icon.
3
Click the Adapters tab. Select "MELCO WLI-PCM 802.11 Network Adapter"
4
and click the Properties button.
Continued on next page
WLI-PCM User’s Manual70
Page 73
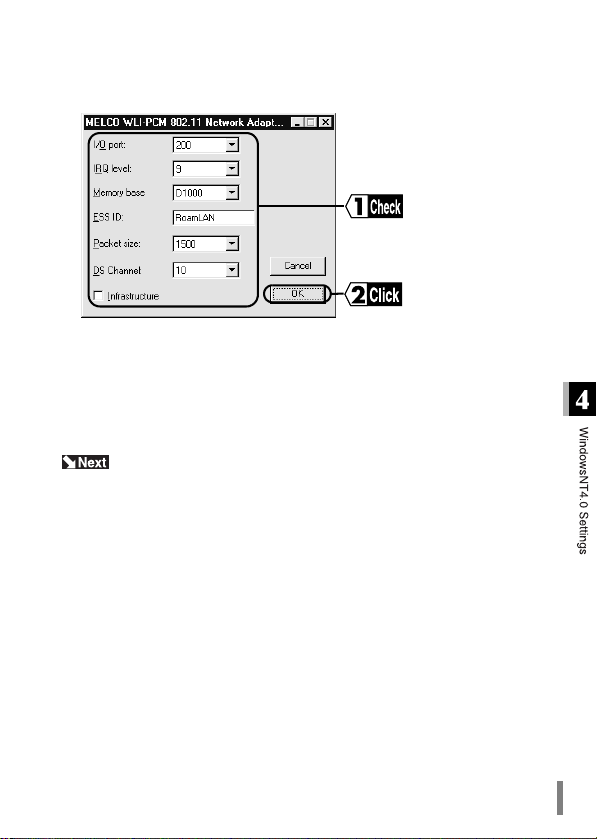
The current settings for the WLI-PCM (IRQ leve l, I/O port address, Memory
5
base) are displayed. Change the settings as required and click the OK button.
Setting items
ESS-ID: To be set later from Client Manager
DS channel: Do not change.
Packet size: Maximum packet size (usually set to 1500)
Infrastructure: Delete the check mark if present.
Restart the computer to activate the new se ttings.
6
Go to "Checking after installation" on page 72.
WLI-PCM User’s Manual 71
Page 74
Checking after installation
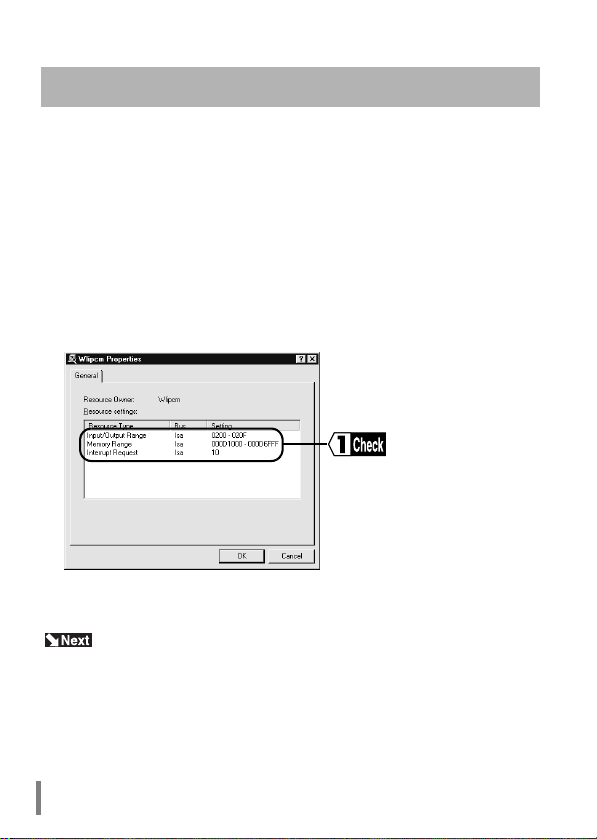
WindowsNT4.0 has a standard diagnosis program that checks whether the WLIPCM is set correctly. Follow the steps below to perform this check.
Click the Start button and select Pr o grams → Administrative Tools (Common)
1
→ WindowsNT Diagnostics.
Click the Resources tab.
2
Click Devices.
3
Select "Wlipcm" from the Device list, and click the Properties button.
4
Check that "Input/Output Ra nge", "Memory Range", and "In terrupt Request"
5
are displayed.
If no settings are displayed or "Wlipcm" is not listed in the Device list, ch ange
the resource settings. Also, check that the WLI-PCM is installed correctly.
Go to "Installing the ESS ID Driver" on page 73.
WLI-PCM User’s Manual72
Page 75
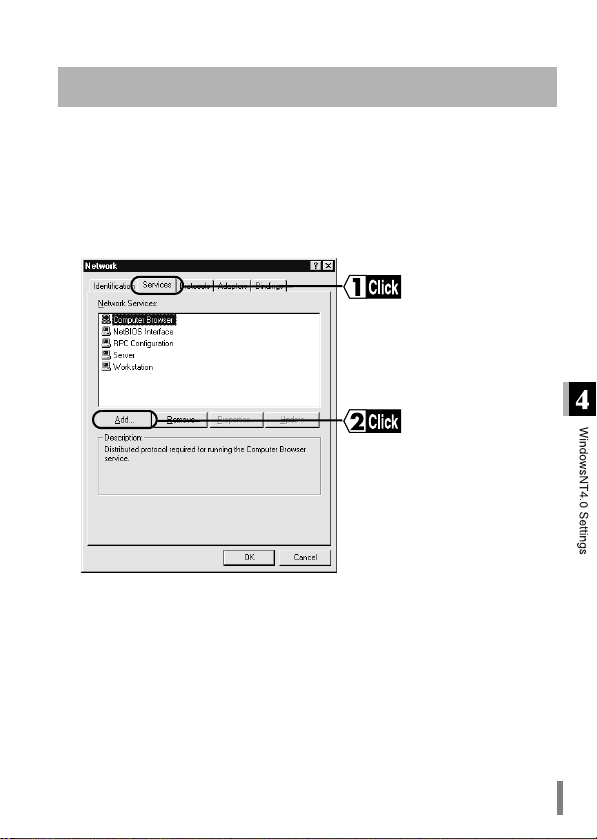
Installing the ESS ID Driver
The ESS ID driver must be installed before you can use the WLI-PCM.
Follow the procedure below to install the driver.
Click the Start button and select Settings → Control Panel.
1
Double-click the Network icon.
2
Click the Services tab and then click the Add... button.
3
WLI-PCM User’s Manual 73
Page 76
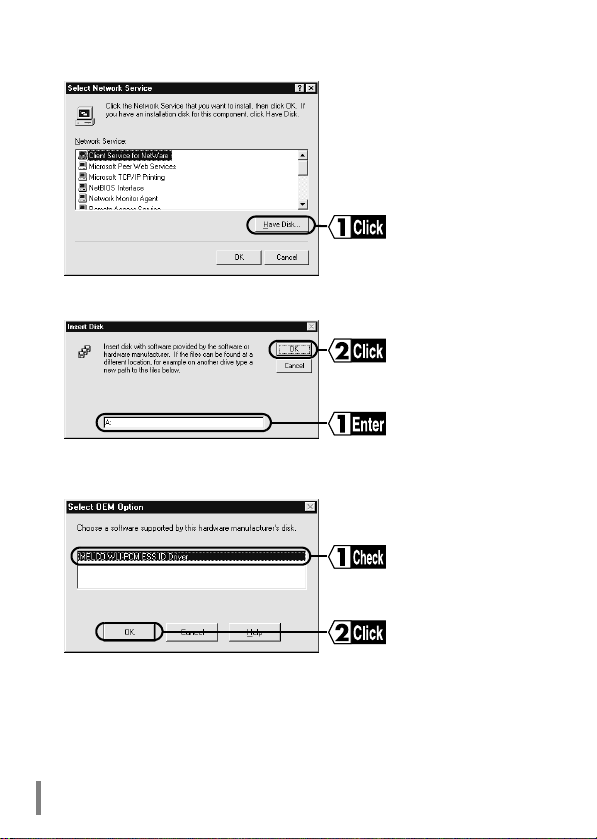
Click the Have Disk... button.
4
Enter "A:" (when the floppy disk drive is "A") and click the OK button.
5
Check that "MELCO WLI-PCM ESS ID Driver" is displayed and then click the
6
OK button.
WLI-PCM User’s Manual74
Page 77
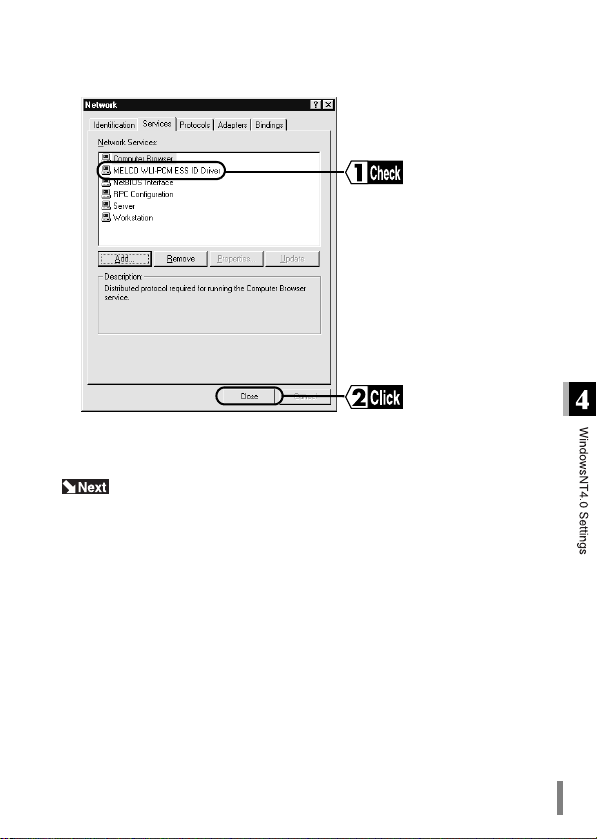
Check that the MELCO WLI-PCM ESS ID Driver is installed and then click the
7
Close button.
The message "Do you want to restart your computer now?" is displayed. Click
Yes to restart.
Go to "Preparing for connection to network" on page 76.
WLI-PCM User’s Manual 75
Page 78
Preparing for connection to network
After checking that the WLI-PCM is operating correctly, you can try connecting to
the network.
The following is required for all computers.
• Checking TCP/IP
• Setting TCP/IP
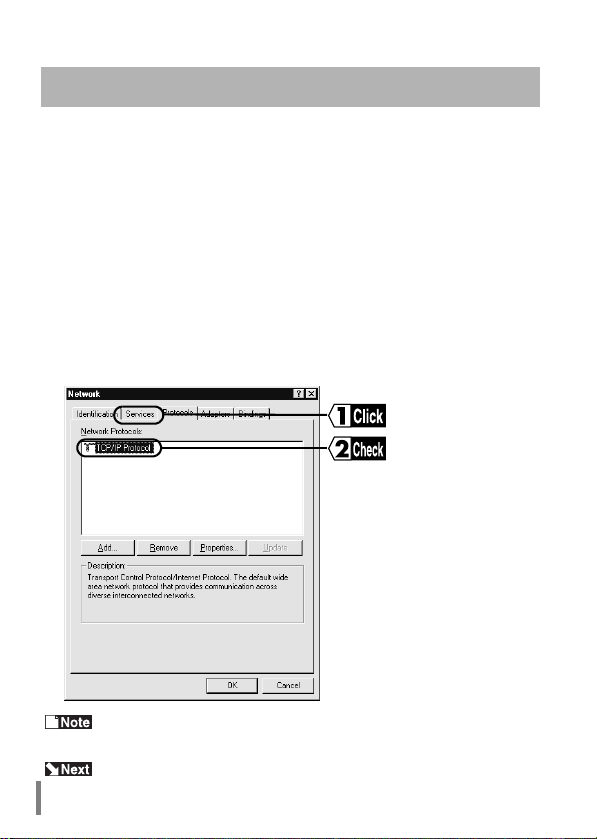
Checking TCP/IP
Click the Start button and select Settings → Control Panel.
1
Double-click the Network icon.
2
Click the Protocol tab and check that "TCP/IP Protocol" is listed in the Net-
3
work Protocols column.
If "TCP/IP Protocol" is not listed, add it, referring to "Adding TCP/IP" on
page 78.
Go to "Setting TCP/IP" on page 77.
WLI-PCM User’s Manual76
Page 79
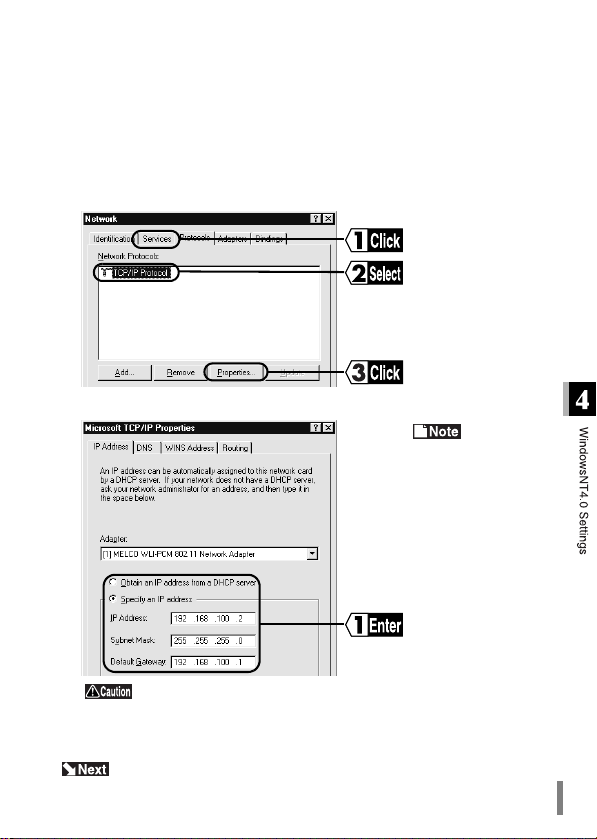
Setting TCP/IP
Click the Start button and select Settings → Control Panel.
1
Double-click the Network icon.
2
Click the Protocol tab. Select "TCP-IP Protocol" and click the Properties but-
3
ton.
Set the IP address and click the OK button.
4
Refer to
"Assign IP address" on
page 115 f or IP address
settings.
Contact the network administrator to check the IP address set-
ting.
WindowsNT4.0 restarts and TCP/IP settings are completed.
5
Go to "Installing Client Manager" on page 79.
WLI-PCM User’s Manual 77
Page 80
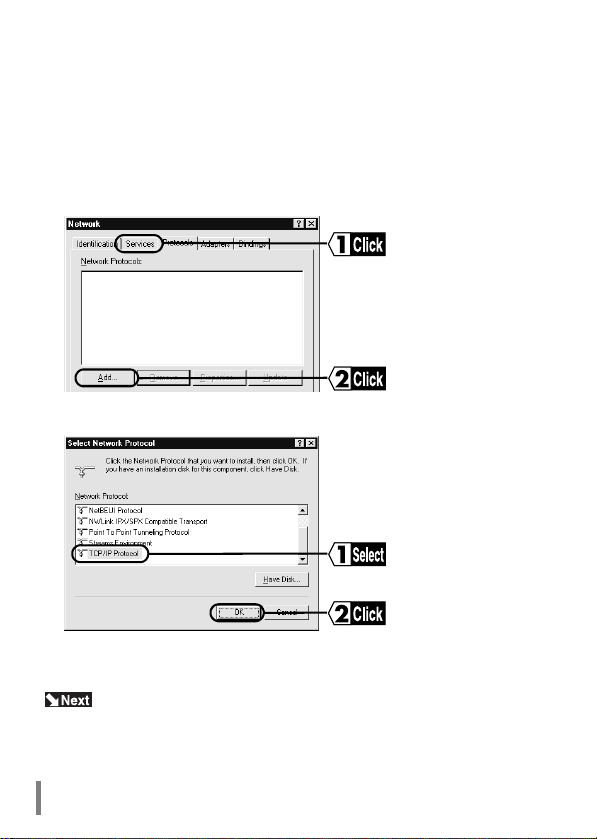
Adding TCP/IP
Follow the steps below when TCP/IP is no t alre ady on yo ur computer.
Click the Start button and select Settings → Control Panel → Network.
1
Double-click the Network icon.
2
Click the Protocol tab and the Add button.
3
Select "TCP/IP Protocol" and click the OK butto n.
4
The Network window (step 2) appears.
5
Go to "Checking TCP/IP" on page 76.
WLI-PCM User’s Manual78
Page 81
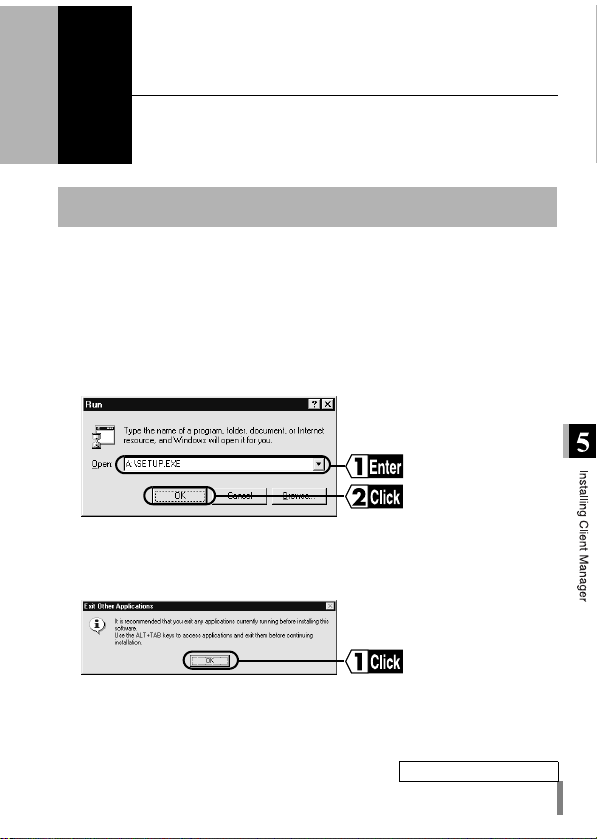
Installing Client Manager
5
Follow the steps below to install Client Manager to all computers using the WLIPCM.
Insert the “LAN Card Utility for WLI-PCM” disk into the floppy disk drive.
1
Click the Start button and select Run....
2
Enter the path for "setup.exe" on the “LAN Card Utility for WLI-PCM” disk and
3
click the OK button.
e.g.: A:\setup.exe (when the floppy disk drive is "A")
Quit any other applications that are running and click the OK button.
4
Client Manager is required to search for the access point and
change settings for the WLI-PCM. This chapter describes the procedures for installing and uninstalling Client Manager.
Installation
Continued on next page
WLI-PCM User’s Manual 79
Page 82
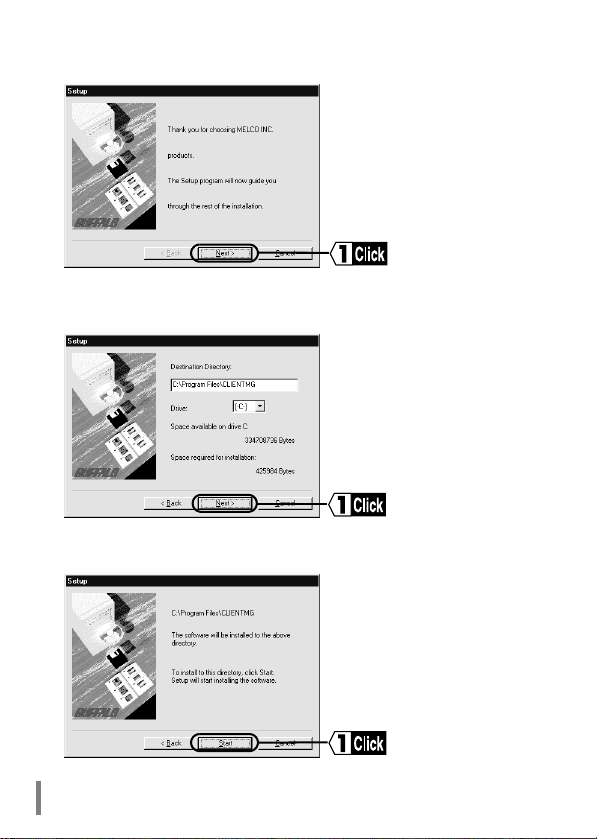
Click the Next button.
5
Check the destination directory for Client Man ager and click th e Next button.
6
If you want to change the directory, enter a new path and click the Next button.
Check the destination directory again and click the Start button.
7
Files are copied to the specified direct ory.
WLI-PCM User’s Manual80
Page 83
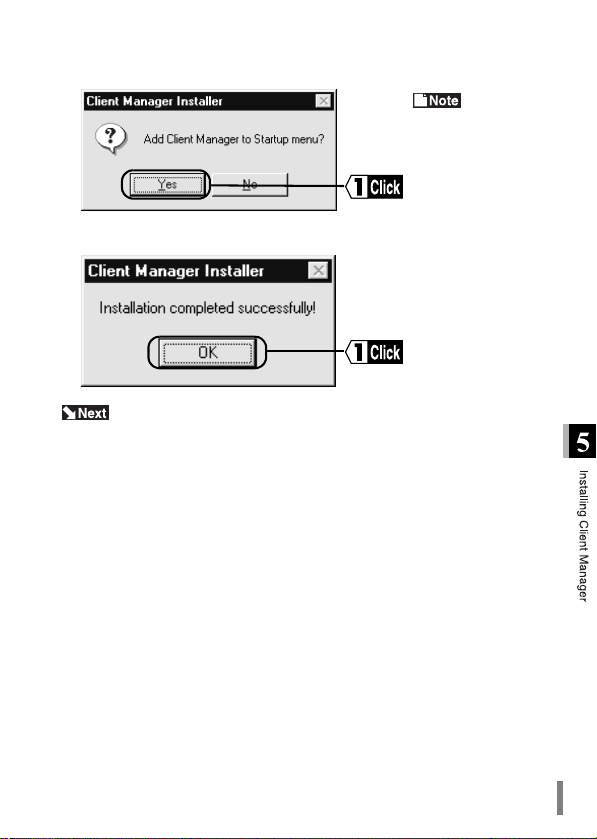
Click the Yes button. Client Manager is registered in the Startup menu.
8
when you do not want
to add Client Manager
to the Startup menu.
Click the OK button to complete installation.
9
Go to "Connection to Network" on page 83.
Click No
WLI-PCM User’s Manual 81
Page 84
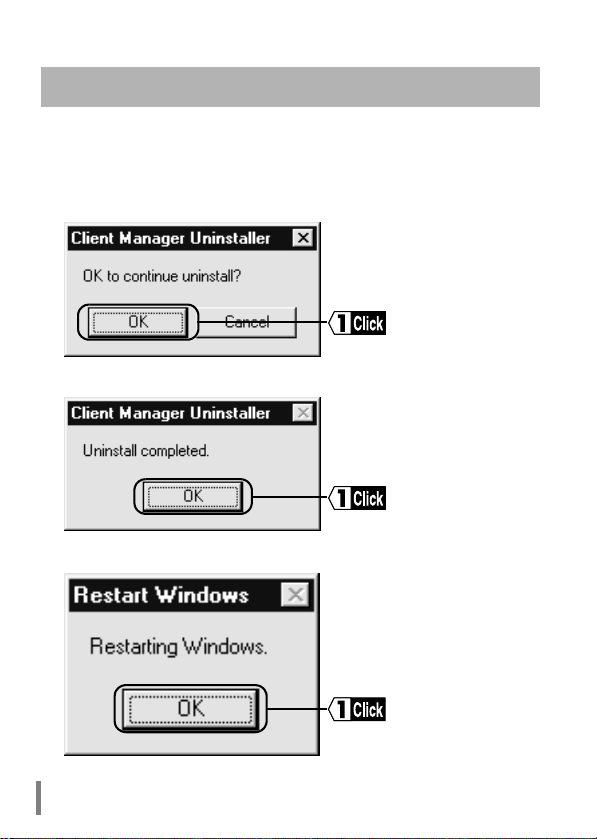
Uninstallation
Follow the steps below to uninstall Client Manager.
Click the Start button and select Programs → MELCO WLI-PCM Utility →
1
Uninstall Client Manager.
Click the OK button. Client Manager is removed, and related files and ico ns
2
are automatically deleted.
Click the OK button. Uninstallation of Client Manager is completed.
3
Click the OK button. The computer restarts.
4
WLI-PCM User’s Manual82
Page 85
Connection to Network
6
Follow the steps below to access the network.
There are two types of connection: direct connection between wireless LAN PC’s
and connection to a computer on a wired LAN via an access point (available separately). The setting procedures va ry depending on th e connectio n typ e. Select
the appropriate procedure for your operating environment.
Connection between wireless LAN PCs
The factory default ESS-ID (RoamL AN) can be used for connection between
wireless LAN PCs, however, we recommend that you change the ESS-ID to
ensure further security.
When adjacent companies build networks using the same (factory default, for
example) ESS-ID, their networks may be inadv ertently connected and confidential information may leak. It is safer to co nfigure the network using an
access point (MELCO INC.’s WLA-T1) with a unique identification code aut omatically assigned.
computer. Computers with different ESS-IDs cannot be connected. Contact the administrator for the ESS-ID.
After all required settings for the computer are completed, you can
try connecting to the network. This chapter describes how to
access the network, check signal and communicatio n conditions,
and select the target computer on the network.
Connection to network
If you change the ESS-ID, be sure to change that of the destination
Refer to "ESS-ID" on page 10.
Continued on next page
WLI-PCM User’s Manual 83
Page 86
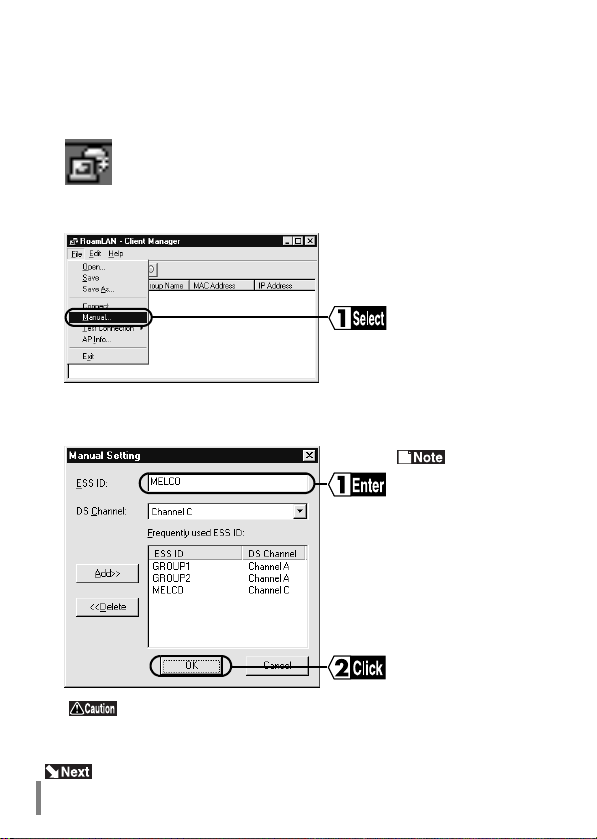
Click the Start button and select Programs → MELCO WLI-PCM Utility → Cli-
1
ent Manager.
If the following icon is displayed in the task tray on the screen, you can double-click this icon to start Client Manager.
Select File → Manual....
2
Enter the ESS-ID, select the DS channel and click the OK button.
3
If the desired ESS-ID is registered in the Frequently Used ESS ID list, select it
from there and click the OK button.
Click the Add
button after entering the
ESS-ID to register it as
a frequently used ESSID. Select any unus ed
ESS-IDS in the list and
click the Delete button
to delete it.
The ESS-ID is upper/lower case sensitive and can consist of
up to 32 alphanumeric characters, including the under bar (_).
Connection to a wireless LAN PC with the same ESS-ID is completed.
Go to "Checking connection to network" on page 91.
WLI-PCM User’s Manual84
Page 87
Connection to wired LAN PC using
access point
Access point information files must be obtain ed from the network administrator
before connecting to the network.
Refer to "When access point information is not available" on page 88 to
acquire the information files.
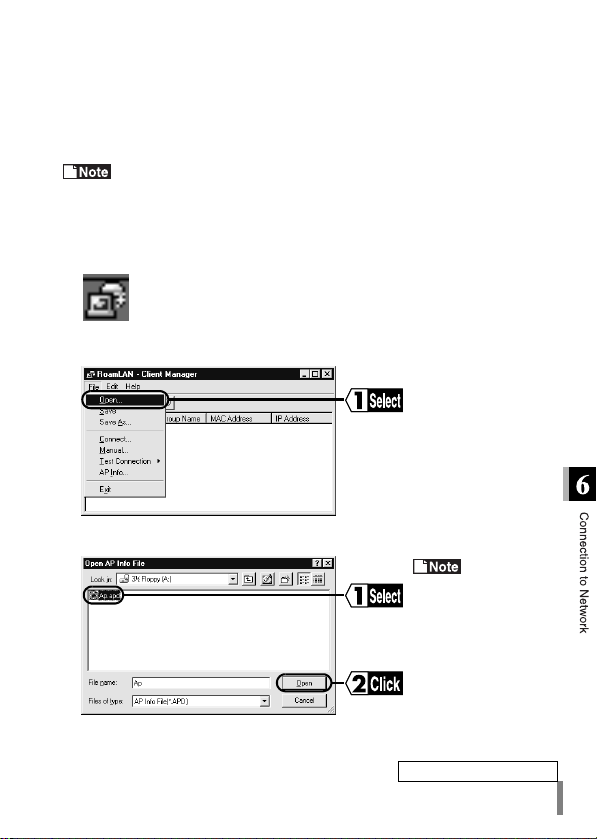
Click the Start button and select Programs → MELCO WLI-PCM Utility → Cli-
1
ent Manager.
If the following icon is displayed in the task tray on the scre en, you can double-click this icon to start Client Manager.
Select File → Open.
2
Select the access point information file and click the Open butto n.
3
Contact the
network administrator
to check the file to be
selected.
Continued on next page
WLI-PCM User’s Manual 85
Page 88
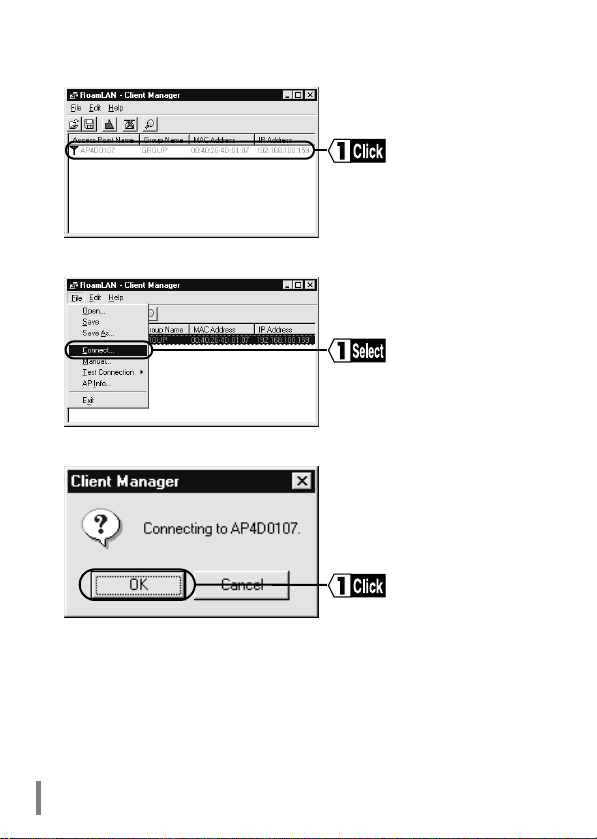
The access point appears in the list in gray. Select the target access point.
4
Select Open → Connect....
5
Click the OK button.
6
WLI-PCM User’s Manual86
Page 89
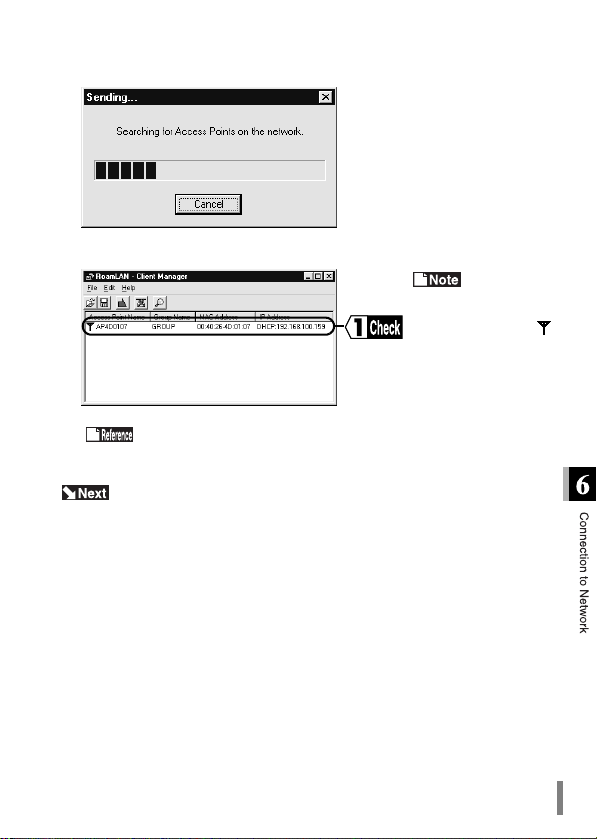
The ESS-ID is changed and access points are searched automatically.
7
Connection to the access point is completed.
8
The access
point in the list turns
from gray to black and
an antenna mark ( )
appears when your
computer is connected
to the access point.
Refer to "The access point cannot be accessed using Client Man ager (access point is displayed in gray even when it is found)." on page 106 if
the access point in the list does not change to black.
Go to "Checking connection to network" on page 91.
WLI-PCM User’s Manual 87
Page 90
When access point information is
not available
You need to enter the ESS-ID if the access point informat ion file is
not available. Contact the netw ork administra tor to chec k the ESSID before connecting to the network.
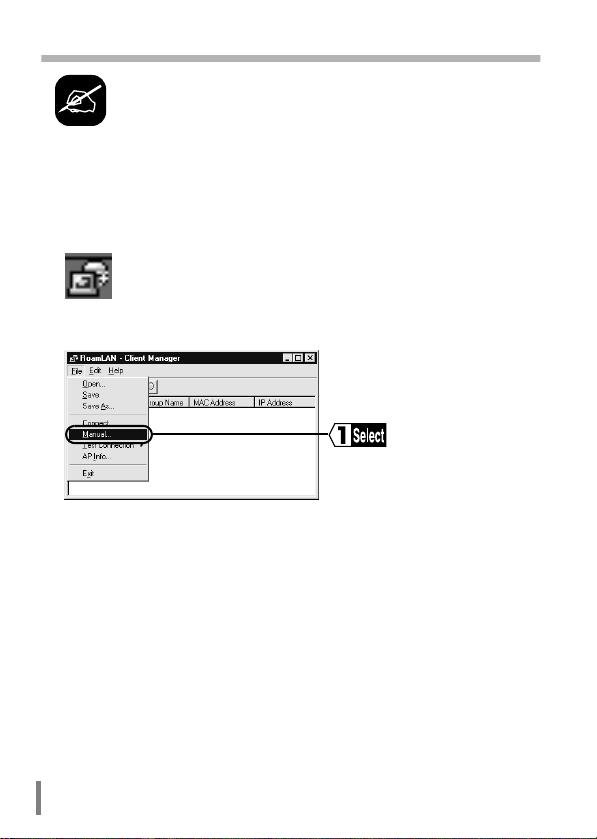
Click the Start button and select Programs → MELCO WLI-PCM Utility → Cli-
1
ent Manager.
If the following icon is displayed in the task tray on the screen, you can double-click this icon to start Client Manager.
Select File → Manual....
2
WLI-PCM User’s Manual88
Page 91
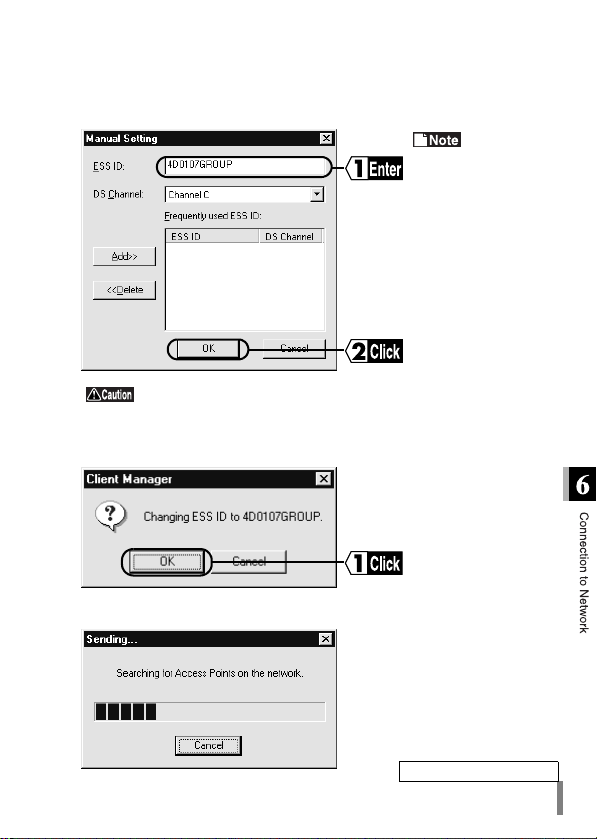
Enter the ESS-ID, select the DS channel for the target access point and click
3
the OK button.
If the desired ESS-ID is registered in the Frequently Used ESS ID list, select it
from there and click the OK button.
Contact the
network administrator
to check the ESS-ID.
The ESS-ID is upper/lower case sensitive and can consist of
up to 32 alphanumeric characters, including the under bar (_).
Click the OK button.
4
The ESS-ID is changed.
The ESS-ID is changed and the access point is searched automatically.
5
Continued on next page
WLI-PCM User’s Manual 89
Page 92
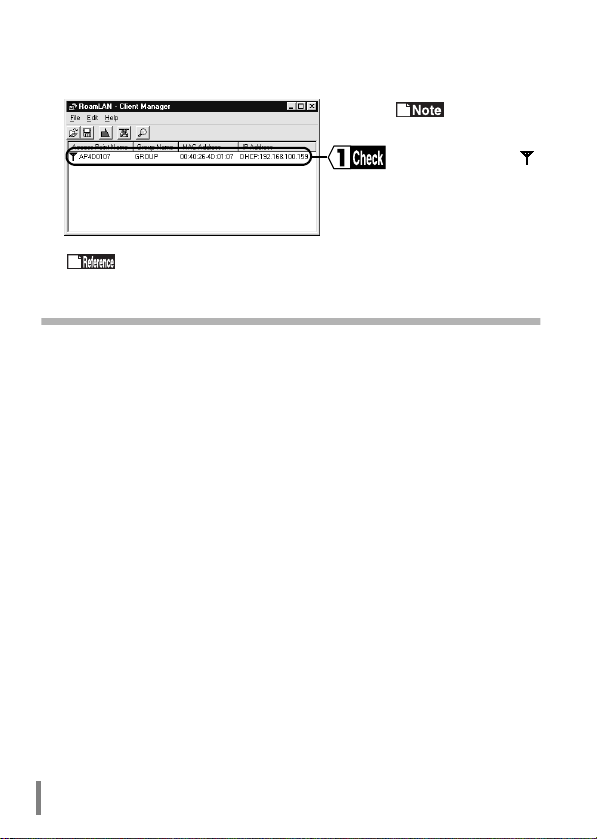
Connection to the access point is complet ed.
6
The access point is displayed.
The access
point in the list turns
from gray to black and
an antenna mark ( )
appears when your
computer is connected
to the access point.
Refer to "The access point cannot be accessed using Client Manager (access point is displayed in gray even when it is found)." on page 106 if
the access point in the list does not change to black.
WLI-PCM User’s Manual90
Page 93
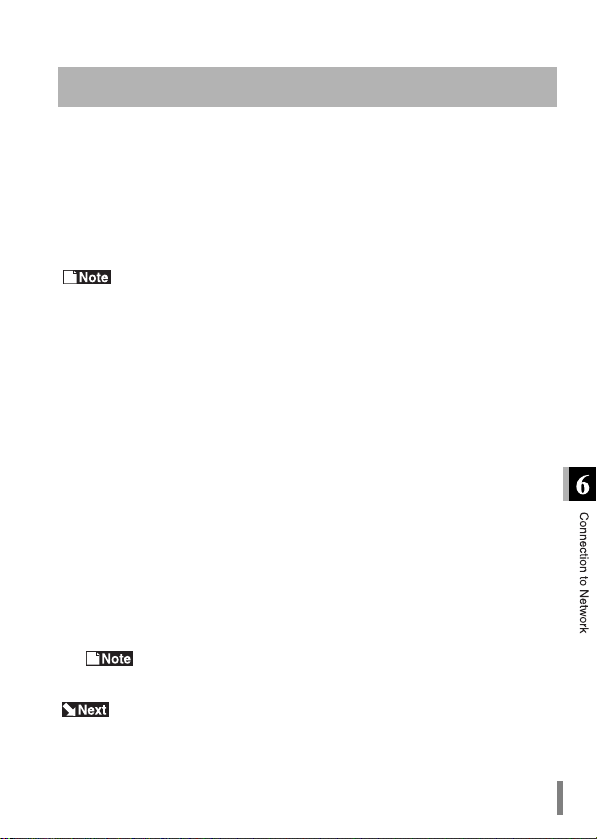
Checking connection to network
This section describes the methods for checking the connection between wireless LAN PCs and between the WLI-PCM and an access point.
Connection between wireless LAN PCs
The PING command is used to check the connection between wireless LAN PCs.
Executing the PING command checks that the IP packet reaches the destination
correctly.
The TCP/IP protocol must be in stalled to execute the PING comma nd .
Click the Start button and select Programs → MS-DOS Prompt.
1
If you are using WindowsNT4.0, select Programs → Command Prompt.
Enter the PING command as shown below (when the hard disk drive is "C").
2
C:\>ping XXX.XXX.XXX.XXX
Where "XXX.XXX.XXX.XXX" is the IP address of the target destination.
e.g. When the IP address of the target destination is "192.168.100.123"
C:\>ping 192.168.100.123
If the devices are connected correctly, the following is displayed.
3
Pinging 192.168.100.123 with 32 bytes of data:
Reply from 192.168.100.123:bytes=32 time=1ms TTL=32
Reply from 192.168.100.123:bytes=32 time<10ms TTL=32
Reply from 192.168.100.123:bytes=32 time=4ms TTL=32
Reply from 192.168.100.123:bytes=32 time<10ms TTL=32
If they are not connected correctly, a condition specific error message such
as "Request timed out" or "Destination host unreachable" appears. In this
case, refer to "Communication bet ween wireless LAN PCs is impossib le. No
reply is returned when executing the PING command to a wireless LAN PC."
on page 109.
Connection to the access point cannot be checked by execut ing the
PING command from a wireless LAN PC.
Go to "Connection to other computers" on page 97.
WLI-PCM User’s Manual 91
Page 94
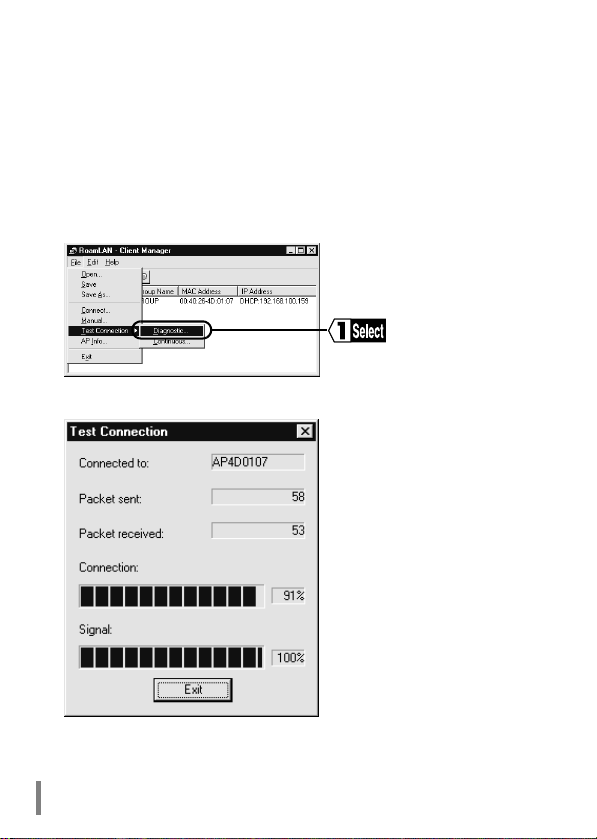
Checking connection between the WLIPCM and an access point
Client Manager is used to check connection conditions between th e WLI-PCM
and an access point.
Click the Start button and select Programs → MELCO WLI-PCM Utility → Cli-
1
ent Manager.
Select the access point, and then File → Test Connection → Diagnost ic ....
2
Check the connection.
3
WLI-PCM User’s Manual92
Page 95
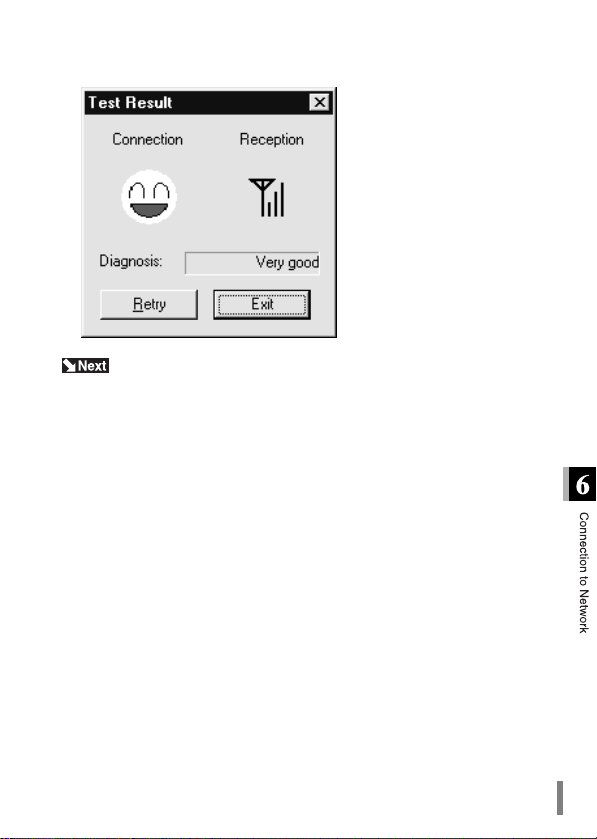
The result of the test is display ed.
4
Go to "Results of test" on page 94.
WLI-PCM User’s Manual 93
Page 96
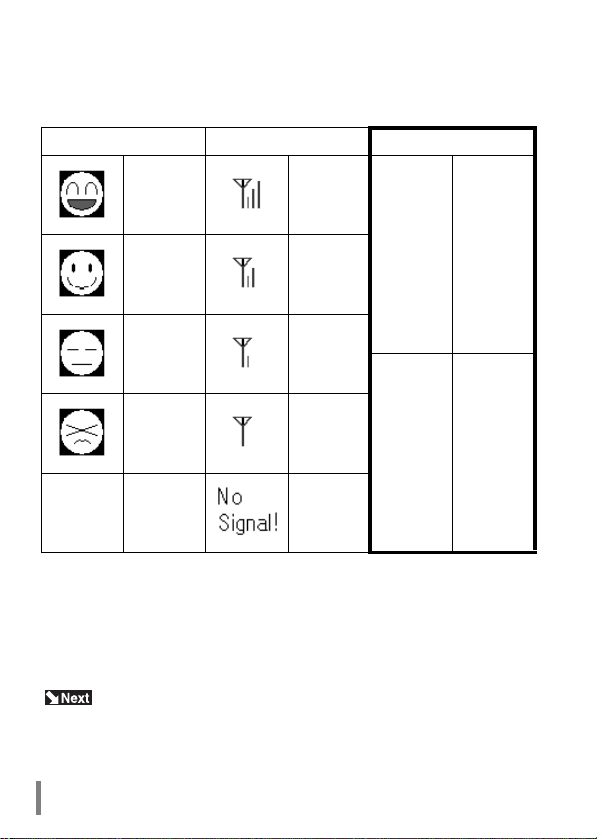
Results of test
The connection and signa l cond itions are shown as the result s of the co nnect ion
test. The symbols used and their meanings are shown below.
Connection Signal Results
Very good Very good
No
Good Good
Acceptable
Bad Poor
communication
problems
Very bad Bad
acceptable
Communi-
cation
impossible
Take any of the following actions when the diagnosis result is "not acceptable".
1.Move the wireless LAN PC closer to the access point.
2.Request the access point administrato r to change the location of the access point.
3.Eliminate obstacles between the wireless LAN PC and the access point.
4.Check that there is no source of interference such as a microwave ov en near
the access point or wireless LAN PC.
Go to "Connection to other computers" on page 97.
WLI-PCM User’s Manual94
Not
Communication
conditions are
unstable
Page 97
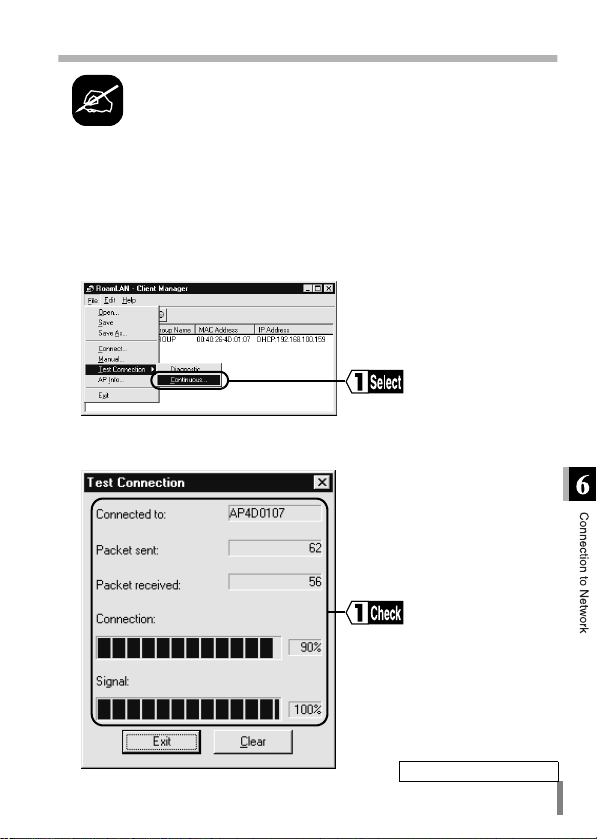
When installing the access point for
the first time
Follow the steps below when installing the access point for the first
time.
Move the access point to the desired locat ion.
1
Click the Start button and select Programs → MELCO WLI-PCM Utility → Cli-
2
ent Manager.
Select the access point, and then File → Test Co nne ction → Continuous....
3
Check the number of sent packets and received packets, and percentage
4
indicating the connection and signal conditions.
Continued on next page
WLI-PCM User’s Manual 95
Page 98

Move the client to check the effective communication range.
5
Determine the location of the access point where the best communication
6
conditions are ensured.
WLI-PCM User’s Manual96
Page 99
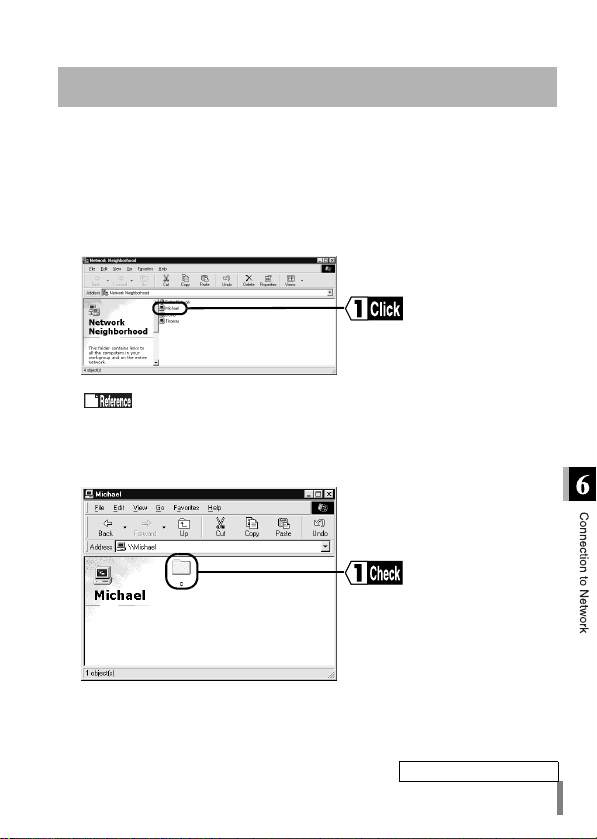
Connection to other computers
When the computer is connected to the network, try connecting to a wireless LAN
PC or wired LAN PC.
Screens from Windows98 are used in this example.
Double-click the Network Neighborhood icon.
1
Computers connected Peer to Peer are listed.
Double-click the icon of the target computer.
2
Refer to "Computers are not listed after double-clicking the Network
Neighborhood icon" on page 103.
The drive(s) set to be shared (page 53) are listed.
3
Double-click the desired drive.
Continued on next page
WLI-PCM User’s Manual 97
Page 100
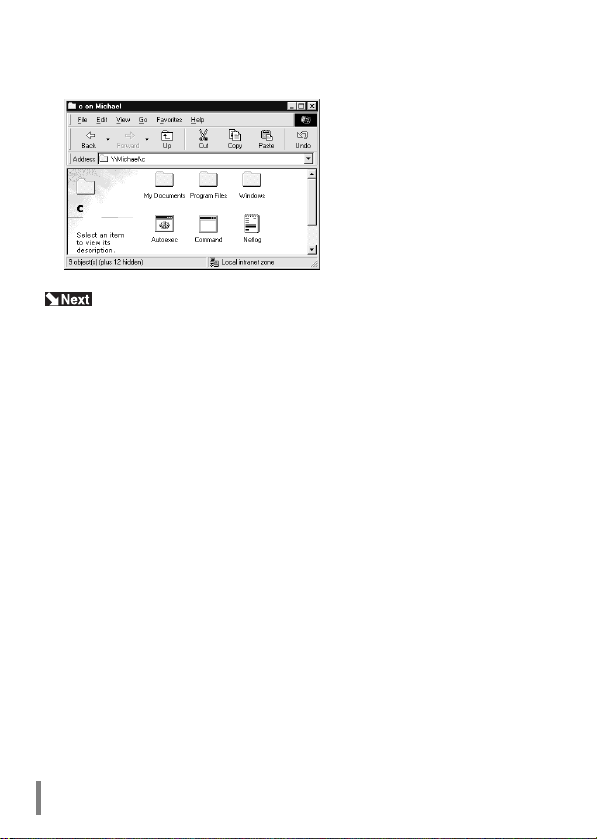
The contents of the selected drive are displayed and you can access the
4
desired folder.
Computers with a WLI-PCM mounted can be connected to other c omputers on the same wireless or wired LAN. You can now operate your computers
in a comfortable environment using both th e wireless and wired LANs.
WLI-PCM User’s Manual98
 Loading...