

Buffalo WHR-HP-G64 User Manual

User Manual - AirStation WHR-HP-G54
High-Power Wireless SmartRouter
www.buffalotech.com
v2.7

Table of Contents
Introduction . . . . . . . . . . . . . . . . . . . . . . . . . . . . . . . . . . . . . . . . . . . . . . . . . . . . . . 5
Installation . . . . . . . . . . . . . . . . . . . . . . . . . . . . . . . . . . . . . . . . . . . . . . . . . . . . . . 6
Automatic Installation . . . . . . . . . . . . . . . . . . . . . . . . . . . . . . . . . . . . . . . . 7
Layout . . . . . . . . . . . . . . . . . . . . . . . . . . . . . . . . . . . . . . . . 8
Manual Installation . . . . . . . . . . . . . . . . . . . . . . . . . . . . . . . . . . . . . . . . 9
Connecting Wireless Client Devices . . . . . . . . . . . . . . . . . . . . . . . . . . . . . . 10
Manual Connection . . . . . . . . . . . . . . . . . . . . . . . . . . . . . . . . . . .10
AOSS . . . . . . . . . . . . . . . . . . . . . . . . . . . . . . . . . . . . . . . . 11
Router Access Point Mode . . . . . . . . . . . . . . . . . . . . . . . . . . . 13
AirStation Conguration Tool . . . . . . . . . . . . . . . . . . . . . . . . 14
Home . . . . . . . . . . . . . . . . . . . . . . . . . . . . . . . . . . . . . . . . . . . . 14
Port Mapping . . . . . . . . . . . . . . . . . . . . . . . . . . . 16
Firewall . . . . . . . . . . . . . . . . . . . . . . . . . . . 17
UPnP . . . . . . . . . . . . . . . . . . . . . . . . . . . . . . . . 18
Encryption . . . . . . . . . . . . . . . . . . . . . . . . . . . 19
Wireless Channel . . . . . . . . . . . . . . . . . . . . . . . . . . . 20
Firmware Update . . . . . . . . . . . . . . . . . . . . . . . . 21
Internet Connection Wizard . . . . . . . . . . . . . . . . . . . . . 22
Advanced Settings . . . . . . . . . . . . . . . . . . . . . . . . . . . 23
WAN Conguration . . . . . . . . . . . . . . . . . . . . . . . . 24
WAN Port . . . . . . . . . . . . . . . . . . . . . . . . . . . . . 24
PPPoE. . . . . . . . . . . . . . . . . . . . . . . . . . . . .25
2

Table of Contents
LAN Conguration . . . . . . . . . . . . . . . . . . . . . . . 26
LAN Port . . . . . . . . . . . . . . . . . . . . . . . . 26
DHCP Server . . . . . . . . . . . . . . . . . . . . . 27
Manual Assignment of IP Address . . 28
Network Conguration. . . . . . . . . . . . . . . . . . . . . 29
Route information . . . . . . . . . . . . . . . . . . . . 29
Address Translation . . . . . . . . . . . . . . . . . . . . . . . . . . 31
IP Filter . . . . . . . . . . . . . . . . . . . . . . 33
Intrusion Detector . . . . . . . . . . . . . . . . . 36
UPnP . . . . . . . . . . . . . . . . . . . . . . . . . . . 37
Wireless Conguration . . . . . . . . . . . . . . . . . . . . . . . . 38
AOSS. . . . . . . . . . . . . . . . . . . . . . . . . 38
802.11g . . . . . . . . . . . . . . . . . . . . . . 39
Basic . . . . . . . . . . . . . . . . . . . . . . 39
Security . . . . . . . . . . . . . . . . . 40
Repeater . . . . . . . . . . . . . . . . . . . . 41
MAC access limit . . . . . . . . . . . . . . . . . . . . . . . . 42
Admin Conguration . . . . . . . . . . . . . . . . . . . . . . . . . . . . . . . . . 44
Password . . . . . . . . . . . . . . . . . . . . . . . . . . . . . . . . 44
Date/NTP . . . . . . . . . . . . . . . . . . . . . . . . . . . . . . 45
Syslog Transfer . . . . . . . . . . . . . . . . . . . . . . . . . . . 46
Save/Load Conguration . . . . . . . . . . . . 47
Initialize/Reboot . . . . . . . . . . . . . . . . . . . . . . . . . . . 48
3

Table of Contents
Firmware Update. . . . . . . . . . . . . . . . . 49
Diagnostic. . . . . . . . . . . . . . . . . . . . . . . . . . . . . . . . . . 50
System Information. . . . . . . . . . . . . . 50
Logs. . . . . . . . . . . . . . . . . . . . . . 51
Packet Trafc Info . . . . . . . . . . . . 52
Client Monitor. . . . . . . . . . . . . . . . 53
Ping . . . . . . . . . . . . . . . . . . . . . . 54
Connecting to an Existing Network. . . . . . . . . . . . . . . . . . . . . . 55
WDS Bridging . . . . . . . . . . . . . . . . . . . . . . . . . . . .56
Troubleshooting WDS . . . . . . . . . . . . . . . . . . . . . . .66
Antennas . . . . . . . . . . . . . . . . . . . . . . . . . . . . . . . . . . . . . . . . . . . . . . 67
Specications . . . . . . . . . . . . . . . . . . . . . . . . . 68
Troubleshooting . . . . . . . . . . . . . . . . . . . . . . . . . . . . . . . 73
Glossary . . . . . . . . . . . . . . . . . . . . . . . . . . . . . . . . . . .75
FCC Information . . . . . . . . . . . . . . . . . . . . . . . . 81
Environmental Information . . . . . . . . . . . . . . . . . . . . . . . . 86
Warranty Information. . . . . . . . . . . . . . . . . . . . . 87
Contact Information (USA) . . . . . . . . . . . . . . . . . . . . . 88
Contact Information (Europe) . . . . . . . . . . . . . . . . . . . . . 89
GPL Information . . . . . . . . . . . . . . . . . . . . . . . . . . 90
4

Introduction
Work and play - further and faster! Eliminate dead spots and enjoy faster connections
with extended range with your new AirStation High Power Wireless SmartRouter.
System Requirements
• A high-speed (Broadband) Internet connection or existing local area
connection.
• A computer with an Ethernet port and a web browser such as
Firefox, Internet Explorer, Opera, or Safari.
Package Contents
• WHR-HP-G54 AirStation
• Antenna
• Optional Base
• AC adapter and power cable
• CAT5 LAN cable
• Utility CD with Manual
• Quick Setup Guides
• Warranty Statement
5

Basic Setup
Begin by nding a good place to set up your router/access point. Some things to
consider:
• You’ll need to be able to plug your internet connection into it, so it should go within
reach of the LAN cable from your DSL or Cable modem. You’ll also want a power outlet
nearby.
• Keep the access point as central in your work area as possible. Signal strength and
speed fall off with distance.
• Higher is often better. For instance, set it up on the top shelf of a bookcase rather than
the bottom one, if possible.
Do you need a password or other information to log in to your internet connection?
Many DSL connections require information like global IP address, subnet mask, default
gateway address, DNS server address, or PPPoE parameters in order to connect. Cable
modems usually don’t require extra information. If you have a DSL internet connection,
make sure that you have any necessary information handy before you continue. Your
Internet Service Provider can give you this information if you don’t know it.
6

Automatic Installation
The AirNavigator CD can install your AirStation for you automatically. To use the
automatic installation program, insert your AirNavigator CD into your computer and
follow the onscreen directions.
The wizard will guide you through installing your AirStation. You will have the
opportunity to change your admin password, personalize your SSID, and set up WEP128
encryption.
7

Power to outlet or
surge protector
Cable or DSL Modem
PC
Layout
8

Manual Installation
To install the AirStation manually,
1. Power down the Cable or DSL modem and the computer which will be used to
congure the AirStation router.
2. Plug the Cable or DSL modem’s Ethernet cable into the AirStation’s WAN port.
Initially, you may need to unplug this cable from your computer, hub or other router.
3. Plug the provided Ethernet cable into one of the four LAN ports on the AirStation and
plug the other end into your computer’s Ethernet adapter (NIC).
4. Important: turn everything on in the correct order!! Power on your cable or DSL modem
and wait one full minute, then power on the AirStation and wait one full minute, and
nally power on the computer which will be used to congure the AirStation.
9

Connecting Wireless Clients to the Access Point
To connect wireless devices to the
AirStation, you may either enter the
SSID and encryption key manually,
or you can use AOSS to automatically
congure your wireless settings.
If you used Automatic Installation with
default settings, then your AirStation’s
SSID is “Buffalo”, and the encryption
is 128-bit WEP with the 13 digit key
that you specied.
Consult your wireless clients’ manuals
for instructions on conguring them
manually.
To use AOSS to congure your wireless
clients automatically, turn to the next
page.
10
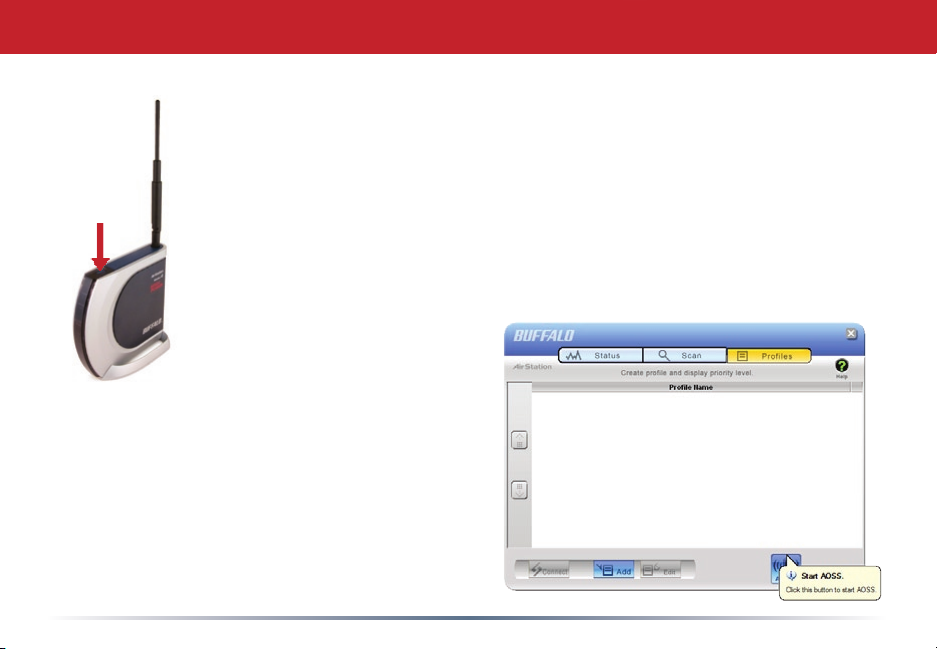
AOSS (AirStation One-Touch Secure System) is a simple system for
conguring your wireless network securely. If your router and your client
device are installed and both support AOSS, then making a secure wireless
connection between them is very easy.
Push the AOSS button on the top of your router and hold it in for a few
seconds. The AOSS light will begin to ash. You now have two minutes to
push the AOSS button on your client device and nish the connection.
Some client devices have a red button labeled “AOSS”. If yours is one of
these, push the button! About 15 seconds later, you’ll have a secure network
connection.
For client devices without a
physical button, use the AOSS
button in the Client Manager
software. Check your client
device’s user manual for instructions on
where to push or click the AOSS button.
After you’ve pressed both buttons, it will
take about 15 seconds for the connection
to complete. When it’s nished, the AOSS
light will glow a solid amber. You now have a
secure network connection!
AOSS
AOSS
11

AOSS Notes
Some things to keep in mind when automatically connecting with
AOSS:
• Only one wireless client adapter can be congured with AOSS at a time.
• It is not necessary to reconnect client devices that have already been congured via
AOSS unless signicant changes have been made to the wireless network.
• Do not attempt to congure two separate AOSS networks at the same time, as it may
cause undesired congurations.
• If an undesired client has connected via AOSS, it can be disconnected from within the
WHR-HP-G54’s web-based admin tool.
• Even if your client device doesn’t ofcially support AOSS, you may still be able to use
AOSS if you install Buffalo’s Client Manager software on your computer. It works with
most client devices, including many made by other manufacturers. You can download
it from www.buffalotech.com.
12

Router/Access Point Mode
This AirStation supports quickly changing the product from
a wireless router to a conventional access point.
Put your Airstation into Access Point Mode by moving the
switch on the bottom of your AirStation from AUTO to BRI.
This changes the default IP address of the AirStation from
192.168.11.1 to 192.168.11.100, and DHCP, NAT, and the
WAN port are disabled.
Access Point Mode might be desirable if you’re adding
wireless capability to an existing network with a router,
or conguring your AirStation as part of a repeater bridge
setup. It is not suitable for most home congurations. If you plan to use the AirStation as
an normal wireless router, make sure that this switch is in the normal (AUTO) position!
Instructions for conguring multiple AirStations in a wireless bridge can be found in the
‘WDS Bridging’ section of this guide.
13

Log in to the Web Admin Tool
The Web Admin Tool allows you to easily change the settings for your AirStation. To use
it, launch a web browser on a computer connected to the AirStation.
Enter the AirStation’s LAN-side IP address into the URL
eld. By default, this will be 192.168.11.1.
A window will open, prompting you to enter a User
Name and Password.
The User Name is root. By default, the password is
blank.†
*In AP mode (mode switch BRI), the default IP address is 192.168.11.100.
†If you ran the Automatic Installation program, you may have changed your password for
the Web Admin Tool. If so, use the password you set. To reset the password to a blank
eld, hold down the Init button on the AirStation until the Diag LED ashes.
14
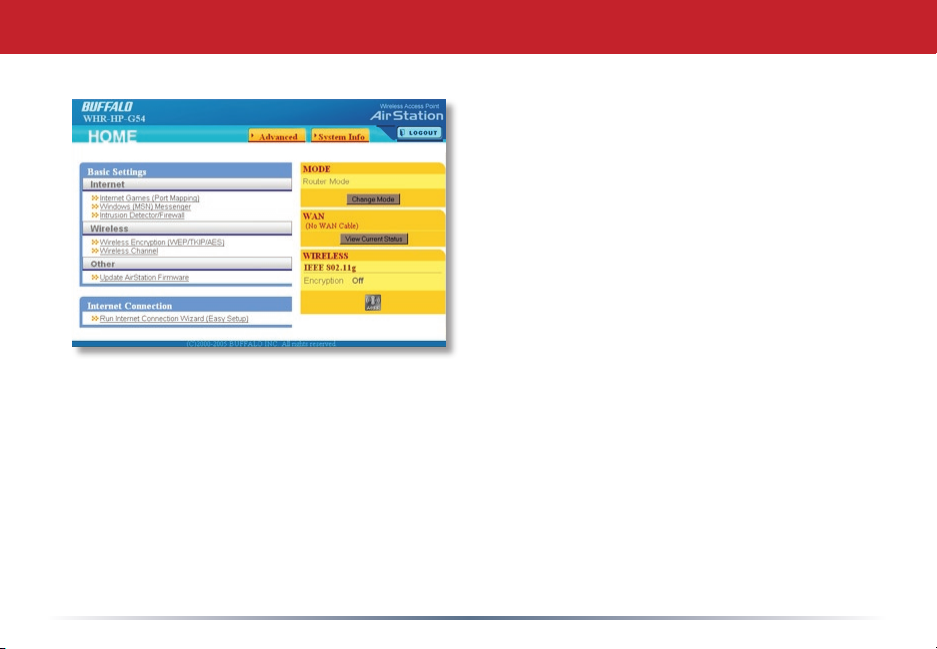
AirStation Conguration Tool (Home)
When you rst open your AirStation
Conguration Tool, it takes you to its Home
page. From Home, you can congure port
mapping for your internet games, set UPnP
for Windows (MSN) Messenger, congure
your rewall, setup encryption, choose your
wireless channel, update your AirStation’s
rmware, and reset your Internet
Connection’s conguration. Clicking the
Advanced tab gives you access to all of the
AirStation’s conguration tools.
You can get back to Home from anywhere
in the management tool by clicking on the
Home button at the top left of the screen.
15

Internet Games (Port Mapping)
Select any ports that need to be opened
for your internet games to function
correctly. Consult your game’s
documentation for more information on
what ports need to be congured.
16

Firewall/Intrusion Detector
From this page, choose the level of rewall
security you desire. You may also choose
to have alerts sent to a different PC, if you
like. Click Next when done to restart the
router.
Get to this page from Home by clicking on
Firewall/Intrusion Detector.
17

Windows (MSN) Messenger/UPnP
Windows (MSN) Messenger requires
UPnP for proper operation. You may
Enable UPnP here. UPnP may need to be
congured on your PC as well.
If you need to congure UPnP on your PC,
the links at the bottom of the page have
instructions for doing so on Windows ME
and XP computers.
Get to this page from Home by clicking on
Windows (MSN) Messenger.
18

Wireless Encryption
This page is available from Home by selecting
Wireless Encryption. Here, you can manually
select the type of wireless encryption you’d
like to use. Your AirStation supports three
different encryption schemes; choose the best
one that all your clients support.
Virtually all wireless clients support WEP. It’s
better than nothing.
TKIP is more secure than WEP, but some
wireless clients don’t support it.
AES is even more secure. It should be your
rst choice if all of your clients support it.
19

Wireless Channel
This page is available from Home by
selecting Wireless channel. With Auto
Channel selected, your AirStation will
choose the best channel available.
Current channel will show the channel
that your AirStation is currently using.
You may also select any channel from
1-11 manually. Channels 1, 6, and
11 are non-overlapping. If multiple
channels are in use in an area, select
a different channel for your AirStation,
as far away from the other channels
being used as possible.
20

Firmware Update
This page is available from Home
by selecting Firmware update. Use
Browse to select your rmware
update le, and then click on Apply.
Firmware update may take several
minutes to complete. Don’t power
down your AirStation until the diag
LED has gone out.
21

Internet Connection (Multisession Reset)
From Home, selecting the Internet
Connection Wizard (Multisession Reset)
tab will begin the Internet Connection
Wizard.
The Internet Connection Wizard will
only function correctly in simple
networks, where your cable or DSL
modem is plugged directly into your
AirStation’s WAN port. If you have
a complicated existing network that
you’re adding the AirStation to, see
page 55.
22

Advanced Settings
Advanced Settings lets you congure
every element of your AirStation. Get
to Advanced Settings from Home
by clicking the Advanced Tab. You
may return to Home by clicking on
the yellow > Home link in the top left
corner.
Click Help in the top right corner for
more information about any of the
pages in Advanced Settings.
To begin, click on WAN Cong. The
rst page in WAN Cong, WAN Port,
will open.
23
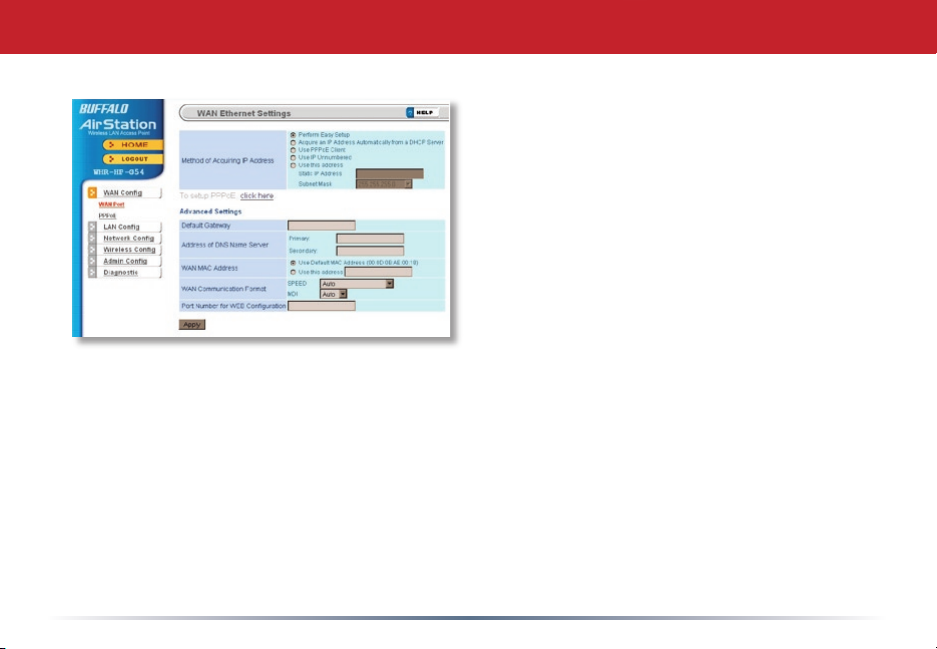
WAN Cong (WAN Port)
Here, you may choose how the AirStation
acquires an IP address. Normally, the
internet connection wizard will set this for
you if you have a cablemodem or DSL. If
you’re not sure what to choose, perform
Easy Setup.
To setup PPPoE manually, click on click
here and turn to the next page.
Also on this page, under Advanced Setup,
you may manually set the Default Gateway,
DNS server, WAN MAC address, WAN
format, and WEB port number.
Click Apply when nished.
24

PPPoE
Many DSL connections require a PPPoE
Connection in order to log in to an internet
connection. Normally, the Easy Detection
Wizard will help you congure that, but
you may manually congure one here.
Consult your ISP for more information
on correctly conguring your PPPoE
connection.
To add a new PPPoE connection, click Edit
Connection List. To choose your preferred
connection, click on Edit Preferred
Connection List.
25

LAN Cong (LAN Port)
Default for the LAN side IP address is
192.168.11.1. To add the AirStation to an
existing LAN, specify a unique IPaddress, not
used elsewhere in the network.
The default Subnet Mask is 255.255.255.0.
To connect AirStation to an existing LAN,
specify the Subnet Mask that the LAN uses.
If there’s more than one DHCP server on
a network, disable all but one of them.
To have DHCP assign addresses from a
specic range, enter a beginning address by
Assigned IP Address and give the number of addresses to assign in the Addresses box. To
exclude specic addresses from being assigned by DHCP, specify them in the Excluded IP
Address box. Multiple IP addresses may be specied by separating them with a comma,
e.g. 192.168.11.7,192.168.11.9. You can also specify an IP address range by start and
end address connected by a dash, e.g. 192.168.11.15-192.168.11.21. The ‘,’ and ‘-’ can be
used at the same time, e.g. 192.168.11.7,192.168.11.9,192.168.11.15-192.168.11.21, up
to a total string length of 128 characters.
Click the Help link in the top right corner for more information.
26
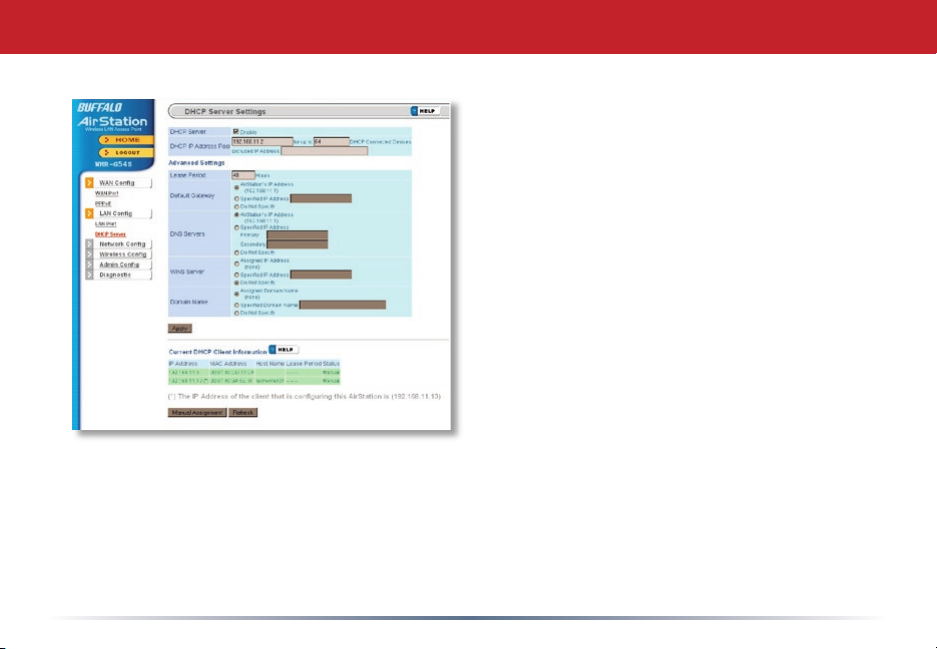
Advanced DHCP Settings
This page offers the same DHCP settings as
the previous one, and in addition, offers you
the chance to change the Lease Period, De-
fault Gateway, DNS servers, WINS server, and
Domain Name. Click Apply when you have
the settings the way you want them.
To manually assign an IP address, click
Manual Assignment.
27

DHCP Server (Manual Assignment of IP Address)
To manually link a LAN address to a MAC
address, enter them under Add Client Infor-
mation and click Add.
Current DHCP Client Information shows
all LAN addresses currently assigned by
AirStation’s DHCP. You may congure a
specic client to always receive the same
IP address by clicking Manual Assignment
to the right of its MAC Address. Clicking
Delete returns a manually assigned client
to normal DHCP operation. Edit allows
you to manually adjust a linked IP Address
and Mac Address in the Client Information
window above.
28
 Loading...