

Page 1
Network Attached Storage
TeraStation User Manual
www.buffalotech.com
35011187 ver.01 v1.2
Page 2

Contents
Chapter 1 Diagrams and Layout ............................................................. 4
Diagrams and Layout............................................................................................................4
Auto Power Mode ..................................................................................................................6
Chapter 2 Using your TeraStation ........................................................... 7
Opening Web Admin ............................................................................................................7
Chapter 3 Changing RAID Modes ............................................................ 9
RAID Arrays .............................................................................................................................9
Using Normal mode ..............................................................................................................11
Using RAID 5 mode (4 hard drives) ....................................................................................12
Using RAID 5 mode (3 hard drives) ....................................................................................13
Using RAID 10 mode .............................................................................................................14
Using RAID 1 mode ...............................................................................................................15
Using RAID 0 mode ...............................................................................................................16
Conguring a Hot Spare ......................................................................................................17
Chapter 4 Adding an External Hard Drive ............................................... 18
Connect an External Drive ...................................................................................................18
Formatting the External Drive ............................................................................................19
Set Access Restrictions on the External Drive .................................................................20
Chapter 5 Removing External Hard Drives .............................................. 21
Dismounting with the Function button ...........................................................................21
Dismounting from the Web Admin ...................................................................................22
Chapter 6 Backup ................................................................................... 23
Backup Data from your Windows PC ................................................................................23
Backup Data on the TeraStation.........................................................................................23
TeraStation User Manual 1
Page 3

TeraStation User Manual 2
Replication ..............................................................................................................................28
Time Machine .........................................................................................................................30
Chapter 7 Conguring Access Restrictions ............................................. 33
Adding a Shared Folder .......................................................................................................34
Adding Users ..........................................................................................................................38
Adding Groups .......................................................................................................................40
Access Restrictions ................................................................................................................41
Access Restrictions on NT Domain .....................................................................................43
Access Restrictions on Active Directory ............................................................................45
Access Restrictions through Delegate Authority to External SMB Server .................47
Chapter 8 Managing your TeraStation .................................................... 50
Name, Date and Time ...........................................................................................................50
RAID Scanning ........................................................................................................................52
Disk Check ...............................................................................................................................53
Encrypt Hard Drives on the TeraStation ...........................................................................53
Formatting Disks ...................................................................................................................54
E-mail Notication .................................................................................................................55
UPS Settings ...........................................................................................................................57
Beep Alerts ..............................................................................................................................58
LCD Display Settings .............................................................................................................58
Changing the Admin Password ..........................................................................................59
Erase Data on the TeraStation Completely ......................................................................60
Initialization ............................................................................................................................61
Changing the IP Address......................................................................................................63
Network ...................................................................................................................................64
Port Trunking..........................................................................................................................66
Chapter 9 Extensions .............................................................................. 68
WebAccess ..............................................................................................................................68
Direct Copy .............................................................................................................................74
PrintServer ..............................................................................................................................76
Sleep Timer .............................................................................................................................80
Disk Quotas .............................................................................................................................82
TeraSearch ..............................................................................................................................87
Oine Files .............................................................................................................................89
DFS (Distributed File System) .............................................................................................92
Page 4

TeraStation User Manual 3
FTP Server ...............................................................................................................................94
Accessing from a NFS Client ................................................................................................96
Encrypting Data Transmission ............................................................................................99
Chapter 10 NAS Navigator2 .................................................................... 101
Mac OS X 10.3.9 or later .......................................................................................................105
Chapter 11 Software ............................................................................... 106
NAS Navigator2 ......................................................................................................................106
File Security Tool....................................................................................................................106
Memeo Backup ......................................................................................................................107
NS-SHFT ...................................................................................................................................107
EXT3 Reader ............................................................................................................................108
Chapter 12 List of Settings in the Web Admin ......................................... 109
Common items (left side of the screen) ............................................................................109
Shared Folders .......................................................................................................................109
Users/Groups ..........................................................................................................................112
Network ...................................................................................................................................114
System .....................................................................................................................................118
Extensions ...............................................................................................................................132
Appendix .................................................................................... 134
Assign as Network Drive (Windows) .................................................................................134
Mount as a Network Drive (Mac OS X 10.3.9 or later) ....................................................135
Factory Defaults .....................................................................................................................136
List of LCD Display ................................................................................................................137
Update the TeraStation’s Firmware ...................................................................................140
Term Lists ................................................................................................................................141
Page 5
Chapter 1
±¸
±¹
²°
TS-XL
Series
TS-XEL
Series
±³
±´
±µ
±
±·
±·
±´
±µ
±
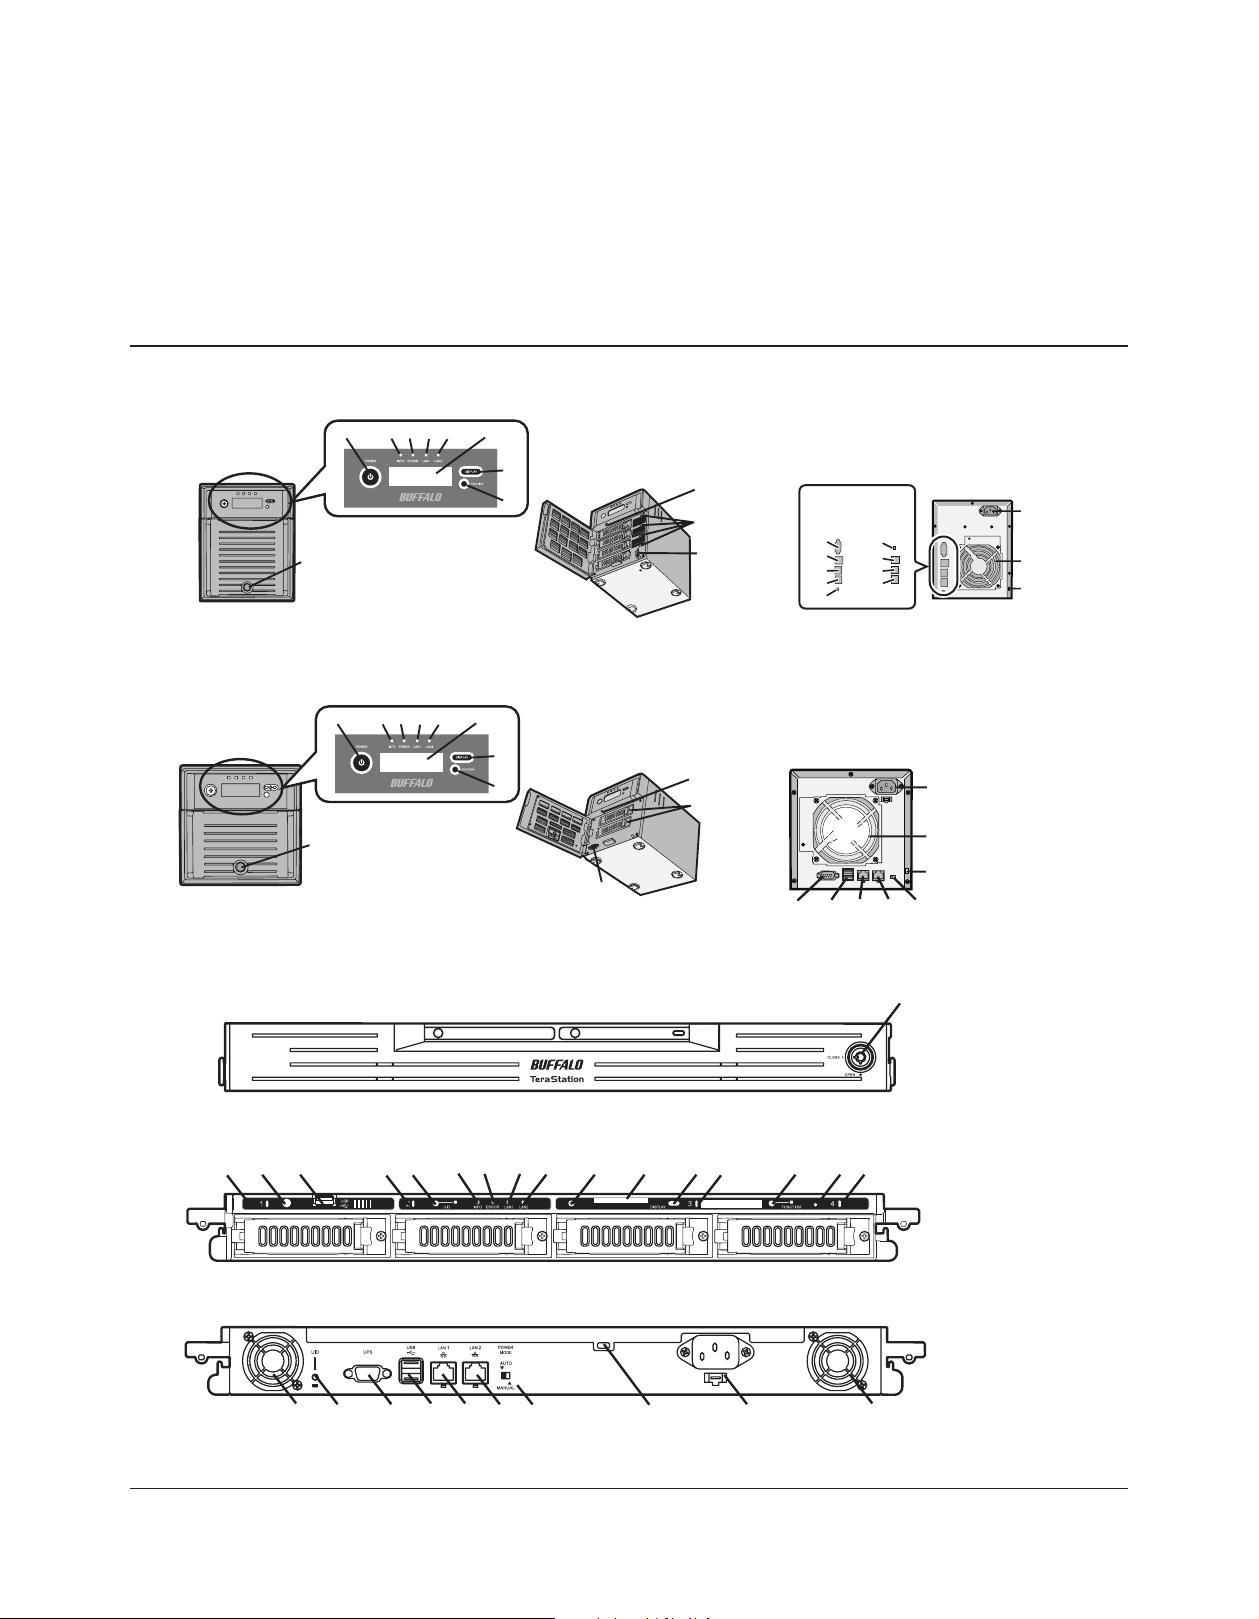
Diagrams and Layout
Diagrams and Layout
<TS-XL, TS-XEL>
Front View
<TS-WXL>
Front View
<TS-RXL>
with cover attached
1 2
9
1 234 5
9
3 4 5
6
7
8
10
Rear View
11
12
6
7
8
10
Rear View
18
11
19
20
12
15 16 17
14
13
9
11
12
14 11
21
3
2
4 5
1 6 7
11
8
10
11
with cover removed
Rear View
19 21 13 14 15 16 17 18 19
TeraStation User Manual 4
20
Page 6

1 Power Button
Power ON: Push the Power button. When the power is ON,
the power button will be illuminated in green (except TS-RXL
series).
Power OFF: Press and hold the Power button for 3 seconds
(or until it beeps).
12 Factory Use Only
TS-XEL Series doesn’t have this port.
13 UPS Port
Connect a UPS (Uninterruptable Power Supply).
TS-XEL Series doesn’t have this port.
2 Info LED
If there is a message about the current status, the amber Info
LED is illuminated. Check the LCD display for current status.
3 Error LED
The red Error LED is illuminated when an error occurs. Check
the LCD display for more information.
4 LAN1 LED
When the LAN1 Port is connected to a network, it is
illuminated in green (the light next to the LAN Port1 will be
illuminated as well).
5 LAN2 LED
When the LAN2 Port is connected to a network, it is
illuminated in green (the light next to the LAN Port2 will be
illuminated as well).
6 LCD Display
Displays the status of the TeraStation.
7 Display Button
Switches between the dierent display modes.
8 Function Button
Use this button to perform the following operations:
• DirectCopy
• Removal of USB devices
• Rebuild RAID after replacing hard drives
14 USB Connector (USB 2.0/1.1 Series A)
Compatible Bualo USB hard drives, USB ash drives,
and Digital Cameras can be connected. USB hubs are not
supported.
15 LAN Port 1
Connect to a router, hub, or switch on your Ethernet network.
16 LAN Port 2
Use this second Ethernet port for redundancy or backup. For
backup, a second TeraStation may be connected directly.
17 Power Mode Switch
Switches between Auto and Manual power modes (page 6).
18 Power Connector
Use the included AC cable to connect to an UPS, surge
protector, or outlet.
19 Fan
Do not block the fan when installing the unit.
20 Anti-Theft Security Slot
You can also secure it using an o-the-shelf wire lock.
21 UID Button
The blue LED next to the UID button will be illuminated or
turned o every time you push this button on the front or
back.
9 Drive Lock
Open the front panel with the key to replace hard drives or
press the Reset Button.
10 Reset Button
With the TeraStation powered on, hold down this button
until it beeps (about 5 seconds), to reset the TeraStation’s IP
address and Password to the factory defaults. The password
will not be reset if this functionality has been disabled from
within the Web Admin.
Note: To access the TS-RXL series’ reset button, insert the tip
of an unfolded paper clip.
11 Status LEDs 1 - 4
LEDs 1 through 4 will be illuminated in green when the
corresponding hard drives are accessed. If an error occurs on
a hard drive, the corresponding LED will be illuminated or
ash in red or amber.
TeraStation User Manual 5
Page 7
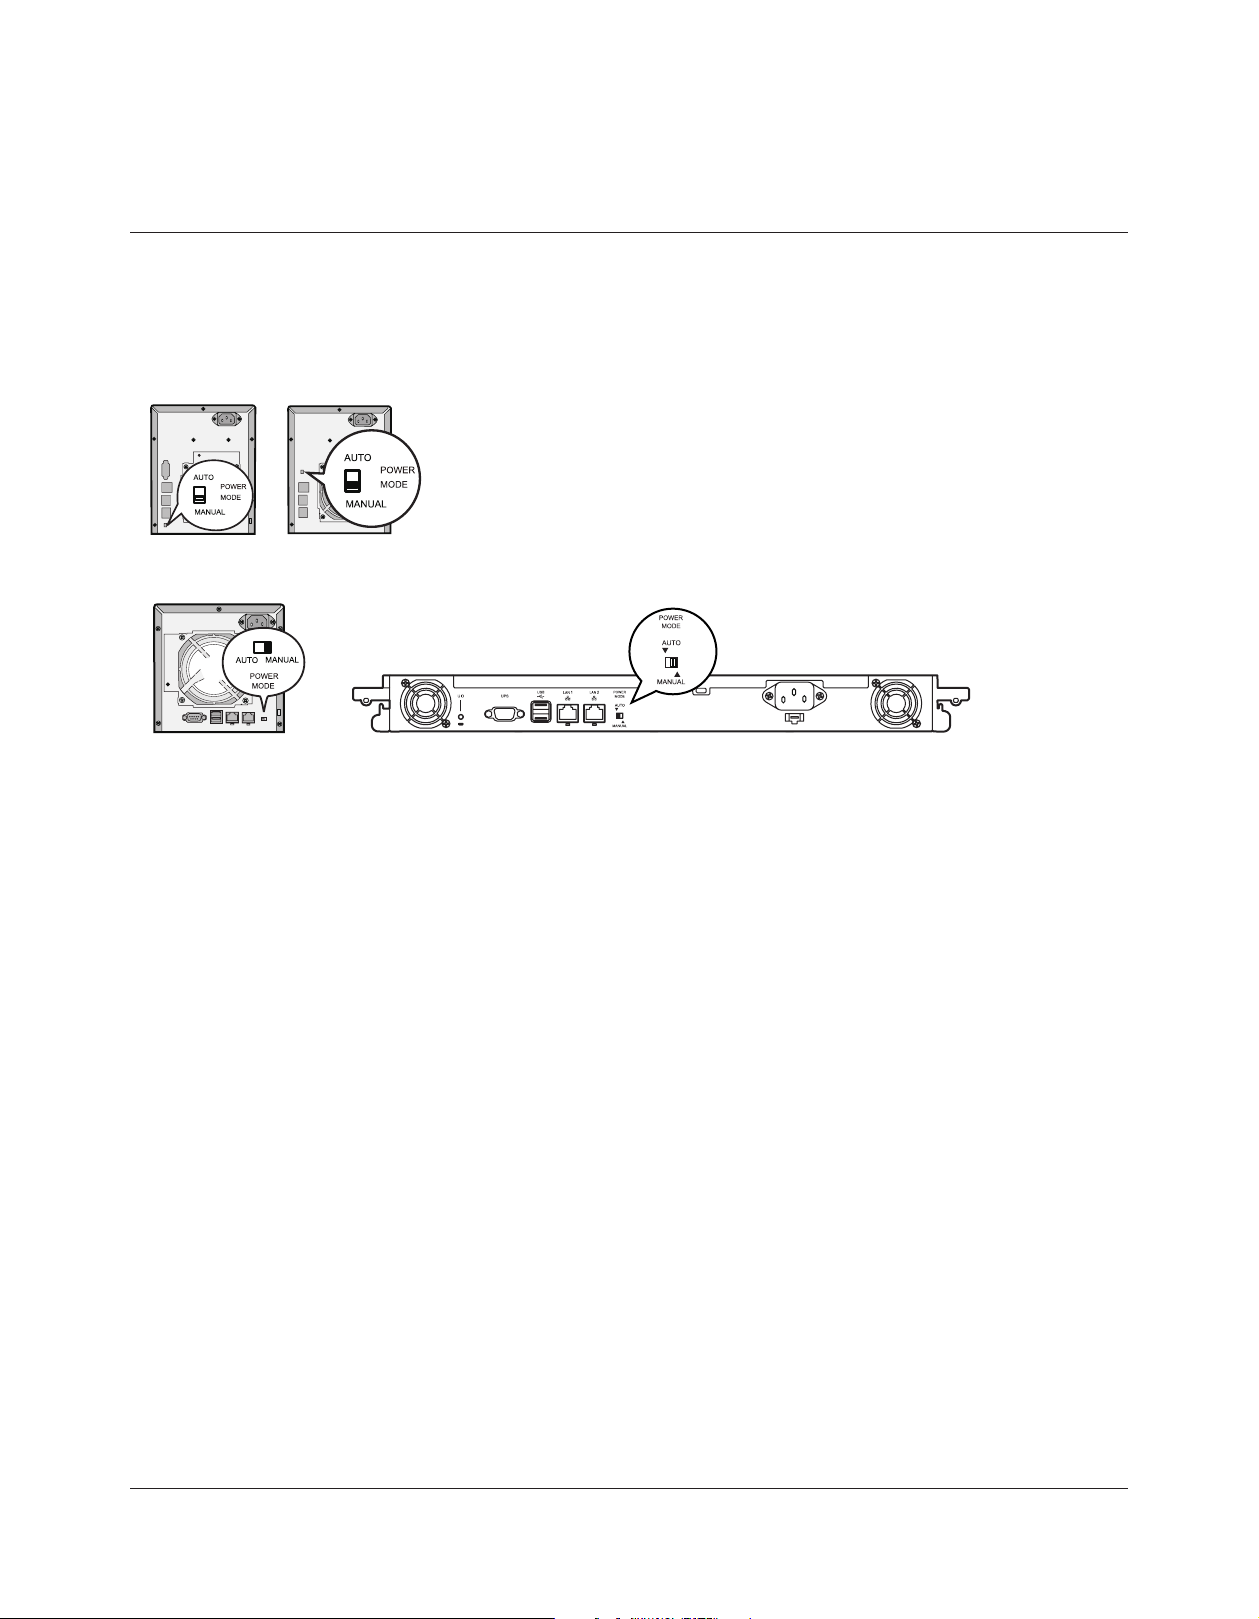
Auto Power Mode
The TeraStation can be congured to automatically turn on and o with your computer. To use this feature, install NAS
Navigator 2 on your computer(s) and then set the Power Mode Switch on the back of your TeraStation to Auto.
TS-XL TS-XEL
TS-WXL
TS-RXL
Notes:
• After you turn o your computer, it may take several minutes for the TeraStation to shut down.
• When the Power Mode Switch is changed from Auto to Manual or vice-versa, it takes about ve minutes for
the change to take eect.
• Power on the TeraStation before moving the switch to the Auto position.
• Auto Power Mode doesn’t work if port trunking is enabled or if NasNavi detection is disabled.
• Install NAS Navigator 2 on all computers that will be accessing the TeraStation before switching to Auto Power
Mode.
• Some networks may not support the Auto Power Mode. If you have problems with it, just use Manual power
mode.
Manual (default):
In this position, the power button on the front of the TeraStation turns it on
and o. It is not aected by the power state of connected computers.
Auto:
In this position, if all connected computers are turned o, the TeraStation
will turn o too. If a connected computer is powered on, the TeraStation will
power on too.
TeraStation User Manual 6
Page 8
Chapter 2 Using your TeraStation
Opening Web Admin
To congure your TeraStation, use the web-based Web Admin from a browser on a computer connected to the same
network.
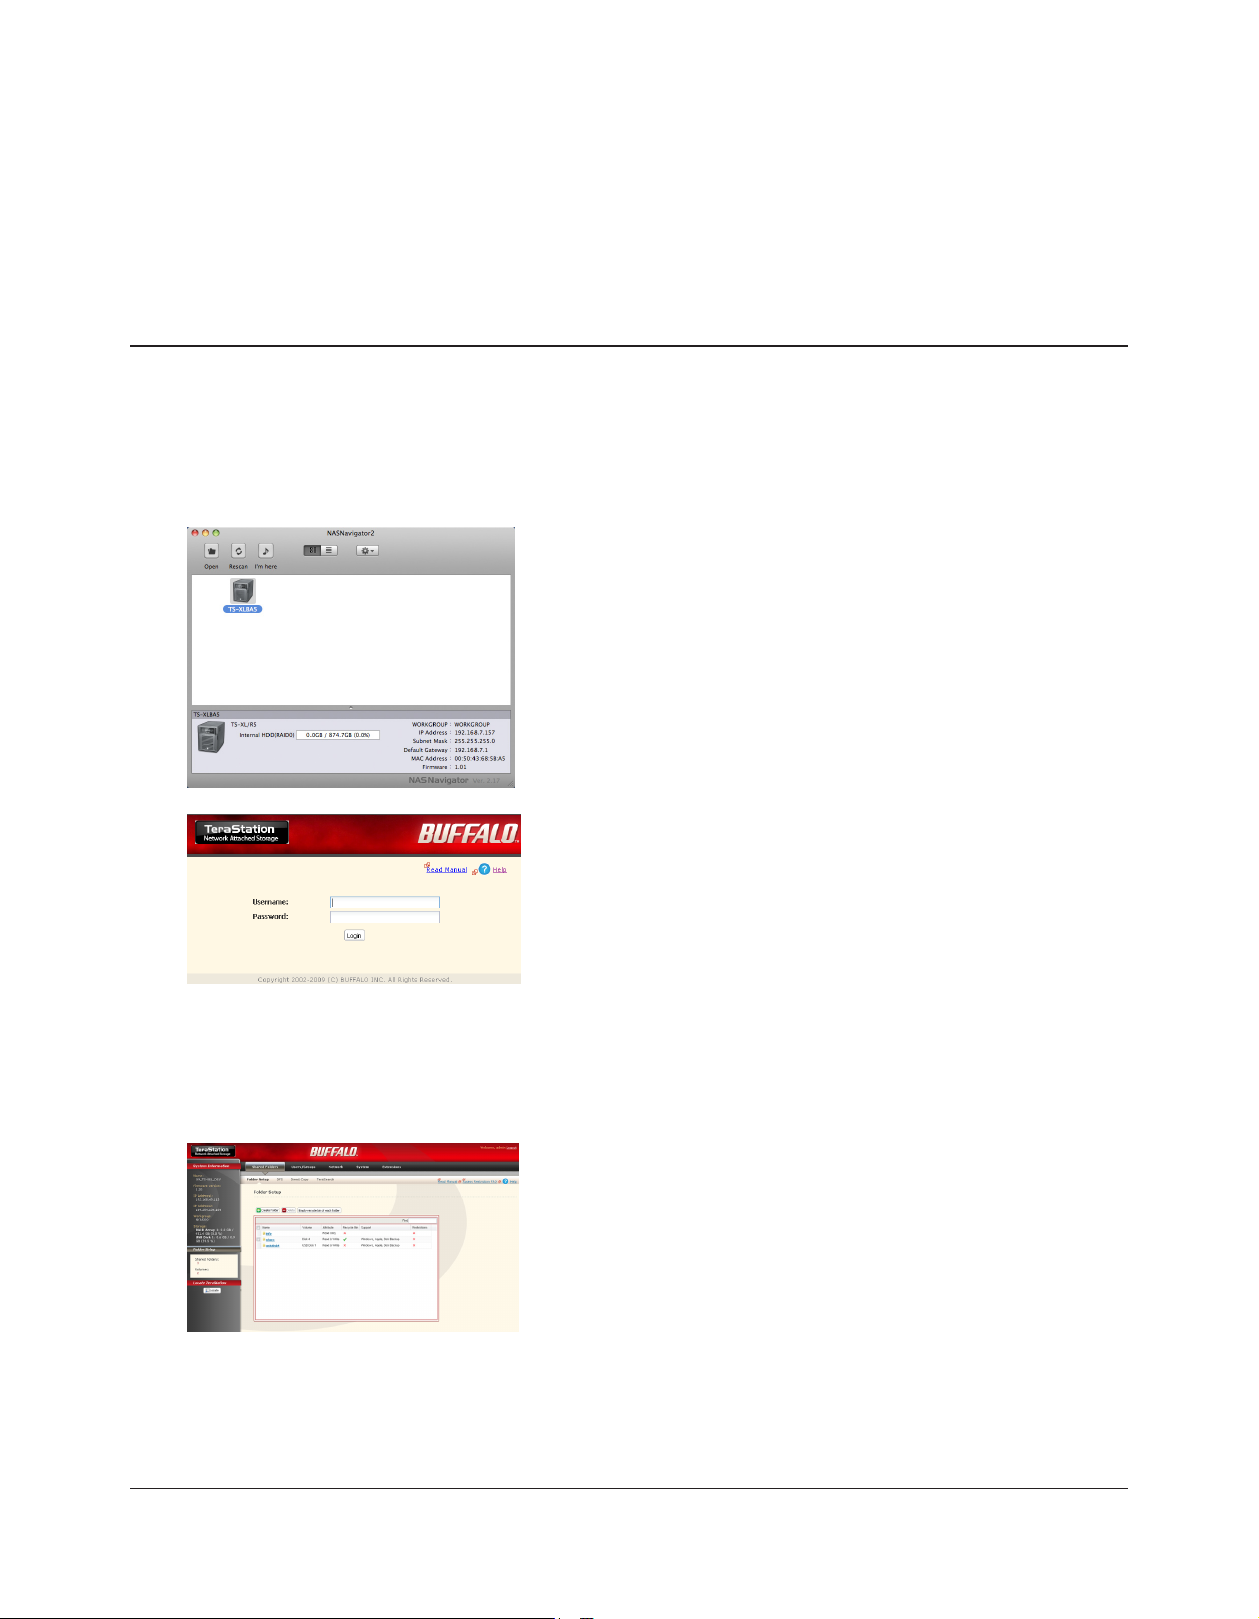
Launch NAS Navigator2. For Windows, click on the [BUFFALO NAS Navigator2] icon on your desktop. For Mac OS 1
X, double-click on the [NAS Navigator2] icon in the Dock.
2
3
Note:
• To login as a guest, type “guest” for the Username, leave the password blank, and click [OK]. Guests can check the
TeraStation’s name, IP address, workgroup, and disk status. Regular users can change their login passwords as well
as check the TeraStation name, IP Address, workgroup, and disk status. Administrator user, “admin” by default, can
congure all options.
Right-click on the TeraStation icon (on Mac OS X, click the icon
while holding down the control key) and select [Open Web
Admin] from the menu.
Notes:
• If multiple TeraStations and TeraStations are connected to
the network, multiple icons will be displayed. Click on the
correct TeraStation.
• Record the TeraStation’s IP address from the bottom right of
the NAS Navigator2 window.
Enter your username and password, and click [Login]. 1
Initially, use the default username and password:
Username: admin
Password: password
After you log in, change the password for security.2
This is the TeraStation’s Web Admin. This page displays the
4
Notes:
• The Web Admin supports Firefox 1.5 or later, Internet Explorer 6.0 with SP2 or later, and Safari 3 or later. It may not
display properly in other browsers.
• The Web Admin may not display correctly in Internet Explorer due to your browser security settings. If this happens,
navigate to [Tools] - [Internet Options] - [Security] on Internet Explorer, and set the Security Settings to [Local Intranet].
TeraStation User Manual 7
TeraStation’s current status, including name, IP address,
workgroup, and hard disk settings.
Page 9
The Web Admin is organized by tabs across the top. The following tabs are available.
Shared Folder•
Add or delete Shared Folders; congure Access Restrictions,
DirectCopy, DFS and TeraSearch.
Users/Groups•
Add, delete, and congure Users and Groups.
Network•
Congure Network, Workgroup, and NFS settings.
System•
Congure Name, Date and Time, RAID setup, RAID Scanning, Check Disk/Format Disk, Backup, Replication,
Email Notication, Sleep Timer, UPS Settings, Restore/Format.
Extensions•
Congure Web Access, Print Server, and Time Machine.
Notes:
•To open the Web Admin from a dierent computer, refer to Quick Setup Guide and install NAS Navigator2. After the
installation, follow Chapter 2, or, you may type the IP address of TeraStation on a web browser.
• You may also open the TeraStation’s Web Admin by typing the IP address that you wrote down in step 2 into the
address eld of your browser. Press the <Enter> key and bookmark this page in your browser so that you can return to it
easily.
•With Mac OS X 10.4 or later, you can open the TeraStation’s Web Admin from within Safari with Bonjour.
Launch Safari. 1
Select [View] - [View Bookmark Bar] from Safari’s menu.2
3
4
5
Select [Bonjour] from the left-side menu, then click on your
TeraStation in the bookmark list.
Enter your username and password.1
Click [Login].2
Note: To log in as a guest, type “guest” as the username and
leave the password blank.
The Web Admin opens.
The TeraStation’s name, IP address and disk information are
displayed on the left.
TeraStation User Manual 8
Page 10

Chapter 3 Changing RAID Modes
RAID Arrays
TS-XL, TS-XEL and TS-RXL series TeraStations default to RAID 5 mode (4 hard drives), TS-WXL/R1 series default to RAID
1 mode, and TS-WXL/1D series default to Normal mode. The characteristics of each type of RAID are described below.
If you change the RAID mode, all of the data on the hard drive is deleted. Always back up any important data before
changing the RAID mode.
Note:
• In this document, “recovery” means putting the TeraStation back to the state it was in before the malfunction
happened. It does not mean reading data from failed hard drives.
• RAID 5 mode (4 hard drives) (Default for TS-XL, TS-XEL and TS-RXL)
Note:
TS-WXL/R1 and TS-WXL/1D TeraStations don’t support this mode, as they don’t have 4 hard drives.
Uses 4 hard drives as one array. It generates parity during writes, so access speeds are slower than other RAID modes.
Usable space is the sum of 3 hard drives’ space. If one hard drive in the array is damaged, you can recover data by
replacing the hard drive. You cannot recover data if 2 or more drives are damaged.
• RAID 5 mode (3 hard drives)
Note:
TS-WXL/R1 and TS-WXL/1D TeraStations don’t support this mode, as they don’t have 3 hard drives.
Uses 3 hard drives as one array. It generates parity during writes, so access speeds are slower than other RAID
modes. Usable space is the sum of 2 hard drives’ space. You can designate a 4th drive as a hot spare, which will boot
automatically if one of the drives in the array fails. If one hard drive in the array is damaged, you can recover data by
replacing the hard drive. You cannot recover data if 2 or more drives are damaged.
• RAID 10 mode
Note:
TS-WXL/R1 and TS-WXL/1D TeraStations don’t support this mode, as they don’t have 4 hard drives
RAID 10 combines 4 hard drives into a single array. Usable space is the sum of the capacity of 2 hard drives. Data is
written quickly and access speed is faster than other RAID modes except for RAID 0. Since the same data is written to 2
hard drives at the same time, if drive in a pair (1-2 or 3-4) is damaged, data can be recovered by replacing the damaged
hard drive. If both 1-2 or 3-4 hard drives are damaged, you cannot recover data.
TeraStation User Manual 9
Page 11

TeraStation User Manual 10
• RAID 1 mode (Default for TS-WXL/R1)
Uses 2 hard drives as one array. You can use up to 2 arrays on TS-XL, TS-XEL and TS-RXL Series. The space you can use
is 1 hard drive’s space for each array. The same data is written to 2 drives at once. If a drive is damaged, data can be
recovered by replacing the damaged hard disk. If both drives in an array are damaged, data cannot be restored. You
can create an array and designate another drive as a hot spare (which will boot automatically when one of the hard
drive fails) in TS-XL and TS-RXL TeraStations. You can use 2 drives to create a RAID 1 array, use anther drive as a hot
spare, and use another as a regular drive, all at once.
• RAID 0 mode
This mode uses multiple hard drives as a single array. The disk space you can use is the total space of all hard drives
used. This is the fastest of the TeraStation’s RAID modes. If any hard disks are damaged, you cannot recover data.
• Normal Mode (Default for TS-WXL/1D)
This mode uses the hard drives inside the TeraStation as individual hard disks. It is sometimes referred to as JBOD. The
disk space you can use is the total space of all hard drives in the TeraStation. If a hard disk is damaged, you cannot
recover data from that drive.
Note:
During a recovery, the TeraStation’s front LED display shows “RAID ARRAY* Resyncing” and le transfer speeds are
slower than usual until the RAID array is rebuilt.
Page 12
TeraStation User Manual 11
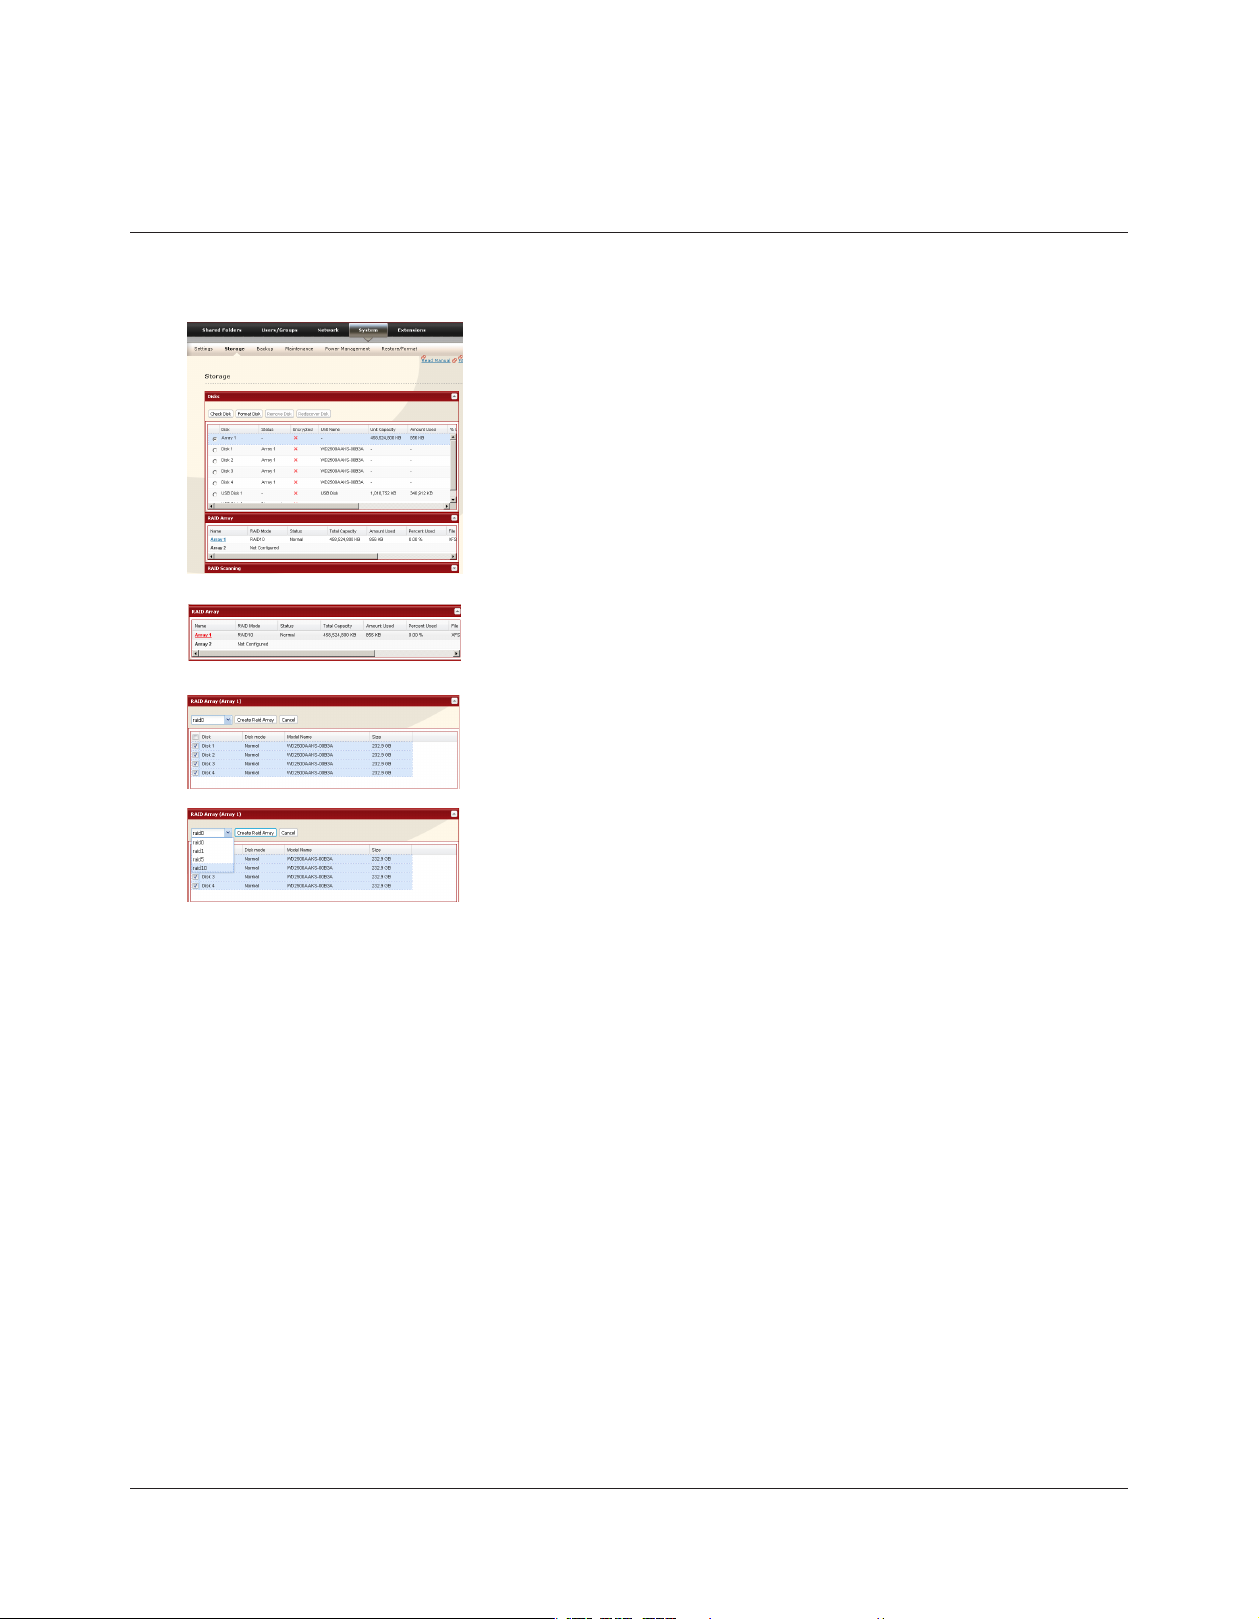
Using Normal mode
1
2
Click [Delete RAID Array].3
When the RAID Array operation window opens, click [Apply].4
The Conrm Operation screen will appear. 5
Enter the number shown in the [Conrmation Number] eld within 60 seconds, and click [Apply].
Follow the instructions displayed on the screen.6
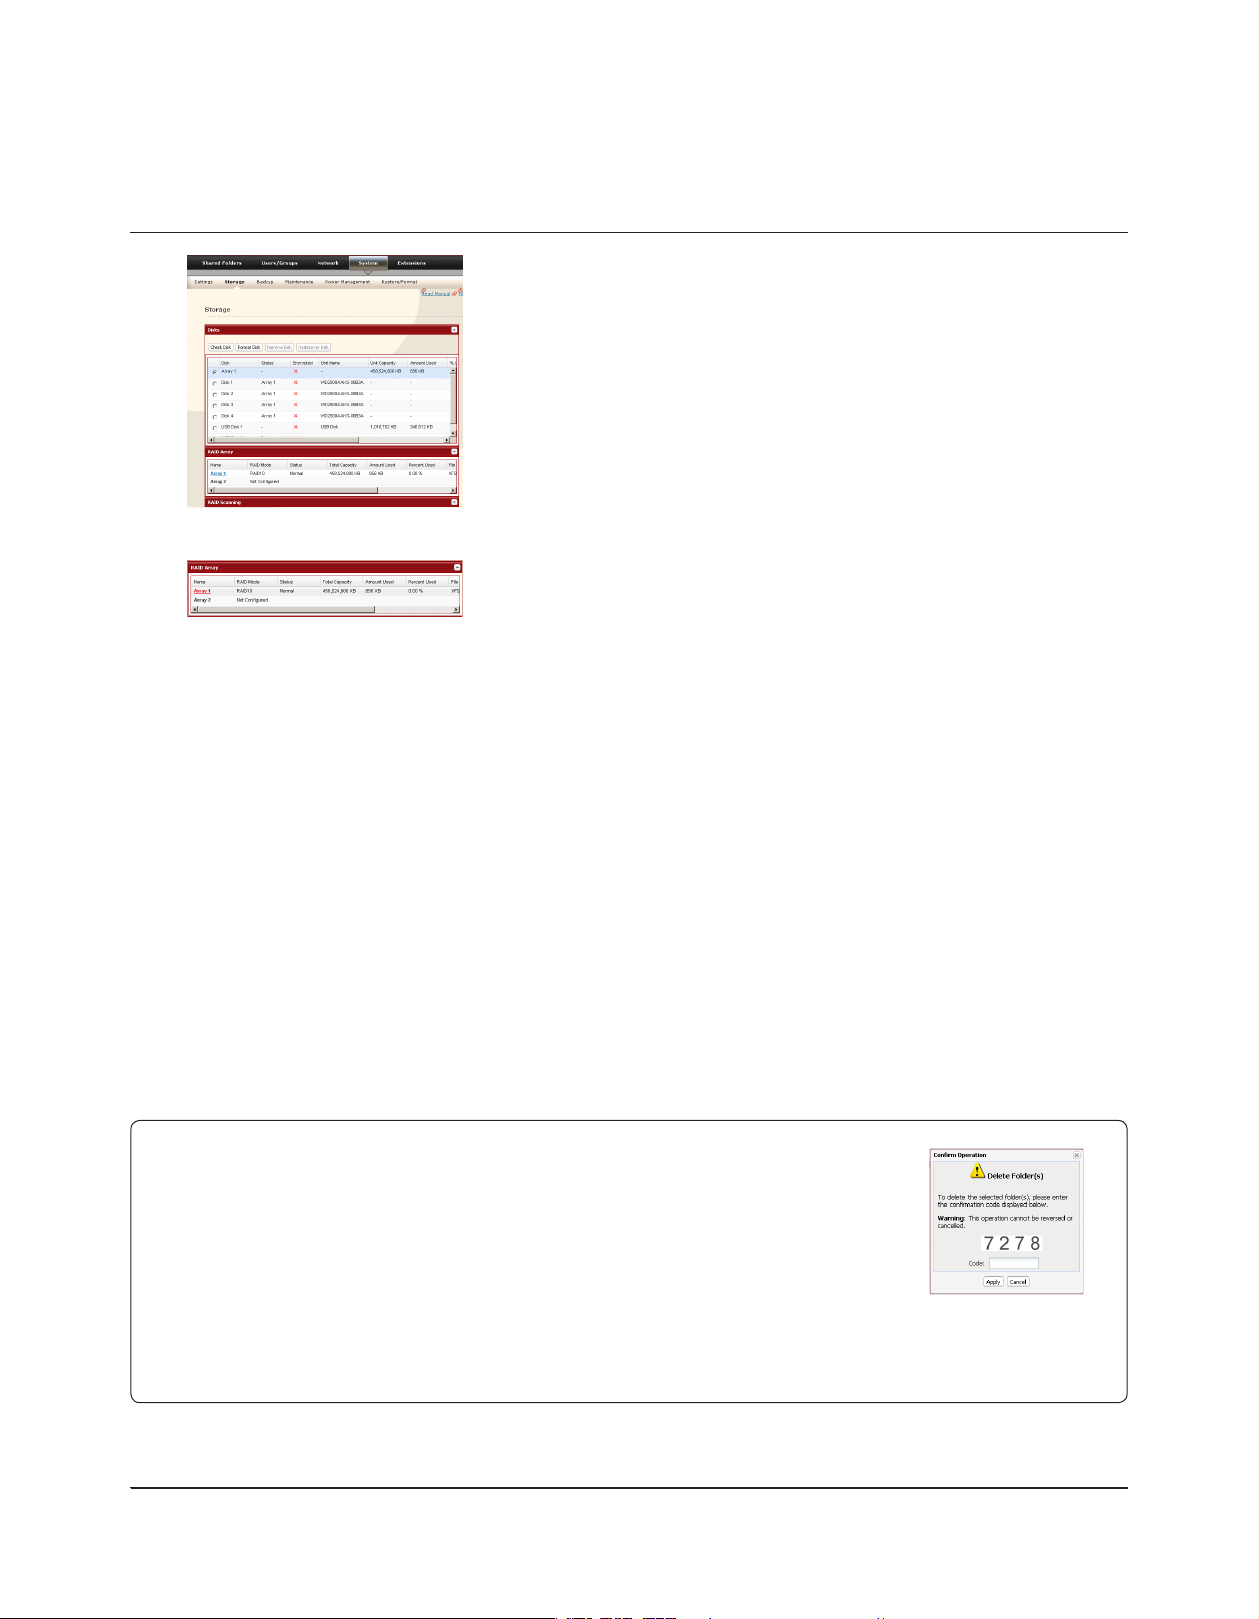
Click [System] - [Storage] - [RAID Array] in the Web Admin.
Select the array you want to congure.
You have now set up Normal mode. Refer to page 34 to create a shared folder.
Conrm Operation screen
When you perform any of the following tasks, a Conrm Operation screen is displayed . To
continue, enter the displayed number within 60 seconds and click [Apply].
Changing structures of RAID array (Create/Delete)•
Delete Folder•
TeraStation’s Restore Factory Defaults•
Format TeraStation•
Empty recycle bin of each folder•
Format Array or Disk•
Remove Disk•
Rebuild RAID array•
Congure hot spare•
Congure normal mode•
Conrm Operation
Screen
Page 13
TeraStation User Manual 12
Using RAID 5 mode (4 hard drives)
Change system to normal mode (previous page).1
2
3
4
5
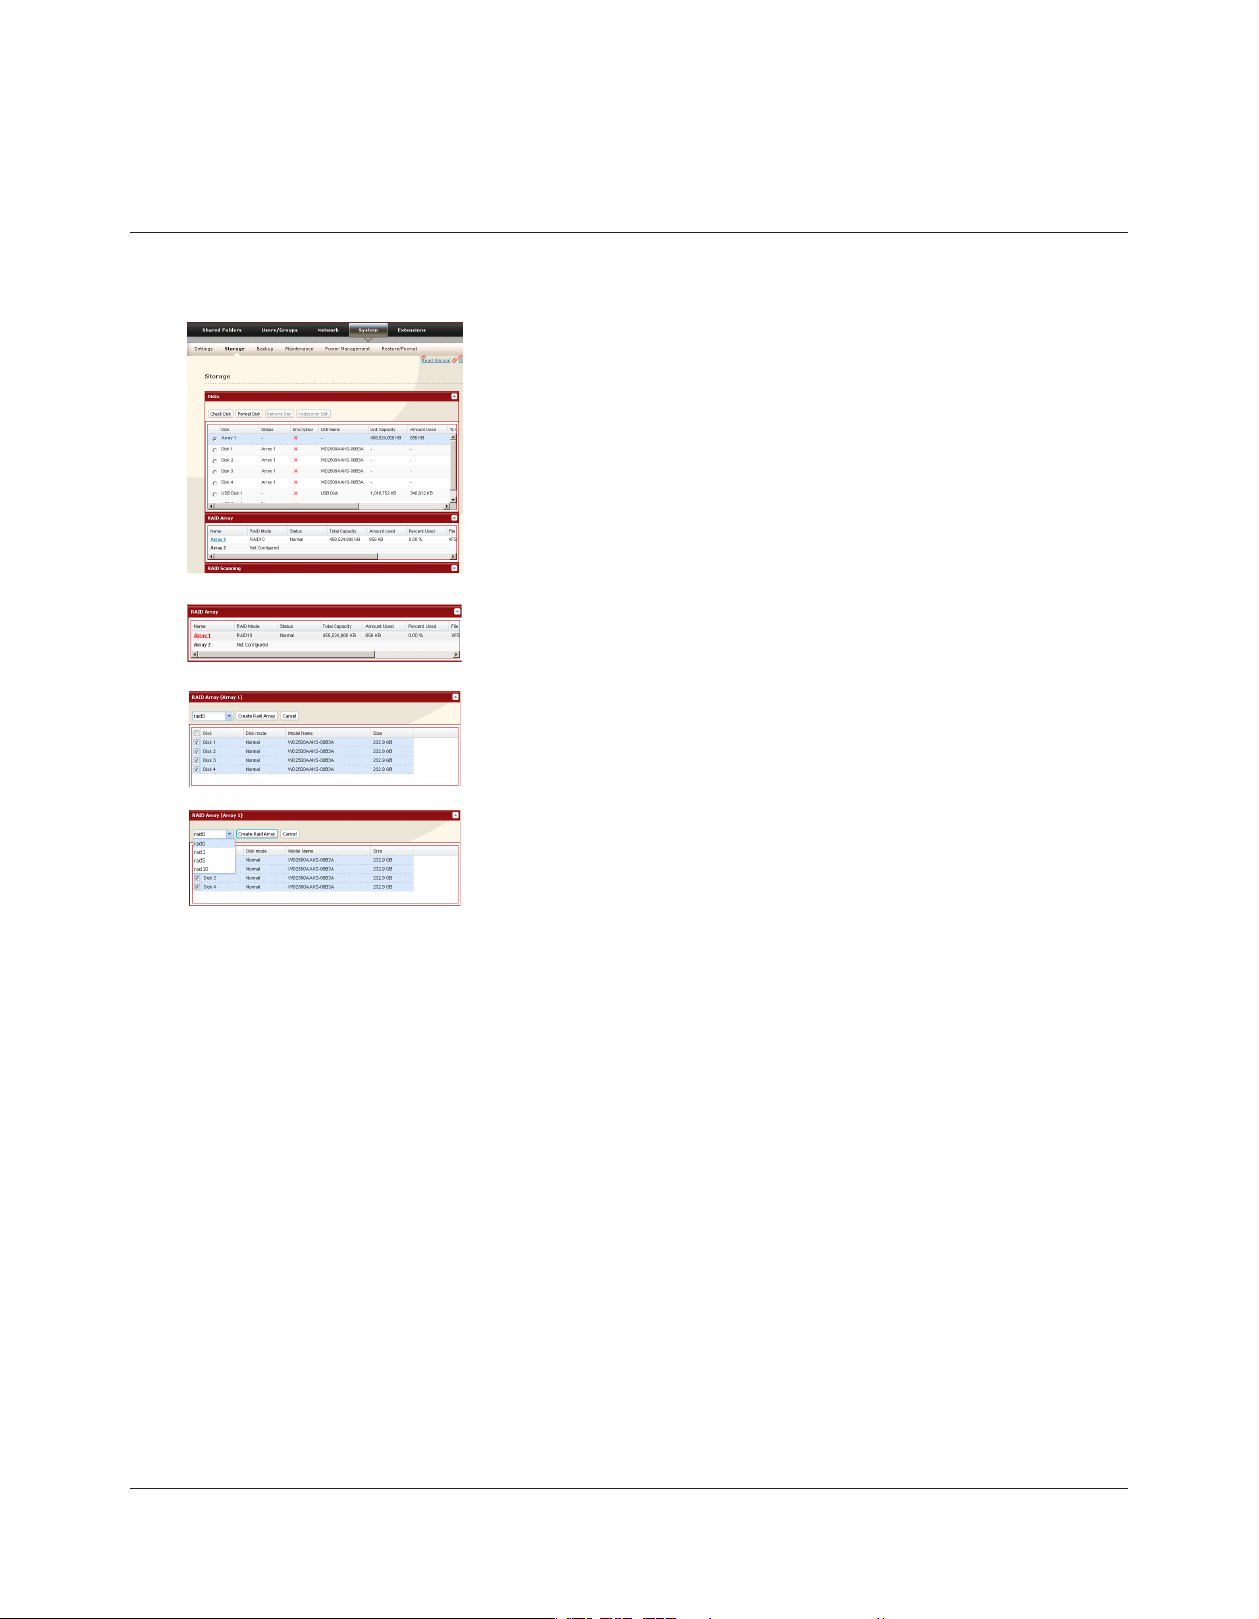
Click [System] - [Storage] - [RAID Array] in the Web Admin.
Click the array you want to congure.
Select hard disks (all 4 of them) to use in RAID5.
Select [RAID5].1
Click [Create RAID Array].2
Note:
After the RAID array is changed, the TeraStation will perfom a RAID check that will take about 5 hours per TB. File
transfers will be slower during this period. While the “RAID ARRAY x Resyncing” message is displayed on the LCD
screen, do not turn o the TeraStation. If you turn it o, the RAID check will start over.
The Conrm Operation screen will appear. 6
Enter the number shown in the [Conrmation Number] eld within 60 seconds, and click [Apply].
Follow the instructions displayed on the screen.7
You have now set up a RAID 5 array. Turn to page 34 to create a shared folder.
Page 14
TeraStation User Manual 13
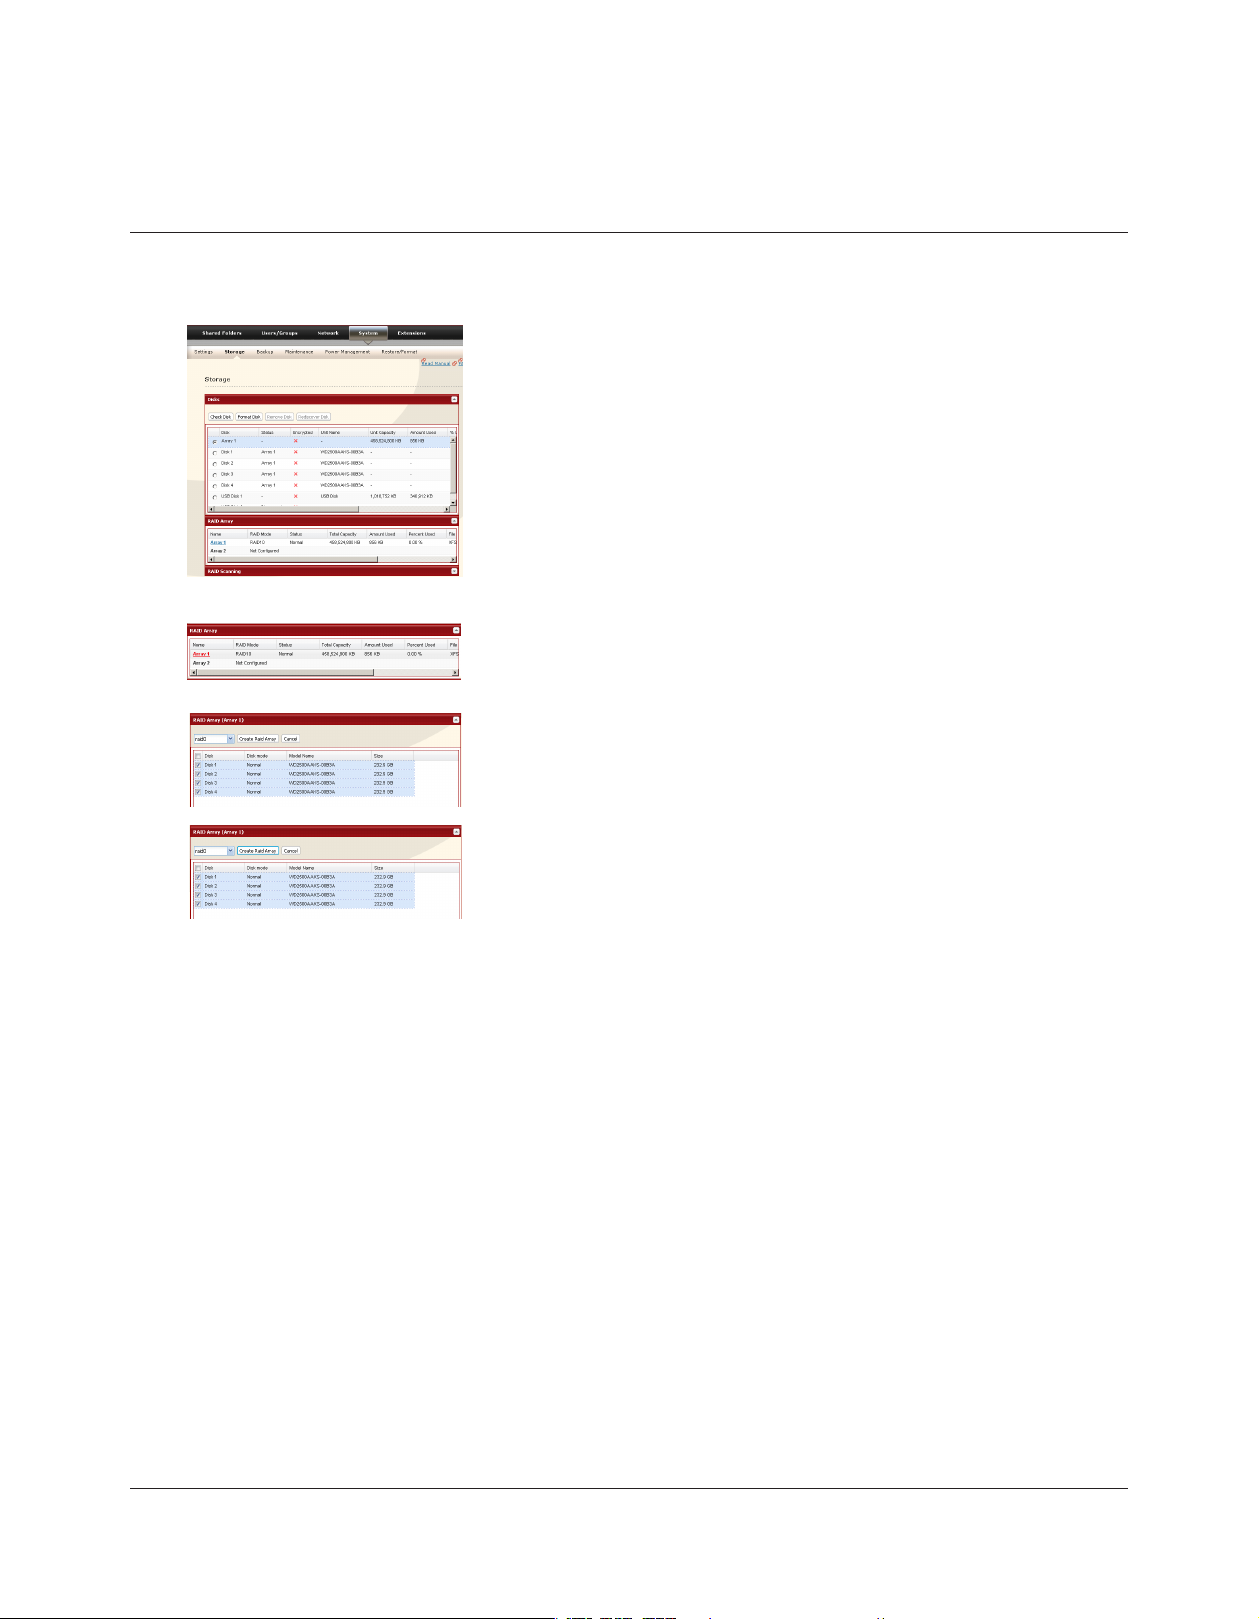
Using RAID 5 mode (3 hard drives)
Change system to normal mode (page 11).1
2
3
4
5
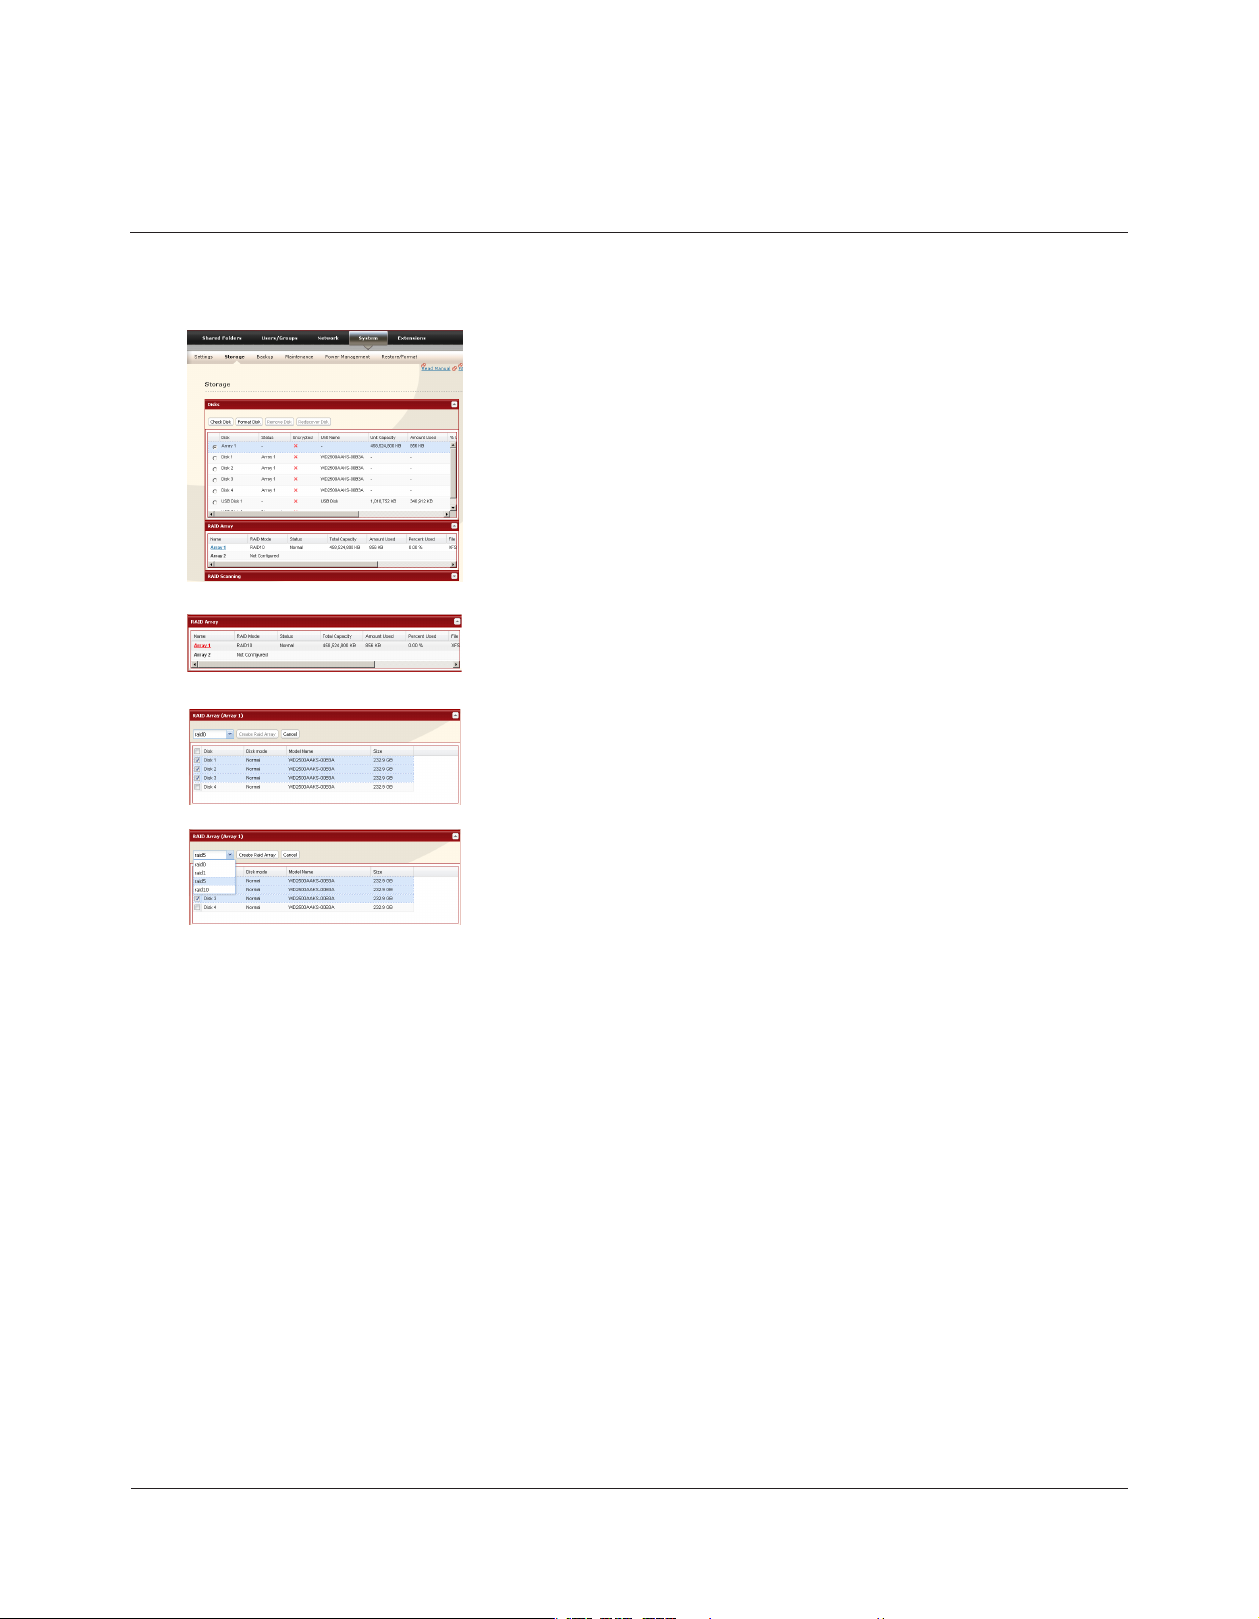
Click [System] - [Storage] - [RAID Array] in the Web Admin.
Click the array you want to congure.
Select hard disks (3 of them) to use in RAID5.
Select [RAID5].1
Click [Create RAID Array].2
Note:
After the RAID array is changed, the TeraStation will perfom a RAID check that will take about 5 hours per TB. File
transfers will be slower during this period. While the “RAID ARRAY x Resyncing” message is displayed on the LCD
screen, do not turn o the TeraStation. If you turn it o, the RAID check will start over.
The Conrm Operation screen will appear. Enter the number shown in the [Conrmation Number] eld within 60 6
seconds, and click [Apply].
Follow the instructions displayed on the screen.7
You have now set up a RAID 5 array. Refer to page 17 to congure a hot spare with the remaining drive. Turn to page
34 to create a shared folder.
Page 15
TeraStation User Manual 14
Using RAID 10 mode
Change system to normal mode (page 11).1
2
3
4
5
Click [System] - [Storage] - [RAID Array] in the Web Admin.
Click the array you want to congure.
Select hard drives (all 4 of them) to use in RAID10.
Select [RAID 10].1
Click [Create RAID Array].2
Note:
After the RAID array is changed, the TeraStation will perfom a RAID check that will take about 5 hours per TB. File
transfers will be slower during this period. While the “RAID ARRAY x Resyncing” message is displayed on the LCD
screen, do not turn o the TeraStation. If you turn it o, the RAID check will start over.
The Conrm Operation screen will appear. 6
Enter the number shown in the [Conrmation Number] eld within 60 seconds, and click [Apply].
Follow the instructions displayed on the screen.7
You have now set up a RAID 10 array. Turn to page 34 to create a shared folder.
Page 16

TeraStation User Manual 15
Using RAID 1 mode
Change system to normal mode (page 11).1
2
3
4
5
Click [System] - [Storage] - [RAID Array] in the Web Admin.
Click the array you want to set.
Click hard disks (Disk 1 and Disk 2, or Disk 3 and Disk 4) in RAID1.
Select [RAID 1].1
Click [Create RAID Array].2
Note:
After the RAID array is changed, the TeraStation will perfom a RAID check that will take about 5 hours per TB. File
transfers will be slower during this period. While the “RAID ARRAY x Resyncing” message is displayed on the LCD
screen, do not turn o the TeraStation. If you turn it o, the RAID check will start over.
The Conrm Operation screen will appear. Enter the number shown in the [Conrmation Number] eld within 60 6
seconds, and click [Apply].
Follow the instructions displayed on the screen.7
You have set up a RAID 1 array. Repeat the steps to create a second RAID 1 array with the other two drives, or refer to
page 17 to congure a hot spare with one of the remaining drives. Turn to page 34 to create a shared folder.
Page 17
TeraStation User Manual 16
Using RAID 0 mode
Change system to normal mode (page 11).1
2
3
4
5
Click [System] - [Storage] - [RAID Array] in the Web Admin.
Click the array you want to congure.
Select all available hard drives.
Select [RAID 0].1
Click [Create RAID Array].2
The Conrm Operation screen will appear. Enter the number shown in the [Conrmation Number] eld within 6
60 seconds, then click [Apply].
Follow the instructions displayed on the screen.7
You have set up a RAID 0 array. Turn to page 34 to create a shared folder.
Page 18
TeraStation User Manual 17
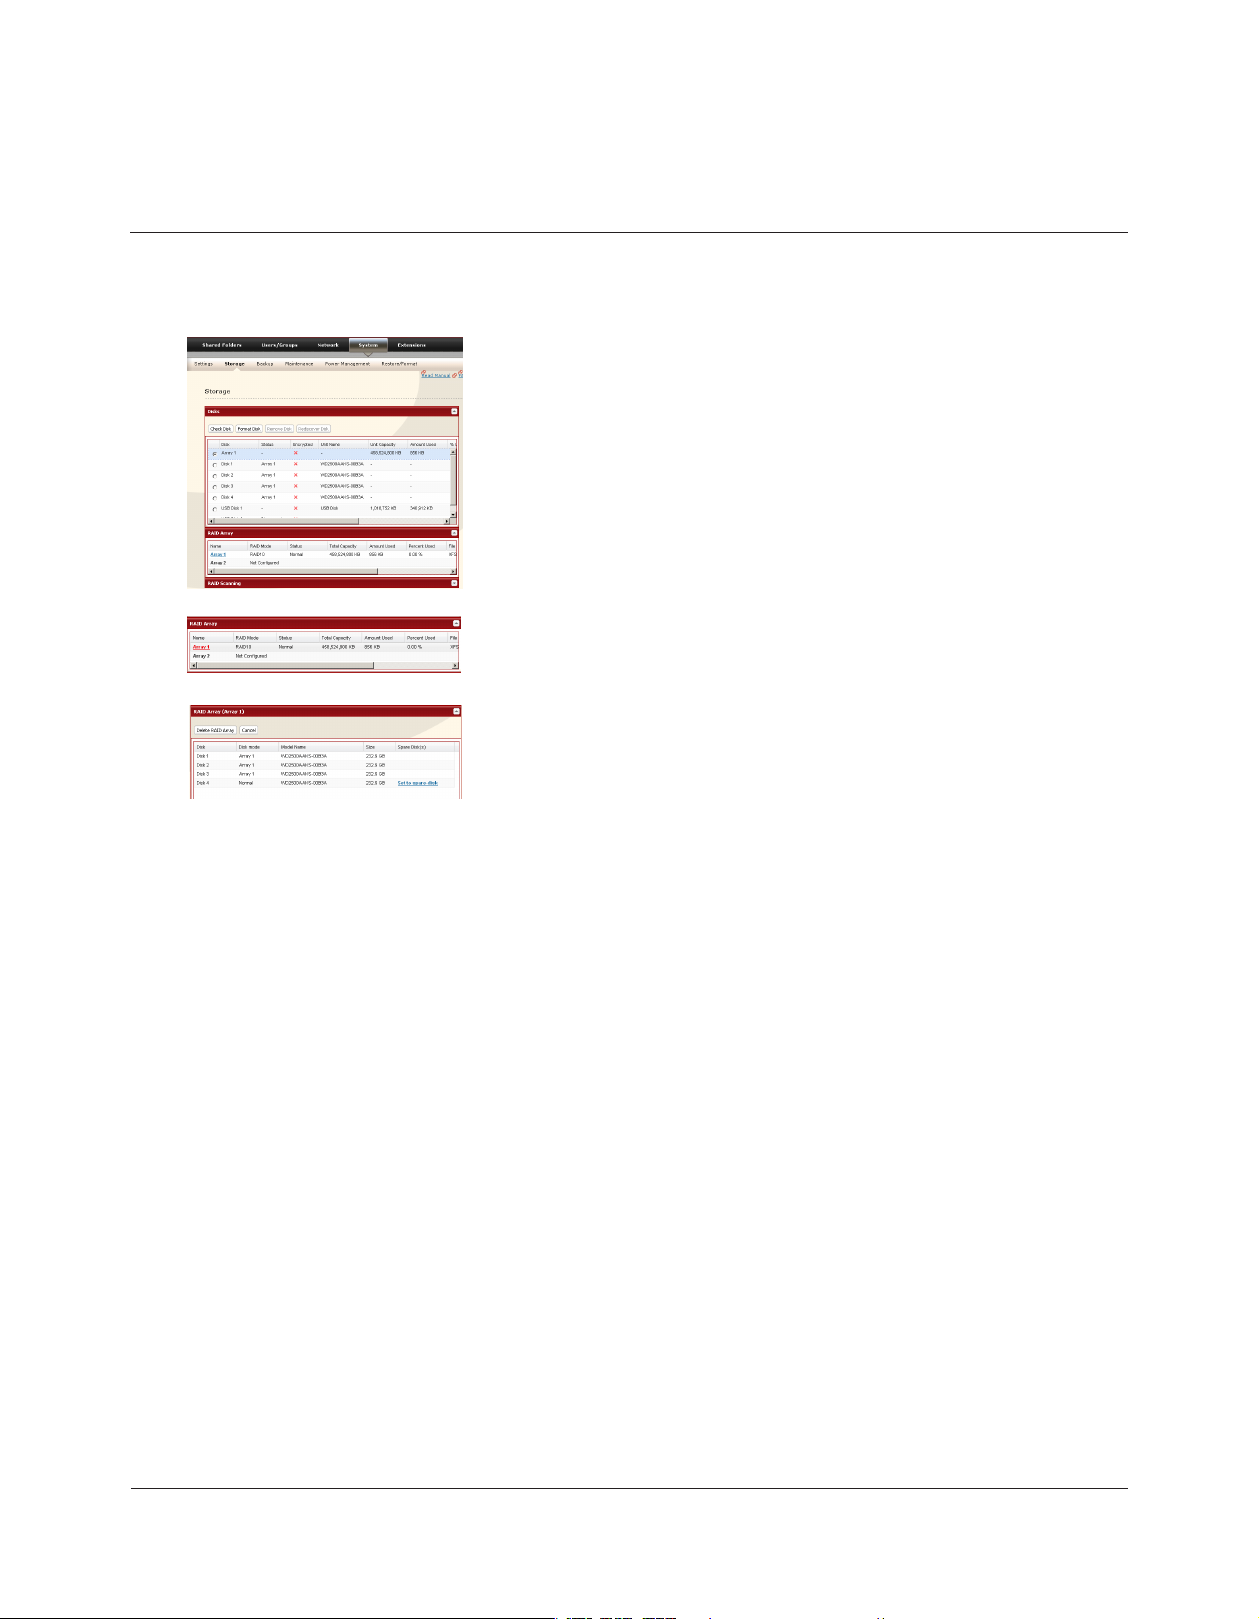
Conguring a Hot Spare
If you have 3 drives in a RAID 5 array, or 2 drives in a RAID 1 array, then you can congure another drive as a hot spare. If
one of the drives in the array fails, the TeraStation will switch over to the hot spare immediately.
1
2
3
Note:
If a hot spare is congured, click [Set to normal disk] to change the hot spare to a normal disk.
Click [System] - [Storage] - [RAID Array] in the Web Admin.
Choose a RAID 5 or RAID1 array.
Click [Set to spare-disk].
The Conrm Operation screen will appear. Enter the number shown in the [Conrmation Number] eld within 60 4
seconds and click [Apply].
Follow the instructions displayed on the screen.5
You have now congured a hot spare.
Note:
All data in the hot spare drive will be deleted when it is congured as a hot spare and again when it changes over from a
spare to a drive in the array.
Page 19
Chapter 4 Adding an External Hard Drive
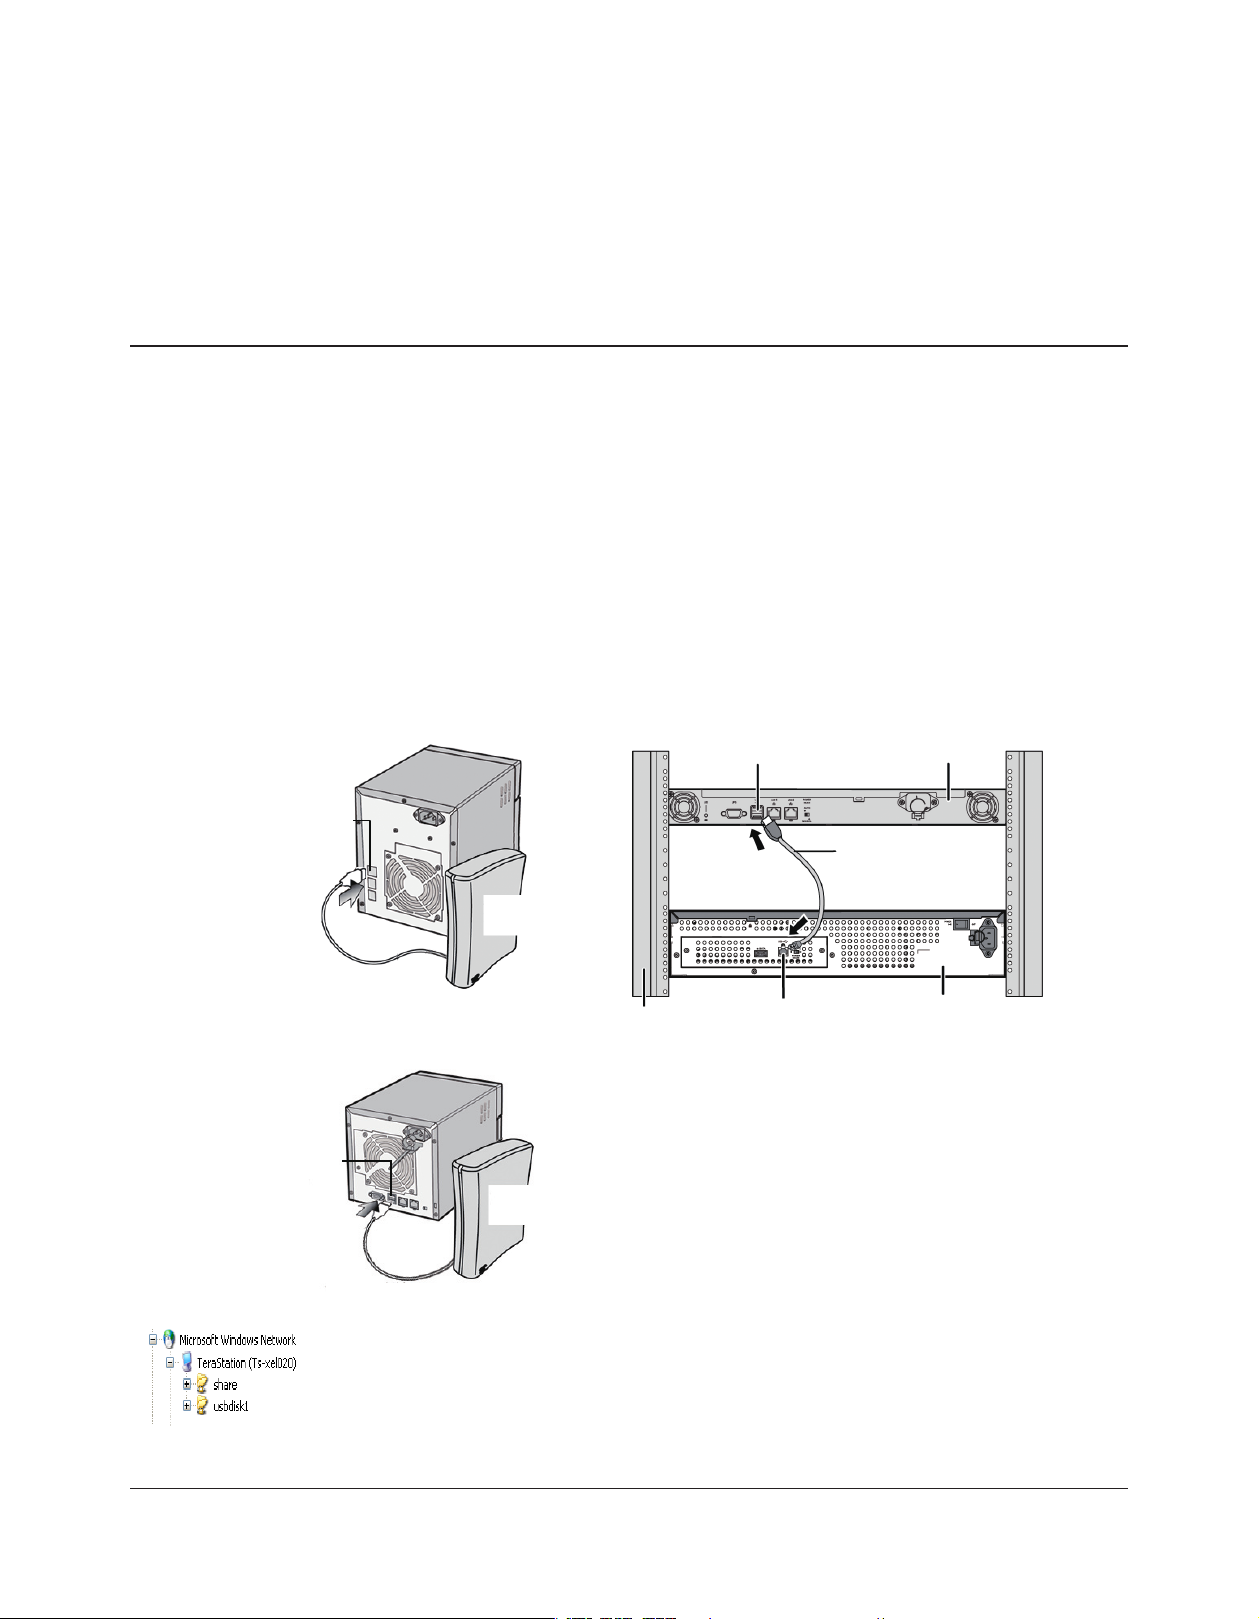
Connect an External Drive
Your TeraStation includes 2 USB connectors (3 if it’s a TS-RXL). You can connect a Bualo external hard drive to it for
backup or extra storage.
Connect the external drive as shown below. If the hard drive is already formatted, it will be detected automatically. If it
is not formatted, format it from within the Web Admin (page 19).
One external hard drive may be connected to each USB port on the TeraStation. USB hubs are not supported.
Warning! Do not unplug the drive from the TeraStation without dismounting it rst. Turn to page 21 for directions on
dismounting a connected drive.
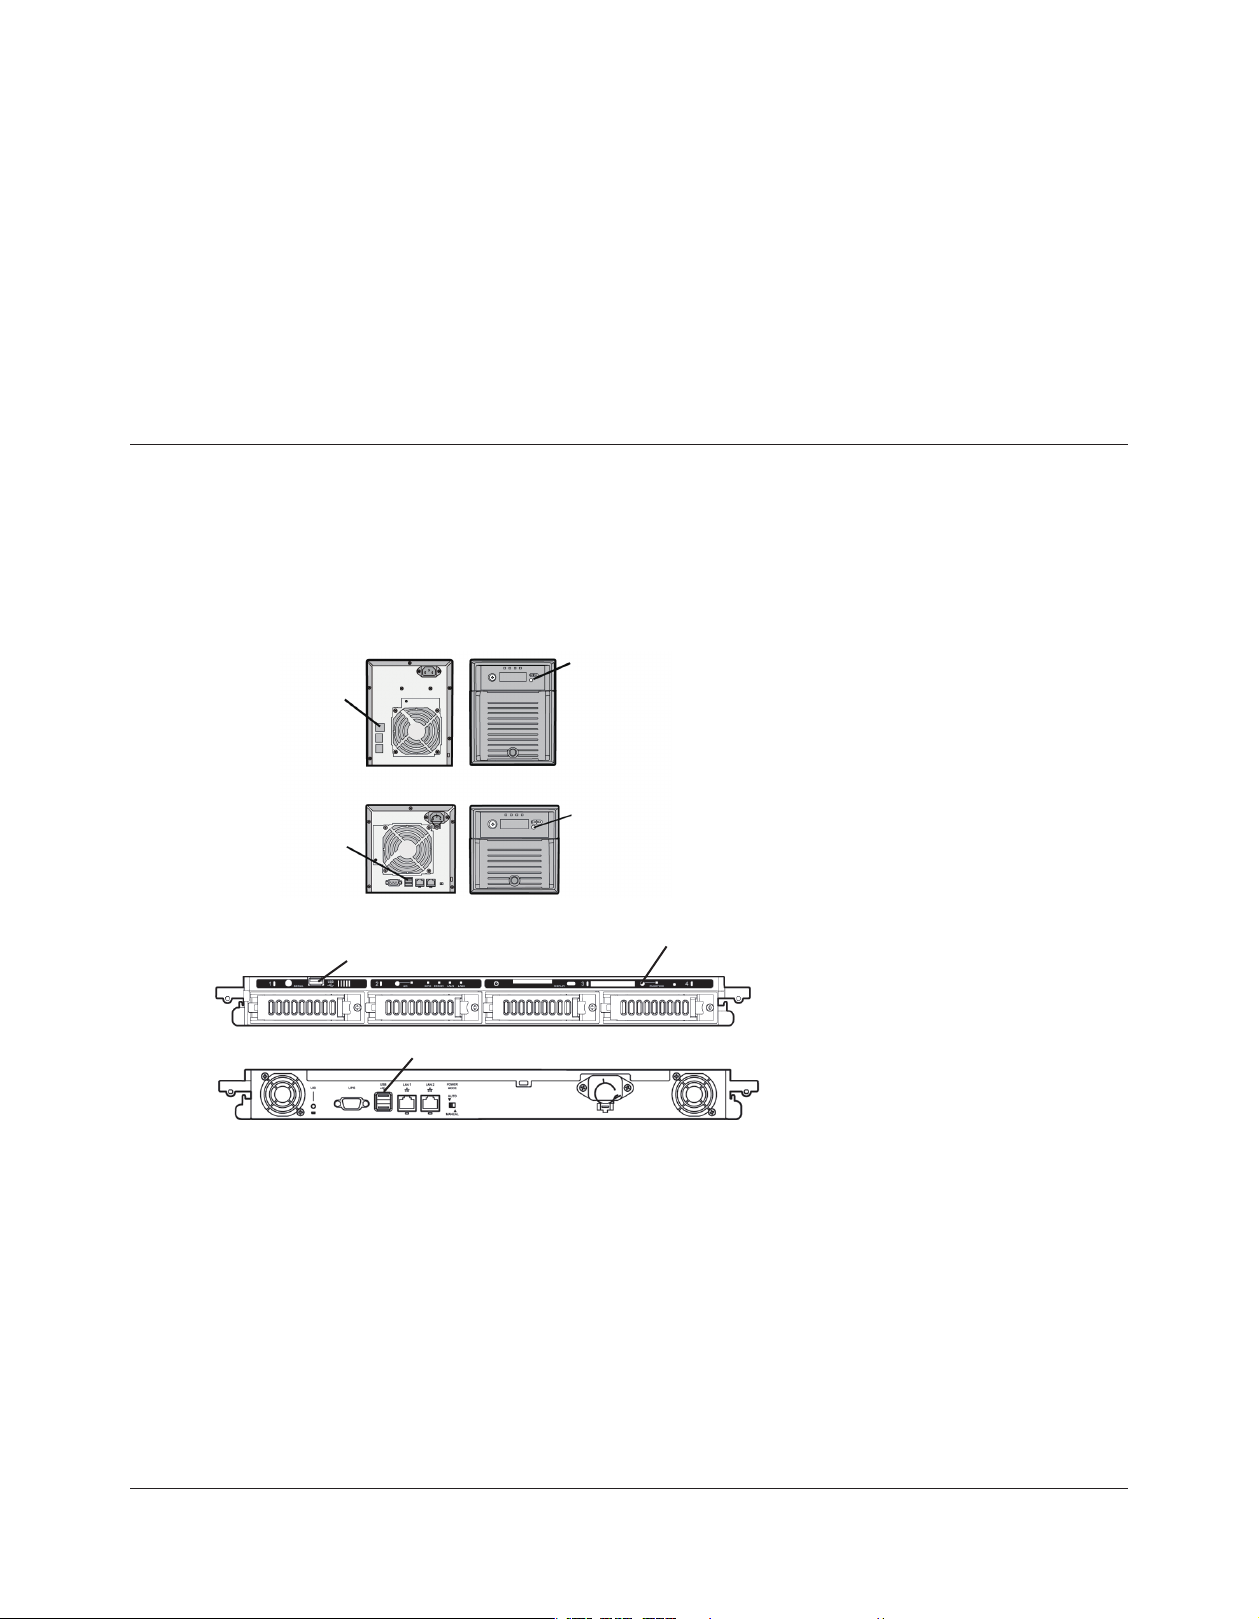
<TS-XL, TS-XEL Series>
USB Connector
USB Cable
(not included)
<TS-WXL Series>
USB Connector
USB Cable
(not included)
Bualo External
Hard Drive
(not included)
Bualo External
Hard Drive
(not included)
<TS-RXL Series>
USB Connector
Rack
(not included)
(Series A)
USB Connector
(Series B)
USB Cable
(not included)
TS-RXL Series
Bualo External
Hard Drive
(not included)
A third hard drive can be connected to the USB connector
on the front panel of the TS-RXL TeraStation if the front
panel is removed.
If the drive properly connected, usbdiskX
is added to the TeraStation’s shares on the
network, where X is the # of the drive.
Note: • Files that are automatically created
by Mac OS X cannot be backed up to a FAT
32 drive because they contain characters
that are not allowed in FAT 32.
TeraStation User Manual 18
Page 20
Formatting the External Drive
A format deletes all data from a hard drive. Be careful! Back up any important data on a drive before formatting it. It •
will take a several minutes to format a drive.
Shared folders cannot be accessed during formatting. •
Do not turn o or disconnect power to the TeraStation while formatting a hard drive.•
If Auto power is set to [Auto], then the TeraStation will turn o when the format is nished.•
To erase all data on a disk, choose [System] - [Restore/Erase].•
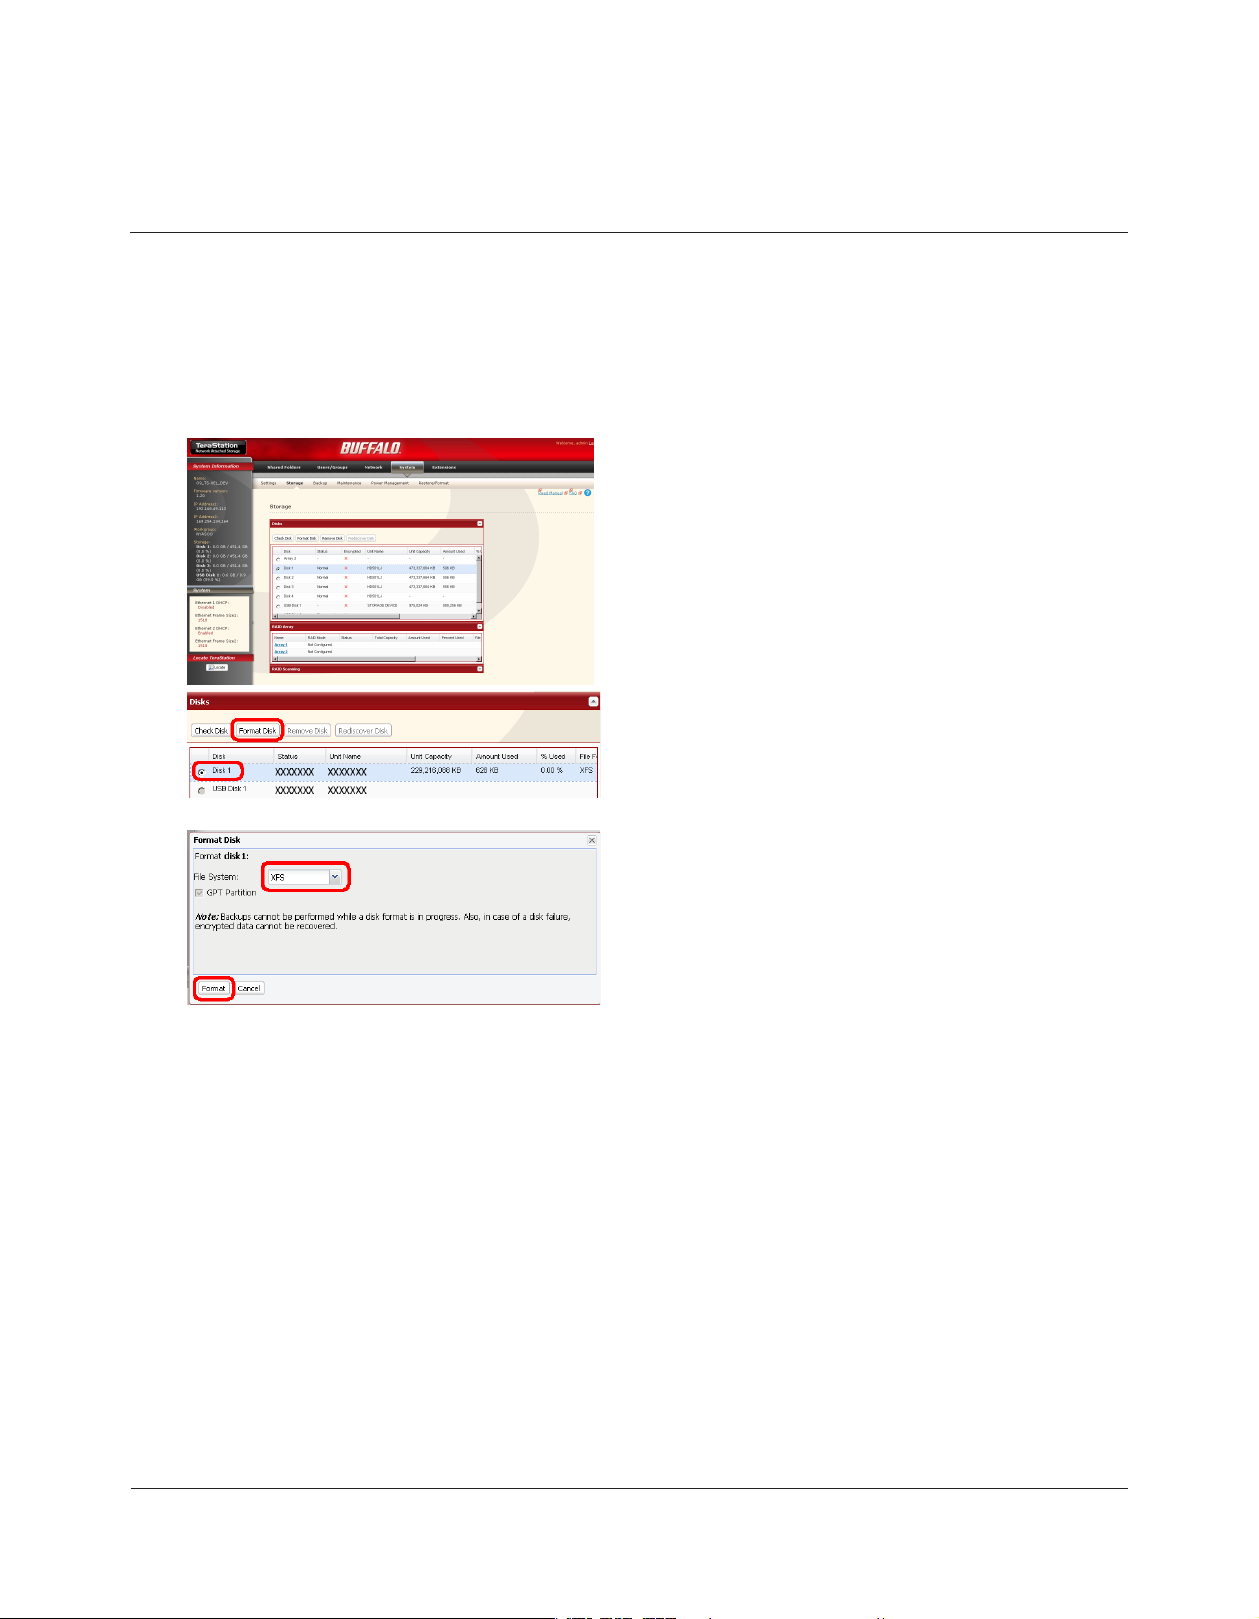
1
2
3
In the Web Admin, navigate to [System] - [Storage].
Select the drive to format. Make sure that you have 1
the right drive!
Click [Format Disk].2
Click [Format].
The [Conrm Operation] screen will be displayed. Type the displayed number into the [Conrmation Number] 4
eld within 60 seconds, then click [Apply].
Follow the instructions displayed on the screen.5
Notes:
• The time needed to format a hard drive varies based on the hard drive’s size and format type (a few seconds to several
minutes).
• The Info LED on the front of the TeraStation will ash during formatting. The TeraStation’s shared folders cannot be
accessed until the disk format is complete.
• If the hard drive is connected to the USB connector, partitions will be recreated.
TeraStation User Manual 19
Page 21

Set Access Restrictions on the External Drive
You can set the access restrictions on the new drive. Use the procedure on page 33 to set the access restrictions.
Note:
Even if a shared folder is not visible, you can still format the drive, run a disk check, and back up to the new drive.
Restrictions
The TeraStation supports many types of USB devices including USB storage devices, card readers, digital cameras, and •
USB printers. Other devices are not supported, such as USB hubs, card readers that recognize multiple memory cards,
and USB mice and keyboards.
You can connect up to 2 hard drives to a TeraStation via its USB connectors (3 for a TS-RXL). Only Bualo drives are •
supported.
* The TeraStation may not recognize a hard drive whose power mode is set to Auto. Set the power mode to Manual
for drives connected to the TeraStation.
* Direct Copy doesn’t work with the HD-DU2 series DriveStation unless it has been reformatted.
* The TeraStation can supply bus power to a single external drive only. For multiple drives, or if you experience power
problems, connect an AC adapter to each hard drive.
Only the primary partition of the hard drive connected via USB connector will be recognized. Secondary and other •
partitions will not be recognized.
TeraStation User Manual 20
Page 22
Chapter 5 Removing External Hard Drives
If the TeraStation is on, always dismount external hard drives before disconnecting them. You may dismount drives
with the Function button, or from within the Web Admin. If the TeraStation is turned o, dismounting is not necessary.
Dismounting with the Function button
To dismount a USB drive, press and hold the function button for 7 seconds. The Function button will be illuminated
in blue (The LED next to the Function button will be illuminated in blue on the TS-RXL). After the light in the function
button goes out, you can safely remove your USB device.
<TS-XL, TS-XEL>
Rear View Front View
USB Connectors
Function button
<TS-WXL>
USB Connectors
<TS-RXL>
Front View
Rear View
Note:
Wait 3 minutes before reconnecting a dismounted USB drive. It may not be recognized if you attempt to connect it
immediately.
Rear View Front View
Function button
Function button
USB Connector
* View with the front cover open
USB Connectors
TeraStation User Manual 21
Page 23
Dismounting from the Web Admin
Alternately, you can dismount an external drive from within the TeraStation’s Web Admin.
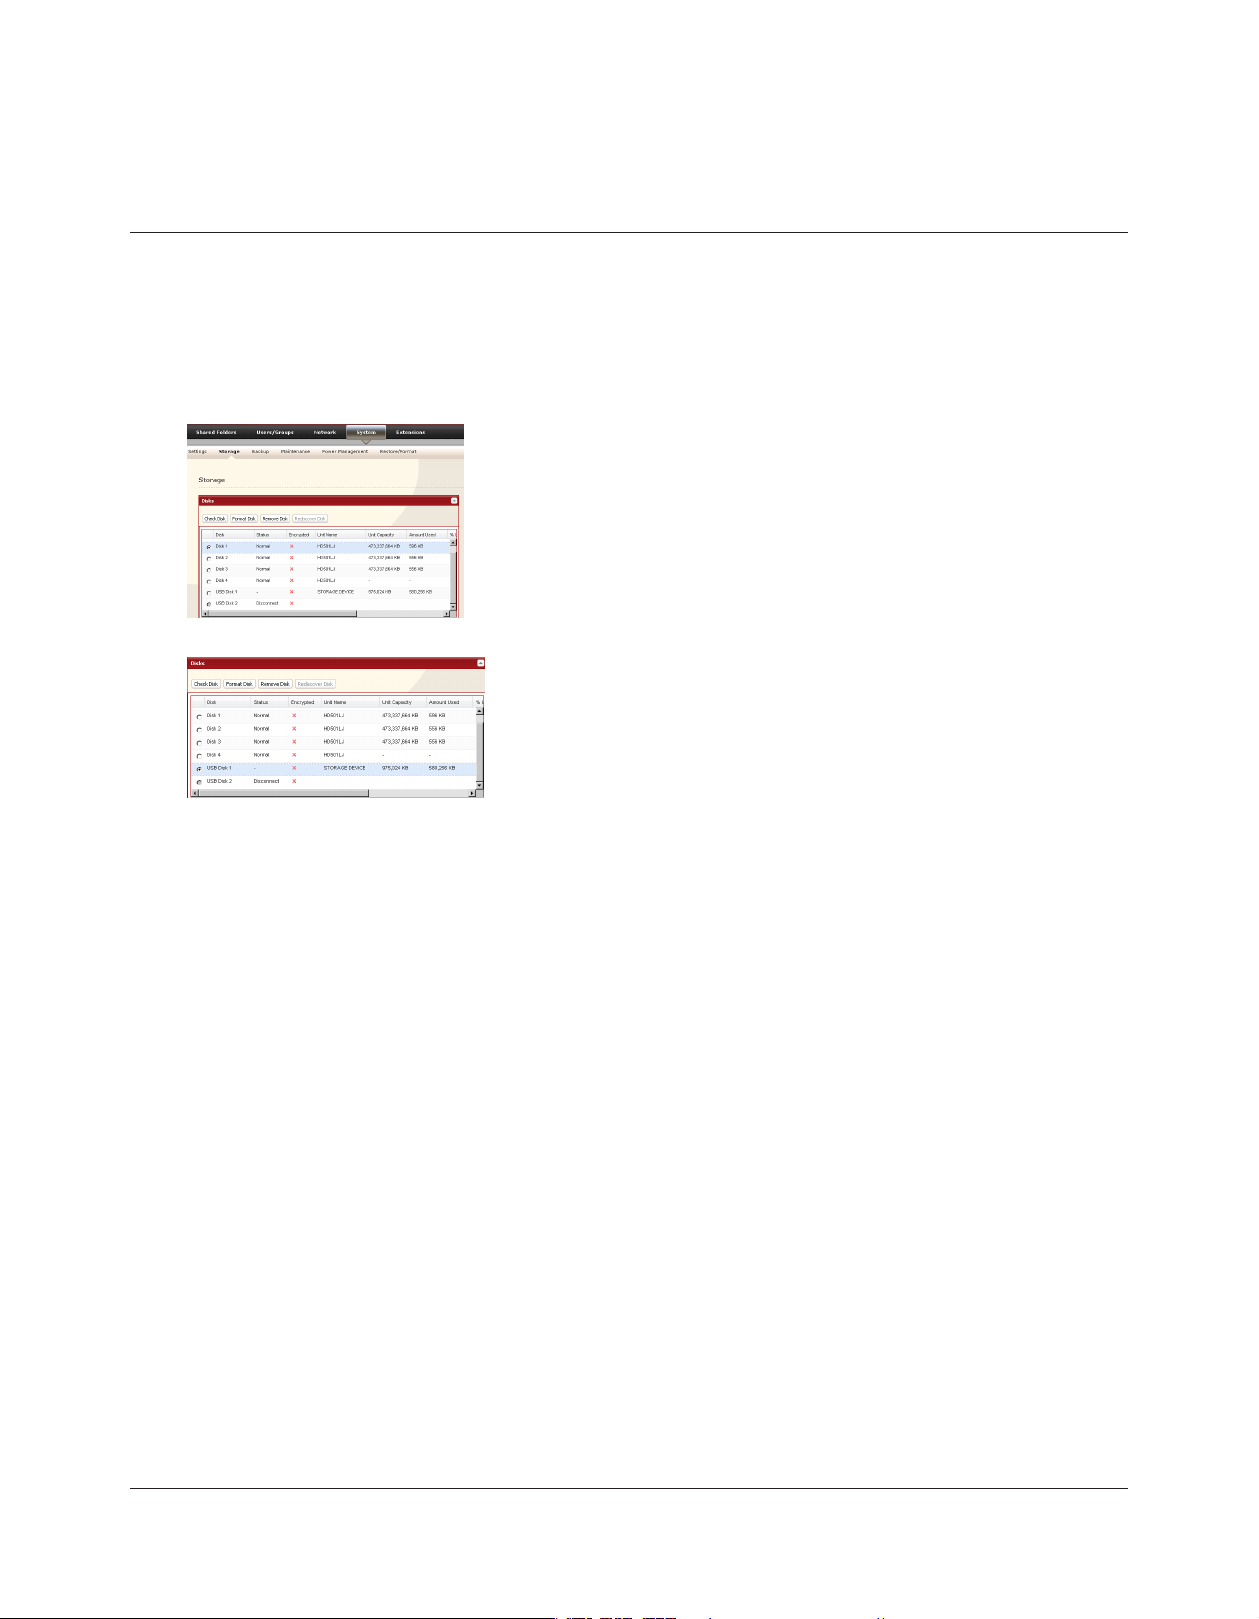
1
In the Web Admin, click [System] – [Storage].
2
Select the USB drive.1
Click [Remove Disk].2
When the Conrm Operation screen opens, enter the displayed number within 60 seconds and click [Apply].
The function button will ash blue (on the TS-RXL, the LED next to the function button will ash). Remove the 3
USB device within 30 seconds.
Note:
After 30 seconds, the drive will be remounted. If this happens, perform another dismount before removing it.
The USB drive may now be safely disconnected.
TeraStation User Manual 22
Page 24
Chapter 6 Backup
Backup Data from your Windows PC
To back up data from your PC to the TeraStation, use the Memeo Backup program, included with your TeraStation.
Memeo backup can be installed from your TeraNavigator CD. After installation, refer to [(All) Programs] - [BUFFALO] [Memeo Backup] - [Memeo Backup ] for instructions on how to use it.
Backup Data on the TeraStation
You can back up folders on the TeraStation to any of the following destinations:
Another TeraStation (instructions on pages 23, 24, and 25)•
A dierent folder on the same TeraStation (instructions on pages 23 and 25)•
A USB hard drive connected to the TeraStation (instructions on page 25)•
• Set up Destination for Backup
Before backing up to a TeraStation, you must congure a folder on the TeraStaion as a backup destination.
1
2
3
i
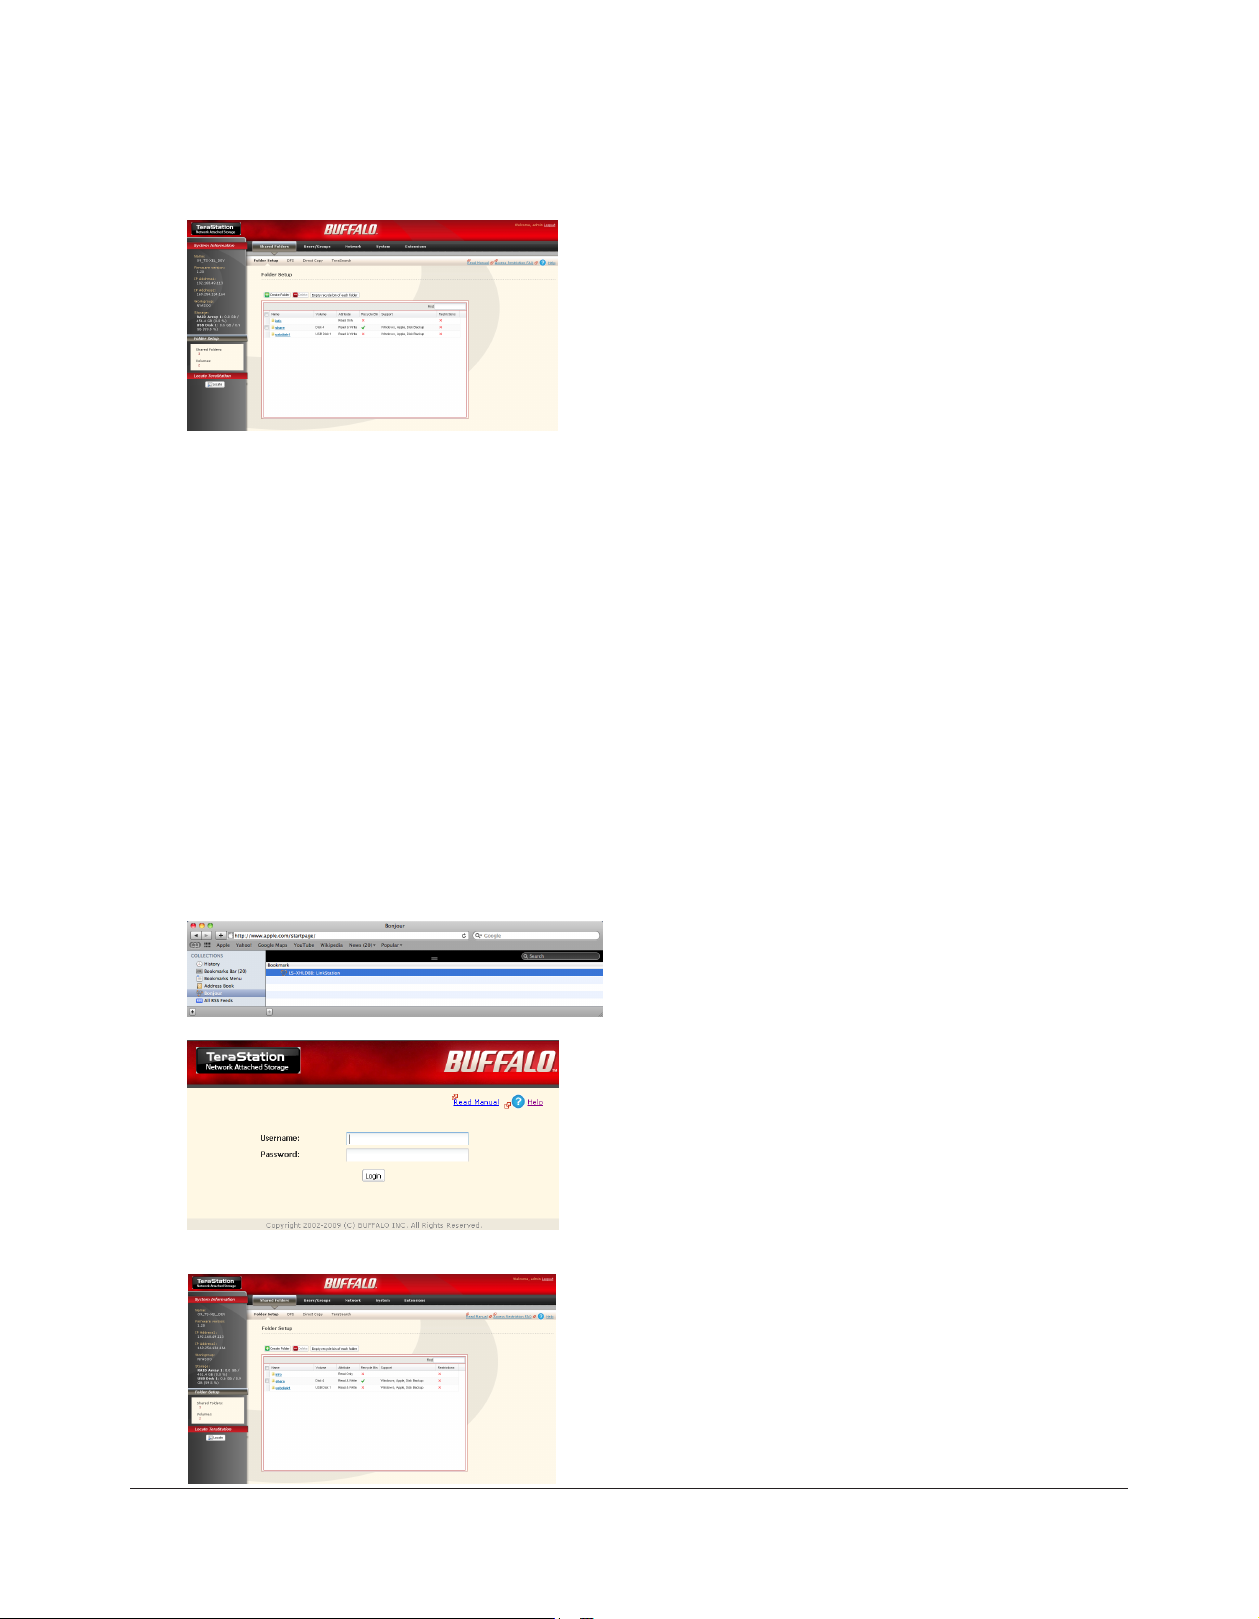
In the TeraStation’s Web Admin, click [Shared Folders] - [Folder Setup].
Choose the folder you want to set as a backup destination.
Check [Disk Backup] from Shared Folder Support.
Optional: To congure a password for backup jobs to this share, enter it in
the [Remote backup password] eld. If you do not want to set a
password, do not enter anything.
Click [Save] at the bottom of the screen.4
TeraStation User Manual 23
Page 25
TeraStation User Manual 24
Backing up to another TeraStation on the local network
If the target TeraStation is congured with a password for backup, you can nd it on the network by searching for the
password.
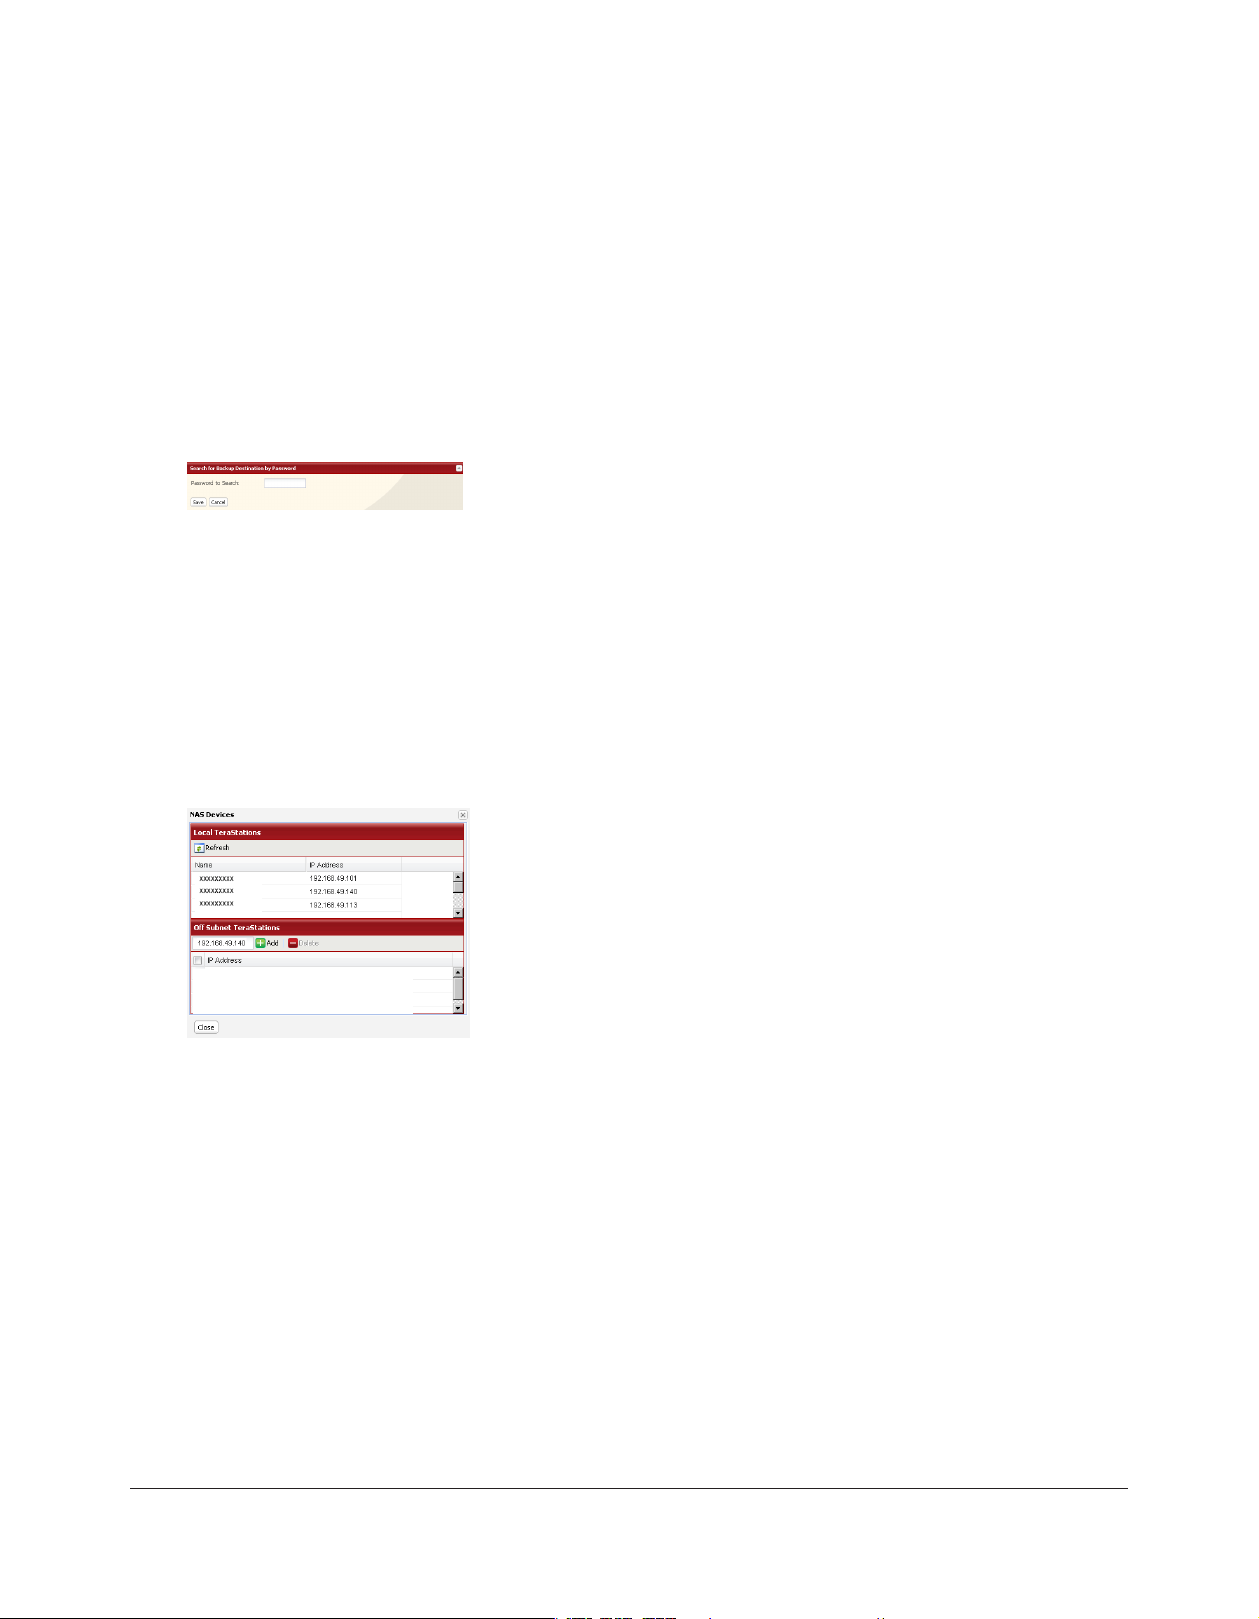
In the target TeraStation’s Web Admin, navigate to1 [System] – [Backup].
Under [Search for Backup Destination by Password], click [Modify Settings].2
3
Enter a password and click [Save].
Now, you can easily nd this target TeraStation when conguring backup
jobs on a source TeraStation.
Backing up to a TeraStation on another network which is connected by a VPN
You can back up to a TeraStation on another network as long as the two networks are connected by a VPN. Follow the
procedure below to enter IP address of the target TeraStation.
In the source TeraStation’s Web Admin, c1 lick [System] – [Backup] - [View NAS Devices].
2
Under [O Subnet TeraStation], enter the IP address of the target
TeraStation and click [Add].
If you meet the following conditions, then you don’t have to congure the settings described above:
Not setting a password for backup on the target TeraStation.•
Source TeraStation and target TeraStation are on the same network.•
Instead, just turn to the next page and congure a backup job
Page 26
TeraStation User Manual 25
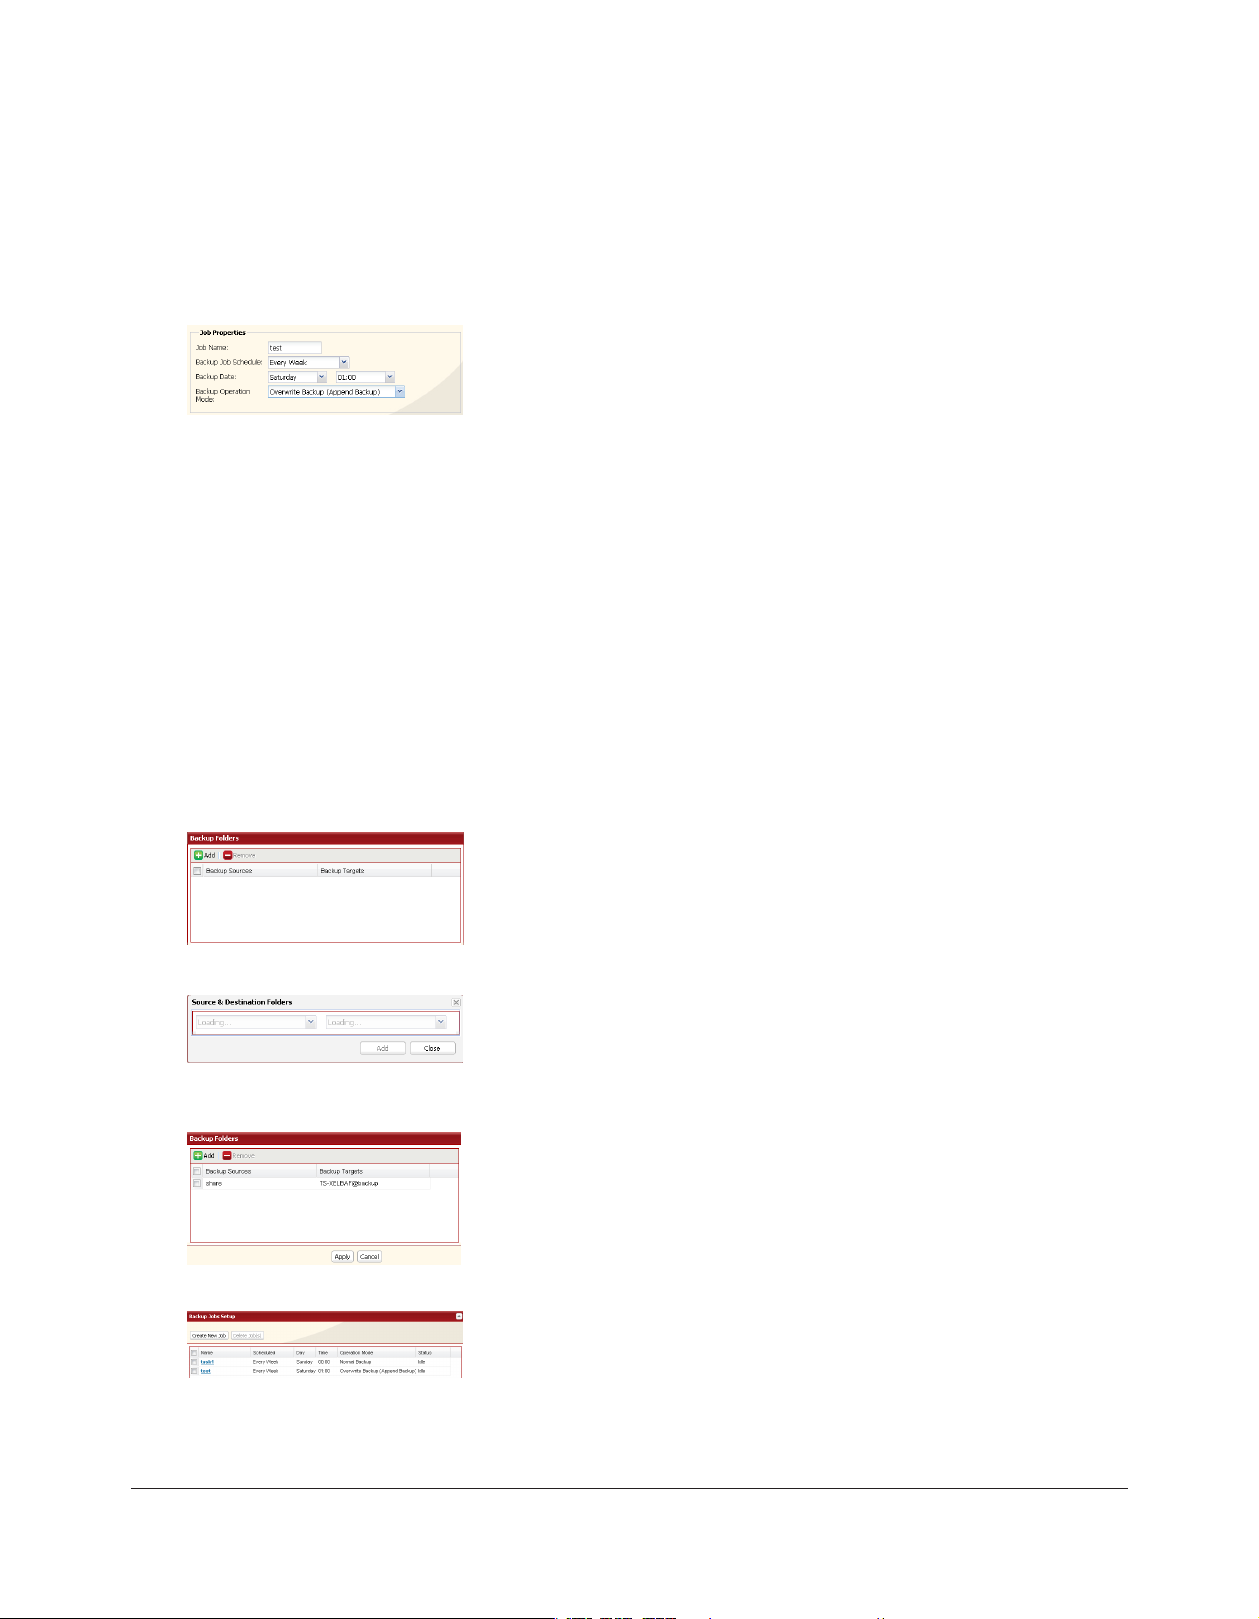
Conguring a backup job
To create a backup job, navigate to [System] - [Backup] - [Back Jobs Setup] - [Create New Job] in the source 1
TeraStation's Web Admin.
Note: Up to 8 backup jobs can be congured.
2
Note:
The following types of backup job may be selected:
Normal Backup
All les in the source will be backed up to the destination.
Overwrite Backup (Append Backup)
The rst time the backup job runs is just like a normal backup. Each addditional time the backup job runs, if le
A was added to and le B removed from the backup source, then le A is added to but le B is not removed from
the backup destination. Over time, the backup destination folder will become larger than the backup source
folder.
Overwrite Backup (Dierential Backup)
The rst time the backup job runs is just like a normal backup. Each addditional time the backup job runs, if le
A was added to and le B removed from the backup source, then le A is added to and le B is removed from the
backup destination. The backup destination folder is always the same as the backup source folder.
Select backup settings such as date and time to run.
Note:
Refer to page 125 for more on backup options.
Click [Backup Folders] - [Add].
3
Select Backup source and Backup destination folders. 1
Click [Add].2
4
Click [Apply].
5
The backup job is added to the list of backup jobs.
Page 27

TeraStation User Manual 26
Backup Notes:
Subfolders may be selected, but not subfolders of subfolders. Folders with more than 80 characters in their total path •
may not be selected.
Before they can be selected as backup target folders, folders on other TeraStations must be congured as backup •
destinations.
To use a folder on an external hard drive as a backup target, you should format it with XFS, FAT or EXT3.•
If you are using PC Power Management, your system will automatically boot 15 minutes before the backup job begins.•
If your PC enters sleep mode just before a scheduled backup, the backup job may not have time to reboot the system •
before the backup job begins. If this happens, the backup job may fail.
S• ource and target TeraStations should be congured with similar jumbo-frame settings. If you are experiencing
problems backing up one TeraStation to another, try setting the frame size for both to the default (1518 bytes).
If you change formatting or RAID array settings, previously created backup jobs may no longer run correctly. Delete •
the old backup jobs and create new backup jobs for the new share(s).
Backups on EXT3 formatted USB disks can be read from a Windows PC with the provided Bualo EXT3 reader software.•
Page 28

TeraStation User Manual 27
Restrictions regarding to Backup
When performing backup to USB hard disk (FAT32 format) with Overwrite Backup (Dierential) option, it may •
overwrite even though there are no dierence in data. This is because of the specication of FAT 32. If the second
of the date when the le created is an odd number, Overwriting backup is performed every time regardless of the
dierences in data.
If you are using Jumbo Frame and backup data on TeraStation/TeraStation to another TeraStation/TeraStation, set •
the Ethernet frame size of those 2 TeraStation/TeraStation to the closest value. If Ethernet frame sizes of these are
signicantly dierent, the backup job may not be properly performed. In such a case, select the default frame size
(1518 bytes).
When backing up data by using TeraStation’s Web Admin screen, if a le name or folder name to backup contains 2 •
bytes characters, a le/folder name of a log le may not be output correctly.
If you change settings for formatting or RAID array after setting for backup, you must change the settings for backup. •
If there is no shared folder at the destination, an error message will be displayed.
Page 29

TeraStation User Manual 28
Replication
Replication will mirror data on your TeraStation to a second TeraStation. An exact duplicate of a data share on the rst
TeraStation is copied to the second TeraStation virtually simultaneously. To congure Replication, use an Ethernet cable
to connect LAN port 2 on the rst TeraStation to LAN Port 2 on the second TeraStation. The rst TeraStation should be
connected to the local Network by LAN Port 1.
Notes:
• If the rst TeraStation goes down, you can switch to the second TeraStation by moving the main Ethernet cable from
the rst TeraStation to the second TeraStation’s LAN Port 1.
• Replication copies data only, not users or settings. To back up users, groups, and passwords from a TeraStation, use the
NS-SHFT utility.
• If a backup password is set for a share, then that share cannot be selected as a backup target for replication.
• Replication copies data from the source folder to a target folder. Please note that any data in the target folder that is
not in the backup source folder will be deleted.
Only folders on TeraStations which support Replication (TS-XL, TS-XEL, TS-WXL, TS-RXL, TS-HTGL, TS-RHTGL. etc.) can
be selected as replication source folders or target folders.
Up to 64 shares can be selected for replication.
• Only data written by SMB and CIFS (Windows) and AFP, NFS, SFTP, FTP, and FTPS (Apple) can be mirrored by
replication.
• Replication transfers les asynchronously. It may take time to transfer les depending on the network environment or
status of the TeraStation.
• Replication will retry le transfers if they fail because of a network problem. If the retry fails, the TeraStation’s Error LED
will light and an alarm will sound. To repair, x the network problem, then, in the TeraStation’s Web Admin, navigate
to [System] - [Backup] - [Replication] and click [Resynchronize].
• Do not set multiple Backup Targets for one Backup Source. Multiple transfer processes for Replications will run, and
system performance will be adversely aected.
• Do not replicate a share that is the target of Time Machine backups by Mac OS X.
• System performance may be degraded if Mac OS X writes to the replication source folder with an AFP connection. If
this occurs, connect via SMB for better performance.
• When replicating to a USB drive, a folder which has the same name as the backup source will be created on the USB
drive. If the same folder name already exists on the USB drive, any les in that folder will be deleted.
• External hard drives formatted with FAT 16 or FAT 32 should not be used with replication. For best results with the
TeraStation, format your external USB hard drives with XFS or EXT3.
Page 30
TeraStation User Manual 29
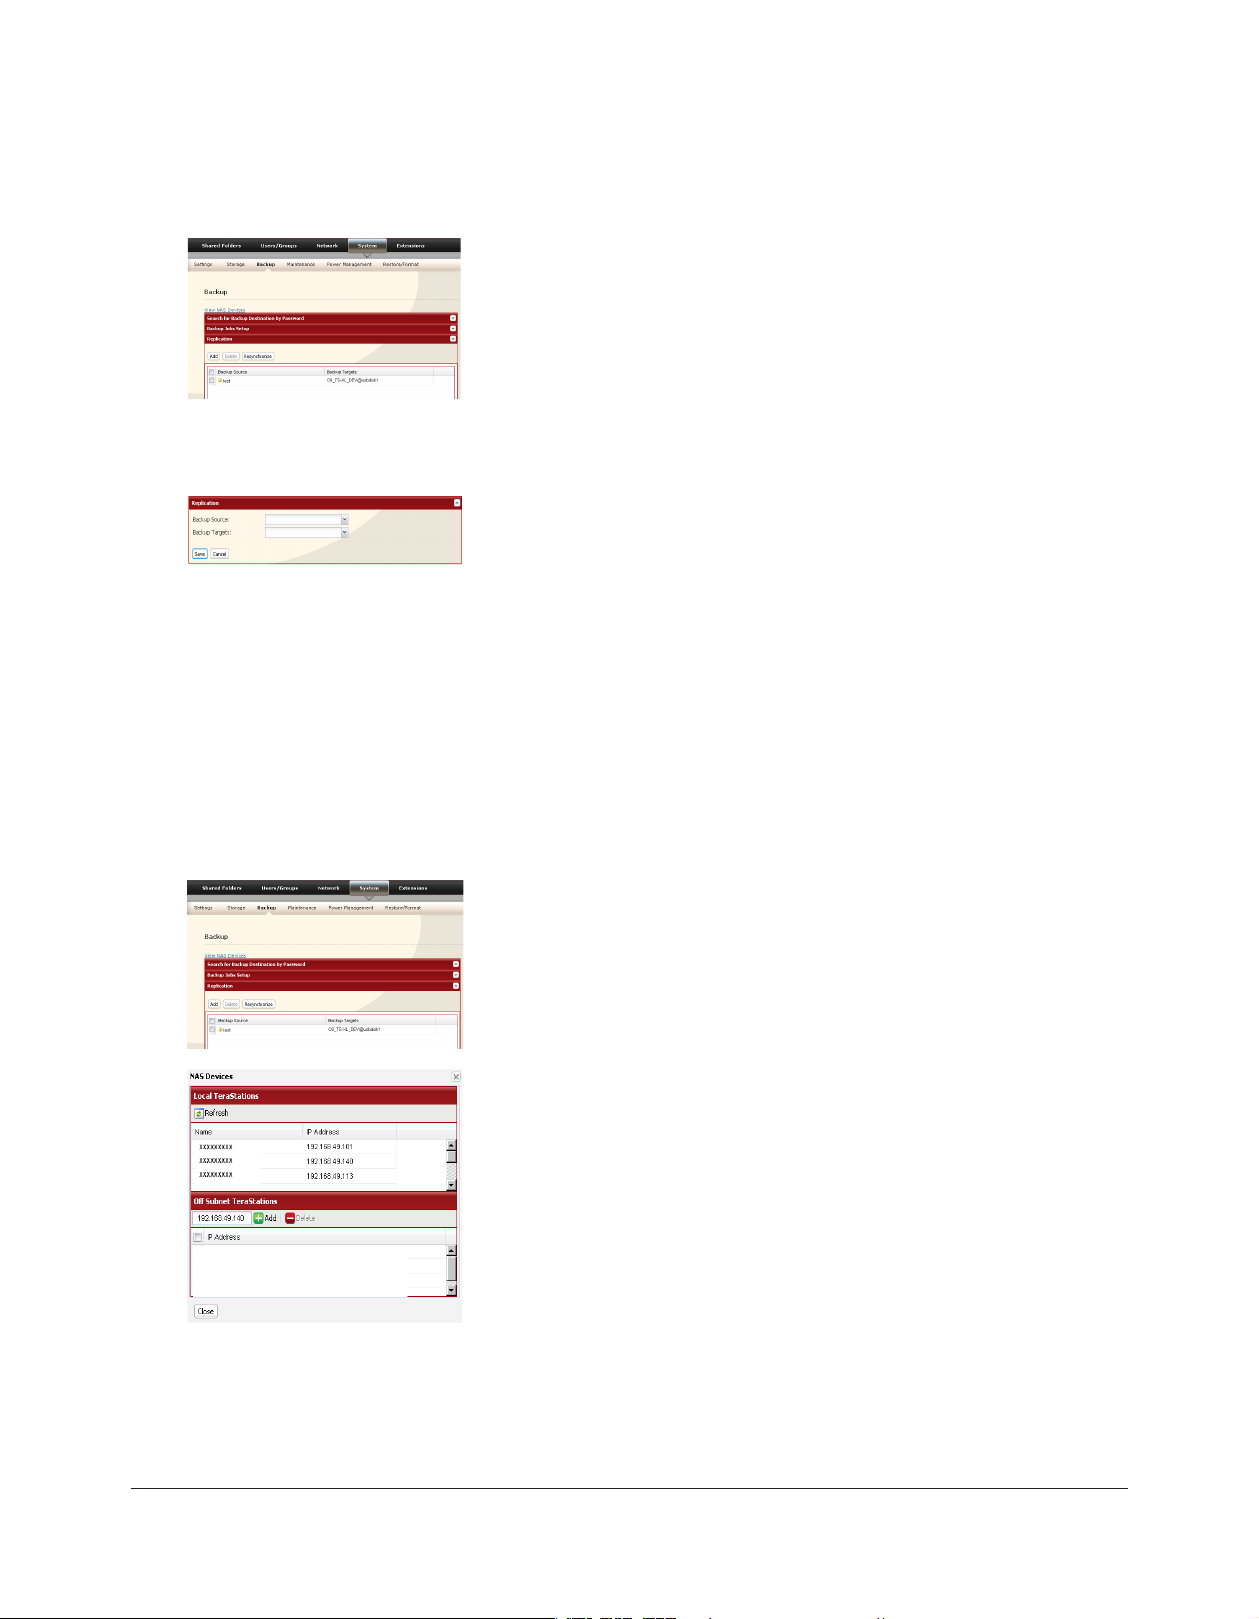
Congure replication as described below.
1
Click [Add].2
3
Read the alert message carefully and click [OK].4
Replication is congured.
In the source TeraStation’s Web Admin, click [System] - [Backup] [Replication].
Select replication source folder.1
Select replication target folder.2
Click [Save].3
Replication to a TeraStation on a dierent network
If your target TeraStation is on a dierent network or subnet, you may still congure replication as described above, but
you must rst add the target TeraStation to your list of o-subnet TeraStations as described below.
1
2
Click [Close].3
You can now congure Replication as described in the previous section.
In the source TeraStation’s Web Admin, navigate to [System] - [Backup].
Click on [View NAS Devices].
Under [O Subnet TeraStations], enter the target TeraStation’s IP address
in the [New IP Address] eld. Click [Add].
Note: If the Target TeraStation is behind a router, enter the router’s WAN
side IP address. You will need to map ports 873, 22938, 22939 to the target
TeraStation in the router for this to work correctly.
Page 31

TeraStation User Manual 30
Time Machine
Time Machine is a backup program included with Mac OS X 10.5 or later. To use it with the TeraStation, congure the
TeraStation as described below.
1
2
3
4
In the TeraStation’s Web Admin, navigate to [Network] - [Settings] [Network Services] and click [AFP].
Select [Enable] and click [Save].
Note:
Settings for both LAN Port 1 and 2 are the same (ports cannot be
congured separately).
Click [Shared Folders].1
Choose a shared folder to congure as a backup destination for Time 2
Machine.
Check [Apple] under [Shared Folder Support].1
Click [Save].2
5
Navigate to [Extensions] - [Time Machine].1
Click [Modify Settings].2
Page 32

TeraStation User Manual 31
6
Select [Enable].1
Select the shared folder that you set in step 3.2
Click [Save].3
7
Notes: • A Macintosh computer’s host name can be found under [Computer Name] in [System Preferences] -
[Sharing].
• A Macintosh computer’s Ethernet MAC address is available from its network page.
Enter the Mac’s host name.1
Enter the Mac’s Ethernet MAC address.2
Click [Create].3
Examples:
If Computers on your local network can access your computer at
“bbbbbbbbbb.local”, enter ’bbbbbbbbbb” for the host name. If it is
“cccccccccc.eee-ee.local”, enter “cccccccccc” for the host name. If it
is “dddddddddd.f-.jp”, enter “dddddddddd” for the host name.
From the Apple menu, select [About This Mac], then [More Info].1
System Proler will open. Click [Network] on the left side.2
The Ethernet MAC address will have a BSD Device Name of “en0”. 3
It will be labeled “IPv4 Addresses”. Copy the address and paste it
into [Target MAC address].
Note:
The folder <Macintosh Host Name>_<Macintosh MAC address>.sparsebundle will be created in the shared
folder that was selected as the target share for Time Machine in step 3. Do not delete this folder or change its
name, or Time Machine will not work properly.
From the Apple menu, select [System Preferences].8
Page 33

9 Click [Time Machine].
10 Click [Choose Backup Disk].
11 Select TeraStation, and click [Use for Backup].
12 Enter a user name and password with the rights to access the shared folder
of the TeraStation, and click [Connect].
Note:
If the backup target folder on the TeraStation does not have access restrictions congured, type “admin” for the
username and “password” for the Password.
13 Make sure that Time Machine is “on”. A backup will start in 120 seconds.
Time Machine will run in the background, and you can use your Mac as
usual. For information on using Time Machine, do a search for “Time
Machine” in your Mac’s help.
Your TeraStation is now congured for use with Time Machine.
TeraStation User Manual 32
Page 34

Chapter 7
Conguring Access Restrictions
TeraStation allows you to set permissions for users or groups to access specic shared folders. Four types of Access
Restrictions are available:
• Access Restrictions for Users and/or Groups on the TeraStation
Follow the procedure on page 41 to congure.
• Access Restrictions on NT Domain
Follow the procedure on page 43 to congure.
• Access Restrictions on Active Directory
Follow the procedure on page 45 to congure.
Notes:
• This chapter describes the procedure to use Active Directory with Windows 2000 Server, Server 2003, and Server
2008.
• Depending on the security settings, the TeraStation may not be able to join, or may be able to join but may not
be authenticated by a domain. In such a case, it is recommended to restrict access by delegating authority.
• Restrict access by delegating authority
Follow the procedure on page 47 to congure.
Notes:
• Access restrictions on the TeraStation are congured for shared folders in the root folder. Subfolders inherit their
permissions from their parent folder and may not be congured separately.
• Permissions on the TeraStation are congured from within the TeraStation’s Web Admin. Changing TeraStation
permissions on the y from within Windows or OS X is not supported.
TeraStation User Manual 33
Page 35

TeraStation User Manual 34
Adding a Shared Folder
1
2
Notes:
• Shared folder names can contain up to 12 alphanumeric charactors (or 6 2-byte charactors). Hyphens and
underscores may be used. Do not use a number or symbol as the rst letter of a shared folder name.
You can enter up to 50 alphanumeric characters (25 characters for 2-byte) for the description. Hyphens,
underscores, and spaces may be used. Do not use a number or symbol as the rst letter of the name.
• You may create up to 400 shared folders on the TeraStation.
You have created a new shared folder.
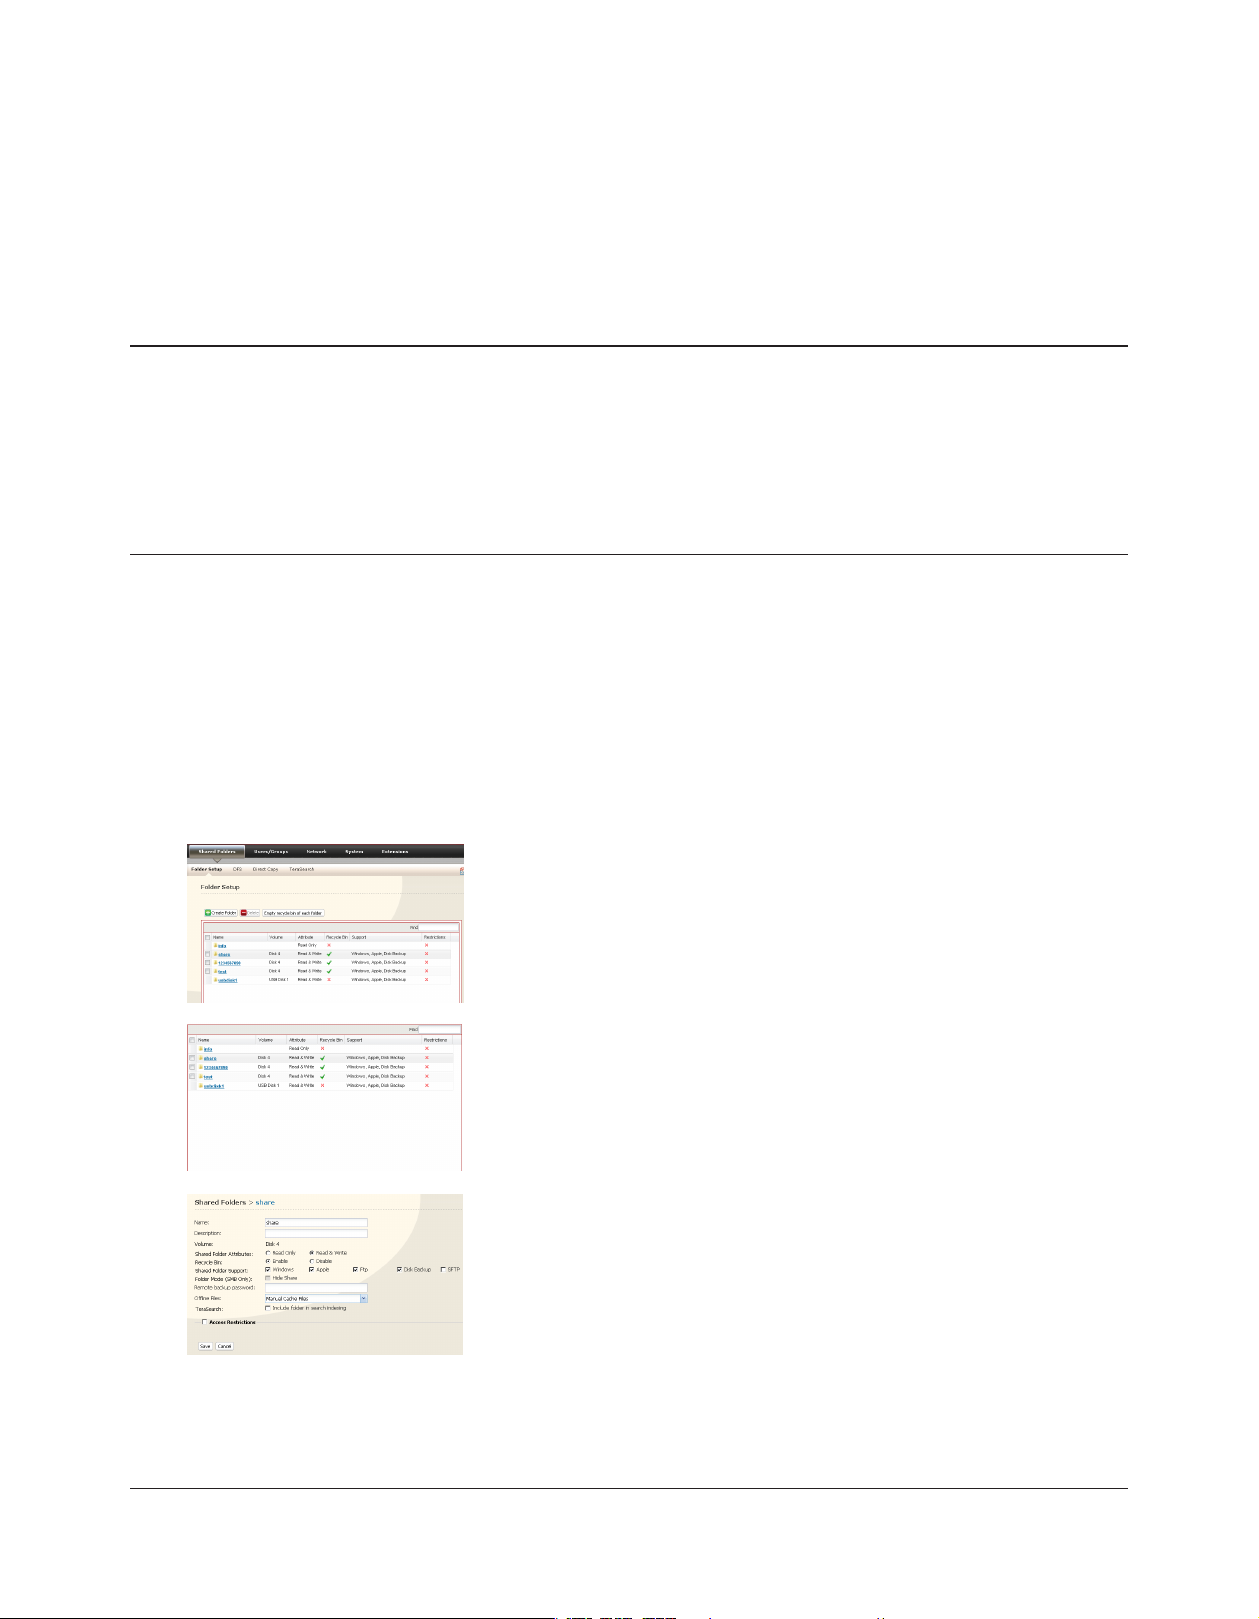
In the 1 Web Admin, click [Shared Folders] - [Folder Setup].
Click [Create Folder].2
Congure the desired settings for the new folder.1
Click [Save]. 2
Page 36

TeraStation User Manual 35
Recycle Bin
Each shared folder on the TeraStation that is connected by SMB may have the recycle bin enabled or disabled from
within the Web Admin. If enabled, deleted data from a shared folder will be temporarily moved to a [Trashbox]
subfolder. To recover deleted data, open the [Trashbox] folder and move les.
Notes: To delete all les in the Recycle Bin, click [Shared Folders] - [Folder Setup] - [Empty recycle bin of each
folder] on the Web Admin.
Read-only Shares
A folder may be congured as read-only by selecting [Read Only] from Shared Folder Attributes.
Notes: The default setting is [Read & Write].
A shared folder whose attribute is set to read-only is read-only for all users, even if they are assigned write
permissions on the share.
When a shared folder is congured to be read-only, the message “(Read Only)” is added to the description
of that share folder.
Hidden Shares
In the Web Admin, click [Shared Folders] and select [Hide Share] on [Folder Mode (SMB Only) ]. Click [Save].
Only SMB shares may be hidden. If other protocols are checked for the share, such as AFP, FTP, or SFTP, you cannot select [Hidden
Share].
To open a hidden share, click [Start] - [Run] and enter \\TeraStation Name\Shared Folder name$\. Example: If your TeraStation is
named “ TS-XL001” with the default share “share” hidden, enter \\TS-XL001\share$\.
Page 37

TeraStation User Manual 36
Technical Restrictions
Windows does not support some characters that OS X and the TeraStation allow. So, if you create a lename on a Mac •
with any of the following characters, it will not display correctly on a Windows computer. With Mac OS X 10.2 or later,
you may have to connect to the TeraStation via AFP in order to display or copy any of the following characters: ? [ ] / ¥
= + < > ; : ” , | *
Do not use any of the following words as a Username or Group Name: root, bin, daemon, sys, adm, tty, disk, lp, sync, •
shutdown, halt, operator, nobody, mail, news, uucp, ftp, kmem, utmp, shadow, users, nogroup, all, none, hdusers,
admin, guest, man, www, sshd, administrator, ftpuser, apache, mysql.
Do not use any of the following words as a shared folder name: info, spool, usbdisk1, usbdisk2, usbdisk3, usbdisk4, •
lost+found, global, printers, homes, lp, auth, ram, disk1, disk2, disk3, disk4, array1, array2.
When using 2-byte characters (such as Japanese), make folder and le names with 80 characters or less. Total •
pathlength is limited to 1024 bytes (512 two-byte characters). You may not be able to copy a folder or le whose
name is more than 80 two-byte characters long, or whose pathname is more than 1024 bytes total.
You cannot set hidden or read-only attributes to folders or les on a TeraStation from Windows. To set an attribute •
for a share on the TeraStation, use the TeraStation’s Web Admin. In [Shared Folders] - [Folder Setup], click the shared
folder you want to congure. Select [Read Only] or [Read & Write] from [Shared Folder Attributes], and [Hide Share]
from [Folder Mode (SMB Only)].
If local characters aren’t displayed properly in a Shared Folder or Workgroup name, use alphabetical character. •
If you access a shared folder from a Macintosh computer, information les for Macintosh may be automatically •
generated. Do not delete these les from a Windows computer. Otherwise, you may no longer access folders from
Macintosh.
A volume name mounted by Finder from Mac OS X 10.3.9 may be corrupted when connected via SMB. File names •
and data should be ne.
On Mac OS X 10.5 - 10.5.6, you cannot search by Spotlight while connected via AFP. In such a case, use SMB •
connection or use Mac OS X 10.5.7 or later.
TeraStation belongs to the default zone specied by an AppleShare Server. You cannot specify a zone. •
Date and Time stamp information stored on a TeraStation’s hard disk or a USB hard disk connected to the TeraStation •
may be updated by an attached OS, and its accuracy cannot be guaranteed.
If you display size of hard drives through the Web Admin, it will show a larger value than that shown by Windows’ •
drive properties.
If you change a TeraStation’s settings or add a USB hard drive while transferring les, the le transfer may be aborted.•
Copying les to TeraStation is protected by the Journaling File System. However, if power is suddenly disconnected in •
the middle of a le copy, the following events may occur:
Data congured (TeraStation, User or Group names) may be lost. -
The copied le may be incomplete and it may not be deleted. In such a case, restart TeraStation and delete the le, and try copying the le again.
Although you format TeraStation’s hard disk, [Percent Used] or [Amount Used] in the Web Admin will not show 0 •
(zero). This is because some space is used for the system.
Set the TeraStation’s username and password the same as the user’s username and password for logging into the •
Windows network. If they are dierent, you may not be able to access share folders with access restrictions.
Click [Shared Folders] - [Folder Setup] - [Empty recycle bin of each folder] in the Web Admin to delete all of the •
contents of the [Recycle Bin] folder in the shared folder.
Do not set the same network address for LAN Port1 and LAN Port 2, or data transmission may be unstable. If this •
happens, initialize the TeraStation with the Reset Button.
Page 38

TeraStation User Manual 37
If you want to access a dierent network from the TeraStation, use LAN Port 1. LAN Port 2 cannot access beyond the •
local subnet as it doesn’t have a default gateway.
Examples: You cannot use Mail Notication (cannot nd the mail server), or you cannot nd a TeraStation by IP address
to congure as a backup destination.
To resolve, place the TeraStation on the same subnet as the device that you are trying to connect to via LAN
Port 2.
Page 39

TeraStation User Manual 38
Adding Users
1
2
Notes:
• Usernames can contain up to 20 alphanumeric characters. Hyphens, underscores, and periods may be used. Do not
use a symbol as the rst character of a name.
• User descriptions may contain up to 50 alpha-numeric characters (25 characters for 2-byte characters). Hyphens and
underscores may also be used. Do not use a number or symbol as the rst character of a user description.
• You may register up to 300 local users with the TeraStation.
• Passwords can contain up to 20 alphanumeric characters. Hyphens, underscores, commas, semi-colons, periods, @, !,
#, $, %, &, ’, (, ), *, +, /, <, >, =, ?, [, ], ^, {, }, |, and ~ (tildes) may be used. Do not use any symbol except the underscore as
the rst letter of a password.
• Set the TeraStation’s username and password the same as the user’s username and password for logging into the
Windows network. If they are dierent, the user may not be able to access shared folders with access restrictions.
• Repetitive deletions and additions of users may cause the Quota feature to not work properly. Even though the data
is copied by the backup function of the TeraStation, the Quota feature may not work properly if a user ID/group ID is
duplicated. In such a case, use a user name/group name of an unused user ID or group ID.
• To assign Quotas for users, check [Enable] for User Quota and enter a limit in GB. (Instructions on page 82)
• If the user ID is left blank, a user ID will be automatically assigned. When using the Quota feature, use numbers
between 1000 and 1999 to set a group ID manually. Make sure that user ID are unique.
Click [Users/Groups] - [Local Users].1
Click [Create User].2
Enter [Name], [Password], and [Description].1
Click [Save].2
Page 40

TeraStation User Manual 39
Importing Users
To import many users at once, enter the following information in the [Input CSV format data] eld on [Users/
Groups] - [Local Users] on the Web Admin, and click [Import].
Format of the user information: Username (required), Password (required), and Description (optional)
Example)
username1, password1, description1
username2, password2, description2
username3, password3, description3
…
…
…
Notes: • It may take about 1 hour depending on the number of users you import. Please note that you cannot use
the Web Admin while the system is busy.
• Use commas as separators. Do not use spaces before or after the commas.
• If a line is incorrectly formatted, then the user in that line will not be registered.
• If a username is already registered on the TeraStation, that user will be overwritten.
• Commas should not be used in usernames, passwords, or user descriptions
Page 41

TeraStation User Manual 40
Adding Groups
1
2
Notes:
• Group names can contain up to 12 alphanumeric letters. Hyphens, underscores, and periods may be used. Do not use
any symbol except underscore as a rst letter of the name.
• Group descriptions may contain up to 50 alphanumeric characters (25 characters for 2-byte characters). Hyphens and
underscores may also be used. Do not use a number or symbol as the rst character of a group description.
• You may register up to 300 groups with the TeraStation.
• Repetitive deletions and additions of groups may cause the quota feature to not work properly. Even though the data
is copied by the backup function of the TeraStation, the Quota feature may not work properly if a user ID/group ID is
duplicated. In such a case, use a user name/group name of an unused user ID or group ID.
• If the Group ID is left blank, a Group ID will be automatically assigned. When using the Quota feature, use numbers
between 1000 and 1999 to set a group ID manually. Make sure that a user ID does not duplicate to other users.
• To set a Quota for a group, check [Enable] for Group Quota, and enter the maximum disk space allotted in GB.
(Instructions on page 84)
Click [Users/Groups] - [Local Groups] in the 1 Web Admin.
Click [Create Group].2
Enter Group Name and Description.1
Select users who join a group, click [Add].2
Click [Save].3
Page 42

TeraStation User Manual 41
Access Restrictions
Setting Access Restrictions for Users/Groups
The TeraStation allows you to specify which groups and users can access specic shared folders.
Register Users and Groups to the TeraStation as described in the previous sections.1
2
3
4
In the Web Admin, click [Shared Folders] - [Folder Setup].1
Click the shared folder you want to set Access Restrictions for.2
Click [Access Restrictions].
Click [Add].
Note:
The procedure described here shows an example of how to set the access restrictions for local users. To set the
access restrictions on Local Groups bases, click [Local Groups] - [Add].
Page 43

TeraStation User Manual 42
5
Check users or groups that you want to allow to access to the share.1
Click [Add].2
6
Click [Save].7
You have completed conguring access restrictions.
Notes:
• If you log on from a Microsoft Network Domain, you can set the access restrictions with the user names/group names
which are registered on the domain.
• If a specic user is assigned both Read Only and Read & Write, they will have Read Only access. The most restrictive
access is always used.
Select the level of privilege for the user or group you added.
Page 44

TeraStation User Manual 43
Access Restrictions on NT Domain
The TeraStation can download users, groups, and passwords from an NT Domain server. This procedure is
recommended for system administrators only.
Create an account on the Domain Controller for the TeraStation.1
Note: If there is an option to “Accept accounts for computers with Windows 2000 or earlier”, then select it.
2
3
Follow the instructions in the previous section to add access restrictions to the domain.4
Notes:
• Domain names can contain up to 15 alphanumeric letters. Hyphens, underscores, and periods may be used. Do not
use a number or symbol as the rst letter of a domain name.
• Domain controller names can contain up to 12 alphanumeric letters. Hyphens, underscores, and periods may be used.
Do not use a number or symbol as the rst letter of a domain name.
Click [Network] - [Workgroup/Domain] - [Modify Settings] in the Web
Admin.
Select [NT Domain].1
Select [NT Domain Name].2
Select [NT Domain Controller Name].3
Enter an Administrator password.4
Enter an Administrator password.5
Enter WINS Server IP Address (Optional)6
Click [Save].7
Page 45

TeraStation User Manual 44
Restrictions
If you change the TeraStation’s Name, you will no longer be able to use Domain Users/Groups or access restrictions. •
Rejoin the domain.
If a domain user name contains more than 20 characters, the TeraStation truncates it to 20 characters. •
The TeraStation only downloads the rst 1000 users or the rst 1000 groups from a Domain Controller.•
If you operate TeraStation as a member server of NT Domain or Active Directory Domain, you cannot connect as a •
guest user via AFP.
When you change the user or group settings on the domain controller, these changes may not take eects •
immediately on TeraStation. If you need to reect changes on the domain controller immediately, reboot TeraStation.
While you are operating TeraStation as a member server of NT Domain or Active Directory and you change the •
[Authentication Method] in [Network] - [Workgroup Settings] to [Workgroup] on the Web Admin, the computer
account on the domain controller will not be deleted automatically.
If it has joined a domain network, you cannot connect to the TeraStation via FTP.•
Page 46

TeraStation User Manual 45
Access Restrictions on Active Directory
The TeraStation can download users, groups, and passwords from an Active Domain server. This procedure is
recommended for system administrators only.
1
2
Click [Network] - [Workgroup/Domain] - [Modify Settings] in the 1 Web
Admin.
Select [Active Directory].1
Enter an Active Directory Domain Name (NetBIOS name).2
Enter an Active Directory Domain Name (DNS name).3
Enter an Active Directory Domain Controller Name (Computer name).4
Enter an Administrator password.5
Enter an Administrator password.6
Enter WINS Server IP Address (Optional)7
Click [Save].8
Follow the instructions on page 41 to 42 to add Access Restrictions to Domain Users/Domain Groups.3
You have completed the settings for this feature.
Page 47

TeraStation User Manual 46
Restrictions when administrating in Active Directory Domain
When you have the TeraStation joined to an Active Directory domain, you must specify the DNS Server which can •
resolve names for Active Directory domain.
After building an Active Directory domain, the administrator’s password which is needed to join the Active Directory •
Domain must be changed at least once, or joining the Active Directory domain will fail.
Active Directory domain’s DNS name and NetBIOS name must be identical.•
If there are more than 5 minutes dierences between the TeraStation’s clock and the domain controller’s clock, •
joining the domain or authenticating domain user or group may fail.
Page 48

TeraStation User Manual 47
Access Restrictions through Delegate Authority to
External SMB Server
To permit access to the TeraStation by administrating all user accounts and passwords together using a delegate server,
follow procedures below. This is recommended for network administrators only.
Notes:
For Windows 7/Vista, Windows Server 2003/Server 2008 Users
When setting Access Restrictions via Delegate Authority to External SMB Server, you need to change the security
setting on Windows 7/Vista and Windows Server 2003/Server 2008.
Select [Start] - [Bualo] - [File Security Tool] - [File Security Tool] and select [Change the le security level] to change the
security level (when changing back again, select [Change back the le security level]).
[File Security Tool] can be installed only on Windows 7/Vista, Windows Server 2003/Server 2008 from the CD included
with this product.
During the initial setup, the message, [Changing the security level. Are you sure?] is displayed. Click [Yes] and follow
the instructions on the screen to restart your PC .
Clicking [Yes] on the message for converting to Local Users which is displayed when applying changing External SMB
Server Settings will convert all Local Users registered on the TeraStation to External SMB Server Users. You must set the
Local user password again after resetting the External SMB Server.
Page 49

TeraStation User Manual 48
1
In the Web Admin, click [Network] - [Workgroup/Domain] - [Modify
Settings].
2
3
Notes:
• Match the Workgroup name of this product and the Windows domain controller’s domain name if you would like to
specify the Windows domain controller as an external authentication server.
• A Workgroup Name can be up to 15 alphanumeric characters or 7 two-byte characters. Hyphens, underscores, and
periods may be used.
• Do not use a number or symbol as the rst letter of a workgroup name.
Double click [Workgroup].1
Note: Even if you will use this unit in a domain environment, select
[Workgroups].
Select [Delegate Authority to External SMB Server].2
Click [Automatic User Registration]. Check [Enable Authentication 1
Shared Folder]. If using Windows Domain Controller, check [Use
Windows Domain Controller as Authentication Server].
Enter [Authentication Server Name or IP Address].2
Note:
If you will be connecting using AFP and FTP, entering an IP address for the
authentication server is recommended.
Enter an Authentication Share Folder Name.3
If you want to allow access by local users in addition to externally 4
authenticated use, select [Allow].
Click [Save].5
Page 50

TeraStation User Manual 49
An Authentication Shared Folder is created on the TeraStation. 4
When a user who is registered to the specied External Server opens the Authentication Shared Folder, he/she
will be automatically registered as a TeraStation user (you can directly register users).
Notes:
• A user who is automatically registered will belong to the “hdusers” group. They can be set to belong to any
group from the Group settings.
• Access Restrictions to shared folders can be set for the User Name obtained
• User Name registered will be displayed when clicking [Users/Groups] - [External Users]. To delete a user that
automatically registered, select the user and click [Delete External Users].
• When connecting using AFP and FTP, always use an IP address. Authentication may fail if a Server Name is used.
• Enter the IP address when specifying a server in a dierent subnet.
• AFP and FTP connections do not allow obtaining user information by delegating authority to External SMB
Server.
Follow the instructions on pages 41 and 42 to add access restrictions to External Users/Groups.5
You have completed the settings for the Authentication Server.
Restrictions when administrating Delegate Authority option
If you cannot access the TeraStation while logged into Windows using the account information registered to the •
authentication server, you cannot access shared folders on the TeraStation or set access restrictions.
If you use the Delegate Authority option, you cannot connect as a guest user via AFP.•
If you use the Delegate Authority option, you cannot connect as a Anonymous user via FTP.•
Page 51

Chapter 8 Managing your TeraStation
Name, Date and Time
Congure the TeraStation’s host name, date, or time as follows:
1
2
3
In the Web Admin, navigate to [Modify Settings] in
[System] - [Settings] - [Name].
In the Web Admin, navigate to [Modify Settings] in
[System] - [Settings] - [Date and Time].
4
TeraStation User Manual 50
Enter the year, month, day, and time.1
Click [Save].2
Page 52

Click [Use Local Date/Time] to use your computer’s time settings for the TeraStation.
By default, the TeraStation adjust its clock automatically by using an NTP server.
NTP
NTP may not be usable in some networks.
The default NTP Server (ntp.jst.mfeed.ad.jp) belongs to Internet Multi Feed Inc. For more information,
please visit www.jst.mfeed.ad.jp.
Use NTP at your own risk. Bualo Technology is not responsible for any loss or damage caused by using
of this service, stopping the service, or missing service.
You’ve completed hostname and time settings for the TeraStation.
Note:
The TeraStation’s internal clock may run at a slightly dierent speed from other clocks on you network, and over a long
period of time your network devices may show dierent times. If clocks on your network vary by more than 5 minutes
it may cause unexpected behavior. For best results, keep all clocks on the network set to the same time by adjusting
them regularly, or use an NTP server to correct them all automatically.
TeraStation User Manual 51
Page 53

TeraStation User Manual 52
RAID Scanning
RAID Scanning allows regular scans of your RAID arrays to be congured to run automatically. Errors will be xed as
they are found if possible.
For best results, schedule regular RAID scans if you use RAID arrays in your TeraStation.
1
In the Web Admin, click [System] - [Storage] - [RAID Scanning]. 1
Click [Modify Settings] under [RAID Scanning]. 2
2
You have congured RAID Scanning.
Click [Enable]. 1
Select a schedule for RAID scans. 2
Notes:
•Select [Shutdown] to have the TeraStation to shut down automatically
when an error is detected.
• If [Begin Immediate RAID Scan] is selected, then a RAID scan will begin
immediately.
• To stop a RAID scan, click [Abort RAID Scanning].
Click [Save]. 3
Page 54

TeraStation User Manual 53
Disk Check
A disk check tests the data on a drive in the TeraStation or connected via USB. Errors are xed automatically. A disk
check may run for more than ten hours. Shared folders cannot be accessed during the disk check. Do not turn o
power to the TeraStation during the disk check.
If the Power Mode Switch is set to [AUTO], then the TeraStation will turn o when the disk check is nished.
Run a disk check as follows:
1
2
3
In the Web Admin, navigate to [System] - [Storage].
Select the hard drive to test.1
Click [Check Disk].2
Click [Check].
The Status LED on the front of the TeraStation will ash during the disk check. The TeraStation’s shared folders
cannot be accessed until the disk check is complete.
Note:
If a power outage disconnects the TeraStation in the middle of a disk check, then you may not be able to access
shares on the TeraStation from Mac OS. This is because the database created by Mac OS is damaged. To resolve,
navigate to [System] - [Storage] - [Check Disk] and check [Delete any hidden, non-essential Mac OS dedicated
les]. Rerun the disk check when done.
Encrypt Hard Drives on the TeraStation
If encryption is selected during a refomat of a drive or array, it will be encrypted with 128 bit AES. The drive or array will
then be only readable from that specic TeraStation. To unencrypt the hard drive, untick [Encrypt] and format it again.
Notes:
• Performance will be slower if an array or drive is encrypted.
• USB drives cannot be encrypted.
• Data recovery services will probably not be able to recover data from an encrypted drive or array.
Page 55

TeraStation User Manual 54
Formatting Disks
Notes:
• Formatting deletes all data from a hard drive. Be careful! Back up any important data on a drive before formatting it. It
will take a several minutes to format a hard drive.
• Shared folders cannot be accessed during formatting.
• Do not turn o the power switch or disconnect power while formatting a hard drive.
• If the Power Mode Switch is set to [Auto], then the TeraStation will turn o when the format is nished.
• To erase all data on a disk, choose [System] - [Restore/Erase] instead of formatting.
1
2
3
In the Web Admin, navigate to [System] - [Storage].
Select the drive to format.1
Click [Format Disk].2
Click [Format].
The [Conrm Operation] screen will be displayed. Type the displayed number into the [Conrmation Number] 4
eld within 60 seconds, then click [Apply].
Follow the instructions displayed on the screen.5
Notes:
• The time needed to format a hard drive varies based on the hard drive’s size and format types (a few seconds to
several minutes).
• The Info LED on the front of the TeraStation will ash during formatting. The TeraStation’s shared folders cannot be
accessed until the disk format is complete.
• If the hard drive is an external USB drive, its partitions will be recreated.
Page 56

TeraStation User Manual 55
E-mail Notication
Your TeraStation can send you daily e-mail reports. It can also send you an e-mail when settings are changed or an error
occurs.
The following contents will be sent via E-mail.
Sends the status of hard drives at specied time•
Changes to RAID conguration•
Fan error alert•
Hard drive replacement alert•
Noties when backup jobs are completed•
RAID error alert•
Hard drive read error alert•
Notication of Quota changes or limits •
1
3
In the Web Admin, navigate to [System] - [Maintenance].
Click [Modify Settings] in [Email Notication].2
Click [Enable] under [Notication].1
Type the SMTP Server Address and SMTP Port Number. 2
Note:
If using POP before SMTP, enter POP3 Server Address and
POP3 Port Number.
Select User verication method (Disabled/pop before 3
smtp/login(SMTP-AUTH)/cram-md5 (SMTP-AUTH)).
Enter a username.4
Enter a password that will be used to verify.5
To use a secured connection, select SSL/TLS.6
Enter the subject for notication e-mail. 7
Enter an e-mail address, then click [Add] . E-mails can 8
be sent to up to 5 addresses.
Page 57

TeraStation User Manual 56
Select conditions for e-mails to be sent.9
HDD Status Report Sends the condition of the hard drives at the specied time.•
Fan Failure Sends when the fan error is recognized.•
Disk Error Sends when an hard drive error is recognized•
Backup Complete Sends when the backup is complete.•
Quota Alert Notication Sends when the Quota Space Limitation is exceeded at the time which is specied •
on HDD Status Report.
System Alert Sends when system is rebooted or shut down, or RAID conguration is changed.•
If you have selected [HDD Status Report] for sending condition, select time to send.10
Click [Save].11
4
Notes:
The following examples show notication e-mails for each selection:
• The content of the mail which include the periodical report when “HDD Status Report” is selected
TeraStation Status Report: Periodical Report: Information
[TeraStation Information]
TeraStation Name: TS-xxxxx
Time Stamp: 2009/03/23 00:00:01
IP Address: 172.16.37.62
Conguration Scree: http://172.16.37.62/
Continuous operating time: 13:51:57
• The content of mail which is sent periodically when “Disk Error” is selected
TeraStation Status Report: DISK Error Notication: Failure: Fail to mount a disk
DISK Error Notication
The error occurred on HDD.
The erroneous disk drive: Disk 1
Disk could not be mounted.
• The content of mail which is sent periodically when “Fan Failure” is selected
TeraStation Status Report: FAN Error Notication: Failure: FAN stopped.
FAN Error Notication
The FAN has stopped.
The internal temperature is now over the threshold. Shut down the system.
System temperature: 52 [°C]
Click [Send Test Message] to send a test message.
Page 58

TeraStation User Manual 57
UPS Settings
An uninterruptible power supply (UPS) can protect the TeraStation from power outages and brownouts. To use the
TeraStation with a UPS, proceed as follows:
Plug the power cable of the UPS to a wall socket.1
Connect the AC cable of the TeraStation to the UPS.2
Connect the UPS to the TeraStation with a USB or serial connection.3
Note:
• TS-XEL Series doesn’t have UPS Port.
Turn on the UPS, then the TeraStation.4
In the TeraStation’s Web Admin, click [System] - [Power Management] - [UPS Settings].5
Click [Modify Settings].6
7
Check [Enable].1
Congure settings.2
Click [Save].3
Notes:
• If the UPS has shut down the TeraStation because of a power outage, make sure that power has been restored before
restarting the TeraStation. If the TeraStation is restarted after a shutdown, but power is not available, then the UPS
will not shut down the TeraStation a second time even if its battery is running low.
• If the TeraStation is set to use UPS recovery, then the UPS will restart the TeraStation when normal power is restored.
Page 59

TeraStation User Manual 58
Beep Alerts
You can set the TeraStation to beep when certain erros occur.
In the conguration utiltiy, select [System] - [Maintenance] - [Alert Sound Settings] - [Modify Settings].1
2
You’ve now congured alerts.
Select the conditions to beep the alert from high temperature, drive 1
error, fan error, or UPS power outage detection.
Click [Save].2
LCD Display Settings
You may congure the LEDs and LCD screen on the front of the TeraStation here.
In the 1 Web Admin, select [System] - [Maintenance] - [Front Panel Settings]. Click [Modify Settings].
2
Several settings can be congured, including displayed information and
the brightness of the LCD screen and the LEDs. Click [Save] when done.
You have completed the settings for the display panel.
Page 60

TeraStation User Manual 59
Changing the Admin Password
1
2
3
You’ve now changed the admin password.
In the Web Admin, select [Users/Groups] - [Users].
Click [admin] from the user list.1
Click [Edit User].2
Enter a new password twice.1
Click [Save].2
Notes:
• Passwords can contain up to 20 alphanumeric letters. Spaces, hyphens, underscores, commas, semicolons, (, ), @,
!, #, $, %, &, ’, *, +, /, <, >, =, ?, [, ], ^, {, }, |, and ~ (tildes) may be used. Do not use a symbol besides underscore as the
rst letter of a password.
• You cannot assign access restrictions to the “admin” account, or use it for WebAccess.
Page 61

TeraStation User Manual 60
Erase Data on the TeraStation Completely
Data on the hard drive is not completely erased by just performing “Delete” or “Format”. If you want to completely
delete data from a TeraStation that you are going to donate, give away, or send in for repairs, do the following.
In the 1 Web Admin, select [System] - [Restore/Erase] - [Erase TeraStation].
2
The [Conrm Operation] screen will appear. Enter the 3 number from the [Conrmation Number] eld within 60
seconds, then click [Apply].
Follow the instructions displayed on the screen. 4
Notes: This will erase all data on the TeraStation and replace it with zeros. When the process is complete, the
TeraStation will be congured as follows:
Hard drives in Normal mode
Shared folders (share 1 - 4 on TS-XL, TS-XEL, and TS-RXL; share 1 and 2 on TS-WXL) on each drive.
All settings to factory defaults
Logs: All deleted
Data: All deleted
If you remove a drive and then erase all data on the TeraStation, the LCD display will show the error “HDx Error
E22 HDx Can’t Mount” where x is the hard drive you removed. You can still use the TeraStation.
Click [Erase TeraStation].
Page 62

TeraStation User Manual 61
Initialization
Reset Button
Restore Factory Defaults
To reset the TeraStation to its factory default settings, power on the unit and hold down the reset button for ve
seconds.
Location of the reset button varies according to model. You will need to open or remove the drive door to access it. A
key for the drive door is included in your TeraStation package.
TS-XL, TS-XEL
TS-RXL
To press the reset button on the TS-RXL TeraStation, insert the tip of an unfolded paper
clip.
To reset the TeraStation to its factory default settings, power on the unit and hold down the reset button for ve
seconds.
TS-WXL
Reset Button
* View with the front cover open
Notes:
• Normally, holding down the reset button initializes settings for IP address, Ethernet frame size, admin password, SSL
key, port trunking (default is o), and NASNavi detection (default is on). The ability to reset the admin password may
be turned o in the Web Admin. You can also initialize settings from within the Web Admin (next page).
• To disable resetting the admin password from the initialization button, navigate to [System] - [Restore/Format] and
select [Keep current admin password]. Click [Save].
• If you disable resetting the admin password from the reset button, you can no longer congure the TeraStation if you
forget the password. Write down your password and keep it in a safe place.
Page 63

TeraStation User Manual 62
Initialization from within the Web Amin
In the Web Admin, you can initialize the following settings, including things that are not initialized from the reset
button.
TeraStation Name, Description, NTP Settings, Workgroup Settings, Network Services, Shared Folders Settings, USB
Disk Settings, RAID Scanning, Timer ON/OFF, Upon restore, Restrictions on Shared Folders, User Settings, User/Group,
Notication Settings, Synchronization with UPS, Backup Settings, Admin password, Network Settings (IP Address,
Subnet Mask and etc.), Time Machine, Web Access, DFS, DirectCopy, NFS, TeraSearch, Alert Sound Settings, Front Panel
Settings, Language, Syslog, PrintServer
In the 1 Web Admin, navigate to [System] - [Restore/Format].
2
The [Conrm Operation] screen will open. Enter the number from the 3 [Conrmation Number] eld within 60
seconds, then click [Apply].
Follow the instructions displayed on the screen.4
Notes:
• To disable resetting the admin password from the reset button, navigate to [System] - [Restore/Format] and select
[Keep current admin password]. Click [Apply].
• If you disable resetting the admin password from the reset button, you can no longer congure the TeraStation if you
forget the password. Write down your password and keep it in a safe place.
Click [Restore TeraStation].
Page 64

TeraStation User Manual 63
Changing the IP Address
Normally, the TeraStation’s IP address is set automatically from a DHCP server on your network. If you prefer, you can
set it manually. To change the TeraStation’s IP address settings, your computer should be connected to the same router
(subnet) as the TeraStation and should be running NAS Navigator2 (included on your TeraNavigator CD).
For a PC, double-click the 1 [NAS Navigator2] icon on your Desktop. For a Mac, click the [NAS Navigator2] icon in
the Doc. NAS Navigator2 will launch.
For a PC, right-click your TeraStation and choose [Properties]. Select [IP Address]. For a Mac, hold the control key 2
and click your TeraStation's icon, then choose [Open the device conguration screen] - [IP Address].
3
You’ve congured a static IP address for the TeraStation. To return to using DHCP, reopen the Network Properties
screen and recheck [Obtain an IP address automatically].
Uncheck [Obtain an IP address automatically]. Enter the desired IP address
and subnet mask. Click [OK], or [Apply Now] if you’re using a Mac.
Page 65

TeraStation User Manual 64
Connection Transmission
Transmit
Jumbo Frame
( 4102/7422/9694)
TeraStation
Jumbo Frame
(4102/7422/9694)
Jumbo Frame
supported
Jumbo Frame
supported
TeraStation
Jumbo Frame
(4102/7422/9694)
Jumbo Frame
Supported
Jumbo Frame
not supported
TeraStation
Jumbo Frame
(4102/7422/9694)
Jumbo Frame
not supported
Jumbo Frame
not supported
TeraStation
Jumbo Frame
(4102/7422/9694)
Jumbo Frame
not supported
Jumbo Frame
supported
Transmit
normally(1518)
Transmit
normally(1518)
No transmission
Network
Jumbo Frames
If your other network devices support it, you may be able to increase network performance with jumbo frames.
1
2
3
In the Web Admin, navigate to [Modify Settings] in
[Network] - [Settings] - [Ethernet Frame Size].
Select Ethernet Frame Size.1
Click [Save].2
Page 66

TeraStation User Manual 65
Notes:
• To benet from using jumbo frames in the TeraStation, your router/switch/hub should support jumbo frames.
• To use jumbo frames (4102/7422/9694 bytes), your computer’s NICs and all switches, hubs, and routers on the
transmission route need to support jumbo frames. If any device on the route doesn’t support jumbo frames, use
standard transmission (1518 bytes) instead.
• If you are using jumbo frames and back up data from a TeraStation/TeraStation to another TeraStation/TeraStation, set
the Ethernet frame sizes of the TeraStations/TeraStations to the same settings (or the closest available). If the Ethernet
frame sizes are signicantly dierent, the backup job may fail. If you have problems with backup jobs, select the
default frame size (1518 bytes).
Page 67

TeraStation User Manual 66
Port Trunking
You may use two separate LAN connections for redundancy, speed, and reliability.
Note:
To use Port Trunking, your hub or switch must support it.
The following Port Trunking modes are available:
Disabled: Port trunking is not used.
Round-robin policy(*1):
Sets a round-robin policy for fault tolerance and load balancing.
Active-backup policy :
Sets an active-backup policy for fault tolerance.
XOR policy(*1) :
Sets an XOR (exclusive-or) policy for fault tolerance and load balancing.
Broadcast policy:
Sets a broadcast policy for fault tolerance.
Dynamic link aggregation (*2):
Sets an IEEE 802.3ad dynamic link aggregation policy.
Adaptive transmit load balancing (TLB):
Sets a Transmit Load Balancing (TLB) policy for fault tolerance and load balancing
*1 Your switch must support this. Congure the two ports on the switch in advance. Refer to your switch’s manual for
instructions on conguring it.
*2 Your switch must support this. Enable LACP (Link Aggregation Control Protocol) in the switch in advance. Refer to
your switch’s manual for instructions on conguring it.
Important:
After conguring port trunking in the TeraStation’s Web Admin, reboot the TeraStation by holding down the power
button until it shuts down, then restarting it.
Page 68

TeraStation User Manual 67
To congure port trunking,
Connect LAN Port 1 on the TeraStation to a port on the switch.1 Do not connect LAN Port 2 yet.
In the Web Admin, navigate to [Network] - [Settings] - [Port Trunking]. 2
Under [Port Trunking], click on [Modify Setiings].3
Connect LAN Port 2 on the TeraStation to the switch.4
Hold down the TeraStation's power button for 3 seconds to turn it o. P ress it again to restart the TeraStation. 5
Port Trunking is now congured.
Page 69

Chapter 9
Extensions
WebAccess
WebAccess lets you access les on the TeraStation from outside your network. You can access the TeraStation from
anywhere with an Internet connection and play music, display pictures, and download or upload data. You can set
access restrictions for each shared folder. These restrictions will apply to users accessing the TeraStation via WebAccess
as well as locally. TeraStation also supports UPnP for conguring your router and redirects with bualonas.com (similar
to Dynamic DNS).
To Congure WebAccess:
1
2
3
Click [Extensions].1
Click [WebAccess].2
Choose the folder to be shared with WebAccess.
Choose what access users will have.1
Disabled: WebAccess is not allowed.•
Allow Anonymous: Anyone can access shared •
folders.
Allow All Groups / Users: All groups/users that •
are registered on the TeraStation can access with
WebAccess.
Use Inherited Folder Permissions: All users have the •
same rights that they would have locally. If access
restrictions are not congured, then this option is
not displayed.
Click [Save].2
TeraStation User Manual 68
Page 70

4
Click [Modify Settings].
5
Notes:
• Check [HTTPS/SSL Encryption] to encrypt your data transfers.
• To use another DNS service instead of BualoNAS.com, enter the host name in [Other DNS Hostname].
• To congure manually without using UPnP, enter port number for data access. The default port is 9000.
• Your account will be stored for at least 60 days even if it it not used. If your TeraStation is disconnected from the
Internet for more than 60 days, your BualoNAS account may be deleted.
Enable [WebAccess Service].1
Enable [Use BualoNAS.com].2
Enter a name for your account in [BualoNAS.com 3
Name].
Note:
You'll use this name to access your TeraStation through
BualoNAS.com. It does not have to be the same
name as your TeraStation.
Enter a password for your account in [BualoNAS.com 4
Key].
Enable [Auto-Congure Firewall (UPnP)].5
Note:
UPnP must be enabled in your router for this to work.
Click [Save].6
WebAccess is congured.
TeraStation User Manual 69
Page 71

TeraStation User Manual 70
Accessing folders with WebAccess
Open the following URL in an Internet browser. 1
http://bualonas.com
To access BualoNAS.com from iPhone/iPod touch:
Connect to the Internet and open [Safari].1
Enter 2 http://bualonas.com in the address bar, and select [Go].
Notes:
•The screenshots below show WebAccess from a Windows PC. WebAccess screens on an iPhone or iPod touch
look slightly dierent.
•Video and audio les that are protected with DRM may not be accessed from the iPhone/iPod.
•Files saved with access restrictions are not accessible from the iPhone/iPod.
•Files cannot be copied to the iPhone or iPod with WebAccess. Video and music les are streamed and picture
les are displayed in the browser.
•Not all video and audio formats are playable on the iPhone/iPod. Many types of software are available to
convert non-compatible formats to playable formats for the iPhone and iPod touch.
•Uploading les, changing le names, and deleting les are not supported from the iPhone and iPod.
•iPhone and iPod touch are trademarks of Apple Inc.
2
Enter your BualoNAS.com name and click [Connect].
3
To view without using BualoNAS.com, open the following URL on the Internet browser: http://IP_address: 9000, where
IP_address is the WAN-side IP address of the network that has your TeraStation on it.
Notes:
• To nd your WAN-side IP address, contact your ISP, or go to an IP sensing website like whatismyipaddress.com or www.
whatismyip.com from a PC on your network.
•To view folders with restricted access, click [Login] and enter your username and password.
From your browser, you can view folders and les from
the TeraStation.
Page 72

TeraStation User Manual 71
What can you do with WebAccess?
You can perform the following operations from the WebAccess screen: open, rename, delete, Link to this le, mail link to
this le, Create Folder , and Upload.
open - 1 Click [open] to open a le or folder. To save a le to the local drive, right-click on it.
rename -2 To change a lename or folder name, click [rename]. The window below will open. Enter a new name for
the le or folder and click [Rename].
Do not use any of the following characters in a le name or folder name: ?•
Folder and le names may contain up to 80 characters.•
delete -3 Clicking [delete] will display the following screen. Click [Yes] to delete the selected le.
Link to this le - 4 Right-click on [Link to this le] in the white area and select [Copy Shortcut] to copy an address link
that can be used to access that le directly. You can then give this link to your friends and they will be able to go
directly to that le or folder. From the right-click menu, select [Add to Favorites] to bookmark the link.
Page 73

TeraStation User Manual 72
Mail link to this le - 5 Sends the address link by e-mail. Click [Mail link to this le] to launch your mail software and
send the address link in the mail body.
Create Folder - 6 Click [Create Folder], then enter a name for the new folder and click [Make]. A new folder will be cre-
ated.
You cannot include following characters in a le name/folder name: ?•
Folder and le names may include up to 80 characters.•
Upload - 7 Click [Upload] to display the following screen. Click [Browse] and select a le to be uploaded. Click [Upload]
to begin uploading the selected le.
Page 74

TeraStation User Manual 73
Clicking [Upload Files] will display the following screen.
Select the les you want to upload in [Append les], and click [Start upload].
Files may be up to 2 GB in size
You may select up to 100 les per upload
You cannot upload a le if the same le name already exists at the destination. Delete the le with the identical name in
the destination before uploading the new le.
If a selected le is graphic data, the word [Preview] is displayed next to the le name. Clicking [Preview] will display a
preview of the le in the browser.
Click at the bottom of the image to nish displaying the preview.
Move the mouse cursor to the top right of the preview image, and will be displayed (unless there are no more
graphics les). Clicking will display the next graphic.
Move the mouse cursor to the left top of the preview image, and will be displayed (unless there is no previous
graphic le). Clicking will display the previous graphic.
Page 75

TeraStation User Manual 74
Direct Copy
USB Connector
Function Button
Front View Rear View
USB Connector
Function Button
Front View Rear View
TS-XL, TS-XELSeries
T
S-WXL Series
TS-RXLSeries
Rear View
Front View
Function Button
USB Connector
USB Connector
DirectCopy automatically copies movie, music, and images directly to the TeraStation from a USB device.
You can connect many types of USB devices to the TeraStation, including USB hard drives, USB ash drives, single-card
card readers, digital cameras, and USB printers. USB hubs, mice, keyboards, and card readers that support 2 or more
cards are not supported.
Connect to a USB device (USB ash/digital camera/hard disk/card reader) to the TeraStation.1
After the USB device is recognized,
the function button is lit in blue for
60 seconds. After the function button
is lit in blue, you can access the USB
device.
If an unsupported USB memory device
is connected to the TeraStation, then
the function button will not light up
in blue, and the device will not be
mounted.
While the function button is blue, press it to automatically copy data from the USB device to the DirectCopy 2
folder on the TeraStation. The function button will ash blue during the copy. Push the function button again to
abort the copy.
Page 76
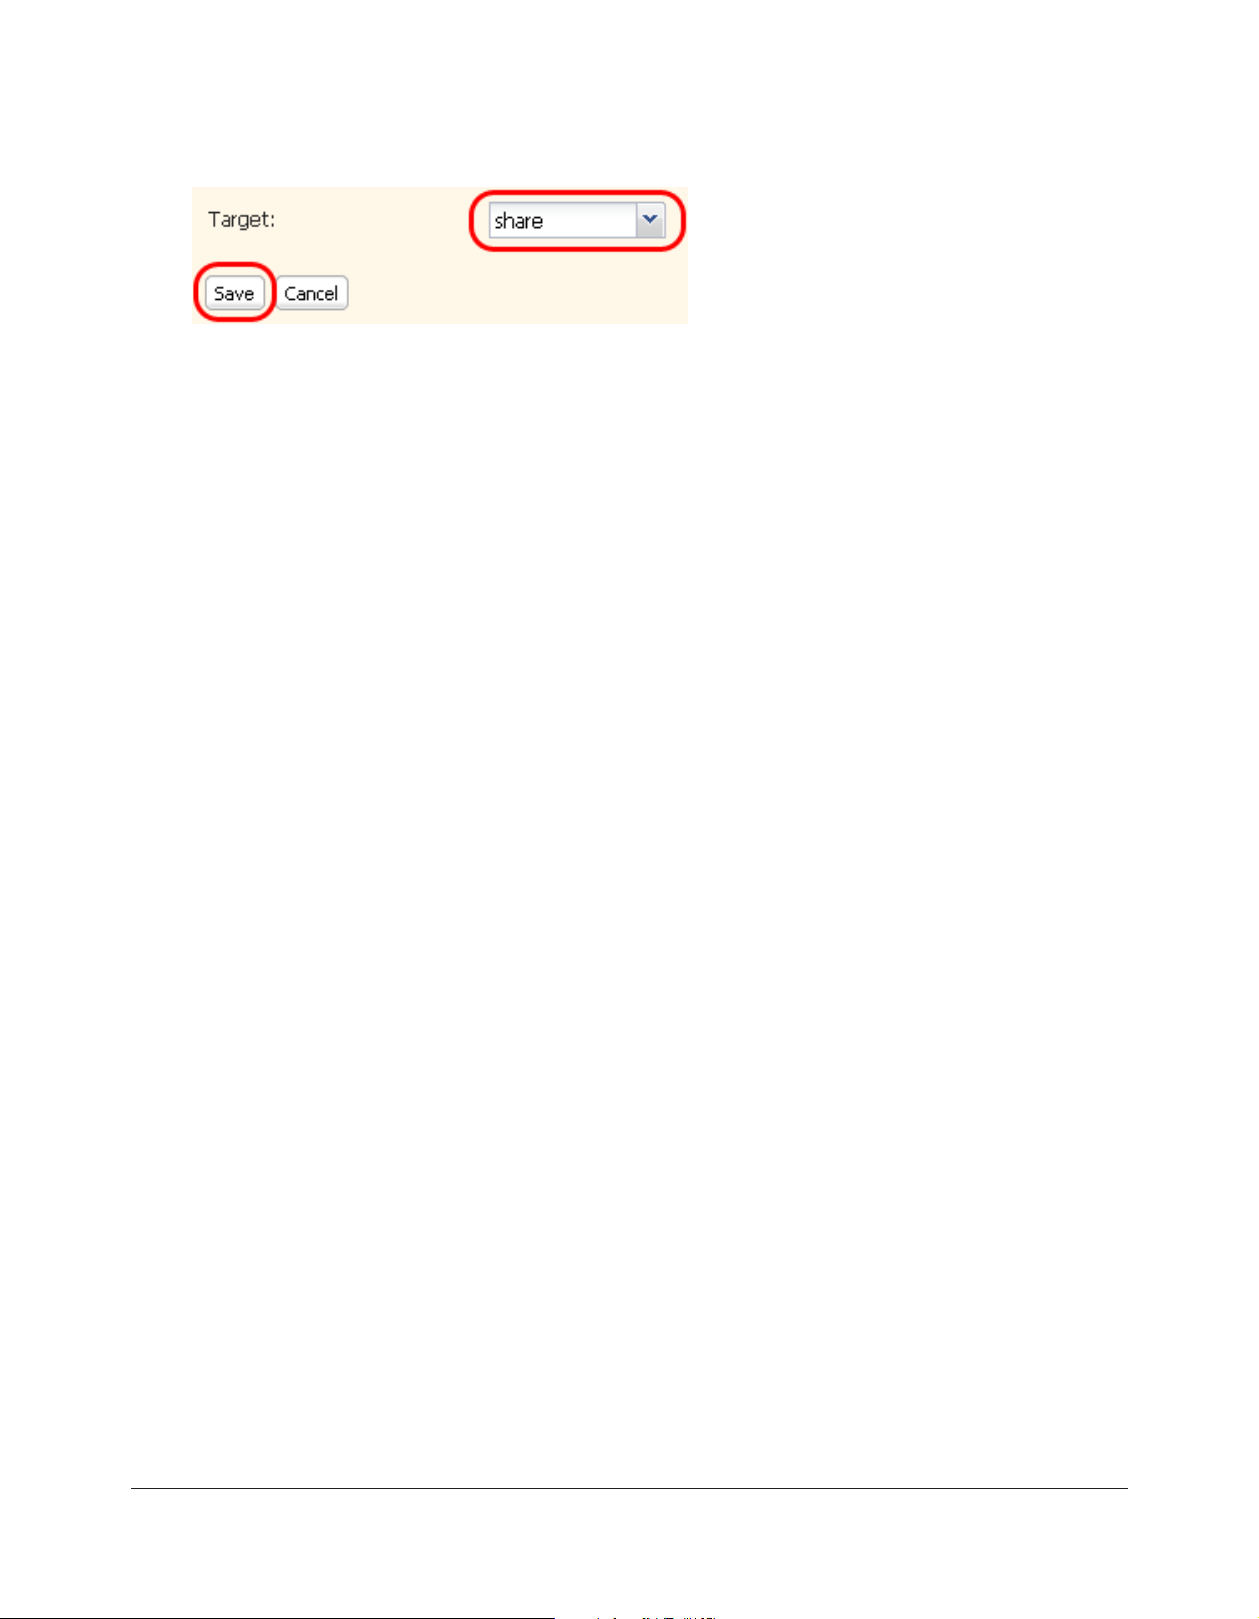
TeraStation User Manual 75
Files are copied to the folder:
<DirectCopy folder>/pictures/yyyymmdd
yyyy: year copied
mm: month copied
dd: date copied
You may change the destination shared folder for DirectCopy in [Shared Folders] - [Direct Copy] - [Modify
Settings] in the Web Admin. Subsequent DirectCopy folders are created at:
<DirectCopy folder>/pictures/yyyymmdd/n
yyyy: year copied
mm: month copied
dd: date copied
n: 1st time n=0, 2nd time n=1, 3rd time=2 and so on.
For USB Mass Storage class USB devices, les with following extensions will be copied.
avi, divx, asf, mpg, mpe, m1v, vob, mts, m2ts, m2t, mpeg, mpeg2, vdr, spts, tp, ts, 3gp, mov, m4v, wmv, dvr-ms,
xvid, mp4, jpg, jpeg, gif, png, tif, ti, yuv, bmp, mp3, mpa, wma, aac, apl, ac3, lpcm, pcm, wav, m3u, m4a, m4b, aif,
ai, ac, ogg, mp2, mp1
For digital cameras and other devices that don’t follow the USB Mass Storage Class standard, all les on the
device will be copied.
When the access LED of the USB device goes o, the copy is nished. Dismount the USB device before 3
unplugging it.
To dismount the USB device if the TeraStation is on, hold in the function button for 6 seconds. The blue LED will
go out, and the USB device is dismounted. You may now unplug it safely.
If you turn o the TeraStation, the USB device is already dismounted, and you can remove it safely.
Page 77

TeraStation User Manual 76
PrintServer
<
TS-XL, TS-XEL Series
>
<
TS-WXL Series
>
<
TS-RXL Series
>
USB
Connector
USB
Connector
USB
Connector
USB Cable
(not included)
USB Cable
(not included)
USB Cable
(not included)
USB Printer
(not included)
USB Printer
(not included)
USB Printer
(not included)
TeraStation is equipped with a USB connector on the back. You can connect a USB printer to the TeraStation as shown
below.
Notes:
• Only one printer can be connected to the TeraStation.
• The TeraStation does not support 2-way communication. For example, it cannot tell you the amount of ink left.
• Multi-function printers are not supported.
• Printers which only support 2-way communication or WPS (Windows Printing System) are not supported.
• Mac OS X cannot print to a printer connected to the TeraStation.
Setting up a printer on Windows 7/Vista
1
In the TeraStation’s Web Admin, navigate to [Extensions] [PrintServer] and click [Modify Settings].
2
3 Refer to your printer’s manual installation instructions. You may need to install the printer
Select [Enable] and click [Save].
driver from a software disk.
Page 78

TeraStation User Manual 77
Click [Start] - [Network].4
Double-click on the TeraStation’s server name.5
6
7
8
Double-click on the TeraStation’s printer icon (“LP”).
Click [OK].
Select your printer. Choose the manufacturer on 1
the left and the model on the right. If your printer
is not listed, click [Have Disk] and follow the printer
manufacturer’s directions for installation.
Click [OK].2
You have added a printer.
Page 79

TeraStation User Manual 78
Setting up a printer on Windows XP
1
2
7
In the TeraStation’s Web Admin, navigate to [Extensions] [PrintServer] and click [Modify Settings].
Choose [Enable] and click [Save].1
Refer to your printer’s manual installation instructions. You may need to install the printer driver from a software 3
disk.
Click [Start] - [Control Panel].4
Click [Network and Internet Connections] icon.5
Double-click on [View workgroup computers] - (Name of the TeraStation Server name) in this order.6
Double-click on the TeraStation’s printer icon (“lp”).
If “The printer driver to your computer will be automatically installed. (...) Would you like to continue?” is 8
displayed, click [Yes].
9
Select your printer. Choose the manufacturer on 1
the left and the model on the right. If your printer
is not listed, click [Have Disk] and follow the printer
manufacturer’s directions for installation.
Click [OK].2
You have added a printer.
Page 80

TeraStation User Manual 79
Setting up a printer on Windows 2000
1
2
Refer to your printer’s manual to install the printer driver.3
Double-click [My Network Places (*)] -[Entire Network] - (the TeraStation Server Name).4
* On Windows NT 4.0 this is [Network].
5
Double-click on the TeraStation’s printer icon (“lp”).
In the TeraStation’s Web Admin, navigate to [Extensions] [PrintServer] and click [Modify Settings]..
Click [Enable].1
Click [Save].2
6
7
8
Click [Yes].
Click [OK].
Select your printer. Choose the manufacturer on 1
the left and the model on the right. If your printer
is not listed, click [Have Disk] and follow the printer
manufacturer’s directions for installation.
Click [OK].2
You have added a printer.
Page 81

TeraStation User Manual 80
Sleep Timer
Sleep Timer will automatically turn your TeraStation on and o at specic times to save energy. In Sleep mode, the
TeraStation’s hard drives, display panel, and LED lights are turned o. To use Sleep Timer, set your TeraStation’s Power
Mode Switch to “Manual”. Sleep Timer is not usable when the Power Mode Switch is set to “Auto”.
In the 1 Web Admin, navigate to [System] - [Power Management] - [Sleep Timer].
Click [Modify Settings].2
3
Specify the Timer Interval, Wake up time, and Begin Sleeping time. You
can set up to 3 timers. Wake up at times may be set from 0:00 to 23:45.
Begin Sleep times may be set from 0:00 to 27:45. If “Begin Sleep at” is set
to 24:00 or later, then “Wake up at” can be set from 4:00 to 23:45. 24:00 is
equivalent to 0:00 of the next day, and 27:00 is equivalent to 3:00 of the
next day. Wake up times should be earlier in the day than Begin Sleep
times. Do not set the same time for both Awaken Time and Begin Sleeping
time.
Click [Save] when done.
Page 82

TeraStation User Manual 81
Notes:
•To exit sleep mode, hold in the power button on the TeraStation for about 3 seconds. The unit will power on.
•The TeraStation will not go into sleep mode while performing Check Disk, Disk Format, or Backup, or if a backup is
scheduled within 5 minutes of the current time.
•If multiple sleep timers conict, the longest interval time is used. Here are some examples of multiple timers:
A timer is set to turn the unit on for Wednesday at 10:00:
Timer 1 Everyday 12:00 - 24:00
Timer 2 Disabled
Timer 3 Disabled
-> Nothing happens at 12:00 and the unit enters sleep mode at 24:00
A timer is set to turn the unit on for Wednesday at 10:00:
Timer 1 Everyday 9:00 - 18:00
Timer 2 Select Day Wednesday 10:00 - 20:00
Timer 3 Disabled
-> Except on Wednesdays, the unit powers on at 9:00 and moves to sleep mode at 18:00.
-> On Wednesday, it enters sleep mode at 20:00.
A timer is set to turn the unit on for Wednesday at 10:00:
Timer 1 Everyday 9:00 - 18:00
Timer 2 Select Day Wednesday 10:00 - 25:00
Timer 3 Disabled
-> Except on Wednesdays, the unit powers on at 9:00 and moves to sleep mode at 18:00.
-> Except on Wednesdays, it enters sleep mode at 1:00 of the next day.
A timer is set to turn the unit on for Wednesday at 10:00:
Timer 1 Everyday 9:00 - 18:00
Timer 2 Select Day Wednesday 07:30 - 22:00
Timer 3 Disabled
->Except on Wednesdays, the unit powers on at 9:00 and enters sleep mode at 18:00.
-> On Wednesday, the unit powers on at 7:30 and enters sleep mode at 22:00 of the next day.
Sleep Timer
Page 83

TeraStation User Manual 82
Disk Quotas
Notes:
• When using quotas, disable the recycle bin or empty the trash folder. The limited space includes the space used for
trash.
• Quotas apply per drive or per array. If a Quota is set to 1 GB, each array or drive can use maximum of 1 GB.
• Quotas can’t be set for external USB hard drives connected to the TeraStation, only internal drives.
Disk space quotas for users
To limit the space of shared folders that each user can use, follow the procedure below.
1
2
Notes:
• Username and password must be the same one that the user logs into Windows with. If these values are dierent,
shared folders with access restrictions cannot be accessed.
In the 1 Web Admin, select [Users/Groups] - [Local Users].
Click [Create User].2
Enter username, user ID, password, and user description.1
Note:
User IDs may be between 1000 and 1999. Do not duplicate user IDs.
Check [Enable] for User Quota.2
Enter the maximum space this user is allowed for the [Hard Limit]. If a 3
[Soft Limit] is entered, the user will receive a warning when the soft limit
is reached. The soft limit should be smaller than the hard limit.
Click [Save]. 4
• Deleting or adding users repeatedly may cause quotas to not work properly.
Select [Shared Folders].
Page 84

TeraStation User Manual 83
Click [Create Shared Folder].3
4
5
6
Set a shared folder name, attributes and other settings.1
Click [Access Restrictions].2
Click [Add].
Check the user you created in step 2.1
Click [Add].2
7
Click [Save]. 8
You’ve congured a disk quota.
Select level of access privileges for the user you added.
Page 85

TeraStation User Manual 84
Disk space quotas for groups
To limit the space of shared folders that each group can use, follow the procedure below.
1
2
Notes:
• Usernames and passwords should be the same ones that the users log in to Windows with.
• If two dierent quotas apply, such a a user quota and a group quota, the smaller quota is applied.
In the 1 Web Admin, select [Users/Groups] - [Local Users].
Click [Create User].2
Enter username, user ID, password and user description.1
Note: User IDs may be between 1000 and 1999. Do not duplicate user
IDs.
Click [Save]. 2
Repeat steps 1 and 2 for each user in the group.
3
Select [Users/Groups] - [Local Groups].1
Click [Create Group].2
Page 86

TeraStation User Manual 85
4
Note:
Deleting and adding groups repeatedly may cause quotas to not work properly.
5
Enter Group Name, Group ID and Group Description.1
Note:
The group ID may be any number from 1000 and 1999. Do not duplicate
Group IDs.
Click [Enable].2
Enter the stotal space that the group can use in the Hard Limit (GB) eld.3
Select users from step 2 in [Local User], and click [Add] for each. 4
Click [Save]. 5
Click [Users/Groups] - [User].1
Select a user from step 2, and click [Edit User].2
6
9
Select the group created in step 4 for [Primary Group] and click [Save].
Click [Shared Folder]. 7
Click [Create Shared Folder].8
Set a shared folder name, attributes and other settings.1
Click [Access Restrictions].2
Page 87
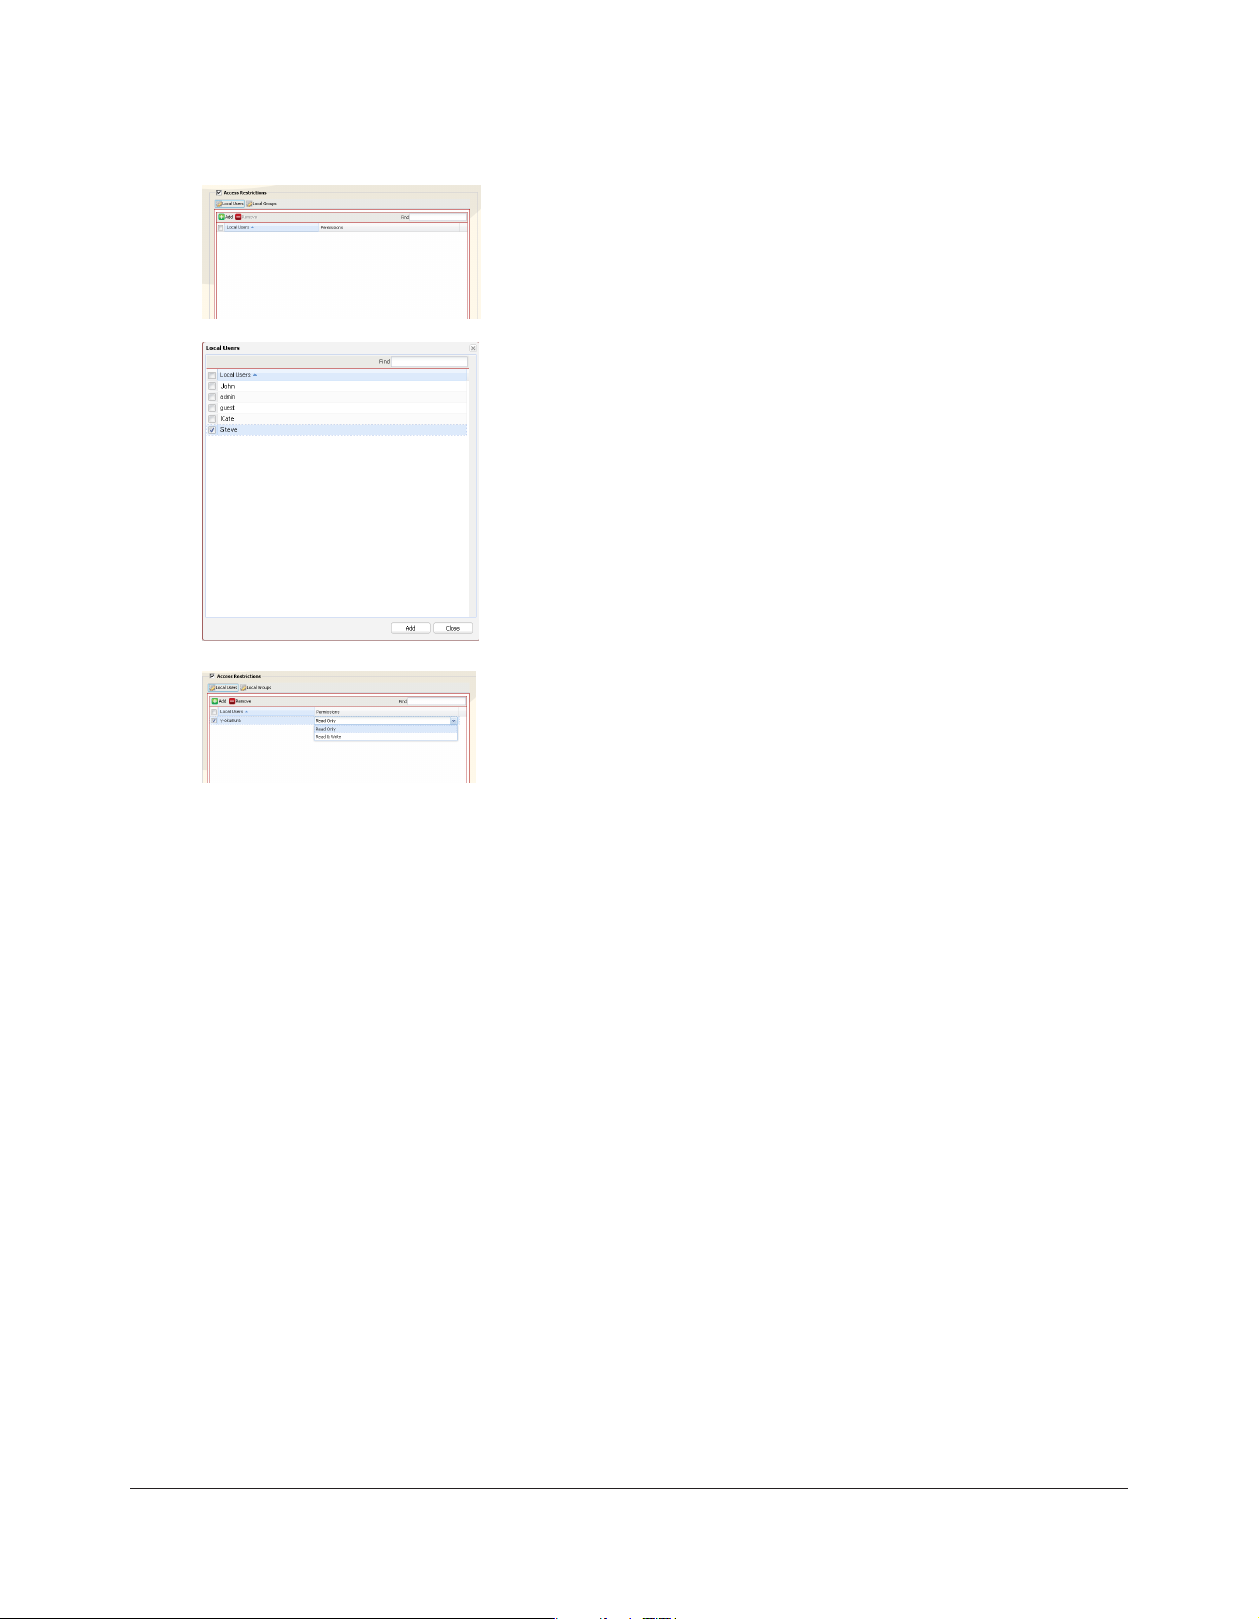
TeraStation User Manual 86
10
Click [Local Group].1
Click [Add].2
11
12
Click [Save]. 13
You have congured a group quota.
Check the group you created step 2.1
Click [Add].2
Select privilege of group you added.
Page 88

TeraStation User Manual 87
TeraSearch
Enable TeraSearch to allow text searches for strings (such as from a text le or data) on the TeraStation.
In the Web Admin, select [Shared Folders] - [Folder Setup].1
2
3
Click [Shared Folders] - [TeraSearch] on the Web Admin.4
Click [Modify Settings].5
Select [Enable], and click [Save].]6
Note:
If you want to update the index regularly, click [Modify Settings] and specify a Time to update the index.
Click the shared folder to create an index for.
Click [Include folder in search indexing].1
Click [Save].2
Click [Update the index now].7
Page 89

TeraStation User Manual 88
Open and display the following URL in an Internet browser.8
http://(IP address of TeraStation) :3000/
Tip: You can get the IP address of your TeraStation from its front panel LCD display, or from NAS Navigator 2.
Enter a username and password from an account on the TeraStation and click [Login]. For example, the guest 9
account, with blank password, will work.
Enter a keyword to search for. If you check 10 [Enhanced Search], you can also specify lename, owner, update
date/time, and size to search for.
Click [Search]. 11
Your search results are now displayed.
Page 90

TeraStation User Manual 89
Oine Files
Your PC can access les from the TeraStation even when it’s not connected to the network if Oine Files are enabled.
Oine Files are updated and saved on the computer when it’s online. Oine Files work with Windows 2000, Windows
XP Professional, Vista, and Windows 7. Windows Me and XP Home Edition are not supported.
Congure your PC to use les oine as follows:
In the Web Admin, select [Shared Folders] - [Folder Setup].1
2
3
If you're running Windows 7, skip steps 4 & 5 and move to step 6.
Select a folder to be available oine. Double-click on the folder’s name.
From the [Oine Files] dropdown, select [Manual Cache Files], [Automatic
Cache Files] or [Automatic Cache Programs and Files].
Manual Cache Files - Manually select the les to be available oine.
Automatic Cache Files - Opened les are cached locally and may be used
oine. Old les that cannot be synchronized will be deleted automatically
and replaced by new ones.
Automatic Cache Programs and Files - Opened les are cached locally
and may be used oine. Old les and network applications that cannot be
synchronized will be deleted automatically and replaced with new ones.
To check if Oine Files are enabled, follow the instruction below.
Open the Windows folder, press [Alt] on the keyboard, and select [Tool] - [Open Synchronize Center] 1
from the popup menu.
Click [Manage oine les] on the left side of the [Synchronized Center] screen.2
If you see [Oine Files is enabled] on the [General] tab, Oine Files are enabled. 3
Click [Disable oine les] to disable Oine Files.
If Oine Files are disabled, click [Enable Oine Files] to enable them.
Page 91

TeraStation User Manual 90
Open Windows folder. Select [Folder Options] from the [Tool] menu.4
Note:
Select [Control Panel] - [Folder Options] in Windows 2000 Server.
5
Note:
If [Fast User Switching] in Windows XP is enabled, the screen above will not be displayed. In such a case, open
[User Accounts] in the Control Panel and uncheck [Use Fast User Switching].
Click [Oine Files] tab.1
Click [Enable Oine Files].2
Click [OK].3
6
When the Oine File Wizard opens, follow the instructions on the screen to congure. For more information, 7
refer to the Windows Help File.
After conguration, your oine les and folders display as below (from Windows XP). 8
Right-click on the icon of the shared folder on the TeraStation you have 1
set the oine feature for.
Click [Make Available Oine].2
Page 92

TeraStation User Manual 91
After the synchronization is complete, you can open oine les even after disconnecting from the network that 9
the TeraStation is on. Oine les can be accessed through the UNC to the original location.
Note: If oine les are available, the icon is displayed in the systray.
* Editing Oine Files
Oine les can be edited or deleted just like regular les. Dierences between data in dierent locations will be
resolved by re-synchronization when the network connection is re-established.
* Synchronizing Oine Files
Oine les are automatically synchronized when you log on or o the network.
* Version Conicts
Conicts occur when the oine and original les are both modied dierently before they are re-synchronized. If
conicts occur, the following wizard opens. Step through the wizard to resolve the conicts.
You’ve congured oine les.
Page 93

TeraStation User Manual 92
DFS (Distributed File System)
Distributed File System (or DFS) combines shares on the network server together into one tree.
In the following example, when the client computer addresses //tera/share/backup, it’s actually looking at les located
at //pc_srv/backup. This is transparent to the user of the client computer. If the TeraStation is congured to address
multiple DFS shares, then shares on other devices could be addressed as native shares on the TeraStation. For example,
//tera/share/share might actually address data located at //link/share.
DFS Link
share
Host Name: tera
backup
share
//pc_srv/backup
PC Server
DFS Link
Access to “//tera/share/backup”
Client
//link/share
Notes:
• Bualo does not support using DFS with Mac OS X.
• Windows 2000 and Windows Server 2003 cannot properly address DFS link destinations that have access restrictions
on one or more folders.
• DFS only works with SMB connections. AFP and FTP connections are not supported.
• Access restrictions congured on DFS link destinations are applied to the shared folder link. Access restrictions on the
DFS root or DFS links are not visible.
Page 94

TeraStation User Manual 93
Set up DFS as described below:
In the Web Admin, select [Shared Folders] - [DFS].1
Under [DFS Service], click [Modify Settings].2
3
Under [DFS Links], click [Add Link].4
Click [Enable].1
Choose whether to allow multiple DFS links, or just one.2
[No] allows just one DFS link to be addressed.
[Yes] allows up to 8 DFS link destinations to be
used.
Enter the [DFS Root Folder Name].3
Click [Save].4
5
DFS has been congured.
Type Destination Hostname and Destination Folder.1
Notes:
The following machines can be DFS link destinations:
• TeraStations
• Windows PC with SMB (Mac OS and Linux are not supported)
Click [Save].2
Page 95

TeraStation User Manual 94
FTP Server
By default, the TeraStation’s shares are only accessible by users connected to the same network or router as the
TeraStation. The optional FTP server allows users to access the TeraStation from outside of the local network. You may
enable it as follows.
1
2
4
In the Web Admin, navigate to [Network] - [Settings] [Network Services] and click [FTP].
Select [Enable].1
Click [Save].2
Click [Shared Folders] - [Folder Setup].3
Click the folder to enable remote FTP access on.
5
The folder is now congured for FTP access. Don’t forget to give read (or write) permissions for the FTP share to any
users that will be accessing the share remotely. Folder permissions can only be changed from the TeraStation’s Web
Admin. Changing them remotely with FTP client software is not supported.
Select whether the shared folder is to be read-only or 1
writeable.
Check [FTP].2
Click [Save].3
Page 96

TeraStation User Manual 95
To access the TeraStation with an FTP client
Congure your FTP client software with the following settings:
Host Name IP address of the TeraStation.•
Username Username registered on the TeraStation•
Password Password registered to the TeraStation•
Port 21•
Example ftp://192.168.11.150/
You cannot write by FTP if the shared folder is set to read-only on the TeraStation.•
Access restrictions are applied based on the settings in the TeraStation. The restrictions aren’t displayed for users •
without permissions for the share.
To access your FTP share from outside of your network, you may need to congure your router and rewall. Consult •
your router documentation for more information.
Shared folders appear as follows when connected by FTP:•
disk1 share usbdisk1 info -
The internal hard drive of the TeraStation is displayed as disk1, and a USB hard drive (optional) will be displayed as •
usbdisk1.
”usbdisk1” is not displayed when the USB hard drive is not connected, or if access is restricted.•
Accessing the TeraStation with an Anonymous user:
To allow anonymous access to your FTP share, disable access restrictions on the FTP share. Congure your FTP client as
follows:
Host Name IP address of the TeraStation•
Username anonymous•
Password any set of characters•
Port 21•
Example ftp://192.168.11.150/
To make your FTP share available from outside your network, you will need to congure your router and rewall. •
Consult your router’s documentation for information on how to allow FTP trac.
If the TeraStation joins a domain, anonymous users cannot access it. •
Folders created or copied via an AFP connection may not be deleted from the AFP connection. This is because an •
automatically generated “.AppleDouble” folder begins with a dot. To delete these les, use an SMB connection.
Do not exceed 250 characters for a le/folder name including directory path when you are creating it by using an FTP •
connection. Otherwise, you cannot view or delete it in Explorer or other applications.
Page 97

TeraStation User Manual 96
Accessing from a NFS Client
Use the following procedure congure the TeraStation for access from UNIX with NFS.
Note: This section is for information only. Unix and NFS are not supported by Bualo. If you choose to congure your
TeraStation this way, it does not void your warranty, but you are on your own for tech support.
In the 1 Web Admin, select [Network] - [NFS] - [Modify Settings].
Click [Enable].1
2
Note:
To set access restrictions by IP addresses, specify a [Public Network Address] and [Public Subnet Mask] from the
screen above.
E.g.) To allow access from a client with the IP address 192.168.11.xxx:
[Public Network Address]: 192.168.11.0
[Public Subnet mask]: 255.255.255.0
xxx can be 1 to 254. Enter 0 (zero) for the [Publishing Network Address].
E.g.) To allow access from a client with the IP address 192.168.xxx.xxx:
[Public Network Address]: 192.168.0.0
[Public Subnet mask]: 255.255.255.0
xxx can be 1 to 254. Enter 0 (zero) for the [Publishing Network Address]
Click [Save].2
4
5
Click [NFS Folders Setup].3
Choose a shared folder.
Write down the NFS public path.1
Click [Enable].2
Click [Save].3
Page 98

TeraStation User Manual 97
Click [NFS Client Setup].6
7
8
Click [Add Client].
Type the IP address and hostname of the NFS UNIX client.1
Click [Save].2
9
The IP address and the hostname of the client are added.
Notes:
• To remove, check the box next to the hostname and click [Delete Connected Client].
• You may be able to connect via NFS from a computer that is not registered as a client.
Page 99

TeraStation User Manual 98
Examples of commands to access a folder on the TeraStation from the NFS client:10
From Linux:
mount -t nfs <IP Address>:<NFS public path for the TeraStation><the mounting point on the local computer>
e.g., mkdir /mnt/tsxl
mount -t nfs 192.168.11.10:/mnt/array1/share /mnt/tsxl
In this example, TeraStation’s IP address is “192.168.11.10”, NFS publishing path is “/mnt/array1/share”,
and a mount point on the local computer is “/mnt/tsxl”.
From Windows Services for Unix 3.5:
mount <IP Address>:<NFS publishing path for the TeraStation> <a network drive’s letter (an error occurs if not
available)>
e.g., mount 192.168.11.10:/mnt/array1/share z:
In this example, TeraStation’s IP address is “192.168.11.10”, NFS publishing path is “/mnt/array1/share”,
and a network drive letter is “z”.
From Solaris10:
mount -<F nfs IP Address>:<NFS publishing path for the TeraStation><the mounting point on the local
computer>
e.g., mkdir /mnt/tsxl
mount -F nfs 192.168.11.10:/mnt/array1/share /mnt/tsxl
In this example, TeraStation’s IP address is “192.168.11.10”, NFS publishing path is “/mnt/array1/share”,
and a mount point on the local computer is “/mnt/tsxl”.
Notes:
• Settings on the NFS Client will be applied to le access. However, if you write on root, uid and gid for all will
be 99.
• You cannot unify the uid and gid for user management on the TeraStation and for the users on NFS clients.
• Root (admin) rights are required to perform the mount operation.
• If you mount as root for other users, each user will need access rights for the mount point.
You’ve completed the steps to access the TeraStation via NFS.
Page 100

TeraStation User Manual 99
Encrypting Data Transmission
・Encrypting Data from the Web Admin
Access https://<TeraStation’s P address> instead of http://... to encrypt all data from the Web Admin.
Note:
Your computer may display “there is a problem with this site’s security”, but you may ignore this message and work
normally.
・Encrypting FTP Transfer Data
First, in the Web Admin, navigate to [Public] - [FTP]. Check the box by each shared folder to encrypt data transfers.
Enable SSL security in your FTP client to encrypt login passwords and les by using SSL/TLS for FTP communication.
Examples: In FileZilla’s settings, select [FTP over TLS (explicit encryption)] for the server type. For Smart FTP, select [FTP
over SSL explicit] in the settings.
Notes:
• Encryption processes may seriously reduce data transfer speeds. Your transfers may be as much as 10 times slower
when using encryption.
• Depending on your computer’s security settings, the message “there is a problem with this site’s security” may be
displayed, but you may ignore this message and work normally.
 Loading...