

Page 1
TS-RIGL/R5
iSCSI Rackmount TeraStation Pro
QUICK SETUP GUIDE
EN DE FR IT ES PT NL SV
www.bualotech.com
NO
DA FI
Page 2

Page 3
Bualo iSCSI Rackmount TeraStation Pro (TS-RIGL/R5)
Package Contents
Thank you for purchasing a Bualo iSCSI Rackmount TeraStation Pro.
Package contents includes:
• iSCSI Rackmount TeraStation Pro
• Ethernet Cable
• Power Cable
• TeraStation Installation CD
• Quick Setup Guide
• Warranty Statement
EN
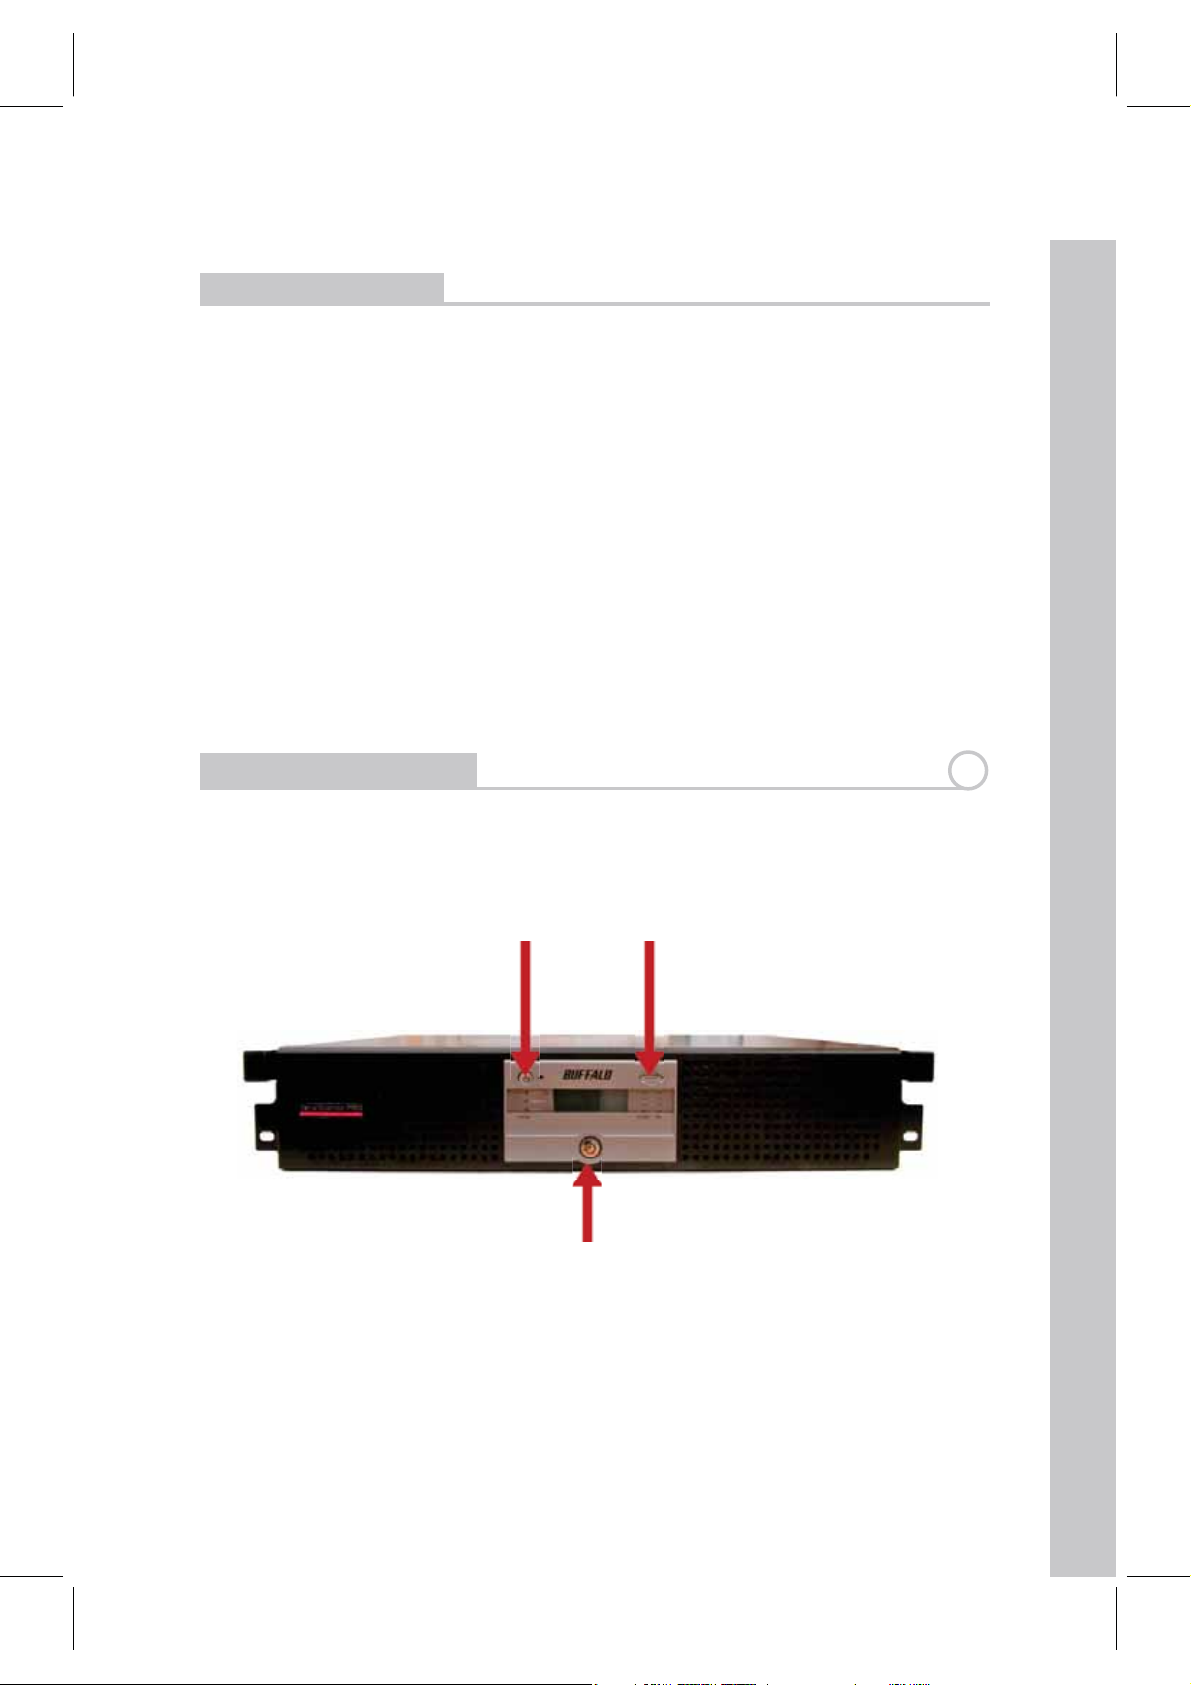
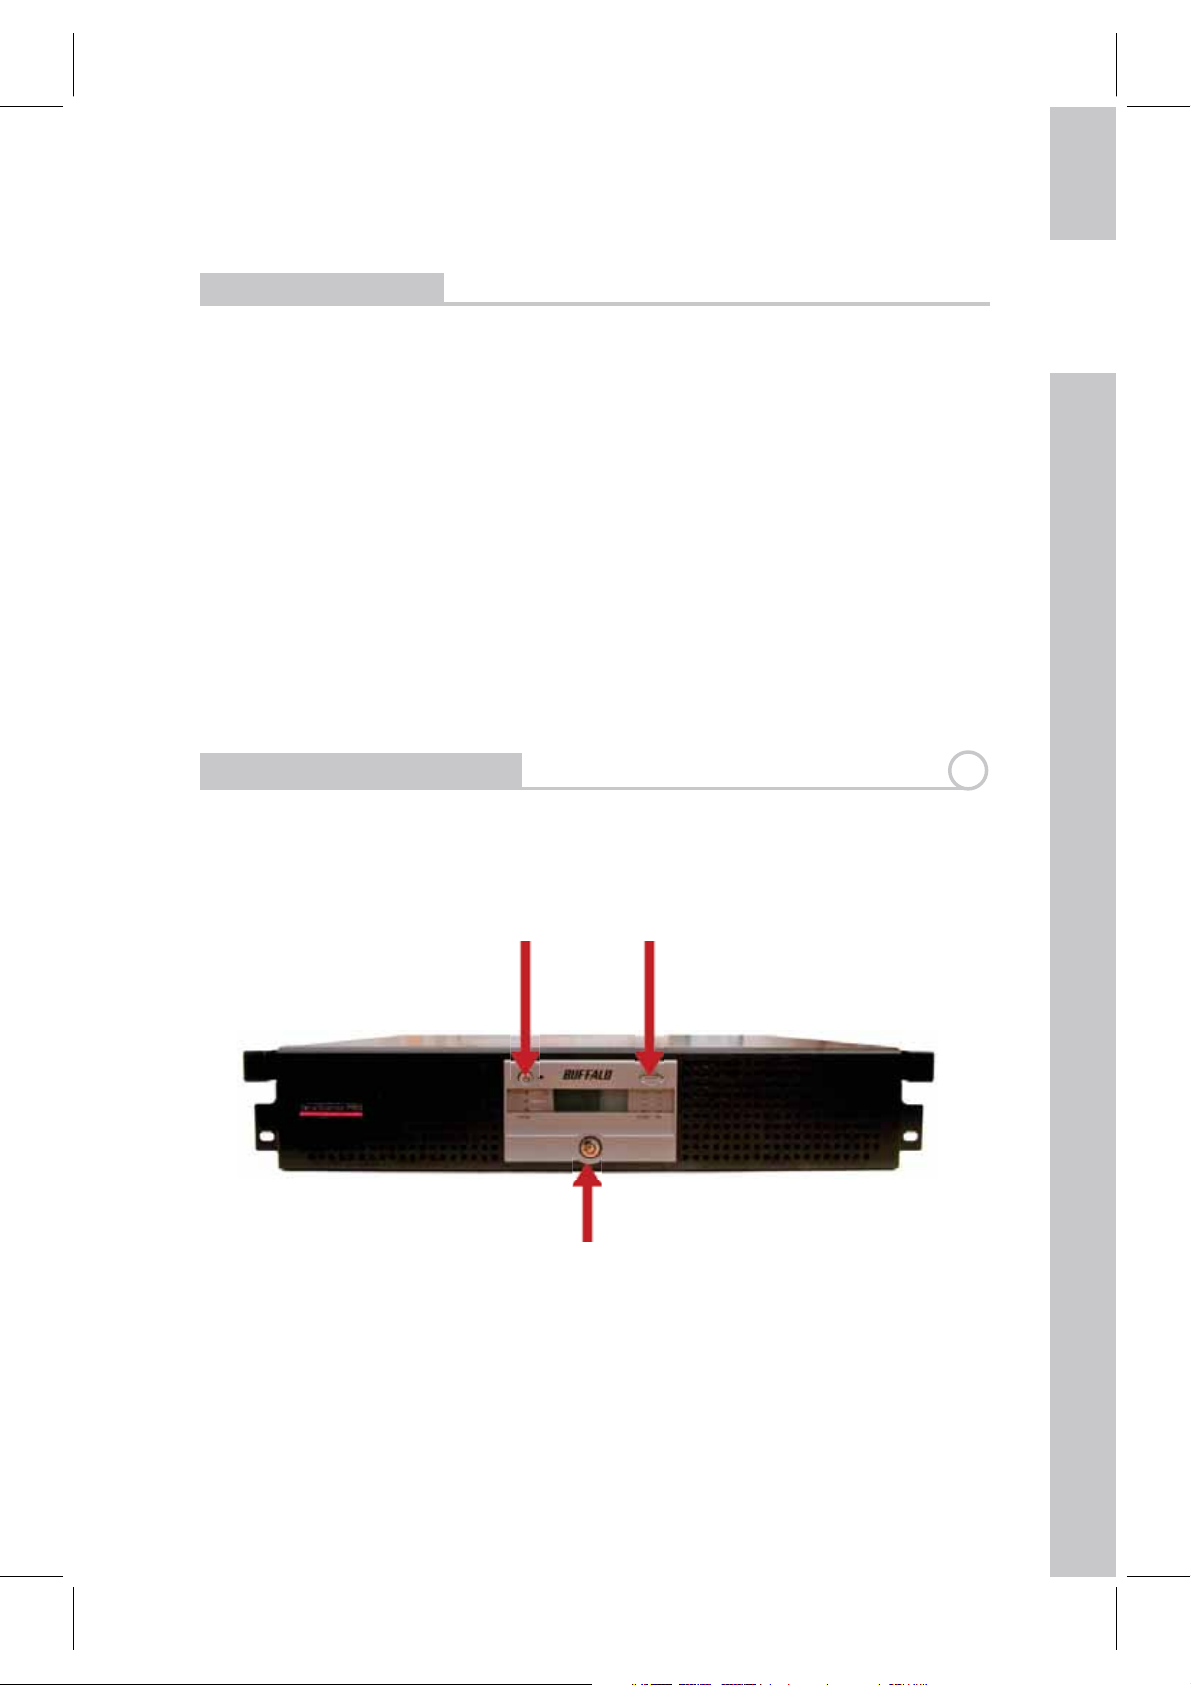
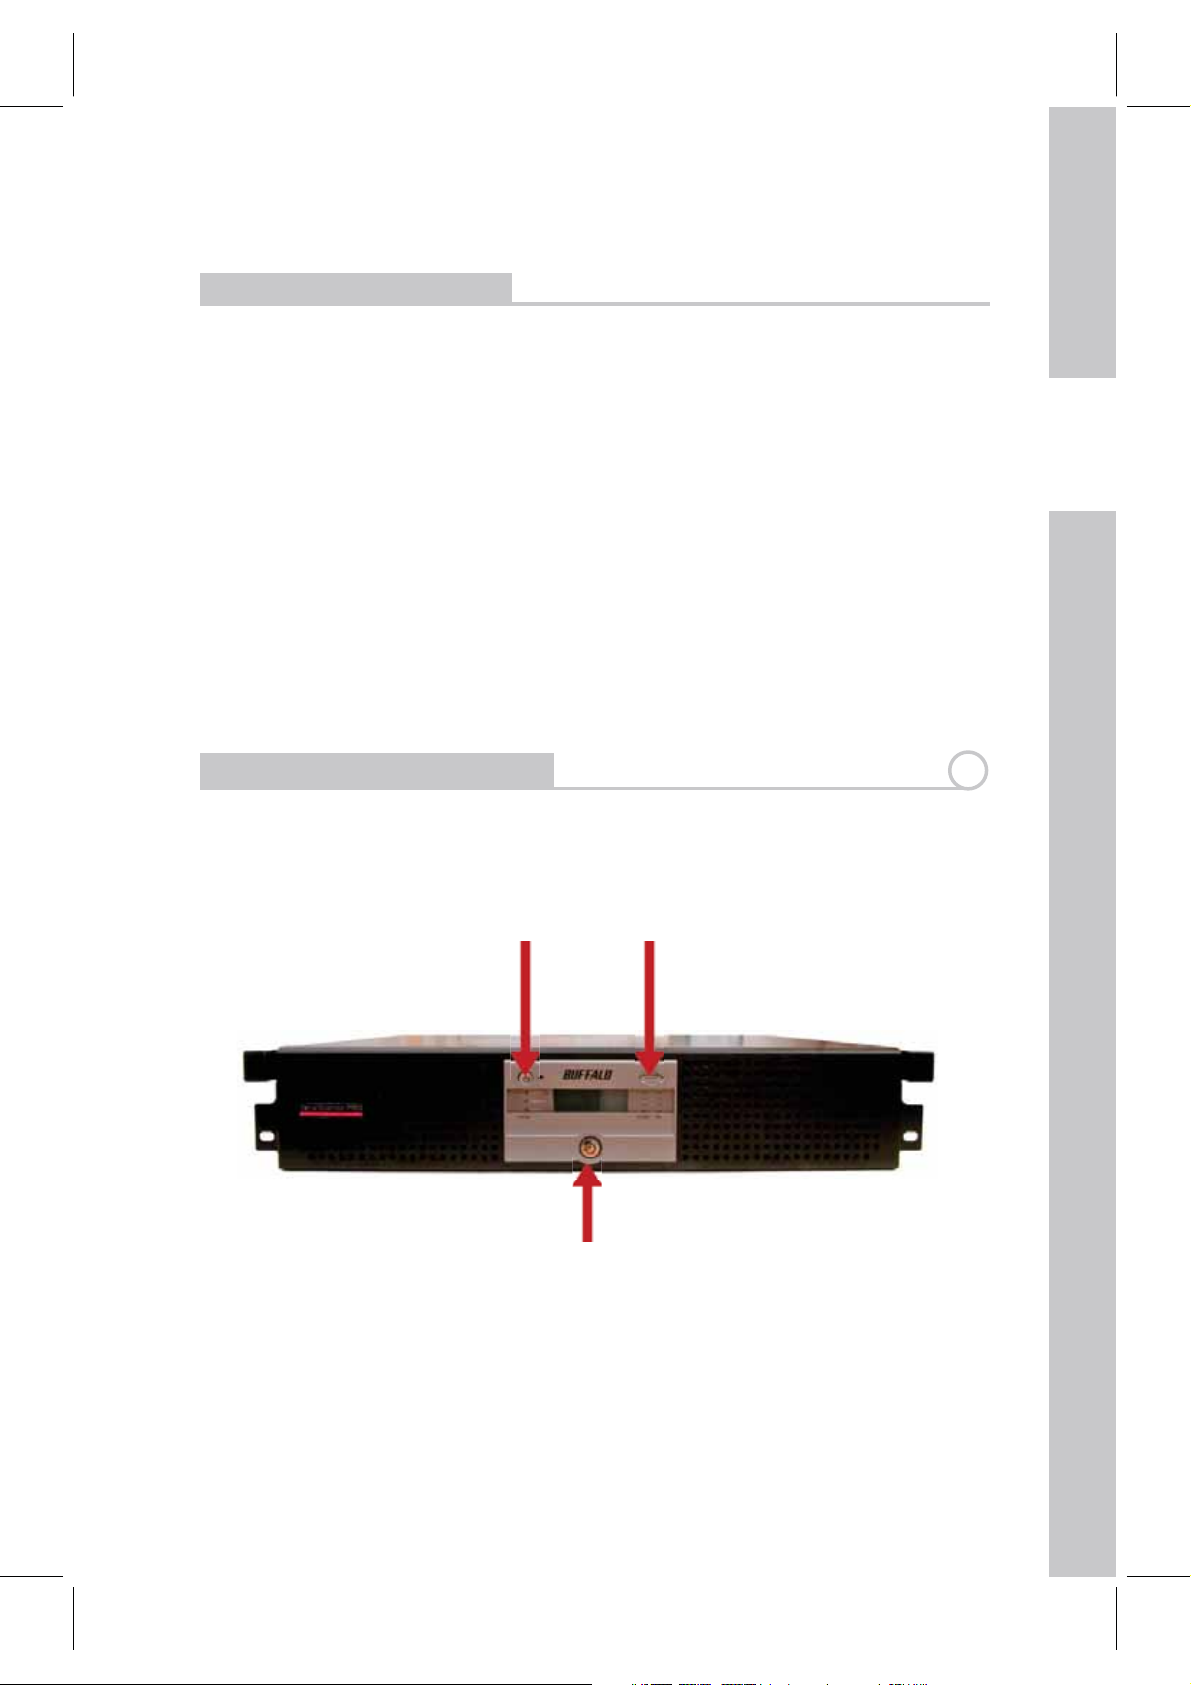
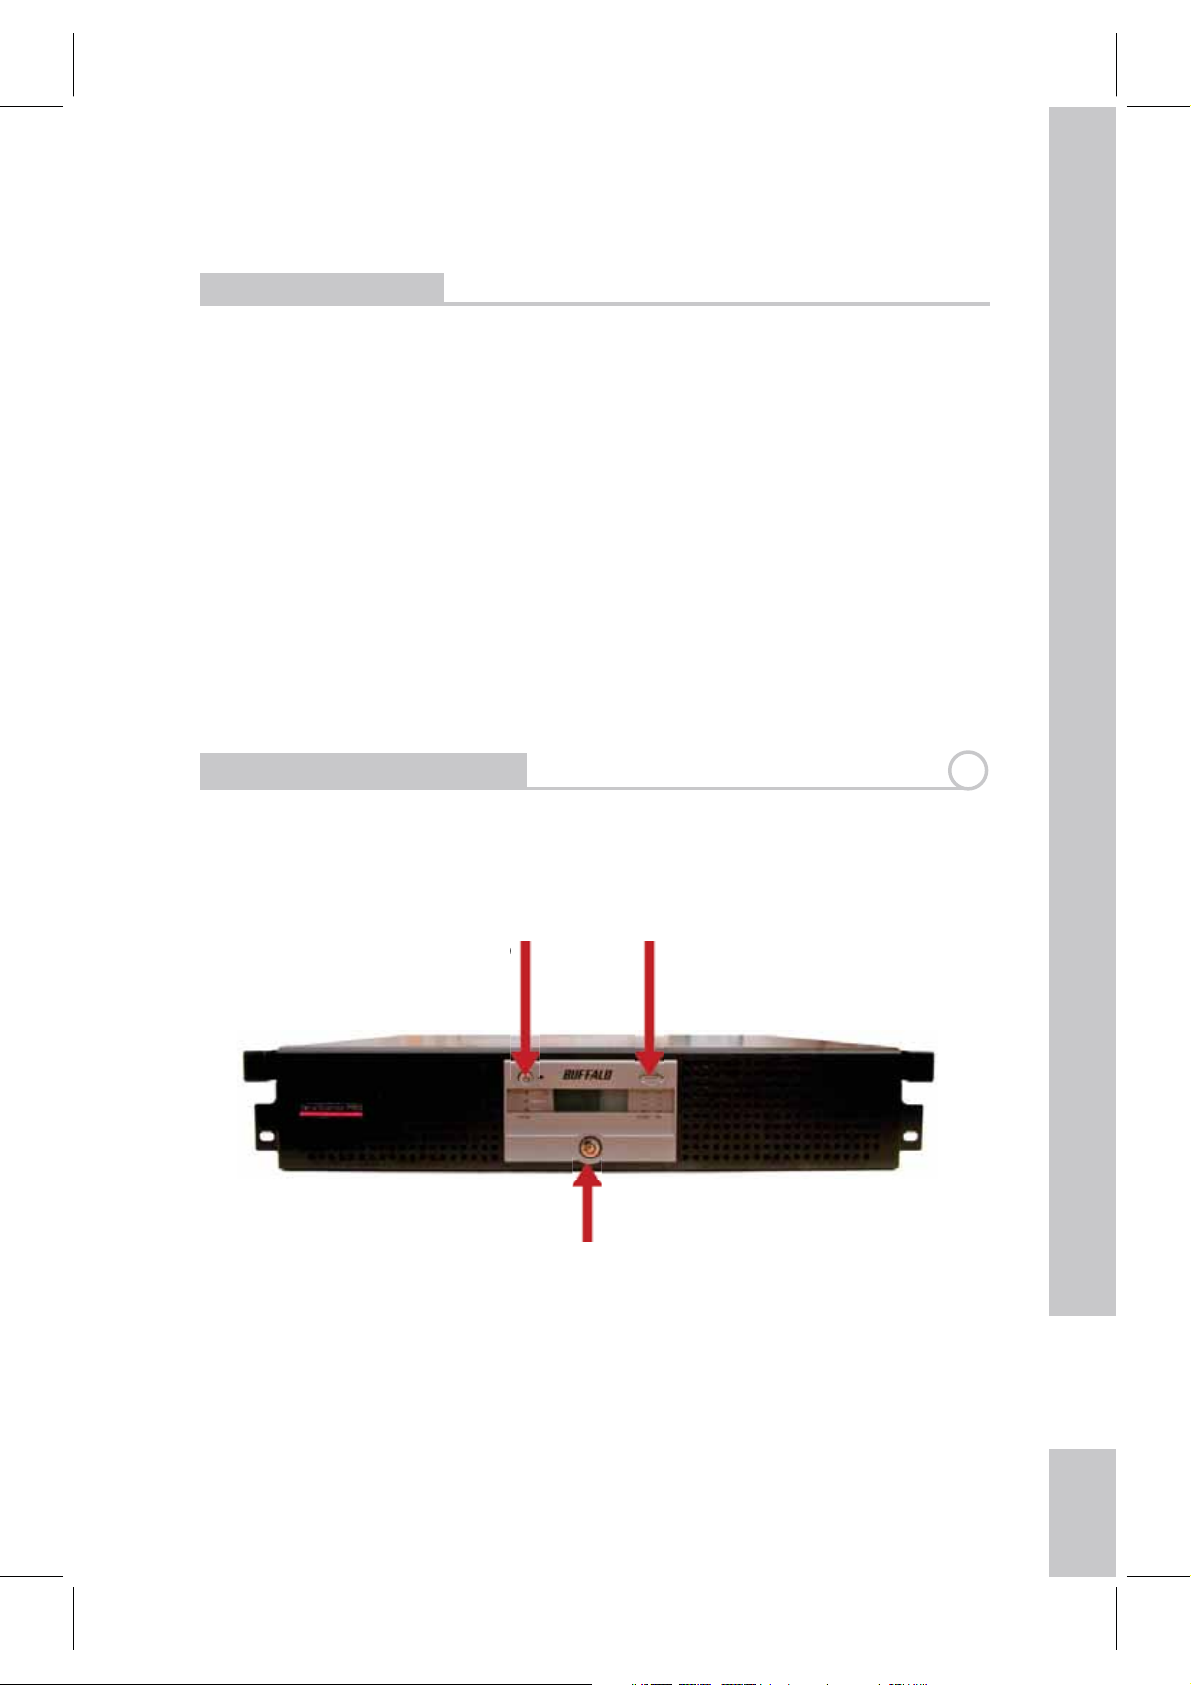
TeraStation Layout
Power Switch
Fig: 1
1
Display Mode Switch
Front Panel lock
(Turn counter-clockwise to release)
1
Page 4
EN
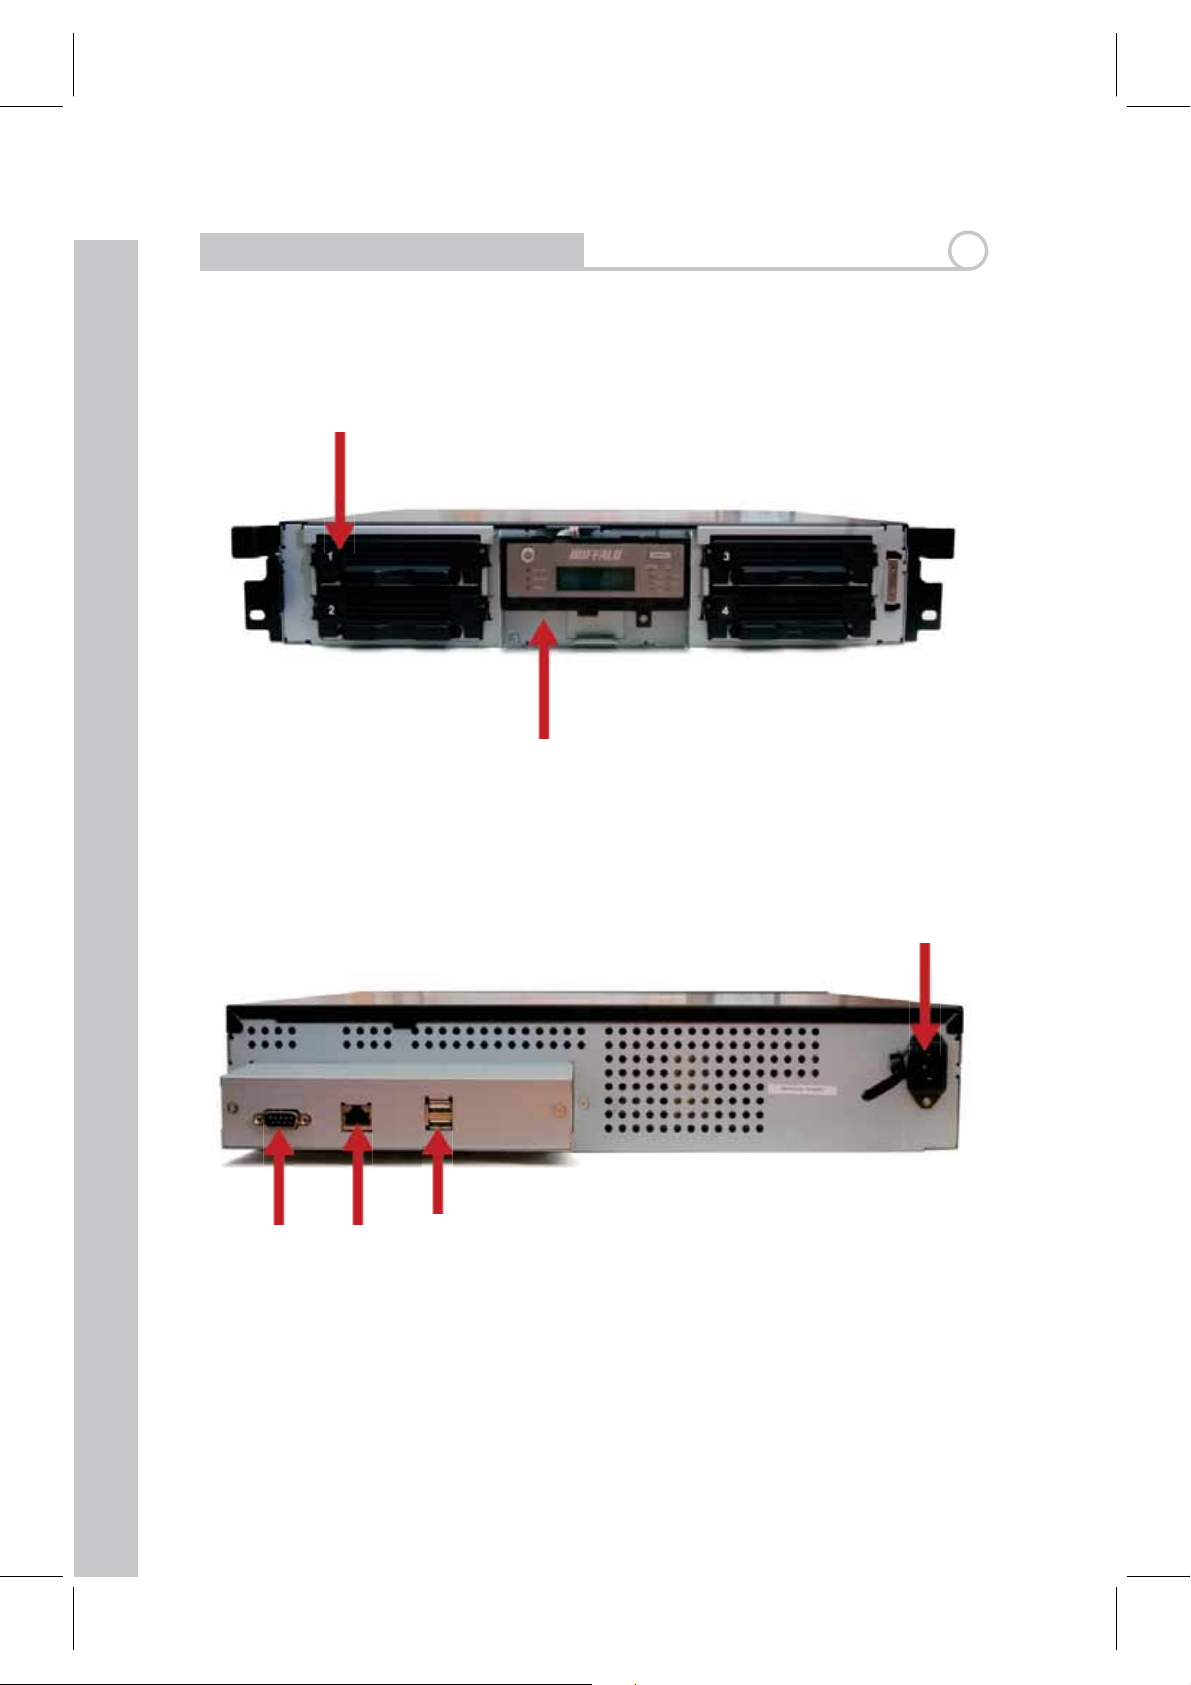
TeraStation Layout
Front With Panel Removed
Hard Drives
(Squeeze tabs to release)
Fig: 2
1
Init Button
(Hold down to reset all settings)
Back Panel
UPS
Ethernet
(to router)
USB in
Power Cable
Fig: 3
2
Page 5

EN
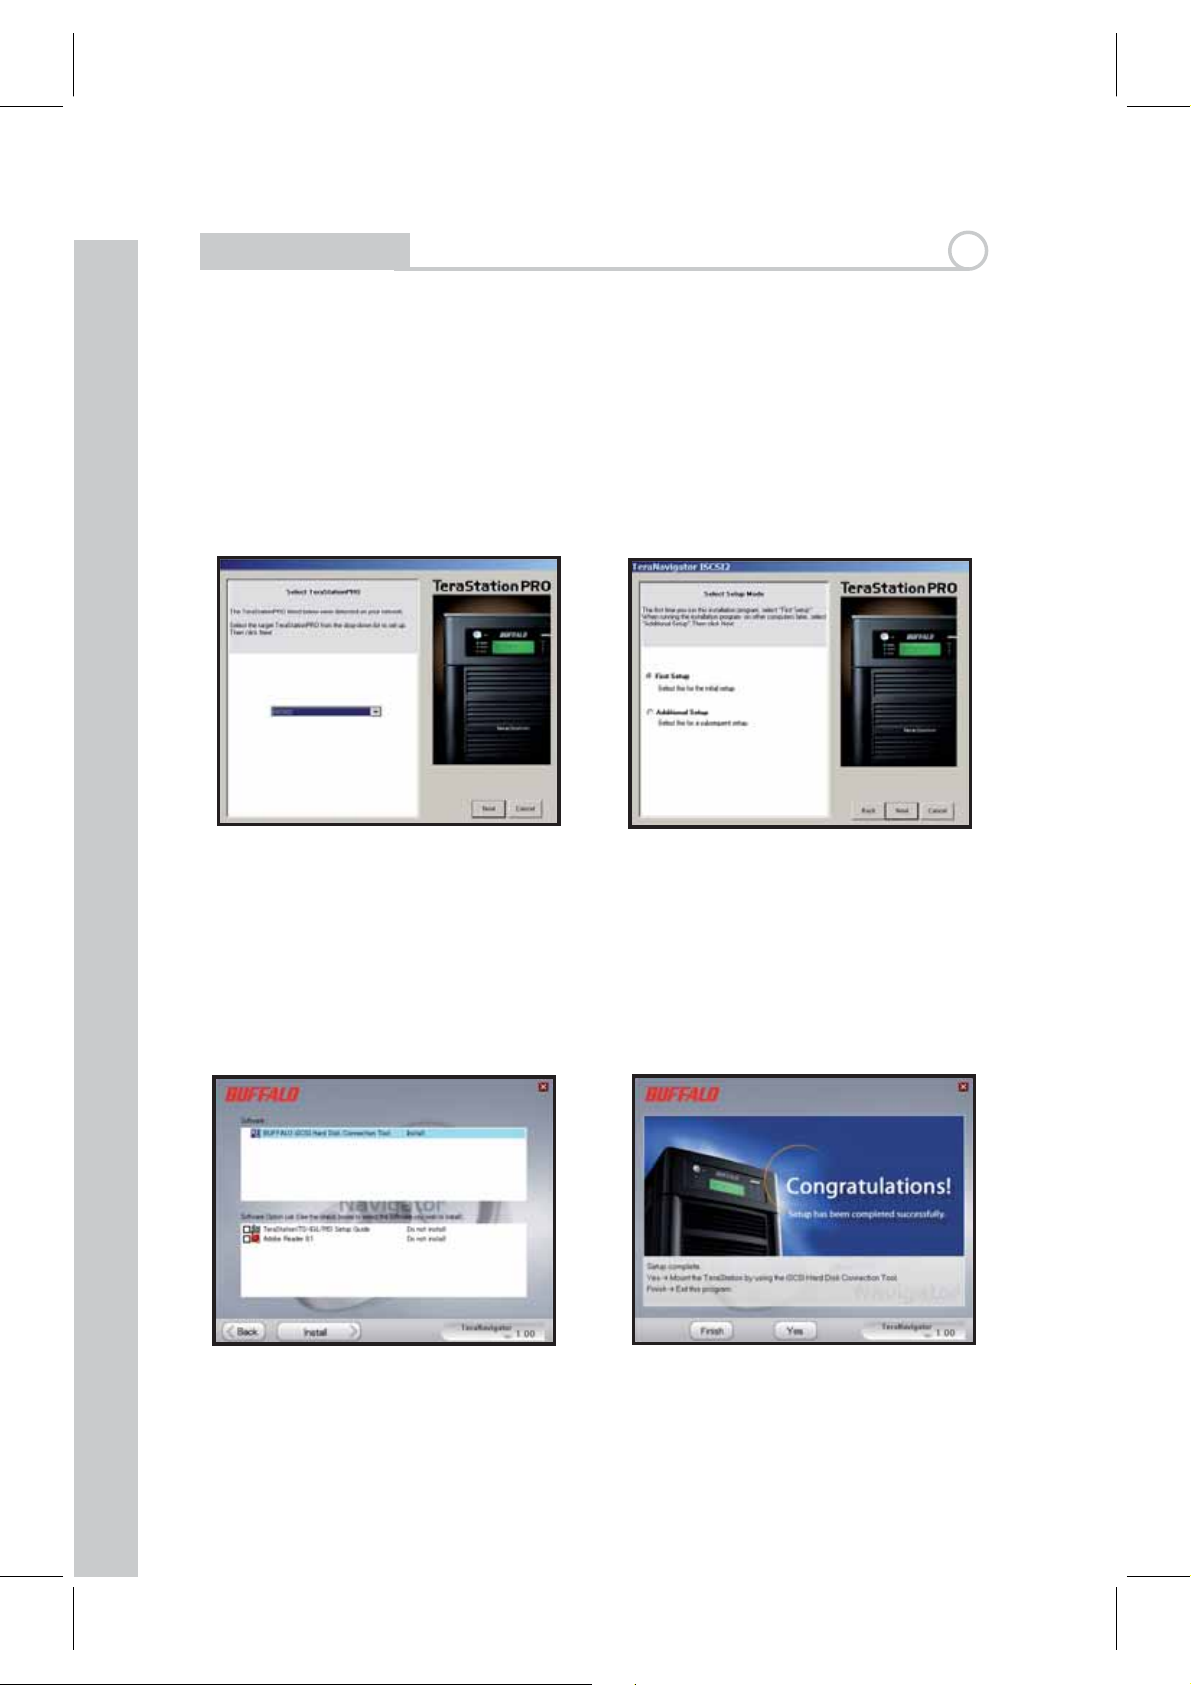
Installation
Insert the TeraNavigator CD into your computer’s CD-ROM drive.
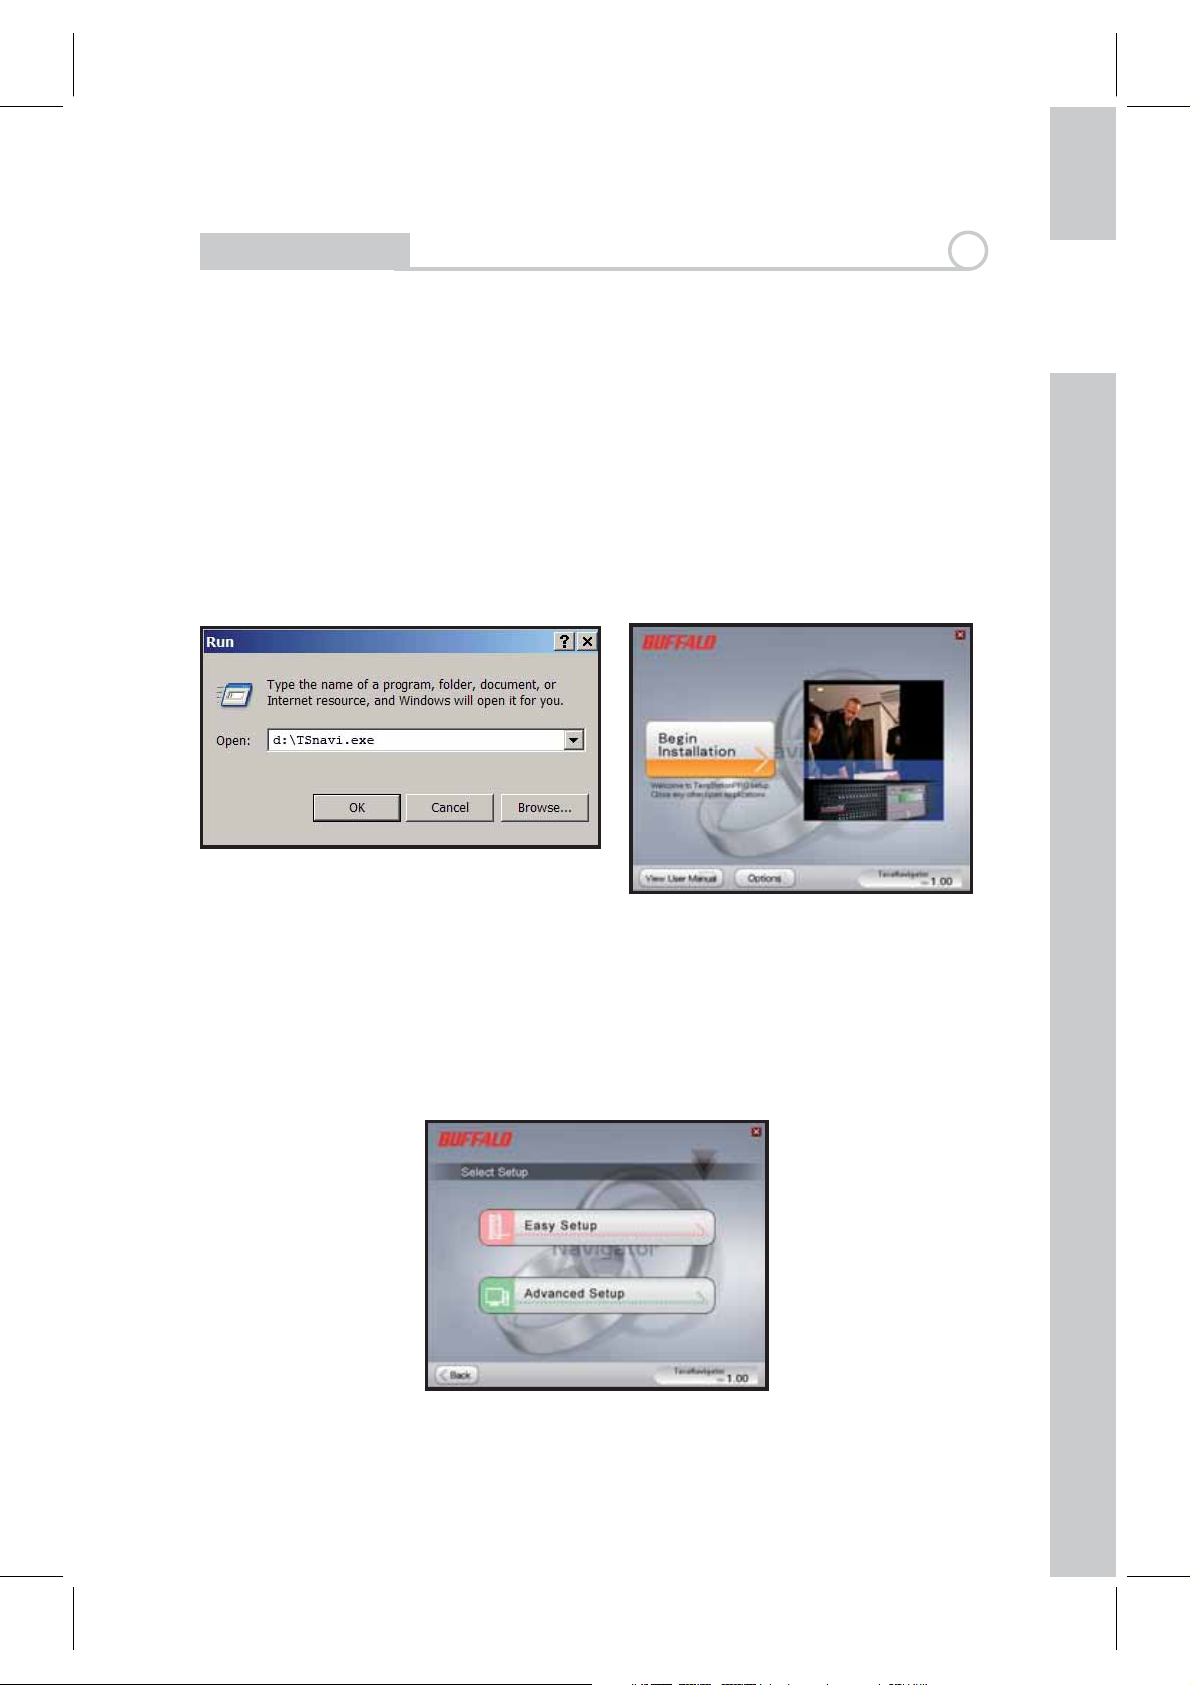
On a PC, setup should launch automatically. If it does not, manually launch
TSnavi.exe by pressing Start and selecting the Run... option. When the Run
dialog opens, type d:\TSnavi.exe (where d is the drive letter of your CD-ROM
drive). Press OK to continue. (Fig: 4)
Then press the Begin Installation button to start. (Fig: 5)
2
Fig: 4
Fig: 5
Easy Setup will step you through physically connecting your TeraStation. It
will then install software.
Advanced Setup skips the connection tutorial and goes directly to installing
software. (Fig: 6)
Fig: 6
3
Page 6
EN
Installation
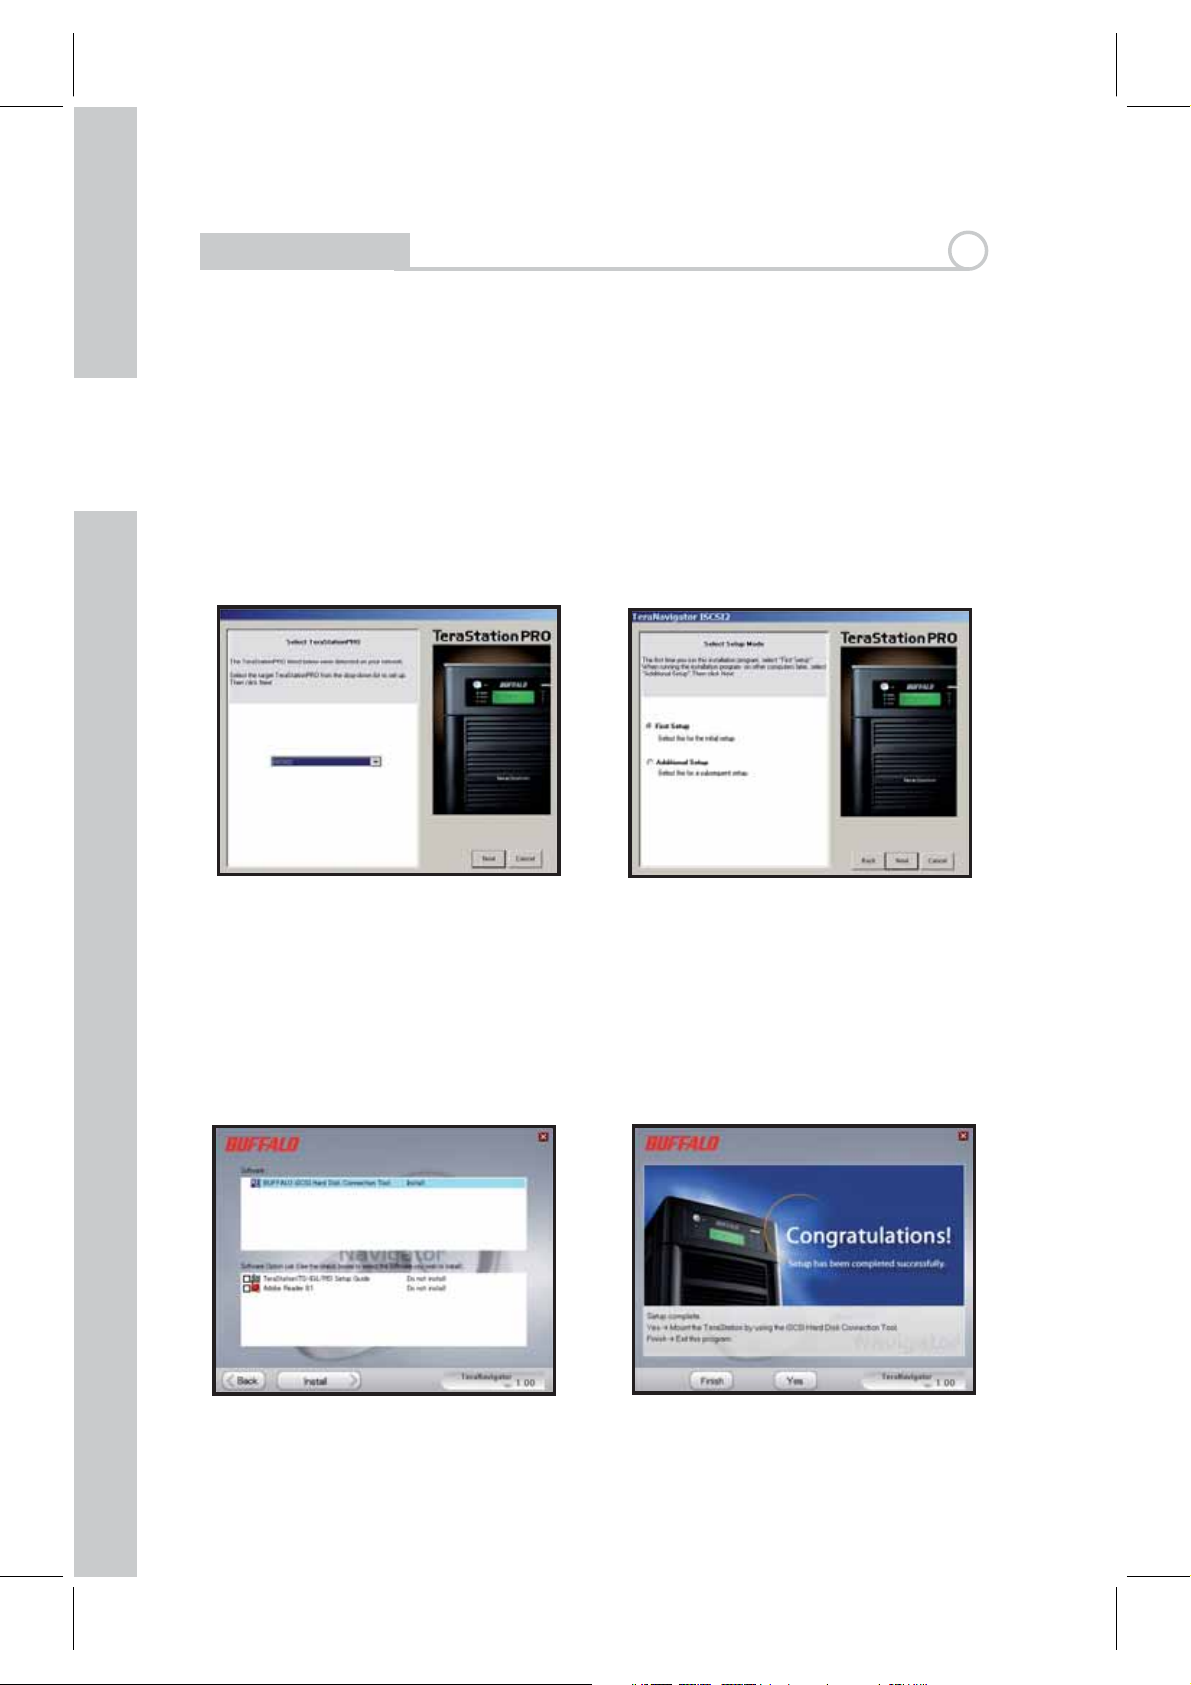
If your TeraStation is connected correctly, it will be highlighted in the dropdown list. If you have multiple units to set up, select the correct TeraStation
from the list. (Fig: 7)
Select First Setup for the initial installation.
To install the software on additional computers, chose Additional Setup.
(Fig: 8)
2
Fig: 7
Fig: 8
Once the TeraStation is installed, you’ll need to install the iSCSI connection
tool. Click Next, and step through the wizard until the iSCSI connection tool
is installed. (Fig: 9)
Click Ye s to launch the iSCSI connection tool. (Fig: 10)
Fig: 9
Fig: 10
4
Page 7
EN
Installation
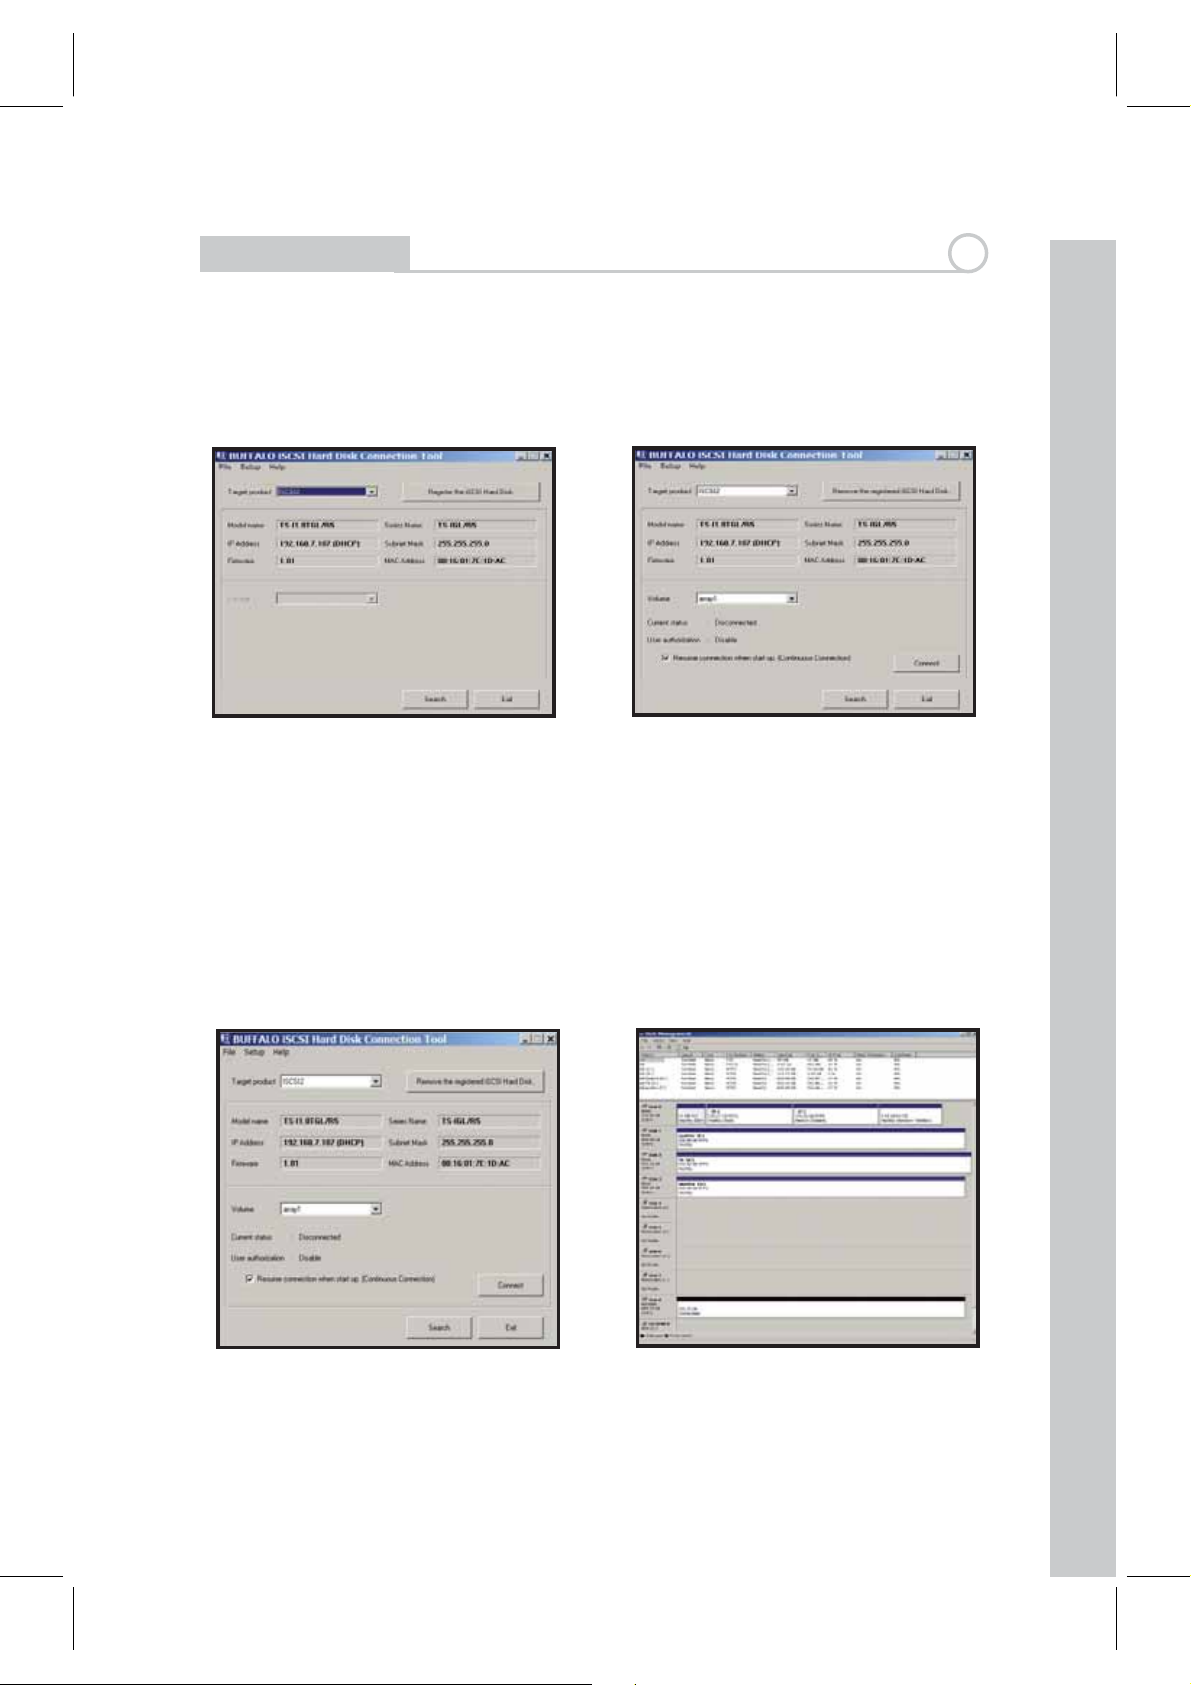
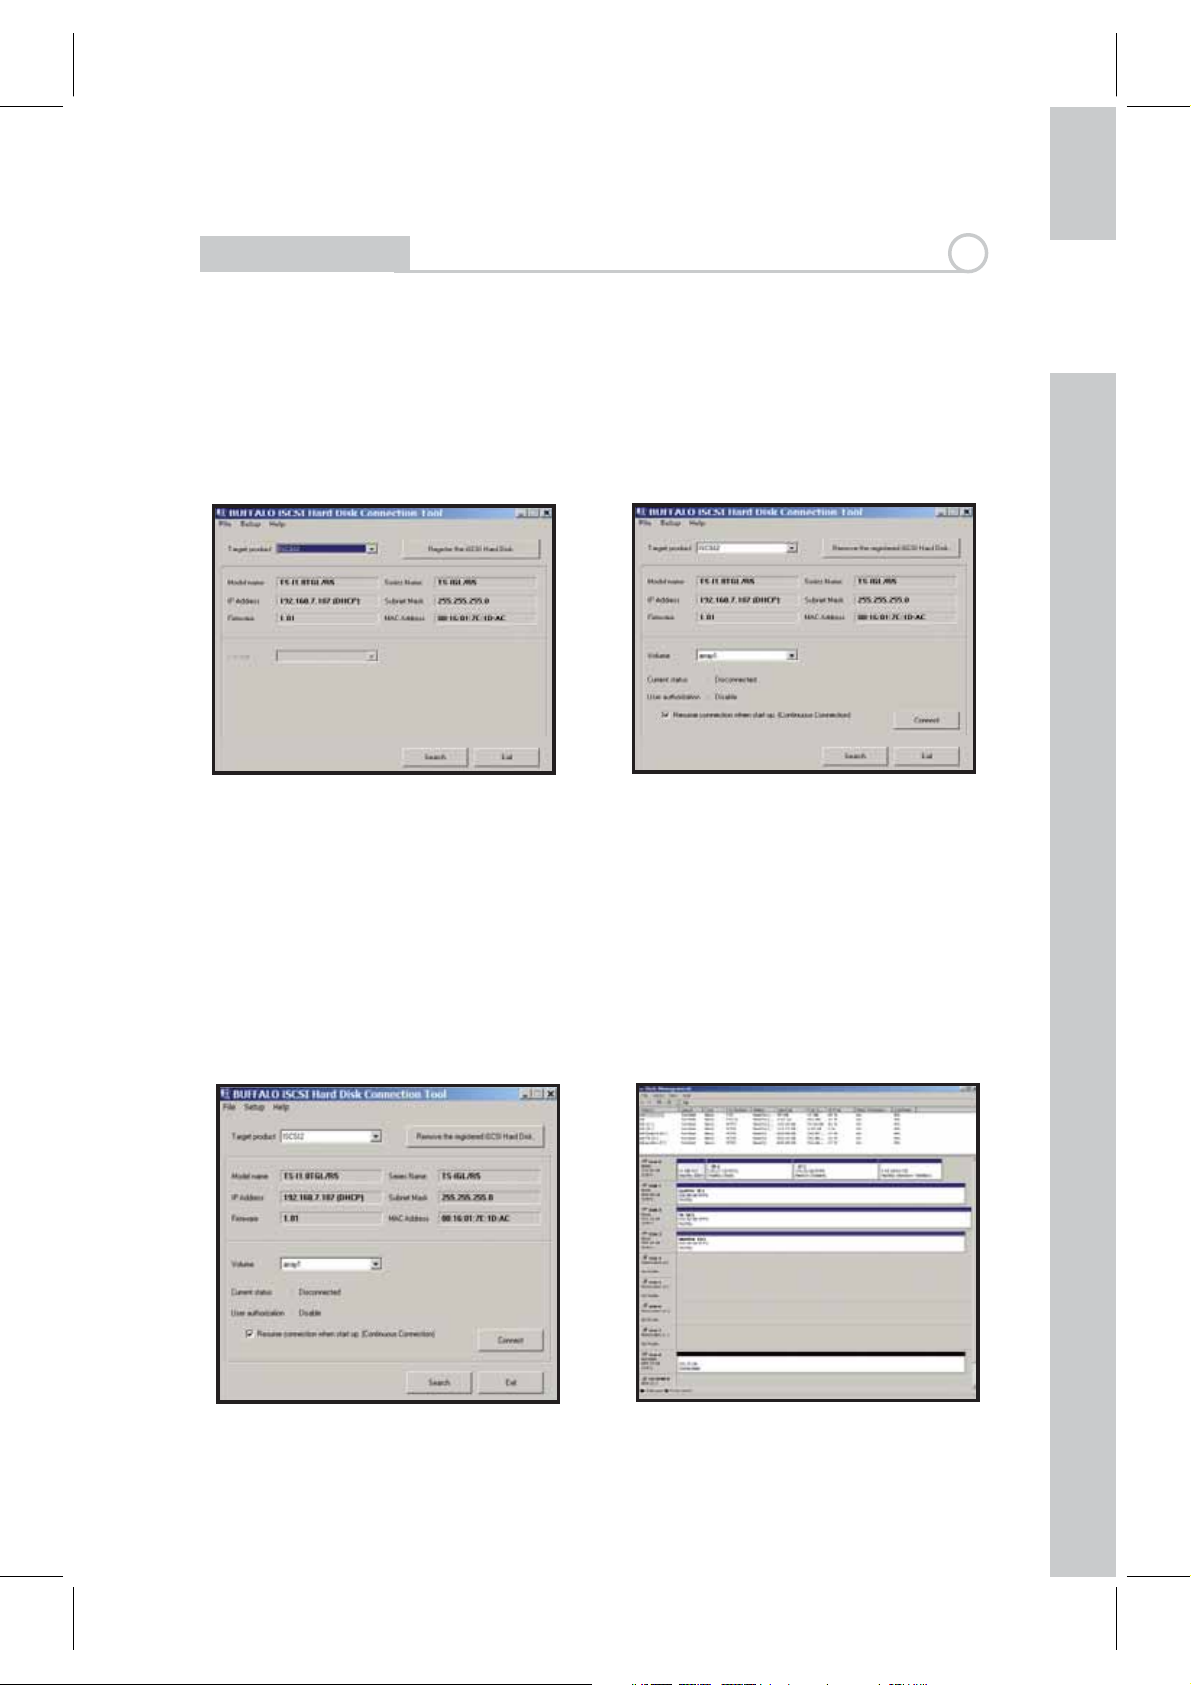
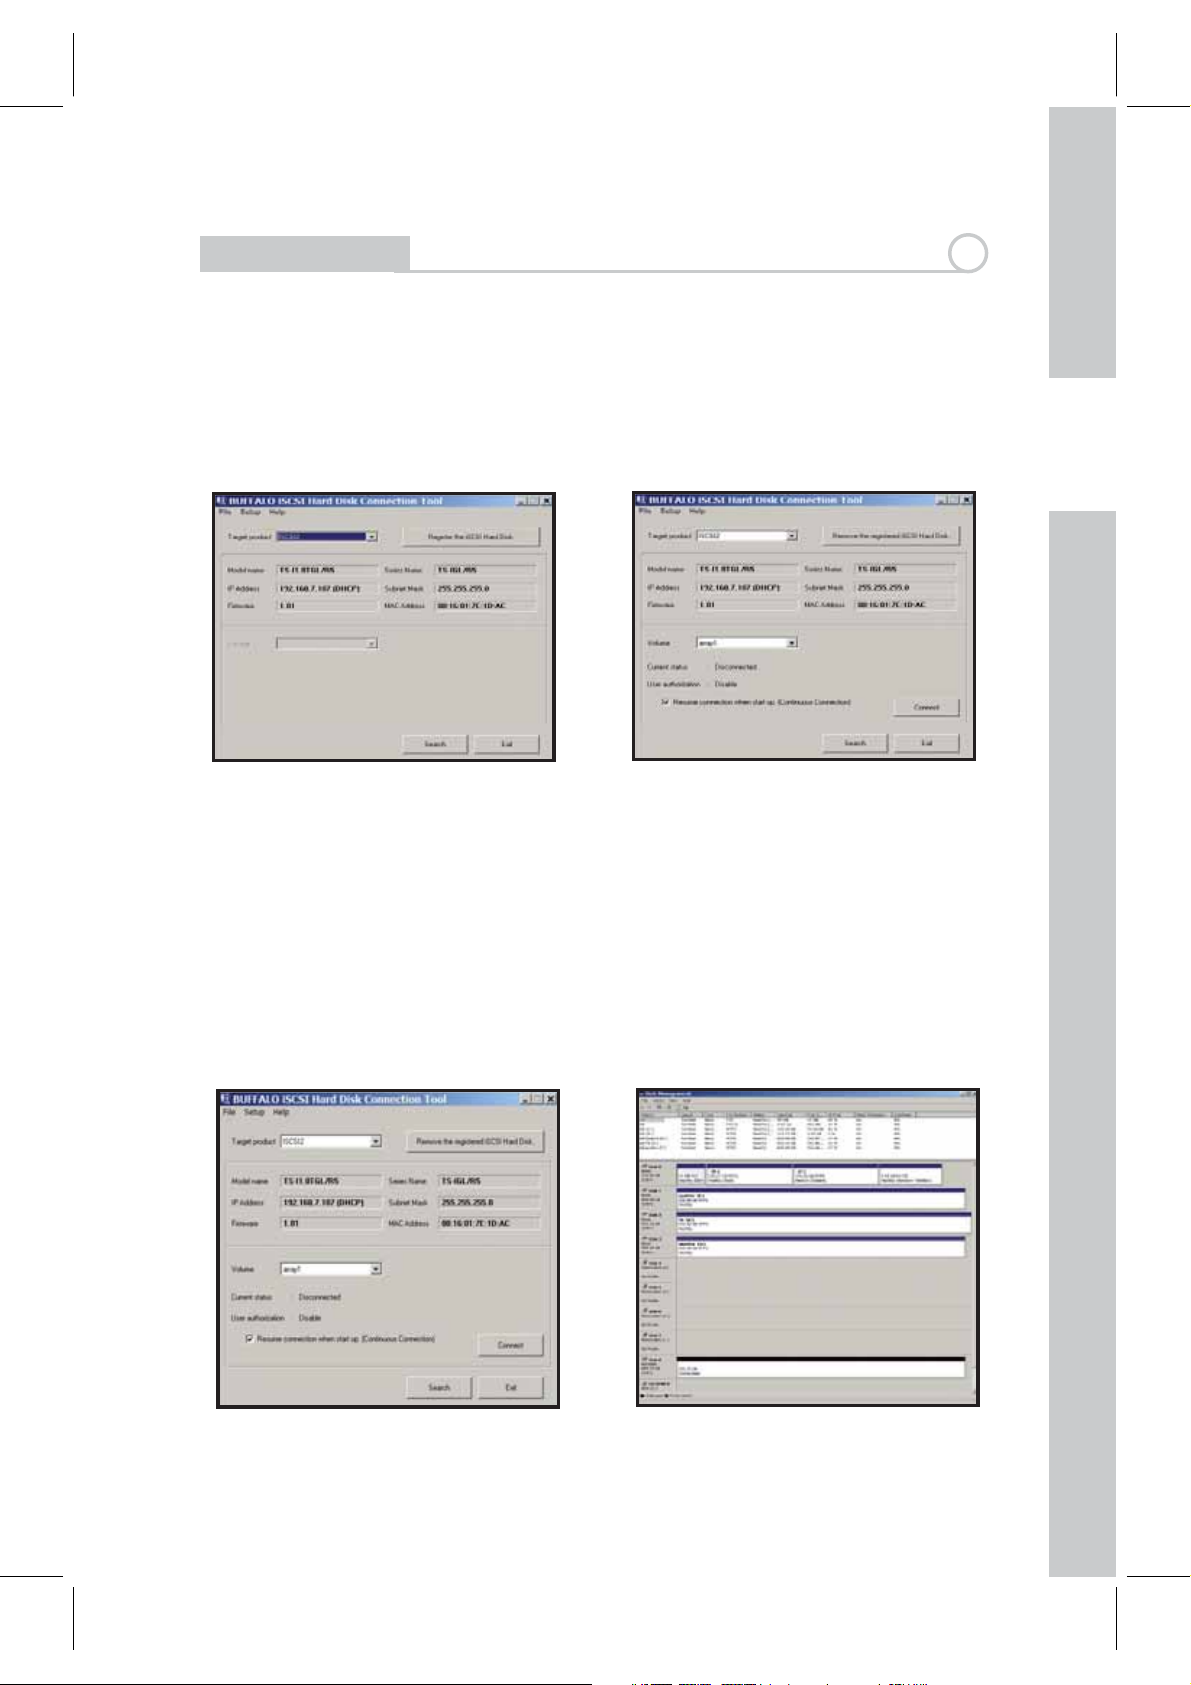
Click Register the iSCSI Hard Disk, and then OK. (Fig: 11)
Check Resume connection at start up and then click Connect.(Fig: 12)
Fig: 11
Fig: 12
If Disk Management does not open automatically, you may launch it
manually. From the Setup menu at the top of the window, choose Launch
Disk Management. (Fig: 13)
2
Your iSCSI TeraStation now appears as a hard drive in Disk Management.
Double-click on the black bar above it. (Fig: 14)
Fig: 13
Fig: 14
5
Page 8

EN
Installation
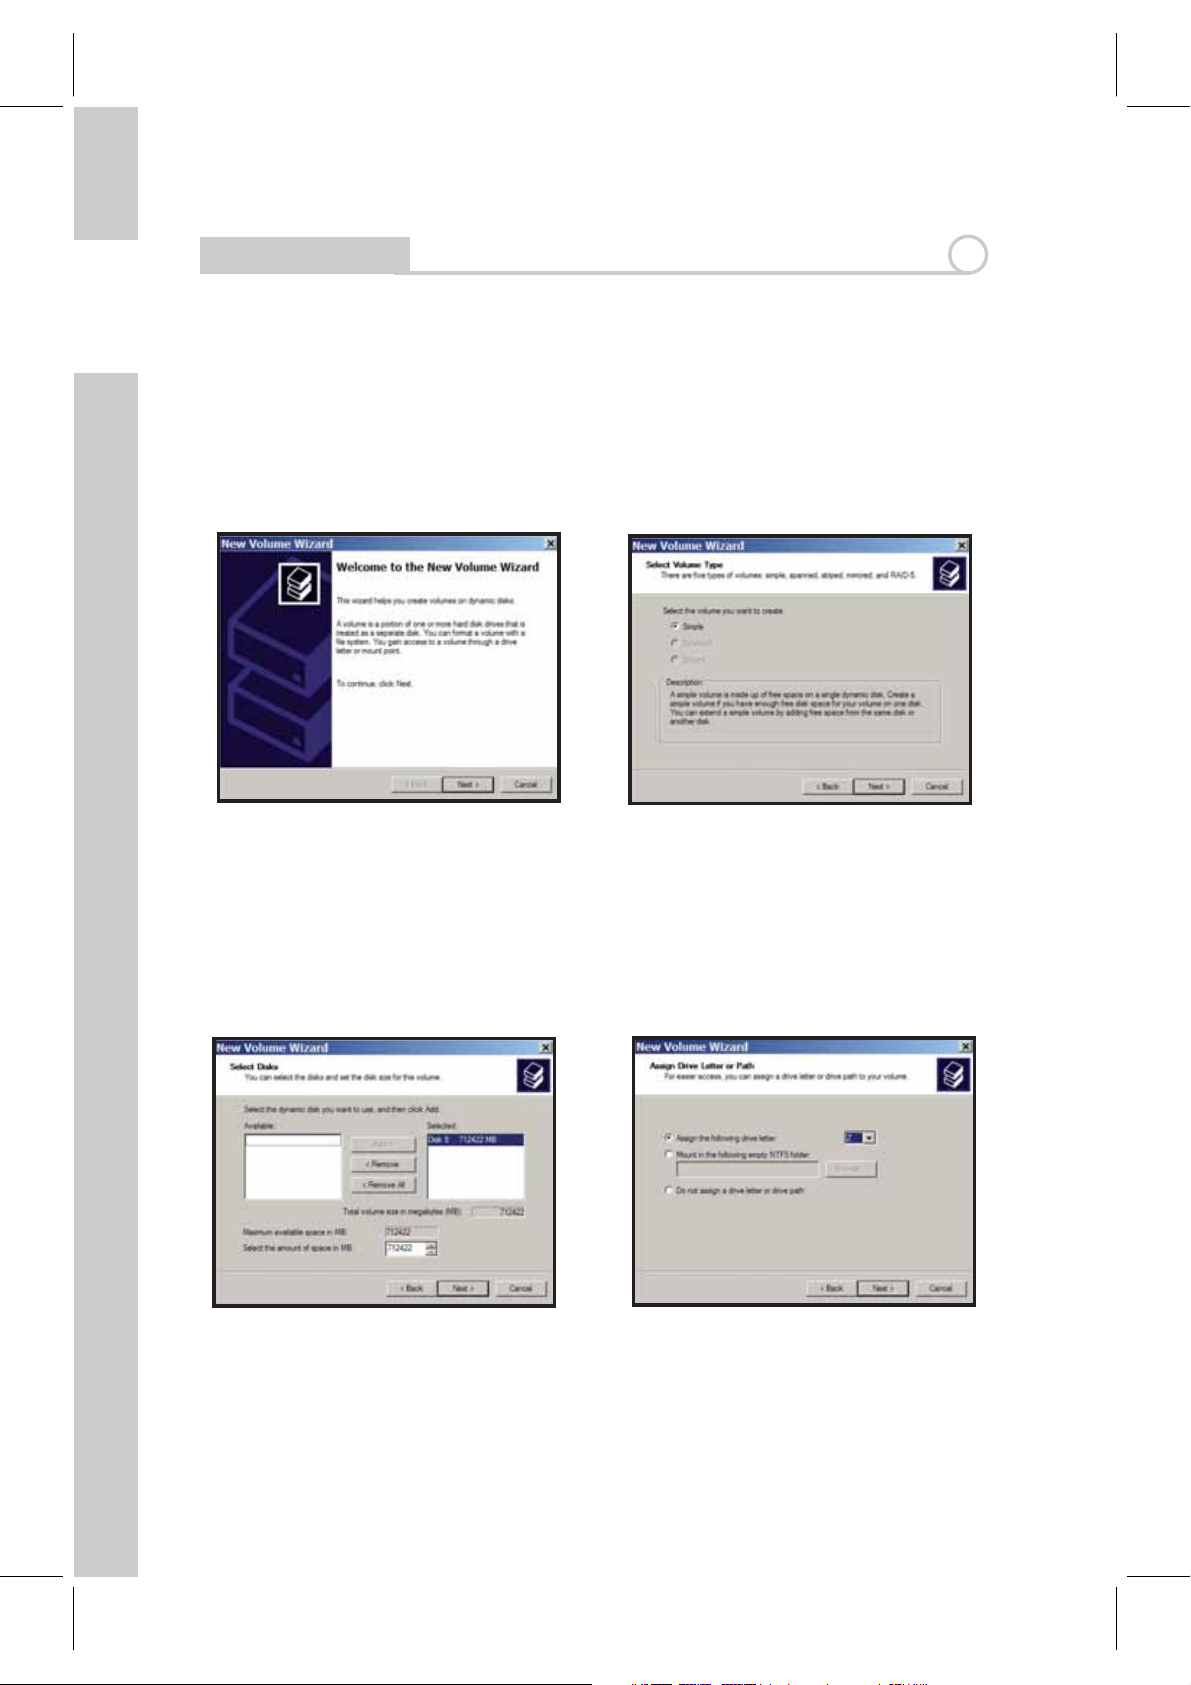
The New Volume Wizard will open. Click Next. (Fig: 15)
Choose your desired volume type. Click Next. (Fig: 16)
Fig: 15
Fig: 16
2
Add all dynamic disks that will be included in the volume to the Selected
column. (Fig: 17)
Choose your desired drive letter. Click Next. (Fig: 18)
Fig: 17
Fig: 18
6
Page 9
EN
Installation
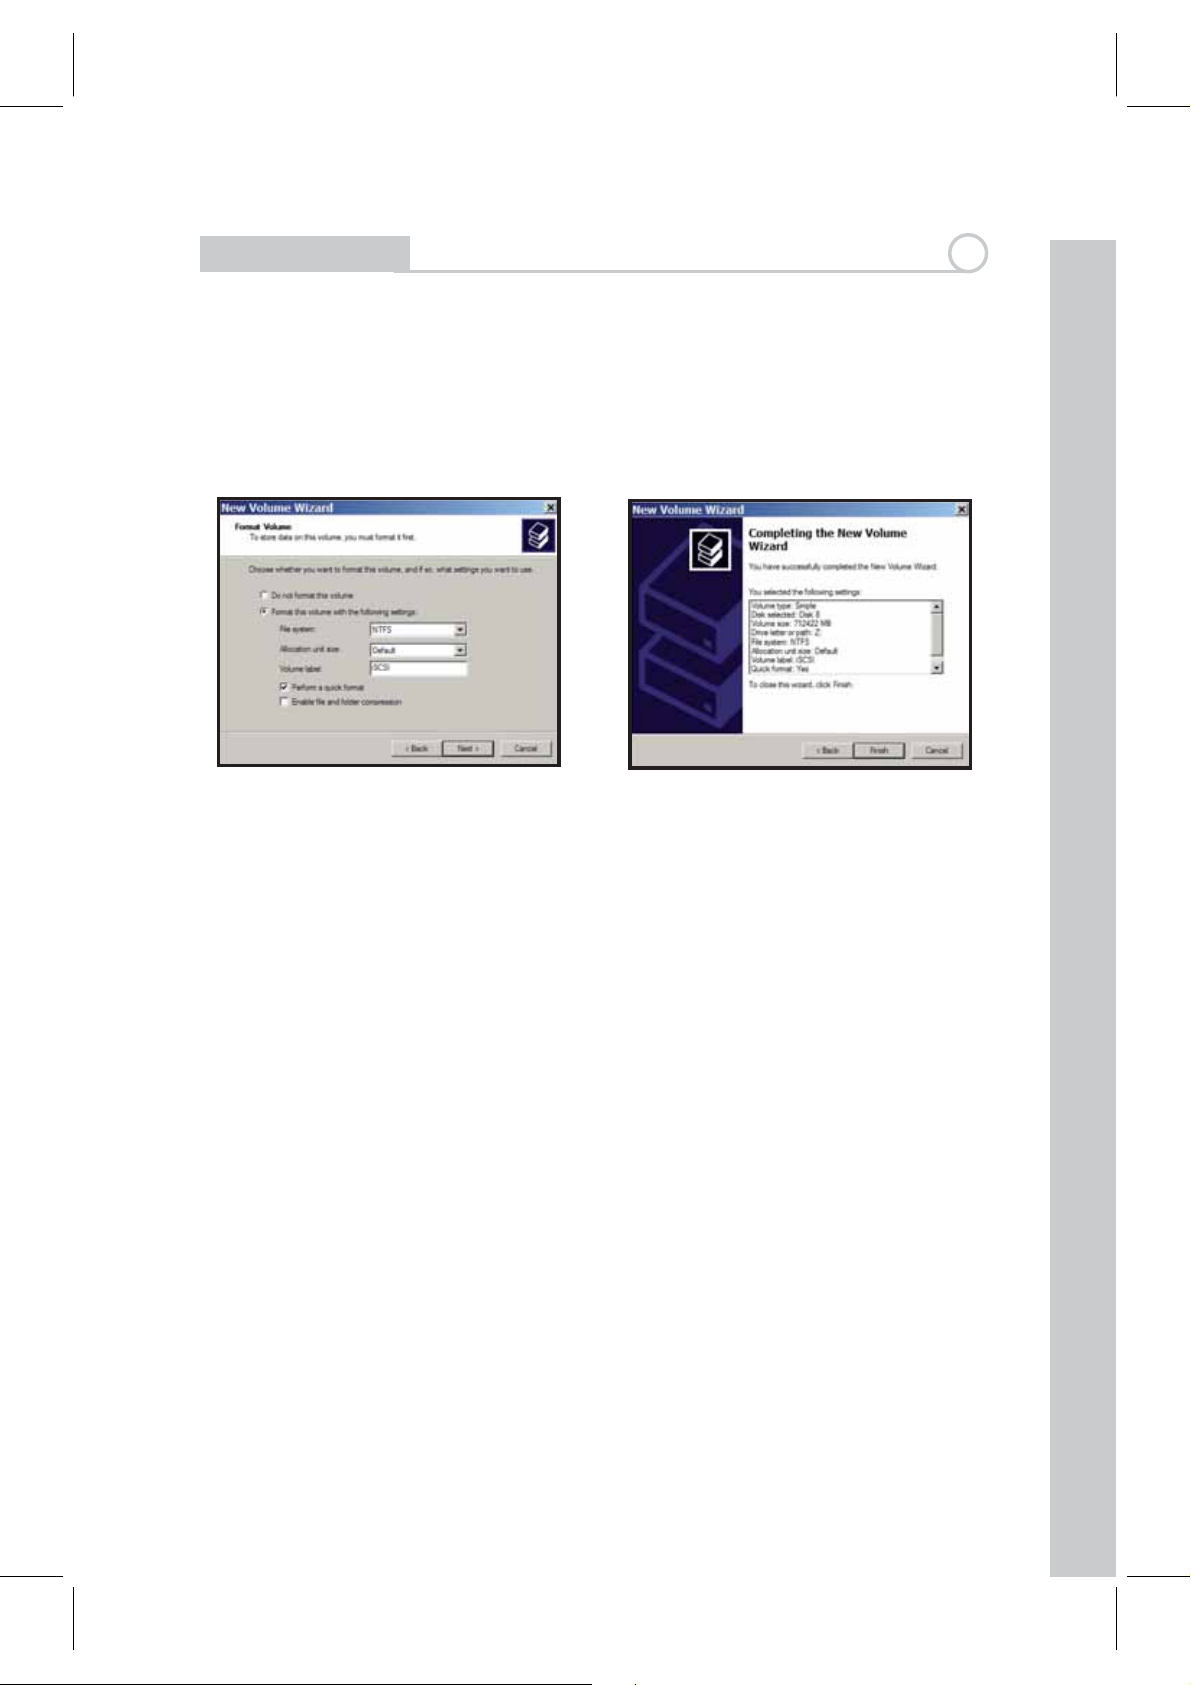
Choose your desired format and volume label. Click Next. (Fig: 19)
Your new volume is installed and ready to use. (Fig: 20)
Fig: 19
Fig: 20
2
7
Page 10

EN
Max:
)
)
:
56W
ccess Media:
/CD
;
T
Technical Specications
LAN Standards: IEEE 802.3u 100BASE-TX; IEEE 802.3 10BASE-T
AN Standards:
Transmission: 1000/100Mbps/10 Mbps, 1000BASE-T: 8B1Q4,
X 4B/5B, MLT-3; 10BASE-T Manchester Coding
.3u
BASE-TX
.310BASE-
A
Access Media: CSMA/CD
Media Interface: RJ-45
USB Standard: USB 2.0
Hi-Speed (HS)
Full-Speed (FS)
Low-Speed (LS)
USB Connector: USB A Connector (2)
ata Transmission Speed:
Data Transmission Speed: Max: 480 Mbps (HS Mode)
Max: 12 Mbps (FS Mode)
Electric Current: 100-240V A/C
ower Consumption
Power Consumption: ~17-56W (Varies with size)
Dimensions: 430 x 86 x 350 mm
Weight: 9.8 Kg (Weight varies with size)
Operating Temperature: 0-45˚ C; 20-80% non-condensing
~17-
MA
Max:
80 MbpsHS
s
FSMode
Varies withsize)
ode
CE Mark Warning
This is a Class B product. In a domestic environment, this product may cause
radio interference, in which case the user may be required to take adequate
measures.
8
Page 11

Environmental Information
• The equipment that you have purchased has required the extraction and
use of natural resources for its production.
• The equipment may contain hazardous substances that could impact health
and the environment.
• In order to avoid the dissemination of those substances in our environment
and to diminish the pressure on the natural resources, we encourage you to
use the appropriate take-back systems.
• The take-back systems will reuse or recycle most of the materials of your end
life equipment in a sound way.
• The crossed-out wheeled bin symbol invites you to use those systems.
• If you need more information on the collection, reuse and recycling systems,
please contact your local or regional waste administration.
EN
Contact Details
Address: Bualo Technology UK Ltd
2 Bracknell Beeches
Old Bracknell Lane
Bracknell
Berkshire
RG12 7BW
United Kingdom
General Inquiries:
Email
Technical Support:
Bualo Technology provide technical support
in English, German, French, Italian and
Spanish.
For opening hours and relevant telephone
numbers, please go to:
http://www.bualo-technology.com/contact
sales@bualo-technology.com
9
Page 12

EN
10
Page 13
Bualo iSCSI Rackmount TeraStation Pro (TS-RIGL/R5)
Lieferumfang
Vielen Dank, dass Sie sich für die Bualo iSCSI Rackmount TeraStation Pro
entschieden haben.
Im Lieferumfang sind folgende Teile enthalten:
• iSCSI Rackmount TeraStation Pro
• Ethernet-Kabel
• Netzkabel
• Installations-CD für die TeraStation
• Handbuch für die Schnellinstallation
• Garantieerklärung
DE
Elemente der TeraStation
Netzschalter
Abb. 1
1
Schalter für den Anzeigemodus
Verriegelung an der Vorderseite
des Gehäuses
(Zur Entriegelung gegen den
Uhrzeigersinn drehen)
11
Page 14

Elemente der TeraStation
1
DE
Vorderseite ohne Abdeckung
Festplatten
(Zum Herausnehmen die Hebel an der Seite
zusammendrücken)
Abb. 2
Rückseite
Reset-Taste
(Zum Zurücksetzen der Einstellungen
gedrückt halten)
Netzkabel
USV
(Unterbrechungsfreie
Stromversorgung)
Ethernet-Anschluss (zum Router)
USB-Eingangsschnittstelle
12
Abb. 3
Page 15
Installation
2
Legen Sie die TeraNavigator-CD in das CD-ROM-Laufwerk des Computers ein.
Die Installation startet auf dem Computer automatisch. Sollte dies nicht der
Fall sein, önen Sie im Windows-Startmenü die Eingabeauorderung (Ausfüh-
ren…). Nachdem das Dialogfeld Ausführen… eingeblendet wurde, geben Sie
d:\TSnavi.exe ein („d“ ist der Laufwerksbuchstabe Ihres CD-ROM-Laufwerks).
Klicken Sie auf die Schaltäche Begin Installation (Installation beginnen), um
den Installationsprozess zu starten. (Abb. 5)
DE
Abb. 4
Abb. 5
Unter Easy Setup (Einfache Installation) wird beschrieben, wie Sie Ihre TeraStation anschließen. Danach wird die Software installiert.
Unter Advanced Setup (Erweiterte Einrichtung) wird das Anschließen übersprungen und direkt mit der Softwareinstallation begonnen. (Abb. 6)
Abb. 6
13
Page 16

DE
Installation
2
Wenn Ihre TeraStation ordnungsgemäß angeschlossen ist, wird sie in der
Dropdown-Liste markiert. Wenn Sie mehrere Geräte einrichten möchten,
wählen Sie die richtige TeraStation aus der Liste aus. (Abb. 7)
Wählen Sie die Option First Setup (Erste Einrichtung) bei einer Erstinstallation
aus.
Wählen Sie die Option Additional Setup (Zusätzliche Einrichtung), um die
Software auf zusätzlichen Computern zu installieren. (Abb. 8)
Abb. 7
Abb. 8
Nach der Installation der TeraStation müssen Sie das iSCSI-Verbindungstool
installieren. Klicken Sie auf Next (Weiter), und folgen Sie dem
Installationsprogramm, bis das iSCSI-Verbindungstool installiert ist. (Abb. 9)
Klicken Sie auf Ye s (Ja), um das iSCSI-Verbindungstool zu starten. (Abb. 10)
Abb. 9
Abb. 10
14
Page 17
Installation
Klicken Sie auf Register the iSCSI Hard Disk (iSCSI-Festplatte registrieren) und
anschließend auf OK. (Abb. 11)
Aktivieren Sie das Kontrollkästchen Resume connection at start up
(Verbindung beim Start fortsetzen), und klicken Sie danach auf Connect
(Verbinden). (Abb. 12)
2
DE
Abb. 11
Abb. 12
Falls Disk Management (Festplattenverwaltung) nicht automatisch geöffnet
wird, können Sie dies manuell tun. Wählen Sie aus dem Menü Setup
(Einrichtung) im oberen Bereich des Fensters die Option Launch Disk
Management (Festplattenverwaltung starten).(Abb. 13)
Ihre iSCSI TeraStation erscheint nun als Festplatte in der
Festplattenverwaltung. Doppelklicken Sie auf den schwarzen Balken darüber.
(Abb. 14)
Abb. 13
Abb. 14
15
Page 18
DE
Installation
Der New Volume Wizard (Assistent für neue Datenträger) wird geöffnet.
Klicken Sie auf Next (Weiter). (Abb. 15)
Wählen Sie den gewünschten Datenträgertyp aus. Klicken Sie auf Next
(Weiter). (Abb. 16)
2
Abb. 15
Abb. 16
Fügen Sie alle dynamischen Festplatten hinzu, die Teil des Datenträgers im
Fenster Selected (Ausgewählt) werden sollen. (Abb. 17)
Wählen Sie den gewünschten Laufwerksbuchstaben aus. Klicken Sie auf Next
(Weiter). (Abb. 18)
Abb. 17
Abb. 18
16
Page 19

Installation
Wählen Sie das gewünschte Format und die Datenträgerbezeichnung aus.
Klicken Sie auf Next (Weiter). (Abb. 19)
Ihr neuer Datenträger ist nun installiert und betriebsbereit. (Abb. 20)
2
DE
Abb. 19
Abb. 20
17
Page 20

DE
)
)
56
t
je
)
;
T
Technische Daten
LAN-Standards: IEEE 802.3u 100BASE-TX; IEEE 802.3 10BASE-T
AN-Standards:
Übertragung: 1000/100 Mbit/s;10 Mbit/s, 1000BASE-T: 8B1Q4,
X 4B/5B, MLT-3; 10BASE-T Manchester-Codierung
.3u
BASE-TX
.310BASE-
Zugriffsmedien:
Zugriffsmedien: CSMA/CD
Medienschnittstelle: RJ-45
USB-Standard: USB 2.0
High Speed (HS)
Full Speed (FS)
Low Speed (LS)
USB-Stecker: USB-A-Steckverbinder (2)
atenübertragungsgeschwindigkeit:
Datenübertragungsgeschwindigkeit:
Max. 480 Mbit/s (HS-Modus)
Max. 12 Mbit/s (FS-Modus)
Stromversorgung: 100–240 V Wechselspannung
tromverbrauch: ~17–
Stromverbrauch: ~17–56 W (variiert je nach Größe)
Abmessungen: 430 × 86 × 350 mm
Gewicht: 9,8 kg (variiert je nach Größe)
Umgebungstemperatur bei Betrieb:
0–45 °C, relative Luftfeuchte 20–80 %
MA/CD
Max.
ax.
Mbit/s
bit/sFS-Modus
HS-Modus
variier
nach
röße
(nicht kondensierend)
CE-Hinweis
Dies ist ein Produkt der Klasse B. Im häuslichen Umfeld kann das Produkt
unter Umständen Funkstörungen verursachen. In diesem Fall muss der
Benutzer möglicherweise entsprechende Abhilfemaßnahmen ergreifen.
18
Page 21
Informationen zum Umweltschutz
• Für die Herstellung des von Ihnen gekauften Produkts wurden natürliche
Ressourcen verbraucht.
• Das Produkt kann gefährliche Substanzen enthalten, die Auswirkungen auf
Gesundheit und Umwelt haben.
• Um die Verbreitung dieser Substanzen in unsere Umwelt und den
Verbrauch natürlicher Ressourcen zu verringern, fordern wir Sie auf, die
entsprechenden Rücknahmesysteme zu nutzen.
• In den Rücknahmesystemen werden die meisten Materialien Ihrer
ausgesonderten Geräte aufbereitet oder wieder verwendet.
• Das Symbol der durchgestrichenen Mülltonne weist Sie darauf hin, diese
Systeme zu nutzen.
• Wenn Sie mehr Informationen über die Sammel-, Wiederverwendungs- und
Wiederaufbereitungssysteme wünschen, wenden Sie sich an die regionalen
Abfallzweckverbände.
Kontaktdaten
DE
Adresse: Bualo Technology UK Ltd
2 Bracknell Beeches
Old Bracknell Lane
Bracknell
Berkshire
RG12 7BW
Großbritannien
Allgemeine Fragen:
E-Mail
Technischer Support:
Bualo Technology leistet technischen
Support in den Sprachen Deutsch, Englisch,
Französisch, Italienisch und Spanisch.
Unsere Geschäftszeiten und wichtige
Telefonnummern nden Sie im Internet unter:
http://www.bualo-technology.com/contact
sales@bualo-technology.com
19
Page 22

DE
20
Page 23
Bualo iSCSI Rackmount TeraStation Pro (TS-RIGL/R5)
Contenu de l'emballage
Merci d'avoir acheté l'unité Bualo iSCSI Rackmount TeraStation Pro.
Contenu de l'emballage :
• iSCSI Rackmount TeraStation Pro
• Câble Ethernet
• Câble d'alimentation
• CD-ROM d’installation TeraStation
• Guide d'installation rapide
• Carte de garantie
FR
Présentation de TeraStation
Interrupteur
Fig. 1
1
Mode d'achage - Interrupteur
Verrouillage du panneau avant
(tourner dans le sens inverse
des aiguilles d'une montre avant
commercialisation)
21
Page 24

FR
Présentation de TeraStation
Panneau avant supprimé
Disques durs
(serrer les attaches avant commercialisation)
1
Fig. 2
Face arrière
Onduleur
Ethernet
USB
Bouton Init
(maintenir enfoncé pour réinitialiser tous
les paramètres)
Câble d'alimentation
Fig. 3
(vers le routeur)
22
Page 25

Installation
2
Insérez le CD TeraNavigator dans le lecteur de CD-ROM de votre ordinateur.
Sur PC, la conguration doit s'exécuter automatiquement. Si tel n'est pas le
cas, lancez TSnavi.exe en cliquant sur Démarrer, puis Exécuter… Lorsque la
boîte de dialogue Exécuter apparaît, tapez d:\TSnavi.exe (« d » étant la lettre
correspondant au lecteur de CD-ROM). Cliquez sur OK pour continuer. (Fig. 4)
Ensuite, cliquez sur le bouton Begin Installation (Commencer l'installation)
pour démarrer. (Fig. 5)
FR
Fig. 4
Fig. 5
Easy Setup (Installation rapide) vous guidera lors de la connexion physique de
la TeraStation. Elle procédera ensuite à l'installation du logiciel.
Advanced Setup (Conguration avancée) ignore les instructions de connexion
et passe directement à l'installation du logiciel. (Fig. 6)
Fig. 6
23
Page 26
Installation
2
Si votre TeraStation est correctement connectée, elle apparaîtra en
surbrillance dans la liste déroulante. Si plusieurs unités doivent être
configurées, sélectionnez l'unité TeraStation qui convient dans la liste. (Fig. 7)
FR
Sélectionnez First Setup (Première configuration) pour l'installation initiale.
Pour installer le logiciel sur d'autres ordinateurs, sélectionnez Additional Setup
(Configuration supplémentaire). (Fig. 8)
Fig. 7
Fig. 8
Une fois la TeraStation installée, vous devrez installer l'outil de
connexion iSCSI. Cliquez sur Next (Suivant) et suivez les indications de
l'assistant pour l'installation de l'outil de connexion iSCSI. (Fig. 9)
Cliquez sur Ye s (Oui) pour lancer l'outil de connexion iSCSI. (Fig. 10)
Fig. 9
Fig. 10
24
Page 27
Installation
Cliquez sur Register the iSCSI Hard Disk (Enregistrer le disque dur iSCSI), puis
sur OK. (Fig. 11)
2
Cochez la case Resume connection at start up (Reprendre la connexion au
démarrage), puis cliquez sur Connect (Connecter). (Fig. 12)
Fig. 11
Fig. 12
Si l'écran de gestion des disques ne s'ouvre pas automatiquement, lancez-le
manuellement. Dans le menu Setup (Configuration) en haut de la fenêtre,
sélectionnez Launch Disk Management (Lancer la gestion des disques).
(Fig. 13)
Votre iSCSI TeraStation apparaît maintenant en tant que disque dur sur
l'écran de gestion des disques. Double-cliquez sur la barre noire se trouvant
au-dessus. (Fig. 14)
FR
Fig. 13
Fig. 14
25
Page 28

Installation
La fenêtre New Volume Wizard (Assistant Nouveau volume) s'ouvre. Cliquez
sur Next (Suivant). (Fig. 15)
2
FR
Choisissez le type de volume souhaité. Cliquez sur Next (Suivant). (Fig. 16)
Fig. 15
Fig. 16
Ajoutez à la colonne Selected (Sélectionné) tous les disques dynamiques qui
seront inclus au volume. (Fig. 17)
Sélectionnez la lettre souhaitée pour le disque. Cliquez sur Next (Suivant).
(Fig. 18)
Fig. 17
Fig. 18
26
Page 29

Installation
Sélectionnez le format et l'intitulé de volume voulus. Cliquez sur Next
(Suivant). (Fig. 19)
2
Votre nouveau volume est installé et prêt à être utilisé. (Fig. 20)
Fig. 19
Fig. 20
FR
27
Page 30

FR
esse de
des données
)
)
56
n
)
ccès mu
a
/CD
es
3u
3BAS
Spécications techniques
Normes LAN : IEEE 802.3u 100BASE-TX, IEEE 802.3 10BASE-T
rm
Transmission : 1000/100 Mbits/s/10 Mbits/s, 1000BASE-T : 8B1Q4,
X 4B/5B, MLT-3; 10BASE-T codage Manchester
A
Accès multimédia :
Interface multimédia : RJ-45
Normes USB : USB 2.0
Haut débit (HS)
Fonctionnement à plein régime (FS)
Faible débit (LS)
Connecteur USB : Connecteur USB A (2)
ltimédi
CSMA/CD
MA
.
BASE-TX,
.
E-T
Vit
Vitesse de transmission des données :
Maximum : 480 Mbits/s (mode HS)
Maximum : 12 Mbits/s (mode FS)
Courant électrique : 100-240 Vca
onsommation
Consommation : ~17-56 W (varie selon la taille)
Dimensions : 430 x 86 x 350 mm
Poids : 9,8 kg (varie selon la taille)
Température de fonctionnement :
0-45 °C ; 20-80 % d'humidité
(sans condensation)
transmission
Maximum
Maximum
~17-
Mbits/smodeS
bits/smodeS
varie
elo
aille
Avertissement concernant la marque CE
Ce produit est un produit de classe B. Dans un environnement résidentiel,
ce produit peut être source de perturbations radioélectriques, auquel cas
l'utilisateur peut être amené à prendre les mesures adéquates.
28
Page 31

Informations relatives à l'environnement
• La production de l'équipement que vous avez acquis a nécessité l'extraction
et l'utilisation de ressources naturelles.
• L'équipement peut contenir des matières dangereuses susceptibles d'avoir
un impact sur la santé et l'environnement.
• An d'éviter la diusion de ces matières dans notre environnement et de
réduire l'exploitation des ressources naturelles, nous vous encourageons à
passer par des circuits de récupération appropriés.
• Ces systèmes réutiliseront ou recycleront de manière saine la plupart des
composants de votre équipement périmé.
• Le symbole représentant une poubelle sur roues barrée d'une croix vous
invite à utiliser ces circuits.
• Pour en savoir plus sur les systèmes de collecte, de réutilisation et de
recyclage, veuillez contacter votre administration locale ou régionale
chargée de la gestion des déchets.
FR
Coordonnées
Adresse : Bualo Technology UK Ltd
2 Bracknell Beeches
Old Bracknell Lane
Bracknell
Berkshire
RG12 7BW
Royaume-Uni
Demandes générales :
E-mail
Assistance technique :
Bualo Technology propose une assistance
technique dans plusieurs langues : anglais,
allemand, français, italien et espagnol.
Pour connaître les heures d'ouverture ainsi
que les numéros de téléphone appropriés,
visitez la page Web suivante :
http://www.bualo-technology.com/contact
sales@bualo-technology.com
29
Page 32

FR
30
Page 33

Bualo iSCSI Rackmount TeraStation Pro (TS-RIGL/R5)
Contenuto della confezione
Grazie per aver acquistato un dispositivo Bualo iSCSI Rackmount TeraStation
Pro.
La confezione contiene:
• iSCSI Rackmount TeraStation Pro
• Cavo Ethernet
• Cavo di alimentazione
• CD di installazione di TeraStation
• Guida di installazione rapida
• Garanzia
Layout di TeraStation
Interruttore di alimentazione
IT
1
Interruttore modalità Display
Fig. 1
Blocco del pannello anteriore
(ruotare in senso antiorario per il
rilascio)
31
Page 34

IT
Layout di TeraStation
Pannello anteriore rimosso
Dischi rigidi
(stringere le linguette per il rilascio)
1
Fig. 2
Pannello posteriore
UPS
Ethernet
Pulsante di inizializzazione
(tenere premuto per ripristinare tutte le
impostazioni)
Ingresso USB
Cavo di alimentazione
Fig. 3
(per il router)
32
Page 35

Installazione
Inserire il CD TeraNavigator nell'unità CD-ROM del computer.
In un PC, la procedura di congurazione viene avviata automaticamente. In
caso contrario, avviare manualmente il le TSnavi.exe premendo Start e
selezionando l'opzione Esegui... Nella nestra di dialogo corrispondente,
digitare d:\TSnavi.exe (in cui "d" corrisponde all'unità CD-ROM utilizzata).
Premere OK per continuare (g. 4).
2
Premere il pulsante Begin Installation (Avvia installazione) per iniziare (g. 5).
Fig. 4
Fig. 5
Easy Setup (Impostazione rapida) consente di procedere con la connessione
sica di TeraStation e di installare il software in seguito.
Advanced Setup (Congurazione avanzata) consente di passare direttamente
all'installazione del software, ignorando la procedura guidata di connessione
(g. 6).
IT
Fig. 6
33
Page 36

IT
Installazione
2
Se connesso correttamente, TeraStation viene evidenziato nell'elenco a
discesa. Per configurare più unità, selezionare dall'elenco il dispositivo
TeraStation appropriato (fig. 7).
Selezionare l'opzione First Setup (Prima configurazione) per l'installazione
iniziale.
Per installare il software su altri computer, scegliere l'opzione Additional Setup
(Ulteriore configurazione) (fig. 8).
Fig. 7
Fig. 8
Dopo l'installazione di TeraStation, è necessario installare lo strumento di
connessione iSCSI. Fare clic su Next (Avanti) e seguire la procedura guidata
fino al completamento dell'installazione dello strumento di connessione iSCSI
(fig. 9).
Fare clic su Ye s (Sì) per avviare lo strumento di connessione iSCSI (fig. 10).
Fig. 9
Fig. 10
34
Page 37

Installazione
Fare clic sul pulsante Register the iSCSI Hard Disk (Registra disco rigido iSCSI),
quindi scegliere OK (fig. 11).
Selezionare l'opzione Resume connection at start up (Riprendi la connessione
all'avvio), quindi fare clic su Connect (Connetti) (fig. 12).
2
IT
Fig. 11
Fig. 12
Avviare manualmente l'opzione Gestione disco qualora non venga avviata
automaticamente. Dal menu Setup (Configura) nella parte superiore della
finestra, selezionare Launch Disk Management (Avvia Gestione disco) (fig. 13).
iSCSI TeraStation viene visualizzato come disco rigido in Gestione disco. Fare
doppio clic sulla barra di colore nero posta sopra l'opzione (fig. 14).
Fig. 13
Fig. 14
35
Page 38

IT
Installazione
Viene visualizzata la procedura guidata New Volume Wizard (Configurazione
guidata nuovo volume). Fare clic su Next (Avanti) (fig. 15).
Scegliere il tipo di volume desiderato. Fare clic su Next (Avanti) (fig. 16).
2
Fig. 15
Fig. 16
Nella colonna Selected (Selezionati) aggiungere tutti i dischi dinamici che
verranno inclusi nel volume (fig. 17).
Scegliere la lettera corrispondente all'unità desiderata. Fare clic su Next
(Avanti)(g. 18).
Fig. 17
Fig. 18
36
Page 39

Installazione
Scegliere il formato e l'etichetta del volume desiderati. Fare clic su Next
(Avanti) (fig. 19).
A questo punto, il nuovo volume sarà installato e pronto all'uso (fig. 20).
2
IT
Fig. 19
Fig. 20
37
Page 40

Speciche tecniche
Max.:
)
)
56
CSMA/CD
;
T
Standard LAN: IEEE 802.3u 100BASE-TX; IEEE 802.3 10BASE-T
tandard LAN:
Trasmissione: 1000/100 Mbps/10 Mbps, 1000BASE-T: 8B1Q4,
X 4B/5B, MLT-3; codifica Manchester 10BASE-T
Supporti di accesso:
Supporti di accesso: CSMA/CD
Interfaccia supporto: RJ-45
Standard USB: USB 2.0
.3u
BASE-TX
.310BASE-
IT
Hi-Speed (HS)
Full-Speed (FS)
Low-Speed (LS)
Connettore USB: Connettore USB A (2)
Velocità di trasmissione dati:
Velocità di trasmissione dati: Max.: 480 Mbps (modalità HS)
Max.: 12 Mbps (modalità FS)
Corrente: 100-240 V CA
onsumo: ~17-
Consumo: ~17-56 W (variabile in base alla dimensione)
Dimensioni: 430 x 86 x 350 mm
Peso: 9,8 Kg (variabile in base alla dimensione)
Temperatura di esercizio: 0-45˚ C; 20-80% senza condensa
Max.:Mbps
80
bps
modalitàS
modalità
variabile
S
n
dimensione)
Marchio CE
Questo prodotto appartiene alla classe B. In un ambiente domestico, può
causare interferenze radio. In tal caso l'utente dovrà adottare le misure
adeguate.
38
Page 41

Informazioni sull'ambiente
• L'apparecchio acquistato richiede l'estrazione e l'impiego di risorse naturali
per la sua produzione.
• L'apparecchio può contenere sostanze nocive alla salute e all'ambiente.
• Per evitare la dispersione nell'ambiente di queste sostanze e ridurre
l'impiego di risorse naturali, consigliamo di adoperare il sistema di
smaltimento più appropriato.
• I sistemi di smaltimento consentono il riutilizzo o il riciclo appropriato della
maggior parte dei materiali dell'apparecchio.
• Il simbolo barrato del raccoglitore di riuti invita a utilizzare questi sistemi.
• Per ulteriori informazioni sui sistemi di raccolta, riciclo e riutilizzo, contattare
l'ente amministrativo locale e regionale addetto allo smaltimento dei riuti.
IT
Dettagli di contatto
Indirizzo Bualo Technology UK Ltd
2 Bracknell Beeches
Old Bracknell Lane
Bracknell
Berkshire
RG12 7BW
Regno Unito
Informazioni generali
E-mail
Assistenza tecnica
Bualo Technology ore un servizio di
assistenza tecnica in inglese, tedesco,
francese, italiano e spagnolo.
Per informazioni sugli orari del servizio e i
numeri di telefono, visitare l'indirizzo:
http://www.bualo-technology.com/contact
sales@bualo-technology.com
39
Page 42

IT
40
Page 43

Bualo iSCSI Rackmount TeraStation Pro (TS-RIGL/R5)
Contenido del paquete
Gracias por adquirir una iSCSI Rackmount TeraStation Pro de Bualo.
El paquete incluye:
• iSCSI Rackmount TeraStation Pro
• Cable Ethernet
• Cable de alimentación
• CD de instalación de la TeraStation
• Guía de instalación rápida
• Declaración de garantía
ES
Esquema de la TeraStation
Interruptor Power
(Encendido)
Fig. 1
1
Conmutador Display Mode
(Modo de visualización)
Bloqueo del panel frontal
(Girar en el sentido contrario de las
agujas del reloj para liberarlo)
41
Page 44

Esquema de la TeraStation
Frontal con panel eliminado
Discos duros
(Presionar en las patillas para liberarlo)
1
ES
Fig. 2
Panel posterior
UPS
Ethernet
USB
Botón Init
(Mantener pulsado para restablecer la
conguración)
Cable de alimentación
Fig. 3
(al enrutador)
42
Page 45

Instalación
2
Introduzca el CD de TeraNavigator en la unidad de CD-ROM de su ordenador.
En un PC, el programa de instalación debe iniciarse automáticamente. Si
no lo hace, inicie manualmente TSnavi.exe pulsando Inicio y seleccionando
la opción Ejecutar... Cuando se abra el cuadro de diálogo Ejecutar, escriba
d:\TSnavi.exe (“d” es la letra de su unidad de CD-ROM). Pulse Aceptar para
continuar. (Fig. 4)
A continuación, pulse el botón Begin Installation (Iniciar instalación) para
comenzar. (Fig. 5)
ES
Fig. 4
Fig. 5
Easy Setup (Conguración sencilla) le lleva por los pasos para la conexión
física de su TeraStation. A continuación, se instalará el software.
Advanced Setup (Conguración avanzada) omite el tutorial de conexión y va
directamente a la instalación del software. (Fig. 6)
Fig. 6
43
Page 46

ES
Instalación
2
Si la TeraStation esta conectada correctamente, aparecerá resaltada en la lista
desplegable. Si tiene varias unidades para instalar, seleccione la TeraStation
correcta de la lista. (Fig. 7)
Seleccione First Setup (Primera instalación) para la instalación inicial.
Para instalar el software en más ordenadores, elija Additional Setup
(Instalación adicional). (Fig. 8)
Fig. 7
Fig. 8
Una vez que se ha instalado la TeraStation, deberá instalar la herramienta de
conexión iSCSI. Haga clic en Next (Siguiente), y recorra los pasos del asistente
hasta haber instalado la herramienta de conexión iSCSI. (Fig. 9)
Haga clic en Ye s (Sí) para iniciar la herramienta de conexión iSCSI. (Fig. 10)
Fig. 9
Fig. 10
44
Page 47

Instalación
Haga clic en Register the iSCSI Hard Disk (Registrar el disco duro iSCSI) y, a
continuación, en OK (Aceptar). (Fig. 11)
Active Resume connection at start up (Reanudar conexión al inicio) y, a
continuación, haga clic en Connect (Conectar). (Fig. 12)
2
ES
Fig. 11
Fig. 12
Si Disk Management (Administración de disco) no se abre automáticamente,
inícielo manualmente. En el menú Setup (Configurar) de la parte superior de
la ventana, elija Launch Disk Management (Iniciar administración de disco).
(Fig. 13)
La iSCSI TeraStation aparece ahora como disco duro en Disk Management
(Administración de disco). Haga doble clic en la barra negra que hay encima.
(Fig. 14)
Fig. 13
Fig. 14
45
Page 48

ES
Instalación
Se abre el New Volume Wizard (Asistente de nuevo volumen). Haga clic en
Next (Siguiente). (Fig. 15)
Elija el tipo de volumen deseado. Haga clic en Next (Siguiente). (Fig. 16)
2
Fig. 15
Fig. 16
Añada todos los discos dinámicos que se incluirán en el volumen a la
columna Selected (Seleccionados). (Fig. 17)
Elija la letra de unidad deseada. Haga clic en Next (Siguiente).(Fig. 18)
Fig. 17
Fig. 18
46
Page 49

Instalación
Elija el formato y la etiqueta de volumen deseados. Haga clic en Next
(Siguiente). (Fig. 19)
El nuevo volumen está ya instalado y listo para su uso. (Fig. 20)
2
ES
Fig. 19
Fig. 20
47
Page 50

Especicaciones técnicas
dad de
os:
bps
)
)
56
)
:
;
T
Estándares de LAN: IEEE 802.3u 100BASE-TX; IEEE 802.3 10BASE-T
tándares de LAN
Transmisión: 1000/100Mbps/10 Mbps, 1000BASE-T: 8B1Q4,
X 4B/5B, MLT-3; 10BASE-T Manchester Coding
.3u
BASE-TX
.310BASE-
ES
oporte de acceso:
Soporte de acceso: CSMA/CD
Interfaz de soporte: RJ-45
Estándar USB: USB 2.0
Hi-Speed (HS)
Full-Speed (FS)
Low-Speed (LS)
Conector USB: Conector USB A (2)
Veloci
Velocidad de transmisión de datos:
Máx. 480 Mbps (modo HS)
Máx. 12 Mbps (modo FS)
Alimentación: 100-240 V CA
onsumo: ~17-
Consumo: ~17-56 W (varía según el tamaño)
Dimensiones: 430 x 86 x 350 mm
Peso: 9,8 Kg (varía según el tamaño)
Temperatura de funcionamiento:
De 0 a 45˚C; humedad relativa de
transmisión de dat
MA/CD
Máx.
Máx.
M
bps
modo HS
modoFS
varíaegún el tamaño
20 a 80% sin condensación
Advertencia sobre la marca CE
Este es un producto de Clase B. En entornos domésticos, este producto puede
provocar interferencias radioeléctricas. En tal caso, se puede exigir al usuario
que tome las medidas oportunas.
48
Page 51

Información medioambiental
• Para la fabricación de este equipo han sido necesarios la extracción y el uso
de recursos naturales.
• El equipo puede contener sustancias peligrosas que podrían afectar a la
salud y al medio ambiente.
• Para evitar la difusión de estas sustancias en el entorno y minimizar el uso
innecesario de recursos naturales, le sugerimos que utilice los sistemas de
reciclaje adecuados.
• Cuando su dispositivo llegue al n de su vida útil, la mayor parte de
los materiales empleados en su fabricación se reutilizarán o reciclarán
convenientemente a través del reciclaje.
• El símbolo del contenedor de basura tachado le invita a usar dichos
sistemas.
• Si necesita más información sobre los sistemas de recogida, reutilización
y reciclaje, póngase en contacto con su administración local o regional de
recogida de basura.
ES
Información de contacto
Dirección: Bualo Technology UK Ltd
2 Bracknell Beeches
Old Bracknell Lane
Bracknell
Berkshire
RG12 7BW
Reino Unido
Consultas generales:
Correo electrónico
Asistencia técnica:
Bualo Technology ofrece asistencia técnica
en inglés, alemán, francés, italiano y español.
Para saber cuáles son las horas de atención al
público y los números de teléfono, visite:
http://www.bualo-technology.com/contact
sales@bualo-technology.com
49
Page 52

ES
50
Page 53

Bualo iSCSI Rackmount TeraStation Pro (TS-RIGL/R5)
Conteúdo da Embalagem
Obrigado por adquirir a Bualo iSCSI Rackmount TeraStation Pro.
A embalagem contém:
• iSCSI Rackmount TeraStation Pro
• Cabo Ethernet
• Cabo de Energia
• CD de instalação da TeraStation
• Guia de Conguração Rápida
• Declaração de Garantia
Esquema da TeraStation
Interruptor
Fig: 1
1
PT
Interruptor do Modo de
Apresentação
Bloqueio do Painel Frontal
(Rode no sentido contrário ao dos
ponteiros do relógio para soltar)
51
Page 54

Esquema da TeraStation
Frente Com o Painel Removido
Unidades de Disco Rígido
(Aperte as patilhas para libertar)
1
PT
Fig: 2
Painel Posterior
UPS
Ethernet
Botão Iniciar
(Mantenha premido para repor todas as
denições)
Entrada USB
Cabo de Energia
Fig: 3
(para o router)
52
Page 55

Instalação
2
Insira o CD TeraNavigator na unidade de CD-ROM do computador.
Num PC, a instalação deverá ser iniciada automaticamente. Se não for, inicie
manualmente o programa TSnavi.exe, premindo Iniciar e seleccionando
a opção Executar.... Quando aparecer a caixa de diálogo Executar, escreva
d:\TSnavi.exe (em que “d” é a letra da unidade de CD-ROM). Prima OK para
continuar. (Fig: 4)
Em seguida, prima o botão Begin Installation (Iniciar Instalação) para começar.
(Fig: 5)
Fig: 4
Fig: 5
Easy Setup ajudá-lo-á a estabelecer a ligação física à TeraStation. Em seguida,
instalará o software.
Advanced Setup ignora a explicação da ligação física e avança directamente
para a instalação do software. (Fig: 6)
Fig: 6
PT
53
Page 56

Instalação
Se a TeraStation for ligada correctamente, aparecerá em destaque na lista
pendente. Se estiver a instalar várias unidades, seleccione a TeraStation
correcta na lista. (Fig: 7)
Seleccione First Setup (Primeira Instalação) para efectuar a instalação inicial.
Para instalar o software noutros computadores, seleccione Additional Setup
(Instalação Adicional). (Fig: 8)
2
PT
Fig: 7
Fig: 8
Depois de instalar a TeraStation, terá de instalar a ferramenta de ligação
iSCSI. Clique em Seguinte e siga as instruções do Assistente para instalar a
ferramenta de ligação iSCSI. (Fig: 9)
Clique em Ye s (Sim) para iniciar a ferramenta de ligação iSCSI. (Fig: 10)
Fig: 9
Fig: 10
54
Page 57

Instalação
2
Clique em Register the iSCSI Hard Disk (Registar o Disco Rígido iSCSI) e, depois,
em OK. (Fig: 11)
Marque Resume connection at start up (Retomar a ligação no arranque) e, em
seguida, clique em Connect. (Ligar) (Fig: 12)
Fig: 11
Fig: 12
Se o Disk Management não for iniciado automaticamente, poderá ser
necessário iniciá-lo manualmente. No menu Setup (Configuração), na parte
superior da janela, seleccione Launch Disk Management (Iniciar o Disk
Management). (Fig: 13)
A iSCSI TeraStation aparece agora como uma unidade de disco rígido no Disk
Management. Faça duplo clique na barra preta acima da unidade. (Fig: 14)
PT
Fig: 13
Fig: 14
55
Page 58

Instalação
Aparece o New Volume Wizard (Assistente de Novo Volume). Clique em Next
(Seguinte). (Fig: 15)
Seleccione o tipo de volume pretendido. Clique em Next (Seguinte). (Fig: 16)
2
PT
Fig: 15
Fig: 16
Adicione todos os discos dinâmicos a serem incluídos no volume à coluna
Selected (Seleccionado). (Fig: 17)
Seleccione a letra de unidade pretendida. Clique em Next (Seguinte). (Fig: 18)
Fig: 17
Fig: 18
56
Page 59

Instalação
Seleccione o formato e a etiqueta de volume que pretende. Clique em Next
(Seguinte). (Fig: 19)
O novo volume está instalado e pronto a ser utilizado. (Fig: 20)
2
Fig: 19
Fig: 20
PT
57
Page 60

Especicações Técnicas
dade de
ssão de Dados:
)
)
e
)
cesso:
LAN:
;
T
Normas LAN: IEEE 802.3u 100BASE-TX; IEEE 802.3 10BASE-T
rmas
Transmissão: 1000/100Mbps/10 Mbps, 1000BASE-T: 8B1Q4,
X 4B/5B, MLT-3; 10BASE-T Manchester Coding
.3u
BASE-TX
.310BASE-
PT
ios de A
Meios de Acesso: CSMA/CD
Interface: RJ-45
Norma USB: USB 2.0
Alta Velocidade (HS)
Velocidade Total (FS)
Baixa Velocidade (LS)
Conector USB: Conector USB A (2)
Veloci
Velocidade de Transmissão de Dados:
Max: 480 Mbps (Modo HS)
Max: 12 Mbps (Modo FS)
Corrente Eléctrica: 100-240V A/C
onsumo de Energia: ~17-56W
Consumo de Energia: ~17-56W (Varia consoante o tamanho)
Dimensões: 430 x 86 x 350 mm
Peso: 9.8 Kg (O peso varia consoante o
tamanho)
Temperatura de Funcionamento:
Transmi
MA/CD
Max:
ax:
Mbps
bpsModoS
Modo
Variaconsoant
S
tamanho
0-45˚ C; 20-80% sem condensação
Aviso de Marca CE
Este é um produto Classe B. Num ambiente doméstico este produto pode
causar interferências de rádio, pelo que o utilizador pode ter de tomar
medidas adequadas.
58
Page 61

Informações Ambientais
• O equipamento que adquiriu exigiu a extracção e utilização de recursos
naturais na sua produção.
• O equipamento pode conter substâncias perigosas com impacto na saúde
e no ambiente.
• Para impedir a disseminação dessas substâncias no ambiente e diminuir a
pressão sobre os recursos naturais, recomendamos a utilização de sistemas
take-back (recepção e reciclagem) apropriados.
• Os sistemas take-back reutilizam ou reciclam a maior parte dos materiais de
equipamentos em m de vida, de maneira saudável.
• O símbolo do contentor de lixo com rodas barrado com uma cruz convida-o
a utilizar esses sistemas.
• Caso necessite de mais informações sobre sistemas de recolha, reutilização
e reciclagem, contacte as autoridades locais responsáveis pela gestão de
resíduos.
Dados de Contacto
Endereço: Bualo Technology UK Ltd
2 Bracknell Beeches
Old Bracknell Lane
Bracknell
Berkshire
RG12 7BW
United Kingdom
Consultas Gerais:
Correio electrónico
Suporte Técnico:
A Bualo Technology disponibiliza suporte
técnico em inglês, alemão, francês, italiano e
espanhol.
Para obter informações acerca de horários e
números de telefone, visite:
http://www.bualo-technology.com/contact
sales@bualo-technology.com
PT
59
Page 62

PT
60
Page 63

Bualo iSCSI Rackmount TeraStation Pro (TS-RIGL/R5)
Inhoud van de verpakking
Hartelijk gefeliciteerd met uw aankoop van een Bualo iSCSI Rackmount
TeraStation Pro.
De verpakking bevat de volgende inhoud:
• iSCSI Rackmount TeraStation Pro
• Ethernet-kabel
• Netsnoer
• Installatie-cd TeraStation
• Beknopte installatiegids
• Garantiebepalingen
Overzicht TeraStation
Aan/uit-schakelaar
Afb. 1
1
Schakelaar weergavemodus
NL
Slot voorpaneel
(linksom draaien om te
ontgrendelen)
61
Page 64

Overzicht TeraStation
Voorzijde met verwijderd paneel
Harde schijven
(lipjes indrukken om te ontgrendelen)
1
NL
Afb. 2
Achterpaneel
UPS
Ethernet
USB-ingang
Init-knop
(Ingedrukt houden om alle
instellingen te resetten)
Netsnoer
Afb. 3
(naar router)
62
Page 65

Installatie
2
Plaats de TeraNavigator-cd in het cd-rom-station van uw computer.
Het installatieprogramma wordt automatisch gestart. Als de installatie niet
automatisch begint, start u TSnavi.exe handmatig door op Start te klikken en
de optie Uitvoeren... te kiezen. Typ D:\TSnavi.exe ("D" staat voor de stationsletter van het cd-rom-station). klik op OK om verder te gaan. (Afb. 4)
Klik op de knop Begin Installation (Installatie starten) om de installatie te
starten. (Afb. 5)
Afb. 4
Afb. 5
Easy Setup (Eenvoudige installatie) begeleidt u bij de fysieke aansluiting van
uw TeraStation. Daarna wordt de software geïnstalleerd.
Advanced Setup (Geavanceerde installatie) geeft geen hulp bij het aansluiten
en installeert direct de software. (Afb. 6)
Afb. 6
NL
63
Page 66

Installatie
Als uw TeraStation correct is aangesloten, wordt het in de vervolgkeuzelijst
weergegeven. Als u meerdere apparaten wilt configureren, selecteert u het
gewenste TeraStation uit de lijst. (Afb. 7)
Selecteer First Setup (Eerste installatie) voor de eerste installatie.
Als u de software op meerdere computers wilt installeren, kiest u Additional
Setup (Extra installatie). (Afb. 8)
2
NL
Afb. 8
Afb. 7
Nadat het TeraStation is geïnstalleerd, installeert u de iSCSI-verbindingstool.
Klik op Next (Volgende) en volg de aanwijzingen van de wizard totdat de
iSCSI-verbindingstool is geïnstalleerd. (Afb. 9)
Klik op Ye s (Ja) om de iSCSI-verbindingstool te starten. (Afb. 10)
Afb. 9
Afb. 10
64
Page 67

Installatie
Klik op Register the iSCSI Hard Disk (iSCSI-harddisk registreren) en klik op OK.
(Afb. 11)
Schakel de optie Resume connection at start up (Verbinding herstellen bij
opstarten) in en klik op Connect (Verbinding maken).(Afb. 12)
2
Afb. 11
Afb. 12
Als Schijfbeheer niet automatisch wordt geopend, kunt u dit hulpprogramma
handmatig starten. Kies in het menu Setup (Instellingen) boven in het venster
de optie Launch Disk Management (Schijfbeheer starten). (Afb. 13)
Uw iSCSI TeraStation wordt in Schijfbeheer weergegeven als een harde schijf.
Dubbelklik op de zwarte balk boven het TeraStation. (Afb. 14)
NL
Afb. 13
Afb. 14
65
Page 68

Installatie
De wizard New Volume (Nieuw volume) wordt geopend. Klik op Next
(Volgende). (Afb. 15)
Kies het gewenste volumetype. Klik op Next (Volgende). (Afb. 16)
2
NL
Afb. 15
Afb. 16
Voeg aan de kolom Selected (Geselecteerd) alle dynamische schijfstations toe
die op het volume worden aangemaakt. (Afb. 17)
Kies de gewenste stationsletter. Klik op Next (Volgende). (Afb. 18)
Afb. 17
Afb. 18
66
Page 69

Installatie
Kies een formattering en typ een volumelabel. Klik op Next (Volgende).
(Afb. 19)
Het nieuwe volume is nu geïnstalleerd en klaar voor gebruik. (Afb. 20)
2
Afb. 19
Afb. 20
NL
67
Page 70

Technische specicaties
:
Max:
)
)
56
k
)
a:
/CD
daarden:
;
T
LAN-standaarden: IEEE 802.3u 100BASE-TX; IEEE 802.3 10BASE-T
AN-stan
Gegevensoverdracht: 1000/100 Mbps / 10 Mbps, 1000BASE-T: 8B1Q4,
X 4B/5B, MLT-3; 10BASE-T Manchester Coding
.3u
BASE-TX
.310BASE-
NL
i
Media: CSMA/CD
Media-interface: RJ-45
USB-standaard: USB 2.0
Hi-Speed (HS)
Full-Speed (FS)
Low-Speed (LS)
USB-connector: USB A (2)
Overdrachtssnelheid
Overdrachtssnelheid: Max: 480 Mbps (HS)
Max: 12 Mbps (FS)
Stroomvoorziening: 100-240 V wisselstroom
troomverbruik: ~17-
Stroomverbruik: ~17-56 W (afhankelijk van omvang)
Afmetingen: 430 x 86 x 350 mm
Gewicht: 9,8 kg (afhankelijk van omvang)
Bedrijfstemperatuur: 0-45°C, 20-80% luchtvochtigheid
(niet-condenserend)
MA
Max:
80 MbpsHS
s
FS
(afhankelij
mvang
Waarschuwing CE-markering
Dit is een klasse B-product. In een woonomgeving kan dit product
radio-interferentie veroorzaken, waartegen de gebruiker zelf maatregelen
dient te treen.
68
Page 71

Milieu-informatie
• Voor de productie van het apparaat dat u hebt aangeschaft, zijn natuurlijke
rijkdommen gebruikt.
• Dit apparaat bevat mogelijk gevaarlijke stoen die uw gezondheid en het
milieu kunnen schaden.
• Om de verspreiding van deze stoen in het milieu te voorkomen en de druk
op natuurlijke rijkdommen te verminderen, willen we u aanmoedigen de
beschikbare recycleprocedures te volgen.
• Hierdoor worden de meeste materialen aan het einde van de levensduur
van het apparaat op een verantwoorde manier opnieuw gebruikt of
gerecycled.
• Met het pictogram met de doorgestreepte vuilnisbak vragen wij u van deze
procedures gebruik te maken.
• Neem voor informatie over het inzamelen, hergebruiken en recyclen van
verouderde apparatuur contact op met uw plaatselijke aanspreekpunt voor
het recyclebeleid.
Contactgegevens
Adres: Bualo Technology UK Ltd
2 Bracknell Beeches
Old Bracknell Lane
Bracknell
Berkshire
RG12 7BW
Verenigd Koninkrijk
Algemene informatie:
E-mail
Technische ondersteuning:
Bualo Technology verleent technische
ondersteuning in het Engels, Duits, Frans,
Italiaans en Spaans.
Ga voor openingstijden en relevante
telefoonnummers naar:
http://www.bualo-technology.com/contact
sales@bualo-technology.com
NL
69
Page 72

NL
70
Page 73

Bualo iSCSI Rackmount TeraStation Pro (TS-RIGL/R5)
Förpackningens innehåll
Tack för att du har valt att köpa en Bualo iSCSI Rackmount TeraStation Pro.
Förpackningen innehåller följande:
• iSCSI Rackmount TeraStation Pro
• Ethernetkabel
• Nätkabel
• TeraStation installations-CD
• Snabbguide
• Garantiinformation
TeraStation Layout
Strömbrytare
Bild: 1
1
Brytare för visningsläge
SV
Främre panellås
(Vrid moturs för att frigöra)
71
Page 74

TeraStation Layout
Framsida med borttagen panel
Hårddiskar
(Kläm åt ikarna för att frigöra)
1
SV
Bild: 2
Bakre panel
UPS
Ethernet
USB in
Init-knapp
(Håll ner för att återställa alla inställningar)
Nätkabel
Bild: 3
(till router)
72
Page 75

Installation
2
Sätt i TeraNavigator-cd:n i datorns CD-ROM-enhet.
På en PC bör installationen starta automatiskt. Gör den inte det, startas
TSnavi.exe manuellt genom att trycka på Start och välja alternativet Kör....
När dialogrutan Run [Kör] öppnas skriver du in d:\TSnavi.exe (där “d” står för
CD-ROM-enhetens drivenhet). Tryck på OK för att fortsätta. (Bild: 4)
Starta genom att trycka på knappen Begin Installation [Starta installationen].
(Bild: 5)
Bild: 4
Bild: 5
Enkel installation går igenom hur du fysiskt ansluter din TeraStation. Därefter
installeras programvaran.
Avancerad installation hoppar over anslutningsguiden och går direkt till
installation av programvaran. (Bild: 6)
Bild: 6
SV
73
Page 76

Installation
2
Om din TeraStation är korrekt ansluten, markeras den i nedrullningslistan. Om
du har flera enheter att installera, väljer du TeraStation från listan. (Bild: 7)
Välj Första installation för ursprunglig installation.
För installation av programvaran på andra datorer, välj Extra installation.
(Bild: 8)
SV
Bild: 7
Bild: 8
Då TeraStation har installerats måste du även installera anslutningsverktyget
iSCSI. Klicka på Nästa och följ guiden till dess att anslutningsverktyget iSCSI
har installerats. (Bild: 9)
Klicka på Ja för att starta anslutningsverktyget iSCSI. (Bild: 10)
Bild: 9
Bild: 10
74
Page 77

Installation
Klicka på Registrera iSCSI-hårddisken, och därefter på OK. (Bild: 11)
Markera Återuppta anslutning vid start och klicka därefter på Anslut.(Bild: 12)
2
Bild: 11
Bild: 12
Om diskhantering inte öppnas automatiskt kan du starta den manuellt. Från
menyn Inställning högst upp i fönstret, väljer du Starta diskhantering.(Bild: 13)
Din iSCSI TeraStation visas nu som en hårddisk i Diskhantering. Dubbelklicka
på det svarta fältet ovanför. (Bild: 14)
SV
Bild: 13
Bild: 14
75
Page 78

Installation
Guiden Ny volym öppnas. Klicka på Nästa. (Bild: 15)
Välj önskad volymtyp. Klicka på Nästa. (Bild: 16)
2
SV
Bild: 15
Bild: 16
Lägg till alla dynamiska diskar som ska inkluderas i volymen i kolumnen
Valda. (Bild: 17)
Välj önskad enhetsbokstav. Klicka på Nästa. (Bild: 18)
Bild: 17
Bild: 18
76
Page 79

Installation
Välj önskat format och volymetikett. Klicka på Nästa. (Bild: 19)
Din nya volym har nu installerats och är klar att användas. (Bild: 20)
2
Bild: 19
Bild: 20
SV
77
Page 80

Tekniska specikationer
Max:
)
)
56W
de
)
a:
:
;
T
LAN-standarder: IEEE 802.3u 100BASE-TX; IEEE 802.3 10BASE-T
AN-standarder
Överföring: 1000/100Mbps/10 Mbps, 1000BASE-T: 8B1Q4,
X 4B/5B, MLT-3-T Manchester-kodning
.3u
BASE-TX
.310BASE-
Åtkomstmedi
Åtkomstmedia: CSMA/CD
Mediegränssnitt: RJ-45
USB-standard: USB 2.0
Hi-Speed (HS)
Full-Speed (FS)
Low-Speed (LS)
USB-kontakt: USB A-kontakt (2)
ataöverföringshastighet:
Dataöverföringshastighet: Max: 480 Mbps (HS-läge)
Max: 12 Mbps (FS-läge)
Elektrisk ström: 100-240V A/C
trömförbrukning: ~17-
Strömförbrukning: ~17-56W (Varierar beroende på storlek)
Storlek: 430 x 86 x 350 mm
Vikt: 9,8 Kg (Vikt varierar beroende på storlek)
Driftstemperatur: 0-45 ˚C; 20-80 % icke-kondenserande
MA/CD
Max:
80 MbpsHS-läge
s
FS-läge
Varierar
roen
storlek
SV
CE-märkesvarning
Det här är en klass B-produkt. I hemmiljö kan produkten orsaka
radiostörningar, vilket kan tvinga användaren att vidta adekvata åtgärder.
78
Page 81

Miljöinformation
• Den utrustning du har köpt har krävt att man utvunnit och använt
naturtillgångar för att tillverkas.
• Utrustningen kan innehålla skadliga ämnen som kan påverka hälsan och
miljön.
• För att undvika att dessa ämnen sprids i miljön och för att minska trycket på
naturens resurser ber vi dig att utnyttja tillämpliga återvinningssystem.
• Vid återvinningen återanvänds eller återvinns de esta material i den
uttjänta utrustningen på ett säkert sätt.
• Den överkorsade soptunnesymbolen uppmanar dig att använda dessa
system.
• Om du vill ha mer information om insamling, återanvändning och
återvinning ber vi att du kontaktar din lokala miljöförvaltning.
Kontaktinformation
Adress: Bualo Technology UK Ltd
2 Bracknell Beeches
Old Bracknell Lane
Bracknell
Berkshire
RG12 7BW
Storbritannien
Allmänna frågor:
E-post
Teknisk support:
Bualo Technology erbjuder teknisk support
på engelska, tyska, franska, italienska och
spanska.
För öppettider och relevanta telefonnummer,
besök sidan:
http://www.bualo-technology.com/contact
sales@bualo-technology.com
SV
79
Page 82

SV
80
Page 83

Bualo iSCSI Rackmount TeraStation Pro (TS-RIGL/R5)
Innhold
Takk for at du kjøpte en Bualo iSCSI Rackmount TeraStation Pro.
Pakken inneholder:
• iSCSI Rackmount TeraStation Pro
• Ethernet-kabel
• Strømledning
• Installasjons-CD for TeraStation
• Hurtigveiledning for installasjon
• Garanti
Oversikt over TeraStation
Strømbryter
Fig: 1
Skjermmodus-bryter
Frontpanellås
(Vri mot klokka for å låse opp)
1
NO
81
Page 84

Oversikt over TeraStation
Front med ernet panel
Harddiskstasjoner:
(Trykk sammen knappene for å låse opp)
1
NO
Fig: 2
Bakpanel
UPS
Ethernet
(til ruter)
USB inn
Initialiseringsknapp
(hold nede for å tilbakestille alle innstillinger)
Strømledning
Fig: 3
82
Page 85

Installasjon
Sett TeraNavigator CD-en inn i CD-ROM-stasjonen på datamaskinen.
På PC skal installasjonen starte automatisk. Start i motsatt fall TSnavi.exe
manuelt ved å trykk på Start og velge alternativet Run... (Kjør). Når
dialogvinduet Run (Kjør) åpnes, skriver du inn d:\TSnavi.exe (der d er
stasjonsbokstaven for CD-ROM-en). Trykk på OK for å fortsette. (Fig.: 4)
Trykk deretter på knappen Begin Installation (Start installasjon) for å starte.
(Fig.: 5)
2
Fig: 4
Fig: 5
Easy Setup (Enkel installasjon)tar deg gjennom den fysiske tilkoblingen av
TeraStation trinn for trinn. Deretter installeres programmet.
Advanced Setup (Avansert installasjon) hopper over tilkoblingsveiviseren og
går direkte til programinstallasjonen. (Fig.: 6)
Fig: 6
NO
83
Page 86

Installasjon
2
Dersom TeraStation er riktig koblet til, utheves den i nedtrekkslisten. Dersom
du har flere enheter som skal installeres, må du velge riktig TeraStation fra
listen. (Fig.: 7)
Velg First Setup (Første gangs installasjon) for første gangs installasjon.
Velg Additional Setup (Tilleggsinstallasjon) for å installere programmet på
flere datamaskiner. (Fig.: 8)
NO
Fig: 7
Fig: 8
Når TeraStation er installert, må du installere iSCSI-tilkoblingsverktøyet. Klikk
på Next (Neste), og gå gjennom veiviseren til iSCSI-tilkoblingsverktøyet er
installert. (Fig.: 9)
Klikk på Ye s (Ja) for å starte iSCSI-tilkoblingsverktøyet. (Fig.: 10)
Fig: 9
Fig: 10
84
Page 87

Installasjon
2
Klikk på Register the iSCSI Hard Disk (Registrer iSCSI-harddisken) og deretter på
OK. (Fig.: 11)
Kontroller Resume connection at start up (Fortsett tilkobling ved oppstart), og
klikk deretter på Connect (Koble til) (Fig: 12)
Fig: 11
Fig: 12
Dersom Disk Management (stasjonsbehandlingsprogram) ikke
åpnes automatisk, kan du starte det manuelt. Fra menyen Setup
(Installasjon) øverst i vinduet velger du Launch Disk Management (Start
stasjonsbehandlingsprogram). (Fig.: 13)
iSCSI TeraStation vises nå som harddisk i Disk Management
(Stasjonsbehandlingsprogram). Dobbeltklikk på den svarte linjen over.
(Fig.: 14)
NO
Fig: 13
Fig: 14
85
Page 88

Installasjon
New Volume Wizard (Veiviser for nytt volum) åpnes. Klikk på Next (Neste).
(Fig.: 15)
Velg ønsket volumtype. Klikk på Next (Neste). (Fig.: 16)
2
NO
Fig: 15
Fig: 16
Legg til alle dynamiske stasjoner som inngår i volumet i kolonnen Selected
(Valgt). (Fig.: 17)
Velg ønsket stasjonsbokstav. Klikk på Next (Neste).(Fig.: 18)
Fig: 17
Fig: 18
86
Page 89

Installasjon
Velg ønsket format og volummerking. Klikk på Next (Neste). (Fig.: 19)
Det nye volumet er installert og klart til bruk. (Fig.: 20)
2
Fig: 19
Fig: 20
NO
87
Page 90

Tekniske spesikasjoner
:
)
)
:
56
ed
)
T
/CD
:
;
T
LAN-standarder: IEEE 802,3u 100BASE-TX; IEEE 802,3 10BASE-T
AN-standarder
Overføring: 1000/100 MB/s / 10 MB/s, 1000 BASE-T: 8B1Q4,
X 4B/5B, MLT-3; 10BASE-T Manchester-koding
,3u
BASE-TX
,310BASE-
ilgangsmedier:
Tilgangsmedier: CSMA/CD
Mediegrensesnitt: RJ-45
USB-standard: USB 2.0
Høy hastighet (HS)
Full hastighet(FS)
Lav hastghet (LS)
USB-tilkobling: USB A-tilkobling (2)
ataoverføringshastighet
Dataoverføringshastighet: Maks: 480 MB/s (HS-modus)
Maks: 12 MB/s (FS-modus)
Spenning: 100–240 V AC
Effekt
Effekt: ~17–56 W (varierer med størrelse)
Mål: 430 x 86 x 350 mm
Vekt: 9,8 kg (variere med størrelse)
Driftstemperatur: 0–45˚ °C; 20–80 % ikke-kondenserende
MA
Maks:480MB/sHS-modus
Maks: 12B/s
~17–
FS-modus
varierer m
tørrelse
Advarsel angående CE-merket
Dette produktet tilhører klasse B. Produktet kan forårsake radioforstyrrelser,
og dette kan kreve at brukeren må iverksette tiltak deretter.
NO
88
Page 91

Miljøinformasjon
• I produksjonen av det kjøpte utstyret er det blitt utvunnet og utnyttet
naturressurser.
• Utstyret kan inneholde skadelige stoer som kan påvirke helse og miljø.
• For å unngå å forurense miljøet med slike stoer og for å spare
naturressurser bør du benytte deg av ordningen for innlevering av
elektronisk avfall.
• Dersom du leverer inn spesialavfall på riktig sted, vil est mulig av
bestanddelene bli gjenbrukt eller resirkulert på en fornuftig måte.
• Søppelkasse-symbolet er en påminnelse om å benytte denne ordningen.
• Mer informasjon om innsamling, gjenbruk og resirkulering fås av
avfallsmyndighetene i distriktet.
Kontaktinformasjon
Adresse: Bualo Technology UK Ltd
2 Bracknell Beeches
Old Bracknell Lane
Bracknell
Berkshire
RG12 7BW
Storbritannia
Generelle forespørsler:
E-post
Teknisk brukerstøtte:
Bualo Technology yter teknisk støtte på
engelsk, fransk, italiensk, spansk og tysk.
Du nner åpningstider og relevante
telefonnumre på:
http://www.bualo-technology.com/contact
sales@bualo-technology.com
NO
89
Page 92

NO
90
Page 93
Bualo iSCSI Rackmount TeraStation Pro (TS-RIGL/R5)
Pakkens indhold
Tak, fordi du har købt en Bualo iSCSI Rackmount TeraStation Pro.
Pakkens indhold:
• iSCSI Rackmount TeraStation Pro
• Ethernetkabel
• Strømkabel
• TeraStation-installations-cd
• Hurtig installationsvejledning
• Garantierklæring
Indretning af TeraStation
Tænd-/slukknap
Fig. 1
1
Displaytilstandskontakt
Frontpanellås
(drej mod uret for at løsne)
91
DA
Page 94

Indretning af TeraStation
Forside uden panel
Harddiske
(tryk på ringene for at løsne)
1
Fig. 2
Bagpanel
UPS
Ethernet
USB ind
Init-knap
(hold nede for at nulstille alle indstillinger)
Strømkabel
Fig. 3
DA
(til router)
92
Page 95

Installation
2
Indsæt TeraNavigator-cd'en i computerens cd-rom-drev.
På en pc starter installationen automatisk. Hvis det ikke sker, kan du starte
TSnavi.exe manuelt ved at trykke på Start og vælge valgmuligheden Run...
(Kør). Når dialogboksen Run (Kør) åbnes, skal du skrive d:\TSnavi.exe (hvor "d"
står for cd-rom-drevet). Tryk på OK for at fortsætte. (Fig. 4)
Tryk på knappen Begin Installation (Begynd installationen) for at starte. (Fig. 5)
Fig. 4
Fig. 5
Easy Setup (Nem opsætning) vil guide dig igennem den fysiske tilslutning af
TeraStation. Derefter installeres softwaren.
Advanced Setup (Avanceret opsætning) springer instruktionerne om tilslutning over og går direkte til installation af softwaren. (Fig. 6)
Fig. 6
DA
93
Page 96

Installation
2
Hvis TeraStation er tilsluttet korrekt, vil den være fremhævet i rullelisten. Hvis
du skal konfigurere flere enheder, skal du vælge den korrekte TeraStation på
listen. (Fig. 7)
Vælg First Setup (Første opsætning) for den første installation.
Du kan installere softwaren på flere computere ved at vælge Additional Setup
(Yderligere opsætning). (Fig. 8)
DA
Fig. 7
Fig. 8
Når TeraStation er installeret, skal du installere iSCSI-tilslutningsværktøjet. Klik
på Next (Næste), og følg trinnene i guiden, indtil iSCSI-tilslutningsværktøjet er
installeret. (Fig. 9)
Klik på Ye s (Ja) for at starte iSCSI-tilslutningsværktøjet. (Fig. 10)
Fig. 9
Fig. 10
94
Page 97

Installation
2
Klik på Register the iSCSI Hard Disk (Registrer iSCSI-harddisken), og klik derefter
på OK. (Fig. 11)
Marker afkrydsningsfeltet Resume connection at start up (Tilslut ved opstart),
og klik på Connect (Tilslut) (Fig. 12)
Fig. 11
Fig. 12
Hvis Diskhåndtering ikke åbnes automatisk, kan du starte det manuelt. Vælg
Launch Disk Management (Start diskhåndtering) i menuen Setup (Opsætning)
øverst i vinduet. (Fig. 13)
Din iSCSI TeraStation vises nu som en harddisk i Diskhåndtering. Dobbeltklik
på den sorte streg oven over den. (Fig. 14)
Fig. 13
Fig. 14
DA
95
Page 98

Installation
2
Nu åbnes guiden New Volume Wizard (Nyt drev). Klik på Next (Næste). (Fig. 15)
Vælg den ønskede drevtype. Klik på Next (Næste). (Fig. 16)
Fig. 15
Fig. 16
Tilføj alle dynamiske diske, som skal være inkluderet i drevet, i kolonnen
Selected (Valgte). (Fig. 17)
Vælg det ønskede drevbogstav. Klik på Next (Næste). (Fig. 18)
Fig. 17
Fig. 18
DA
96
Page 99

Installation
Vælg det ønskede format og drevnavn. Klik på Next (Næste). (Fig. 19)
Det nye drev er installeret og klar til brug. (Fig. 20)
2
Fig. 19
Fig. 20
97
DA
Page 100

Tekniske specikationer
aks.:
)
)
56
)
:
;
T
LAN-standarder: IEEE 802.3u 100BASE-TX; IEEE 802.3 10BASE-T
AN-standarder
Overførsel: 1000/100Mbps/10 Mbps, 1000BASE-T: 8B1Q4,
MLT-3, MLT-3; 10BASE-T Manchester-kodning
.3u
BASE-TX
.310BASE-
Adgangsmedie:
Adgangsmedie: CSMA/CD
Mediegrænseflade: RJ-45
USB-standard: USB 2.0
Hi-Speed (HS)
Full-Speed (FS)
Low-Speed (LS)
USB-stik: USB A-stik (2)
ataoverførselshastighed: M
Dataoverførselshastighed: Maks.: 480 Mbps (HS-tilstand)
Maks.: 12 Mbps (FS-tilstand)
Elektrisk strøm: 100-240V A/C
trømforbrug: ~17-
Strømforbrug: ~17-56 W (afhængigt af størrelsen)
Dimensioner: 430 x 86 x 350 mm
Vægt: 9,8 kg (vægten afhænger af størrelsen)
Driftstemperatur: 0-45° C, 20-80 % (ingen kondensering)
MA/CD
Maks.:
80
bpsHS-tilstand
Mbps
(afhængigt
FS-tilstand
f størrelsen
DA
CE-mærkning
Dette er et produkt i klasse B. I et privat miljø kan dette produkt forårsage
radiointerferens, og i dette tilfælde kan det kræves, at brugeren tager passende forholdsregler.
98
 Loading...