

Buffalo TERASTATION PRO QUAD WSS, TERASTATION PRO 6 WSS, TERASTATION PRO RACKMOUNT WSS, TERASTATION PRO WSS, TERASTATION PRO DUO WSS User Manual

English
TeraStation PRO WSS
User Manual
Buffalo Inc.
www.buffalotech.com
35012014 ver.02

Contents
Chapter 1
Opening Windows Storage Server .....................................................3
Opening Windows Storage Server .................................................................................3
Chapter 2
Windows Update .................................................................................4
Windows Update .................................................................................................................. 4
Chapter 3
Software................... ............................................................................5
RAID Builder............................................................................................................................5
Mail Notication ....................................................................................................................5
Backup & Replication Settings ......................................................................................... 6
LCD Settings ........................................................................................................................... 6
I’m here ....................................................................................................................................6
Chapter 4
Creating Volumes ................................................................................7
Volume Types ........................................................................................................................7
Deleting Volumes .................................................................................................................8
Formatting Volumes ............................................................................................................9
RAID 5 Volume ....................................................................................................................... 10
Mirrored Volume ...................................................................................................................11
Striped Volume ......................................................................................................................12
Spanned Volume ..................................................................................................................13
Simple Volume ......................................................................................................................14
TeraStation PRO WSS User Manual 1

Chapter 5
Backup................. .................................................................................16
Back Up from your Windows PC .....................................................................................16
Back Up from the TeraStation ..........................................................................................16
Replication ..............................................................................................................................20
Chapter 6
Creating an iSCSI Target .....................................................................23
Creating an iSCSI Target .....................................................................................................23
Creating a Virtual Disk ........................................................................................................25
Chapter 7
Various Settings ..................................................................................27
Date and Time Setting ........................................................................................................27
Changing the Server Name, Workgroup, and Domain Settings .........................28
Changing the Password .....................................................................................................29
Adding a User ........................................................................................................................31
Adding a Group ..................................................................................................................... 32
Creating a Shared Folder ...................................................................................................34
Mail Notication Settings ..................................................................................................37
Changing the IP Address ...................................................................................................39
Chapter 8
NAS Navigator2 ...................................................................................40
Menu Commands .................................................................................................................40
Appendix................ ..............................................................................44
Factory Defaults ....................................................................................................................44
LCD Message List ..................................................................................................................45
Compliance Information .................................................................................................... 47
TeraStation PRO WSS User Manual 2

Chapter 1 Opening Windows Storage Server
Opening Windows Storage Server
To open Windows Storage Server, perform the following procedure.
If using Mac OS X , download and install "Remote Desktop Connection Client for Mac 2" from www.microsoft.com.
If using Mac OS X 10.3.9, use version 1.0.3 instead.
1
Double-click the Bualo NAS Navigator2 icon on your desktop.
In Mac OS, click the Bualo NAS Navigator2 icon in the Dock.
2
3
Computer
In NAS Navigator2, right-click (for a Mac, click while holding down
the Control key) the TeraStation icon and select [Open Remote
Desktop].
Notes:
• When two or more LinkStations or TeraStations are connected
on the same network, multiple icons will be displayed. Select the
TeraStation for the remote desktop that you want to open.
• The IP address and other unique information for the TeraStation
can be conrmed by selecting the TeraStation icon.
• If the message "The identity of the remote computer cannot be
veried. Do you want to connect anyway?" is displayed, click [Yes]
or [Continue].
Enter the username and the password, then click [OK].
By default, the username and password are as follows.
Username:Administrator
Password:password
After logging in, changing of the password from the
default is recommended for security reasons.
Computer
Windows Storage Server now opens in remote desktop.
4
Windows Storage Server is now open.
TeraStation PRO WSS User Manual 3

Chapter 2 Windows Update
Windows Update
Note:
• To perform Windows Update, the TeraStation must be connected to the Internet.
For best results, Windows Storage Server should be updated regularly. Use Windows Update as described below.
1
Click [Check for updates].
2
3
In Windows Storage Server, navigate to [Start] - [All Programs] [Windows Update].
Remote Desktop
Click [Install updates].
The Internet Explorer plug-ins required for Windows Update are
installed.
Remote Desktop
This completes the Windows Update process.
Note:
Installing antivirus software on the TeraStation is recommended.
Connect a USB CD/DVD drive to the TeraStation's USB port, load the anti-virus software CD into the CD-ROM drive, and
install.
TeraStation PRO WSS User Manual 4
Follow the on-screen instructions to perform the update.

Chapter 3 Software
RAID Builder
Remote Desktop
RAID Builder is used when modifying the RAID array. Please refer to page 7 for
details.
Mail Notication
Remote Desktop
With Mail Notication, you can congure the TeraStation to send you an email
when settings are changed or an error occurs. Please refer to page 37 for details.
TeraStation PRO WSS User Manual 5

Backup & Replication Settings
Use this to back up TeraStation data or congure replication.
For details, see pages 16 and 20.
Remote Desktop
LCD Settings
This opens the settings for the LCD panel of the TeraStation.
The available settings are shown below.
LCD Setup The item displayed on the LCD panel of the
TeraStation can be selected from [Host IP], [HDD
Usage], [Time], and [IP 2].
LCD Auto Flip This sets whether the display of the item on the LCD
panel of the TeraStation is automatically switched
at xed intervals.
LCD Brightness The brightness of the LCD panel backlight can be
adjusted to one of ve levels.
OK This saves the current settings.
Remote Desktop
Cancel This cancels the settings changes and closes the
screen.
I’m here
Click [OK] to play a short melody from the TeraStation. Use this to nd out
which TeraStation you are setting when managing multiple TeraStations.
Remote Desktop
TeraStation PRO WSS User Manual 6

Chapter 4 Creating Volumes
Volume Types
The features of each volume type are explained below.
Notes:
• When a volume type is changed, all data stored in that volume is erased. Before changing the volume type, be sure to
always back up any important data.
• In this manual, "recover" refers to the process of returning the state within the TeraStation (including the data) to its
original state before the failure occurred. This does not refer to the reading of data from a failed hard drive.
• When a volume type is changed, setting is possible for unallocated areas only. If there are no unallocated areas, delete
a volume to make unallocated areas rst.
RAID 5 volume
The unallocated areas of three or more hard drives are used as a single array. Because data is written to the volume
while generating parity (error-correcting code), access speeds are slightly slower.
Even if one hard drive in the RAID array fails, data can be recovered if the failed hard drive is replaced (however, data
cannot be recovered if two or more hard drives have failed). Also, note that le transfer speeds are slower during RAID
resynchronization.
Mirrored volume
The unallocated areas of two drives are combined into a single RAID 1 array. Because the same data is written to
both drives simultaneously, if one drive fails, data can be recovered from the other drive. If both drives in the array
fail, data cannot be recovered. After replacing a failed drive, le transfer speeds will be slower than usual until RAID
resynchronization is complete.
Striped volume
In a striped volume, the unallocated areas of two or more drives are combined into a single logical volume using RAID
0. Because data is written across multiple drives, access speeds are slightly faster. However, data cannot be recovered if
even a single drive fails.
Spanned volume
In a spanned volume, the unallocated areas in multiple hard drives are joined to create a single logical volume. This
enables more eective use of all the areas and drive letters in a system consisting of multiple hard drives. However, data
cannot be recovered if even a single hard drive failure occurs.
Simple volume
The internal hard drives of the TeraStation are each used as individual drives. If a hard drive fails, the data in the failed
hard drive cannot be recovered.
TeraStation PRO WSS User Manual 7
Deleting Volumes
An unallocated area in a hard drive of the TeraStation is required to create a volume. If there are no unallocated areas,
create one by deleting an existing volume.
1
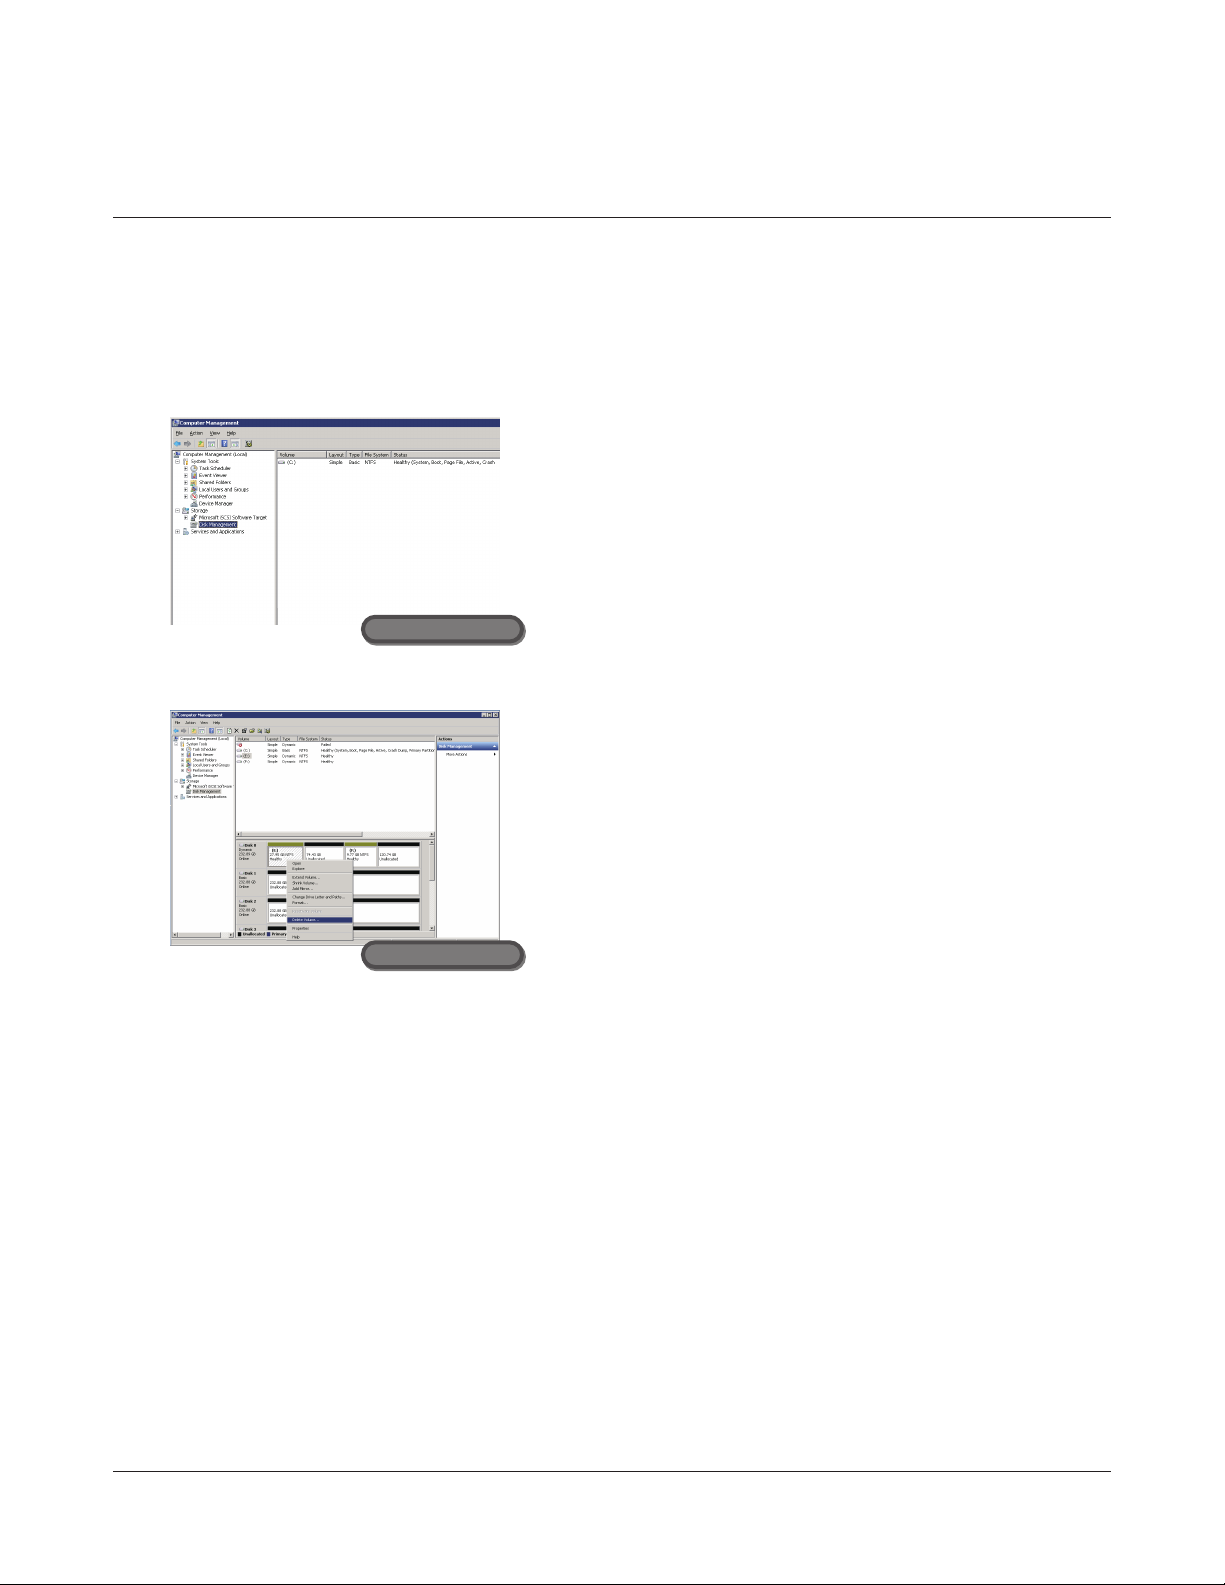
In Windows Storage Server, navigate to [Start] - [All Programs] - [Administrative Tools] - [Computer
Management].
2
Click [Disk Management].
Remote Desktop
3
Right-click the volume that you want to delete, then select [Delete
Volume].
Remote Desktop
4
Follow the instructions displayed on the screen.
This completes the deletion of a volume.
Note:
Changing the usage mode of a hard drive will erase all data stored
in the hard drive. Be sure to always back up any important data on
the hard drive before changing the usage mode.
TeraStation PRO WSS User Manual 8

Formatting Volumes
Follow the procedure below to format a volume.
1
In Windows Storage Server, navigate to [Start] - [All Programs] - [Administrative Tools] - [Computer
Management].
2
Remote Desktop
Click [Disk Management].
3
Remote Desktop
4
Follow the instructions displayed on the screen.
This completes for formatting process for the volume.
Right-click the volume that you want to format, then select [Format].
Note:
The formatting process will erase all data stored in the hard drive.
Be sure to always back up any important data on the hard drive
before formatting.
TeraStation PRO WSS User Manual 9
RAID 5 Volume
1
In Windows Storage Server, navigate to [Start] - [All Programs] - [BUFFALO] - [RAID Builder] - [Launch RAID
Builder].
2
Remote Desktop
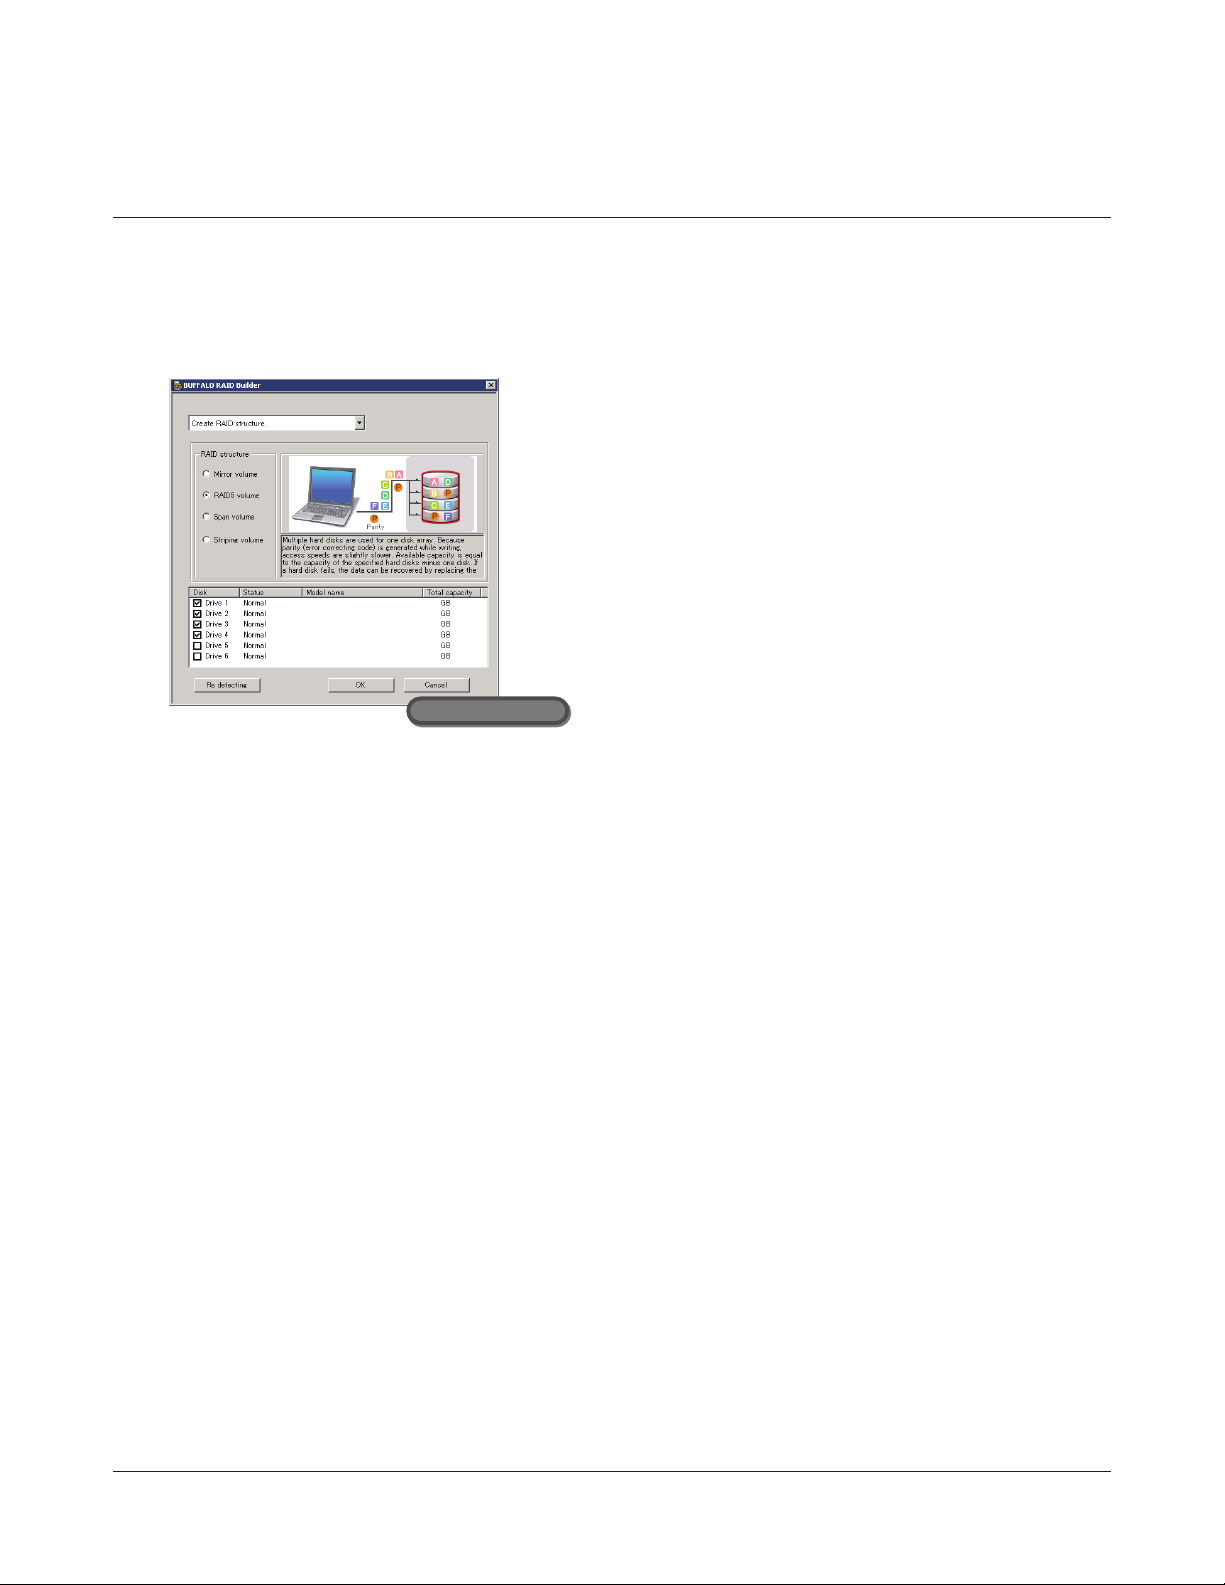
1
Select [Create RAID structure].
2
Select [RAID 5 volume] from [RAID structure].
3
Select three or more drives
4
Click [OK].
Note:
File transfer times are slower during RAID resynchronization (about
5 hours per 1 TB).
3
Follow the instructions displayed on the screen.
Note:
An example of the available space when using four drives is shown below.
Example:
• For a conguration with Drive 1 (50 GB), Drive 2 (80 GB), Drive 3 (58 GB), and Drive 4 (100 GB), the space that
can be used in the RAID volume is (50 GB × 4 drives) × 3/4 = 150 GB.
• For n identical hard drives in a RAID 5 array, the available space is (n-1)/n times the total drive space.
This completes the setting of the RAID 5 volume.
Next, create a shared folder by referring to the procedure on page 34.
TeraStation PRO WSS User Manual 10

Mirrored Volume
1
In Windows Storage Server, navigate to [Start] - [All Programs] - [BUFFALO] - [RAID Builder] - [Launch RAID
Builder].
2
Remote Desktop
1
Select [Create RAID structure].
2
Select [Mirror volume] from [RAID structure].
3
Select two drives.
4
Click [OK].
Note:
File transfer times are slower during RAID resynchronization (about
5 hours per 1 TB).
3
Follow the instructions displayed on the screen.
Note:
An example of the available space is shown below.
Example:
• For a conguration with Drive 3 (58 GB) and Drive 4 (100 GB), the space that can be used in the mirroring
volume is 58 GB.
This completes the setting of the mirroring volume.
Next, create a shared folder by referring to the procedure on page 34.
TeraStation PRO WSS User Manual 11

Striped Volume
1
In Windows Storage Server, navigate to [Start] - [All Programs] - [BUFFALO] - [RAID Builder] - [Launch RAID
Builder].
2
3
Follow the instructions displayed on the screen.
Note:
An example of the available space is shown below.
Example:
• For a conguration with Drive 1 (50 GB), Drive 2 (80 GB), Drive 3 (58 GB), and Drive 4 (100 GB), the space that
can be used in the striped volume is 50 GB × 4 drives = 200 GB.
Remote Desktop
1
Select [Create RAID structure].
2
Select [Striping volume] from [RAID structure].
3
Select two or more drives.
4
Click [OK].
This completes the setting for the striped volume.
Next, create a shared folder by referring to the procedure on page 34.
TeraStation PRO WSS User Manual 12

Spanned Volume
1
In Windows Storage Server, navigate to [Start] - [All Programs] - [BUFFALO] - [RAID Builder] - [Launch RAID
Builder].
2
Remote Desktop
1
Select [Create RAID structure].
2
Select [Span volume] from [RAID structure].
3
Select two or more drives
4
Click [OK].
3
Follow the instructions displayed on the screen.
Note:
An example of the available space is shown below.
Example:
• For a conguration with Drive 1 (50 GB), Drive 2 (80 GB), Drive 3 (58 GB), and Drive 4 (100 GB), the space that can
be used in the span volume is 50 GB + 80 GB + 58 GB + 100 GB = 288 GB.
This completes the setting of the spanned volume.
Next, create a shared folder by referring to the procedure on page 34.
TeraStation PRO WSS User Manual 13

Simple Volume
1
In Windows Storage Server, navigate to [Start] - [All Programs] - [Administrative Tools] - [Computer
Management].
2
Remote Desktop
Click [Disk Management].
3
4
Right-click the unallocated area and select [New Simple Volume].
Note:
Changing the usage mode of a hard drive will erase all data stored
on the drive. Back up your data before changing the usage mode.
Remote Desktop
Click [Next].
Remote Desktop
TeraStation PRO WSS User Manual 14
 Loading...