

Buffalo TeraStation 5010 TS5210DN, TeraStation 5010 TS5210DF, TeraStation 5010 TS5410DN, TeraStation 5010 TS5410RN, TeraStation 5010 TS51210RH User Manual

Network Attached Storage
TeraStation 5010
User Manual
Please make sure to read this manual before using and follow the procedures. If you have any inquiries about
the product, contact the number on the warranty statement or the packing box. Do not discard this manual, the
warranty statement, or the packing box.
Americas: www.buffaloamericas.com
Europe: www.buffalo-technology.com
Asia Pacific: www.buffalo-asia.com
35021131-09
2017.04

Contents
Chapter 1 Getting Started .............................................9
Diagrams ...........................................................................................9
2-Bay, 4-Bay Desktop Model ..................................................................... 9
4-Bay Rackmount Model .........................................................................12
12-Bay Rackmount Model ....................................................................... 14
Turning the TeraStation On and Off............................................. 16
Creating an Initialization Drive .................................................... 18
Chapter 2 Configuration ............................................. 19
Setting Up Through Initial Setup Wizard .................................... 19
Opening Advanced Settings ........................................................ 23
Opening Easy Admin .................................................................... 24
Chapter 3 Sharing Files ............................................... 27
Configuring Shared Folders ......................................................... 27
Adding a Shared Folder ........................................................................... 27
Recycle Bin ................................................................................................29
Read-Only Shares .....................................................................................29
Hidden Shares .......................................................................................... 30
Configuring Users ......................................................................... 30
Adding a User ........................................................................................... 30
Importing User Information ....................................................................32
Adding a Group ............................................................................. 33
Configuring Access Restrictions for Shared Folders .................. 36
Local Users and Groups ...........................................................................36
1

Active Directory .......................................................................................37
Configuring Access Restrictions for Subfolders ......................... 40
Enabling Subfolders' Access Restrictions ..............................................40
Restoring Owner and Permission Settings ............................................42
Chapter 4 Managing Storage...................................... 44
RAID Modes ................................................................................... 44
Working with RAID Arrays ............................................................ 45
Using JBOD ............................................................................................... 45
Changing RAID Mode ..............................................................................46
Shutting Down the TeraStation Automatically if Error Occurred .........47
Rebuilding the RAID Array Automatically .............................................49
Configuring a Hot Spare .......................................................................... 50
RMM (RAID Mode Manager) ....................................................................51
RAID Scanning..........................................................................................54
Adding an External Drive ............................................................. 55
Connecting an External Drive ................................................................. 55
Compatibility ...........................................................................................55
Dismounting Drives ...................................................................... 56
Dismounting with the Function Button .................................................56
Dismounting from Settings ....................................................................56
Checking Drives ............................................................................ 57
SSD Trimming ................................................................................ 58
S.M.A.R.T. ....................................................................................... 59
Displaying S.M.A.R.T. Information .........................................................59
Checking Drive Condition .......................................................................60
Formatting Drives ......................................................................... 60
Encrypting Drives .......................................................................... 62
2

Erasing Data on the TeraStation Completely .............................. 62
Drive Quotas .................................................................................. 63
Quotas for Users .......................................................................................63
Quotas for Groups ...................................................................................63
Size Limits ................................................................................................. 64
Using the TeraStation as an iSCSI Device .................................... 67
Introduction .............................................................................................67
Creating an iSCSI Volume ........................................................................67
Connecting or Disconnecting Volumes .................................................. 69
Using with Multiple Computers .............................................................. 71
Configuring Access Restrictions .............................................................71
Expanding Volume Sizes .........................................................................75
Deleting Volumes .....................................................................................76
Chapter 5 Backup ........................................................ 78
Backing Up to the TeraStation ..................................................... 78
Preparing a Backup Destination ............................................................. 78
Configuring a Backup Job .......................................................................80
Backing Up to rsync-Compatible Devices ................................... 83
Preparing a Backup Destination ............................................................. 83
Configuring a Backup Job .......................................................................83
Backing Up from rsync-Compatible Devices .............................. 87
Backup Logs .................................................................................. 88
Replication ..................................................................................... 91
Preparing a Replication Destination ......................................................91
Configuring a Replication Task ...............................................................92
Synchronizing Between Source and Destination TeraStations
Periodically ............................................................................................... 95
3

Failover .......................................................................................... 96
Before Configuring Failover ....................................................................97
Usage Restrictions ...................................................................................98
Configuring Failover ................................................................................ 98
Replacing to the Backup TeraStation Manually ..................................100
Reconfiguring After Failover Occurs ....................................................100
Synchronizing Between Main and Backup TeraStations Periodically 101
Backing Up Your Mac with Time Machine ................................. 103
Chapter 6 Remote Access .......................................... 108
WebAccess ................................................................................... 108
FTP ................................................................................................ 110
Cloud Storage .............................................................................. 111
Configuring Cloud Storage ...................................................................111
Uploading Files to Cloud Storage ......................................................... 113
Dropbox Sync .............................................................................. 117
Configuring a New Task .........................................................................117
Changing Dropbox Task Settings .........................................................119
Creating a Shared Link (Windows Only) ...............................................122
Chapter 7 Advanced Features .................................. 123
Antivirus Software ...................................................................... 123
Activating Virus Scanning .....................................................................123
Configuring Security Settings ..............................................................124
Licenses ..................................................................................................126
Connecting Through a Proxy Server ....................................................127
Updating Antivirus Pattern Files ..........................................................127
Configuring Folders as Virus Scanning Targets ...................................128
4

Virus Scanning .......................................................................................129
Checking the Log ...................................................................................130
Online Help ............................................................................................. 131
Email Notification ....................................................................... 132
Sleep Mode .................................................................................. 133
Wake-on-LAN .............................................................................. 135
UPS (Uninterruptible Power Supply) ......................................... 136
One PSU Is Installed ............................................................................... 136
Two PSUs Are Installed ..........................................................................137
Power Supply Failure .................................................................. 139
Port Trunking ............................................................................... 140
Offline Files .................................................................................. 142
Accessing from an NFS Client ..................................................... 143
Encrypting Data Transmission ................................................... 147
Encrypting Settings Data ......................................................................147
Encrypting FTP Transfer Data ...............................................................147
SSL Keys ..................................................................................................147
SNMP ............................................................................................ 148
Saving and Applying Settings .................................................... 149
Saving Settings ......................................................................................149
Applying Settings ..................................................................................150
Transferring Another TeraStation's Settings ............................ 151
Creating a Config File (.nas_config) ......................................................151
Transferring Settings .............................................................................152
Restoring Factory Defaults ......................................................... 153
Initializing from Settings ......................................................................153
Initializing with the USB Initialization Drive .......................................153
5

Resetting the Administrator Password ..................................... 154
Logs .............................................................................................. 155
Displaying TeraStation's Logs ............................................................... 155
Transferring Logs to the Syslog Server ................................................155
Creating a Link to the Logs in the Shared Folder ................................156
Updating the Firmware ............................................................... 157
Updating Manually ................................................................................157
Updating Automatically ........................................................................158
Sending Usage Feedback ........................................................... 159
Name, Date, Time, and Language .............................................. 160
Beep Alerts .................................................................................. 163
LCD and LEDs ............................................................................... 164
Proxy Server ................................................................................ 165
Jumbo Frames ............................................................................. 166
Changing the IP Address ............................................................ 169
Boot Authentication ................................................................... 171
Notes Before Use ....................................................................................172
Important Notice ...................................................................................172
Setting Up the Authentication Server on a Windows PC ....................172
Configuring Boot Authentication on the TeraStation .........................173
If the TeraStation Cannot Be Accessed .................................................174
Chapter 8 Replacing Drives ...................................... 177
Replacing Drives on the TS51210RH Series .............................. 177
LEDs ........................................................................................................177
Using JBOD or a Redundant RAID Mode and TeraStation Is On ......... 178
Using JBOD or a Redundant RAID Mode and TeraStation Is Off ........179
Using RAID 0 ........................................................................................... 179
6

Using a Hot Spare ...................................................................................180
Replacing Drives on Another Unit Series Other Than the
TS51210RH Series ....................................................................... 181
LEDs ........................................................................................................181
Using JBOD or a Redundant RAID Mode and TeraStation Is On ......... 182
Using a Redundant RAID Mode and TeraStation Is Off .......................184
Using RAID 0 ........................................................................................... 184
Using a Hot Spare ...................................................................................185
Replacing a Non-Malfunctioning Drive ..................................... 185
Chapter 9 Utilities ...................................................... 187
NAS Navigator2 for Windows ..................................................... 187
Mounting as a Network Drive ...............................................................190
Changing the IP Address .......................................................................191
NAS Navigator2 for Mac ............................................................. 191
Mounting as a Network Drive ...............................................................193
Changing the IP Address .......................................................................194
NovaBACKUP ............................................................................... 194
Chapter 10 Appendix ................................................ 195
TeraStation Does Not Work Properly ......................................... 195
Power LED Keeps Blinking ....................................................................195
Booting the TeraStation in Emergency Mode ...................................... 196
Cleaning the Dustproof Filter .................................................... 196
LCD Panel ..................................................................................... 199
Modes .....................................................................................................199
Errors .......................................................................................................200
Status ......................................................................................................201
7

Default Settings .......................................................................... 203
Specifications .............................................................................. 204
Chapter 11 Regulatory Compliance Information .... 206
For Customers in the United States ........................................... 206
For Customers in Europe ............................................................ 206
For Customers in Taiwan ............................................................. 209
8

Chapter 1 Getting Started
Diagrams
Depending on the number or type of drives in the unit, the model name will be different. Verify the sticker on the
packing box for your unit's model name.
2-Bay, 4-Bay Desktop Model
TS5210DN, TS5210DF
1 3456
2 7
11
12 13
8
9
10
22 23
24
21
14
19
20
15 16 17 18
9
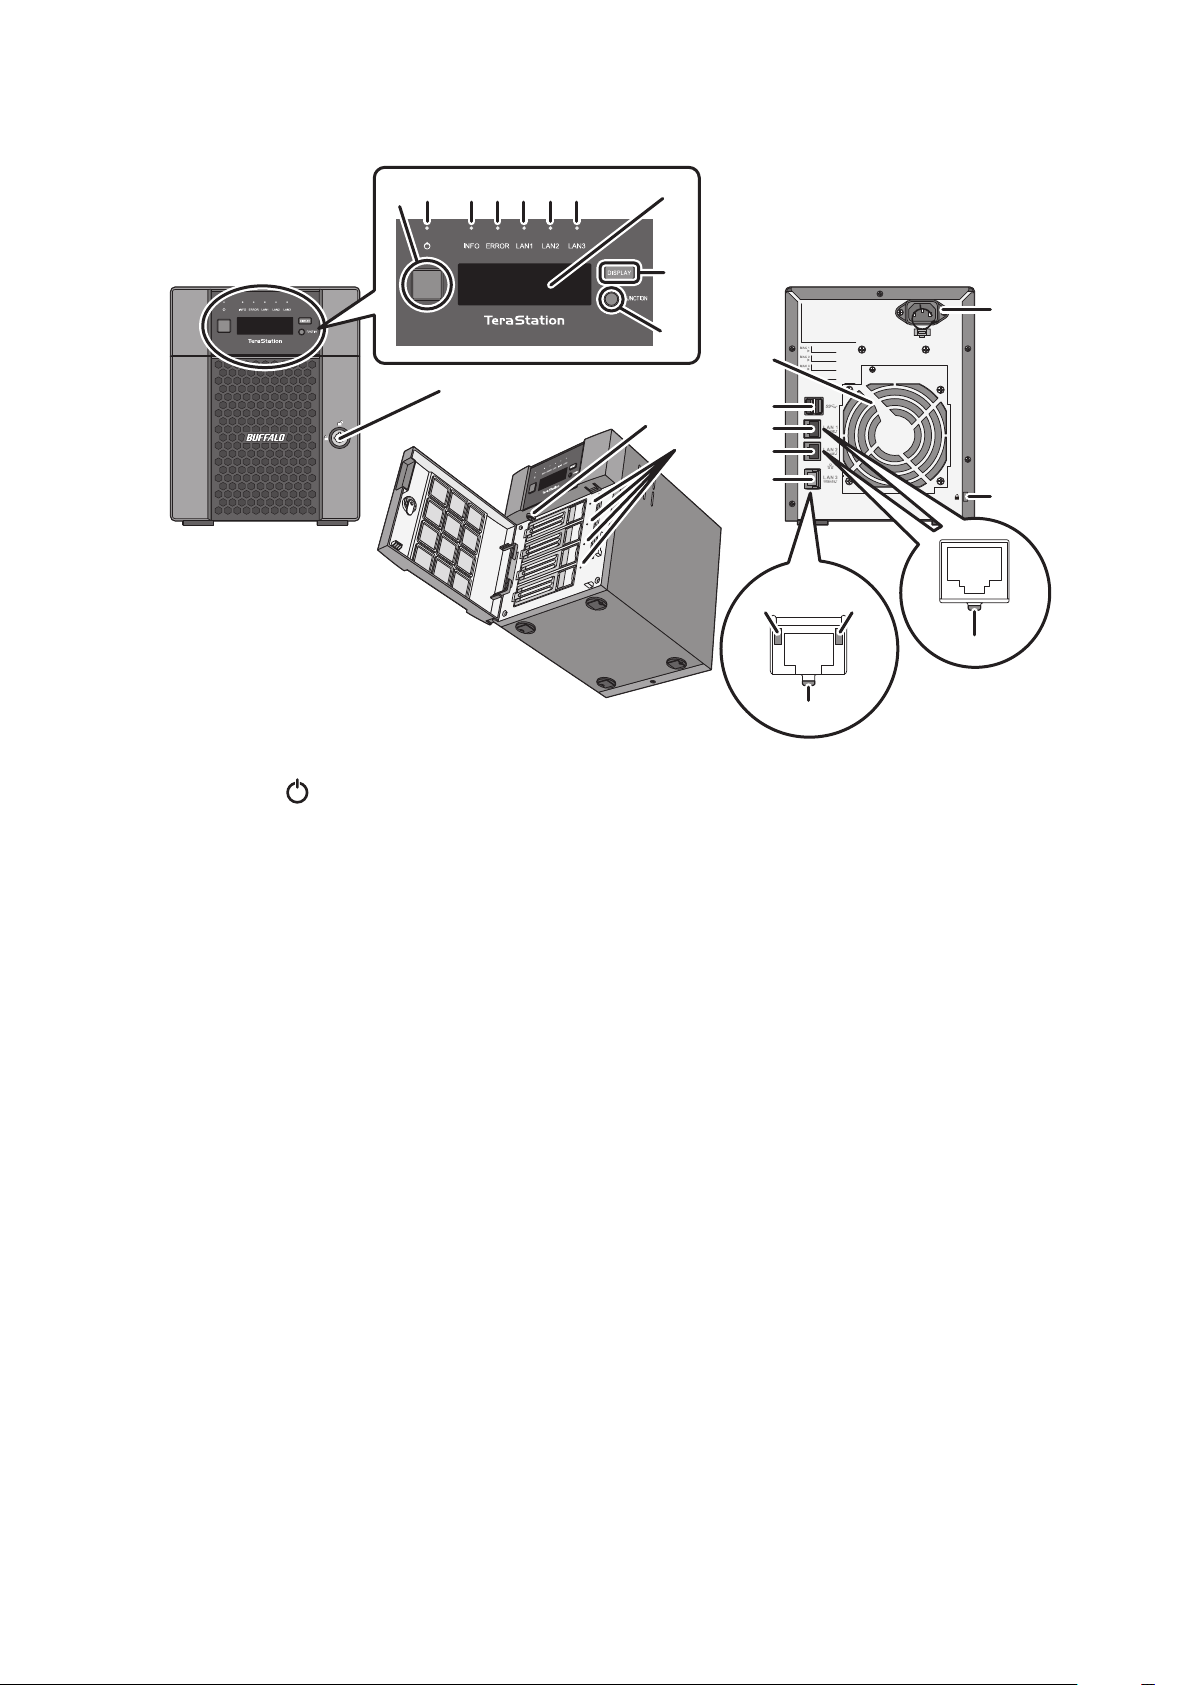
TS5410DN
13456
2 7
11
12
8
9
10
13
19
14
15
16
17
18
20
22 23
21
24
1 Power Button ( )
To power on, connect the power cable and wait for 10 seconds, then press the power button. To power off,
press and hold the power button for 3 seconds.
If the TeraStation beeps, pressing this button for a short period will stop the beeping.
2 Power LED
When the TeraStation is on, the LED glows green.
3 Info LED
If there is a status message, the amber info LED will light up. Check the LCD panel to see the status message.
4 Error LED
If there is an error, the red error LED will light up. Check the LCD panel to see the error message.
5 LAN1 LED
When LAN port 1 is connected, this LED glows green. It blinks when the connection is active.
6 LAN2 LED
When LAN port 2 is connected, this LED glows green. It blinks when the connection is active.
7 LAN3 LED
When LAN port 3 is connected, this LED glows blue. It blinks when the connection is active.
8 LCD Panel
This display shows the status of many TeraStation settings. It also displays errors and messages when available.
9 Display Button
Switches between the different display modes. Also, if the TeraStation is beeping, press this button to stop it.
10

10 Function Button
Use this button for dismounting USB devices, rebuilding RAID arrays, configuring failover, stopping the
TeraStation's beeping, and initializing settings using a USB drive.
11 Drive Lock ( )
Open the front panel with the key to replace drives or access the init button.
12 Init Button
Hold down this button with something pointed to initialize the TeraStation's admin username and password,
IP settings, SSL, and service port restriction settings to their factory default values. The effects of this button
can be modified in Settings.
13 Status LEDs
Normally, these LEDs blink green when drives are accessed. If a drive fails, its LED will turn red.
14 Fan
Spins to avoid overheating inside. Do not block the fan.
15 USB 3.0 Port ( )
Compatible Buffalo USB drives, USB flash drives, digital cameras, and USB UPS connections can be connected.
USB hubs are not supported.
16 LAN Port 1 ( )
Connect an Ethernet cable to use this port for your network. It is available for communicating at max. 1000
Mbps.
17 LAN Port 2 ( )
Connect an Ethernet cable to use this port for your network. It is available for communicating at max. 1000
Mbps.
18 LAN Port 3 ( )
Connect an Ethernet cable to use this port for your network. It is available for communicating at max. 10 Gbps
if using the included Ethernet or category 6A cable.
Note: To communicate at up to 10 Gbps, all network devices must be compatible with 10GbE.
19 Power Connector
Use the included power cable to connect to an UPS, surge protector, or outlet.
20 Anti-Theft Security Slot ( )
Use this slot to secure your TeraStation with a cable lock (not included).
21 Link LED
Glows green when the unit is connected to a network.
22 Link LED on 100 Mbps, 2.5 Gbps, and 5 Gbps
Glows amber when the unit is connected to a network at 100 Mbps or 2.5 and 5 Gbps.
23 Link LED on 1000 Mbps
Glows green when the unit is connected to a network at 1000 Mbps.
24 Link LED on 10 Gbps
Glows blue when the unit is connected to a network at 10 Gbps.
11
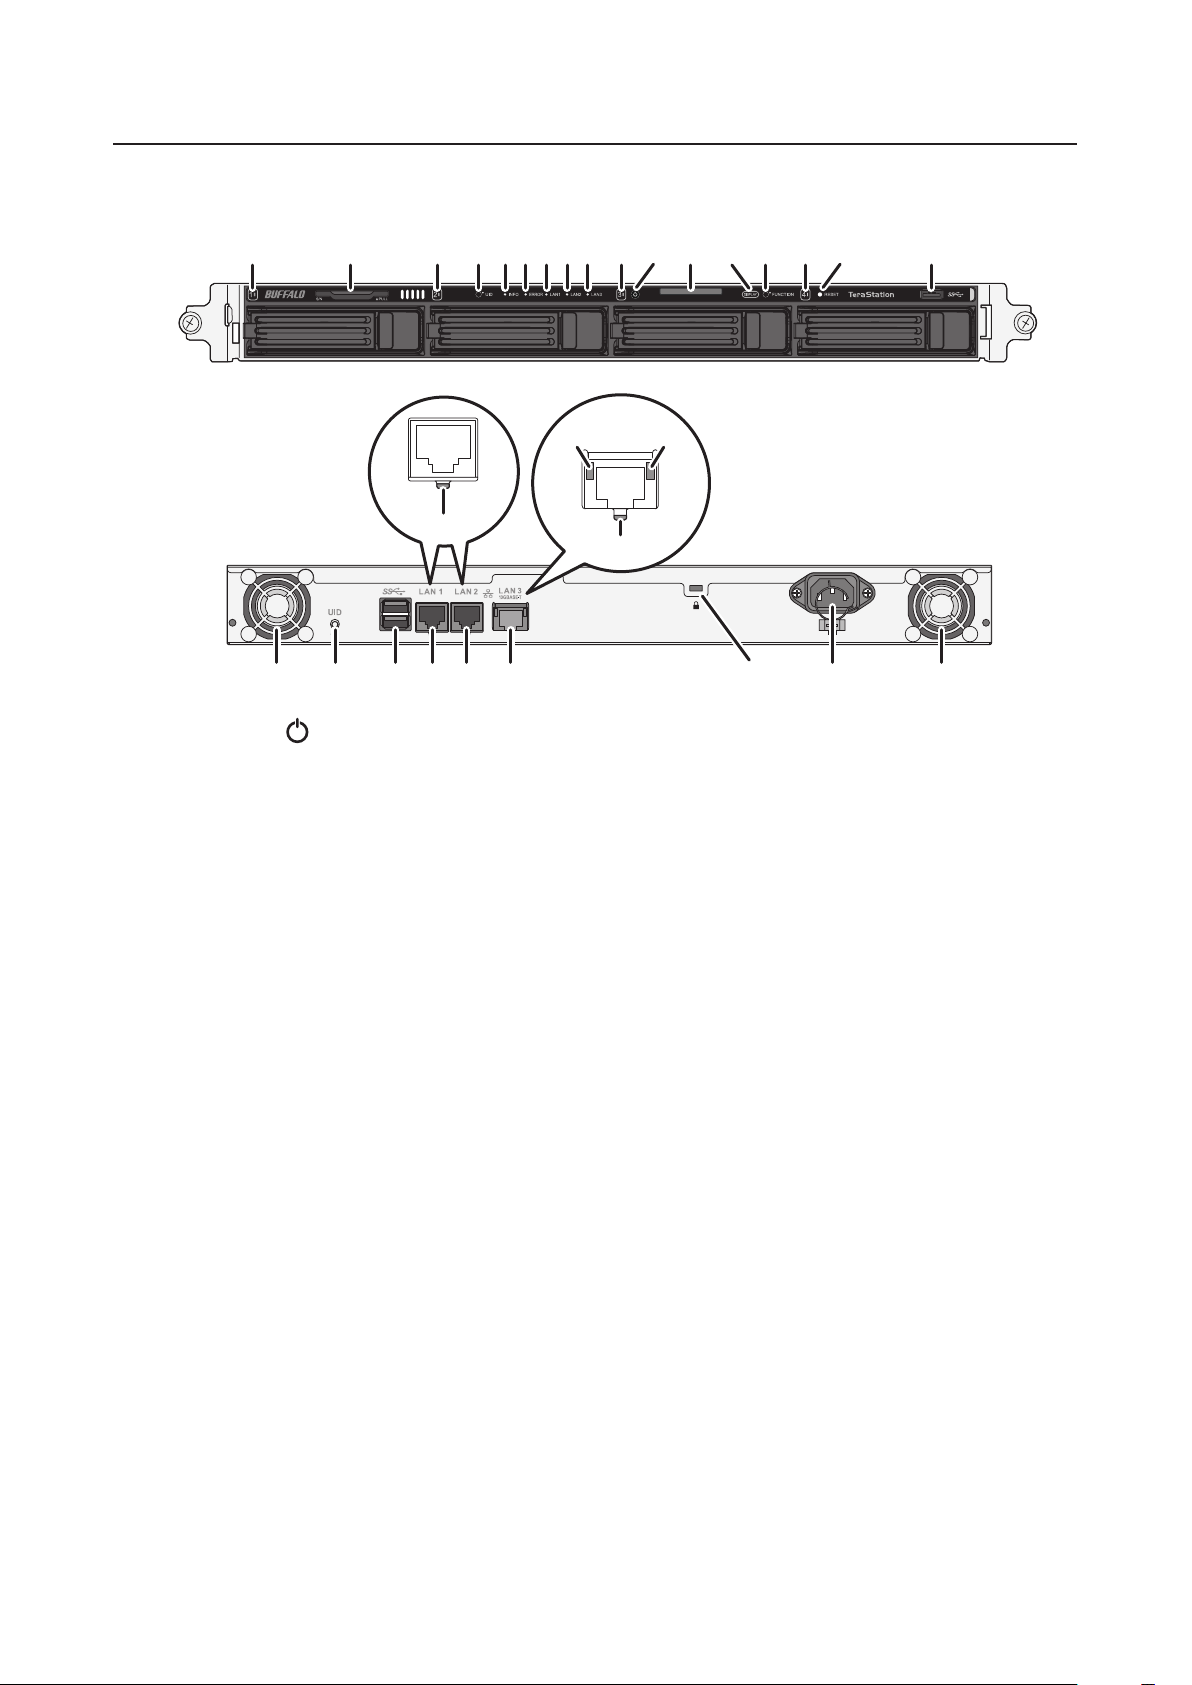
4-Bay Rackmount Model
TS5410RN
11 19 11 20
21
12 20 13 18 17 121614 15
2345
22 23
11
6 78
1
24
9111013
1 Power Button ( )
To power on, connect the power cable and wait for 10 seconds, then press the power button. To power off,
press and hold the power button for 3 seconds.
If the TeraStation beeps, pressing this button for a short period will stop the beeping.
2 Info LED
If there is a status message, the amber info LED will light up. Check the LCD panel to see the status message.
3 Error LED
If there is an error, the red error LED will light up. Check the LCD panel to see the error message.
4 LAN1 LED
When LAN port 1 is connected, this LED glows green. It blinks when the connection is active.
5 LAN2 LED
When LAN port 2 is connected, this LED glows green. It blinks when the connection is active.
6 LAN3 LED
When LAN port 3 is connected, this LED glows blue. It blinks when the connection is active.
7 LCD Panel
This display shows the status of many TeraStation settings. It also displays errors and messages when available.
8 Display Button
Switches between the different display modes. Also, if the TeraStation is beeping, press this button to stop it.
9 Function Button
Use this button for dismounting USB devices, rebuilding RAID arrays, configuring failover, stopping the
TeraStation's beeping, and initializing settings using a USB drive.
12

10 Init Button
Hold down this button with something pointed to initialize the TeraStation's admin username and password,
IP settings, SSL, and service port restriction settings to their factory default values. The effects of this button
can be modified in Settings.
11 Status LEDs
Normally, these LEDs blink green when drives are accessed. If a drive fails, its LED will turn red.
12 Fan
Spins to avoid overheating inside. Do not block the fan.
13 USB 3.0 Port ( )
Compatible Buffalo USB drives, USB flash drives, digital cameras, and USB UPS connections can be connected.
USB hubs are not supported.
14 LAN Port 1 ( )
Connect an Ethernet cable to use this port for your network. It is available for communicating at max. 1000
Mbps.
15 LAN Port 2 ( )
Connect an Ethernet cable to use this port for your network. It is available for communicating at max. 1000
Mbps.
16 LAN Port 3 ( )
Connect an Ethernet cable to use this port for your network. It is available for communicating at max. 10 Gbps
if using the included Ethernet or category 6A cable.
Note: To communicate at up to 10 Gbps, all network devices must be compatible with 10GbE.
17 Power Connector
Use the included power cable to connect to an UPS, surge protector, or outlet.
18 Anti-Theft Security Slot ( )
Use this slot to secure your TeraStation with a cable lock (not included).
19 Serial Number
This sticker shows the TeraStation's serial number.
20 UID Button
Press the UID button on the front or the back of the unit to cycle the blue LED on and off.
21 Link LED
Glows green when the unit is connected to a network.
22 Link LED on 100 Mbps, 2.5 Gbps, and 5 Gbps
Glows amber when the unit is connected to a network at 100 Mbps or 2.5 and 5 Gbps.
23 Link LED on 1000 Mbps
Glows green when the unit is connected to a network at 1000 Mbps.
24 Link LED on 10 Gbps
Glows blue when the unit is connected to a network at 10 Gbps.
13

12-Bay Rackmount Model
TS51210RH
4
5
6
7
1
2
3
8
9
10
2120
19
1211 14 15 16 17 1813
22
1 Power Button ( )
To power on, connect the power cable and wait for 10 seconds, then press the power button. To power off,
press and hold the power button for 3 seconds.
If the TeraStation beeps, pressing this button for a short period will stop the beeping.
2 Power LED ( )
When the TeraStation is on, the LED glows green.
3 Error LED ( )
If there is an error, the red error LED will light up. Check the Settings interface or NAS Navigator2 to see the
error message.
4 Reset Button
Hold down this button with something pointed to initialize the TeraStation's admin username and password,
IP settings, SSL, and service port restriction settings to their factory default values. The effects of this button
can be modified in Settings.
5 Function Button
Use this button for rebuilding RAID arrays, configuring failover, stopping the TeraStation's beeping, and
initializing settings using a USB drive.
14

6 LAN LED ( )
When any LAN ports are connected, this LED glows blue. It blinks when the connection is active.
7 Info LED ( )
If there is a status message, the amber info LED will light up. Check the Settings interface or NAS Navigator2 to
see the status message.
8 Drive Status LED ( )
This LED blinks blue when drives are accessed.
9 Drive Error LED ( )
Normally, this LED is extinguished. If a drive fails, its LED will turn red.
10 USB 2.0 Port ( )
Compatible Buffalo USB drives, USB flash drives, digital cameras, and USB UPS connections can be connected.
USB hubs are not supported.
11 Power Connector
Use the included power cable to connect to an UPS, surge protector, or outlet.
12 Fan
Spins to avoid overheating inside. Do not block the fan.
13 Micro-USB Port
Factory use only.
14 USB 3.0 Port ( )
Compatible Buffalo USB drives, USB flash drives, digital cameras, and USB UPS connections can be connected.
USB hubs are not supported.
15 LAN Port 1 ( )
Connect an Ethernet cable to use this port for your network. It is available for communicating at max. 1000
Mbps.
16 LAN Port 2 ( )
Connect an Ethernet cable to use this port for your network. It is available for communicating at max. 1000
Mbps.
17 LAN Port 3 ( )
Connect an Ethernet cable to use this port for your network. It is available for communicating at max. 10 Gbps
if using the included Ethernet or category 6A cable.
Note: To communicate at up to 10 Gbps, all network devices must be compatible with 10GbE.
18 LAN Port 4 ( )
Connect an Ethernet cable to use this port for your network. It is available for communicating at max. 10 Gbps
if using the included Ethernet or category 6A cable.
Note: To communicate at up to 10 Gbps, all network devices must be compatible with 10GbE.
19 Link/Act LED
Glows and blinks green when the unit is connected to a network.
15

20 Link LED on 100 Mbps, 2.5 Gbps, and 5 Gbps
Glows amber when the unit is connected to a network at 100 Mbps or 2.5 and 5 Gbps.
21 Link LED on 1000 Mbps
Glows green when the unit is connected to a network at 1000 Mbps.
22 Link LED on 10 Gbps
Glows blue when the unit is connected to a network at 10 Gbps.
Turning the TeraStation On and Off
Note: Do not disconnect or reconnect the internal drives while turning on or off the TeraStation.
Press the power button on the TeraStation to turn it on.
To turn off the TeraStation, press and hold the power button for 3 seconds. Don't unplug the TeraStation without
turning it off first. You can also shut it down and restart it remotely from Settings.
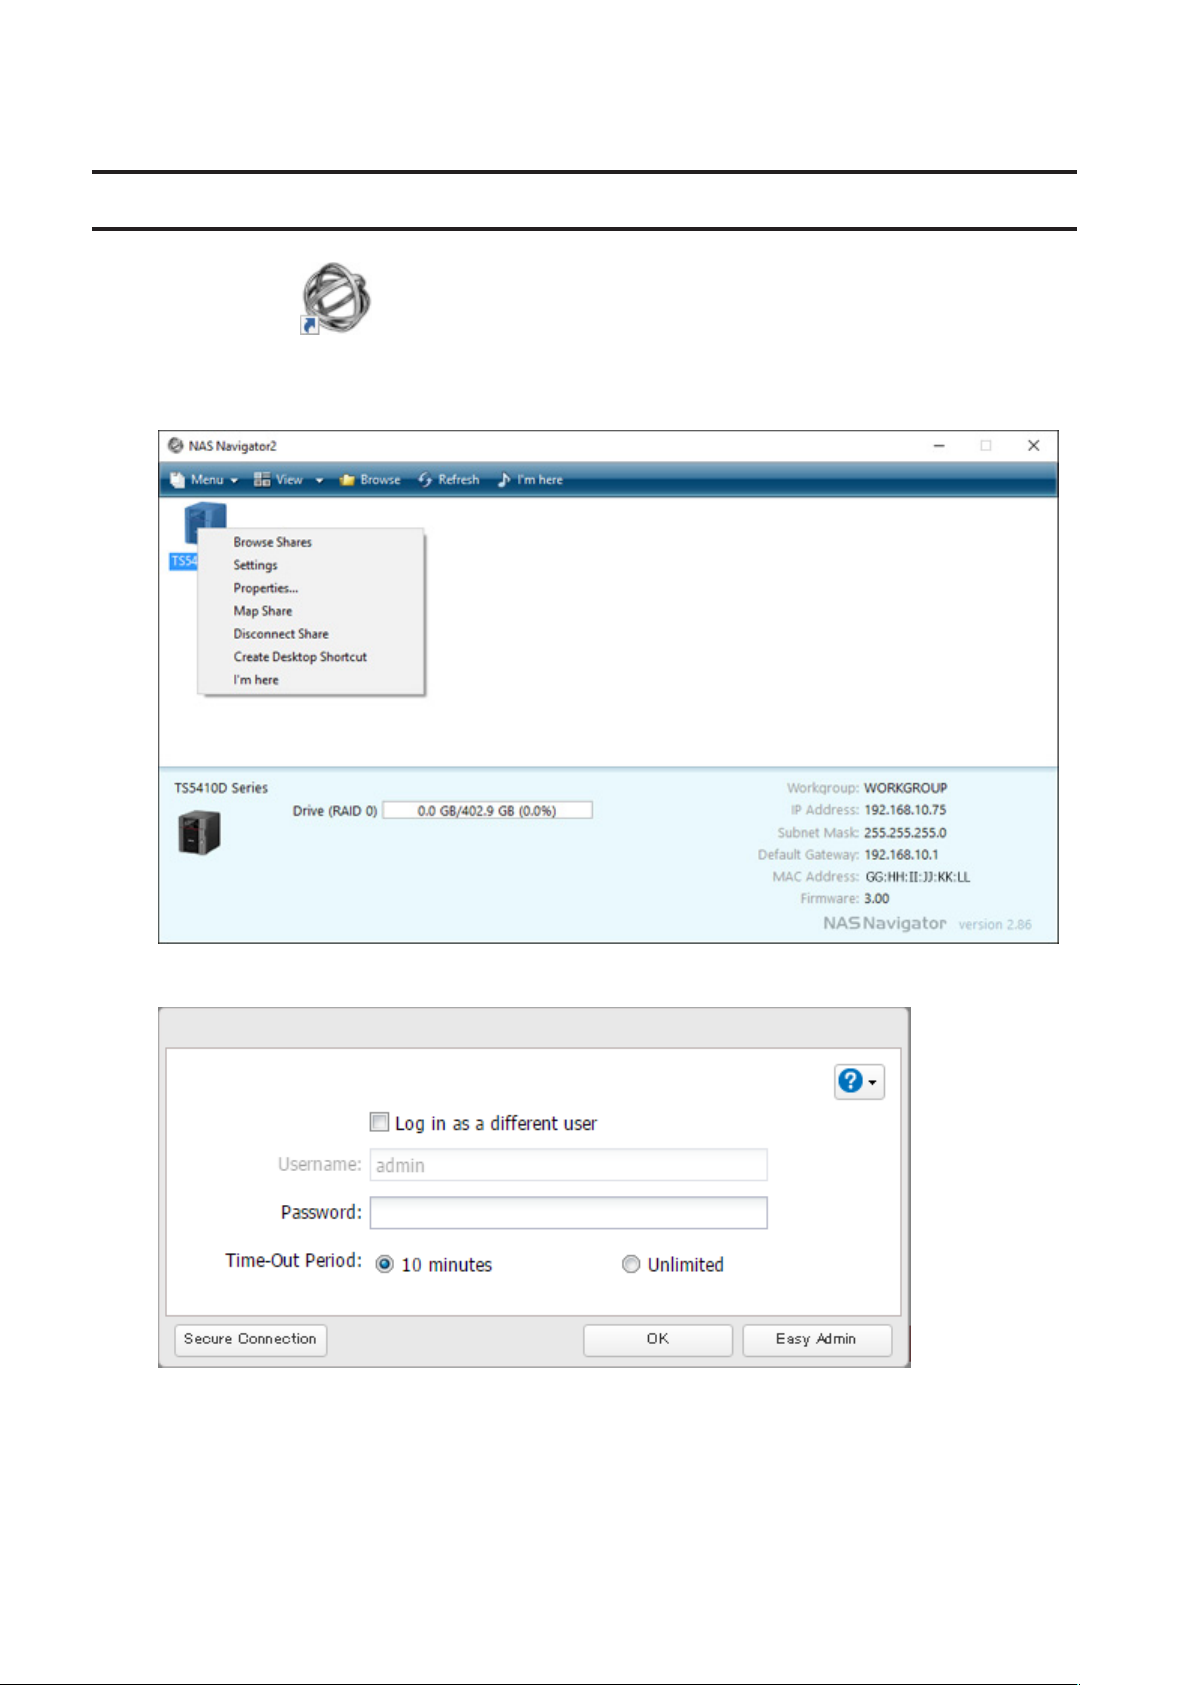
1 Double-click the icon to start NAS Navigator2.
2 Right-click your TeraStation's icon and select Settings. For macOS, select the TeraStation's icon while holding
down the control key, then select Settings.
16

3 Enter the username and password, then click OK.
Note: The default username and password are "admin" and "password".
4 Settings will open.
17

5 Click at the top-right of Settings and choose Shut Down.
6 Click Yes .
7 The "Confirm Operation" screen will open. Enter the confirmation number, then click OK.
When all the LEDs on the front of the TeraStation turn off, the shutdown process is complete.
Creating an Initialization Drive
We recommend creating an initialization drive as soon as possible. This USB drive can be used to initialize the
TeraStation's settings to its factory default values, or recover the system if your TeraStation encounters an error that
prevents the unit from booting. For detailed procedure, refer to the "Creating an Initialization Drive" subsection in
chapter 7.
18

Chapter 2 Configuration
Configure and manage your TeraStation using the Settings interface, accessible from a browser window. Open the
interface using the procedure below or type the TeraStation's IP address in the URL field of your browser. Within
Settings, the Easy Admin page gives you quick access to commonly used settings.
Note: Microsoft Edge, Firefox, Google Chrome, Internet Explorer 9 or later, and Safari 9 or later are supported. If you
have difficulty viewing Settings, check the following:
• If there are a large number of registered users, groups, or shared folders, use another browser instead of Internet
Explorer.
• If you have a proxy server enabled in the browser settings, disable the proxy server.
• With Internet Explorer, set security to Local intranet. On Windows Server operating systems, higher-level security
is configured by default. Set the security to a lower level temporarily.
• On a Mac, you can also use Bonjour to log in to Settings. Navigate to Bookmarks - Bonjour - TeraStation name from
the menu bar of Safari. If you don't see "Bonjour" in the Bookmarks menu, click Safari - Preferences and select
"Include Bonjour in the Bookmarks menu" under "Advanced".
Setting Up Through Initial Setup Wizard
When you access Settings for the first time, or after initializing the TeraStation's settings, the initial setup wizard will
be displayed. To set up the TeraStation using the wizard, follow the procedure below.
1 Double-click the icon to start NAS Navigator2.
2 Right-click on your TeraStation's icon in NAS Navigator2 and select Settings. For macOS, click your TeraStation's
icon while holding down the control key, then select Settings.
19

3 The password settings page will be displayed. Enter the desired new administrator password and click Next. If
you click Skip, the administrator password will not change from the default value ("password").
4 The time zone settings page will be displayed. If you need to change the time zone from that which is currently
displayed on the page, select it from the drop-down list and click Next.
20
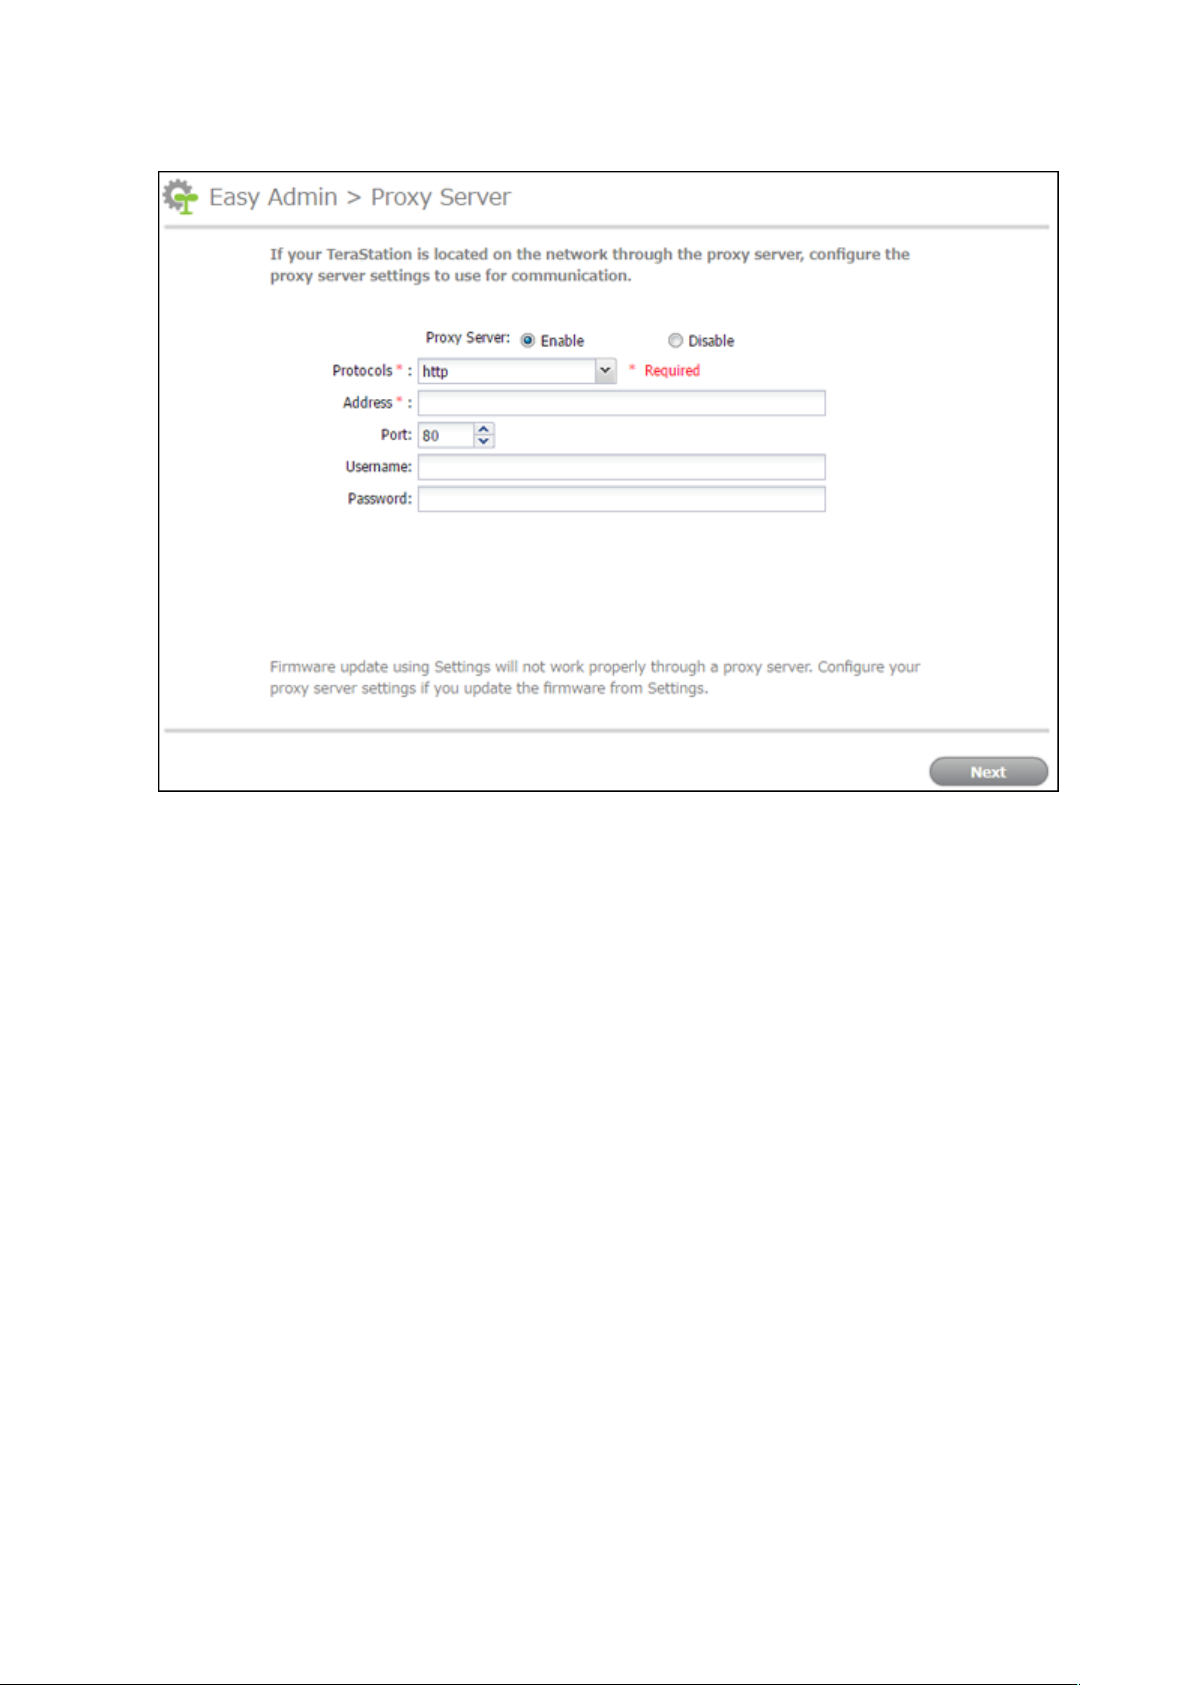
5 The proxy server settings page will be displayed. If you place the TeraStation under a proxy network, set your
proxy settings. Click Next.
6 The RAID settings page will be displayed. To change the RAID mode from the default mode, select the desired
RAID mode and click Next, then click Start on the next page. The "Confirm Operation" screen will open so enter
the confirmation number and click OK. Changing the RAID mode will begin.
21

If you want to keep the RAID mode as is, select "Keep current RAID mode" and click Next.
Note: The RAID settings page will not be displayed if using TS5210DN series.
7 The usage feedback settings page will be displayed. If you allow Buffalo to collect your usage and environment
information, select the "Send usage feedback" box. If you don't permit information collection, leave the box
blank and click Next.
22
8 The folder path to access shared folders will be displayed and the initial setup will finish.
Opening Advanced Settings
1 Double-click the icon to start NAS Navigator2.
2 Right-click on your TeraStation's icon in NAS Navigator2 and select Settings. For macOS, click your TeraStation's
icon while holding down the control key, then select Settings.
3 Enter the username and password and click OK.
Notes:
• If the time-out period is set to "10 minutes", you will be logged out of Settings after 10 minutes of inactivity.
• Click Secure Connection to log in with an encrypted connection.
23
4 Settings will open.
Notes:
• Username/Password Combinations:
Username Password Settings Available
admin (default) password (default) All
guest blank System information (read-only)
If a user is assigned as an administrator, all settings
Your username Your password
• Click to open Easy Admin.
• Click to play a tone from the TeraStation for easy location.
are available. If assigned under another group, only
system information (read-only) is available.
Opening Easy Admin
The Easy Admin page makes it easy to change common settings. Follow the procedure below to open Easy Admin.
1 Double-click the icon to start NAS Navigator2.
24

2 Right-click on your TeraStation's icon and choose Settings. For macOS, click the TeraStation icon while holding
down the control key, then select Settings.
3 Click Easy Admin.
25

4 The Easy Admin screen will open.
Note: If you click any buttons, you will need to enter a username and password.
26

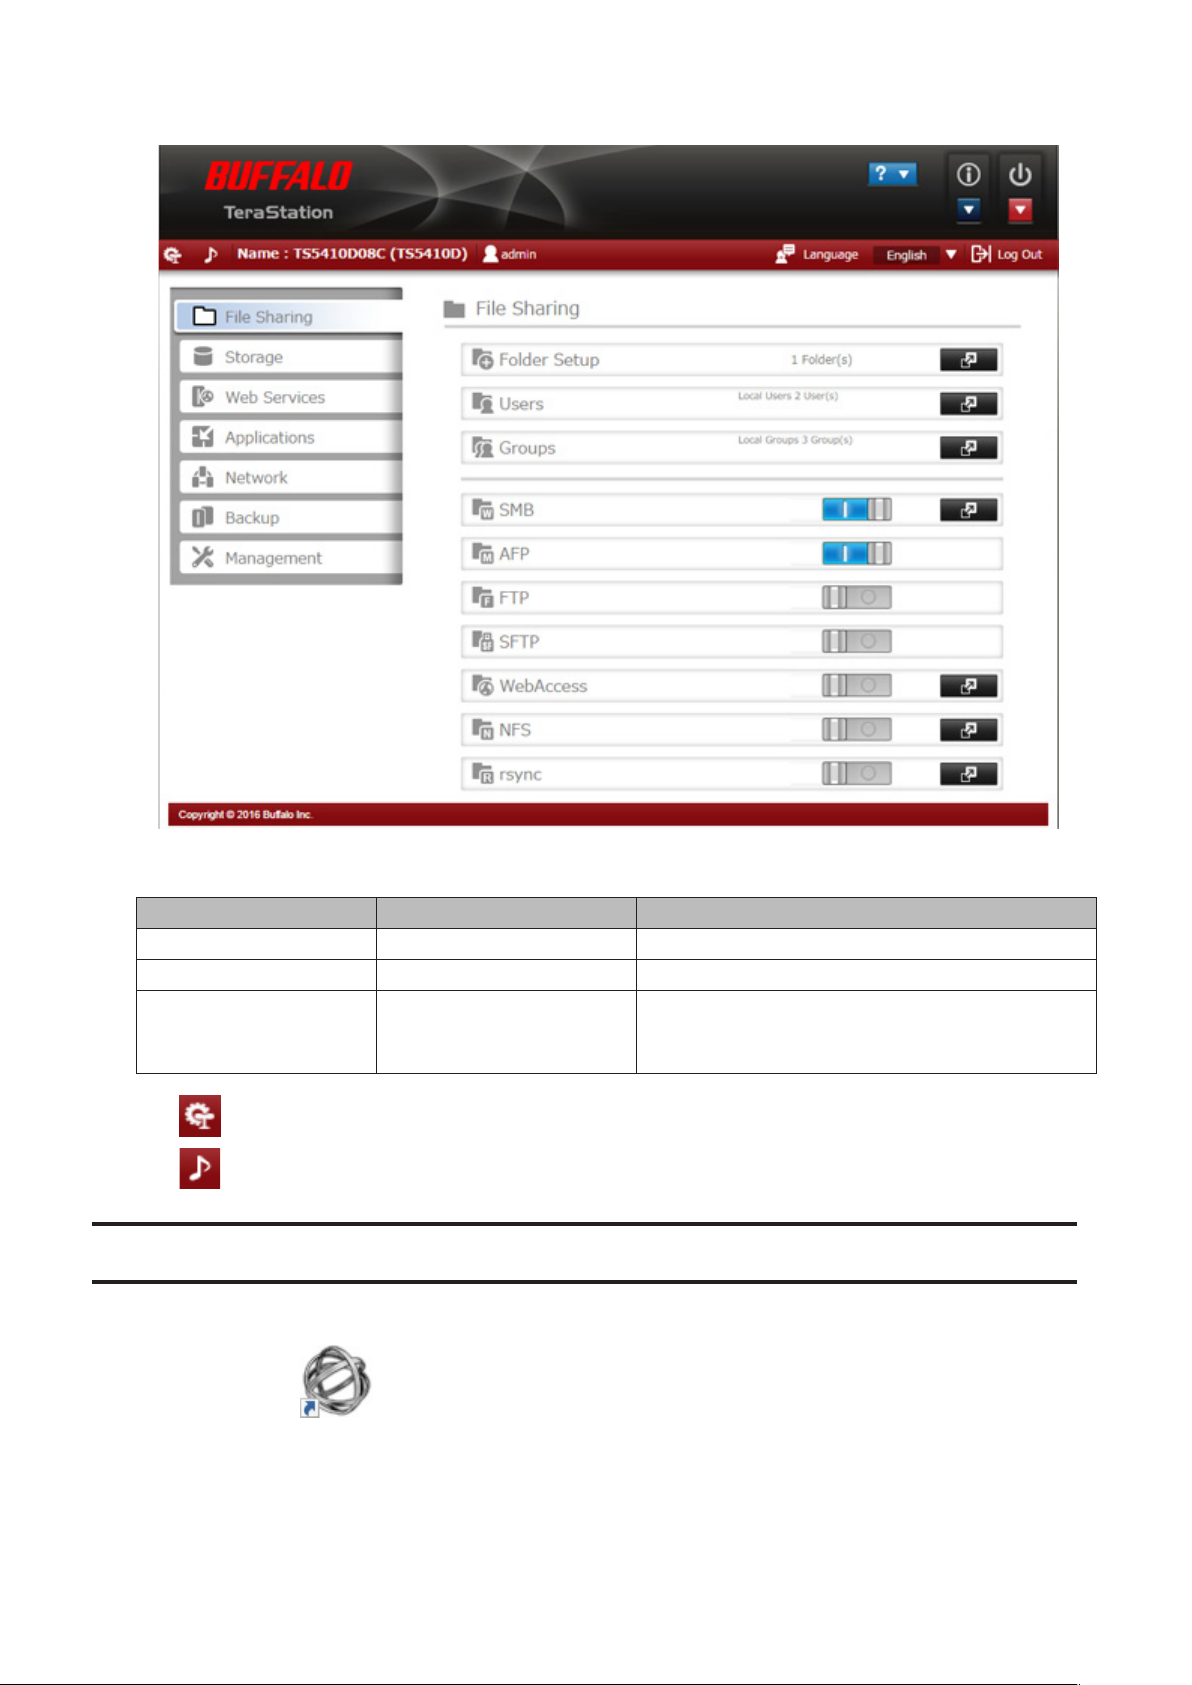
Chapter 3 Sharing Files
Configuring Shared Folders
Adding a Shared Folder
1 In Settings, click File Sharing.
2 Click to the right of "Folder Setup".
3 Click Create Folder.
27

4 Configure the desired settings, then click OK.
―〜∥−¢£¬
Notes:
• Names may contain up to 27 multibyte or alphanumeric characters, hyphens (-), and underscores (_). The first
character should not be a symbol.
• When you click the Option 1 tab, you can enter the folder description. Descriptions may contain up to 75
multibyte or alphanumeric characters, hyphens (-), underscores (_), and spaces. The first character should not be a
space.
• You may create up to 400 shared folders.
• If the names of shared folders accessed via AFP and FTP connections contain multibyte characters, configure the
client language in Management - Name/Time/Language to match the characters. If the setting does not match,
the shared folder name will not be displayed correctly.
• The following characters are handled differently by macOS and Windows. Avoid using these characters when
sharing data between macOS and Windows:
• Windows does not support some characters that macOS and the TeraStation allow. If you create a filename on a
Mac with any of the following characters, it will not display correctly on a Windows computer. You may have to
connect to the TeraStation via AFP in order to display or copy any of the following characters:
? [ ] / \ = + < > ; : " , | *
28

• Do not use any of the following words for the name of a shared folder as these words are reserved for internal
①②③④⑤⑥⑦⑧⑨⑩⑪⑫⑬⑭⑮⑯⑰⑱⑲⑳ⅠⅡⅢⅣⅤⅥⅦⅧⅨⅩ
use by the TeraStation: authtest, global, homes, info, lost+found, lp, msdfs_root, mt-daapd, printers, ram, spool,
usbdisk x (where "x" is a number, for example: usbdisk1)
• Don't use the following unsupported characters in shared folder names, workgroup names, or filenames:
ⅰⅱⅲⅳⅴⅵⅶⅷⅸⅹ㎜㎝㎞㎎㎏㏄㎡№㏍℡㊤㊥㊦㊧㊨㈱㈲㈹㍾㍽㍼㍻㍉㌔㌢㍍㌘㌧㌃㌶㍑㍗㌍㌦㌣㌫
㍊㌻¦'"〝〟∮Σ∟⊿
纊褜鍈銈蓜俉炻昱棈鋹曻彅丨仡仼伀伃伹佖侒侊侚侔俍偀倢俿倞偆偰偂傔僴僘兊兤冝冾凬刕劜劦勀勛匀匇
匤卲厓厲叝﨎咜咊咩哿喆坙坥垬埈埇﨏塚增墲夋奓奛奝奣妤妺孖寀甯寘寬尞岦岺峵崧嵓﨑嵂嵭嶸嶹巐弡弴
彧德忞恝悅悊惞惕愠惲愑愷愰憘戓抦揵摠撝擎敎昀昕昻昉昮昞昤晥晗晙晴晳暙暠暲暿曺朎朗杦枻桒柀栁桄
棏﨓楨﨔榘槢樰橫橆橳橾櫢櫤毖氿汜沆汯泚洄涇浯涖涬淏淸淲淼渹湜渧渼溿澈澵濵瀅瀇瀨炅炫焏焄煜煆煇
凞燁燾犱犾猤猪獷玽珉珖珣珒琇珵琦琪琩琮瑢璉璟甁畯皂皜皞皛皦益睆劯砡硎硤硺礰礼神祥禔福禛竑竧靖
竫箞精絈絜綷綠緖繒罇羡羽茁荢荿菇菶葈蒴蕓蕙蕫﨟薰蘒﨡蠇裵訒訷詹誧誾諟諸諶譓譿賰賴贒赶﨣軏﨤逸
遧郞都鄕鄧釚釗釞釭釮釤釥鈆鈐鈊鈺鉀鈼鉎鉙鉑鈹鉧銧鉷鉸鋧鋗鋙鋐﨧鋕鋠鋓錥錡鋻﨨錞鋿錝錂鍰鍗鎤鏆
鏞鏸鐱鑅鑈閒隆﨩隝隯霳霻靃靍靏靑靕顗顥飯飼餧館馞驎髙髜魵魲鮏鮱鮻鰀鵰鵫鶴鸙黑畩秕緇臂蘊訃躱鐓
饐鷯
• File and folder names may contain up to 255 single-byte characters.
• Folder and workgroup names whose names contain non-Roman characters may not be displayed correctly.
• If shared folders are accessed from a Mac, information files for the Mac may be generated automatically. Do not
delete these files. If they are deleted using Windows, this may prevent further access from a Mac.
• The TeraStation belongs to the default zone in AppleShare; the zone cannot be specified.
• When files are copied to the TeraStation or to a USB drive connected to the TeraStation, file information such as
date created, date modified, and other date information may be updated or changed.
• During a file transfer, if settings are changed, the file transfer operation may be aborted.
• File copying to the TeraStation is protected by a journaling file system. If the Ethernet cable is disconnected or a
power outage occurs while copying data, the following may occur:
- Preset data such as the TeraStation name, users, and groups may be erased.
- An incomplete file may be copied and the file can no longer be deleted. If this happens, restart the TeraStation,
delete the file, and perform the copy operation again.
• If the Ethernet cable is disconnected from the LAN port during file copying, even if the cable is not in use, the
copy operation will abort. Do not disconnect or reconnect the Ethernet cable to the LAN port during file copying.
Recycle Bin
To protect your data from accidental deletion, you may configure your TeraStation to use a recycle bin instead of
deleting files immediately. The recycle bin will only work with SMB connections. To empty the recycle bin, click File
Sharing - Folder Setup - Empty Recycle Bin in Settings.
Notes:
• You can prevent guests and other users from emptying the trash by navigating to File Sharing - SMB - Recycle Bin
Permissions and select "Administrator only".
• If you use macOS, select "Keep when original file is deleted" for "Mac OS Temp Files" option. If this setting is
changed, files in the recycle bin may be corrupted.
Read-Only Shares
By default, new shares are set with read and write access, but you may change the attribute to Read only at Attribute
on the "Option 2" tab. Read-only shares and HFS Plus-formatted USB drives will have "(Read Only)" added to
comments in Explorer.
29
 Loading...