

Buffalo TeraStation 5000, TeraStation 5000N User Manual
TeraStation 5000 and 5000N
User Manual
Americas: www.buffaloamericas.com
Europe: www.buffalo-technology.com
Asia Pacific: www.buffalo-asia.com
35020018-12
2015.07

1
Contents
Chapter 1 Installation .....................................................9
Diagrams ...........................................................................................9
Turning the TeraStation On and Off............................................. 12
Changing the Administrator Password ....................................... 14
Creating a Recovery Drive ............................................................ 16
For Initializing Settings ...........................................................................16
For Resetting Password ........................................................................... 17
Chapter 2 Configuration ............................................. 18
Opening Settings .......................................................................... 18
Opening Easy Admin .................................................................... 20
Chapter 3 Access Restrictions ..................................... 22
Adding a Shared Folder ................................................................ 22
Adding Users ................................................................................. 25
Importing User Information ....................................................................26
Adding Groups .............................................................................. 27
Configuring Access Restrictions .................................................. 29
Local Users and Groups ...........................................................................29
Active Directory .......................................................................................30
NT Domain ................................................................................................ 33
User Authentication with an External SMB Server ................................ 35

2
Chapter 4 Managing Storage...................................... 39
RAID Arrays .................................................................................... 39
Working with RAID Arrays ............................................................ 40
Using JBOD ............................................................................................... 41
Changing RAID Mode ..............................................................................41
Configuring a Hot Spare .......................................................................... 43
RMM (RAID Mode Manager) ....................................................................44
RAID Scanning..........................................................................................46
Adding an External Hard Drive .................................................... 47
Connecting an External Drive ................................................................. 47
Compatibility ...........................................................................................47
Dismounting Drives ...................................................................... 48
Checking Drives ............................................................................ 49
S.M.A.R.T. ....................................................................................... 50
Formatting Drives ......................................................................... 51
Encrypting Drives .......................................................................... 54
Media Cartridges ........................................................................... 54
Erase Data on the TeraStation Completely .................................. 55
Disk Quotas ................................................................................... 56
Quotas for Users .......................................................................................56
Quotas for Groups ...................................................................................57
Size Limits ................................................................................................. 58
Using the TeraStation as an iSCSI Device .................................... 60
Introduction .............................................................................................60
Creating a iSCSI Volume ..........................................................................61
Connecting or Disconnecting Volumes .................................................. 63
Configuring Access Restrictions .............................................................69
Expanding Volume Sizes .........................................................................77

3
Deleting Volumes .....................................................................................78
Hard Drive Replacement .............................................................. 80
Hard Drive Replacement Examples ........................................................81
Chapter 5 Backup ........................................................ 86
Back Up from the TeraStation ...................................................... 86
Preparing a Backup Destination ............................................................. 86
Configuring a Backup Job .......................................................................88
Replication ..................................................................................... 92
Preparing a Replication Destination ......................................................92
Configuring a Replication Task ...............................................................93
Failover .......................................................................................... 96
Ethernet Cable Connection Methods .....................................................96
Usage Restrictions ...................................................................................98
Configuration ...........................................................................................98
Additional Settings .................................................................................. 99
When the Main TeraStation Fails ..........................................................100
Backing Up Your Mac with Time Machine ................................. 100
Copying from a USB Device ........................................................ 105
Chapter 6 Remote Access .......................................... 107
WebAccess ................................................................................... 107
WebAccess Remote ..................................................................... 109
FTP ................................................................................................ 111
Cloud Storage .............................................................................. 112
Configuring Cloud Storage ...................................................................112
Uploading Files to Cloud Storage .........................................................114

4
Chapter 7 BitTorrent .................................................. 119
Chapter 8 Multimedia ............................................... 122
DLNA ............................................................................................ 122
Playing Files ...........................................................................................123
Connected DLNA-compatible Devices .................................................123
Streaming to DLNA-compatible Devices .............................................124
Disabling Playback from Specific Devices ...........................................125
iTunes Server ............................................................................... 126
Squeezebox Server ..................................................................... 128
Chapter 9 Surveillance Server .................................. 131
Getting Started ........................................................................... 131
Installing Client Tools ............................................................................132
Connecting Devices to the Network .....................................................132
Enabling Surveillance Cameras ............................................................132
Enabling the Free License .....................................................................134
Registering Recording Policies .............................................................136
Checking Recording ...............................................................................141
Viewing Saved Video .............................................................................142
Advanced Usage .......................................................................... 142
Export Recorded Data as a MOV Video File .........................................142
Viewing Video Real-time .......................................................................145
Moving Recorded Video Data to Another TeraStation ........................ 146
Backing Up Recorded Video to Another TeraStation ..........................147
Automatically Delete Old Data when Space is Low .............................148
Changing Where Recorded Video Is Saved ..........................................150
Email Notification ..................................................................................150

5
Client Tools .................................................................................. 151
Camera Policies ......................................................................................151
Live Viewer .............................................................................................151
Data Service Policies ..............................................................................152
Vault Admin ............................................................................................153
Surveillance Video Manager .................................................................154
Network Activity ....................................................................................155
Mini Vault Stats ......................................................................................156
Activating Additional Licenses .................................................. 156
When the TeraStation is Connected to the Internet ............................156
TeraStation Not Connected to the Internet .........................................158
Troubleshooting .......................................................................... 162
Chapter 10 Advanced Features ................................ 164
Antivirus Software ...................................................................... 164
Licenses ..................................................................................................164
Activating Virus Scanning .....................................................................165
Configuring Security Settings ..............................................................165
Connecting through a Proxy Server ..................................................... 166
Updating .................................................................................................167
Excluding a Specific Folder from Antivirus Scanning .........................168
Virus Scanning .......................................................................................168
Checking the Log ...................................................................................169
Online Help ............................................................................................. 170
Email Notification ....................................................................... 171
Sleep Mode .................................................................................. 172
Wake-on-LAN .............................................................................. 174
UPS (Uninterruptible Power Supply) ......................................... 175

6
Port Trunking ............................................................................... 176
Configuring Port Trunking ....................................................................177
Connecting a Printer ................................................................... 178
Setting Up a Printer with Windows 8.1, Windows 8, Windows 7, or
Windows Vista ........................................................................................178
Setting Up a Printer with Windows XP .................................................179
TeraSearch ................................................................................... 180
Offline Files .................................................................................. 181
DFS ............................................................................................... 184
Accessing from an NFS Client ..................................................... 186
Encrypting Data Transmission ................................................... 188
Encrypting Settings Data ......................................................................188
Encrypting FTP Transfer Data ...............................................................188
SSL Keys ..................................................................................................189
Web Server ................................................................................... 189
MySQL Server .............................................................................. 191
SNMP ............................................................................................ 192
Saving and Applying Settings .................................................... 193
Saving Settings ......................................................................................193
Applying Settings ..................................................................................194
Restoring Factory Defaults ......................................................... 195
Initializing from Settings ......................................................................195
Creating an Initialization Drive .............................................................196
Initializing with the USB Drive ..............................................................196
Resetting the Administrator Password ..................................... 197
Creating a Password Reset Drive ..........................................................197
Resetting with the USB Drive ................................................................197
Logs .............................................................................................. 197

7
Updating the Firmware ............................................................... 199
Updating Manually ................................................................................199
Updating Automatically ........................................................................199
Name, Date, Time, and Language .............................................. 200
Beep Alerts .................................................................................. 203
LCD and LEDs ............................................................................... 203
Jumbo Frames ............................................................................. 204
Changing the IP Address ............................................................ 206
Chapter 11 Utilities .................................................... 208
NAS Navigator2 for Windows ..................................................... 208
Mount as Network Drive........................................................................210
Changing the IP Address .......................................................................211
NAS Navigator2 for Mac ............................................................. 212
Mount as Network Drive........................................................................214
Changing the IP Address .......................................................................214
iSCSI Connection Tool ................................................................. 215
Home Screen ..........................................................................................216
Menu .......................................................................................................217
NovaBACKUP ............................................................................... 217
Chapter 12 Appendix ................................................ 219
LCD Display .................................................................................. 219
Modes .....................................................................................................219
Errors .......................................................................................................219
Status ......................................................................................................220
Default Settings .......................................................................... 222

8
Specifications .............................................................................. 223
Chapter 13 Regulatory Compliance Information .... 225
For Customers in the United States ........................................... 225
For Customers in Europe ............................................................ 225
For Customers in Korea ............................................................... 227
For Customers in Taiwan ............................................................. 228
For Customers in China ............................................................... 228
For Customers in Russia .............................................................. 228

9
Chapter 1 Installation
Diagrams
TS5800D, TS5800DN, TS5800DWR
±
·
¸
²
³
´
µ
±µ
¹
±°
±±
±²
±³
±´
±µ
±
±·
±¸
±¹
²°
²±
²´
²µ
TS5600D, TS5600DN
±°
±±
±²
±
·
¸
²
³
´
µ
±µ
¹
±³
±´
±µ
±
±·
±¸
±¹
²°
²±
²´
²µ

10
TS5400D, TS5400DN, TS5400DWR
±°
±
·
¸
¹
±±
±²
²
³
´
µ
±¹
²°
²±
±³
±´
±µ
±
±·
±¸
²´
²µ
TS5200D, TS5200DN, TS5200DS, TS5200DWR
±°
±
²
³
´
µ
·
¸
¹
±±
±²
±¹
±³
±´
±µ
±
±·
²±
±¸
²°
²´
²µ
TS5400R, TS5400RH, TS5400RN, TS5400RWR
²´ ²µ
±°±²³ ´ µ¶·¸±±
±² ±¹
±³
±´
±µ
±
±·
²±±¸
²°
±±²³ ²² ±± ±±
²²
±µ
²°
1 Power Button

11
To power on, connect the power cable and wait for 10 seconds, then press the power button. To power off,
press the power button twice.
2 Info LED
If there is a status message, the amber info LED will light up. Check the LCD panel to see the status message.
3 Error LED
If there is an error, the red error LED will light up. Check the LCD panel to see the error message.
4 LAN1 LED
When LAN port 1 is connected, this LED glows green. It blinks when the connection is active.
5 LAN2 LED
When LAN port 2 is connected, this LED glows green. It blinks when the connection is active.
6 LCD Panel
This display shows the status of many TeraStation settings. It also displays errors and messages when available.
7 Display Button
Switches between the different display modes. Also, if the TeraStation is beeping, press this button to stop it.
8 Function Button
Use this button for Direct Copy, dismounting USB devices, rebuilding RAID arrays, and configuring failover.
9 Drive Lock
Open the front panel with the key to replace hard drives or access the reset button.
10 Reset Button
To shut down and reboot the TeraStation, hold down the reset button.
11 Status LEDs
Normally, these LEDs blink green when hard drives are accessed. If a drive fails, its LED will turn red or amber.
12 Factory Use Only
13 Boot Mode Switch
Leave the switch in the HDD position during normal operation. To recover settings, insert the recovery USB
drive into a USB 2.0 port, move the boot switch to the USB position, and press the power button.
14 UPS Port
Connect to a UPS.
15 USB 3.0 Port
Compatible Buffalo USB 3.0 hard drives can be connected. USB hubs are not supported.
16 USB 2.0 Port
Compatible Buffalo USB hard drives, USB flash drives, digital cameras, and USB UPS connections can be
connected. USB hubs are not supported.
17 LAN Port 1
Use an Ethernet cable to connect this port to your network.
18 LAN Port 2
12
This second Ethernet port may be used for network redundancy or backup. You may connect a second
TeraStation directly to this port for backup.
19 Power Connector
Use the included power cable to connect to an UPS, surge protector, or outlet.
20 Fan
Do not block the fan.
21 Anti-Theft Security Slot
Use this slot to secure your TeraStation with a cable lock (not included).
22 UID Button
Press the UID button on the front or the back of the unit to cycle the blue LED on and off.
23 Serial Number
This sticker shows the TeraStation's serial number.
24 Link LED
Glows orange when the unit is connected to a network.
25 Act LED
This LED shows network activity. It blinks orange when the TeraStation is accessed over the network.
Turning the TeraStation On and Off
Press the power button on the TeraStation to turn it on.
To turn off the TeraStation, press the power button twice. Don't unplug the TeraStation without turning it off first.
You can also shut it down and restart it remotely from Settings.
Shutting Down or Restarting from Settings
1 Double-click the icon.

13
2 Right-click your TeraStation's icon and select Settings. For Mac OS, select the TeraStation's icon while holding
down the control key, then select Settings.
3 Enter the username and password, then click OK.
Note: The default username and password are "admin" and "password".
14
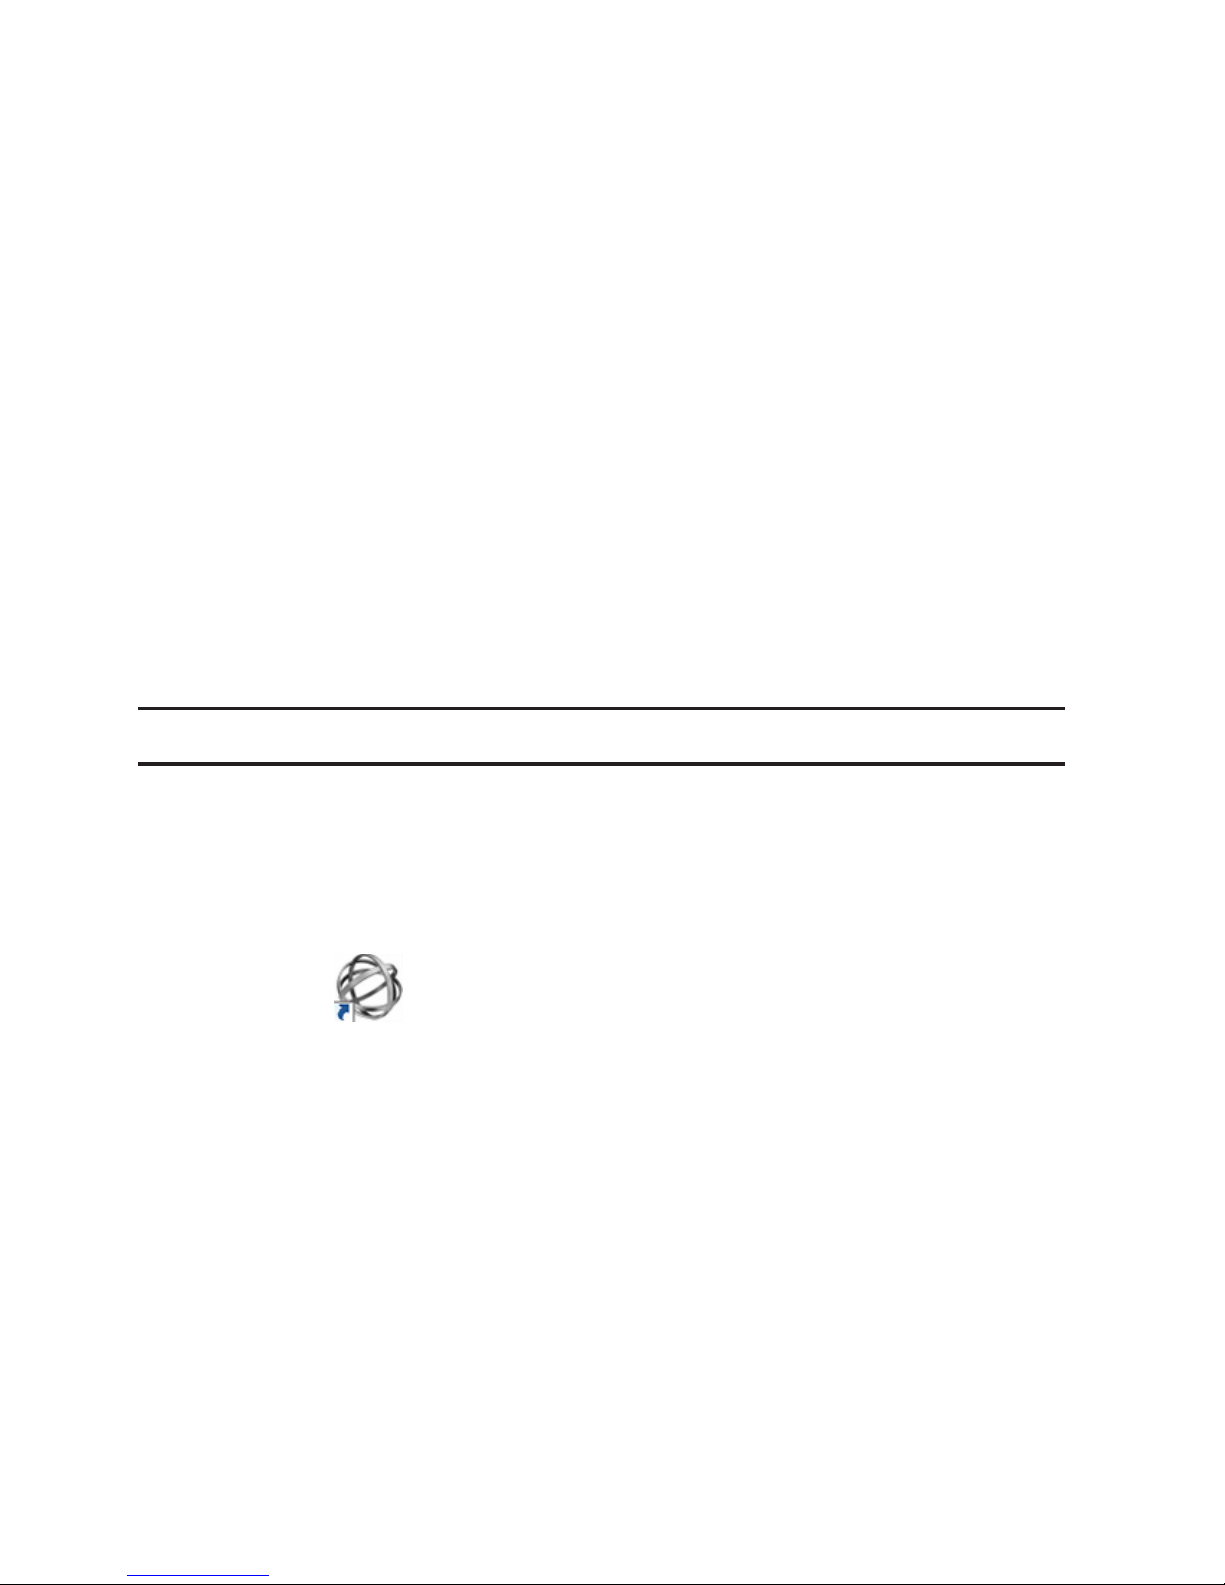
4 Settings will open.
5 Click at the top-right of Settings and choose either Restart or Shut Down.
When all the LEDs on the front of the TeraStation turn off, the shutdown process is complete.
Changing the Administrator Password
After initial setup, follow this procedure to change your password.
1 Double-click the icon to start NAS Navigator2.

15
2 Right-click on your TeraStation's icon and select Settings. On the Mac, select the TeraStation's icon while
holding down the control key, then select Settings.
3 Click Easy Admin.
4 Click Change Password.

16
5 If this screen is displayed, enter the current password and click OK. The default password is "password".
6 Enter the new password (twice) and click Next.
7 Click OK. You have changed the admin password.
Creating a Recovery Drive
To initialize all of the TeraStation's settings, or just restore the admin password to its factory default value, create the
recovery drives as described below.
For Initializing Settings
A system initialization drive can reset all settings to their default values.
Notes:
• Normally, creating and using a system initialization drive will not affect data on the TeraStation. However,
always back up your data regularly!
• This USB drive can be used to recover the system if your TeraStation doesn't boot at all. In this case, if the data
partition is damaged, then all your data will be deleted by the recovery process.

17
1 Insert a 1 GB or larger USB flash drive into a USB port on the TeraStation.
Note: All data on the USB flash drive will be erased!
2 In Settings, navigate to Management - Restore/Erase - USB Options.
3 Select Create a USB drive for initializing settings.
4 Select the USB memory device from "Target USB drive", then click Execute.
5 Enter the 4 digit confirmation number and click OK. The TeraStation will create the initialization drive. This will
take about a minute.
6 When the "finished" dialog opens, the USB initialization drive is ready to use. Dismount the USB drive before
unplugging it. See "Dismounting Drives" in chapter 4 for the instructions on dismounting drives.
For Resetting Password
A password initialization drive can reset the administrator password to its default value ("password"). This could be
very useful if you forget your admin password.
1 Insert a 1 GB or larger USB memory device (not included) to a USB 2.0 port on the TeraStation.
Note: All data on the USB flash drive will be erased!
2 In Settings, navigate to Management - Restore/Erase - USB Options.
3 Select Create a USB drive for resetting the admin password.
4 Select the USB memory device from "Target USB drive" list, then click Execute.
5 Enter the 4 digit confirmation number and click OK. The TeraStation will create the password reset drive. This
will take about a minute.
6 When the "finished" dialog opens, the password reset drive is ready to use. Dismount the USB drive before
unplugging it. See "Dismounting Drives" in chapter 4 for the instructions on dismounting drives.
For instructions on using system initialization or password initialization drives, see chapter 10.

18
Chapter 2 Configuration
Configure and manage your TeraStation using the Settings interface, accessible from a browser window. Open the
interface using the procedure below or type the TeraStation's IP address in the URL field of your browser. Within
Settings, the Easy Admin page gives you quick access to commonly used settings.
Note: Internet Explorer 9, Firefox 18, Google Chrome 24, Safari 5, and later are supported. If you have difficulty
viewing Settings, check the following:
• If there are a large number of registered users, groups, or shared folders, use Firefox instead of Internet
Explorer.
• If you have a proxy server enabled in the browser settings, disable the proxy server.
• With Internet Explorer, set security to Local intranet. On Windows Server 2008 or later version Windows OS,
higher-level security is configured by default. Set the security to a lower level temporarily.
Opening Settings
1 Double-click the icon to start NAS Navigator2.
2 Right-click on your TeraStation's icon in NAS Navigator and select Settings. For Mac OS, click your TeraStation's
icon while holding down the control key, then select Settings.

19
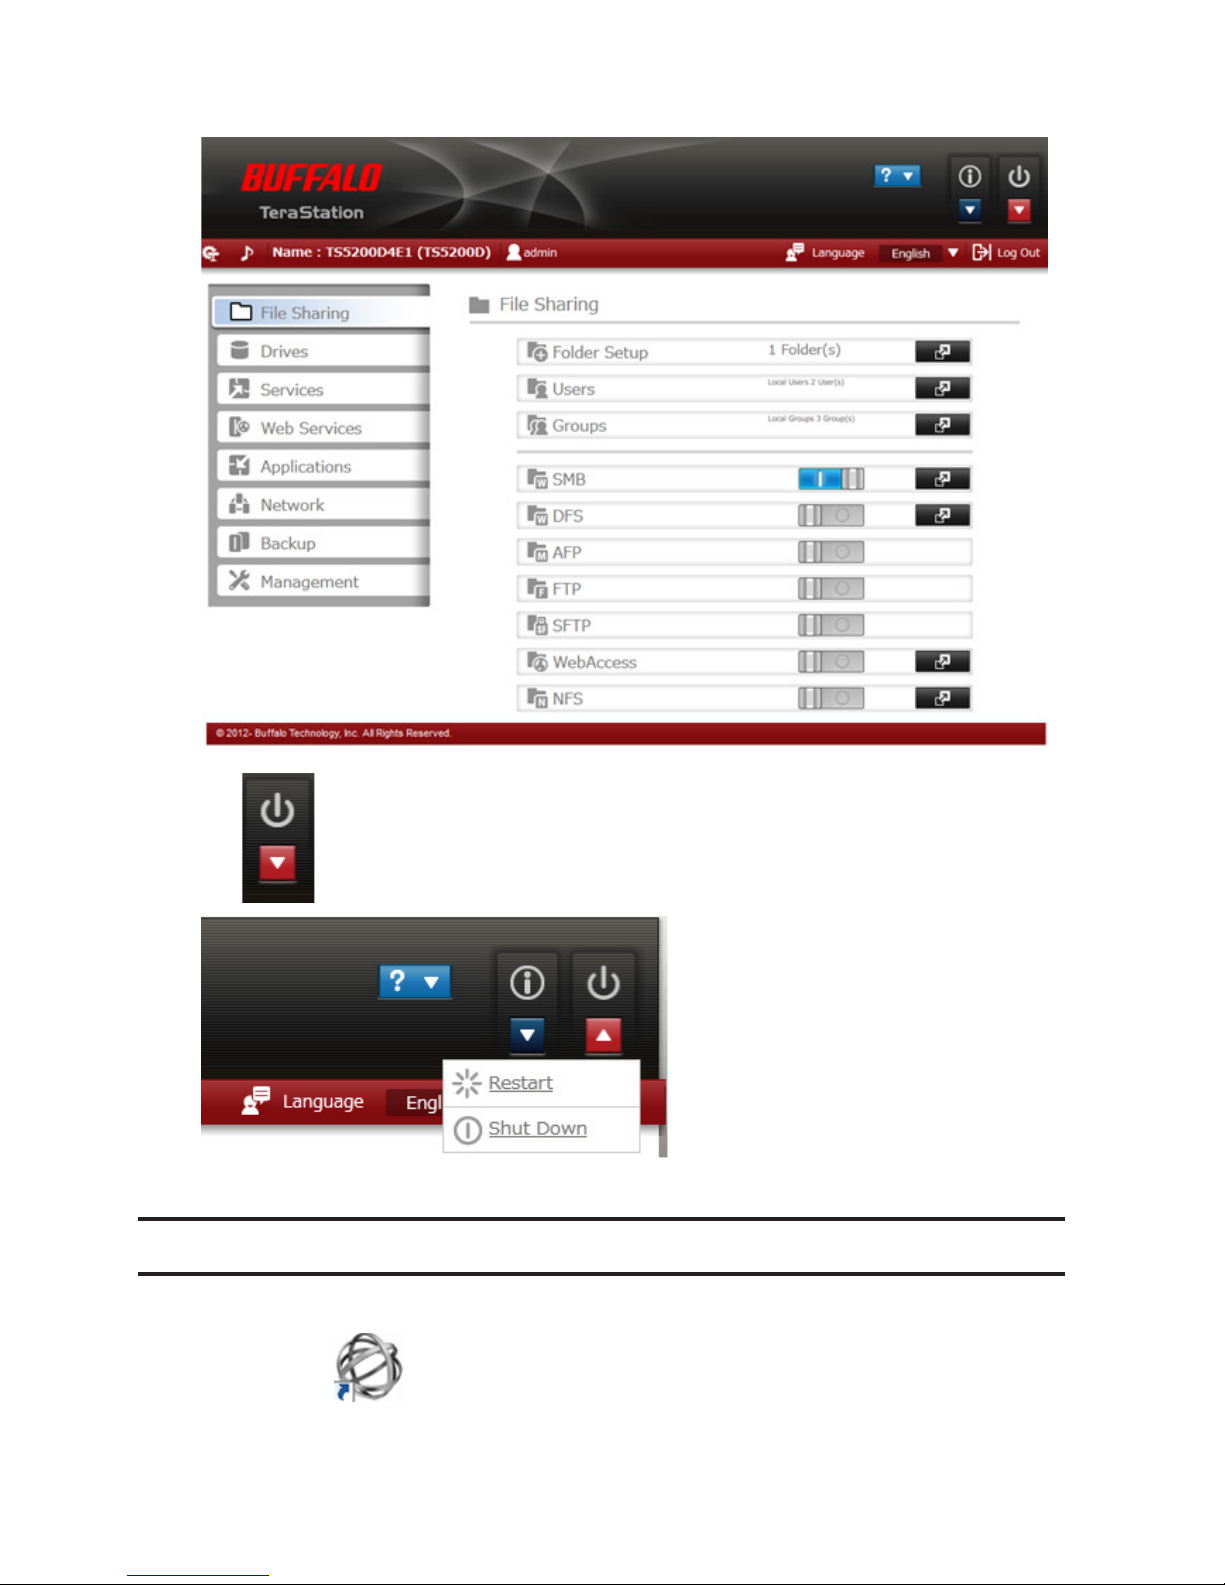
3 Enter the username and password and click OK.
Notes:
• If the time-out period is set to "10 minutes", you will be logged out of Settings after 10 minutes of inactivity.
• Click Secure Connection to log in with an encrypted connection.
4 Settings will open.
Notes:
• Username/Password Combinations:
Username Password Settings Available
admin password All
guest blank System information (read-only)
Your username Your password
If a user is assigned as an administrator, all settings
are available. If assigned under another group, only
system information (read-only) is available.

20
• Click to open Easy Admin.
• Click to play a tone from the TeraStation for easy location.
• You can also use Bonjour to log in to Settings from OS X 10.4 or later. In Safari, click View - Show Bookmarks
Bar. From Bookmarks, click Bonjour - TeraStation name.
Opening Easy Admin
The Easy Admin page makes it easy to change common settings. Follow the steps below to open Easy Admin.
1 Double-click the icon to start NAS Navigator2.
2 Right-click on your TeraStation's icon and choose Settings. For Mac OS, click the TeraStation icon while holding
down the control key, then select Settings.
21
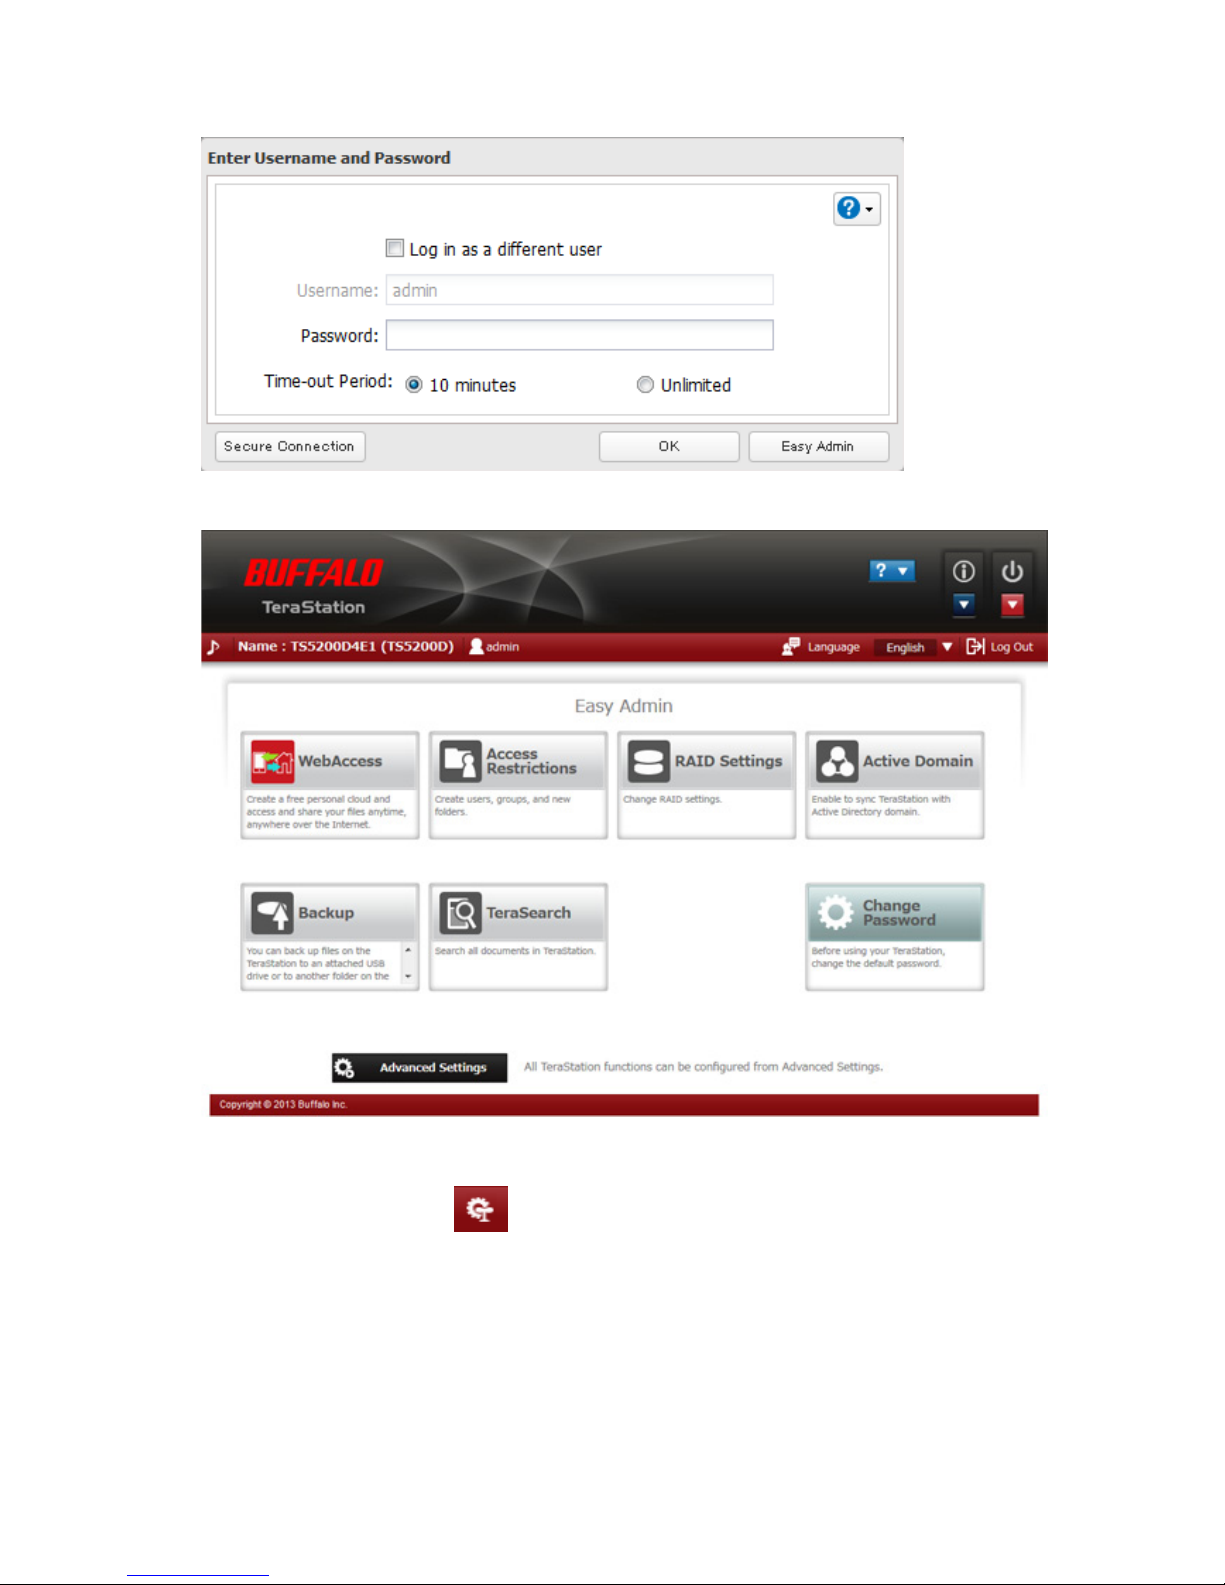
3 Click Easy Admin.
4 The Easy Admin screen will open.
Notes:
• If you click any buttons , you will need to enter a username and password.
• In Advanced Settings, click the icon at the top left to open Easy Admin.

22
Chapter 3 Access Restrictions
You may restrict access to specific shared folders, including external USB drives.
Notes:
• Access restrictions can be set separately for each shared folder, but not for folders within the shared folders.
• Configure access restrictions through Settings. Configuring access restrictions through Windows is not
supported and may cause unexpected behavior.
• You can also configure users, groups, and shared folders from Easy Admin by clicking Access Restrictions.
• Shared folders with limited access can still be used as backup destinations.
• If you change access restrictions for a user or group while they are accessing files, unexpected behavior may
result.
Adding a Shared Folder
1 In Settings, click File Sharing.
2 Click to the right of "Folder Setup".
3 Click Create Folder.

23
4 Configure the desired settings, then click OK.
Notes:
• Names may contain up to 27 alphanumeric characters, hyphens (-), and underscores (_). Do not use a symbol
as the first character in a name.
• The description may contain up to 75 alphanumeric characters, hyphens (-), underscores (_), and spaces. Do
not use a symbol or space as the first character.
• You may create up to 400 shared folders.
• The names of shared folders should not use characters from more than one language. For example, mixing
Japanese and Korean characters in names is not supported.
• If multi-byte characters are used in shared folder names, configure the client language to match the
characters in Management - Name/Time/Language.

24
• The following characters are handled differently by Mac OS and Windows. Avoid using these characters when
sharing data between Mac OS and Windows:
• Windows does not support some characters that Mac OS and the TeraStation allow. If you create a filename
on a Mac with any of the following characters, it will not display correctly on a Windows computer. With
OS X 10.2 or later, you may have to connect to the TeraStation via AFP in order to display or copy any of the
following characters:
? [ ] / \ = + < > ; : " , | *
• Do not use any of the following words as the name of a shared folder. These words are reserved for internal
use by the TeraStation: info, spool, lost+found, global, printers, homes, lp, authtest, ram, msdfs_root, mtdaapd, usbdisk# (where # is a number, for example: usbdisk1)
• Don't use the following unsupported characters in shared folder names, workgroup names, or filenames:
• File and folder names may contain up to 255 single-byte characters.
• Configure hidden and read-only file attributes in Settings. Configuring them from within Windows is not
supported and may cause unexpected behavior.
• Folder and workgroup names whose names contain non-Roman characters may not be displayed correctly.
• If shared folders are accessed from a Mac, information files for the Mac may be generated automatically. Do
not delete these files. If they are deleted using Windows, this may prevent further access from a Mac.
• If an SMB connection is used with OS X 10.3.9, the names of mounted volumes may appear as unreadable
characters in Finder and other applications. This is not a problem with the filename or data.
• With OS X 10.5 to 10.5.6, Spotlight searches are not supported over AFP connections. Use SMB connections or
upgrade to OS X 10.5.7 or later.
• The TeraStation belongs to the default zone in AppleShare; the zone cannot be specified.
• When files are copied to the TeraStation or to a USB drive connected to the TeraStation, file information such
as date created, date modified, and other date information may be updated or changed.
• During a file transfer, if settings are changed, the file transfer operation may be aborted.
• File copying to the TeraStation is protected by a journaling file system. If the Ethernet cable is disconnected
or a power outage occurs while copying data, the following may occur:
- Preset data such as the TeraStation name, users, and groups may be erased.
- An incomplete file may be copied and the file can no longer be deleted. If this happens, restart the
TeraStation, delete the file, and perform the copy operation again.
• The details for a shared folder may show that offline files are enabled for the folder even when they are
disabled for all folders. However, offline files really ware disabled correctly; it is only the details that are
wrong. This behavior will be corrected in a future firmware update.

25
Recycle Bin
To protect your data from accidental deletion, you may configure your TeraStation to use a recycle bin instead of
deleting files immediately. The recycle bin will only work with SMB connections. To empty the recycle bin, click File
Sharing - Folder Setup - Empty Recycle Bin in Settings.
Notes:
• You can prevent guests and other users from emptying the trash by navigating to File Sharing - SMB - Recycle
Bin Permissions and selecting "Administrator only".
• If you use Mac OS, enable "Exclude Mac OS temp files from recycle bin". If this setting is changed, files in the
recycle bin may be corrupted.
Read-only Shares
By default, new shares are set with read & write access, but you may change the attribute to Read Only in Attribute.
Read-only shares and HFS+ formatted USB hard drives will have "Read-only" added to the shared folder description.
Hidden Shares
If hidden shares is enabled, shared SMB folders will not be displayed in My Network, and only certain users are
allowed to access them. To hide a shared SMB folder, follow the instructions below.
1 In Settings, navigate to File Sharing - Folder Setup and choose a shared folder or a USB drive to configure
hidden shares.
2 Check "Hidden Share (SMB Only)" and click OK.
Note: If protocols other than "SMB" or "Backup" under "LAN Protocol Support" are enabled, the hidden shares
option will be grayed out and cannot be selected.
To open a hidden folder, click Start - Search programs and files and enter "\\TeraStation name\Shared folder name$\"
for the name. For example, if the TeraStation name is "TSXXX001" and the shared folder name is "share", enter "\\
TSXXX001\share$\" to open it.
Adding Users
Note: The TeraStation can register a maximum 300 of users, which includes the default users "admin" and
"guest".
1 In Settings, click File Sharing.
2 Click to the right of "Users".
3 Click Create User.

26
4 Enter the desired settings, then click OK.
Notes:
• Usernames may contain up to 128 characters, including hyphens (-), underscores (_), periods (.), !, #, &, @, $, *,
^, and %. Do not use a symbol as the first character.
• The user ID should be a number from 1000 to 1999. Each user ID should be unique. If this field is left blank, a
user ID is assigned automatically.
• Do not duplicate user IDs, group IDs, usernames, or group names. Each should be distinct and unique.
• The description may contain up to 75 alphanumeric characters, hyphens (-), underscores (_), and spaces. Do
not use a symbol or space as the first character.
• Passwords may contain up to 20 alphanumeric characters and the following characters: - _ @ ! # $ % & ' ( ) * + ,
. / ; < > = ? " [ ] ^ { } | ~. Do not use a symbol other than an underscore (_) as the first character.
• Use the same username and password for both Windows and the TeraStation or you may not be able to
access shared folders.
• Do not use any of the following words as a username: root, bin, daemon, sys, adm, tty, disk, lp, sync,
shutdown, halt, operator, nobody, mail, news, uucp, ftp, kmem, utmp, shadow, users, nogroup, all, none,
hdusers, admin, guest, man, www, sshd, administrator, ftpuser, apache, mysql
Importing User Information
You can import users in File Sharing - Users by clicking Import CSV File. Existing users will be overwritten.
Format for user data: Username (required), password (required), and user description (optional).
Examples:
username1,password1,comment1

27
username2,password2,comment2
username3,password3,comment3
Guidelines:
• Use commas (,) as separators. Do not put spaces before or after commas.
• If a line has an incorrect format, the user on that line will not be registered.
• If a username exists, the new user information will overwrite the old information.
• Do not use commas (,) in the username, password, or user description.
Note: Imported users are added to the "hdusers" group automatically.
Adding Groups
1 In Settings, click File Sharing.
2 Click to the right of "Groups".
3 Click Add Group.

28
4 Enter settings, then click OK.
Notes:
• Group names may contain up to 20 alphanumeric characters, hyphens (-), underscores (_), and periods (.). Do
not use a symbol other than an underscore (_) as the first character.
• Group descriptions may contain up to 75 alphanumeric characters, hyphens (-), underscores (_), and spaces.
Do not use a symbol or space as the first character.
• If the group ID field is left blank, a group ID is automatically assigned. Use numbers between 1000 and 1999
to set a group ID manually. Don't use duplicate group IDs.
• You may register up to 300 groups with the TeraStation.
• If you are logged in as a member of the general users group, you can only change your own password. If
you're logged in as an administrator, you can change any settings, including other users' passwords. If you are
logged in as a member of the power users group, you can create and edit shared folders, users, and groups.
• Do not use any of the following words as a group name: root, bin, daemon, sys, adm, tty, disk, lp, sync,
shutdown, halt, operator, nobody, mail, news, uucp, ftp, kmem, utmp, shadow, users, nogroup, all, none,
hdusers, admin, guest, man, www, sshd, administrator, ftpuser, apache, mysql

29
Configuring Access Restrictions
Local Users and Groups
1 In Settings, click File Sharing.
2 Click to the right of "Folder Setup".
3 Click the shared folder that you want to set access restrictions for.
4 Click Edit.
5 Enable "Access Restrictions".
6 Select the level of access for the user or group you added.
 Loading...