

Page 1

Page 2

4030 W. Braker Lane #120
Austin, TX 78759
800-456-9799
www.buffalotech.com
Buffalo Technology (USA), Inc. is a leading global provider of affordable, easy-to-use, next-generation wired and wireless network solutions for the consumer, SOHO
and SMB markets. With its expansion into the U.S. retail market, Buffalo offers Home users a full suite of wireless Home networking solutions such as its awardwinning line of AirStation 54g products; its 125* High-Speed Mode™ 802.11g products; and its versatile line of 802.11a/b/g combo products. Buffalo completes its
offerings with additional world-class networking solutions that include memory, storage and multimedia products – perfectly suited for any wireless environment.
© Buffalo Technology (USA), Inc. Buffalo Technology, Buffalo Technology logo and AOSS logo are registered trademarks of Buffalo Technology (USA), Inc. The names and logos of other companies mentioned
herein belong to their respective owners.
PY00-30049-DM20-01 v3.1
Page 3
PC–P3LWG/DVD
Page 4

Contents
Safety Information . . . . . . . . . . . . . . . . . . . . . . . . . . . . . . . . . . . . . . . . . . . . . . . . . . . . .3
Introduction . . . . . . . . . . . . . . . . . . . . . . . . . . . . . . . . . . . . . . . . . . . . . . . . . . . . . . . . . .8
High-Definition Info . . . . . . . . . . . . . . . . . . . . . . . . . . . . . . . . . . . . . . . . . . . . . . . . . . . .8
Package Contents . . . . . . . . . . . . . . . . . . . . . . . . . . . . . . . . . . . . . . . . . . . . . . . . . . . . .9
System Requirements . . . . . . . . . . . . . . . . . . . . . . . . . . . . . . . . . . . . . . . . . . . . . . . . . .9
Remote Control . . . . . . . . . . . . . . . . . . . . . . . . . . . . . . . . . . . . . . . . . . . . . . . . . . . . . .10
Hardware Diagrams . . . . . . . . . . . . . . . . . . . . . . . . . . . . . . . . . . . . . . . . . . . . . . . . . .12
Connecting LinkTheater to the Display . . . . . . . . . . . . . . . . . . . . . . . . . . . . . . . . . . . .13
Configuring LinkTheater Settings . . . . . . . . . . . . . . . . . . . . . . . . . . . . . . . . . . . . . . . .15
Using AOSS . . . . . . . . . . . . . . . . . . . . . . . . . . . . . . . . . . . . . . . . . . . . . . . . . . . . . . . . .19
External Wireless Antenna Installation . . . . . . . . . . . . . . . . . . . . . . . . . . . . . . . . . . . .19
Standard Controls / Important Tips . . . . . . . . . . . . . . . . . . . . . . . . . . . . . . . . . . . . . . .20
The Home Screen . . . . . . . . . . . . . . . . . . . . . . . . . . . . . . . . . . . . . . . . . . . . . . . . . . . .21
DVD / VCD Playback . . . . . . . . . . . . . . . . . . . . . . . . . . . . . . . . . . . . . . . . . . . . . . . . . .22
DVD / CD File Playback. . . . . . . . . . . . . . . . . . . . . . . . . . . . . . . . . . . . . . . . . . . . . . . .23
USB Device Playback . . . . . . . . . . . . . . . . . . . . . . . . . . . . . . . . . . . . . . . . . . . . . . . . .25
PC Playback . . . . . . . . . . . . . . . . . . . . . . . . . . . . . . . . . . . . . . . . . . . . . . . . . . . . . . . .27
Configuring the LinkTheater Software . . . . . . . . . . . . . . . . . . . . . . . . . . . . . . . . . . . .30
LinkTheater PC Software Playback . . . . . . . . . . . . . . . . . . . . . . . . . . . . . . . . . . . . . . .34
Windows Media Connect Setup . . . . . . . . . . . . . . . . . . . . . . . . . . . . . . . . . . . . . . . . . .39
Windows Media Connect Playback . . . . . . . . . . . . . . . . . . . . . . . . . . . . . . . . . . . . . . .41
Using CinemaNow . . . . . . . . . . . . . . . . . . . . . . . . . . . . . . . . . . . . . . . . . . . . . . . . . . . .42
Macintosh Software Installation . . . . . . . . . . . . . . . . . . . . . . . . . . . . . . . . . . . . . . . . . .44
LinkStation and LinkTheater . . . . . . . . . . . . . . . . . . . . . . . . . . . . . . . . . . . . . . . . . . . .46
TeraStation and LinkTheater . . . . . . . . . . . . . . . . . . . . . . . . . . . . . . . . . . . . . . . . . . . .49
TeraStation and LinkStation Playback . . . . . . . . . . . . . . . . . . . . . . . . . . . . . . . . . . . . .51
Future Capabilities . . . . . . . . . . . . . . . . . . . . . . . . . . . . . . . . . . . . . . . . . . . . . . . . . . . .53
Troubleshooting . . . . . . . . . . . . . . . . . . . . . . . . . . . . . . . . . . . . . . . . . . . . . . . . . . . . .54
Technical Specifications . . . . . . . . . . . . . . . . . . . . . . . . . . . . . . . . . . . . . . . . . . . . . . .56
Warranty Statement . . . . . . . . . . . . . . . . . . . . . . . . . . . . . . . . . . . . . . . . . . . . . . . . . .57
2
Page 5
Safety
Caution
Reference
Using this Safety Guide
In order to use this guide correctly, the meaning of the notations and symbols used are described below.
Notations and Symbols
Caution Mark
Items to which you must pay attention when handling the product. Failure to follow this
mark may result in personal injury and/or damage the equipment.
Reference Mark
Refers to the related subject page.
For your safety, please be sure to follow the instructions given below:
To prevent unexpected injury to yourself or others, or damage to the equipment, be sure to follow all the safety
precautions given below. To use the LinkTheater correctly, first read these precautions and make sure that you
understand the contents. After reading, be sure to store this manual in a safe place so that you can refer to it if
necessary.
This manual contains instructions concerning the general operation of the computer system to which the Linktheater
is connected, as well as those concerning the LinkTheater itself.
Please note that our warranty will not cover any damage or failures of the computer, the loss or corruption of data,
or damage to the LinkTheater due to misuse.
Meaning of Notations and Symbols
Meaning of Notations
Danger
Indicates a hazardous situation, which, if not avoided, runs a high risk of death or serious injury.
Caution
Indicates a potentially hazardous situation which, if not avoided, may result in death or serious injury.
Warning
Indicates a potentially hazardous situation which, if not avoided, may result in minor or moderate personal injury
and/or damage to the equipment.
Meaning of Symbols
This symbol indicates warnings and cautions e.g. electric shock warning
This symbol indicates actions that must not be performed (prohibited actions)
This symbol indicates actions that must be performed (essential actions)
3
Page 6

Danger
Prohibited
Prohibited
Prohibited
Contact
Prohibited
Strongly
Recommended
Strongly
Recommended
Disassembly
Prohibited
Strongly
Recommended
Strongly
Recommended
Prohibited
Warning
When handling batteries
Do not disassemble or remodel.
Do not place a metal wire between the + and – pads. Do not carry with a hairpin or necklace.
Do not place in the fire or overheat.
Do not pierce with a nail, hit with a hammer or stamp down.
Or heat will be generated and the battery will ignite and explode.
When handling batteries
Do not disassemble, remodel, repair or charge.
Do not use a new and a used battery or two batteries of a different make together.
Do not mistake the + and – nodes when inserting the battery.
Do not leave used batteries in the device.
Or heat will be generated and the battery will ignite and explode.
When a battery leaks do not touch the liquid.
The liquid that leaks from a battery may burn. If the liquid gets on skin or clothing, wash with clean water.
If the liquid gets in your eye, wash with clean water immediately and seek medical treatment.
When changing the batteries, only used those which have been specified.
Using batteries other than that specified may result in the leakage of fluid, and the battery may ignite
and explode.
Make sure to observe the instructions of the computer and peripheral manufacturers when
installing and using the LinkTheater.
Do not attempt to disassemble or repair the LinkTheater.
This may result in fire or electric shock
Using the device with a different voltage such as may exist overseas, may result in a short circuit,
smoke or fire.
Only insert the plug into a 100V (50/60Hz) AC socket.
Insert the AC adapter firmly into the AC Socket.
Using the equipment without the AC Adapter firmly inserted may cause a short circuit or overheating, or
result in fire or electric shock.
Do not damage, process, overheat, or attempt to repair the power supply cable, as this may result
in fire or electric shock.
- When installing the equipment, do not crimp the power supply cable between walls and racks
(shelves) etc.
- Do not place heavy objects on the power supply cable, or pull at the cable.
- Do not place the power supply cable close to heat sources, or overheat the cable in any way.
- When removing the power supply cable, be sure to remove it my holding the plug.
- Do not bend the cable past its natural bending radius.
- Do not move the LinkTheater while the power supply cable is still connected.
If the power supply cable is damaged consult your dealer.
4
Install the equipment in a location where children cannot reach the interior of the electrical
equipment, cables, or connectors.
Failure to do so may result in injury.
Page 7
A small child should only use the LinkTheater under supervision of an adult.
Strongly
Recommended
Strongly
Recommended
Strongly
Recommended
Strongly
Recommended
Remove
Power P
Remove
Power P
Remove
Power P
Water
Prohib
Prohibited
Prohibited
Prohibited
Do not handle the equipment with wet hands.
This may result in electric shock if the LinkTheater is connected to the AC power supply.
Even when connected it may cause internal damage to the LinkTheater.
If you see smoke or there is a strange smell or sound, remove the plug from the AC power supply
socket.
Continuing to use the device under these conditions may result in a short circuit, fire, or electric shock.
Consult with your dealer immediately.
Do not use the LinkTheater in bathrooms or other locations with a lot of water or humidity.
Using the device under these conditions may result in fire or electric shock .
If the product is dropped or subjected to a severe shock, remove the AC adapter immediately.
Continuing to use the device under these conditions may result in a short circuit, fire, or electric shock.
Consult with your dealer immediately.
Caution
If liquid or foreign matter enters the equipment, remove the plug from the power socket.
Continuing to use the device under these conditions may result in a short circuit, fire, or electric shock.
Consult with your dealer immediately.
Do not look straight at the Laser Beam.
Do not peer into or open the casing and look straight at the Laser light, as it may be hazardous for your
sight.
To Prevent damage due to static electricity, before touching the equipment, first touch a nearby
metal object (such as a door handle or metal window blinds) to discharge any static electricity
from your body.
Static electricity from your body may result in damage to the equipment.
Only use the power cable and AC adapter provided with the LinkTheater.
The polarity and voltage of the terminal may differ between makes. Which may result in smoke and
fire.
Please remove the battery if not using the LinkTheater over a long period.
The battery may leak, which would dirty the device and might cause damage to it, or cause a fire.
Do not use the LinkTheater if there has been a leakage of battery fluid.
Continuing to use the device under these conditions may result in a fire, or electric shock. Consult with
your dealer immediately.
5
Page 8
Carefully read the manuals provided by the manufacturers of all other products used (i.e. PC).
Strongly
Recommended
Strongly
Recommended
Strongly
Recommended
Prohibited
Prohibited
Prohibited
Prohibited
Prohibited
Do not install the LinkTheater in the following locations, as doing so may result in an electric
shock or fire, or may adversely affect the equipment.
- Locations with strong magnetic fields (may result in damage).
- Locations with static electricity (may result in damage).
- Locations prone to vibration (may result in damage).
- Locations that are not level (may result in rolling, falling, or injury).
- Locations in direct sunlight (may result in damage or deformation).
- Locations close to fire or subject to heating (may result in damage or deformation).
- Locations where there is a danger of current leakage (may result in damage or electric shock).
- Locations where there is a danger of water leakage (may result in damage or electric shock).
Before installing or uninstalling the LinkTheater make sure to create backup files of all hard disk
data to another media (MO disk, floppy disk etc.).
When making any change to the PC environment there is always a possibility that the data on the hard
disk may be lost or corrupted, therefore it is always advisable to create a backup.
Buffalo will not be held responsible for loss or corruption of hard disk data.
Please remove any dust or dirt from the head of the connectors and do not touch with
your hands.
Dirt on the connector may cause damage.
Do not place any heavy object on top of the LinkTheater.
Doing so may damage the LinkTheater.
Care for CD or DVD media.
- Do not expose to direct sunlight
- Do not use abrasive or solvent cleaners use a slightly damp, soft, lint-free cloth to remove spots,
dust, or fingerprints. Always wipe from the center to the outer edges and never wipe in a
circular motion.
- Do not use adhesive labels or write on the disk with a pencil or ballpoint pen.
- Store discs in a cool, dry, dust free place.
- Handle the disc only by the outer edge or inner hole, to keep fingerprints and smears from
the surface.
- Store discs in protective storage cases to avoid scratches or damage while carrying.
Do not used scratched or damaged media.
Using such media may result in damage to the LinkTheater.
Please take care not to damage the reflective side of the media.
- Do not scratch the top (label surface) of the CD or DVD.
- Do not stack uncovered CDs or DVDs on top of each other.
- Do not write on the label side with a ballpoint pen or any hard object.
- Do not use adhesive labels.
6
Do not move the LinkTheater with a CD or DVD inside.
Do not move the LinkTheater while still operating or while a CD or DVD are inside.
Doing so may cause damage to the media or the LinkTheater. Also, before moving the LinkTheater,
switch it off and unplug the power.
Page 9

Regularly clean the lens.
Strongly
Recommended
Strongly
Recommended
Prohibited
Dust and cigarette smoke may adhere to the lens causing poor reading quality or may prevent writing to
the media Use a cleaning kit to clean the lens regularly.
Do not use abrasive or solvent cleaners.
Use a soft cloth when cleaning the LinkTheater. If very dirty, use a slightly damp cloth to remove any
dirt.
Please follow local regulations when discarding the LinkTheater.
Refer to local rules and regulations for the appropriate method to discard the contents of
this product.
7
Page 10

Introduction
Buffalo Technology’s LinkTheater PC-P3LWG/DVD Wireless High-Definition Media Player is the
missing link between your TV, home entertainment center, and computer network. Now, you can
play the movies, music, and photos stored on your computers from the comfort of your living room,
through your TV and home entertainment center.
The LinkTheater can connect to wired or wireless networks. With 802.11g technology, your media
files can move through your wireless network at up to 54 Mbps*, and the RJ-45 Ethernet port is good
for 100 Mbps with wired connections.
The LinkTheater has a wide variety of AV connections on the back, including High-Definition
compatible video connectors as well as digital Dolby™ 5.1 and DTS compatible audio connectors.
LinkTheater also supports Universal Plug & Play for easy installation.
Most of the industry’s most popular video, image, and audio formats are supported by LinkTheater.
LinkTheater includes support for the following file types:
Video: AVI, DAT, MPEG 1, MPEG 2, MPEG 4, DivX, Xvid, WMV, WMV 9, DivX HD, WMV HD,
VOB, ASF
Image: JPEG, JPEG2000, BMP, GIF, PNG, TIF
Audio: MP3, WMA, WAV, OGG Vorbis, AIFF, PLS, M3U
Besides ordinary CD's and DVD's, LinkTheater's player can handle the following media: CD-ROM,
CD-R, CD-RW, DVD-ROM, DVD-R, DVD-RW, DVD+R, DVD+RW
Prepare to experience one of the highest quality, most versatile media players available! Buffalo
Technology’s LinkTheater will provide seamless access to your multimedia archives.
The LinkTheater supports playback on high-definition displays. If a high-definition display is being
used, media playback is automatically upconverted to high-definition (720p or 1080i). This results in
enhanced image and video quality over a standard player on high-definition displays. Additionally,
the menu and browsing displays may be displayed in high-definition for a richer user experience.
Unlike most other media players, the LinkTheater also supports playback of true, native highdefinition video files like DivX HD and WMV HD.
NOTE: Due to the requirements of the DVD Consortium and MPAA, DVD Video playback is fixed
at 480p and not upconverted to 720p or 1080i.
*54 Mbps is the theoretical maximum data transfer rate of the IEEE 802.11g standard. Actual wireless network
data transfer speed is limited by environmental and system factors and will be less.
8
Page 11
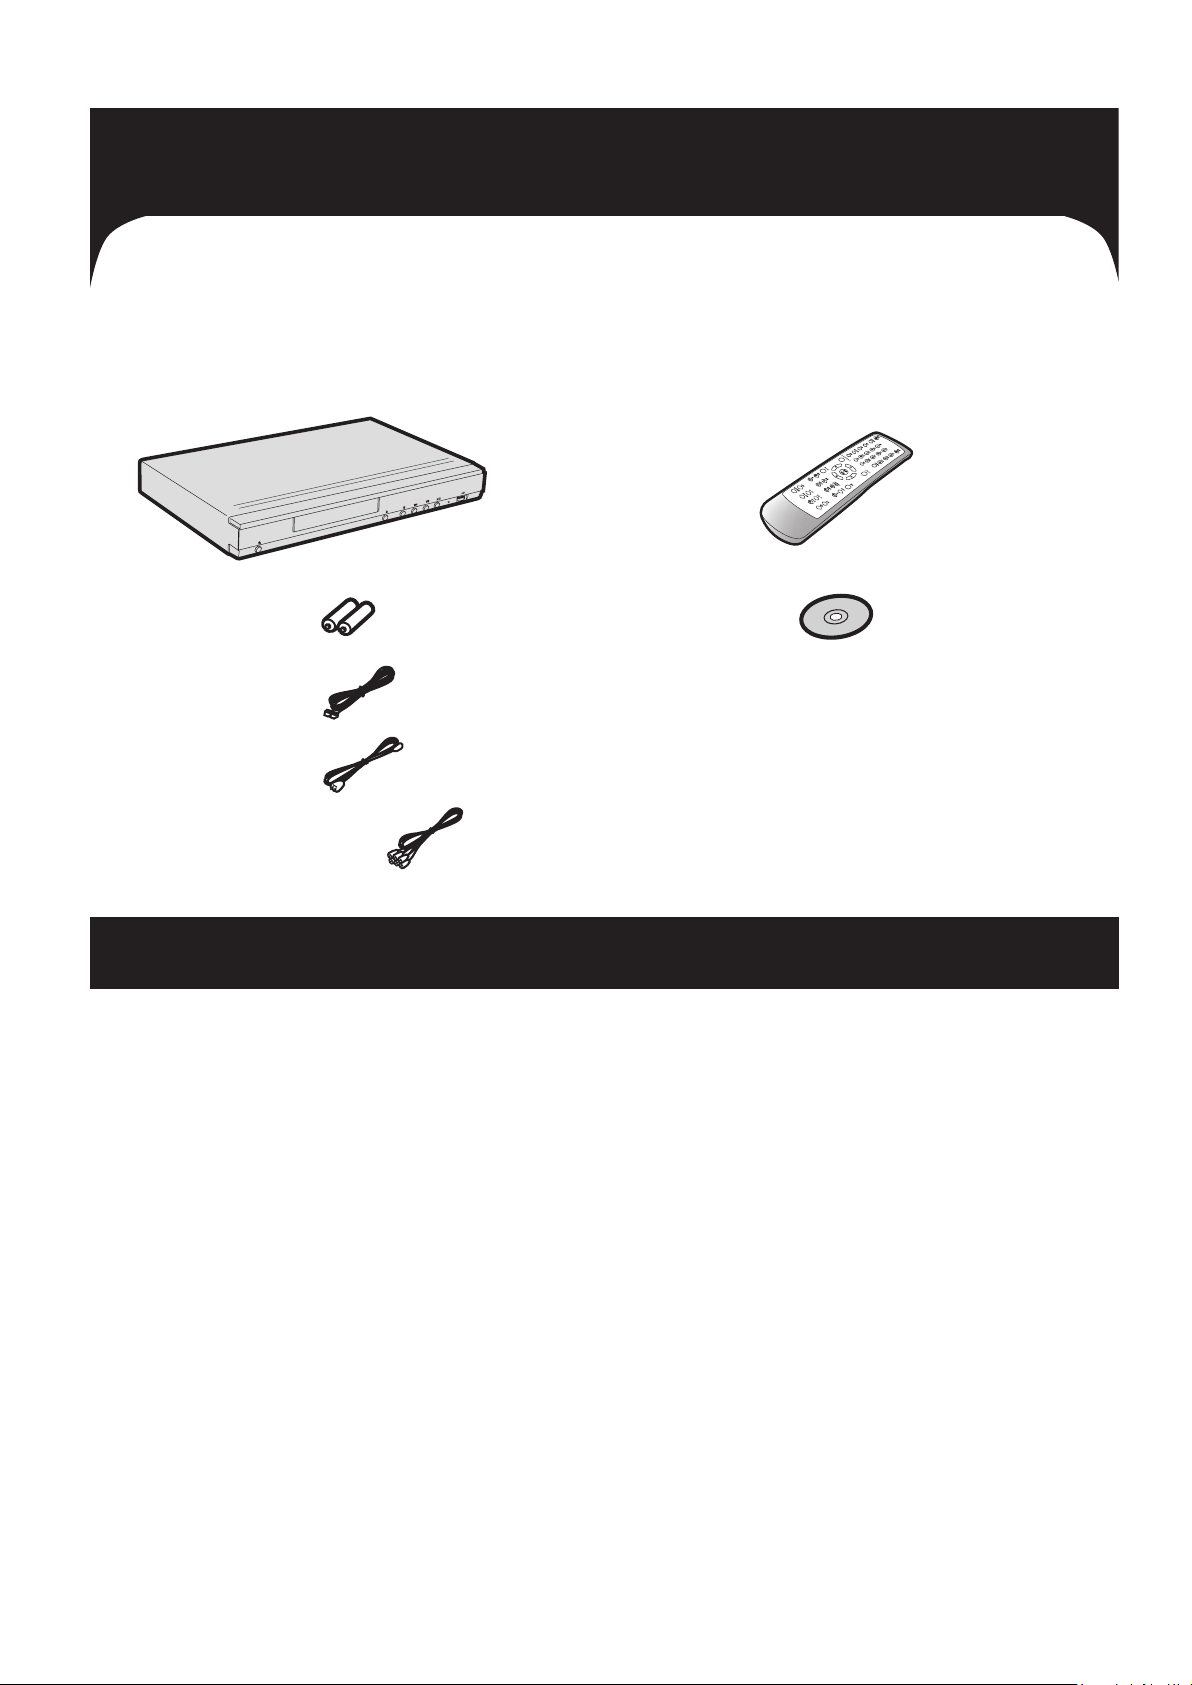
Package Contents
The LinkTheater package should include the following items. If any items are missing, contact your retailer or
reseller.
• LinkTheater
• AAA Batteries
• Power Cable
• Ethernet Cable
• AV (Composite) Cable
• Remote Control
• CD-ROM
• Manual (This Guide)
• Warranty Card
System Requirements
• Television or monitor with one of the following video input connectors:
• Composite (RCA) Video, S-Video, Component Video, or D4 video
• Television, monitor, audio receiver, or powered speakers with one of the following audio input connectors:
• Analog RCA, Coaxial Digital, or Optical Digital audio
• A wired or wireless network (802.11b or 802.11g)
• One or more of the following media sources:
• Windows 98SE/ME/2000/XP PC or Apple OS X Mac with a CD-ROM or DVD-ROM Drive
(500 MHz or above is recommended)
• LinkStation Network Storage Center
(with at least version 1.46 firmware; firmware update program is included on the CD-ROM)
• TeraStation Network Storage Center
• USB Hard Drive
• USB Multi-Card Reader
• USB Memory Stick
• CD-ROM, CD-R, CD-RW, DVD-ROM, DVD-R, DVD-RW, DVD+R, DVD+RW
9
Page 12
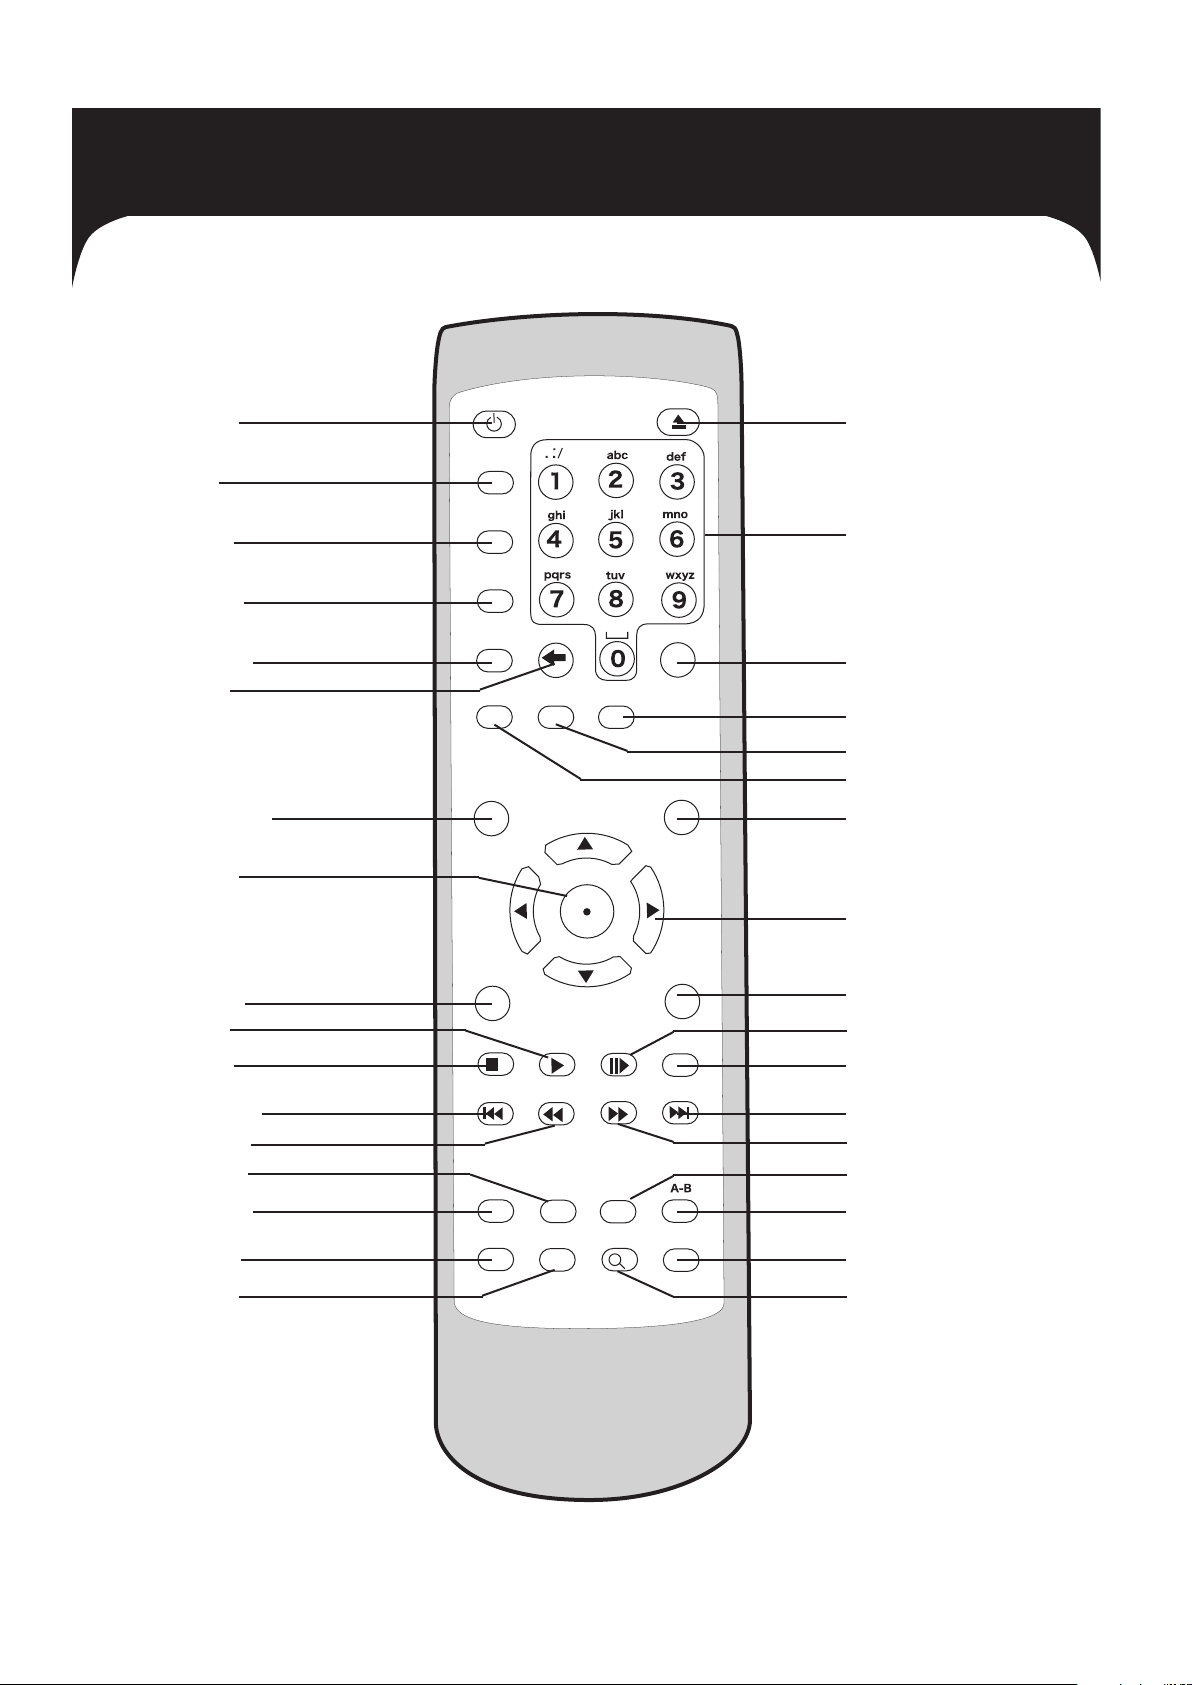
Remote Control
Power
Info
Setup
Refresh
TV
Clear CAPS/NUMS
Video
Top Menu Menu
Home
Stop Play Pause Slow
Previous Rewind Forward
Subtitle Search Repeat
Audio Angle Zoom Mute
Next
Return
Enter
Music Photo
Open/Close
1. Power
3. Info
4. Setup
5. Refresh
6. TV Mode
7. Clear
13. Top Menu
15. Enter
17. Home
19. Play
2. Open/Close Tray Drawer
8. Alphanumeric Buttons
9. Caps/Num
10. Photo
11. Music
12. Video
14. Menu
16. Directional Pad
18. Return
21. Pause/Step
20. Stop
23. Previous
24. Rewind
27. Search
28. Subtitle
31. Audio
33. Angle
10
22. Slow
25. Next
26. Fast Forward
29. Repeat
30. A-B
32. Mute
34. Zoom
Page 13

Remote Control
1. Power – Turns the LinkTheater on and off.
2. Open/Close Tray Drawer – Opens and closes the
LinkTheater’s DVD drive door
3. Info – Provides on-screen information when viewing
or playing a file
4. Setup – Setup options for LinkTheater configuration
5. Refresh – Refreshes the information and file list on
the screen
6. TV Mode – Toggles the different display modes; the
modes are as follows:
a. Composite/S-Video (Default Setting)
b. 480i Component Video / D4
c. 480p Component Video / D4 (Progressive Scan)
d. 720p Component Video / D4 (HDTV)
e. 1080i Component Video / D4 (HDTV)
Toggle the proper TV Mode button by pressing TV
Mode and then the ‘Enter’ button until the proper
display is visible on your screen. Depending on
what video cables are used to connect to your
TV, there may be times where the screen remains
black; in this case, continue to press the ‘TV Mode’
button followed by the ‘Enter’ button until the best
visible display is found.
7. Clear – Clears the last text or numerical entry
8. Alphanumeric Buttons – Used for character input.
Press the numbers multiple times to begin using
alphabetic characters. Press the ‘1’ key multiple
times to access punctuation marks and press the ‘0’
key to insert a space.
9. Caps/Num – Press once to lock Alphanumeric buttons
to all capital letters, press again to lock Alphanumeric
buttons to numeric entry only, press again to return to
normal Alphanumeric entry operation.
10. Photo – Press the Photo button to list only available
image files on the display.
11. Music - Press the Music button to list only available
audio files on the display.
12. Video - Press the Video button to list only available
video files on the display.
13. Top Menu – Access the Top Menu in DVD Video
Playback
14. Menu – Access the Menu in DVD Video Playback
15. Enter – Selects a file for playback, selects a field for
input, confirms on screen messages
16. Directional Pad – Selects the proper content on the
display.
17. Home – Returns the LinkTheater to the Home ("login
page") menu
18. Return – Takes the display back to the previously
viewed screen.
19. Play – Plays a file or starts a slide show
20. Stop – Stops file playback or stops a slide show
21. Pause/Step – Pauses file playback, press again to
step one frame forward
22. Slow – Begins slow motion playback, press multiple
times to increase slow motion effect
23. Previous – Skips one chapter back in DVD playback
24. Rewind – Rewinds playback, press multiple times to
increase rewind speed
25. Next – Skips one chapter ahead in DVD playback
26. Fast Forward – Fast forwards playback, press mul-
tiple times to increase fast forward speed
27. Search – Displays search menu in DVD playback
28. Subtitle – Activates subtitles in DVD or supported file
playback. Press multiple times to cycle through available subtitles
29. Repeat – Repeats DVD, CD, or file playback
30. A-B – Repeats a user defined segment of CD or DVD
playback. Press once to mark the beginning of the
playback segment, press again to mark the end of
playback, and press a third time to loop and repeat
the playback segment.
31. Audio – Cycles through the available audio playback
modes including Mono and Stereo playback.
32. Mute – Mutes the LinkTheater’s audio output. Press
once to mute, press again to turn mute off.
33. Angle – In DVD playback press this button to change
DVD disc angle (on multi-angle DVD discs). In photo
playback or slide shows, press the Angle button to
rotate the photos display by 90 degrees.
34. Zoom – Zooms the display in a variety of ways. If
video or DVD playback appears as a small window,
use the Zoom button to make the display fit the
screen or go into full screen mode.
Insert the included AAA batteries into the
remote control by sliding the battery cover
off of the remote control (as
shown in the illustration).
Insert both AAA batteries into
the battery sockets the proper
way, following the etched
guide underneath the battery
sockets.
This illustration shows
the maximum angle and
distance for the remote
control. The remote control
should be within a 30° angle and no
more than 8 meters from the infrared
receiver on the LinkTheater. The
infrared receiver is located just
to the right of the LED display.
Page 14
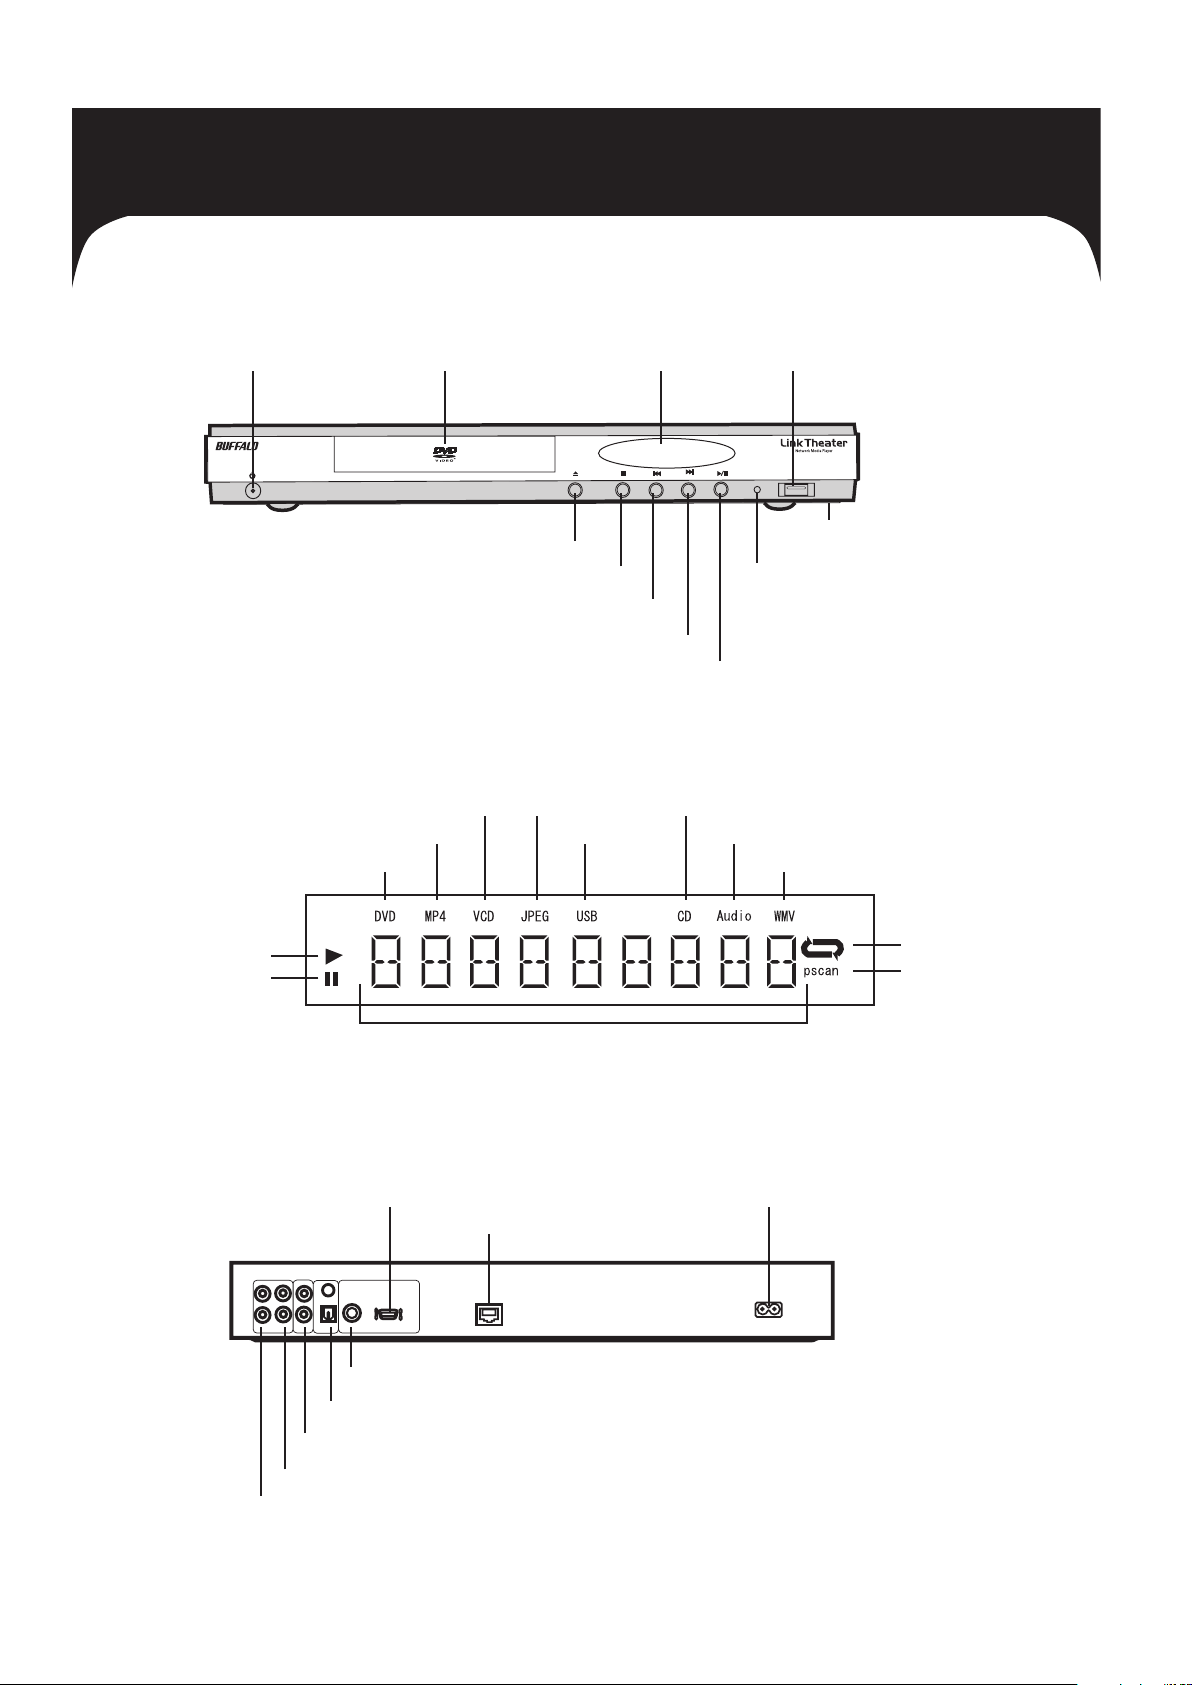
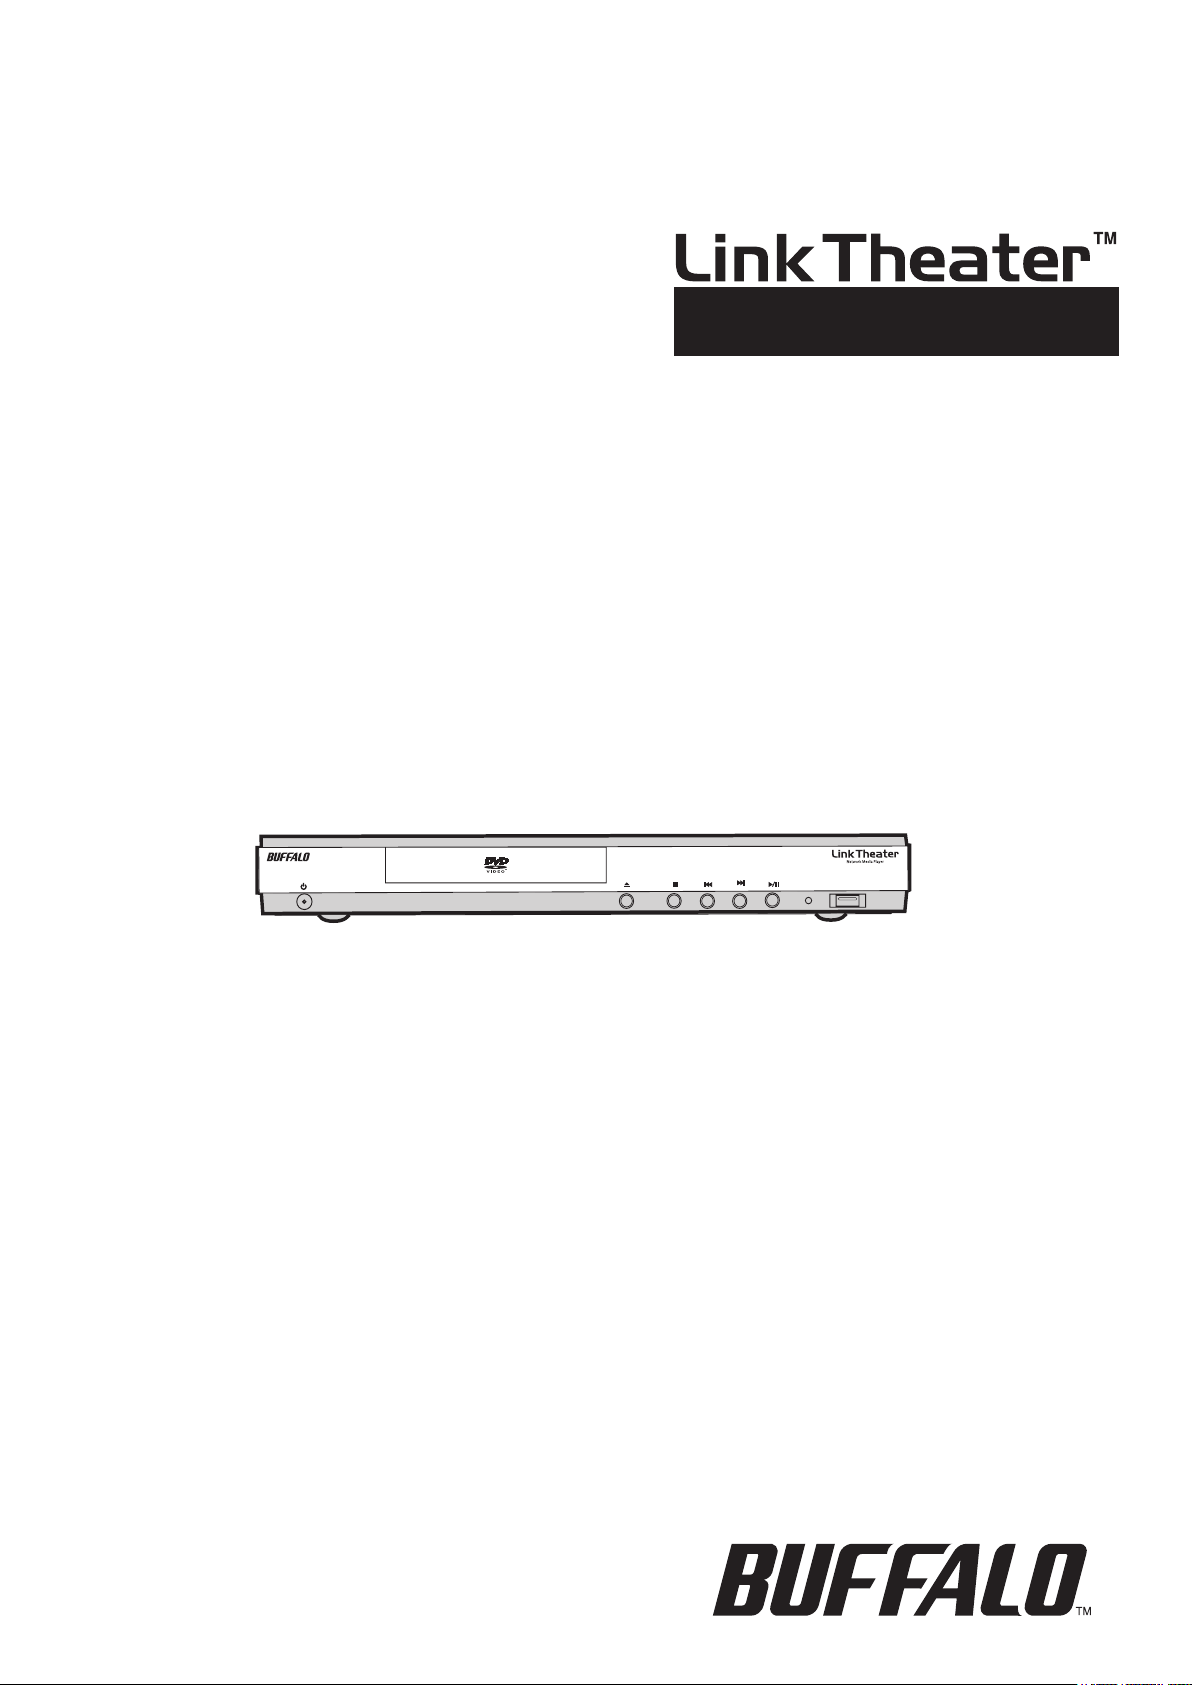
Front Panel
Hardware Diagrams
LED Display
Power Button
MPEG-4 USB Audio Playback
DVD Playback WMV Playback
DVD Display USB 2.0 Port
Eject Button
AOSS Button
VCD Playback
Stop Button
Skip Back
Skip Forward Button
Play/Pause Button
JPEG
CD Playback
External Antenna Connector
Rear Panel
Play Mode
Pause Mode
D4 Connector
S-Video Connector
Digital Audio Connectors
Composite Audio Connector
Composite Video Connector
Component Video Connectors
Repeat Mode
Progressive Scan Mode
Numeric
AC Power Connector
LAN Port
12
Page 15
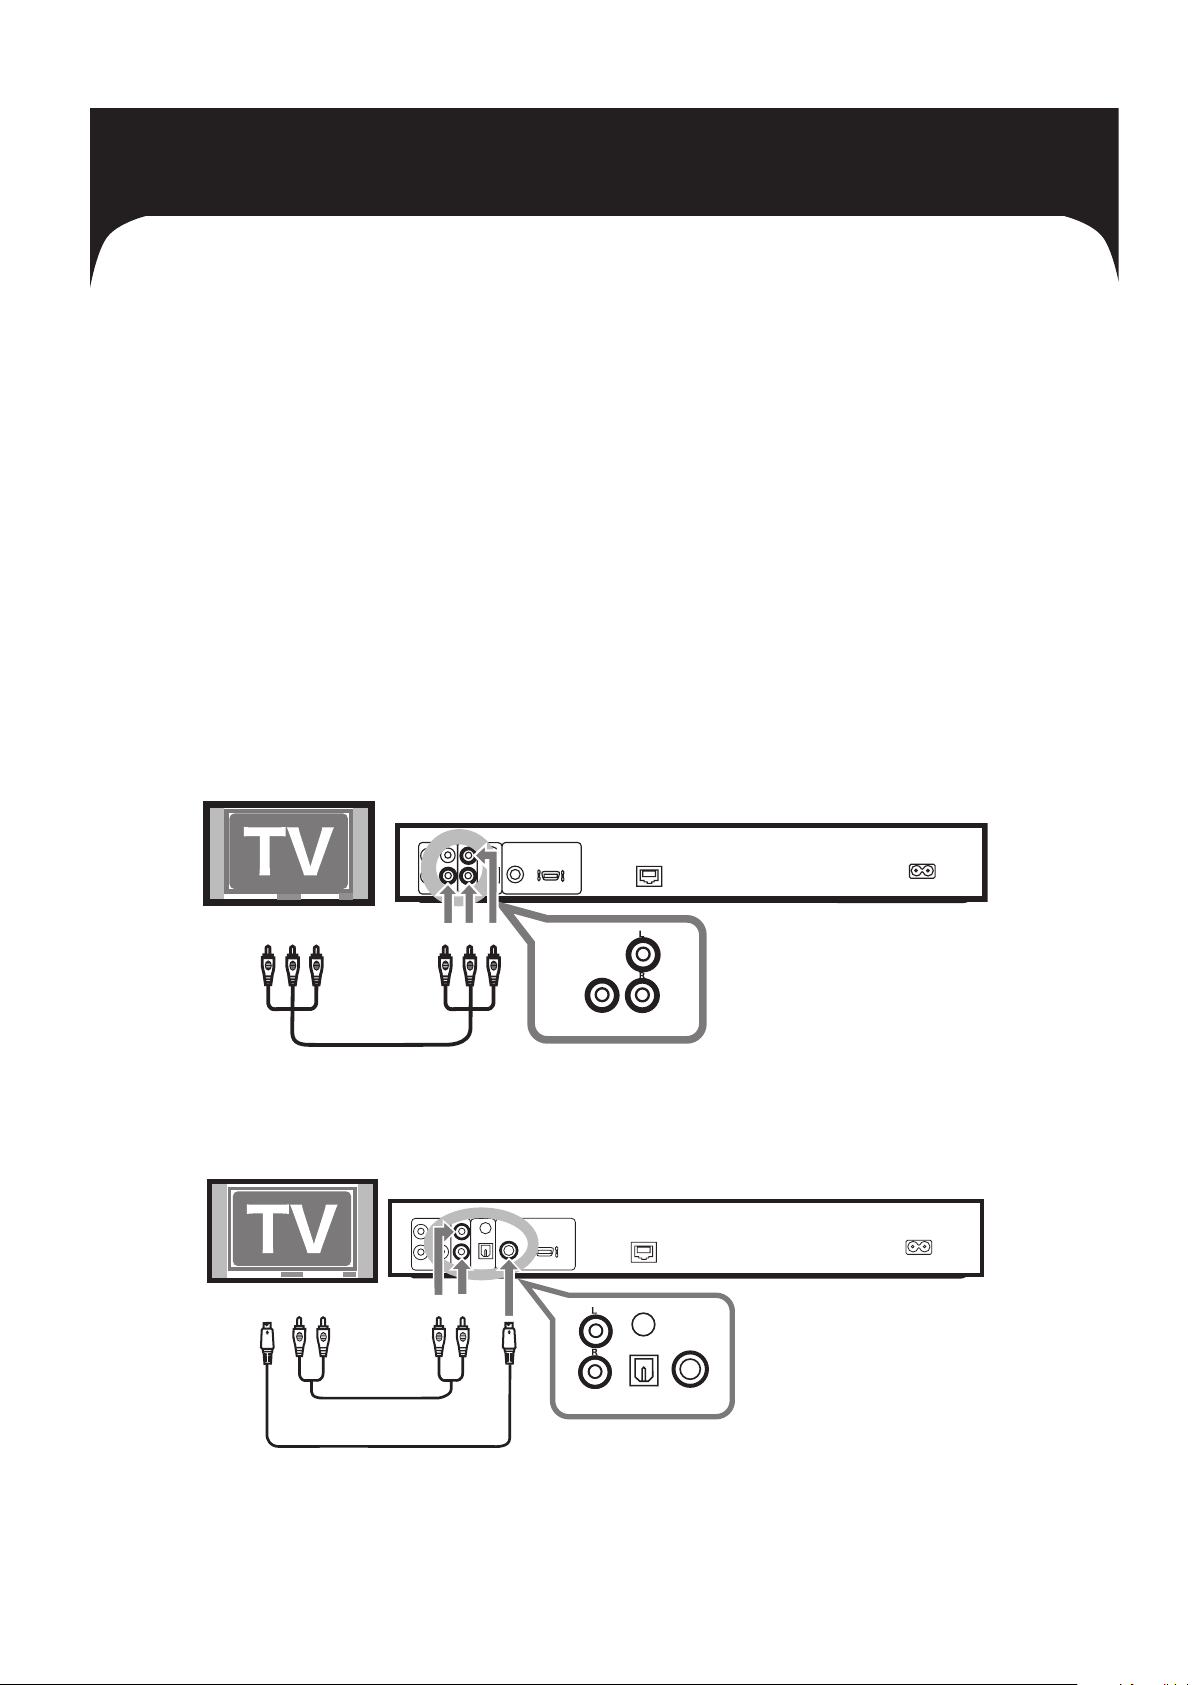
Connecting LinkTheater to the Display
(W) (R) (W) (R)
Composite Audio Cable
S-Video Cable
Audio
Connector
S-Video
(Y)(W)(R) (Y) (R)(W)
Included Composite Cable
Video
Connector
Audio
Connector
There are several methods for connecting video and audio cables between your LinkTheater, your TV monitor, and
your home theater. LinkTheater comes with a Composite (RCA) cable that will connect LinkTheater to a TV. This is
probably the simplest solution; just connect video and audio directly from the linkTheater to your TV with the supplied
cable, lean back, and enjoy your new media player. However, you may get higher quality video and audio by using
other configurations. Alternate video cables such as S-Video or Component Video offer a potentially better picture
if your TV supports them. Also, if you have an A/V receiver with better speakers than your TV monitor, connecting
LinkTheater's audio output to it may give you much improved sound quality. You can even connect LinkTheater
to your A/V receiver with RCA or Toslink digital 5.1 inputs, if your receiver has these, allowing 5.1 surround sound.
Additional cables (not included) will be necessary for these configurations. If you want the best video and audio
possible, you'll probably want to connect the LinkTheater's video output to your monitor or TV with component video
cables and the audio output to an A/V receiver with an RCA or Toslink digital connection, but not all televisions and
receivers have these inputs available. If in doubt about which connections to use, consult the user manuals for your
television and your A/V receiver.
Please begin by connecting the included AC power cable into the AC In port on the back of LinkTheater. Then, plug
the AC power cable into a power outlet. If you are using an Ethernet cable to connect your LinkTheater to your
network, then plug the Ethernet cable into the Ethernet port on the back of LinkTheater.
Setup Using Composite Video and Analog Audio:
Setup Using S-Video:
NOTE: The included composite cable can be used for audio with the S-Video setup; just use the red and white audio
connectors only. The yellow composite video connector can be left unplugged. For that setup, you'll also need an S-Video
cable, not included with LinkTheater, for the video connection.
13
Page 16

Setup Using Component Video:
Sound
Receiver
Optical Digital Cable
Coaxial Digital Cable
Coaxial
Optical
Composite Audio Cable
Component Video Cable
(R)
(W) (R) (W) (R)
(G) (B) (R) (B) (G)
Component
Video Connector
Audio
Connector
Note: The LinkTheater's default TV Mode will not initially send video to the Component Video outputs, so all you'll
see on your TV at first is a blank screen. If your TV's input is set to ‘Component’, you can find the correct videoout mode by pressing 'TV' and then 'Enter' on your Linktheater remote until you see the LinkTheater menu on your
TV. This will cycle through the different display modes available. Continue pressing 'TV' and then 'Enter' until the
best display is found. Turn to the next section of this manual for more information on configuring your display with
Component Video cables.
Setup Using Digital Audio:
If your A/V receiver has a digital audio input, you'll get better sound (and 5.1 support) if you connect the audio from
LinkTheater to the A/V receiver with either a toslink (optical) or RCA (coaxial) digital audio cable. You'll also need
to enable digital out in the LinkTheater's main options settings to complete the digital audio setup. Turn to the next
page to continue setting up LinkTheater.
14
Page 17
Configuring LinkTheater Settings
Now that LinkTheater is hooked up, you can begin configuring it. Your LinkTheater and display or TV should be
powered on, the right TV input mode to match the video input that you plugged your LinkTheater into should be
selected, and the LED Display on the front of the LinkTheater should be lit. If it isn't, make sure that LinkTheater is
plugged into a working power outlet and that the batteries in the remote control are fresh and correctly installed.
When LinkTheater is first turned on, the LED Display will read BUFFALO. After it completes booting up, the display
will change to LOG IN. If you are using Composite Video or S-Video you should see a picture on your display or TV.
If you're using Component Video you will need to follow the next step.
Component Video Mode:
If you're using the component video connections to connect LinkTheater to your TV, you'll see a blank screen the
first time you turn LinkTheater on. On your TV, select the component input that your LinkTheater's component video
cable is plugged into. Usually, you can find this by pressing the ‘Input’ button on your TV's remote until you see the
word "Component" on the screen. Press the ‘TV’ button on the LinkTheater remote control, followed by the ‘Enter’
button. Press ‘TV’ again followed by ‘Enter’ again to enter additional modes (480p, 720p, and 1080i). Most highdefinition TV's will look their best in one of these three modes. If you cycle too far, LinkTheater may select a mode
that is not compatible with your display or TV, and the display will go black. Keep pressing ‘TV’ and then ‘Enter’
until the best display is chosen.
Progressive Scan: If a progressive scan compatible mode is selected, a PScan LED will light up on LinkTheater’s
display.
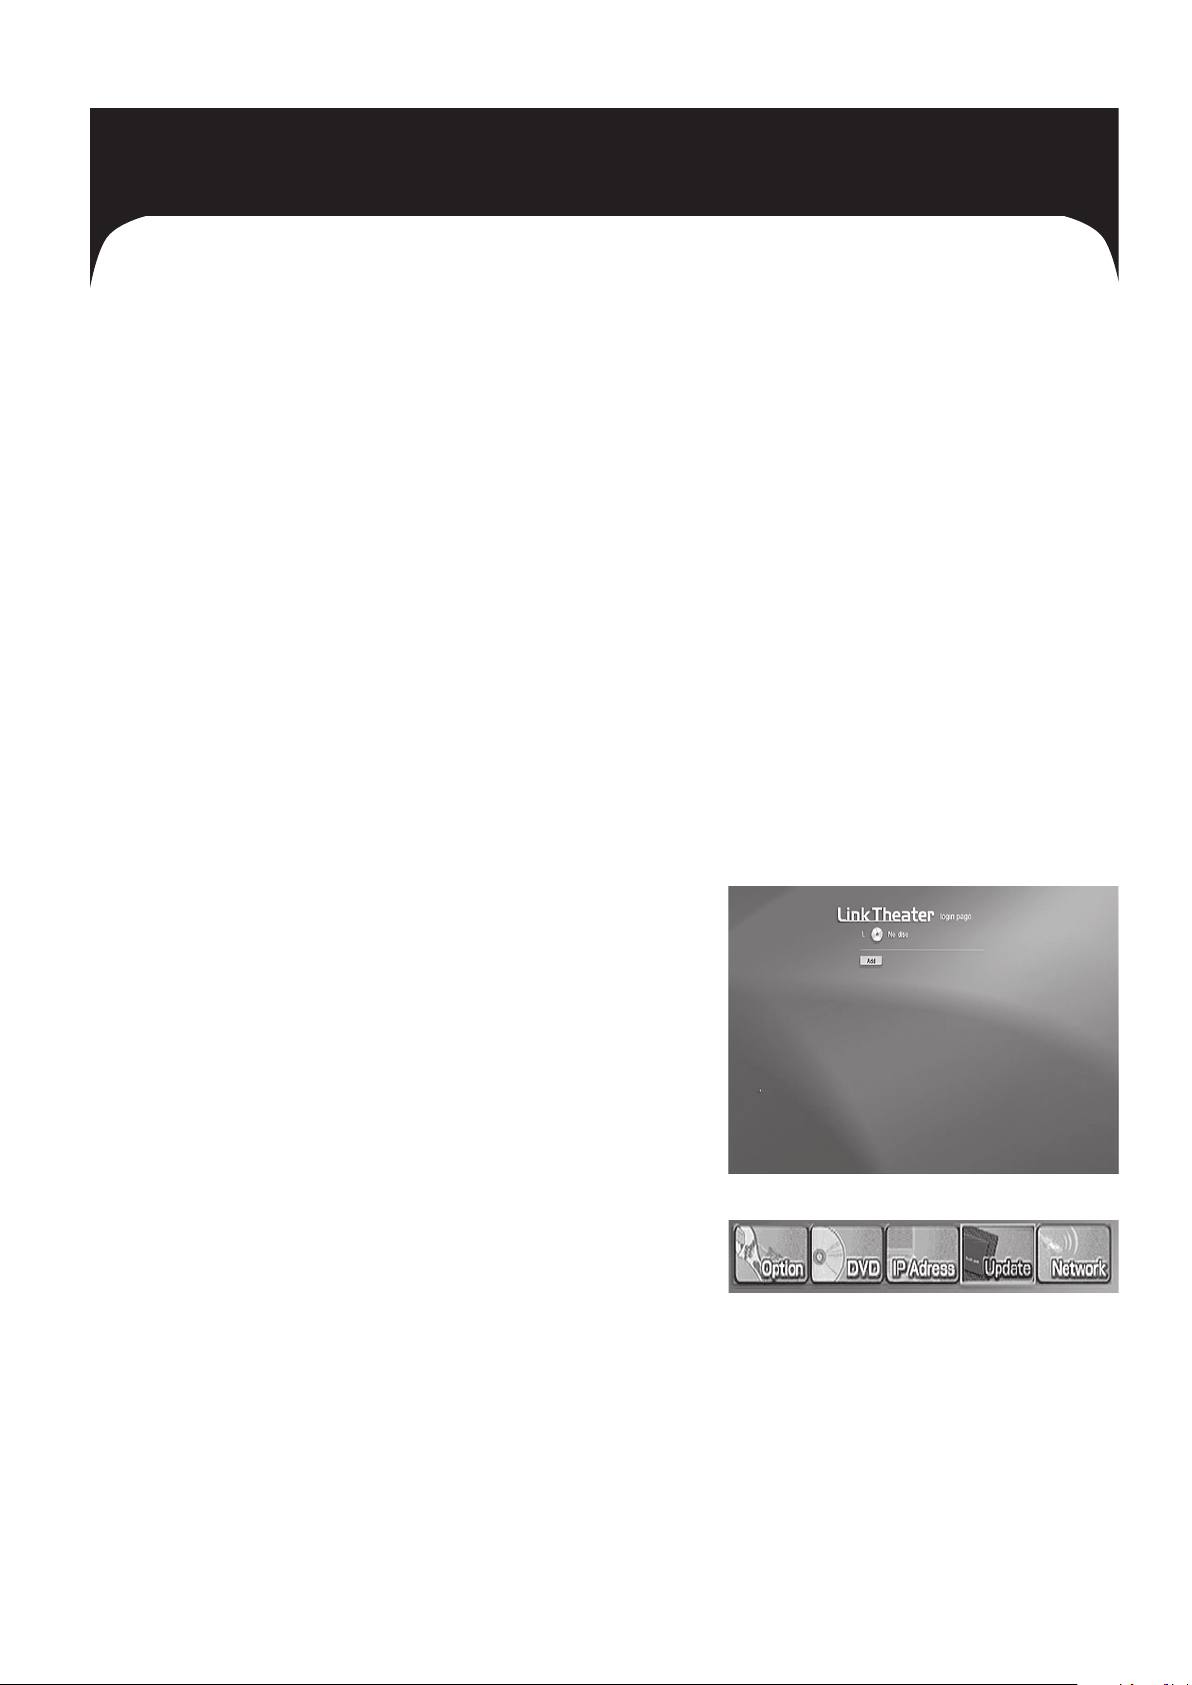
Home Page:
Now that your video is displaying properly, the Home screen will be
visible on your display or TV. You can always get back to this page by
pressing the ‘Home’ button on LinkTheater's remote control.
Press the ‘Setup’ button on the remote control to begin configuring
LinkTheater.
There are five setup pages within LinkTheater. Use the remote
control’s directional pad to navigate between the five graphical icons
inside the Setup area. Use the ‘Enter’ button on the remote control
to select one of the five setup pages.
15
Page 18
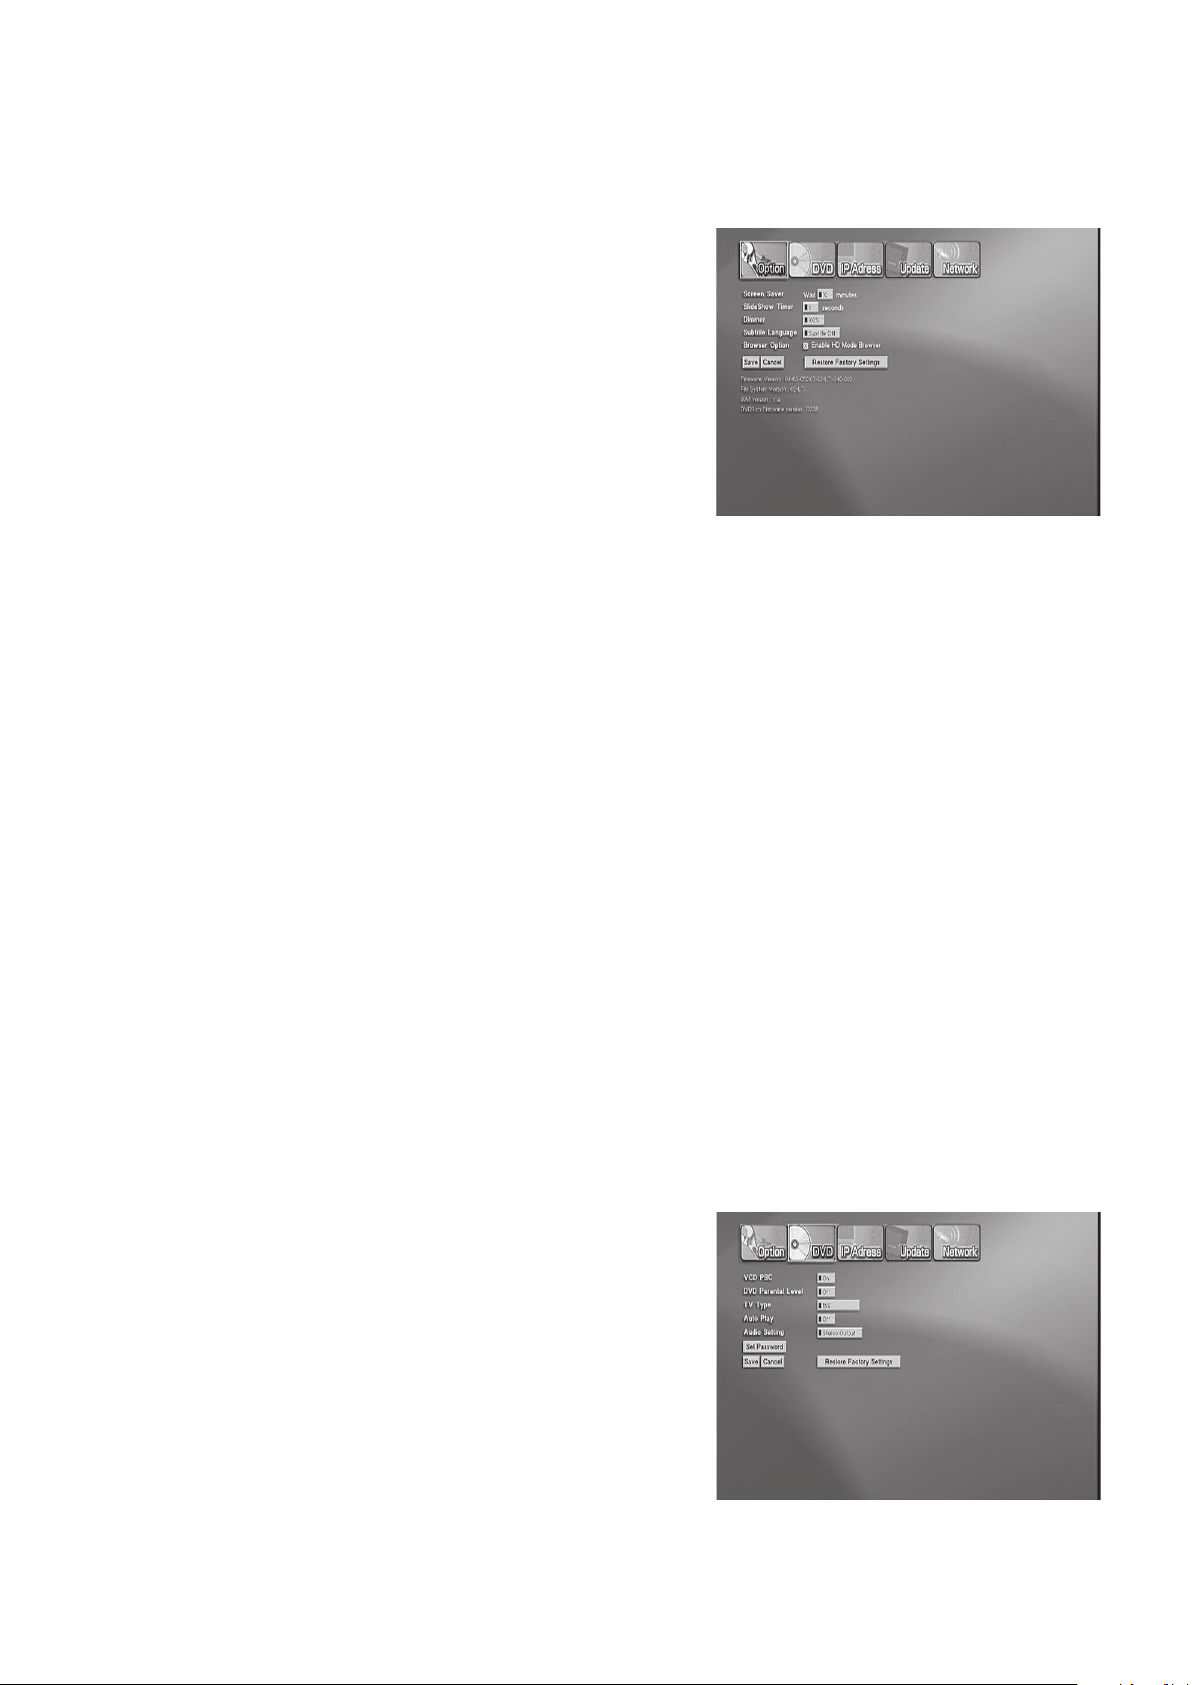
Each of the five setup pages contains settings for different LinkTheater functionality:
Option Settings Menu
Screen Saver – Specify the amount of time before LinkTheater
switches its display to a screen saver. Some displays and TVs can
suffer screen burn if the same image is displayed for too long. The
screen saver helps protect your display or TV from this burn-in.
Slide show Timer – The default time between slides when running a
photo or image slide show off of the LinkStation, the USB Port, or the
DVD Drive.
Dimmer – Specifies how bright the LED Display on the front of
LinkTheater should be. There are three settings (100%, 50%, and
OFF). 100% is the brightest display level, while OFF makes the
display invisible.
Subtitle – Specify the default subtitle language for LinkTheater. This applies only where applicable subtitles are
available (like DVD or VCD playback). If you do not wish to use subtitles, then set the subtitles to ‘Off’. If you ever
need to quickly enable subtitles, the ‘Subtitle’ button on the remote control can quickly enable or disable subtitles.
Browser Option – Specifies whether or not to run the LinkTheater browser in high-definition mode. This setting
should typically only be checked if you are running a high-definition (720p or 1080i) TV or Display. It greatly enhances
the way the menus and browsers look while operating the LinkTheater. After this option is enabled, LinkTheater will
have to be restarted before the setting takes effect.
NOTE: Some 480p progressive scan displays may benefit from enabling this option.
Once all of the settings on this page have been applied, press the ‘Save’ button. You may be prompted to restart
LinkTheater.
DVD Settings Menu
VCD PBC – Specifies whether VCD playback control is enabled. Usually this should be set to ‘On’.
DVD Parental Level – Specifies whether DVD parental control is activated or not and to what degree. Some
DVDs enforce parental management levels, allowing players to play only DVDs that meet specific requirements.
Parameters for level settings are as follows:
Off – Do not enforce any parental control (allows unrated movies to play)
1 – Acceptable for children of all ages (allows G rated movies to play)
2-3 – Acceptable for elementary children (allow most PG rated movies to play)
4-7 – Acceptable for middle school and high school children (allow most PG13 rated movies to play)
8 – Acceptable for adults (allows most NC-17 and R rated movies to play)
TV Type – Select the aspect ratio that matches your TV or display.
A 16:9 ratio is recommended for wide-screen monitors, while the 4:3
setting is best for a conventional TV or display.
Auto Play – If Auto Play is on, LinkTheater will automatically play disks
when they're inserted into the DVD drive. If Auto Play is turned off, you
will be required to select the DVD disc from the main Home screen
whenever you want to play a DVD.
Audio Setting – Specifies whether LinkTheater outputs analog
(composite) or digital audio. If you're using composite RCA audio
cables then leave this setting at ‘Stereo Output’. If you used a digital
audio cable, whether coaxial or optical, select the ‘AC3 5.1’ output. A
digital connection allows for Dolby 5.1 surround sound and DTS surround sound playback.
16
Page 19

Set Password – This allows you to password-protect the DVD Parental controls, discouraging an unauthorized user
from changing them.
Once all of the settings on this page have been applied, press the ‘Save’ button. You may be prompted to restart
LinkTheater.
IP Address Settings Menu
This setup page displays your current IP Address settings. By default,
DHCP automatically selects an IP Address for you. Some advanced
users may want to specify their own IP address and can do so by
pressing the ‘Switch to Manual’ button.
Update Settings Menu
This setup page allows you to check for updates to the LinkTheater
firmware and software. Click the ‘Check for firmware update’ text
and you will begin the process of locating and applying a firmware
update. This option requires a network connection that connects
to the Internet. Only apply firmware updates if you have been told
to do so by Buffalo Technology’s Technical Support or are positive
that a firmware update is required. Updating a firmware on a device
improperly can cause unexpected behavior.
Network Settings Menu
Now Using – Displays whether you are connected to a wired or
wireless network.
Network – Select ‘Wired’ or ‘Wireless’ depending on how you wish to
connect to your network. If you make a change to this field you will be
required to reboot. After you make a change to this field, immediately
press the ‘Save’ button below, allow LinkTheater to reboot, and then
return to this page to continue your network configuration.
AOSS – Specifies whether Buffalo Technology’s AOSS will work on
this product. AOSS is a wireless technology and will only work if the
network mode is set to ‘Wireless’ and your access point is AOSS
compatible. If both Wireless and AOSS are on, then the AOSS
button on the front of LinkTheater will work. Please see the next section labeled ‘Using AOSS’ for more information
regarding AOSS.
Available – Provides a list of wireless networks available in the area. Only access points or wireless routers that
broadcast SSIDs will be displayed here. Once you select the proper wireless network, press the ‘Select’ button.
SSID – This field displays the SSID that LinkTheater is to connect to. SSIDs can be manually inputted here if they're
not broadcast. The SSID can automatically be filled in by using the ‘Available’ option above.
17
Page 20

Connection – Specifies whether to use Infrastructure or Ad-hoc mode. If you're connecting your LinkTheater
to a network through a router or wireless access point, leave this in the Infrastructure mode. To make a network
connection directly to a computer, choose the Ad-hoc mode.
WEP – Specifies whether WEP encryption is used on the wireless network. If it's used, please select the proper
mode from the drop down menu.
WEP 64 ASCII - 5 digit WEP key
WEP 64 HEX - 10 digit WEP key
WEP 128 ASCII - 13 digit WEP key
WEP 128 HEX - 26 digit WEP key
WEP Key – If your wireless network uses a WEP key, enter it here. Leave out colon separators (":"). If it doesn't
use one, leave this field blank.
Once all of the settings on this page have been applied, press the ‘Save’ button. You may be prompted to restart
the LinkTheater.
Congratulations, your LinkTheater is configured! Press the ‘Home’ button on the remote control to return to the
Home screen. You can now use your LinkTheater to play multimedia files.
18
Page 21

Using AOSS
If you don't have an AOSS compatible wireless router or access point, you can skip this section. Consult your router's
documentation for more information on configuring it for WEP encryption.
If your wireless router or access point is AOSS compatible, setting up a secure wireless network is very easy. Begin
by pressing the AOSS button on your wireless router or access point until the AOSS light begins to flash on that
device. Then, press the AOSS button on the front of LinkTheater until AOSS begins flashing on the LED Display.
The AOSS session may take up to two minutes to complete; once completed, LinkTheater will display a message
stating that the AOSS process is complete. You will be required to restart LinkTheater to apply the new settings.
External Wireless Antenna Installation
The LinkTheater uses two internal diversity antennas for the internal 802.11g wireless radio. In some cases it may
be desirable to add a higher gain antenna. If the signal is weak between the LinkTheater and your wireless router
or access point, an external antenna can increase the range and signal quality.
The LinkTheater has an MC Card antenna connector for attaching an external antenna. Any antenna with an MC
Card connector on it should work with the LinkTheater. For best results, Buffalo Technology’s indoor antennas are
recommended. Please visit the Buffalo Technology Web Site (http://www.buffalotech.com) for more information
regarding Buffalo Technology antennas.
Installing an external antenna is easy. Plug the antenna into LinkTheater’s
antenna connector. The antenna connector is on the bottom of the
LinkTheater, under the USB Port. For more antenna installation information,
refer to the documentation that came with your antenna.
19
Page 22

Using your LinkTheater's Remote Control
Operating the LinkTheater is easy, especially if you remember these five buttons on your remote:
• At any menu screen, pressing the ‘Home’ button on the remote control will return you to the
starting Home page. If you are playing a file and wish to return to the Home page, please
press the ‘Stop’ button and then the ‘Home’ button.
• The ‘Return’ button takes you back to the page you were at last. If you accidentally browse
to the wrong area, the ‘Return’ button will quickly return you to the screen you came from.
• The ‘Refresh’ button will immediately refresh all of the data on the current screen. If
multimedia files have been moved, reorganized, or deleted, a quick refresh will show
the changes immediately. Also, on the Home screen, the refresh button will show new
computers and devices available to LinkTheater.
• When playing a video or music file, the ‘Mute’ button on the remote control will immediately
shut down all audio output from the LinkTheater. Pressing the ‘Mute’ button a second time
will un-mute the LinkTheater and resume audio playback at the original volume level.
• Due to the differences in video file formats, some video files may play back in a smaller than
desirable part of the video screen. Try pressing the ‘Zoom’ button on the remote control to
cycle through the different display modes until the best display setting is found.
20
Page 23

The Home Screen
When LinkTheater starts up, it goes to the Home screen. This screen gives you access to all of your computers and
devices. If at any time you wish to return to the Home screen, press the ‘Home’ button on the remote control (if you
are playing back a media file, press the ‘Stop’ button first).
The LinkTheater uses UPnP (Universal Plug ‘n Play) technology to automatically add computers and devices to the
Home screen. If UPnP has been intentionally disabled on a device, you may have to add it to the Home screen
manually, but most devices will automatically appear on the Home screen.
Computers or devices on the network will be displayed next to teal
bullets. Computers or devices that are turned off will be displayed next
to dull grey colored bullets. The last computer or device you accessed
will be displayed with a picture of a Home in the bullet.
To manually add a computer or device to LinkTheater, press the ‘Add’ button on the Home screen. Use the remote
control’s directional pad to navigate to the ‘Add’ button and then press the ‘Enter’ button on the remote control.
The next screen will guide you through adding a computer or device to
LinkTheater. Enter the following information:
Media Server Name – Enter an appropriate name to identify this computer
or device on the Home screen.
Media Server IP – Enter the IP Address of the media server you wish to
connect to. Refer to your computer’s operating system documentation or
your device’s documentation to help you determine the IP Address.
Always connect to this Media Server – Checking this box will tell
LinkTheater to always connect to this Media Server when it starts up.
When you have completed inputting the entry, press the ‘Save’ button.
If a computer or device on the Home screen is no longer necessary it can
be removed. Use the remote control’s directional pad to navigate to the
‘Delete’ button and then press the ‘Enter’ button on the remote control.
Check the appropriate computers or devices to be removed and then
press the ‘Delete’ button. After the computers or devices have been
deleted, you will need to press the ‘Back’ button to return to the Home
screen.
21
Page 24

DVD/VCD Playback
DVD or VCD playback on LinkTheater is very easy; it’s much like a stand-alone DVD player. There are two ways to
begin DVD or VCD playback:
1) If ‘Auto Play’ is turned on in the DVD Settings Menu, then just
inserting a DVD or VCD will begin playback.
2) You may always launch playback manually: Insert the DVD or
VCD movie into LinkTheater’s DVD Drive. Press the ‘Home’
button on the remote control to go to the Home page. The top
icon there will be your DVD or VCD movie. Select it with the
directional pad and press the ‘Enter’ button on the remote control.
Playback will begin.
22
Page 25

DVD/CD File Playback
LinkTheater can play most multimedia CD and DVD disks. Supported disc media include:
CD-ROM
CD-R
CD-RW
DVD-ROM
LinkTheater supports most popular video, image, and audio formats:
Video: AVI, DAT, MPEG 1, MPEG 2, MPEG 4, DivX, Xvid, WMV, WMV 9, DivX HD, WMV HD, VOB, ASF
Image: JPEG, JPEG2000, BMP, GIF, PNG, TIF
Audio: MP3, WMA, WAV, OGG Vorbis, AIFF, PLS, M3U
To play a DVD or CD, insert it into LinkTheater’s DVD Drive. The disc
will then be available from the Home page. Press the ‘Home’ button
on the remote control to see your media choices. The top icon will be
your DVD or CD data disc. Select it with the directional pad and press
the ‘Enter’ button on the remote control.
You'll then able to browse through any available folders and subfolders
using the remote control’s directional pad. When you find a music,
audio, or video file you would like to play, press the ‘Enter’ button on
the remote control.
DVD-R
DVD-RW
DVD+R
DVD+RW
By pressing the ‘Video’, ‘Music’, or ‘Photo’ buttons on the remote
control you can quickly list only videos, music, or photo files. In
cluttered, large directories this may help you locate the specific file you
are looking for more easily.
Video Playback
Highlight a video file on LinkTheater and press the ‘Enter’ button on
your remote to play. During the video the ‘Pause’ button will pause the
video’s playback (the ‘Play’ button will resume the video). The ‘Rew’
and ‘FF’ buttons will rewind and fast forward the video. The ‘Stop’
button will halt video playback.
23
Page 26

Photo Playback
Press the ‘Enter’ button to display a photo on LinkTheater. Press the
‘Play’ button to play all of the photo files in that directory as a slide
show. During the slide show the ‘Pause’ button can be used to stop
a slide show (the ‘Play’ button will resume the slide show). The up
and down arrows on the directional pad can also be used to change
slides. The ‘Stop’ button will stop the slide show. Additionally, the
‘Angle’ button on the remote control will rotate an image or photo 90
degrees.
Music Playback
Press the ‘Enter’ button to play a music file on LinkTheater. Press the
‘Play’ button to play all of the music files in that directory as a playlist.
The ‘Pause’ button can be used to pause music playback (the ‘Play’
button will resume the playback). The ‘Prev’ and ‘Next’ buttons on the
remote control can be used to skip to the next song, and the ‘Rew’ and
‘FF’ buttons can be used to rewind and fast forward a music file. The
‘Stop’ button can be used to stop playback altogether.
To exit back to the main Home page, press the ‘Home’ button on the
remote control after all file playback has been stopped.
24
Page 27

USB Device Playback
The USB 2.0 Port on the LinkTheater can be used for media playback. Several USB devices can be used for media
playback including the following:
USB Hard Drive
Memory Stick USB Keychain
Multi-Card Memory Reader
USB Digital Camera
NOTE: Other USB devices may work as well, as long as they're formatted with FAT16 or FAT32.
If you have a USB storage device, insert it into the USB port on the
front of the LinkTheater. USB Devices can be inserted at any time,
the LinkTheater does not have to be turned off to insert or remove a
USB Device. Once it has been inserted, the USB device will become
available from the Home page within seconds. Press the ‘Home’
button on the remote control to access the Home page. The USB
Device will be listed based off of its name.
NOTE: When using a Multi-Card Reader, multiple USB Devices may
be available from the Home screen, each entry supports a different
media format.
Once you have accessed the USB Device, you'll be able to browse
through available folders and subfolders using the remote control’s directional pad. When you find an image, audio,
or video file that you would like to play, press the ‘Enter’ button on the remote control.
By pressing the ‘Video’, ‘Music’, or ‘Photo’ buttons on the remote control you can quickly list only videos, music,
or photo files depending on which button you pressed. In cluttered, large directories this may help you locate the
specific file you are looking for.
Video Playback
Press the ‘Enter’ button to play a video file on LinkTheater. During
the video the ‘Pause’ button will pause the video’s playback (the
‘Play’ button will resume the video). The ‘Rew’ and ‘FF’ buttons will
rewind and fast forward the video. The ‘Stop’ button will stop the video
playback altogether.
25
Page 28

Photo Playback
Press the ‘Enter’ button to display a photo on LinkTheater. Press the
‘Play’ button to play all of the photo files in that directory as a slide
show. During the slide show the ‘Pause’ button can be used to stop
a slide show (the ‘Play’ button will resume the slide show). The up
and down arrows on the directional pad can also be used to change
slides. The ‘Stop’ button will stop the slide show. Additionally, the
‘Angle’ button on the remote control will rotate an image or photo 90
degrees.
Music Playback
Press the ‘Enter’ button to play a music file on LinkTheater. Press the
‘Play’ button to play all of the music files in that directory as a playlist.
The ‘Pause’ button can be used to pause music playback (the ‘Play’
button will resume the playback). The ‘Prev’ and ‘Next’ buttons on the
remote control can be used to skip to the next song, and the ‘Rew’ and
‘FF’ buttons can be used to rewind and fast forward a music file. The
‘Stop’ button can be used to stop playback altogether.
To exit back to the main Home page, press the ‘Home’ button on the
remote control after all file playback has been stopped.
26
Page 29

PC Playback
To play back files from your PC on your LinkTheater you must install Buffalo’s LinkTheater PC Software or use
Microsoft’s Windows Media Connect Software. For most media, Buffalo’s LinkTheater PC Software is recommended
with the LinkTheater for the best overall playback experience, but you'll need Windows Media Connect if you want to
play copyrighted media that has been protected with DRM (Digital Rights Management). You can, of course, install
both.
Buffalo LinkTheater PC Software
Requirements to run LinkTheater PC Software:
• Windows 98SE/ME/2000/XP PC System
• CD-ROM or DVD-ROM Drive
• 250 Megs of available Hard Drive space
• Wired or wireless (802.11b or 802.11g) network connectivity
• 500 MHz or higher PC is recommended
Installation of Buffalo LinkTheater PC Software
Insert the Buffalo LinkTheater CD into the PC’s CD-ROM or DVDROM drive. The CD will auto-launch and bring up an on-screen
menu. If the CD does not auto launch, press on the ‘Start’ menu,
press the ‘Run . . .’ option, and type D:\setup.exe (where D is the
drive letter of your CD-ROM device).
Once the CD-ROM has launched, an on-screen menu will be visible.
Please select the ‘Install LinkTheater PC Software’ option and
press ‘OK’.
The Setup Wizard for the LinkTheater PC Software will begin. Press
the ‘Next’ button to continue installation.
27
Page 30

Accept the user license agreement by reading the entire license
agreement, selecting the ‘I accept the agreement’ bullet, and pressing
the ‘Next’ button.
Read the information and press the ‘Next’ button to continue.
Select the installation directory. The default installation directory is
recommended, but if you require a special installation location, please
type it in the field or search for it via the ‘Browse’ button. Once the
proper installation directory has been selected, press the ‘Next’ button.
Select the start menu group that will be created by setup. The default
start menu group is recommended, but if you'd like to rename the group,
feel free to do so. Additionally, if you’d prefer not to have a start menu
group (not recommended), then check the ‘Don’t create a Start Menu
folder’ option. When you have finished, press the ‘Next’ button.
28
Page 31

Select any additional tasks from the list. Press the ‘Next’ button to
accept the additional tasks.
Confirm that the installation information is correct and then press the
‘Install’ button.
The installation may take more than several seconds to complete.
When you see this screen, press the ‘Finish’ button. If you leave the
checkbox checked, the LinkTheater software will now launch.
29
Page 32

Configuring the LinkTheater Software
The LinkTheater software should be running on your PC at this point; you'll see this
icon in the system tray. Configure the LinkTheater software by double-clicking on its
icon.
Once the LinkTheater PC Software is visible on your screen, use the pull
down menu to select ‘Edit’ -> ‘Preferences’.
General
The General preferences menu will allow you to custom configure the
LinkTheater Software. It is not recommended to change any settings
under the ‘System’ tab. Only change the port number if absolutely
required to by a network administrator. Unchecking the ‘Support for
UPnP Media Server’ will force you to manually find the LinkTheater PC
Software from the LinkTheater device itself. With this option checked,
LinkTheater will automatically find your LinkTheater software.
The ‘Security’ tab allows you to set a password for access to this
PC from LinkTheater. Setting a password here will require a user of
LinkTheater to input a password every time they want to playback
multimedia files that reside on the specific PC. One may wish to do
this if there is adult or mature content residing on the PC that should be
restricted from children. Please make sure to press the ‘Save’ button
after you have inputted a password, or the password will not be stored.
30
Page 33

The ‘MAC Address’ tab allows you to specify which LinkTheater can
see this PC. If there are multiple LinkTheaters on your network and you
wish to only stream information from this PC to one specific LinkTheater,
then check the ‘Enable MAC address control’ check box, press the ‘+’
button, and enter the MAC Address of the specific LinkTheater into the
MAC Address list. You may add multiple MAC addresses if you want
this PC to stream information to multiple LinkTheaters. If you only have
one LinkTheater, ignore this tab.
The MAC Address of a LinkTheater can be found on its rear panel,
just above the serial number. Each LinkTheater will have two MAC
Addresses, one for the Wired Ethernet Port and one for the Wireless
Radio. Please enter the MAC Address that corresponds to the way
LinkTheater is connected (if unsure, enter both MAC Addresses).
Video
The Video preference menu tells the LinkTheater PC Software how to
handle video files on your PC. Press the ‘Browse’ button to setup a
‘Video Library’. This library will be the folder on this PC that will be
accessible by LinkTheater. If you would like to enter more then one
folder, then please press on the ‘Watch Folder’ tab, check the ‘Enable
watch folder’ option and add additional folders to that list. Any folder
in the watch folder list will also be accessible from LinkTheater.
The ‘Enable automatic OpenDiv3 video conversion’ option instructs
the LinkTheater Software to automatically convert any unplayable
Div3 format file to a playable DivX format. It is recommended to leave
this option checked. It is also recommended to leave the ‘Check for
OpenDiv3 video every 1 minute(s)’ set to 1 minute. This instructs the
software to search for new video to convert every 60 seconds.
The ‘Remove original file after conversion’ check box directs the LinkTheater Software to delete source files after
they've been converted to a playable format. Leaving this box unchecked is recommended.
Music
The Music preference menu instructs the LinkTheater PC Software on
how to handle music/audio files on your PC. Press the ‘Browse’ button
to setup a ‘Music Library’. This library will be the folder on this PC
that will be accessible by LinkTheater. If you would like to enter more
then one folder, then please press on the ‘Watch Folder’ tab, check the
‘Enable watch folder’ option and add additional folders to that list. Any
folder in the watch folder list will also be accessible from LinkTheater.
Alternatively, an I-Tunes database can be loaded by pressing the
respective ‘Browse’ button and selecting the database file.
The ‘Scan for song information’ check box should be checked if you
want detailed information about the song being played to be searched
for. This includes searching ID3 tags and CDDB databases. Leaving
this box uchecked is recommended.
The ‘Scan Windows Media Player / Winamp Playlist’ option lists available playlists in the library and watch
folders.
31
Page 34

Photo
The Photo preference menu tells the LinkTheater PC Software how to handle photo/image files on your PC. Press
the ‘Browse’ button to setup a ‘Photo Library’. This library will be the folder on this PC that will be accessible by
LinkTheater.
The ‘Select photo scale’ options help the photos to look better on
LinkTheater’s display or TV. Some pictures may be too small or too
large to fit properly on your display or TV. These options help to
improve the photo viewing experience by scaling their size to fit nicely
on your display or TV. These settings may be changed later from within
the LinkTheater PC Software.
The ‘Fit to Screen’ option shrinks or enlarges an image or photo to
display the complete image using as much of the full height or width of
the screen as possible. This option is recommended for most users.
The ‘Full Screen’ option shrinks or enlarges an image or photo to
display it using the full display area of the TV; in some cases the image
will be cropped or expanded to make it fit. This option is popular with
users of wide screen (16:9) HDTVs.
The ‘Actual Size’ option displays your pictures in their actual size, pixel for pixel. If your pictures are very small or
very large, this may make them difficult to view.
Internet
The Internet preference menu tells the LinkTheater PC Software how
to handle Internet access through this PC.
Select a photo album for radio playback selects a slide show that
displays while an internet radio site is playing on LinkTheater. Choosing
the ‘None’ option from the pull down menu will instruct LinkTheater not
to run a slide show while internet radio is being used.
Synchronize bookmarks instructs LinkTheater on which of the two
popular PC browser’s bookmark lists should be used for browsing web
pages through LinkTheater.
Language and Theme
The Language and Theme options cannot be changed at this time. English is currently the only available language,
and the LinkTheater theme is currently the only available theme.
Once you have configured all of the settings in the LinkTheater PC Software Preferences, press the ‘OK’ button.
Anytime you wish to add new files to the PC for file playback on LinkTheater, make sure to insert them in the proper
library or watch folder or create a new watch folder by re-entering the preferences menu. The LinkTheater will
constantly search for new multimedia files inside the library and watch folders.
After the preferences have been set on the LinkTheater PC Software, other options can be configured by navigating
the main interface on your PC to the three available selections (Video, Music, and Photo).
32
Page 35

Video
The video screen will now show the videos available from your library
and watch folders. By clicking on the check box that says ‘Play files
randomly’, LinkTheater will play all of the video files in your library and
watch folders randomly.
You may also manually convert a non-playable Div3 file to DivX. Select
an appropriate file from the screen and press the ‘convert OpenDiv3
file’ button to convert the file.
Music
The music screen will now show the audio and music files available
from your library and watch folders. If you click on the check box that
says ‘Play music in random order’, LinkTheater will play all of the
audio and music files in your library and watch folders randomly.
The option to link a slide show to a music folder is also available.
Select a music folder and use the pull down menu labeled ‘Photo
Album’ to play a slide show while the music in that folder is being
played. Different folders can have different photo albums selected.
Photo
The photo screen will now be configured with the photo and image
files available from your library folder. If you click on the ‘Play slides
in random order’ check box, LinkTheater will play all of the photo and
image files in your library folder randomly.
The option to link a music folder to a slide show is also available. Select
a slide show and use the pull down menu labeled ’Playlist’ to play a
music folder or playlist while the slide show is being played. Different
folders can have different playlists or music folders selected.
Once the LinkTheater PC Software has been configured, you can exit
the main control screen. If you want your LinkTheater to continue to be
able to access media from the PC after the application is closed, be sure
to put a checkmark next to ’Streaming server running in backgroud’
before pressing the ‘OK’ button.
NOTE: The LinkTheater PC Software can always be manually launched from either the desktop icon or the start
menu entry. The application can be exited at any time by right clicking on the system tray icon and selecting the ‘Exit’
option. By default, the LinkTheater PC Software will start with your PC as it boots into Windows.
33
Page 36

LinkTheater PC Software Playback
Now that the LinkTheater PC Software is installed and running, you will be able to stream any files that are inside
library or watch folders.
Access your computer by pressing the ‘Home’ button on the remote
control. The Home page will appear and your PC will appear on the
list of available folders. Its name will be the same as its Windows
machine name. Use the remote control’s directional pad to select the
PC and press the ‘Enter’ key on the remote control.
Win98 and WinMe Users: You may be required to add your computer
manually. Please see the “The Home Screen” section (page 21) to
add your PC to the Home resource list.
Once you have logged into the computer, a unique LinkTheater screen
will be displayed. Press ‘Video’, ‘Music’, ‘Photo’, or ‘Service’ to select
the type of media you wish to play back from the computer.
Video Playback
Press the ‘Enter’ button to play a video file on LinkTheater. During the video the ‘Pause’ button will pause the video’s
playback (the ‘Play’ button will resume the video). The ‘Rew’ and ‘FF’ buttons will rewind and fast forward the video
(press ‘Play’ to resume normal playback). The ‘Stop’ button will stop the video playback altogether.
On the top of the display, there are three buttons:
Go to – Displays a prompt where the number corresponding to the
video can be entered for immediate playback. For instance, if the video
labeled 6 is to be played, pressing the ‘Go to’ button and entering ‘6’ will
immediately begin video playback of the file labeled 6.
Search – Displays a search field to assist you in locating a specific
file. Once at the search field, enter the title or any portion of the title
into the field using the 10 key text entry of the remote control. Once
completed, press the ‘Search’ button. Once the search has completed,
the matching results will be listed.
Play all – Plays all of the files inside of the current folder and subfolders
in alphabetical order.
If there are many files in the folder, you may be required to switch between pages. Pages can be switched by manually
navigating to the arrows in the top right area of the display. Alternatively, the ‘Prev’ or ‘Next’ buttons on the remote will
change pages.
34
Page 37

Photo Playback
Press the ‘Enter’ button to display a photo on LinkTheater. Press the
‘Play’ button to play all of the photo files in that directory as a slide
show. During a slide show, the ‘Pause’ button can be used to stop a
slide show (the ‘Play’ button will resume the slide show). The up and
down arrows on the directional pad can also be used to change slides.
The ‘Stop’ button will stop the slide show.
On the top of the display, there are three buttons:
Go to – Displays a prompt where the number corresponding to the
photo can be entered for immediate playback. For instance, if the
photo labeled 6 is to be played, pressing the ‘Go to’ button and
entering 6 will immediately begin photo viewing of the file labeled 6.
Slide show – Displays all of the images inside of the current folder and
subfolders in an alphabetical slide show.
Back – Jumps back to the previous location or folder.
If there are several files in the folder, you may be required to switch between pages. Pages can be switched by
manually navigating to the arrows in the top right area of the display. Alternatively, the ‘Prev’ or ‘Next’ buttons on
the remote will change pages.
Music Playback
Press the ‘Enter’ button to play a music file on LinkTheater. Press the ‘Play’ button to play all of the music files in
that directory as a playlist. The ‘Pause’ button will pause music playback and the ‘Play’ button will resume it. The
‘Prev’ and ‘Next’ buttons on the remote control will skip to the last or next song, and the ‘Rew’ and ‘FF’ buttons can
be used to rewind and fast forward through a music file. The ‘Stop’ button will stop playback altogether.
On the top of the display, there are four buttons:
Go to – Displays a prompt where the number corresponding to the
music file can be entered for immediate playback. For instance, if the
music file labeled 6 is to be played, pressing the ‘Go to’ button and
entering 6 will immediately begin music playback of the file labeled 6.
Search – Displays a search field to assist you in locating a specific
file. Once at the search field, enter the title or any portion of the
title into the field using the 10 key text entry of the remote control.
Once completed, press the ‘Search’ button. Once the search has
completed, the matching results will be listed.
Play all – Plays all of the files inside of the current folder in alphabetical
order.
Back – Jumps back to the previous location or folder.
Music can be sorted by library, album, artist, or genre by using the four buttons at the bottom of the display. Navigate
to bottom of the display with the remote control’s directional pad.
If there are many files in a folder, you may be required to switch between pages. Pages can be switched by
manually navigating to the arrows in the top right area of the display, or by pressing the ‘Prev’ or ‘Next’ buttons on
the remote.
35
Page 38

Service
The Service portion of the LinkTheater PC Software allows you to
do a number of different things. The PC with the LinkTheater PC
Software installed on it will need to be connected to the internet for
these features to work properly. The Service page has links for RSS
Directory, Web Bookmark, Music Radio, Podcast, and Yahoo Search.
Other links can be added to the services page with plugins. Navigate
the display with the remote control’s directional pad and press ‘Enter’
to select a service.
RSS Directory
The RSS Directory function shows your RSS feeds. Navigate through
the list with the remote control’s directional pad, then press the ‘Enter’
button to select an RSS feed.
Web Bookmark
The Web Bookmark function pulls your bookmarks from your web
browser (Internet Explorer or Mozilla FireFox). Navigate to one of
your folders or bookmarks and press the ‘Enter’ button on the remote
control. The web page for the book mark will then load on the display.
The ‘Return’ button on the remote control will return you back to the
original bookmark list. From within a web page the remote control’s
directional pad may be used to navigate the page and to select
hyperlinks. Pressing the ‘Enter’ button on a hyperlink will bring up the
linked web page on the display.
Music Radio (Jazz)
The When you select Music Radio, you are taken to a list of Jazz radio
stations. You may change to Rock or Pop stations by selecting from
the icons at the top right of the page. The disk icon takes you to Pop
stations and the guitar icon takes you to Rock stations. Selecting the
horn brings you back to the Jazz page.
On the Jazz page, you may select from a list of Jazz stations. Press
‘Enter’ to start a station playing. To stop a radio station from playing,
press the ‘Stop’ button on the remote control.
If there are many bookmarks or items in the folder, you may be
required to switch between pages. Pages can be switched by manually
navigating to the arrows in the top right area of the display or by using
the ‘Prev’ and ‘Next’ buttons on the LinkTheater remote control.
To exit back to the main Home page, press the ‘Home’ button on the remote control after all file playback has been
stopped.
36
Page 39

Music Radio (Pop)
The Pop page works exactly like the Jazz page. Select a station with
the directional keys on your remote and press the ‘Enter’ button to start
it playing. You may change to Rock or Jazz stations by selecting the
guitar or horn icons from the top right of the page.
Music Radio (Rock)
The Rock page works exactly like the Jazz and Pop pages. Select a
station with the directional keys on your remote and press the ‘Enter’
button to start it playing. You may change to Pop or Jazz stations by
selecting the disk or horn icons from the top right of the page.
Yahoo Search
The Yahoo Search function lets you search the web. Use the
alphanumeric keys on your remote to enter in the term you want to
search for, and click the ‘Enter’ button on your remote to begin your
search. You may limit your search to video, images, or news by
checking the appropriate box before searching.
37
Page 40

Contents
Settings
Some settings may be adjusted from the main LinkTheater PC Media
Player page. Use the directional keypad to negotiate to the Setting
link in the top right corner of the screen and click the ‘Enter’ button on
your remote.
Change your Settings
If you have additional themes installed, you may select one here. You
may select to play videos, music, and/or slides in random order, and
you may choose how pictures are displayed:
Fit to screen - Proportions are maintained, but pictures are displayed
as large as fits on your screen. This setting is recommended.
Full screen - Pictures are cropped as necessary to fill your screen
completely.
Actual size - displays your pictures in their actual size, pixel for pixel. If
your pictures are very small or very large, this may make them difficult
to view.
Click ‘Submit’ when changes are complete.
38
Page 41

Windows Media Connect Setup
Windows Media Connect is available only on Windows XP systems. It’s Microsoft’s software that streams multimedia
content to devices like LinkTheater. Currently it is the only way to transmit DRM (Digital Rights Management)
protected multimedia files from a PC to your LinkTheater. If you don't play DRM protected multimedia files, then
setting up Windows Media Connect is not necessary. Windows Media Connect supports playback of DRM protected
files that use the WinDRM codec, including files downloaded from napster.com, walmart.com, movielink.com, and
cinemanow.com.
First determine whether or not Windows Media Connect is already installed
on your Windows XP system. Open the Control Panel and look for
Windows Media Connect. You may need to switch your Control Panel to
‘Classic View’ to see the ‘Windows Media Connect’ icon. Double-click
on the ‘Windows Media Connect’ icon to launch it.
If the icon is not present, you can download it from Microsoft’s site by
searching for Windows Media Connect or from Microsoft’s Windows
Update (http://windowsupdate.microsoft.com). After the installation,
find the Windows Media Connect icon in Control Panel and double-click
on it.
Windows Media Connect's software will appear in your system tray. Double-click on
its icon to display the program.
Once Windows Media Connect is running and displayed on your screen,
the Devices page will be displayed. The first step is to press the ‘Add…’
button.
The Windows Media Connect Wizard will open. Select ‘Device 1’ from the list and
press the ‘OK’ button. Then select ‘Device 2’ from the list and press the ‘OK’ button
again. Repeat for all devices listed.
39
Page 42

After all listed devices are activated, your Windows XP machine is
ready to stream media to LinkTheater.
Press on the ‘Sharing’ button on the left.
Press the ‘Add’ button to specify a folder to share to LinkTheater.
Browse to a folder that contains data you would like to share with
LinkTheater by pressing the ‘Browse’ button. Give it a name that
you would recognize and select the privacy settings that apply to
your environment (the default values are acceptable in most cases).
Press the ‘OK’ button when finished. Press ‘Yes’ if any dialog boxes
appear.
Add as many folders as you would like to share with your LinkTheater
by repeating the previous steps as necessary.
Press on the ‘Settings’ tab to the left.
Recommended: check ‘Automatically start folder sharing when
Windows starts.’ This check box instructs Windows Media Connect
to run every time Windows is started. If you prefer to launch Windows
Media Connect manually from the Control Panel each time you want
to use it from LinkTheater, you can leave the box unchecked. Press
the ‘Close’ button once you are finished.
Congratulations, Windows Media Connect is set up and running on
your Windows XP PC!
40
Page 43

Windows Media Connect Playback
Now that Windows Media Connect is installed on your Windows XP PC(s), you can access media files that reside in the
Windows Media Connect shared folders.
Access your Windows Media Connect PC by pressing the ‘Home’ button
on the remote control. The Home page will appear and your computer
will appear on LinkTheater's list of available media with the name YOUR_
COMPUTER: Windows Media Connect (where YOUR_COMPUTER is
the machine name of your computer). Use the remote control’s directional
pad to select this name from the list and then press the ‘Enter’ key on the
remote control.
Your LinkTheater is now connected to the Windows Media Connect PC.
Windows Media Connect organizes your multimedia files automatically
and depending on your Windows Media Connect configuration, your
screen may look different.
Using the remote control’s directional pad, browse through the folders and
subfolders to find the file you wish to view or play. Once you have located
the file, press the ‘Enter’ button to begin viewing or playing the file.
Video Playback
Press the ‘Enter’ button to play a video file on LinkTheater. During the video the ‘Pause’ button will pause the video’s
playback (the ‘Play’ button will resume the video). The ‘Rew’ and ‘FF’ buttons will rewind and fast forward the video. The
‘Stop’ button will stop the video playback altogether.
Photo Playback
Press the ‘Enter’ button to display a photo on the LinkTheater. Press the ‘Play’ button to play all of the photo files in that
directory as a slide show. During the slide show the ‘Pause’ button can be used to stop a slide show (the ‘Play’ button
will resume the slide show). The up and down arrows on the directional pad can also be used to change slides. The
‘Stop’ button will stop the slide show. Additionally, the ‘Angle’ button on the remote control will rotate an image or photo
90 degrees.
Music Playback
Press the ‘Enter’ button to play a music file on the LinkTheater. Press the ‘Play’ button to play all of the music files in
that directory as a playlist. The ‘Pause’ button can be used to pause music playback (the ‘Play’ button will resume the
playback). The ‘Prev’ and ‘Next’ buttons on the remote control can be used to skip to the next song, and the ‘Rew’ and ‘FF’
buttons can be used to rewind and fast forward a music file. The ‘Stop’ button can be used to stop playback altogether.
Windows Media Connect lists and organizes files automatically; there are often extra folders that must be entered before
file playback can occur. There is no way to change or speed the process up, it is automatically sorted via Windows Media
Connect.
To exit back to the main Home page, press the ‘Home’ button on the remote control after all file playback has been
stopped.
41
Page 44

Using LinkTheater to play CinemaNow files
Movies downloaded from CinemaNow© (www.cinimanow.com) are encoded with Microsoft’s Digital Rights
Management. You can play these on your LinkTheater, but keep the following in mind:
1) The LinkTheater streaming server software on your PC cannot play Microsoft DRM encoded files. You will need
to use Microsoft’s Windows Media Connect software to play these files.
2) Microsoft’s Windows Media Connect must be installed and running on the PC that the movie was downloaded
onto, and the LinkTheater must be activated in the Windows Media Connect Software. (See pages 39 - 41.)
3) The movie must complete downloading before it can be played on the LinkTheater. Windows Media Connect does
not support partially downloaded files at this time.
Begin by selecting a movie to download. Many movies at
CinemaNow will offer options to "watch" (stream the movie), to
buy, to download, or to rent the file. Windows Media Connect
doesn't support streaming, so selecting "watch" will not give
you a file that LinkTheater can play. Make sure that you
'download', 'rent', or 'buy' the movie if you want to watch the
movie with your LinkTheater.
In this example, you have a choice of renting a 700kbs or
1500kbs version of the movie. Larger file sizes will often offer
higher quality video, but will take longer to download.
After you pay for your movie, you'll get this download screen. Do not close
this window until the download is complete. The movie must be completely
downloaded to your PC before Windows Media Connect will allow it to be
played on your LinkTheater.
42
#
Page 45

On your LinkTheater's Home screen, you'll see two different entries with the name
of your PC. Choose the one labled "Windows Media Connect".
Click on 'Video',
then 'All Video',
Contents
and nally, choose your new movie from the list of movies in your media folder.
It will take several seconds for the buffer to load.
Enjoy your movie!
,
#43
Page 46

Installing LinkTheater software on your Macintosh
Insert the LinkTheater disk in your Macintosh. An icon
of a CD will appear on your desktop. Double-click the
LinkTheater icon.
The LinkTheater folder will open. Double-click on the linktheaterx-mac.
dmp icon.
The LinkTheater Installer will appear.
Open your Applications folder by choosing Go/Applications.
Drag the LinkTheater icon into your Applications folder.
44
Page 47

LinkTheater installation for Mac
Open your Home folder by choosing Go/Home. In the Home
folder window, you'll see the Library folder. Drag Media
Service Plugins into the Library folder.
Congratulations! Your media files are now accessable from your LinkTheater.
45
Page 48

LinkStation
with LinkTheater
Buffalo’s LinkStation Network Storage Center can easily stream files to LinkTheater to be played. If you don't have
a Buffalo LinkStation or do not wish to playback files from your Buffalo LinkStation, then please skip to the next
section.
For LinkStation to stream multimedia files to the LinkTheater, a LinkStation firmware that supports ‘PCast’ is required.
Some older LinkStations may not contain a firmware that supports ‘PCast’. If that is the case then please proceed
with updating the LinkStation’s firmware (instructions below). If you are unsure of whether your LinkStation supports
‘PCast’, then please follow the following instructions.
Login to your LinkStation’s Web Based Configuration. This is typically done by typing http://NAME-OF-LINKSTATION
into your web browser (where NAME-OF-LINKSTATION is the name you gave your LinkStation during setup). A login
prompt will appear asking you for user credentials to login to your LinkStation. If your LinkStation cannot be found,
please consult the documentation that came with LinkStation or contact our free 24x7 Technical Support.
At the login prompt, enter the proper username and password. The
username is always root and there is no password by default. However,
if you set up a password during your initial LinkStation setup, then you
must enter it in the password field. Once the proper information has
been entered, press the ‘OK’ button.
Once logged in, the main LinkStation configuration page will appear.
At the bottom of the page there may be a PCast configuration area. If
there is a configuration area named ‘PCast’, then you do not need the
firmware update and you can skip the firmware update procedure and
continue to the ‘Configuration of LinkStation’ section. If no ‘PCast’
configuration area exists, then you will need to follow the next step,
upgrading the firmware.
Upgrading LinkStation’s Firmware to Support PCast
Power cycle your LinkStation by holding the power button down until the POWER lamp begins to blink. Once the
POWER lamp stops blinking the device is off. Please wait 5 seconds and then press the power button. The POWER
lamp will begin to blink again signifying the startup process. Once the POWER lamp becomes solid, LinkStation has
successfully restarted.
46
Page 49

Insert the Buffalo LinkTheater CD into your PC’s CD-ROM drive.
The CD should auto-launch and bring up an on-screen menu. If
the CD doesn't launch automatically, click on ‘Start’, select ‘Run .
. .’, and type D:\setup.exe (where D is the drive letter of your CDROM).
Once the Easy Setup Wizard has launched, select the ‘Upgrade
LinkStation Firmware’ option. Press ‘OK’.
The LinkTheater update menu will appear. There are 2 different
updates available for LinkStations. Only the correct update program
will work, so if you don't know which to use, try Update #1. If it
doesn't work, then you know Update #2 is the right one for you.
Update #1 – Updater for version 1.xx LinkStations. 1.xx LinkStations
shipped from late 2003 until early 2005.
Update #2 – Updater for version 2.xx LinkStations. 2.xx LinkStations
started shipping in early 2005.
When you press an update button, the update program will begin by searching for available LinkStations on your
network. Update #1 will only find 1.xx version LinkStations while Update #2 will only find 2.xx version LinkStations.
Thus, if the first updater you try does not find your LinkStation, then simply exit the updater and use the other
updater.
Once the proper updater has been selected, the updater will find all of the
available LinkStations on your network. If more than one LinkStation resides
on your network, then please select the appropriate LinkStation from the
pull down menu. Once the proper LinkStation has been selected, press the
‘Renew Firmware’ button.
A status screen will appear showing the current version of your LinkStation's
firmware and the new version that this firmware update will install. If
you've set an administrator password on your LinkStation, enter it into the
‘Administrator Password’ field. If no password was set, leave the password
field blank. Press the ‘OK’ button when you are finished.
The firmware update process will take 3-5 minutes and you will be greeted by a dialog box informing you when the
firmware update has completed. If you have any problems updating the firmware, please contact our free 24x7
Technical Support.
47
Page 50

Configuration of LinkStation
Login to your LinkStation’s Web Based Configuration tool. This is
typically done by typing http://NAME-OF-LINKSTATION into your
web browser (where NAME-OF-LINKSTATION is the name you gave
LinkStation during setup). A login prompt will appear asking you for
user credentials to login to your LinkStation. Enter your account name
and password.
Once logged into the main configuration page, click on the ‘LinkTheater
Settings’ option at the bottom of the main page (highlighted in the
figure to right).
This will take you to the LinkTheater Settings page, where you can configure the following options:
Media Server Function: ‘Enable’ or ‘Disable’ the ability of your LinkTheater to play back files from this
LinkStation.
Media Folder: Select the share or folder from the pull down menu that will be shared from this LinkStation to your
LinkTheater(s). Only one folder or share can be selected on a LinkStation. Please select a folder that contains all
of the files and subfolders you desire LinkStation to share with LinkTheater.
Media Server Password: If enabled, you will be required to enter a password to stream files from this LinkStation
to LinkTheater. Enter a password twice if you enable this.
Once you have finished making changes, press the ‘Apply’ button to store the new settings on LinkStation. You may
now close the Web Browser used for configuring the LinkStation.
The LinkStation supports UPnP, therefore, the next time you start LinkTheater this LinkStation will automatically
appear on the Home screen ready for you to stream multimedia files from. Pressing the ‘REFRESH’ button on the
remote control from the Home page will show the LinkStation without restarting LinkTheater.
48
Page 51

TeraStation with LinkTheater
If you have a TeraStation in your network, you can easily access it from your LinkTheater. To do this, you need to
enable PCast on the TeraStation.
Begin by opening your TeraStation's Web Based
Configuration Tool. You can do this by typing http://
TERASTATIONNAME into your web browser, or by
opening your TeraStation Client Utility and choosing
Setup, then Browser Management from the drop-down
menues.
From the menu on the left
side, click on ‘PCast’.
Enter your password and click ‘OK’.
49
Page 52

PCast Settings:
• ‘Enable’ PCast Media Server.
• Select the folder on your TeraStation that
you keep your media in. If in doubt, just
select share here.
• ‘Enable’ or ‘Disable’ password protection
on your media folder. If you enable
password protection, enter a password
into the next two fields.
• Click ‘Apply’.
Your TeraStation is now set up to share media with LinkTheater!
50
#
Page 53

Playback with LinkStation or TeraStation
Now that your LinkStation or TeraStation has been configured with PCast support, you'll be able to stream media
files to LinkTheater.
Access your LinkStation or TeraStation by pressing the ‘Home’ button
on the remote control. The Home page will appear and a new device
will automatically appear on the display or TV. The friendly name of
your LinkStation or TeraStation will appear. Use the remote control’s
directional pad to select the friendly name and press the ‘Enter’ key on
the remote control.
Once you have logged in, the Media Server will start. Just select the
type of media you wish to play. Additionally, the ‘Video’, ‘Music’, and
‘Photo’ buttons on the remote can be used to select the media type at
any time while browsing.
Video Playback
Press the ‘Enter’ button to play a video file from your LinkTheater or
TeraStation. During the video the ‘Pause’ button will pause the video’s
playback (the ‘Play’ button will resume the video). The ‘Rew’ and ‘FF’
buttons will rewind and fast forward the video. The ‘Stop’ button will
stop the video playback altogether.
On the top of the Media Server display, there are three buttons:
Play all – Plays all of the files inside of the current folder in alphabetical
order.
Play randomly – Plays all of the files inside of the current folder in
random order.
Back – Jumps back to the previous location or folder.
If there are several files in the folder, you may be required to switch between pages. Pages can be switched by
manually navigating to the arrows in the top right area of the Media Server display. Alternatively, the ‘Prev’ or ‘Next’
buttons on the remote will change pages.
51
Page 54

Photo Playback
Press the ‘Enter’ button to display a photo on the LinkTheater. Press the ‘Play’ button to play all of the photo files in
that directory as a slide show. During the slide show the ‘Pause’ button can be used to stop a slide show (the ‘Play’
button will resume the slide show). The up and down arrows on the directional pad can also be used to change
slides. The ‘Stop’ button will stop the slide show. Additionally, the ‘ANGLE’ button on the remote control will rotate
an image or photo 90 degrees.
On the top of the LinkStation Media Server display, there are three
buttons:
Slide show – Displays all of the images inside of the current folder in
an alphabetical slide show.
Play randomly – Displays all of the images inside of the current folder
in a random slide show.
Back – Jumps back to the previous location or folder.
If there are several files in the folder, you may be required to switch
between pages. Pages can be switched by manually navigating to the
arrows in the top right area of the LinkStation Media Server display.
Alternatively, the ‘Prev’ or ‘Next’ buttons on the remote will change
pages.
Music Playback
Press the ‘Enter’ button to play a music file on the LinkTheater. Press the ‘Play’ button to play all of the music files
in that directory as a playlist. The ‘Pause’ button can be used to pause music playback (the ‘Play’ button will resume
the playback). The ‘Prev’ and ‘Next’ buttons on the remote control can be used to skip to the next song, and the
‘Rew’ and ‘FF’ buttons can be used to rewind and fast forward a music file. The ‘Stop’ button can be used to stop
playback altogether.
On the top of the LinkStation Media Server display, there are three
buttons:
Play all – Plays all of the files inside of the current folder in alphabetical
order.
Play randomly – Plays all of the files inside of the current folder in
random order.
Back – Jumps back to the previous location or folder.
If there are several files in the folder, you may be required to switch
between pages. Pages can be switched by manually navigating to the
arrows in the top right area of the LinkStation Media Server display.
Alternatively, the ‘Prev’ or ‘Next’ buttons on the remote will change
pages.
To exit back to the main Home page, press the ‘Home’ button on the remote control after all file playback has been
stopped.
52
Page 55

Future Capabilities
Updates for the LinkTheater are planned for the near future. Please check the Buffalo Technology web site (http://
www.buffalotech.com) to determine if new updates are available for LinkTheater. Here are some of the planned
upgrades:
◗ More audio and video codec support
◗ More DRM-protected content playback
◗ Direct downloading/streaming of content directly through LinkTheater
◗ Partenerships with leading content providers to make the LinkTheater experience easier and more entertaining
◗ Third party custom applications, such as ITunes Top 10, News Today, Movie Store, Music Store, etc.
53
Page 56

Troubleshooting
The troubleshooting section answers some Frequent Asked Questions (FAQ). If problems still persist, please contact
our free 24x7 technical support.
Q: What file formats can I use with LinkTheater?
A: LinkTheater is able to play the following type of files:
Video Files - dat, mpg, mpe, mpeg, m2v, m1v, vob, avi, asf, divx, xvid, rmp4, mov, mp4, vro, m4v, m2p, hnl,
wmv, wmv hd, divx hd
Audio Files - mp3, mp2, ogg, wav, aac, wma, pls, m4a, ac3, mp1, mpa, asf, m3u
Picture Files - jpg, gif, bmp, tif, png
Q: I can’t access the LinkTheater PC software from LinkTheater!
A: Check the following:
1. Check Computer – Check that your computer is on and is not in “sleep” mode.
2. Check the path settings for media content – Confirm that you have placed your media content in the correct
folders you have assigned in the preferences of the LinkTheater PC software.
3. Check computer’s connection on the Home network – Ensure that your computer is physically onnected
to your Home network (or wirelessly connected). If your Home network includes a shared internet
connection, check your computer’s connection by trying to browse to the internet.
4. Check LinkTheater’s connection on the Home network – Ensure that LinkTheater is connected to the Home
network. This can be done by checking if a proper IP Address has been assigned to LinkTheater (IP Address
tab of LinkTheater’s main settings).
5. Check that the LinkTheater PC software is running – Check that the LinkTheater PC software is running on
your computer. Check for the icon running in the system tray.
6. Check network security/firewall software – Some network security or firewall software may prevent the
LinkTheater PC software from operating properly. Try disabling the network security/firewall software.
7. Check that you’re logged into your Windows PC – If your computer is running Windows 2000 or Windows
XP, make sure you have signed in.
Q: I can’t hear any sound from LinkTheater!
A: Check the following:
1. Check the volume and power to the speakers – Make sure that your television or sound system is powered
on, and that the volume is at an acceptable level. Some sound systems allow you to choose the speakers to
use for output. Please ensure the correct speakers are selected.
2. Check connections – If LinkTheater is connected to any stereo or home entertainment equipment, please
check that the cables are connected properly and firmly.
3. the video and/or song file – Make sure that the content you are playing has working audio. Test the content
for audio playback on your PC. Also, make sure the audio format used is supported by LinkTheater.
Q: I don’t see any video, music, or photos on the LinkTheater!
A: Check the following:
1. Check that video, audio, or photo content is available on the resource you are accessing.
2. Check that the video, audio, or photo file is playable on your PC.
3. Check that the LinkTheater PC Software is configured properly and that the multimedia content is residing
in the configured library and watch folders.
54
Page 57

Q: I changed some of the video, music, or photo content on a resource; why can’t I see the changes on
LinkTheater?
A: Press the “Refresh” button on the remote control to refresh the page. Also, try toggling the video, music, or
photo buttons on the remote control.
Q: Why does LinkTheater respond slowly when I watch a movie, browse photos, or listen to music?
A: Check the following:
1. Publish multiple folders – If there are a large number of files in a folder, navigating through the folder may
be slow. Try creating more folders with less content in each folder.
2. Remove unusable files – Move files that are known not to be media content. Non-supported file formats
may not be seen on LinkTheater but they are still processed and filtered by LinkTheater, slowing down
response times.
3. PC performance – Try installing the software on a faster PC if available.
55
Page 58

Technical Specifications
Product Specifications
Supporting OS Win. Me, 2000 Professional, XP Home and Professional
Package Contents LinkTheater, Video/Analog Audio Cable (about 150cm), LAN cable (about 180cm),
Power cable (about 180cm), Installation Manual, Utility CD-ROM, Remote Control,
2 Batteries (AAA)
Driver and Utilities Media Server Software
Power Source AC100V 50/60 Hz
The Actual Product 5 V, 12 V
Cycling Voltage
Power Consumption Max. 25 W (at Standby 1 W)
Dimensions 420 x 50 x 265 mm
Weight About 2.7 kg
Warranty 1-year warranty
Acquired Regulations UL, FCC, CE, PSE, VCCI ClassB
Multi-Format Playback DVD-R/RW, DVD+R/RW, DVD-ROM, CD-R/RW, CD-ROM
(Playable Disc Types)
Content Formats Disc Contents Formats (Media): DVD-Video, Video CD, Super Video CD, Audio CD (CD-DA)
File/Contents Formats (Media):
Digital Audio File Formats: MP3, WMA, Ogg, WAV (non-compiled)
Picture File Formats: JPEG, GIF, TIF, BMP, PNG
AVI File Formats: DivX (Ver. 3.11.4.5), RMP4, XviD+MP3/AC3
Video File Formats: MPEG-1, MPEG-2, WindowsMediaVideo9
Video Formats Digital Video Compression Formats:
MPEG-2 (DVD-Video, Super Video CD, *.MPG file) –
Max. Bit Rate: 15Mbps, Frame Rate: Max. 30fps
MPEG-1 (Video CD, *.DAT file) – Max. Bit Rate: 15Mbps, Frame Rate: Max. 30fps
MPEG-4 (*.AVI file, *.MP4 file) – Max. Bit Rate: 4Mbps (DivX), 5Mbps (RMP4), 8Mbps (XviD),
Frame Rate: Max. 30fps
Windows Media Video (*.WMV file, *.ASF file) – Max. Bit Rate: 8Mbps,
Frame Rate: Max. 30fps
Digital Audio Compression Formats:
Dolby Digital (AC-3) Multi-Channel (Digital Output Only, No Decoding Feature)
DTS Multi-Channel (Digital Output Only, No Decoding Feature)
MPEG-1 Audio Layer 1 2 Channel
MPEG-1 Audio Layer 2 Multi-Channel
MPEG-1 Audio Layer 3 2 Channel
MPEG-4 AAC (Low Complexty) 5.1 Channel
Windows Media Audio 9 (HD) 2 Channel
Digital Audio Non-Compression Formats:
Renear PCM 2 Channel, (S/P DIF) 16/20/24 bit, 44.1/48/96kHz
Audio Formats CD-DA, Renear PCM (*.WAV), Ogg Vorbis (*.OGG), MPEG-1 Audio Layer-3 (*.MP3),
Windows Media Audio (*.WMA), MPEG4-AAC (*.M4A)
Picture Formats JPEG (Baseline JPEG only), GIF, TIFF, BMP, PNG
File Extensions Video Files - dat, mpg, mpe, mpeg, m2v, m1v, vob, avi, divx, xvid, rmp4, mov, mp4, vro, m4v,
m2p, (in network mode) hnl, wmv
Audio Files - mp3, mp2, ogg, wav, aac, wma, pls, m4a, ac3, mp1, mpa, asf
Picture Files - jpg, gif, bmp, tif, png
File Extensions Video Files - dat, mpg, mpe, mpeg, m2v, m1v, vob, avi,divx, xvid, rmp4,mov, mp4, vro, m4v,
(via LinkStation) m2p,hnl, wmv
Audio Files - mp3, mp4, ogg, wav, aac, wma, ac3, m4a, aac, asf
Picture Files - jpg, gif
Video Output Signals DA Converter – 12bit/54 MHz
Composite Video – 1.0Vp-p / 75 Ω
S Video – Y Output: 0.7Vp-p / 75 Ω; C Output: 0.3Vp-p / 75 Ω
Progressive/Scan – Y Output: 1.0Vp-p / 75 Ω; Pb Output: 0.7Vp-p / 75 Ω;
Pr Output: 0.7Vp-p / 75 Ω
P
56
Page 59

Product Specifications continued
Audio Output Signals DA Converter – 24bit/192 MHz
Signal Noise
Dynamic Range
Mixed Noise
Crack/Noise
Rear Panel Input/Output Video Output, S-Video Output, Component Video Output (Progressive Scan),
D4 Video Output,
Composite Audio Output, Composite Video Output, Digital Audio Output,
Digital Coaxial Audio
Output, Ethernet Port (100 Base-TX / 10Base-T), AC Adapter Input
>
90 dB (1kHz)
>
80 dB (1kHz)
>
80 dB (1kHz)
>
-65 dB (1kHz)
Network Interface (Wired)
Interface (10BASE-T) IEEE802.3, (10BASE-TX) IEEE802.3u
Supporting Protocol TCP/IP (HTTP) Setup Features, AppleTalk
Connector Type RJ-45 8 pin (NIC mode) x 1
Access Method CSMA/CD
Transfer Rate (Auto Sensing) 10 Mbps 100 Mbps
Network Interface (Wireless)
Standards IEEE802.11g/IEEE802.11b; ARIB STD-T66
Frequency 2,412 - 2,472 MHz (11channel)
Data Transfer Rate 6, 9, 12, 18, 24, 36, 48, 54 Mbps (IEEE802.11g); 1, 2, 5.5, 11 Mbps (IEEE802.11b)
Access Method Infrastracture Mode
Antenna Internal Diversity Antennas x 2
AOSS Technology AOSS button x 1 (on the front panel)
Security WEP 128 (104) / 64 (40) bit (Security can be set up by AOSS technology when you have a
Buffalo AOSS enabled router or access point.)
USB Interface
Interface USB2.0/1.1
Controller VIA VT6212L
Data Transfer Speed 480 Mbps
Connector Type Series A x 1 (Front x 1)
DVD-ROM
Interface ATAPI
Buffalo Warranty
Buffalo Technology (Buffalo Inc.) product comes with a one-year limited warranty from the date of purchase. Buffalo Technology (Buffalo Inc.)
warrants to the original purchaser the product; good operating condition for the warranty period. This warranty does not include non-Buffalo
Technology (Buffalo Inc.) installed components. If the Buffalo product malfunctions during the warranty period, Buffalo Technology (Buffalo Inc.)
will replace the unit, provided the unit has not been subjected to misuse, abuse, or non-Buffalo Technology (Buffalo Inc.) authorized alteration,
modifications or repair.
All expressed and implied warranties for Buffalo Technology's (Buffalo Inc.) product line including, but not limited to, the warranties of merchantability and fitness of a particular purpose are limited in duration to the above period.
Under no circumstances shall Buffalo Technology (Buffalo Inc.) be liable in any way to the user for damages, including any lost profits, lost savings
or other incidental or consequential damages arising out of the use of, or inability to use the Buffalo products.
In no event shall Buffalo Technology's (Buffalo Inc.) liability exceed the price paid for the product from direct, indirect, special, incidental, or consequential damages resulting from the use of the product, its accompanying software, or its documentation. Buffalo Technology (Buffalo Inc.) does
not offer refunds for any product.
57
 Loading...