

Buffalo MiniStation HD-PUSU3-WR User Manual
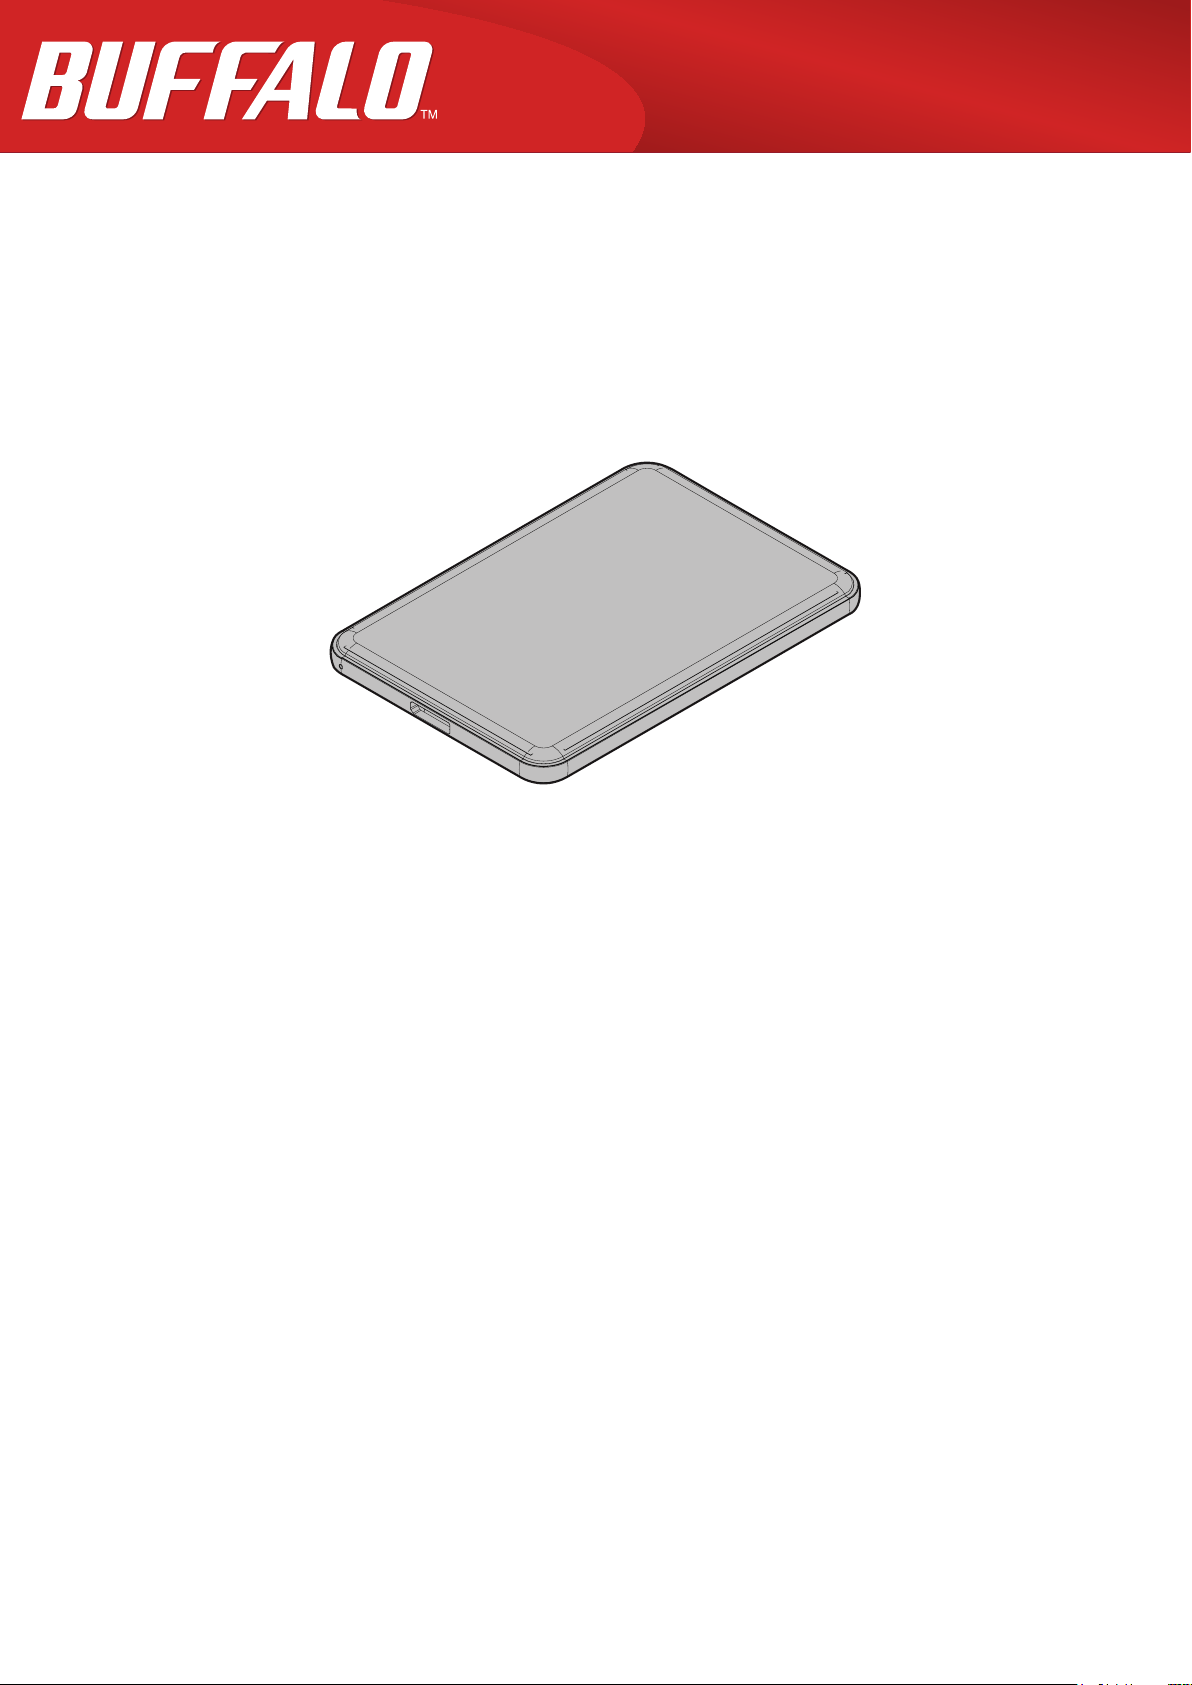
MiniStation
External Hard Drive
HD-PUSU3-WR
User Manual
Please make sure to read this manual before using and follow the instructions. If you have any inquiries about
the product, contact the number on the warranty statement or the packing box. Do not discard the manuals, the
warranty statement, or the packing box.
Americas: www.buffaloamericas.com
Europe: www.buffalo-technology.com
35021158-01
2016.06

Contents
Specifications ..................................................................3
Diagrams ...........................................................................................3
Technical Specifications ..................................................................3
Software Installation .......................................................................4
Notes .................................................................................................4
Dismounting the Drive ....................................................................5
Troubleshooting ...............................................................................5
I can see the MiniStation in Computer (This PC) but I cannot access it .5
I cannot see the MiniStation ..................................................................... 5
My backup program cannot save files to the MiniStation ...................... 6
About Formatting ...........................................................7
Format Types ....................................................................................7
Notes .................................................................................................7
Formatting with NTFS or FAT32 ......................................................8
Formatting ..................................................................................................8
Formatting with Mac OS Extended .................................................9
Mac OS X 10.11 ......................................................................................... 10
Mac OS X 10.10 and Earlier .....................................................................11
SecureLockMobile (For Windows) .............................. 15
Overview ........................................................................................ 15
1. Download SecureLockMobile .................................................. 15
2. Create an Encryption Box ......................................................... 15
1

Creating Your First Encryption ................................................................15
Additional Encryption Boxes ..................................................................18
3. Store Data in the Encryption Box ............................................. 19
4. Open Encryption Box and Retrieve Data ................................. 19
Delete Encryption Box .................................................................. 20
Notes .............................................................................................. 21
TurboPC EX (For Windows) .......................................... 22
Overview ........................................................................................ 22
Installation ..................................................................................... 22
Uninstallation ................................................................................ 22
Backup Utility (For Windows) ..................................... 23
Features ......................................................................................... 23
Notes .............................................................................................. 23
Installation ..................................................................................... 23
Configuration ................................................................................ 23
Backup Jobs ................................................................................... 30
Checking Logs ............................................................................... 30
Restoring Data from a Backup ..................................................... 31
Uninstallation ................................................................................ 31
Regulatory Compliance Information ......................... 32
For Customers in the United States ............................................. 32
For Customers in Europe .............................................................. 32
2
Specifications
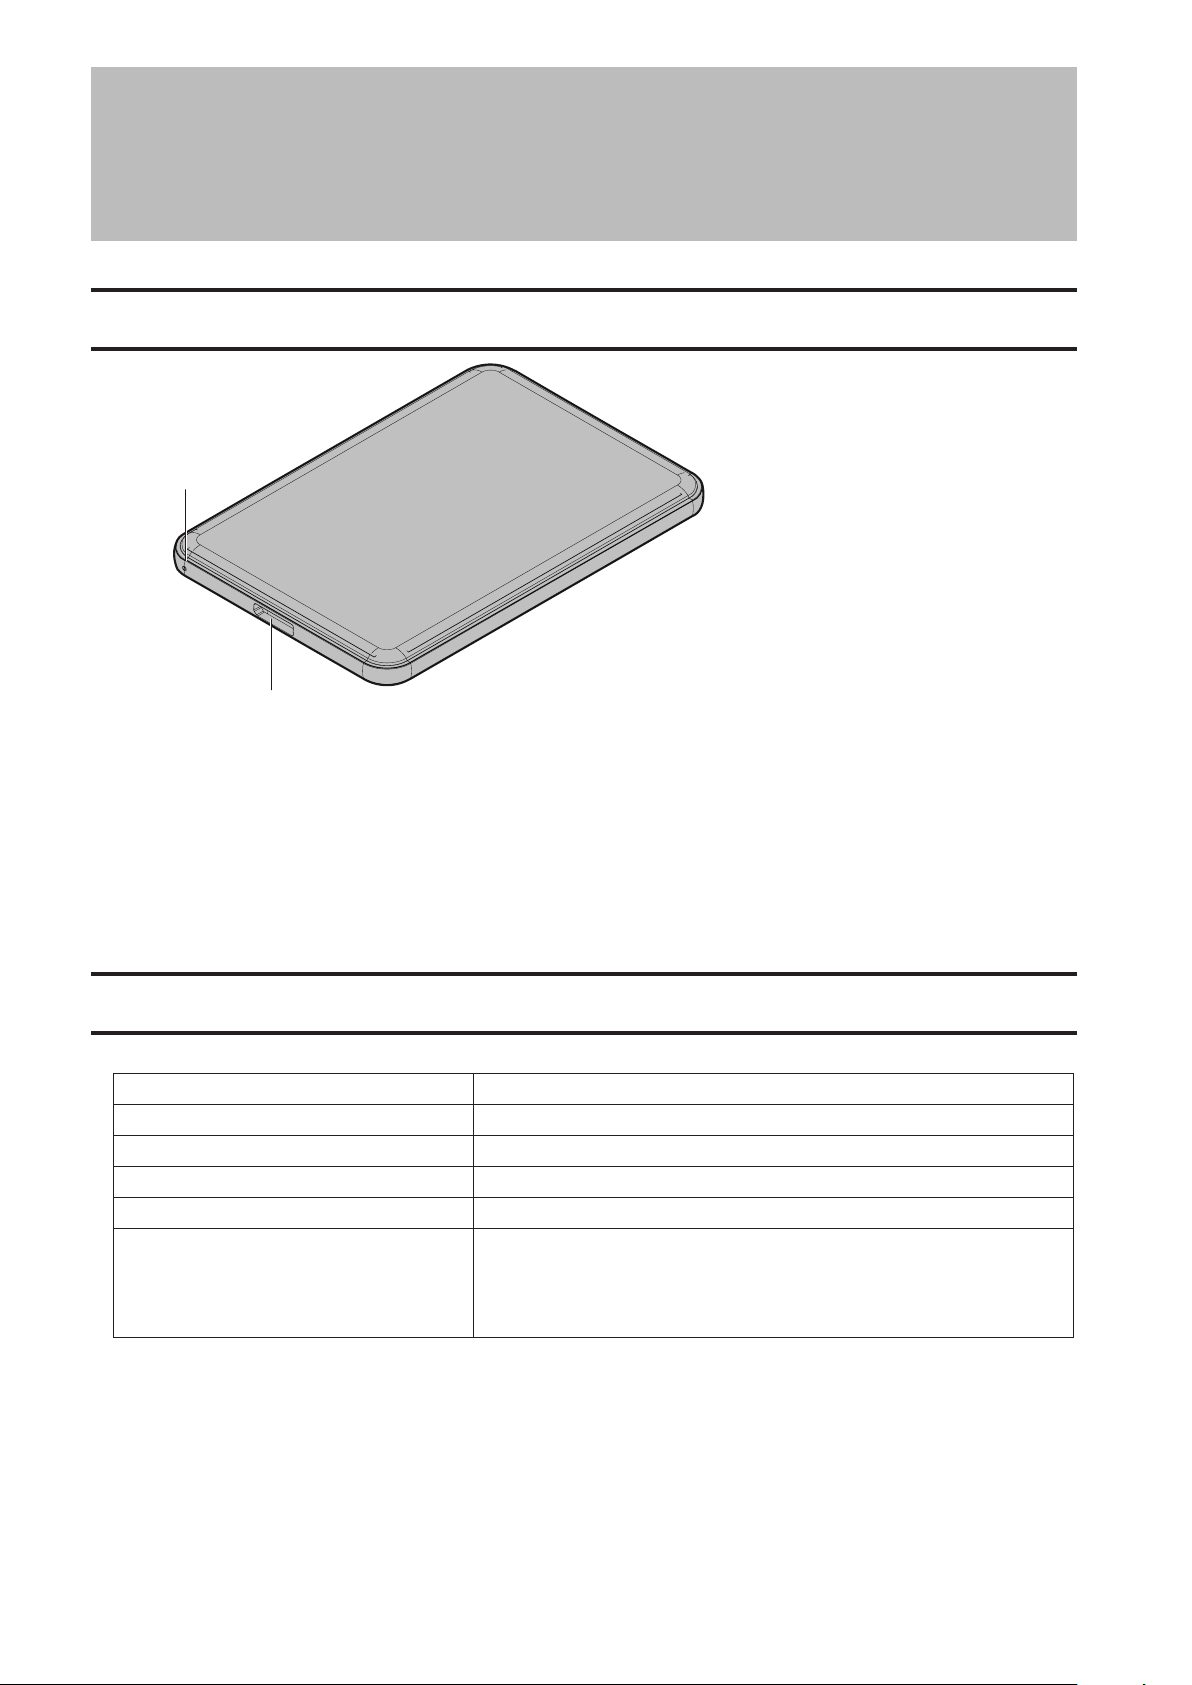
Diagrams
1
2
1 Power / Access LED
Idle: White
Active: Blinking white
2 USB Connector
Technical Specifications
Check Buffalo's website for information on the latest products and compatible models.
Interface USB 3.0
Connector USB 3.0 Micro-B
Transfer speed 5 Gbps maximum (USB 3.0)
External dimensions 79 x 115 x 8.8 mm; 3.11 x 4.53 x 0.35 in (excluding protruding parts)
Power 5 V ± 5%
Windows 10 (32-bit and 64-bit)
Compatible OS
Windows 8.1 (32-bit and 64-bit)
Windows 7 (32-bit and 64-bit)
OS X 10.9 or later
WARNING:
This product and its components contain chemicals known to the State of California to cause cancer and birth
defects, or reproductive harm. Wash hands after handling.
3

Software Installation
Optional software and manuals for the HD-PUSU3-WR are available from the download page below.
http://d.buffalo.jp/hd-pusu3-wr/
Notes
To avoid damage to data, never do any of the following while data is being accessed:
• unplug the cable connected to the drive
• turn off your computer
• put your computer into standby, hibernate, or sleep mode
Never put anything on top of the MiniStation. It may cause the drive to malfunction.
If Windows displays a message that a high-speed USB device is connected to a non high-speed USB hub, move
the drive to a USB 3.0 port for best performance, or click [X] to continue.
Never configure this drive as a destination for virtual memory.
The maximum size of a file on a FAT32 drive is 4 GB. To work with larger files, reformat the drive with NTFS or
Mac OS Extended. Please refer to the "About Formatting" section.
Some computers may not recognize this device. If this happens, unplug the USB cable, then plug it in again after
a few seconds.
This drive supports hot-plugging.
You can plug or unplug the USB cable while the drive and your PC are on. However, never unplug the cable while
data is being accessed. If you unplug the drive while data is being accessed, your data may be damaged or lost.
You may hear some noise while the drive is working, especially while it's booting or being accessed. This is
normal.
Do not boot your operating system from this drive.
The first time you connect this drive, it may take about 20 seconds before the power/access LED turns on.
If you use this drive with multiple partitions, format each partition before use.
If your Windows computer will not boot while this drive is connected, then connect the drive to your computer
after rebooting Windows. Also, refer to your computer's manual to change the BIOS setting to boot from an
internal hard drive if you want to turn your computer on or off while this drive is connected.
Some computers may display a delayed write when they return from an energy-saving state. If this happens,
unplug the drive before putting your computer into the energy-saving mode.
This drive may become hot during use. This is not a malfunction.
4
This drive is designed to release heat through its case. The surface of the case may become quite hot in normal use.
Even when the drive is off, the case may still be warm from standby current.
If the power/access LED does not turn off when you turn off your computer, unplug the USB cable from the
drive.
Some computers do not support power saving mode.
Before using this drive with a Mac, reformat it with Mac OS Extended using the disk utility in Mac OS.
Dismounting the Drive
If your computer is turned on, please follow the procedure below to unplug the drive. If your computer is turned off,
then it is always safe to unplug the drive. Unplugging the drive incorrectly can corrupt data. Please be careful.
For Windows
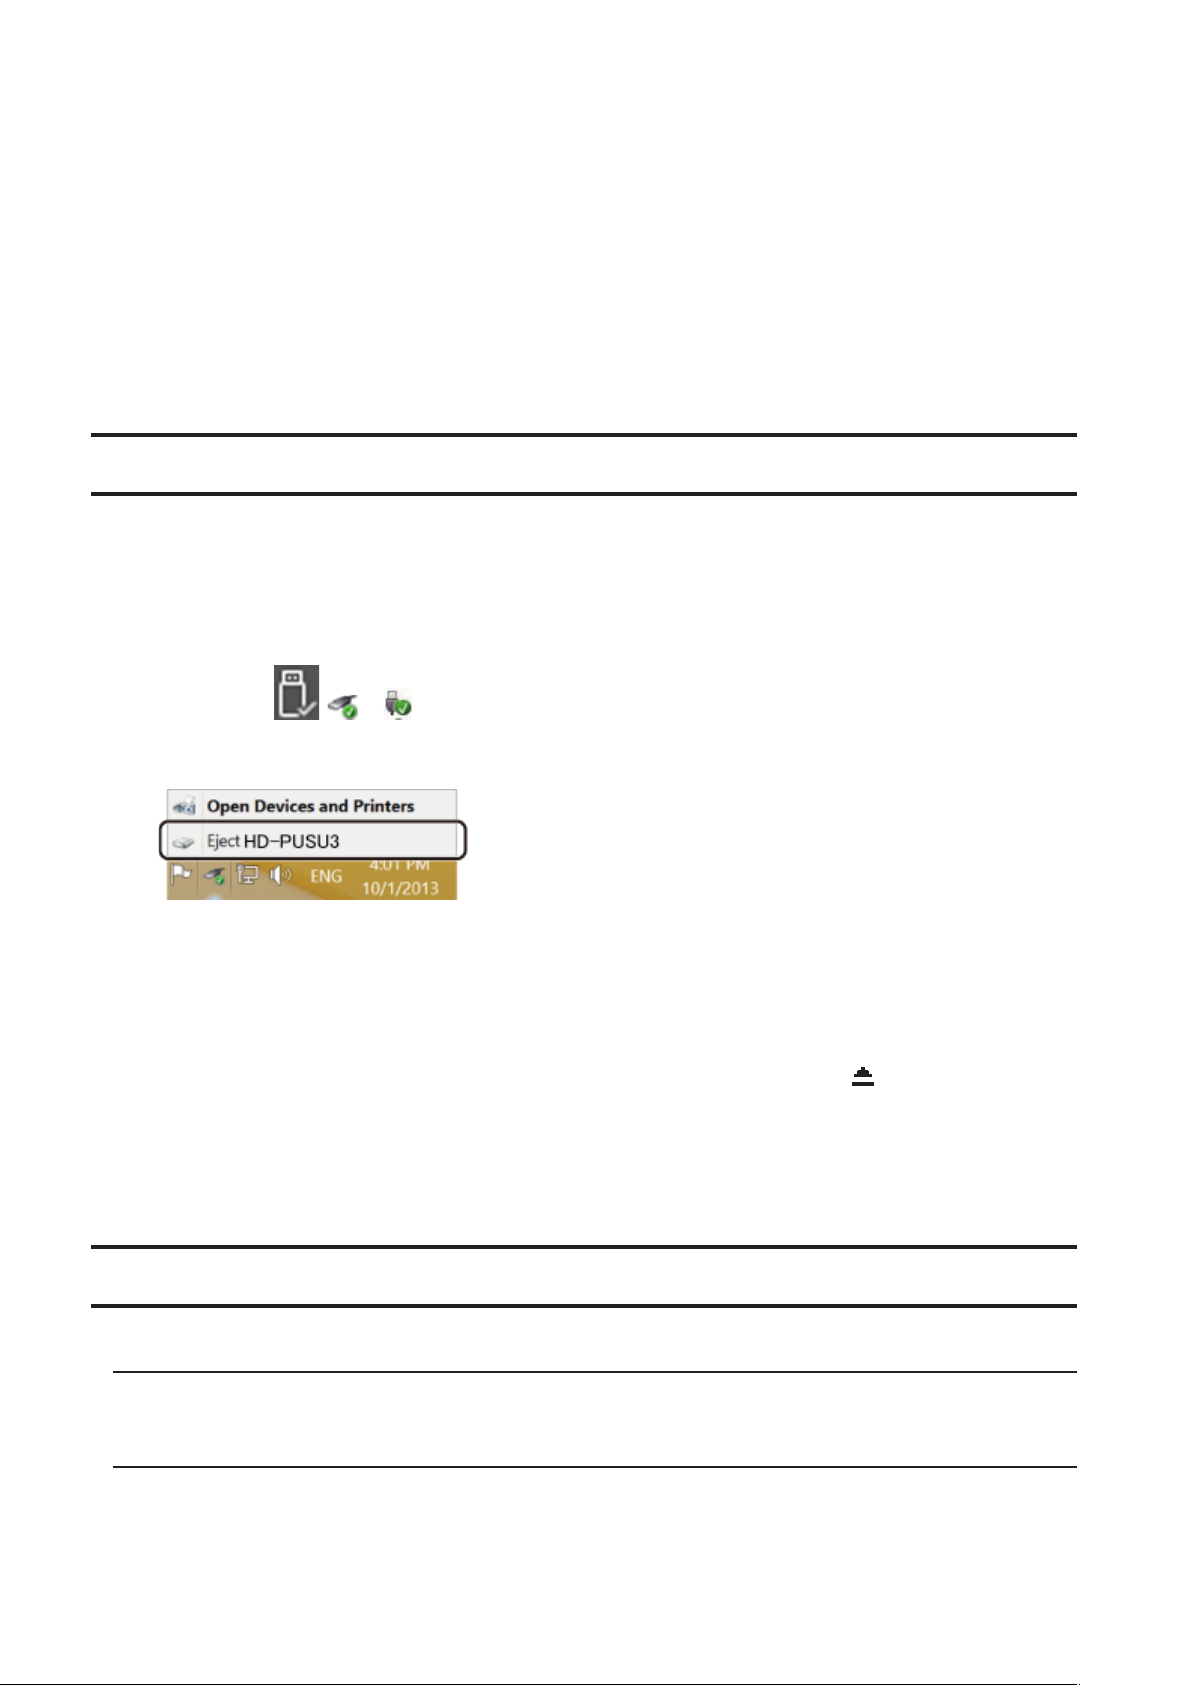
1 Click the icon , or in the system tray.
2 When the menu opens, click the device name.
3 A message that indicates you can safely remove the drive will appear.
For Mac
1 Drag this drive's icon to the trash to dismount the drive. Or, click the dismount icon from the sidebar of the
Finder to dismount the drive.
2 It's now safe to unplug the drive from your Mac.
Troubleshooting
I can see the MiniStation in Computer (This PC) but I cannot access it
The drive may require formatting. Try using DiskFormatter2. Please refer to the “About Formatting” section below.
I cannot see the MiniStation
Verify that the power/access LED is on. If it is not, check the cable. The MiniStation should be connected to your
computer by a USB cable. Check that both ends are correctly plugged in.
5

My backup program cannot save files to the MiniStation
Reformat your MiniStation with NTFS or Mac OS Extended. FAT32 is limited to 4 GB size files.
Please refer to the “About Formatting” section below.
6
35021159-01 2016.06
About Formatting
Formatting is the process of preparing a storage device such as a hard drive for use on your computer. To format a
drive, refer to the procedures below.
Format Types
There are several different format types, each compatible with different operating systems.
NTFS
NTFS formatting is compatible with Windows. Mac OS can read this format but not write to it. It can handle files
larger than 4 GB.
FAT32
FAT32 works with most modern operating systems including Windows and Mac OS. It doesn't support the use of
files larger than 4 GB.
Mac OS Extended
This is a format for the Mac OS only. It supports use of files that are 4 GB or larger in size. Windows doesn't
support this format.
NTFS FAT32 Mac OS Extended
Both reading and writing
Windows
Mac OS X
Both reading and writing
are supported
Only reading is supported
Writing is not supported
are supported (cannot
handle files larger than 4
GB)
Both reading and writing
are supported (cannot
handle files larger than 4
GB)
Not supported (Hard drive
is not recognized)
Both reading and writing
are supported
Notes
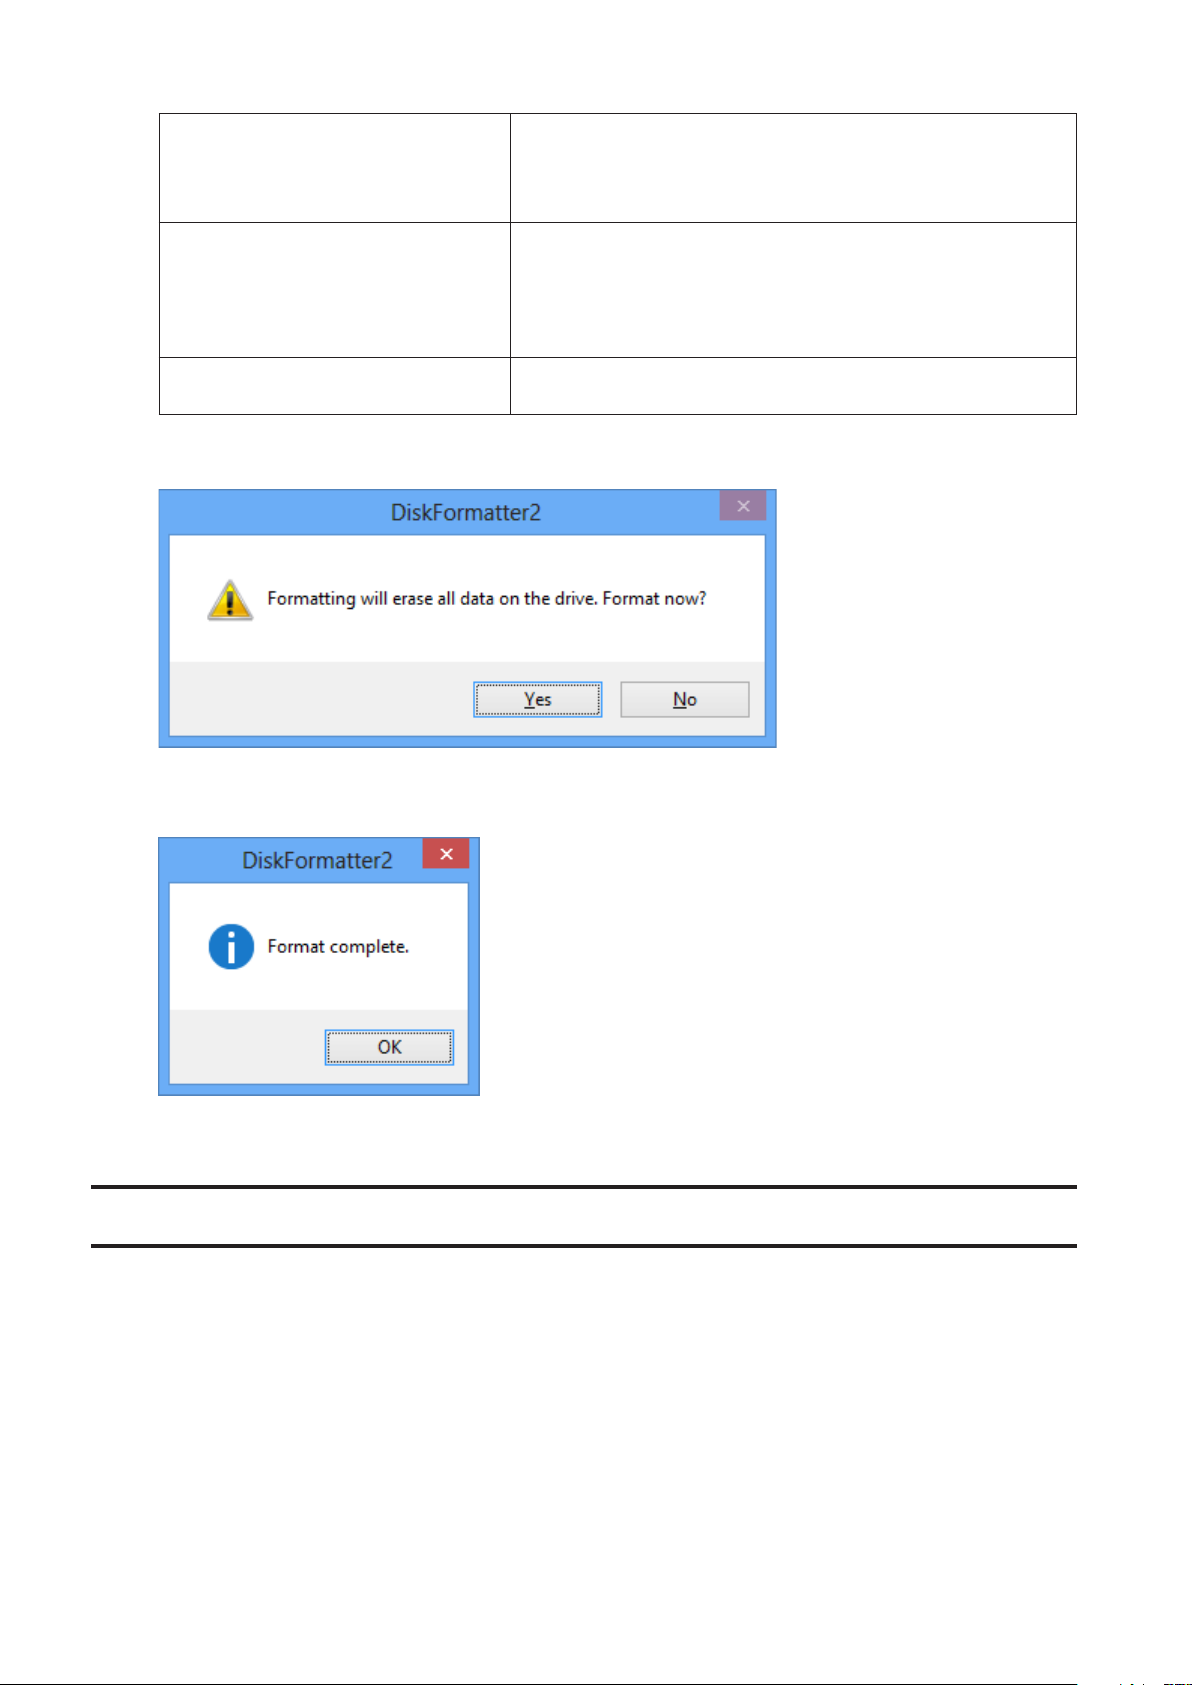
Never unplug the cable, reset, or turn off the computer during the formatting process.
This could result in damage to the drive or other problems. Proper operation cannot be guaranteed if the format
process was interrupted.
Formatting will erase all data on the hard drive. Before formatting, back up any data.
The user is responsible for any data lost due to formatting of the hard drive.
Don't format the wrong drive! Check the drive letter and partition name carefully. If you format the wrong drive, all
data on it will be lost.
7
Formatting with NTFS or FAT32
• Use a Windows computer to format drives with NTFS or FAT32. Using a Mac is not recommended for these format
types.
• Always use DiskFormatter2 to format drives with FAT32. Windows Disk Management will not format drives larger
than 32 GB with FAT32.
• FAT32-formatted drives can't save or open files larger than 4 GB. Use a different file system if you work with very
large files.
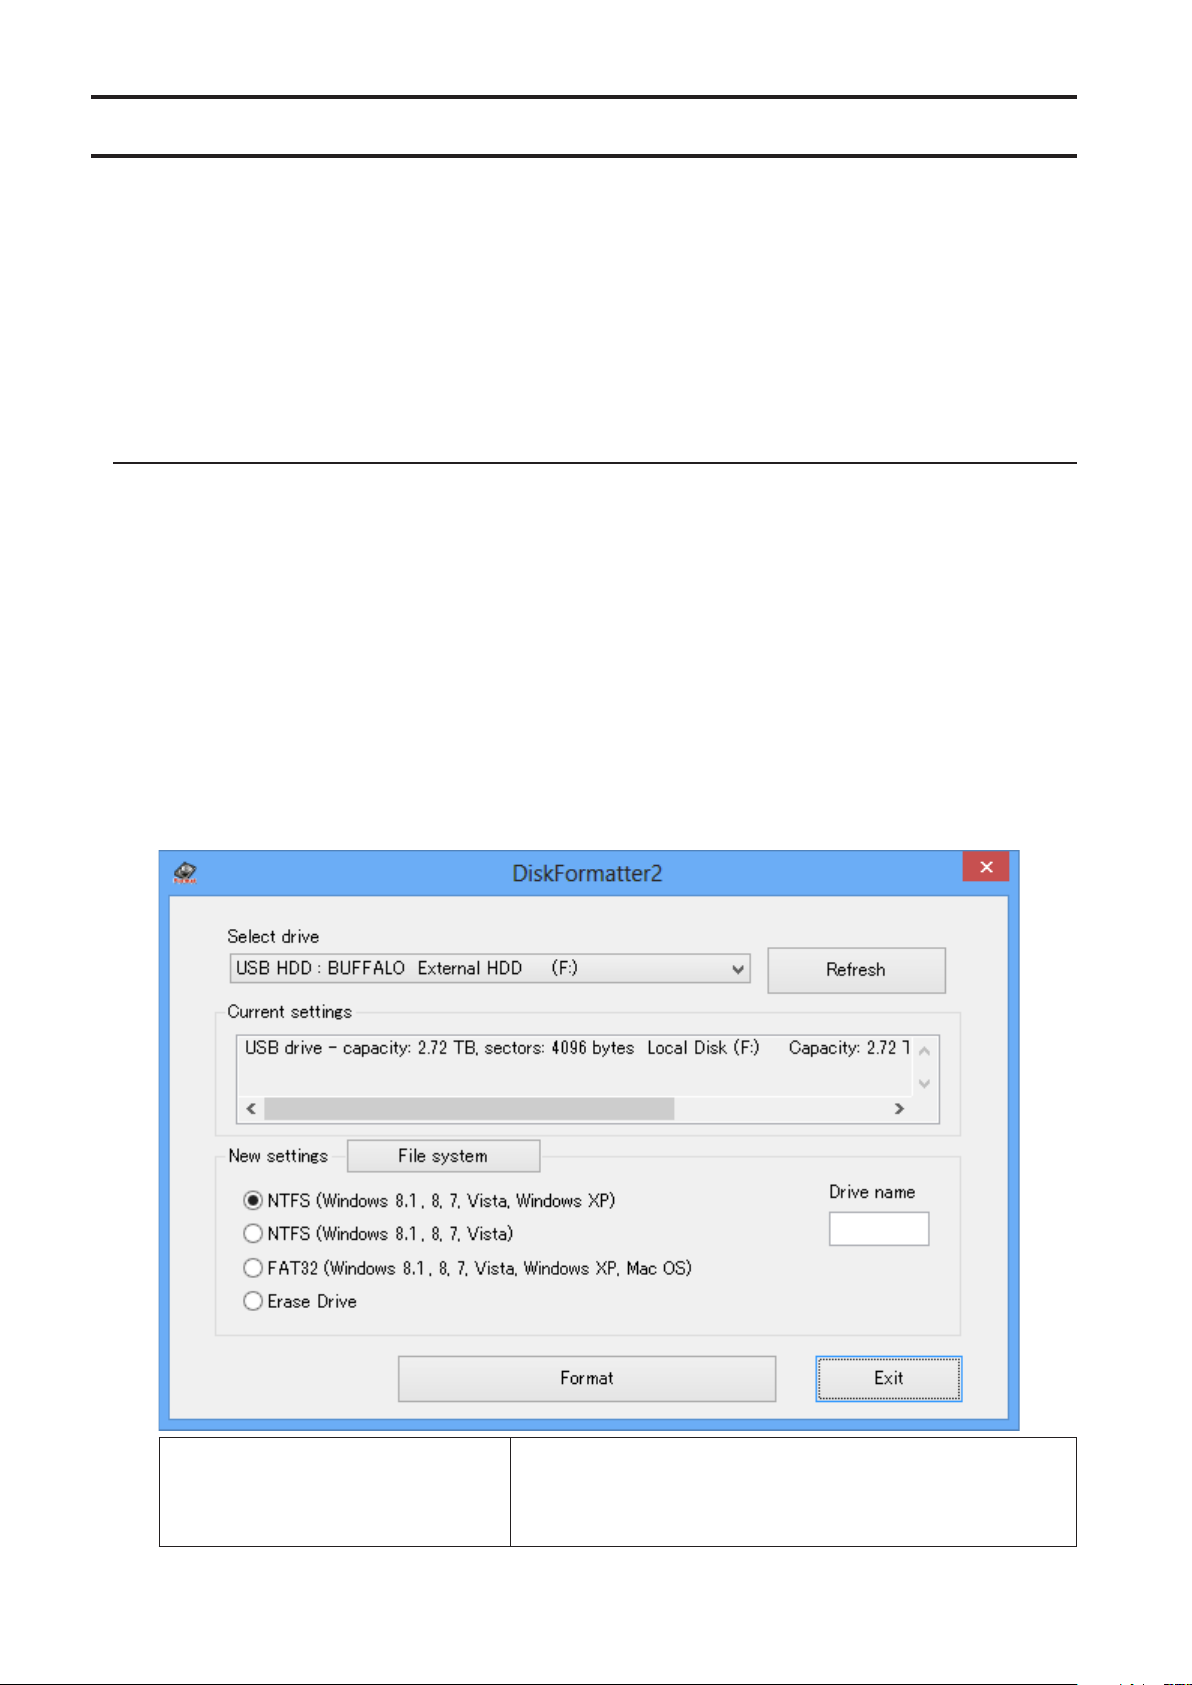
Install DiskFormatter2 software on your Windows computer to start the formatting process described below.
Formatting
1 Download the DiskFormatter2 software.
Refer to the "Software Installation" section of the manual, and go to the download page. Check the check box
for the software license agreement, and select "DiskFormatter2".
2 Execute "df2inst.exe" in the downloaded zip file.
3 Connect the drive to be formatted to your computer.
4 Launch the DiskFormatter2 software.
5 Check that the correct drive to be formatted is displayed here. Select a filesystem for the format. See the table
below for more information on the available filesystems. To set the name (volume label) for the drive, enter the
desired name in "Drive name". Click Format.
NTFS (Windows 8.1, 8, 7, Vista, Windows
XP)
NTFS (MBR) works with Windows 10, Windows 8.1,Windows 8,
Windows 7, Windows Vista, and Windows XP.Sector sizeModels
with 3 TB or more: 4096 bytesModels with 2 TB or less: 512
bytesPartition style: MBRFile system: NTFS
8
NTFS (Windows 8.1, 8, 7, Vista)
This option is only available when a 3
TB or larger drive is connected.
FAT32 (Windows 8.1, 8, 7,
Vista,Windows XP, Mac OS)
Erase Drive
6 Click Ye s.
Windows NTFS (GPT) partitions can be formatted with partitions
larger than 2 TB. Older Windows computers (such as Windows XP)
can't read these partitions.Sector size: 512 bytesPartition style:
GPTFile system: NTFS
Drives formatted with the FAT32 file system are compatible with
most operating systems. Note that this file system does not
support files that are 4 GB or larger in size.Sector size:Models
with 3 TB or more: 4096 bytesModels with 2 TB or less: 512
bytesPartition style: MBRFile system: FAT32
This changes the drive to an unformatted state.Sector size: 512
bytesPartition style: NoneFile system: None
The format may take several minutes to finish. Wait until the screen below is displayed.
7 Click OK.
The hard drive is now formatted.
Formatting with Mac OS Extended
Follow the procedure for your version of the Mac OS.
• Windows computers don't support Mac OS Extended format. To use the drive with Windows computers, use a
different format instead, such as NTFS or FAT32.
• Some drives don't support multiple partitions. If yours is one of them, use only a single partition on the drive.
• For more details on Mac OS Extended, consult your Mac OS Help.
9
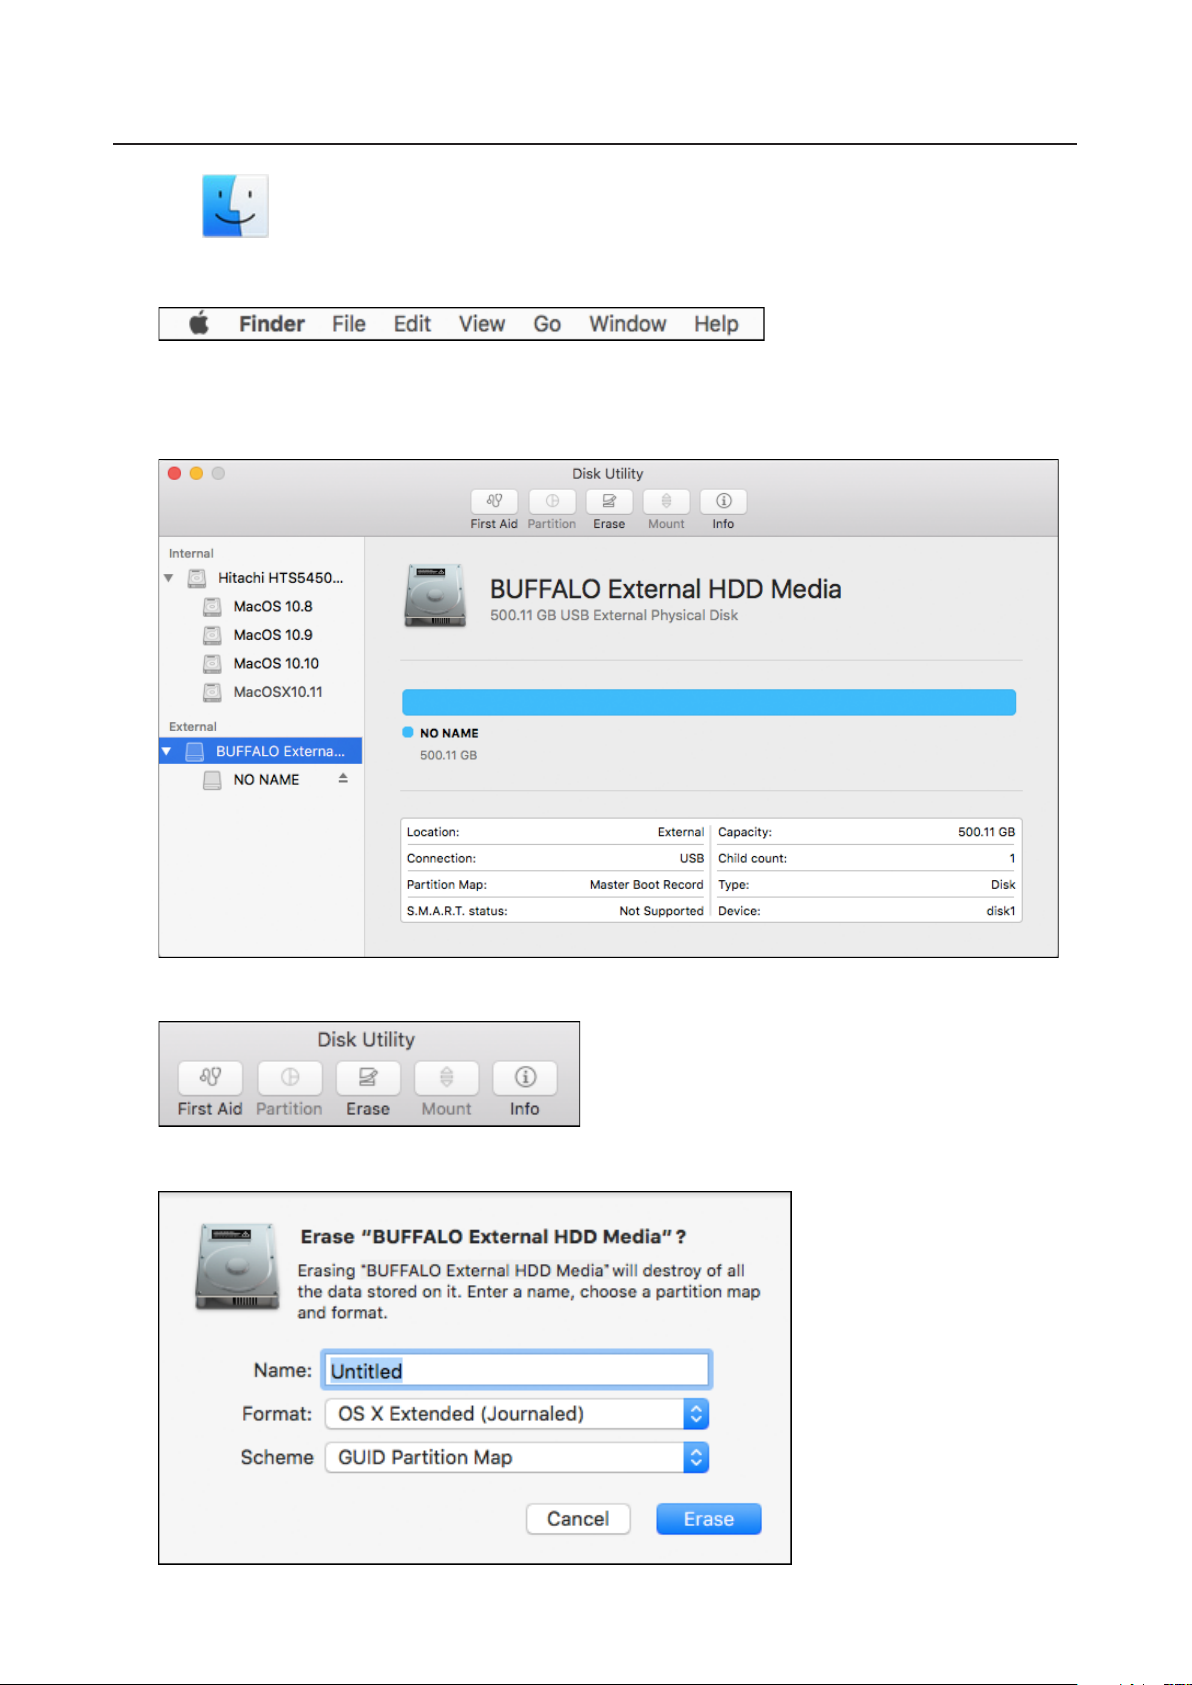
Mac OS X 10.11
1 Click to select the Finder.
2 Select Go - Utilities.
3 Double-click Disk Utility.
4 Click the drive to be formatted.
5 Click Erase.
6 Select OS X Extended (Journaled). Select GUID Partition Map. Click Erase.
10
 Loading...