

Page 1
User Manual
LinkStation MultiMedia Home Server
HS-DGL Series
www.buffalotech.com
v1.4
Page 2

Introduction
Congratulations on your purchase! Your LinkStation Home Server gives you a central location for
storing all your media fi les in your local network. All your computers and media players will be
able to access fi les on the LinkStation.
This user manual uses images representative of LinkStation user interfaces and software at time
of publication. As time passes, future user interfaces and software may be available for download
from: http://www.buffalotech.com (Support Section - Downloads).
Due to the evolving state of the product, the images and text in this manual may vary slightly
from the images and text displayed by your LinkStation. These changes are minor and should
not affect the ease of setup.
If at any time you have additional questions or seek additional help, please contact our technical
support (see Page 80 for technical support contact information).
2
Page 3

LinkStation Diagram ......................................... 4
LinkStation Quick Setup ................................... 5
Link Navigator Setup ...................................... 11
Accessing LinkStation Data from a PC .......... 20
Accessing LinkStation Data from a Mac ........ 23
LinkStation Expansion .................................... 26
Transfering Files from your Digital Camera ... 27
Basic Settings ................................................. 28
Network Settings ............................................ 31
Security Settings............................................. 37
USB Settings ................................................... 45
USB Printer Installation ................................. 48
Maintenance Settings ..................................... 53
Restoring LinkStation Backups ..................... 59
PCast/DLNA Settings .......................... ........... 64
PC Backup Utility .......................................... 67
Troubleshooting .............................................. 76
Technical Specifi cations ................................. 79
Technical Support ........................................... 80
FCC and GPL ................................................... 80
Table of Contents
3
Page 4

1. Power Button – The Power Button is used to
power the LinkStation on or off. The power on
process will take approximately 30 seconds to
a full minute to complete. During this time,
do not unplug the LinkStation from the wall
outlet. To turn the LinkStation off, press and
hold the power button for several seconds until
the Power LED light begins blinking. At that
time, stop pressing the button and shutdown
should complete within 30 seconds.
2. Power LED – The Power LED light will blink
during startup or shutdown, but otherwise will
remain lit up while LinkStation is powered on.
3. LINK/ACT LED – The LINK/ACT LED light
will light up if an Ethernet Cable is plugged in
that is attached to another device such as a
router, hub, or PC. Periodically, the LED will
blink. This blinking signifi es network activity.
LinkStation Diagram
4
Page 5
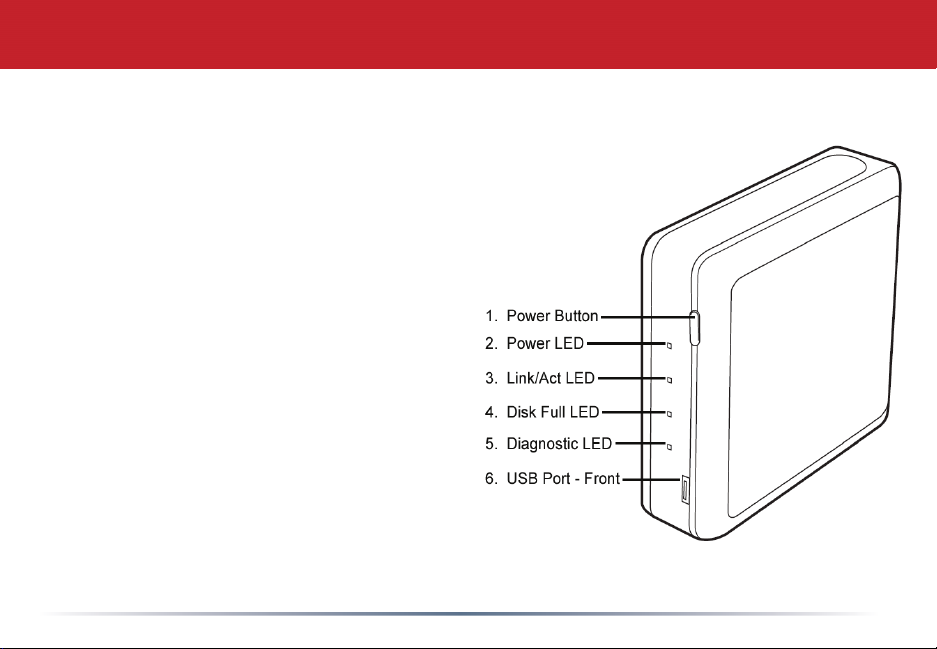
4. Disk Full LED – When LinkStation’s
internal drive approaches 95% of its
capacity, the Disk Full LED will light up
in red. For options to increase storage
capacity, see LinkStation Expansion section
on page 26.
5. Diagnostic LED – The Diagnostic LED
fl ashes if the LinkStation encounters an
error. In this event, please contact our
technical support.
6. USB Port (Front & Rear) – LinkStation
offers two USB Ports for adding external
drives or USB printers. Please see the
LinkStation Expansion section on page 26
to learn more about how to take advantage
of the USB Ports on LinkStation.
LinkStation Diagram
5
Page 6

Quick Setup
Plug the LinkStation’s power cord into a power outlet.
Also, plug the included Ethernet Cable into LinkStation’s 10/100 Network Port located on the
back of LinkStation.
6
Page 7

Quick Setup
Connect the other end of the Ethernet Cable into a hub, switch, or router on the network, or
connect it directly to a nearby running PC.
NOTE: It is recommended that you connect LinkStation to a hub or switch on your network.
Connecting it directly to the back of a PC should only be used if absolutely necessary. Many
features, including automatic DHCP IP Addressing, require LinkStation to be connected to a
switch or hub. If the LinkStation is connected directly to a PC, you will have to confi gure it
manually.
7
Page 8

Quick Setup
Turn the LinkStation on by pressing the power button until the green Power LED begins to fl ash.
8
Page 9

Quick Setup
Check the LINK/ACT light on the front of the LinkStation. If it is lit, then your LinkStation is
connected properly; please turn to page 11 to continue setup. If it is not lit, continue to the next
page.
9
Page 10

Quick Setup
If the LINK/ACT LED on the front of LinkStation is lit, your LinkStation is connected properly.
If the LINK/ACT LED is not lit, make sure that:
• Both LinkStation and the switch or PC are powered on.
• The Ethernet Cable is securely fastened to both devices.
• The Ethernet Cable is not damaged; verify this by trying another Ethernet Cable.
If problems persist, contact our technical support. Please see page 80 for support contact
information.
10
Page 11

Link Navigator Setup
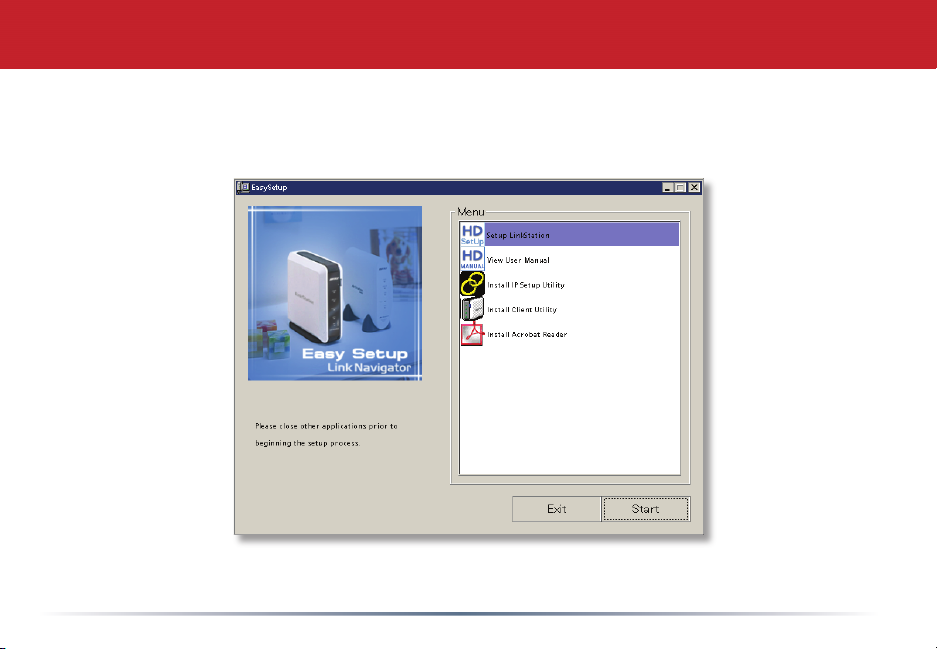
Insert the Link Navigator CD into a PC’s CD-ROM drive. Depending on the PC’s confi guration,
the EasySetup program may launch. If it does not automatically launch, manually launch it
by pressing the Start menu, selecting the Run... option. When the Run dialog opens, type x:
easysetup.exe (where x is the drive letter of the CD-ROM drive). Press OK to continue.
11
Page 12
Link Navigator Setup
LinkNavigator is now running. Please press the Install IP Setup Utility icon, then press the Start
button. The LinkStation IP Confi guration Utility will launch and scan for networks.
12
Page 13

Link Navigator Setup
The IP Confi guration Utility allows you to easily confi gure LinkStation’s network settings. The
Search button will re-scan the network for any and all LinkStations available. The drop down
menu lists all available LinkStations. If there are multiple LinkStations on the network, then
select the proper LinkStation from the pull down menu. Once the proper LinkStation has been
selected, press the Change IP Address button to continue.
13
Page 14

Link Navigator Setup
This section of the program changes LinkStation’s IP Address. Check the check box that states
Acquire IP Address Automatically. This will give LinkStation an IP Address from the network’s
router/DHCP server. A fi xed (static) IP Address and Gateway can be set if preferred. The
Administrator Password fi eld sets an administrator password for the web-based confi guration. If
desired, type a password in the fi eld. When fi nished, press the OK button. LinkStation will set
the IP Address and Password settings.
NOTE: If LinkStation was plugged directly into a PC, then the DHCP function will timeout and
give LinkStation the default IP Address of 192.168.11.150. You will need to adjust your PC’s IP
Address to an IP Address on the same subnet (e.g. 192.168.11.151), or give the LinkStation a
fi xed IP address on the same subnet as your PC.
14
Page 15

Link Navigator Setup
LinkStation is now ready to be confi gured. The login prompt will appear. The user name is root.
There is no password by default. If a password was specifi ed on the previous step, then type that
password in, otherwise leave the password fi eld blank. Press the OK button when fi nished.
User name: root
Password: default password is blank.
Only enter a password if you have confi gured one.
In the future, LinkStation can be accessed by typing http://LINKSTATION_NAME into a Web
browser (where LINKSTATION_NAME is the name of your LinkStation set on page 17).
15
Page 16

Link Navigator Setup
Congratulations, you have logged into LinkStation. These are the main confi guration menus.
Please bookmark this page for easy access. For detailed explanations of each menu and setting,
please refer to the Settings section (starting on page 28) of this manual. To continue setup, click
on the Basic link. Then, click on the LinkStation Name Setup link to continue.
16
Page 17

Link Navigator Setup
This section allows you to change the name of your LinkStation. This name will be required to
access LinkStation data. A friendly, easy name is recommended. Please enter an appropriate
name in the LinkStation Name fi eld. The name cannot contain any spaces or special characters.
Alphanumeric characters including hyphen and underscore are allowed.
A short description of the LinkStation can be created in the LinkStation Description fi eld. This
description will be shown while browsing through Network Neighborhood on Windows machines.
Once the fi elds have been completed, press the Apply button.
17
Page 18

Link Navigator Setup
By default there are two shared folders on LinkStation. One is for Windows and Mac machines,
while the other is for Macs only. Windows machines will only see one share. If you would like to
create additional shares for specifi c users or specifi c types of data, then click on the Security tab
on the left. Then click on the Shared Folder Settings link to continue. From this screen you can
add new shares/folders or edit existing shares/folders. Press the Add a New Folder button to
begin creating a new share/folder.
18
Page 19

Link Navigator Setup
To begin setting up a new share, enter an appropriate share/folder name in the Shared Folder
Name fi eld. Set the remaining settings to the desired function. Access Restriction will turn on
security features. Please refer to the Settings section (starting on page 28) of this manual before
using the Access Restriction function. Press the Apply button when fi nished. A new shared folder
has been set up. Please repeat this step to set up more shared folders. Note: OS X Macs work
best with “Win” shares. Use “Mac” shares only with older Macs, as AppleTalk entails a 2 GB
fi lesize limitation.
19
Page 20

Accessing LinkStation Data from a PC
Accessing LinkStation data is performed using the following steps:
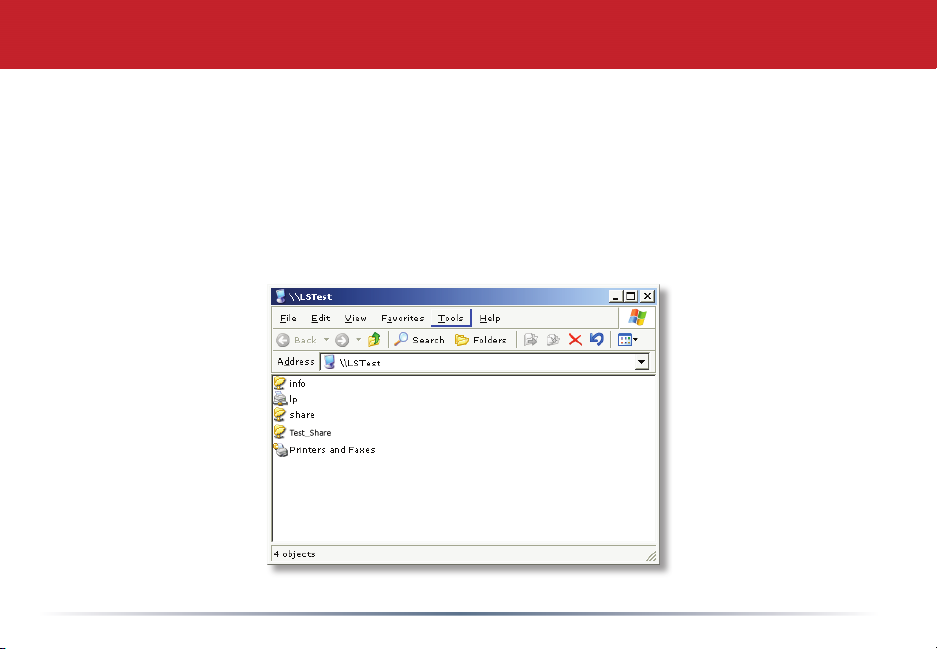
Press the Start menu, select the Run... option. When the Run dialog opens, type \\LinkStation_
Name (where LinkStation_Name is name of the LinkStation set on page 17). Press the OK button
to continue.
20
Page 21
Accessing LinkStation Data from a PC
LinkStation’s root directory will appear. You will see all of the confi gured shares. All users
can read and write to all folders unless otherwise confi gured. To set up security and password
protection, please refer to the Settings section (starting on page 28) of this manual. To setup a
printer see the LinkStation Expansion section found on page 26. LinkStation can be accessed
by multiple PC’s simultaneously by following this step. A drive letter can also be mapped to the
LinkStation; see the next page for more information.
21
Page 22
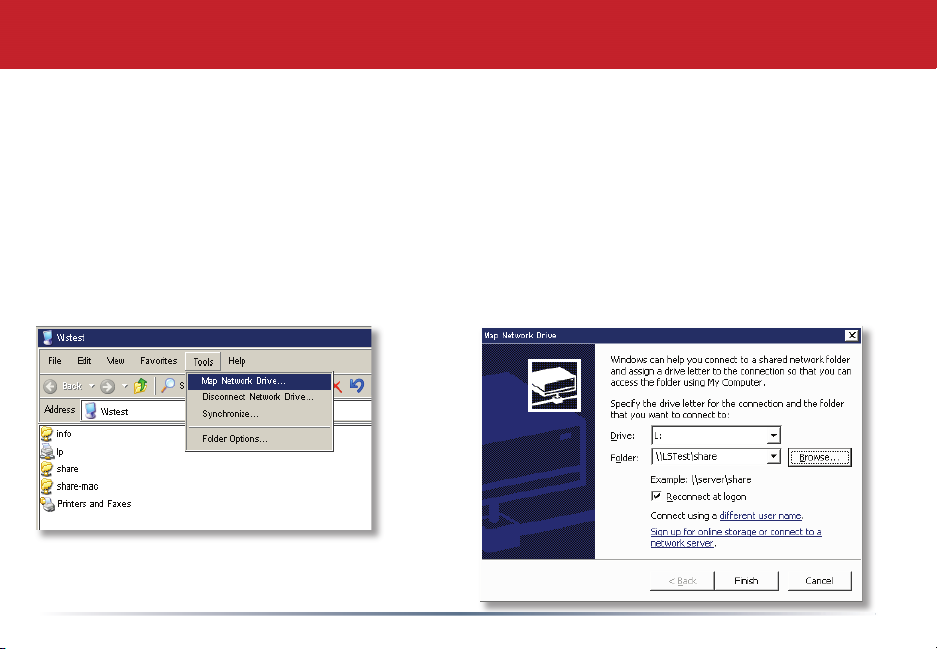
Accessing LinkStation Data from a PC
From the previous step’s Root Directory screen, use the pull down menu and click Tools and then
select Map Network Drive. The Map Network Drive program will run. Select the drive letter you
would like LinkStation to assume from the Drive: pull down menu. Enter the \\LinkStation_
Name\share_name in the Folder: fi eld (where LinkStation_Name is the LinkStation Name set on
page 17 and share_name is the Shared Folder Name set on page 19). You can also browse for the
shared folder by pressing the Browse button and searching through the Entire Network and then
the Microsoft Windows Network. Check the Reconnect at logon checkbox to create this mapped
drive everytime Windows starts. Once complete, press the Finish button. LinkStation is now
mapped to a drive letter.
NOTE: If errors occur while mapping multiple
drive shares, see page 76 for help.
22
Page 23
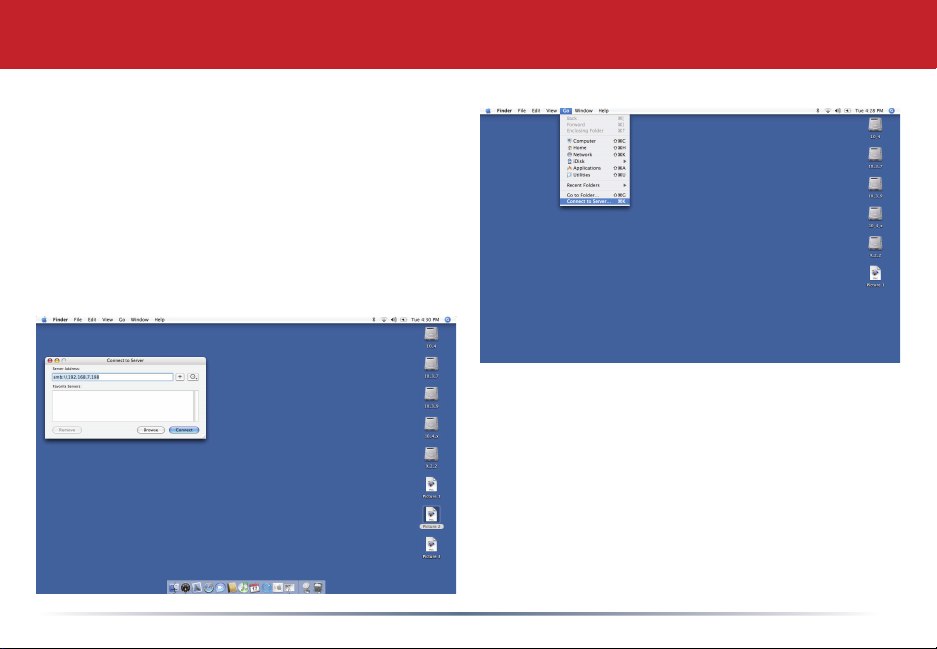
Accessing LinkStation Data from a Mac
If your Mac does not automatically detect your
LinkStation’s Share folder and put it on your
desktop, you will need to add the LinkStation
to the Mac’s server list. Begin by clicking Go,
and then choose Connect to Server.
Enter your LinkStation’s IP address in the
Server Address fi eld and click Connect.
If you don’t know your LinkStation’s IP
address, see page 25.
23
Page 24
Accessing LinkStation Data from a Mac
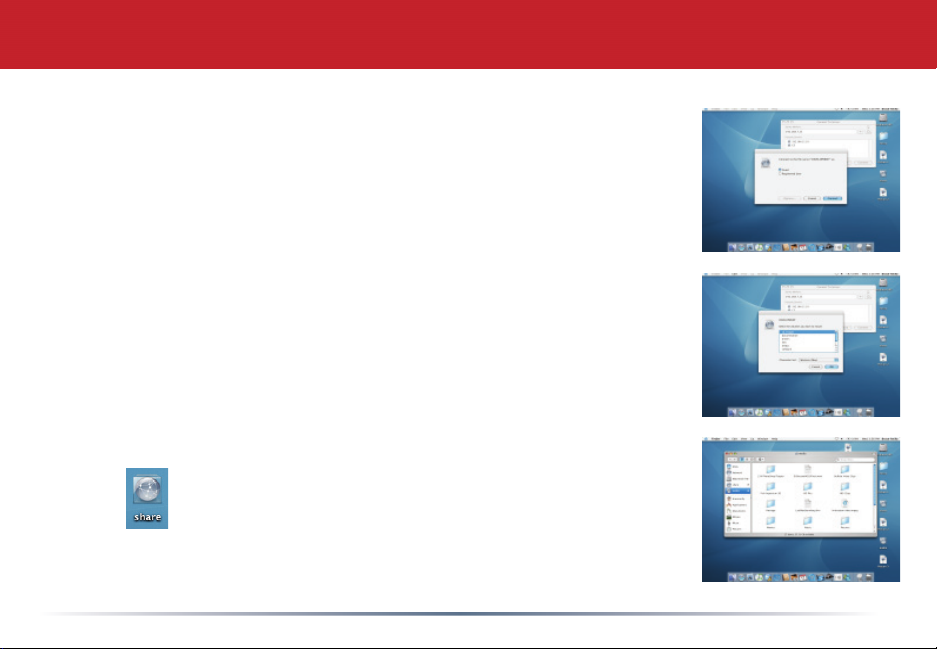
Select Guest and click on Connect. Note: If you have confi gured share
permissions on your TeraStation, select Registered User and enter your
Registered User credentials.
Select the volume that you want to mount, such as share or share-mac,
from the list of folders on the LinkStation.
The share will open. A link to the shared folder will appear on your
desktop.
24
Page 25

Accessing LinkStation Data from a Mac
If you don’t know your LinkStation’s IP address, there are
several ways to get it.
One simple method is to use the LinkStation client utility
(included on your CD) or TeraStation client utility (available
for download from www.buffalotech.com) to fi nd your
LinkStation(s). You must have a Windows PC running on the
network to use the LinkStation or TeraStation client utility.
If you have an all-Mac network with no Windows PCs
available, you will need to get the LinkStation’s IP address
from your router’s confi guration utility. Many Buffalo
routers list this information on the Client Monitor page, as
shown to the right. Consult your Router’s documentation for
instructions on identifying the LinkStation’s IP address.
25
Page 26

LinkStation Expansion
LinkStation has two USB 2.0 ports on it, one on the front and one on the rear. These ports
can be used for adding an external USB Hard Drive or a USB Printer, allowing everyone on the
network to share the USB device. You can also connect your digital camera to one of these ports
and download your pictures directly to the LinkStation (see page 27). One printer or one external
USB Hard Drive can be added to either of the ports. If you install both a printer and a USB hard
drive, the printer must be plugged into the front USB port and the hard drive into the rear USB
port. You may not install two USB Printers or two USB Hard Drives on a single Linkstation, only
one of each device. To connect a USB device to LinkStation, plug it into one of the USB Ports and
then enable it in the LinkStation confi guration tool.
USB Hard Drive Information: See page 43 for information on enabling shared folders on a USB
Hard Drive. Page 61 will show you how to format the USB Hard Drive. Page 57 & page 58 will
show you how to set up LinkStation to backup to a USB Hard Drive.
USB Printer Information: See page 48 to set up a USB Printer on LinkStation.
Digital Camera Information: If your camera appears as a hard drive in My Computer, you can
connect it directly to your LinkStation and download photos and movies automatically. See page
27 for more information.
26
Page 27

Transfering Pictures from a Digital Camera
If you plug a digital camera (or USB media card reader) directly into the
LinkStation, you may automatically download all picture and movie fi les
directly to the LinkStation.
Begin by connecting the camera to a USB port on the LinkStation and
powering it on. The Power led on the front of the LinkStation will blink a
lighter shade of green for about 20 seconds as your camera is mounted.
Once the drive is mounted, quickly press the LinkStations’s power
button twice (do not hold it down) to begin downloading your media fi les.
While fi les are downloading, the Disk Full led will blink red.
When the Disk Full led ceases to blink, downloading has fi nished. Press
the Power button one click to dismount your camera. The Power led will
blink a lighter shade of green until the dismount has fi nished, about 20
seconds.
Notes: Your digital camera must support hard drive emulation to do this. If your camera appears as a
hard drive with a drive letter in My Computer when connected to a PC, you can connect it directly to your
LinkStation and download photos and movies automatically.
Never disconnect your digital camera from the LinkStation without dismouting it fi rst! Doing so could damage
your camera or LinkStation.
Downloaded fi les will normally appear in the /Share/Pictures folder on your LinkStation. If you change the
media folder from /Share to /Media_Folder on page 65, then downloaded fi les will appear in Media_Folder/
Pictures.
27
Page 28

Basic Settings
LinkStation
Name Setup:
LinkStation should
be confi gured with
a unique name to
identify it over the
network. A general
description can be
given for the device
as well.
Date and Time
Setup:
To properly
catalogue shares
and fi les by date,
and to properly
schedule tasks
(such as backups),
the current date
and time must be
set. An NTP client
is confi gurable for
automatic time
corrections.
28
Page 29

Basic Settings - LinkStation Name
The LinkStation Name identifi es the
LinkStation on your network.
The LinkStation name should be
something easy to remember. It can
be named after its owner, its location,
or the type of data that will be installed
on it. If there is only one LinkStation
on the network, then naming it
“LinkStation” would be fi ne.
LinkStation Description is a handy
way of differentiating multiple LinkStations. A suitable description would be a short sentence
or phrase describing LinkStation’s purpose. The description will appear when browsing through
Network Neighborhood.
The Apply button will set these settings.
29
Page 30

Basic Settings - Time and Date
Time Setup: The LinkStation time must be
set to maintain proper logs and to schedule
proper backups Input the proper time and
date or press the Get Current Date & Time
button to set LinkStation’s time to the same
time as the PC that is being used to confi gure
it. Check the Daylight Savings Time checkbox
if your region is currently in DST. This will
have to be unchecked in the fall and checked
again in the spring each year. Select the
appropriate region from the Character Code
pull down menu. This specifi es and/or
activates LinkStation’s use of International
Character Support.
NTP Settings: The NTP function enables the LinkStation to poll a network time server to correct
its time. Once enabled, an IP Address of a NTP Server is required. A domain name will not work
in this fi eld; an IP Address is required. Buffalo recommends use of (time.nist.gov) 192.43.244.18
as an Internet NTP Server. The Sychronized Interval is the setting that states how often the check
takes place.
The Apply buttons set the settings for their respective sections.
30
Page 31

Network Settings
IP Address
Settings:
By default,
LinkStation will
attempt to obtain
an IP Address from
a DHCP Server. If
a DHCP Server is
not available, it
will assign itself
an IP Address of
192.168.11.150.
A designated
static IP Address
can be given
to LinkStation
within IP Address
Settings. The
gateway and
subnet can also be
set here.
Workgroup/
Domain Settings:
LinkStation may
be set up to join a
Microsoft Workgroup
or Domain in the
Workgroup/Domain
Settings. WINS server
information can be
added as well, but is
not necessary in most
environments.
FTP Server Settings: LinkStation includes a
built-in FTP Server. The FTP Server can be used
for accessing fi les over the internet using the FTP
protocol. All of the FTP Server related settings
can be accessed from FTP Server Settings.
31
Page 32

Network - IP Address & Default Gateway
IP Address Settings: LinkStation operates
using the TCP/IP protocol. Thus, it must
have an IP Address to communicate on
a network. This IP Address is also used
to access the web-based confi guration
menus. If LinkStation cannot obtain an IP
Address from a DHCP Server, LinkStation
will automatically use the IP Address
192.168.11.150, or you may enter an IP
address and subnet mask manually.
Contact your administrator to determine a
proper IP Address and Subnet mask for this
device.
255.255.255.0 is the recommended default
Subnet mask. It is recommended that most
users use DHCP unless they have a thorough
understanding of their network.
32
Page 33

Default Gateway Settings: By default LinkStation does not require a default gateway address.
If DHCP is enabled, then the Gateway will be set up automatically. If DHCP is not used, then
please contact your Network Admin for the proper Gateway information. Gateway setup is
required for some features to work properly (e.g. NTP, FTP, Remote Web-Based Confi guration,
etc.)
33
Page 34

Network - Microsoft Networking
Microsoft Networking: Select the
appropriate Network ID. Workgroup is
recommended for most home and small
business applications. If Workgroup is
chosen, then enter the proper workgroup in
the Workgroup Name fi eld. Domain is used
for business applications that operate on a
Windows Domain. If Domain is chosen, please
follow the instructions on the next page.
If the LinkStation is connected to a Domain,
then it will acquire the user list from the
primary domain controller. If LinkStation is
connected to a Workgroup, then it will rely on
its internal users and groups.
Wins Client Settings: LinkStation does not require a WINS Server address. Don’t enable WINS
Client unless you have a good reason for doing so.
34
Page 35

Network - Domain and Workgroup
Domain - When connecting to a NT or Win2k
Domain Controller, please add the LinkStation
to a computer on the PDC or in Active Directory.
For instance, if the LinkStation’s name is LSTEST,
then add LSTEST as a computer on the PDC.
Then, enter the Domain Name and the Host
Name of the PDC into LinkStation’s confi guration
settings. Once entered, press the Apply button.
It will take a few moments for the LinkStation to
join the domain. Once joined, a brief summary
will appear listing the domain info and the user
list. Press the Apply button to continue. For
future reference, the user list is obtainable from
within the LinkStation’s Security Settings.
NOTE: LinkStation’s domain compatibility is
only fully functional with Windows NT domains.
Windows 2000 and 2003 Server support is
limited. Most Active Directory information will
have to be manually entered.
35
Page 36

Network - FTP Server
To enable LinkStation’s FTP Server, set the
FTP Server to Enable. It is not recommended
that you enable the FTP Server unless you are
familiar with how FTP works. Select whether
FTP Server is anonymous or password protected
with FTP Access User. Select Registered
Users for a password protected FTP Server. If
Anonymous is selected as the FTP type, then
one and only one shared folder on LinkStation
can be made available; select that folder as
the Anonymous User Shared Folder. Buffalo
does not recommend using anonymous due
to potential security concerns. FTP Access
specifi es whether the anonymous shared folder
is read only or writable, select the appropriate
setting. If Registered Users is selected as the
FTP type, then the shared folders that are to be added to the FTP Server must be checked. Check
the appropriate checkboxes under Registered Users Public Shared Folder Settings. Multiple
shared folders can be added when the Registered Users FTP is used. The shared folder’s settings
are carried over from LinkStation to the FTP Server. A user account that has been added to
LinkStation can be used for FTP login credentials. Different user accounts have different access
restrictions, their rights will carry over as rights on the FTP Server.
36
Page 37

Security - Shared Folders
Shared Folder
Setup:
Shared folders
should be created
to store data.
Access to shared
folders can be
controlled via
group and User
permissions. By
default a shared
folder will allow
access to all
groups and users.
Folders can be
created in fi le
formats for use
by Windows, Mac,
or both operating
systems.
Group Setup:
T
o ease security administration, groups should be
created for users to control shared folder access. Once
a group has been created, settings on shared folders
can be modifi ed to limit access to a group or groups.
Also, individual users can be added to the groups.
37
User Setup:
Individual users
and passwords
should be created
for each user that
needs to access
restricted shared
folders. Once
created, a user can
specifi cally be given
access to a shared
folder or included in
a group.
Domain User List:
A Domain User
List is available
when LinkStation
is a member of a
Domain. This list
displays the user
list obtained from
the PDC.
Page 38

Security - Shared Folders
LinkStation stores its data in shares.
Multiple shares can be confi gured for
different types of data. By default
LinkStation has two shares. One share is
for Windows and Macintosh computers.
The other share is for Macintosh only. The
default shares may be deleted if desired.
Add a New Folder:
process to create a new share. The next
page describes this process further.
Edit Shared Folder:
shared folder information to be edited.
Delete Shared Folder:
deletes a shared folder. Note that this will
delete all of the data inside of the shared
folder as well.
38
This begins the
This button allows
This button
Page 39

Security - Add a new Shared Folder
Shared Folder Name: Name can be up to 12
alphanumeric characters (“-” and “_” are supported).
Shared Folder Description:
folders on LinkStation, a brief sentence or phrase
evoking the type of data in the share is recommended.
Shared Folders OS Support:
machines will access this shared folder, then select
Win. If both Windows and Macintosh machines
will access this shared folder then select Win/Mac.
Finally, if only Macintosh machines are to access this
shared folder, then select Mac. Linux can read Win or
Win/Mac shares.
Access Restriction Function:
function will password protect a folder. For more information, see the next page about using
Access Restriction.
Recycle Bin: If the recycle bin is disabled, then any deleted data from the shared folder cannot
be restored. If the recycle bin is enabled, then all deleted data will be moved to a folder called
.trash. Data will then need to be removed from the trash before it is permanently deleted. In some
versions of Windows it may be necessary to set Windows to display all hidden fi les and folders
before the .trash folder is visible. Mac OS 10.2 or higher is required for Recycle Bin functionality
in Mac environments.
This function turns on user/group permissions. Using this
To differentiate the
If only Windows
39
Page 40

Security - Shared Folder Settings
Enabling Access Restriction on the previous
page will give you this screen, where you can
restrict access to your new shared folder to
specifi c users and/or groups.
NOTE: You may add restrictions to an
existing shared folder by pressing the Edit
Shared Folder button on the main Shared
Folder Settings page and enabling Access
Restriction.
Here you can specify who may access the
new shared folder. Select which groups
and which users will have access to the new shared folder. The group hdusers gives access to all
users on the LinkStation, so this will allow access to every user on the LinkStation. Anonymous
users will still not have access however. If a group is selected, then every member inside that
group will have access to the shared folder. For example, in the image above, Group1 (which
includes Bob and Jane) is selected. The user Richard is also selected. This means that Bob,
Jane, and Richard will be the only users who will have access to this shared folder.
Press the Apply button when you’re fi nished making your selections.
40
Page 41

Security Settings
Groups allow for quicker security
administration. A group is a group of users
with specifi c rights to specifi c shared folders.
A business may want to make a Manager group
and add all of its managers to the group. This
group could have access to a shared folder
that the regular employees do not have access
to. By default there is a share called hdusers.
This share cannot be deleted.
Add New Group:
Edit Group:
group here.
Delete a group:
no longer be members of the deleted group.
This begins the process of creating a new group.
This allows group settings to be changed. Users can be added or removed from the
This button deletes a group. The users inside the group will still exist but will
41
Page 42

Security - Add New Group
Group Name: This will be the name of the
group. The name should refl ect the types of
users added. For example, the managers’s
group could be named ‘Managers’.
Group Description:
should be used to differentiate the different
groups on LinkStation. A brief sentence or
phrase regarding the users inside of the group
is recommended.
Select Affi liated Users:
that are to be added to this new group. The check box next to the user’s name should be checked
if they are to be added to the group. Users can be added to or removed from the group at a later
time by editing the group and checking or unchecking their respective boxes.
Clicking Apply will set the settings.
42
The group description
Select the users
Page 43

Security Settings - Shared Folder Setup
User accounts allow LinkStation to limit access
to certain or all shared folders. A user account
is assigned a password. This password is used
to obtain the data inside the shared folder. If
a user does not have the proper user account
credentials, then access to the data will be
denied.
NOTE: User accounts will only be used on
shares with the Access Restriction function
Add New User:
Edit User Info:
changed here.
Delete User:
any groups they were associated with.
This begins the process of creating a new user.
This allows user information to be changed. A user’s password may also be
This button deletes a user. If a user is deleted, they will also be removed from
43
Page 44

Security Settings - Shared Folder Setup
User Name: Enter a name for each user here.
Each name should indicate the named user.
For instance, you could use the user’s fi rst
name as the user name.
Password: The user password is the password
associated with the user. The password can
be up to 8 characters and can contain spaces,
hyphens, and underscores. The password
will need to be confi rmed on the Password
(Confi rm) line as well. The password can be
changed at a later time by editing the user’s
settings.
User Description: The user description can help to differentiate different users on LinkStation.
The Apply button will set the settings.
44
Page 45

USB Settings
USB Details:
Normally, all devices
currently connected to
the LinkStation will be
displayed under USB
Details. Newly attached
USB devices may not
be visible here until the
LinkStation is restarted.
USB Disk Setup:
An attached USB Disk can be confi gured as an additional shared folder for
additional storage space. The attached USB Disk must be formatted by the
LinkStation before it can be used on LinkStation. If a USB Disk is attached
to LinkStation, it must be attached to the rear USB Port.
Clear Printer Job Queue:
If the printer queue on the LinkStation becomes corrupted or frozen, it
may be cleared here. All submitted print jobs will need to be re-sent to the
printer.
45
USB Printer Setup:
Postscript Printers
can easily be shared
from the LinkStation
via USB. If a nonPostscript Printer is
attached, additional
information from your
printer’s documentation
is required in the
LinkStation printer
setup to ensure proper
operation. Once
installed, the printer will
be available to users on
LinkStation.
Page 46

USB Settings
USB Information: The USB Information
table lists information about connected USB
devices (such as printers and hard drives). It
lists the USB Class (Printer or Storage), the
Manufacturer if available, the Device Name,
and whether it is a USB 1.1 or USB 2.0 device.
46
Page 47

USB Settings
Setup USB Disk: The USB Disk setup
options specifi es if an attached USB Disk
is to be used as a shared folder. Using it
as a shared folder increases the capacity of
LinkStation. Selecting the Disable option
makes it impossible to make the USB Disk
drive a shared folder. However, if set to
Disable, the USB Disk will still be available
for Disk Backup.
NOTE: The USB Disk must be attached
to the rear USB Port to work properly.
The front USB Port only works with USB
Printers.
Recycle Bin: The recycle bin is a feature that moves deleted data to a recycle bin before
completely deleting. If the recycle bin is disabled, then any deleted data inside the USB Disk
cannot be restored. If the recycle bin is enabled, then all deleted data will be moved fi rst to a
folder called .trash on the USB Disk. Data may then be removed from the recycle bin before
it is permanently deleted. In Windows it may be necessary to set Windows to display all
hidden fi les and folders before the .trash folder is visible. Consult your OS documentation
for more information. Mac OS 10.2 or higher is required for Recycle Bin functionality in Mac
environments.
47
Page 48

USB Settings - Print Server
Print Server: The Print Server function turns printer
sharing on or off. The Print Server function must be
set to Enable if a printer is to be shared.
By default LinkStation is confi gured to share a
PostScript printer. If that’s what you have, leave all
settings at their defaults.
To connect a non-PostScript printer to LinkStation,
consult your printer’s documentation for more
information on what needs to be manually confi gured
from this page. then select a compatible printer
from the Printer Type pull down menu. Other settings will have to be set based on the printer’s
documentation. If a printer is not available from the pull down menu, then it is not supported by
LinkStation.
Press the Apply button when settings are complete. For the printer to work on your network, it
must be plugged into one of LinkStation’s USB Ports, and the printer must be powered on. You
may have to turn the LinkStation off and then on again after connecting the USB printer to one of
the USB Ports.
Please see page 46 for information on installing the printer to Windows PC’s on your network.
48
Page 49

USB Settings - Printer Share Installation
Now that LinkStation is set up to share your printer, you can easily add the printer to any Windows
PC on your network. Follow these steps for each PC that you want to be able to access the printer.
• Access the LinkStation by pressing the Start Menu,
selecting the ‘Run...’ option and entering \\LinkStation_
Name (where LinkStation_Name is the name set on page
18). Press the OK button when fi nished.
• Right click on the lp icon and select Connect. You may
receive a warning about installing from a trust worthy
source. If you receive this message, press the Yes button
to continue.
NOTE: The LinkStation’s Printer name cannot be changed
• You will receive a warning stating that the server
does not have the proper drivers. Press the OK
button to continue.
49
Page 50

USB Settings - Printer Share Installation
• The Add Printer Wizard will launch. Select the proper driver
for your printer. If the specifi c printer is not in the list,
you will be required to insert the CD that came with your
printer into your PC’s CD-ROM drive and press the Have
Disk button. Refer to your printer documentation for further
information on installing your printer if necessary. Press the
• The printer is now successfully installed. To further
confi gure and test the printer, open your PC’s Control Panel.
The Control Panel can be accessed through ‘My Computer’
or through the Start Menu. Once the Control Panel is open,
double click on the Printers and Faxes icon.
• If lp is the only printer installed on the PC, then it will
automatically be set as the default printer. However, if it is
not the only printer on the PC, then it is not set as default. If
you would like to make it the default printer, right click on
the lp printer icon and select the Set as Default Printer option.
50
Page 51

USB Settings - Printer Share Installation
• To print a test page or confi gure additional printer
settings, right click on the lp printer icon and select
Properties. This will open the printer’s driver properties
page.
• Press the Print Test Page button to print a test page. You
can also browse through the available settings for the
printer. Please refer to the printer’s documentation for
more information on changing the printer’s settings.
NOTE: The printer installation process can be done on
any machine on your network. Multiple machines may
print to the printer at the same time. Repeat this process
on all computers that require access to the printer.
51
Page 52

USB Settings - Delete Print Queue
Deleting print jobs may be
necessary if a corrupt print job
was sent to a printer. If printing
to the printer connected to
LinkStation suddenly fails, it is
recommended that you Execute
the Delete Print Queue program.
Deleting the print jobs will
require that users re-send their
print jobs to the printer.
If there are still problems
printing to the printer, then
check the printer manufacturer’s
documentation for troubleshooting information. Also, verify that the USB cable is securely
fastened to both the printer and the LinkStation. Finally, you may try turning the LinkStation
off, turning the printer off, turning the printer back on, and then turning the LinkStation back on
again.
52
Page 53

Maintenance Settings
System Status:
The System Status
page displays
current information
about LinkStation.
Disk Sleep
Function: The
LinkStation can be
scheduled to enter
a sleep mode to
preserve energy at
a scheduled time.
The sleep time
cannot coincide
with the time of a
scheduled backup
or the backup will
fail.
Disk Backup: Individual
Shares or folders inside of
shares can be scheduled
for backup to an attached
USB Disk. The scheduled
backup time should not
confl ict with a scheduled
sleep time.
Disk Scan: Periodically
it may be necessary to run
a disk scan. A disk scan
will repair errors upon
the LinkStation’s drives’
surfaces and fi x errors
within the fi le system. A
thorough disk check can
take several hours to
complete.
53
Page 54

Maintenance Settings
Disk Format: The
internal drive or an
attached USB drive
can be formatted and
rebuilt.
begins all data will
be lost on the drive.
Care should be taken
to backup any data
stored on the drive
prior to formatting.
External USB hard
drives attached to
LinkStation may need
to be formatted via this
Disk Format utility
before being used by
LinkStation.
Once a format
Administrator
Password: By default,
the administrator name
(login) is “root” with
a blank password.
Administrator Password
allows you to change
the administrator
password.
Shutdown: Shutdown
allows an administrator
to turn off the
LinkStation without
physically pressing the
power button.
54
Page 55

Maintenance Settings - System Status
The System Status page briefl y lists
important confi guration information about
LinkStation.
No confi guration changes can be made from
this screen, but it’s a good place to review
settings.
55
Page 56

Click Apply to save these settings.
Maintenance Settings - Sleep
Sleep Function: Enable Sleep
Function to allow LinkStation to go
into Sleep Mode. In Sleep Mode,
LinkStation’s internal hard drive shuts
off until the Wakeup Time. Disable
Sleep Mode if you want LinkStation to
always remain on. When LinkStation is
sleeping, data cannot be accessed and
scheduled backups will fail.
Schedule Sleep Time: If the Sleep
Function is set to Enable, then enter an
appropriate Disk Sleep Time and Disk
Wake Up Time.
56
Page 57

Maintenance Settings - Backup
All Disk Backups are sent to the attached USB
Disk on LinkStation. Please turn to page 59 for
information on how to restore Backups.
Disk Backup Folders:
Before Disk Backup can be enabled, at least one
share or folder inside of a share must be added
to the Backup. To select a share or folder to be
backed up, use the drop down menu under Folders
for Backup. It is important to note that all fi les and
folders underneath the share or folder (recursive)
selected will also be backed up. Once a share or
folder is selected, press the Backup Folder Add
button to add it as a backup source.
To remove shares or folders as backup sources,
check the checkbox next to the share(s) or
folder(s) and press the Backup Folder Delete
button. Multiple shares or folders can be deleted
simultaneously by checking more then one share or folder.
The next page goes through the remainder of the Backup Settings. Once completed, press the
Apply button to set the settings into memory and begin the Backup Scheduler.
57
Page 58

Maintenance Settings - Backup Settings
Disk Backup: The Disk Backup function allows
LinkStation’s data to be backed up to an external
USB Hard Drive. Backing up data is important in the
event of LinkStation becoming damaged. Without a
backup you risk losing data if a catastrophe happens.
The Disable option turns off the ability to backup.
Backup Frequency: There are three options for
starting backups. The Run Backup Immediately
option makes LinkStation begin backing up instantly.
This is a one-time backup solution. The Run Backup
Daily at the Specifi ed Time option makes LinkStation
perform backups daily at a scheduled time. The
Run Backup Every (Day) at the Specifi ed Time option
makes LinkStation perform a backup at a scheduled
time once a week.
Specifi ed Time: The Specifi ed Time is the time that
LinkStation will perform its backup if scheduled.
Overwrite Backup: The Overwrite Backup option specifi es whether LinkStation will create a
new backup everytime or whether it will overwrite every backup. If Overwrite Backup is set to
Disable then a new folder will be created on the USB Disk everytime a backup occurs If it is set to
Enable then there will be only one backup on the USB Disk and it will be overwritten by each new
backup.
58
Page 59

Restoring a Backup
To restore a backup, the USB Disk must be shared as a shared
folder. This setting can be enabled on page 47. Then, browse to
LinkStation and fi nd the folder labeled usbdisk1. This is where
all of the backup data is sent during backups. Double click on its
icon, or right click on it and select the Open option.
Once inside of the folder, the backup archives will be present.
If there are multiple folders labeled by numbers, then multiple
backups exist on the USB Disk. You will need to select the
proper backup before accessing the data. The backup naming
convention in this case is (YEARMONTHDAYTIME). Thus,
0408062200 is a backup that occurred on August 6th, 2004 at
22:00 (or 10pm). If Overwrite Backup was set when the backup
ran, then only one backup folder will exist. Also, if the USB Disk
has been used as additional storage, then other fi les and folders
may exist. From inside the backup archive, data can be moved
or copied to its original location. It can also be placed in a new
location.
NOTE: LinkStation backup USB Disks can be added to other LinkStations to recover the data in
the event that a LinkStation fails. In this case, just attach the USB Disk to another LinkStation,
share it as a shared folder, and access the data as described above. DO NOT REFORMAT the USB
Disk when adding it to another LinkStation; this process will delete all of the data on the USB
Disk.
59
Page 60

Maintenance Settings - Disk Scan
Disk Scan: The Disk Scan Target is the disk
that is to be scanned. The Internal HDD option
is for LinkStation’s internal hard drive. If a
USB Hard Drive is connected to LinkStation,
then it will also be available from the pull-down
menu. Please select the disk that should be
scanned. If both disks are to be scanned, then
the Disk Scan must be run twice; once for each
disk.
Disk Scan Type: The Disk Scan Type pull-down menu allows you to select whether the Disk
Scan is to be a Normal or a Thorough scan. A Normal scan is a fast disk scan. The Thorough Scan
will scan every sector individually. The Thorough Scan can take up to several hours to complete.
It is recommended that you not access LinkStation or turn LinkStation off during a Thorough
Scan.
60
Page 61

Maintenance Settings - Format
Select a disk to format:
The pull-down menu lists the drives that
can be formatted. If a USB Hard Drive is
connected to LinkStation then it will be
available for format. The Internal HDD can
also be formatted from this page.
All external USB Hard Drives MUST be
initially formatted by LinkStation before they
are used.
NOTE: Formatting a drive will erase all data. Do not format a drive unless you are absolutely
sure you want to delete ALL of the data on the drive. Brand new USB Disks may need to be
formatted before the LinkStation can write to them, but the internal LinkStation hard drive comes
pre-formatted.
Before formatting a USB Disk, please make sure it is plugged into the rear USB Port on
LinkStation. Only the rear USB Port supports use with a USB Disk.
61
Page 62

Maintenance Settings - Administrator Password Settings
Administrator Name: The Administrator
Name is used to log into the Web-Based
confi guration. The default Administrator Name
is “root”. It cannot be changed.
Old Password: Please type the current
administrator password into this fi eld. By
default there is no LinkStation password. If a
password has already been set on LinkStation,
then enter the current password.
New Password: Please enter the new desired administrator password. This password can be
up to 8 characters and may include spaces, hyphens, and underscores.
New Password (Confi rm): Please re-type the New Password into this fi eld. This will verify that
the proper password was typed in correctly.
Click Apply when fi nished.
62
Page 63

Maintenance Settings - Shutdown
Shutdown:
The Shutdown function in LinkStation allows
an administrator to shut down LinkStation
without using the power button.
This feature can be handy if LinkStation is
being confi gured from a location not close to
the LinkStation’s power button.
Press the Execute button to shutdown the
LinkStation. The LinkStation can then only be
turned on by pressing the power button on the
front of it or by waiting for the Wake Up Time (if
Disk Sleep is enabled on page 53).
63
Page 64

PCast and DLNA are special services that
can run within LinkStation, allowing it to
be a media server for LinkTheater or other
digital multimedia players. The LinkTheater
product is a media server that connects
to your television and streams multimedia
content. The PCast service allows you to
stream any multimedia content directly from
LinkStation to the LinkTheater. DLNA is an
industry standard supported by many digital
multimedia players.
If you do not own a multimedia player, PCast
and DLNA settings can be completely ignored.
For more information on LinkTheater, please
visit Buffalo Technology’s web site at
http://www.buffalotech.com and look under
Multimedia Products.
PCast
64
Page 65

PCast Settings - LinkTheater
Media Server Function: The Media Server
Function will need to be enabled for this function
to work. If you do not own a LinkTheater than
disabling this feature is recommended.
Media Folder: The Media Folder specifi es which
shared folder to share with LinkTheater. All of
the multimedia fi les inside this shared folder
will be available to LinkTheater. NOTE: At this
time, only one shared folder can be accessed
with LinkTheater. Please make sure that all
of the multimedia fi les you wish to share with
LinkTheater are in this shared folder.
PCast Password: Restrict access to your media
server by specifying an access password.
Limit DLNA Client Access: Choose what devices can access your media server. See next page
for more information on confi guration.
Update Media List: This updates the list of multimedia folders and fi les displayed by your
media player. Some changes may not be shown until the list is refreshed or the media player
rebooted.
65
Page 66

PCast Settings - LinkTheater
Get to this page by clicking Choose Devices on the
previous page.
Search for DLNA Client: This will show a list
of all clients that could connect to the media
server. For any that you want to have access, put
a checkmark next to their MAC address and click
Allow Access. You can deny access to any DLNA
client by checking it and clicking Deny Access.
66
Page 67

LinkStation Backup Utility Installation
The Backup Utility is a simple utility that allows a user to backup their data onto the LinkStation.
Backups are recommended for any user who cannot afford to lose their data. If your computer
fails, you have a backup copy of your data on the LinkStation. The Backup Utility includes a
scheduler and a restore feature.
Install Utility – Install the Backup Utility by browsing
to the Info folder on your LinkStation. Then, browse
into the folder named LSBackup. Once there, doubleclick on the Setup.exe icon.
An installer dialog box will appear. Press the Install
button to continue the installation process. Press the
Next button when the second dialog box appears.
The Disk Backup Utility will launch after pressing the
Next button. It can also be launched by double clicking
on the Easy Backup icon.
67
Page 68

LinkStation Backup Utility
Backup Utility (Performing Backup) – The Backup Utility
main screen will appear. The Backup Utility will start every
time you restart your PC. It will run in the system tray and
can be accessed by double clicking on its icon in the system
tray.
Backup Source - Press the Add button in the Backup Source
box to set a save location. Press the Browse button and
browse for the folder you would like to backup to LinkStation.
The Compress Data option instructs the Backup Utility to
zip-compress the data into an archive before it copies it to
LinkStation. The compression process shrinks the fi le size
down resulting in less space used on LinkStation. However, by doing this the data will have to be
uncompressed before it can be accessed or restored. The Do not compress data option instructs
the Backup Utility to copy the fi les and folders onto LinkStation exactly how they appear on your
PC. This allows for easier access to the backed up data but at the expense of using more space
on LinkStation. The Verify checkbox simply tells LinkStation to verify the data after copying it to
LinkStation. Press the OK button when fi nished.
68
Page 69

The new Backup Source will appear in the box. You can use
the Add button to add more sources and the Delete button
to remove sources from the box. Once sources have been
removed, their respective fi les and folders will no longer be
backed up.
Backup Destination - Press the Change button to select
a backup location. Using the pull down menus, select
the proper LinkStation (if more then one exists on your
network), and then select the target directory on that
LinkStation. Once you have made your selection, press the
Set button.
LinkStation Backup Utility
69
Page 70

Timer Settings - Press the Set button if you wish to
schedule regular backups of your PC. Pressing the Run
button will start a one-time backup immediately.
After pressing the Set button, the Timer Settings dialog
opens. Please select your desired settings and press the OK
button.
The Backup Utility has now been confi gured. In this
example, a backup will take place everyday at 11:00pm.
The data will be copied to the share directory on the LSTest
LinkStation.
LinkStation Backup Utility
70
Page 71

Now that confi guration is complete, you can minimize
or exit the backup application. When you do so,
a dialog box will appear prompting you to save the
settings. Click Yes to save the confi guration changes.
If you press No, then the settings are discarded
immediately.
Backup Utility
71
Page 72

Backup Utility
Restore Backup File - To restore a backup fi le, use the pull down
menu, select Settings and press the Expand/Delete Backup File
option.
Press the “+” icon to expand the backup selections. If more then one
backup has occurred, then multiple fi le lists will appear. In this case,
select the proper list and press the “+” button. Once expanded, click
on the proper date. This date represents when the backup occurred.
Backups are shown as YEAR / MONTH / DAY followed by the time
the backup occurred.
Collapse - The Collapse button deletes the backup archive. Once it has been deleted it cannot be restored.
This does not delete the original data, just the backup image of the data.
Expand - Expand restores the backup archive. Select the path to restore the data to (it can be placed in any
folder) and press the OK button. A status window will appear during the restore process. Once complete,
press the Close button to return to the main application. Your data has now been restored.
72
Page 73

Backup Utility- Advanced Options
Settings - The settings pull down menu references the
same settings from the buttons discussed on earlier pages.
However, the option Delete All Backup Source Folders provides
the ability to delete all of the folders specifi ed for backup. This
will remove all of the entries from the backup source box.
This is an alternative to selecting each entry individually and
pressing the Delete button.
Tools - The tools pull down gives four options:
• Run Backup is the same as the Run button.
• Run Backup and Shutdown Computer runs a backup and
then shuts the computer down. This is an ideal setting to
choose if the backup is to be run after you leave work or go to
sleep for the evening.
• View Logs brings up the log text fi le.
• Clear Logs erases the log text fi le.
73
Page 74

Advanced Users - Advanced users can browse the backed
up data on LinkStation. Folders that start with ‘Backup...’
contain backup archives. If a compressed backup was set,
then a zip fi le will be inside the folder. If a non-compressed
backup was set, then the folder that was backed up will be
inside the folder.
NOTE: If the saved archives are modifi ed, it may result in
improper behavior from the Backup Utility’s Restore File
Wizard. However, the data can always be restored manually
by copying or moving the archived backup’s data to the
proper destination.
The compression format used is ZIP, so backup fi les may be
restored with most common uncompression software.
LinkStation Backup Utility
74
Page 75

LinkStation Backup Utility Uninstallation
Uninstalling Utility – To uninstall the Disk Backup
Utility, click on the Uninstaller program in the LinkStation
program group folder.
The Uninstaller dialog box will appear. Press the
Uninstall button to begin the uninstallation process.
Another Uninstaller dialog box will appear. Press the
Quit button to fi nish the process.
75
Page 76

Troubleshooting - Multiple Shares
When adding multiple shares, it’s possible that you may get an error message similar to the
This is caused by having multiple shares to the same resource using different credentials. The
error occurs when connecting to at least one secure, restricted share. Due to a constraint
in Microsoft Windows only one set of credentials can map drive letters to a network resource
such as the LinkStation. Thus, only one username and password can be used while mapping
to your LinkStation, even if different drive letters are mapped to different shares. If unsecure,
unrestricted shares are mapped, and then an attempt to map a secure, restricted share occurs,
this error will occur. To remedy the situation, you must create all shares using the same login
and password information. Please follow the steps on the next page to remedy this problem.
76
Page 77

Troubleshooting - Multiple Shares
When mapping any share, select the ‘Connect using a different user
name’ option. A login and password prompt will appear. Enter
the same username and password for all LinkStation shares. This
username and password
for the secure, restricted share. Use this same login procedure for
all unsecure, unrestricted and restricted shares on LinkStation.
Only one username and password can be used for all mapped
shares! Thus, a PC cannot have two mapped, secured shares that
use different username and passwords.
It is important to remember that all mapped drives on a single
LinkStation must use the same username and password. This
means that even unsecure, unrestricted mapped shares will have to
login using the secured share’s username and password.
If only unrestricted shares are being mapped, then it is not
necessary to set a username and password for the shares. Multiple
mapped drives to unrestricted shares can exist without a username
and password (as long as no restricted, secure shares are mapped).
is the username and password required
77
Page 78

Troubleshooting - Disk Scan
If LinkStation encounters a disk error, it will be reported in the LinkStation status on the top of
any of the Web-Based confi guration screens. It is recommended to start a Normal Disk Scan in
the event of this error. If that doesn’t work, try running a Thorough Disk Scan. Additionally, if
that still does not resolve the problem a format is recommended. Formatting the drive will delete
all of the data on it so try to backup any data you can before this process is started. Finally, if
none of the above solutions help, then please contact our technical support.
78
Page 79

Technical Specifi cations
,
LAN Standards: Auto-MDIX10/100/1000 Base-T Ethernet
Transmission Types: 1000BASE-T: 8B1Q4, PAM5; 100BASE-TX 4B/5B
MLT-3;10BASE-T Manchester Coding
Access Media: CSMA/CD
Media Interface: RJ-45
USB Standard: USB 2.0
Hi-Speed (HS)
Full-Speed (FS)
Low-Speed (LS)
USB Connector: USB 2.0 Connectors (2)
Data Transmission Speed: Max: 480 Mbps (HS Mode)
Max: 12 Mbps (FS Mode)
Electric Current: 5.0V
Power Consumption: Average 21W with no USB devices attached
Dimensions: 2.4 x 6.94 x 7.4 in. (60 x 173.5 x 185 mm.)
Weight: 3.1 lb. (1.4 kg.)
Operating Temperature: 5-35° C; 20-80% non-condensing
79
Page 80

Technical Support
Buffalo Technology offers free technical support for this product.
North America Support is available 24 hours a day, 7 days a week
Telephone: 866-752-6210 Email: info@buffalotech.com
Europe Support is available between 9am-6pm (GMT) Monday-Thursday and 9am-4:30pm on
Fridays.
Email: helpdesk@buffalo-technology.ie
FCC Warning
This device complies with part 15 of the FCC Rules. Operation is subject to the following two
conditions:
(1) This device may not cause harmful interference, and (2) this device must accept any
interference received, including interference that may cause undesired operation.
GPL Statement
This product uses GPL/LGPL software. Please see the GNU LICENSE document on the
LinkNavigator CD-ROM for more information concerning the terms of the license. To obtain a
copy of our open source software, please send a message to GPL@buffalotech.com to inquire
about obtaining a package.
80
 Loading...