

Page 1
User Guide
HD-WLU3R1 DriveStation Duo
РПЧЕТ
БГГЕУУ
EN
35011790 ver.01
Page 2
РПЧЕТ
БГГЕУУ
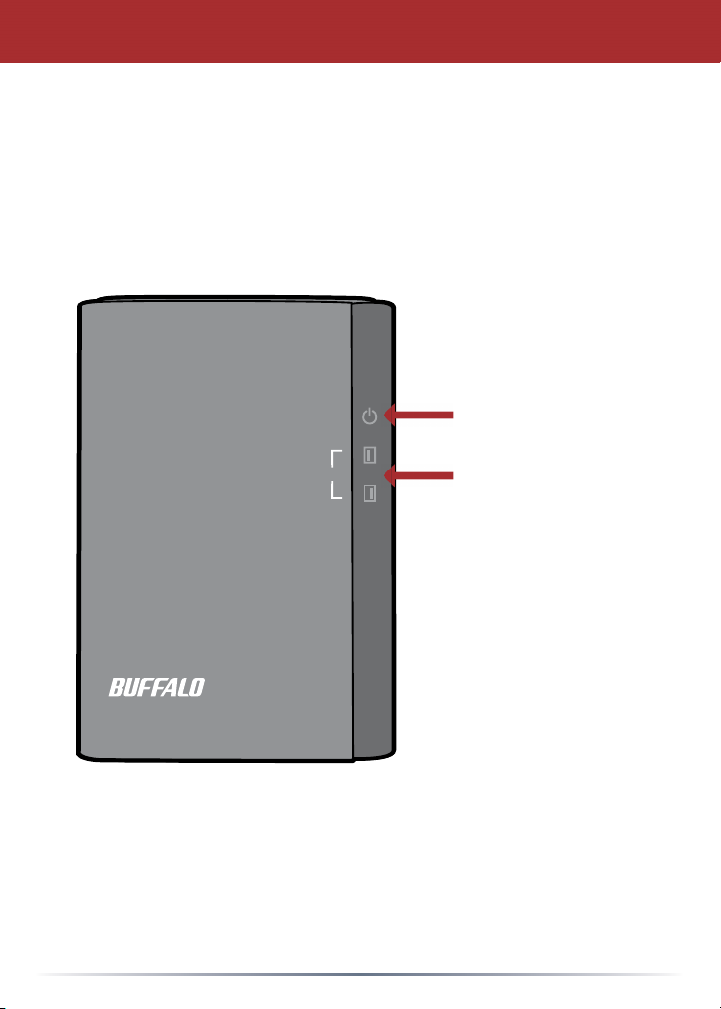
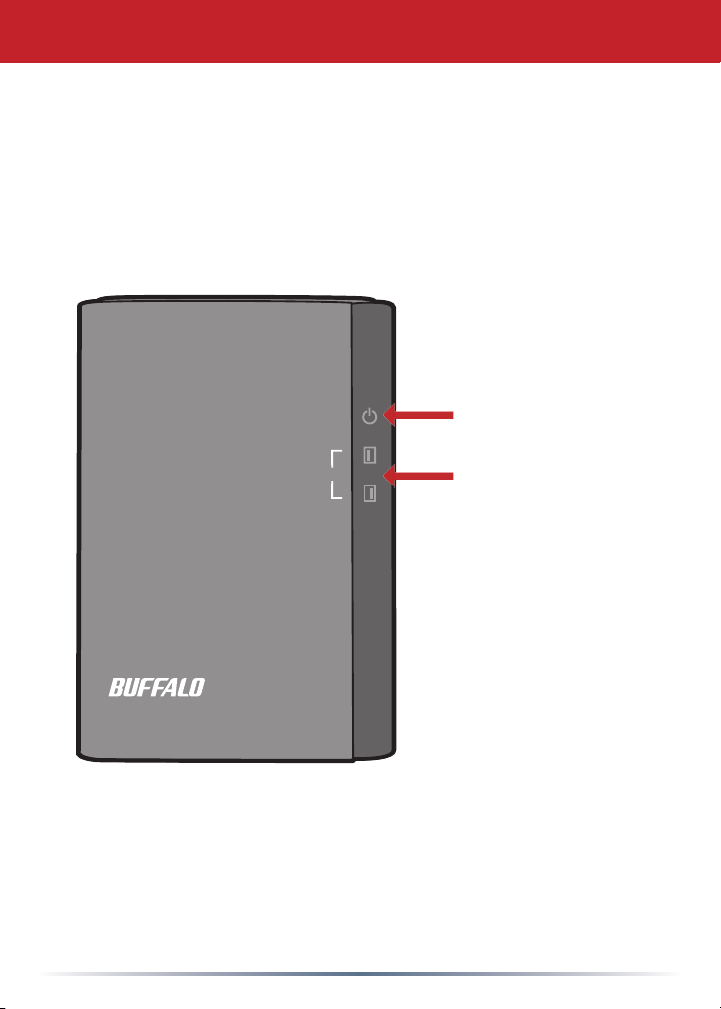
Front Panel Layout
Power LED
Power On: blue
RAID Maintenance: purple
Power Off: off
Access LEDs
Access: blinking green
Failure: red
Rebuild: blinking red
Power Off: off
2
Page 3
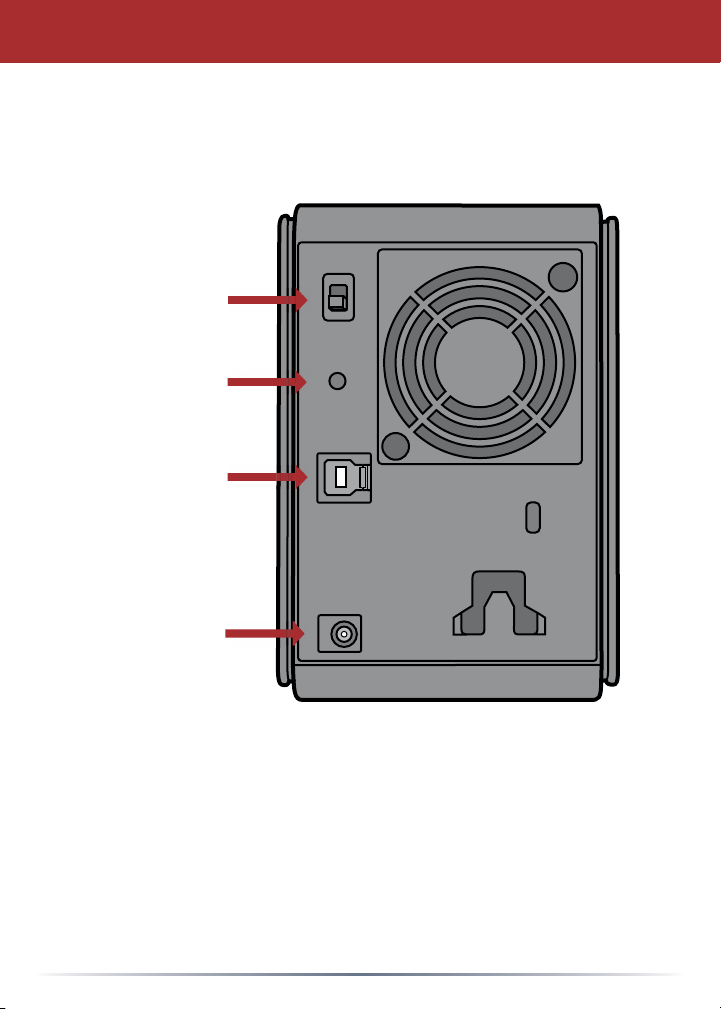
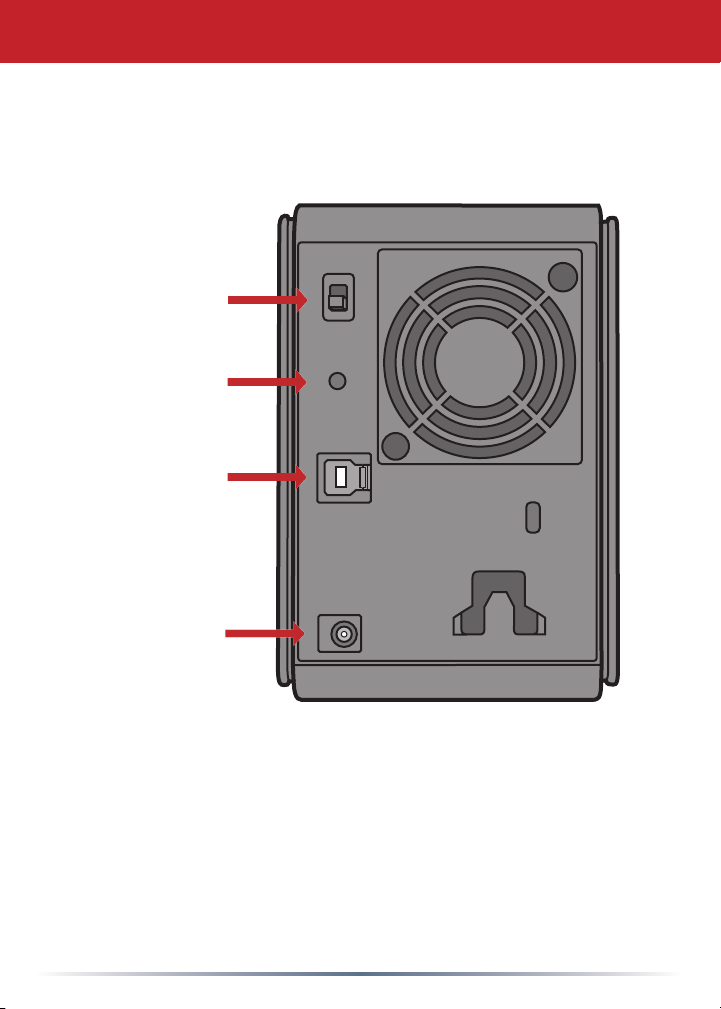
Power Mode Switch
▲Auto
▼Off
RAID Mode
Button
USB 3.0
Back Panel Layout
DC in
Note: To change between RAID modes, you may use either the RAID
utility or the RAID mode button. The RAID utility is included with the
software on your DriveNavigator CD. For more information on using
the RAID mode button, see the Reference Guide.
3
Page 4

DriveStation Setup
Congratulations on your new DriveStation Duo! With dual hard drives, the
DriveStation Duo gives you many options for large capacity and easy-to-use
redundancy.
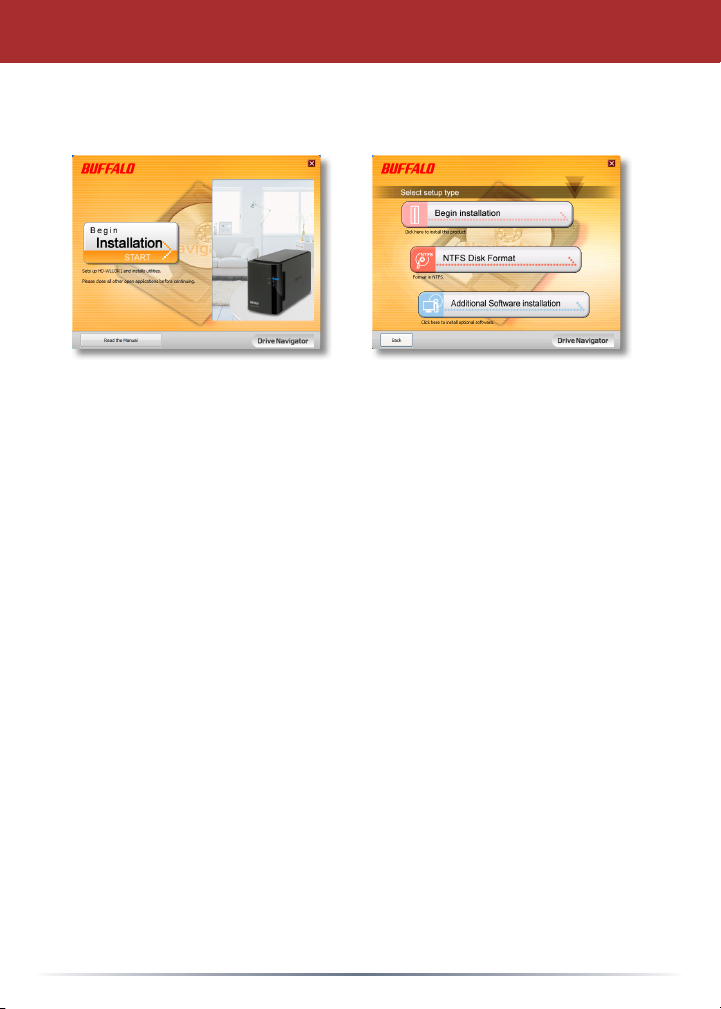
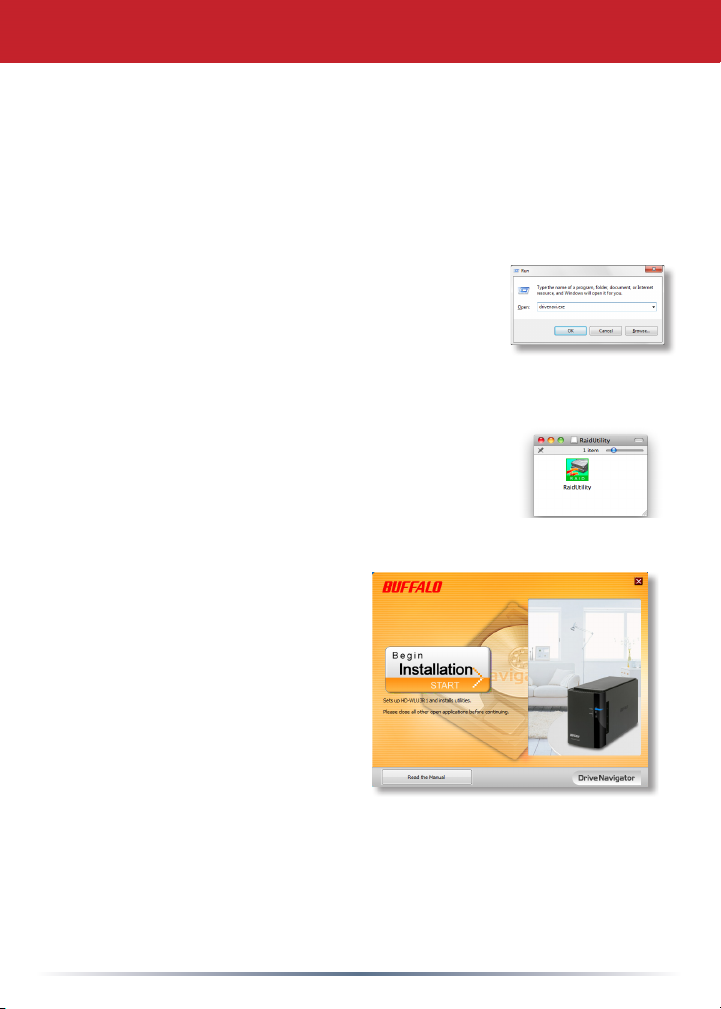
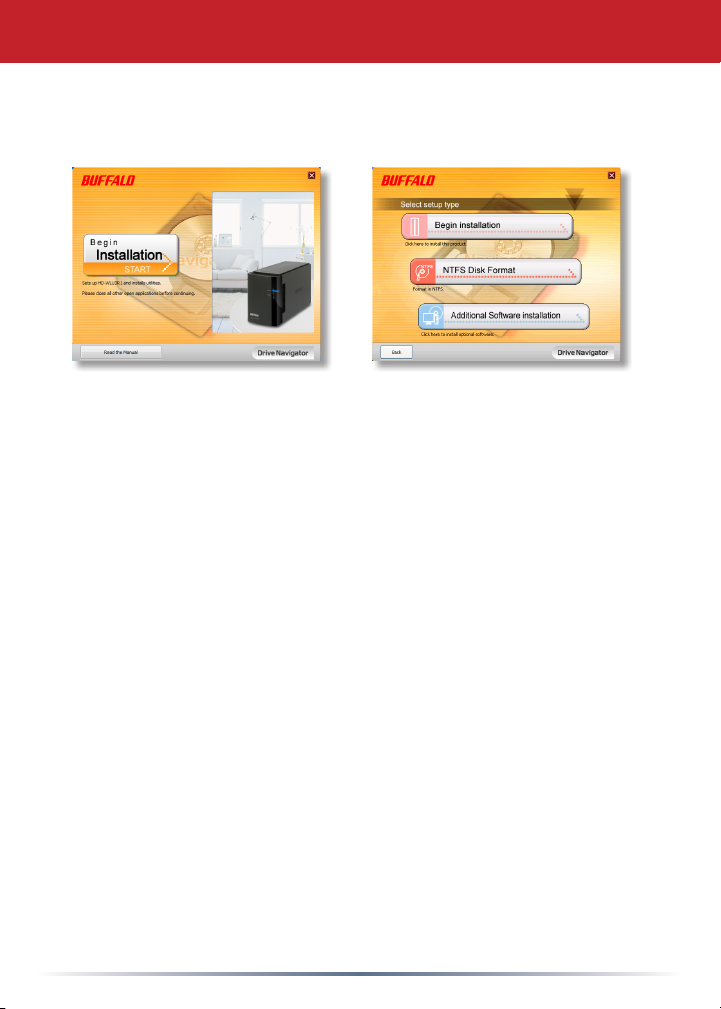
Insert the DriveNavigator CD into your computer’s CD-ROM drive.
On a PC, DriveNavigator should automatically launch.
If it does not, click [Start] and select [Run]. In the Run
dialog, enter “d:\DriveNavi.exe” (where d is the drive
letter of your CD-ROM drive). Click [OK] to continue.
For a Mac, open the CD and click [RaidUtility.dmg] to
begin installation.
Click [Begin Installation]. Click [Next] to
step through the installation. Mac users
can skip this step.
4
Page 5

The wizard will step you through setting up your DriveStation Duo, confi guring
your RAID settings, and reformatting if desired.
The DriveStation Duo may be connected to your computer with a USB
connection.
After completing the setup wizard, your DriveStation Duo is installed and ready to
use!
By default, your Duo is confi gured in RAID 1 mode. In RAID 1, data can be
recovered even if one of the hard disks in DriveStation fails. However, the total
available space is 1/2 of the maximum space.
If you prefer a different RAID confi guration, or if you prefer to use DriveStation
as a single drive, you may use the RAID Utility to change your DriveStation’s
RAID settings. Turn to the next page for instructions on using the RAID Utility.
Alternately, you may change the RAID mode with the RAID mode button as
described in the Reference Guide.
Out of the box, the DriveStation is formatted with FAT32, allowing it to be used
with most common operating systems. If you’re going to use it with programs
that generate fi lesizes larger than 4 GB, such as backup software, reformat the
DriveStation with NTFS or Mac OS Extended.
By default, all drives on the DriveStation are divided into 2 TB partitions. This
allows older versions of Windows, such as 32-bit Windows XP and Windows
Server 2003, to read the drives without additional software or service packs.
Users of newer operating systems may wish to re-partition the DriveStation with
larger partitions, but this is not recommended for 32-bit Windows XP. Windows
Server 2003 may be able to read larger partitions after the latest service pack is
applied.
5
Page 6
Using the RAID Utility
The RAID Utility allows you to confi gure your DriveStation Duo in several modes:
Normal mode - Appears to your computer as two separate hard drives. Note that
normal mode only works with a USB connection.
Spanning mode - Appears to your computer as one large hard drive.
RAID 0 mode - Appears to your computer as a single drive. Higher performance
than Spanning mode.
RAID 1 mode - Appears to your computer as a single drive. The second drive is
an exact copy of the fi rst drive, for redundancy.
Notes:
・Changing the mode of the drives in your Duo will erase all data on them! Back
up any important data before using the RAID Utility.
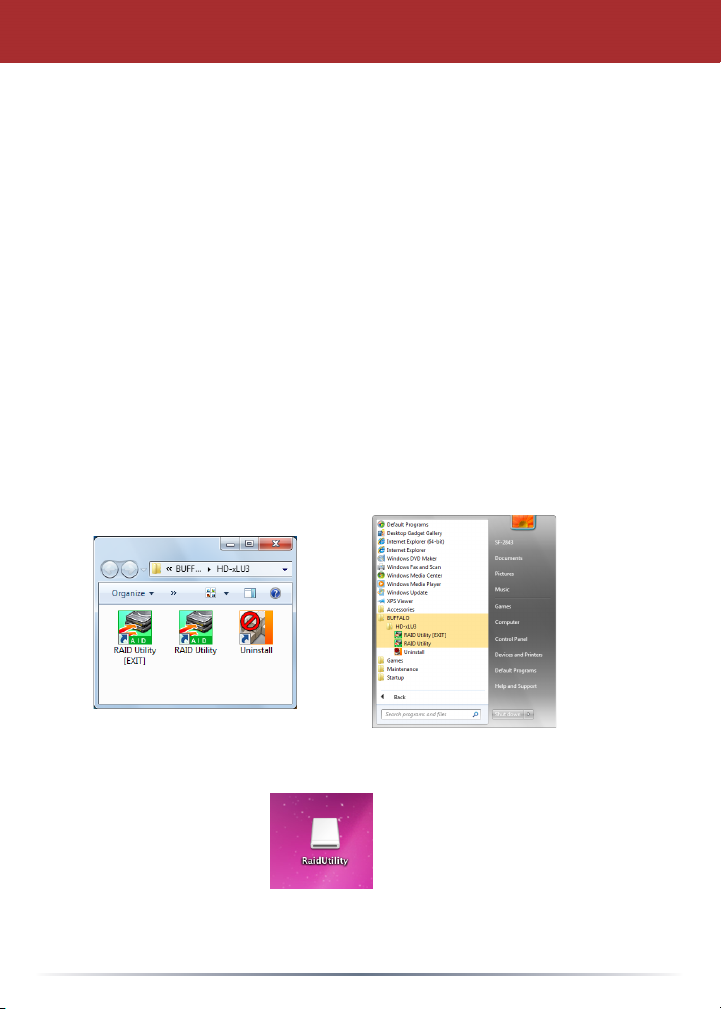
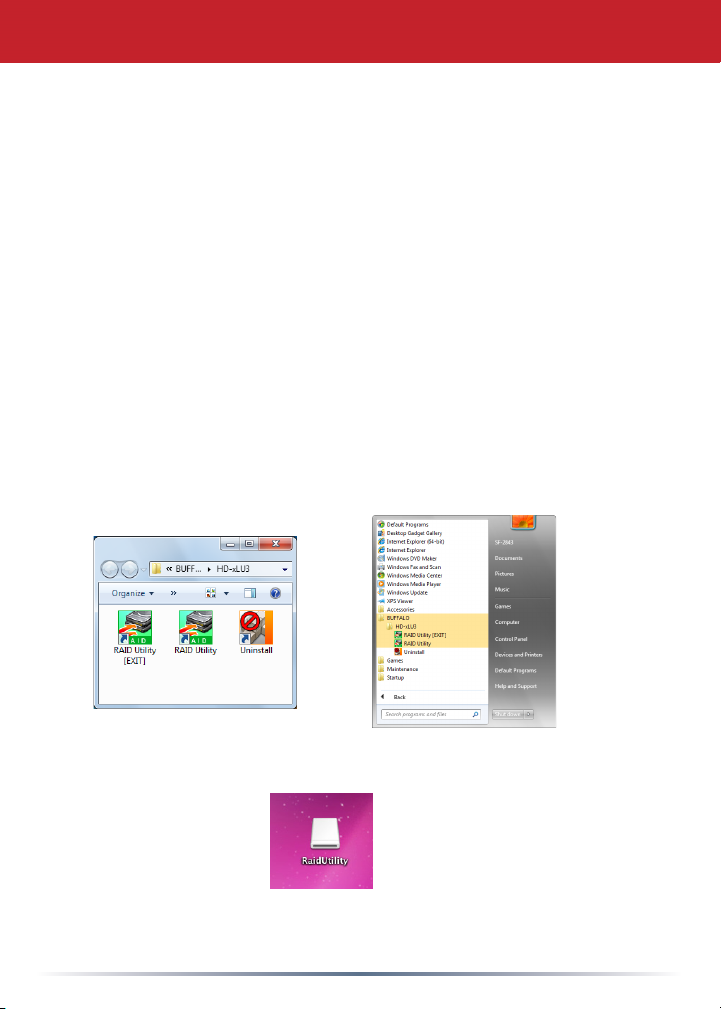
On a PC, launch the RAID Utility by clicking on [RAID Utility] in the DriveStation
Duo program group, or from the Start menu.
On a Mac, double-click the RaidUtility icon on your desktop.
6
Page 7
Using the RAID Utility
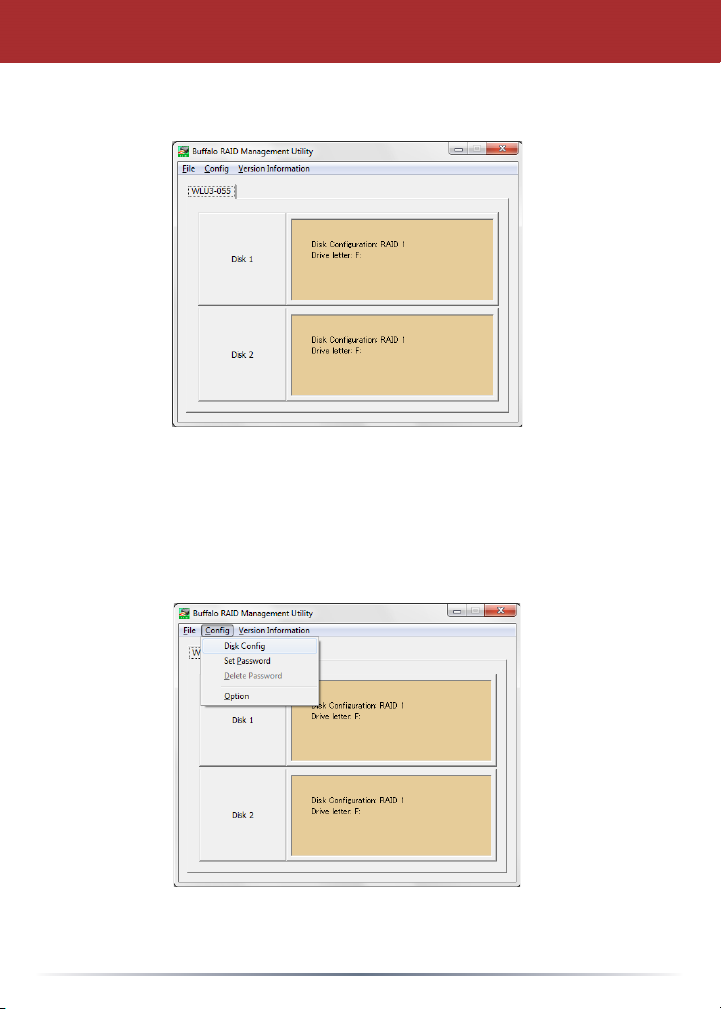
Once launched, the RAID Utility will briefl y scan for your DriveStation
Duo. This may take a few seconds.
The initial screen will show your current confi guration. If your Duo is
new, it will probably be in RAID 1 mode.
To change the RAID mode, click [Confi g] and choose [Disk Confi g].
7
Page 8
Using the RAID Utility
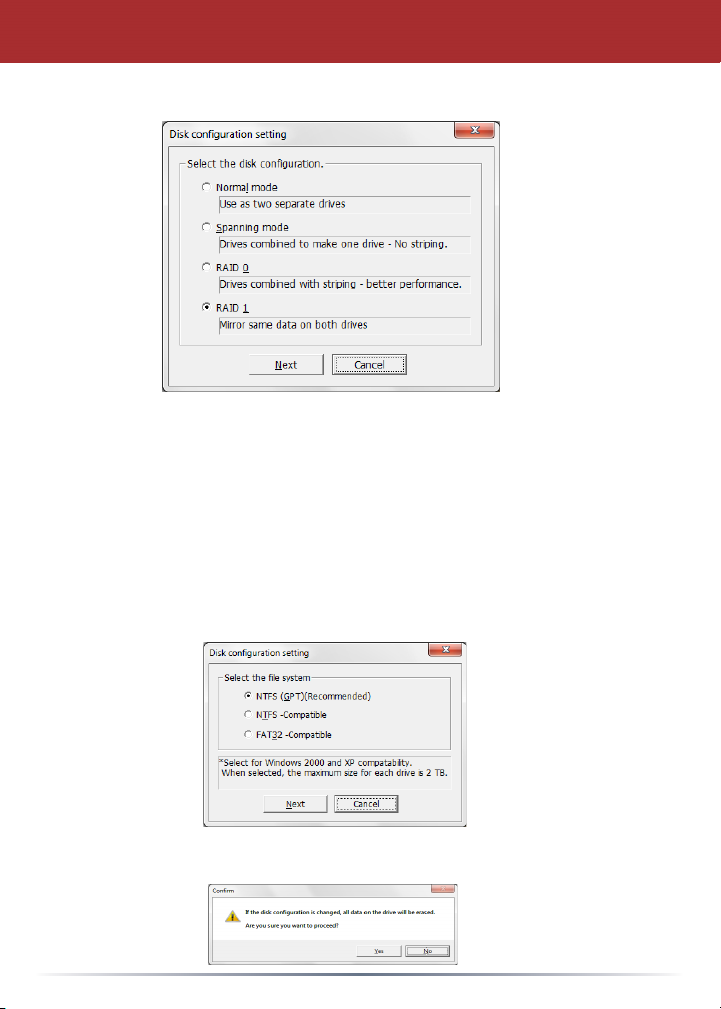
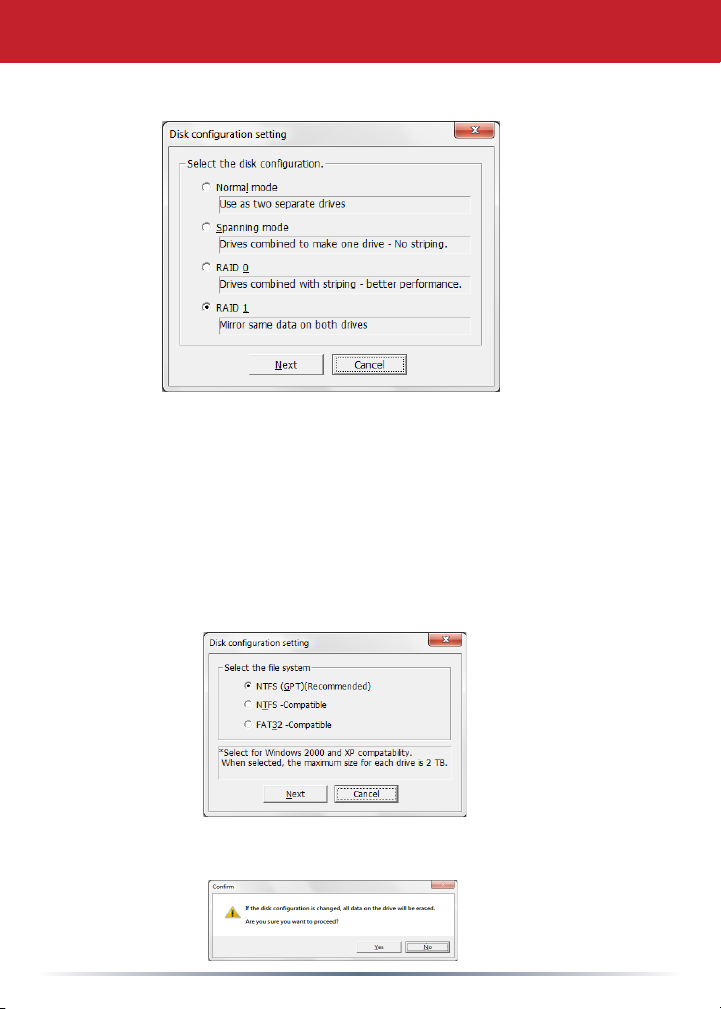
Select the drive structure that you’d like to use.
On a PC, the disk can be formatted with FAT32 or NTFS. Select the
format that you prefer. FAT32 is compatible with most Windows PCs
and Macs. NTFS offers the best performance with Windows, but isn’t
compatible with Mac. NTFS is recommended for use with backup, video
editing and other programs that may need fi lesizes larger than 4 GB.
If you are using Windows XP, or Windows Server 2003 without SP1 or
later, use compatability mode. Compatability mode will divide drives into
2 TB partitions that can be read by Windows XP or Windows Server 2003.
Click [Yes], and [Yes] again. Understand that this will erase any data on
the drive!
8
Page 9
Using the RAID Utility
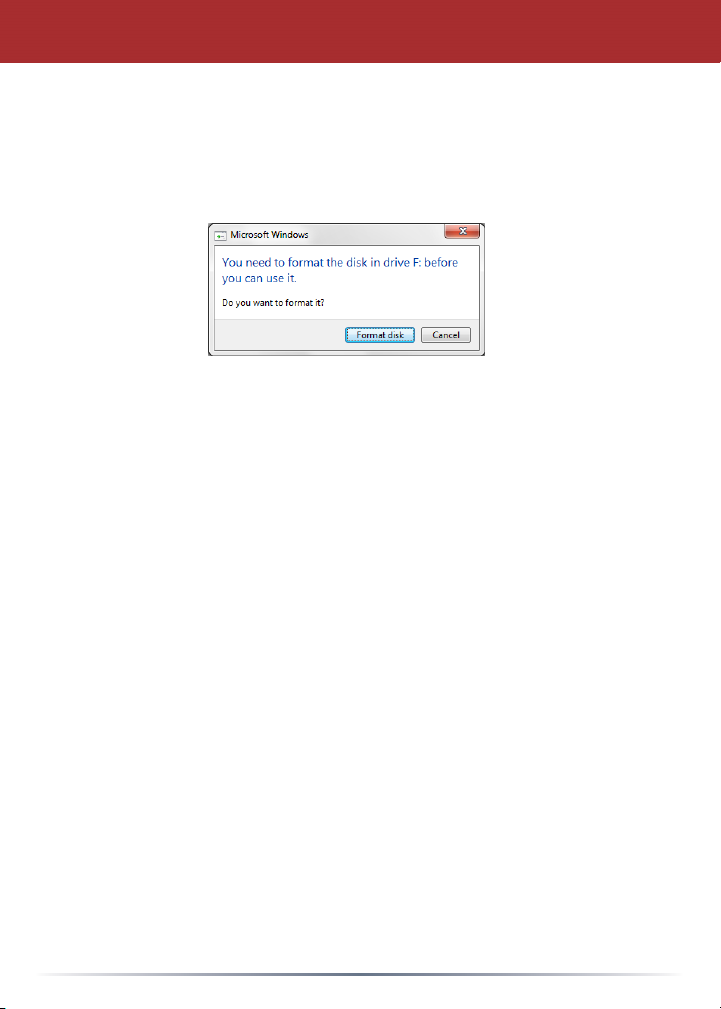
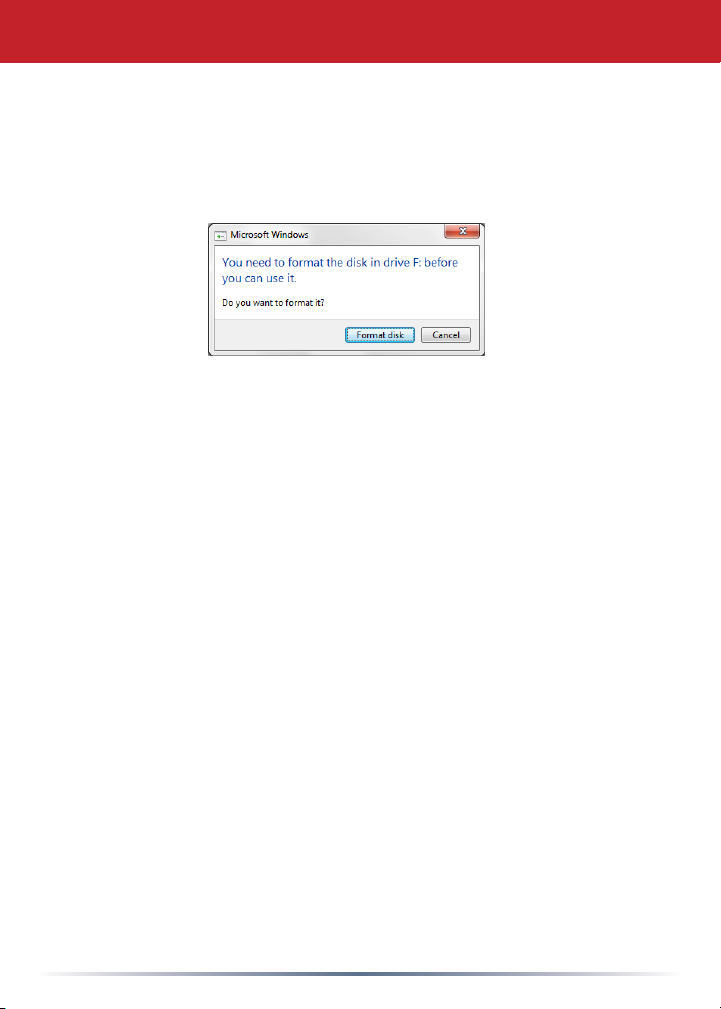
To Windows Users
The message below may be displayed when you try to change the
disk confi guration (such as by selecting NTFS format) using the RAID
Management Utility.
If this message appears, wait until the changes to the disk confi guration
are complete and “The setting was successfully changed” is displayed,
then click [Cancel]. The disk is now ready to use.
If you inadvertently click [Format disk] in the above message, one of
the following things will happen.
• If “You do not have suffi cient rights to perform this operation” is
displayed, click [OK].
• If “Not Formattable” is displayed, click [Close].
• If the standard Windows format screen is displayed, click [Close].
Note: If the drive is formatted with the Windows format utility,
changes to the disk confi guration may not complete normally.
If this happens, use the RAID Management Utility to set the
disk confi guration again.
9
Page 10
Other Utilities (Windows Only)
The DriveStation Duo includes several optional utilities for use with Windows
computers. To install and use these utilities, insert the CD-ROM that came
with your DriveStation Duo into a Windows PC.
Click [Begin Installation] and then [Additional Software Installation].
TurboPC can increase data transfer speeds for your Buffalo product.
TurboCopy uses caching to increase data transfer speeds.
Backup Utility is software to back up and restore data from your PC. To use,
select a source drive to be backed up and a target location for backup data.
RAMDISK Utility uses the memory in your computer as a virtual hard drive
“RAM drive”. The RAM drive is recognised as a hard drive by your computer,
and you can read and write data to it like any other hard drive.
Buffalo Tools Launcher lets you easily launch software from the Buffalo
utility suite. Just click an icon to launch the desired Buffalo tool or utility.
eco Manager lets you put the DriveStation into sleep mode to save power.
It works in RAID 0, RAID 1, and Spanning modes. Normal mode is not
supported.
SecureLockMobile encrypts the data on your DriveStation, preventing the
data from being accessed by anyone but you.
NovaBACKUP is backup software.
To learn more about installing and using these utilities, click on [View User
Manual].
10
Page 11

Replacing a Hard Drive
Caution:
Please do not lift the DriveStation Duo by its front cover. The front cover
might come off.
Before removing hard drives, touch a metal object to dissipate static
electricity in your body, or wear a static wrist strap.
Work carefully! Some of the metal edges inside the DriveStation Duo
are sharp.
Damage done to the DriveStation Duo by improper disassembly is not
covered by warranty.
Do not reverse the two drives, or your data may be lost.
Replacement drives should be the same capacity as the drive being
replaced, or larger.
Do not use a hard drive that has previously been used in a DriveStation
Duo as a replacement drive. Remove any partitions on it fi rst, or
rebuilding might not work normally.
Replacement hard drives are available from www.buffalotech.com.
Replacing a drive can result in lower transfer speeds for DriveStation
Duo depending on the performance of the replacement drive.
11
Page 12

Replacing a Hard Drive
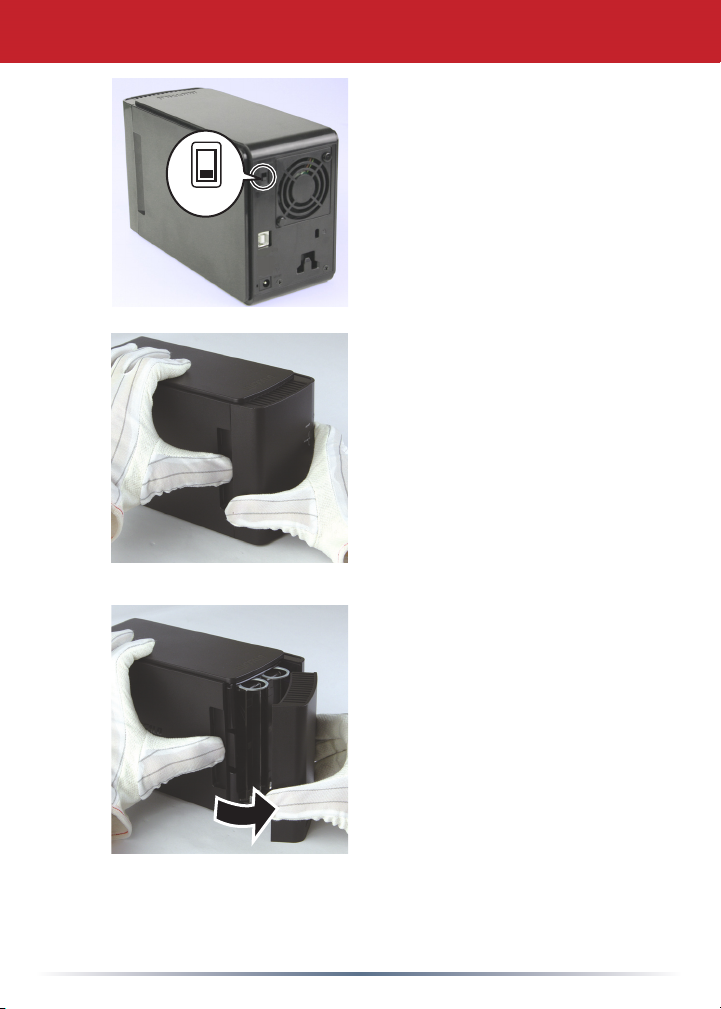
1
Shut down the DriveStation and
remove all cables.
▲
AUTO
▼
OFF
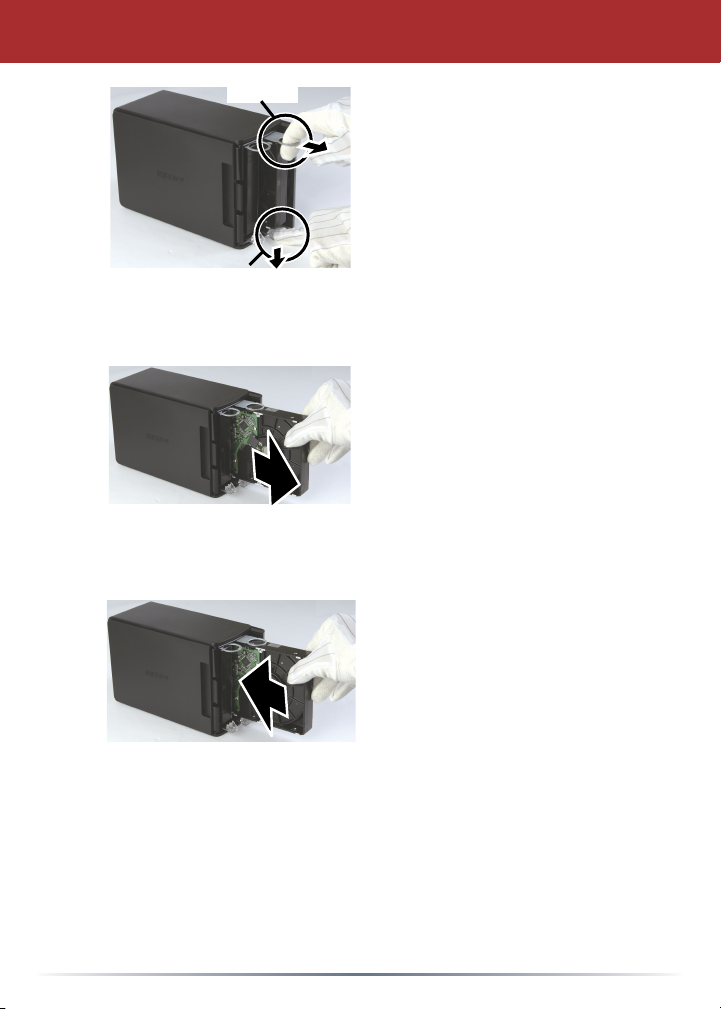
2
Pull the front cover forward while
pressing gently on the hollow on
the left side.
3
Remove the front cover.
12
Page 13
Replacing a Hard Drive
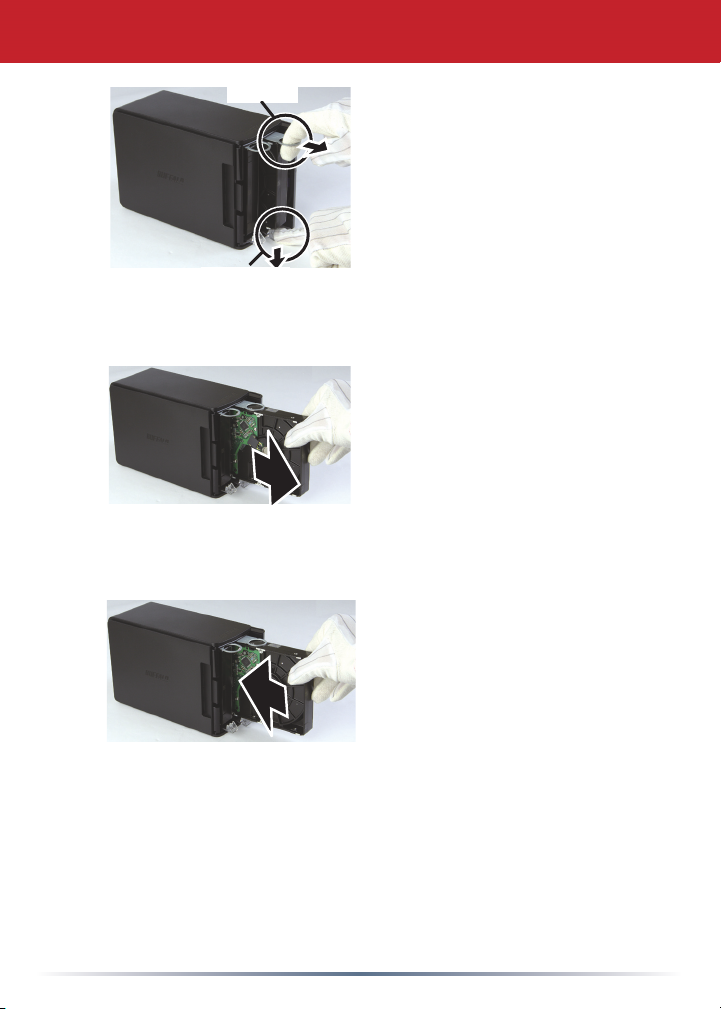
4
5
6
Knob
Tab
Press the release below the drive
and pull the tab above the drive
out 2 cm (about 1 inch) .
Remove the failed drive.
Insert the new drive until it clicks.
13
Page 14
Replacing a Hard Drive
7
Reattach all cables and power on the DriveStation Duo.
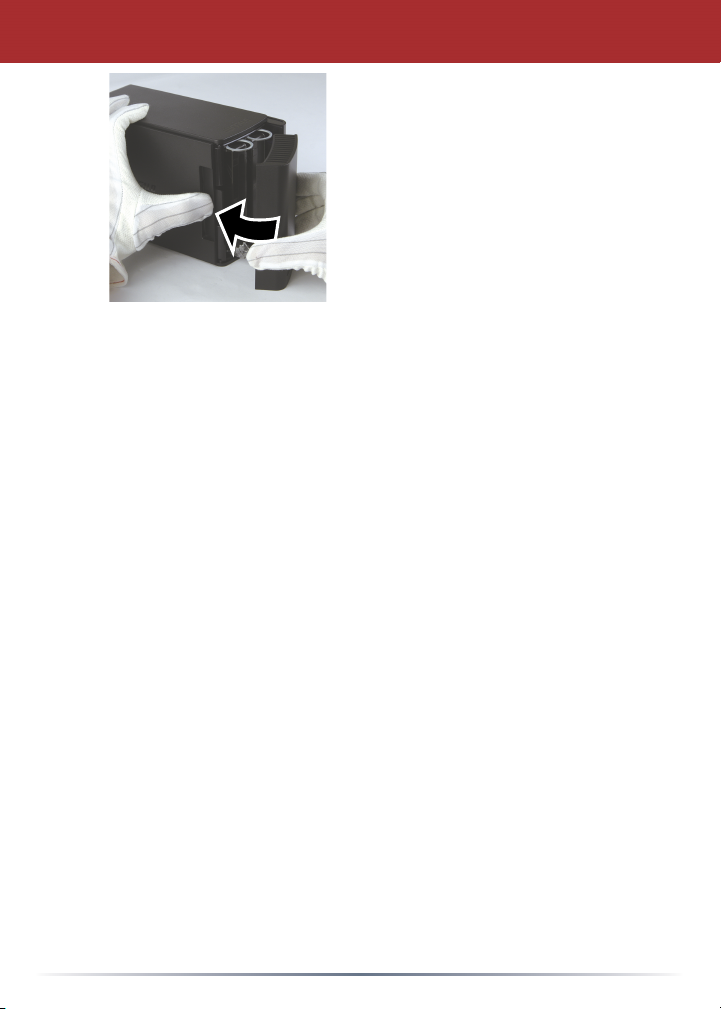
8
Note: If the DriveStation Duo is in normal mode, format the new drive.
Reattach the front cover.
14
Page 15

Troubleshooting
FAQ
The following is a list of common issues with the DriveStation. Following
each issue are possible resolutions.
I cannot see the DriveStation in My Computer. (Windows)
Verify that the POWER light is on. If it is not, then ensure that the
power switch is in the AUTO position.
If you have installed the Power Save Utility, then verify that the
DriveStation was not put into power saving mode. Consult the
manual for the Power Save Utility for additional help. The manual
can be found on the DriveNavigator CD-ROM.
Verify that the hard drive inside the DriveStation is spinning. This
can be verifi ed by placing your hand on the sides of the case
and feeling for a slight vibration. Also, after the DriveStation has
been powered on for fi fteen minutes or more it will begin to get
warm. If neither of the proceeding tests verifi ed that the hard drive
is spinning, then please contact technical support for further
assistance.
My backup program can’t save fi les to the DriveStation.
Reformat your DriveStation with NTFS or Mac OS Extended.
FAT32 is limited to 4 GB fi lesizes.
15
Page 16

Technical Specifi cations
OS Compatibility:
Windows 7 (32-bit or 64-bit),
Windows Vista (32-bit or 64-bit),
Windows XP (32-bit),
Windows Server 2008 R2 (64-bit),
Windows Server 2008 (32-bit or 64-bit),
Windows Server 2003 R2 (32-bit),
Windows Server 2003 (32-bit),
Mac OS X 10.4 or later
Weight:
4.85 lbs. (2.2 kgs)
Power Consumption:
Max. 36 W
Standard Compliance:
USB 3.0
Standard Compliance: USB 3.0
Transmission Speed: Max. 5.0 Gbps (USB 3.0)
Power Consumption: Max. 36 W
Dimensions: 3.4” x 5.0” x 8.1” (86 x 127 x 204 mm)
Weight: 4.85 lbs. (2.2 kgs)
Operating Environment: 41 - 95° F (5 - 35° C)
20 - 80% humidity (non-condensing)
OS Compatibility: Windows 7 (32-bit or 64-bit),
Windows Vista (32-bit or 64-bit),
Windows XP (32-bit),
Windows Server 2008 R2 (64-bit),
Windows Server 2008 (32-bit or 64-bit),
Windows Server 2003 R2 (32-bit),
Windows Server 2003 (32-bit),
Mac OS X 10.4 or later
16
Page 17

www.buffalotech.com
Page 18
User Guide
HD-WLU3R1 DriveStation Duo
РПЧЕТ
БГГЕУУ
DE
35011790 ver.01
Page 19
РПЧЕТ
БГГЕУУ
Layout des Front-Panels
Strom-LED
Eingeschaltet: blau
RAID-Wartung: violett
Strom ausgeschaltet: Aus
LEDs für die Anzeige
des Zugriffs
Zugriff: Blinkt grün
Fehler: Rot
Neuerstellung: Blinkt rot
Strom ausgeschaltet: Aus
2
Page 20
Power Mode Switch
(Strommodusschalter)
▲Auto
▼Off (Aus)
RAID Mode
Button (RAID-
Modus-Taste)
USB 3.0
Layout der Rückseite
DC in
(DC-Eingang)
Hinweis: Zum Wechseln zwischen RAID-Modi können Sie entweder die RAID-
Utility oder die RAID-Modus-Taste verwenden. Die RAID-Utility wird
mit der Software auf der DriveNavigator-CD mitgeliefert. Weitere
Informationen zur Verwendung der RAID-Modus-Taste erhalten Sie im
Referenzhandbuch.
3
Page 21
Einrichtung der DriveStation
Herzlichen Glückwunsch zu Ihrem DriveStation Duo-Kauf! Mit zwei Festplatten
erhalten Sie mit der DriveStation Duo viele Optionen für benutzerfreundliche
Redundanz mit hoher Kapazität.
Legen Sie die DriveNavigator-CD ins CD-ROM-Laufwerk des Computers ein.
Auf einem PC sollte DriveNavigator automatisch gestartet
werden. Wenn dies nicht der Fall ist, klicken Sie auf
[Start] und wählen Sie [Ausführen] aus. Geben Sie im
Dialogfenster [Ausführen] „d:\DriveNavi.exe“ ein (wobei „d“
für den Laufwerkbuchstaben Ihres CD-ROM-Laufwerks
steht). Klicken Sie zum Fortfahren auf [OK].
Bei einem Mac-Computer öffnen Sie die CD und klicken
Sie zum Starten der Installation auf [RaidUtility.dmg].
Klicken Sie auf [Begin Installation
(Installation starten)]. Klicken Sie
auf [Next (Weiter)], um die einzelnen
Installationsschritte auszuführen.
Dieser Schritt kann von Mac-Benutzern
übersprungen werden.
4
Page 22

Der Assistent führt Sie schrittweise durch das Einrichten der DriveStation Duo,
das Kongurieren der RAID-Einstellungen und ggf. das Neuformatieren.
Die DriveStation Duo kann über einen USB-Anschluss an den Computer
angeschlossen werden.
Nach Abschließen des Setup-Assistenten ist die DriveStation Duo installiert und
verwendungsbereit!
Die Duo ist standardmäßig im RAID 1-Modus konguriert. Im RAID 1-Modus
können Daten auch dann wiederhergestellt werden, wenn eine der Festplatten
in der DriveStation ausfällt. Der insgesamt verfügbare Speicherplatz beträgt
jedoch nur die Hälfte des maximalen Speicherplatzes.
Wenn Sie eine andere RAID-Konguration oder die DriveStation als einzelne
Festplatte bevorzugen, können Sie das RAID-Dienstprogramm verwenden,
um die RAID-Einstellungen der DriveStation zu ändern. Anweisungen zur
Verwendung der RAID Utility nden Sie auf der nächsten Seite.
Alternativ dazu können Sie den RAID-Modus, wie im Referenzhandbuch
beschrieben, mit der RAID-Modus-Taste ändern.
Die DriveStation ist werkseitig mit FAT32 formatiert, sodass sie mit den
gängigsten Betriebssystemen verwendet werden kann. Formatieren Sie
die DriveStation auf NTFS oder Mac OS Extended um, wenn Sie das Gerät
mit Programmen verwenden, die deren Dateien über 4 GB groß sind (z. B.
Sicherungssoftware).
Standardmäßig sind alle Laufwerke der DriveStation in Partitionen von 2 TB
aufgeteilt. So können die Laufwerke ohne zusätzliche Software oder Service
Packs von älteren Windows-Versionen wie Windows XP mit 32 Bit und Windows
Server 2003 gelesen werden. Benutzer neuerer Betriebssysteme möchten die
DriveStation möglichweise mit größeren Partitionen neu partitionieren. Dies wird
für Windows XP in der 32-Bit-Version jedoch nicht empfohlen. Windows Server
2003 ist nach dem Installieren des neuesten Service Pack möglicherweise in
der Lage, größere Partitionen zu lesen.
5
Page 23
Verwenden der RAID Utility
Das RAID-Dienstprogramm ermöglicht das Kongurieren der DriveStation Duo in
verschiedenen Modi:
Normal mode (Normalmodus ): Das Gerät wird vom Computer als zwei getrennte
Festplatten erkannt. Beachten Sie, dass der Normalmodus nur mit einer USB-Verbindung
funktioniert.
Spanning mode (Verbundmodus) - Auf Ihrem Computer wird eine große Festplatte angezeigt.
RAID 0 mode (RAID 0-Modus) - Auf Ihrem Computer wird ein einzelnes Laufwerk
angezeigt. Dieser Modus bietet eine bessere Leistung als der Verbundmodus.
RAID 1 mode (RAID 1-Modus): Auf Ihrem Computer wird ein einzelnes Laufwerk
angezeigt. Das zweite Laufwerk ist eine exakte Kopie des ersten Laufwerks zu
Redundanzzwecken.
Hinweise:
・ Durch Ändern des Modus der Duo-Laufwerke werden alle vorhandenen Daten gelöscht!
Sichern Sie daher alle wichtigen Daten, bevor Sie die RAID Utility verwenden.
Auf einem PC können Sie die RAID-Utility entweder über das Startmenü starten oder indem
Sie in der DriveStation Duo-Programmgruppe auf [RAIDUtility] klicken.
Auf einem Mac doppelklicken Sie auf das Symbol RaidUtility auf Ihrem Desktop.
6
Page 24

Verwenden der RAID Utility
Nach dem Starten führt das RAID-Dienstprogramm einen Scanvorgang
für die DriveStation Duo durch. Dieser Vorgang kann einige Sekunden
dauern.
Auf dem Startbildschirm wird Ihre aktuelle Konguration angezeigt.
Wenn die Duo neu ist, liegt das Gerät vermutlich im RAID 1-Modus vor.
Klicken Sie zum Ändern des RAID-Modus auf [Cong (Kongurieren)]
und wählen Sie [Disk Cong (Datenträger kongurieren)].
7
Page 25
Verwenden der RAID Utility
Wählen Sie die Laufwerksstruktur aus, die Sie verwenden möchten.
Auf einem PC kann der Datenträger mit FAT32 oder NTFS formatiert werden. Wählen
Sie das gewünschte Format aus. FAT32 ist mit den meisten Windows-PCs und MacComputern kompatibel. NTFS bietet unter Windows die beste Leistung, ist jedoch
nicht kompatibel mit Mac. NTFS wird für Sicherungen, Videobearbeitung und andere
Programme empfohlen, die Dateien mit einer Größe von über 4 GB verwenden.
Wenn Sie Windows XP oder Windows Server 2003 ohne SP1 oder höher verwenden,
verwenden Sie den Kompatabilitätsmodus. Der Kompatabilitätsmodus teilt die
Festplatten in Partitionen mit 2 TB auf, die sowohl von Windows XP als auch Windows
Server 2003 gelesen werden können.
Klicken Sie auf [Yes (Ja)] und erneut auf [Yes (Ja)]. Mit diesem Vorgang werden alle
Daten auf dem Laufwerk gelöscht.
8
Page 26
Verwenden der RAID Utility
Windows-Nutzer
Die folgende Nachricht wird möglicherweise angezeigt, wenn Sie mit dem
RAID-Verwaltungsdienstprogramm die Laufwerkskonguration ändern
möchten (z. B. durch die Auswahl des NTFS-Formats).
Wenn diese Nachricht angezeigt wird, warten Sie, bis die Änderungen
an der Laufwerkskonguration abgeschlossen wurden und „The
setting was successfully changed“ (Die Einstellung wurde erfolgreich
geändert) angezeigt wird. Klicken Sie anschließend auf [Cancel
(Abbrechen)]. Das Laufwerk kann nun verwendet werden.
Wenn Sie in der oben angezeigten Nachricht unbeabsichtigt auf
[Format disk (Laufwerk formatieren)] klicken, wird eine der folgenden
Meldungen angezeigt:
• Wenn „You do not have sufcient rights to perform this operation“
(Sie verfügen nicht über ausreichend Rechte, um diese Operation
auszuführen) angezeigt wird, klicken Sie auf [OK].
• Wenn „Not Formattable“ (Nicht formatierbar) angezeigt wird, klicken
Sie auf [Close (Schließen)].
• Wenn der Windows-Standardbildschirm angezeigt wird, klicken Sie auf
[Close (Schließen)].
Hinweis: Wenn das Laufwerk mit dem Windows-
Formatierungsprogramm formatiert wurde, werden
Änderungen an der Laufwerkskonguration möglicherweise
nicht erfolgreich abgeschlossen. Wenn dies der Fall ist,
verwenden Sie das RAID-Verwaltungsdienstprogramm, um
die Laufwerkskonguration erneut festzulegen.
9
Page 27
Sonstige Dienstprogramme (nur Windows)
Die DriveStation Duo umfasst verschiedene optionale dienstprogramme, die mit
Windows-Computern verwendet werden können. Legen Sie zum Installieren und
Verwenden dieser Dienstprogramme die CD-ROM in einen Windows-PC ein, die mit der
DriveStation Duo mitgeliefert wurde.
Klicken Sie auf [Begin Installation (Installation starten)] und dann auf [Additional
Software Installation (Installation von zusätzlicher Software)].
Mit TurboPC kann die Geschwindigkeit von Datenübertragungen für das BuffaloProdukt verbessert werden.
TurboCopy steigert durch Zwischenspeicherung die Geschwindigkeit von
Datenübertragungen.
Backup Utility ist eine Software zum Sichern und Wiederherstellen von Daten auf
Ihrem PC. Wählen Sie zum Verwenden dieser Software ein zu sicherndes Quelllaufwerk
sowie ein Zielverzeichnis für die Sicherungsdaten aus.
RAMDISK Utility verwendet den Speicher Ihres Computer als virtuelle Festplatte
(„RAM-Laufwerk“). Das RAM-Laufwerk wird vom Computer als Festplatte erkannt,
und Sie können darauf Datenlese- und Datenschreibvorgänge wie auf jeder anderen
Festplatte ausführen.
Mit Buffalo Tools Launcher können Sie auf einfache Weise Software aus der BuffaloSuite von Dienstprogrammen aufrufen. Klicken Sie einfach auf ein Symbol, um das
gewünschte Buffalo-Tool bzw. -Dienstprogramm zu starten.
Mit eco Manager können Sie DriveStation zum Strom sparen in den Energiesparmodus
versetzen. Dies funktioniert in den Modi „RAID 0“, „RAID 1“ und „Spanning“. Der
Normalmodus wird nicht unterstützt.
SecureLockMobile verschlüsselt die Daten auf der DriveStation und verhindert, dass
unbefugte Personen auf die Daten zugreifen können.
NovaBACKUP ist Sicherungssoftware.
Um weitere Informationen zum Installieren und Verwenden dieser Dienstprogramme zu
erhalten, klicken Sie auf [View User Manual (Benutzerhandbuch anzeigen)].
10
Page 28

Festplattenaustausch
Vorsicht:
Heben Sie die DriveStation Duo nicht an der Frontabdeckung an, da
sich diese lösen könnte.
Berühren Sie vor dem Entfernen der Festplatte ein metallisches Objekt,
um die statische Elektrizität Ihres Körpers abzuleiten. Alternativ können
Sie ein Armband zur elektrostatischen Entladung tragen.
Gehen Sie vorsichtig vor! Einige der Metallkanten in der DriveStation
Duo sind scharfkantig.
Durch unsachgemäße Handhabung hervorgerufene Schäden an der
DriveStation Duo werden nicht von der Garantie abgedeckt.
Vertauschen Sie die beiden Laufwerke nicht, das sonst Ihre Daten
verlorengehen können.
Ersatzlaufwerke sollten die gleiche oder eine höhere Kapazität
aufweisen als das ersetzte Laufwerk.
Verwenden Sie keine Festplatte als Ersatzlaufwerk, die bereits in
einer DriveStation Duo verwendet wurde. Entfernen Sie zuvor alle
darauf vorhandenen Partitionen, da die Rekonstruktion sonst nicht
ordnungsgemäß ausgeführt wird.
Ersatzlaufwerke erhalten Sie unter www.buffalotech.com.
Das Ersetzen eines Laufwerks kann je nach der Leistung des
Ersatzlaufwerks zu niedrigeren Übertragungsgeschwindigkeiten der
DriveStation Duo führen.
11
Page 29
Festplattenaustausch
1
Fahren Sie die DriveStation herunter
und trennen Sie alle Kabel.
AUTO
▲
OFF
▼
2
Ziehen Sie die Frontabdeckung
nach vorne, während Sie vorsichtig
auf die Aussparung auf der linken
Seite drücken.
3
Entfernen Sie die Frontabdeckung.
12
Page 30
Festplattenaustausch
4
5
6
Riegel
Tab
Knob
Taste
Drücken Sie auf die Entriegelung
unterhalb der Festplatte und
ziehen Sie die Schlaufe über dem
Laufwerk 2 cm heraus.
Nehmen Sie die fehlerhafte
Festplatte heraus.
Setzen Sie die neue Festplatte so
ein, dass Sie ein Klicken hören.
13
Page 31

Festplattenaustausch
7
Verbinden Sie alle Kabel wieder und schalten Sie die DriveStation
8
Duo ein.
Hinweis: Wenn sich die DriveStation Duo im Normalmodus bendet,
formatieren Sie die neue Festplatte.
Bringen Sie die Frontabdeckung
wieder an.
14
Page 32

Problembehandlung
Häug gestellte Fragen
Die folgende Liste enthält allgemeine Probleme, die mit der DriveStation
auftreten können. Für jedes Problem sind mögliche Lösungen angegeben.
Die DriveStation wird unter [Arbeitsplatz] nicht angezeigt. (Windows)
Überprüfen Sie, ob die Power LED leuchtet. Wenn dies nicht
der Fall ist, stellen Sie sicher, dass sich der Netzschalter in der
Position [AUTO] bendet.
Wenn die Power Save Utility installiert ist, überprüfen Sie, ob
sich die DriveStation im Energiesparmodus bendet. Weitere
Informationen nden Sie im Handbuch der Power Save Utility.
Das Handbuch bendet sich auf der DriveNavigator CD-ROM.
Überzeugen Sie sich, dass sich die Festplatte im Innern der
DriveStation dreht. Legen Sie dazu Ihre Hände seitlich an das
Gehäuse und achten Sie auf eine leichte Vibration. Außerdem
wird die DriveStation nach Betrieb von 15 Minuten oder mehr
langsam warm. Wenn sich durch die oben beschriebene
Vorgehensweise nicht bestätigen lässt, dass sich die Festplatte
dreht, wenden Sie sich an den technischen Support, um Hilfe zu
erhalten.
Mein Sicherungsprogramm kann keine Dateien auf die DriveStation
speichern.
Formatieren Sie die DriveStation mit NTFS oder Mac OS
Extended neu. FAT32 ist auf Dateigrößen von 4 GB beschränkt.
15
Page 33

Technische Daten
Standardkonformität: USB 3.0
Übertragungsgeschwindigkeit: Max. 5,0 GBit/s (USB 3.0)
Stromverbrauch: Max. 36 W
Abmessungen: 86 x 127 x 204 mm (3,4 x 5,0 x 8,1 Zoll)
Weight: 4.85 lbs. (2.2 kgs)
Betriebsumgebung: 5 - 35° C
Luftfeuchtigkeit 20–80 % (keine Kondensierung)
B
etriebssystemkompatibilität:
Windows Vista (32-bit oder 64-bit),
Windows XP (32-bit),
Windows Server 2008 R2 (64-bit),
Windows Server 2008 (32-bit oder 64-bit),
Windows Server 2003 R2 (32-bit),
Windows Server 2003 (32-bit),
Mac OS X 10,4 oder höher
Windows 7 (32-bit oder 64-bit),
16
Page 34

www.buffalotech.com
Page 35

Guía del usuario
HD-WLU3R1 DriveStation Duo
РПЧЕТ
БГГЕУУ
ES
35011790 ver.01
Page 36

РПЧЕТ
Aspecto del panel frontal
LED de encendido/apagado
Dispositivo encendido: azul
Mantenimiento de RAID: violeta
Dispositivo apagado: apagado
БГГЕУУ
LED de acceso
Acceso: verde parpadeante
Fallo: rojo
Reconstrucción:
rojo parpadeante
Dispositivo apagado: apagado
2
Page 37

Power Mode Switch
(Interruptor de
encendido/apagado)
▲ Auto
(Automático)
▼Off (Apagado)
RAID Mode
Button (Botón
RAID Mode)
USB 3.0
Aspecto del panel trasero
DC in
(Entrada de CC)
Nota: para alternar entre modos RAID, puede utilizar la utilidad RAID o el botón
RAID mode (Modo RAID). La utilidad RAID se incluye con el CD de
software de la DriveNavigator. Para conocer más información sobre cómo
utilizar el botón RAID mode (Modo RAID), consulte la guía de referencia.
3
Page 38

Conguración de la DriveStation
Enhorabuena por su nueva DriveStation Duo. Gracias a sus dos discos duros,
la DriveStation Duo ofrece muchas opciones de capacidad alta, así como de
redundancia fácil de usar.
Introduzca el CD de DriveNavigator en la unidad de CD-ROM del ordenador.
Si utiliza un PC, DriveNavigator debería iniciarse
automáticamente. En caso contrario, haga clic en
[Inicio] y seleccione [Ejecutar]. En el cuadro de diálogo
Ejecutar, introduzca “D:\DriveNavi.exe” (donde D es la
letra de la unidad del CD-ROM). Haga clic en [Aceptar]
para continuar.
En Mac, abra el CD y haga clic en [RaidUtility.dmg] para
comenzar la instalación.
Haga clic en [Begin Installation
(Comenzar instalación)]. Haga clic en
[Next (Siguiente)] para seguir los pasos
de la instalación. Los usuarios de Mac
pueden omitir este paso.
4
Page 39

El asistente le indicará los pasos que debe seguir para congurar la DriveStation
Duo y los ajustes de RAID, así como para volver a formatear, si lo desea.
La DriveStation Duo puede conectarse al equipo mediante conexión USB.
Cuando nalice el asistente de conguración, la DriveStation Duo estará
instalada y lista para utilizarse.
Duo está congurada en modo RAID 1 de forma predeterminada. En RAID
1, los datos pueden recuperarse incluso si falla uno de los discos duros de la
DriveStation. No obstante, el espacio total disponible es de 1/2 del espacio
máximo.
Si preere otra conguración de RAID o utilizar la DriveStation como una única
unidad, puede modicar los ajustes de RAID de la DriveStation con RAID Utility.
Consulte la página siguiente para obtener instrucciones sobre el uso de RAID
Utility.
De forma alternativa, puede cambiar el modo RAID mediante el botón RAID
mode (Modo RAID) tal y como se describe en la guía de referencia.
La DriveStation está lista para utilizarse y está formateada con FAT32, lo que
hace que funcione con la mayoría de los sistemas operativos habituales. Si va
a utilizarla con programas que generan tamaños de archivo superiores a 4 GB,
como el software de copias de seguridad, vuelva a formatear la DriveStation
con un volumen extendido de NTFS o MAC OS.
De forma predeterminada, todas las unidades de la DriveStation se dividen en
particiones de 2 TB. Gracias a ello, las versiones anteriores de Windows, como
Windows XP y Windows Server 2003 de 32 bits, pueden leer las unidades sin
necesidad de añadir software o service packs. Es posible que los usuarios de
los sistemas operativos más recientes deseen volver a dividir la DriveStation
en particiones más grandes, pero esto no es recomendable en Windows XP
de 32 bits. Es posible que Windows Server 2003 lea particiones más grandes
después de aplicar el service pack más reciente.
5
Page 40

Uso de RAID Utility
RAID Utility le permite congurar la DriveStation Duo en varios modos:
Normal mode (modo normal): aparece en el ordenador como dos discos duros
independientes. Este modo funciona únicamente con una conexión USB.
Spanning mode (modo expandido): aparece en el ordenador como un gran disco duro.
RAID 0 mode (modo RAID 0): aparece en el ordenador como una única unidad.
Produce más rendimiento que el modo expandido.
RAID 1 mode (mode RAID 1):
segunda unidad es una copia exacta de la primera, para la redundancia.
Notas:
・Si cambia el modo de las unidades de la DriveStation Duo, se eliminarán todos los
datos que haya en ellos. Realice una copia de seguridad de los datos importantes
antes de utilizar RAID Utility.
Si utiliza un PC, inicie la Utilidad RAID haciendo clic en [RAIDUtility] en el grupo de
programas de la DriveStation Duo, o en el menú Inicio.
aparece en el ordenador como una única unidad. La
En Mac, haga doble clic en el icono RaidUtility de su escritorio.
6
Page 41

Uso de RAID Utility
Una vez iniciada, RAID Utility buscará en seguida la DriveStation Duo.
Esta operación puede tardar unos segundos.
En la pantalla inicial aparecerá su conguración actual. Si la Duo es
nueva, probablemente estará en modo RAID 1.
Para cambiar el modo RAID, haga clic en [Cong (Congurar)] y elija
[Disk Cong (Conguración de disco)].
7
Page 42

Uso de RAID Utility
Seleccione la estructura de unidades que desee utilizar.
En Windows, puede formatear el disco con FAT32 o NTFS. Seleccione el formato
que desee. FAT32 es compatible con la mayoría de ordenadores de Windows y
Mac. NTFS ofrece el mejor funcionamiento con Windows, pero no es compatible
con Mac. Se recomienda NTFS para el uso de programas de copia de seguridad,
de edición de vídeo u otros programas que puedan necesitar tamaños de archivo
superiores a 4 GB.
Si utiliza Windows XP, o Windows Server 2003 sin SP1 o posterior, utilice el
modo de compatibilidad. El modo de compatibilidad dividirá las unidades en
particiones de 2 TB que podrán leerse con Windows XP o Windows Server 2003.
Haga clic en [Yes (Sí)] y, a continuación, en [Yes (Sí)] otra vez. Recuerde que al
hacer esto, se borrará toda la información de la unidad.
8
Page 43

Uso de RAID Utility
Para usuarios de Windows
Podría mostrarse el siguiente mensaje al intentar cambiar la conguración
del disco (por ejemplo, al seleccionar el formato NTFS) mediante la
utilidad RAID Management Utility.
Si se aparece el mensaje, espere hasta que los cambios en la
conguración del disco se hayan completado y se muestre “The
setting was successfully changed (La conguración se ha modicado
correctamente)” y haga clic en [Cancel (Cancelar)] . El disco está
preparado para utilizarse.
Si hace clic en [Format disk (Formatear disco)] accidentalmente en el
mensaje anterior, puede ocurrir uno de los siguientes casos.
• Si se muestra “You do not have sufcient rights to perform this
operation (No tiene sucientes derechos para realizar esta
operación).” haga clic en [OK (Aceptar)].
• Si se muestra “Not Formattable (No formateable)” haga clic en
[Close (Cerrar)].
• Si se muestra la pantalla de formateo de Windows haga clic en
[Close (Cerrar)].
Nota: si la unidad se formatea con la utilidad de formateo de
Windows, es posible que los cambios en la conguración no
se completen con normalidad. Si esto ocurre, utilice la utilidad
RAID Management Utility para establecer la conguración del
disco otra vez.
9
Page 44

Otras utilidades (sólo Windows)
La DriveStation Duo incluye varias utilidades de opcionales para ordenadores Windows.
Para instalar y utilizar estas utilidades, inserte en un ordenador Windows el CD-ROM
que se incluye en la DriveStation Duo.
Haga clic en [Begin Installation (Comenzar instalación)] y, a continuación, en [Additional
Software Installation (Instalación de software adicional)].
TurboPC puede incrementar la velocidad de transferencia de datos del producto
Buffalo.
TurboCopy utiliza el almacenamiento en caché para incrementar la velocidad de
transferencia de datos.
Backup Utility es un software que le permite realizar copias de seguridad y restablecer
datos desde su equipo. Para utilizarlo, seleccione una unidad de origen para realizar la
copia de seguridad y una unidad de destino para almacenar los datos copiados.
RAMDISK Utility utiliza la memoria de su equipo como una unidad de disco duro virtual
“unidad RAM”. El equipo reconoce la unidad RAM como una unidad de disco duro, con
lo que puede leer y escribir datos en esta exactamente igual que lo haría en cualquier
otro unidad de disco duro.
Buffalo Tools Launcher permite iniciar de forma sencilla software desde el paquete de
utilidades de Buffalo. Haga clic en un icono para iniciar una herramienta o utilidad de
Buffalo.
Con eco Manager puede establecer la DriveStation en modo de suspensión para
ahorrar energía. Funciona en RAID 0, RAID 1, y en modos combinados. No es
compatible con el modo normal.
SecureLockMobile cifra los datos de la DriveStation. De esta forma, impide que otras
personas accedan a ella.
NovaBACKUP es un software de copia de seguridad.
Para obtener más información acerca de la instalación y el uso de estas utilidades,
haga clic en [View User Manual (Ver manual de usuario)].
10
Page 45

Sustitución de discos duros
Advertencia:
No levante la DriveStation Duo por la cubierta frontal. La cubierta frontal
podría desprenderse.
Antes de extraer los discos duros, toque un objeto metálico para
eliminar la electricidad estática del cuerpo o utilice una muñequera
antiestática.
Tenga mucho cuidado: podría lesionarse con los bordes metálicos
alados que hay dentro de la DriveStation Duo.
La garantía no cubre los daños ocasionados a la DriveStation Duo por
desmontarla de manera inadecuada.
No cambie de posición las dos unidades, pues podría perder los datos.
Las unidades de sustitución deben tener al menos la misma capacidad
que la unidad sustituida.
No utilice ningún disco duro que ya se haya utilizado antes en una
DriveStation Duo como unidad de sustitución. Elimine previamente las
particiones que haya en este; en caso contrario, podría ocurrir que la
reconstrucción no se realizara correctamente.
Puede obtener discos duros de sustitución en www.buffalotech.com.
Según el funcionamiento de la unidad de sustitución, el reemplazo
puede suponer una bajada de la velocidad de transferencia de la
DriveStation Duo.
11
Page 46

Sustitución de discos duros
1
Apague la DriveStation y
desconecte todos los cables.
AUTO
▲
OFF
▼
2
Tire de la cubierta frontal y
presione a la vez sobre la cavidad
del lateral izquierdo.
3
Retire la cubierta frontal.
12
Page 47

Sustitución de discos duros
4
5
6
Lengüeta
Botón
Presione el disparador
situado bajo la unidad y tire
de la lengüeta situada encima
hasta que sobresalga 2 cm
(aproximadamente 1 pulgada).
Extraiga la unidad dañada.
Introduzca la nueva unidad hasta
que encaje.
13
Page 48

Sustitución de discos duros
7
Vuelva a conectar todos los cables y encienda la DriveStation Duo.
8
Nota: si la DriveStation Duo está en modo normal, formatee la nueva
unidad.
Vuelva a colocar la cubierta
frontal.
14
Page 49

Resolución de problemas
Preguntas frecuentes
A continuación, podrá ver algunos de los problemas más comunes que
presenta la DriveStation. Hay posibles soluciones para cada uno de ellos.
No veo la DriveStation en Mi PC. (Windows)
Compruebe que la luz de ENCENDIDO está activada. Si no es
así, asegúrese de que el interruptor de encendido se encuentra
en la posición de encendido automático.
Si ha instalado Power Save Utility, compruebe que la DriveStation
no está en modo de ahorro de energía. Consulte el manual de
Power Save Utility para obtener más ayuda. Puede encontrar el
manual en el CD-ROM de DriveNavigator.
Compruebe que el disco duro que hay dentro de la DriveStation
está girando. Puede comprobarlo poniendo las manos en los
laterales de la caja para ver si nota una ligera vibración. Además,
cuando la DriveStation lleva encendida al menos 15 minutos,
comienza a calentarse. Si tras estas pruebas no verica que el
disco duro está girando, póngase en contacto con el servicio
técnico para obtener más ayuda.
Mi programa de copia de seguridad no guarda los archivos en la
DriveStation.
Vuelva a formatear la DriveStation con un volumen extendido de
NTFS o Mac OS. FAT32 está limitado a tamaños de archivo de
4 GB.
15
Page 50

Especicaciones técnicas
Estándares compatibles: USB 3.0
Velocidad de transmisión: Máx. 5,0 Gbps (USB 3.0)
Consumo eléctrico: Máx. 36 W
Dimensiones: 3,4 in x 5,0 in x 8,1 in (86 mm x 127 mm x 204 mm)
Peso: 4,85 lbs. (2.2 kgs)
Entorno operativo: 41-95 °F (5-35 °C)
20-80% humedad (sin condensación)
Compatibilidad con Windows 7 (32-bit o 64-bit),
sistemas operativos: Windows Vista (32-bit o 64-bit),
Windows XP (32-bit),
Windows Server 2008 R2 (64-bit),
Windows Server 2008 (32-bit o 64-bit),
Windows Server 2003 R2 (32-bit),
Windows Server 2003 (32-bit),
Mac OS X 10.4 o posterior
16
Page 51

www.buffalotech.com
Page 52

Manuel d'utilisation
HD-WLU3R1 DriveStation Duo
РПЧЕТ
БГГЕУУ
FR
35011790 ver.01
Page 53

Présentation du panneau frontal
Voyant POWER (Alimentation)
Alimentation activée : bleu
РПЧЕТ
Maintenance RAID : violet
Alimentation coupée : Éteint
БГГЕУУ
Voyants d'accès
Accès : Vert clignotant
Échec : Rouge
Reconstruction :
Rouge clignotant
Alimentation coupée : Éteint
2
Page 54

Power Mode Switch
(Interrupteur du mode
d’alimentation)
▲Auto
▼Off (Éteint)
RAID Mode
Button (Bouton
de mode RAID)
USB 3.0
Présentation du panneau arrière
DC in
(Alimentation CC)
Remarque : Pour changer de mode RAID, vous pouvez utiliser soit l’utilitaire
RAID soit le bouton de mode RAID. L’utilitaire RAID est fourni
avec le logiciel sur le CD DriveNavigator. Pour plus d’informations
sur l’utilisation du bouton de mode RAID, reportez-vous au Guide
de référence.
3
Page 55

Conguration de la DriveStation
Félicitations ! Vous venez d'acquérir une DriveStation Duo ! Composée de deux
disques durs, la DriveStation Duo vous offre plein de possibilités grâce à une
grande capacité et une redondance simple d'utilisation.
Insérez le CD DriveNavigator dans le lecteur de CD-ROM de votre ordinateur.
Sur PC, DriveNavigator se lance automatiquement.
Sinon, cliquez sur [Démarrer] et sélectionnez [Exécuter].
Dans la boîte de dialogue Exécuter, tapez « d:\
DriveNavi.exe » (où d correspond à la lettre de votre
lecteur de CD-ROM). Cliquez sur [OK] pour continuer.
Sur Mac, ouvrez le CD et cliquez sur [RaidUtility.dmg]
pour commencer l’installation.
Cliquez sur [Begin Installation
(Commencer l'installation)]. Cliquez
sur [Next (Suivant)] pour naviguer
dans l'installation. Les utilisateurs Mac
peuvent ignorer cette étape.
4
Page 56

L'assistant vous guidera dans la conguration de votre DriveStation Duo, la
conguration de vos paramètres RAID et le reformatage le cas échéant.
La DriveStation Duo peut être reliée à votre ordinateur par une connexion USB.
Une fois l'assistant de conguration terminé, votre DriveStation Duo est installée
et prête à être utilisée !
Par défaut, l'unité Duo est congurée en mode RAID 1. En RAID 1, les données
peuvent être récupérées même si l'un des disques dur de la DriveStation
est défaillant. Toutefois, l'espace total disponible représente 1/2 de l'espace
maximum.
Si vous préférez utiliser une conguration RAID différente, ou si vous préférez
utilisez la DriveStation comme un seul disque, vous pouvez utiliser l'utilitaire
RAID pour modier les paramètres RAID de votre DriveStation. Passez à la
page suivante pour obtenir des instructions sur l'utilisation de l'utilitaire RAID.
Vous pouvez également changer le mode RAID en utilisant le bouton de mode
RAID comme indiqué dans le Guide de référence.
En l'état, la DriveStation est formatée en FAT32, ce qui permet de l'utiliser avec
les systèmes d'exploitation les plus courants. Si vous avez l'intention de l'utiliser
avec des programmes générant des tailles de chiers supérieures à 4 Go (des
logiciels de sauvegarde par exemple), reformatez la DriveStation en NTFS ou
en Mac OS Étendu.
Par défaut, tous les disques de la DriveStation sont divisés en deux partitions
de 2 To. Cela permet aux anciennes versions de Windows, telles que Windows
XP 32 bits et Windows Server 2003, de pouvoir lire les disques sans avoir à
installer de logiciel supplémentaire ni de microprogramme de service (service
pack). Les utilisateurs de systèmes d'exploitation plus récents souhaiteront
peut-être re-partitionner la DriveStation Duo avec des partitions plus larges ;
toutefois, cela n'est pas recommandé sous Windows XP 32 bits. Windows
Server 2003 peut lire des partitions plus grandes après application du dernier
microprogramme de service.
5
Page 57

Utilisation de l'utilitaire RAID
L'utilitaire RAID vous permet de congurer votre DriveStation Duo selon plusieurs modes :
Normal mode (mode Normal) : apparaît sur votre ordinateur sous la forme de
deux disques durs distincts. Notez que le mode normal ne fonctionne qu'avec une
connexion USB.
Spanning mode (mode Fractionné) : apparaît sur votre ordinateur sous la forme
d'un seul grand disque dur.
RAID 0 mode (mode RAID 0) : apparaît sur votre ordinateur comme un seul disque.
Procure de meilleures performances que le mode fractionné.
RAID 1 mode (mode RAID 1) : apparaît sur votre ordinateur comme un seul disque.
Le deuxième disque est une copie exacte du premier disque, pour la redondance.
Remarques :
・La modication du mode des disques de votre Duo effacera toutes les données qu'ils
contiennent ! Il est donc impératif de sauvegarder toutes les données importantes
avant d'utiliser l'utilitaire RAID.
Sur PC, lancez l’utilitaire RAID en cliquant sur [RAIDUtility] dans le groupe de
programmes de la DriveStation Duo ou à partir du menu Démarrer.
Sur Mac, double-cliquez sur l'icône RaidUtility placée sur votre bureau.
6
Page 58

Utilisation de l'utilitaire RAID
Une fois lancé, l'utilitaire RAID analysera rapidement votre DriveStation
Duo. Cela peut prendre quelques secondes.
L'écran initial afchera votre conguration actuelle. Si votre Duo est
neuve, elle sera probablement en mode RAID 1.
Pour modier le mode RAID, cliquez sur [Cong], puis sélectionnez
[Disk Cong (Cong. disques)].
7
Page 59

Utilisation de l'utilitaire RAID
Sélectionnez la structure de disque que vous souhaitez utiliser.
Sur PC, le disque peut être formaté en FAT32 ou en NTFS. Sélectionnez le
format que vous préférez. FAT32 est compatible avec la plupart des PC et Mac
Windows. NTFS offre de meilleures performances avec Windows, mais n'est pas
compatible avec Mac. NTFS est recommandé en cas d'utilisation de programmes
de sauvegarde, d'édition vidéo ou d'autres programmes nécessitant des tailles de
chiers supérieures à 4 Go.
Si vous utilisez Windows XP, ou Windows Server 2003 sans SP1 ou une version
ultérieure, utilisez le mode Compatibility (Compatibilité). Le mode Compatibilité
divisera les disques en partitions de 2 To pouvant être lues par Windows XP or
Windows Server 2003.
Cliquez sur [Yes (Oui)], puis encore sur [Yes (Oui)]. Comprenez bien que cela
effacera toutes les données qui se trouvent sur le disque !
8
Page 60

Utilisation de l'utilitaire RAID
Pour les utilisateurs Windows
Le message ci-dessous peut s’afcher lorsque vous tentez de changer la
conguration du disque (sélection du format NTFS par exemple) à partir
de l’utilitaire de gestion RAID.
Si ce message apparaît, attendez la n des modications de la
conguration du disque et lorsque le message « The setting was
successfully changed (Les paramètres ont été modiés avec succès) »
s’afche, cliquez sur [Cancel (Annuler)]. Le disque est maintenant prêt
à être utilisé.
Si vous cliquez par inadvertance sur [Format disk (Formater le disque)]
dans le message ci-dessus, suivez l’une des instructions suivantes :
• Si le message « You do not have sufcient rights to perform this
operation (Vous ne disposez pas des droits sufsants pour effectuer
cette opération) » s'afche, cliquez sur [OK].
• Si le message « Not Formattable (Non formatable) » s'afche, cliquez
sur [Close (Fermer)].
• Si un écran standard de formatage Windows s'afche, cliquez sur
[Close (Fermer)].
Remarque : Si le disque est formaté avec l’utilitaire de formatage
Windows, les modications apportées à la conguration
du disque peuvent ne pas s’effectuer correctement. Si
cela se produit, utilisez l’utilitaire de gestion RAID pour
dénir de nouveau la conguration du disque.
9
Page 61

Autres utilitaires (Windows uniquement)
La DriveStation Duo inclut plusieurs utilitaires de en option que vous pouvez utiliser sur
les ordinateurs Windows. Pour installer et utiliser ces utilitaires, insérez le CD-ROM livré
avec votre DriveStation Duo dans un PC Windows.
Cliquez sur [Begin Installation (Commencer l'installation)], puis sur [Additional Software
Installation (Installation de logiciel supplémentaire)].
TurboPC peut accroître la vitesse de transfert des données de votre produit Buffalo.
TurboCopy
Backup Utility est un logiciel qui permettant de sauvegarder et de restaurer les
données de votre PC. Pour l'utiliser, sélectionnez un disque source à sauvegarder et un
emplacement cible pour des données de sauvegarde.
RAMDISK Utility utilise la mémoire de votre ordinateur comme un disque dur virtuel
« lecteur RAM ». Le lecteur RAM est reconnu par votre ordinateur comme un disque
dur ; vous pouvez lire et écrire des données sur ce disque comme vous le feriez avec
n'importe quel autre disque dur.
Buffalo Tools Launcher vous permet de lancer facilement un logiciel de la suite
d'utilitaires Buffalo. Cliquez simplement sur une icône pour lancer l'outil ou l'utilitaire
Buffalo associé.
eco Manager vous permet de placer la DriveStation en mode veille pour économiser de
l’énergie. Il fonctionne en mode RAID 0, RAID 1 et en mode Spanning. Le mode normal
n’est pas pris en charge.
SecureLockMobile crypter les données de votre DriveStation, ce qui permet d’éviter
que d’autres personnes que vous puissent y accéder.
NovaBACKUP est un logiciel de sauvegarde.
utilise la mise en cache pour accroître la vitesse de transfert des données.
Pour en savoir plus sur l'installation et l'utilisation de ces utilitaires, cliquez sur [View
User Manual (Consulter le manuel d'utilisation)].
10
Page 62

Remplacer un disque dur
Attention :
Veillez à ne pas soulever la DriveStation Duo par son panneau frontal.
Ce dernier pourrait s'enlever.
Avant de retirer les disques durs, touchez un objet métallique pour
dissiper l'électricité statique de votre corps, ou portez un bracelet de
mise à la terre.
Travaillez avec précaution ! Certains des bords métalliques situés à
l'intérieur de la DriveStation Duo sont acérés.
Les dégâts causés à la DriveStation Duo suite à un démontage
inapproprié ne sont pas couverts par la garantie.
N'inversez pas les deux disques car vous risqueriez de perdre vos
données.
Les disques de remplacement doivent offrir la même capacité que le
disque remplacé, ou une capacité supérieure.
N'utilisez pas un disque dur qui a été utilisé auparavant dans une
DriveStation Duo en tant que disque de remplacement. Supprimez
d'abord toute partition qu'il contient. Dans le cas contraire, la
reconstruction pourrait ne pas fonctionner normalement.
Des disques durs de remplacement sont disponibles sur le site
www.buffalotech.com.
Le remplacement d'un disque peut entraîner des vitesses de
transfert moins importantes pour la DriveStation Duo, en fonction des
performances du disque de remplacement.
11
Page 63

Remplacer un disque dur
1
Mettez la DriveStation hors
tension et retirez tous les câbles.
AUTO
▲
OFF
▼
2
Tirez le panneau frontal vers
l’avant, tout en appuyant
délicatement sur le trou situé à
gauche.
3
Retirez le panneau frontal.
12
Page 64

Remplacer un disque dur
4
5
6
Languette
Tab
Bouton
Knob
Appuyez sur la molette de
déclenchement située en dessous
du disque, et tirez la languette
placée au-dessus du disque
vers l'extérieur de 2 cm (environ
1 pouce).
Retirez le disque défaillant.
Insérez le nouveau disque jusqu’à
ce qu’il se mette en place.
13
Page 65

Remplacer un disque dur
7
Replacez tous les câbles et remettez la DriveStation Duo sous
8
tension.
Remarque : si la DriveStation Duo est en mode normal, formatez le
nouveau disque.
Replacez le panneau frontal.
14
Page 66

Dépannage
Foire aux questions
Ci-dessous gure une liste des problèmes courants rencontrés avec la
DriveStation. Chaque problème est suivi des éventuelles solutions.
Je ne trouve pas la DriveStation dans mon Poste de travail.
(Windows)
Vériez que le voyant POWER est allumé. Dans le cas contraire,
assurez-vous que l'interrupteur d'alimentation est en position
AUTO.
Si vous avez installé l'utilitaire Power Save, vériez alors que la
DriveStation n'est pas passée en mode d'économie d'énergie.
Consultez le manuel de l'utilitaire Power Save pour obtenir une
assistance supplémentaire. Ce manuel est disponible sur le
CD-ROM DriveNavigator.
Vériez que le disque dur à l'intérieur de la DriveStation tourne
correctement. Cela peut être vérié en plaçant votre main sur les
côtés du boîtier : vous devriez ressentir une légère vibration. En
outre, si la DriveStation est allumée depuis quinze minutes ou
plus, elle commence à chauffer. Si aucun de ces tests n'a permis
de vérier que le disque dur tournait, alors veuillez contacter
l'assistance technique pour obtenir de l'aide.
Mon programme de sauvegarde ne parvient pas à sauvegarder des
chiers sur la DriveStation.
Reformatez votre DriveStation en NTFS ou Mac OS étendu.
FAT32 est limité à des tailles de chiers de 4 Go maximum.
15
Page 67

Caractéristiques techniques
Conformité aux normes : USB 3.0
Vitesse de transmission : 5.0 Gbits/s max (USB 3.0)
Consommation électrique : 36 W max
Dimensions : 3,4” x 5,0” x 8,1” (86 x 127 x 204 mm)
Poids : 4,85 livres (2.2 kgs)
Environnement 41 - 95° F (5 - 35° C)
de fonctionnement : 20-80 % d'humidité (sans condensation)
Compatibilité SE : Windows 7 (32-bit ou 64-bit),
Windows Vista (32-bit ou 64-bit),
Windows XP (32-bit),
Windows Server 2008 R2 (64-bit),
Windows Server 2008 (32-bit ou 64-bit),
Windows Server 2003 R2 (32-bit),
Windows Server 2003 (32-bit),
Mac OS X 10,4 ou version ultérieure
16
Page 68

www.buffalotech.com
Page 69

Manuale dell'utente
HD-WLU3R1 DriveStation Duo
РПЧЕТ
БГГЕУУ
IT
35011790 ver.01
Page 70

Struttura pannello anteriore
LED Power (alimentazione)
Alimentazione attiva: blu
РПЧЕТ
Manutenzione RAID: viola
Alimentazione disattiva: spento
БГГЕУУ
LED di accesso
Accesso: verde lampeggiante
Guasto: rosso
Ricostruzione:
rosso lampeggiante
Alimentazione disattiva: spento
2
Page 71

Power Mode Switch
(Interruttore di modalità
alimentazione)
▲Auto
▼Off
RAID Mode
Button (Tasto
modalità RAID)
USB 3.0
Struttura pannello posteriore
DC in
(Ingresso CC)
Nota: per passare da una modalità RAID ad un’altra, è possibile utilizzare sia
l’utility RAID che il pulsante di modalità RAID. L’utility RAID è inclusa con
il software nel CD DriveNavigator. Per maggiori informazioni sull’impiego
del tasto di modalità RAID, consultare la Guida di riferimento.
3
Page 72

Installazione DriveStation
Congratulazioni per la vostra nuova DriveStation Duo! Con due hard disk, la
DriveStation Duo offre molte opzioni per un'ampia capacità e una ridondanza
facile da utilizzare.
Inserire il CD DriveNavigator nell'unità CD-ROM del computer.
Su PC, il DriveNavigator dovrebbe avviarsi
automaticamente. In caso contrario, fare clic su [start]
e selezionare [Esegui]. Nella nestra di dialogo Esegui,
inserire “d:\DriveNavi.exe” (dove d è la lettera unità
dell’unità CD-ROM). Cliccare su [OK] per continuare.
Su Mac, aprire il CD e fare clic su [RaidUtility.dmg] per
avviare l’installazione.
Fare clic su [Begin Installation
(Inizio installazione)]. Fare clic su
[Next (Avanti)] per procedere con
l'installazione. Gli utenti Mac possono
saltare questo passaggio.
4
Page 73

La procedura guidata assisterà l'utente durante l'installazione della DriveStation
Duo, congurando le impostazioni RAID e riformattando, se necessario.
È possibile collegare la DriveStation Duo al computer con un collegamento USB.
Al termine della procedura guidata, la DriveStation Duo sarà installata e pronta
all'uso!
Come impostazione predenita, Duo si trova in modalità RAID 1. In RAID 1,
i dati possono essere ripristinati anche se uno degli hard disk nella DriveStation
non funziona. Tuttavia, lo spazio disponibile totale è 1/2 dello spazio massimo.
Se si desidera una congurazione RAID diversa, o si preferisce utilizzare
la DriveStation come unità singola, è possibile impiegare l'Utility RAID per
modicare le impostazioni RAID della DriveStation. Andare alla pagina seguente
per istruzioni sull'impiego dell'Utility RAID.
In alternativa, è possibile cambiare la modalità RAID tramite il relativo tasto,
secondo quanto descritto nella Guida di riferimento.
La DriveStation è formattata con FAT32 che ne consente l'impiego con i più
comuni sistemi operativi. Se si intende utilizzarla con programmi che generano
dimensioni le superiori ai 4 GB, come i software di backup, riformattare la
DriveStation con NTFS o Mac OS esteso.
Per impostazione predenita, tutte le unità sulla DriveStation sono divise in
partizioni da 2 TB. Questo consente alle versioni meno recenti di Windows,
come Windows XP a 32bit e Windows Server 2003, di leggere le unità senza
software aggiuntivi o service pack. Gli utenti dei più recenti sistemi operativi
possono riseparare la DriveStation con partizioni più grandi, ma questa
operazione non è consigliata con Windows XP 32bit. Windows Server 2003
potebbe essere in grado di leggere partizioni superiori dopo aver applicato il
service pack più aggiornato.
5
Page 74

Utilizzare l'Utility RAID
L'Utility RAID consente di congurare la DriveStation Duo in diverse modalità:
Normal mode (modalità normale) - si presenta sul computer come due hard disk
distinti. La modalità normale funziona solo con un collegamento USB.
Spanning mode (modalità spanning) - si presenta sul computer come un hard disk
di grandi dimensioni.
RAID 0 mode (modalità RAID 0) - si presenta sul computer come una singola unità.
Prestazioni superiori rispetto alla modalità spanning.
RAID 1 mode (modalità RAID 1) - si presenta sul computer come una singola unità.
La seconda unità è una copia esatta della prima, per ridondanza.
Note:
・ La modica della modalità RAID delle unità nella Duo comporterà la cancellazione
di tutti i dati presenti su di esse! Prima di servirsi dell'utility RAID, eseguire il backup
di tutti i dati importanti.
Su PC, avviare l’Utility RAID cliccando su [RAIDUtility] nel gruppo di programmi
DriveStation Duo, o dal menu start.
Su Mac, fare doppio clic sull'icona RaidUtility presente sul desktop.
6
Page 75

Utilizzare l'Utility RAID
Una volta avviata, l'utility RAID eseguirà l'analisi della DriveStation Duo.
Questa operazione richiederà alcuni secondi.
La schermata iniziale mostrerà la congurazione attuale. Se la Duo è
nuova, probabilmente si troverà in modalità RAID 1.
Per modicare la modalità RAID, fare clic su [Cong (Congurazione)]
e scegliere [Disk Cong (Congurazione disco)].
7
Page 76

Utilizzare l'Utility RAID
Selezionare la struttura dell'unità che si intende utilizzare.
Su PC, è possibile formattare il disco con FAT32 o NTFS. Selezionare la
formattazione desiderata. FAT32 è compatibile con la maggior parte di PC Windows
e Mac. NTFS offre una migliore prestazione con Windows, ma non è compatibile
con Mac. NTFS è consigliato per l'impiego con programi di backup, editing video e
altri programmi che potrebbero richiedere dimensioni le superiori ai 4 GB.
Se si sta lavorando su Windows XP, o Windows Server 2003 senza SP1 o versione
successiva, utilizzare la modalità compatibilità. La modalità compatibilità dividerà
le unità in partizioni da 2 TB che possono essere lette da Windows XP o Windows
Server 2003.
Fare clic su [Yes (Sì)], e di nuovo [Yes (Sì)]. Questo procedimento comporterà la
cancellazione di tutti i dati sull'unità!
8
Page 77

Utilizzare l'Utility RAID
Per gli utenti Windows
Se si prova a modicare la congurazione disco (selezionando la
formattazione NTFS ad esempio) servendosi dell’Utility RAID Management,
potrebbe apparire il seguente messaggio.
Se questo messaggio viene visualizzato, attendere no al
completamento delle modiche alla congurazione disco e nché
non appare il messaggio “The setting was successfully changed
(Impostazione modicata con successo)”, quindi fare clic su [Cancel
(Annulla)]. Il disco è ora pronto per l’uso.
Se inavvertitamente si clicca su [Format disk (Formatta disco)] nel
messaggio sopra, si vericherà una delle seguenti condizioni.
• Se appare “You do not have sufcient rights to perform this operation
(I diritti per eseguire l’operazione non sono sufcienti)”, fare clic su [OK].
• Se appare “Not Formattable (Non formattabile)”, fare clic su [Close
(Chiudi)].
• Se appare la normale nestra di formattazione Windows, fare clic su
[Close (Chiudi)].
Nota: Se l’unità viene formattata con l’utility di formattazione
Windows, è possibile che le modiche alla congurazione
del disco non vengano completate normalmente. In questo
caso, servirsi dell’Utility RAID Management per impostare
nuovamente la congurazione del disco.
9
Page 78

Altre utility (solo per Windows)
La DriveStation Duo include numerose utility opzionali da utilizzare con i computer
Windows. Per installare e impiegare queste utility, inserire in un PC Windows il CDROM incluso nella DriveStation Duo.
Fare clic su [Begin Installation (Inizio installazione)] e su [Additional Software Installation
(Installazione software aggiuntivo)].
TurboPC consente di aumentare le velocità di trasferimento dati del prodotto Buffalo.
TurboCopy si serve della caching per aumentare le velocità di trasferimento dati.
Backup Utility è un software in grado di eseguire il backup e il ripristino dei dati da
PC. Per utilizzarlo, selezionare un driver sorgente di cui eseguire il back-up e una
destinazione in cui salvare il back-up.
RAMDISK Utility si serve della memoria all'interno del computer come un disco rigido
virtuale "RAM drive". RAM drive viene riconosciuto come un disco rigido dal computer, e
sarà quindi possibile leggere e scrivere dati proprio come si farebbe con qualsiasi altro
disco rigido.
Buffalo Tools Launcher consente di avviare in modo facile software dalla suite di utility
Buffalo. Basta fare clic sull'icona per avviare lo strumento o l'utility Buffalo adatta.
eco Manager consente di impostare la DriveStation in modalità sospensione per
risparmiare energia. Funziona nelle modalità RAID 0, RAID 1 e Spanning. Non supporta
la modalità Normale.
SecureLockMobile crittografa i dati sulla DriveStation, impedendone l'accesso ad
utenti non autorizzati.
NovaBACKUP è un programma di backup.
Per saperne di più sull'installazione e l’impiego di queste utility, fare clic su [View User
Manual (Visualizza manuale utente)].
10
Page 79

Sostituire un hard disk
Attenzione:
non sollevare la DriveStation Duo dal suo coperchio anteriore.
Quest'ultimo infatti potrebbe staccarsi.
Prima di rimuovere gli hard disk, toccare un oggetto metallico per
disperdere l'elettricità statica presente sul corpo, oppure indossare un
braccialetto antistatico.
Prestare molta cautela durante lo svolgimento di queste operazioni!
Alcuni bordi in metallo all'interno della DriveStation Duo sono appuntiti.
Danni sulla DriveStation Duo provocati da uno smontaggio improprio
non sono coperti da garanzia.
Non invertire le due unità, potrebbe vericarsi una perdita dei dati.
Le unità sostitutive dovrebbero avere la stessa capacità dell’unità da
sostituire, o superiore.
Non servirsi di un hard disk già utilizzato precedentemente in una
DriveStation Duo come unità sostitutiva. Per prima cosa, rimuovere
le eventuali partizioni presenti su di esso; in caso contrario, la
ricostruzione potrebbe funzionare in modo anomalo.
Gli hard disk di sostituzione sono disponibili sul sito web
www.buffalotech.com.
La sostituzione di un'unità può comportare una riduzione delle velocità
di trasferimento della DriveStation Duo, a seconda delle prestazioni
dell'unità sostitutiva.
11
Page 80

Sostituire un hard disk
1
Spegnere la DriveStation e
staccare tutti i cavi.
AUTO
▲
OFF
▼
2
Tirare in avanti il coperchio
anteriore premendo leggermente
sulla cavità che si trova sul lato
sinistro.
3
Rimuovere il coperchio anteriore.
12
Page 81

Sostituire un hard disk
4
5
6
Linguetta
Tab
Manopola
Knob
Premere il dispositivo di scatto
al di sotto dell'unità e estrarre la
linguetta sull'unità di circa 2 cm.
Rimuovere l’unità guasta.
Inserire la nuova unità nché non
scatta in posizione.
13
Page 82

Sostituire un hard disk
7
Collegare nuovamente tutti i cavi e accendere la DriveStation Duo.
8
Nota: Se la DriveStation Duo si trova in modalità normale, formattare la
nuova unità.
Riposizionare il coperchio anteriore.
14
Page 83

Risoluzione problemi
Domande frequenti
Segue un elenco di problemi comuni che potrebbero vericarsi con la
DriveStation. Per ciascun problema ci sono possibili soluzioni.
Non riesco a vedere la DriveStation in Risorse del computer.
(Windows)
Accertarsi che la luce di alimentazione POWER sia accesa. Se
non lo è, vericare che l'interruttore di alimentazione si trovi in
posizione AUTO.
Se è stata installata l'utility Power Save (risparmio energetico),
vericare che la DriveStation non si trovi in modalità risparmio
energetico. Consultare il manuale per ulteriore assistenza
sull'utility Power Save. Il manuale è disponibile sul CD-ROM
DriveNavigator.
Assicurarsi che l'hard disk all'interno della DriveStation stia
girando. È possibile vericare questa funzione mettendo la mano
sui lati del case e avvertendo una leggera vibrazione. Inoltre,
dopo che la DriveStation è stata accesa per quindici minuti o più,
inizierà a riscaldarsi. Se da nessuna di queste veriche è risultato
che l'hard disk sta girando, contattare il supporto tecnico per
ulteriore assistenza.
Il mio programma di backup non riesce a salvare i le sulla
DriveStation.
Riformattare la DriveStation con NTFS o Mac OS esteso. FAT32 è
limitato a dimensioni le di 4 GB.
15
Page 84

Speciche tecniche
Conformità agli standard: USB 3.0
Velocità di trasmissione: max. 5.0 Gbps(USB 3.0)
Consumo di energia max. 36 W
Dimensioni: 86 x 127 x 204 mm
Peso: 2.2 kg.
Ambiente operativo: 5 - 35° C
20-80 % umidità (senza condensa)
Sistemi operativi compatibili:
Windows Vista (32-bit o 64-bit),
Windows XP (32-bit),
Windows Server 2008 R2 (64-bit),
Windows Server 2008 (32-bit o 64-bit),
Windows Server 2003 R2 (32-bit),
Windows Server 2003 (32-bit),
Mac OS X 10.4 o versione successiva
Windows 7 (32-bit o 64-bit),
16
Page 85

www.buffalotech.com
Page 86

用户指南
HD-WLU3R1 DriveStation Duo
РПЧЕТ
БГГЕУУ
SC
35011790 ver.01
Page 87

РПЧЕТ
БГГЕУУ
前面板布局
电源 LED
电源打开:蓝色
RAID 维护:紫色
电源关闭:熄灭
访问 LED
访问:闪烁绿灯
故障:红灯
重建:闪烁红灯
电源关闭:熄灭
2
Page 88

Power Mode Switch
(电源模式开关)
▲
Auto (自动)
▼
Off (熄灭)
RAID Mode
Button (RAID
模式按钮)
USB 3.0
后面板布局
DC in
(插入直流电)
注意: 要更改 RAID 模式,您可以使用 RAID 实用工具或者 RAID 模式按钮。
RAID 实用工具随附在 DriveNavigator CD 上的软件中。 如需了解使用
RAID 模式按钮的更多信息,请查看“参考指南”。
3
Page 89

DriveStation
恭喜您使用了新的 DriveStation Duo!DriveStation Duo 通过使用双硬盘可以为您
带来更多选择,比如提供更大的容量和方便使用的冗余。
将 DriveNavigator CD 插入计算机的 CD-ROM 驱动器。
在 PC 上,DriveNavigator 应自动运行。如果没有自动运
行,请单击 [开始],然后选择 [运行]。在运行对话框中,请
输入 “d:\DriveNavi.exe”(d 是您的 CD-ROM 驱动器的驱
动器号)。单击 [确定] 继续操作。
对于 Mac,请打开 CD,然后单击 [RaidUtility.dmg] 可开
始安装。
单击 [Begin Installation(开始安装)]。
单击 [Next(下一步)] 来逐步安装。
Mac 用户可以跳过此步骤。
设置
4
Page 90

请按照向导指示逐步安装 DriveStation Duo,配置 RAID 设置,以及如有需要进行
重新格式化。
DriveStation Duo 可以通过 USB 连接至您的计算机。
完成安装向导的指示后,DriveStation Duo 安装完毕并准备就绪!
默认状态下,系统将 Duo 设置在 RAID 1 模式中。在 RAID 1 模式中,就算
DriveStation 中其中一个硬盘出现故障,照样可以恢复数据。然而,可用的总空
间将是最大空间的一半。
如果您想要更改 RAID 配置,或者想将 DriveStation 当作唯一的硬盘使用,您可
以使用 RAID 实用工具更改 DriveStation’s RAID 设置。请参阅下一页上的有关如
何使用 RAID 实用工具的说明。
或者,您可以根据“参考指南”中的描述使用 RAID 模式按钮更改 RAID 模式。
即开即用,DriveStation 可使用 FAT32 进行格式化,并支持最常见的操作系统。
如果您要通过可生成大于 4 GB 文件的程序(例如备份软件)来使用 DriveStation,
您需要用 NTFS 或 Mac OS 扩展格式重新将其格式化。
默认状态下,系统会将 DriveStation 上的所有硬盘分成 2 TB 分区。该功能允许
Windows 的旧版本,如 32-位 Windows XP 和 Windows Server 2003,无需附加
软件或服务包就可读取硬盘。使用更新操作系统的用户可能希望将 DriveStation
Quattro 进行重新分区,使其拥有更大的分区,但是我们不建议 32-位 Windows
XP 同样如此。应用最新的服务包,Windows Server 2003 就可读取更大的分区。
5
Page 91

RAID
使用
实用工具允许您在不同的模式中配置 DriveStation Duo:
Normal mode(正常模式)- 当使用两个独立的硬盘时,计算机处于该模式。
注意:正常模式只有通过 USB 连接时才可正常运作。
Spanning mode(跨越模式)- 当使用一个大硬盘时,计算机处于该模式。
RAID 0 mode(RAID 0 模式 )- 当仅使用一个硬盘时,计算机处于该模式。
与扫描模式相比,其性能更高。
RAID 1 mode(RAID 1 模式)- 当仅使用一个硬盘时,计算机处于该镜像。
第二个硬盘完全是第一个硬盘的副本,用来存储冗余。
注意:
在 Duo 中更改硬盘的 RAID 模式将删除设备上的所有数据!使用 RAID 实用工具
・
之前,请备份所有重要的数据。
在 PC 上,单击 DriveStation Duo 程序组中的 [RAIDUtility] 或者从 [开始] 菜单中单
击 [RAIDUtility] 运行 RAID 实用工具。
实用工具
在 Mac上,双击桌面上的 RaidUtility 图标。
6
Page 92

RAID
使用
启动后,RAID 实用程序将扫描您的 DriveStation Duo。扫描可耗时数秒。
初始屏幕上将显示您的当前配置。如果您使用的是新的 Duo,Duo将处
于 RAID 1 模式下。
要更改 RAID 模式,请单击 [Config(配置)],然后选择 [Disk Config
(磁盘配置)]。
实用工具
7
Page 93

RAID
使用
选择您想要使用的硬盘结构。
在 PC 上,可使用 FAT32 或 NTFS 将磁盘格式化。选择您的目标格式。
FAT32 可与多数 Windows PC 以及 Mac 兼容。NTFS 在 Windows 操作系
统中呈现最佳性能,但是与 Mac 不兼容。建议您在备份、编辑视频和存储
其他大于 4GB 程序时使用 NTFS。
如果您使用的是无 SP1 或更新版本的 Windows XP 或 Windows Server
2003,请使用兼容模式。兼容模式会将硬盘分成 Windows XP 或 Windows
Server 2003 能够读取的 2 TB 分区。
实用工具
单击 [Yes(是)],然后再次单击 [Yes(是)]。请注意,该操作将删除硬
盘上的所有数据!
8
Page 94

RAID
使用
对于 Windows 用户
当您试图使用 RAID 管理实用工具更改磁盘配置(如选择 NTFS 格式),
将显示下面的消息。
如果显示该消息,请等待直到完成对磁盘配置的更改,并且显示“The
setting was successfully changed(已成功更改设置)”,然后单击
[Cancel(取消)]。 现在磁盘准备就绪。
如果您不小心单击了上面消息中的 [Format disk(格式化磁盘)],即会
出现下面一种情况。
• 如果显示“You do not have sufficient rights to perform this operation
(您没有执行此操作的足够权限)”,请单击 [OK(确定)]。
• 如果显示“Not Formattable(无法格式化)”,请单击 [Close(关
闭)]。
• 如果显示标准 Windows 格式屏幕,请单击 [Close(关闭)]。
注意:如果使用 Windows 格式实用工具对磁盘进行格式化,可能无法
正常更改磁盘配置。 如果发生此类情况,请使用 RAID 管理实
用工具来重新对磁盘进行配置。
实用工具
9
Page 95

其他实用工具(仅限
DriveStation Duo 为使用 Windows computer 的用户提供了很多可选的实用工
具。要安装和实用这些实用程序,请将 DriveStation Duo 随附的 CD-ROM 插入
Windows PC 中。
依次单击 [Begin Installation(开始安装)] 和 [Additional Software Installation
(附加软件安装)]。
TurboPC 可提高 Buffalo 产品的数据传输速度。
TurboCopy 通过使用缓存以提高数据的传输速度。
Backup Utility 是一种从 PC 备份及还原数据的软件。要使用此程序,请选择
要备份的源硬盘和保存备份数据的目标位置。
RAMDISK Utility 该软件将您计算机的内存用作虚拟硬盘“RAM 驱动器”。
计算机会将 RAM 驱动器识别为一个硬盘,您可像使用其他硬盘一样使用该硬
盘读取和写入数据。
Windows
)
使用 Buffalo Tools Launcher,您可以轻松地从 Buffalo 实用工具套件中启动
软件。仅需单击软件图标,即可启动所需的 Buffalo 工具或实用工具。
eco Manager 允许您将 DriveStation 设置为休眠模式以便保存电量。 可以在
RAID 0、RAID 1 模式和跨越模式中运行。 不支持正常模式。
SecureLockMobile 可对 DriveStation 中的数据进行加密,防止除您本人以外
的其他人访问数据。
NovaBACKUP 是备份软件。
要了解更多有关安装和使用这些实用工具的信息,请单击 [View User Manual
(查看用户手册)]。
10
Page 96

更换硬盘
警告:
请勿从前盖处抬起 LinkStation Duo。前盖可能会脱落。
在卸除硬盘之前,请触摸金属物体以导走您体内的静电,或戴上静电手
腕带。
请小心操作!LinkStation Duo 内部的有些金属边缘非常锋利。
由于不当地拆卸而对 LinkStation 造成的损坏,不在产品保修范围内。
请勿将两个硬盘反置,否则您的数据将会丢失。
替换硬盘应与被更替硬盘的容量相同,或更大。
请勿将之前已用于 DriveStation Duo 的硬盘作为替换硬盘使用。请首先
将其上面的全部分区删除,否则重置将无法正常发挥作用。
替换硬盘可从网站 www.buffalotech.com 上获取。
更换硬盘会降低依赖所替换硬盘性能的 DriveStation Duo 的传输速度。
11
Page 97

更换硬盘
1
AUTO
▲
OFF
▼
2
关闭 DriveStation 并拔掉所有的电缆。
轻按设备左侧空心部位,同时将前
盖向前拉动。
3
卸下前盖。
12
Page 98

更换硬盘
4
5
6
卡扣
Knob
拉环
Tab
按住硬盘地下的“释放”并将硬盘上
的选项卡拉出 2 厘米(约 1 英寸)。
移出损毁的硬盘。
插入新的硬盘,直至其发出咔嚓的
声音。
13
Page 99

更换硬盘
7
重新插上所有的电缆,然后点开 DriveStation Duo 的电源。
8
注意:如果 DriveStation Duo 处于正常模式,请将新的硬盘格式化。
重新安上前盖。
14
Page 100

常见问题解答
以下是 DriveStation 的常见问题列表。下面的每个问题都可解决。
故障排除
“
在
我的计算机
我的备份程序无法将文件保存在 DriveStation。
”
中看不见 DriveStation。(Windows)
请确认电源灯为点亮状态。如若不是,请确认电源开关位于“开”
位置。
如果您已安装省电实用工具,请确认 DriveStation 没有处于省电模式
下。请咨询省电实用工具手册以获得其他帮助。您可在 DriveNavigator
CD-ROM 上发现该手册。
检查 DriveStation 内部的硬盘是否运转正常。可将您的手放在
箱盒侧面处并感到轻微的震动来检查。而且,打开 15 分钟后,
DriveStation 会变热。如果以上操作无法确认硬盘是否正常运作,
请联系技术支持 以获得进一步的援助。
请以 NTFS 或 Mac OS 扩展格式重新格式化 DriveStation。FAT32
格式限制文件体积不得超过 4 GB。
15
 Loading...