

Page 1

USB Hard Drive with Encryption
HDS-PHU2 Series
User's Manual
Part Names .......................................2
Safety Precautions ..........................3
How to Use with Windows ..............6
How to Use with Macintosh ............9
If You Forget Your Password .........12
Specications ................................15
1
2
3
4
5
6
Page 2

Using This Manual
CAUTION
Next
The symbols used in the manual are explained here to ensure proper use of this manual.
Symbols
Caution symbol .........................
handling the product. Failure to follow the caution can result in personal injury or damage to the product.
Next operation symbol...........
Terms Used in This Manual
The instructions in this manual are described using the following drive conguration in Windows.
•
C: Hard drive
D: CD-ROM drive
Brackets [ ] indicate the names of dialog boxes and the names of menus, buttons, and checkboxes that
•
can be selected during operations.
The hard disk capacity described in this manual is calculated as 1 GB = 1,0003 bytes. Operating systems
•
and applications use the calculation 1 GB = 1,0243 byte, so the displayed capacity diers.
The copyright of this manual belongs to Bualo Technology, Inc. It is prohibited to copy, reproduce, or modify
■
this manual, in whole or in part, without permission.
BUFFALO™ is a trademark of Melco Holdings Inc. All other products mentioned herein are the trademarks or
■
registered trademarks of their respective owners.
The specications, design, and other contents in this manual are subject to change without notice and may
■
dier from those of the actual product.
Every eort has been made to ensure the accuracy of the information in this manual. If, however, you notice
■
any missing information or errors, please contact the retailer from which the product was purchased or Bualo
Technology Technical Support.
This product was developed for general oce and household use. Bualo Technology, Inc. shall not be responsible
■
whatsoever for any damage resulting from the use of this product for a purpose other than general oce and household
use.
Do not use this product in applications requiring a high level of safety, such as systems that are directly
•
or indirectly related to medical equipment or human safety.
When using this product in mechanical or computer system applications that require higher reliability
•
than general oce equipment, make every eort to provide a safety design for the system and
adequate failsafe measures.
Follow the operations described in this manual when using this product. Be sure to follow all safety precautions
■
for handling this product.
Bualo Technology, Inc. provides repair of the product under certain circumstances, but it is not responsible for
■
any loss or corruption of recorded data during repair. Follow all safety precautions described herein when using
the product as a data recording device, such as a hard disk drive, or when using the product connected to a
data recording device. Be sure to back up all necessary data on a regular basis. Bualo Technology, Inc. shall not
be responsible for any loss or corruption of data as a result of the customer violating the safety precautions or
failing to back up data recorded on the product.
Regarding liability due to default or illegal activities resulting from the use of this product, with the exception
■
of any intentional or gross negligence on the part of Bualo Technology, Inc., Bualo Technology, Inc. shall
compensate the customer up to the purchase cost of the product.
If this product is deemed defective, Bualo Technology, Inc. shall repair the product at no cost or replace the
■
product with the same or similar product. Bualo Technology, Inc. is not responsible for any damage as a result
of a product defect.
This indicates an operation that requires caution when
This indicates the next page to go to.
Page 3

Table of Contents
Layout ..............................................................2
1
Diagram ........................................................................................................2
Safety Precautions ..........................................3
2
Safety Precautions ......................................................................................3
Locking the Drive After Authentication
Uninstalling the Password Authentication Software
How to Use with Windows ..............................6
3
Conguring (Changing) the Password Default Settings ..........................6
Authenticating the Password to Use..........................................................7
How to Use with Mac OS X ..............................9
4
....................................................5
(Macintosh) .................5
Installing the Password Authentication Software ....................................9
Conguring (Changing) the Password Default Settings
Authenticating the Password to Use........................................................10
If You Forget Your Password .........................12
5
If You Forget Your Password (Formatting the Device) ............................12
Windows .......................................................................................................................................... 12
Macintosh
Specications ................................................15
6
Specications .............................................................................................15
....................................................................................................................................... 13
..........................9
Page 4

Layout
1
Familiarize yourself with your MiniStation.
Power/Access indicator
Lights green when the power is on.
Blinks orange when accessing the hard
drive.
Layout
USB port
(Mini-B)
You can wrap the USB cable around
the edge of the device, inserting it
into groove, for ease of portability.
DC jack
2
HDS-PHU2 Series User�s Manual Series User�s Manual
Page 5

Safety Precautions
CAUTION
2
This describes the safety precautions for use with this product.
Safety Precautions
Do not perform any of the following, as this can result in a loss
of data.
•
Setting this device as the save destination of virtual memory.
•
Removing the USB cable or power cable or turning o the power of the
connected computer while this device is being accessed.
•
Enabling the power-saving mode (standby, hibernation, or sleep) of the
connected computer. (The device may not resume operations after entering
the power-saving mode.)
●
After you are done using this device, be sure to disconnect it from the computer.
The device automatically locks when disconnected from the computer. If the computer is turned o or
restarted without rst disconnecting the device, the device may not lock.
●
If you forget the password, you will not be able access the data recorded on this device, so take
measures so you do not forget the password.
●
Keep your password secret and do not tell it to others.
●
In Windows 2000, after the password is authenticated, the [Unplug or Eject Hardware] notication
appears, but the device operates normally. Click [Close] to close the notication. You can continue to
use the device.
●
In Macintosh, multiple devices cannot be used at the same time.
●
In Macintosh, install the password authentication software before using the device. (In Windows,
there is no need to install the software.)
In Macintosh, if multiple operating systems are installed, install the password authentication software on
all Macintosh operating systems.
●
The maximum size for a le stored to a FAT32 formatted hard drive is 4 GB.
This device is formatted as a FAT32 hard drive, so the maximum le size is 4 GB. If you reformat this device
with an NTFS format or Macintosh format, you can store les that are larger than 4 GB
In Windows 2000, the [Found New Hardware Wizard] dialog box may appear during setup. Click [Finish]
●
on the dialog box.
The [The software for this device is now installed, but may not work correctly.] message appears, but the
device operates normally.
HDS-PHU2 Series User�s Manual
3
Page 6

This device can be hot-plugged.
CAUTION
●
This means you can plug and unplug the USB cable of the device to and from a computer when both
devices are on.
Never unplug the USB cable while the hard drive is being accessed (the power/access
indicator is blinking orange), as this can damage the recorded data on the hard drive.
To use this device in a conguration with multiple USB devices, use a USB hub (not supplied) or
●
similar device.
Be sure to read the manuals of the computer and peripheral equipment.
●
This device cannot be used to boot the operating system.
●
Do not place other objects against this device.
●
This can damage the device.
In Windows XP and Vista, if this device is connected to a USB 1.1 port, the [HI-SPEED USB Device
●
Plugged into non-HI-SPEED USB Hub] warning message may appear. To continue operations, click [X]
to close the dialog box.
This device may emit a sound during operation, such as at startup and when accessing the hard
●
drive. This is normal.
Installing the drivers of this device adds the following devices to to the Device Manager*.
●
* Use the following procedures to display the Device Manager.
Windows Vista .........................................Click [Start] right-click [Computer] click [Manage] click [Continue]
Windows XP
Windows 2000
Operating System Location Added Device Name
Windows Vista
Windows 2000/XP
.............................................Click [Start] right-click [My Computer] click [Manage] click [Device
........................................Right-click [My Computer] click [Manage] click [Device Manager]
Universal Serial Bus controllers USB Mass Storage Device
Disk drives BUFFALO Disk Drive USB Device
DVD/CD-ROM drives BUFFALO USB-ATA Bridge USB Device
Universal Serial Bus controllers USB Mass Storage Device
Disk drives BUFFALO Disk Drive USB Device
DVD/CD-ROM drives
when [Windows needs your permission to continue] appears click [Device
Manager]
Manager]
BUFFALO USB-ATA Bridge USB Device
4
HDS-PHU2 Series User�s Manual Series User�s Manual
Page 7

Locking the Drive After Authentication
To lock the Secure Disk after the password has been authenticated, disconnect the device from the
computer. The device does not lock unless it is disconnected from the computer, so it is recommended that
you disconnect it after use.
Uninstalling the Password Authentication Software
(Macintosh)
Use the following procedure to uninstall the password authentication software from a Macintosh computer.
Turn on the computer, and log in with the administrator account.
1
Connect this device to the computer.
2
Click [Utility] on the desktop [Mac X] folder [Secure
3
Disk Tool Uninstaller VJx.xx] folder (where "x.xx" is a number),
and double-click [Uninstall Secure Disk Tool].
Follow the on-screen instructions for uninstalling the software.
HDS-PHU2 Series User�s Manual
5
Page 8

6
HDS-PHU2 Series User�s Manual
How to Use with Windows
CAUTION
3
To use this device with Windows, use the following procedure.
I Conguring (Changing) the Password Default Settings
Because the factory password is disclosed, make sure to change the password before you use this device.
* For Windows XP/2000, log in with the administrator account.
When logged in with a user account, password cannot be set.
Factory password is [12345].
Connect this device to the computer.
1
* When the following screen appears, click [Run Password.exe].
Click.
2
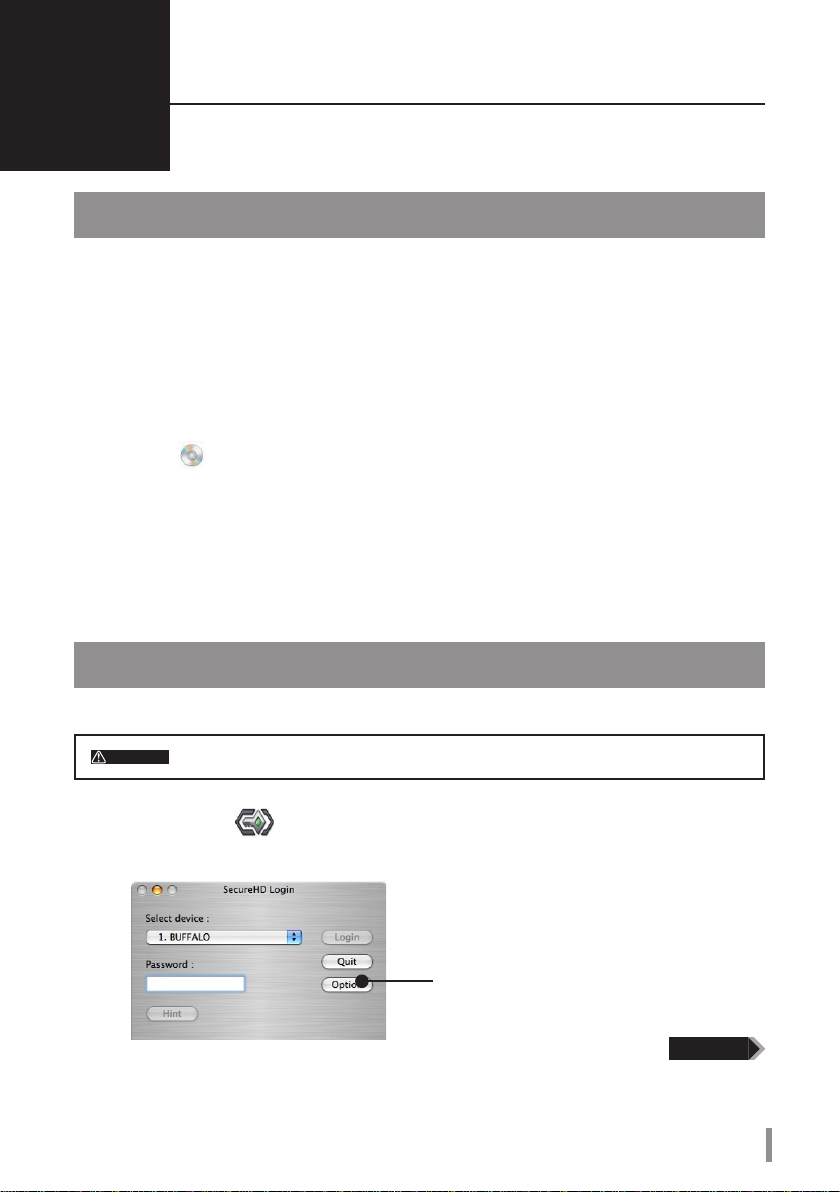
Click [Option].
* If the screen above doesn’t appear, you may double-click [Password.exe] in [Utility] from
[Computer] ([My Computer]).
Continued
Page 9

3
* Copy and Paste are disabled for password and hint entry.
When the [Password Security enabled successfully.] message appears, click
4
[OK].
Disconnect the device from the computer.
5
Password default settings are congured.
1 Enter the current password.
* Enter [12345] (factory setting) when you use
this device for the rst time.
2 Enter a new password (4 to 10 characters)
in 2 places.
3
Enter a hint phrase (5 to 75 characters).
4 Click [OK].
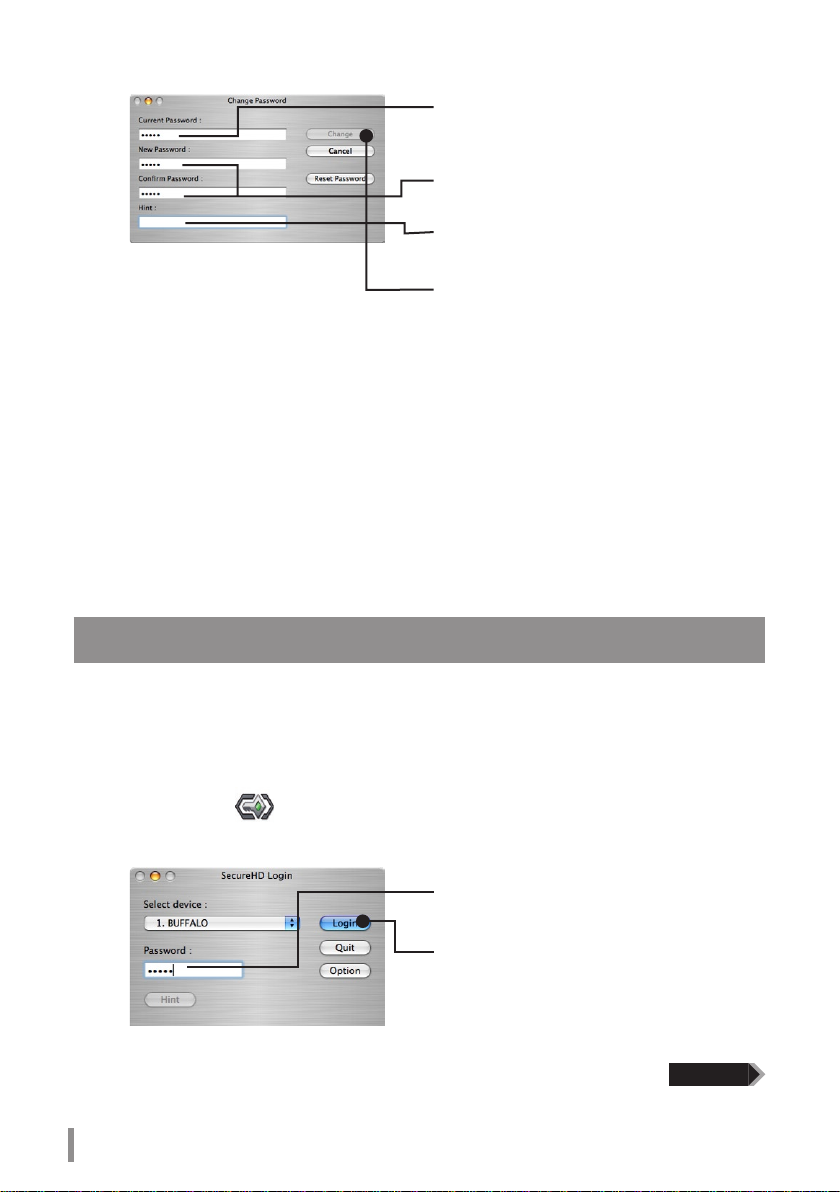
II Authenticating the Password to Use
Authenticate the password and prepare the device to read and write data.
Connect this device to the computer.
1
2
* If you enter wrong passwords 3 times, you can check the hint phrase you entered from the [Hint]
button (for Windows XP/2000, when logged in with the administrator account only).
1 Enter the current password.
* Enter the password changed in section I.
2 Click [OK].
Continued
HDS-PHU2 Series User�s Manual
7
Page 10

3
Click [OK].
Make sure [Secure Disk] is added in [Computer] ([My Computer]).
4
Make sure [Secure Disk] is added.
Procedure is completed. [Secure Disk] is ready to read and write data same as a normal hard disk.
To Store Files Larger Than 4 GB
Format the Secure Disk with NTFS format. The device is formatted with FAT32 format when it is
shipped, and cannot store les larger than 4 GB. This is a limitation of FAT32. When the device
is formatted with NTFS format, les larger than 4 GB can be stored. To use this device with Mac
OS computers as well, use as is without formatting. FAT32 works with both Windows and Mac
computers. NTFS cannot be used with MAC OS.
8
HDS-PHU2 Series User�s Manual
Page 11
How to Use with a Mac
CAUTION
4
To use this device with Mac OS X, use the following procedure.
I Installing the Password Authentication Software
Install the password authentication software Secure Disk Tool.
Turn on the computer, and log in with the administrator account.
1
Connect this device to the computer.
2
Open [Utility] on the desktop and double-click [Secure Disk Tool
3
InstallerVJ1_xx.pkg] in the [Mac X] folder.
* Where "xx" in [Secure Disk Tool Installer VJ1_xx.pkg] is a version number.
Follow the on-screen instructions for installing the software.
II Conguring (Changing) the Password Default Settings
Because the factory password is disclosed, make sure to change the password before you use this device.
Factory password is [12345].
Double-click [Secure Disk Tool] on the desktop.
1
2
Click [Option].
Continued
HDS-PHU2 Series User�s Manual
9
Page 12
10
HDS-PHU2 Series User�s Manual
3
* Copy and Paste are disabled for password and hint entry.
When the [Password Security enabled successfully.] message appears, click
4
[OK].
Disconnect the device from the computer.
5
Password is changed.
1 Enter the current password.
* Enter [12345] (factory setting) when you use
this device for the rst time.
2 Enter a new password (4 to 10 characters)
in 2 places.
3
Enter a hint phrase (5 to 75 characters).
4 Click [OK].
III Authenticating the Password to Use
Authenticate the password and prepare the device to read and write data.
Connect this device to the computer.
1
Double-click [Secure Disk Tool] on the desktop.
2
3
1 Enter the password.
2 Click [Authenticate].
* When you enter wrong passwords 3 times, you
can check the hint phrase you entered from the
[Hint] button.
Continued
Page 13

When the [Login successful.] message appears, click [OK].
4
* A warning message similar to [Set disk contains unreadable volume with Mac OS X.] may appear.
Click [OK].
Make sure [Secure Disk] ( ) is displayed on the desktop.
5
Procedure is completed. [Secure Disk] is ready to read and write data same as a normal hard disk.
To Store Files Larger Than 4 GB
Format the Secure Disk with Mac OS extended format. The device is formatted with FAT32 when
it is shipped, and cannot store les larger than 4 GB. This is a limitation of FAT32. When the device
is formatted with Mac OS extended format, les larger than 4 GB can be stored. To use this device
with Windows computers as well, use as is without formatting. FAT32 works with both Windows
and Mac computers. Mac OS extended format cannot be used with Windows computers.
HDS-PHU2 Series User�s Manual
11
Page 14

12
HDS-PHU2 Series User’s Manual
If You Forget Your Password
CAUTION
CAUTION
Continued
5
If you forget your password, you must format the device to be able to use it again. This
describes the procedure for formatting the device.
If You Forget Your Password (Formatting the Device)
If you forgot your password and cannot remember it, you must format the device. Formatting the device
erases all stored data on the device and resets the password. You should only format the device if you forget
your password.
The following proceedure reformats the DriveStation as a FAT32 hard drive
and erases all stored data. Before formatting the device, move all necessary
data to a computer or other storage device. To be able to store les greater
than 4 GB to this device, reformat the hard drive with an NTFS or Macintosh
format.
Windows
To format the device in Windows 2000 or XP, you must log in with the administrator
account.
Connect this device to the computer.
1
When the password authentication window appears, close it.
In Windows Vista, the AutoPlay window may appear. Close this window.
Right-click [Utility] ( ) in [Computer] ([My Computer]) and select [Open].
2
Double-click [menu.exe].
3
Select [Initialize Device] on the open window, and then click [Start].
4
5
Click [Reset Password].
Page 15

Continued
Enter the new password (two times). The
6
The following window is displayed three times.
7
Conrm the content and click [Yes].
When the [The password has been reset successfully.] message appears,
8
click [OK], and then disconnect the device from the computer.
The device is formatted and the password is reset.
1
password must be between 4 and 10
characters.
Enter a hint phrase. The hint phrase must
2
be between 5 and 75 characters.
Click [Reset Password].
3
Note: Do not use copy and paste for password and
hint entry.
Conrm the content.
1
Click [Yes].
2
Macintosh
Connect this device to the computer.
1
Double-click [Secure Disk Tool] ( ) on the desktop.
2
3
Click [Option].
4
Click [Reset Password].
HDS-PHU2 Series User’s Manual
13
Page 16

5
6
The following window is displayed three times.
7
Conrm the content and click [Yes].
Click [Reset Password].
Enter the new password twice. The
1
password must be between 4 and 10
characters.
Enter a hint phrase. The hint phrase must
2
be between 5 and 75 characters.
Click [Reset Password].
3
Note: Copy and Paste are disabled for password
and hint entry.
Conrm the content.
4
When the [The password has been reset successfully.] message appears,
8
click [OK], and then disconnect the device from the computer.
The device is formatted and the password is reset.
14
HDS-PHU2 Series User’s Manual
Click [Yes].
5
Page 17

Specications
6
Specications
* See the Bualo Technology, Inc. catalog or website (www.bualotech.com) for the latest product
information and supported models.
Interface USB
USB Standard USB Specication Rev. 2.0
Port USB Mini-B port
Capacity 512 bytes/sector
Seek time Max. 13 msec
Transmission speed (theoretical) Max. 480 Mbps*
Format at time of purchase FAT32 (single partition)
Dimensions 127 (W) × 84 (H) × 23 (D) mm (excluding projecting parts)
Power consumption Max. 2.5 W
Power supply DC 5V±5%
Operating
environment
Supported models The following computer models with a standard USB port:
Supported OS DOS/V Windows Vista/XP (including Media Center Edition),
* To use this device with HS mode (at a max. transmission speed of 480 Mbps), as dened by USB 2.0
specications, a USB 2.0 interface is required.
Temperature 0–45ºC
Humidity 10-85% (non-condensing)
DOS/V (OADG specications)
•
Apple Mac series (with Intel processor)
•
Windows 2000 Service Pack 3 or later
Macintosh Mac OS X 10.4 or later
Macintosh and Mac OS are trademarks of Apple Inc., registered in the U.S. and other countries. Windows
is a registered trademark of Microsoft Corporation in the United States and other countries.
HDS-PHU2 Series User�s Manual
15
Page 18

HDS-PHU2 Series User's Manual
Published by Bualo Technology, Inc. Bualo Technology,Inc.Bualo Technology, Inc.
First Edition, May 30, 2008
Page 19
USB-Festplatte mit Verschlüsselung
HDS-PHU2
Benutzerhandbuch
Aufbau .............................................................. 2
Sicherheitsmaßnahmen ................................. 3
Verwenden unter Windows ............................6
Verwenden unter MAC OS X ........................... 9
Vorgehen bei vergessenem Kennwort ........12
Technische Daten ..........................................15
1
2
3
4
5
6
Page 20

Verwenden dieses Handbuchs
VORSICHT
Weiter
Zur korrekten Verwendung dieses Handbuchs werden an dieser Stelle die im Handbuch verwendeten
Symbole erklärt.
Symbole
Symbol „Vorsicht“ .....................
Umgang mit dem Produkt Vorsicht angebracht ist. Bei Nichtbeachtung
kann es zu Verletzungen und zu Beschädigungen am Produkt führen.
Symbol „Weiter“ .........................
In diesem Handbuch verwendete Begrie
Die Anweisungen in diesem Handbuch basieren auf folgender Laufwerkkonguration unter Windows.
•
C: Festplatte
D: CD-ROM-Laufwerk
Klammern [ ] zeigen die Namen von Dialogfeldern, Menüs, Schaltächen und Kontrollkästchen an, [ ] zeigen die Namen von Dialogfeldern, Menüs, Schaltächen und Kontrollkästchen an,zeigen die Namen von Dialogfeldern, Menüs, Schaltächen und Kontrollkästchen an,
•
die während der Vorgänge ausgewählt werden können.
Die in diesem Handbuch beschriebene Festplattenkapazität wird wie folgt berechnet: 1 GB = 1.0003 Byte.
•
Betriebssysteme und Anwendungen verwenden jedoch die Berechnung 1 GB = 1.0243 Byte.
Die angezeigte Kapazität kann daher von der beschriebenen abweichen.
Bualo Technology, Inc. besitzt das Urheberrecht an diesem Handbuch. Das Kopieren, Vervielfältigen oder
Ändern dieses Handbuchs oder seiner Teile ohne Genehmigung ist nicht gestattet.
BUFFALO™ ist eine Marke der Melco Holdings Inc. Alle anderen hier erwähnten Produkte sind Marken oder
eingetragene Marken ihrer jeweiligen Eigentümer.
Die technischen Daten, Designs und andere Inhalte dieses Handbuchs können ohne weiteren Hinweis
geändert werden und können sich vom tatsächlichen Produkt unterscheiden.
Die Informationen in diesem Handbuch wurden so genau wie möglich erstellt. Sollten Ihnen jedoch Fehler
auallen oder Informationen fehlen, wenden Sie sich an den Händler, von dem Sie das Produkt erworben
haben oder an den technischen Support von Bualo Technology.
Dieses Produkt wurde zur allgemeinen Verwendung in Büro und zu Hause entwickelt. Bualo Technology,
Inc. übernimmt keine Haftung für Schäden, die sich aus einer Verwendung des Produkts außerhalb des
gewöhnlichen Gebrauchs in Büro und zu Hause ergeben.
•
Verwenden Sie dieses Produkt nicht in Hochsicherheitsanwendungen wie Systemen, die direkt oder indirekt
mit medizinischen Geräten verbunden oder für die Sicherheit von Menschen verantwortlich sind.
•
Wenn Sie dieses Produkt in Anwendungen der Mechanik oder in Computer-Systemanwendungen
verwenden, für die eine höhere Zuverlässigkeit als für gewöhnliche Bürogeräte erforderlich ist, erstellen
Sie ein Sicherheitskonzept für das System, und treen Sie geeignete Maßnahmen für das Eintreten eines
Systemausfalls.
Befolgen Sie bei der Verwendung des Produkts die in diesem Handbuch beschriebenen Vorgänge. Beachten
Sie bei der Handhabung des Produkts alle Sicherheitsmaßnahmen.
Bualo Technology, Inc. leistet unter bestimmten Umständen eine Reparatur des Produkts. Bualo Technology,
Inc. übernimmt bei der Reparatur jedoch keine Verantwortung für den Verlust oder die Beschädigung von
aufgezeichneten Daten. Befolgen Sie alle hier beschriebenen Sicherheitsmaßnahmen, wenn Sie das Produkt
als Datenaufzeichnungsgerät, wie beispielsweise als Festplattenlaufwerk, oder in Verbindung mit einem
Datenaufzeichnungsgerät verwenden. Sichern Sie wichtige Daten regelmäßig. Bualo Technology, Inc.
übernimmt keine Haftung für den Verlust oder die Beschädigung von Daten aufgrund der Nichtbeachtung der
Sicherheitsmaßnahmen oder wenn auf dem Produkt aufgezeichnete Daten nicht gesichert wurden.
Die Haftung von Bualo Technology, Inc. aufgrund von fahrlässigen oder illegalen Handlungen durch die
Verwendung dieses Produkts beschränkt sich auf die Entschädigung des Kunden in Höhe des Kaufpreises des
Produkts. Dies gilt nicht bei Vorsatz und grober Fahrlässigkeit von Bualo Technology, Inc.
Ist dieses Produkt fehlerhaft, repariert Bualo Technology, Inc. das Produkt kostenlos oder ersetzt das Produkt
durch ein gleiches oder ähnliches Produkt. Bualo Technology, Inc. übernimmt keine Haftung für Schäden
aufgrund eines Fehlers des Produkts.
Dieses Symbol zeigt einen Vorgang an, bei dem im
Dieses Symbol zeigt die folgende Seite an.
Page 21

Inhaltsverzeichnis
Aufbau ............................................................. 2
1
Produktdarstellung .....................................................................................2
Sicherheitsmaßnahmen .................................3
2
Sicherheitsmaßnahmen ..............................................................................3
Sperren des Laufwerks nach der Authentizierung
Deinstallieren der Kennwort-Authentizierungssoftware (Macintosh)
Verwenden unter Windows ............................ 6
3
Kongurieren (Ändern) der Kennwort-Standardeinstellungen ..............6
Authentizieren des zu verwendenden Kennworts
Verwenden unter Macintosh ..........................9
4
.................................5
.................................7
...5
Installieren der Kennwort-Authentizierungssoftware ..........................9
Kongurieren (Ändern) der Kennwort-Standardeinstellungen
Authentizieren des zu verwendenden Kennworts
Vorgehen bei vergessenem Kennwort ........12
5
Vorgehen bei vergessenem Kennwort (Formatieren des Geräts) .........12
Windows .......................................................................................................................................... 12
Macintosh
Technische Daten ..........................................15
6
Technische Daten ......................................................................................15
....................................................................................................................................... 13
...............................10
..............9
Page 22

Aufbau
1
Machen Sie sich mit Ihrer MiniStation vertraut.
Betriebs-/Zugrisanzeige
Bei Betrieb leuchtet die Anzeige grün.
Die Anzeige blinkt orange, wenn auf die
Festplatte zugegrien wird.
Aufbau
USB-Anschluss
(Mini-B)
Gleichspannungsbuchse
Sie können das USB-Kabel zum
einfacheren Transport um die Seiten
des Geräts legen und in die Rille
einlegen.
2
Benutzerhandbuch zu HDS-PHU2
Page 23

Sicherheitsmaßnahmen
VORSICHT
2
Nachfolgend sind die bei der Verwendung des Produkts zu beachtenden Sicherheitsmaßnahmen beschrieben.
Sicherheitsmaßnahmen
Nehmen Sie keine der folgenden Handlungen vor, da dies zu
einem Datenverlust führen kann.
Verwenden des Geräts als virtueller Arbeitsspeicher.
•
Entfernen des USB-Kabels oder des Stromkabels oder Ausschalten des
•
verbundenen Computers während eines Zugris auf das Gerät.
Aktivieren des Energiesparmodus (Standby oder Ruhezustand) des
•
verbundenen Computers (Das Gerät kann nach der Aktivierung des
Energiesparmodus den Betrieb möglicherweise nicht fortsetzen.)
Trennen Sie das Gerät vom Computer, wenn Sie es nicht mehr benötigen.
Das Gerät wird automatisch gesperrt, wenn es vom Computer getrennt wird. Wenn der Computer
ausgeschaltet oder neu gestartet wird, bevor das Gerät getrennt wurde, wird das Gerät möglicherweise
nicht gesperrt.
Sollten Sie Ihr Kennwort vergessen, können Sie nicht auf die auf dem Gerät aufgezeichneten Daten
zugreifen. Treen Sie daher geeignete Maßnahmen, um das Kennwort nicht zu vergessen.
Halten Sie Ihr Kennwort geheim, und geben Sie es an niemanden weiter.
Unter Windows 2000 wird nach der Authentizierung des Kennworts die Meldung [Hardware
entfernen oder auswerfen] angezeigt. Das Gerät arbeitet jedoch normal. Klicken Sie auf [Schließen],
um die Meldung zu schließen. Sie können das Gerät weiterhin verwenden.
Bei Macintosh können nicht mehrere Geräte gleichzeitig verwendet werden.
Installieren Sie bei Macintosh die Kennwort-Authentizierungssoftware, bevor Sie das Gerät
verwenden. (Unter Windows muss diese Software nicht installiert werden.)
Wenn bei Macintosh mehrere Betriebssysteme installiert sind, installieren Sie die
Kennwort-Authentizierungssoftware auf allen Macintosh-Betriebssystemen.
Die maximale Größe einer Datei, die auf einer FAT32-formatierten Festplatte gespeichert werden
kann, beträgt 4 GB.
Dieses Gerät ist als FAT32-Festplatte formatiert. Die maximale Dateigröße beträgt daher 4 GB. Wenn Sie
das Gerät mit einem NTFS- oder Macintosh-Dateisystem formatieren, können Sie auch Dateien speichern,
die größer als 4 GB sind.
Unter Windows 2000, wird während der Installation möglicherweise das Dialogfeld [Assistent für das
Suchen neuer Hardware] angezeigt. Klicken Sie im Dialogfeld auf [Fertig stellen].
Die Meldung [Die Software für dieses Gerät ist jetzt installiert, funktioniert jedoch möglicherweise nicht
richtig] wird angezeigt, das Gerät arbeitet jedoch normal.
Benutzerhandbuch zu HDS-PHU2
3
Page 24

Das Gerät kann im Hot-Plug-Verfahren verbunden werden.
VORSICHT
Dies bedeutet, dass Sie das USB-Kabel des Geräts auch mit einem Computer verbinden und von diesem
trennen können, wenn beide Geräte eingeschaltet sind.
Trennen Sie das USB-Kabel nie, wenn auf die Festplatte zugegrien wird (wenn die
Betriebs-/Zugrisanzeige orange blinkt). Andernfalls können die auf der Festplatte
aufgezeichneten Daten beschädigt werden.
Verwenden Sie einen Bualo USB-Hub (nicht im Lieferumfang enthalten) oder ein ähnliches Gerät,
wenn Sie dieses Gerät zusammen mit weiteren USB-Geräten verwenden.
Lesen Sie die Handbücher des Computers und der Peripheriegeräte aufmerksam durch.
Dieses Gerät kann nicht zum Starten des Betriebssystems verwendet werden.
Legen Sie keine anderen Objekte auf oder direkt neben das Gerät.
Andernfalls kann das Gerät beschädigt werden.
Wenn dieses Gerät mit einem USB 1.1-Anschluss verbunden ist, wird unter Windows XP und Vista
möglicherweise die Warnmeldung [Hochgeschwindigkeits-USB-Gerät an langsamem USB-Hub]
angezeigt. Klicken Sie auf [X], um das Dialogfeld zu schließen und den Betrieb fortzusetzen.
Das Gerät gibt während des Betriebs (beispielsweise beim Start und beim Zugri auf die Festplatte)
möglicherweise Geräusche ab. Dabei handelt es sich um normales Geräteverhalten.
Wenn Sie die Treiber dieses Geräts installieren, werden folgende Geräte zum Geräte-Manager*
hinzugefügt.
* Um den Geräte-Manager aufzurufen, gehen Sie wie nachfolgend beschrieben vor.
Windows Vista .........................................Klicken Sie auf [Start] klicken Sie mit der rechten Maustaste auf
Windows XP
Windows 2000
Betriebssystem Kategorie Gerätename
Windows Vista
Windows 2000/XP
.............................................Klicken Sie auf [Start] klicken Sie mit der rechten Maustaste auf
........................................Klicken Sie mit der rechten Maustaste auf [Arbeitsplatz] klicken Sie auf
Universal Serial Bus-Controller USB-Massenspeichergerät
Festplatten BUFFALO Disk Drive USB-Gerät
DVD-/CD-ROM-Laufwerke BUFFALO USB-ATA Bridge USB-Gerät
Universal Serial Bus-Controller USB-Massenspeichergerät
Festplatten BUFFALO Disk Drive USB-Gerät
DVD-/CD-ROM-Laufwerke
[Computer] klicken Sie auf [Verwalten] klicken Sie auf [Fortsetzen],
wenn [Zur Fortsetzung des Vorgangs ist Ihre Zustimmung erforderlich]
angezeigt wird klicken Sie auf [Geräte-Manager]
[Arbeitsplatz] klicken Sie auf [Verwalten] klicken Sie auf
[Geräte-Manager]
[Verwalten] klicken Sie auf [Geräte-Manager]
BUFFALO USB-ATA Bridge USB-Gerät
4
Benutzerhandbuch zu HDS-PHU2
Page 25

Sperren des Laufwerks nach der Authentizierung
Um die gesicherte Festplatte nach der Authentizierung des Kennworts für Zugrie zu sperren, trennen Sie
das Gerät vom Computer. Das Gerät wird nicht gesperrt, solange es nicht vom Computer getrennt ist.
Wir empfehlen daher, das Gerät nach der Verwendung vom Computer zu trennen.
Deinstallieren der
Kennwort-Authentizierungssoftware (Macintosh)
Um die Kennwort-Authentizierungssoftware auf einem Macintosh-Computer zu deinstallieren,
gehen Sie so vor:
Schalten Sie den Computer ein, und melden Sie sich als Administrator an.
1
Verbinden Sie das Gerät mit dem Computer.
2
Klicken Sie auf [Dienstprogramm] auf dem Desktop Ordner [Mac X]
3
Ordner [Secure Disk Tool Uninstaller VJx.xx (Deinstallationsprogramm für
Secure Disk Tool VJx.xx)] (wobei „x.xx“ eine Zahl ist), und doppelklicken
Sie auf [Uninstall Secure Disk Tool (Secure Disk Tool deinstallieren)].
Folgen Sie den Anweisungen auf dem Bildschirm, um die Software zu deinstallieren.
Benutzerhandbuch zu HDS-PHU2
5
Page 26

6
Benutzerhandbuch zu HDS-PHU2
Verwenden mit Windows
VORSICHT
3
Gehen Sie wie nachfolgend beschrieben vor, um das Gerät unter Windows zu verwenden.
I Kongurieren (Ändern) der Kennwort-Standardeinstellungen
Da das werkseitig vorgegebene Kennwort bekannt ist, sollten Sie zunächst das Kennwort ändern, bevor Sie
das Gerät verwenden.
* Melden Sie sich unter Windows XP/2000 als Administrator an.
Wenn Sie nur als Benutzer angemeldet sind, können Sie das Kennwort nicht einrichten.
Das werkseitig vorgegebene Kennwort lautet [12345].
Verbinden Sie das Gerät mit dem Computer.
1
* Wenn der nachfolgend dargestellte Bildschirm angezeigt wird, klicken Sie auf [Run Password.exe
(Password.exe ausführen)].
Klicken Sie auf diese Schaltäche.
2
Klicken Sie auf [Option].
* Es wird kein Bildschirm angezeigt? Doppelklicken Sie unter [Computer] ([Arbeitsplatz]) unter
[Dienstprogramm] auf [Password.exe].
Weiter
Page 27

3
* Die Funktionen Kopieren und Einfügen sind beim Eintragen von Kennwort und Hinweissatz
deaktiviert.
Wenn die Meldung [Password Security enabled successfully
4
(Kennwortsicherheit erfolgreich aktiviert)] angezeigt wird, klicken Sie auf [OK].
Trennen Sie das Gerät vom Computer.
5
Die Kennwort-Standardeinstellungen wurden konguriert.
1 Geben Sie das aktuelle Kennwort ein.
* Geben Sie [12345] (werkseitige Vorgabe) ein,
wenn Sie das Gerät zum ersten Mal verwenden.
2 Geben Sie das neue Kennwort (4 bis
10 Zeichen) in zwei Eingabefeldern ein.
3
Geben Sie einen Hinweissatz
(5 bis 75 Zeichen) ein.
4 Klicken Sie auf [OK].
II Authentizieren des zu verwendenden Kennworts
Authentizieren Sie das Kennwort, und bereiten Sie das Gerät zum Schreiben und Lesen von Daten vor.
Verbinden Sie das Gerät mit dem Computer.
1
2
* Sollten Sie dreimal hintereinander ein falsches Kennwort eingegeben haben, können Sie den von
Ihnen eingegebenen Hinweissatz prüfen, indem Sie auf die Schaltäche [Hint (Hinweis)] klicken
(bei Windows XP/2000 nur, wenn Sie als Administrator angemeldet sind.).
1 Geben Sie das aktuelle Kennwort ein.
* Geben Sie das in Abschnitt I geänderte
Kennwort ein.
2 Klicken Sie auf [Login (Anmelden)]
Benutzerhandbuch zu HDS-PHU2
Weiter
7
Page 28

3
Klicken Sie auf [OK].
Überprüfen Sie, ob [Secure Disk] zu [Computer] ([Arbeitsplatz]) hinzugefügt
4
wurde.
Überprüfen Sie, ob [Secure Disk]
hinzugefügt wurde.
Der Vorgang ist damit abgeschlossen. Somit können auf dem Datenträger [Secure Disk] Daten wie auf einer
normalen Festplatte geschrieben und gelesen werden.
So speichern Sie Dateien, die größer als 4 GB sind:
Formatieren Sie den Datenträger Secure Disk im NTFS-Format. Das Gerät ist bei Lieferung im
FAT32-Format formatiert. Gemäß den Spezikationen des FAT32-Formats können keine Dateien
gespeichert werden, die größer als 4 GB sind. Wenn das Gerät im NTFS-Format formatiert wird,
können auch Dateien gespeichert werden, die größer als 4 GB sind. Falls Sie das Gerät am
Macintosh verwenden, setzen Sie es im Lieferzustand ein, ohne es neu zu formatieren. Dateien,
die größer als 4 GB sind, können nicht gespeichert werden. Das NTFS-Format wird von Macintosh
nicht unterstützt.
8
Benutzerhandbuch zu HDS-PHU2
Page 29

Verwenden unter MAC OS X
VORSICHT
4
Gehen Sie wie nachfolgend beschrieben vor, um das Gerät unter Mac OS X zu verwenden.
I Installieren der Kennwort-Authentizierungssoftware
Installieren Sie die Kennwort-Authentizierungssoftware „Secure Disk Tool“.
Schalten Sie den Computer ein, und melden Sie sich als Administrator an.
1
Verbinden Sie das Gerät mit dem Computer.
2
Önen Sie [Dienstprogramm] auf dem Desktop, und doppelklicken Sie im
3
Ordner [Mac X] auf [Secure Disk Tool Uninstaller VJx.xx (Installationsprogramm
für Secure Disk Tool VJx.xx)].
* „xx“ in [Secure Disk Tool Installer VJ1_xx.pkg] steht für eine Versionsnummer.
Folgen Sie den Anweisungen auf dem Bildschirm, um die Software zu installieren.
II Kongurieren (Ändern) der Kennwort-Standardeinstellungen
Da das werkseitig vorgegebene Kennwort bekannt ist, sollten Sie das Kennwort ändern, bevor Sie das Gerät
verwenden.
Das werkseitig vorgegebene Kennwort lautet [12345].
Doppelklicken Sie auf Ihrem Desktop auf das Symbol [Secure Disk Tool].
1
2
Klicken Sie auf [Option].
Benutzerhandbuch zu HDS-PHU2
Weiter
9
Page 30

10
Benutzerhandbuch zu HDS-PHU2
3
* Die Funktionen Kopieren und Einfügen sind beim Eintragen von Kennwort und Hinweissatz
deaktiviert.
Wenn die Meldung [Password Security enabled successfully
4
(Kennwortsicherheit erfolgreich aktiviert)] angezeigt wird, klicken Sie auf [OK].
Trennen Sie das Gerät vom Computer.
5
Das Kennwort wurde geändert.
1 Geben Sie das aktuelle Kennwort ein.
* Geben Sie [12345] (werkseitige Vorgabe) ein,
wenn Sie das Gerät zum ersten Mal verwenden.
2 Geben Sie das neue Kennwort (4 bis
10 Zeichen) in zwei Eingabefeldern ein.
3
Geben Sie einen Hinweissatz
(5 bis 75 Zeichen) ein.
4 Klicken Sie auf [Change (Ändern)]
III Authentizieren des zu verwendenden Kennworts
Authentizieren Sie das Kennwort, und bereiten Sie das Gerät zum Schreiben und Lesen von Daten vor.
Verbinden Sie das Gerät mit dem Computer.
1
Doppelklicken Sie auf Ihrem Desktop auf das Symbol [Secure Disk Tool].
2
3
1 Geben Sie das Kennwort ein.
2 Klicken Sie auf [Login (Anmelden)]
* Sollten Sie dreimal hintereinander ein falsches
Kennwort eingegeben haben, können Sie den
von Ihnen eingegebenen Hinweissatz prüfen,
indem Sie auf die Schaltäche [Hint (Hinweis)]
klicken.
Weiter
Page 31

Wenn die Meldung [Login successful (Anmeldung erfolgreich)] angezeigt wird,
4
klicken Sie auf [OK].
* Möglicherweise wird eine Warnmeldung wie [Eingerichtete Festplatte enthält ein Laufwerk,
das von Mac OS X nicht gelesen werden kann] angezeigt. Klicken Sie auf [OK].
Überprüfen Sie, ob das Symbol [Secure Disk] ( ) auf dem Desktop angezeigt
5
wird.
Der Vorgang ist damit abgeschlossen. Somit können auf dem Datenträger [Secure Disk] Daten wie auf einer
normalen Festplatte geschrieben und gelesen werden.
So speichern Sie Dateien, die größer als 4 GB sind
Formatieren Sie den Datenträger Secure Disk im MacOS Extended Format. Das Gerät ist bei
Lieferung im FAT32-Format formatiert. Es können keine Dateien gespeichert werden, die größer
als 4 GB sind. ierbei handelt es sich um eine Beschränkung des FAT32-Systems. Wenn das Gerät im
Mac OS Extended Format formatiert wird, können auch Dateien gespeichert werden, die größer
als 4 GB sind. Wenn Sie dieses Gerät auch unter Windows verwenden möchten, muss es nicht
formatiert werden. FAT32 ist sowohl mit Windows- als auch mit Mac-Computern kompatibel. Das
Mac OS Extended Format wird von Windows nicht unterstützt.
Benutzerhandbuch zu HDS-PHU2
11
Page 32

12
Benutzerhandbuch zu HDS-PHU2
Vorgehen bei vergessenem Kennwort
VORSICHT
VORSICHT
Weiter
5
Wenn Sie Ihr Kennwort vergessen, müssen Sie das Gerät formatieren, um es wieder verwenden
zu können. Nachfolgend ist das Verfahren zum Formatieren des Geräts beschrieben.
Vorgehen bei vergessenem Kennwort (Formatieren des Geräts)
Wenn Sie Ihr Kennwort vergessen haben, müssen Sie das Gerät formatieren. Durch die Formatierung werden
alle auf dem Gerät gespeicherten Daten gelöscht und das Kennwort zurückgesetzt. Sie sollten das Gerät nur
dann formatieren, wenn Sie Ihr Kennwort vergessen haben.
Durch den nachfolgenden Vorgang wird die DriveStation als FAT32-Festplatte
formatiert, und alle gespeicherten Daten werden gelöscht. Verschieben Sie
vor der Formatierung alle zu sichernden Daten auf einen Computer oder ein
anderes Speichergerät. Um Dateien speichern zu können, die größer als 4 GB
sind, formatieren Sie die Festplatte im NTFS- oder Macintosh-Format neu.
Windows
Um das Gerät unter Windows 2000 oder XP zu formatieren, müssen Sie als
Administrator angemeldet sein.
Verbinden Sie das Gerät mit dem Computer.
1
Wenn das Fenster zur Kennwortauthentizierung angezeigt wird, schließen Sie es.
Unter Windows Vista wird möglicherweise das Fenster „AutoPlay“ angezeigt. Schließen Sie
dieses Fenster.
Klicken Sie unter [Computer] ([Arbeitsplatz]) mit der rechten Maustaste
2
auf [Dienstprogramm] ( ), und wählen Sie [Önen] aus.
Doppelklicken Sie auf [menu.exe].
3
Wählen Sie im geöneten Fenster [Initialize Device (Gerät initialisieren)] aus,
4
und klicken Sie anschließend auf [Start].
5
Klicken Sie auf [Reset Password
(Kennwort zurücksetzen)].
Page 33

Weiter
Geben Sie das neue Kennwort in zwei
6
Das nachfolgend dargestellte Fenster wird dreimal angezeigt.
7
Bestätigen Sie den Inhalt, und klicken Sie auf [Ja].
Wenn die Meldung [The password has been reset successfully
8
(Das Kennwort wurde erfolgreich zurückgesetzt)] angezeigt wird,
klicken Sie auf [OK], und trennen Sie das Gerät vom Computer.
Das Gerät wurde formatiert und das Kennwort zurückgesetzt.
1
Eingabefeldern ein. Das Kennwort muss
zwischen 4 und 10 Zeichen lang sein.
Geben Sie einen Hinweissatz ein. Der
2
Hinweissatz muss zwischen 5 und 75
Zeichen lang sein..
Klicken Sie auf [Reset Password
3
(Kennwort zurücksetzen)].
Hinweis: Verwenden Sie nicht die Funktionen
Kopieren und Einfügen zum Eintragen von
Kennwort und Hinweissatz.
Bestätigen Sie den Inhalt.
1
Klicken Sie auf [Yes (Ja)].
2
Macintosh
Verbinden Sie das Gerät mit dem Computer.
1
Doppelklicken Sie auf Ihrem Desktop auf das Symbol [Secure Disk Tool] ( ).
2
3
4
Klicken Sie auf [Option].
Klicken Sie auf [Reset Password
(Kennwort zurücksetzen)].
Benutzerhandbuch zu HDS-PHU2
13
Page 34

5
Klicken Sie auf [Reset Password
(Kennwort zurücksetzen)].
6
Das nachfolgend dargestellte Fenster wird dreimal angezeigt.
7
Bestätigen Sie den Inhalt, und klicken Sie auf [Ja].
Geben Sie das neue Kennwort in zwei
1
Eingabefeldern ein. Das Kennwort muss
zwischen 4 und 10 Zeichen lang sein.
Geben Sie einen Hinweissatz ein. Der
2
Hinweissatz muss zwischen 5 und
75 Zeichen lang sein.
Klicken Sie auf [Reset Password (Kennwort
3
zurücksetzen)].
Hinweis: Die Funktionen Kopieren und Einfügen
sind beim Eintragen von Kennwort und
Hinweissatz deaktiviert.
Bestätigen Sie den Inhalt.
4
Wenn die Meldung [The password has been reset successfully
8
(Das Kennwort wurde erfolgreich zurückgesetzt)] angezeigt wird,
klicken Sie auf [OK], und trennen Sie das Gerät vom Computer.
Das Gerät wurde formatiert und das Kennwort zurückgesetzt.
14
Benutzerhandbuch zu HDS-PHU2
Klicken Sie auf [Yes (Ja)].
5
Page 35

Technische Daten
6
Technische Daten
* Aktuelle Produktinformationen und unterstützte Modelle nden Sie im Katalog oder auf der Webseite
von Bualo Technology, Inc. (www.bualotech.com).
Schnittstelle USB
USB-Standard USB Specication Rev. 2.0
Anschluss USB-Anschluss Mini-B
Kapazität 512 Byte/Sektor
Suchzeit max. 13 ms
Übertragungsgeschwindigkeit
(theoretisch)
Format im Lieferzustand FAT32 (eine Partition)
Abmessungen 127 (B) × 84 (H) × 23 (T) mm (ohne herausragende Teile)
Stromverbrauch max. 2,5 W
Stromversorgung Gleichspannung 5 V ±5 %
Betriebsumgebung Temperatur 0–45 ºC
Luftfeuchtigkeit 10-85 % (nicht kondensierend)
Unterstützte Modelle Die folgenden Computermodelle mit Standard-USB-Anschluss
Unterstützte
Betriebssysteme
* Um dieses Gerät im HS-Modus (bei einer maximalen Übertragungsgeschwindigkeit von 480 Mbit/s)
entsprechend den USB 2.0-Spezikationen verwenden zu können, ist eine USB 2.0-Schnittstelle
erforderlich.
DOS/V Windows Vista/XP (einschließlich Media Center Edition),
Macintosh Mac OS X 10.4 oder höher
max. 480 Mbit/s*
werden unterstützt:
DOS/V (OADG-Spezikationen)
•
Apple Mac-Serie (mit Intel-Prozessor)
•
Windows 2000 Service Pack 3 oder höher
Macintosh und MAC OS sind Warenzeichen von Apple, Inc., registriert in den USA und anderen Ländern.
Windows ist ein eingetragenes Warenzeichen der Microsoft Corporation in den USA und anderen
Ländern.
Benutzerhandbuch zu HDS-PHU2
15
Page 36

Benutzerhandbuch zu HDS-PHU2
Veröentlicht von BualoTechnology, Inc.
Erste Auage, 30. Mai 2008
Page 37

Disque dur USB avec cryptage
Gamme HDS-PHU2
Manuel d’utilisation
Noms des diérentes parties .........2
Mesures de sécurité ........................3
Utilisation avec Windows ................6
Utilisation avec Macintosh .............9
En cas d’oubli de votre mot de passe
Spécications ................................15
..12
1
2
3
4
5
6
Page 38

Utilisation du manuel
ATTENTION
Suivant
Les symboles utilisés dans ce document sont expliqués ci-dessous an de garantir une utilisation adéquate
du manuel.
Symboles
Symbole Attention ...................
prudence lors de la manipulation du produit. Un manque de précaution
peut entraîner un préjudice corporel ou endommager le produit.
Symbole Suivant .......................
Termes utilisés dans ce manuel
Les instructions de ce manuel sont présentées sur la base de la conguration suivante du disque sous
•
Windows :
C: disque dur
D: lecteur de CD-ROM
Les crochets [ ] indiquent les noms des boîtes de dialogue, menus, boutons et cases à cocher pouvant
•
être sélectionnés au cours d’une opération.
La capacité du disque dur décrit dans ce manuel est de 1 Go = 1 0003 octets. Les systèmes d’exploitation
•
et les applications utilisent le calcul suivant 1 Go = 1 024
achée varie.
Les droits d’auteur de ce manuel appartiennent à Bualo Technology, Inc. Il est interdit de copier, reproduire ou
modier ce manuel, en tout ou partie, sans autorisation.
BUFFALO™ est une marque de Melco Holdings Inc. Tous les autres produits mentionnés dans le présent
document sont des marques ou des marques déposées et appartiennent à leur propriétaire respectif.
Les spécications, la conception et autre contenu de ce manuel peuvent être modiés sans préavis et peuvent
ne pas correspondre au véritable produit.
Tout à été mis en œuvre pour garantir l’exactitude des informations contenues dans ce manuel. Si toutefois,
vous constatez des erreurs ou l’absence d’information, veuillez contacter votre revendeur ou l’assistance
technique Bualo Technology.
Ce produit a été conçu pour une utilisation dans les services administratifs ou pour un usage domestique.
Bualo Technology, Inc. ne peut en aucun cas être tenu responsable des dommages résultant d’une utilisation de ce
produit à d’autres ns qu’un usage administratif ou domestique.
•
•
Assurez-vous du respect de toutes les mesures de sécurité lors de la manipulation du produit.
Dans certains cas, Bualo Technology, Inc. prend en charge la réparation du produit, mais ne peut être tenu
responsable de la perte ou de l’altération de données enregistrées survenant lors de la réparation. Respectez
toutes les mesures de sécurité mentionnées dans ce document lorsque vous utilisez le produit en tant que
dispositif de lecture-écriture, lecteur de disque dur ou lorsque vous utilisez le produit connecté à un dispositif
de lecture-écriture. Sauvegardez régulièrement toutes les données indispensables. Bualo Technology, Inc. ne
peut être tenu responsable de la perte ou de l’altération de données résultant du non-respect des mesures de
sécurité ou de la non-sauvegarde des données enregistrées sur le produit.
Concernant la responsabilité en cas de défaillance ou d’activités interdites résultant de l’utilisation de ce
produit, à l’exception de négligence délibérée ou agrante de notre part, Bualo Technology, Inc. est tenu
d’indemniser le client à hauteur du prix d’achat du produit.
S'il est jugé défectueux, Bualo Technology, Inc. devra le réparer à titre gracieux ou le remplacer par le même
produit ou par un produit similaire. Bualo Technology, Inc. ne peut être tenu responsable des dommages
résultant d’un défaut du produit.
N'utilisez pas ce produit dans des applications exigeant un niveau de sécurité élevé, par exemple, des
systèmes directement ou indirectement liés aux appareils médicaux ou à la sécurité d’autrui.
Lorsque vous utilisez ce produit dans des applications mécaniques ou informatiques nécessitant un niveau
de abilité plus important que des équipements administratifs, faites votre possible pour fournir au système
un modèle de sécurité adapté, ainsi que des mesures adéquates de sûreté intégrée.
Il indique une opération qui nécessite une certaine
Il indique la prochaine page à consulter.
3
octets. Cela explique pourquoi la capacité
Page 39

Table des matières
Présentation ....................................................2
1
Graphique ....................................................................................................2
Mesures de sécurité ........................................3
2
Mesures de sécurité .....................................................................................3
Verrouillage du disque après authentication
Désinstallation du logiciel d’authentication du mot de passe (Macin-
..............................................................................................................5
tosh)
Utilisation avec Windows ...............................6
3
.........................................5
Conguration (modication) des paramètres par défaut du mot de passe
Authentication du mot de passe pour l’utilisation
Utilisation avec Mac OS X ...............................9
4
Installation du logiciel d’authentication du mot de passe ....................9
Conguration (modication) des paramètres par défaut du mot de passe
Authentication du mot de passe pour l’utilisation
En cas d’oubli de votre mot de passe ...........12
5
En cas d'oubli de votre mot de passe (formatage du dispositif) ...........12
Windows .......................................................................................................................................... 12
Macintosh
Spécications ................................................15
6
Spécications .............................................................................................15
....................................................................................................................................... 13
................................7
..............................10
..6
..9
Page 40

Présentation
1
Familiarisez-vous avec votre MiniStation.
Voyant de mise sous tension/d'accès
La lumière du voyant est verte lorsque
l’appareil est sous tension.
Elle passe à l’orange et clignote lorsque
vous accédez au disque dur.
Présentation
Port USB
(Mini B)
Connecteur CC
Vous pouvez enrouler le câble USB
autour du dispositif, en suivant les
bords et en l’insérant dans la rainure,
pour faciliter son transport.
2
Manuel d’utilisation HDS-PHU2 Series
Page 41

Mesures de sécurité
ATTENTION
2
Vous trouverez ci-dessous une description des mesures de sécurité à respecter lors de
l’utilisation de ce produit.
Mesures de sécurité
N’eectuez, en aucun cas, l'une des opérations suivantes,
sous peine de provoquer une perte de données.
•
Paramétrer le dispositif comme destination de sauvegarde de la mémoire
virtuelle.
•
Retirer le câble USB ou le câble d’alimentation, ou éteindre l’ordinateur
connecté lors de l'accès à ce dispositif.
•
Activer le mode d’économie d’énergie (veille, veille prolongée ou sommeil)
de l’ordinateur connecté. (Il se peut que le dispositif ne recommence pas à
fonctionner après l’activation du mode d’économie d’énergie.)
Une fois que vous avez terminé d'utiliser le dispositif, déconnectez-le de l’ordinateur.
Le dispositif se verrouille automatiquement lorsqu'il est déconnecté de l’ordinateur. Si l’ordinateur est éteint
ou redémarré sans que le dispositif n'ait été déconnecté au préalable, ce dernier peut ne pas se verrouiller.
En cas d’oubli de votre mot de passe, l’accès aux données enregistrées sur ce dispositif vous sera
refusé. Faites donc le nécessaire pour éviter ce type d’oubli.
Votre mot de passe doit rester secret et ne doit être communiqué à quiconque.
Sous Windows 2000, après authentication du mot de passe, le message de notication [Débrancher
ou Ejecter le matériel] s’ache, mais le dispositif fonctionne normalement. Cliquez sur [Fermer] pour
fermer ce message. Vous pouvez continuer à utiliser le dispositif.
Le système Macintosh ne permet pas l’utilisation de plusieurs dispositifs à la fois.
Si vous possédez un Macintosh, installez le logiciel d’authentication du mot de passe avant
d’utiliser le dispositif. (Sous Windows, l’installation du logiciel est inutile.)
Sous Macintosh, si plusieurs systèmes d’exploitation sont mis en œuvre, installez le logiciel
d’authentication du mot de passe sur tous les systèmes d’exploitation dont vous disposez.
La taille maximale d’un chier stocké sur un disque dur formaté avec FAT32 est de 4 Go.
Ce dispositif est formaté comme un disque dur FAT32. La taille maximale d’un chier est donc de 4 Go.
Si vous formatez ce dispositif au format NTFS ou Macintosh, il vous sera possible de stocker des chiers
de plus de 4 Go.
Sous Windows 2000, la boîte de dialogue [Assistant Nouveau matériel détecté] peut s’acher lors de la
conguration. Cliquez sur [Terminer] dans la boîte dialogue.
Le message [The software for this device is now installed, but may not work correctly.] (Le logiciel de ce
dispositif est maintenant installé, mais il se peut qu’il ne fonctionne pas correctement) s’ache, mais le
dispositif fonctionne normalement.
Manuel d’utilisation HDS-PHU2 Series
3
Page 42

Ce dispositif peut être connecté à chaud.
ATTENTION
Autrement dit, vous pouvez brancher et débrancher le câble USB du dispositif à partir d’un ordinateur
lorsque les deux dispositifs sont sous tension.
Ne débranchez jamais le câble USB lorsque vous êtes en train d’accéder au disque
dur (le voyant de mise sous tension/accès est orange et clignote), ceci peut
endommager les données enregistrées sur le disque dur.
An d’utiliser ce dispositif dans une conguration avec plusieurs dispositifs USB, munissez-vous d’un
concentrateur (hub) USB Bualo (non fourni) ou d’un dispositif similaire.
Lisez les manuels de l’ordinateur et du périphérique.
Ce dispositif ne permet pas d’amorcer le système d’exploitation.
Ne posez aucun objet contre ce dispositif.
Cela pourrait l’endommager.
Sous Windows XP et Vista, si ce dispositif est connecté à un port USB 1.1, le message d’avertissement
[Périphérique USB à haut débit connecté à un concentrateur USB à débit réduit] peut s’acher. Pour
continuer, cliquez sur [X] pour fermer la boîte de dialogue.
Ce dispositif peut émettre un son lors du démarrage et lorsque vous accédez au disque dur, par
exemple. Cela est normal.
L’installation des pilotes du dispositif permet d’ajouter les éléments suivants au Gestionnaire de
périphériques*.
* Suivez les instructions ci-dessous pour acher le Gestionnaire de périphériques.
Windows Vista .........................................Cliquez sur [Démarrer] avec le bouton droit de la souris, cliquez sur
Windows XP
Windows 2000
Système
d'exploitation
Windows Vista
Windows 2000/XP
.............................................Cliquez sur [Démarrer] avec le bouton droit de la souris, cliquez sur [Poste
........................................Avec le bouton droit de la souris, cliquez sur [Poste de travail] cliquez sur
Emplacement ajouté Nom du dispositif
Contrôleurs de bus USB Dispositif de stockage de masse USB
Lecteurs de disque Dispositif USB de lecteur de disque BUFFALO
Lecteurs de DVD/CD-ROM Dispositif USB de pont BUFFALO USB-ATA
Contrôleurs de bus USB Dispositif de stockage de masse USB
Lecteurs de disque Dispositif USB de lecteur de disque BUFFALO
Lecteurs de DVD/CD-ROM
[Ordinateur] cliquez sur [Gérer] cliquez sur [Continuer] lorsque le
message [Windows a besoin de votre autorisation pour continuer] s’ache
cliquez sur [Gestionnaire de périphériques]
de travail] cliquez sur [Gérer] cliquez sur [Gestionnaire de périphériques]
[Gérer] cliquez sur [Gestionnaire de périphériques]
Dispositif USB de pont BUFFALO USB-ATA
4
Manuel d’utilisation HDS-PHU2 Series
Page 43

Verrouillage du disque après authentication
Pour verrouiller le disque sécurisé, une fois le mot de passe authentié, déconnectez le dispositif de
l’ordinateur. Le verrouillage du dispositif n’est possible que s’il est déconnecté de l’ordinateur. Il est donc
recommandé de le déconnecter après utilisation.
Désinstallation du logiciel d'authentication
du mot de passe (Macintosh)
Respectez les instructions suivantes pour la désinstallation du logiciel d’authentication du mot de passe
d’un ordinateur Macintosh..
Allumez l’ordinateur, et connectez-vous avec le compte administrateur.
1
Connectez le dispositif à l’ordinateur.
2
Cliquez sur l’[Utility] (Utilitaire) sur le bureau dossier [Mac X] (Mac X)
3
dossier [Secure Disk Tool Uninstaller VJx.xx] (Désinstallation de l’outil de disque
sécurisé VJx.xx) (« x.xx » étant un nombre) et double-cliquez sur [Uninstall
Secure Disk Tool] (Désinstaller l’outil de disque sécurisé).
Suivez les instructions à l’écran pour désinstaller le logiciel.
Manuel d’utilisation HDS-PHU2 Series
5
Page 44

6
Manuel d’utilisation HDS-PHU2 Series
Utilisation avec Windows
ATTENTION
3
Pour utiliser ce dispositif avec Windows, suivez la procédure suivante.
I Conguration (modication) des paramètres par
défaut du mot du passe
Étant donné que le mot de passe déni en usine est divulgué, modiez-le avant d’utiliser ce dispositif.
* Sous Windows XP/2000, connectez-vous avec le compte administrateur.
Le mot de passe ne peut pas être déni si vous êtes connecté avec un compte utilisateur.
Le mot de passe défini en usine est [12345].
Connectez le dispositif à l’ordinateur.
1
* Lorsque l’écran ci-dessous apparaît, cliquez sur [Run Password.exe].
Cliquez ici.
2
Cliquez sur [Option] (Option).
* Si l'écran ci-dessus n'apparaît pas, dans [Ordinateur] ([Poste de travail]), cliquez sur [Utility] (Utili-
taire) puis double-cliquez sur [Password.exe].
Suite
Page 45

3
1 Saisissez le mot de passe actuel.
* Saisissez [12345] (mot de passe déni en
usine) lorsque vous utilisez ce dispositif pour la
première fois.
2 Tapez un nouveau mot de passe
(comportant entre 4 et 10 caractères)
dans les deux champs.
Entrez une phrase indice (comportant
3
entre 5 et 75 caractères).
4 Cliquez sur [OK].
* Les fonctions Copier et Coller sont désactivées pour les entrées concernant le mot de passe et l’indice.
Lorsque le message [Password Security enabled successfully.] (Sécurité par mot
4
de passe activée) apparaît, cliquez sur [OK].
Déconnectez le dispositif de l’ordinateur.
5
Les paramètres par défaut du mot de passe ont été congurés.
II Authentication du mot de passe pour
l’utilisation
Procédez à l’authentication du mot de passe et préparez le dispositif à la lecture et l’écriture de données.
Connectez le dispositif à l’ordinateur.
1
2
1 Saisissez le mot de passe actuel.
* Saisissez le mot de passe modié dans la
section I.
2 Cliquez sur [OK].
* Lorsque vous saisissez trois mots de passe incorrects, vous pouvez consulter la phrase indice
que vous avez entrée en cliquant sur le bouton [Hint] (Indice) (sous Windows XP/2000, cela ne
fonctionne que si vous êtes connecté avec un compte administrateur).
Suite
Manuel d’utilisation HDS-PHU2 Series
7
Page 46

3
Cliquez sur [OK].
Assurez-vous que [Secure Disk] (Disque sécurisé) apparaît dans [Ordinateur]
4
([Poste de travail]).
Vériez que [Secure Disk]
(Disque sécurisé) apparaît.
La procédure est terminée. Le [Secure Disk] (Disque sécurisé) est maintenant prêt pour la lecture et l’écriture
de données tout comme un disque dur classique.
Pour stocker des chiers de plus de 4 Go
Formatez le disque sécurisé au format NTFS. Le dispositif est fourni au format FAT32. Il ne peut
stocker des chiers de plus de 4 Go. Il s'agit d'une limite du format FAT32. Lorsque le dispositif
est formaté avec NTFS, il peut stocker des chiers de plus de 4 Go. Pour utiliser ce dispositif avec
les ordinateurs Mac OS également, utilisez-le tel quel, sans formatage. FAT32 fonctionne avec les
ordinateurs Windows et Mac. NTFS ne peut pas être utilisé avec MAC OS.
8
Manuel d’utilisation HDS-PHU2 Series
Page 47

Utilisation avec un Mac
ATTENTION
4
Pour utiliser ce dispositif avec Mac OS X, suivez la procédure ci-dessous..
I Installation du logiciel d’authentication du mot de passe
Installez le logiciel d’authentication du mot de passe Secure Disk Tool (Outil de disque sécurisé).
Allumez l’ordinateur, et connectez-vous avec le compte administrateur.
1
Connectez le dispositif à l’ordinateur.
2
Ouvrez l’[Utility] (Utilitaire) sur le bureau puis double-cliquez sur
3
[Secure Disk Tool InstallerVJ1_xx.pkg] (Installation de l’outil de disque sécurisé
VJ1_xx.pkg) dans le dossier [Mac X] (Mac X).
* Dans [Secure Disk Tool Installer VJ1_xx.pkg] (Installation de l’outil de disque sécurisé VJ1_xx.pkg),
« xx » est un numéro de version.
Suivez les instructions à l’écran pour installer le logiciel.
II Conguration (modication) des paramètres par
défaut du mot du passe
Étant donné que le mot de passe déni en usine est divulgué, modiez-le avant d’utiliser ce dispositif.
Le mot de passe défini en usine est [12345].
Double-cliquez sur [Secure Disk Tool] (Outil de disque sécurisé) sur le
1
bureau.
2
Cliquez sur [Option] (Option).
Manuel d’utilisation HDS-PHU2 Series
Suite
9
Page 48

10
Manuel d’utilisation HDS-PHU2 Series
3
* Les fonctions Copier et Coller sont désactivées pour les entrées concernant le mot de passe et
l’indice.
Lorsque le message [Password Security enabled successfully.] (Sécurité par mot
4
de passe activée) apparaît, cliquez sur [OK].
Déconnectez le dispositif de l’ordinateur.
5
Le mot de passe a été modié.
1 Saisissez le mot de passe actuel.
* Saisissez [12345] (mot de passe déni en usine)
lorsque vous utilisez ce dispositif pour la
première fois.
2 Tapez un nouveau mot de passe
(comportant entre 4 et 10 caractères)
dans les deux champs.
3
Entrez une phrase indice (comportant
entre 5 et 75 caractères).
4 Cliquez sur [OK].
III Authentication du mot de passe pour l’utilisation
Procédez à l’authentication du mot de passe et préparez le dispositif à la lecture et l’écriture de données.
Connectez le dispositif à l’ordinateur.
1
Double-cliquez sur [Secure Disk Tool] (Outil de disque sécurisé) sur le
2
bureau.
3
1 Saisissez votre mot de passe.
2 Cliquez sur [Authenticate] (Authentier).
* Lorsque vous saisissez trois mots de passe
incorrects, vous pouvez consulter la phrase
indice que vous avez entrée en cliquant sur le
bouton [Hint] (Indice).
Suite
Page 49

Lorsque le message [Login successful.] (Connexion réussie) apparaît, cliquez sur
4
[OK].
* Un message d’avertissement de type [Set disk contains unreadable volume with Mac OS X.]
(Le disque contient des informations impossibles à lire avec Mac OS X.) peut apparaître.
Cliquez sur [OK].
Assurez-vous que [Secure Disk] (Disque sécurisé) ( ) apparaît sur le bureau.
5
La procédure est terminée. Le [Secure Disk] (Disque sécurisé) est maintenant prêt pour la lecture et l’écriture
de données tout comme un disque dur classique.
Pour stocker des chiers de plus de 4 Go
Formatez le disque sécurisé au format Mac OS Extended. Le dispositif est fourni au format FAT32.
Il ne peut stocker des chiers de plus de 4 Go. Il s'agit d'une limite du format FAT32. Lorsque le
dispositif est formaté avec Mac OS Extended, il peut stocker des chiers de plus de 4 Go. Pour
utiliser ce dispositif avec des ordinateurs Windows également, utilisez-le tel quel, sans formatage.
FAT32 fonctionne avec les ordinateurs Windows et Mac. Le format Mac OS Extended ne peut pas
être utilisé avec les ordinateurs Windows.
Manuel d’utilisation HDS-PHU2 Series
11
Page 50

12
Manuel d’utilisation HDS-PHU2 Series
En cas d’oubli de votre mot de passe
ATTENTION
ATTENTION
Suite
5
Si vous oubliez votre mot de passe, vous devez formater le dispositif pour pouvoir l’utiliser
à nouveau. La section suivante indique la procédure à suivre pour formater le dispositif.
En cas d’oubli de votre mot de passe (formatage du dispositif)
Si vous avez oublié votre mot de passe, vous devez formater le dispositif. Le formatage du dispositif entraîne
l’eacement de toutes les données stockées sur celui-ci ainsi que la réinitialisation du mot de passe. Vous
devez uniquement formater le dispositif si vous oubliez votre mot de passe.
La procédure ci-dessous reformate DriveStation en tant que disque dur
FAT32 et eace toutes les données stockées. Avant de procéder au formatage,
déplacez toutes les données indispensables sur un ordinateur ou sur un
autre dispositif de stockage. Pour stocker des chiers de plus de 4 Go sur ce
dispositif, reformatez le disque dur avec NTFS ou Macintosh.
Windows
Pour formater le dispositif sous Windows 2000 ou XP, vous devez vous connecter
avec le compte administrateur.
Connectez le dispositif à l’ordinateur.
1
Lorsque la fenêtre d’authentication du mot de passe apparaît, fermez-la.
Sous Windows Vista, la fenêtre Lecture automatique peut apparaître. Fermez cette fenêtre.
Dans [Ordinateur] ([Poste de travail]), cliquez avec le bouton droit de la souris
2
sur l’[Utility] (Utilitaire) ( ) et sélectionnez [Ouvrir].
Double-cliquez sur [menu.exe].
3
Dans la fenêtre ouverte, sélectionnez [Initialize Device] (Initialiser le dispositif)
4
puis cliquez sur [Start] (Démarrer).
5
Cliquez sur [Reset Password]
(Réinitialiser le mot de passe).
Page 51

Suite
Saisissez le nouveau mot de passe (à
6
La fenêtre suivante apparaît trois fois.
7
Conrmez le contenu et cliquez sur [Yes] (Oui).
Lorsque le message [The password has been reset successfully.] (Le mot de
8
passe a été réinitialisé.) apparaît, cliquez sur [OK] puis déconnectez le dispositif
de l’ordinateur.
Le dispositif a été formaté et le mot de passe a été réinitialisé.
1
deux reprises). Le mot de passe doit
contenir entre 4 et 10 caractères.
Entrez une phrase indice. La phrase indice
2
doit contenir entre 5 et 75 caractères.
Cliquez sur [Reset Password] (Réinitialiser
3
le mot de passe).
Remarque :
N’utilisez pas les fonctions Copier et Coller pour
les entrées concernant le mot de passe et l’indice.
Conrmez le contenu.
1
Cliquez sur [Yes] (Oui).
2
Macintosh
Connectez le dispositif à l’ordinateur.
1
Double-cliquez sur [Secure Disk Tool] (Outil de disque sécurisé) ( ) sur le
2
bureau.
3
Cliquez sur [Option] (Option).
4
Cliquez sur [Reset Password]
(Réinitialiser le mot de passe).
Manuel d’utilisation HDS-PHU2 Series
13
Page 52

5
6
La fenêtre suivante apparaît trois fois.
7
Conrmez le contenu et cliquez sur [Yes] (Oui).
Cliquez sur [Reset Password]
(Réinitialiser le mot de passe).
Saisissez le nouveau mot de passe
1
(à deux reprises). Le mot de passe doit
contenir entre 4 et 10 caractères.
Entrez une phrase indice. La phrase indice
2
doit contenir entre 5 et 75 caractères.
Cliquez sur [Reset Password]
3
(Réinitialiser le mot de passe).
Remarque : Les fonctions Copier et Coller
Conrmez le contenu.
4
sont désactivées pour les entrées
concernant le mot de passe et l’indice..
Lorsque le message [The password has been reset successfully.] (Le mot de
8
passe a été réinitialisé.) apparaît, cliquez sur [OK] puis déconnectez le dispositif
de l’ordinateur.
Le dispositif a été formaté et le mot de passe a été réinitialisé.
14
Manuel d’utilisation HDS-PHU2 Series
Cliquez sur [Yes] (Oui).
5
Page 53

Spécications
6
Spécications
* Pour plus d’informations sur les nouveautés concernant les produits et sur les modèles pris en charge,
reportez-vous au catalogue de Bualo Technology, Inc. ou visitez notre site Web à l’adresse suivante :
www.bualotech.com.
Interface USB
Normes USB Spécication USB Rev. 2.0
Port Port USB Mini B
Capacité 512 octets/secteur
Temps d'accès 13 msec maximum
Vitesse de transmission
(valeur théorique)
Format à l’achat FAT32 (partition unique)
Dimensions 127 (L) × 84 (H) × 23 (P) mm (pièces en saillie non incluses)
Power consumption 2,5 W maximum
Alimentation électrique 5 Vcc ±5 %
Environnement
d'exploitation
Modèles pris en charge Modèles d’ordinateurs suivants avec un port USB standard :
Systèmes
d'exploitation
pris en charge
Température Entre 0 et 45 ºC
Humidité 10-85 % d'humidité (sans condensation)
DOS/V Windows Vista/XP (y compris Édition Media Center)
Macintosh Mac OS X 10.4 (ou versions supérieures)
480 Mbits/s maximum*
DOS/V (OADG specications)
•
Gamme Apple Mac (avec processeur Intel)
•
Windows 2000 Service Pack 3 ou version ultérieure
* Pour utiliser ce dispositif au mode HS (avec une vitesse de transmission maximale de 480 Mbits/s), tel
que déni dans les spécications USB 2.0, une interface USB 2.0 est nécessaire.
Macintosh et Mac OS sont des marques commerciales d'Apple Inc., déposées aux États-Unis et dans
d'autres pays. Windows est une marque déposée de Microsoft Corporation aux États-Unis et dans
d'autres pays.
Manuel d’utilisation HDS-PHU2 Series
15
Page 54

Manuel d’utilisation HDS-PHU2 Series
Première édition, 30 mai 2008
Publié par Bualo Technology,Inc.
Page 55

Unità disco rigido USB con crittograa
Serie HDS-PHU2
Manuale per l'utente
Nomi dei componenti .....................2
Misure di sicurezza ..........................3
Utilizzo con Windows ......................6
Utilizzo con Macintosh ....................9
Password dimenticata ..................12
Speciche tecniche .......................15
1
2
3
4
5
6
Page 56

Utilizzo del manuale
ATTENZIONE
Avanti
Di seguito vengono illustrati i simboli utilizzati per garantire il corretto utilizzo del manuale.
Simboli
Simbolo di attenzione ............
la durante l'utilizzo del prodotto. In caso contrario, potrebbero vericarsi
lesioni alla persona o danni al prodotto.
Simbolo Avanti ..........................
Termini utilizzati nel manuale
Le istruzioni nel manuale vengono descritte utilizzando la seguente congurazione dell'unità in Windows.
•
C: unità disco rigido
D: unità CD-ROM
Le parentesi [ ] indicano i nomi delle nestre di dialogo, dei menu, dei pulsanti e delle caselle di
•
controllo che possono essere selezionati durante le operazioni.
La capacità del disco rigido descritta nel manuale è calcolata come segue: 1 GB = 1.0003 byte. I sistemi
•
operativi e le applicazioni utilizzano il seguente calcolo: 1 GB = 1.0243 byte, pertanto la capacità
visualizzata può variare.
Il copyright del manuale appartiene a Bualo Technology, Inc. È vietata la copia, la riproduzione o la modica,
parziale o totale, del manuale senza autorizzazione.
BUFFALO™ è un marchio di Melco Holdings Inc. Tutti gli altri prodotti qui citati sono marchi o marchi registrati
dei rispettivi proprietari.
Le speciche tecniche, il design e gli altri contenuti disponibili nel presente manuale sono soggetti a modiche
senza preavviso ed è possibile che non corrispondano a quelli del prodotto eettivo.
È stata posta la massima attenzione nel garantire l'esattezza delle informazioni presenti in questo manuale.
Qualora si rilevassero errori o lacune nelle informazioni fornite, contattare il proprio rivenditore o il servizio di
assistenza tecnica di Bualo Technology.
Questo prodotto è stato sviluppato per uso domestico e attività d'ucio. Bualo Technology, Inc. declina
qualsiasi responsabilità per danni causati dall'utilizzo del prodotto per scopi diversi da quelli specicati.
Non utilizzare il prodotto nelle applicazioni che richiedono un elevato livello di sicurezza, quali sistemi
•
direttamente o indirettamente correlati alla sicurezza della persona o ad apparecchiature mediche.
Nei casi in cui il prodotto venga utilizzato in applicazioni computerizzate o meccaniche che richiedono una
•
maggiore adabilità di quella fornita dalle consuete apparecchiature d'ucio, è fondamentale garantire un
piano di sicurezza per il sistema e misure di protezione adeguate indentation.
Per l'utilizzo del prodotto, attenersi alle procedure riportate in questo manuale. Assicurarsi di seguire tutte le
misure di sicurezza relative alla manipolazione del prodotto.
Bualo Technology, Inc. provvede alla riparazione del prodotto in determinate circostanze, ma non si ritiene
responsabile dell'eventuale perdita o danneggiamento dei dati memorizzati nel corso della riparazione. Se il
prodotto viene utilizzato come dispositivo di registrazione dati, come unità disco rigido o se viene collegato a
un dispositivo di registrazione dati, seguire tutte le misure di sicurezza illustrate. Assicurarsi di eseguire il backup
di tutti i dati importanti ad intervalli regolari. Bualo Technology, Inc. non si ritiene responsabile dell'eventuale
perdita o danneggiamento dei dati come conseguenza della violazione delle norme di sicurezza da parte
dell'utente o del mancato backup dei dati registrati nel prodotto.
Bualo Technology, Inc., risarcirà il cliente per una cifra non superiore al costo del prodotto, in caso di
responsabilità dovuta ad attività di inadempienza o attività illegali risultanti dall'utilizzo del prodotto, salvo i casi
di dolo e colpa grave da parte di Bualo Technology, Inc.
In caso di prodotto difettoso, Bualo Technology, Inc. provvederà alla riparazione del prodotto senza costi
aggiuntivi o alla sostituzione di esso con un altro prodotto uguale o con caratteristiche simili. Bualo
Technology, Inc. non si ritiene responsabile di eventuali danni causati dai difetti del prodotto.
Indica un'operazione che deve essere eseguita con caute-
Indica la pagina successiva a cui andare.
Page 57

Sommario
Layout ..............................................................2
1
Schema .........................................................................................................2
Misure di sicurezza .......................................... 3
2
Misure di sicurezza ......................................................................................3
Blocco dell'unità dopo l'autenticazione
Disinstallazione del software di autenticazione della password
(Macintosh)
Utilizzo con Windows ......................................6
3
..................................................................................................5
....................................................5
Congurazione (modica) delle impostazioni predenite della password
Autenticazione della password da utilizzare
Utilizzo con Mac OS X ......................................9
4
Installazione del software di autenticazione della password .................9
Congurazione (modica) delle impostazioni predenite della password
Autenticazione della password da utilizzare
Password dimenticata ..................................12
5
Password dimenticata (formattazione del dispositivo) .........................12
Windows .......................................................................................................................................... 12
Macintosh
Speciche tecniche .......................................15
6
Speciche tecniche ....................................................................................15
....................................................................................................................................... 13
............................................7
..........................................10
...6
...9
Page 58

Layout
1
Schema illustrativo del dispositivo MiniStation.
Indicatore di alimentazione/accesso.
Si illumina in verde quando il dispositivo
è acceso.
Lampeggia in arancione durante
l'accesso all'unità disco rigido.
Layout
Porta USB
(Mini-B)
Presa CC
È possibile avvolgere il cavo USB
intorno al dispositivo, inserendolo
nella scanalatura, per una migliore
trasportabilità.
2
Manuale per l'utente serie HDS-PHU2
Page 59

Misure di sicurezza
ATTENZIONE
2
In questa sezione vengono descritte le misure di sicurezza relative all'utilizzo del prodotto.
Misure di sicurezza
L'esecuzione di una delle seguenti operazioni può comportare
la perdita di dati.
•
Impostazione del dispositivo come destinazione di salvataggio della
memoria virtuale.
•
Rimozione del cavo USB o del cavo di alimentazione oppure spegnimento
del computer collegato al momento dell'accesso al dispositivo.
•
Abilitazione della modalità di risparmio energetico (standby, ibernazione
o sospensione) del computer collegato. Una volta immessa la modalità
di risparmio energetico, è possibile che il computer non sia in grado di
riprendere le operazioni.
Dopo aver utilizzato il dispositivo, assicurarsi di scollegarlo dal computer.
Una volta scollegato, il dispositivo si blocca automaticamente. Ciò non si verica se il computer viene
spento o riavviato senza prima aver disconnesso il dispositivo.
Se si dimentica la password, non sarà possibile accedere ai dati registrati nel dispositivo. Pertanto, è
fondamentale prendere tutte le precauzioni per evitare di dimenticarla.
Conservare la password in un luogo sicuro e non rivelarla a terzi.
In Windows 2000, dopo l'autenticazione della password, viene visualizzata la notica [Unplug or
Eject Hardware (Scollegare o espellere hardware)] sebbene il dispositivo funzioni in maniera corretta.
Fare clic su [Chiudi] per chiudere la notica. È possibile continuare ad utilizzare il dispositivo.
In Macintosh, non è possibile utilizzare più dispositivi contemporaneamente.
Se si sta utilizzando Macintosh, installare il software di autenticazione della password prima di
utilizzare il dispositivo. Non è necessario installare alcun software per Windows.
In Macintosh, nel caso in cui siano installati più sistemi operativi, installare il software di autenticazione
della password su tutti i sistemi operativi Macintosh.
La dimensione massima per un le memorizzato su un'unità disco rigido formattata in FAT32 è di 4 GB.
Il dispositivo viene formattato come un'unità disco rigido FAT32, pertanto la dimensione massima del le
è di 4 GB. Nel caso in cui il dispositivo venga formattato in NTFS o in un formato Macintosh, è possibile
memorizzare le con dimensioni maggiori di 4 GB.
In Windows 2000, durante l'impostazione è possibile che venga visualizzata la nestra di dialogo [Found
New Hardware Wizard (Installazione guidata nuovo hardware)]. Fare clic su [Fine] nella nestra di dialogo.
Viene visualizzato il messaggio [The software for this device is now installed, but may not work correctly
(Il software del dispositivo è installato ma potrebbe non funzionare correttamente)], sebbene il
dispositivo stia funzionando in maniera corretta.
Manuale per l'utente serie HDS-PHU2
3
Page 60

Questo dispositivo è in grado di supportare il collegamento a sistema acceso.
ATTENZIONE
È quindi possibile collegare e scollegare il cavo USB del dispositivo dal computer quando entrambi i
dispositivi sono attivi.
Non scollegare mai il cavo USB durante l'accesso all'unità disco rigido (l'indicatore
di alimentazione/accesso lampeggia in arancione) in quanto tale operazione può
danneggiare i dati registrati sull'unità disco rigido.
Per utilizzare il dispositivo in una congurazione con più dispositivi USB, utilizzare un hub USB di
Bualo (fornito separatamente) o un dispositivo simile.
Leggere la documentazione relativa al computer e all'apparecchiatura periferica.
Il dispositivo non può essere utilizzato per avviare il sistema operativo.
Non posizionare altri oggetti sul dispositivo
o potrebbero vericarsi dei danni.
In Windows XP and Vista, se il dispositivo è connesso a una porta USB 1.1, viene visualizzato il
messaggio di avviso [Dispositivo USB ad alta velocità collegato a un hub USB non ad alta velocità].
Per continuare con le operazioni, fare clic su [X] per chiudere la nestra di dialogo.
Durante l'utilizzo è possibile che venga emesso un segnale acustico, ad esempio all'avvio e quando
viene eettuato l'accesso all'unità disco rigido. L'emissione di tale segnale è normale.
L'installazione dei driver del dispositivo consente di aggiungere i seguenti dispositivi in Gestione
dispositivi*.
* Utilizzare le procedure riportate di seguito per visualizzare Gestione dispositivi.
Windows Vista .........................................Fare clic su [Start] fare clic con il pulsante destro del mouse su [Computer]
Windows XP
Windows 2000
Sistema operativo Posizione aggiunta Nome dispositivo
Windows Vista
Windows 2000/XP
.............................................Fare clic su [Start] fare clic con il pulsante destro del mouse su [Risorse del
........................................Fare clic con il pulsante destro del mouse su [Risorse del computer]
Controller USB (Universal Serial Bus)
Unità disco BUFFALO Disk Drive USB Device
Unità DVD/CD-ROM BUFFALO USB-ATA Bridge USB Device
Controller USB (Universal Serial Bus)
Unità disco BUFFALO Disk Drive USB Device
Unità DVD/CD-ROM
fare clic su [Gestione] fare clic su [Continua] quando viene visualizzato il
messaggio [Per continuare è necessaria l'autorizzazione dell'utente]
fare clic su [Gestione dispositivi]
computer] fare clic su [Gestione] fare clic su [Gestione periferiche]
fare clic su [Gestione] fare clic su [Gestione periferiche]
Dispositivo di archiviazione di massa USB
Dispositivo di archiviazione di massa USB
BUFFALO USB-ATA Bridge USB Device
4
Manuale per l'utente serie HDS-PHU2
Page 61

Blocco dell'unità dopo l'autenticazione
Per bloccare Secure Disk dopo l'autenticazione della password, è necessario scollegare il dispositivo dal
computer. Il dispositivo viene bloccato solo se scollegato dal computer, pertanto si consiglia di scollegarlo
sempre dopo l'utilizzo.
Disinstallazione del software di autenticazione
della password (Macintosh)
Per disinstallare il software di autenticazione della password da un computer Macintosh seguire la procedura
riportata di seguito.
Accendere il computer ed eettuare l'accesso mediante l'account di
1
amministratore.
Collegare il dispositivo al computer.
2
Fare clic su [Utility (Utilità)] sul desktop cartella [Mac X] cartella [Secure
3
Disk Tool Uninstaller VJx.xx] (dove "x.xx" è un numero) e fare doppio clic su
[Uninstall Secure Disk Tool (Disinstalla Secure Disk Tool)].
Seguire le istruzioni visualizzate nella schermata per disinstallare il software.
Manuale per l'utente serie HDS-PHU2
5
Page 62

6
Manuale per l'utente serie HDS-PHU2
Utilizzo con Windows
ATTENZIONE
3
Per utilizzare il dispositivo con Windows seguire la procedura riportata di seguito.
Congurazione (modica) delle impostazioni
predenite della password
La password predenita è pubblica, è quindi necessario modicare la password prima di utilizzare il
dispositivo.
* Per Windows XP/2000, eettuare l'accesso mediante l'account di amministratore.
Non è possibile impostare la password eettuando l'accesso con un account utente.
La password predefinita è [12345].
Collegare il dispositivo al computer.
1
* Quando viene visualizzata la schermata riportata di seguito, fare clic su [Run Password.exe (Esegui
Password.exe)].
Fare clic qui.
2
Fare clic su [Opzione].
* Se la schermata sopra indicata non viene visualizzata, è possibile fare doppio clic su [Password.
exe] in [Utility] (Utilità) da [Computer] ([Risorse del computeruter]).
Continua
Page 63

3
* La funzione di copia e incolla è disabilitata nei campi relativi alla password e al suggerimento.
Una volta visualizzato il messaggio [Password Security enabled successfully
4
(Abilitazione protezione password completata)], fare clic su [OK].
Scollegare il dispositivo dal computer.
5
Vengono congurate le impostazioni predenite della password.
1 Immettere la password corrente.
* Immettere [12345] (impostazione predenita)
quando si utilizza il dispositivo per la prima volta.
2 Immettere una nuova password
(da 4 a 10 caratteri) nei due campi.
3
Immettere un suggerimento
(da 5 a 75 caratteri).
4 Fare clic su [OK].
II Autenticazione della password da utilizzare
Autenticare la password e preparare il dispositivo alla lettura e alla scrittura dei dati.
Collegare il dispositivo al computer.
1
2
* Se viene immessa una password non valida per 3 volte di seguito, è possibile vericare il
suggerimento immesso facendo clic sul pulsante [Suggerimento] (per Windows XP/2000,
disponibile solo eettuando l'accesso mediante l'account di amministratore).
1 Immettere la password corrente.
* Immettere la password modicata nella
sezione I.
2 Fare clic su [OK].
Manuale per l'utente serie HDS-PHU2
Continua
7
Page 64

3
Fare clic su [OK].
Assicurarsi che [Secure Disk] venga aggiunto in [Computer] ([Risorse del
4
computer]).
Vericare che [Secure Disk] sia stato
aggiunto.
La procedura è stata completata. [Secure Disk] è ora pronto per la lettura e la scrittura dei dati come una
comune unità disco rigido.
Per memorizzare le di dimensioni superiori a 4 GB
Formattare Secure Disk in NTFS. Il dispositivo viene fornito con una formattazione in FAT32 e non
è in grado di memorizzare le di dimensioni superiori a 4 GB (limitazione del formato FAT32).
È possibile archiviare le di dimensioni superiori a 4 GB se il dispositivo viene formattato in NTFS.
Per utilizzare il dispositivo anche con Mac OS, la formattazione non è necessaria. Il formato FAT32
può essere utilizzato sia con i computer Windows che con quelli Mac. Il formato NTFS non può
essere utilizzato con MAC OS.
8
Manuale per l'utente serie HDS-PHU2
Page 65

Utilizzo con Mac
ATTENZIONE
4
Per utilizzare il dispositivo con Mac OS X, seguire la procedura riportata di seguito.
I Installazione del software di autenticazione della password
Installare il software di autenticazione della password Secure Disk Tool.
Accendere il computer ed eettuare l'accesso mediante l'account di amministratore.
1
Collegare il dispositivo al computer.
2
Aprire [Utility (Utilità)] sul desktop e fare doppio clic su [Secure Disk Tool
3
InstallerVJ1_xx.pkg] nella cartella [Mac X].
* In [Secure Disk Tool Installer VJ1_xx.pkg] "xx" indica il numero della versione.
Seguire le istruzioni visualizzate nella schermata per installare il software.
II Congurazione (modica) delle impostazioni
predenite della password
La password predenita è pubblica, è quindi necessario modicare la password prima di utilizzare il
dispositivo.
La password predefinta è [12345].
Fare doppio clic su [Secure Disk Tool] sul desktop.
1
2
Fare clic su [Opzione].
Manuale per l'utente serie HDS-PHU2
Continua
9
Page 66

10
Manuale per l'utente serie HDS-PHU2
3
* La funzione di copia e incolla è disabilitata nei campi relativi alla password e al suggerimento.
Una volta visualizzato il messaggio [Password Security enabled successfully
4
(Abilitazione protezione password completata)], fare clic su [OK].
Scollegare il dispositivo dal computer.
5
La password è stata modicata.
1 Immettere la password corrente.
* Immettere [12345] (impostazione predenita)
se si utilizza il dispositivo per la prima volta.
2 Immettere una nuova password
(da 4 a 10 caratteri) nei due campi.
3
Immettere un suggerimento
(da 5 a 75 caratteri).
4 Fare clic su [OK].
III Autenticazione della password da utilizzare
Autenticare la password e preparare il dispositivo alla lettura e alla scrittura dei dati.
Collegare il dispositivo al computer.
1
Fare doppio clic su [Secure Disk Tool] sul desktop.
2
3
1 Immettere la password.
2 Fare clic su [Authenticate
(Autenticazione)].
* Se viene immessa una password non valida
per 3 volte di seguito, è possibile vericare
il suggerimento immesso facendo clic sul
pulsante [Suggerimento].
Continua
Page 67

Una volta visualizzato il messaggio [Login successful (Accesso eseguito)], fare
4
clic su [OK].
* È possibile che venga visualizzato un messaggio di avviso simile al seguente [Set disk contains
unreadable volume with Mac OS X (Il disco impostato contiene un volume non leggibile
mediante Mac OS X).]. Fare clic su [OK].
Assicurarsi che l'icona [Secure Disk] ( ) venga visualizzata sul desktop.
5
La procedura è stata completata. [Secure Disk] è ora pronto per la lettura e la scrittura dei dati come una
comune unità disco rigido.
Per memorizzare le di dimensioni superiori a 4 GB
Formattare Secure Disk con il formato esteso Mac OS. Il dispositivo viene fornito con una
formattazione in FAT32 e non è in grado di memorizzare le di dimensioni superiori a 4 GB
(limitazione di FAT32). È possibile archiviare le di dimensioni superiori a 4 GB, se il dispositivo
viene formattato nel formato esteso Mac OS. Per utilizzare il dispositivo anche con Windows,
la formattazione non è necessaria. Il formato FAT32 può essere utilizzato sia con i computer
Windows che con quelli Mac. Il formato esteso Mac OS non può essere utilizzato con Windows.
Manuale per l'utente serie HDS-PHU2
11
Page 68

12
Manuale per l'utente serie HDS-PHU2
Password dimenticata
ATTENZIONE
ATTENZIONE
Continua
5
In caso di password dimenticata, è necessario eseguire la formattazione del dispositivo per
poterlo utilizzare nuovamente. Di seguito viene descritta la procedura di formattazione del
dispositivo.
Password dimenticata (formattazione del dispositivo)
In caso di password dimenticata, è necessario formattare il dispositivo. La formattazione del dispositivo
comporta la cancellazione di tutti i dati memorizzati e la reimpostazione della password. La formattazione
del dispositivo è necessaria solo in caso di password dimenticata.
La procedura seguente riformatta la DriveStation come unità disco rigido
FAT32 ed elimina tutti i dati archiviati. Prima di formattare il dispositivo,
spostare tutti i dati necessari su un computer o su altro dispositivo di
archiviazione. Per archiviare le di dimensioni superiori a 4 GB nel dispositivo,
è necessario riformattare il disco rigido in formato NTFS o Macintosh.
Windows
Per formattare il dispositivo in Windows 2000 o XP, è necessario eettuare l'accesso
mediante un account di amministratore.
Collegare il dispositivo al computer.
1
Chiudere la nestra di autenticazione della password quando viene visualizzata.
È possibile che in Windows Vista venga visualizzata la nestra AutoPlay. Chiudere la nestra.
Fare clic con il pulsante destro del mouse su [Utility (Utilità)] ( ) in
2
[Computer] ([Risorse del computer]) e selezionare [Apri].
Fare doppio clic su [menu.exe].
3
Selezionare [Initialize Device (Inizializza dispositivo)] nella nestra, quindi fare
4
clic su [Avvia].
5
Fare clic su [Reset Password
(Reimposta password)].
Page 69

Continua
Immettere la nuova password (due volte).
6
La nestra riportata di seguito viene visualizzata tre volte.
7
Confermare il contenuto e fare clic su [Sì].
Una volta visualizzato il messaggio [The password has been reset successfully
8
(La password è stata reimpostata correttamente)], fare clic su [OK] e scollegare
il dispositivo dal computer.
Il dispositivo è stato formattato e la password è stata reimpostata.
1
La password deve contenere un numero
di caratteri compreso tra 4 e 10.
Immettere il suggerimento. Il suggerimento
2
deve contenere un numero di caratteri
compreso tra 5 e 75.
Fare clic su [Reset Password
3
(Reimposta password)].
Nota: non utilizzare la funzione di copia e incolla per i
campi relativi alla password e al suggerimento.
Confermare il contenuto.
1
Fare clic su [Sì].
2
Macintosh
Collegare il dispositivo al computer.
1
Fare doppio clic su [Secure Disk Tool] ( ) sul desktop.
2
3
Fare clic su [Opzione].
4
Fare clic su [Reset Password
(Reimposta password)].
Manuale per l'utente serie HDS-PHU2
13
Page 70

5
Fare clic su [Reset Password
(Reimposta password)].
6
La nestra riportata di seguito viene visualizzata tre volte.
7
Confermare il contenuto e fare clic su [Sì].
Immettere la nuova password (due volte).
1
La password deve contenere un numero
di caratteri compreso tra 4 e 10.
Immettere il suggerimento.
2
Il suggerimento deve contenere un
numero di caratteri compreso tra 5 e 75.
Fare clic su [Reset Password
3
(Reimposta password)].
Nota: la funzione di copia e incolla è disabilitata
nei campi relativi alla password e al
suggerimento.
Confermare il contenuto.
4
Una volta visualizzato il messaggio [The password has been reset successfully
8
(La password è stata reimpostata correttamente).], fare clic su [OK] e scollegare
il dispositivo dal computer.
Il dispositivo è stato formattato e la password è stata reimpostata.
14
Manuale per l'utente serie HDS-PHU2
Fare clic su [Sì].
5
Page 71

Speciche tecniche
6
Speciche tecniche
* Per ottenere informazioni aggiornate relative al prodotto e ai modelli supportati, consultare il catalogo
o il sito Web (www.bualotech.com) di Bualo Technology, Inc.
Interfaccia USB
Standard USB Speciche USB Rev. 2.0
Porta Porta Mini-B USB
Capacità 512 byte/settore
Tempo di posizionamento Max. 13 msec
Velocità di trasmissione (teorica) Max. 480 Mbps*
Formato al momento
dell'acquisto
Dimensioni 127 (L) × 84 (A) × 23 (P) mm (escluse le parti sporgenti)
Consumo Max. 2,5 W
Corrente elettrica 5V±5% C.C.
Temperatura
di esercizio
Modelli supportati I modelli di computer riportati di seguito con porta USB standard.
Sistemi
operativi
supportati
* Per utilizzare il dispositivo in modalità HS (alla velocità massima di trasmissione di 480 Mbps), come
denito dalle speciche USB 2.0, è necessaria un'interfaccia USB 2.0.
Temperatura 0–45ºC
Umidità 10-85% senza condensa
DOS/V Windows Vista/XP (incluso Media Center Edition),
Macintosh Mac OS X 10.4 o versioni successive
FAT32 (partizione unica)
DOS/V (speciche OADG)
•
Serie Apple Mac (con processore Intel)
•
Windows 2000 Service Pack 3 o versioni successive
Macintosh e Mac OS sono marchi di Apple Inc., registrati negli Stati Uniti e in altri paesi. Windows è un
marchio registrato di Microsoft Corporation negli Stati Uniti e in altri paesi.
Manuale per l'utente serie HDS-PHU2
15
Page 72

Manuale per l'utente serie HDS-PHU2
Prima edizione, 30 maggio 2008
Pubblicato da Bualo Technology, Inc.
Page 73

Disco duro USB con cifrado
Serie HDS-PHU2
Manual de usuario
Nombres de las piezas ....................2
Precauciones de seguridad ............3
Cómo usar con Windows .................6
Cómo usar con Macintosh ..............9
Si olvida su contraseña .................12
Especicaciones ............................15
1
2
3
4
5
6
Page 74

Uso de este manual
ADVERTENCIA
Siguiente
Explicamos a continuación los símbolos utilizados en el presente manual para garantizar un uso adecuado
del mismo.
Símbolos
Símbolo de advertencia .......................
en el manejo del producto. No observar la advertencia puede
provocar lesiones personales o daños en el producto.
Símbolo de siguiente operación .......
Términos del presente manual
Las instrucciones del presente manual se entenderán según la siguiente conguración de unidad de
•
Windows.
C: Disco duro
D: CD-ROM
Los corchetes [ ] indican los nombres de los cuadros de diálogo y de los menús, los botones y las
•
casillas de vericación que pueden seleccionarse mientras se realizan las operaciones.
La capacidad de disco duro descrita en el presente manual se calcula según la equivalencia
•
1 GB = 1.000
1 GB = 1.0243 bytes, de modo que la capacidad que se muestra varía.
3
bytes. Los sistemas operativos y las aplicaciones utilizan la equivalencia
Los derechos de autor del presente manual son propiedad de Bualo Technology, Inc. Queda prohibido copiar,
reproducir o modicar total o parcialmente el presente manual sin autorización.
BUFFALO™ es una marca comercial de Melco Holdings Inc. Todos los otros productos mencionados en el
presente manual son propiedad de sus respectivos propietarios.
Las especicaciones, el diseño y otros contenidos del presente manual pueden cambiar sin previo aviso y
pueden ser diferentes de los del producto.
Se ha hecho todo lo posible para garantizar la exactitud de la información contenida en el presente manual. Sin
embargo, si usted detectara errores o falta de información, comuníquese con el revendedor a quien compró el
producto o con el servicio de asistencia técnica de Bualo Technology.
Este producto ha sido desarrollado para su uso en ocinas y en domicilios particulares. Bualo Technology, Inc. no asume
responsabilidad alguna por cualquier daño que resulte del uso de este producto para cualquier propósito diferente de su uso
general en ocinas y domicilios particulares.
•
No use este producto en aplicaciones que requieran un alto nivel de seguridad, tales como sistemas
relacionados de forma directa o indirecta con equipamiento médico o seguridad personal.
•
Si utiliza este producto para aplicaciones mecánicas o aplicaciones de un sistema informático que exigen
un nivel de abilidad más elevado que el del equipamiento de una ocina en general, asegúrese de dotar al
sistema de un diseño de seguridad y de las medidas de seguridad adecuadas.
Siga las operaciones descritas en el presente manual cuando use este producto. Asegúrese de seguir todas las
precauciones de seguridad al manipular este producto.
Bualo Technology, Inc. ofrece reparación del producto en determinadas circunstancias, pero no se hace
responsable de ninguna pérdida o corrupción de los datos registrados durante la reparación. Siga todas las
instrucciones de precaución descritas en el presente manual cuando utilice el producto como un dispositivo
de registro de datos, tal como un disco duro, o mientras está conectado a un dispositivo de registro de datos.
Asegúrese de hacer copias de seguridad de todos los datos necesarios periódicamente. Bualo Technology,
Inc. no asume responsabilidad alguna con respecto a cualquier pérdida o corrupción de datos derivada de la
violación de las precauciones de seguridad por parte del cliente o en caso de que no se hayan creado copias
de seguridad de los datos guardados en el producto.
En cuanto a la responsabilidad derivada de acciones contrarias a la ley o del incumplimiento de obligaciones
como resultado del uso de este producto, y salvo que haya negligencia intencionada o grave por parte de
Bualo Technology, Inc., Bualo Technology, Inc. se compromete a compensar al cliente únicamente por el
coste de la adquisición del producto.
Si el producto se considera defectuoso, Bualo Technology, Inc. lo reparará de forma gratuita o lo sustituirá por
otro igual o similar. Bualo Technology, Inc. no asume responsabilidad alguna por cualquier daño derivado de
un defecto del producto.
Indica una operación que requiere precaución
Indica la siguiente página a la que hay que ir.
Page 75

Tabla de contenido
Diseño ..............................................................2
1
Esquema .......................................................................................................2
Precauciones de seguridad ............................3
2
Precauciones de seguridad.........................................................................3
Precauciones de seguridad.........................................................................5
Desinstalación del software de autenticación de contraseña (Macintosh)
Cómo usar con Windows ................................. 6
3
Conguración (modicación) de los parámetros predeterminados
de la contraseña ..........................................................................................6
Autenticación de la contraseña de uso
......................................................7
..5
Cómo usar con Mac OS X ................................9
4
Instalación del software de autenticación de la contraseña....................9
Conguración (modicación) de los parámetros predeterminados
de la contraseña
Autenticación de la contraseña de uso
Si olvida su contraseña .................................12
5
Si olvida su contraseña (formateo del dispositivo) ................................12
Windows .......................................................................................................................................... 12
Macintosh
Especicaciones ............................................15
6
Especicaciones.........................................................................................15
..........................................................................................9
....................................................10
....................................................................................................................................... 13
Page 76

Diseño
1
Familiarícese con su MiniStation.
Indicador de encendido/acceso
Verde cuando está encendido.
Intermitente y naranja al acceder al
disco duro.
Diseño
Puerto USB
(Mini-B)
Toma de CC
El cable USB puede enrollarse
alrededor del borde del dispositivo
e insertarse en la ranura para
facilitar su transporte.
2
Serie HDS-PHU2 Manual de usuario
Page 77

Precauciones de seguridad
ADVERTENCIA
2
Descripción de las precauciones de seguridad para el uso de este producto.
Precauciones de seguridad
Para evitar posibles pérdidas de datos, no lleve a cabo ninguna
de las siguientes acciones.
•
Congurar el dispositivo para guardar destino de la memoria virtual.
•
Desenchufar el cable USB o el de alimentación o apagar el ordenador
conectado mientras se accede al dispositivo.
•
Habilitar el modo de ahorro de energía (espera, hibernación o suspensión)
del ordenador conectado. (El dispositivo no reanudará el funcionamiento
tras haber entrado en el modo de ahorro de energía).
Tras haber hecho uso del dispositivo, asegúrese de desconectarlo del ordenador.
El dispositivo se bloquea automáticamente una vez que se ha desconectado del ordenador. Si se apaga
o se reinicia el ordenador sin haber desconectado previamente el dispositivo, es posible que éste no se
bloquee.
Si olvida la contraseña, no podrá acceder a los datos registrados en este dispositivo. Tome medidas
para evitarlo.
Mantenga en secreto su contraseña; no se la revele a nadie.
En Windows 2000, tras haber autenticado la contraseña, aparece la noticación [Unplug or Eject
Hardware ] (Desenchufar o expulsar hardware), pero el dispositivo funciona normalmente. Haga clic
en [Close] (Cerrar) para cerrar el aviso. Continúe usando el dispositivo normalmente.
En Macintosh no pueden utilizarse varios dispositivos a la vez.
En Macintosh instale el software de autenticación de contraseña antes de usar el dispositivo.
(En Windows no es necesario instalar el software).
En Macintosh, si hay instalados varios sistemas operativos, instale el software de autenticación de
contraseña en todos los sistemas operativos Macintosh.
El tamaño máximo de un archivo almacenado en un disco duro formateado con FAT32 es 4 GB.
Dado que el dispositivo está formateado como un disco duro FAT32, el tamaño máximo de archivo es 4 GB.
Si formatea este dispositivo con un formato NTFS o Macintosh, podrá almacenar archivos de más de 4 GB.
En Windows 2000 durante la actualización puede aparecer el cuadro de diálogo [Found New Hardware
Wizard] (Asistente para hardware nuevo encontrado). Haga clic en [Finish] (Finalizar) en el cuadro de
diálogo.
Aunque aparece el mensaje [The software for this device is now installed, but may not work correctly.]
(Se ha instalado el software para este dispositivo, pero puede ser que no funcione correctamente), el
dispositivo funciona normalmente.
Serie HDS-PHU2 Manual de usuario
3
Page 78

El dispositivo se puede enchufar en caliente.
ADVERTENCIA
Esto quiere decir que puede enchufarse el cable USB del dispositivo al ordenador y desenchufarse
mientras ambos dispositivos están encendidos.
No desenchufe nunca el cable USB mientras se está accediendo al disco duro (el
indicador de encendido/acceso parpadea y es de color naranja), pues ello podría
dañar los datos registrados en el disco duro.
Para usar el dispositivo en una conguración con varios dispositivos USB, utilice el concentrador USB
de Bualo (no incluido) o un dispositivo semejante.
Asegúrese de leer los manuales del ordenador y de los periféricos.
Este dispositivo no puede usarse para el arranque de los sistemas operativos.
No coloque otros objetos sobre el dispositivo.
Esto puede dañar el dispositivo.
En Windows XP y Vista, si el dispositivo está conectado a un puerto USB 1.1, puede aparecer el
mensaje de advertencia [HI-SPEED USB Device Plugged into non-HI-SPEED USB Hub] (Dispositivo
USB HI-SPEED enchufado a un concentrador USB no HI-SPEED). Para continuar, haga clic en [X] para
cerrar el cuadro de diálogo.
Es normal que este dispositivo emita algún sonido durante su funcionamiento, como, por ejemplo,
en el arranque o cuando se accede al disco duro.
Al instalar los controladores de este dispositivo se agregan los siguientes dispositivos al
Administrador de dispositivos*.
* Para visualizar el Administrador de dispositivos, proceda de la siguiente manera.
Windows Vista. ........................................Haga clic en [Start] (Inicio) haga clic con el botón derecho en [Computer]
Windows XP
Windows 2000
Sistema operativo Ubicación agregada Nombre del dispositivo
Windows Vista
Windows 2000/XP
.............................................Haga clic en [Start] (Inicio) haga clic con el botón derecho en [My
........................................Haga clic con el botón derecho en [My Computer] (Mi PC) haga clic en
Controladores de bus serie universal Dispositivo USB de almacenamiento masivo
Unidades de disco Dispositivo USB de unidad de disco BUFFALO
DVD/CD-ROM USB BUFFALO-dispositivo USB puente ATA
Controladores de bus serie universal Dispositivo USB de almacenamiento masivo
Unidades de disco Dispositivo USB de unidad de disco BUFFALO
DVD/CD-ROM
(PC) haga clic en [Manage] (Administrar) haga clic en [Continue]
(Continuar) cuando aparezca [Windows needs your permission to continue]
(Windows necesita permiso para continuar) haga clic en [Device Manager]
(Administrador de dispositivos)
Computer] (Mi PC) haga clic en [Manage] (Administrar) haga clic en
[Device Manager] (Administrador de dispositivos)
[Manage] (Administrar) haga clic en [Device Manager] (Administrador de
dispositivos)
USB BUFFALO-dispositivo USB puente ATA
4
Serie HDS-PHU2 Manual de usuario
Page 79

Bloqueo de la unidad tras la autenticación
Desconecte el dispositivo del ordenador para bloquear el disco seguro después de que la contraseña haya
sido autenticada. El dispositivo no se bloquea a menos que se desconecte del ordenador, por lo que es
recomendable desconectarlo después de haberlo usado.
Desinstalación del software de autenticación de
contraseña (Macintosh)
Para desinstalar el software de autenticación de la contraseña de un Macintosh, proceda de la siguiente
manera.
Encienda el ordenador e inicie sesión con la cuenta de administrador.
1
Conecte el dispositivo al ordenador.
2
Haga clic en [Utility] (Utilidad) en el escritorio carpeta [Mac X]
3
carpeta [Secure Disk Tool Uninstaller VJx.xx] (Herramienta de disco seguro
Desinstalador VJx.xx) (donde "x.xx" es un número) y haga doble clic en
[Uninstall Secure Disk Tool] (Herramienta de desinstalación de disco seguro).
Para desinstalar el software, siga las instrucciones que aparecen en pantalla.
Serie HDS-PHU2 Manual de usuario
5
Page 80

6
Serie HDS-PHU2 Manual de usuario
Cómo usar con Windows
ADVERTENCIA
3
Para usar este dispositivo con Windows, proceda de la siguiente manera.
I Conguración (modicación) de los parámetros
predeterminados de la contraseña
Dado que la contraseña de fábrica no es secreta, asegúrese de cambiarla antes de usar este dispositivo.
* Para Windows XP/2000, inicie sesión con la cuenta de administrador.
Si se inicia sesión con una cuenta de usuario no puede establecerse contraseña.
La contraseña de fábrica es [12345].
Conecte el dispositivo al ordenador.
1
* Cuando aparezca la siguiente pantalla, haga clic en [Run Password.exe] (Ejecutar contraseña.exe).
Haga clic aquí.
2
Haga clic en [Option] (Opción).
* ¿No aparece esta pantalla? Haga doble clic en [Password.exe] (Contraseña.exe) en [Utility]
(Utilidad) de [Computer] (PC) ([My Computer] (Mi PC)).
Sigue
Page 81

3
* Las funciones copiar y pegar permanecen deshabilitadas al introducir contraseña y pista.
Cuando aparezca el mensaje [Password Security enabled successfully.]
4
(Contraseña de seguridad habilitada con éxito), haga clic en [OK] (Aceptar).
Desconecte el dispositivo del ordenador.
5
Los parámetros predeterminados de la contraseña han sido congurados.
1 Introduzca la contraseña actual.
* Introduzca [12345] (parámetro de fábrica)
cuando use el dispositivo por primera vez.
2 I nt rod uzca una nue va c ontra seña
(de 4 a 10 caracteres) en dos lugares.
3
Introduzca una pista
(de 5 a 75 caracteres).
4 Haga clic en [OK] (Aceptar).
II Autenticación de la contraseña de uso
Autentique la contraseña y prepare el dispositivo para leer y escribir datos.
Conecte el dispositivo al ordenador.
1
2
* Si introduce una contraseña errónea tres veces, puede probar la pista que introdujo con el botón
[Hint] (Pista) (para Windows XP/2000, cuando se inició la sesión con la cuenta del administrador).
1 Introduzca la contraseña actual.
* Introduzca la contraseña modicada en la
sección I.
2 Haga clic en [OK] (Aceptar).
Serie HDS-PHU2 Manual de usuario
Sigue
7
Page 82

3
Haga clic en [OK] (Aceptar).
Asegúrese de que ha agregado [Secure Disk] (Disco seguro) a [Computer] (PC)
4
([My Computer]) (Mi PC).
Asegúrese de que ha agregado [Secure Disk]
(Disco seguro).
El proceso se ha completado. [Secure Disk] (Disco seguro) está listo para leer y escribir datos como un disco
duro normal.
Para almacenar archivos mayores de 4 GB
Formatee el disco seguro con el formato NTFS. El dispositivo se recibe de fábrica formateado
con FAT32 y no puede almacenar archivos mayores de 4 GB (especicación de formato FAT32).
Cuando el dispositivo está formateado con el formato NTFS se pueden almacenar archivos
mayores de 4 GB. Para usar el dispositivo también con Macintosh, utilícelo sin formatearlo (no
puede almacenar archivos mayores de 4 GB). El formato NTFS no puede usarse con Macintosh.
8
Serie HDS-PHU2 Manual de usuario
Page 83

Cómo usar con Macintosh
ADVERTENCIA
4
Para usar este dispositivo con Macintosh, proceda de la siguiente manera.
I Instalación del software de autenticación de la
contraseña
Instale la Herramienta de software de autenticación de contraseña Disco seguro.
Encienda el ordenador e inicie sesión con la cuenta de administrador.
1
Conecte el dispositivo al ordenador.
2
Abra [Utility] (Utilidad) en el escritorio y haga doble clic en [Secure Disk
3
Tool InstallerVJ1_xx.pkg] (Herramienta de disco seguro Instalador VJ1_xx.pkg)
en la carpeta [Mac X].
* Donde "xx" en [Secure Disk Tool Installer VJ1_xx.pkg] (Herramienta de disco seguro Instalador
VJ1_xx.pkg) es un número de versión.
Para instalar el software siga las instrucciones que aparecen en pantalla.
II Conguración (modicación) de los parámetros
predeterminados de la contraseña
Dado que la contraseña de fábrica no es secreta, asegúrese de cambiarla antes de usar este dispositivo.
La contraseña de fábrica es [12345].
Haga doble clic en [Secure Disk Tool] (Herramienta de disco seguro) en el
1
escritorio.
2
Haga clic en
[Option] (Opción).
Serie HDS-PHU2 Manual de usuario
Sigue
9
Page 84

10
Serie HDS-PHU2 Manual de usuario
3
* Las funciones copiar y pegar permanecen deshabilitadas al introducir contraseña y pista.
Cuando aparezca el mensaje [Password Security enabled successfully.]
4
(Contraseña de seguridad habilitada con éxito), haga clic en [OK] (Aceptar).
Desconecte el dispositivo del ordenador.
5
La contraseña se ha cambiado.
1 Introduzca la contraseña actual.
* Introduzca [12345] (parámetro de fábrica)
cuando use el dispositivo por primera vez.
2 Introduzca una nueva contraseña
(de 4 a 10 caracteres) en dos lugares.
3
Introduzca una pista
(de 5 a 75 caracteres).
4 Haga clic en [OK] (Aceptar).
III Autenticación de la contraseña de uso
Autentique la contraseña y prepare el dispositivo para leer y escribir datos.
Conecte el dispositivo al ordenador.
1
Haga doble clic en [Secure Disk Tool] (Herramienta de disco seguro) en el
2
escritorio.
3
1 Introduzca la contraseña.
2 Haga clic en [Authenticate] (Autenticar).
* Si introduce una contraseña errónea tres veces,
puede probar la pista que introdujo con el
botón [Hint] (Pista).
Sigue
Page 85

Cuando aparezca el mensaje [Login successful.] (Inicio con éxito), haga clic en
4
[OK] (Aceptar).
* Puede aparecer un mensaje similar a [Set disk contains unreadable volume with Mac OS X.]
(El disco introducido contiene un volumen ilegible con Mac OS X). Haga clic en [OK] (Aceptar).
Asegúrese de que [Secure Disk] (Disco seguro) ( ) se muestra en el
5
escritorio.
El proceso se ha completado. [Secure Disk] (Disco seguro) está listo para leer y escribir datos como un disco
duro normal.
Para almacenar archivos mayores de 4 GB
Formatee el disco seguro con el formato extendido Macintosh. El dispositivo se recibe de fábrica
formateado con FAT32 y no puede almacenar archivos mayores de 4 GB (especicación de
formato FAT32). Cuando el dispositivo está formateado con el formato extendido Macintosh,
se pueden almacenar archivos mayores de 4 GB. Para usar el dispositivo también con Windows,
utilícelo sin formatearlo (no puede almacenar archivos mayores de 4 GB). El formato extendido
Macintosh no se puede usar con Windows.
Serie HDS-PHU2 Manual de usuario
11
Page 86

12
Serie HDS-PHU2 Manual de usuario
Si olvida su contraseña
ADVERTENCIA
ADVERTENCIA
Sigue
5
Si olvida su contraseña debe formatear el dispositivo para poder usarlo de nuevo.
Descripción del proceso de formateo del dispositivo.
Si olvida su contraseña (formateo del dispositivo)
Si olvida su contraseña y no puede recordarla, debe formatear el dispositivo. Al formatear el dispositivo
se borran todos los datos almacenados en éste y se restablece la contraseña. Sólo debería formatear el
dispositivo si olvida su contraseña.
Al formatearlo, el dispositivo queda formateado como un disco duro FAT32
y se borran todos los datos almacenados. Antes de formatear el dispositivo, pase
todos los datos necesarios a un ordenador u otro dispositivo de almacenamiento.
Para poder almacenar archivos mayores de 4 GB en este dispositivo, después de
formatearlo, formatee el disco duro con un formato NTFS o Macintosh.
Windows
Para formatear el dispositivo en Windows 2000 o XP debe iniciar la sesión con la
cuenta del administrador.
Conecte el dispositivo al ordenador.
1
Cuando aparezca la ventana de autenticación de contraseña, ciérrela.
En Windows Vista puede aparecer la ventana de AutoPlay (Reproducción automática).
Cierre esta ventana.
Haga clic con el botón derecho en [Utility] ( ) (Utilidad) en [Computer]
2
(Ordenador) ([My Computer]) (Mi PC) y seleccione [Open] (Abrir).
Haga doble clic en [menu.exe].
3
Seleccione [Initialize Device] (Inicializar dispositivo) en la ventana abierta
4
y haga clic en [Start] (Inicio).
5
Haga clic en [Reset Password]
(Restablecer contraseña).
Page 87

Sigue
Introduzca la nueva contraseña
6
La siguiente ventana se muestra tres veces.
7
Conrme el contenido y haga clic en [Yes] (Sí).
Cuando aparezca el mensaje [The password has been reset successfully.]
8
(La contraseña ha sido restablecida con éxito), haga clic en [OK]
(Aceptar) y luego desconecte el dispositivo del ordenador.
El dispositivo ha sido formateado y la contraseña ha sido restablecida.
1
(dos veces). La contraseña debe tener
entre 4 y 10 caracteres.
Introduzca una pista. La pista debe tener
2
entre 5 y 75 caracteres.
Haga clic en [Reset Password]
3
(Restablecer contraseña).
Nota: No use las funciones copiar y pegar para
introducir la contraseña y la pista.
Conrme el contenido.
1
Haga clic en [Yes] (Sí).
2
Macintosh
Conecte el dispositivo al ordenador.
1
Haga doble clic en [Secure Disk Tool] ( ) (Herramienta de disco seguro) en
2
el escritorio.
3
Haga clic en [Option] (Opción).
4
Haga clic en [Reset Password]
(Restablecer contraseña).
Serie HDS-PHU2 Manual de usuario
13
Page 88

5
6
La siguiente ventana se muestra tres veces.
7
Conrme el contenido y haga clic en [Yes] (Sí).
Haga clic en [Reset Password]
(Restablecer contraseña).
Introduzca la nueva contraseña
1
(dos veces). La contraseña debe tener
entre 4 y 10 caracteres.
Introduzca una pista. La pista debe tener
2
entre 5 y 75 caracteres.
Haga clic en [Reset Password]
3
(Restablecer contraseña).
Nota: Las funciones copiar y pegar permanecen
deshabilitadas al introducir contraseña y pista.
Conrme el contenido.
4
Cuando aparezca el mensaje [The password has been reset successfully.]
8
(La contraseña ha sido restablecida con éxito), haga clic en [OK] (Aceptar)
y luego desconecte el dispositivo del ordenador.
El dispositivo ha sido formateado y la contraseña ha sido restablecida.
14
Serie HDS-PHU2 Manual de usuario
Haga clic en [Yes] (Sí).
5
Page 89

Especicaciones
6
Especicaciones
* Ver el catálogo Bualo Technology, Inc. o la página Web (www.bualotech.com) para consultar la
información actualizada sobre el producto y los modelos compatibles.
Interfaz USB
Estándar USB USB Specication Rev. 2.0
Puerto Puerto USB Mini-B
Capacidad 512 bytes/sector
Tiempo de acceso Máx. 13 mseg
Velocidad de transmisión
(teórica)
Formato de compra FAT32 (partición única)
Dimensiones 127 (An) × 84 (Al) × 23 (Pr) mm (excluyendo accesorios)
Consumo de energía Máx. 2,5 W
Alimentación CC 5V±5%
Entorno de
funcionamiento
Modelos compatibles Los siguientes modelos de ordenador con un puerto USB
SO
compatibles
* Para usar este dispositivo en modo HS (con una velocidad de transmisión máxima de 480 Mbps),
tal y como se dene en las especicaciones USB 2.0, se requiere una interfaz Bualo USB2.0 (o un
ordenador compatible con USB2.0).
Temperatura 0–45ºC
Humedad 10-85% (sin condensación)
DOS/V Windows Vista/XP (Edición Media Center incluida),
Macintosh Mac OS X 10.4 o posterior
Máx. 480 Mbps*
estándar:
DOS/V (especicaciones OADG)
•
Serie Apple Mac (con procesador Intel)
•
Windows 2000 Service Pack 3 o posterior
Macintosh y Mac OS son marcas registradas de Apple Inc., registradas en EE. UU. y en otros países.
Windows es una marca registrada de Microsoft Corporation en los EE. UU. y en otros países.
Serie HDS-PHU2 Manual de usuario
15
Page 90

Serie HDS-PHU2 Manual de usuario
Primera edición, 30 de mayo de 2008
Publicado por BualoTechnology,Inc.
 Loading...