

Page 1
User Guide
DriveStation Quattro
v1.0
Page 2

Table of Contents
English ......................................................................................3
Deutsch ...................................................................................18
Français ..................................................................................33
Italiano ....................................................................................48
Español ...................................................................................63
Português ................................................................................78
Nederlands ..............................................................................93
Svenska .................................................................................108
Norsk.....................................................................................123
Dansk ....................................................................................138
Suomi ....................................................................................153
2
Page 3

English
User Guide
DriveStation Quattro
Package contents:
• Main Unit (DriveStation)
• Power Cord
• USB Cable
• PCI eSATA Card
• eSATA Cable
• eSATA Backplate
• DriveNavigator Installation CD
• User Guides
v1.0
Page 4

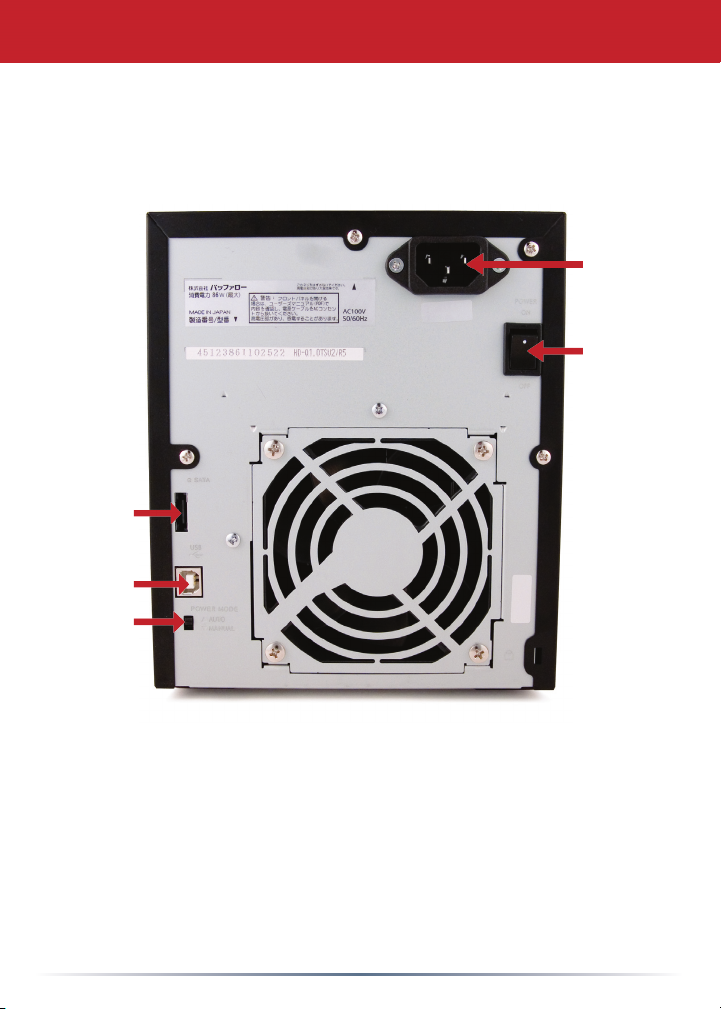
eSATA
USB
Back Panel Layout
Socket for
Power Cord
Power On
Off
Auto / Manual
Swich
Note: Changing between RAID modes is done with the RAID Utility, included
with the software on your DriveNavigator CD.
4
Page 5

DriveStation - PC Setup
Congratulations on your new DriveStation Quattro! With four separate hard
drives inside, the DriveStation Quattro gives you many options for large,
economical capacity and easy-to-use redundancy.
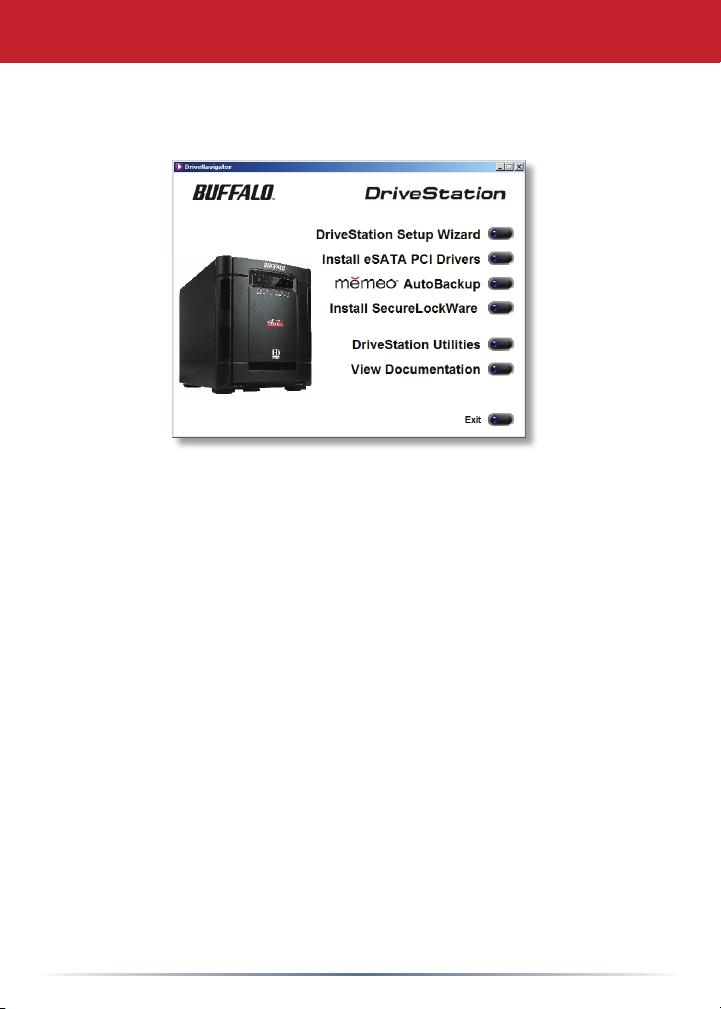
To begin, insert the DriveNavigator CD in your PC. The setup program will run.
Follow the steps to connect your DriveStation Quattro.
If the setup program doesn’t run automatically, click
Start, then Run, and then type “d:\setup.exe” in the
Open window. Click OK.
Click DriveStation Setup Wizard to begin.
After completing the setup wizard, your DriveStation Quattro is installed and
ready to use!
By default, your Quattro is congured in RAID 0 Mode. This gives you maximum
usable capacity and performance, but no redundancy. If a drive fails, all data on
the DriveStation is lost. If you would prefer a different RAID conguration, you
may use the RAID Utility to change your DriveStation’s RAID settings. Turn to the
next page for instructions on using the RAID Utility.
5
Page 6

Using the RAID Utility - PC
The RAID Utility allows you to congure your DriveStation Quattro in several
modes:
Normal Mode - Appears to your computer as four separate hard drives.
Spanning Mode - Appears to your computer as one large hard drive.
RAID 0 Mode - Appears to your computer as a single drive. Higher performance
than Spanning Mode.
RAID 1 Mode - Appears to your computer as a single drive. The third and fourth
drives keep an exact copy of the rst and second drives, for redundancy.
RAID 5 Mode - Appears to your computer as a single drive. Approximately 3/4 of
your total space is usable, yet you still have full redundancy.
Note that changing the mode of the drives in your Quattro will erase all data on
them! Back up any important data before using the RAID utility.
You should be connected to the DriveStation with a USB cable while running the
RAID utility. You may switch to an eSATA connection for normal use after the
utility has run.
You may launch the RAID Utility by clicking on RAID Setup Utility in the
DriveStation Quattro program group.
Or, you can launch the program from the Start menu:
6
Page 7

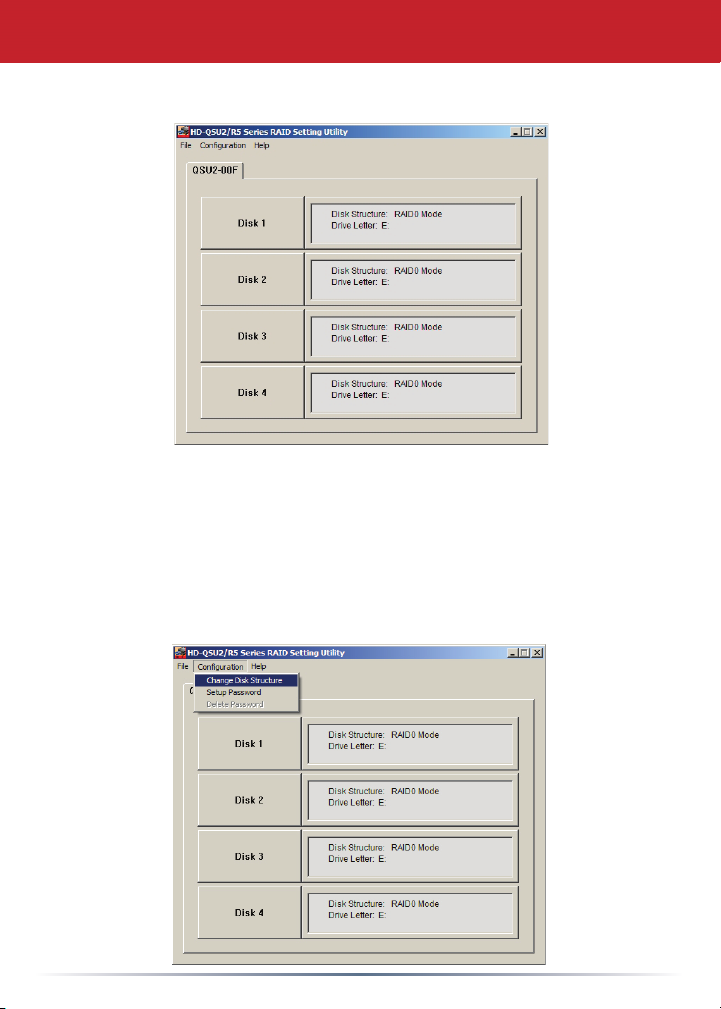
Using the RAID Utility - PC
Once launched, the RAID Utility will briey scan for your DriveStation
Quattro. This may take a few seconds.
The initial screen will show your current conguration. If your Quattro
is new, it will probably be in RAID 0 mode, with one high-performance
partition. If you want better data security, Buffalo recommends RAID 5
mode, with its excellent balance of security and total capacity.
To change the RAID mode, click Conguration and choose Change
Disk Structure.
7
Page 8
Using the RAID Utility - PC
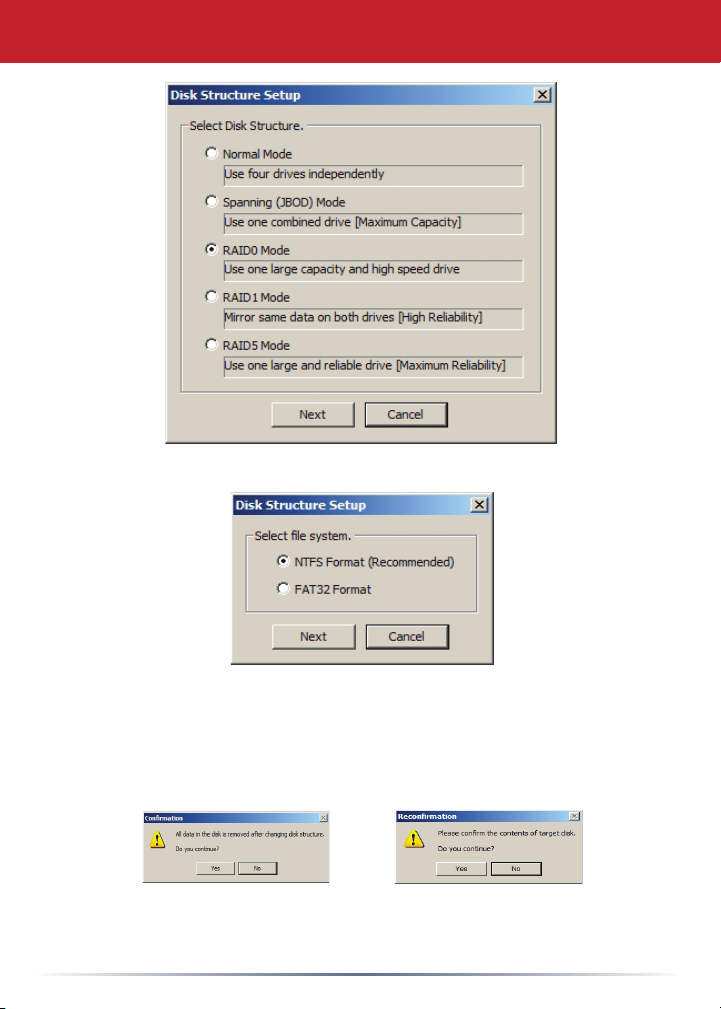
Select the drive structure that you’d like to use.
After rebuilding the disk structure, the disk will be formatted with FAT32
or NTFS. Select the format that you prefer. FAT32 is compatible with
most Windows PCs, Macs, and Linux. NTFS offers better performance
with Windows 2000 and XP machines, but isn’t compatible with other
operating systems.
Click Yes, and Yes again. Understand that this will erase any data on
the drive!
8
Page 9

Other Utilities - PC
The DriveStation includes several optional disk utilities. To install and use
these utilities, insert the CD-ROM that came with your DriveStation into a
Windows PC.
Memeo™ AutoBackup software is available for backing up documents,
multimedia les, and other les from your Windows PC to the
DriveStation. A license for using Memeo on a single PC or workstation is
included with your DriveStation. Please view the Memeo documentation
for more information on installing and using memeo.
Other utilities are also available, including:
Disk Formatter (for formatting your DriveStation)
SecureLockWare (for encrypting the data on your DriveStation,
preventing the data from being accessed by anyone but you)
To learn more about installing and using these utilities, click on View
Documentation.
9
Page 10

DriveStation - Mac Setup
Flip the power switch on the back of the DriveStation to the OFF position. Plug
DriveStation’s power cord into the power socket as shown, as well as a power
outlet or surge protector. Then, connect a USB or eSATA cable into a matching
port on the back of the DriveStation.
Connect the USB or eSATA cable to your Mac or other device you are adding
the DriveStation to.
10
Page 11

DriveStation - Mac Setup
Flip the power switch on the back of the DriveStation to the ON position.
Your Mac will detect the new drive and place an icon on your desktop.
Your DriveStation is now ready for use! Double-click on the icon to open the hard
drive.
11
Page 12
Installing the RAID Utility- Mac
By default, your Quattro is congured in RAID 0 mode. This gives you maximum
usable capacity and performance, but no redundancy. If a drive fails, all data
on the DriveStation is lost. If you’re willing to trade some performance for better
data security, Buffalo Technology recommends RAID 5 mode, with its excellent
balance of security and total capacity. You may change your RAID conguration
with the RAID Utility.
The RAID Utility only runs on PCs and G4 and G5 based Macs! You may use
the DriveStation Quattro with an Intel Mac, but you will not be able to change the
RAID settings from it. You must use a Windows PC or a PowerPC based Mac to
run the RAID Utility! Also, the DriveStation must be connected to your Mac with
a USB cable while using the utility. You may switch to an eSATA connection for
normal use after the utility has run.
The RAID Utility allows you to congure your DriveStation Quattro in several
modes:
Normal Mode - Appears to your computer as four separate hard drives.
Spanning Mode - Appears to your computer as one large hard drive.
RAID 0 Mode - Appears to your computer as a single drive. Higher performance
than Spanning mode.
RAID 1 Mode - Appears to your computer as a single drive. The third and fourth
drives keep an exact copy of the rst and second drives, for redundancy.
RAID 5 Mode - Appears to your computer as a single drive. Approximately 3/4 of
your total space is usable, yet you still have full redundancy.
Changing the mode of the drives in your Quattro will erase all data on them!
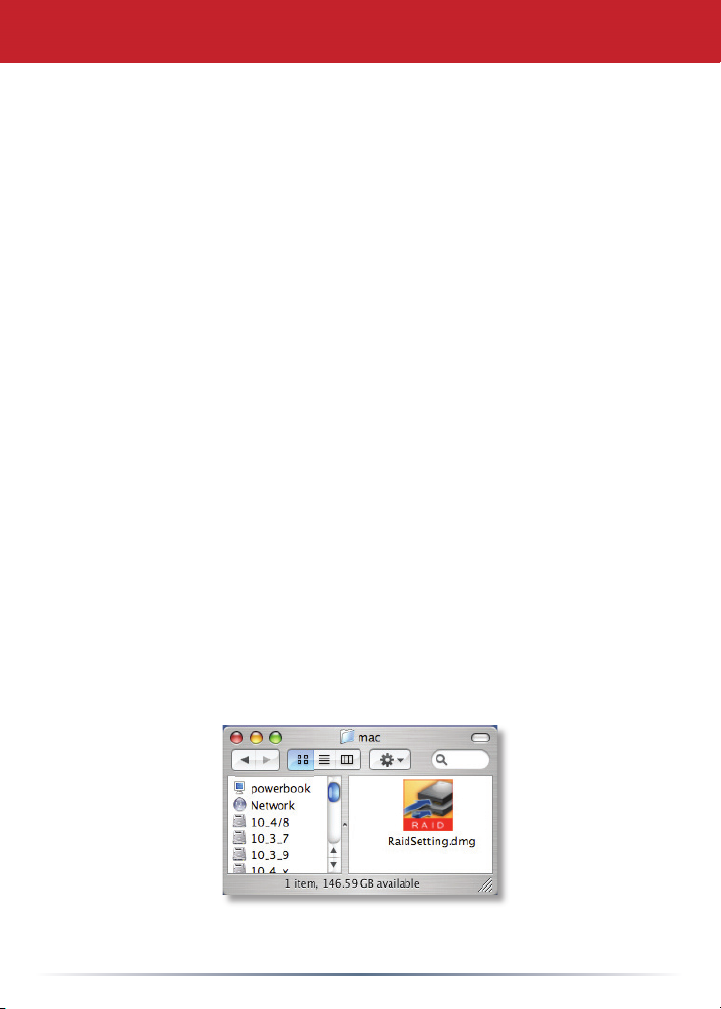
Back up any important data before using the RAID utility.To install the RAID utility,
open the Mac folder on your DriveNavigator CD.
Double-click on RaidSetting.dmg to open the RAID utility image. Copy the
contents to the application folder on your Mac.
12
Page 13
Using the RAID Utility - Mac
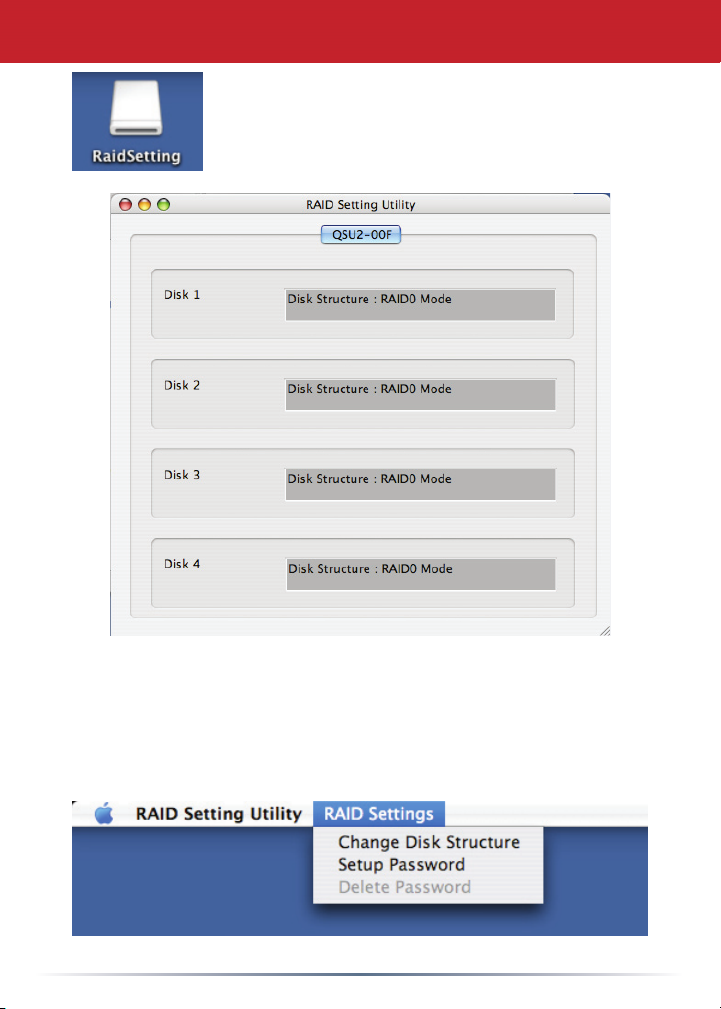
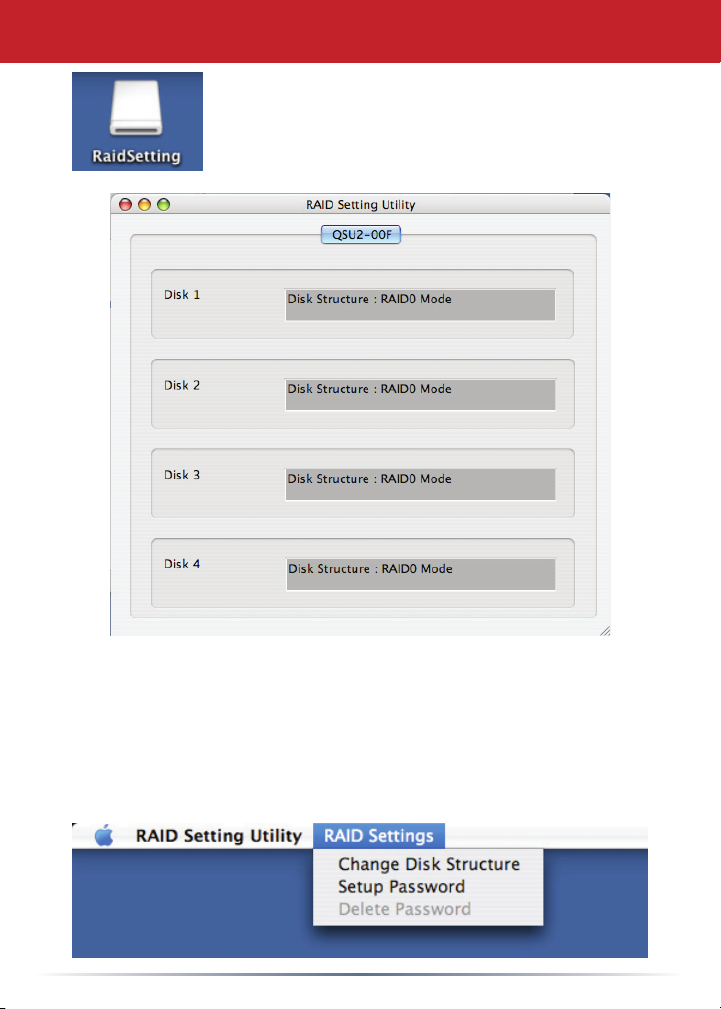
Double-click the RaidSetting icon on your desktop.
Once launched, the RAID utility will briey scan for
your DriveStation Quattro. This may take a few
seconds.
The initial screen will show your current conguration. If your Quattro
is new, it will probably be in RAID 0 mode, with all four disks in one
high-performance partition.
To change the RAID mode, click RAID Settings and choose Change
Disk Structure.
13
Page 14

Using the RAID Utility - Mac
Select the drive structure that you’d like to use. Click OK, Yes, and Yes.
Understand that this will erase any data on the drive!
After changing the RAID mode, you will need to use the Disk Utility to
format the new partition.
14
Page 15
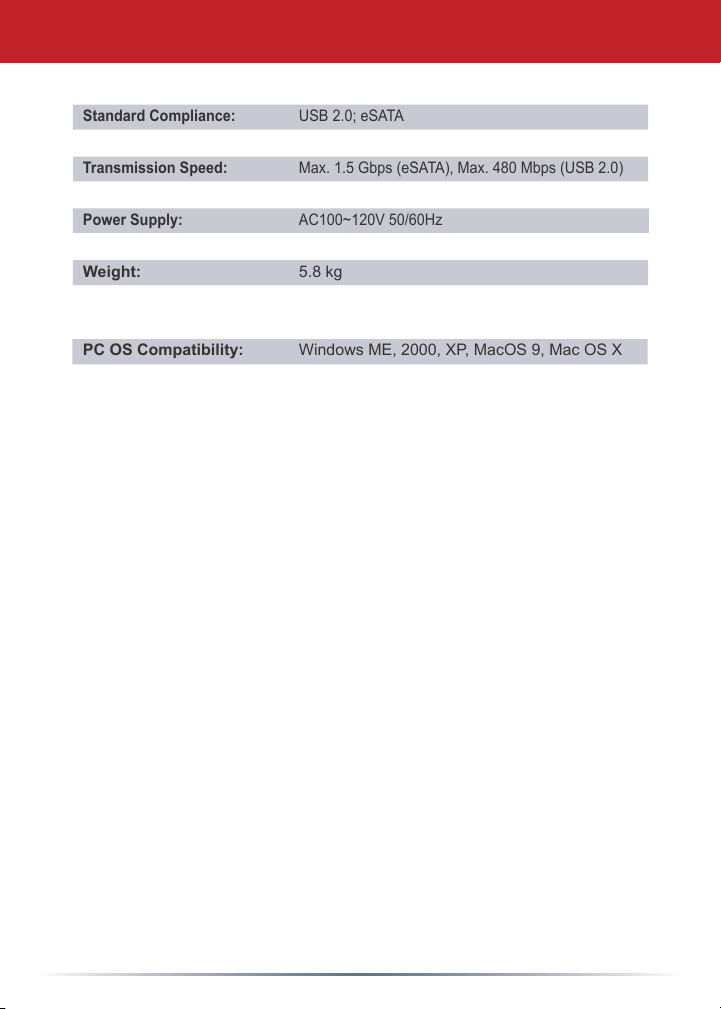
Technical Specications
Standard Compliance: USB 2.0; eSATA
Seek Time: Max. 11 milliseconds
Transmission Speed: Max. 1.5 Gbps (eSATA), Max. 480 Mbps (USB 2.0)
Power Consumption: Max. 86W, Average 40W
Power Supply: AC100~120V 50/60Hz
Dimensions: 165 x 203 x 241 mm
Weight: 5.8 kg
Operating Environment: 5- 35° C
20-80% humidity (non-condensing)
PC OS Compatibility: Windows ME, 2000, XP, MacOS 9, Mac OS X
FCC Warning
This device complies with part 15 of the FCC Rules. Operation is
subject to the following two conditions: (1) This device may not cause
harmful interference, and (2) this device must accept any interference
received, including interference that may cause undesired operation.
15
Page 16

Environmental Information
• The equipment that you have purchased has required the extraction
and use of natural resources for its production.
• The equipment may contain hazardous substances that could impact
health and the environment.
• In order to avoid the dissemination of those substances in our
environment and to diminish the pressure on the natural resources, we
encourage you to use the appropriate take-back systems.
• The take-back systems will reuse or recycle most of the materials of
your end life equipment in a sound way.
• The crossed-out wheeled bin symbol invites you to use those systems.
• If you need more information on the collection, reuse and recycling
systems, please contact your local or regional waste administration.
16
Page 17

www.buffalo-technology.com
European Technical Support is available between 9am-6pm (Monday-Thursday) (GMT)
and 9am-4:30pm on Fridays.
Phone (UK only): 08712 50 12 60*
Phone: +353 61 70 80 50
Email: helpdesk@buffalo-technology.ie
*Calls cost 8.5p per minute
© 2007, Buffalo Technology UK Ltd.
Page 18

Deutsch
Benutzerhandbuch
DriveStation Quattro
Packungsinhalt:
• Haupteinheit (DriveStation)
• Stromkabel
• USB-Kabel
• PCI eSATA-Karte
• eSATA-Kabel
• eSATA-Portblech
• DriveNavigator-Installations-CD
• Benutzerhandbücher
v1.0
Page 19
eSATA
USB
Elemente auf der Rückseite
Buchse für
Stromkabel
Netzschalter
Umschalter
Automatisch /
Manuell
Hinweis: Mit dem RAID-Dienstprogramm, das Teil der Software auf Ihrer
DriveNavigator-CD ist, können Sie zwischen den einzelnen RAID-Modi
wechseln.
19
Page 20

DriveStation – PC-Setup
Herzlichen Glückwunsch zum Kauf Ihrer neuen DriveStation Quattro! Die
DriveStation Quattro bietet Ihnen mit vier individuellen Festplatten hohe,
wirtschaftlich zu nutzende Speicherkapazität und ermöglicht Ihnen auf
benutzerfreundliche Art, redundanten Speicherplatz bereitzustellen.
Legen Sie die DriveNavigator-CD in Ihren PC ein. Das Setup-Programm wird
ausgeführt. Befolgen Sie die Schritte, um eine Verbindung mit der DriveStation
Quattro herzustellen.
Wird das Setup-Programm nicht automatisch gestartet,
klicken Sie auf Start, dann auf Ausführen, und geben
Sie im Dialogfeld „d:\setup.exe“ ein. Klicken Sie auf OK.
Klicken Sie zum Starten auf DriveStation Setup Wizard.
Sobald der Installationsassistent beendet ist, ist die DriveStation Quattro installiert
und bereit zur Anwendung.
Das Gerät ist standardmäßig auf den RAID 0-Modus voreingestellt. Dieser Modus
bietet maximale Speicherkapazität und Leistung, allerdings ohne Redundanz.
Wenn ein Laufwerk ausfällt, gehen alle Daten der DriveStation verloren.
Wenn Sie eine andere RAID-Konguration vorziehen, können Sie mithilfe des
RAID-Dienstprogrammes die RAID-Einstellungen der DriveStation ändern.
Auf der nächsten Seite nden Sie Anweisungen zur Verwendung des RAID-
Dienstprogrammes.
20
Page 21

Verwendung des RAID-Dienstprogrammes - PC
Mithilfe des RAID-Dienstprogrammes können Sie Ihre DriveStation Quattro in
verschiedenen Modi kongurieren:
Normal Mode - Ihr Computer registriert vier individuelle Festplatten.
Spanning Mode - Ihr Computer registriert eine große Festplatte.
RAID 0 Mode - Ihr Computer registriert ein einziges Laufwerk. Dieser Modus ist
leistungsstärker als der Spanning Mode.
RAID 1 Mode - Ihr Computer sieht ein einziges Laufwerk. Aus
Redundanzgründen sind das dritte und vierte Laufwerk eine exakte Kopie des
ersten und zweiten.
RAID 5 Mode - Ihr Computer registriert ein einziges Laufwerk. Etwa ¾ des
gesamten Speicherplatzes können verwendet werden; Sie verfügen aber noch
immer über vollständige Redundanz.
Beachten Sie, dass eine Änderung des Laufwerkmodus in Ihrer DriveStation
Quattro alle vorhandenen Daten löscht! Legen Sie von wichtigen Daten eine
Sicherungskopie an, bevor Sie das RAID-Dienstprogramm anwenden.
Während Sie das RAID-Dienstprogramm ausführen, sollten Sie mit der DriveStation
durch ein USB-Kabel verbunden sein. Nach Beendigung des Dienstprogrammes
können Sie für den normalen Betrieb das eSATA-Kabel verwenden.
Sie können das RAID-Dienstprogramm starten, indem Sie in der DriveStation
Quattro-Programmgruppe auf RAID Setup Utility klicken.
Alternativ starten Sie das Programm vom Startmenü aus:
21
Page 22
Verwendung des RAID-Dienstprogrammes - PC
Beim Start sucht das RAID-Dienstprogramm nach Ihrer DriveStation
Quattro. Dies kann einige Sekunden dauern.
Im Anfangsbildschirm wird Ihre aktuelle Konguration angezeigt. Ist
Ihre DriveStation Quattro neu, so ist sie normalerweise im RAID 0-
Modus mit einer einzigen hochleistungsfähigen Partition konguriert.
Wenn Sie Wert auf höhere Datensicherheit legen, empehlt Ihnen
Buffalo den RAID 5-Modus, der ein ausgezeichnetes Gleichgewicht
zwischen Sicherheit und Kapazität darstellt.
Wenn Sie den RAID-Modus wechseln wollen, klicken Sie auf
Conguration (Konguration), und wählen Sie Change Disk Structure
(Datenträgerstruktur ändern) aus.
22
Page 23

Verwendung des RAID-Dienstprogrammes - PC
Wählen Sie die von Ihnen gewünschte Laufwerkstruktur aus.
Nach Neuerstellung der Datenträgerstruktur wird der Datenträger für
FAT32 oder NTFS formatiert. Wählen Sie das von Ihnen gewünschte
Format aus. FAT32 ist mit den meisten Windows-Computern, Macs und
Linux kompatibel. NTFS bietet eine bessere Leistung mit Windows 2000
und XP, ist aber mit anderen Betriebssystemen nicht kompatibel.
Klicken Sie auf Yes (Ja) und nochmals auf Yes (Ja). Denken Sie daran,
dass hierdurch alle Daten auf Ihrem Laufwerk gelöscht werden!
23
Page 24
Andere Dienstprogramme – PC
Die DriveStation umfasst mehrere optionale Dienstprogramme für
Datenträger. Um diese Dienstprogramme zu installieren, legen Sie die
CD-ROM, die mit Ihrer DriveStation mitgeliefert wurde, in einen WindowsPC ein.
Mit der Software Memeo™ AutoBackup können Sie Sicherungskopien
von Dokumenten, Multimediadateien und anderen Dateien von Ihrem
Windows-PC auf der DriveStation anlegen. Die Anwenderlizenz
für Memeo auf einem Einzel-PC oder einer Workstation ist in Ihrer
DriveStation eingeschlossen. In der Dokumentation zu Memeo nden Sie
weitere Informationen zur Installation und Anwendung dieser Software.
Zu den weiteren verfügbaren Dienstprogrammen gehören:
Disk Formatter (zur Formatierung Ihrer DriveStation)
SecureLockWare (zur Verschlüsselung Ihrer Daten auf Ihrer
DriveStation; dadurch wird der Zugriff auf die Daten auf Sie
beschränkt)
Um weitere Informationen zur Installation und Verwendung dieser
Dienstprogramme zu erhalten, klicken Sie auf View Documentation
(Dokumentation anzeigen).
24
Page 25

DriveStation – Mac-Setup
Schalten Sie den Netzschalter auf der Rückseite der DriveStation aus
(Position OFF). Verbinden Sie das Netzkabel der DriveStation wie gezeigt mit
der Stromversorgungsbuchse und mit einer Steckdose (ggf. mit zwischengeschaltetem Überspannungsschutz). Stecken Sie dann ein USB- oder
eSATA-Kabel in die jeweils zugehörige Anschlussbuchse auf der Rückseite der
DriveStation.
Verbinden Sie dieses USB- oder eSATA-Kabel mit Ihrem Mac oder einem
anderen Gerät, zu dem Sie die DriveStation hinzufügen.
25
Page 26

DriveStation – Mac-Setup
Schalten Sie den Netzschalter auf der Rückseite der DriveStation ein (Position
ON).
Ihr Mac erkennt das neue Laufwerk und platziert ein entsprechendes Symbol auf
Ihrem Desktop.
Ihre DriveStation ist nun betriebsbereit! Doppelklicken Sie auf das Symbol, um
die Festplatte zu öffnen.
26
Page 27

Installieren des RAID-Dienstprogrammes - Mac
Ihre DriveStation Quattro ist standardmäßig im RAID 0-Modus konguriert.
Dieser Modus bietet maximale Speicherkapazität und Leistung, allerdings ohne
Redundanz. Wenn ein Laufwerk ausfällt, gehen alle Daten der DriveStation verloren.
Wenn Sie bereit sind, zugunsten höherer Datensicherheit auf etwas Leistung zu
verzichten, empehlt Ihnen Buffalo den RAID 5-Modus, der ein ausgezeichnetes
Gleichgewicht zwischen Sicherheit und Speicherkapazität darstellt. Mithilfe des RAID-
Dienstprogrammes können Sie Ihre RAID-Konguration ändern.
Das RAID-Dienstprogramm kann nur auf PCs sowie auf G4- und G5-basierten
Macs ausgeführt werden. Sie können die DriveStation Quattro mit einem IntelMac verwenden, allerdings können Sie von dort die RAID-Einstellungen nicht
ändern. Das RAID-Dienstprogramm kann nur auf einem Windows-PC oder auf
einem PowerPC-basierten Mac ausgeführt werden! Beachten Sie, dass die
DriveStation über ein USB-Kabel mit Ihrem Mac verbunden sein muss, während
Sie das Dienstprogramm verwenden. Nach Beendigung des Dienstprogrammes
können Sie für den normalen Betrieb das eSATA-Kabel verwenden.
Mithilfe des RAID-Dienstprogrammes können Sie Ihre DriveStation Quattro in
verschiedenen Modi kongurieren:
Normal Mode - Ihr Computer registriert vier individuelle Festplatten.
Spanning Mode - Ihr Computer registriert eine große Festplatte.
RAID 0 Mode - Ihr Computer registriert ein einziges Laufwerk. Dieser Modus ist
leistungsstärker als der Spanning Mode.
RAID 1 Mode - Ihr Computer registriert ein einziges Laufwerk. Aus
Redundanzgründen sind das dritte und vierte Laufwerk eine exakte Kopie des
ersten und zweiten.
RAID 5 Mode - Ihr Computer registriert ein einziges Laufwerk. Etwa ¾ des
gesamten Speicherplatzes können verwendet werden; Sie verfügen aber noch
immer über vollständige Redundanz.
Beachten Sie, dass eine Änderung des Laufwerkmodus in Ihrer DriveStation
Quattro alle vorhandenen Daten löscht!
Sichern Sie alle wichtigen Daten, bevor Sie das RAID-Dienstprogramm
verwenden. Um es zu installieren, öffnen Sie auf Ihrer DriveNavigator-CD den
Ordner Mac.
Doppelklicken Sie auf RaidSetting.dmg, um das RAID-Dienstprogramm zu
öffnen. Kopieren Sie den Inhalt in den Anwendungsordner auf Ihrem Mac.
27
Page 28
Verwendung des RAID-Dienstprogrammes - Mac
Doppelklicken Sie auf Ihrem Desktop auf das
Symbol RaidSetting. Beim Start sucht das RAIDDienstprogramm kurz nach Ihrer DriveStation Quattro.
Dies kann einige Sekunden dauern.
Im Anfangsbildschirm wird Ihre aktuelle Konguration angezeigt. Ist
Ihre DriveStation Quattro neu, so ist sie normalerweise im RAID 0-
Modus als eine einzige hochleistungsfähige Partition konguriert, die
aus allen vier Festplatten besteht.
Wenn Sie den RAID-Modus wechseln wollen, klicken Sie auf RAID
Settings (RAID-Einstellungen), und wählen Sie Change Disk Structure
(Datenträgerstruktur ändern) aus.
28
Page 29

Verwendung des RAID-Dienstprogrammes - Mac
Wählen Sie die von Ihnen gewünschte Laufwerkstruktur aus. Klicken
Sie auf OK, Yes (Ja) und Yes (Ja). Denken Sie daran, dass hierdurch
alle Daten auf Ihrem Laufwerk gelöscht werden!
Nachdem Sie den RAID-Modus geändert haben, müssen Sie die neue
Partition mit dem Dienstprogramm formatieren.
29
Page 30

Technische Spezikationen
Standardkonformität: USB 2.0; eSATA
Suchzeit: maximal 11 ms
Übertragungsgeschwindigkeit: maximal 1,5 Gbit/s (eSATA), maximal 480 Mbit/s (USB 2.0)
Stromverbrauch: maximal 86 W, durchschnittl. 40 W
Netzanschluss: 100-120 V Wechselspannung, 50/60 Hz
Abmessungen: 165 x 203 x 241 mm
Gewicht: 5,8 kg
Betriebstemperatur: 5-35 °C
20-80% Feuchtigkeit (nicht kondensierend)
Kompatibilität mit folgenden Betriebssystemen:
Windows ME, 2000, XP, MacOS 9, Mac OS X
FCC-Warnung
Dieses Gerät entspricht Teil 15 der FCC-Vorschriften. Die Bedienung
unterliegt den beiden folgenden Bedingungen: (1) Dieses Gerät darf
keine gefährlichen Funkstörungen verursachen und (2) dieses Gerät
muss jede empfangene Funkstörung annehmen, inklusive einer
Funkstörung, die den Betrieb beeinträchtigt.
30
Page 31

Umweltschutz-Information
• Für die Herstellung des von Ihnen gekauften Produktes wurden
natürliche Ressourcen verbraucht.
• Das Produkt kann gefährliche Substanzen enthalten, die Auswirkungen
auf Gesundheit und Umwelt haben.
• Um die Ausbreitung dieser Substanzen in unserer Umgebung und den
Verbrauch natürlicher Ressourcen zu verringern, fordern wir Sie auf,
die entsprechenden Rücknahmesysteme zu nutzen.
• In den Rücknahmesystemen werden die meisten Materialien Ihrer
ausgesonderten Geräte aufbereitet oder wieder verwendet.
• Das Symbol mit der durchgestrichenen Mülltonne lädt Sie ein, diese
Systeme zu nutzen.
• Wenn Sie mehr Informationen über die Sammel-, Wiederverwendungsund Wiederaufbereitungssysteme benötigen, wenden Sie sich an die
regionalen Abfallzweckverbände.
31
Page 32

http://www.buffalo-technology.de
Der Technische Support in Europa steht Montag bis Donnerstag von 10.00 bis 19.00 Uhr MEZ
und Freitag von 10.00 bis 17.30 Uhr MEZ für Sie bereit.
E-Mail: info@buffalo-technology.de
Tel.: +49 211 3611790
© 2007, Buffalo Technology, Büro Deutschland
Page 33

Français
Guide d’utilisation
DriveStation Quattro
Contenu de l’emballage :
• Unité principale (DriveStation)
• Câble d’alimentation
• Câble USB
• Carte eSATA PCI
• Câble eSATA
• Face arrière eSATA
• CD-ROM d’installation DriveNavigator
• Guides d’utilisation
v1.0
Page 34

eSATA
USB
Présentation de la face arrière
Prise pour câble
d’alimentation
Interrupteur
Marche/arrêt
Commutateur
auto/manuel
Remarque : le basculement entre les modes RAID est effectué à l’aide de
l’utilitaire RAID, inclus sur le CD ROM DriveNavigator.
34
Page 35

DriveStation - Installation (PC)
Vous venez d’acquérir l’unité DriveStation Quattro. Félicitations ! Intégrant quatre
disques durs distincts, l’unité DriveStation Quattro offre de nombreuses possibilités en
matière de capacités étendues et économiques, et de redondance simple d’utilisation.
Dans un premier temps, insérez le CD DriveNavigator dans le lecteur de
CD-ROM de votre ordinateur. Le programme d’installation démarre. Suivez les
étapes indiquées pour connecter l’unité DriveStation Quattro.
Si le programme d’installation ne démarre pas
automatiquement, cliquez sur Démarrer, puis sur
Exécuter, et saisissez « d:\setup.exe » dans le champ
Ouvrir. Cliquez sur OK.
Cliquez sur DriveStation Setup Wizard (Assistant d’installation de
DriveStation) pour commencer.
Une fois les opérations de l’assistant d’installation réalisées, l’unité DriveStation
Quattro est installée et prête à l’emploi.
Par défaut, l’unité DriveStation Quattro est congurée en mode RAID 0. Ce
mode offre une capacité utilisable et des performances maximales, mais aucune
redondance. Si un disque échoue, toutes les données de l’unité DriveStation sont
perdues. Utilisez l’utilitaire RAID pour modier les paramètres RAID de l’unité
si vous souhaitez une conguration RAID différente. Reportez-vous à la page
suivante pour obtenir des instructions sur l’utilisation de cet utilitaire.
35
Page 36

Utilisation de l’utilitaire RAID – PC
L’utilitaire RAID vous permet de congurer votre unité DriveStation Quattro selon
plusieurs modes :
Normal Mode (Mode normal) - Apparaît sous la forme de quatre disques durs
distincts.
Spanning Mode (Agrégation de disques) - Apparaît sous la forme d’un disque
dur unique, de grande capacité.
RAID 0 Mode (Mode RAID 0) - Apparaît sous la forme d’un disque dur unique.
Performances supérieures à celles de l’agrégation de disques.
RAID 1 Mode (Mode RAID 1) - Apparaît sous la forme d’un disque dur unique. À
des ns de redondance, les troisième et quatrième disques conservent une copie
exacte des premier et deuxième disques.
RAID 5 Mode (Mode RAID 5) - Apparaît sous la forme d’un disque dur unique.
Les 3/4 de l’espace total environ sont utilisables. Néanmoins, vous bénéciez
d’une redondance complète.
Notez que la modication du mode des disques de l’unité DriveStation Quattro
entraîne l’effacement de toutes les données qu’ils contiennent. Veillez donc à
sauvegarder les données importantes avant d’utiliser l’utilitaire RAID.
Lors de l’exécution de l’utilitaire RAID, vous devez être connecté à l’unité
DriveStation au moyen d’un câble USB. Une fois l’utilitaire exécuté et dans le
cadre d’une utilisation normale, vous pouvez passer à une connexion eSATA.
Pour lancer l’utilitaire RAID, cliquez sur RAID Setup Utility (Utilitaire d’installation
RAID) dans le groupe de programmes DriveStation Quattro.
Vous pouvez également lancer le programme à partir du menu Démarrer :
36
Page 37

Utilisation de l’utilitaire RAID – PC
Une fois lancé, l’utilitaire RAID analyse rapidement votre unité
DriveStation Quattro. Cette opération peut prendre quelques secondes.
L’écran initial afche la conguration actuelle. Si votre unité
DriveStation Quattro est neuve, la conguration indique probablement
le mode RAID 0, avec une partition hautes performances. Si
vous souhaitez obtenir une sécurité accrue des données, Buffalo
recommande le mode RAID 5, qui offre un excellent équilibre entre
sécurité et capacité totale.
Pour modier le mode RAID, cliquez sur Conguration (Conguration)
et sélectionnez Change Disk Structure (Modier la structure de disque).
37
Page 38

Utilisation de l’utilitaire RAID – PC
Sélectionnez la structure de disque à utiliser.
Une fois la structure de disque modiée, le disque est formaté avec
FAT32 ou NTFS. Sélectionnez le format souhaité. Le système FAT32
est compatible avec la plupart des ordinateurs Windows, Mac et
Linux. Le système NTFS offre de meilleures performances avec les
ordinateurs Windows 2000 et XP, mais n’est pas compatible avec
d’autres systèmes d’exploitation.
Répondez Yes (Oui) à chaque message. Gardez à l’esprit que cette
action efface toutes les données du disque.
38
Page 39

Autres utilitaires – PC
L’unité DriveStation comprend plusieurs utilitaires de disque optionnels.
Pour installer et utiliser ces utilitaires, insérez le CD de l’unité DriveStation
dans le lecteur de CD-ROM d’un ordinateur Windows.
Le logiciel Memeo™ AutoBackup permet de sauvegarder des
documents, des chiers multimédias et d’autres chiers à partir de votre
ordinateur Windows vers l’unité DriveStation. L’unité inclut une licence
d’utilisation de Memeo pour un poste unique. Pour plus d’informations
sur l’installation et l’utilisation du programme, reportez-vous à la
documentation Memeo.
D’autres utilitaires sont également disponibles, notamment :
Disk Formatter (pour le formatage de l’unité DriveStation)
SecureLockWare (dédié au cryptage des données sur l’unité
DriveStation, cet utilitaire garantit que vous seul pouvez accéder
aux données)
Pour en savoir plus sur l’installation et l’utilisation de ces utilitaires, cliquez
sur View Documentation (Consulter la documentation).
39
Page 40

DriveStation - Installation (Mac)
Positionnez l’interrupteur situé à l’arrière de l’unité DriveStation sur la position
OFF (ARRÊT). Connectez une extrémité du câble d’alimentation de la
DriveStation à la prise, comme indiqué, et l’autre extrémité à une prise de
courant ou un parasurtenseur. Raccordez ensuite un câble USB ou eSATA au
port correspondant à l’arrière de l’unité.
Connectez le câble USB ou eSATA au Mac ou au dispositif auquel vous
souhaitez ajouter l’unité DriveStation.
40
Page 41

DriveStation - Installation (Mac)
Positionnez l’interrupteur situé à l’arrière de l’unité DriveStation sur la position
ON (MARCHE).
L’ordinateur Mac détecte la nouvelle unité et place une icône sur le bureau.
L’unité DriveStation est désormais prête à l’emploi. Double cliquez sur l’icône
pour ouvrir le disque dur.
41
Page 42

Installation de l’utilitaire RAID - Mac
Par défaut, l’unité DriveStation Quattro est congurée en mode RAID 0. Ce
mode offre une capacité utilisable et des performances maximales, mais aucune
redondance. Si un disque échoue, toutes les données de l’unité DriveStation
sont perdues. Si vous êtes prêt à échanger une certaine performance contre une
sécurité accrue des données, Buffalo Technology recommande le mode RAID
5, qui offre un excellent équilibre entre sécurité et capacité totale. Vous pouvez
modier la conguration RAID à l’aide de l’utilitaire RAID.
L’utilitaire RAID ne s’exécute que sur les PC et les ordinateurs Mac G4 et
G5. Vous pouvez utiliser l’unité DriveStation Quattro avec un ordinateur Mac
Intel, mais vous n’aurez pas la possibilité de modier les paramètres RAID sur
ce dernier. Pour pouvoir exécuter l’utilitaire RAID, vous devez utiliser un PC
Windows ou un Mac PowerPC. En outre, lors de l’exécution de l’utilitaire, l’unité
DriveStation doit être connectée au Mac au moyen d’un câble USB. Une fois
l’utilitaire exécuté et dans le cadre d’une utilisation normale, vous pouvez passer
à une connexion eSATA.
L’utilitaire RAID vous permet de congurer votre unité DriveStation Quattro selon
plusieurs modes :
Normal Mode (Mode normal) - Apparaît sous la forme de quatre disques durs
distincts.
Spanning Mode (Agrégation de disques) - Apparaît sous la forme d’un disque
dur unique, de grande capacité.
RAID 0 Mode (Mode RAID 0) - Apparaît sous la forme d’un disque dur unique.
Performances supérieures à celles de l’agrégation de disques.
RAID 1 Mode (Mode RAID 1) - Apparaît sous la forme d’un disque dur unique. À
des ns de redondance, les troisième et quatrième disques conservent une copie
exacte des premier et deuxième disques.
RAID 5 Mode (Mode RAID 5) - Apparaît sous la forme d’un disque dur unique.
Les 3/4 de l’espace total environ sont utilisables. Néanmoins, vous bénéciez
d’une redondance complète.
La modication du mode des disques de l’unité DriveStation Quattro entraîne
l’effacement de toutes les données qu’ils contiennent. Veillez donc à sauvegarder
les données importantes avant d’utiliser l’utilitaire RAID. Pour installer l’utilitaire,
ouvrez le dossier Mac sur le CD ROM DriveNavigator.
Double cliquez sur RaidSetting.dmg pour ouvrir l’image de l’utilitaire RAID.
Copiez le contenu vers le dossier d’application de l’ordinateur Mac.
42
Page 43

Utilisation de l’utilitaire RAID – Mac
Double cliquez sur l’icône RaidSetting du bureau.
Une fois lancé, l’utilitaire RAID analyse rapidement
votre unité DriveStation Quattro. Cette opération peut
prendre quelques secondes.
L’écran initial afche la conguration actuelle. Si votre unité DriveStation
Quattro est neuve, la conguration indique probablement le mode RAID 0,
avec les quatre disques dans une partition hautes performances.
Pour modier le mode RAID, cliquez sur RAID Settings (Paramètres
RAID) et sélectionnez Change Disk Structure (Modier la structure de
disque).
43
Page 44

Utilisation de l’utilitaire RAID – Mac
Sélectionnez la structure de disque à utiliser. Cliquez sur OK, Yes
(Oui) et Yes (Oui). Gardez à l’esprit que cette action efface toutes les
données du disque.
Après la modication du mode RAID, vous devez utiliser l’utilitaire de
disque pour formater la nouvelle partition.
44
Page 45

Spécications techniques
Conformité aux normes : USB 2.0, eSATA
Temps d’accès : max. 11 millisecondes
Vitesse de transmission : max. 1,5 Gbit/s (eSATA), max. 480 Mbits/s (USB 2.0)
Consommation : max. 86 W, moyenne 40 W
Alimentation : 100~120 V CA - 50/60 Hz
Dimensions : 165 x 203 x 241 mm
Poids : 5,8 kg
Environnement d’exploitation :
5 - 35 °C
20-80 % d’humidité (sans condensation)
Compatibilité système d’exploitation :
Windows ME, 2000, XP, Mac OS 9, Mac OS X
Réglementation FCC
Ce dispositif est conforme à l’alinéa 15 de la réglementation FCC.
Son utilisation est soumise aux conditions suivantes : ce dispositif (1)
ne doit pas provoquer d’interférences nuisibles et (2) doit supporter
toute interférence extérieure, pouvant notamment entraîner un
fonctionnement imprévu.
45
Page 46

Informations relatives à l’environnement
• La production de l’équipement que vous avez acquis a nécessité
l’extraction et l’utilisation de ressources naturelles.
• L’équipement peut contenir des matières dangereuses susceptibles
d’avoir un impact sur la santé et l’environnement.
• An d’éviter la diffusion de ces matières dans notre environnement
et de réduire l’exploitation des ressources naturelles, nous vous
encourageons à utiliser les systèmes de récupération appropriés.
• Ces systèmes réutiliseront ou recycleront de manière saine la plupart
des composants de votre équipement périmé.
• Le symbole représentant une poubelle sur roues barrée d’une croix vous
invite à utiliser ces systèmes.
• Pour en savoir plus sur les systèmes de collecte, de réutilisation et de
recyclage, veuillez contacter votre administration locale ou régionale
chargée de la gestion des déchets.
46
Page 47

www.buffalo-technology.com
L’assistance technique européenne est disponible du lundi au jeudi de 9 h à 18 h (GMT)
et le vendredi de 9 h à 16 h 30.
Téléphone (Royaume-Uni uniquement) : 08712 50 12 60
Téléphone : +353 61 70 80 50
Courrier électronique : helpdesk@buffalo-technology.ie
© 2007, Buffalo Technology UK Ltd.
Page 48

Italiano
Manuale per l'utente
DriveStation Quattro
Contenuto della confezione:
• Unità principale (DriveStation)
• Cavo di alimentazione
• Cavo USB
• Scheda PCI eSATA
• Cavo eSATA
• Backplate eSATA
• CD di installazione DriveNavigator
• Manuale per l'utente
v1.0
Page 49

eSATA
USB
Layout del pannello posteriore
Presa per
cavo di
alimentazione
Pulsante di
accensione
Interruttore
automatico/
manuale
Nota: per passare da una modalità RAID all'altra, utilizzare l'utilità RAID
disponibile insieme al software sul CD DriveNavigator.
49
Page 50

DriveStation - Congurazione per PC
Congratulazioni per avere acquistato una nuova DriveStation Quattro. Grazie ai
quattro dischi rigidi interni separati, DriveStation Quattro offre numerose opzioni
di ridondanza per una grande capacità di memorizzazione a costi contenuti.
Per iniziare, inserire il CD DriveNavigator nel PC. Viene eseguito il programma
di installazione. Per collegare DriveStation Quattro, attenersi alla procedura
riportata di seguito.
Se l'installazione non si avvia automaticamente, fare
clic su Start, Esegui, quindi digitare il percorso “d:\
setup.exe” nella nestra Apri. Fare clic su OK.
Fare clic su DriveStation Setup Wizard (Congurazione guidata DriveStation)
per iniziare.
Una volta completata la congurazione guidata, DriveStation Quattro è installato
e pronto per essere utilizzato.
Per impostazione predenita, Quattro è congurato in modalità RAID 0 che
consente di ottenere una capacità di utilizzo e prestazioni massime, non la
ridondanza. In caso di guasto di un'unità, tutti i dati presenti su DriveStation
andranno perduti. Se si desidera utilizzare un tipo di congurazione RAID diverso,
l'utilità RAID consente di modicare le impostazioni RAID della DriveStation.
Andare alla pagina successiva per informazioni sull'utilizzo dell'utilità RAID.
50
Page 51

Utilizzo dell'utilità RAID – PC
L'utilità RAID consente di congurare DriveStation Quattro in diverse modalità:
Normale: viene visualizzata sul computer sotto forma di quattro dischi rigidi
separati.
Spanning: viene visualizzata sul computer sotto forma di un unico disco rigido.
RAID 0: viene visualizzata sul computer sotto forma di un'unica unità. Le
prestazioni sono superiori a quelle possibili con la modalità spanning.
RAID 1: viene visualizzata sul computer sotto forma di un'unica unità. La terza e
la quarta unità conservano una copia esatta della prima e della seconda unità per
la ridondanza.
RAID 5: viene visualizzata sul computer sotto forma di un'unica unità. Circa
3/4 dello spazio totale risulta utilizzabile; la ridondanza disponibile è comunque
completa.
Se si modica la modalità delle unità della DriveStation Quattro, tutti i dati in esse
contenuti andranno perduti. Eseguire pertanto una copia di backup di tutti i dati
rilevanti prima di utilizzare l'utilità RAID.
Per eseguire l'utilità RAID, è necessario essere collegati alla DriveStation tramite
un cavo USB. È possibile passare a un collegamento eSATA per l'uso normale
solo dopo che l'utilità è in funzione.
Per avviare l'utilità RAID, fare clic su RAID Setup Utility (Utilità di congurazione
RAID) nel gruppo di programmi DriveStation Quattro.
In alternativa, è possibile avviare il programma dal menu di avvio:
51
Page 52

Utilizzo dell'utilità RAID – PC
Una volta avviata l'utilità RAID, viene eseguita la ricerca della
DriveStation Quattro. Questa operazione può richiedere alcuni secondi.
Nella schermata iniziale viene visualizzata la congurazione corrente.
Al primo utilizzo, la DriveStation Quattro è solitamente congurata in
modalità RAID 0, con una partizione ad elevate prestazioni. Per una
migliore protezione dei dati, si consiglia di utilizzare la modalità RAID 5
che assicura un eccellente equilibrio tra sicurezza e capacità totale.
Per modicare la modalità RAID, fare clic su Conguration (Congurazione)
e scegliere Change Disk Structure (Modica struttura disco).
52
Page 53

Utilizzo dell'utilità RAID – PC
Selezionare la struttura dell'unità da utilizzare.
Dopo avere congurato la struttura dell'unità, il disco verrà formattato
con FAT32 o NTFS. Selezionare il formato desiderato. FAT32 è
compatibile con la maggior parte dei computer Windows, Mac e Linux.
NTFS garantisce migliori prestazioni con i sistemi operativi Windows
2000 e XP, ma non è compatibile con altri sistemi operativi.
Fare clic su Yes (Sì) e nuovamente su Yes (Sì). Si tenga presente che
questa operazione cancella tutti i dati archiviati sull'unità.
53
Page 54

Altre utilità – PC
DriveStation comprende numerose utilità disco opzionali. Per installare e
utilizzare queste utilità, inserire il CD-ROM in dotazione con DriveStation
in un computer Windows.
Il software Memeo™ AutoBackup consente di eseguire il backup di
documenti, le multimediali e altri le dal PC Windows alla DriveStation.
Con la DriveStation è disponibile una licenza per l'utilizzo di Memeo su
un unico PC o workstation. Per ulteriori informazioni sull'installazione
e utilizzo di Memeo, consultare la documentazione appropriata di
riferimento.
Sono inoltre disponibili altre utilità, tra cui:
Disk Formatter: consente di formattare la DriveStation.
SecureLockWare: consente di crittografare i dati sulla
DriveStation, impedendone l'accesso da parte di persone diverse
dall'utente.
Per ulteriori informazioni sull'installazione e utilizzo di queste utilità, fare
clic su View Documentation (Visualizza documentazione).
54
Page 55

DriveStation - Congurazione per Mac
Posizionare l'interruttore di alimentazione, che si trova sul retro della
DriveStation, su OFF. Collegare il cavo di alimentazione della DriveStation
alla presa come mostrato; collegare inoltre un'uscita di alimentazione o un
limitatore di sovratensione. Collegare quindi un cavo USB o eSATA nella porta
corrispondente sul retro della DriveStation.
Collegare il cavo USB o eSATA al computer Mac o agli altri dispositivi che
vengono aggiunti alla DriveStation.
55
Page 56

DriveStation - Congurazione per Mac
Posizionare l'interruttore di alimentazione, che si trova sul retro della
DriveStation, su ON.
Il computer Mac rileva la nuova unità inserendo un'icona sul desktop.
È quindi possibile iniziare a utilizzare la DriveStation. Fare doppio clic sull'icona
per aprire il disco rigido.
56
Page 57

Installazione dell'utilità RAID - Mac
Per impostazione predenita, Quattro è congurato in modalità RAID 0 che
consente di ottenere una capacità di utilizzo e prestazioni massime, non la
ridondanza. In caso di guasto di un'unità, tutti i dati presenti su DriveStation
andranno perduti. Per aumentare le prestazioni e assicurare una migliore
protezione dei dati, si consiglia di utilizzare la modalità RAID 5 che garantisce
un eccellente equilibrio tra sicurezza e capacità totale. L'utilità RAID consente di
modicare la congurazione RAID.
L'utilità RAID viene eseguita esclusivamente su PC e MAC G4 e G5. È possibile
utilizzare la DriveStation Quattro con un Intel Mac; in questo caso però non
sarà possibile modicarne le impostazioni RAID. Per eseguire l'utilità RAID, è
necessario utilizzare un PC Windows o un Mac PowerPC. Inoltre la DriveStation
deve essere collegata al Mac con un cavo USB durante l'utilizzo dell'utilità. È
possibile passare a un collegamento eSATA per l'uso normale solo dopo che
l'utilità è in funzione.
L'utilità RAID consente di congurare la DriveStation Quattro in diverse modalità:
Normale: viene visualizzata sul computer sotto forma di quattro dischi rigidi separati.
Spanning: viene visualizzata sul computer sotto forma di un unico disco rigido.
RAID 0: viene visualizzata sul computer sotto forma di un'unica unità. Le
prestazioni sono superiori a quelle possibili con la modalità spanning.
RAID 1: viene visualizzata sul computer sotto forma di un'unica unità. La terza e
la quarta unità conservano una copia esatta della prima e della seconda unità per
la ridondanza.
RAID 5: viene visualizzata sul computer sotto forma di un'unica unità. Circa
3/4 dello spazio totale risulta utilizzabile; la ridondanza disponibile è comunque
completa.
Se si modica la modalità delle unità di Quattro, tutti i dati in esse contenuti
andranno perduti. Eseguire il backup di dati rilevanti prima di utilizzare l'utilità
RAID. Per installare l'utilità RAID, aprire la cartella Mac nel CD DriveNavigator.
Fare doppio clic su RaidSetting.dmg per aprire l'immagine dell'utilità RAID.
Copiare il contenuto nella cartella dell'applicazione del Mac.
57
Page 58

Utilizzo dell'utilità RAID – Mac
Fare doppio clic sull'icona RaidSetting (Impostazione
Raid) sul desktop. Una volta avviata l'utilità RAID,
viene eseguita la ricerca della DriveStation Quattro.
Questa operazione può richiedere alcuni secondi.
Nella schermata iniziale viene visualizzata la congurazione corrente.
Al primo utilizzo, la DriveStation Quattro è solitamente congurata in
modalità RAID 0, con una partizione ad elevate prestazioni.
Per modicare la modalità RAID, fare clic su RAID Settings
(Impostazioni RAID) e scegliere Change Disk Structure (Modica
struttura disco).
58
Page 59

Utilizzo dell'utilità RAID – Mac
Selezionare la struttura dell'unità da utilizzare. Fare clic su OK, quindi su
Yes (Sì) e ancora su Yes (Sì). Si tenga presente che questa operazione
cancella tutti i dati archiviati sull'unità.
Dopo avere modicato la modalità RAID, sarà necessario utilizzare
l'utilità disco per formattare la nuova partizione.
59
Page 60

Speciche tecniche
Conformità standard: USB 2.0; eSATA
Tempo di posizionamento: Max. 11 millisecondi
Velocità di trasmissione dati: Max. 1,5 Gbps (eSATA). Max. 480 Mbps (USB 2.0)
Consumo: Max. 86W, in media 40W
Corrente elettrica: AC100~120V 50/60Hz
Dimensioni: 165 x 203 x 241 mm
Peso: 5,8 kg
Temperatura di esercizio: 5 - 35° C
20-80% senza condensa
Compatibilità SO PC: Windows ME, 2000, XP, MacOS 9, Mac OS X
Avvertenza FCC
Questo dispositivo è conforme alle norme FCC parte 15. Il
funzionamento è soggetto alle seguenti condizioni: (1) il presente
dispositivo non deve emettere interferenze dannose; (2) il presente
dispositivo deve ricevere qualsiasi tipo di interferenza, comprese le
interferenze che potrebbero causare un funzionamento indesiderato.
60
Page 61

Informazioni sull'ambiente
• L'apparecchio acquistato richiede l'estrazione e l'impiego di risorse
naturali per la sua produzione.
• L'apparecchio può contenere sostanze nocive alla salute e all'ambiente.
• Per evitare la dispersione nell'ambiente di queste sostanze e ridurre
l'impiego di risorse naturali, consigliamo di adoperare il sistema di
smaltimento più appropriato.
• I sistemi di smaltimento consentono il riutilizzo o il riciclo appropriato
della maggior parte dei materiali dell'apparecchio.
• Il simbolo barrato del raccoglitore di riuti invita a utilizzare questi
sistemi.
• Per ulteriori informazioni sui sistemi di raccolta, riciclo e riutilizzo,
contattare l'ente amministrativo locale e regionale addetto allo
smaltimento dei riuti.
61
Page 62

www.buffalo-technology.com
Gli orari dell'assistenza tecnica europea sono 9:00-18:00 dal lunedì al giovedì (GMT)
e 9:00-16.30 il venerdì.
Telefono (solo UK): 08712 50 12 60
Telefono: +353 61 70 80 50
e-mail: helpdesk@buffalo-technology.ie
© 2007, Buffalo Technology UK Ltd.
Page 63

Español
Manual de usuario
DriveStation Quattro
Contenido del paquete:
• Unidad principal (DriveStation)
• Cable de alimentación
• Cable USB
• Tarjeta eSATA PCI
• Cable eSATA
• Placa posterior eSATA
• CD de instalación de DriveNavigator
• Manuales del usuario
v1.0
Page 64

eSATA
USB
Esquema del panel posterior
Toma del cable
de alimentación
Conmutador
de encendido
Conmutador
automático/
manual
Nota: el cambio entre modos RAID se efectúa mediante RAID Utility, que se
incluye en el software del CD de DriveNavigator.
64
Page 65

DriveStation. Instalación en PC
¡Enhorabuena por la adquisición de su nueva DriveStation Quattro! Las
cuatro unidades de disco independientes de la DriveStation Quattro le ofrecen
numerosas opciones de conguración para obtener una capacidad económica y
abundante y una redundancia de uso sencillo.
Para empezar, introduzca el CD de DriveNavigator en la unidad óptica de su PC.
Se ejecutará el programa de instalación. Siga los pasos indicados para conectar
su DriveStation Quattro.
Si el programa de instalación no se ejecuta
automáticamente, haga clic en Inicio > Ejecutar y
escriba “d:\setup.exe” en la ventana Abrir. Haga clic en
Aceptar.
Haga clic en DriveStation Setup Wizard (asistente de instalación de
DriveStation) para empezar.
Una vez nalizado el asistente de instalación, su DriveStation Quattro estará
instalada y lista para su uso.
De forma predeterminada, la DriveStation Quattro está congurada en modo
RAID 0, que le proporciona el máximo rendimiento y capacidad utilizables, pero
sin redundancia. En caso de avería de una de las unidades, todos los datos de
la DriveStation se perderán. Si preere una conguración RAID distinta, utilice
RAID Utility para modicar los parámetros RAID de su DriveStation. En la página
siguiente se indican instrucciones para el uso de RAID Utility.
65
Page 66

Uso de RAID Utility – PC
RAID Utility le permite congurar su DriveStation Quattro en diversos modos:
Modo Normal: se muestra en el ordenador como cuatro unidades
independientes.
Modo Spanning: se muestra en el ordenador como una sola unidad de disco
grande.
Modo RAID 0: se muestra en el ordenador como una única unidad. El
rendimiento es superior al del modo Spanning.
Modo RAID 1: se muestra en el ordenador como una única unidad. Las unidades
tercera y cuarta contienen una copia exacta de las unidades primera y segunda
para proporcionar redundancia.
Modo RAID 5: se muestra en el ordenador como una única unidad.
Aproximadamente 3/4 del espacio total es aprovechable, pero sigue manteniendo
redundancia total.
¡Tenga en cuenta que al cambiar el modo de las unidades de su DriveStation
Quattro se borrarán todos los datos que contienen! Haga una copia de seguridad
de los datos importantes antes de utilizar RAID Utility.
Para emplear RAID Utility, deberá estar conectado a la DriveStation mediante un
cable USB. Cuando haya terminado de usar la utilidad puede cambiar de nuevo
a una conexión eSATA para uso normal.
Para ejecutar RAID Utility haga doble clic en RAID Setup Utility en el grupo de
programas DriveStation Quattro.
También puede ejecutar el programa desde el menú Inicio:
66
Page 67

Uso de RAID Utility en PC
Al ejecutarla, RAID Utility buscará la DriveStation Quattro. Puede tardar
unos segundos en encontrarla.
En la pantalla inicial se muestra la conguración actual. Si su unidad
Quattro es nueva, lo más probable es que se encuentre en modo RAID
0, con una única partición de alto rendimiento. Si desea una mayor
seguridad en sus datos, Buffalo le recomienda el modo RAID 5, que
ofrece un excelente equilibrio entre seguridad y capacidad total.
Para cambiar el modo RAID, haga clic en Conguration
(Conguración) y seleccione Change Disk Structure (Cambiar
estructura de disco).
67
Page 68

Uso de RAID Utility en PC
Seleccione la estructura de unidades que desee utilizar.
Una vez reconstruida la estructura, el disco se formateará con FAT32 o
NTFS. Seleccione el formato que preera. FAT32 es compatible con la
mayor parte de PC con Windows, equipos Mac y sistemas Linux. NTFS
ofrece un mayor rendimiento en equipos con Windows 2000 y XP, pero
es incompatible con otros sistemas operativos.
Haga clic en Yes (Sí), y de nuevo en Yes. ¡Tenga en cuenta que esta
acción borrará todos los datos de la unidad!
68
Page 69

Otras utilidades para PC
La DriveStation incluye diversas utilidades de disco opcionales. Para
instalarlas y utilizarlas, inserte el CD-ROM incluido con la DriveStation en
la unidad óptica de un PC con Windows.
El software Memeo™ AutoBackup sirve para hacer copias de seguridad
de documentos, archivos multimedia y otros archivos de su PC con
Windows en la DriveStation. Su DriveStation incluye una licencia para
el uso de Memeo en un único PC o estación de trabajo. Para obtener
mas información sobre la instalación y el uso de Memeo, consulte la
documentación del producto.
También se incluyen otras utilidades, como:
Disk Formatter (para formatear su DriveStation)
SecureLockWare (para el cifrado de datos en su DriveStation,
lo que impide que otras personas accedan a los datos)
Para saber más acerca de la instalación y el uso de estas utilidades, haga
clic en View Documentation (Ver documentación).
69
Page 70

DriveStation. Instalación en Mac
Ponga el interruptor de encendido de la parte posterior de la DriveStation en la
posición OFF. Conecte el cable de alimentación de la DriveStation en la base
tal como se muestra, y también a una toma de corriente o a un protector contra
subidas de tensión. A continuación, conecte un cable USB o eSATA al puerto
adecuado de la parte posterior de la DriveStation.
Conecte el cable USB o eSATA a su Mac o al dispositivo al que desee
incorporar la DriveStation.
70
Page 71

DriveStation. Instalación en Mac
Ponga el interruptor de encendido de la parte posterior de la DriveStation en la
posición ON.
Su Mac detectará la nueva unidad y pondrá un icono en el escritorio.
Su DriveStation está ahora lista para utilizarla. Haga doble clic en el icono para
abrir la unidad de disco.
71
Page 72

Instalación de RAID Utility en Mac
De forma predeterminada, la DriveStation Quattro está congurada en modo
RAID 0, que le proporciona el máximo rendimiento y capacidad utilizables, pero
sin redundancia. En caso de avería de una de las unidades, todos los datos de la
DriveStation se perderán. Si desea una mayor seguridad en sus datos a cambio
de un rendimiento ligeramente menor, Buffalo Technology le recomienda el modo
RAID 5, que ofrece un excelente equilibrio entre seguridad y capacidad total.
Para cambiar la conguración RAID emplee RAID Utility.
RAID Utility solo puede ejecutarse en PC y en equipos Mac con procesadores
PowerPC G4 o G5. Puede utilizar la DriveStation Quattro en un Mac con
procesador Intel, pero no podrá modicar la conguración RAID. ¡Para ejecutar
RAID Utility es imprescindible utilizar un PC con Windows o un equipo Mac con
procesador PowerPC! Asimismo, para usar el software, la DriveStation debe
estar conectada al Mac mediante un cable USB. Cuando haya terminado de usar
la utilidad puede cambiar de nuevo a una conexión eSATA para uso normal.
RAID Utility le permite congurar su DriveStation Quattro en diversos modos:
Modo Normal: se muestra en el ordenador como cuatro unidades
independientes.
Modo Spanning: se muestra en el ordenador como una sola unidad de disco
grande.
Modo RAID 0: se muestra en el ordenador como una única unidad.
El rendimiento es superior al del modo Spanning.
Modo RAID 1: se muestra en el ordenador como una única unidad. Las unidades
tercera y cuarta contienen una copia exacta de las unidades primera y segunda
para proporcionar redundancia.
Modo RAID 5: se muestra en el ordenador como una única unidad.
Aproximadamente 3/4 del espacio total es aprovechable, pero sigue manteniendo
redundancia total.
¡Tenga en cuenta que al cambiar el modo de las unidades de su DriveStation
Quattro se borrarán todos los datos que contienen! Haga una copia de seguridad
de los datos importantes antes de emplear RAID Utility. Para instalar RAID Utility,
abra la carpeta Mac en el CD de DriveNavigator.
Haga doble clic en RaidSetting.dmg para abrir la imagen de RAID Utility. Copie
el contenido a la carpeta de aplicaciones de su Mac.
72
Page 73

Uso de RAID Utility en Mac
Haga doble clic en el icono RaidSetting de su
escritorio. Al ejecutarla, RAID Utility buscará la
DriveStation Quattro. Puede tardar unos segundos en
encontrarla.
En la pantalla inicial se muestra la conguración actual. Si su unidad
Quattro es nueva, lo más probable es que se encuentre en modo RAID
0, con los cuatro discos en una única partición de alto rendimiento.
Para cambiar el modo RAID, haga clic en RAID Settings
(Conguración RAID) y seleccione Change Disk Structure (Cambiar
estructura de disco).
73
Page 74

Uso de RAID Utility en Mac
Seleccione la estructura de unidades que desee utilizar. Haga clic en
Aceptar, Yes (Sí) y Yes. ¡Tenga en cuenta que esta acción borrará todos
los datos de la unidad!
Después de cambiar el modo RAID tendrá que usar Disk Utility para
formatear la nueva partición.
74
Page 75

Especicaciones técnicas
Estándares compatibles: USB 2.0; eSATA
Tiempo de acceso: máx. 11 milisegundos
Velocidad de transmisión: máx. 1,5 Gbps (eSATA), máx. 480 Mbps (USB 2.0)
Consumo: máx. 86 W, promedio de 40W
Alimentación: 100~120 V CA, 50/60 Hz
Dimensiones: 165 x 203 x 241 mm
Peso: 5,8 kg
Entorno de funcionamiento: de 5 a 35 ºC
Humedad relativa del 20 al 80% (sin condensación)
Sistemas operativos compatibles:
Windows ME, 2000, XP, MacOS 9, Mac OS X
Aviso sobre FCC (normas sobre
interferencias electromagnéticas)
Este dispositivo cumple con el apartado 15 de las normas FCC sobre
interferencias electromagnéticas. El funcionamiento está sujeto a
las dos condiciones siguientes: (1) Este dispositivo no puede causar
interferencias dañinas, y (2) este dispositivo debe aceptar cualquier
interferencia que reciba, lo que incluye aquellas que puedan producir
un funcionamiento no deseado.
75
Page 76

Información medioambiental
• Para la fabricación de este equipo han sido necesarios la extracción y el
uso de recursos naturales.
• El equipo podría contener sustancias peligrosas que podrían afectar a la
salud y al medioambiente.
• Para evitar la difusión de estas sustancias en el entorno y disminuir el
uso innecesario de los recursos naturales, le sugerimos que utilice los
sistemas de reciclaje adecuados.
• Cuando su dispositivo llegue al n de su vida útil, la mayor parte de los
materiales empleados en su fabricación se reutilizarán o reciclarán de
modo adecuado a través de estos sistemas de reciclaje.
• El símbolo del contenedor de basura tachado le invita a usar dichos
sistemas.
• Si necesita más información sobre los sistemas de recogida,
reutilización y reciclaje, póngase en contacto con su administración
local o regional de recogida de basura.
76
Page 77

www.buffalo-technology.com
El servicio técnico para Europa está disponible entre las 9.00 y las 18.00 (GMT) de
lunes a jueves, y de 9.00 a 16.30 los viernes.
Teléfono (sólo Reino Unido): 08712 50 12 60
Teléfono: +353 61 70 80 50
Correo electrónico: helpdesk@buffalo-technology.ie
© 2007, Buffalo Technology UK Ltd.
Page 78

Português
Manual do Utilizador
DriveStation Quattro
Conteúdo da embalagem:
• Unidade Principal (DriveStation)
• Cabo de Alimentação
• Cabo USB
• Placa PCI eSATA
• Cabo eSATA
• Backplate eSATA
• CD de Instalação DriveNavigator
• Manuais do Utilizador
v1.0
Page 79

eSATA
USB
Esquema do Painel Posterior
Socket para
Cabo de
Alimentação
Ligar/
Desligar
Comutador
Automático /
Manual
Nota: A mudança entre modos RAID é efectuada com o Utilitário RAID, incluído
no software do CD DriveNavigator.
79
Page 80

DriveStation – Conguração do PC
Parabéns pelo seu novo DriveStation Quattro. Com quatro unidades de disco
rígido separadas, o DriveStation Quattro oferece várias opções de grande
capacidade económica e redundância de fácil utilização.
Para começar, insira o CD DriveNavigator no PC. O programa de conguração é
executado. Siga os passos para ligar o DriveStation Quattro.
Se o programa de conguração não for iniciado
automaticamente, clique em Start (Inicair), em seguida,
clique em Run (Executar) e escreva “d:\setup.exe” no
caixa Open (Abrir). Clique em OK.
Para começar, clique no Assistente de Conguração DriveStation.
Após conclusão do assistente de conguração, o DriveStation Quattro é instalado
e está pronto para ser utilizado.
Por predenição, o Quattro é congurado no Modo RAID 0. Este modo permite
máxima capacidade de utilização e desempenho, mas sem redundância. Se uma
das unidades falhar, perdem-se todos os dados da DriveStation. Caso prera
uma conguração RAID diferente, pode utilizar o Utilitário RAID para alterar
as denições RAID da DriveStation. Siga para a página seguinte para obter
instruções sobre utilização do Utilitário RAID.
80
Page 81

Utilizar o Utilitário RAID – PC
O Utilitário RAID permite congurar o DriveStation Quattro em vários modos:
Normal Mode - Aparece no computador como quarto unidades de disco rígido
separadas.
Spanning Mode - Aparece no computador como uma grande unidade de disco
rígido.
RAID 0 Mode - Aparece no computador com uma única unidade. Desempenho
superior ao do Modo Spanning.
RAID 1 Mode - Aparece no computador com uma única unidade. A terceira e
quarta unidades guardam uma cópia exacta das duas primeiras unidades, para
redundância.
RAID 5 Mode - Aparece no computador com uma única unidade. É possível
utilizar aproximadamente ¾ do espaço total, mantendo a redundância total.
Note que a alteração do modo das unidades no Quattro apaga todos os dados
nelas contidos. Faça uma cópia de segurança dos dados importantes antes de
utilizar o utilitário RAID.
Deve estar ligado à DriveStation com um cabo USB, ao executar o utilitário
RAID. Pode mudar para uma ligação eSATA para utilização normal, após
execução do utilitário.
Pode iniciar o Utilitário RAID clicando em RAID Setup Utility (Utilitário de
Conguração RAID) no grupo de programas DriveStation Quattro.
Ou pode iniciar o programa a partir do menu Start:
81
Page 82

Utilizar o Utilitário RAID – PC
Uma vez iniciado, o Utilitário RAID analisa rapidamente o DriveStation
Quattro. A análise pode demorar alguns segundos.
O ecrã inicial apresenta a conguração actual. Se o Quattro for novo,
é provável que esteja no modo RAID 0, com uma partição de alto
desempenho. Caso pretenda mais segurança, a Buffalo recomenda o
modo RAID 5, com excelente equilíbrio entre segurança e capacidade
total.
Para alterar o modo RAID, clique em Conguração e escolha Change
Disk Structure (Alterar Estrutura do Disco).
82
Page 83

Utilizar o Utilitário RAID – PC
Seleccione a estrutura da unidade que gostaria de utilizar.
Após reconstrução da estrutura do disco, o disco será formatado com
o sistema FAT32 ou NTFS. Seleccione o formato preferido. O formato
FAT32 é compatível com a maioria dos computadores Windows, Macs
e Linux. O formato NTFS oferece desempenho com computadores
Windows 2000 e XP, mas não é compatível com outros sistemas
operativos.
Clique em Yes (Sim) e novamente em Yes. Note que este
procedimento irá apagar todos os dados da unidade.
83
Page 84

Outros Utilitários – PC
A DriveStation inclui vários utilitários de disco opcionais. Para instalar e
utilizar estes utilitários, insira o CD-ROM fornecido com a DriveStation
num computador com o sistema operativo Windows.
O software Memeo™ AutoBackup está disponível para fazer cópia de
segurança de documentos, cheiros de multimédia e outros cheiros do
computador com o Windows para a DriveStation. A DriveStation inclui
uma licença para utilizar o software Memeo num único computador ou
estação de trabalho. Consulte a documentação do software Memeo para
mais informações sobre instalação e utilização.
Também estão disponíveis outros utilitários, incluindo:
Formatador de Disco (para formatar a DriveStation)
SecureLockWare (para encriptar os dados da DriveStation e
impedir que os dados sejam acedidos por terceiros)
Para obter mais informações sobre instalação e utilização destes
utilitários, clique em View Documentation (Ver Documentação).
84
Page 85

DriveStation – Conguração Mac
Rode o interruptor de energia na parte de trás da DriveStation para a posição
OFF (Desligado). Ligue o cabo de alimentação da DriveStation ao socket de
alimentação, tal como mostrado, bem como a uma tomada de corrente ou um
protector contra picos de corrente. Em seguida, ligue o cabo USB ou eSATA a
uma porta correspondente na parte de trás da DriveStation.
Ligue o cabo USB ou eSATA ao Mac ou outro dispositivo ao qual a DriveStation
está a ser adicionada.
85
Page 86

DriveStation – Conguração Mac
Rode o interruptor de energia na parte de trás da DriveStation para a posição
ON (Ligado).
O Mac irá detectar a nova unidade e pôr um ícone no ambiente de trabalho.
A DriveStation está pronta para ser utilizada Faça duplo clique no ícone par abrir
a unidade de disco rígido.
86
Page 87

Instalar o Utilitário RAID - Mac
Por predenição, o Quattro é congurado no modo RAID 0. Este modo permite
máxima capacidade de utilização e desempenho, mas sem redundância. Se uma
das unidades falhar, perdem-se todos os dados da DriveStation. Caso pretenda
trocar algum desempenho por mais segurança de dados, a Buffalo Technology
recomenda o modo RAID 5, com excelente equilíbrio entre segurança e
capacidade total. É possível alterar a conguração RAID com o Utilitário RAID.
O Utilitário RAID só pode ser executado em computadores e em Macs G4 e G5
É possível utilizar a DriveStation Quattro com um Intel Mac, embora não seja
possível alterar as denições RAID a partir daí. É necessário utilizar um PC com
Windows ou um Mac PowerPC para executar o Utilitário RAID. Além disso, a
DriveStation tem de estar ligada ao Mac com um cabo USB ao utilizar o utilitário.
Pode mudar para uma ligação eSATA para utilização normal, após execução do
utilitário.
O Utilitário RAID permite congurar o DriveStation Quattro em vários modos:
Normal Mode - Aparece no computador como quarto unidades de disco rígido
separadas.
Spanning Mode - Aparece no computador como uma grande unidade de disco
rígido.
RAID 0 Mode - Aparece no computador com uma única unidade. Desempenho
superior ao do modo Spanning.
RAID 1 Mode - Aparece no computador com uma única unidade. A terceira e
quarta unidades guardam uma cópia exacta das duas primeiras unidades, para
redundância.
RAID 5 Mode - Aparece no computador com uma única unidade. É possível
utilizar aproximadamente ¾ do espaço total, mantendo a redundância total.
A alteração do modo das unidades no Quattro apaga todos os dados nelas
contidos. Faça uma cópia de segurança de todos os dados importantes antes de
utilizar o utilitário RAID. Para instalar o Utilitário RAID, abra a pasta Mac no CD
DriveNavigator.
Faça duplo clique no cheiro RaidSetting.dmg para abrir a imagem do utilitário
RAID. Copie o conteúdo para a pasta de aplicações no Mac.
87
Page 88

Utilizar o Utilitário RAID – Mac
Faça duplo clique no ícone RaidSetting no ambiente
de trabalho. Uma vez iniciado, o Utilitário RAID
analisa rapidamente o DriveStation Quattro. A análise
pode demorar alguns segundos.
O ecrã inicial apresenta a conguração actual. Se o Quattro for novo,
é provável que esteja no modo RAID 0, com os quatro discos numa
partição de alto desempenho.
Para alterar o modo RAID, clique em Congurações RAID e escolha
Change Disk Structure (Alterar Estrutura do Disco).
88
Page 89

Utilizar o Utilitário RAID – Mac
Seleccione a estrutura da unidade que gostaria de utilizar. Clique em
OK, Yes e Yes. Note que este procedimento irá apagar todos os dados
da unidade.
Após alteração do modo RAID, é necessário utilizar o Utilitário de Disco
para formatar a nova partição.
89
Page 90

Especicações Técnicas
Conformidade Padrão: USB 2.0; eSATA
Tempo de Pesquisa: Máx. 11 milisegundos
Velocidade de Transmissão: Máx. 1.5 Gbps (eSATA), Máx. 480 Mbps (USB 2.0)
Consumo de Energia: Máx. 86W, Médio 40W
Fonte de Alimentação: AC100~120V 50/60Hz
Dimensões: 165 x 203 x 241 mm
Peso: 5,8 kg
Ambiente Operativo: 5º - 35° C
20-80% humidade (non-condensável)
Compatibilidade SO PC: Windows ME, 2000, XP, MacOS 9, Mac OS X
Aviso FCC
Este dispositivo está em conformidade com a parte 15 das Regras
FCC. A operação está sujeita às duas condições que se seguem: (1)
Este dispositivo não pode causar interferências prejudiciais, e (2) este
dispositivo tem de aceitar quaisquer interferências recebidas, incluindo
as interferências que possam causar efeitos indesejado.
90
Page 91

Informações ambientais
• O equipamento que adquiriu exigiu a extracção e utilização de recursos
naturais na sua produção.
• O equipamento pode conter substâncias perigosas com impacto na
saúde e no ambiente.
• Para impedir a disseminação dessas substâncias no ambiente e
diminuir a pressão sobre os recursos naturais, recomendamos a
utilização de sistemas take-back (recepção e reciclagem) apropriados.
• Os sistemas take-back reutilizam ou reciclam a maior parte dos
materiais de equipamentos em m de vida, de maneira saudável.
• O símbolo do contentor de lixo com rodas barrado com uma cruz,
convida-o a utilizar esses sistemas.
• Caso necessite de mais informações sobre sistemas de recolha,
reutilização e reciclagem, contacte as autoridades locais responsáveis
pela gestão do lixo.
91
Page 92

www.buffalo-technology.com
O serviço European Technical Support está disponível entre as 9H00 e as 18H00 GMT
(de Segunda a Quinta-feira) e das 9H00 às 16H30 GMT à Sexta-feira.
Phone (Só RU): 08712 50 12 60
Telefone: +353 61 70 80 50
Email: helpdesk@buffalo-technology.ie
© 2007, Buffalo Technology UK Ltd.
Page 93

Nederlands
Gebruikershandleiding
DriveStation Quattro
Inhoud verpakking:
• DriveStation
• Elektriciteitssnoer
• USB-kabel
• PCI eSATA-kaart
• eSATA-kabel
• eSATA-achterplaat
• Installatie-cd DriveNavigator
• Gebruikershandleidingen
v1.0
Page 94

eSATA
USB
Overzicht achterpaneel
Aansluiting
elektriciteitssnoer
Aan/uitschakelaar
Schakelaar
automatisch/
handmatig
Let op: u kunt schakelen tussen de RAID-modi via het RAID-hulpprogramma
dat u bij de software op uw DriveNavigator-cd aantreft.
94
Page 95

DriveStation - installatie voor de pc
Gefeliciteerd met de aanschaf van uw nieuwe DriveStation Quattro. Met zijn vier
afzonderlijke vaste schijven biedt de DriveStation Quattro u een groot aantal
opties voor een grote capaciteit tegen een betaalbare prijs, en eenvoudig in te
zetten redundantie.
Plaats allereerst de DriveNavigator-cd in uw pc. Het installatieprogramma wordt
gestart. Volg de stappen voor het aansluiten van uw DriveStation Quattro.
Als het installatieprogramma niet automatisch wordt
gestart, klikt u op Start en vervolgens op Uitvoeren.
Typ ‘d:\setup.exe’ in het invoervak Openen (d: is hier
de stationsletter voor het cd-romstation). Klik op OK.
Klik op DriveStation Setup Wizard om te beginnen.
Als u de installatiewizard hebt voltooid, is uw DriveStation Quattro geïnstalleerd
en klaar voor gebruik.
De Quattro is standaard gecongureerd in RAID 0-modus. Hiermee maakt
u optimaal gebruik van capaciteit en prestaties, maar beschikt u niet over
redundantie. Als een schijf uitvalt, gaan alle gegevens op de DriveStation
verloren. Als u liever een andere RAID-conguratie gebruikt, kunt u de
RAID-instellingen van uw DriveStation aanpassen met behulp van het RAIDhulpprogramma. Zie de volgende pagina voor uitleg over het gebruik van het
RAID-hulpprogramma.
95
Page 96

Gebruik van het RAID-hulpprogramma - pc
Met het RAID-hulpprogramma kunt u uw DriveStation Quattro gebruiken in
verschillende modi:
Normale modus - weergegeven op uw computer als vier afzonderlijke vaste schijven.
Spanning-modus - weergegeven op uw computer als één grote vaste schijf.
RAID 0-modus - weergegeven op uw computer als een enkele schijf. Betere
prestaties dan in Spanning-modus.
RAID 1-modus - weergegeven op uw computer als een enkele schijf. Op de
derde en vierde schijf worden exacte reservekopieën van de eerste en tweede
schijf bewaard.
RAID 5-modus - weergegeven op uw computer als een enkele schijf. Ongeveer
driekwart van de totale ruimte is beschikbaar, zonder dat u hoeft in te leveren op
redundantie.
Let op: als u de modus van de schijven op uw Quattro wijzigt, worden alle
aanwezige gegevens gewist! Zorg dat u een back-up maakt van belangrijke
gegevens voordat u het RAID-hulpprogramma gaat gebruiken.
Uw computer moet tijdens het uitvoeren van het RAID-hulpprogramma met een
USB-kabel zijn aangesloten op de DriveStation. U kunt na het uitvoeren van het
programma weer overschakelen op een eSATA-aansluiting voor normaal gebruik.
U kunt het RAID-hulpprogramma starten door in de programmagroep
DriveStation Quattro te klikken op RAID Setup Utility.
U kunt het programma ook starten vanuit het menu Start:
96
Page 97

Gebruik van het RAID-hulpprogramma - pc
Na het starten zoekt het RAID-hulpprogramma naar de DriveStation
Quattro. Dit kan enige seconden duren.
In het beginscherm ziet u de huidige conguratie. Als uw Quattro
nieuw is, staat deze waarschijnlijk in RAID 0-modus, met één highperformance-partitie. Als u kiest voor een betere gegevensbeveiliging
adviseert Buffalo de RAID 5-modus. In deze modus is de verhouding
tussen veiligheid en capaciteit uitstekend in balans.
Om de RAID-modus te wijzigen klikt u op Conguration en kiest u
Change Disk Structure.
97
Page 98

Gebruik van het RAID-hulpprogramma - pc
Selecteer de schijfstructuur die u wilt gebruiken.
Nadat de schijfstructuur opnieuw is opgebouwd, wordt de schijf
geformatteerd met FAT32 of NTFS. Selecteer de gewenste indeling.
FAT32 is compatibel met de meeste Windows-pc’s, Macs en Linux.
NTFS biedt betere prestaties met Windows 2000 en XP maar is niet
compatibel met andere besturingssystemen.
Klik op Yes en vervolgens nogmaals op Yes. Let op: alle gegevens op
de schijf worden hierdoor gewist!
98
Page 99

Andere hulpprogramma’s
De DriveStation beschikt over verschillende optionele
schijfhulpprogramma’s. Om deze programma’s te installeren en gebruiken
plaatst u de bij de DriveStation meegeleverde cd-rom in een Windows-pc.
Memeo™ AutoBackup-software kunt u gebruiken voor het maken van
back-ups van documenten, multimediabestanden en andere bestanden
van uw Windows-pc op de DriveStation. Uw DriveStation wordt geleverd
met een licentie voor het gebruik van Memeo op één pc of werkstation.
Zie de documentatie van Memeo voor meer informatie over de installatie
en het gebruik van Memeo.
Er is nog een aantal andere hulpprogramma’s, waaronder:
Disk Formatter (voor het formatteren van de DriveStation)
SecureLockWare (voor het versleutelen van de gegevens op uw
DriveStation, om te voorkomen dat anderen toegang kunnen
krijgen tot uw gegevens)
Voor meer informatie over de installatie en het gebruik van deze
programma’s klikt u op View Documentation.
99
Page 100

DriveStation - installatie voor de Mac
Zet de aan/uit-schakelaar aan de achterzijde van de DriveStation in de stand
OFF. Sluit het elektriciteitssnoer van de DriveStation op de aangegeven wijze
aan op het stopcontact of een stroombeveiliger. Sluit vervolgens een USB- of
eSATA-kabel aan op een corresponderende poort aan de achterzijde van de
DriveStation.
Sluit de USB- of eSATA-kabel aan op de Mac of het apparaat waarop u de
DriveStation aansluit.
100
 Loading...