

Page 1
Mac User Guide
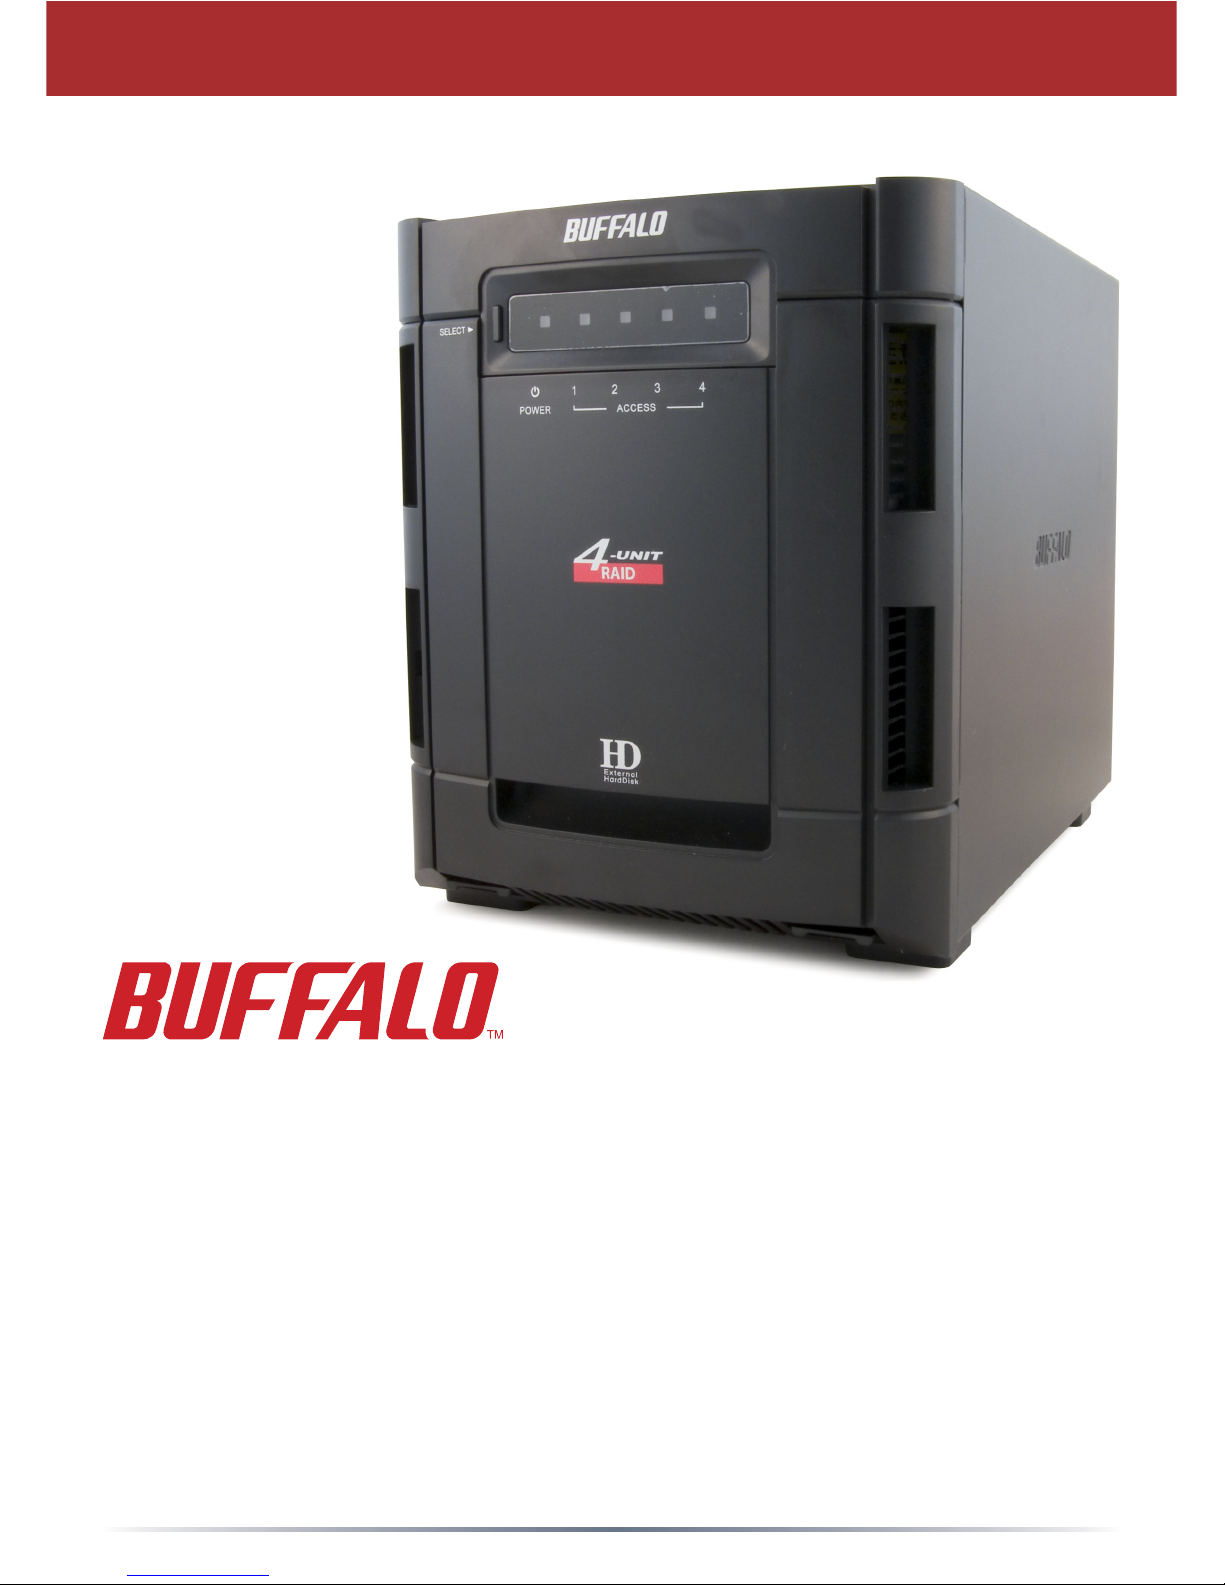
HD-QSTSU2/R5 DriveStation Quattro
Package contents:
• Main Unit (DriveStation)
• Power Cord
• USB Cable
• eSATA Cable
• eSATA Backplate
• DriveNavigator Installation CD
• User Guides
Page 2
2
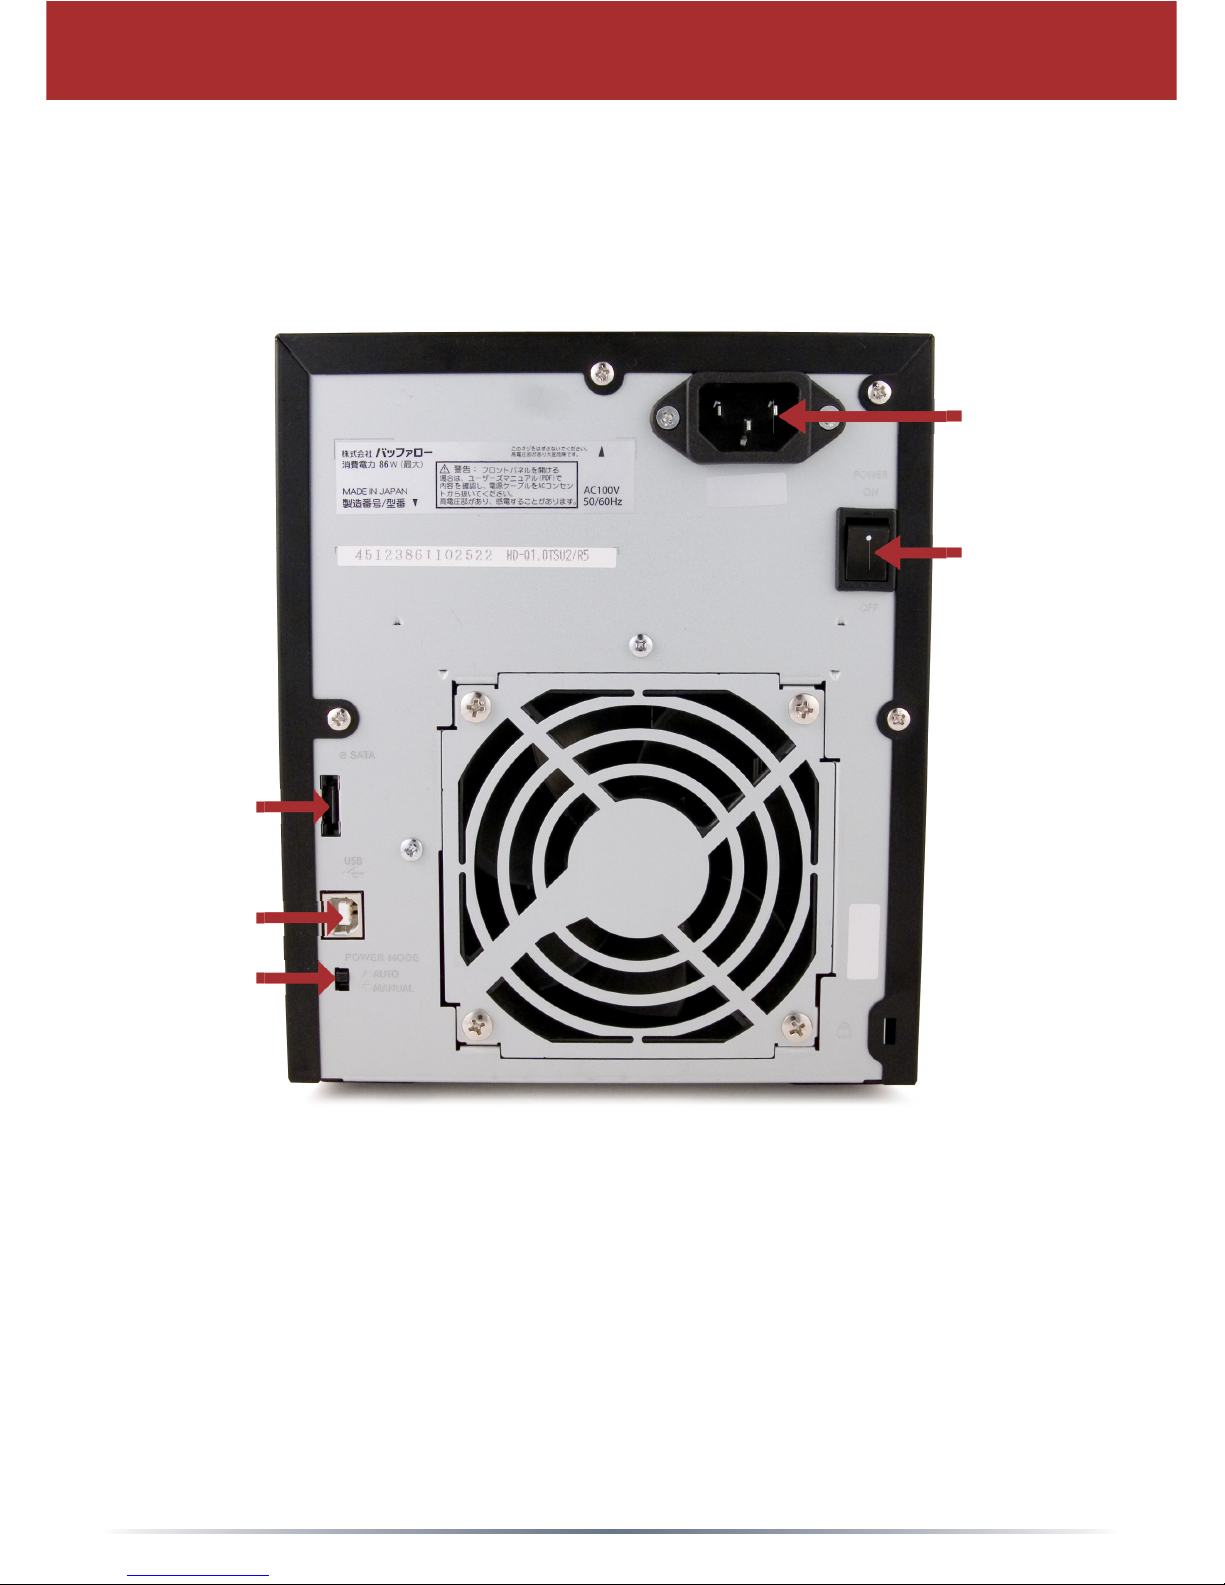
Back Panel Layout
Power On
Off
Socket for
Power Cord
Auto On/Off
Manual On/Off
USB
eSATA
Note: Changing between RAID modes is done with the RAID Utility, included
with the software on your DriveNavigator CD.
Page 3
3
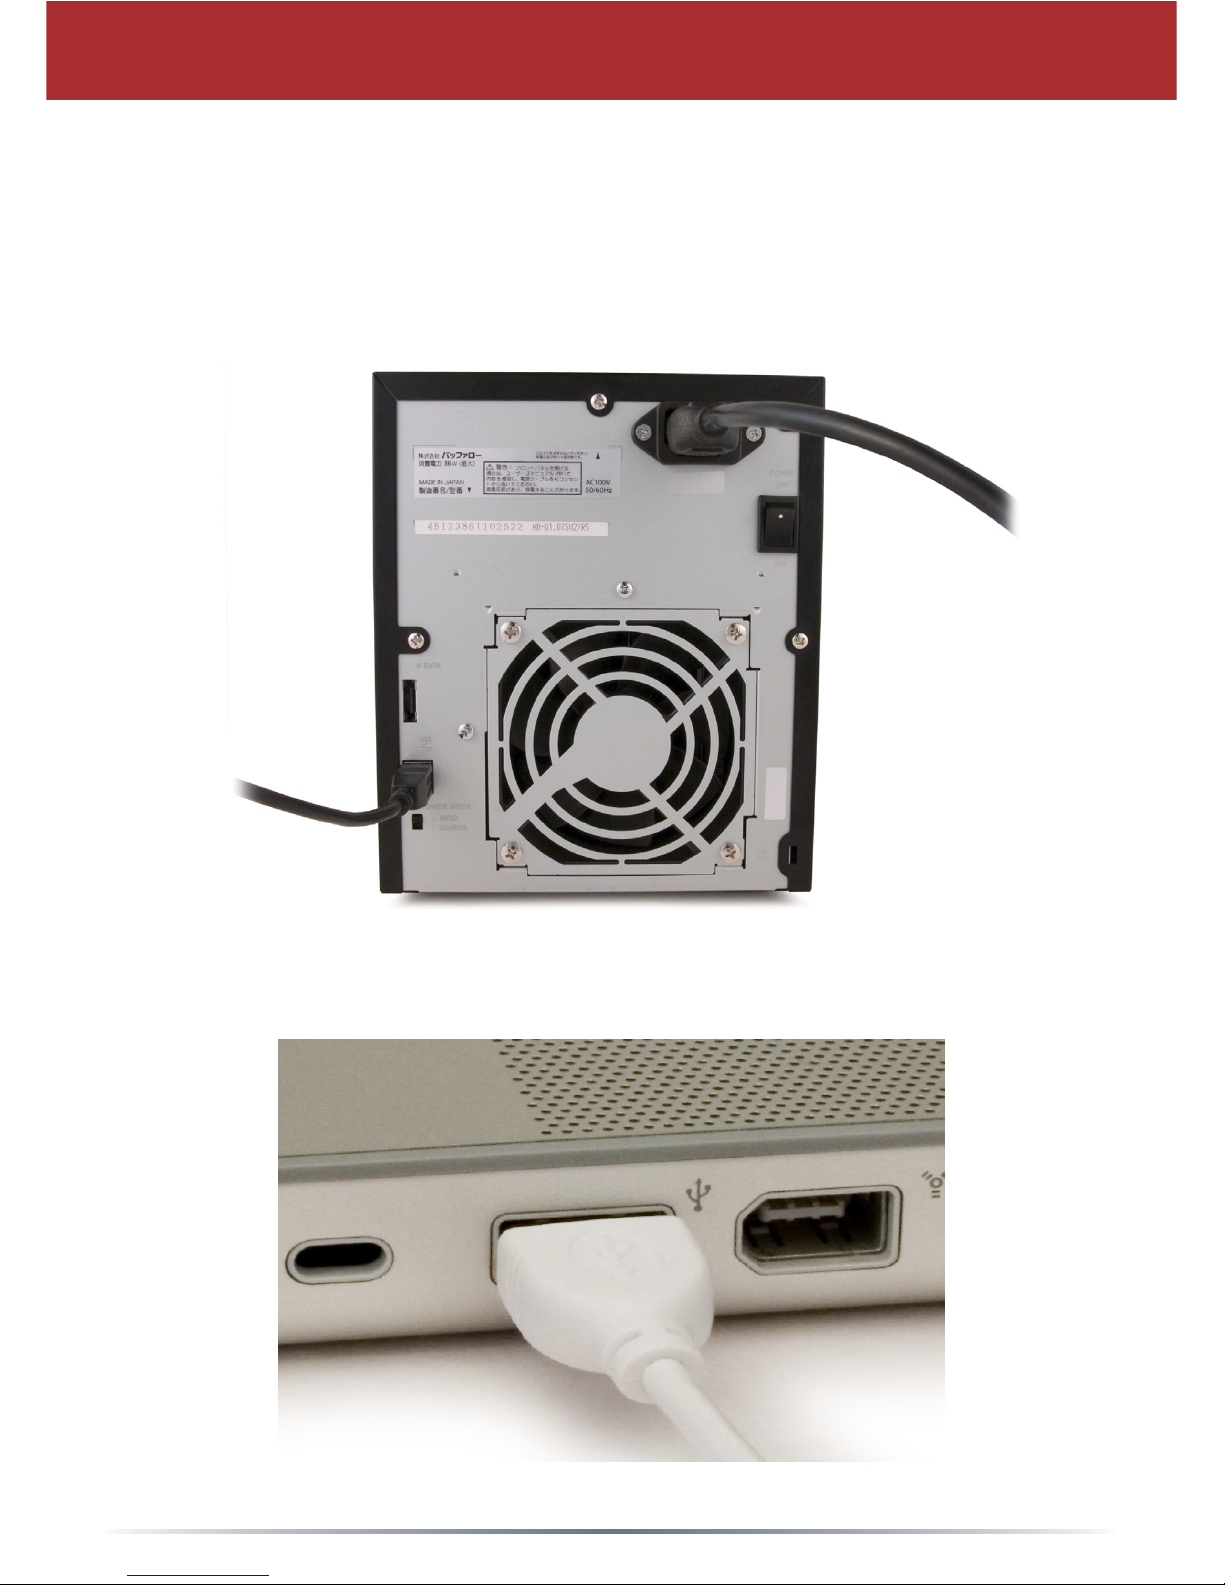
Flip the power switch on the back of the DriveStation to the OFF position. Plug
DriveStation’s power cord into the power socket as shown, as well as a power
outlet or surge protector. Then, connect a USB or eSATA cable into a matching
port on the back of the DriveStation.
DriveStation Setup
Connect the USB or eSATA cable to your Mac or other device you are adding
the DriveStation to.
Page 4

4
Flip the power switch on the back of the DriveStation to the ON (“I”) position.
Your Mac will detect the new drive and place an icon on your desktop.
Your DriveStation is now ready for use! Double-click on the icon to open the hard
drive.
DriveStation Setup
Page 5

5
Installing the RAID Utility
By default, your Quattro is configured in RAID 0 mode. This gives you maximum
usable capacity and performance, but no redundancy. If a drive fails, all data
on the DriveStation is lost. If you’re willing to trade some performance for better
data security, Buffalo Technology recommends RAID 5 mode, with its excellent
balance of security and total capacity. You may change your RAID configuration
with the RAID Utility.
The DriveStation must be connected to your Mac with a USB cable while using
the utility. You may switch to an eSATA connection for normal use after the utility
has run.
The RAID Utility allows you to configure your DriveStation Quattro in several
modes:
Normal Mode - Appears to your computer as four separate hard drives.
Spanning Mode - Appears to your computer as one large hard drive.
RAID 0 Mode - Appears to your computer as a single drive. Higher performance
than Spanning mode.
RAID 1 Mode - Appears to your computer as a single drive. The third and fourth
drives keep an exact copy of the first and second drives, for redundancy.
RAID 5 Mode - Appears to your computer as a single drive. Approximately 3/4 of
your total space is usable, yet you still have full redundancy.
Changing the mode of the drives in your Quattro will erase all data on them!
Back up any important data before using the RAID utility.
To install the RAID utility, open the Mac folder on your DriveNavigator CD.
Double-click on RaidSetting.dmg to install the RAID utility.
Page 6

6
Using the RAID Utility
Double-click the RaidSetting icon on your desktop.
Once launched, the RAID utility will briefly scan for
your DriveStation Quattro. This may take a few
seconds.
The initial screen will show your current configuration. If your Quattro
is new, it will probably be in RAID 0 mode, with all four disks in one
high-performance partition.
To change the RAID mode, click RAID Settings and choose Change
Disk Structure.
Page 7

7
Using the RAID Utility
Select the drive structure that you’d like to use. Click OK, Yes, and Yes.
Understand that this will erase any data on the drive!
After changing the RAID mode, you will need to use the Disk Utility to
format the new partition.
Page 8

8
If your hard drives are in
“Normal” (JBOD) mode, then
the Drive Select button lets
you choose which of the 4
separate drives will be seen as
the primary drive by your PC.
If you are using a USB
connection with JBOD mode,
then you will still be able to see
all four separate hard drives in
My Computer. If you are using
an eSATA interface to connect
Quattro only one single drive
will be active in this mode.
Use the Drive Select button
to chose which drive will be
active in this case.
Drive Select
If four separate drives are not desired, use RAID 0, RAID 1, or RAID
5 instead of “Normal” (JBOD) mode. You may switch between RAID
modes with the RAID utility during installation. The utility may also be
installed or run from your DriveNavigator CD.
If you’ve changed the Quattro’s RAID mode to normal (JBOD) mode
with the RAID setting utility, disconnect the Quattro from the computer.
Hold the Select button for three seconds or until the Power LED is lit
orange and beeps. Click the Select button again to change which single
drive is activated. You can see which drive is selected by its Access
LED.
Here’s what the LED colors mean:
Green: Selected and activated.
Orange: Not selected but activated. If you are using a USB
connection the drive will still be visable in My Computer. With an
eSATA connection, only the selected drive will be usable.
Off: Not selected and invisible to your PC.
If you are in a RAID mode where the four drives appear as a single
drive, such as RAID 0, 1, or 5, then the Drive Select button is disabled.
Page 9

9
FCC Warning
This device complies with part 15 of the FCC Rules. Operation is
subject to the following two conditions: (1) This device may not cause
harmful interference, and (2) this device must accept any interference
received, including interference that may cause undesired operation.
Note on Format
By default, the DriveStation is formatted with FAT32, allowing use with
all modern operating systems. Unfortunately, FAT32 is limited to 4GB
files, making it unsuitable for use with many video editing and backup
software packages. If you plan to use the DriveStation with programs
that generate files larger than 4GB in size, use the Mac Disk Utility to
reformat your drive with a “Mac OS Extended” format.
CAUTION
DO NOT OPEN UNIT COVER.
Technical Specifications
Standard Compliance: USB 2.0; eSATA
Seek Time: Max. 11 milliseconds
Transmission Speed: Max. 1.5 Gbps (eSATA), Max. 480 Mbps (USB 2.0)
Power Consumption: Max. 86W
Power Supply: AC100~120V 50/60Hz (USA and Taiwan)
AC200~240V 50/60Hz (Europe and other countries)
Dimensions: 6.5” x 8.0” x 9.5” (165 x 203 x 242 mm)
Weight: 12.8 lbs. (5.8 kgs)
Operating Environment: 41 - 95° F (5 - 35° C)
20-80% humidity (non-condensing)
PC OS Compatibility: Windows 2000, XP, Vista, Mac OS X
Weight:
12.8 lbs. (5.8 kgs)
AC100~120V 50/60Hz (USA and Taiwan)
AC200~240V 50/60Hz (Europe and other countries)
Max. 1.5 Gbps (eSATA), Max. 480 Mbps (USB 2.0)
USB 2.0; eSATA
Windows 2000, XP, Vista, Mac OS X
Page 10

10
• The equipment that you have purchased has required the extraction
and use of natural resources for its production.
• The equipment may contain hazardous substances that could impact
health and the environment.
• In order to avoid the dissemination of those substances in our
environment and to diminish the pressure on the natural resources, we
encourage you to use the appropriate take-back systems.
• The take-back systems will reuse or recycle most of the materials of
your end life equipment in a sound way.
• The crossed-out wheeled bin symbol invites you to use those systems.
• If you need more information on the collection, reuse and recycling
systems, please contact your local or regional waste administration.
Environmental Information
Page 11

USA/Canada Technical Support is available 24 hours a day, 7 days a week
Toll-Free: 866-752-6210
email: info@buffalotech.com
©2005-2007, Buffalo Technology Inc.
www.buffalotech.com
 Loading...