

Page 1

User Guide
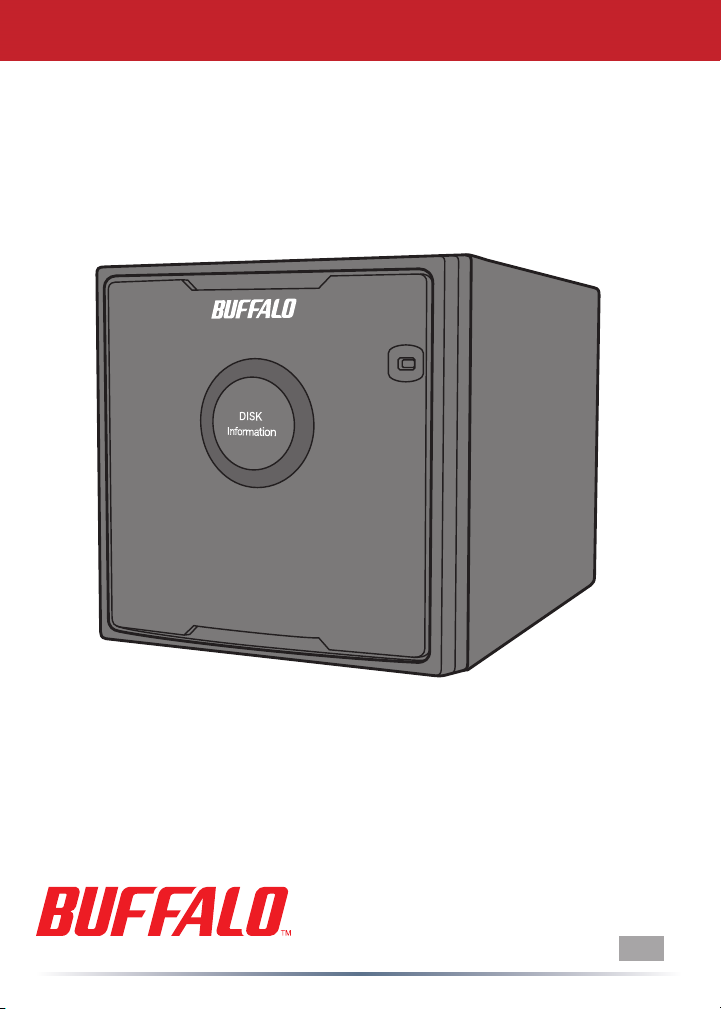
HD-QLSU2R5 DriveStation Quad
РПЧЕТ
‣
․
…
‥
35011433 ver.01
EN
Page 2
‣ ․
ÄÉÓË
Йожптнбфйпо
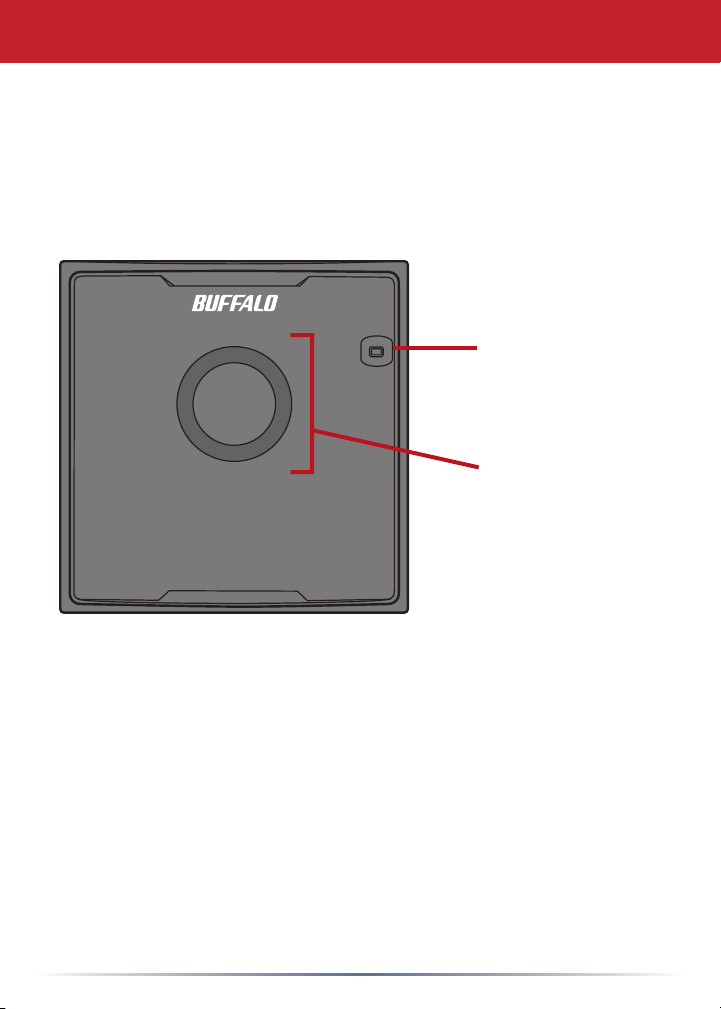
Front Panel Layout
РПЧЕТ
Power LED
Power On: Green
Raid Maintenance: Orange
Power Off: Off
… ‥
Access LEDs
Access: Blinking Green
Failure: Red
Rebuild: Blinking Red
Power Off: Off
2
Page 3

Power Mode
▲Auto
▼Off
eSATA port
USB port
DC in
Back Panel Layout
Note: Changing between RAID modes is done with the RAID Utility, included
with the software on your DriveNavigator DVD.
3
Page 4
DriveStation Setup
Congratulations on your new DriveStation Quad! With four separate hard drives
inside, the DriveStation Quad gives you many options for large, economical
capacity and easy-to-use redundancy.
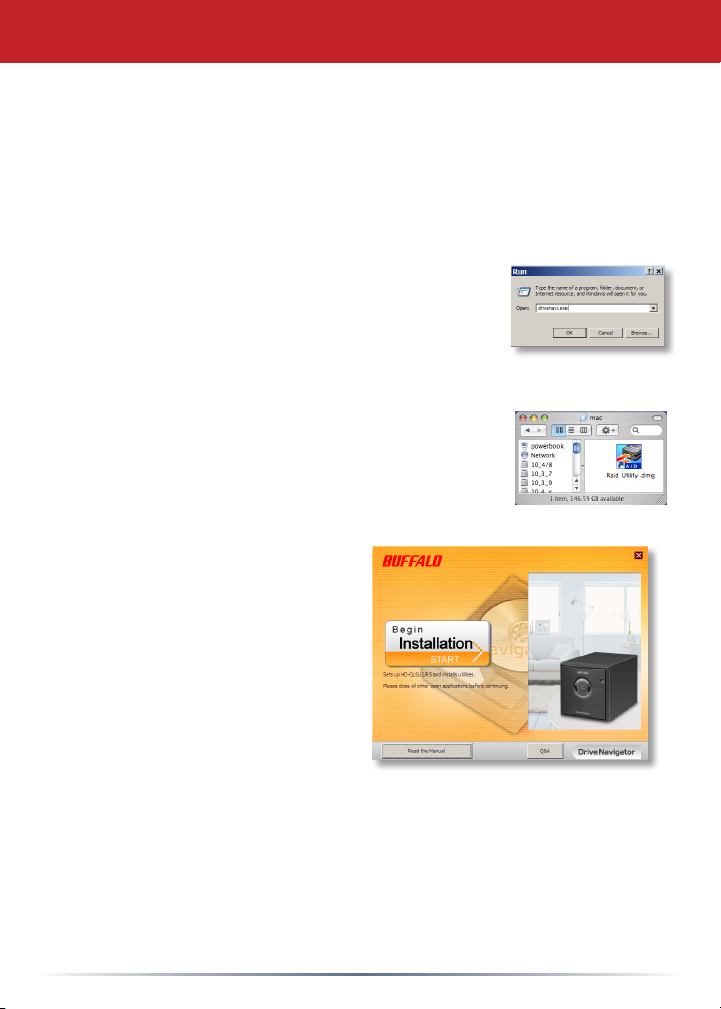
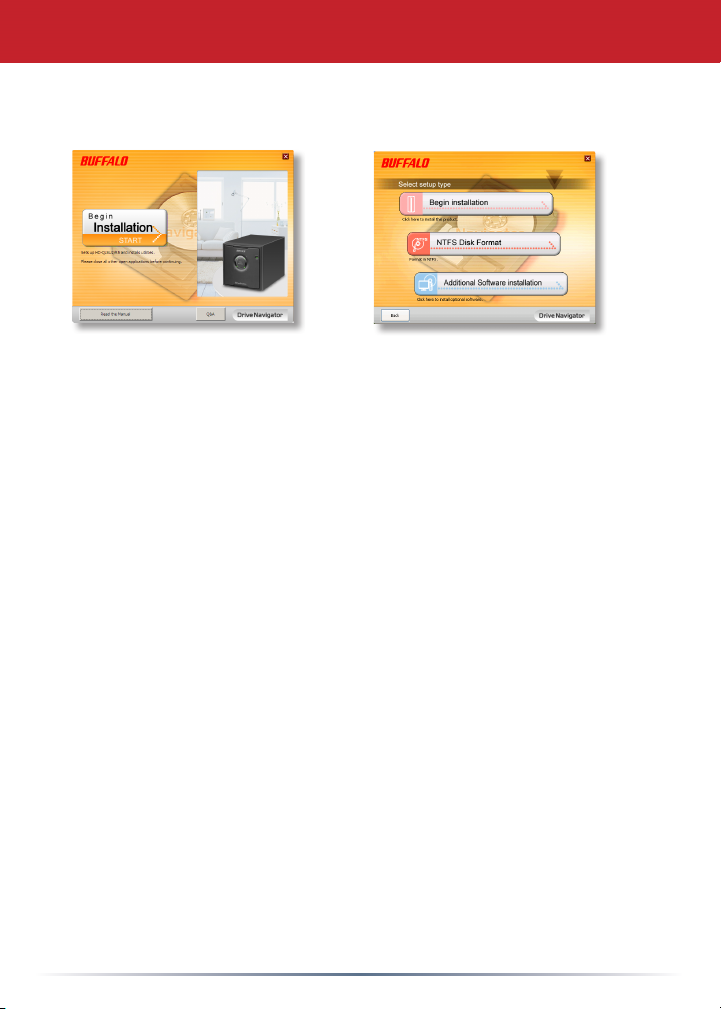
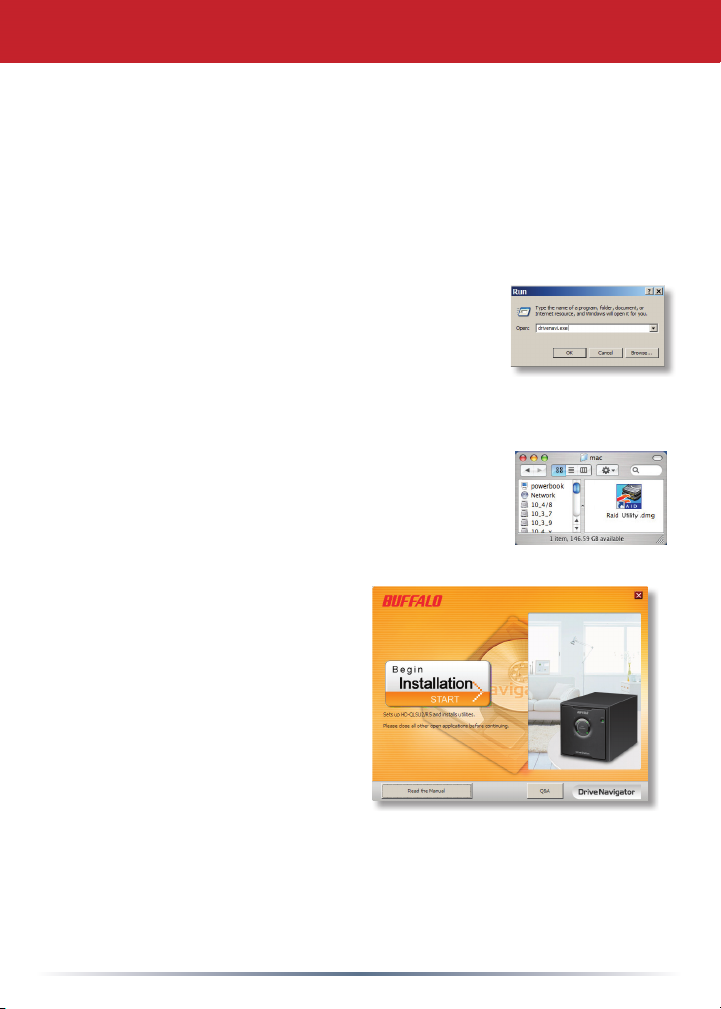
Insert the DriveNavigator DVD into your computer’s DVD-ROM drive.
On a PC, DriveNavigator should automatically launch. If
it does not, manually launch [DriveNavi.exe] by clicking
[Start] and selecting [Run]... [option]. When the Run
dialog opens, type [d:\DriveNavi.exe] (where d is the
drive letter of your DVD-ROM drive). Click [OK] to
continue.
If you are installing the RAID utility on a Mac, open the
DVD and click [RaidUtility.dmg] to begin installation.
Click [Begin Installation]. Click [Next] to
step through the installation. Mac users
can skip this step.
4
Page 5

The wizard will step you through setting up your DriveStation Quad, conguring
your RAID settings, and reformatting if desired.
The DriveStation Quad may be connected to your computer with either a USB
connection or an eSATA connection. The eSATA connection will usually give
higher performance.
Use either the eSATA cable or the USB cable to connect the Quad to your
computer at any given time. Do not connect both at once!
After completing the setup wizard, your DriveStation Quad is installed and ready
to use!
By default, your Quad is congured in RAID 5 mode. In RAID 5, data can be
recovered even if one of the hard disks in DriveStation fails. However, the total
available space is 3/4 of the maximum space.
If you prefer a different RAID conguration, you may use the RAID Utility to
change your DriveStation’s RAID settings. Turn to the next page for instructions
on using the RAID Utility.
Out of the box, the DriveStation is formatted with FAT32, allowing it to be used
with most common operating systems. If you’re going to use it with programs
that generate lesizes larger than 4 GB, such as backup software, reformat the
DriveStation with NTFS or Mac OS Extended.
By default, all drives on the DriveStation are divided into 2 TB partitions. This
allows older versions of Windows, such as 32-bit Windows XP and Windows
Server 2003, to read the drives without additional software or service packs.
Users of newer operating systems may wish to re-partition the DriveStation
Quad with larger partitions, but this is not recommended for 32-bit Windows
XP. Windows Server 2003 may be able to read larger partitions after the latest
service pack is applied.
5
Page 6

Using the RAID Utility
The RAID Utility allows you to congure your DriveStation Quad in several
modes:
Normal Mode - Appears to your computer as four separate hard drives. Note
that normal mode only works with a USB connection. With an eSATA connection,
only one drive will be visible.
Spanning Mode - Appears to your computer as one large hard drive.
RAID 0 Mode - Appears to your computer as a single drive. Higher performance
than Spanning Mode.
RAID 5 Mode - Appears to your computer as a single drive. Approximately 3/4 of
your total space is usable, yet you still have full redundancy.
RAID 10 Mode - Combines RAID 1 and RAID 0 for a fast, secure array. Half of
the DriveStation’s total capacity is used for redundant information.
Notes :
・Changing the RAID mode of the drives in your Quad will erase all data on them!
Back up any important data before using the RAID utility.
・Your computer must be connected to the DriveStation via USB to change the
RAID mode.
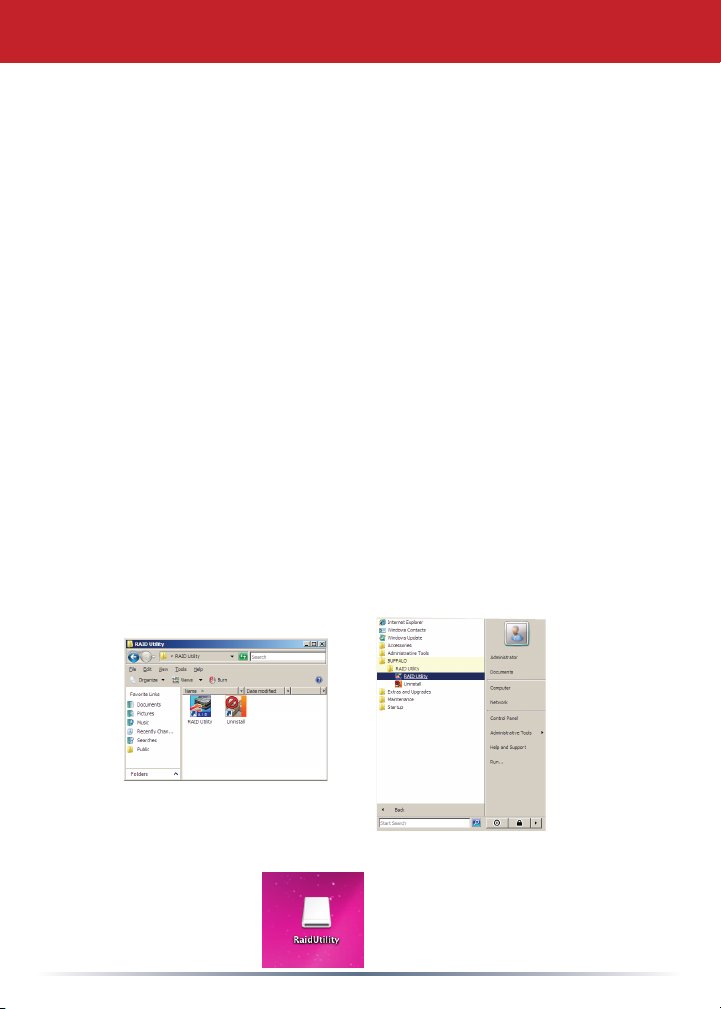
On a PC, You may launch the RAID Utility by clicking on [RAIDUtility] in the
DriveStation Quad program group.Or, you can launch the program from the Start
menu.
On a Mac, Double-click [RaidUtility] icon on your desktop.
6
Page 7
Using the RAID Utility
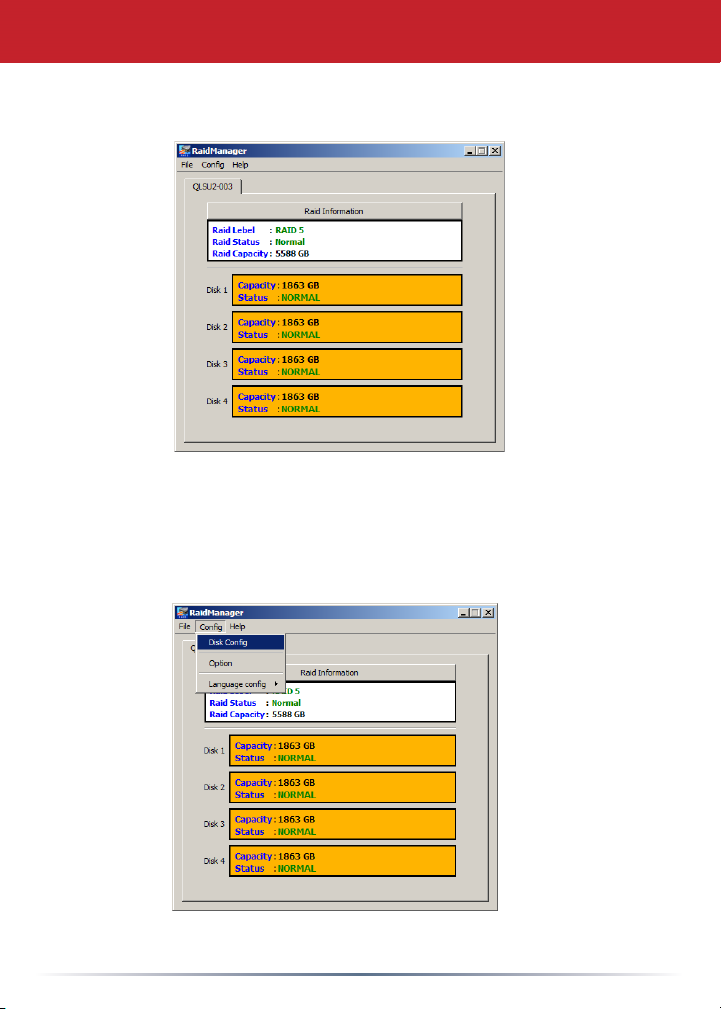
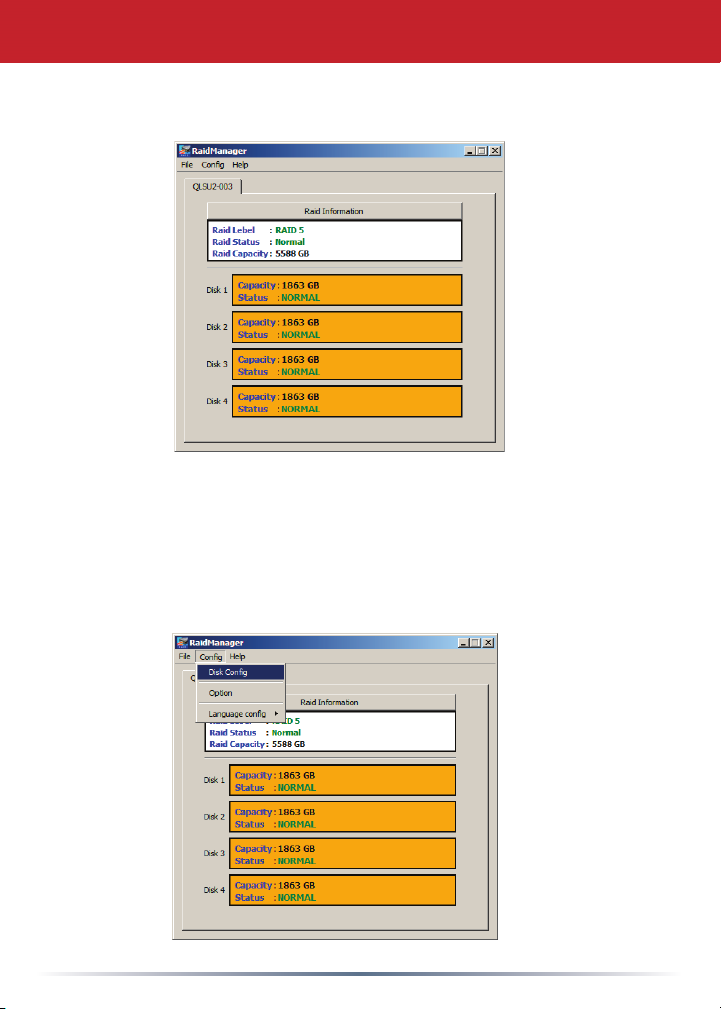
Once launched, the RAID Utility will scan for your DriveStation Quad.
This may take a few seconds.
The initial screen will show your current conguration. If your Quad is
new, it will probably be in RAID 5 mode. Buffalo recommends RAID 5
mode, with its excellent balance of security and total capacity.
To change the RAID mode, click [Cong] and choose [Disk Cong].
7
Page 8
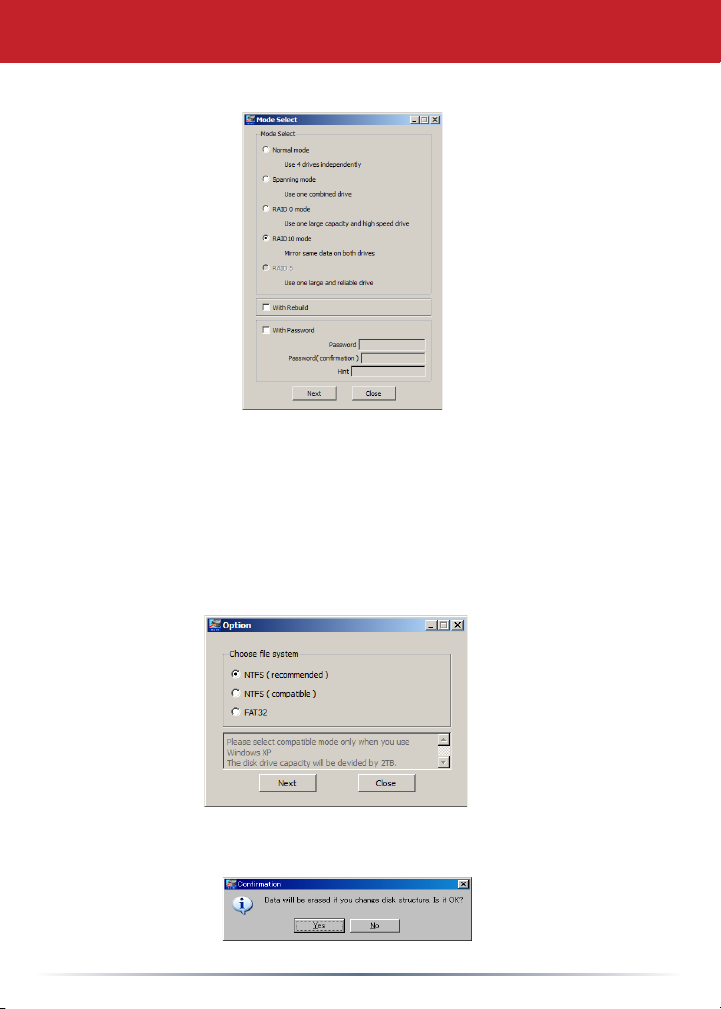
Using the RAID Utility
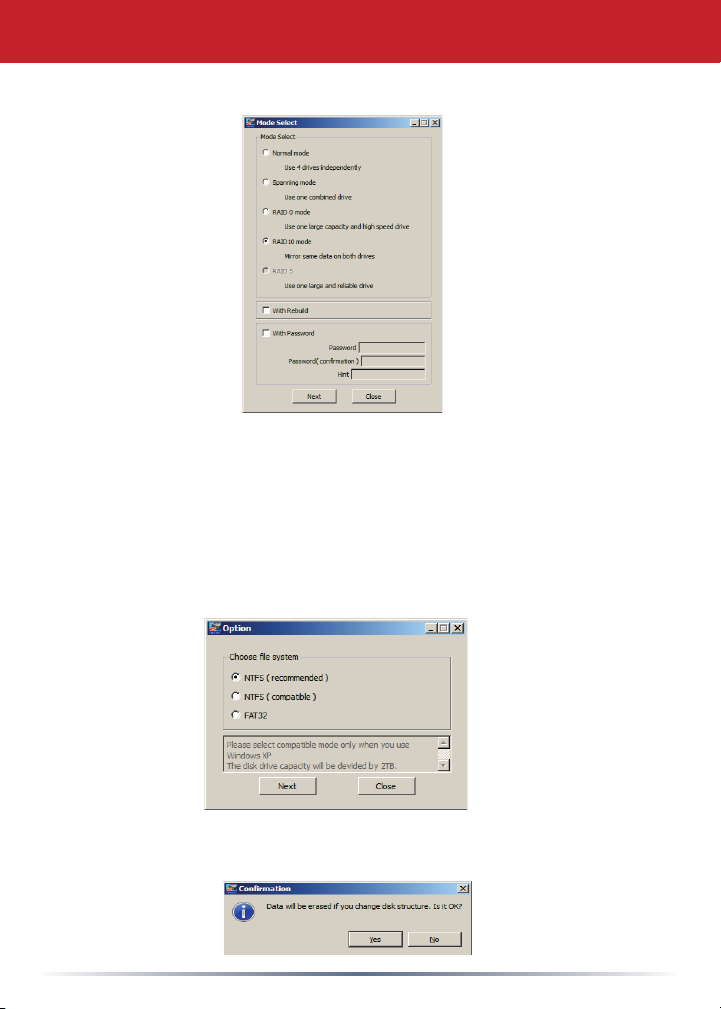
Select the drive structure that you’d like to use.
On a PC, the disk can be formatted with FAT32 or NTFS. Select the
format that you prefer. FAT32 is compatible with most Windows PCs
and Macs. NTFS offers the best performance with Windows, but isn’t
compatible with Mac. NTFS is recommended for use with backup, video
editing and other programs that may need lesizes larger than 4GB.
If you are using Windows XP, or Windows Server 2003 without SP1 or
later, use compatibility mode. Compatibility mode will divide drives into 2
TB partitions that can be read by Windows XP or Windows Server 2003.
Click [Yes], and [Yes] again. Understand that this will erase any data
on the drive!
8
Page 9
Other Utilities (Windows Only)
The DriveStation Quad includes several optional disk utilities. To install and
use these utilities, insert the DVD-ROM that came with your DriveStation into a
Windows PC.
Click [Begin Installation] and then [Additional Software Installation].
TurboPC can increase data transfer speeds for your Buffalo product.
TurboCopy uses caching to increase data transfer speeds.
Backup Utility is software to back up and restore data from your PC. To use,
select a source drive to be backed up and a target location for backup data.
RAMDISK Utility uses the memory in your computer as a virtual hard drive “RAM
drive”. The RAM drive is recognised as a hard drive by your computer, and you
can read and write data to it like any other hard drive.
Buffalo Tools Launcher lets you easily launch software from the Buffalo utility
suite. Just click an icon to launch the desired Buffalo tool or utility.
eco Manager lets you put the DriveStation into sleep mode to save power.
SecureLockMobile encrypts the data on your DriveStation, preventing the data
from being accessed by anyone but you.
To learn more about installing and using these utilities, click on [View User
Manual].
9
Page 10

Replacing a Hard Drive
Caution
Do not use any replacement hard drive which draws more than 0.92
amps at 5 volts DC and 0.9 amps at 12 volts DC.
Replacement hard drives must have safety certication (such as MET or
UL) approved by NRTL.
The above warnings are basic safety restrictions only, and do not
constitute the full requirements for a hard disk drive to function properly
in the DriveStation.
Your product warranty may be void if you mount a non-approved
hard drive in the DriveStation. Buffalo’s OP-HD series drives are
recommended.
For best results, replacement drives should be blank, with no les or
partitions on them.
The DriveStation’s hard drives are not hot-swappable. Before changing
a hard drive in the DriveStation, power the unit down and then unplug its
power cord.
Ground yourself and the DriveStation before handling drives, or use a
wriststrap with the other end grounded to the DriveStation’s chassis.
Replacing a drive can result in lower transfer speeds for DriveStation
depending on the performance of the replacement drive.
10
Page 11
Replacing a Hard Drive
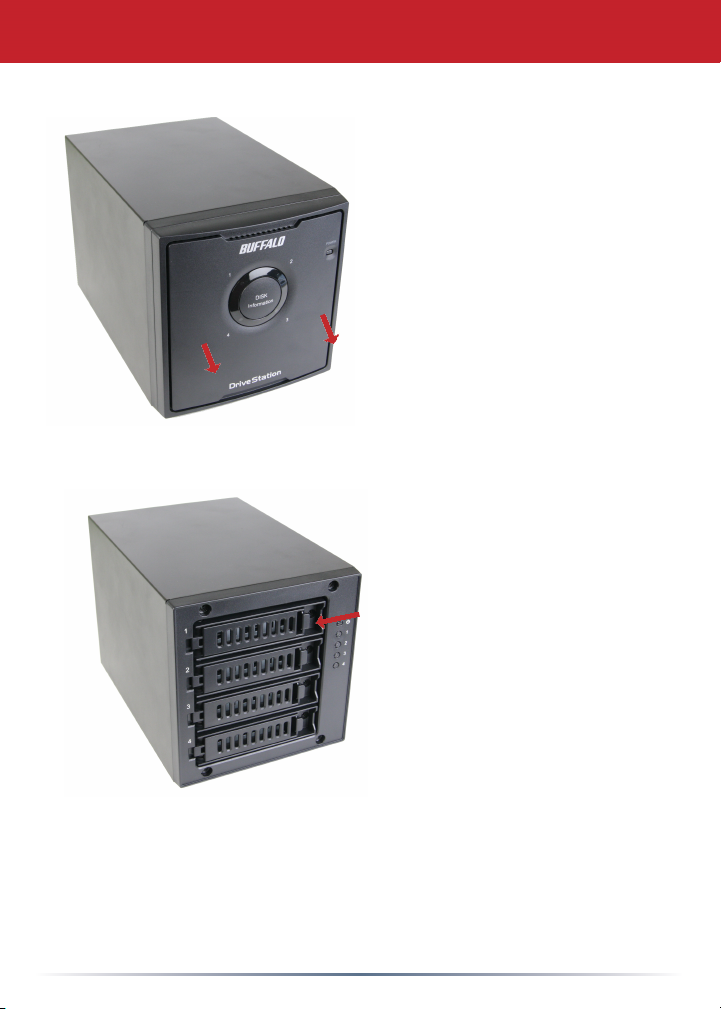
Make sure that the DriveStation is
turned off and disconnected from
power. Pull front cover straight off
to open case.
Push tab to left to release lock.
11
Page 12
Replacing a Hard Drive
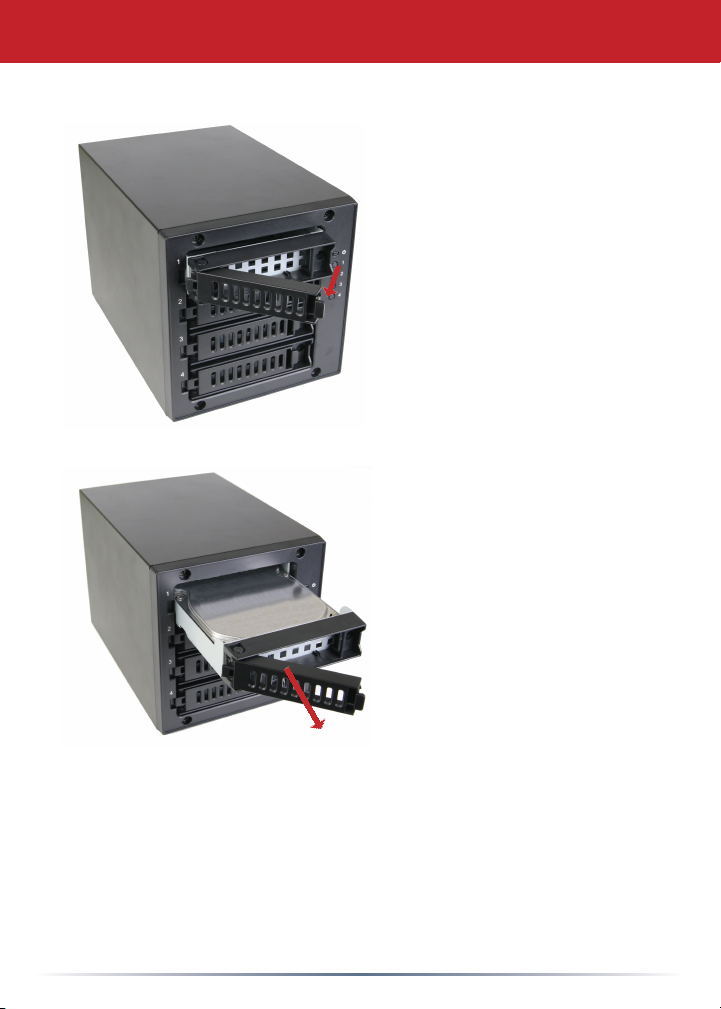
Swing locking mechanism to left to
release drive.
The hard drive tray will now slide
out.
12
Page 13
Replacing a Hard Drive
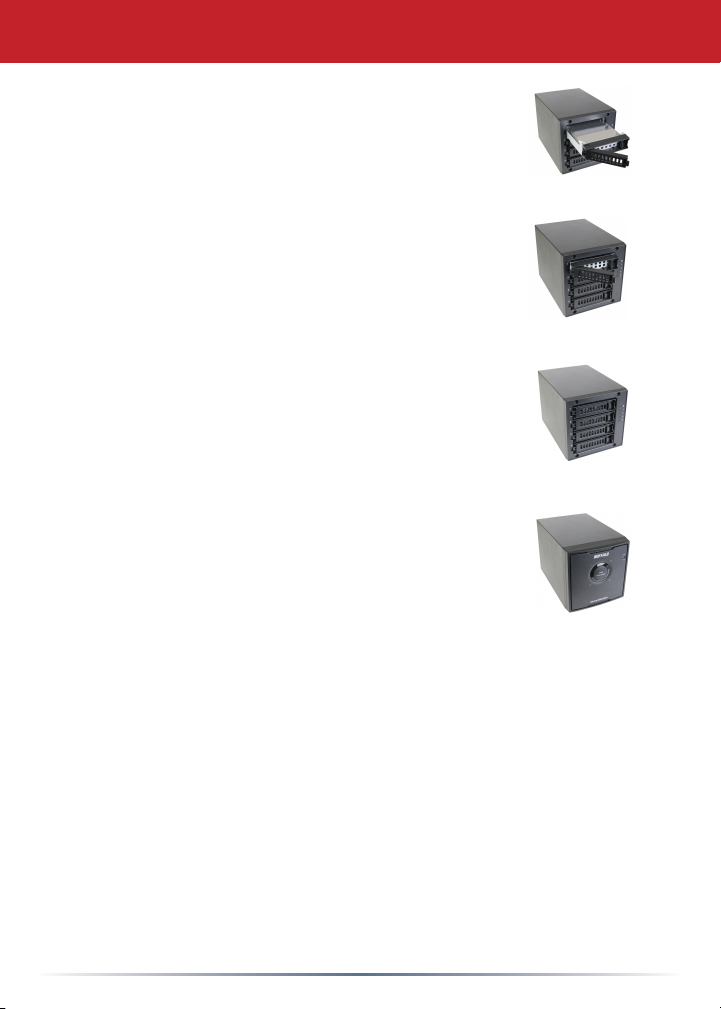
Install a new hard drive by doing the same steps
in reverse order:
Slide the new hard drive into the case.
With the lock mechanism open for the last bit,
slide the drive into place.
Close the lock mechanism. It will “click” as it
engages.
Replace the front cover.
13
Page 14

Troubleshooting
FAQ
The following is a list of common issues with the DriveStation. Following
each issue are possible resolutions.
I cannot see the DriveStation in My Computer. (Windows)
Verify that the POWER light is on. If it is not, then ensure that the
power switch is in the AUTO position.
If you have installed the Power Save Utility, then verify that the
DriveStation was not put into power saving mode. Consult the
manual for the Power Save Utility for additional help. The manual
can be found on the DriveNavigator DVD-ROM.
Verify that the hard drive inside the DriveStation is spinning. This
can be veried by placing your hand on the sides of the case
and feeling for a slight vibration. Also, after the DriveStation has
been powered on for fteen minutes or more it will begin to get
warm. If neither of the proceeding tests veried that the hard drive
is spinning, then please contact technical support for further
assistance.
My backup program can’t save les to the DriveStation.
Reformat your DriveStation with NTFS or Mac OS Extended.
FAT32 is limited to 4 GB lesizes.
14
Page 15
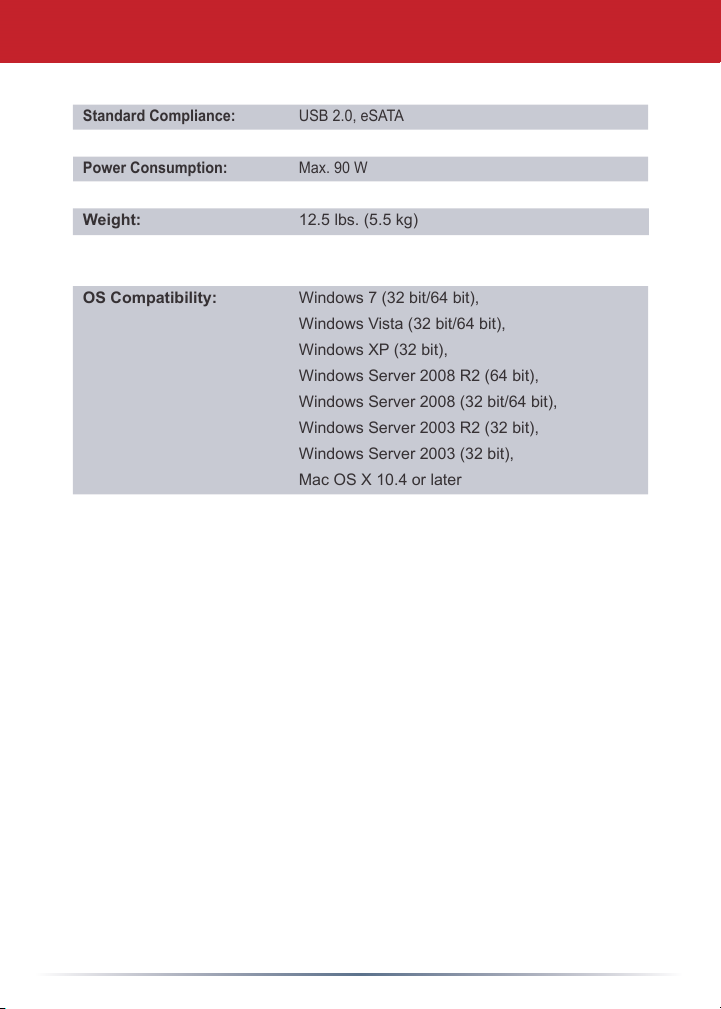
Technical Specications
Standard Compliance: USB 2.0, eSATA
Transmission Speed: Max. 3.0 Gbps (eSATA), Max. 480 Mbps (USB 2.0)
Power Consumption: Max. 90 W
Dimensions: 5.9” x 9.2” x 6.1” (149 x 233 x 154 mm)
Weight: 12.5 lbs. (5.5 kg)
Operating Environment: 41 - 95° F (5 - 35° C)
20 - 80% humidity (non-condensing)
OS Compatibility: Windows 7 (32 bit/64 bit),
Windows Vista (32 bit/64 bit),
Windows XP (32 bit),
Windows Server 2008 R2 (64 bit),
Windows Server 2008 (32 bit/64 bit),
Windows Server 2003 R2 (32 bit),
Windows Server 2003 (32 bit),
Mac OS X 10.4 or later
15
Page 16

www.buffalotech.com
Page 17
User Guide
HD-QLSU2R5 DriveStation Quad
РПЧЕТ
‣
․
…
‥
35011433 ver.01
DE
Page 18

‣ ․
ÄÉÓË
Йожптнбфйпо
Layout des Front-Panels
РПЧЕТ
Strom-LED
Strom eingeschaltet: Grün
RAID-Wartung: Orange
Strom ausgeschaltet: Aus
… ‥
LEDs für die Anzeige des
Zugriffs
Zugriff: Blinkt grün
Fehler: Rot
Neu erstellen: Blinkt rot
Strom ausgeschaltet: Aus
2
Page 19

Power Mode
(Strommodus)
▲Auto
▼Off (Aus)
eSATA port
(eSATA-Port)
USB port
(USB-Port)
DC in
(DC-Eingang)
Layout der Rückseite
Hinweise: Der Wechsel zwischen den RAID-Modi erfolgt mit der RAID Utility, die in der
Software auf der DriveNavigator DVD enthalten ist.
3
Page 20
Einrichtung der DriveStation
Herzlichen Glückwunsch zu Ihrer neuen DriveStation Quad. Mit den
vier integrierten einzelnen Festplatten bietet die DriveStation Quad
zahlreiche Varianten für eine umfangreiche, wirtschaftliche Kapazität und
benutzerfreundliche Redundanz.
Legen Sie die DriveNavigator DVD in das DVD-ROM-Laufwerk des Computers ein.
Auf einem PC startet DriveNavigator automatisch. Falls
nicht, starten Sie die Datei [DriveNavi.exe] manuell,
indem Sie auf [Start] klicken und [Ausführen...] und
[Option] auswählen. Das Dialogfeld [Ausführen] wird
geöffnet. Geben Sie [d:\DriveNavi.exe] ein, wobei „d“
der Laufwerkbuchstabe des DVD-ROM-Laufwerks ist.
Klicken Sie auf [OK], um den Vorgang fortzusetzen.
Zum Installieren der RAID Utility auf einem Mac öffnen
Sie die DVD und klicken Sie auf [RaidUtility.dmg].
Klicken Sie auf [Begin Installation
(Installation starten)]. Klicken Sie
auf [Next (Weiter)], um die einzelnen
Installationsschritte auszuführen.
Dieser Schritt kann von Mac-Benutzern
übersprungen werden.
4
Page 21

Der Wizard führt Sie Schritt für Schritt durch die Einrichtung Ihrer DriveStation
Quad, die Konguration der RAID-Einstellungen und die Neuformatierung, sofern
gewünscht.
Die DriveStation Quad kann entweder über eine USB- oder eine eSATA-
Verbindung an den Computer angeschlossen werden. Mit der eSATA-Verbindung
lässt sich in der Regel eine bessere Leistung erzielen.
Schließen Sie die DriveStation Quad entweder über das eSATA- oder das USBKabel an den Computer an. Verwenden Sie nicht beide Kabel gleichzeitig.
Nach Beenden des Setup Wizard ist Ihre DriveStation Quad installiert und
betriebsbereit.
Die DriveStation Quad wird standardmäßig im RAID 5-Modus konguriert.
In diesem Modus können Daten auch dann wiederhergestellt werden, wenn
eine der Festplatten in der DriveStation ausfällt. Der gesamte verfügbare
Speicherplatz beträgt allerdings nur drei Viertel des maximalen Speicherplatzes.
Wenn Sie eine andere RAID-Konguration bevorzugen, können Sie die RAID-
Einstellungen Ihrer DriveStation mit dem RAID Utility ändern. Anweisungen zur
Verwendung der RAID Utility nden Sie auf der nächsten Seite.
Die DriveStation ist werkseitig mit FAT32 formatiert, sodass sie mit den
gängigsten Betriebssystemen verwendet werden kann. Wenn Sie die
DriveStation mit Programmen verwenden, die Dateien mit einer Größe von über
4 GB erstellen (z. B. Sicherungssoftware), formatieren Sie sie mit NTFS oder
Mac OS Extended neu.
Standardmäßig sind alle Laufwerke der DriveStation in Partitionen von 2 TB
aufgeteilt. So können die Laufwerke ohne zusätzliche Software oder Service
Packs von älteren Windows-Versionen wie Windows XP mit 32 Bit und Windows
Server 2003 gelesen werden. Benutzer von neueren Betriebssystemen können
die DriveStation Quad in größere Partitionen aufteilen. Für Windows XP mit
32 Bit wird dies jedoch nicht empfohlen. Windows Server 2003 ist nach dem
Installieren des neuesten Service Pack möglicherweise in der Lage, größere
Partitionen zu lesen.
5
Page 22
Verwenden der RAID Utility
Mit der RAID Utility können Sie Ihre DriveStation Quad in mehreren Modi kongurieren:
Normal Mode (Normalmodus) - Auf Ihrem Computer werden vier einzelne Festplatten
angezeigt. Beachten Sie, dass der Normalmodus nur mit einer USB-Verbindung funktioniert.
Mit einer eSATA-Verbindung ist nur ein Laufwerk sichtbar.
Spanning Mode (Verbundmodus) - Auf Ihrem Computer wird eine große Festplatte angezeigt.
RAID 0 Mode (RAID 0-Modus) - Auf Ihrem Computer wird ein einzelnes Laufwerk
angezeigt. Dieser Modus bietet eine bessere Leistung als der Verbundmodus.
RAID 5 Mode (RAID 5-Modus) - Auf Ihrem Computer wird ein einzelnes Laufwerk
angezeigt. Rund drei Viertel des gesamten verfügbaren Speicherplatzes sind nutzbar, wobei
weiterhin vollständige Redundanz besteht.
RAID 10 Mode (RAID 10-Modus) - Kombiniert RAID 1 und RAID 0 zu einem schnellen
und sicheren Array.Die Hälfte der gesamten Kapazität der DriveStation wird für redundante
Informationen verwendet.
Hinweise:
・Durch Ändern des RAID-Modus der Laufwerke in Ihrer DriveStation Quad werden alle auf
den Laufwerken gespeicherten Daten gelöscht. Sichern Sie daher alle wichtigen Daten,
bevor Sie die RAID Utility verwenden.
・Zum Ändern des RAID-Modus muss der Computer über ein USB-Kabel mit der
DriveStation verbunden sein.
Auf einem PC können Sie die RAID Utility durch Klicken auf [RAIDUtility] in der
Programmgruppe DriveStation Quad starten. Sie können das Programm auch über das
Startmenü aufrufen.
Auf einem Mac doppelklicken Sie auf das Symbol [RaidUtility] auf Ihrem Desktop.
6
Page 23
Verwenden der RAID Utility
Nach dem Start sucht die RAID Utility Ihre DriveStation Quad. Dieser
Vorgang kann einige Sekunden dauern.
Auf dem Startbildschirm wird Ihre aktuelle Konguration angezeigt. Wenn
Ihre DriveStation Quad neu ist, ist sie üblicherweise im RAID 5-Modus
konguriert. Aufgrund der ausgezeichneten Ausgewogenheit von Sicherheit
und Gesamtkapazität wird der RAID 5-Modus von Buffalo empfohlen.
Klicken Sie zum Ändern des RAID-Modus auf [Cong (Kongurieren)] und
wählen Sie [Disk Cong (Datenträger kongurieren)].
7
Page 24
Verwenden der RAID Utility
Wählen Sie die gewünschte Laufwerkstruktur aus.
Auf einem PC kann der Datenträger mit FAT32 oder NTFS formatiert werden.Wählen
Sie das gewünschte Format aus. FAT32 ist mit den meisten Windows-PCs und
Mac-Computern kompatibel. NTFS bietet die beste Leistung mit Windows, ist jedoch
mit Mac nicht kompatibel. NTFS wird für Sicherungen, Videobearbeitung und andere
Programme empfohlen, die Dateien mit einer Größe von über 4 GB verwenden.
Verwenden Sie unter Windows XP oder Windows Server 2003 ohne SP1 oder
höher den Kompatibilitätsmodus. Im Kompatibilitätsmodus werden die Laufwerke
in Partitionen von 2 TB aufgeteilt, die von Windows XP oder Windows Server 2003
gelesen werden können.
Klicken Sie auf [Yes (Ja)] und erneut auf [Yes (Ja)]. Mit diesem Vorgang werden
alle Daten auf dem Laufwerk gelöscht.
8
Page 25

Sonstige Dienstprogramme (nur Windows)
Die DriveStation Quad umfasst mehrere optionale Datenträgerdienstprogramme. Um diese
Dienstprogramm zu installieren und zu verwenden, legen Sie die mit der DriveStation
mitgelieferte DVD-ROM in einen Windows-PC ein.
Klicken Sie auf [Begin Installation (Installation starten)] und dann auf [Additional Software
Installation (Installation von zusätzlicher Software)].
Mit TurboPC kann die Geschwindigkeit von Datenübertragungen für das Buffalo-Produkt
verbessert werden.
TurboCopy steigert durch Zwischenspeicherung die Geschwindigkeit von
Datenübertragungen.
Backup Utility ist eine Software zum Sichern und Wiederherstellen von Daten auf Ihrem
PC. Wählen Sie zum Verwenden dieser Software ein zu sicherndes Quelllaufwerk sowie ein
Zielverzeichnis für die Sicherungsdaten aus.
RAMDISK Utility verwendet den Speicher Ihres Computer als virtuelle Festplatte („RAMLaufwerk“). Das RAM-Laufwerk wird vom Computer als Festplatte erkannt, und Sie können
darauf Datenlese- und Datenschreibvorgänge wie auf jeder anderen Festplatte ausführen.
Mit Buffalo Tools Launcher können Sie auf einfache Weise Software aus der Buffalo-Suite
von Dienstprogrammen aufrufen. Klicken Sie einfach auf ein Symbol, um das gewünschte
Buffalo-Tool bzw. -Dienstprogramm zu starten.
Mit eco Manager können Sie die DriveStation in den Ruhemodus versetzen, um Energie
zu sparen.
SecureLockMobile verschlüsselt die Daten auf der DriveStation und verhindert, dass
unbefugte Personen auf die Daten zugreifen können.
Um weitere Informationen zum Installieren und Verwenden dieser Dienstprogramme zu
erhalten, klicken Sie auf [View User Manual (Benutzerhandbuch anzeigen)].
9
Page 26

Festplattenaustausch
Vorsicht
Verwenden Sie keine Ersatzfestplatte, die über 0,92 Ampere bei 5 V Gleichstrom
und 0,9 Ampere bei 12 Volt Gleichstrom benötigt.
Ersatzfestplatten müssen mit einem von NRTL genehmigten Sicherheitszertikat
(wie MET oder UL) ausgestattet sein.
Die oben genannten Warnhinweise beziehen sich nur auf grundlegende
Sicherheitseinschränkungen und stellen nicht die gesamten Anforderungen dar,
die ein Festplattenlaufwerk für den Einsatz in der DriveStation erfüllen muss.
Ihre Produktgewährleistung verfällt ggf., wenn Sie eine nicht genehmigte
Festplatte in die DriveStation einbauen. Empfohlen werden die Laufwerke der
OP-HD-Serie von Buffalo.
Die besten Ergebnisse werden mit Ersatzlaufwerken erzielt, die leer sind und
keine Dateien oder Partitionen enthalten.
Die Festplattenlaufwerke der DriveStation sind nicht im laufenden Betrieb
austauschbar. Bevor Sie eine Festplatte in der DriveStation auswechseln,
schalten Sie das Gerät aus und ziehen Sie das Netzkabel.
Erden Sie sich selbst und die DriveStation, bevor Sie die Laufwerke anfassen,
oder tragen Sie ein Erdungsarmband, wobei das Gehäuse der DriveStation über
das andere Ende geerdet ist.
Durch einen Festplattenaustausch kann abhängig von der Leistung der
jeweiligen Ersatzfestplatte die Übertragungsgeschwindigkeit der DriveStation
abnehmen.
10
Page 27

Festplattenaustausch
Überprüfen Sie, ob die DriveStation
ausgeschaltet und das Netzkabel
gezogen ist. Ziehen Sie die vordere
Abdeckung gerade ab, um das
Gehäuse zu öffnen.
Drücken Sie die Lasche nach links, um
die Verriegelung zu lösen.
11
Page 28

Festplattenaustausch
Schieben Sie die Verriegelung nach
links, um das Laufwerk freizugeben.
Das Festplattenfach gleitet heraus.
12
Page 29

Festplattenaustausch
Installieren Sie eine neue Festplatte, indem Sie
dieselben Schritte in umgekehrter Reihenfolge
ausführen.
Schieben Sie die neue Festplatte in das Gehäuse.
Positionieren Sie das Laufwerk mit halb geöffneter
Verriegelung.
Schließen Sie die Verriegelung. Sie rastet mit einem
Klickgeräusch ein.
Bringen Sie die vordere Abdeckung wieder an.
13
Page 30

Problembehandlung
Häug gestellte Fragen
Die folgende Liste enthält allgemeine Probleme, die mit der DriveStation auftreten
können. Für jedes Problem sind mögliche Lösungen angegeben.
Die DriveStation wird unter [Arbeitsplatz] nicht angezeigt.(Windows)
Überprüfen Sie, ob die Power LED leuchtet. Wenn dies nicht der Fall
ist, stellen Sie sicher, dass sich der Netzschalter in der Position [AUTO]
bendet.
Wenn die Power Save Utility installiert ist, überprüfen Sie, ob sich die
DriveStation im Energiesparmodus bendet. Weitere Informationen nden
Sie im Handbuch der Power Save Utility. Das Handbuch bendet sich auf
der DriveNavigator DVD-ROM.
Überzeugen Sie sich, dass sich die Festplatte im Innern der DriveStation
dreht. Legen Sie dazu Ihre Hände seitlich an das Gehäuse und achten
Sie auf eine leichte Vibration. Außerdem wird die DriveStation nach
Betrieb von 15 Minuten oder mehr langsam warm. Wenn sich durch die
oben beschriebene Vorgehensweise nicht bestätigen lässt, dass sich die
Festplatte dreht, wenden Sie sich an den technischen Support, um Hilfe zu
erhalten.
Mein Sicherungsprogramm konnte keine Dateien auf der DriveStation
speichern.
Formatieren Sie die DriveStation mit NTFS oder Mac OS Extended neu.
FAT32 ist auf Dateigrößen bis zu 4 GB beschränkt.
14
Page 31

Technische Daten
Standardkonformität: USB 2.0, eSATA
Übertragungsgeschwindigkeit: Max. 3,0 GBit/s (eSATA), Max. 480 MBit/s (USB 2.0)
Stromverbrauch: Max. 90 W
Abmessungen: 149 x 233 x 154 mm
Gewicht: 5,5kg
Betriebsumgebung: 5 - 35° C
20 - 80% Luftfeuchtigkeit (nicht kondensierend)
Betriebssystemkompatibilität:
Windows Vista (32 bit/64 bit),
Windows XP (32 bit),
Windows Server 2008 R2 (64 bit),
Windows Server 2008 (32 bit/64 bit),
Windows Server 2003 R2 (32 bit),
Windows Server 2003 (32 bit),
Mac OS X 10,4 oder höher
Windows 7 (32 bit/64 bit),
15
Page 32

www.buffalotech.com
Page 33

Guía del usuario
HD-QLSU2R5 DriveStation Quad
РПЧЕТ
‣
․
…
‥
35011433 ver.01
ES
Page 34

‣ ․
ÄÉÓË
Йожптнбфйпо
… ‥
Aspecto del panel frontal
РПЧЕТ
LED de encendido/apagado
Dispositivo encendido: verde
Mantenimiento de RAID:
naranja
Dispositivo apagado:
apagado
LED de acceso
Acceso: verde parpadeante
Fallo: rojo
Reconstrucción: rojo
parpadeante
Dispositivo apagado:
apagado
2
Page 35

Power Mode
(Modo de encendido/
apagado)
▲Auto (Automático)
▼Off (Apagado)
eSATA port
(Puerto eSATA)
USB port
(Puerto USB)
DC in
(Entrada de CC)
Aspecto del panel trasero
Nota: el cambio de un modo RAID a otro se realiza mediante RAID Utility, que
se incluye en el software del DVD de DriveNavigator.
3
Page 36

Conguración de la DriveStation
Enhorabuena por su nueva DriveStation Quad. Gracias a sus cuatro discos
duros independientes, la DriveStation Quad ofrece muchas opciones de
capacidad alta y económica, así como de redundancia fácil de usar.
Introduzca el DVD de DriveNavigator en la unidad de DVD-ROM del ordenador.
En Windows, DriveNavigator debería iniciarse
automáticamente. Si no es así, inicie manualmente
[DriveNavi.exe]; para ello, haga clic en [Inicio] y
seleccione la opción [Ejecutar]. Cuando se abra el
cuadro de diálogo Ejecutar, escriba [d:\DriveNavi.exe]
(si D es la letra de su unidad de DVD-ROM). Haga clic
en [Aceptar] para continuar.
En Mac, abra el DVD y haga clic en [RaidUtility.dmg]
para iniciar la instalación.
Haga clic en [Begin Installation
(Comenzar instalación)]. Haga clic en
[Next (Siguiente)] para seguir los pasos
de la instalación. Los usuarios de Mac
pueden omitir este paso.
4
Page 37

El asistente le indicará los pasos que debe seguir para congurar la DriveStation
Quad y los ajustes de RAID, así como para volver a formatear, si lo desea.
La DriveStation Quad se conecta al ordenador mediante una conexión USB o
una conexión eSATA. La conexión eSATA suele producir mayor rendimiento.
Conecte la DriveStation Quad a su ordenador en cualquier momento mediante el
cable eSATA o USB. No conecte los dos a la vez.
Cuando nalice el asistente de conguración, la DriveStation Quad estará
instalada y lista para utilizarse.
Quad está congurada en modo RAID 5 de forma predeterminada. En RAID
5, los datos pueden recuperarse incluso si falla uno de los discos duros de la
DriveStation. No obstante, el espacio total disponible es de 3/4 del espacio
máximo.
Si preere una otra conguración de RAID, puede utilizar RAID Utility para
modicar los ajustes de RAID de la DriveStation. Consulte la página siguiente
para obtener instrucciones sobre el uso de RAID Utility.
La DriveStation está lista para utilizarse y está formateada con FAT32, lo que
hace que funcione con la mayoría de los sistemas operativos habituales. Si va
a utilizarla con programas que generan tamaños de archivo superiores a 4 GB,
como el software de copias de seguridad, vuelva a formatear la DriveStation
con un volumen extendido de NTFS o MAC OS.
De forma predeterminada, todas las unidades de la DriveStation se dividen en
particiones de 2 TB. Gracias a ello, las versiones anteriores de Windows, como
Windows XP y Windows Server 2003 de 32 bits, pueden leer las unidades sin
necesidad de añadir software o service packs. Es posible que los usuarios de
los sistemas operativos más recientes deseen volver a dividir la DriveStation
Quad en particiones más grandes, pero esto no es recomendable en Windows
XP de 32 bits. Es posible que Windows Server 2003 lea particiones más
grandes después de aplicar el service pack más reciente.
5
Page 38

Uso de RAID Utility
RAID Utility le permite congurar la DriveStation Quad en varios modos:
Normal Mode (Modo Normal): aparece en el ordenador como cuatro discos duros
independientes. Este modo funciona únicamente con una conexión USB. Con una
conexión eSATA, sólo podrá ver una unidad.
Spanning Mode (Modo expandido): aparece en el ordenador como un gran disco
duro.
RAID 0 Mode (Modo RAID 0): aparece en el ordenador como una única unidad.
Produce más rendimiento que el modo expandido.
RAID 5 Mode (Modo RAID 5): aparece en el ordenador como una única unidad.
Puede utilizar aproximadamente 3/4 del espacio total, pero sigue teniendo
redundancia completa.
RAID 10 Mode (Modo RAID 10): combina RAID 1 y RAID 0 para obtener una matriz
rápida y segura. La información redundante ocupa la mitad de la capacidad total de la
DriveStation.
Notas:
・Si cambia el modo RAID de las unidades de la DriveStation Quad, se eliminarán
todos los datos que haya en ellos. Realice una copia de seguridad de los datos
importantes antes de utilizar RAID Utility.
・Para cambiar el modo RAID, debe conectar el ordenador a la DriveStation mediante
un cable USB.
En Windows, puede iniciar RAID Utility haciendo clic en [RAIDUtility] en el grupo de
programas DriveStation Quad o desde el menú Inicio.
En Mac, haga doble clic en el icono [RaidUtility] de su escritorio.
6
Page 39

Uso de RAID Utility
Una vez iniciada, RAID Utility buscará la DriveStation Quad. Esta
operación puede tardar unos segundos.
En la pantalla inicial aparecerá su conguración actual. Si la Quad es
nueva, probablemente estará en modo RAID 5. Buffalo recomienda el modo
RAID 5, por su excelente combinación de seguridad y capacidad total.
Para cambiar el modo RAID, haga clic en [Cong (Congurar)] y elija [Disk
Cong (Conguración de disco)].
7
Page 40

Uso de RAID Utility
Seleccione la estructura de unidades que desee utilizar.
En Windows, puede formatear el disco con FAT32 o NTFS. Seleccione el formato
que desee. FAT32 es compatible con la mayoría de ordenadores de Windows y
Mac. NTFS ofrece el mejor funcionamiento con Windows, pero no es compatible
con Mac. Se recomienda NTFS para el uso de programas de copia de seguridad,
de edición de vídeo u otros programas que puedan necesitar tamaños de archivo
superiores a 4 GB.
Si utiliza Windows XP o Windows Server 2003 sin SP1 o posterior, utilice el modo
de compatibilidad. El modo de compatibilidad dividirá las unidades en particiones
de 2 TB que podrán leerse con Windows XP o Windows Server 2003.
Haga clic en [Yes (Sí)] y, a continuación, en [Yes (Sí)] otra vez. Recuerde que al
hacer esto, se borrará toda la información de la unidad.
8
Page 41

Otras utilidades (sólo Windows)
La DriveStation Quad incluye varias utilidades de disco opcionales. Para instalar y utilizar
estas utilidades, inserte en un ordenador Windows el DVD-ROM que se incluye en la
DriveStation.
Haga clic en [Begin Installation (Comenzar instalación)] y, a continuación, en [Additional
Software Installation (Instalación de software adicional)].
TurboPC puede incrementar la velocidad de transferencia de datos del producto Buffalo.
TurboCopy utiliza el almacenamiento en caché para incrementar la velocidad de
transferencia de datos.
Backup Utility es un software que le permite realizar copias de seguridad y restablecer
datos desde su equipo. Para utilizarlo, seleccione una unidad de origen para realizar la
copia de seguridad y una unidad de destino para almacenar los datos copiados.
RAMDISK Utility utiliza la memoria de su equipo como una unidad de disco duro virtual
“unidad RAM”. El equipo reconoce la unidad RAM como una unidad de disco duro, con lo
que puede leer y escribir datos en esta exactamente igual que lo haría en cualquier otro
unidad de disco duro.
Buffalo Tools Launcher permite iniciar de forma sencilla software desde el paquete de
utilidades de Buffalo. Haga clic en un icono para iniciar una herramienta o utilidad de
Buffalo.
eco Manager le permite pasar DriveStation al modo de suspensión para ahorrar energía.
SecureLockMobile cifra los datos de la DriveStation. De esta forma, impide que otras
personas accedan a los datos.
Para obtener más información acerca de la instalación y el uso de estas utilidades, haga
clic en [View User Manual (Ver manual de usuario)].
9
Page 42

Sustitución de discos duros
Advertencia
No utilice ningún disco duro de sustitución que requiera más de 0,92 A
a 5 V (CC) y 0,9 A a 12 V (CC).
Los discos duros de sustitución deben tener una certicación de
seguridad (como MET o UL) aprobada por NRTL.
Las advertencias anteriores son únicamente restricciones de seguridad
básicas; no constituyen la totalidad de los requisitos de los discos duros
para su correcto funcionamiento en la DriveStation.
La garantía del producto puede anularse si instala un disco duro no
aprobado en la DriveStation. Se recomienda utilizar unidades de la
serie OP-HD de Buffalo.
Para obtener los mejores resultados, las unidades de sustitución deben
estar en blanco, sin archivos ni particiones.
Los discos duros de la DriveStation no se pueden sustituir en caliente.
Antes de cambiar un disco duro de la DriveStation, apague la unidad y
desenchufe el cable de alimentación.
Antes de manipular los discos duros, asegúrese de que tanto usted
como la DriveStation están en contacto con el suelo, o bien utilice
una correa para la muñeca cuyo extremo esté unido al chasis de la
DriveStation.
En función del disco duro de sustitución, el reemplazo de un disco
duro puede suponer una bajada de la velocidad de transferencia de la
DriveStation.
10
Page 43

Sustitución de discos duros
Asegúrese de que la DriveStation
está apagada y desconectada
de la alimentación. Retire
directamente la cubierta frontal
para abrir la caja.
Mueva la pestaña hacia la
izquierda para desbloquear.
11
Page 44

Sustitución de discos duros
Mueva el mecanismo de bloqueo
hacia la izquierda para liberar la
unidad.
La bandeja del disco duro se
deslizará hacia afuera.
12
Page 45

Sustitución de discos duros
Para instalar un disco duro nuevo, siga los pasos
anteriores pero orden inverso:
Introduzca el disco duro nuevo en la caja.
Antes de cerrar el mecanismo de bloqueo,
introduzca la unidad completamente.
Cierre el mecanismo de bloqueo. Sonará un "clic"
cuando encaje.
Vuelva a colocar la cubierta frontal.
13
Page 46

Resolución de problemas
Preguntas frecuentes
A continuación, podrá ver algunos de los problemas más comunes que
presenta la DriveStation. Hay posibles soluciones para cada uno de ellos.
No veo la DriveStation en Mi PC. (Windows)
Compruebe que la luz de ENCENDIDO está activada. Si no es
así, asegúrese de que el interruptor de encendido se encuentra
en la posición de encendido automático.
Si ha instalado Power Save Utility, compruebe que la La
DriveStation no está en modo de ahorro de energía. Consulte el
manual de Power Save Utility para obtener más ayuda. Puede
encontrar el manual en el DVD-ROM de DriveNavigator.
Compruebe que el disco duro que hay dentro de la DriveStation
está girando. Puede comprobarlo poniendo las manos en los
laterales de la caja para ver si nota una ligera vibración. Además,
cuando la DriveStation lleva encendida al menos 15 minutos,
comienza a calentarse. Si tras estas pruebas no verica que el
disco duro está girando, póngase en contacto con el servicio
técnico para obtener más ayuda.
Mi programa de copia de seguridad no guarda los archivos en la
DriveStation.
Vuelva a formatear la DriveStation con un volumen extendido de
NTFS o Mac OS. FAT32 está limitado a tamaños de archivo de
4 GB.
14
Page 47

Especicaciones técnicas
Estándares compatibles: USB 2.0 y eSATA
Velocidad de transmisión: Máx. 3,0 Gbps (eSATA), y máx. 480 Mbps (USB 2.0)
Consumo eléctrico: Máx. 90 W
Dimensiones: 5,9 in x 9,2 in x 6,1 in (149 x 233 x 154 mm)
Peso: 12.5 lb (5,5 kg)
Entorno operativo: 41-95 °F (5-35 °C)
20-80% humedad (sin condensación)
Compatibilidad con Windows 7 (32 bits/64 bits)
sistemas operativos: Windows Vista (32 bits/64 bits)
Windows XP (32 bits)
Windows Server 2008 R2 (64 bits)
Windows Server 2008 (32 bits/64 bits)
Windows Server 2003 R2 (32 bits)
Windows Server 2003 (32 bits)
Mac OS X 10.4 o posterior
15
Page 48

www.buffalotech.com
Page 49

Manuel d'utilisation
HD-QLSU2R5 DriveStation Quad
РПЧЕТ
‣
․
…
‥
35011433 ver. 01
FR
Page 50

‣ ․
ÄÉÓË
Йожптнбфйпо
… ‥
Présentation du panneau frontal
РПЧЕТ
Voyant POWER
(Alimentation)
Alimentation activée : Vert
Maintenance RAID : Orange
Alimentation coupée : Éteint
Voyants d'accès
Accès : Vert clignotant
Échec : Rouge
Reconstruction : Rouge
clignotant
Alimentation coupée : Éteint
2
Page 51

Power Mode
(Mode
d’alimentation)
▲Auto
▼Off (Éteint)
eSATA port
(Port eSATA)
USB port
(Port USB)
DC in
(Alimentation CC)
Présentation du panneau arrière
Remarque : le passage d'un mode RAID à un autre s'effectue avec l'utilitaire
RAID, fourni avec le logiciel sur votre DVD DriveNavigator.
3
Page 52

Conguration de la DriveStation
Félicitations ! Vous venez d'acquérir une DriveStation Quad ! Composée de
quatre disques durs séparés à l'intérieur, la DriveStation Quad vous offre plein de
possibilités grâce à une grande capacité économique et une redondance simple
d'utilisation.
Insérez le DVD DriveNavigator dans le lecteur de DVD-ROM de votre ordinateur.
Sur PC, DriveNavigator doit se lancer automatiquement.
Dans le cas contraire, lancez manuellement le chier
[DriveNavi.exe] en cliquant sur [Démarrer] puis en
sélectionnant [Exécuter]...[option]. Lorsque la boîte de
dialogue d'exécution s'ouvre, tapez [d:\DriveNavi.exe]
(où d correspond à la lettre de votre lecteur de
DVD-ROM). Cliquez sur [OK] pour continuer.
Si vous installez l'utilitaire RAID sur Mac, ouvrez
le dossier de votre lecteur DVD, puis cliquez sur
[RaidUtility.dmg] pour commencer l'installation.
Cliquez sur [Begin Installation
(Commencer l'installation)]. Cliquez
sur [Next (Suivant)] pour naviguer
dans l'installation. Les utilisateurs Mac
peuvent ignorer cette étape.
4
Page 53

L'assistant vous guidera dans la conguration de votre DriveStation Quad, la
conguration de vos paramètres RAID et le reformatage le cas échéant.
La DriveStation Quad peut être reliée à votre ordinateur à l'aide d'une connexion
USB ou d'une connexion eSATA. La connexion eSATA procure généralement de
meilleures performances.
Utilisez soit un câble eSATA, soit un câble USB pour relier la Quad à votre
ordinateur à tout moment. N'utilisez pas les deux connexions simultanément !
Une fois l'assistant de conguration terminé, votre DriveStation Quad est installée
et prête à être utilisée !
Par défaut, l'unité Quad est congurée en mode RAID 5. En RAID 5, les
données peuvent être récupérées même si l'un des disques dur de la
DriveStation est défaillant. Toutefois, l'espace total disponible représente 3/4 de
l'espace maximum.
Si vous souhaitez une autre conguration RAID, vous pouvez utiliser l'utilitaire
RAID pour modier les paramètres RAID de votre DriveStation. Passez à la
page suivante pour obtenir des instructions sur l'utilisation de l'utilitaire RAID.
En l'état, la DriveStation est formatée en FAT32, ce qui permet de l'utiliser avec
les systèmes d'exploitation les plus courants. Si vous avez l'intention de l'utiliser
avec des programmes générant des tailles de chiers supérieures à 4 Go (des
logiciels de sauvegarde par exemple), reformatez la DriveStation en NTFS ou
en Mac OS Étendu.
Par défaut, tous les disques de la DriveStation sont divisés en deux partitions
de 2 To. Cela permet aux anciennes versions de Windows, telles que Windows
XP 32 bits et Windows Server 2003, de pouvoir lire les disques sans avoir à
installer de logiciel supplémentaire ni de microprogramme de service (service
pack). Les utilisateurs de systèmes d'exploitation plus récents souhaiteront
peut-être re-partitionner la DriveStation Quad avec des partitions plus larges ;
toutefois, cela n'est pas recommandé sous Windows XP 32 bits. Windows
Server 2003 peut lire des partitions plus grandes après application du dernier
microprogramme de service.
5
Page 54

Utilisation de l'utilitaire RAID
L'utilitaire RAID vous permet de congurer votre DriveStation Quad selon plusieurs modes :
Normal Mode (Mode Normal) : apparaît sur votre ordinateur sous la forme de quatre
disques durs distincts. Notez que le mode normal ne fonctionne qu'avec une connexion
USB. Dans le cas d'une connexion eSATA, un seul disque sera visible.
Spanning Mode (Mode Fractionné) : apparaît sur votre ordinateur sous la forme d'un seul
grand disque dur.
RAID 0 Mode (Mode RAID 0) : apparaît sur votre ordinateur comme un seul disque.
Procure de meilleures performances que le mode fractionné.
RAID 5 Mode (Mode RAID 5) : apparaît sur votre ordinateur comme un seul disque.
Environ 3/4 de votre espace total est utilisable, toutefois vous bénéciez toujours d'une
redondance complète.
RAID 10 Mode
disques rapide et sûre. La moitié de la capacité totale de la DriveStation est utilisée pour les
informations redondantes.
Remarques :
・La modication du mode RAID des disques de votre Quad effacera toutes les données
qu'ils contiennent ! Il est donc impératif de sauvegarder toutes les données importantes
avant d'utiliser l'utilitaire RAID.
・
Votre ordinateur doit être relié à la DriveStation via USB pour pouvoir modier le mode RAID.
Sur PC, vous pouvez lancer l'utilitaire RAID en cliquant sur [RAIDUtility] dans le groupe de
programmes DriveStation Quad. Vous pouvez également lancer le programme depuis le
menu Démarrer.
(Mode RAID 10) :
associe les modes RAID 1 et RAID 0 pour une batterie de
Sur Mac, double-cliquez sur l'icône [RaidUtility] placée sur votre bureau.
6
Page 55

Utilisation de l'utilitaire RAID
Une fois lancé, l'utilitaire RAID analysera votre DriveStation Quad. Cela peut
prendre quelques secondes.
L'écran initial afchera votre conguration actuelle. Si votre Quad est neuve, elle
sera probablement en mode RAID 5. Buffalo recommande le mode RAID 5, car
il constitue un excellent équilibre entre sécurité et capacité totale.
Pour modier le mode RAID, cliquez sur [Cong], puis sélectionnez [Disk Cong
(Cong. disques)].
7
Page 56

Utilisation de l'utilitaire RAID
Sélectionnez la structure de disque que vous souhaitez utiliser.
Sur PC, le disque peut être formaté en FAT32 ou en NTFS. Sélectionnez le format que
vous préférez. FAT32 est compatible avec la plupart des PC et Mac Windows. NTFS
offre de meilleures performances avec Windows, mais n'est pas compatible avec Mac.
NTFS est recommandé en cas d'utilisation de programmes de sauvegarde, d'édition
vidéo ou d'autres programmes nécessitant des tailles de chiers supérieures à 4 Go.
Si vous utilisez Windows XP, ou Windows Server 2003 sans SP1 ou une version
ultérieure, utilisez le mode Compatibility (Compatibilité). Le mode Compatibilité divisera
les disques en partitions de 2 To pouvant être lues par Windows XP or Windows
Server 2003.
Cliquez sur [Yes (Oui)], puis encore sur [Yes (Oui)]. Comprenez bien que cela
effacera toutes les données qui se trouvent sur le disque !
8
Page 57

Autres utilitaires (Windows uniquement)
La DriveStation Quad inclut plusieurs utilitaires de disque en option. Pour installer et utiliser
ces utilitaires, insérez le DVD-ROM livré avec votre DriveStation dans un PC Windows.
Cliquez sur [Begin Installation (Commencer l'installation)], puis sur [Additional Software
Installation (Installation de logiciel supplémentaire)].
TurboPC peut accroître la vitesse de transfert des données de votre produit Buffalo.
TurboCopy utilise la mise en cache pour accroître la vitesse de transfert des données.
Backup Utility est un logiciel qui permettant de sauvegarder et de restaurer les données de
votre PC. Pour l'utiliser, sélectionnez un disque source à sauvegarder et un emplacement
cible pour des données de sauvegarde.
RAMDISK Utility utilise la mémoire de votre ordinateur comme un disque dur virtuel
« lecteur RAM ». Le lecteur RAM est reconnu par votre ordinateur comme un disque dur ;
vous pouvez lire et écrire des données sur ce disque comme vous le feriez avec n'importe
quel autre disque dur.
Buffalo Tools Launcher vous permet de lancer facilement un logiciel de la suite
d'utilitaires Buffalo. Cliquez simplement sur une icône pour lancer l'outil ou l'utilitaire Buffalo
associé.
eco Manager vous permet de placer la DriveStation en mode Veille pour économiser de
l'énergie.
SecureLockMobile crypter les données de votre DriveStation, ce qui permet d’éviter que
d’autres personnes que vous puissent y accéder.
Pour en savoir plus sur l'installation et l'utilisation de ces utilitaires, cliquez sur [View User
Manual (Consulter le manuel d'utilisation)].
9
Page 58

Remplacer un disque dur
Attention
N'utilisez pas de disque dur de remplacement qui consomme plus de
0,92 amp à 5 V CC et 0,9 amp à 12 V CC.
Les disques durs de remplacement doivent présenter une certication
de sécurité (MET ou UL par exemple) approuvée par un NRTL.
Les avertissements susmentionnés ne sont que des restrictions de
sécurité de base ; ils ne constituent pas la totalité des exigences
permettant à un disque dur de fonctionner correctement sur la
DriveStation.
La garantie de votre produit peut s'annuler si vous installez un disque
dur non approuvé sur la DriveStation. Les disques série OP-HD de
Buffalo sont recommandés.
Pour de meilleurs résultats, les disques de remplacement doivent être
vierges, et donc ne comporter aucun chier ni aucune partition.
Les disques durs de la DriveStation ne sont pas échangeables à chaud.
Avant de changer un disque dur de la DriveStation, mettez l'unité hors
tension, puis débranchez son câble d'alimentation.
Mettez-vous vous-même et la DriveStation à la terre avant de manipuler
les disques, ou utilisez un bracelet anti-statique avec l'autre extrémité
mis à la terre sur le châssis de la DriveStation.
Le remplacement d'un disque peut entraîner des vitesses de transfert
moins importantes pour la DriveStation, en fonction des performances
du disque de remplacement.
10
Page 59

Remplacer un disque dur
Assurez-vous que la DriveStation
est éteinte et débranchée de
l'alimentation secteur. Tirez son
panneau frontal bien droit pour
ouvrir le boîtier.
Poussez la languette sur la
gauche pour déverrouiller.
11
Page 60

Remplacer un disque dur
Faites basculer le mécanisme de
verrouillage sur la gauche pour
pouvoir sortir le disque.
La baie de disque dur s'éjecte
vers l'extérieur.
12
Page 61

Remplacer un disque dur
Installez un nouveau disque dur en réalisant les
mêmes étapes, mais dans le sens inverse :
Faites glisser le nouveau disque dur dans la baie.
Le mécanisme de verrouillage ouvert, faites
glisser le disque en place.
Fermez le mécanisme de verrouillage. Un clic se
fait entendre lorsqu'il se verrouille.
Replacez le panneau frontal.
13
Page 62

Dépannage
Foire aux questions
Ci-dessous gure une liste des problèmes courants rencontrés avec la
DriveStation. Chaque problème est suivi des éventuelles solutions.
Je ne trouve pas la DriveStation dans mon Poste de travail. (Windows)
Vériez que le voyant POWER est allumé. Dans le cas contraire,
assurez-vous que l'interrupteur d'alimentation est en position AUTO.
Si vous avez installé l'utilitaire Power Save, vériez alors que la
DriveStation n'est pas passée en mode d'économie d'énergie.
Consultez le manuel de l'utilitaire Power Save pour obtenir une
assistance supplémentaire. Ce manuel est disponible sur le
DVD-ROM DriveNavigator.
Vériez que le disque dur à l'intérieur de la DriveStation tourne
correctement. Cela peut être vérié en plaçant votre main sur
les côtés du boîtier : vous devriez ressentir une légère vibration.
Aussi, si votre DriveStation est allumée depuis quinze minutes au
moins, elle doit commencer à chauffer. Si aucun de ces tests ne
vous a permis de vérier que votre disque dur tournait, veuillez
contacter l'assistance technique pour obtenir de l'aide.
Mon programme de sauvegarde ne parvient pas à sauvegarder des
chiers sur la DriveStation.
Reformatez votre DriveStation en NTFS ou Mac OS étendu.
FAT32 est limité à des tailles de chiers de 4 Go maximum.
14
Page 63

Caractéristiques techniques
Conformité aux normes : USB 2.0, eSATA
Vitesse de transmission : 3 Gbits/s max (eSATA), 480 Mbits/s max (USB 2.0)
Consommation électrique : 90 W max
Dimensions : 5,9” x 9,2” x 6,1” (149 x 233 x 154 mm)
Poids : 12.5 livres (5,5 kg)
Environnement de 41 - 95° F (5 - 35° C)
fonctionnement : 20 - 80 % d'humidité (sans condensation)
Compatibilité SE : Windows 7 (32 bits/64 bits),
Windows Vista (32 bits/64 bits),
Windows XP (32 bits),
Windows Server 2008 R2 (64 bits),
Windows Server 2008 (32 bits/64 bits),
Windows Server 2003 R2 (32 bits),
Windows Server 2003 (32 bits),
Mac OS X 10,4 ou version ultérieure
15
Page 64

www.buffalo-technology.com
Page 65

Manuale dell'utente
Drive Station Quad HD-QLSU2R5
РПЧЕТ
‣
․
…
‥
35011433 ver.01
IT
Page 66

‣ ․
ÄÉÓË
Йожптнбфйпо
… ‥
Struttura pannello anteriore
РПЧЕТ
LED Power (alimentazione)
Alimentazione attiva: verde
Manutenzione Raid: arancio
Alimentazione disattiva:
spento
LED di accesso
Accesso: verde
lampeggiante
Guasto: rosso
Ricostruzione: rosso
lampeggiante
Alimentazione disattiva:
spento
2
Page 67

Power Mode
(Modalità
alimentazione)
▲Auto
▼
Off
eSATA port
(Porta eSATA)
USB port
(Porta USB)
DC in
(Ingresso CC)
Struttura pannello posteriore
Nota: La modica tra le modalità RAID viene eseguita con l'utility RAID, inclusa
nel software sul DVD DriveNavigator.
3
Page 68

Installazione DriveStation
Congratulazioni per la vostra nuova DriveStation Quad! Con quattro hard disk
separati al suo interno, la DriveStation Quad offre molte opzioni per una capacità
ampia ed economica e per una ridondanza facile da utilizzare.
Inserire il DVD DriveNavigator nell'unità DVD-ROM del computer.
Su PC, DriveNavigator dovrebbe partire automaticamente.
In caso contrario, avviare manualmente [DriveNavi.exe]
cliccando su [start] e selezionando [Esegui...][opzionale].
Quando si apre la nestra di dialogo Esegui, inserire
[d:\DriveNavi.exe] (dove d è la lettera dell'unità
DVD-ROM). Cliccare su [OK] per continuare.
Se si sta installando l'utility RAID su un Mac, aprire
il DVD e fare clic su [RaidUtility.dmg] per avviare
l'installazione.
Fare clic su [Begin Installation
(Inizio installazione)]. Fare clic su
[Next (Avanti)] per procedere con
l'installazione. Gli utenti Mac possono
saltare questo passaggio.
4
Page 69

La procedura guidata assisterà l'utente durante l'installazione della DriveStation
Quad, congurando le impostazioni RAID e riformattando, se necessario.
La DriveStation Quad può essere collegata al computer con un collegamento
USB o eSATA. Il collegamento eSATA consente solitamente una prestazione
superiore.
Per collegare la Quad al computer in qualsiasi momento, utilizzare un cavo
eSATA o un cavo USB. Non collegarli mai insieme!
Al termine della procedura guidata, la DriveStation Quad sarà installata e pronta
all'uso!
Come impostazione predenita, Quad si trova in modalità RAID 5. In RAID 5, i
dati possono essere ripristinati anche se uno degli hard disk nella DriveStation
non funziona. Tuttavia, lo spazio disponibile totale è 3/4 dello spazio massimo.
Se si desidera una congurazione RAID differente, è possibile utilizzare l'Utility
RAID per modicare le impostazioni RAID della DriveStation. Andare alla pagina
seguente per istruzioni sull'impiego dell'Utility RAID.
La DriveStation è formattata con FAT32 che ne consente l'impiego con i più
comuni sistemi operativi. Se si intende utilizzarla con programmi che generano
dimensioni le superiori ai 4 GB, come i software di backup, riformattare la
DriveStation con NTFS o Mac OS esteso.
Per impostazione predenita, tutte le unità sulla DriveStation sono divise in
partizioni da 2 TB. Questo consente alle versioni meno recenti di Windows,
come Windows XP a 32bit e Windows Server 2003, di leggere le unità senza
software aggiuntivi o service pack. Gli utenti degli ultimi sistemi operativi
possono ripartire la DriveStation Quad con partizioni più grandi, ma questa
operazione non è consigliata con Windows XP 32bit. Windows Server 2003
potebbe essere in grado di leggere partizioni superiori dopo aver applicato il
service pack più aggiornato.
5
Page 70

Utilizzare l'Utility RAID
L'Utility RAID consente di congurare la DriveStation Quad in diverse modalità:
Normal Mode (Modalità normale) - si presenta sul computer come quattro hard
disk distinti. La modalità normale funziona solo con un collegamento USB. Con
un collegamento eSATA, sarà visibile una sola unità.
Spanning Mode (Modalità spanning) - si presenta sul computer come un hard
disk di grandi dimensioni.
RAID 0 Mode (Modalità RAID 0) - si presenta sul computer come una singola
unità. Prestazioni superiori rispetto alla modalità spanning.
RAID 5 Mode (Modalità RAID 5) - si presenta sul computer come una singola
unità. Circa 3/4 dello spazio totale sono utilizzabili, con completa ridondanza.
RAID 10 Mode (Modalità RAID 10) - combina RAID 1 e RAID 0 per un array
sicuro e veloce. Metà della capacità totale della DriveStation viene utilizzata per
informazioni ridondanti.
Note :
・La modica della modalità RAID delle unità nella Quad comporterà la
cancellazione di tutti i dati presenti su di esse! Prima di servirsi dell'utility RAID,
eseguire il backup di tutti i dati importanti.
・Per cambiare la modalità RAID, è necessario che il computer sia collegato alla
DriveStation tramite USB.
Su PC, è possibile avviare l'utility RAID facendo clic su [RAIDUtility] nel gruppo
di programmi DriveStation Quad. Oppure, è possibile avviare il programma dal
menu start.
Su Mac, fare doppio clic sull'icona [RaidUtility] presente sul desktop.
6
Page 71

Utilizzare l'Utility RAID
Una volta avviata, l'utility RAID eseguirà l'analisi della DriveStation Quad.
Questa operazione richiederà alcuni secondi.
La schermata iniziale mostrerà la congurazione attuale. Se la Quad è nuova,
probabilmente si troverà in modalità RAID 5. Buffalo consiglia la modalità RAID
5, per il suo eccellente bilanciamento tra protezione e capacità totale.
Per modicare la modalità RAID, fare clic su [Cong (Congurazione)] e
scegliere [Disk Cong (Congurazione disco)].
7
Page 72

Utilizzare l'Utility RAID
Selezionare la struttura dell'unità che si intende utilizzare.
Su PC, è possibile formattare il disco con FAT32 o NTFS. Selezionare la
formattazione desiderata. FAT32 è compatibile con la maggior parte di PC
Windows e Mac. NTFS offre una migliore prestazione con Windows, ma non è
compatibile con Mac. NTFS è consigliato per l'impiego con programi di backup,
editing video e altri programmi che potrebbero richiedere dimensioni le superiori
ai 4 GB.
Se si sta lavorando su Windows XP, o Windows Server 2003 senza SP1 o versione
successiva, utilizzare la modalità compatibilità. La modalità compatibilità dividerà
le unità in partizioni da 2 TB che possono essere lette da Windows XP o Windows
Server 2003.
Fare clic su [Yes (Sì)], e di nuovo [Yes (Sì)]. Questo procedimento comporterà la
cancellazione di tutti i dati sull'unità!
8
Page 73

Altre utility (solo per Windows)
La DriveStation Quad include diverse utility disco opzionali. Per installare e
utilizzare queste utility, inserire in un PC Windows il DVD-ROM incluso nella
DriveStation.
Fare clic su [Begin Installation (Inizio installazione)] e su [Additional Software
Installation (Installazione software aggiuntivo)].
TurboPC consente di aumentare le velocità di trasferimento dati del prodotto Buffalo.
TurboCopy si serve della caching per aumentare le velocità di trasferimento dati.
Backup Utility è un software in grado di eseguire il backup e il ripristino dei dati da
PC. Per utilizzarlo, selezionare un driver sorgente di cui eseguire il back-up e una
destinazione in cui salvare il back-up.
RAMDISK Utility si serve della memoria all'interno del computer come un disco
rigido virtuale "RAM drive". RAM drive viene riconosciuto come un disco rigido dal
computer, e sarà quindi possibile leggere e scrivere dati proprio come si farebbe con
qualsiasi altro disco rigido.
Buffalo Tools Launcher consente di avviare in modo facile software dalla suite
di utility Buffalo. Basta fare clic sull'icona per avviare lo strumento o l'utility Buffalo
adatta.
eco Manager consente di mettere la DriveStation in modalità sospensione per
risparmiare energia.
SecureLockMobile crittografa i dati sulla DriveStation, impedendone l'accesso ad
utenti non autorizzati.
Per saperne di più sull'installazione e l’impiego di queste utility, fare clic su [View
User Manual (Visualizza manuale utente)].
9
Page 74

Sostituire un hard disk
Attenzione
Non utilizzare hard disk sostitutivi che emettono oltre 0,92 amp a 5 volt
CC e 0,9 amp a 12 volt CC.
Gli hard disk sostitutivi devono avere certicazioni di sicurezza (come
MET o UL) approvate da NRTL.
Le avvertenze sopracitate sono soltanto restrizioni di sicurezza generali,
e non rappresentano i requisiti completi che un hard disk deve avere
per funzionare correttamente nella DriveStation.
La garanzia del prodotto potrebbe invalidarsi nel caso in cui si installi
sulla DriveStation un hard disk non autorizzato. Sono consigliate le unità
di serie OP-HD Buffalo.
Per risultati migliori, le unità sostitutive dovrebbero essere vuote, senza
le o partizioni al loro interno.
Gli hard disk della DriveStation non sono sostituibili a caldo. Prima di
cambiare un hard disk nella DriveStation, spegnere l'unità e scollegare il
cavo di alimentazione.
Prima di toccare le unità, scaricare a terra l'elettricità del corpo e della
DriveStation, o servirsi di un braccialetto antistatico con l'altra estremità
collegata a terra sul telaio della DriveStation.
La sostituzione di un'unità può comportare una riduzione delle velocità
di trasferimento della DriveStation, a seconda delle prestazioni dell'unità
sostitutiva.
10
Page 75

Sostituire un hard disk
Assicurarsi che la DriveStation
sia spenta e scollegata
dall'alimentazione. Estrarre
il coperchio anteriore con
movimento rettilineo per aprire il
case.
Premere la linguetta a sinistra per
togliere il blocco.
11
Page 76

Sostituire un hard disk
Aprire il meccanismo di bloccaggio
a sinistra per togliere l'unità.
A questo punto uscirà il cassetto
dell'hard disk
12
Page 77

Sostituire un hard disk
Per installare un nuovo hard disk, seguire gli
stessi passaggi nell'ordine inverso:
Inserire il nuovo hard disk nel case.
Con il meccanismo di bloccaggio aperto, far
scorrere l'unità in posizione.
Chiudere il meccanismo di bloccaggio. Una volta
innestato, emetterà un "clic".
Riposizionare il coperchio anteriore.
13
Page 78

Risoluzione problemi
Domande frequenti
Segue un elenco di problemi comuni che potrebbero vericarsi con la
DriveStation. Per ciascun problema ci sono possibili soluzioni.
Non riesco a vedere la DriveStation in Risorse del computer.
(Windows)
Accertarsi che la luce di alimentazione POWER sia accesa. Se
non lo è, vericare che l'interruttore di alimentazione si trovi in
posizione AUTO.
Se è stata installata l'utility Power Save (risparmio energetico),
vericare che la DriveStation non si trovi in modalità risparmio
energetico. Consultare il manuale per ulteriore assistenza
sull'utility Power Save. Il manuale è disponibile sul DVD-ROM
DriveNavigator.
Assicurarsi che l'hard disk all'interno della DriveStation stia
girando. È possibile vericare questa funzione mettendo la mano
sui lati del case e avvertendo una leggera vibrazione. Inoltre,
dopo che la DriveStation è stata accesa per quindici minuti o più,
inizierà a riscaldarsi. Se da nessuna di queste veriche è risultato
che l'hard disk sta girando, contattare il supporto tecnico per
ulteriore assistenza.
Il mio programma di backup non riesce a salvare i le sulla
DriveStation.
Riformattare la DriveStation con NTFS o Mac OS Esteso. FAT32
è limitato a le da 4 GB.
14
Page 79

Speciche tecniche
Conformità agli standard: USB 2.0, eSATA
Velocità di trasmissione: max. 3.0 Gbps (eSATA), max. 480 Mbps (USB 2.0)
Consumo di energia max. 90 W
Dimensioni: 149 x 233 x 154 mm
Peso: 5,5 kg.
Ambiente operativo: 5 - 35° C
20 - 80% umidità (senza condensa)
Sistemi operativi compatibili:
Windows Vista (32 bit/64 bit),
Windows XP (32 bit),
Windows Server 2008 R2 (64 bit),
Windows Server 2008 (32 bit/64 bit),
Windows Server 2003 R2 (32 bit),
Windows Server 2003 (32 bit),
Mac OS X 10.4 o versione successiva
Windows 7 (32 bit/64 bit),
15
Page 80

www.buffalotech.com
 Loading...