

Page 1
FTP Setup Guide
Page 2
This guide will assist you in setting up the FTP Server on Buffalo’s LinkStation
product. Instructions to setup anonymous and password protected (registered
user) FTP Servers will be shown separately.
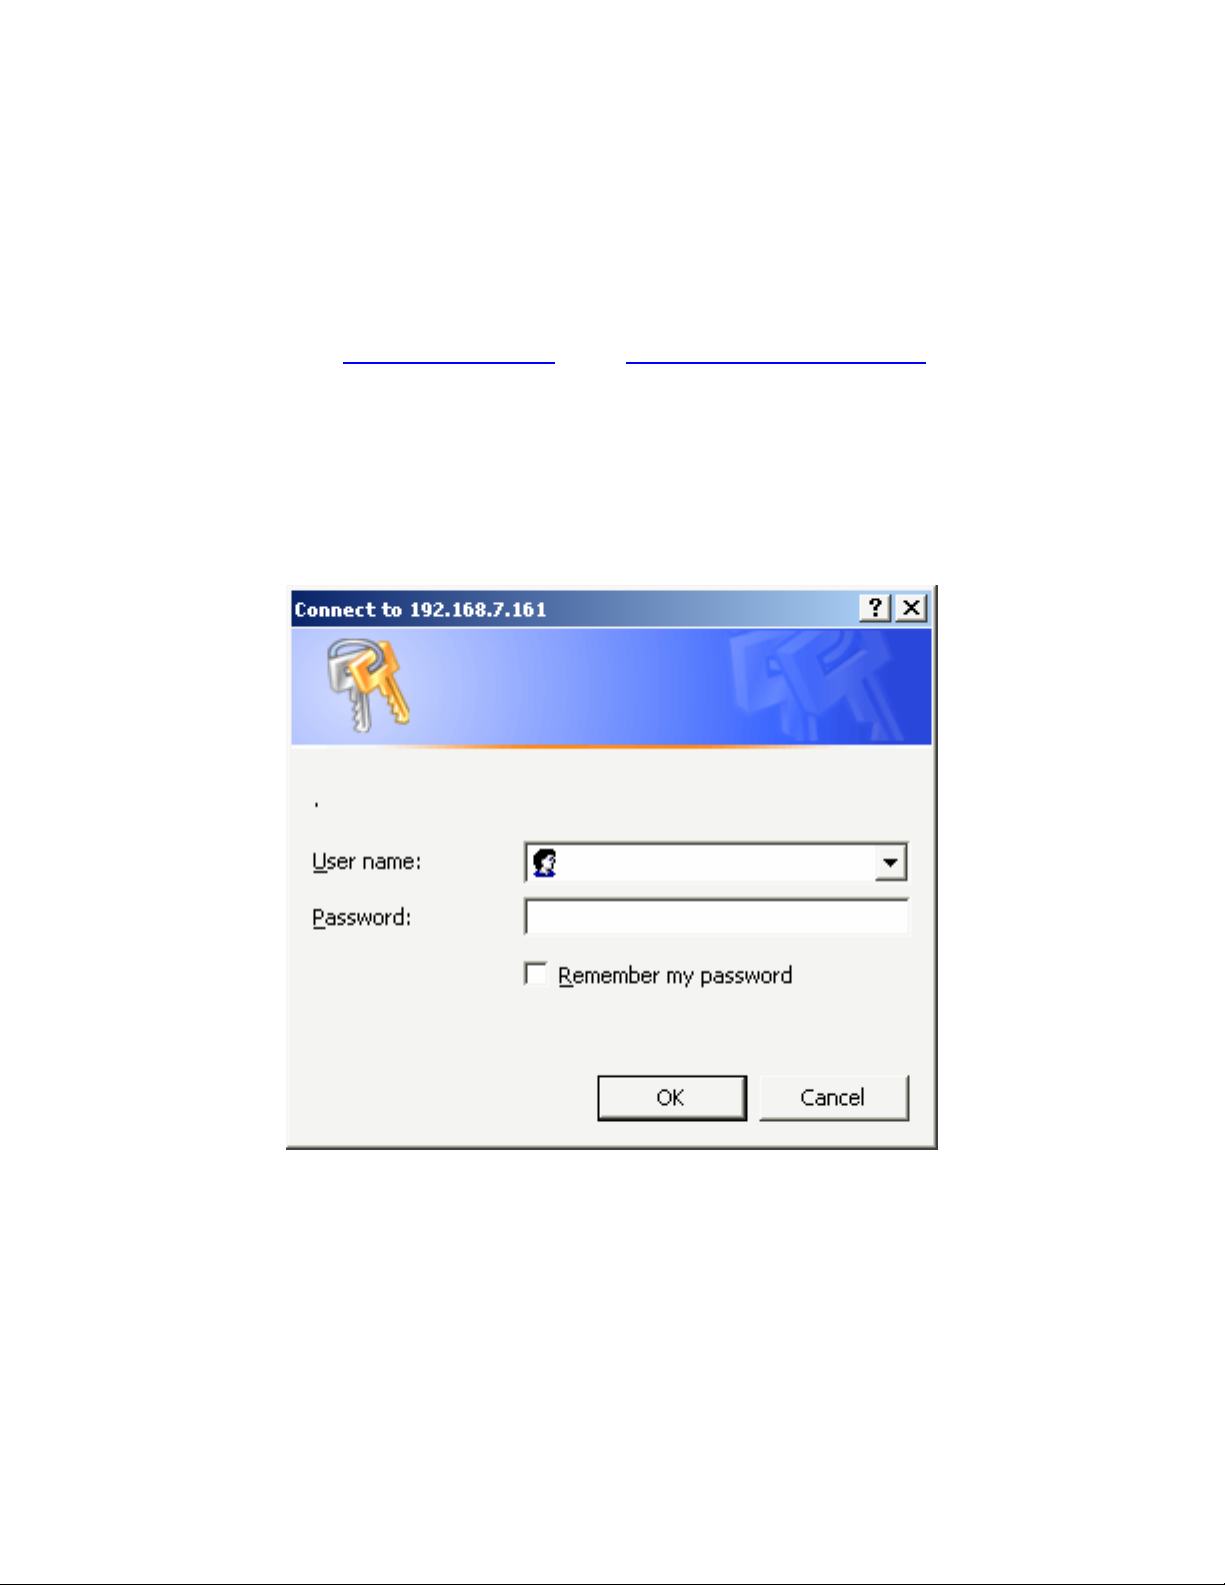
Step 1 (Login to the LinkStation):
The first step is to gain access to the LinkStation’s Web Configuration. This is
done by typing http://IP_ADDRESS –OR- http://LINKSTATION_NAME
NOTE: Please refer to the LinkNavigator CD-ROM’s IP Setup Utility if you do not
know the LinkStation’s IP Address or Host Name.
A login prompt will appear. The user name is root and there is NO password by
default. If a password was setup during the initial configuration, then please
enter that password. Press the ‘OK’ button when finished.
Username: root
Password: LEAVE BLANK
Page 3
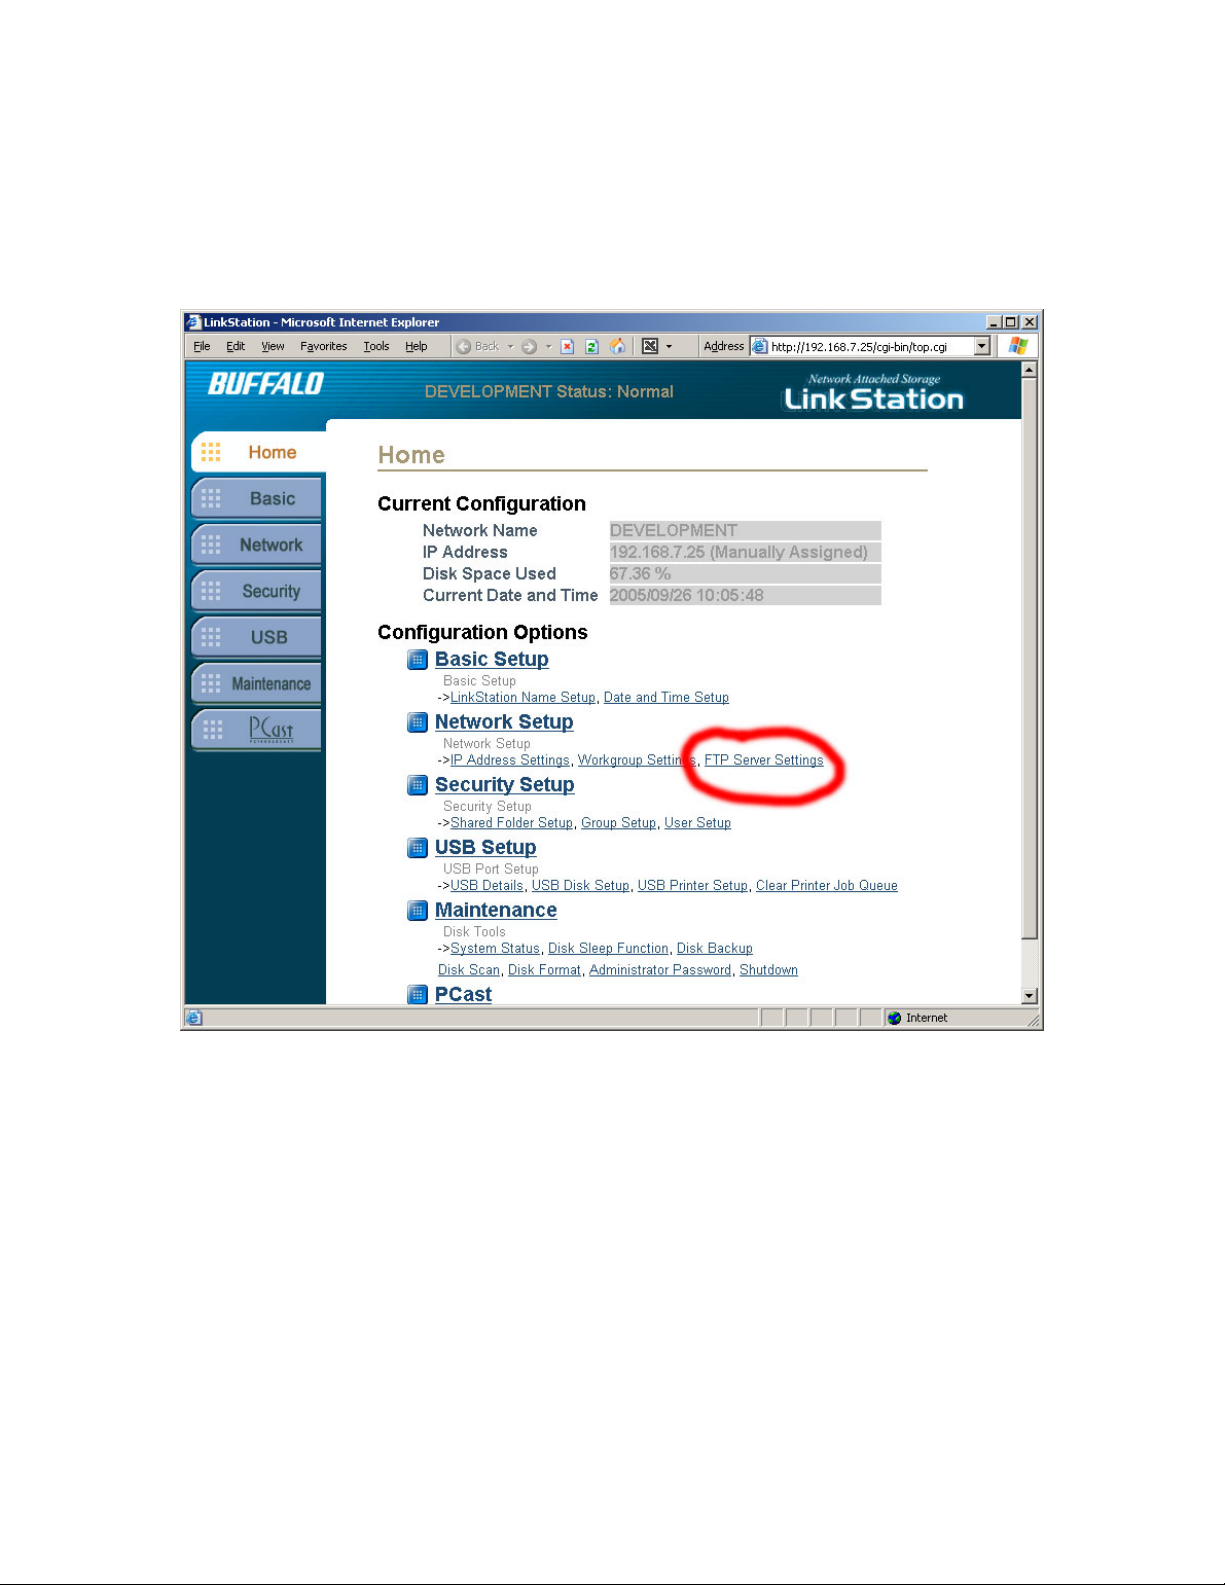
Step 2 (Navigate to FTP Server Settings):
Click on the ‘FTP Server Settings’ link on the main status page.
Page 4

Step 3 (Configure Anonymous FTP Server):
NOTE: If you wish to configure a password protected FTP Server, then skip to
the next page.
A. Begin by clicking on the ‘Enable’ radio button next to ‘FTP Server’.
B. Click on the ‘Anonymous’ radio button next to ‘FTP Access User’.
C. Select one folder/share from the ‘Anonymous User Public Shared Folder’
pull down menu. This folder/share will be the only folder available when users
connect to the LinkStation’s FTP Server.
D. Select either ‘Read Only’ or ‘Writable’ next to ‘FTP Access’. ‘Read Only’
will specify that users connected to the LinkStation’s FTP Server can only
download files. They will not be able to upload files, rename files, or delete files.
‘Writable’ will specify that users can download, upload, modify, rename, and/or
delete files
E. Press the ‘Apply’ button directly under ‘FTP Access’. Skip to Step 4.
Page 5

Step 3 (Configure Registered User/Password Protected FTP Server):
Usernames and Passwords are specified in the ‘Security’ Section.
A. Begin by clicking on the ‘Enable’ radio button next to ‘FTP Server’.
B. Click on the ‘Registered Users radio button next to ‘FTP Access User’.
‘Anonymous User Public Shared Folder’ and ‘FTP Access’ will be greyed out
since those options only pertain to Anonymous FTP.
C. Press the ‘Apply’ button directly under ‘FTP Access’
D. Select one or more folder(s)/share(s) from the ‘Registered Users Public
Shared Folder Settings’ list. Checking a Shared Folder will make that folder
available to users who connect to the FTP Server. If a folder/share is password
protected on the LinkStation, then only users who have the proper username and
password will see that share. If a folder/share is not password protected, then
any username or password specified on LinkStation will be able to see that share.
Settings specified on the share (such as Read-Only) are the same as on the FTP
Server.
E. Press the ‘Apply’ button directly under the Shared Folder List.
Page 6

Step 4 (Connecting to an Anonymous FTP from your LAN):
Connecting to the Anonymous FTP Server is simple. The following instructions
are for Internet Explorer:
A. Type ftp://IP_ADDRESS into the Internet Explorer Address field and press
‘Enter’:
B. The folders inside the share are shown. You can drag files or folders from
Internet Explorer to your desktop. If ‘Writable’ was selected, then you can drag
files from your computer into Internet Explorer. You may also right click on
folders or files and delete or rename them.
Page 7

Step 4 (Connecting to a Registered User FTP from your LAN):
Connecting to the Registered User FTP Server is slightly more complex than
connecting to an anonymous server. The following instructions are for Internet
Explorer:
A. Type ftp://USERNAME:PASSWORD@LOCAL_IP_ADDRESS into the
Internet Explorer Address field and press ‘Enter’:
B. The folder/shares that were checked in Step 3 are shown. You can drag files
or folders from Internet Explorer to your desktop. If ‘Writable’ was selected, then
you can drag files from your computer into Internet Explorer. You may also right
click on folders or files and delete or rename them.
NOTE: You cannot modify, rename, delete the master share(s) through FTP, but
you can delete any folders or files inside of a share.
Page 8

Step 5 (Connecting to a FTP Server from the Internet):
Connecting to an FTP Server from the Internet is an involved and somewhat
difficult process. The usage of Internet Explorer remains the same as in Step 4,
except use the Internet IP Address issued by your ISP instead of
LOCAL_IP_ADDRESS. This IP Address can be found by visiting
http://www.whatismyip.com from any computer on the same router as the
LinkStation.
The router will also need to be configured to instruct Internet FTP requests to go
to the LinkStation. Please consult your router’s documentation for more
information on ‘Port Forwarding’ and/or ‘Network Address Translation’.
FTP runs on TCP Port 21. Thus, your router will need to be configured to allow
inbound requests from Port 21 to the local LAN IP Address of LinkStation. The
local LAN IP Address is the same address that was used to connect to the
LinkStation’s Web Based Configuration in Step 1.
If you have any questions regarding router setup or port forwarding, consult the
support resources (Manual, Web Site, Technical Support) that are available from
your router manufacturer.
NOTE: Please be aware! Enabling the FTP Server to work from the Internet
will allow users to connect from anywhere on the Internet. This also means
that hackers can login to anonymous servers very easily and can access
password protected sites by guessing passwords or knowing someone’s
password. Make sure that passwords are strong and that proper folder/file
security has been configured on the LinkStation.
 Loading...