

Page 1
Quick Setup Guide
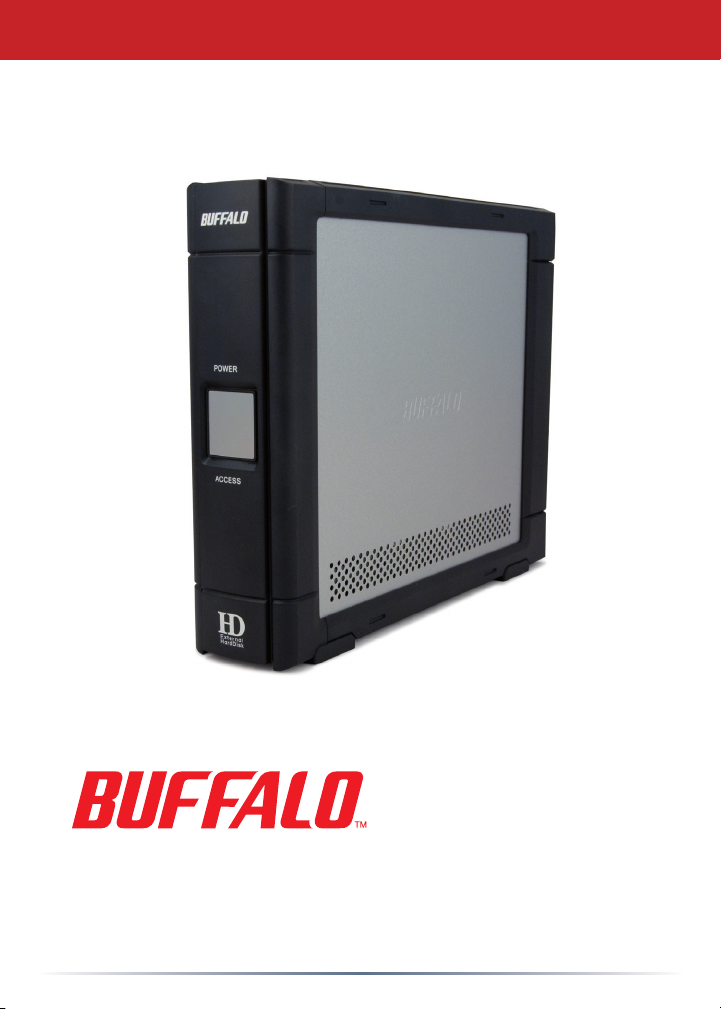
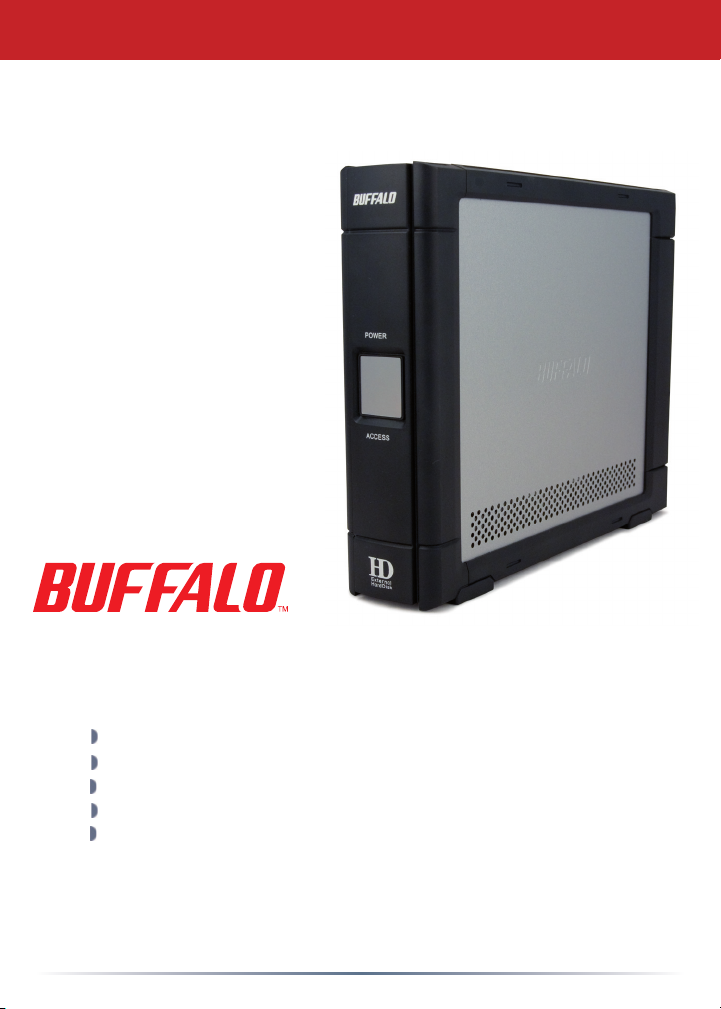
HD-HCU2 DriveStation
Page 2

Table of Contents
English .................................................................................................................................. 2
Deutch ...............................................................................................................................12
Français ..............................................................................................................................22
Italiano ............................................................................................................................... 32
Español ..............................................................................................................................42
Português .......................................................................................................................... 52
Nederlands ....................................................................................................................... 62
Svenska ..............................................................................................................................72
Norsk .................................................................................................................................82
Dansk ................................................................................................................................. 92
Suomi ...............................................................................................................................102
1
Page 3

English
Quick Setup Guide
HD-HCU2 DriveStation
Package contents:
Main Unit (DriveStation)
Power Adapter
USB Cable
DriveNavigator Installation CD
Quick Setup Guide
Page 4
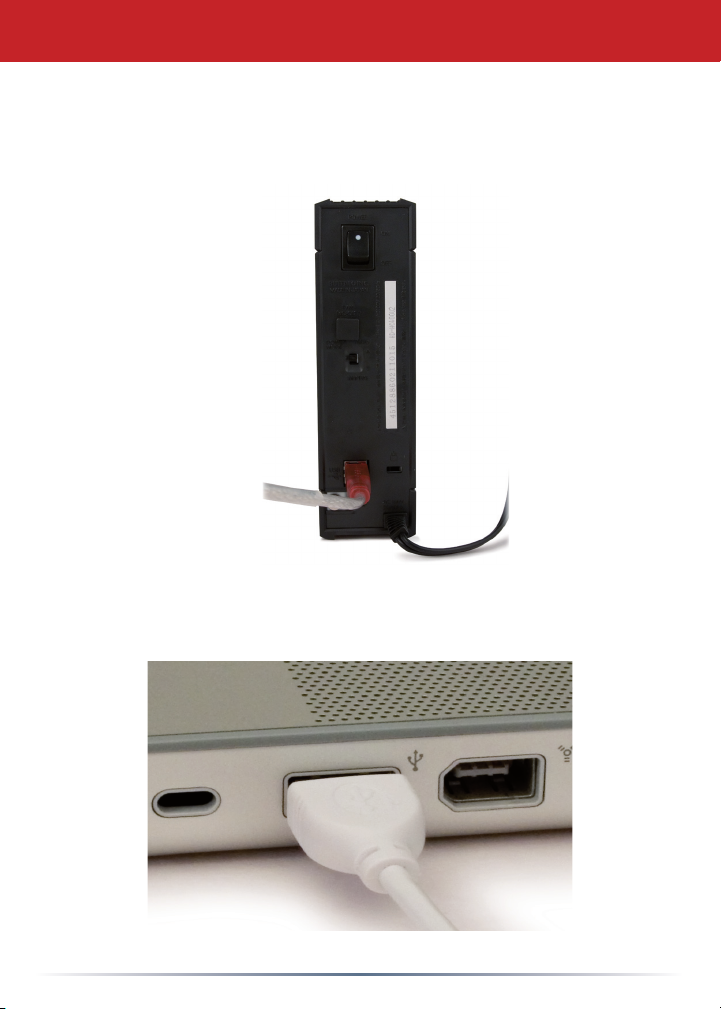
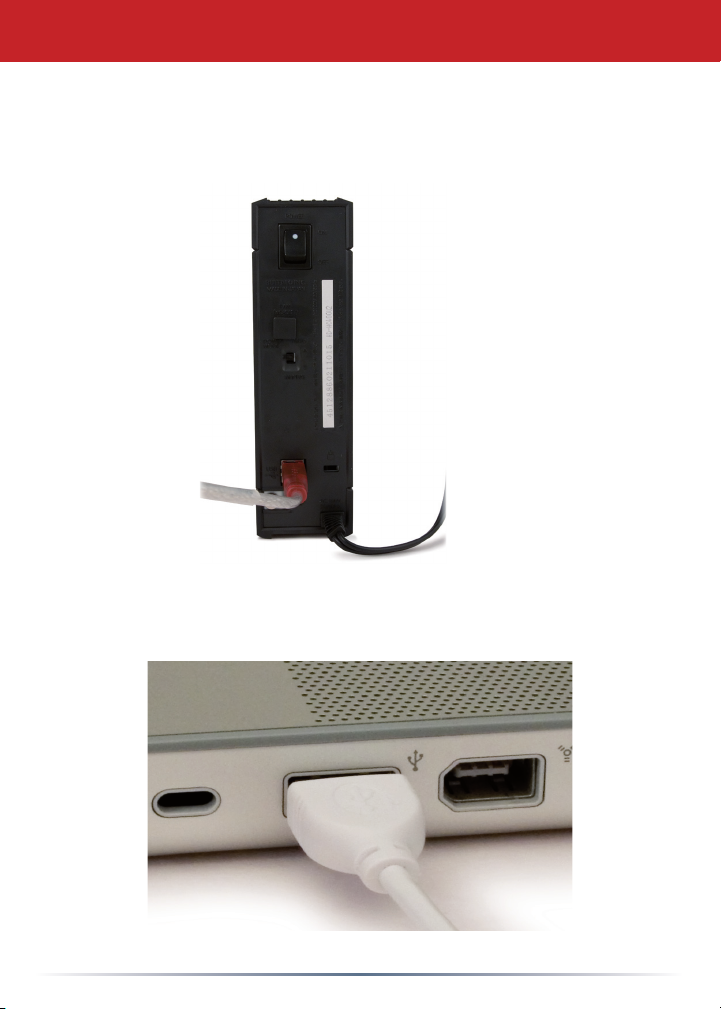
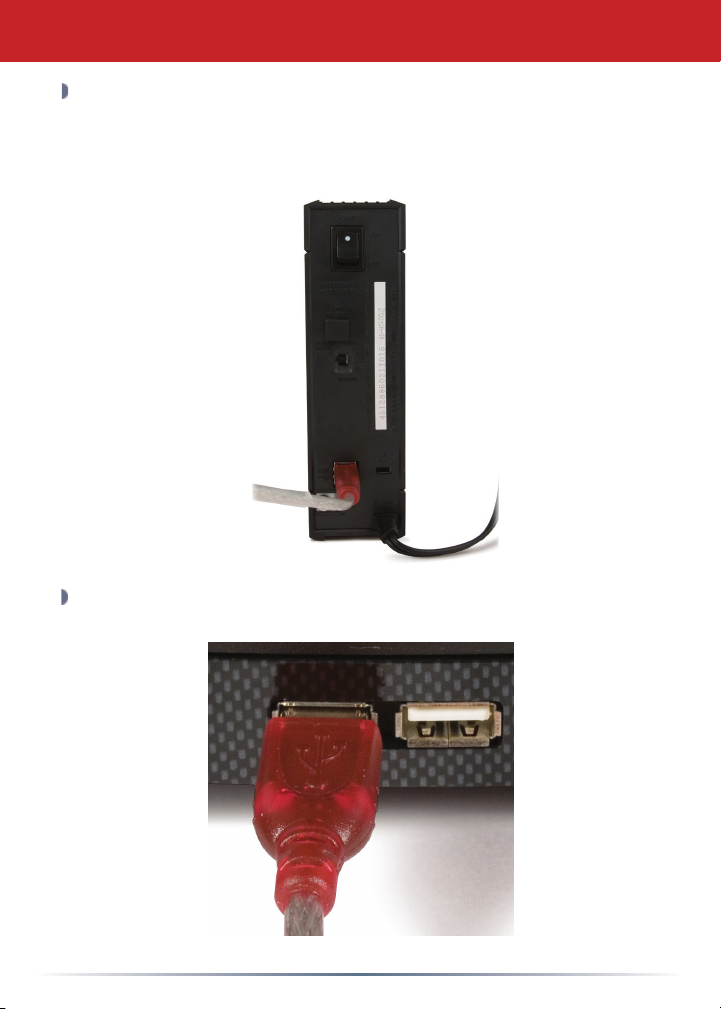
DriveStation Setup
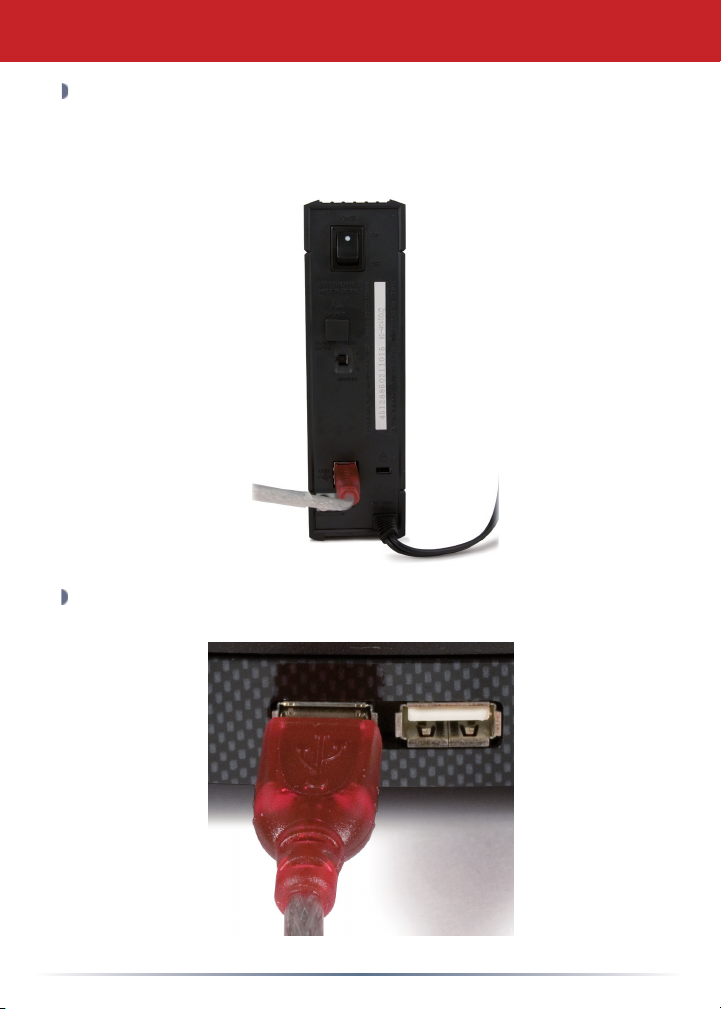
Press the power switch on the back of DriveStation to the OFF position. Plug
DriveStation’s power cord into a power outlet. Then, connect the included USB
cable into the USB port on the back of DriveStation.
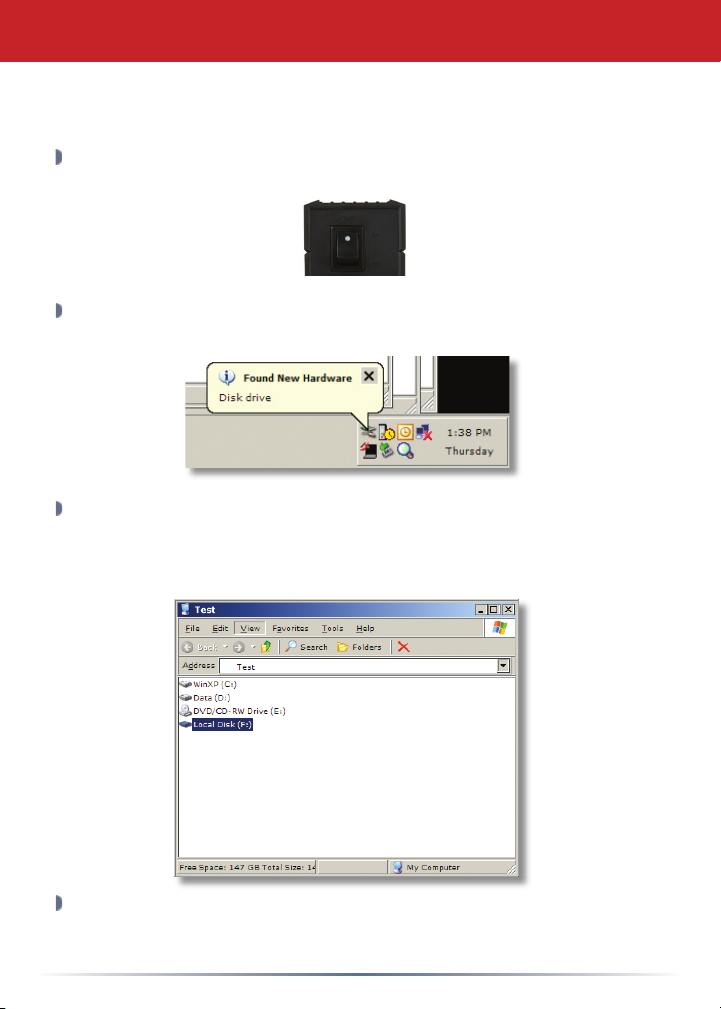
Connect the USB cable into the USB port on the computer or device you are
adding the DriveStation to.
3
Page 5
DriveStation - PC Setup
Windows ME, 2000 & XP
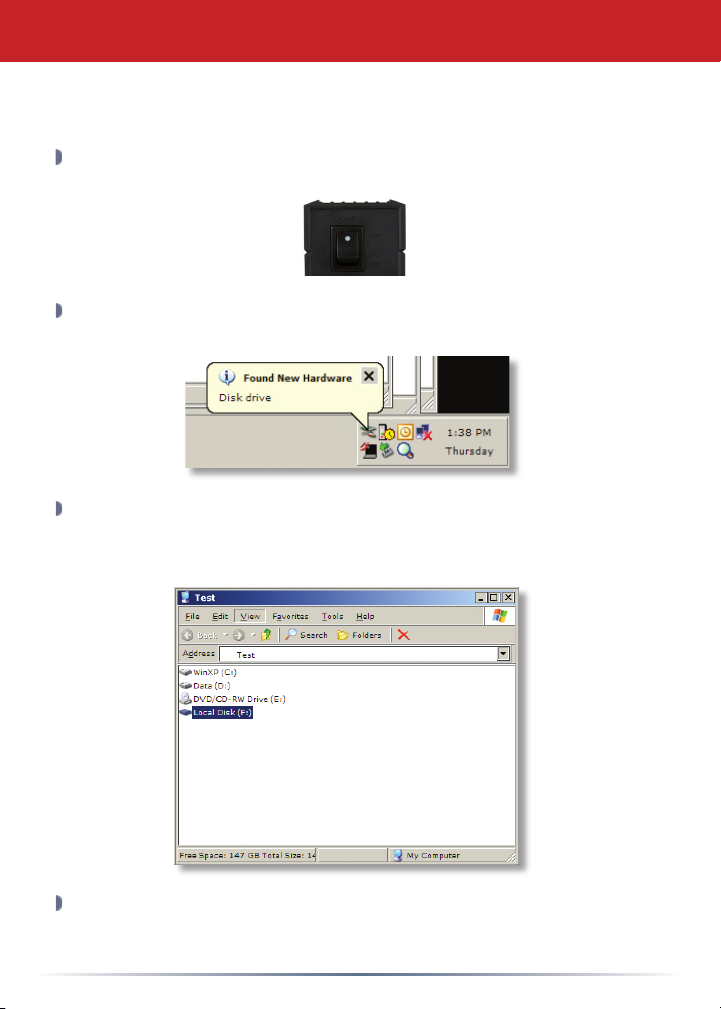
Press the power switch on the back of the DriveStation to the ON position.
In Windows 2000 and XP, the DriveStation will automatically install upon
power-on.
My Computer and the new drive will be present. By default it will use the
Open
first available drive letter and will be named ‘Local Disk’. The DriveStation comes
pre-formatted so you may begin using it immediately.
The DriveNavigator CD includes several useful utilities for your Windows
System. Please insert the DriveNavigator CD into your CD-ROM Drive to learn
more about them.
4
Page 6
DriveStation - PC Setup
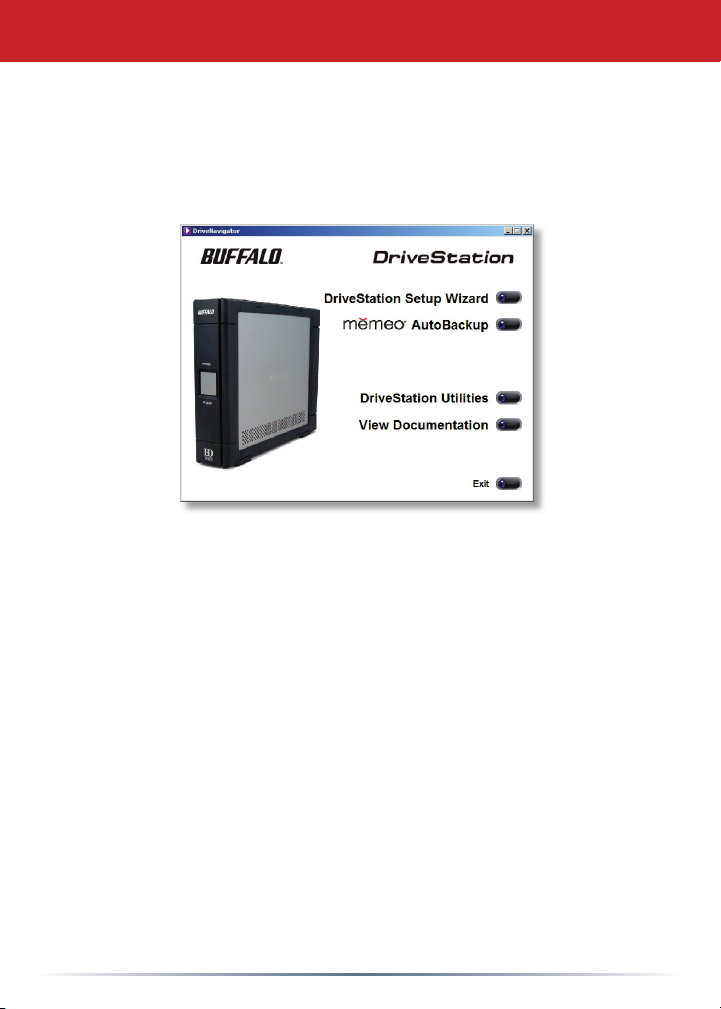
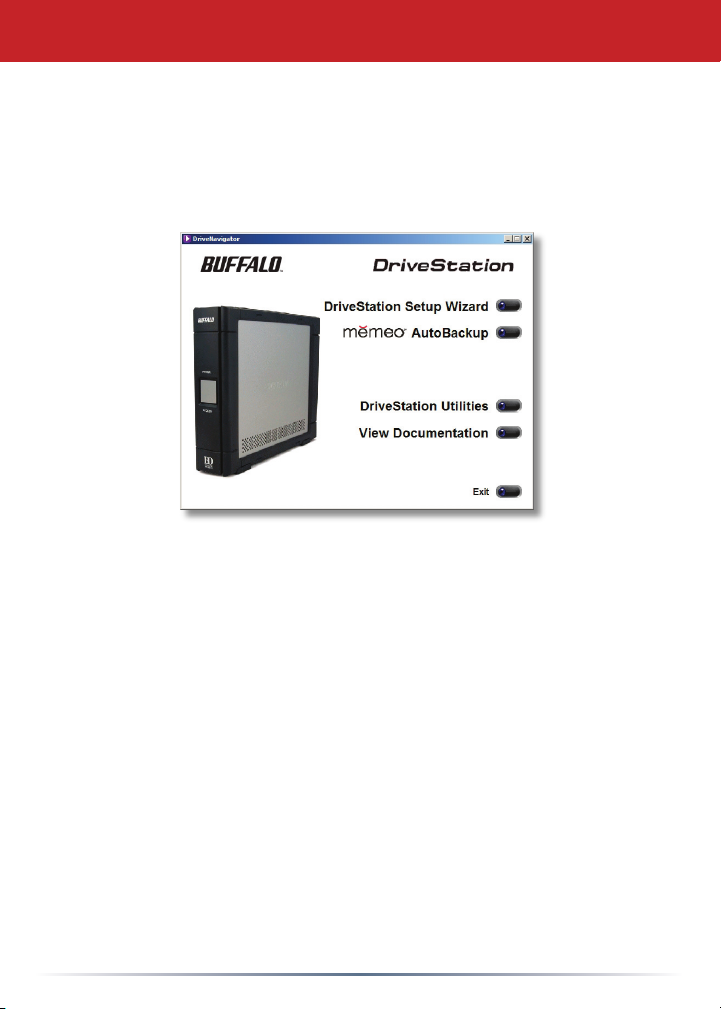
Utilities
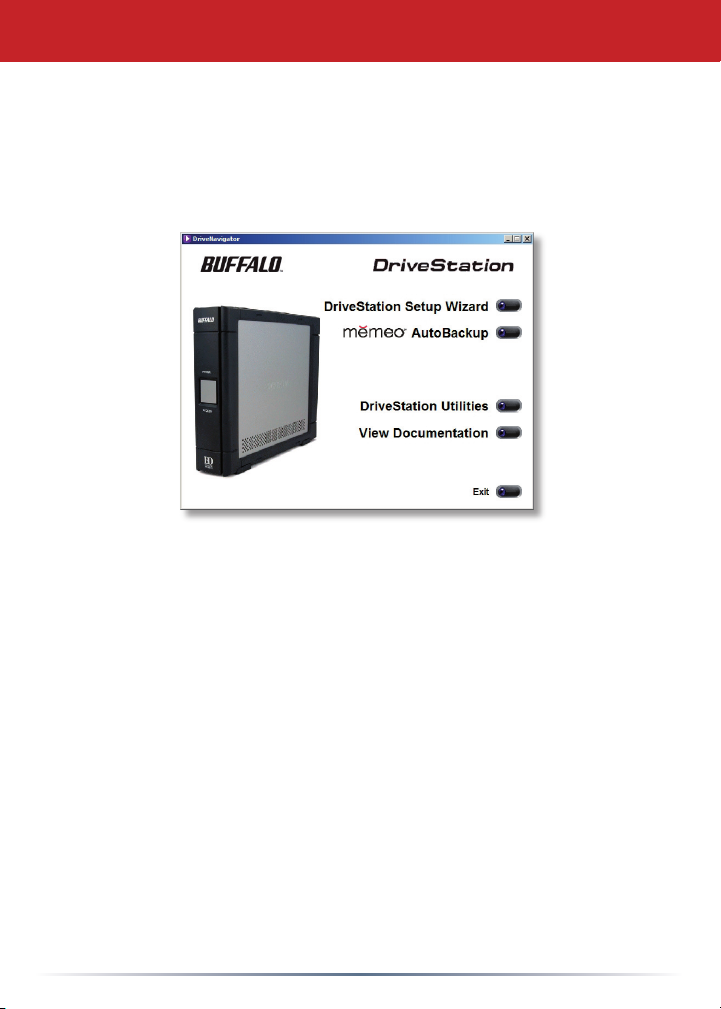
The DriveStation comes with several utilities. To install and utilize these utilities,
please insert the CD-ROM that came with your DriveStation into a Windows PC.
The DriveStation Setup Wizard quickly guides you through the cabling and powerup process for the DriveStation, similar to this quick setup guide.
Memeo™ AutoBackup software is available for backing up documents,
multimedia files, and other files from your Windows PC to the DriveStation.
Please view the memeo documentation for more information on installing and
using memeo.
Other utilities are also available:
Disk Formatter (for formatting your DriveStation)
Disk Sleep Utility (for scheduling power on and off times for the
DriveStation)
Secure Lock Ware (for encrypting the data on your DriveStation,
preventing the data from being accessed by anyone but you)
To learn more about installing and using these utilities, please read their
documentation by clicking on
View Documentation.
5
Page 7
DriveStation - Mac Setup
Press the power switch on the back of DriveStation to the OFF position. Plug
DriveStation’s power cord into a power outlet. Then, connect a USB or firewire cable
into a matching port on the back of DriveStation.
Connect the USB or firewire cable to your Mac or other device you are adding the
DriveStation to.
6
Page 8

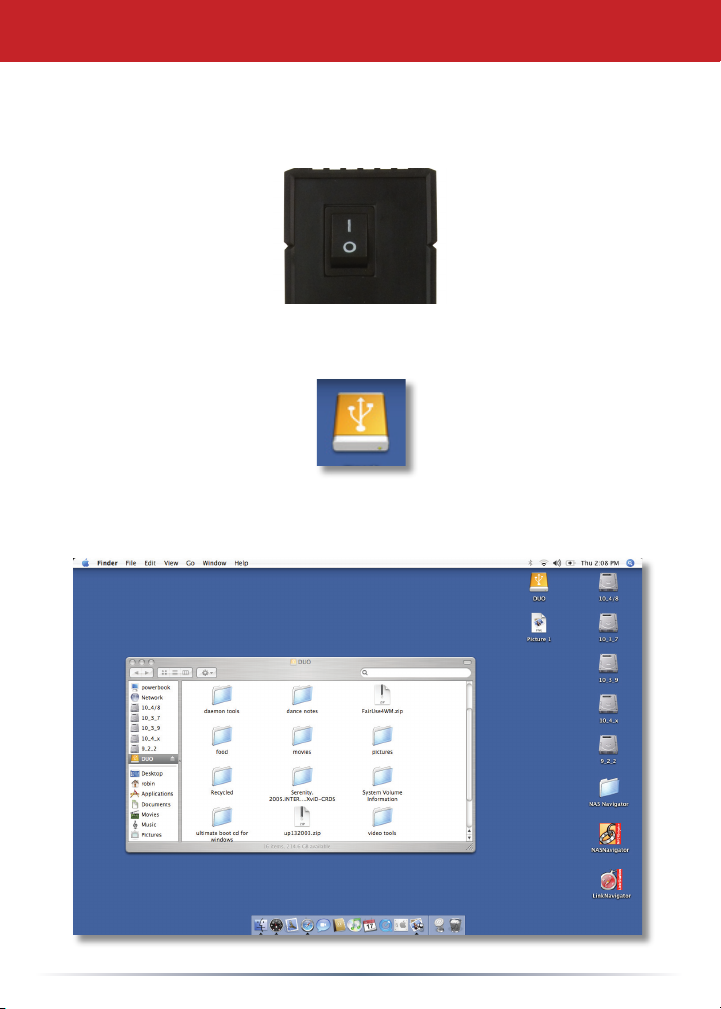
DriveStation - Mac Setup
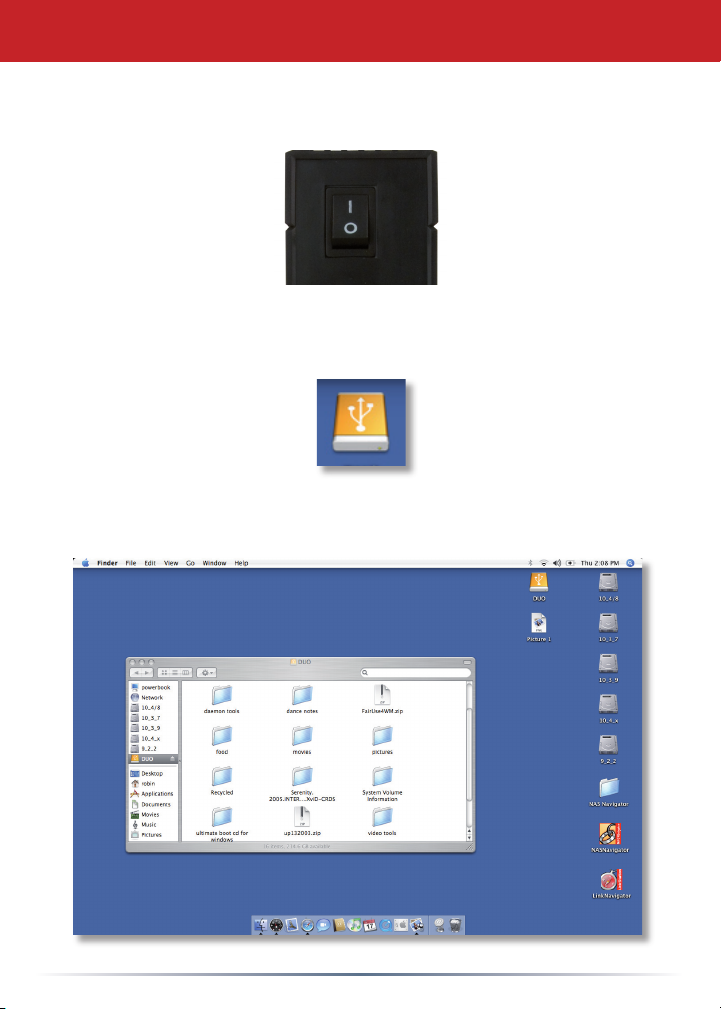
Press the power switch on the back of the DriveStation to the ON position.
Your Mac will detect the new drive and place an icon on your desktop.
Your DriveStation is now ready for use! Double-click on the icon to open the hard
drive.
7
Page 9

Troubleshooting
Troubleshooting
The following is a list of common issues with the DriveStation. Following each
issue are possible resolutions.
I see the DriveStation in My Computer/Finder but I cannot access it.
The drive requires formatting. Try using the Disk Formatter
Utility on the DriveNavigator CD-ROM. Consult the manual for the
Disk Formatter Utility for more help. The manual can also be found on
the DriveNavigator CD-ROM.
I cannot see the DriveStation in My Computer/
Verify that the POWER light is on. If it is not, then ensure that the
power switch is in the ON position.
Try toggling the POWER MODE switch right below the power switch.
The POWER MODE switch toggles whether the device is powered
up via a USB signal (“Auto”) or purely based on the power switch’s
position (“Manual”).
If you have installed the Power Save Utility on your PC, then verify that
the DriveStation was not put into power saving mode. Consult the
manual for the Power Save Utility for additional help. The manual can be
found on the DriveNavigator CD-ROM.
Verify that the hard drive inside the DriveStation is spinning. This
can be verified by placing your hand on the sides of the case
and feeling for a slight vibration. Also, after the DriveStation has
been powered on for fifteen minutes or more it will begin to get
warm. If neither of the preceeding tests verified that the hard drive is
spinning, then please contact technical support for further assistance.
If you are experiencing any additional troubles, please contact our technical
support for additional assistance.
Finder
8
Page 10
Technical Specications
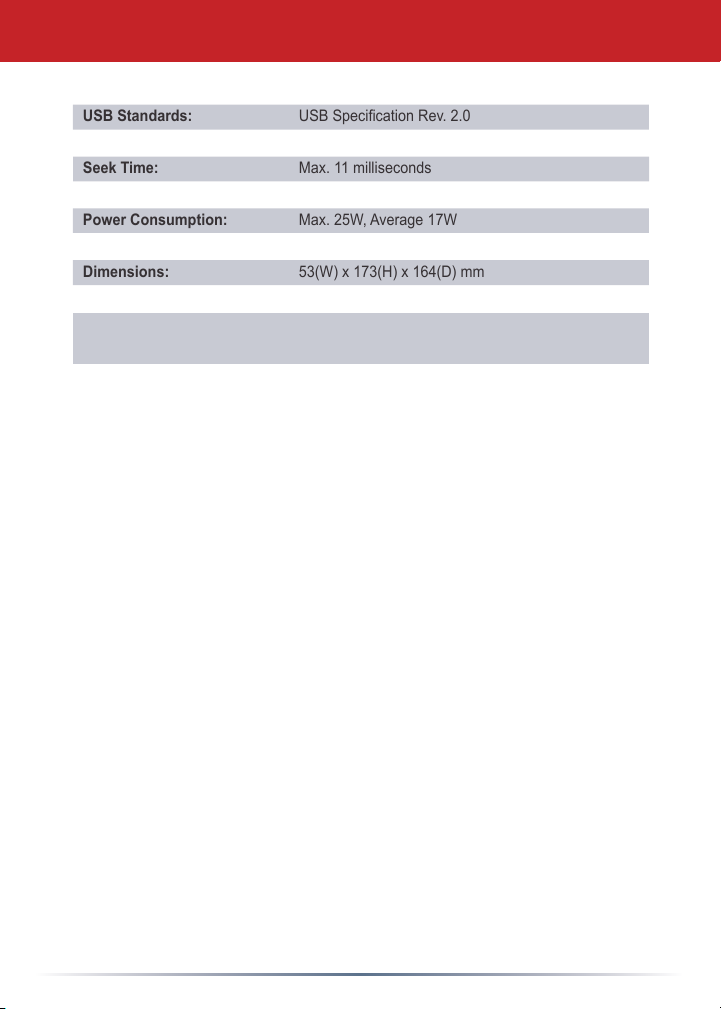
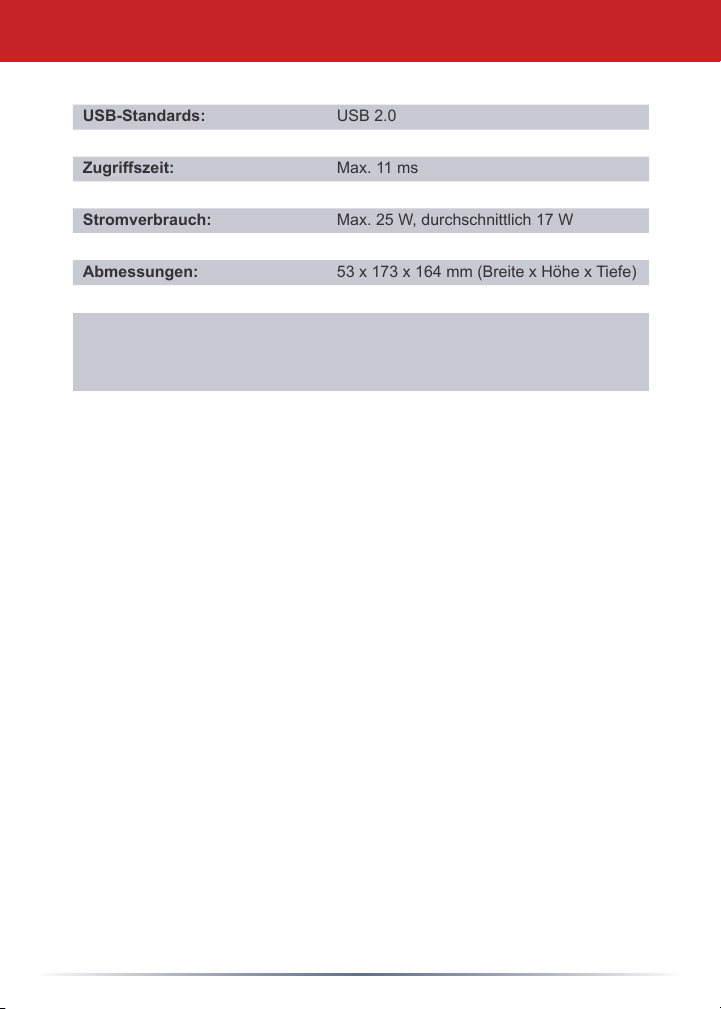
USB Standards: USBSpecicationRev.2.0
Capacity: 160,250,320,500,750GB
Seek Time: Max.11milliseconds
Transmission Speed: Max.480Mbps
Power Consumption: Max.25W,Average17W
Power Supply: AC100-240V50/60Hz
Dimensions: 53(W)x173(H)x164(D)mm
Weight: 1.43kg
Operating Environment: 5-35°C
20-80%humidity(non-condensing)
CE Mark Warning
This is a Class B product. In a domestic environment, this product may cause radio
interference, in which case the user may be required to take adequate measures.
The constantly evolving state of NAS products and operating systems requires Buffalo
Technology to occasionally release updated software to take advantage of new technologies
and to comply with industry standards. For the most recent software, firmware, driver,
and technical whitepaper releases available, please visit the Buffalo Technology website:
www.buffalo-technology.com
9
Page 11
Environmental Information
• The equipment that you have purchased has required the extraction and use of
natural resources for its production.
• The equipment may contain hazardous substances that could impact health and
the environment.
• In order to avoid the dissemination of those substances in our environment and
to diminish the pressure on the natural resources, we encourage you to use the
appropriate take-back systems.
• The take-back systems will reuse or recycle most of the materials of your end
life equipment in a sound way.
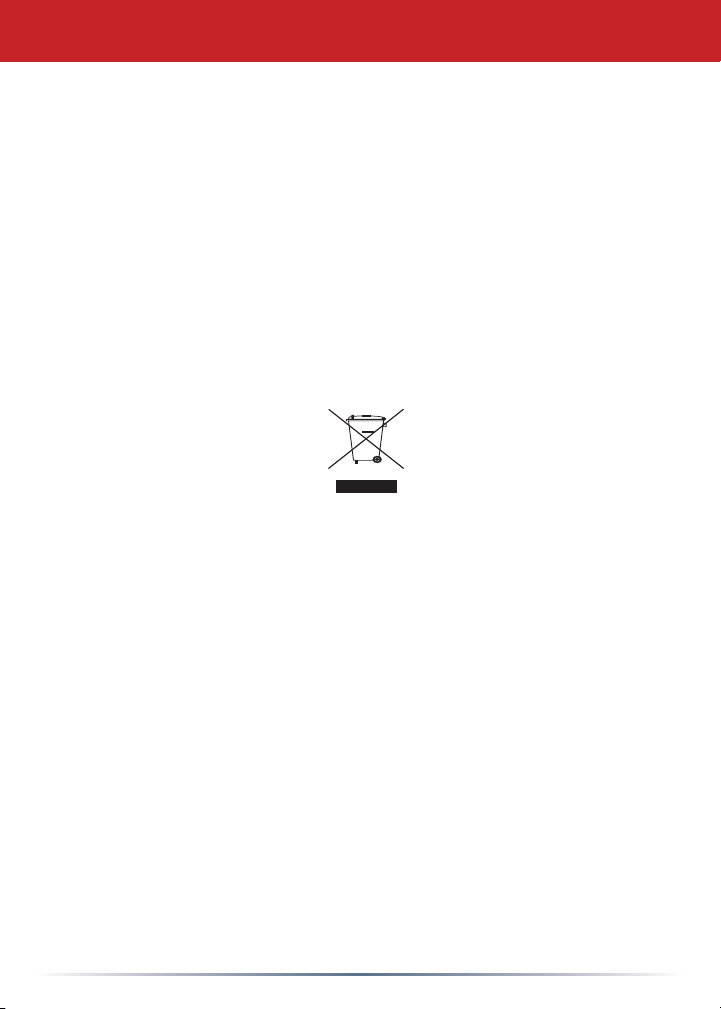
• The crossed-out wheeled bin symbol invites you to use those systems.
• If you need more information on the collection, reuse and recycling systems,
please contact your local or regional waste administration.
10
Page 12

http://www.buffalo-technology.com
Address: Buffalo Technology UK LTD
176, Buckingham Avenue,
Slough, Berkshire, SL1 4RD
United Kingdom
General Inquiries:
Email sales@buffalo-technology.com
Technical Support:
Helpdesk Hours Monday-Thursday 9:00 AM - 6:00 PM
Friday 9:00 AM - 4:30 PM
Phone
Phone (UK only)
Email
+353 61 70 80 50
08712 50 12 60
helpdesk@buffalo-technology.ie
Page 13
Deutch
Kurzanleitung
HD-HCU2 DriveStation
Packungsinhalt:
Hauptgerät (DriveStation)
Power Adapter
USB-Kabel
DriveNavigator-Installations-CD
Kurzanleitung
Page 14

Einrichten der DriveStation am PC
Bringen Sie den Netzschalter an der Rückseite der DriveStation in die Stellung
OFF (AUS). Verbinden Sie das Netzteil der DriveStation mit einer Steckdose.
Schließen Sie dann das mitgelieferte USB-Kabel an den USB-Anschluss an der
Rückseite der DriveStation an.
Stecken Sie das andere Ende des USB-Kabels in den USB-Anschluss des
Computers oder Geräts, an den bzw. das Sie die DriveStation anschließen
möchten.
13
Page 15

Einrichten der DriveStation am PC
Windows Me, 2000 und XP
Bringen Sie den Netzschalter an der Rückseite der DriveStation in die Stellung
ON (EIN).
Unter Windows 2000 und XP startet die Installation nach dem Hochfahren der
DriveStation automatisch.
Wenn Sie Ihren
Standardmäßig erhält es den ersten noch verfügbaren Buchstaben sowie den
Namen „Lokales Laufwerk“. Da die DriveStation vorformatiert ausgeliefert wird,
ist sie sofort einsatzbereit.
Auf der DriveNavigator-CD-ROM sind diverse nützliche Dienstprogramme für
Ihr Windows-Betriebssystem enthalten. Legen Sie die DriveNavigator-CD-ROM
in das CD-ROM-Laufwerk des Computers ein, um mehr über diese Programme
zu erfahren.
Arbeitsplatz öffnen, finden Sie das neu installierte Laufwerk.
14
Page 16
Einrichten der DriveStation am PC
Dienstprogramme
Zum Lieferumfang der DriveStation gehören diverse Dienstprogramme. Legen
Sie die mitgelieferte CD-ROM in das CD-ROM-Laufwerk Ihres Windows-PCs ein,
damit Sie diese Dienstprogramme installieren und nutzen können.
Der
DriveStation Setup Wizard (Setup-Assistent) führt Sie durch das
Verkabeln und die Inbetriebnahme der DriveStation.
Die Software
Multimedia-Dateien und anderen Dateien von Ihrem Windows-PC auf die
DriveStation. Lesen Sie bitte die Memeo-Dokumentation, um Näheres zur
Installation und zum Einsatz der Software zu erfahren.
Des Weiteren stehen folgende Dienstprogramme zur Verfügung:
Wenn Sie Näheres zur Installation und zum Einsatz dieser Dienstprogramme
erfahren möchten, lesen Sie bitte die entsprechende Dokumentation. Klicken Sie
dazu auf
Memeo AutoBackup dient zur Sicherung von Dokumenten,
Disk Formatter (Formatieren der DriveStation)
Disk Sleep Utility (Festlegen von Betriebsperioden der
DriveStation)
Secure Lock Ware (Verschlüsseln der Daten auf der DriveStation,
damit niemand außer Ihnen Zugriff darauf hat)
View Documentation (Dokumentation anzeigen).
15
Page 17
Einrichten der DriveStation am MAC
Drücken Sie den Netzschalter an der Rückseite der DriveStation in die Stellung OFF
(AUS). Verbinden Sie das Netzteil der DriveStation mit einer Steckdose. Schließen Sie
ein USB- oder Firewire-Kabel an einen entsprechenden Anschluss an der Rückseite der
DriveStation an.
Schließen Sie das USB- oder Firewire-Kabel an Ihren Macintosh bzw. an das Gerät an, das
Sie um die DriveStation erweitern.
16
Page 18
Einrichten der DriveStation am MAC
Bringen Sie den Netzschalter an der Rückseite der DriveStation in die Stellung ON
(EIN): („I“).
Ihr Macintosh-Computer erkennt das neue Laufwerk und erstellt ein entsprechendes
Desktop-Symbol.
Ihre DriveStation ist nun betriebsbereit. Doppelklicken Sie auf das Symbol, um das
Festplattenlaufwerk zu öffnen.
17
Page 19

Fehlerbehebung
Fehlerbehebung
Im Folgenden sind einige bekannte Probleme mit der DriveStation aufgeführt. Auf
jede Problembeschreibung folgen ein oder mehrere Lösungsvorschläge.
Die DriveStation wird zwar unter Arbeitsplatz/Finder angezeigt, aber ich
kann darauf nicht zugreifen.
Das Laufwerk muss formatiert werden. Dazu können Sie das
Dienstprogramm Disk Formatter auf der DriveNavigator-CD-ROM
einsetzen. Näheres zu diesem Dienstprogramm erfahren Sie im
entsprechenden Handbuch, das sich ebenfalls auf der DriveNavigatorCD-ROM befindet. An einem Mac verwenden Sie bitte die
entsprechende Funktion des Betriebssystems.
Die DriveStation wird nicht unter Arbeitsplatz/Finder angezeigt.
Die POWER-Anzeige muss in Betrieb sein. Ist dies nicht der Fall, bringen
Sie den Netzschalter in die Stellung ON (EIN). Kontrollieren Sie bitte
auch die Kabelverbindungen.
Verstellen Sie den POWER MODE-Schalter unterhalb des Netzschalters.
Mit diesem Schalter wird festgelegt, ob das Gerät den Betriebsstrom
über ein USB-Signal (Stellung „Auto“) oder über das eigene Netzteil
(Stellung „Manual“) bezieht.
Wenn Sie das Dienstprogramm Power Save am PC installiert haben,
stellen Sie sicher, dass sich die DriveStation nicht im Energiesparmodus
befindet. Näheres zu diesem Dienstprogramm erfahren Sie im
entsprechenden Handbuch, das sich auf der DriveNavigator-CD-ROM
befindet.
Überprüfen Sie, ob die Festplatte in der DriveStation in Aktion ist.
Legen Sie dazu Ihre Hand an das Gerätegehäuse. Wenn Sie Vibrationen
spüren, ist die Festplatte gerade aktiv. Außerdem entwickelt die
DriveStation fünfzehn Minuten nach dem Hochfahren Wärme. Wenn
diese Überprüfungen ergeben haben, dass die Festplatte nicht aktiv ist,
wenden Sie sich bitte für weitere Unterstützung an den Technischen
Support.
Bei allen sonstigen Problemen wenden Sie sich bitte ebenfalls an unseren
Technischen Support.
18
Page 20
Technische Daten
USB-Standards: USB2.0
Kapazität: 160,250,320,500GB
Zugriffszeit: Max.11ms
Übertragungsgeschwindigkeit: Max.480MBit/s
Stromverbrauch: Max.25W,durchschnittlich17W
Stromversorgung: 100–240VWechselstrom,50/60Hz
Abmessungen: 53x173x164mm(BreitexHöhexTiefe)
Gewicht: 1,43kg
Betriebsumgebung: 5–35°C
20–80%Luftfeuchtigkeit
(nichtkondensierend)
CE-Zeichen-Warnung
Dies ist ein Produkt der Klasse B. In einer häuslichen Umgebung kann dieses Produkt
Funkstörungen verursachen. Um diese zu beheben, müssen ggf. entsprechende
Maßnahmen ergriffen werden.
NAS-Produkte und Betriebssysteme entwickeln sich ständig weiter. Deshalb
veröffentlicht Buffalo Technology gelegentlich aktualisierte Software, um neuen
Technologien und der Einhaltung von Branchenstandards Rechnung zu tragen. Die
neuesten Versionen von Software, Firmware, Treibern und Whitepapers finden Sie auf
der Buffalo Technology-Website:
www.buffalo-technology.de
19
Page 21
Umweltschutz-Information
• Für die Herstellung des von Ihnen gekauften Produktes wurden natürliche
Ressourcen und aus der Natur gewonnene Rohstoffe verwendet.
• Das Produkt könnte gefährliche Substanzen enthalten, welche Auswirkungen auf
Gesundheit und Umwelt haben.
• Wegen des uns gesetzten Zieles, die Ausbreitung dieser Substanzen in unserer
Umgebung zu verhindern und den Druck auf natürliche Ressourcen zu
verringern, möchten wir Sie auffordern, die entsprechenden Rücknahmesysteme
zu nutzen.
• In den Rücknahmesystemen werden die meisten Materialien Ihrer ausrangierten
Geräte aufbereitet oder wiederverwendet.
• Das Symbol der durchgestrichenen Mülltonne lädt Sie ein, diese Systeme zu
nutzen.
• Wenn Sie mehr Informationen über die Sammel-, Wiederverwendungs- und
Wiederaufbereitungssysteme benötigen, wenden Sie sich bitte jeweils an die
regionalen Abfallzweckverbände.
20
Page 22

http://www.buffalo-technology.de
Adresse: Buffalo Technology UK LTD
176, Buckingham Avenue,
Slough, Berkshire, SL1 4RD
United Kingdom
Allgemeine Anfragen:
Email sales@buffalo-technology.com
Technischer Support
Helpdesk-Geschäftszeiten Monday-Thursday 9:00 AM - 6:00 PM
Friday 9:00 AM - 4:30 PM
Telefon
Telefon (nur für UK)
E-Mail
+353 61 70 80 50
08712 50 12 60
helpdesk@buffalo-technology.ie
Page 23
Français
Guide d'installation rapide
Unité DriveStation HD-HCU2
Contenu de l'emballage :
Unité principale (DriveStation)
Adaptateur secteur
Câble USB
CD-ROM d'installation DriveNavigator
Guide d'installation rapide
Page 24
Installation de l'unité DriveStation
Placez l'interrupteur situé à l'arrière de l'unité DriveStation sur la position OFF
(ARRÊT). Connectez le câble d'alimentation de l'unité DriveStation à une prise de
courant. Ensuite, connectez le câble USB fourni au port USB situé à l'arrière de
l'unité DriveStation.
Connectez le câble USB au port USB de l'ordinateur ou du dispositif auquel vous
souhaitez ajouter l'unité DriveStation.
23
Page 25
DriveStation - Installation (PC)
Windows ME, 2000 & XP
Placez l'interrupteur situé à l'arrière de l'unité DriveStation sur la position ON
(MARCHE).
Sous Windows 2000 et XP, l'unité DriveStation s'installe automatiquement dès la
mise sous tension.
Ouvrez le Poste de travail ; le nouveau lecteur y est recensé. Par défaut, il utilise
la première lettre de lecteur disponible et porte le nom « Disque local ».
L'unité DriveStation étant préformatée, vous pouvez commencer à l'utiliser
immédiatement.
Le CD-ROM DriveNavigator contient plusieurs utilitaires destinés au
système Windows. Pour plus d'informations à leur sujet, insérez le CD-ROM
DriveNavigator dans le lecteur de CD-ROM.
24
Page 26
DriveStation - Installation (PC)
Utilitaires
L'unité DriveStation est livrée avec plusieurs utilitaires. Pour installer et utiliser ces
utilitaires, insérez le CD-ROM de l'unité DriveStation dans le lecteur de CD-ROM
d'un ordinateur Windows.
L'assistant d'installation de l'unité DriveStation (DriveStation Setup Wizard), de
même que ce guide d'installation rapide, vous guide rapidement dans le processus
de câblage et de mise sous tension de l'unité DriveStation.
Le logiciel
fichiers multimédias et d'autres fichiers à partir de votre ordinateur Windows vers
l'unité DriveStation. Pour plus d'informations sur l'installation et l'utilisation du
programme, reportez-vous à la documentation Memeo.
Memeo™ AutoBackup permet de sauvegarder des documents, des
D'autres utilitaires sont également disponibles :
Disk Formatter (pour le formatage de l'unité DriveStation)
Disk Sleep Utility (pour la planification des mises sous et hors tension
de l'unité DriveStation)
Secure Lock Ware (pour le cryptage des données stockées sur l'unité
DriveStation, afin que vous soyez la seule personne à pouvoir accéder à
celles-ci)
Pour en savoir plus sur l'installation et l'utilisation de ces utilitaires,
reportez-vous à leur documentation en cliquant sur
(Consulter la documentation).
25
View Documentation
Page 27

DriveStation - Installation (Mac)
Placez l'interrupteur situé à l'arrière de l'unité DriveStation sur la position OFF (ARRÊT).
Connectez le câble d'alimentation de l'unité DriveStation à une prise de courant.
Raccordez ensuite un câble USB ou FireWire au port correspondant à l'arrière de
l'unité.
Connectez le câble USB ou FireWire au Mac ou au dispositif auquel vous souhaitez
ajouter l'unité DriveStation.
26
Page 28
DriveStation - Installation (Mac)
Placez l'interrupteur situé à l'arrière de l'unité DriveStation sur la position ON
(MARCHE).
L'ordinateur Mac détecte la nouvelle unité et place une icône sur le bureau.
L'unité DriveStation est désormais prête à l'emploi. Double-cliquez sur l'icône pour
ouvrir le disque dur.
27
Page 29

Dépannage
Dépannage
Les problèmes suivants sont ceux qui affectent le plus l'unité DriveStation. Pour
chaque problème sont proposées des solutions possibles.
L'unité DriveStation apparaît dans le Poste de travail/Finder, mais je ne
peux pas y accéder.
Le lecteur doit être formaté. Essayez de recourir à l'utilitaire Disk
Formatter disponible sur le CD-ROM DriveNavigator. Consultez le
manuel de l'utilitaire Disk Formatter pour obtenir de l'aide. Le manuel
est également disponible sur le CD-ROM DriveNavigator.
L'unité DriveStation n'apparaît pas dans le Poste de travail/
Vérifiez que la diode lumineuse POWER est allumée. Si ce n'est pas le
cas, vérifiez que l'interrupteur est placé sur la position ON (MARCHE).
Essayez de faire basculer le commutateur POWER MODE situé juste
au-dessous de l'interrupteur. Le commutateur POWER MODE peut
basculer, que le dispositif soit alimenté via un signal USB (auto) ou
qu'il dépende simplement de la position de l'interrupteur (manuel).
Si vous avez installé l'utilitaire Power Save sur le PC, vérifiez que
l'unité DriveStation ne se trouvait pas en mode d'économie d'énergie.
Consultez le manuel de l'utilitaire Power Save pour obtenir de l'aide.
Le manuel est disponible sur le CD-ROM DriveNavigator. Vérifiez que
le disque dur de l'unité DriveStation tourne. Pour ce faire, vous pouvez
poser votre main sur les côtés du boîtier ; vous devez, normalement,
ressentir une légère vibration. Par ailleurs, l'unité DriveStation
commence à chauffer au bout d'au moins quinze minutes de mise sous
tension. Si aucun des tests précédents ne permet de conclure que le
disque dur tourne, contactez le support technique.
En cas de tout autre problème supplémentaire, contactez notre support
technique.
Finder.
28
Page 30
Spécications techniques
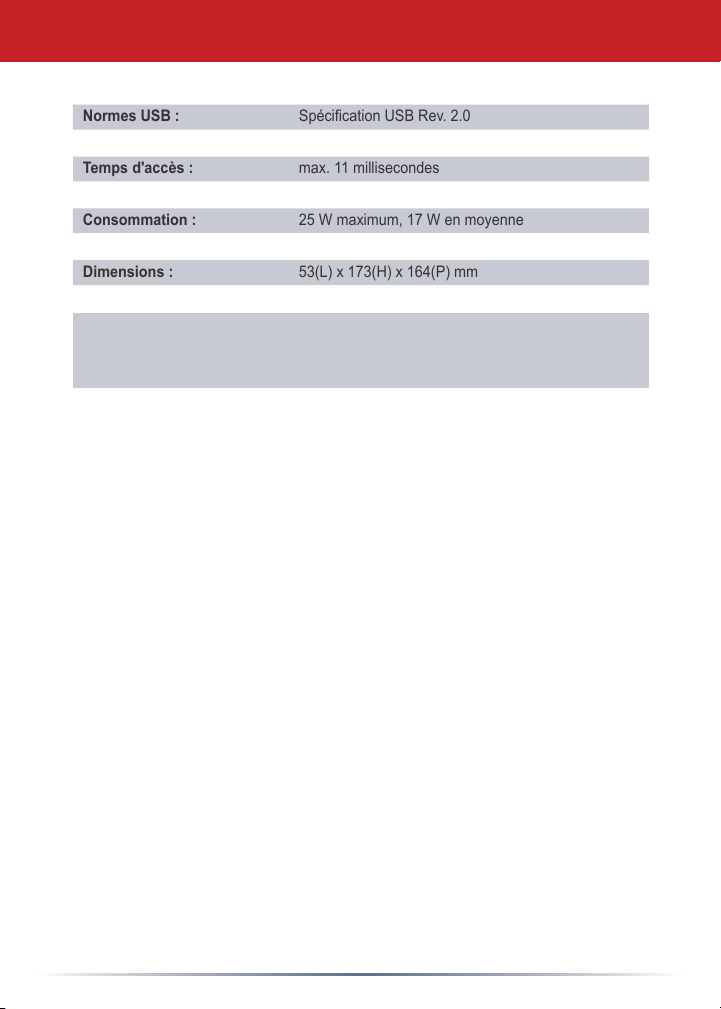
Normes USB : SpécicationUSBRev.2.0
Capacité : 160,250,320,500,750Go
Temps d'accès : max.11millisecondes
Vitesse de transmission : 480Mbits/smaximum
Consommation : 25Wmaximum,17Wenmoyenne
Alimentation : CA100-240V50/60Hz
Dimensions : 53(L)x173(H)x164(P)mm
Poids : 1,43kg
Environnement d'exploitation :
5-35°C
20-80%d'humidité(sanscondensation)
Avertissement concernant la marque CE
Ce produit est un produit de classe B. Dans un environnement résidentiel, ce produit
peut être la source de perturbation radioélectrique, auquel cas l'utilisateur peut être
amené à prendre les mesures adéquates.
L'évolution constante de l'état des systèmes d'exploitation et des produits de stockage en
réseau NAS oblige Buffalo Technology à diffuser de temps à autre des logiciels mis à jour
qui permettent de tirer parti des nouvelles technologies et de respecter les standards en
vigueur. Pour connaître les dernières versions de logiciels, de microprogrammes, de pilotes
et les dernières publications de livres blancs techniques disponibles, visitez le site Web
Buffalo Technology :
www.buffalo-technology.com.
29
Page 31

Informations relatives à l'environnement
• La production de l'équipement que vous avez acquis a nécessité l'extraction et
l'utilisation de ressources naturelles.
• L'équipement peut contenir des matières dangereuses susceptibles d'avoir un
impact sur la santé et l'environnement.
• Afin d'éviter la diffusion de ces matières dans notre environnement et de réduire
l'exploitation des ressources naturelles, nous vous encourageons à utiliser les
systèmes de récupération appropriés.
• Ces systèmes réutiliseront ou recycleront de manière saine la plupart des
composants de votre équipement périmé.
• Le symbole représentant une poubelle sur roues barrée d'une croix vous invite
à utiliser ces systèmes.
• Pour en savoir plus sur les systèmes de collecte, de réutilisation et de recyclage,
veuillez contacter votre administration locale ou régionale chargée de la gestion
des déchets.
30
Page 32

http://www.buffalo-technology.com
Adresse : Buffalo Technology UK LTD
176, Buckingham Avenue,
Slough, Berkshire, SL1 4RD
Royaume-Uni
Demandes générales :
Courrier électronique sales@buffalo-technology.com
Assistance technique :
Heures de bureau Du lundi au jeudi 9:00 - 18:00
Le vendredi 9:00 - 16:30
Téléphone
Téléphone (Royaume-Uni uniquement)
Courrier électronique
+353 61 70 80 50
08712 50 12 60
helpdesk@buffalo-technology.ie
Page 33

Italiano
Guida di installazione rapida
DriveStation HD-HCU2
Contenuto della confezione:
Unità principale (DriveStation)
Adattatore
Cavo USB
CD di installazione DriveNavigator
Guida di installazione rapida
Page 34

Congurazione della DriveStation
Premere l'interruttore di alimentazione, che si trova sul retro della DriveStation,
portandolo in posizione OFF. Collegare il cavo di alimentazione della DriveStation
a una presa di alimentazione. Successivamente, collegare il cavo USB incluso, alla
porta USB che si trova sul retro della DriveStation.
Collegare il cavo USB alla porta USB del computer o del dispositivo al quale si sta
aggiungendo la DriveStation.
33
Page 35

DriveStation - Congurazione per PC
Windows ME, 2000 e XP
Premere l'interruttore di alimentazione, che si trova sul retro della DriveStation,
portandolo in posizione ON.
In Windows 2000 e XP, la DriveStation viene installata automaticamente al
momento dell'accensione.
La nuova unità sarà visualizzata in
predefinita verrà utilizzata la prima lettera di unità disponibile, con la
denominazione ‘Disco locale’. La DriveStation è preformattata, pertanto può
essere utilizzata subito.
Nel CD di DriveNavigator sono incluse diverse utilità per il sistema Windows.
Per ulteriori informazioni su tali utilità, inserire il CD di DriveNavigator nell'unità
CD-ROM.
Risorse del computer. Per impostazione
34
Page 36

DriveStation - Congurazione per PC
Utilità
Insieme alla DriveStation sono fornite diverse utilità. Per installare e utilizzare
queste utilità, inserire il CD fornito con la DriveStation in un computer Windows.
La configurazione guidata DriveStation consente di eseguire facilmente la
procedura di cablaggio e avvio della DriveStation, in modo analogo alla presente
guida di installazione rapida.
Il software
documenti, file multimediali e altri file dal PC Windows alla DriveStation. Per
ulteriori informazioni sull'installazione e sull'utilizzo di Memeo, consultare la
documentazione di riferimento appropriata.
Memeo™ AutoBackup consente di eseguire il backup di
Sono inoltre disponibili altre utilità:
Disk Formatter: consente di formattare la DriveStation.
Disk Sleep Utility: consente di programmare gli orari di accensione e
spegnimento della DriveStation.
SecureLockWare: consente di crittografare i dati sulla DriveStation,
impedendo l'accesso da parte di altre persone.
Per ulteriori informazioni sull'installazione e sull'utilizzo di queste utilità, consultare
la relativa documentazione facendo clic su
documentazione).
View Documentation (Visualizza
35
Page 37

DriveStation - Congurazione per Mac
Premere l'interruttore di alimentazione, che si trova sul retro della DriveStation,
portandolo in posizione OFF. Collegare il cavo di alimentazione della DriveStation
a una presa di alimentazione. Collegare quindi un cavo USB o Fire Wire alla porta
corrispondente sul retro della DriveStation.
Collegare il cavo USB o Fire Wire al computer Mac o al dispositivo a cui si sta
aggiungendo la DriveStation.
36
Page 38

DriveStation - Congurazione per Mac
Premere l'interruttore di alimentazione, che si trova sul retro della DriveStation,
portandolo in posizione ON.
Il computer Mac rileva la nuova unità posizionando un'icona sul desktop.
È quindi possibile iniziare a utilizzare la DriveStation. Fare doppio clic sull'icona per
aprire il disco rigido.
37
Page 39

Risoluzione dei problemi
Risoluzione dei problemi
Di seguito viene riportato un elenco dei problemi più comuni relativi all'utilizzo
della DriveStation. Per ciascuno di essi sono indicate le possibili soluzioni.
La DriveStation viene visualizzata in Risorse del computer o con lo
strumento di ricerca, tuttavia è impossibile accedervi.
È necessario formattare l'unità. Provare a utilizzare Disk Formatter.
L'utilità è presente sul CD di DriveNavigator. Per ulteriori informazioni,
consultare il manuale dell'utilità Disk Formatter. Il manuale è disponibile
anche sul CD di DriveNavigator.
È impossibile visualizzare la DriveStation in Risorse del computer o con
lo strumento
di ricerca.
Verificare che la spia di accensione sia accesa. Se non risulta accesa,
assicurarsi che l'interruttore di alimentazione si trovi in posizione ON.
Provare a cambiare lo stato dell'interruttore POWER MODE posto
al di sotto dell'interruttore di alimentazione, sul lato destro. Lo stato
di questo interruttore varia a seconda che il dispositivo sia alimentato
mediante un segnale USB (automatico) oppure dipenda esclusivamente
dalla posizione dell'interruttore di alimentazione (manuale). Se sul
PC è installata l'utilità Power Save, verificare che la DriveStation non
sia impostata sulla modalità di risparmio energetico. Per ulteriori
informazioni, consultare il manuale dell'utilità Power Save. Il manuale è
disponibile sul CD di DriveNavigator. Verificare la rotazione del disco
rigido nella DriveStation. A tal fine, è sufficiente posizionare le mani sui
lati del case e verificare se si avverte una leggera vibrazione. Inoltre, se
la DriveStation è accesa da oltre quindici minuti, comincia a riscaldarsi.
Se dalle verifiche precedenti non risulta che il disco rigido stia ruotando,
contattare l'assistenza
tecnica.
In caso di ulteriori problemi, contattare l'assistenza tecnica.
38
Page 40

Speciche tecniche
Standard USB: SpecicheUSBRev.2.0
Capacità: 160,250,320,500,750GB
Tempo di posizionamento: Max.11millisecondi
Velocità di trasmissione dati: Max.480Mbps
Consumo: Max.25W,inmedia17W
Corrente elettrica: 100–240V50/60HzC.A.
Dimensioni: 53(L)x173(A)x164(P)mm
Peso: 1,43kg
Temperatura di esercizio: 5-35°C
20-80%diumiditàsenzacondensa
Marchio CE
Questo prodotto appartiene alla classe B. In un ambiente domestico, può causare
interferenze radio. In tal caso l'utente dovrà adottare le misure adeguate.
Dal momento che i sistemi operativi e i prodotti NAS sono in continua evoluzione, Buffalo
Technology rilascia di tanto in tanto aggiornamenti software, per consentire di sfruttare
al meglio le nuove tecnologie e adeguarsi agli standard industriali. Per le versioni software,
firmware, driver più recenti e per le specifiche tecniche disponibili, visitare il sito Web di
Buffalo Technology al seguente indirizzo:
www.buffalo-technology.com
39
Page 41

Informazioni sull'ambiente
• L'apparecchio acquistato richiede l'estrazione e l'impiego di risorse naturali per
la sua produzione.
• L'apparecchio può contenere sostanze nocive alla salute e all'ambiente.
• Per evitare la dispersione nell'ambiente di queste sostanze e ridurre l'impiego
di risorse naturali, consigliamo di adoperare il sistema di smaltimento più
appropriato.
• I sistemi di smaltimento consentono il riutilizzo o il riciclo appropriato della
maggior parte dei materiali dell'apparecchio.
• Il simbolo barrato del raccoglitore di rifiuti invita a utilizzare questi sistemi.
• Per ulteriori informazioni sui sistemi di raccolta, riciclo e riutilizzo, contattare
l'ente amministrativo locale e regionale addetto allo smaltimento dei rifiuti.
40
Page 42

http://www.buffalo-technology.com
Indirizzo Buffalo Technology UK LTD
176, Buckingham Avenue,
Slough, Berkshire, SL1 4RD
Regno Unito
Informazioni generali
E-mail sales@buffalo-technology.com
Assistenza tecnica
Orario del servizio help desk lun. - gio. 9.00 - 18:00
ven. 9.00 - 16.30
Telefono
Telefono (solo Regno Unito)
E-mail
+353 61 70 80 50
08712 50 12 60
helpdesk@buffalo-technology.ie
Page 43

Español
Guía de instalación rápida
HD-HCU2 DriveStation
Contenido del paquete:
Unidad principal (DriveStation)
Adaptador de alimentación
Cable USB
CD de instalación de DriveNavigator
Guía de instalación rápida
Page 44

Instalación de DriveStation
Ponga el interruptor de encendido de la parte posterior de la DriveStation a la
posición OFF. Enchufe el cable de alimentación de la DriveStation en una toma de
corriente. A continuación, conecte el cable USB incluido en el puerto USB de la
parte posterior de la DriveStation.
Conecte el cable USB en un puerto USB del ordenador o del dispositivo con el
que vaya a utilizar la DriveStation.
43
Page 45

DriveStation. Instalación en PC
Windows ME, 2000 y XP
Ponga el interruptor de encendido de la parte posterior de la DriveStation a la
posición ON.
En Windows 2000 y XP, la DriveStation se instalará automáticamente al
encenderla.
Mi PC y verá la nueva unidad. De forma predeterminada, se le asignará la
Abra
primera letra de unidad disponible y el nombre “Disco local”. La DriveStation
está preformateada, de modo que puede empezar a utilizarla de inmediato.
El CD de DriveNavigator incluye algunas prácticas utilidades para su sistema
Windows. Para obtener más información al respecto, introduzca el CD de
DriveNavigator en su unidad de CD-ROM.
44
Page 46

DriveStation. Instalación en PC
Utilidades
La DriveStation incluye diversas utilidades. Para instalarlas y utilizarlas, introduzca
el CD-ROM incluido con la DriveStation en la unidad óptica de un PC con
Windows.
El asistente de instalación de DriveStation le guiará en el proceso de conexión
y puesta en marcha de la DriveStation, de forma parecida a la de esta guía de
instalación rápida.
El software
documentos, archivos multimedia y otros archivos de equipos con Windows en
la DriveStation. Para obtener mas información sobre la instalación y el uso de
Memeo, consulte la documentación del producto.
Memeo™ AutoBackup sirve para hacer copias de seguridad de
También se incluyen las siguientes utilidades:
Disk Formatter (para formatear su DriveStation)
Disk Sleep Utility (para programar horas de encendido y apagado de
la DriveStation)
Secure Lock Ware (para el cifrado de datos en su DriveStation,
lo que impide que otras personas accedan a los datos)
Para saber más acerca de la instalación y el uso de estas utilidades, haga clic en
View Documentation (Ver documentación) y lea la documentación correspondiente.
45
Page 47

DriveStation. Instalación en Mac
Ponga el interruptor de encendido de la parte posterior de la DriveStation a la posición
OFF. Enchufe el cable de alimentación de la DriveStation en una toma de corriente. A
continuación, conecte un cable USB o FireWire al puerto adecuado de la parte posterior
de la DriveStation.
Conecte el cable USB o FireWire a su Mac o al dispositivo al que desee incorporar la
DriveStation.
46
Page 48

DriveStation. Instalación en Mac
Ponga el interruptor de encendido de la parte posterior de la DriveStation a la posición
ON.
Su Mac detectará la nueva unidad y pondrá un icono en el escritorio.
Su DriveStation está ahora lista para utilizarla. Haga doble clic en el icono para abrir la
unidad de disco.
47
Page 49

Solución de problemas
Solución de problemas
A continuación se indica una lista de problemas comunes relacionados con la
DriveStation. Cada uno de ellos va acompañado de posibles soluciones.
Veo la DriveStation en Mi PC/Finder, pero no puedo acceder a ella.
La unidad se debe formatear. Intente usar la utilidad Disk Formatter
del CD-ROM de DriveNavigator. Para obtener más ayuda, consulte el
manual de la utilidad Disk Formatter. Lo encontrará también en el CD-
ROM de DriveNavigator.
No veo la DriveStation en Mi PC/
Compruebe que el indicador luminoso POWER esté encendido. Si no
lo está, compruebe que el interruptor de encendido esté en la posición
ON.
Intente cambiar el conmutador POWER MODE (modo de encendido),
situado debajo del interruptor de alimentación. Con el conmutador
POWER MODE, el dispositivo cambia de puesta en marcha mediante
señal USB (“Auto”) a puesta en marcha basada únicamente en la
posición del interruptor de encendido (“Manual”). Si ha instalado
la utilidad Power Save en el PC, compruebe que la DriveStation no
ha entrado en modo de ahorro de energía. Para obtener más ayuda,
consulte el manual de la utilidad Power Save. Lo encontrará en el
CD-ROM de DriveNavigator. Compruebe que la unidad de disco situada
en el interior de la DriveStation gire. Para ello, ponga la mano en el
lateral de la carcasa y fíjese si nota una ligera vibración. Además, 15
minutos después de poner en marcha la DriveStation,
a calentar. Si no puede verificar el giro de la unidad de disco con ninguna
de estas pruebas, póngase en contacto con el servicio de asistencia
técnica.
Si sufre algún otro tipo de problema, póngase en contacto con nuestro servicio de
asistencia técnica.
Finder.
ésta se empezará
48
Page 50

Especicaciones técnicas
Estándares USB: USBSpecicationRev.2.0
Capacidad: 160,250,320,500,750GB
Tiempo de acceso: máx.11milisegundos
Velocidad de transmisión: máx.480Mbps
Consumo: máx.25W,promedio17W
Alimentación: 100–240VCA,50/60Hz
Dimensiones: 53(An)x173(Al)x164(F)mm
Peso: 1,43kg
Entorno de funcionamiento: 5-35°C
Humedadrelativadel20al80%(sincondensación)
Advertencia sobre la marca CE
Este es un producto de Clase B. En entornos domésticos, este producto puede
provocar interferencias radioeléctricas. En tal caso, se puede exigir al usuario que
tome las medidas oportunas.
La continua evolución de los productos NAS y los sistemas operativos exige que Buffalo
Technology lance ocasionalmente actualizaciones de software para aprovechar las nuevas
tecnologías y cumplir los estándares del sector. Para obtener el software, el firmware, los
controladores y la documentación técnica más recientes, visite la página Web de Buffalo
Technology:
www.buffalo-technology.com.
49
Page 51

Información medioambiental
• Para la fabricación de este equipo han sido necesarios la extracción y el uso de
recursos naturales.
• El equipo podría contener sustancias peligrosas que podrían afectar a la salud y
al medio ambiente.
• Para evitar la difusión de estas sustancias en el entorno y disminuir el uso
innecesario de los recursos naturales, le sugerimos que utilice los sistemas de
reciclaje adecuados.
• Cuando su dispositivo llegue al fin de su vida útil, la mayor parte de los
materiales empleados en su fabricación se reutilizarán o reciclarán de modo
adecuado a través de estos sistemas de reciclaje.
• El símbolo del contenedor de basura tachado le invita a usar dichos sistemas.
• Si necesita más información sobre los sistemas de recogida, reutilización y
reciclaje, póngase en contacto con su administración local o regional de recogida
de basura.
50
Page 52

http://www.buffalo-technology.com
Dirección: Buffalo Technology UK LTD
176, Buckingham Avenue,
Slough, Berkshire, SL1 4RD
Reino Unido
Consultas generales:
Correo electrónico: sales@buffalo-technology.com
Asistencia técnica:
Horario de atención: de lunes a jueves de 9.00 a 18.00
viernes de 9.00 a 16.30
Teléfono:
Teléfono (sólo Reino Unido):
Correo electrónico:
+353 61 70 80 50
08712 50 12 60
helpdesk@buffalo-technology.ie
Page 53

Português
Guia de Conguração Rápida
HD-HCU2 DriveStation
Conteúdo da embalagem:
Unidade Principal (DriveStation)
Adaptador de potência
Cabo USB
CD de Instalação DriveNavigator
Guia de Configuração Rápida
Page 54

Conguração da DriveStation
Prima o interruptor de alimentação na parte de trás da DriveStation para a
posição OFF (Desligado). Ligue o cabo de alimentação da DriveStation a uma
tomada. Em seguida, ligue o cabo USB incluído na porta USB na parte de trás da
DriveStation.
Ligue o cabo USB à porta USB no computador ou dispositivo ao qual a
DriveStation está a ser adicionada.
53
Page 55

DriveStation – Conguração do PC
Windows ME, 2000 & XP
Prima o interruptor de alimentação na parte de trás da DriveStation para a
posição ON (Ligado).
No Windows 2000 e XP, a DriveStation instala-se automaticamente depois de se
ligar.
My Computer (O meu computador) e a nova unidade estará presente. A
Abra
predefinição utilizará a primeira letra disponível para a unidade e será chamada
‘Disco Local’. A DriveStation é entregue pré-formatada por isso pode começar a
utilizá-la imediatamente.
O CD DriveNavigator inclui diversas funcionalidades úteis para o seu Sistema
Windows. Por favor insira o CD DriveNavigator na sua unidade de CD-ROM
para aprender mais sobre estas funcionalidades.
54
Page 56

DriveStation – Conguração do PC
Utilitários
A DriveStation inclui vários utilitários. Para instalar e utilizar estes utilitários,
insira o CD-ROM fornecido com a DriveStation num computador com o sistema
operativo Windows.
O Assistente de Configuração da DriveStation guia-o rapidamente através do
processo de ligação de cabos e de ligação da DriveStation de forma semelhante a
este guia de configuração rápida.
O software
segurança de documentos, ficheiros de multimédia e outros ficheiros do
computador com o Windows para a DriveStation. Consulte a documentação do
software memeo para mais informações sobre instalação e utilização.
Memeo™ AutoBackup está disponível para fazer cópia de
Também estão disponíveis outros utilitários:
Formatador de Disco (para formatar a DriveStation)
Utilitário Disk Sleep (para agendar as horas para ligar e desligar
a DriveStation)
Secure Lock Ware (para encriptar os dados da DriveStation e impedir
que os dados sejam acedidos por terceiros)
Para obter mais informações sobre instalação e utilização destes utilitários, leia a
sua documentação clicando em
View Documentation (Ver Documentação).
55
Page 57

DriveStation – Conguração Mac
Prima o interruptor de alimentação na parte de trás da DriveStation para a posição
OFF (Desligado). Ligue o cabo de alimentação da DriveStation a uma tomada. Em
seguida, ligue o cabo USB ou firewire a uma porta correspondente na parte de trás da
DriveStation.
Ligue o cabo USB ou firewire ao Mac ou outro dispositivo ao qual a DriveStation está a
ser adicionada.
56
Page 58

DriveStation – Conguração Mac
Prima o interruptor de alimentação na parte de trás da DriveStation para a posição ON
(Ligado).
O Mac irá detectar a nova unidade e pôr um ícone no ambiente de trabalho.
A DriveStation está pronta para ser utilizada. Faça duplo clique no ícone para abrir a
unidade de disco rígido.
57
Page 59

Detecção de avarias
Detecção de avarias
O seguinte é uma lista de problemas que habitualmente surgem na DriveStation.
A seguir a cada problema encontram-se as soluções possíveis.
Eu vejo a DriveStation em My Computer/Finder mas não lhe consigo
aceder.
A unidade requer formatação. Tente utilizar o Utilitário Disk Formatter
no CD-ROM do DriveNavigator. Consulte o manual do Utilitário Disk
Formatter para mais ajuda. O manual pode também ser encontrado no
CD-ROM do DriveNavigator.
Não vejo a DriveStation em My Computer/
Verifique se a luz de ALIMENTAÇÃO está ligada. Se não estiver,
certifique-se de que o interruptor de alimentação está ligado.
Tente comutar o interruptor do MODO DE ALIMENTAÇÃO mesmo
por baixo do interruptor de alimentação. O interruptor do MODO
DE ALIMENTAÇÃO comuta se o dispositivo estiver a ser alimentado
através de um sinal USB (“Auto”) ou puramente baseado na posição
do interruptor de potência (“Manual”). Se tiver instalado o Utilitário
de Poupança de Energia no seu PC, verifique se a DriveStation não
foi colocada no modo de poupança de energia. Consulte o manual do
Utilitário de Poupança de Energia para mais ajuda. O manual pode ser
encontrado no CD-ROM do DriveNavigator. Verifique se o disco rígido
dentro da DriveStation está a rodar. Isto pode ser verificado colocando
a sua mão nos lados da caixa e sentindo uma ligeira vibração. Depois da
DriveStation ter estado ligada durante quinze minutos ou mais começa
a ficar quente. Se nenhum dos testes anteriores verificar que a unidade
de disco rígido está a rodar, contacte a assistência técnica para mais
assistência.
Se estiver com problemas adicionais contacte o nosso apoio técnico para mais
assistência.
Finder.
58
Page 60

Especicações Técnicas
Normas USB: EspecicaçãoUSBRev.2.0
Capacidade: 160,250,320,500,750GB
Tempo de Pesquisa: Máx.11milisegundos
Velocidade de Transmissão: Máx.480Mbps
Consumo de Energia: Máx.25W,Média17W
Fonte de Alimentação: AC100-240V50/60Hz
Dimensões: 53(W)x173(H)x164(D)mm
Peso: 1,43kg
Ambiente Operativo: 5º-35°C
20-80%humidade(não-condensável)
Aviso da Marca CE
Isto é um produto de classe B. Num ambiente doméstico este produto pode
provocar interferência de rádio pelo que o utilizador pode ter que tomar as medidas
adequadas.
O estado em constante evolução dos produtos e sistemas operativos NAS implica que a
Buffalo Technology lance ocasionalmente software de actualização para tirar partido das
novas tecnologias e para estar em conformidade com as normas da indústria. Quanto às
edições de software, firmware, controladores e papel branco técnico disponível visite o
website da Buffalo Technology:
www.buffalo-technology.com
59
Page 61

Informações ambientais
• O equipamento que adquiriu exigiu a extracção e utilização de recursos naturais
na sua produção.
• O equipamento pode conter substâncias perigosas com impacto na saúde e no
ambiente.
• Para impedir a disseminação dessas substâncias no ambiente e diminuir a
pressão sobre os recursos naturais, recomendamos a utilização de sistemas
take-back (recepção e reciclagem) apropriados.
• Os sistemas take-back reutilizam ou reciclam a maior parte dos materiais de
equipamentos em fim de vida, de maneira saudável.
• O símbolo do contentor de lixo com rodas barrado com uma cruz, convida-o a
utilizar esses sistemas.
• Caso necessite de mais informações sobre sistemas de recolha, reutilização e
reciclagem, contacte as autoridades locais responsáveis pela gestão do lixo.
60
Page 62

http://www.buffalo-technology.com
Endereço: Buffalo Technology UK LTD
176, Buckingham Avenue,
Slough, Berkshire, SL1 4RD
United Kingdom
Inquéritos gerais:
Email sales@buffalo-technology.com
Suporte Técnico:
Horas de atendimento no Helpdesk Segunda-Quinta 9:00 AM - 6:00 PM
Sexta 9:00 AM - 4:30 PM
Telefone
Telefone (Só RU)
Email
+353 61 70 80 50
08712 50 12 60
helpdesk@buffalo-technology.ie
Page 63

Nederlands
Beknopte installatiegids
HD-HCU2 DriveStation
Inhoud verpakking:
DriveStation
Adapter
USB-kabel
Installatie-cd DriveNavigator
Beknopte installatiegids
Page 64

Installatie DriveStation
Druk de aan/uit-schakelaar aan de achterzijde van de DriveStation in de stand
OFF. Steek het elektriciteitssnoer van de DriveStation in een stopcontact. Sluit
vervolgens de meegeleverde USB-kabel aan op de USB-poort achter op de
DriveStation.
Sluit de USB-kabel aan op de USB-poort op de computer of het apparaat waaraan
u de DriveStation toevoegt.
63
Page 65

DriveStation - installatie voor de pc
Windows ME, 2000 & XP
Druk de aan/uit-schakelaar aan de achterzijde van de DriveStation in de stand
ON.
Onder Windows 2000 en XP wordt de DriveStation na het aanzetten
automatisch geïnstalleerd.
Open
Deze computer en u zult het nieuwe station zien. Standaard zal hiervoor
de eerst beschikbare stationsletter worden gebruikt. Het station krijgt als naam
'Lokale schijf'. De DriveStation is voorgeformatteerd, dus u kunt hem direct gaan
gebruiken.
Op de DriveNavigator-cd staan verschillende handige hulpprogramma's voor uw
Windows-systeem. Plaats de DriveNavigator-cd in uw cd-rom-station voor meer
informatie.
64
Page 66

DriveStation - installatie voor de pc
Hulpprogramma's
De DriveStation wordt met verschillende hulpprogramma's geleverd. Om
deze programma’s te installeren en gebruiken plaatst u de bij de DriveStation
meegeleverde cd-rom in een Windows-pc.
De DriveStations Setup Wizard begeleidt u door het bekabelen en het aanzetten
van de DriveStation, zoals ook deze beknopte installatiegids doet.
Memeo™ AutoBackup -software kunt u gebruiken voor het maken van
back-ups van documenten, multimediabestanden en andere bestanden van uw
Windows-pc op de DriveStation. Zie de documentatie van Memeo voor meer
informatie over de installatie en het gebruik van Memeo.
Er is nog een aantal andere hulpprogramma’s:
Disk Formatter (voor het formatteren van de DriveStation)
Disk Sleep Utility (voor het inplannen van aan- en uittijden voor de
DriveStation)
Secure Lock Ware (voor het versleutelen van de gegevens op uw
DriveStation, om te voorkomen dat anderen toegang krijgen tot uw
gegevens)
Lees voor meer informatie over de installatie en het gebruik van deze programma’s
de bijbehorende documentatie. Klik hiertoe op
65
View Documentation.
Page 67

DriveStation - installatie voor de Mac
Druk de aan/uit-schakelaar aan de achterzijde van de DriveStation in de stand OFF. Steek
het elektriciteitssnoer van de DriveStation in een stopcontact. Sluit vervolgens een
USB- of firewire-kabel aan op een corresponderende poort aan de achterzijde van de
DriveStation.
Sluit de USB- of firewire-kabel aan op de Mac of het apparaat waarop u de DriveStation
aansluit.
66
Page 68

DriveStation - installatie voor de Mac
Druk de aan/uit-schakelaar aan de achterzijde van de DriveStation in de stand ON.
Uw Mac detecteert de nieuwe schijf en plaatst een symbool op het bureaublad.
De DriveStation is nu klaar voor gebruik. Dubbelklik op het symbool om de vaste schijf
te openen.
67
Page 69

Probleemoplossing
Probleemoplossing
Hier volgt een lijst met bekende problemen met de DriveStation. Na elk probleem
zijn mogelijke oplossingen vermeld.
Ik zie de DriveStation in Deze Computer/Finder maar ik krijg geen
toegang.
Het station moet worden geformatteerd. Probeer dit met de Disk
Formatter Utility op de DriveNavigator-cd-rom. Raadpleeg de
handleiding voor de Disk Formatter Utility voor meer hulp. U vindt de
handleiding tevens op de DriveNavigator-cd-rom.
Ik kan de DriveStation niet zien in Deze computer/Finder
Controleer of het POWER-lampje brandt. Brandt het niet, controleer
dan of de aan/uit-schakelaar in de stand ON staat.
Probeer de POWER MODE-schakelaar direct onder de aan/uitschakelaar om te zetten. De POWER MODE-schakelaar bepaalt of het
apparaat wordt gevoed via een USB-signaal ("Auto") of puur op basis
van de stand van de aan/uit-schakelaar ("Manual"). Als u de Power Save
Utility op uw pc hebt geïnstalleerd, controleer dan of de DriveStation
niet in energiezuinige modus is geraakt. Raadpleeg de handleiding voor
de Disk Power Save Utility voor meer hulp. U vindt de handleiding op de
DriveNavigator-cd-rom. Controleer of de vaste schijf in de DriveStation
draait. U kunt dit doen door uw hand op een zijkant van de behuizing
te houden en een lichte trilling waar te nemen. Ook zal de DriveStation
nadat deze vijftien minuten of langer aan heeft gestaan warm beginnen
te worden. Als met geen van de bovenstaande tests is vastgesteld
dat de vaste schijf draait, neem dan contact op met de technische
ondersteuning voor meer hulp.
Als u andere problemen ondervindt, neem dan contact op met onze technische
ondersteuning voor meer hulp.
68
Page 70

Technische gegevens
USB-standaarden: USB-specicatierev.2.0
Capaciteit: 160,250,320,500,750GB
Zoektijd: max.11ms
Overdrachtssnelheid: max.480Mb/s
Stroomverbruik: max.25W,gemiddeld17W
Stroomvoorziening: AC100-240V50/60Hz
Afmetingen: 53(B)x173(H)x164(D)mm
Gewicht: 1,43kg
Omgevingsvereisten: 5-35°C
luchtvochtigheid20-80%(niet-condenserend)
Waarschuwing CE-teken
Dit is een klasse B-product. In een woonomgeving kan dit product radio-interferentie
veroorzaken, waartegen de gebruiker dan eventueel afdoende maatregelen zal
moeten treffen.
Doordat NAS-producten en besturingssystemen voortdurend in ontwikkeling zijn, moet
Buffalo Technology van tijd tot tijd bijgewerkte software uitgeven om te profiteren van
nieuwe technologieën en te voldoen aan de normen van de sector. Ga voor de meest
recente software, firmware, stuurprogramma's en technische artikelen naar de website van
Buffalo Technology:
www.buffalo-technology.com
69
Page 71

Milieu-informatie
• Voor de productie van het apparaat dat u hebt aangeschaft, zijn natuurlijke
rijkdommen gebruikt.
• Dit apparaat bevat mogelijk gevaarlijke stoffen die uw gezondheid en het milieu
kunnen schaden.
• Om de verspreiding van deze stoffen in het milieu te voorkomen en de druk op
natuurlijke rijkdommen te verminderen, raden we u aan de van toepassing zijnde
recycleprocedures op te volgen.
• Zo worden de meeste materialen aan het einde van de levensduur van het
apparaat op een verantwoorde manier opnieuw gebruikt of gerecycled.
• Met het pictogram met de doorgestreepte vuilnisbak vragen wij u van deze
procedures gebruik te maken.
• Neem voor meer informatie over het afhalen, hergebruiken en recyclen van afval
contact op met uw plaatselijke of regionale aanspreekpunt voor het recyclebeleid.
70
Page 72

http://www.buffalo-technology.com
Adres: Buffalo Technology UK LTD
176, Buckingham Avenue,
Slough, Berkshire, SL1 4RD
Groot-Brittannië
Algemene vragen:
E-mail sales@buffalo-technology.com
Technische ondersteuning:
Openingstijden helpdesk Maandag - donderdag 9:00 - 18:00 uur
Vrijdag 9:00 - 16:30 uur
Telefoon
Telefoon (alleen Groot-Brittannië)
E-mail
+353 61 70 80 50
08712 50 12 60
helpdesk@buffalo-technology.ie
Page 73

Svenska
Snabbguide
HD-HCU2 DriveStation
Förpackningens innehåll:
Huvudenhet (DriveStation)
Strömadapter
USB-kabel
Cd-skiva med DriveNavigator
Snabbguide
Page 74

Installation av DriveStation
Stäng av strömbrytaren på DriveStation-enhetens baksida. Stick in strömsladden
för DriveStation i ett eluttag. Anslut sedan den medföljande USB-kabeln till USBporten på baksidan av DriveStation.
Anslut USB-kabeln till USB-porten på den dator eller enhet du kopplar in
DriveStation-enheten till.
73
Page 75

DriveStation – installation på pc
Windows ME, 2000 & XP
Slå på strömbrytaren på DriveStation-enhetens baksida.
För Windows 2000 och XP, kommer DriveStation att installeras automatiskt när
strömmen slås på.
Den här datorn så visas den nya drivrutinen. Som standard används första
Öppna
tillgängliga drivrutinsbokstav och den kallas "Local Disk". DriveStation-enheten
levereras förformaterad så du kan börja använda den omedelbart.
CD-skivan för DriveNavigator inkluderar flera användbara verktyg för ditt
Windows-system. Sätt i CD-skivan för DriveNavigator i CD-ROM-enheten för
att få mer information.
74
Page 76

DriveStation – installation på pc
Verktyg
DriveStation levereras med flera verktyg. Om du vill installera och använda
verktygen sätter du i cd-skivan som följer med DriveStation-enheten i datorn (med
Windows).
Snabbguiden för DriveStation-enheten vägleder dig snabbt genom kabeldragning
och förberedelse av DriveStation, liknande den här snabbguiden.
Programvaran
dokument, multimediefiler och andra filer från Windows-datorn till DriveStationenheten. Läs pm-dokumentationen om du vill ha mer information om hur pm
installeras och används.
Memeo™ AutoBackup används till säkerhetskopiering av
Det finns även andra verktyg, till exempel:
Disk Formatter (för formatering av DriveStation)
Disk Sleep-verktyg (för planering av på- och frånslagningstider för
DriveStation)
Secure Lock Ware (för kryptering av data på DriveStation-enheten,
vilket förhindrar att någon annan än du får åtkomst till data)
Vill du veta mer om hur man installerar och använder dessa verktyg klickar du på
View Documentation (visa dokumentation).
75
Page 77

DriveStation – installation på en Macintosh
Stäng av strömbrytaren på DriveStation-enhetens baksida. Stick in strömsladden för
DriveStation i ett eluttag. Anslut sedan USB- eller firewire-kabeln till motsvarande port
på DriveStation-enhetens baksida.
Anslut USB- eller firewire-kabeln i Macintosh-datorn eller någon annan enhet som
DriveStation-enheten är ansluten till.
76
Page 78

DriveStation – installation på en Macintosh
Slå på strömbrytaren på DriveStation-enhetens baksida.
Datorn hittar den nya enheten och en ikon placeras på skrivbordet.
Nu är DriveStation-enheten färdig att användas! Dubbelklicka på ikonen för att öppna
hårddisken.
77
Page 79

Felsökning
Felsökning
Följande är en lista över vanliga problem som kan inträffa med DriveStation. Efter
varje problem finns möjliga lösningar.
Jag kan se DriveStation på Den här datorn/Finder men jag kan inte
öppna den.
Drivrutinen kräver formatering. Prova att använda Disk Formatter
Verktyg på CD-skivan för DriveNavigator. Se bruksanvisningen för Disk
Formatter-verktyg för ytterligare information. Bruksanvisningen finns
även på CD-skivan för DriveNavigator.
Jag kan inte se DriveStation-enheten i Den här datorn/Finder.
Kontrollera att lampan för POWER lyser. Om inte ska du kontrollera att
strömbrytaren är i läget ON.
Försök att vrida på POWER MODE-brytaren under strömbrytaren.
POWER MODE-brytaren växlar om enheten startar via USBsignal (“Auto”) eller bara genom att strömbrytaren ändrar position
(“Manuell”). Om du har installerat viloläge på din dator, kontrollera att
DriveStation-enheten inte har gått in i viloläge. Se bruksanvisningen för
viloläge för ytterligare information. Bruksanvisningen finns på CD-skivan
för DriveNavigator. Kontrollera att hårdvaran inuti DriveStation-enheten
går. Detta kan kontrolleras genom att lägga handen på kåpans sida och
känna en lätt vibration. Efter att DriveStation-enheten har varit påslagen
under femton minuter eller mer börjar den bli varm. Om ingen av
testerna ovan visar att hårdvaran körs, kontakta teknisk support för att
få hjälp.
Om du har andra problem, kontakta vår tekniska support för att få hjälp.
78
Page 80

Tekniska specikationer
USB-standarder: USB-specikationerRev.2.0
Kapacitet: 160,250,320,500,750GB
Söktid: Max.11millisekunder
Överföringshastighet: Max.480Mbps
Strömförbrukning: Max.25W,genomsnitt17W
Strömförsörjning AC100-240V50/60Hz
Storlek: 53(B)x173(H)x164(D)mm
Vikt: 1,43kg
Miljö för användning: 5-35°C
20–80%luftfuktighet(icke-kondenserande)
CE-märkesvarning
Det här är en klass B-produkt. I hemmiljö kan produkten orsaka radiostörningar,
vilket kan tvinga användaren att vidta adekvata åtgärder.
Till följd av den ständiga utvecklingen hos NAS-produkter och operativsystem gör att
Buffalo Technology ibland publicerar uppdaterade program för att dra nytta av nya tekniker
och efterleva branschstandarder. Besök webbsidan för Buffalo Technology för att få
information om de senaste programvarorna, firmware och drivrutiner som finns tillgängliga.
www.buffalo-technology.com
79
Page 81

Miljöinformation
• Den utrustning du har köpt krävde utvinning och användning av naturtillgångar
för att tillverkas.
• Utrustningen kan innehålla skadliga ämnen som kan påverka hälsan och miljön.
• För att undvika att dessa ämnen sprids i miljön och för att minska trycket på
naturens resurser ber vi dig att utnyttja tillämpliga återvinningssystem.
• Vid återvinning återanvänds eller återvinns de flesta material på ett säkert sätt.
• Den överkorsade soptunnesymbolen uppmanar dig att använda dessa system.
• Om du vill ha mer information om insamling, återanvändning och återvinning ber
vi att du kontaktar din lokala miljöförvaltning.
80
Page 82

http://www.buffalo-technology.com
Adress: Buffalo Technology UK LTD
176, Buckingham Avenue,
Slough, Berkshire, SL1 4RD
United Kingdom
Allmänna frågor:
E-post sales@buffalo-technology.com
Teknisk support:
Helpdeskens öppettider måndag - torsdag 9:00 - 18:00
fredag 9:00 - 16:30
Telefon
Telefon (endast Storbritannien)
E-post
+353 61 70 80 50
08712 50 12 60
helpdesk@buffalo-technology.ie
Page 83

Norsk
Hurtigguide for installasjon
HD-HCU2 DriveStation
Innholdet i pakken:
Hovedenhet (DriveStation)
Strømadapter
USB-kabel
Installasjons-CD for DriveNavigator
Hurtigguide for installasjon
Page 84

DriveStation-oppsett
Slå av strømbryteren bak på DriveStation. Koble DriveStations strømledning til en
stikkontakt. Deretter kobler du den medfølgende USB-kabelen inn i tilsvarende
port bak på DriveStation.
Koble USB-kabelen til datamaskinen eller en annen enhet du utvider med
DriveStation.
83
Page 85

Windows ME, 2000 og XP
Slå på strømbryteren bak på DriveStation.
DriveStation – PC-oppsett
I Windows 2000 og XP, vil DriveStation bli installert automatisk når
strømmen slås på.
Åpne Min datamaskin og du vil finne den nye stasjonen i listen. DriveStation
benytter den første tilgjengelige stasjonsbokstaven som standard, og vil få navnet
"Lokal disk". DriveStation er formatert på forhånd, så du kan begynne å bruke
den med én gang.
DriveNavigator-CD-en inneholder flere nyttige programmer til Windowssystemet ditt. Sett inn DriveNavigator-CD-en i CD-ROM-stasjonen for å lære
mer om disse programmene.
84
Page 86

DriveStation – PC-oppsett
Hjelpeprogrammer
DriveStation leveres med flere hjelpeprogrammer. Hvis du vil installere og bruke
disse hjelpeprogrammene, setter du CD-ROM-en som følger med DriveStation, inn
i en Windows-PC.
DriveStation-veiviseren leder deg, i likhet med denne hurtigveiledningen, gjennom
kablings- og oppstartsprosessene for DriveStation.
Med programmet
multimediafiler og andre filer fra Windows-PC-en til DriveStation. Hvis du vil ha
mer informasjon om hvordan du installerer og bruker Memeo, kan du lese Memeodokumentasjonen.
Memeo™ AutoBackup kan du sikkerhetskopiere dokumenter,
Andre tilgjengelige verktøy er:
Disk Formatter (formaterer DriveStation)
Disk Sleep Utility (planlegger tidspunkt for å slå av og på
DriveStation)
Secure Lock Ware (krypterer dataene på DriveStation,
og hindrer andre enn deg i å få tilgang til dataene)
Hvis du vil ha mer informasjon om hvordan du installerer og bruker disse
verktøyene, klikker du på
dokumentasjonen.
View Documentation (Vis dokumentasjon) for å lese
85
Page 87

DriveStation – Mac-oppsett
Slå av strømbryteren bak på DriveStation. Koble til DriveStations strømledning i en
stikkontakt. Deretter kobler du en USB-kabel inn i tilsvarende port bak på DriveStation.
Koble USB- eller FireWire-kabelen til en Mac eller en annen enhet du utvider med
DriveStation.
86
Page 88

DriveStation – Mac-oppsett
Slå på strømbryteren bak på DriveStation.
Mac-en finner den nye disken og plasserer et ikon på skrivebordet.
DriveStation er nå klar til bruk! Dobbeltklikk på ikonet for å åpne harddisken.
87
Page 89

Feilsøking
Nedenfor følger en oversikt over vanlige problemer med DriveStation. Mulige
løsninger vises etter hvert problem.
Jeg ser DriveStation i Min datamaskin/Finder, men jeg får ikke tilgang
til den.
Stasjonen krever formatering. Prøv å bruke Disk Formatter-verktøyet
på DriveNavigator-CD-ROM-en. Du kan se i Disk Formatter Utilitymanualen for ytterligere hjelp. Manualen ligger også på DriveNavigatorCD-ROM-en.
Feilsøking
Jeg nner ikke DriveStation i Min datamaskin/
Sjekk at POWER-lyset er på. Hvis ikke, må du se til at strømbryteren er
slått på.
Prøv å slå POWER MODE-bryteren rett under strømbryteren av og
på. POWER MODE-bryterens innstilling avgjør om enheten får strøm
gjennom et USB-signal ("Auto") eller kun basert på strømbryterens
stilling ("Manual"). Hvis du har installert Power Save Utility på PC-en, må
du sjekke at DriveStation ikke ble satt i strømsparemodus. Du kan se
i Power Save Utility-manualen for ytterligere hjelp. Manualen ligger på
DriveNavigator CD-ROM-en. Sjekk at harddisken inne i DriveStation går
rundt. Dette kontrollerer du ved å legge hånden på siden av kabinettet
og kjenne etter om det vibrerer litt. Etter at DriveStation har vært
påslått i femten minutter eller mer, vil den begynne å bli varm. Hvis
ingen av de foregående testene fastslo at harddisken går rundt, må du ta
kontakt med teknisk brukerstøtte for å få mer hjelp.
Opplever du noen andre problemer, må du ta kontakt med vår tekniske
brukerstøtte for å få ytterligere assistanse.
Finder
88
Page 90

Tekniske spesikasjoner
USB-standarder: USBSpecicationRev.2.0
Kapasitet: 160,250,320,500,750GB
Søketid: Maks.11millisekunder
Overføringshastighet: Maks.480Mbps
Strømforbruk: Maks.25W,gjennomsnittlig17W
Strømforsyning: Vekselstrøm100~120V50/60Hz
Dimensjoner: 53(H)x173(B)x164(D)mm
Vekt: 1,43kg
Driftstemperatur: 5–35°C
20–80%relativluftfuktighet(ikke-kondenserende)
CE-merkeadvarsel
Dette er et Klasse B-produkt. Bruk av dette produktet i et hjemmemiljø kan føre
til interferens for radiokommunikasjon. I så fall kan det kreves at brukeren foretar
egnede tiltak.
Den stadige utviklingen innen NAS-produkter og operativsystemer krever at Buffalo
Technology utgir oppdatert programvare nå og da for å dra nytte av ny teknologi og å rette
seg etter industriens standarder. For å få tak i den nyeste programvaren, fastvaren, driverne
og de tekniske rapportene, kan du besøke Buffalo Technology sin webside:
www.buffalo-technology.com
89
Page 91

Miljøinformasjon
• Produksjonen av dette utstyret krever utvinning og bruk av naturressurser.
• Utstyret kan inneholde stoffer som kan skade helse og miljø.
• For å unngå å forurense miljøet med slike stoffer og for å spare naturressurser
anbefaler vi at du benytter deg av ordningen for innlevering av elektronisk avfall.
• Ordningen for innlevering av elektronisk avfall innebærer at mesteparten av
materialene som utstyret er laget av, blir resirkulert.
• Søppelkasse-symbolet er en påminnelse om å bruke denne ordningen.
• Hvis du vil vite mer om innlevering, gjenbruk og resirkulering av elektronisk
avfall, kan du ta kontakt med kommunens renovasjonsetat.
90
Page 92

http://www.buffalo-technology.com
Adresse: Buffalo Technology UK LTD
176, Buckingham Avenue,
Slough, Berkshire, SL1 4RD
United Kingdom
Generelt
E-postadresse sales@buffalo-technology.com
Teknisk støtte
Kundeservice, åpningstider: Mandag–torsdag 09.00–18.00
Fredag 09.00–16.30
Telefon
Tlf. (kun Storbritannia)
E-postadresse
+353 61 70 80 50
08712 50 12 60
helpdesk@buffalo-technology.ie
Page 93

Dansk
Hurtig installationsvejledning
HD-HCU2 DriveStation
Pakkens indhold:
Hovedenhed (DriveStation)
Strømforsyning
USB-kabel
Installations-cd til DriveNavigator
Hurtig installationsvejledning
Page 94

Konguration af DriveStation
Sæt tænd-/slukknappen bag på DriveStation på OFF. Sæt DriveStations strømkabel
i en stikkontakt. Sæt derefter det medfølgende USB-kabel i
USB-porten bag på DriveStation.
Sæt USB-kablet i USB-porten på den computer eller enhed, som du tilføjer
DriveStation til.
93
Page 95

DriveStation – pc-konguration
Windows ME, 2000 & XP
Sæt tænd-/slukknappen bag på DriveStation på ON.
I Windows 2000 og XP vil DriveStation automatisk blive installeret, når
computeren tændes.
Denne computer, og du vil kunne se det nye drev. Som standard vil drevet
Åbn
blive tildelt det første ledige bogstav og blive kaldt "Lokal disk". DriveStation er
formateret på forhånd, så du kan begynde at bruge den med det samme.
DriveNavigator-cd'en indeholder en række nyttige værktøjer til Windowssystemet. Indsæt DriveNavigator-cd'en i cd-rom-drevet for at få mere at vide om
værktøjerne.
94
Page 96

DriveStation – pc-konguration
Værktøjer
DriveStation indeholder flere værktøjer. Du kan installere og bruge disse værktøjer
ved at indsætte den cd-rom, du fik sammen med DriveStation, i en Windows-pc.
DriveStation Setup Wizard (konfigurationsguide) vejleder dig hurtigt igennem
kabelføring og start af DriveStation på samme måde som denne hurtige
installationsvejledning.
Softwaren
dokumenter, multimediefiler og andre filer fra en Windows-pc til DriveStation.
I dokumentationen til Memeo kan du finde flere oplysninger om, hvordan du
installerer og bruger softwaren.
Memeo™ AutoBackup kan bruges til at sikkerhedskopiere
Derudover findes der følgende værktøjer:
Disk Formatter (til formatering af DriveStation)
Disk Sleep Utility (til programmering af, hvornår DriveStation skal
tændes og slukkes)
Secure Lock Ware (til kryptering af data på DriveStation for at
forhindre, at dataene ses af andre end dig)
Du kan få mere at vide om, hvordan du installerer og bruger disse værktøjer, ved at
klikke på
View Documentation (Vis dokumentation).
95
Page 97

DriveStation – Mac-konguration
Sæt tænd-/slukknappen bag på DriveStation på OFF. Sæt DriveStations strømkabel i en
stikkontakt. Slut derefter et USB-kabel eller et firewirekabel til det tilsvarende stik bag på
DriveStation.
Sæt USB-kablet eller firewirekablet i Mac'en eller en anden enhed, som du forbinder
DriveStation med.
96
Page 98

DriveStation – Mac-konguration
Sæt tænd-/slukknappen bag på DriveStation på ON.
Mac'en registrerer den nye disk og placerer et ikon på skrivebordet.
DriveStation er nu klar til brug! Dobbeltklik på ikonet for at åbne harddisken.
97
Page 99

Fejlnding
Fejlfinding
Følgende er en liste over almindelige problemer med DriveStation. Efter hvert
problem er beskrevet en mulig løsning.
Jeg kan se DriveStation under Denne computer eller i stinderen, men
jeg kan ikke åbne den.
Drevet skal formateres. Prøv at bruge værktøjet Disk Formatter,
som findes på DriveNavigator-cd'en. Du kan finde yderligere hjælp i
brugervejledningen til Disk Formatter. Brugervejledningen findes også på
DriveNavigator-cd'en.
Jeg kan ikke se DriveStation under Denne computer
Kontroller, at POWER-lampen er tændt. Hvis den ikke er tændt, skal du
kontrollere, at tænd-/slukknappen er sat til ON.
Prøv at slå kontakten POWER MODE lige under tænd-/slukknappen
til. Kontakten POWER MODE styrer, om enheden startes via et USBsignal ("Auto"), eller om den startes udelukkende på baggrund af tænd-/
slukknappens position ("Manual"). Hvis du har installeret værktøjet
til strømbesparelse (Power Save), skal du kontrollere, at DriveStation
ikke er sat i strømbesparende tilstand. Du kan finde yderligere hjælp i
brugervejledningen til værktøjet til strømbesparelse. Brugervejledningen
findes på DriveNavigator-cd'en. Kontroller, at harddisken i DriveStation
kører. Du kan kontrollere dette ved at placere hænderne på siden af
kassen og mærke efter en let vibreren. Når DriveStation har har været
tændt i femten minutter eller mere, vil den begynde at blive varm.
Hvis ingen af de foregående test har vist, at harddisken kører, skal du
kontakte teknisk support for at få hjælp.
Hvis du har andre problemer, kan du kontakte vores tekniske support for at få
yderligere hjælp.
eller i stinderen
98
Page 100

Tekniske specikationer
USB-standarder: USB-specikationrev.2.0
Kapacitet: 160,250,320,500,750GB
Søgetid: Maks.11millisekunder
Overførselshastighed: Maks.480Mbps
Strømforbrug: Maks.25W,gennemsnit17W
Strømforsyning: AC100–240V50/60Hz
Dimensioner: 53(B)x173(H)x164(D)mm
Vægt: 1,43kg
Driftstemperatur: 5-35°C
20-80%luftfugtighed(ingenkondensering)
CE-mærkning
Dette er et produkt i klasse B. I et privat miljø kan dette produkt forårsage
radiointerferens, og i dette tilfælde kan det kræves, at brugeren tager passende
forholdsregler.
Den konstante udvikling inden for NAS-produkter og operativsystemer betyder, at Buffalo
Technology med jævne mellemrum må udgive opdateret software for at kunne drage
fordel af nye teknologier og for at overholde forskellige branchestandarder. Du kan finde
de nyeste udgivelser af software, firmware, drivere og tekniske hvidpapirer ved at besøge
Buffalo Technologys websted:
www.buffalo-technology.com
99
 Loading...