

Page 1
Step.1
Step.2
Opening the User Manual
Additional Information
Step.2 (Continued)
ON
I
II
SSID:
BUFFALO-123456
PIN: 12345678
KEY:
abcdefghijklm
click [Run ASSetWiz.exe].
click [Yes] or [Continue].
PC
Modem
(2) Unplug
(2) Unplug
(1)Turn Off
OFF
1
2
To configure more advanced settings, use the web-based configuration interface. Follow
the steps below to display the AirStation’s configuration interface.
1. Insert the CD into your computer.
If Windows opens the auto-play screen, double-click [Run ASSetWiz.exe].
If the "User Account Control" screen is displayed, click [Yes] or [Continue].
2.
Click [View WEB setting screen].
3.
All AirStations on the netwok will appear
in the list. Select the AirStation that you
want to configure and click [Next].
Note:
If "AirStation's IP Address setting" screen
appears, select [Obtain IP address from
DHCP server] or set the IP address
manually and click [Next].
4. After the user name and password screen is displayed, enter “root” in the User name
field and the AirStation password (no password is set by default) in the Password
field, and then click [OK].
5. The Configuration Interface is displayed.
Note: To display the AirStation's configuration interface without using the CD, open your
web browser and enter the AirStation's IP address in the address bar. The
AirStation’s default IP address is 192.168.11.1 in router mode or 192.168.11.100 in
AP mode.
User Manual
1. Insert the CD into your computer.
If Windows opens the auto-play screen, double-click [Run ASSetWiz.exe].
If the "User Account Control" screen is displayed, click [Yes] or [Continue].
2.
Click [View User Manul].
3. The User Manual will open.
Viewing the Configuration Interface in a Windows
6
WCR Series
Quick Setup Guide
35011710 ver.01 1-01
English
ภาษาไทย
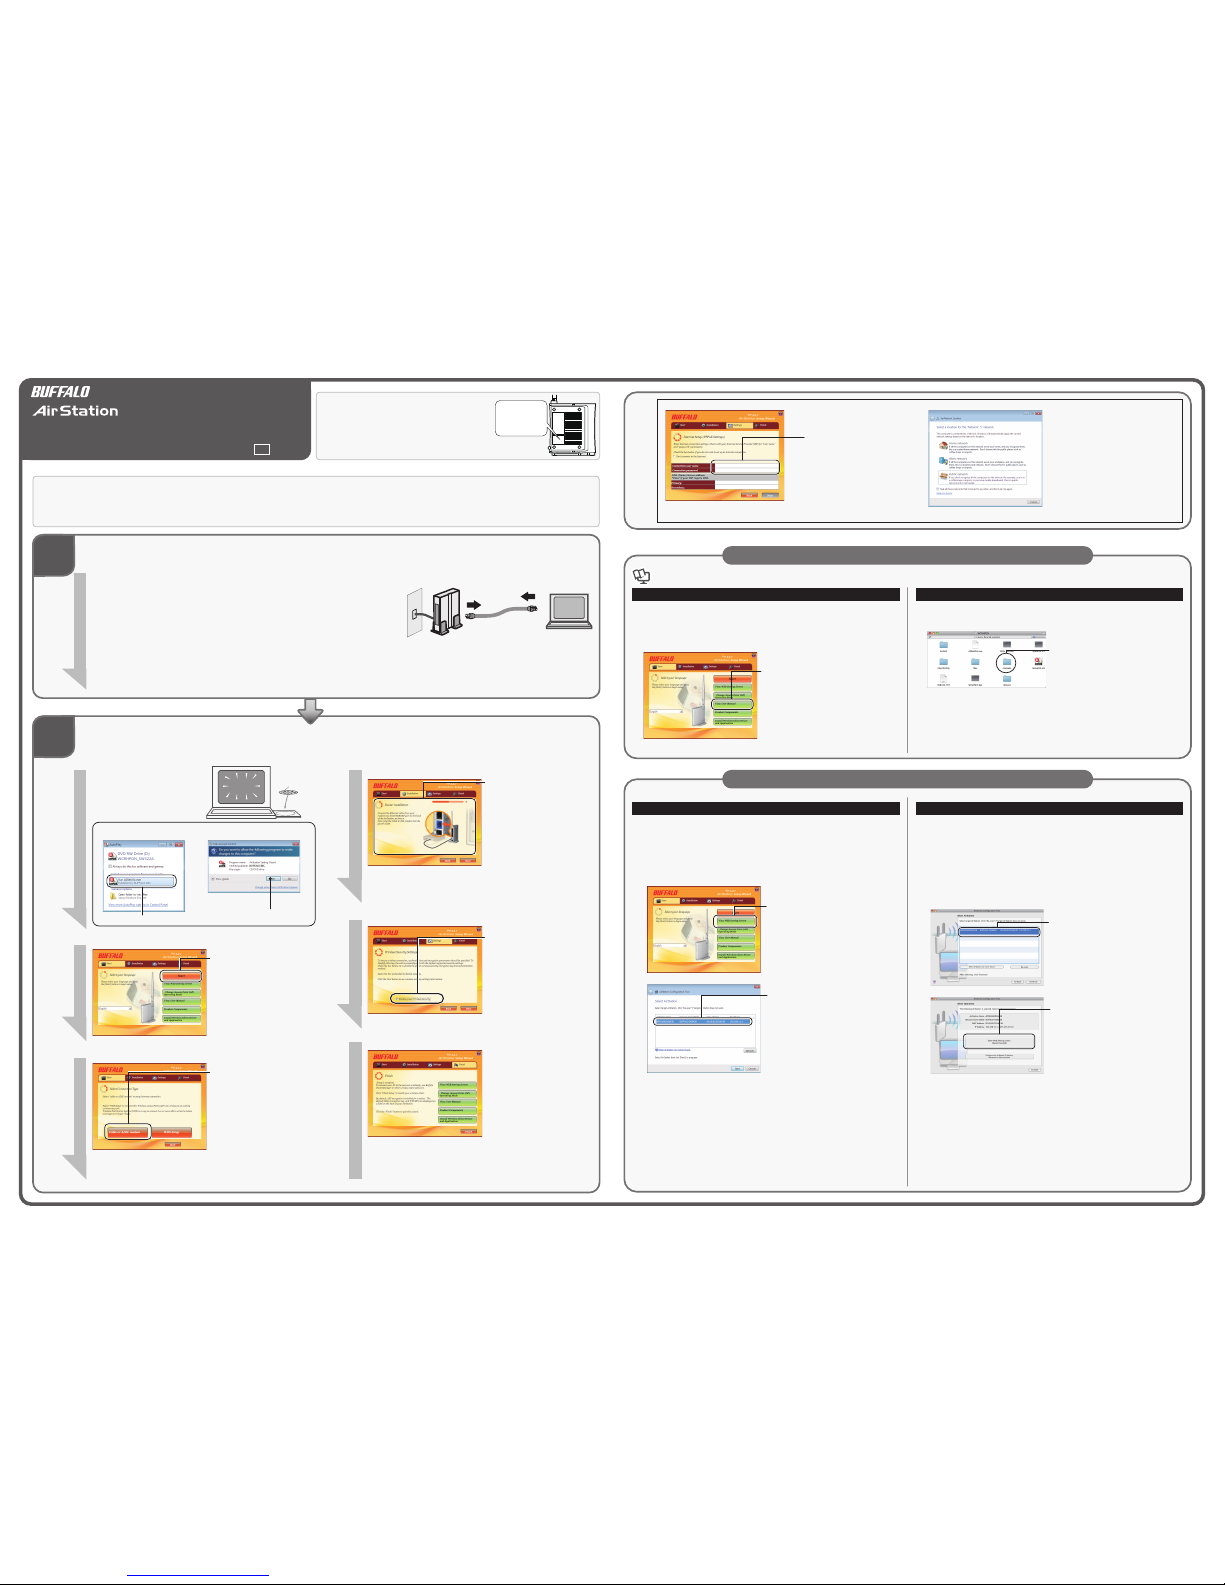
The AirStation’s default SSID is shown on its label, as
shown in the illustration to the right.
This label also shows a PIN code and encryption key, but
they are disabled by default. If you enable encryption in
step 2 - 5 below, this will be the default PIN code and
encryption key.
Getting Started
Installation
The installation CD in your package will step you through installation. To begin, insert the CD in your computer.
Power on your computer and insert
the software CD from your AirStation
package. The setup program will
launch automatically.
CD
If these screens are displayed by Windows,
The settings are complete when
the "Finish" screen is displayed.
(1) Turn off your computer.
(2) Unplug the LAN cable connecting the modem and your PC.
(3) If you are using CATV to connect to the Internet, turn off the modem and leave it off for approxi-
mately 30 minutes.
With CATV, the modem remembers connected network devices, so other network devices can’t connect. After
the modem is off for 30 minutes, its memory will clear and it can establish a new communication.
1
Click [Start].
Note:
If you eject the CD during setup, and
then reinsert it, it will return to the
same place automatically.
For Macintosh Users
To use your Macintosh to make the initial settings for the AirStation, see Chapter 3 in the User Manual.
To access the User Manual, load the AirNavigator CD into your Macintosh, and double-click the PDF file in the “manuals” folder.
To access the Web configuration interface, double-click [AirStation Configuration Tools] in the “Mac” folder.
3
Click [Cable or ADSL modem].
This sheet describes the procedure for connecting the AirStation to the Internet.
For details on “WDS Setup”, see Chapter 3 in the User Manual.
To enable encryption, select
[Enable preset Wireless Security]
and click [Next]. The AirStation
will then use the SSID and
encryption key shown on the
label.
5
If Windows asks you to “Select a
location for the network”, choose
the location that best matches your
environment.
For more information about setup or configuring your AirStation, consult the User Manual on your installation CD.
For Windows Users
For Macintosh Users
1. Load the CD into your Macintosh.
2.
Double-click the icon for the mounted CD,
and double-click the “manuals” folder.
3. Double-click the PDF file in the “manual” folder to open the User Manual.
To configure more advanced settings, use the web-based configuration interface. Follow
the steps below to display the AirStation’s configuration interface.
1. Load the CD into your Macintosh.
2. Double- click the icon for the mounted CD, and double-click [AirStation
Configuration Tools] in the “Mac” folder.
3. Click [Continue].
4.
Select “AirStation” from the list, and click
[Continue].
Note:
If “AirStation” is not displayed in the list,
check the connection between the
Macintosh and AirStation, and click
[Re-scan].
5.
Click [Open Web Setting screen.].
6. After the user name and password screen is displayed, enter “root” in the Name field
and the AirStation password (no password is set by default) in the Password field,
and then click [Log In].
7. The Configuration Interface is displayed.
Note: · Click [Quit] on the [Complete] screen displayed behind the Configuration
Interface to close.
· To display the AirStation's configuration interface without using the CD, open
your web browser and enter the AirStation's IP address in the address bar. The
AirStation’s default IP address is 192.168.11.1 in router mode or 192.168.11.100 in
AP mode.
Viewing the Configuration Interface in a Macintosh
Note : The illustrations or screen shots may look different from the actual screens.
If "Internet Setup (PPPoE Settings)"
screen is displayed, follow the
information your provider provided
to you (the provider registration
notice) to enter each settings, and
click [Next].
4
Proceed with the setup process
by following the on-screen
instructions.
After this, the installation
method and cable connection
method are displayed on the
screen. Follow the instructions
on the screen to perform the
setup.
After the power for the AirStation is turned on, wait until the DIAG LED turns off
before proceeding to the next step.
Page 2
Step.1
Step.2
Opening the User Manual
Additional Information
Step.2 (Continued)
เปิด
I
II
SSID:
BUFFALO-123456
PIN: 12345678
คีย์:
abcdefghijklm
ให้คลิก [เรียกใช้ ASSetWiz.exe]
คลิก [ใช่] หรือ [ดำเนินการต่อ]
พีซี
โมเด็ม
(2) ถอดสาย
(2) ถอดสาย
(1) ปิดเครื่อง
ปิด
1
2
เมื่อต้องการกำหนดค่าขั้นสูงเพิ่มเติม ให้ใช้อินเทอร์เฟซการกำหนดค่าบนเว็บ
ทำตามขั้นตอนด้านล่างเพื่อแสดงอินเทอร์เฟซการกำหนดค่าของ AirStation
1. ใส่แผ่นซีดีลงในคอมพิวเตอร์ของคุณ
ถ้า Windows เปิดหน้าจออัตโนมัติขึ้นมา ให้ดับเบิลคลิก [เรียกใช้ ASSetWiz.exe]
ถ้าหน้าจอ "การควบคุมบัญชีผู้ใช" ปรากฏขึ้น ให้คลิก [ใช่] หรือ [ทำต่อ]
2.
คลิกที่ [เรียกดูหน้าจอการตั้งค่าเว็บ]
3.
AirStations
ทั้งหมดบนเครือข่ายจะปรากฏในรายการ
เลือก AirStation ที่คุณต้องการกำหนดค่า
จากนั้นคลิก [ถัดไป]
หมายเหตุ:
ถ้าหน้าจอ "AirStation's IP Address
setting" (การตั้งค่าที่อยู่ IP ของ
AirStation) ปรากฏขึ้น ให้เลือก [Obtain IP
address from DHCP server] (รับที่อยู่ IP
จากเซิร์ฟเวอร์ DHCP) หรือตั้งค่าที่อยู่ IP
ด้วยตนเองแล้วคลิก [ถัดไป]
4. เมื่อหน้าจอชื่อผู้ใช้และรหัสผ่านแสดงขึ้น ให้ใส่ “root” ในช่องชื่อผู้ใช้และใส่รหัสผ่านของ
AirStation (ตามค่าเริ่มต้นจะไม่มีการกำหนดรหัสผ่าน) ลงในช่องรหัสผ่าน แล้วคลิก
[ตกลง]
5. อินเทอร์เฟซการกำหนดค่าจะปรากฏขึ้น
หมายเหตุ: เมื่อต้องการแสดงอินเทอร์เฟซการกำหนดค่าของ AirStation โดยไม่ใช้แผ่นซีดี
ให้เปิดเว็บเบราว์เซอร์แล้วใส่ที่อยู่ IP ของ AirStation ในแถบที่อยู่
ที่อยู่เริ่มต้นของ AirStation คือ 192.168.11.1 ในโหมดเราท์เตอร์หรือ
192.168.11.100 ในโหมด AP
คู่มือผู้ใช้
1. ใส่แผ่น CD ลงในคอมพิวเตอร์
ถ้า Windows เปิดหน้าจออัตโนมัติขึ้นมา ให้ดับเบิลคลิก [เรียกใช้ ASSetWiz.exe]
ถ้าหน้าจอ "การควบคุมบัญชีผู้ใช้" ปรากฏขึ้น ให้คลิก [ใช่] หรือ [ทำต่อ]
2.
คลิก [ดูคู่มือผู้ใช้]
3. คู่มือผู้ใช้จะเปิดขึ้น
การดูอินเทอร์เฟซกำหนดค่าใน Windows
6
WCR Series
Quick Setup Guide
35011710 ver.01 1-01
English
ภาษาไทย
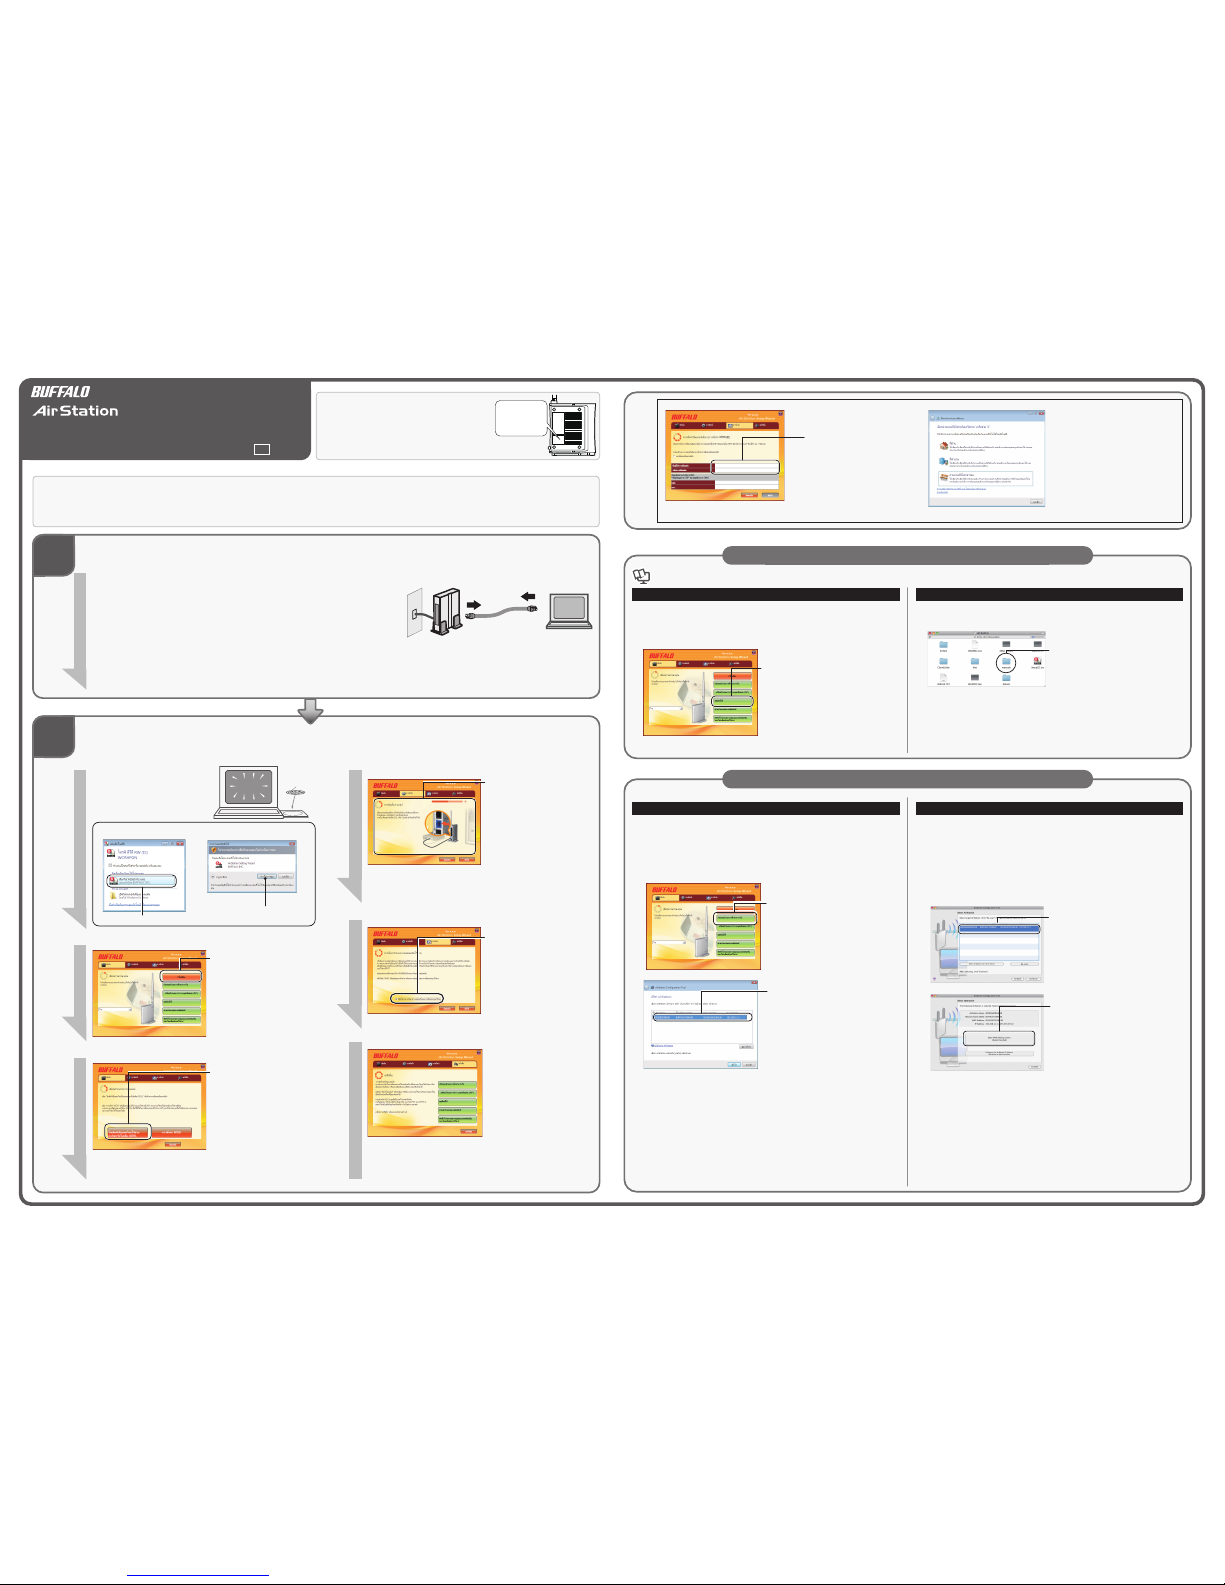
SSID เริ่มต้นของ AirStation
จะแสดงบนป้ายดังที่แสดงในภาพประกอบด้านขวา
ป้ายนี้จะแสดงรหัส PIN และคีย์การเข้ารหัสอีกด้วย
แต่จะถูกปิดใช้งานตามค่าเริ่มต้น
ถ้าคุณเปิดใช้งานการเข้ารหัสในขั้นตอนที่ 2-5 ด้านล่าง
รหัส PIN และคีย์การเข้ารหัสนี้จะเป็นรหัสเริ่มต้น
การเริ่มต้นใช้งาน
การติดตั้ง
ซีดีการติดตั้งจะแนะนำขั้นตอนต่างๆ ในการติดตั้งให้แก่คุณ เมื่อต้องการเริ่มติดตั้ง ให้ใส่ซีดีในคอมพิวเตอร์ของคุณ
เปิดเครื่องคอมพิวเตอร์แล้วใส่ซีดีซอฟต์แวร์
ที่มาพร้อมกับชุดอุปกรณ์ AirStation
โปรแกรมการตั้งค่าจะเปิดใช้โดยอัตโนมัติ
CD
ถ้า Windows แสดงหน้าจอนี้ขึ้น
การตั้งค่าเสร็จสมบูรณ์พร้อมกับปรา
กฏหน้าจอ “เสร็จสิ้น”
(1) ปิดคอมพิวเตอร์
(2) ถอดสาย LAN ที่ต่ออยู่กับโมเด็มและพีซีของคุณ
(3) ถ้าคุณใช้ CATV ในการเชื่อมต่ออินเทอร์เน็ต ให้ปิดโมเด็มทิ้งไว้ประมาณ 30 นาที
เนื่องจาก CATV จะทำให้โมเด็มจดจำอุปกรณ์เครือข่ายที่เชื่อมต่อไว้ จึงทำให้อุปกรณ์เครือข่ายอื่นๆ
ไม่สามารถเชื่อมต่อได้ หลังจากปิดโมเด็มทิ้งไว้ 30
นาทีแล้วความจำโมเด็มจะถูกล้างและสามารถสร้างการสื่อสารใหม่ได้
1
คลิก [เริ่มต้น]
หมายเหตุ:
ถ้าคุณเอาซีดีออกระหว่างการตั้งค่า
แล้วใส่ซีดีเข้าไปอีกครั้ง
การติดตั้งจะดำเนินการต่อจากขั้นตอนเดิม
โดยอัตโนมัติ
สำหรับผู้ใช้ Macintosh
เมื่อต้องการใช้เครื่อง Macintosh ของคุณในการทำการตั้งค่าเบื้องต้นสำหรับ AirStation โปรดดูที่บทที่ 3 ในคู่มือผู้ใช้
เมื่อต้องการใช้งานคู่มือผู้ใช้ ให้ใส่ซีดี AirNavigator ลงในเครื่อง Macintoshแล้วดับเบิลคลิกไฟล์ PDF ในโฟลเดอร์ “manuals”
เมื่อต้องการแสดงอินเทอร์เฟซกำหนดค่าแบบเว็บ ให้ดับเบิลคลิก [Airstation Configuration Tools] (เครื่องมือการกำหนดค่าของ Airstation) ในโฟลเดอร์ “Mac”
3
คลิก
[โมเด็มที่เชื่อมต่อโดยใช้สายเคเบิล
หรือโมเด็ม ADSL]
เอกสารนี้อธิบายถึงกระบวนการในการเชื่อมต่อ AirStation กับอินเทอร์เน็ตเท่านั้น
สำหรับรายละเอียดเกี่ยวกับ “การตั้งค่า WDS” โปรดดูที่บทที่ 3 ในคู่มือผู้ใช้
เมื่อต้องเปิดใช้งานการเข้ารหัส ให้เลือก
[เปิดใช้การรักษาความปลอดภัยของการ
เชื่อมต่อแบบไร้สาย] แล้วคลิก [ถัดไป]
AirStation จะใช้ SSID
และคีย์การเข้ารหัสที่แสดงอยู่บนป้าย
5
ถ้า Windows ขอให้คุณ
"เลือกตำแหน่งสำหรับเครือข่าย"
ให้เลือกตำแหน่งที่เหมาะสมกับสภาพ
แวดล้อมของคุณมากที่สุด
สำหรับข้อมูลเพิ่มเติมเกี่ยวกับการตั้งค่าหรือกำหนดค่า Airstation ของคุณ โปรดศึกษาจากคู่มือผู้ใช้ในแผ่นซีดีการติดตั้ง
สำหรับผู้ใช้ Windows
สำหรับผู้ใช้ Macintosh
1. ใส่แผ่นซีดีลงในเครื่อง Macintosh ของคุณ
2.
ดับเบิลคลิกไอคอนสำหรับซีดีที่ใส่แล้วดับเบิล
คลิกโฟลเดอร์ “manuals”
3. ดับเบิลคลิกไฟล์ PDF ในโฟลเดอร์ “manuals” เพื่อเปิดคู่มือผู้ใช้
เมื่อต้องการกำหนดค่าขั้นสูงเพิ่มเติม ให้ใช้อินเทอร์เฟซการกำหนดค่าบนเว็บ ทำตาม
ขั้นตอนด้านล่างนี้เพื่อแสดงอินเทอร์เฟซการกำหนดค่ของ AirStation
1. ใส่แผ่นซีดีลงในเครื่อง Macintosh ของคุณ
2. ดับเบิลคลิกไอคอนสำหรับซีดีที่ใส่แล้วดับเบิลคลิก [AirStation Configuration Tools]
(เครื่องมือการกำหนดค่าของ AirStation) ในโฟลเดอร์ “Mac”
3. คลิกที่ [Continue] (ทำต่อ)
4.
เลือก “AirStation” จากรายการ แล้วคลิก
[Continue] (ทำต่อ)
หมายเหตุ:
ถ้าไม่มี “AirStation” แสดงอยู่ในรายการ
ให้ตรวจสอบการเชื่อมต่อระหว่างเครื่อง
Macintosh และ AirStation แล้วคลิก
[Re-scan] (สแกนใหม่)
5.
คลิก [Open Web Setting screen.]
(เปิดหน้าจอการตั้งค่าบนเว็บ)
6. เมื่อหน้าจอชื่อผู้ใช้และรหัสผ่านแสดงขึ้น ให้ใส่ “root” ในช่อง ชื่อ และใส่รหัสผ่านของ
AirStation (ตามค่าเริ่มต้นจะไม่มีการกำหนดรหัสผ่าน) ลงในช่อง รหัสผ่าน แล้วคลิก
[Log In] (เข้าสู่ระบบ)
7. อินเทอร์เฟซการกำหนดค่าจะปรากฏขึ้น
หมายเหตุ:
·
คลิก [Quit] (ออก) บนหน้าจอ [Complete] (เสร็จสิ้น)
ที่แสดงอยู่ด้านหลังอินเทอร์เฟซการกำหนดค่าเพื่อปิด
·
เมื่อต้องการแสดงอินเทอร์เฟซการกำหนดค่าของ AirStation โดยไม่ใช้แผ่นซีดี
ให้เปิดเว็บเบราว์เซอร์แล้วใส่ที่อยู่ IP ของ AirStation ในแถบที่อยู่
ที่อยู่เริ่มต้นของ AirStation คือ 192.168.11.1 ในโหมดเราท์เตอร์หรือ
192.168.11.100 ในโหมด AP
การดูอินเทอร์เฟซการกำหนดค่าใน Macintosh
หมายเหตุ : ภาพประกอบหรือภาพหน้าจออาจดูแตกต่างไปจากหน้าจอจริง
หากหน้าจอ
"การตั้งค่าอินเทอร์เน็ต (การตั้งค่า
PPPoE)" ปรากฏขึ้น
ให้ทำตามขั้นตอนที่ได้รับข้อมูลจา
กผู้ให้บริการของคุณ
(ใบแจ้งการลงทะเบียนจากผู้
ให้บริการ)
เพื่อใส่ค่าสำหรับการตั้งค่าแต่ละอ
ย่าง แล้วคลิก [ถัดไป]
4
ดำเนินการตั้งค่าต่อไปโดยปฏิบัติตาม
คำแนะนำบนหน้าจอ
หลังจากนั้นวิธีที่ใช้ในการติดตั้งและ
วิธีที่ใช้ในการเชื่อมต่อจะปรากฏบน
หน้าจอ
ทำตามคำแนะนำบนหน้าจอเพื่อทำ
การตั้งค่า
หลังจากเปิดเครื่อง AirStation แล้ว ให้รอจนกระทั่งไฟ DIAG LED
ดับลงก่อนที่จะดำเนินการขั้นตอนต่อไป
ขั้นตอนที่ 1
ขั้นตอนที่ 2
ขั้นตอนที่ 2 (ต่อ)
การเปิดคู่มือผู้ใช้
ข้อมูลเพิ่มเติม
 Loading...