

Page 1

BT Voyager Digital Media Player
1 Operating system requirements
■ Windows XP Professional or Home Edition
■ Microsoft Windows 2000 Professional Workstation or Server
■ Microsoft Windows Millennium Edition (ME)
■ Microsoft 98 Second Edition (SE)
PLEASE NOTE
Microsoft Windows 98 or earlier, Microsoft NT Workstation or Server 4.0 are not supported.
Also not Mac compatible
Software requirements
■ Microsoft Windows Media Player (WMP) 9.0 or higher, available from the CD – see 2.1
■ Acrobat Reader to view and print the user guide, available from the CD – see 6.2
■ Microsoft Internet Explorer 5.01 or higher, although it does not have to be your default browser.
Optional
■ Real One Player - some Internet Radio stations stream through Real One, e.g. BBC radio 4
Hardware
■ A Pentium ll/Pentium ll equivalent or later processor at 233 MHz with 128 MB of RAM is recommended.
■ A free USB port
■ An active Internet connection (Broadband for optimal results)
PLEASE NOTE
All screen shots contained within this file are taken from Microsoft Windows XP
Page 2

2.1 Installing the DMP Software
■ Please ensure no other applications are running.
■ Insert the BT Voyager Digital Media Player CD into your PC’s CD ROM drive
■ The following screen will appear:
■ If the screen does not appear after a few seconds, select Run in the windows start menu and type
x:\setup.exe where x is letter for your CD ROM drive.
■ If you do not have Windows Media Player 9 installed on your PC you can load it by clicking on the link
■ Click on Install and follow the instructions on screen
■ Click on Next
Page 3

■ Select ‘I accept the terms in the license agreement’ and click on Next
If you select ‘I do not to accept the terms of the license agreement’ you will not be able to continue with the
installation.
■ Enter your name, organization is optional
■ Click on Next
Page 4
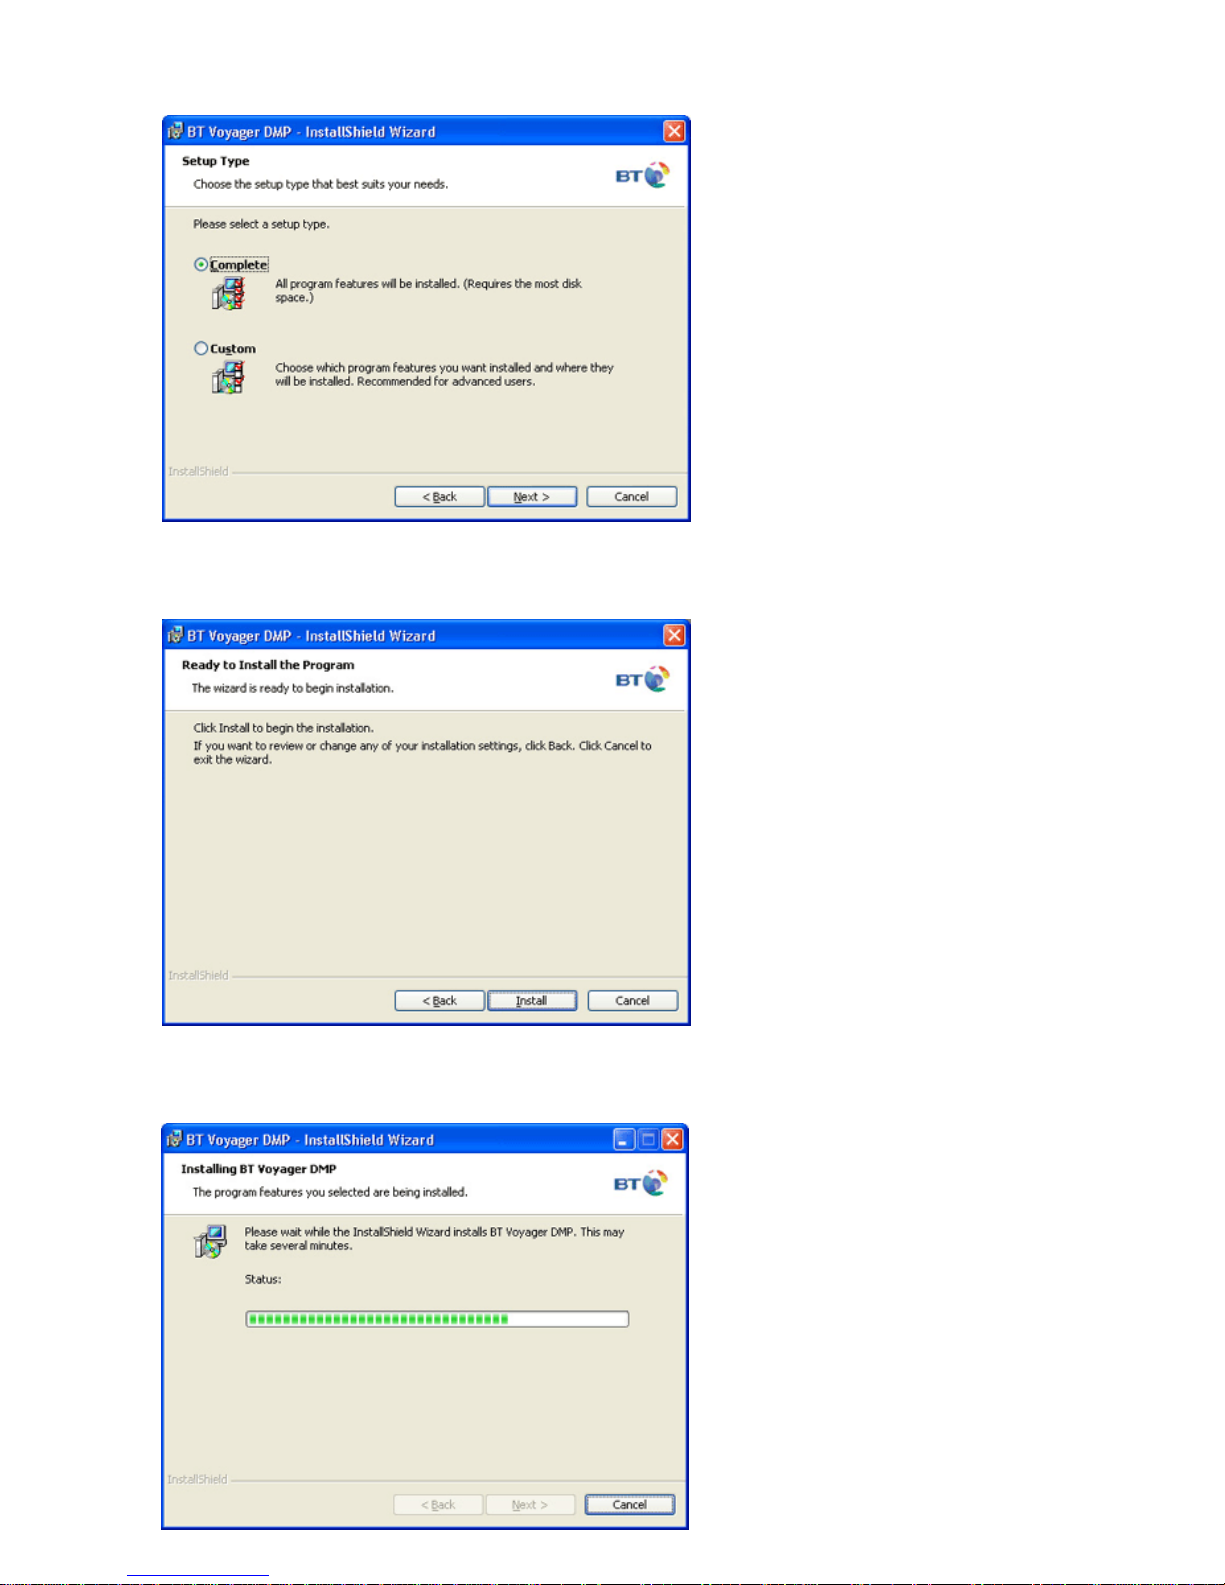
■ Select Complete
■ Click on Next
■ Click on Install
Page 5

■ You can either Select All or select specific types of files you would like the BT Voyager DMP to be associated
to. You can make changes after installation by accessing the Options menu (see 6.1).
■ Click on Apply
■ If you wish to view the User Guide as soon as installation is complete leave the View User Guide box checked.
■ Click on Finish
You may be offered the option to install Acrobat Reader if it is not detected on your PC. This is required to read
and print the pdf version of the user guide and you should click install.
Page 6

■ Click on Exit
■ On exiting a Voyager DMP icon will appear on your desktop
Windows XP, 2000 or Me users should proceed as follows:
■ You may be asked to reboot your PC, if so please do so at this point.
■ Now plug in the USB pod using the USB cable into a free USB port on your PC.
■ The PC will now recognise new hardware and install the necessary drivers.
■ The red power LED should be lit on the USB pod.
Windows 98SE users proceed as follows:
■ Reboot your PC
■ Plug in the USB pod using the USB cable into a free USB port on your PC.
■ You will be prompted to insert your Windows 98SE system disc.
■ When installation complete reboot your PC again.
■ The red power LED should be lit on the USB pod.
2.2 Revert your PC sound settings back to sound card
During the installation the BT Voyager DMP was selected as the preferred audio device, however this plays all
your PC sounds through the BT Voyager DMP.
■ Select Settings then Control Panel from the Windows Start menu
■ Select Multimedia (in 98SE), Sounds and Multimedia (in ME, 2000) Sounds, Speech and Audio Devices then
Sounds and Audio Devices (XP)
■ Select the Audio tab
Page 7

■ Sound playback should be reset to your PC default audio device.
■ Click OK and close the Control Panel screens.
3.1 Plug in the BT Voyager DMP
■ Plug the Power cable supplied into the back of the DMP.
■ Plug into the mains power.
■ The unit can be battery powered - you will require 8 x C type batteries (not supplied).
■ Open the battery compartment at the back of the DMP and insert the batteries as indicated.
IMPORTANT NOTE: To maximise battery life the clock function is disabled during battery operation. When
batteries become weak the DMP may stop receiving audio from your computer. This is normal and it will
recover when you replace the batteries or switch to mains power. Old batteries may swell and leak. To avoid
damage to your DMP, remove the batteries when the unit is to be stored for long periods of time or if the
batteries become exhausted.
■ Ensure you have an active Internet connection.
■ Double click on the BT Voyager DMP icon on your desktop.
■ Press and hold the Power button on the DMP until the display shows WELCOME.
The application will now stream the default Internet radio station through the DMP.
Page 8

3.2 Switching the DMP On and Off
■ To switch On press and hold the Power button until the display shows WELCOME and the red
Power light illuminates.
■ To switch Off press and hold the Power button until the display shows GOOD BYE.
The interface display will show STOPPED.
3.3 Setting the Time (only when Mains Powered)
■ Switch on the DMP.
■ Press and hold the Mode Select button until SETUP MENU is shown on the display.
■ Scroll through the Setup menu by pressing the Mode Select button until the display shows TIME DISPLAY 12
HOUR (or TIME DISPLAY 24 HOUR).
■ Press Tune up or Tune down to change from/to 24 hour or 12 hour.
■ Press Mode Select button again and the display will show SET TIME 12.01
■ Press the Tune down button to change the hours
■ Press the Tune up button to change the minutes.
■ When you have set the correct time press the Mode Select button again.
■ Display shows SAVE SETTINGS & EXIT
■ Press either the Tune up or Tune down buttons to save the changes.
If you select Set current time in the Options menu (6.1) the time setting on the DMP will be automatically setup by the application.
Page 9

3.4 Setting and using the Alarm (only when Mains Powered)
■ Switch on the DMP.
■ The time must be set before an alarm can be set, see 3.2 Setting the Time
■ Press and hold the Mode Select button until SETUP MENU is shown on the display.
■ Scroll through the Setup menu by pressing the Mode Select button until the display shows ALARM MODE
BUZZER (or ALARM MODE FM RADIO)
■ Press the Tune down or Tune up buttons to select either Buzzer or FM Radio.
■ Press the Mode Select button 3 times until the display shows SAVE SETTINGS & EXIT
■ Press the Tune up or down buttons to save the changes.
PLEASE NOTE:
If you have selected the FM radio as your alarm mode the alarm will always wake you up to the FM radio station
stored as preset 1.
■ Switch off the DMP by pressing and holding the Power button until the display shows GOOD BYE.
■ Press and hold the Mode Select button until the display shows ALARM NOT SET. If you have not set the time
the display will show CLOCK NOT SET, see 3.2 Setting the Time.
■ Press and hold the Mode Select button again until the display shows SET ALARM 00:00
■ Use the Tune down button to select the hour and the Tune up button to select the minutes.
■ When you have set the time for your alarm call press the Mute button.
■ A small bell will appear on the display to show the alarm has been set.
■ Pressing the Mode Select button once will show ALARM SET in the display with the time you have selected.
■ Press the Mode Select button again the display will show the current time with a small bell.
3.4.1 Switching the Alarm off
■ When the alarm goes off press the Mute button to switch off
3.4.2 Switching the Alarm to Snooze
■ When the alarm goes off press the Mode Select button to switch to snooze, the display will show scrolling Zz.
■ The alarm will go off every 9 minutes while in snooze mode.
■ Press the Mute button to switch the snooze off.
3.5 Changing the Radio Link Channel on the DMP
It is recommended that you leave the default Channel number in your DMP unless you have more than one
DMP and PC combination working within close proximity.
The five channels allow you to use multiple PC/DMP combinations by selecting different channels for
each set-up.
■ Switch on the DMP.
■ Press and hold the Mode Select button until SETUP MENU is displayed.
■ Press the Mode Select button and RADIO LINK CHANNEL n is shown on the display (where n is the current
setting 1 – 5, the default is 3).
■ Use the Tune down button to move down the channel numbers and the Tune up button to move up the
channel numbers.
Page 10

PLEASE NOTE:
If you change the RADIO LINK CHANNEL in the DMP you must also change the Device Channel in the Options
Menu of the Interface Menu. Both MUST be set to the same number or the audio transmitted from your PC will
not be received by the DMP.
■ When you have selected the correct channel number press the Mode Select button again until the display
shows SAVE SETTINGS & EXIT
■ Press either the Tune up or Tune down buttons to save the changes.
3.6 Setting the Display Contrast
■ Switch on the DMP.
■ Press and hold the Mode Select button until SETUP MENU is displayed.
■ Scroll through the Setup menu by pressing the Mode Select button until the display shows
SET DISPLAY CONTRAST.
■ Use the Tune down button to make the Contrast lighter and the Tune up button make it darker.
■ When you have selected the best Contrast setting press the Mode Select button again until the display
shows SAVE SETTINGS & EXIT
■ Press either the Tune up or Tune down buttons to save the changes.
3.7 Setting the Backlight Mode
You can select between:
Off – the LCD is not backlit
On – the LCD is backlit when the DMP is turned on
Auto – the LCD is backlit when you are operating any of the buttons on the DMP but goes off
after approx. 5 seconds
■ Switch on the DMP.
■ Press and hold the Mode Select button until SETUP MENU is displayed.
■ Scroll through the Setup menu by pressing the Mode Select button until the display shows BACKLIGHT
MODE ON (or OFF or AUTO).
■ Use the Tune down button to select On, Off or Auto.
■ Press the Mode Select button again until the display shows SAVE SETTINGS & EXIT
■ Press either the Tune up or Tune down buttons to save the changes.
Page 11

4 The Voyager DMP Control Panel and Interface Screen
Double click on the BT Voyager DMP icon on your desktop.
The interface screen you see on your PC is a copy of the front panel of the DMP with an added drop down
screen for setup.
4.1 Audio Output/Interface Menu
■ Left click on the DMP icon gives you access to the interface menu.
See section 6 for a full explanation of the interface menu options.
■ Right click on the DMP icon to switch audio devices between your PC default audio device and the DMP
Page 12

Output device is the BT Voyager DMP
Output device is the PC default audio device
4.2 Muting the Volume
On the DMP
■ Press and hold the Mute button until the display shows the word VOLUME flashing.
■ To take the mute off. Press and hold the Mute button. The display will show the word VOLUME as static and
the audio will return.
On the Interface
■ Click on the speaker icon (see 4.6), a large red cross will appear over it
■ To take off the mute, click on the speaker icon the red cross will disappear and audio will resume
4.3 Repeat On/Off
If on the tracks in the current album are repeated. If off the audio stops when the last track/file of the album is
played. Can be used in MP3 and CD modes only.
4.4 Shuffle On/Off
Shuffle allows random playback of tracks in the current album. Can be used in MP3 and CD modes only.
Page 13

4.5 Resize/Close Interface
■ Click on and the interface window will minimise. The DMP icon will only be seen in the system tray and
you must double click on it to open the interface window.
■ Click on and the interface window and application will close. The DMP will also switch off but will
continue to show GOODBYE on the LCD until it is switched off by pressing the Power button.
■ Click on to choose between three interface window options for your desktop:
Page 14

4.6 LCD Window
4.7 Mode Select
The large Mode Select button can be operated manually on the DMP or by clicking on the interface window. It
will switch both the application and the DMP sequentially between the available modes: Internet Radio, MP3,
CD, AUX, FM, MultiMedia and then round again.
4.8 Volume – Power – Data – Tune
■ The volume/tune buttons and the power/data LED’s perform the same function and can be operated in the
same way on the DMP or the interface window.
■ Click/press the Volume – to decrease and Volume + to increase the volume of the DMP.
■ The red Power LED is on when the DMP is turned on with mains power or batteries.
■ The green Data LED is on when the DMP is receiving data from your PC
■ The Tune buttons perform a number of functions dependent on the mode in use, see Section 5.
4.9 Play/Pause – Stop – Back/Forward
■ These buttons perform a number of functions dependent on the mode in use, see Section 5.
4.10 Preset buttons
■ These buttons are used to store and recall selected data such as radio stations.
4.11 Headphone socket
■ Insert the headphone jack in the socket for private listening.
Page 15

5 Modes
As well as playing audio through the DMP speakers you can also connect your DMP into your hi-fi which will
allow you to listen to everything through your existing speaker setup.
Use the phono cable provided to connect to your hi-fi using the Aux Out sockets on the back of the DMP.
5.1 Internet Radio
5.1.1 How to add Internet Radio Stations
■ Ensure you have an active Internet connection (Broadband for optimal performance).
■ Click on the ADD tab.
■ There are 3 ways to add Internet Radio stations:
To add from a URL
Select From URL…. in the ADD menu. You should know the exact Internet address of the radio station and
type it in the URL Link field. In the Name field you can put your preferred name for the radio station.
Page 16

To add using WindowsMedia
Select Windows Media…. in the ADD menu. A browser on WindowsMedia.com Radio Tuner web site opens.
Windows Media radio tuner allows plenty of options to search and select radio stations. Radio stations that
have a icon will automatically be added to the DMP application when you click on the icon.
Some radio stations that are played through their website will need the URL to be copied and added using the
from URL method.
To add using Real One
You must have Real One Player installed on you PC to access the RealOne Radio web site. It is available for
download from www.realone.com
Select Real One…. in the ADD menu. A browser opens on the RealOne Radio web site.
Page 17

RealOne radio tuner allows plenty of options to search and select radio stations. Radio stations that have a
icon will automatically be added to the DMP application when you click on the icon.
Some radio stations that are played through their website will need the URL to be copied and added using
the from URL method.
5.1.2 Setting Presets
You can select up to 6 of the Internet radio stations in your media list as your most favourite and allocate them
to the preset buttons.
Right click on a station
Select Preset and then click on the preset number you wish that radio station to be stored as.
The number you have selected will be shown against the radio station.
You can remove a preset by repeating the process but selecting the X to remove.
5.1.3 To Play Internet Radio Stations
To start playing an Internet radio station either click on Mode Select, or press the Mode Select button on the
DMP, until Internet Radio is shown on the LCD.
On the interface double-click the required radio station or click on a preset button.
On the DMP press any of the 6 preset buttons.
You also have the option to click on or press the Tune or Tune buttons to play the next or previous
Radio Station in the media list.
There is no limit on how many Internet Radio stations you can add to your media list. However, only 6 can be
stored as presets.
You will receive audible and visual feedback from the DMP while it is connecting to the radio station, and when
it is connected the LCD will display the station name.
Page 18

5.2 MP3
MP3 mode allows playback of most stored audio files located on your hard drive, and is not
restricted to MP3 files.
5.2.1 How to add music files or albums
You can listen to an Internet radio station whilst creating playlists without interfering with your listening.
■ Click on the ADD tab.
■ There are 3 options to add music/albums:
Page 19

To add a new album
Select New Album…. in the ADD menu. A new album will appear in the media list. You should rename the
New Album to a name of your choice. You can then add audio files to the album.
To add an album from a folder
Select Albums from Folders…. in the ADD menu. A standard Windows Browse for Folder dialog box appears.
You can then move through folders on your hard disk and select a folder containing your audio files.
Select the relevant folder and click OK. The DMP application searches that folder, and any subfolders
contained within it, and lists all found audio files in the DMP media list. The album name will be the folder
name. You can change this by right clicking on the folder name.
To add music files
Click on the album to which you want to add the files, or create a new album.
The above dialog will appear if you have not selected an album to add the files to in the Media list. The
application must know which album the audio files will be added to.
Page 20

Select MP3 files… in the ADD menu. The standard Windows File Open dialog box opens. You can browse
through folders and look for the audio files you want to add.
The File name field allows multi selection, so you can add more than one file simultaneously
to the selected album.
5.2.2 Setting Presets
Having added a number of albums to your media list you can select up to 6 as your most favourite.
Right click on an album
Select Preset and then click on the preset number you wish that album to be stored as. The number you have
selected will be shown against the album.
You can remove a preset by repeating the process but selecting the X to remove.
Page 21

5.2.3 To Play Audio Files/Albums
To start playing audio files either click on Mode Select, or press the Mode Select button on the DMP, until MP3
is shown on the LCD.
On the interface double-click required album or click on a preset button.
On the DMP press any of the 6 preset buttons.
You also have the option to click on or press the Tune or Tune buttons to play the next or previous
album in the media list.
There is no limit on how many albums you can add to your media list.
However, only 6 can be stored as presets.
The LCD will display information about the music you are listening to.
5.3 CD
Insert an Audio CD into your PC’s CD drive.
5.3.1 To Play an Audio CD
To start playing an audio CD either click on Mode Select, or press the Mode Select button on the DMP, until
CD is shown on the LCD.
You do not need to be connected to the Internet to listen to an audio CD but if a connection exists the DMP
application will automatically search CDDB for the CD details and display them in the LCD and the media list.
When you insert a new audio CD in your PC click on RENEW to refresh the information in the media list.
Page 22

If you do not have an active Internet connection the LCD will display the CD Drive as the Album and Track 1 etc
will appear in the Media list.
If the correct Album and Track names do not appear within reasonable time you can right click on the album or
track and select Search in CDDB.
The DMP application will search the CDDB database and if information is found a dialog box will appear. There
may be more than one CD displayed.
Page 23

You can select the appropriate one and click OK. The information will now appear in the Media list. If this does
not happen you may have selected the wrong CD.
5.3.2 To Clear the Local Database
Once an Audio CD has been played and its Album and Track names found the information is saved and
displayed each time it is played with the DMP.
You can right click on the album and select Clear Local Database to clear the saved information.
5.4 Auxiliary Input
The DMP allows other devices use its speakers e.g. a portable MP3 player or CD player.
Select the Auxiliary Input mode by either clicking the Mode Select button, or press the Mode Select button on
the DMP, until AUXILIARY INPUT is shown on the LCD.
Use the phono cable supplied or any leads supplied with your portable device to connect to the Aux In sockets
on the back of your DMP. The BT Voyager DMP will now become the speakers for your portable device.
5.5 FM Radio
The FM mode gives you the flexibility to listen to any of your favourite terrestrial radio stations. You can only
tune the FM stations from the DMP.
To listen to FM radio either click on Mode Select, or press the Mode Select button on the DMP. FM and the
station frequency is shown on the LCD and FM MODE will be shown in the interface.
The DMP also has an aerial located behind the right hand speaker that can be extended to improve reception.
5.5.1 Tuning FM Radio Stations
On the DMP press and hold the Tune or Tune buttons to auto scan available radio stations. You can
also keep pressing the Tune or Tune to scan manually.
5.5.2 Setting FM Radio Presets
Once you have scanned and connected to the radio station of your choice you can press and hold a preset
button for a few seconds until the display shows PRESET STORED. The radio station is then stored for future
use. Please note you can only select 6 preset FM radio stations and the station stored as preset 1 will be used
in the FM Radio alarm mode, see 3.4
Page 24

5.6 Multimedia Mode
The DMP can be used as peripheral speakers to other applications. If for example you are watching a DVD on
your PC you could use the DMP speakers for improved sound quality. Also if you are using your PC to conduct
a presentation the DMP can be used as remote speakers.
To use Multimedia mode either click on Mode Select or press the Mode Select button on the DMP until the
display shows MULTIMEDIA MODE.
On your PC:
■ Select Settings then Control Panel from the Windows Start menu
■ Select Multimedia (in 98SE), Sounds and Multimedia (in ME, 2000) Sounds, Speech and Audio Devices then
Sounds and Audio Devices (XP)
■ Select the Audio tab
■ Sound playback should be set to the USB Audio Device or Digital Media Player, depending on which
operating system your are running
■ Click OK and close
All audio will now be played via the DMP speakers.
Please note when you no longer wish to use the DMP in this mode you must reset the Audio Device Properties
back to your PC sound card. See 2.2 Revert your PC sound settings back to sound card
Page 25

6 Interface Menu
To open the interface menu left click on the DMP icon on the interface screen.
6.1 Options menu
Click on Options… to open the Options Menu.
6.2 Help
Click on Help and the on screen user guide will open.
A pdf version of this user guide is also available on the installation CD. You can access it by inserting the
installation CD in your computer and choosing User Guide from the menu.
If you cannot find the help you require in the user guide you can call the BT Voyager Helpline
on 0870 242 1950 or obtain help and information from www.voyager.bt.com
Page 26

6.3 About
The About dialogue box gives product version information and may be requested when
speaking to the Helpline.
6.4 Update
If there is a new version of BT Voyager Digital Media Player software, a browser will open and display the new
version and information on how to download it.
6.5 Resize
Performs the same function as and allows you to choose between three interface window options for your
desktop.
6.6 Tray Icon
Performs the same function as , causing the interface window to minimise. The DMP icon will only be seen
in the system tray and you must double click on it to open it.
6.7 Close
Performs the same function as , the interface window and application will close. The DMP will also switch
off but will continue to show GOODBYE on the LCD until it is switched off by pressing the Power button.
Page 27

7 FAQ’s
Why am I no longer getting sound through my PC?
Check you have reset your preferred sound playback to your PC sound card.
I am not able to hear Internet radio stations?
Check you have an active Internet connection.
Check your Firewall documentation and adjust security setting accordingly.
I am not able to hear any audio through the DMP?
Check that the output is selected to be the DMP.
I am hearing a lot of static on the DMP?
Check that both the DMP and the application are on the same radio channels.
I am hearing interference from the USB pod?
Move the USB pod away from your PC tower or monitor.
My PC automatically reboots and the DMP software does not run, why?
You are probably connecting your USB pod to a USB hub. It is recommended that the DMP is connected
directly to one of the PC USB ports.
Please note that BT has no control over the Windows Media or Real One web sites and screen shots are
used for demonstration purposes only and are subject to change.
Page 28

8 LCD Messages
STOPPED
This is shown when the current playing media is stopped. Applicable to Internet Radio, MP3 and Compact Disc
mode.
PAUSED
This is shown when the current playing media is paused. Applicable to MP3 and Compact Disc mode.
BUFFERING...
This is shown when the media stream is being buffered by the DMP audio player application. Applicable to
Internet Radio mode.
WAITING...
This is shown while the application is recognising the media stream. Applicable to Internet Radio mode.
READY
This is shown when the DMP is idle and waiting for a user action. An example of this is in CD mode when there
is no CD in the CD drive.
LOCATING MEDIA...
This is shown until the application locates the media stream. Applicable to Internet Radio mode.
CONNECTING TO MEDIA
This is shown while the application locates the server on which media stream is expected to be found.
Applicable to Internet Radio mode.
SEEKING…
This is shown while the application is seeking for the media stream. Applicable to Internet Radio mode.
ERROR IN MEDIA
This is shown when the media stream is not recognized, missing or raises error in the player. Applicable to
Internet Radio, MP3 and Compact Disc mode.
UNABLE TO PLAY ALBUM
This is shown when an album cannot be played. Applicable to MP3 mode.
CANNOT CONNECT
This is shown when the application cannot connect to media.
PLAYING…
This is shown when an audio stream is being played. The message ‘Playing’ is replaced on the display by the
media information (Album and track name etc) as soon as it is received.
SEARCHING IN CDDB
This is shown when the application requests CD album information from the CDDB server. Applicable to CD
mode.
Page 29

CD ALBUM NOT FOUND
This is shown when the requested CD album information cannot be found on the the CDDB server. Applicable
to CD mode.
MORE CD ALBUMS FOUND
This is shown when more than one album with the requested CD album ID is found on the CDDB server. A
dialog allowing user to manually select the proper album is displayed. Applicable to CD mode.
ERROR
This is shown when an error in the player is raised.
RA NOT INSTALLED
Shown in Internet Radio mode when playback of a ‘Real One’ audio stream is attempted when ‘Real One Audio
Player’ is not installed.
GOOD BYE
This is shown when the DMP is switched off or the application is stopped.
WELCOME
This is shown as a greeting when the DMP is switched on.
INTERNET RADIO MODE
Shown briefly when switching to Internet Radio mode.
MP3 MODE
Shown briefly when switching to MP3 mode.
COMPACT DISC MODE
Shown briefly when switching to Compact Disc mode.
AUXILIARY INPUT
Shown permanently when switching to Auxiliary Input mode.
MULTIMEDIA MODE
Shown permanently when switching to Multimedia mode.
FM MODE
This is shown on the application LCD when switched to FM mode.
ADDING MEDIA START
This is shown temporarily while audio files are being added to an album.
ADDING MEDIA ENDED
This is shown temporarily when the operation of adding audio files to album completes successfully.
Page 30

UNDEFINED
This is shown in case the Windows Media Player enters undefined state. (This is a standard WMP message)
PRESET STORED
This is shown temporarily when the selected media, album or track is set as preset.
 Loading...