

Page 1

Ultimate Doorphone Kit
For use with the Ultimate range
User Guide
Page 2

Please open this page for an ‘at a glance’
guide to your Ultimate Doorphone.
Page 3
1
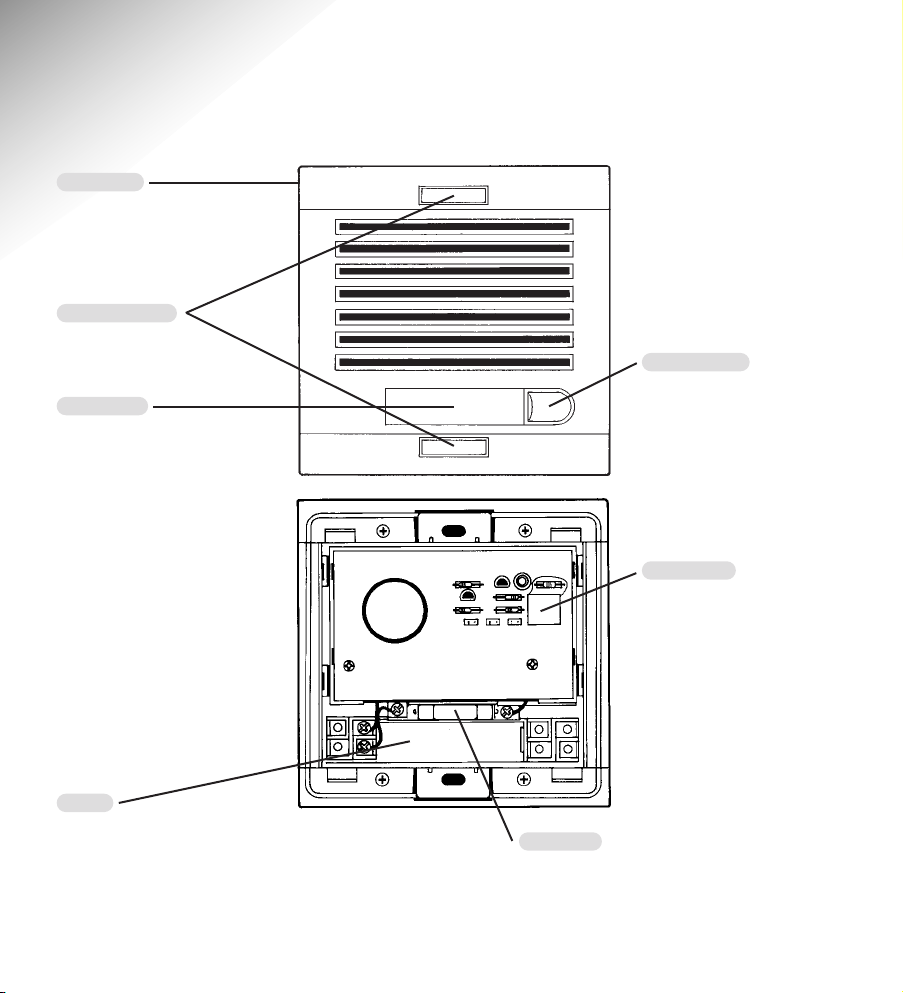
At a glance
Light bulb
For illuminating the name label.
Blanking plates
Name label
Ringer button
Will ring the Ultimate 106
when pressed.
Labels
Access to insert your name
label (see page 5).
Line socket
Connects to Ultimate 106.
Doorphone
With built-in loudspeaker
and microphone.
Page 4

2
Page 5

3
Contents
At a glance 1
Introduction 4
Installation 5
Using the Doorphone 8
Maintenance 11
Helpline 12
Technical information 13
Index 14
Page 6

Check that your Doorphone Kit is complete.
When you unpack you should have:
● Ultimate Doorphone
●
Aluminium surface-mounting
backbox
● Flush-mounting backbox
● Door lock and latch
(Door-release mechanism)
● Screws and Allen key
(4 screws and 4 rawl plugs)
● Pre-printed and blank labels
(see page 5)
● Cable clips
● 20 metre connection cable
(4-wire)
● 20 metre door-release cable
(2-wire)
4
Introduction
Your Ultimate Doorphone has been designed for ease of use and made to the
high standards set by BT.
CUSTOMER HELPLINE
Should you have problems with your
Doorphone, call the Ultimate Helpline on
0845 3300042
List of additional equipment required:
● Philips screwdriver(s)
● Wire strippers
● Screwdriver
Page 7

Break out the panel at the back of the
mounting box (flush or wall mounting) and
feed the connection cable through. Ensure
that the end you feed through is the end
with the plug fitted.
Connect the plug into the socket of the
Doorphone.
Fit the flush-mounting backbox into the
wall or attach the surface-mounting
backbox to the wall.
5
Installing the Doorphone
Choose where you are going to mount
your Doorphone. With the choice of 2
backboxes, you can mount it flush with the
wall, or surface mounting on the wall.
Lift the plastic panel and insert the label
into the Doorphone. Close the panel to
hold the label in place.
●
3
Attach the connection cable to
the Doorphone
Installation
Follow these steps to install your Doorphone and door lock and connect them
to your Ultimate 106.
FLUSH
MOUNTED
PLASTIC PANEL
STANDING
PROUD
TELEPHONE CORD
BACKBOX
DOORPHONE SOCKET
●
4
Fix the backbox to the wall
●
1
Choose where and how to site
your Doorphone
●
2
Insert your name label
Page 8

6
Installing the door lock
The Ultimate door lock can be flush or
surface mounted.
If replacing a Yale style lock, surface-mount
the Ultimate door lock.
The surface-mounting panel is already
attached.
The flush-mounting panel is also supplied
with the kit. If you wish to flush-mount,
you will need to replace the surfacemounting panel.
SURFACE
(YALE)
FLUSH
(MORTISE)
Lift the hinged blanking plates from the
right with a small screwdriver, insert
screws and tighten with the Allen key
provided, as shown.
Reposition the blanking plates over the
screws.
BLANKING
PLATES
ALLEN
KEY
●
5
Attach the Doorphone to the
backbox
PLEASE NOTE
Contact the Ultimate Helpline on 0845
3300042. Alternatively, please consult your
local qualified carpenter/ locksmith.
Page 9

Remove the existing latch from the door
frame.
Attach the door-release cable to the lock
by removing the cover plate and
connecting the wire to the terminal screws
as shown (it does not matter which way
round).
When flush-mounting the door lock,
(mortise type), you will need to drill a hole
through which to feed the wires.
7
●
1
Remove the existing latch
Connecting the Doorphone and
door lock to the Ultimate 106
Fix with cable clips supplied.
Remove the lower cover from the
Ultimate 106.
Cut the wire and cable to the desired length,
leaving enough to reach the connectors.
Strip the outer casing from the connection
cable to expose about 25mm of the inner
wires.
Strip each individual wire to expose about
5mm of copper wire. Do the same for the
door-release cable.
Unscrew the connection screws of the
Ultimate 106 and insert the exposed wires
in the order shown below. Screw the
screws down firmly onto the exposed wire.
Replace the lower cover.
●
2
Attach the door-release cable to
the door lock
●
3
Attach the door lock to the
door frame
●
2
Connect the wire and cable to
your Ultimate 106
●
1
Run the door-release cable and
the connection cable back to the
Ultimate 106
GREY
either way
NARROW BLUE
WIDE BLUE
WIDE ORANGE
NARROW ORANGE
Page 10

8
From any extension, lift the
handset and press the keypad
buttons in the order shown.
To set all extensions to ring
(normal mode)
31#Enter this code.
The Ultimate 106 announces
“Doorphone is set for normal”.
To set all extensions to ring/
take message (mailbox mode)
When in normal mode.
32#Enter this code.
The Ultimate 106 announces
“Doorphone is set for mailbox”.
You can either use the default
Doorphone message or record
your own message (see page 10
in this guide). The visitor will have
30 seconds to leave a message on
the Ultimate 106
To select the Doorphone setting
Using the Doorphone
Doorphone settings
The door phone has 3 different settings.
1
Ring all extensions set to ring – when
the Doorphone is pressed all extensions
which are set will ring. The first
extension to answer can speak to the
visitor and operate the door lock. This
is the default (original) setting so you
need not make any changes to your
Ultimate phone system if you want to
keep it. If no extension answers, the
phones will eventually stop ringing.
2
Ring all extensions/leave message –
when the Doorphone is pressed, all
extensions will ring and the first to
answer will be able to operate the door
lock. If no-one answers the Doorphone,
the visitor is automatically connected
to the voice mailbox (Ext. 11) and can
leave a message.
3
Forward the call – when the
Doorphone is pressed, a telephone
number will be called. This enables
visitors to be put in contact with you at
another location, or with a neighbour,
friend or colleague when you are out.
They cannot operate the door lock.
Page 11

9
The messages will be replayed.
Options during message playback
are:
90 Delete the message.
91 Skip back.
92 Replay current message.
93 Skip forward.
9
#
Skip to end to time/date announce
or CID number announce.
From extension 11, if you have
any messages, the dial tone will
sound a higher pitch.
7 Enter this digit. (If you have no
messages the Ultimate 106 will
announce “No messages”.)
The Ultimate 106 will announce
“You have X messages”, and the
Messages LED will be illuminated.
To play back Doorphone messages
To set the Doorphone to
forward a call
When in normal mode.
33
#
Enter this code.
The Ultimate 106 announces
“Doorphone is set for forward”.
The telephone number that the
visitor will be forwarded to is
speed dial number location 49.
(See the Ultimate 106 user guide
for instructions.)
IMPORTANT
If your Doorphone is set for call forward
(as above), once it has finished dialling the
forwarding number, the connection will
automatically be disconnected after 90 seconds.
If the visitor wishes to speak to the person for
longer than 90 seconds, they can extend the
conversation by another 90 seconds by pressing
the Doorphone button.
PLEASE NOTE
When in answer machine mode, Doorphone
messages will be stored on the central answer
machine with other voice messages.
When in Call Director mode, Doorphone
messages will be stored on extension 11
voice mail.
While you are talking to a visitor
via one of the extension phones:
RECALL
Press RECALL (you hear dial tone).
18 The door lock is opened for 10
seconds and you are connected
back to the Doorphone. (If you
wish – you can press RECALL 18
then hang up immediately.)
Or
18 Pick up any extension phone and
dial 18. The door lock is opened
for 10 seconds and you are
connected to the Doorphone.
To activate door-release mechanism
Page 12

10
You can programme a message
that will be played if you are not
available to answer the Doorphone.
From any extension, press keypad
in order shown.
When in normal mode.
38
#
Enter this code, speak your new
OGM into the handset at the
extension phone.
#
To end recording your message,
it will then be played back to you.
#
To save.
To record the Doorphone
answer message
From any extension, press keypad
in order shown.
When in normal mode.
38
#
Enter this code.
✱ To play your answerphone OGM.
To replay the Doorphone
answer message
From any extension, press keypad
in order shown.
When in normal mode.
38#Enter this code.
0 To delete your OGM.
To delete the Doorphone
answer message
17 Enter this code and speak to a
person at the door (from any
extension).
To call the Doorphone
Page 13

11
Maintenance
General
Simply clean your Ultimate Doorphone with
a damp cloth (not wet) or an antistatic wipe.
Service
Within guarantee
If you experience a problem with your
Ultimate Doorphone you should contact
the Ultimate Helpline on 0845 3300042.
Calls are charged at local call rates. If the
problem is not remedied, you will be
advised to contact your original point of
purchase.
Some retailers offer extended warranty
schemes for cover outside the initial
12-month period. Please ask them for details.
Outside warranty
If your Ultimate Doorphone needs repair
after the warranty period has ended, call
the Ultimate Helpline on 0845 3300042
for information on our recommended
repair agents.
If you have to return your Ultimate
Doorphone kit
Pack the kit securely, preferably in the
original packaging complete with the cables
and wires. We cannot take responsibility
for goods damaged in transit.
Page 14

12
Helpline
If you experiencing any difficulties,
please call the Ultimate Helpline on
0845 3300042.
Page 15

13
Technical information
Safety information This equipment is approved to:
Low Voltage Directive, EN60950.
EMC Directive 89/336/EEC.
BABT, CTR-21.
Installation information The Ultimate 106 Door entry connects to the Ultimate 106
via 4 wires. (Plug and socket at Doorphone side.)
Environmental conditions Temperature range: (storage) –30°C to 60°C,
(operating) –20°C to 55°C.
IP Rating – 437.
Ring cadence Doorphone: 0.5s ON, 2.5s OFF.
Operating Modes Normal, Mailbox and Call Forward – Programmable via
the Ultimate 106.
Power Supply Doorphone 24 volts DC supplied by Ultimate 106.
Power Supply Doorlock 12 volts AC supplied by Ultimate 106.
Dimensions (approx.) Protruding front: 130mm x 128mm x 17mm.
Flush mounting backbox: 115mm x 115mm x 45mm.
Aluminium surface-mounting backbox: 130mm x 128mm x 33mm.
Page 16

14
Index
At a glance 1
Backbox 5, 6
Connection cable 5
Connecting the Doorphone and
door lock to the Ultimate 106 7
Door-release cable 7
Door-release mechanism 9
Delete your answer message 10
Helpline 12
Installing the door lock 6
Installing the Doorphone 5
Introduction 4
Label 5
Maintenance 11
Message (outgoing) 10
– delete 10
– recording 10
– replay 10
Messages (incoming) 9
Name label 5
Playback Doorphone messages 9
Recording your answer message 10
Replay your answer message 10
Service 11
Settings 8
– forward the call 8, 9
– ring all extensions 8
– ring all extensions/leave message 8
Technical information 13
Unpacking 4
Page 17

APPROVED for connection to
telecommunication systems specified
in the instructions for use subject to
the conditions set out in them
CE compliant to 89/336/EEC
(EMC Directive) & 73/23/EEC
(Low Voltage Directive)
Offices in Europe, North America,
Japan and Asia Pacific.
The telecommunications services described in this publication
are subject to availability and may be modified from time to time.
Services and equipment are provided subject to British
Telecommunications plc’s respective standard conditions of contract.
Nothing in this publication forms any part of any contract.
Touchton e™ is a r egistered trade mark of
British Telecommunications plc in the UK.
© British Telecommunications plc 1999.
Registered Office: 81 Newgate Street, London EC1A 7AJ.
Registered in England No. 1800000.
Printed in China. Ultimate Doorphone Issue 1 (8/99) 3.
Designed by The Art & Design Par tnership Limited.
 Loading...