

Page 1
Edition 4 26 March ‘97
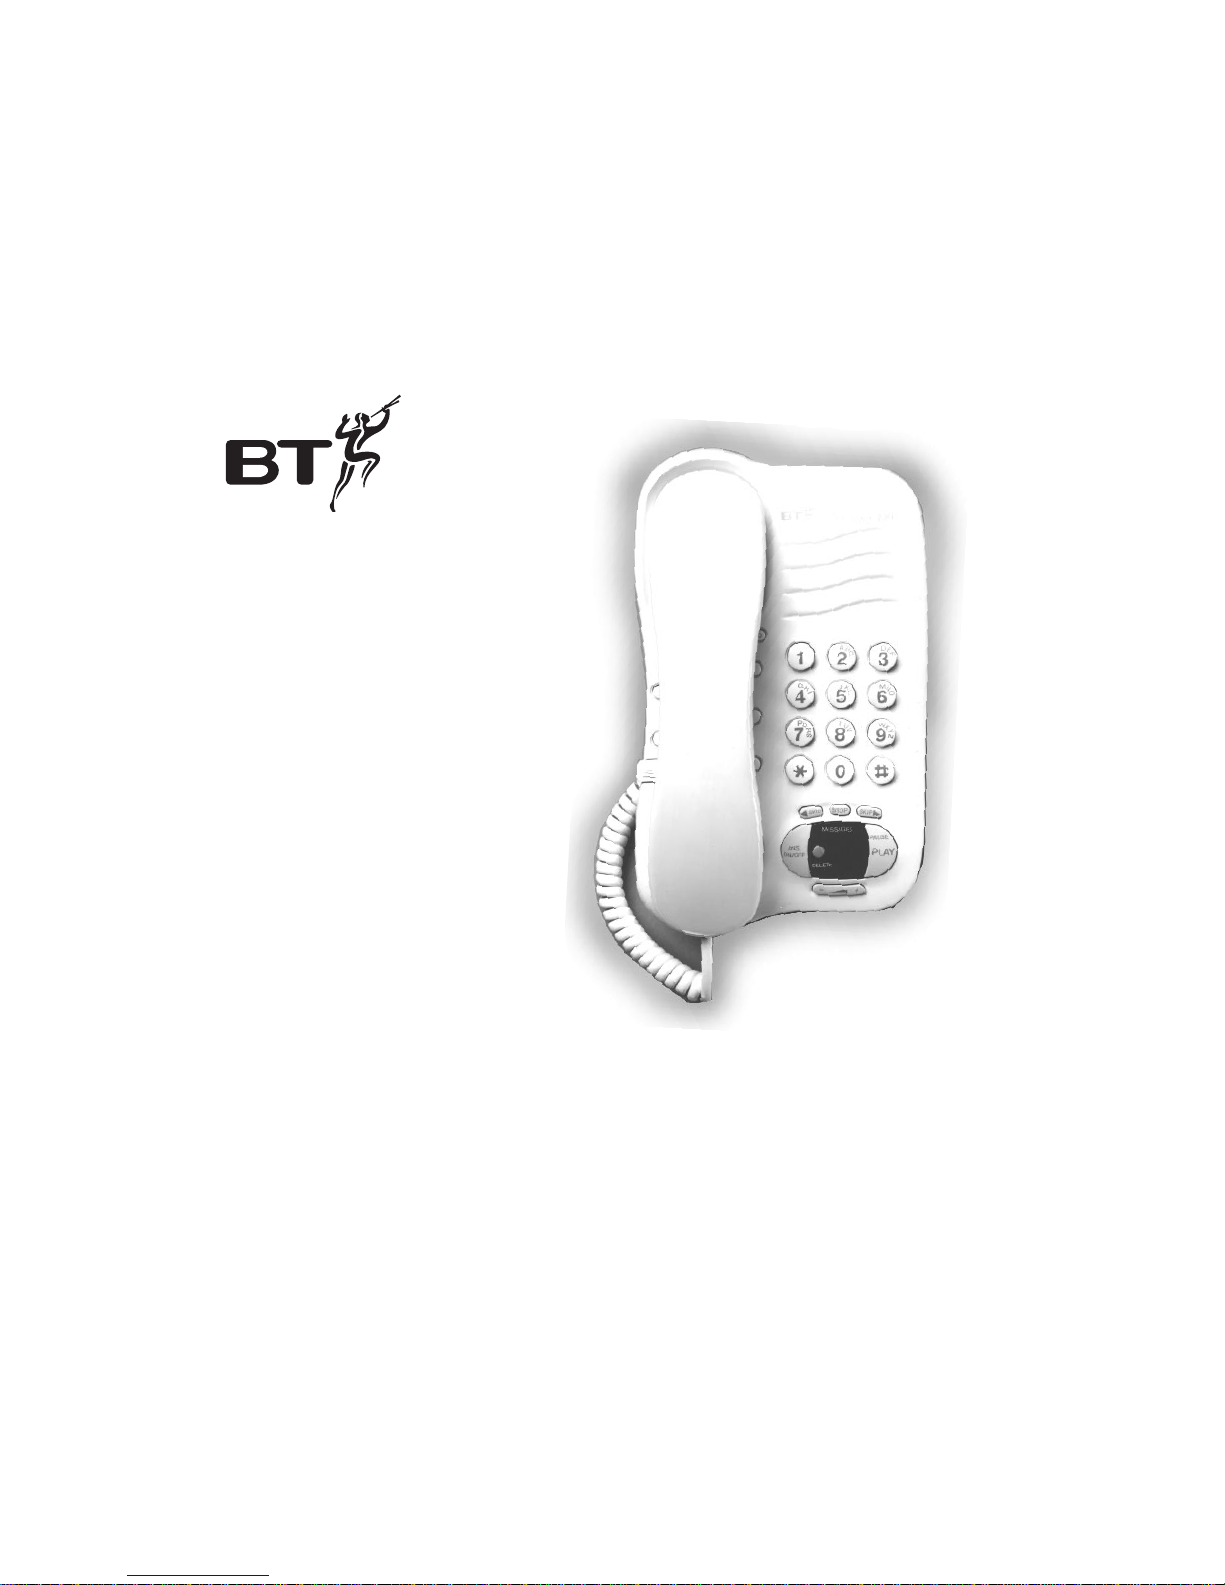
Response 130 telephone and
answering machine
User guide
Page 2
Edition 5 10 March ‘99
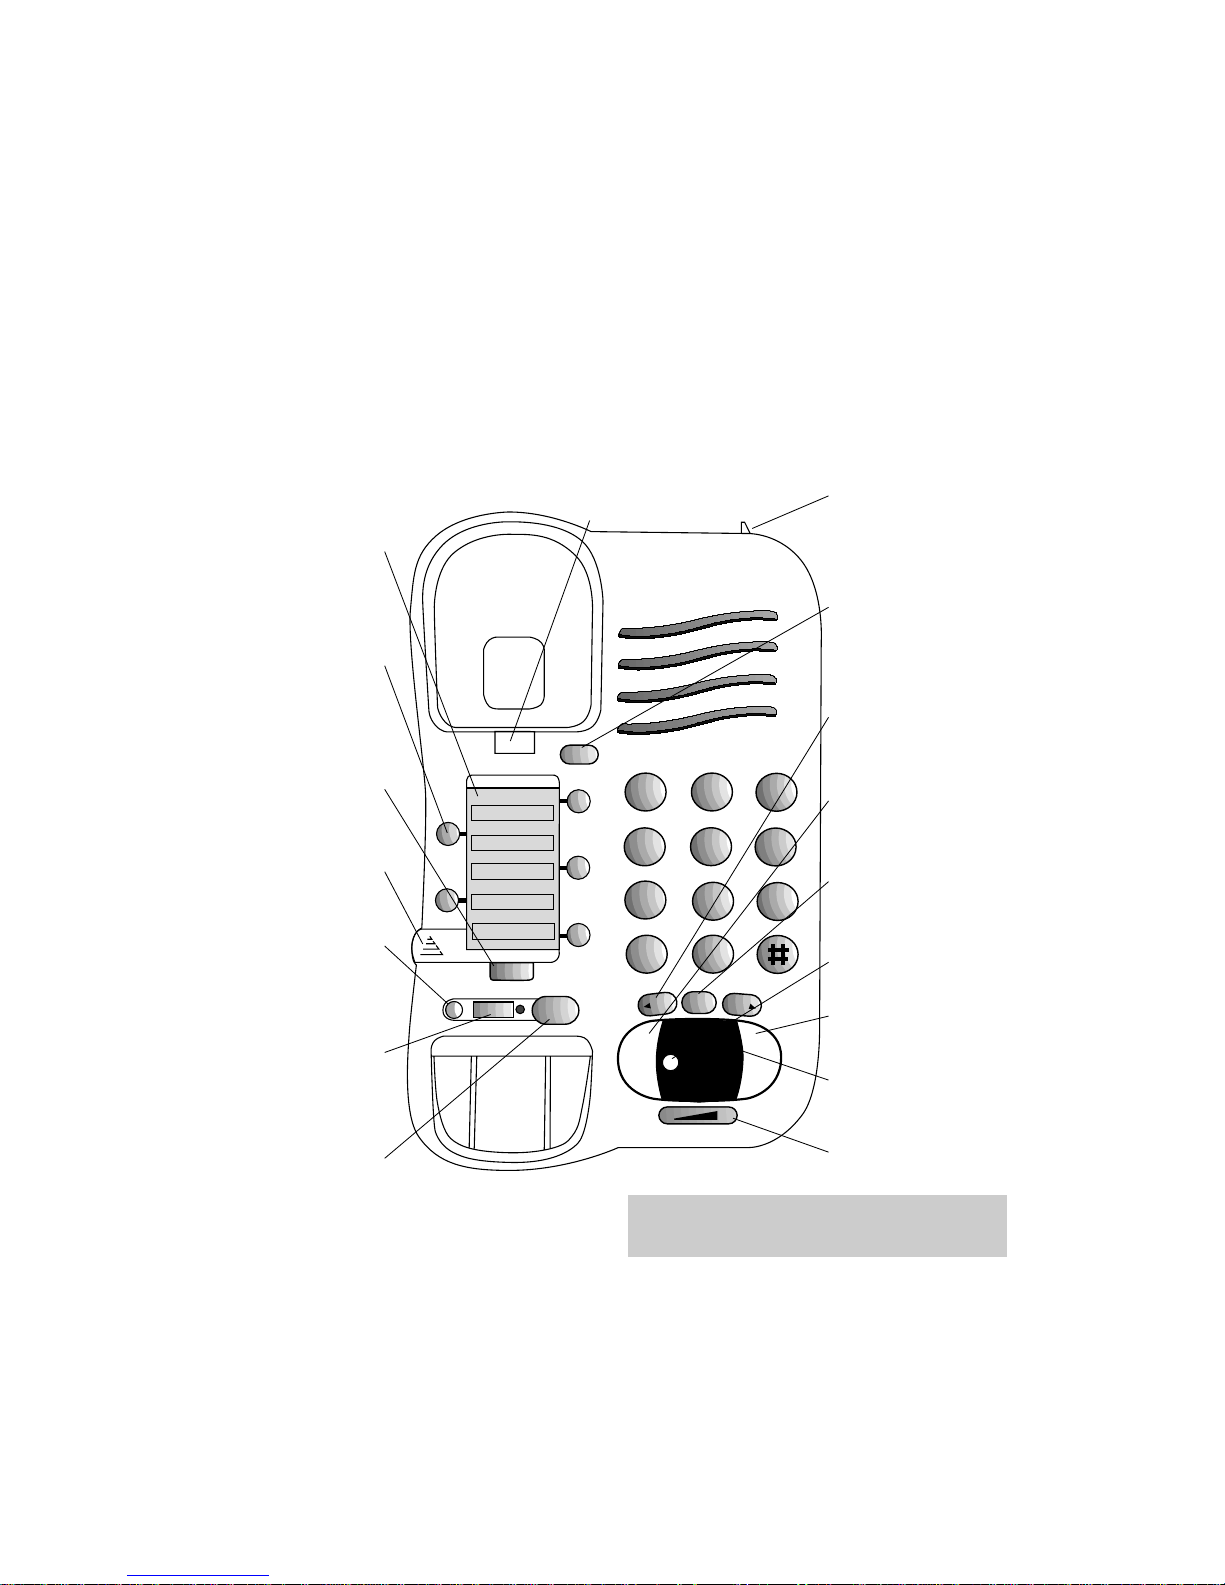
At a glance
Directory label
For making a note of
numbers stored in the
memories.
One-touch dial
memory buttons
Allows you to store and
dial up to five phone
numbers at the press of
a single button.
Two-touch dial
button
Dial up to five phone
numbers by pressing
just two buttons.
Panel cover
Lift to access other
Response 130 functions.
R button
Recall button for use
with switchboards and
BT Select Services.
Secrecy button
Allows you to talk to
someone in the same
room, without the person
on the other end of the
line hearing your
conversation.
Redial button
Press to redial the last
number called.
1
2
A
B
C
3
D
E
F
5
J
K
L
6
M
N
O
8
T
U
V
9
W
X
Y
Z
0
4
G
H
I
7
P
Q
R
S
✱
A
A
B
B
B
B
B
ANS
ON/OFF
MESSSAGES
DELETE
PLAY
PAUSE
REDIAL
SECRECY
DIAL B
MEMO
SKIP
SKIP
- +
STOP
00
Call Diversion
Call Return
Call Waiting
R
Please open this page for a further ‘at a glance’
guide to your Response 130.
Handset park
When wall mounted you can
hook the handset on this if
you need to temporarily
move away from the phone.
Memo button
Press to record a memo
message for someone on
your Response 130, instead
of writing a note.
Skip < >
Allows you to skip forward
or backward through your
messages.
Ans. On/Off
Switches the answering
facility on and off.
Stop button
Stops message playback and
incoming message
recording.
Delete button
Deletes recorded messages.
Play/Pause button
Press to play back and pause
messages.
Message counter
Shows how many messages
have been left.
Volume
Adjusts the volume during
message playback.
Handset catch
Supports handset
when wall mounted
Page 3

Edition 5 10 March ‘99
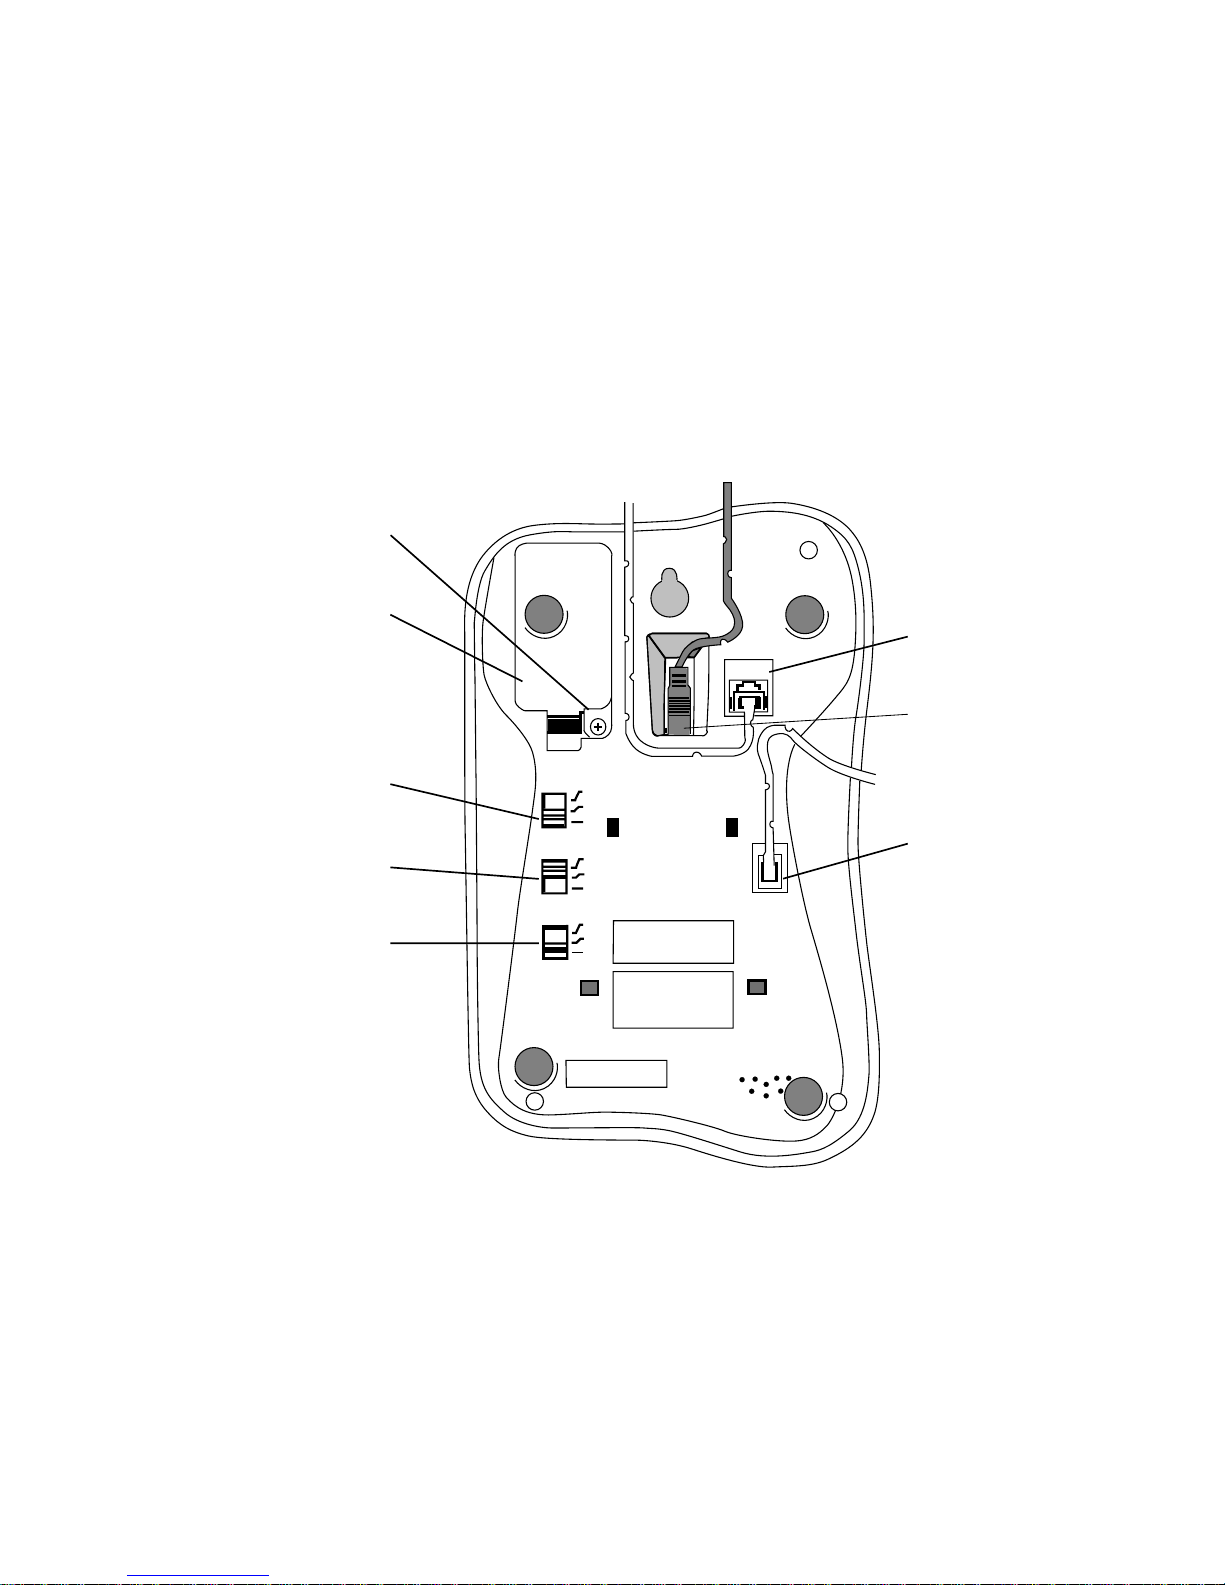
Reset button
Resets your Response
130 to its original factory
settings.
Day, Hour and Minute
buttons
Lets you set the day and
time, with the help of
voice prompts.
Store number
Allows you to store
numbers in the onetouch and two-touch
memories.
Record outgoing
message
Use to record and check
your outgoing message.
Dial Pause
Inserts a pause into a
number.
Code
Allows you to check and
change your three-digit
security code.
Select Services
buttons
Use to access preprogrammed BT Select
Services
-
you can also
overwrite them to store
one-touch numbers.
RESET
TIME SET
HOUR
DAY MINUTE
RECORD
OUTGOING
MESSAGE
STORE NUMBER
DIAL PAUSE
CODE
DIAL B
CALL
DIVERSION
CALL
RETURN
CALL
WAITING
Page 4
Edition 5 10 March ‘99
9V BATTERY
OPEN
MODE
RINGER
VOLUME
ANSWER
DELAY
P
T
TB
HI
LOW
OFF
TS
6
2
LINE CORD
H/SET CORD
Battery cover screw
Unscrew before opening
the battery cover.
Battery cover
Lift open to fit back-up
battery – 9V PP3 alkaline
(not supplied).
Mode switch
Sets the dialling mode.
(TB – for modern
exchanges)
Ringer Volume switch
Answer delay switch
Sets the number of rings
before calls are taken.
Telephone line
cord socket
Mains adaptor socket
Handset cord socket
1
Page 5

Edition 5 10 March ‘99
In this guide
At a glance 1
Introduction 3
Setting up 4
Using the answering machine 7
Using the telephone 14
Additional features 17
Help 22
Maintenance 25
Technical information 26
Index 28
Hints and tips boxes
In this user guide, we’ve included helpful tips and
useful notes. They are shown in a grey box.
Contents
2
et
Page 6
Good quality batteries should provide up to six
months back-up, however following a power cut, if
display is showing ‘ ’ or power cut for more than
one day then the battery should be replaced.
Edition 5 10 March ‘99
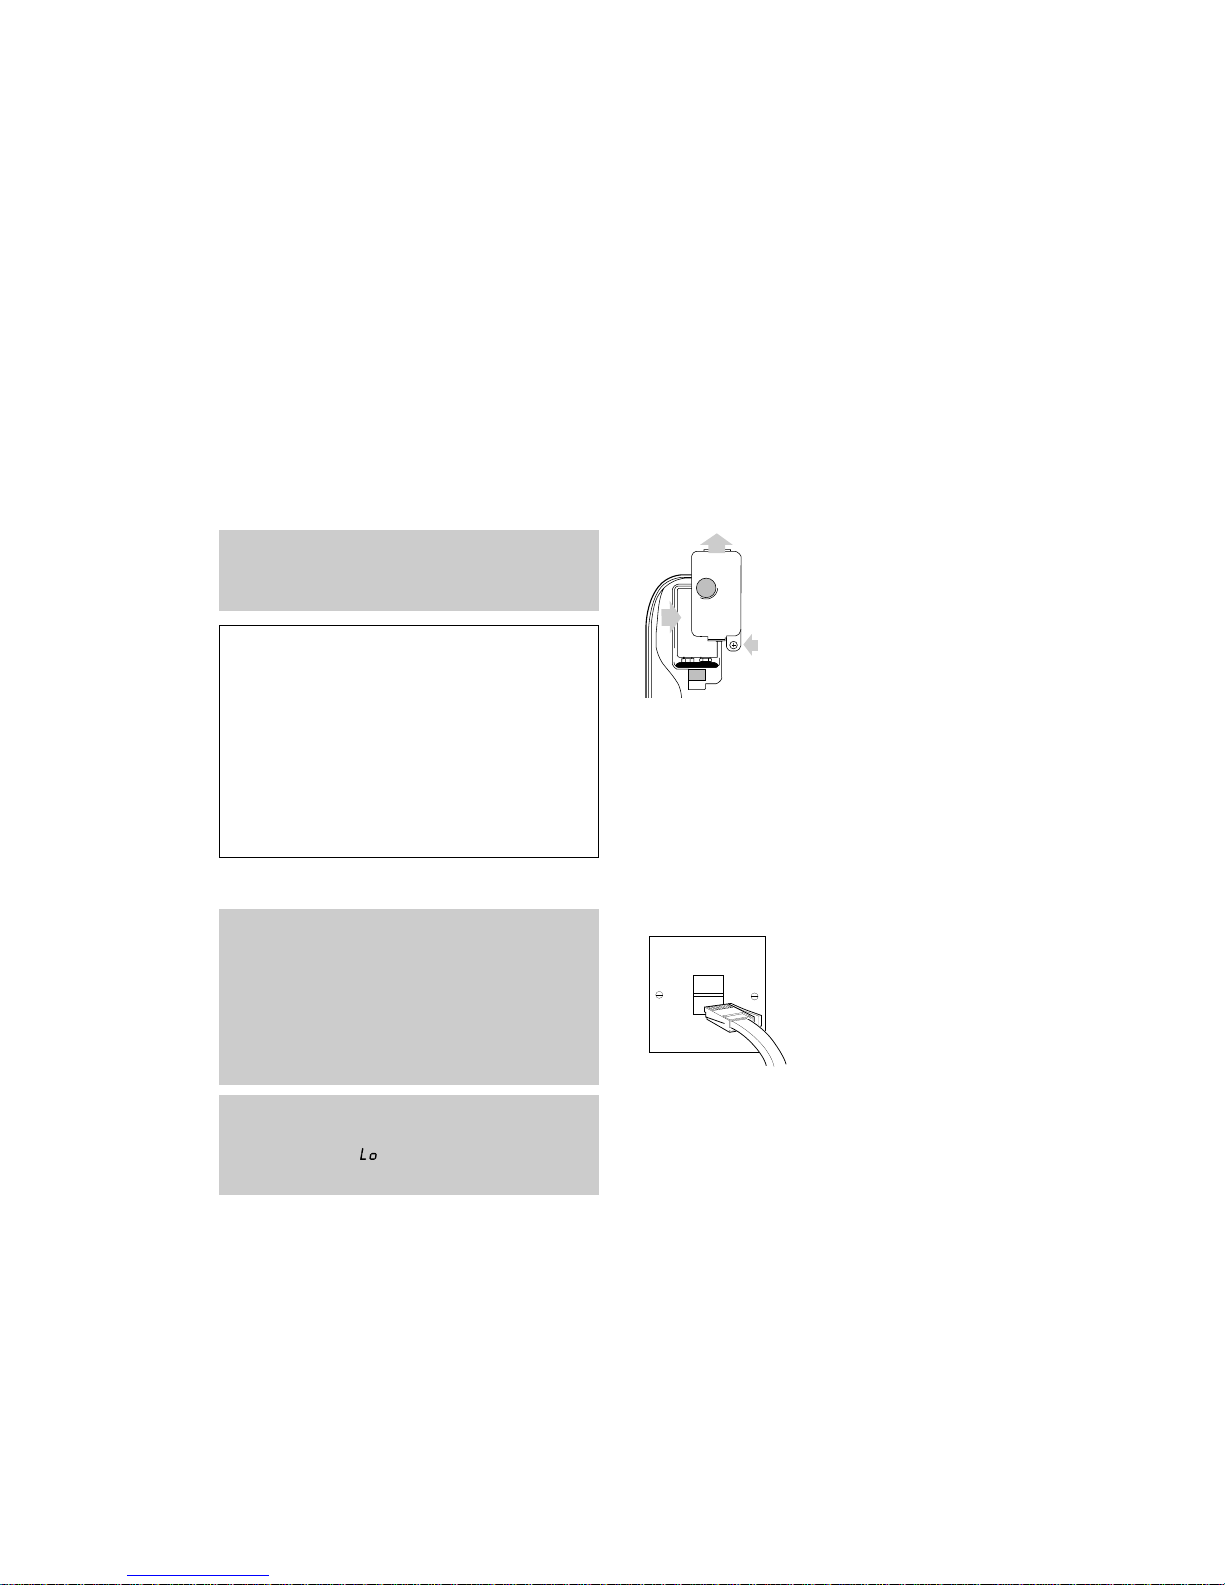
Unscrew and open the battery cover on the
underside of the base. Clip the battery
connector cap to the terminals of a PP3 9V
battery (not supplied). Replace the cover.
2 Plug your Response 130 into
the BT socket
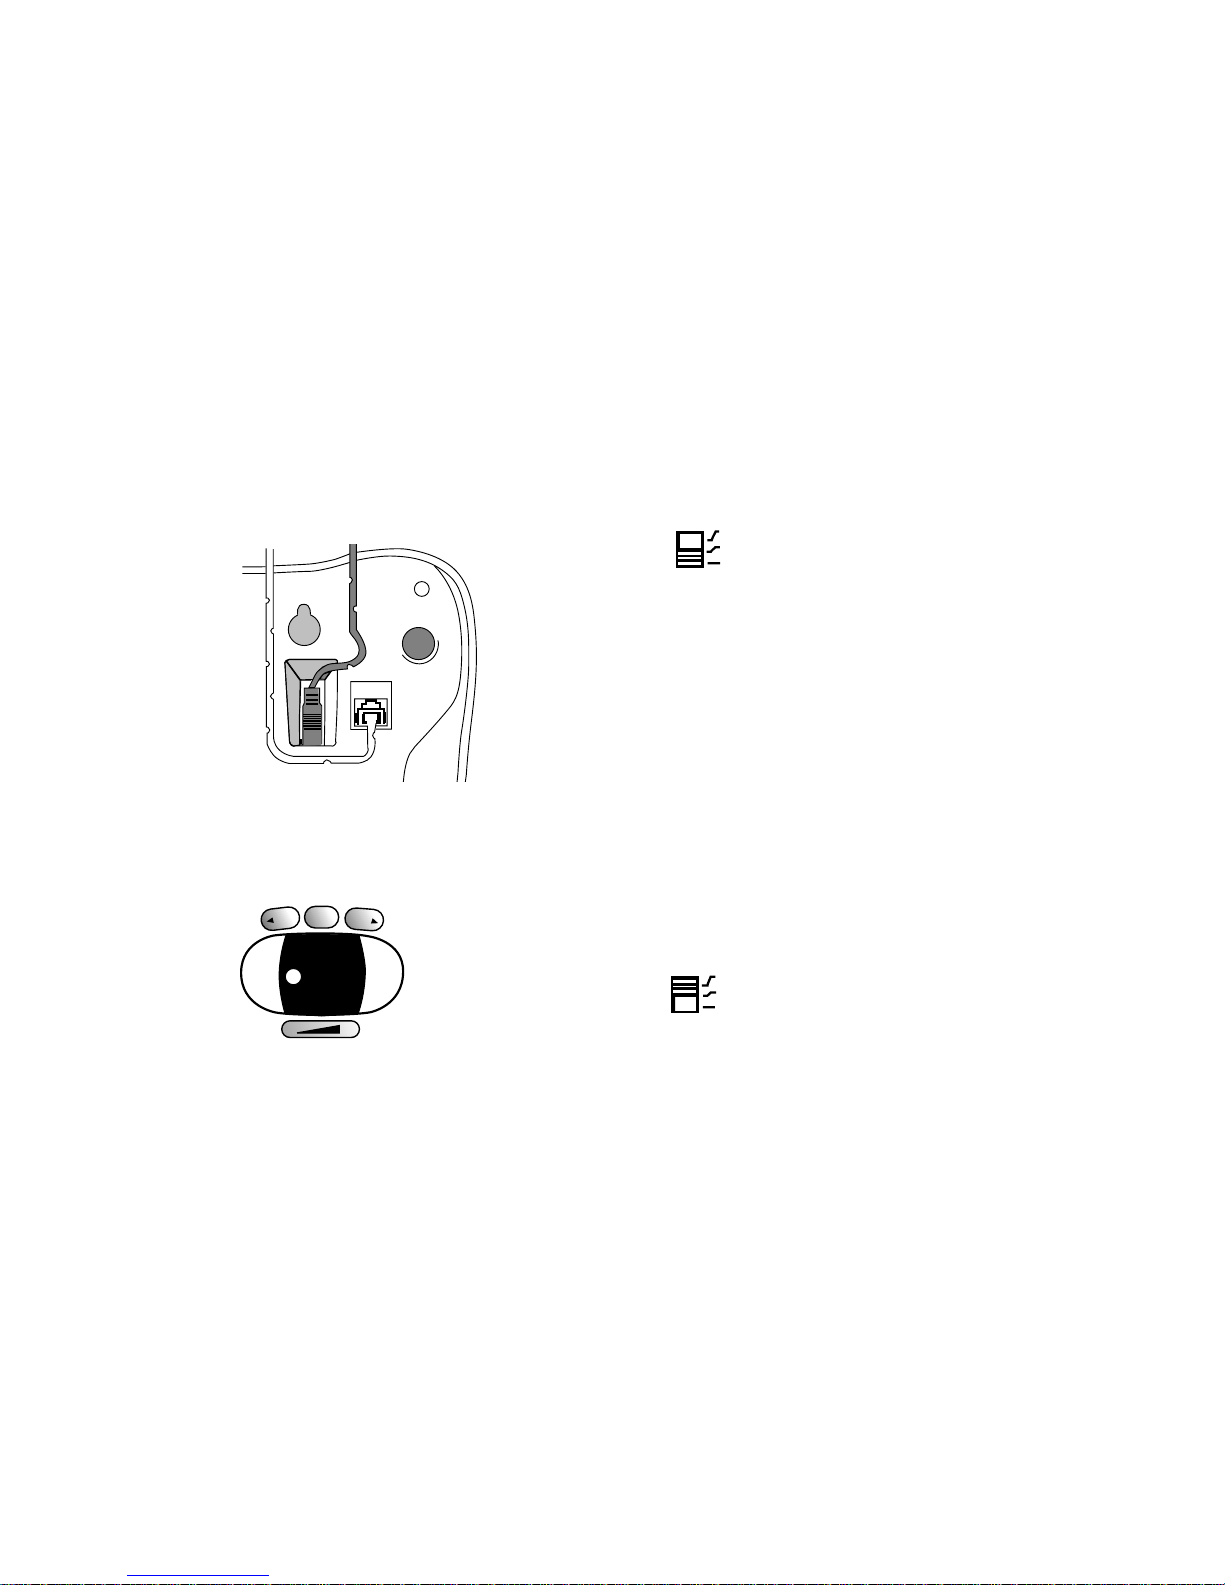
If you do not have a BT socket, call
Freefone 0800 800 150 and ask for a BT
engineer to come and fit the correct socket.
This is a chargeable service.
Setting up Follow these steps to get your Response 130
ready for use.
Plan where you will put your Response 130. It
should be within two metres of a power socket and
the phone socket.
Setting up
4
Warning
1 Do not try to use any power supply except
the one provided, item code 871018, otherwise
you may permanently damage your Response
130 and this will result in non-compliance with
EN41003:1993, and will invalidate the approval
given to this apparatus.
2 There is a slight chance that your phone
could be damaged by an electrical storm. We
recommend that you unplug the base unit from
the mains during storms.
1 Insert battery (for back-up only)
In the event of a power failure the back-up
battery prevents your Response 130 losing its
day/time setting, security code, outgoing message
and any messages or memos which have already
been recorded for up to 6 hours.
The answering machine will not operate until
power is restored.
OPEN
9V BATTERY
Page 7
Edition 5 10 March ‘99
3 Connect the mains adaptor
cord
Plug the mains adaptor cord into the socket
on the underside of your Response 130, then
plug the mains power adaptor into the mains
wall socket.
When the power is switched on, the display
lights up and shows ‘PF’. You will hear the
announcement ‘Please wait for 40 seconds’
while your Response 130 carries out a self-test.
The display counts down from ‘40’ to ‘00’.
When the countdown reaches ‘00’ the unit
will beep and announce the current setting of
the
ANS DELAY switch (pre-set to two rings).
This is the number of times your Response 130
will ring before answering a call.
4 Set the dial mode
The MODE switch, which is located on the
underside of the base, selects tone ( T) or
pulse (P ) with ear th recall, or tone with time
break recall ( TB).
TB Your Response 130 is preset to this
position. Most modern exchanges use
TB for faster dialling and for services
such as BT’s Select Services and
telephone banking.
T Set the switch to this if you are
connected to a PBX switchboard with
earth line recall.
P Set the switch to this if you continue to
hear a dialling tone having dialled a
number when set to
TB or T.
5 Set the ringer volume
The ringer switch is located on the underside
of the unit. There are 3 settings:
HI a loud ring; your Response 130 is pre-set
to this position.
LOW a quiet ring.
OFF no ring.
Setting up
5
LINE CORD
ANS
ON/OFF
MESSSAGES
DELETE
PLAY
PAUSE
SKIP
SKIP
- +
STOP
40
MODE
P
T
TB
RINGER
VOLUME
HI
LOW
OFF
Page 8
Edition 5 10 March ‘99
Setting up
6
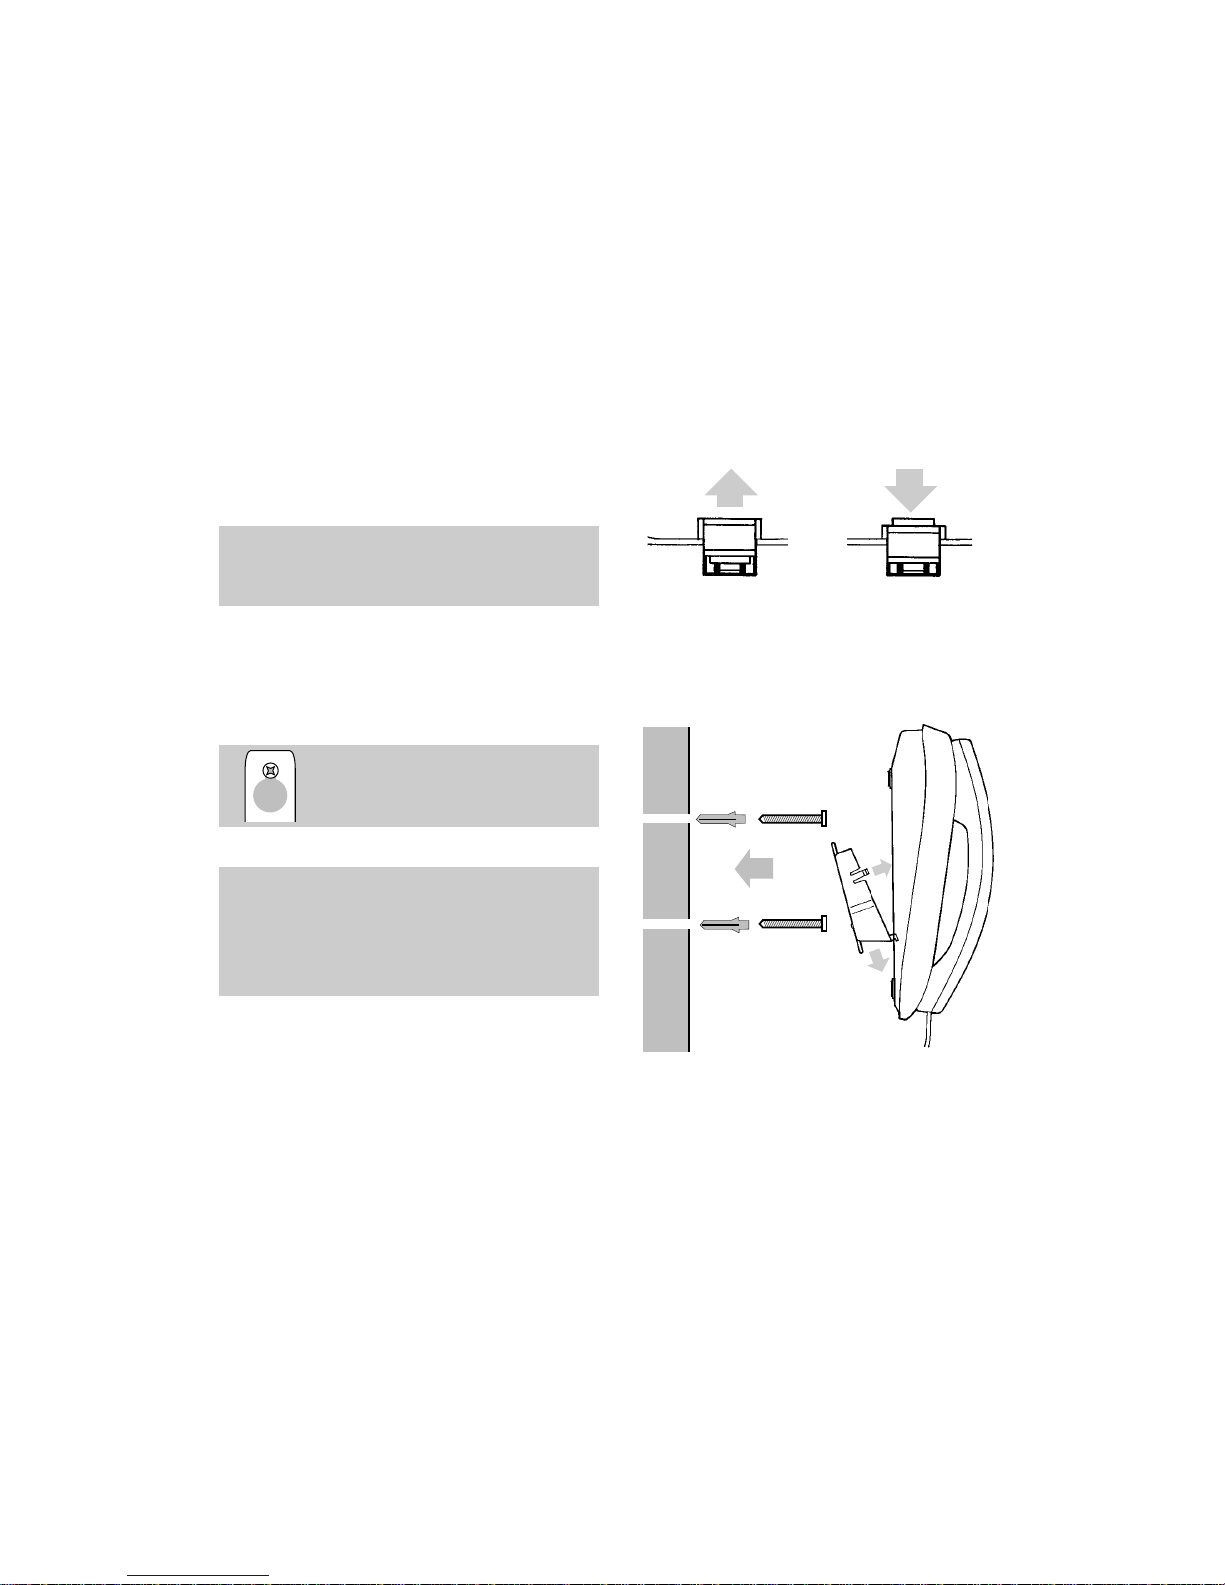
6 Wall-mounting (optional)
Before you start, ensure that the telephone is
in easy reach of the power supply and a
telephone socket, and that the wall can support
the weight of your Response 130.
• Drill two holes for the screws and inser t the
wallplugs provided (if you need them).
• Insert the screws leaving about 2 - 3 mm
sticking out to hang the bracket from.
A stencil is printed at the back of this guide
(page 30) which you can use to mark where you
will put the screws into the wall.
Attach the bracket by hooking
it over the screws protruding from
the wall.
Handset park
When wall mounted, if you need to temporarily
move away from the phone during a conversation
you can hook the handset on the handset park
located on the top of your Response 130.
• Pull out and turn the handset catch around
to prevent the handset falling off the base
when in the upright position.
• Attach the bracket and hang your Response
130 on the wall as shown below.
Wall
Wallplug
Screw
Page 9

Edition 5 10 March ‘99
7
Using the answering machine
Turning the answering machine
on and off
• Press the ANS ON/OFF button to turn the
answer functions on or off.
• If switched on, the unit will announce
‘Answer functions are on’; and display will
show ‘00 ’ or current number of messages,
unless battery is low or not fitted, when
display will alternate between number of
messages and ‘ ’
.
• If switched off, the unit will announce
‘Answer functions are off’; and the display
will show ‘– –’, unless battery is low or not
fitted when display will alternate between
‘– –’ and ‘ ’
.
Recording your outgoing message
The outgoing message is the message
people hear when they call you.
Your Response 130 has a digitally
pre-recorded message which can be replaced
with your own outgoing message (this will
not erase the pre-recorded message).
To listen to your Response 130’s
pre-recorded outgoing message
• Lift the handset to your ear and open the
panel cover.
• Press and release (do not hold down) the
RECORD OUTGOING MESSAGE button.
•
Your Response 130 announces: ‘Hello, your
call cannot be taken at the moment so please
leave your message after the tone’.
RESET
TIME SET
HOUR
DAY MINUTE
RECORD
OUTGOING
MESSAGE
STORE NUMBER
DIAL PAUSE
CODE
DIAL B
CALL
DIVERSION
CALL
RETURN
CALL
WAITING
RECORD
OUTGOING
MESSAGE
Using the
answering machine
Page 10

Edition 5 10 March ‘99
8
To record a new outgoing message
• Lift the handset to your ear and open the
panel cover.
• Press and hold the
RECORD OUTGOING
MESSAGE button. Your Response 130 will
announce, ‘Please speak after the tone, release
the button to end recording’.
• Make sure your mouth is close to the
handset microphone and speak reasonably
loud and clearly.
• You can now record your outgoing message,
for example: ‘Hello, I am sorry I can’t take
your call at the moment, but if you leave your
name and telephone number I’ll call you back
as soon as I can’.
• When you have finished your message,
pause for one second then release the
RECORD OUTGOING MESSAGE button.
• Your Response 130 will announce, ‘End of
recording. Your outgoing message is...’ and
will play back your new outgoing message.
For security reasons you may not wish to record
a message that says you are out.
To check your outgoing message
• Lift the handset to your ear and open the
panel cover.
• Press and release (do not hold down) the
RECORD OUTGOING MESSAGE button.
•
Your Response 130 announces: ‘
Yo ur
outgoing message is...’ and plays back the
message.
RECORD
OUTGOING
MESSAGE
RECORD
OUTGOING
MESSAGE
Using the
answering machine
Page 11

Edition 5 10 March ‘99
Using the
answering machine
9
To set the correct hour
• Press and hold the HOUR button. The voice
prompt will announce ‘The hour is...’, then
count through the hours.
• When the voice reaches the current hour
setting, release the
HOUR button.
• The voice will announce the new hour
setting followed by, ‘Accepted’.
To set the correct minutes
• Press and hold the MINUTE button. The
voice will announce, ‘The minute is’, then
count through the minutes.
• When the voice reaches the current
minute setting, release the
MINUTE button.
• The voice will announce the new setting
followed by, ‘Accepted’.
Setting the day and time
Once programmed, your Response 130 can tell
you the current day and time at the touch of a
button. It will also announce the day and time
of any incoming messages and memos left on
the machine.
The buttons for setting the day and time are
located under the directory label panel.
To hear the currently set day and time
• Lift the handset to your ear and open the
panel cover.
• Press the
DAY button. The voice will
announce the currently set time and
day, for example ‘The time and day is
Sunday 12:30am’.
To set the correct day
• Press and hold the DAY button. The voice
will announce ‘The day is…’, then run
through the days of the week.
• When the voice reaches the current
day, release the
DAY button.
• The voice will announce the new day and
time setting followed by, ‘Accepted’.
• The new day is now stored.
RESET
TIME SET
HOUR
DAY MINUTE
RECORD
OUTGOING
MESSAGE
STORE NUMBER
DIAL PAUSE
CODE
DIAL B
CALL
DIVERSION
CALL
RETURN
CALL
WAITING
TIME SET
HOUR
DAY MINUTE
TIME SET
HOUR
DAY MINUTE
TIME SET
HOUR
DAY MINUTE
Hours are also shown in the display as the voice
prompt counts through them.
Minutes are also shown in the display as the voice
counts through them.
The current day and time, and the recorded outgoing
message, as well as the code setting can also be
heard through the base speaker. This is achieved by
pressing and releasing the appropriate button and
then replacing the hand set, after cover is replaced.
Page 12

Edition 5 10 March ‘99
Using the
answering machine
10
Setting the volume
To set the playback volume
The volume increases/decreases
a step every time you press the volume button.
This is indicated by a short beep.
When you reach the loudest or quietest setting
you will hear two beeps.
• Press the
+
button to increase the
playback volume.
• Press the
-
button to decrease
the playback volume.
The volume of your outgoing message is not
affected by changing the playback setting.
Always make sure that the volume is at a level at
which you can easily hear your messages.
- +
Adjusting the number of rings
before a call is answered
When the answering machine is switched on,
you can set the number of times your Response
130 will ring before it answers a call.
To set the answer delay
The ANSWER DELAY switch, which is located
on the underside of the base, can be set to
2, 6
or TS (time saver), by moving the switch one
step at a time.
• The
2 rings setting will be answered after
about 4-5 seconds. Your Response 130 is
preset to this position.
• The
6 rings setting will be answered after
about 17 seconds.
• The time will var y, dependant on which
exchange or switch the Response 130 is
connected to.
• The
TS setting (time saver) can save you
time when accessing your machine remotely.
Your Response 130 answers after 2 rings if
you have any messages or 6 rings if there
are none. When you call to listen to your
messages, if the telephone rings a third time
it means there are no messages, so hang up
to save time.
ANSWER
DELAY
TS
6
2
Page 13

Edition 5 10 March ‘99
Using the
answering machine
11
To stop playback
• Press the STOP button.
• Your Response 130 will beep and stop playing
messages. The messages will not be deleted.
To pause during playback
• Press the PLAY/PAUSE button. The display
will show ‘
PA’.
• To resume playback, press the
PLAY/PAUSE button again.
If you do not press the
PLAY/PAUSE button
within 30 seconds, a beep is heard and playback
will be stopped.
To skip forward through messages during
playback
• Your Response 130 will skip forward one
message each time you press and release
the
SKIP
©
button during playback.
• Your Response 130 will announce, ‘End of
messages’, after it has played the last message.
Playing back messages
When your Response 130 has received
messages, the display will show the number of
messages you have.
To play back all messages
• Press the PLAY/PAUSE button.
• Your Response 130 will announce the
number of messages recorded, then
play back all messages.
To play back new messages only
• Press and hold the PLAY/PAUSE button for
1 second.
• Your Response 130 will announce the
number of new messages recorded since
the last time the messages were played, then
play the new messages.
• Alternatively messages can be heard through
the handset by picking it up after pressing
the
PLAY/PAUSE button.
If you receive an incoming call during playback, you
can answer the call and playback will be stopped.
Your messages will not be deleted.
PLAY
PAUSE
PLAY
PAUSE
PLAY
PAUSE
STOP
SKIP
©
You can adjust the volume of the playback by using
the volume button.
Page 14

Edition 5 10 March ‘99
To skip back to start of message during
playback
• To return to the beginning of a message,
press and release the
§
SKIP
button during
playback.
To find a specific message
• Press and hold down the
§
SKIP
button.
• Your Response 130 will count backward
through the messages received.
• Release the
§
SKIP
button when you reach
the message you wish to hear.
• The message is then played back.
To delete individual messages
• During playback of messages, press and
release the
DELETE button.
• Your Response 130 will announce, ‘Message
deleted’.
• Your Response 130 will then continue to
playback any further messages.
Using the
answering machine
12
To delete all messages
• Following playback of all messages, your
Response 130 will announce, ‘End of
messages’ and the message display will
count down from ‘06’ to ‘00.’
• During the countdown, press the
DELETE
button.
• Your Response 130 will announce,
‘All messages deleted’, followed by a beep.
When the message unit is full
The Response 130 has a recording capacity of
up to 14 minutes, including the outgoing
message. When the unit is full, the message
display on the base unit will flash ‘FL’ and the
number of messages, and the answering
machine will switch off. Callers will hear the
announcement, ‘Hello your call cannot be
taken at the moment, so please call later’.
To make room for new messages, or to record
a new outgoing message or memo, delete
old messages.
If the unit becomes full while recording a message,
the caller will hear the unit interrupt with the
announcement, ‘Memory is full, answer functions
are off,’ before being cut off. If you attempt to
record a memo when the unit is full, you will hear,
‘Memory is full’.
DELETE
§
SKIP
§
SKIP
DELETE
Page 15

Edition 5 10 March ‘99
Using the
answering machine
13
Call screening
When the answering machine is switched on,
you can hear incoming calls and decide
whether to answer them or let your
Response 130 take their message. If you decide
to answer the call, lift your Response 130’s
handset, the answering machine will stop and
allow you to speak.
Recording a memo
You can use your Response 130 to record a
memo to be played back later. Your Response
130 stores a memo and treats it in the same
way as an incoming message. Memos are
saved with any incoming messages.
To record a memo
• Pick up the handset.
• Press and hold the
MEMO button. The unit
will announce, ‘Please speak after the tone,
release the key to end recording’.
• After the tone, speak into the handset.
• When you have finished your memo, release
the
MEMO button.
Your memo will then be added to the number
of messages shown in the display.
MEMO
Page 16

Edition 5 10 March ‘99
Using the telephone
14
• Enter the number using the keypad.
• Press the
STORE NUMBER button again.
• You will hear two beeps to confirm that the
number is stored.
To dial numbers stored in Directory A
Numbers stored in Directory A can be dialled
at the press of a button.
• Lift the handset.
• Press the Director y
A button under which
the number you wish to dial is stored.
•Your stored number will be dialled
automatically.
Using the memory to store and
dial numbers
Your Response 130 can store a total of 10
phone numbers, each up to 20 digits long, with
5 each in one of its two directories.
Directory A stores five one-touch dialling
numbers. 3 of these buttons are
pre-programmed with Select
Services (see page 20) but can
be overwritten.
Directory B stores a further five two-touch
dialling numbers.
To store numbers in Directory A
• Lift the handset and open the panel cover.
• Press the
STORE NUMBER button.
• Press one of the five Director y buttons
under which you want to store a number.
Using the telephone
RESET
TIME SET
HOUR
DAY MINUTE
RECORD
OUTGOING
MESSAGE
STORE NUMBER
DIAL PAUSE
CODE
DIAL B
CALL
DIVERSION
CALL
RETURN
CALL
WAITING
Directory buttons
Keep a note of numbers stored in Directory A by
writing them on the directory label alongside the
button under which they are stored.
Writing the numbers in pencil makes it easier to
update the list if you change any of the stored
numbers. Additional directory labels are not
available so please be sure to keep your spare label
in a safe place.
Stored numbers can include switchboard and
Select Services using ✱ and # keys as well as
PAUSE and R (recall).
Page 17

Edition 5 10 March ‘99
Using the telephone
15
To dial numbers stored in Directory B
• Lift the handset.
• Press the
DIAL B button
• Press the director y button under which
the number you wish to dial is stored.
•Your stored number will be dialled
automatically.
To store a number of more than 20 digits
• Store the first 20 digits in Directory A
as shown on page 14.
• Then store the rest of the digits in the same
location under Directory
B.
To dial a number stored, as above, of more
than 20 digits
• Lift the handset and press the directory A
button which contains the first part of the
number you wish to dial.
• Press the
DIAL B button.
• Press the directory
B button which
contains the rest of the number.
• Your number will be dialled automatically.
To delete a number from Memory
• Lift the handset and open panel cover.
• Press the
STORE NUMBER button.
• Press the memory button of the memory you
wish to delete (with
DIAL B if necessary).
Your Response 130 beeps once after each
button press.
• Press the
STORE NUMBER button and
your Response 130 beeps twice, replace
the handset.
Storing a new number in memory automatically
overwrites any previous number stored in that
location.
The three select services can be retrieved by
carr ying out the following.
• Lift handset and open panel cover.
• Press the
STORE NUMBER button.
• Press the
DIRECTORY A button appropriate
to the select service.
• Press the
STORE NUMBER button.
• Replace handset before using
SELECT
SERVICE button to dial out.
To store numbers in Directory B
• Lift the handset and open the panel cover.
• Press the
STORE NUMBER button.
• Press the
DIAL B button.
• Press one of the 5 director y buttons
under which your number will be stored.
• Enter the number using the keypad.
• Press the
STORE NUMBER button again.
• You will hear two beeps to confirm that the
number is stored.
RESET
TIME SET
HOUR
DAY MINUTE
RECORD
OUTGOING
MESSAGE
STORE NUMBER
DIAL PAUSE
CODE
DIAL B
CALL
DIVERSION
CALL
RETURN
CALL
WAITING
Directory buttons
If when dialling, you press the DIAL B button by
mistake, you will automatically enter Directory B.
You can return to Directory A by pressing the
DIAL B button again.
Page 18

To redial a number at the touch of a button
• Lift the handset.
• Press the
REDIAL button. Your Response 130
will automatically redial the last number you
called. This saves you time if, for example,
the number dialled was engaged when you
last tried.
Inserting a pause
With some switchboards, after dialling the
access code you may have to wait for a
moment while the switchboard picks up an
outside line.
If this is the case, dial the access number, then
press the
DIAL PAUSE button before entering
the number.
Edition 5 10 March ‘99
Using the telephone
16
If you delete a number stored in the preprogrammed select service memories, the Select
Service number is restored to the memory.
Other Select Services which use the RECALL ✱
and # buttons may also be stored in the memories,
however, the RECALL button must be followed by a
pause. The DIAL PAUSE is located under the panel
cover.
REDIAL
DIAL PAUSE
SECRECY
For such services as home banking, you may need
to use the PAUSE function.
To insert a pause in the memory
•
Before entering a telephone number in the
memory, press the
DIAL PAUSE button.
• When you dial a number stored in the
memory, your Response 130 will
automatically insert a pause before dialling
the number.
Using the secrecy button
During a telephone conversation you can speak
to another person in the room without the
caller hearing you.
• Press and release the
SECRECY button on
the base. The
SECRECY light will come
on, you can hear the other caller but they
will not be able to hear you.
• Press and release the
SECRECY button again
to continue your call.
Using the inductive coupler
Your Response 130 has an inductive coupler in
its handset to improve sound quality for people
using hearing aids. Switch your hearing aid to
T and adjust the position of the phone until you
obtain the best sound.
Page 19

Edition 5 10 March ‘99
Additional
fea tures
17
Additional features
• Press the CODE button. The unit will
announce, ‘Accepted’, and then, ‘Zero’, for
the last digit.
• Press and release the
HOUR button until
you reach the number you want for the last
digit of your code.
• Press the
CODE button. The voice will
announce, ‘Accepted’, and announce and
display the new security code.
To check your security code
• Lift the handset to your ear, and open the
settings compartment.
• Press and release the
CODE button. The
voice will announce and display the current
code.
Remote access
You can switch on your Response 130 or play
back messages and memos using a
Touchtone
™
telephone keypad.
To access your Response 130 you will have to
first enter a three-digit security code. Your
Response 130 has a factory set code of
‘0, 0, 0’.
To set your three-digit code
If you wish to enter your own three-digit
security code:
• Open the panel cover.
• Lift the handset to your ear. Press and hold
the
CODE button while the voice announces
through the handset, ‘Code setting zero’.
Release the
CODE button.
• Press the
HOUR button until you reach the
number you want for the first digit of your
personal code.
• Release the
HOUR button.
• Press the
CODE button. The voice will
announce, ‘Accepted’, and then, ‘Zero’, for
the next digit.
• Press and release the
HOUR button until you
reach the number you want for the second
digit of your code.
If you do not follow the procedure correctly, the unit
will announce, ‘Error,’ and reset itself to the
previous security code.
Page 20

Edition 5 10 March ‘99
Additional
fea tures
18
To access your Response 130 remotely
• Dial your phone number.
• While the answering machine is playing your
outgoing message, enter your three-digit
security code. If the code is correct, the
Response 130 will beep and announce,
‘Accepted. You have ‘X’ new messages’ or
‘You have no new messages’.
• Your Response 130 will then announce the
options available to you.
The available options are as follows:
‘For menu press 1,’
‘To play new messages press 2,’
‘To set the unit on and off press 3,’
‘To play previous message press 4,’
‘To play all messages press 5,’
‘To skip message press 6,’
‘To repeat message press 7,’
‘To play outgoing message press 8,’
‘To record new outgoing message press 9, to stop
press 9 again,’
‘To erase message press 0,’
• When the option you want is announced,
press the corresponding button on the
keypad. Your Response 130 will beep and
carr y out the command immediately.
• As soon as one option has been completed,
you have 8 seconds to access fur ther options.
• If you enter 1 during or in between messages,
the unit will return to the main menu.
• Once your messages have been played back
the unit will announce, ‘End of messages’.
You then have 8 seconds to choose another
menu option before the unit ends the call.
• To end your call, hang up.
To switch on your Response 130 from
another phone
If you forget to switch on your Response 130,
you can do so using a Touchtone
™
telephone
keypad.
• Dial your telephone number to contact your
Response 130.
• After 20 rings the unit will answer the call and
play your outgoing message. You can now
either hang up, leave a message or enter
your three-digit security code to access the
other answering machine functions. At the
end of your call, the answering machine will
remain switched on.
If your Response 130’s recording memory
is full
• Dial the telephone number to which your
Response 130 is connected.
• After 20 rings the unit will announce,
‘Hello, your call cannot be taken at the
moment, so please call later’.
• Enter your three-digit security code to access
the options menu. You will have to delete
some of your messages if you want the
answering functions to remain on.
If you do not hear this announcement, you may
have entered an incorrect security code. Wait for a
moment and re-enter your security code.
Page 21

Edition 5 10 March ‘99
Additional
fea tures
19
Switching from Pulse to Tone
dialling during a call
If you are connected to a pulse dialling
exchange, you can still use services such as
phone banking which require tone dialling.
• Call the telephone number you require in
PULSE mode as usual.
• When you have been connected, press the
✱
button on the keypad to set your
telephone to tone signalling for the duration
of the call.
• When you hang up, your Response 130 will
automatically switch back to
PULSE dialling.
Using the R (Recall) button
If your Response 130 is connected to a
switchboard, the
R button enables you to use
features provided by the switchboard. Ask your
communications manager or switchboard
supplier for details.
The
R button can also be used in conjunction
with BT’s Select Services.
If you are a BT customer connected to a digital
exchange, you can subscribe to a range of BT’s
Select Services. If you wish to subscribe to any
of these services, contact us on Freefone 0800
800 150 for residential customers and
Freefone 0800 800 152 for business
customers (9am to 5pm, Monday to Friday).
If you are not a BT customer, please contact
your network provider for information about
their network based services.
R
MODE
P
T
TB
Page 22

Edition 5 10 March ‘99
Additional
fea tures
20
Using Select Services
Select Services are available to customers on a
modern digital exchange. To use these
services, other than Call Return, you need to
pay a small quarterly charge. You can access
the Select Services using the
Directory A
buttons as marked.
The Select Services pre-programmed on your
Response 130 are:
• Call Diversion
• Call Return
• Call Waiting
A
A
B
B
B
B
B
DIAL B
Call Diversion
Call Return
Call Waiting
Call Diversion
With Call Diversion, when someone rings, your
Response 130 automatically transfers the call to
a nominated number where you can be
contacted.
• To divert all your calls to another number,
lift the handset and press the
CALL
DIVERSION button.
• Wait until you hear a message from the
exchange, then follow the instructions you
are given.
• All your incoming calls will now be diverted
to the number you nominated until you
cancel the instruction.
To cancel Call Diversion, follow the same
procedure as for setting it up. You will receive
instructions from the exchange on what to do.
Page 23

Edition 5 10 March ‘99
In the event of a power failure
You will still be able to make and receive calls
on your Response 130. The answering
machine will not answer incoming calls until
power has been restored however, if you have
fitted a back-up battery, it will retain your
OUTGOING MESSAGE and SECURITY CODE;
it will also keep the
DAY and TIME setting and
any
INCOMING MESSAGES or MEMOS
already recorded. The message display will
remain blank.
Help
23
Customer Helpline
If you still experience problems, please call the BT
Helpline on Lo-call 0845 769 7146 (calls charged
at local BT rate).
Emergency calls
The emergency services can be contacted in the UK
by dialling 999 or 112 which is valid in any
country that is a member of the European
Community.
If your Response 130 is connected to a switchboard,
you may have to dial an access number before
999 or 112 to contact the emergency services.
Some switchboards cannot dial out during a
power failure.
Resetting the answering machine
The RESET button is located underneath the
panel cover.
Press the end of a pointed object such as a pen
or pencil into the hole. The display shows
‘PF’
followed by a countdown from ‘40’. When the
countdown reaches
‘00’ the unit will beep and
announce the current setting of the answer
delay switch.
Your Response 130 has now been reset to its
original factory settings, which are as follows:
• The time and day is Sunday 12.00 am.
• The outgoing message is, ‘Hello, your call
cannot be taken at the moment so please leave
your message after the tone’.
• All incoming messages and memos have
been deleted.
• The
PIN code has been reset to ‘0, 0, 0’.
Resetting the Response 130 does not affect any
telephone numbers stored in its memories.
RESET
TIME SET
HOUR
DAY MINUTE
RECORD
OUTGOING
MESSAGE
STORE NUMBER
DIAL PAUSE
CODE
DIAL B
CALL
DIVERSION
CALL
RETURN
CALL
WAITING
Page 24

Edition 5 10 March ‘99
Help
24
The message display
DISPLAY
PF 40-00
0 59
FL
PA
––
Meaning
Display is blank: The unit is receiving an incoming
message or the unit has no power.
Display shows ‘PF’ then counts down from 40 to 00:
The unit is resetting, please wait.
Display shows a number (‘0’ to ‘59’) which is the current
message number.
Display shows flashing ‘FL’. Indicates that the
memory is full.
Display shows ‘PA’, playback of the messages has
been paused.
Display shows ‘
- -
’, indicating answer functions are off.
This will alternate with either 3, 4, 5 or 6 above indicating
that the battery is low, disconnected or missing.
Page 25

Edition 5 10 March ‘99
APPROVED for connection to
telecommunication systems specified
in the instructions for use subject to
the conditions set out in them
503733
CE compliant to 89/336/EEC
(EMC Directive) & 73/23/EEC (Low
Voltage Directive)
Offices in Europe, North America,
Japan and Asia Pacific.
The telecommunications services described in this publication
are subject to availability and may be modified from time to time.
Services and equipment are provided subject to British
Telecommunications plc’s respective standard conditions of contract.
Nothing in this publication forms any part of any contract.
Touchtone
™
is a registered trade mark of
British Telecommunications plc in the UK.
© British Telecommunications plc 1999.
Registered Office: 81 Newgate Street, London EC1A 7AJ.
Registered in England No. 1800000.
Printed in Hong Kong. Issue 2 (4/99).
Designed by The Art & Design Par tnership Limited.
 Loading...