

User Guide
BT RELATE SMS
This product is intended for connection to analogue
public switched telephone networks and private
switchboards in the United Kingdom.
*YOU MUST
SUBSCRIBE TO YOUR
NETWORK PROVIDER’S
CALLER DISPLAY SERVICE FOR
THIS FEATURE AND FOR SMS TO WORK.
FOR SMS YOU MUST NOT WITHHOLD
YOUR NUMBER. A FEE MAY BE PAYABLE.
Relate SMS User Guide ~ Issue 2 ~ 2nd Edition ~ 20th August ’03 ~ 5538

Relate SMS User Guide ~ Issue 2 ~ 2nd Edition ~ 20th August ’03 ~ 5538
Please open this page for an ‘at a glance’
guide to your BT Relate SMS.

Relate SMS User Guide ~ Issue 2 ~ 2nd Edition ~ 20th August ’03 ~ 5538
Please open this page for a further
‘at a glance’ guide to your BT Relate SMS.
Relate SMS User Guide ~ Issue 2 ~ 2nd Edition ~ 20th August ’03 ~ 5538
1
2
3
4
5
6
7
8
9
0
A
B
C
J
K
L
M
N
O
G
H
I
P
Q
R
S
T
U
V
W
X
Y
Z
D
E
F
Calls
Redial
Dial
Menu
Undo
SMS
Calls
BT Relate SMS
Secrecy
R
Pause
SM S
1
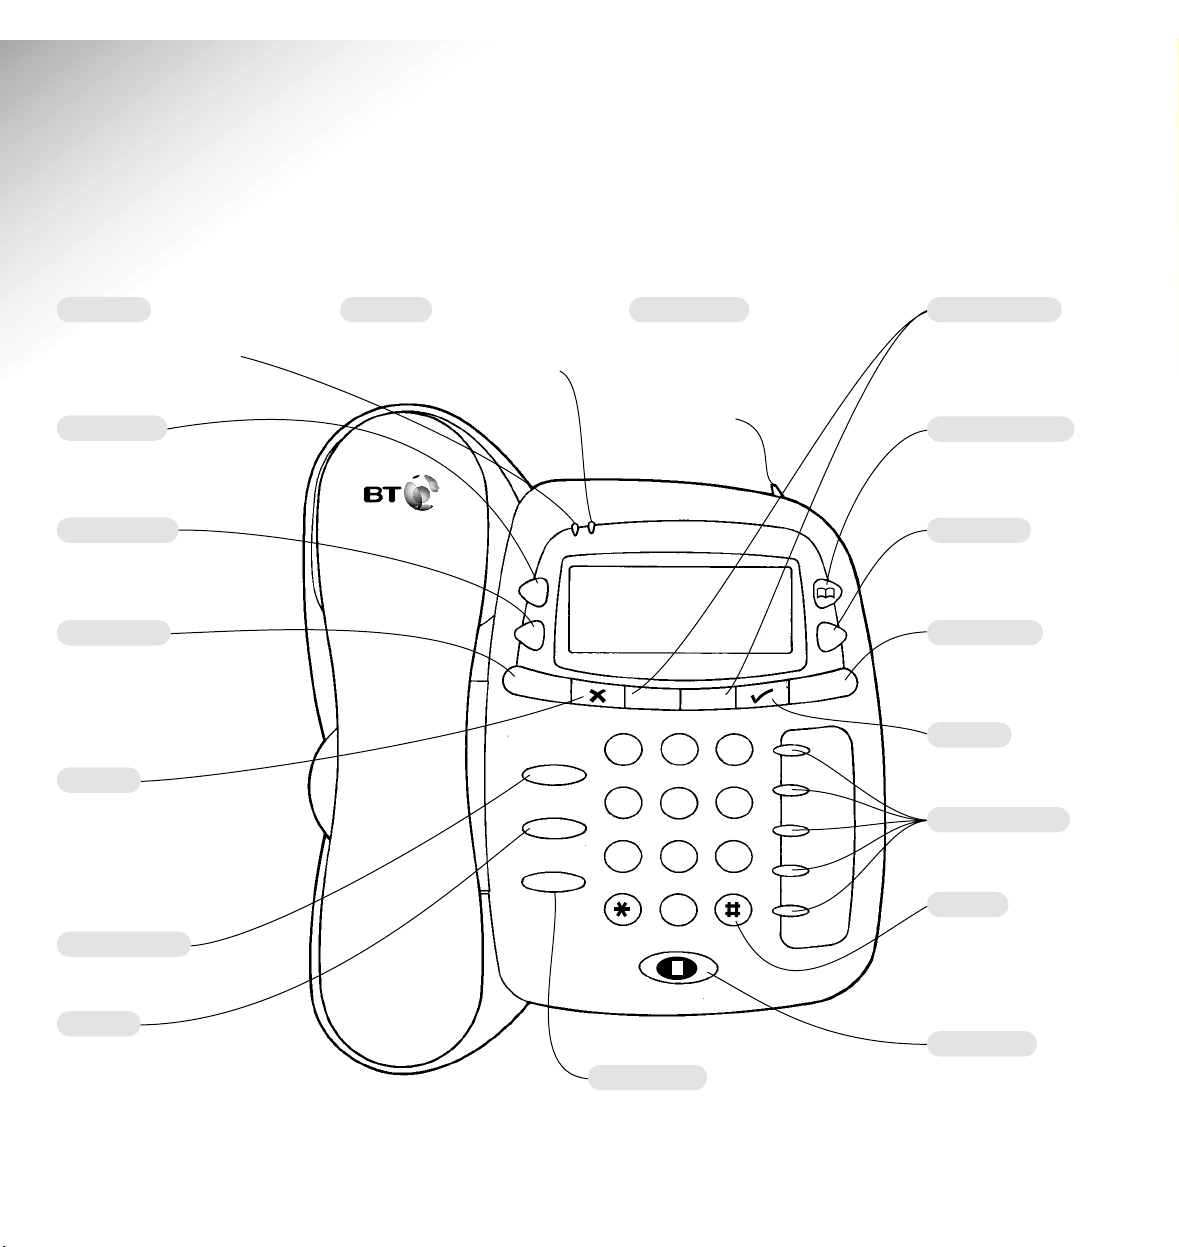
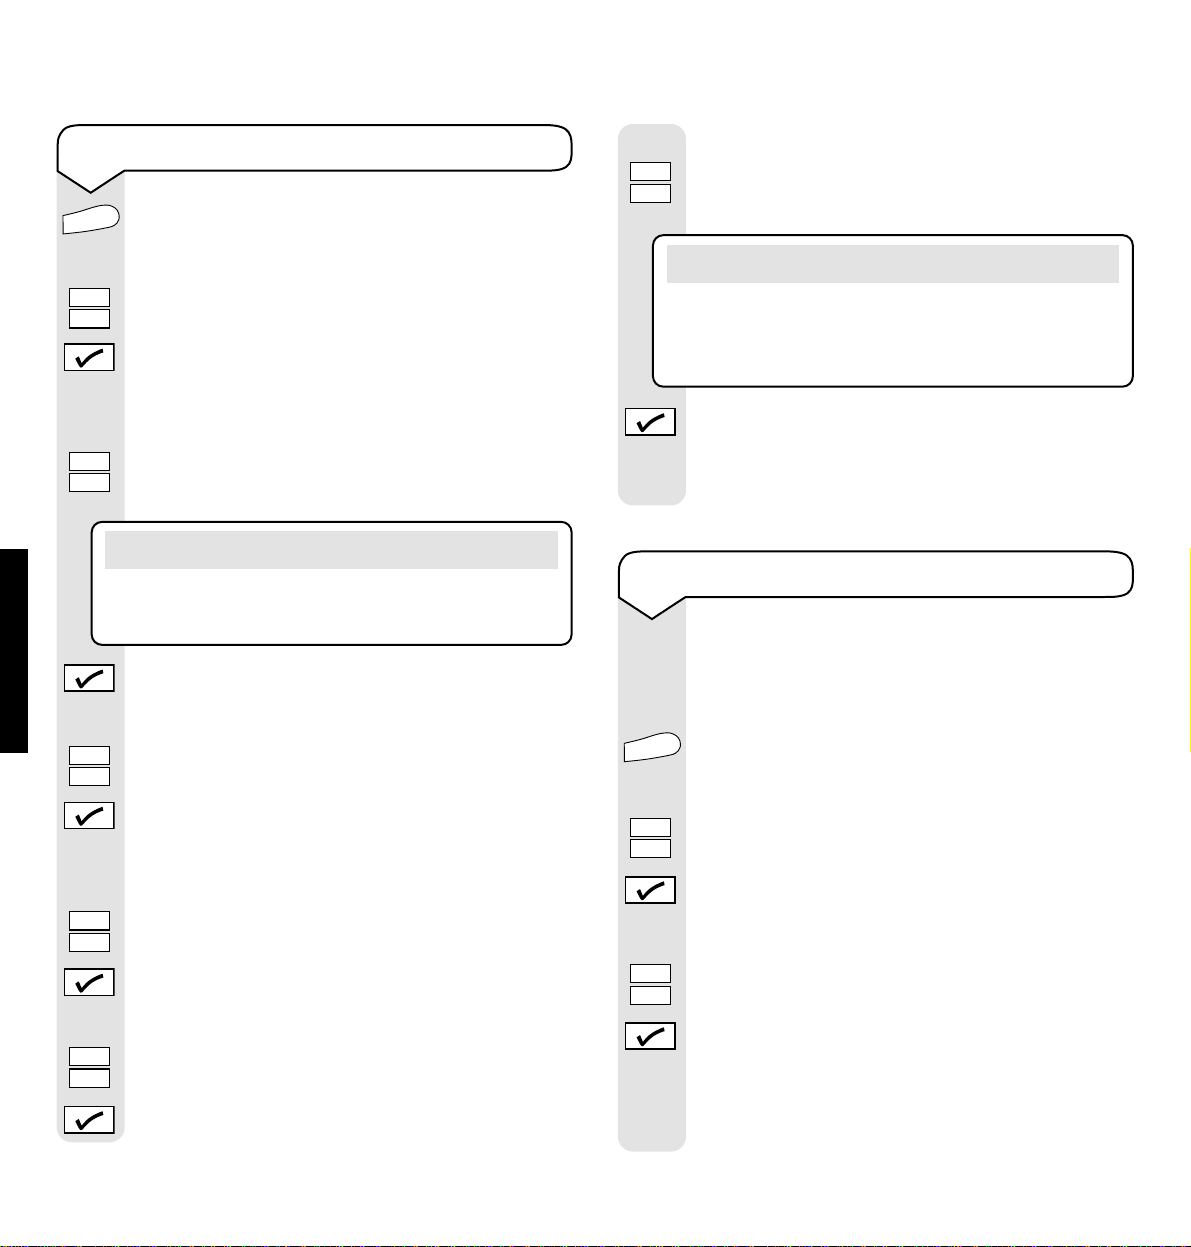
At a glance
Calls light
Flashes when you have
unviewed calls in the
Calls list.
Redial button
To redial a number from
the redial list.
Calls button
Press to access the
Calls List.
Undo button
To return to the previous
display screen.
Press repeatedly to retur n
to standby.
X button
To delete an incorrect
digit/character.
To delete Directory
entries, Calls list entries
and SMS messages.
Secrecy button
Use to turn secrecy on/off.
R button
For use with a
switchboard/PBX and
BT Calling features,
see page 39 and 22.
Pause button
Press to enter a pause
in a stored number.
SMS button
Press to access the SMS
menu options.
# button
To change from upper to
lower case when storing
names and writing SMS
text messages.
M1- M5 buttons
Direct memor y buttons.
✔ Button
Press to confirm a setting.
Menu button
To access the menu
options.
Dial button
To dial a displayed
number.
Directory button
Press to access the
Directory.
or buttons
Use to scroll backwards
and for war ds through the
menu options.
SMS light
Flashes when you have
unviewed SMS text messages
Handset park
When the phone is wall
mounted you can hang
the handset here if you
need to leave the phone
during a call.
Relate SMS User Guide ~ Issue 2 ~ 2nd Edition ~ 20th August ’03 ~ 5538
2
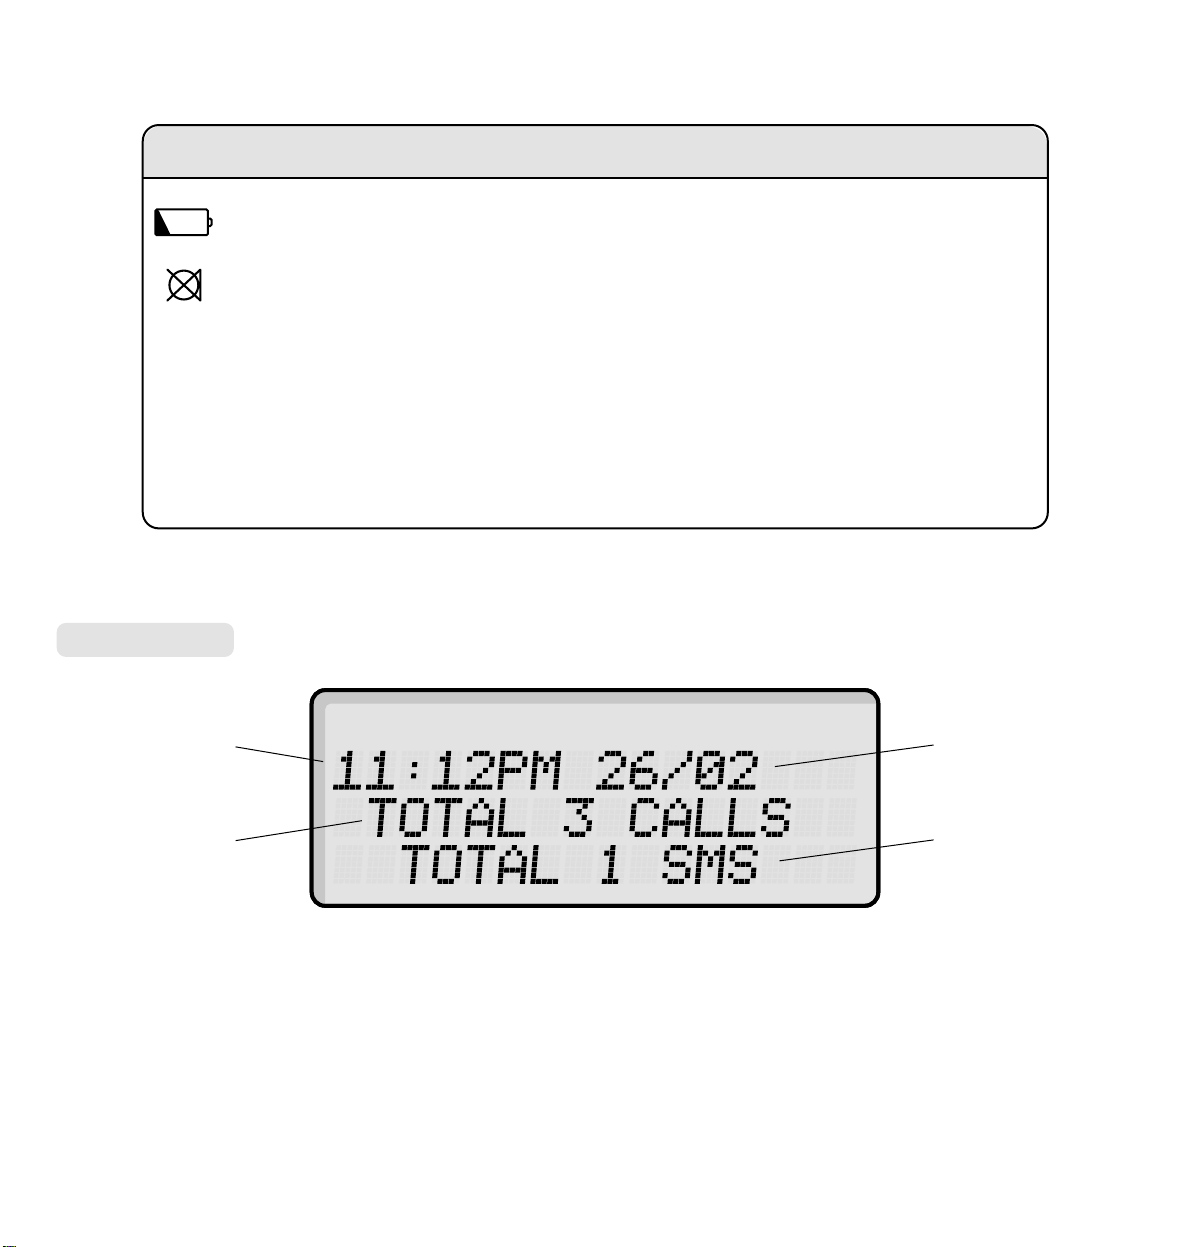
Standby screen
Time
Total Calls
list entries
Date
Total SMS
text messages
Quick guide to display icons
Displayed when the batteries are low and need replacing.
Indicates that secrecy is on.
NEW Displayed when you have new Calls list entries.
REPT Indicates that a number stored in the Calls list has called more than once.
002 Shows you which Calls list entry or which SMS message you are currently viewing,
e.g. number 2.
Relate SMS User Guide ~ Issue 2 ~ 2nd Edition ~ 20th August ’03 ~ 5538
3
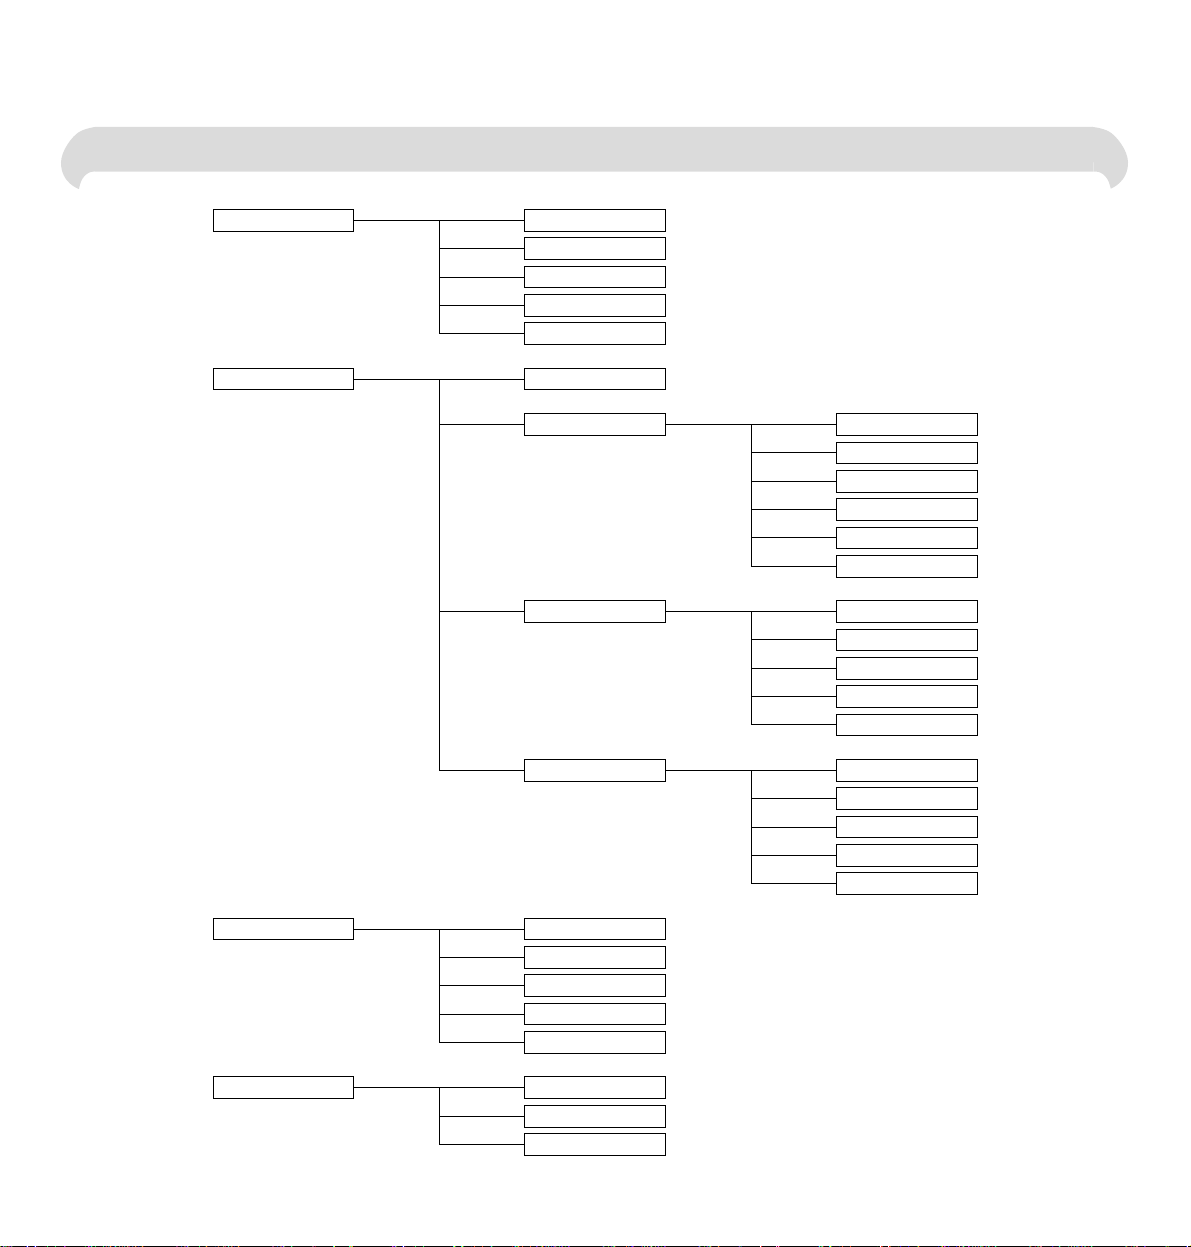
Menu Structure
MAIN MENU
SMS MENU
CALLS MENU
SET CONTRAST
SMS PROVIDERS
12/24H FORMAT
SET CLOCK
AUDIBLE ALERT
WRITE MESSAGE?*
INBOX
OUTBOX
DIRECTORY MENU
WRITE MESSAGE?
WRITE MESSAGE?
WRITE MESSAGE?
NEW?
SAVE TO?
REPLY?
FORWARD?
DELETE?
DELETE ALL?
SAVE TO?
FORWARD?
DELETE?
DELETE ALL?
SAVE TO?
EDIT?
DELETE?
DELETE ALL?
SAVE TO?
DRAFTS
EDIT?
DELETE?
DELETE ALL?
SAVE TO (M1 – M5)?
DELETE?
DELETE ALL?

Relate SMS User Guide ~ Issue 2 ~ 2nd Edition ~ 20th August ’03 ~ 5538
4
At a glance 1
Quick guide to display icons 2
Menu structure 3
Introduction 5
Safety information 6
Setting up 7
Using your Relate SMS 10
Making and receiving calls 10
Call timer 11
Redial 11
Ringer volume 11
Secrecy 12
Display contrast 12
12/24 Hour Clock 12
Time and date display 13
SMS message audible aler t on/off 13
5 Name and number direct memories 14
Character map 15
100 Name and number directory 17
BT Calling Features 22
Caller Display 22
Calls list 22
SMS Text Messaging 26
Using SMS 27
Character map 27
Write and send an SMS message 28
Receiving an SMS message 30
Delivery of SMS messages 31
SMS Service Centre numbers 36
Sending SMS text messages from
mobile phones 37
General information 38
Guarantee 38
If you have to return your product 38
Technical information 38
Switchboard compatibility 39
Help 40
SMS Service Conditions 42
Wall mounting template 49
Index 50
In this guide
Note
There is a detailed INDEX at the end of this guide, see page 50.
Note
In this user guide, we’ve included helpful tips and
useful notes. They are shown in a white box like this.
INTRODUCTION
5
Relate SMS User Guide ~ Issue 2 ~ 2nd Edition ~ 20th August ’03 ~ 5538
Introduction
Your Relate SMS is designed for ease of use and made to the high standards set by BT.
You can expect your Relate SMS to provide many years of quality service. Please read the
instructions carefully before use and keep this user guide for future reference.
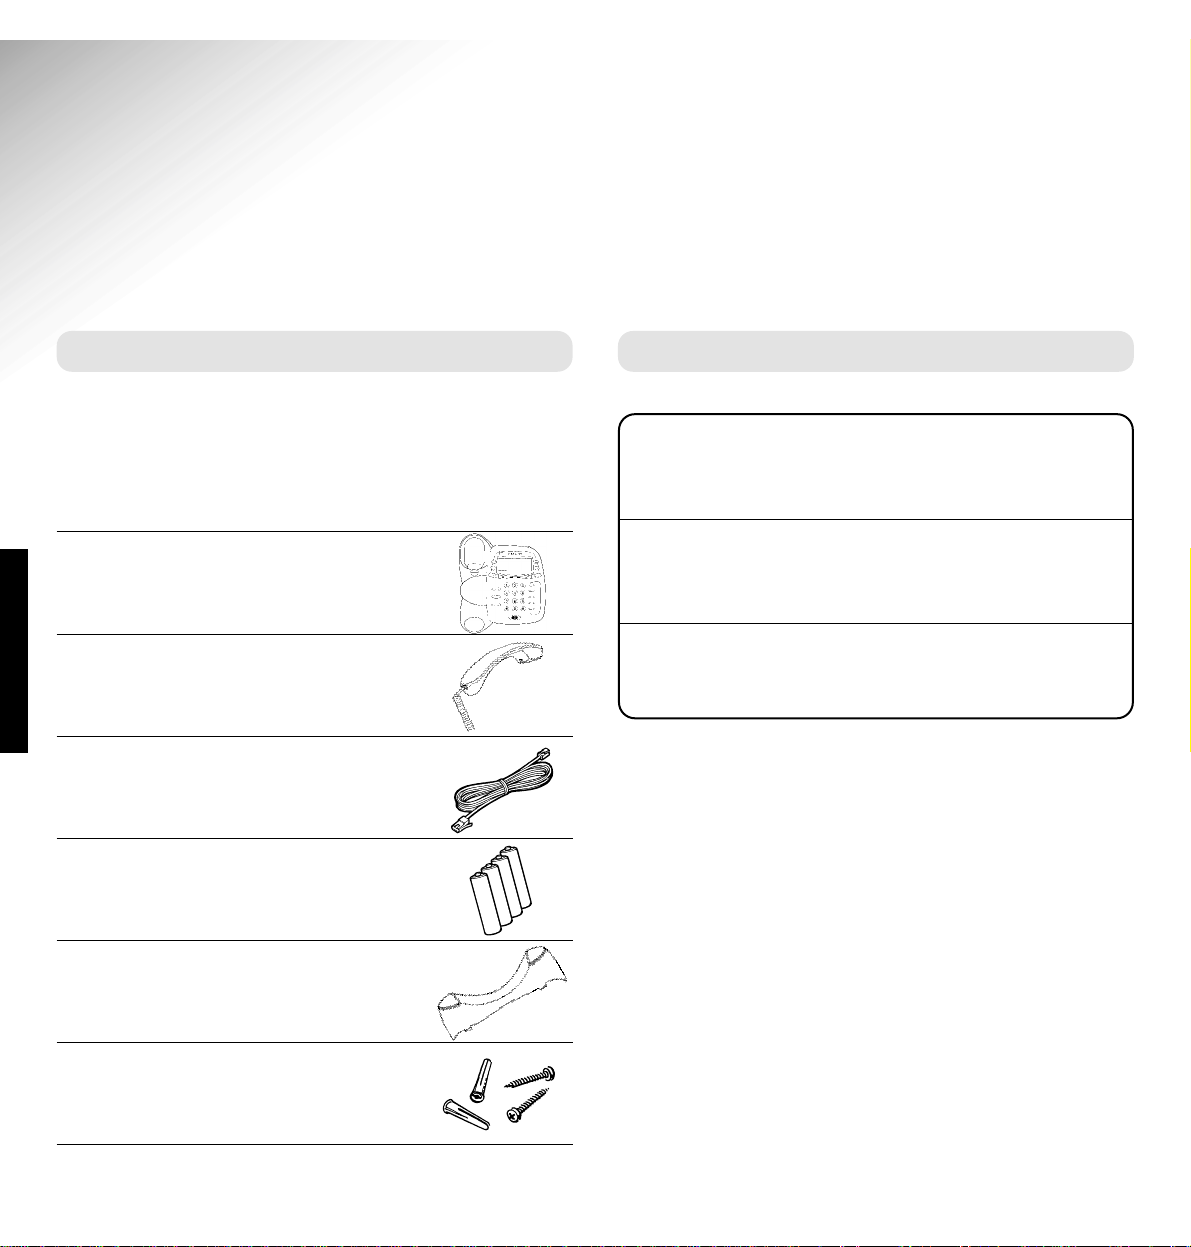
Unpacking your Relate SMS
Check that your Relate SMS is complete.
If anything is missing, please contact your place of
purchase immediately.
Relate SMS telephone
Handset and cord
Telephone line cord
4 x AA batteries
Desk mounting plinth
Wall plugs and screws
For your records
For guarantee purposes proof of purchase is required,
so please keep your receipt.
Date of purchase:
Place of purchase:
Serial number:
(on the underside of the base unit)
Relate SMS User Guide ~ Issue 2 ~ 2nd Edition ~ 20th August ’03 ~ 5538
6
SAFETY INFORMATION
Safety information
General
Do not dismantle the telephone. This could
expose you to high voltages or other risks.
Never dispose of batteries in a fire. There is
a serious risk of explosion and/or the release
of highly toxic chemicals.
Cleaning
Simply clean your Relate SMS with a damp
(not wet) cloth, or an anti-static wipe.
Never use household polish, as this will
damage the product.
Never use a dr y cloth as this may cause a
static shock.
Environmental
Do not expose to direct sunlight.
Do not stand your product on carpets or other
sur faces which generate fibres, or place it in
locations preventing free flow of air over its
surfaces.
Do not submerge any par t of your product
in water and do not use it in damp or humid
conditions, such as in bathrooms.
Do not expose your product to fire, explosive or
other hazardous conditions.
There is a slight chance that your phone could be
damaged by an electrical storm. We recommend
that you unplug the telephone line cord for the
duration of the storm.
SETTING UP
7
Relate SMS User Guide ~ Issue 2 ~ 2nd Edition ~ 20th August ’03 ~ 5538
Setting up
Follow these steps to set up your Relate SMS ready for use.
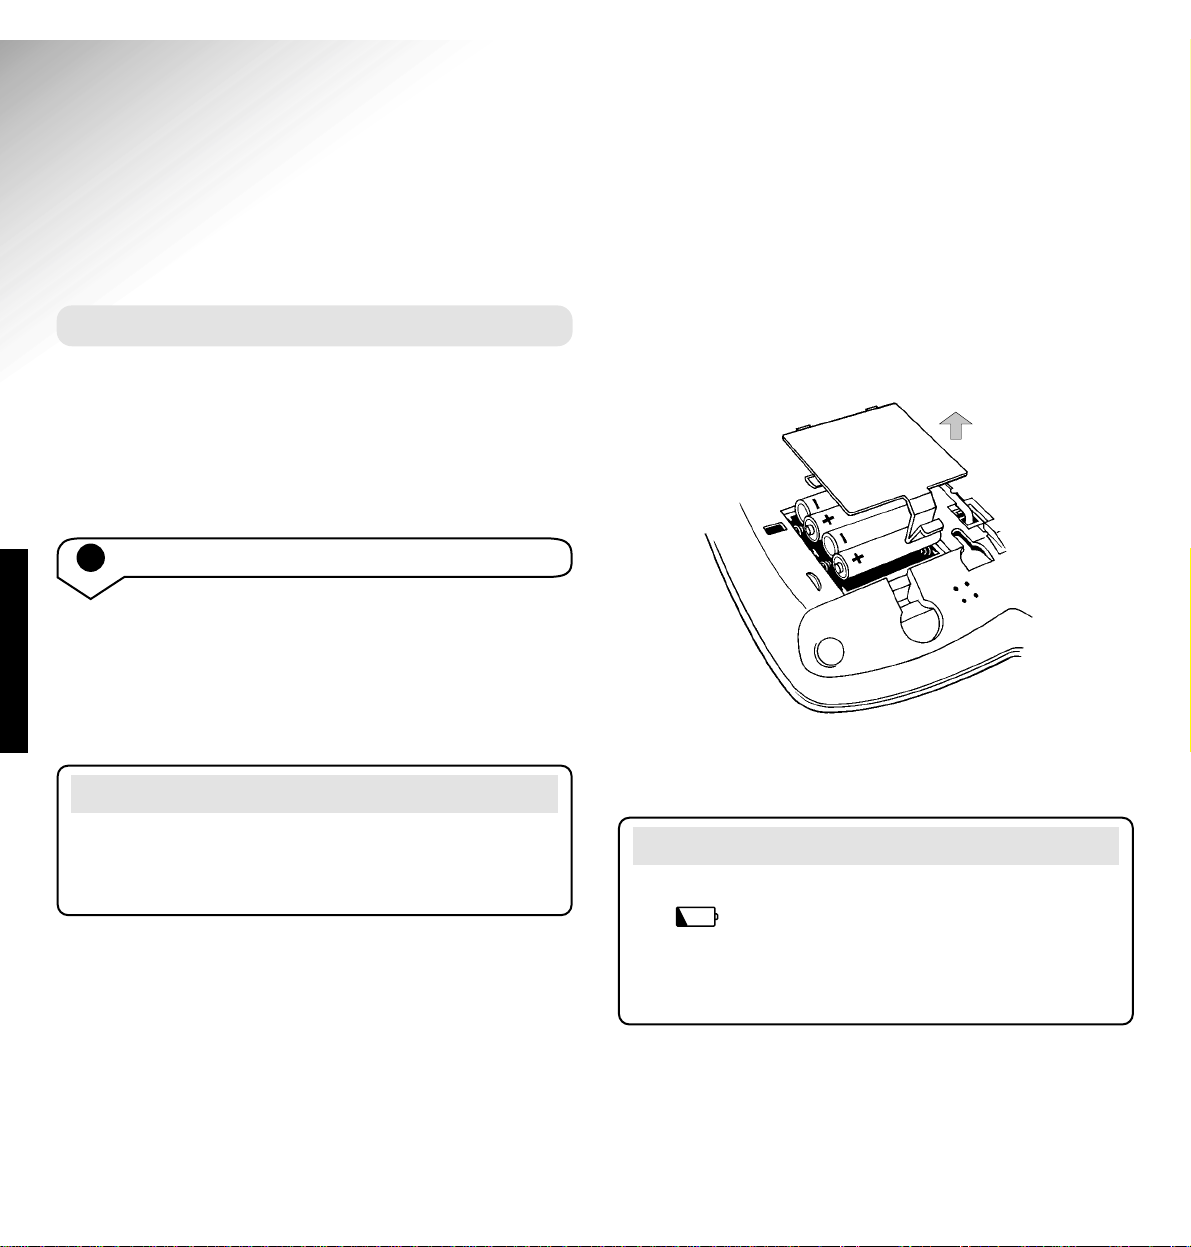
Open the batter y compartment on the back of your
telephone by pushing in the plastic clip and lifting off
the battery cover. Then insert the batteries as shown.
Replace the batter y compartment cover.
Plan the location
Situate your Relate SMS close enough to the
telephone socket so that the line cord will reach.
Do not situate the product in the bathroom or other
humid areas.
Note
If you are replacing batteries you will need to remove
the desk mounting plinth (if attached) to gain access
to the battery compartment.
Note
When your batteries are close to becoming completely
flat, will flash in the top left corner of the
display. If you do not replace the batteries they
will become totally discharged and your display
will not work.
1 Install the batteries
The display on your Relate SMS is powered by 4 x AA
batteries.
Make sure the phone is not plugged into the phone
socket.
Relate SMS User Guide ~ Issue 2 ~ 2nd Edition ~ 20th August ’03 ~ 5538
8
SETTING UP
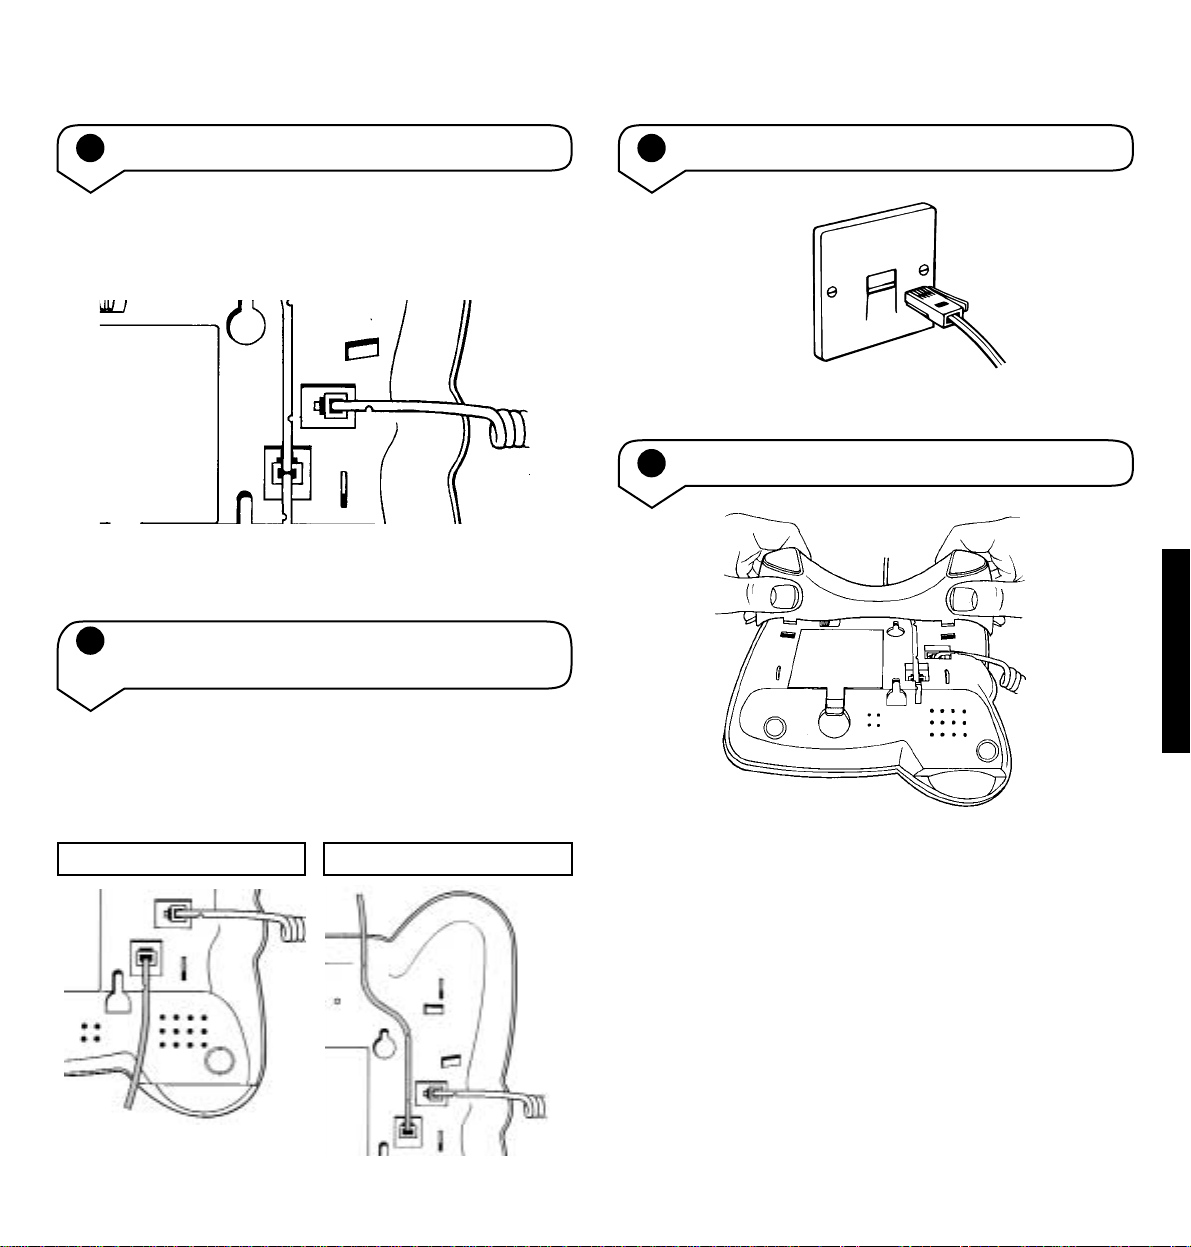
2 Connect the handset
Plug one end of the handset cord into the handset
and the other end into the socket on the underside of
the telephone.
Then place the handset on the telephone cradle.
4 Connect the telephone line cord
5 Fit the plinth for desk mounting
3 Connect the telephone line cord to the
underside of your Relate telephone
Route the line cord as shown in the illustration
according to whether your phone is to be wall or desk
mounted.
If you are using your Relate SMS as a desk phone you
will need to fit the plinth on to the base.
Ensure all cables on the underside of the base are in
their respective channels.
Proceed by holding the plinth as shown in the
illustration, now lower the plinth so that the two lugs
nearest to you, fit into the corr esponding holes on the
base, as shown.
Route for wall mounting Route for desk mounting
Relate SMS User Guide ~ Issue 2 ~ 2nd Edition ~ 20th August ’03 ~ 5538
SETTING UP
9
Push and squeeze until the plinth clicks into place
from front and back.
Note
You can set the time on your Relate SMS display,
please refer to pages 12–13 for instructions.
3 Place your Relate SMS over the screw heads
and slide down.
Your Relate SMS is now ready for use.
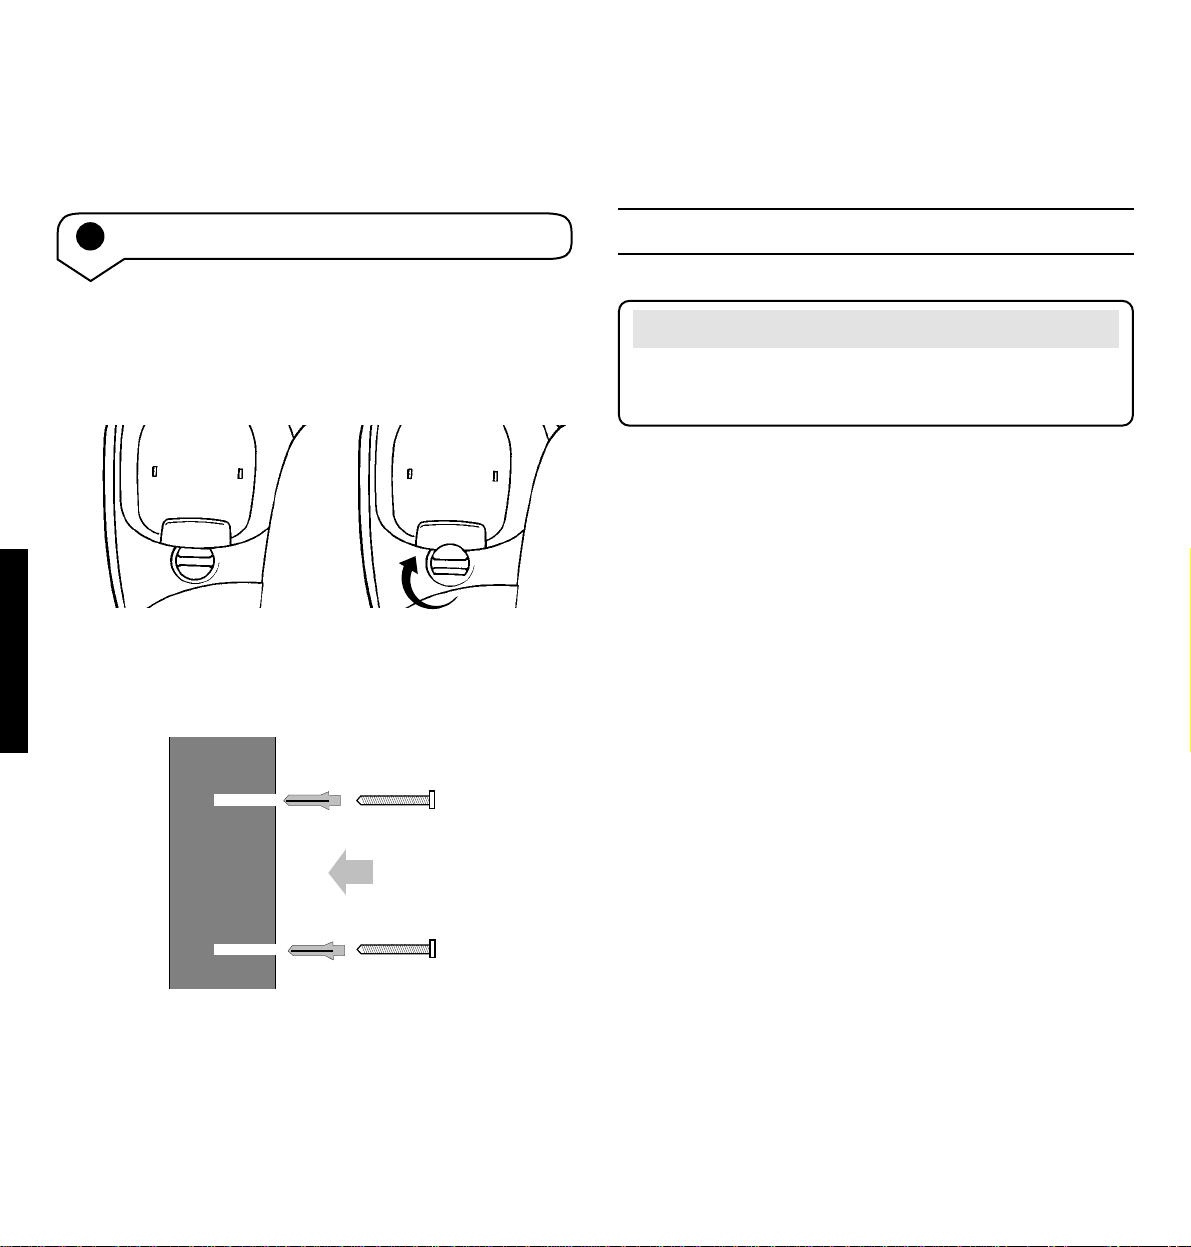
6 Wall-mounting your Relate SMS
1 Using a coin, rotate the handset clip to prevent
the handset from falling when the pr oduct is
wall-mounted.
2 Use the template on page 49 and a 6mm drill
bit to drill holes in the wall. Leave an 8mm gap
between the screw heads and the wall.
WALL
WALL PLUG
SCREW
DESK WALL
USING YOUR PHONE
10
Relate SMS User Guide ~ Issue 2 ~ 2nd Edition ~ 20th August ’03 ~ 5538
Using your Relate SMS
Note
To exit a menu at any time, press the Undo button.
This will take you back one step. To return to the
standby screen keep pressing the Undo button.
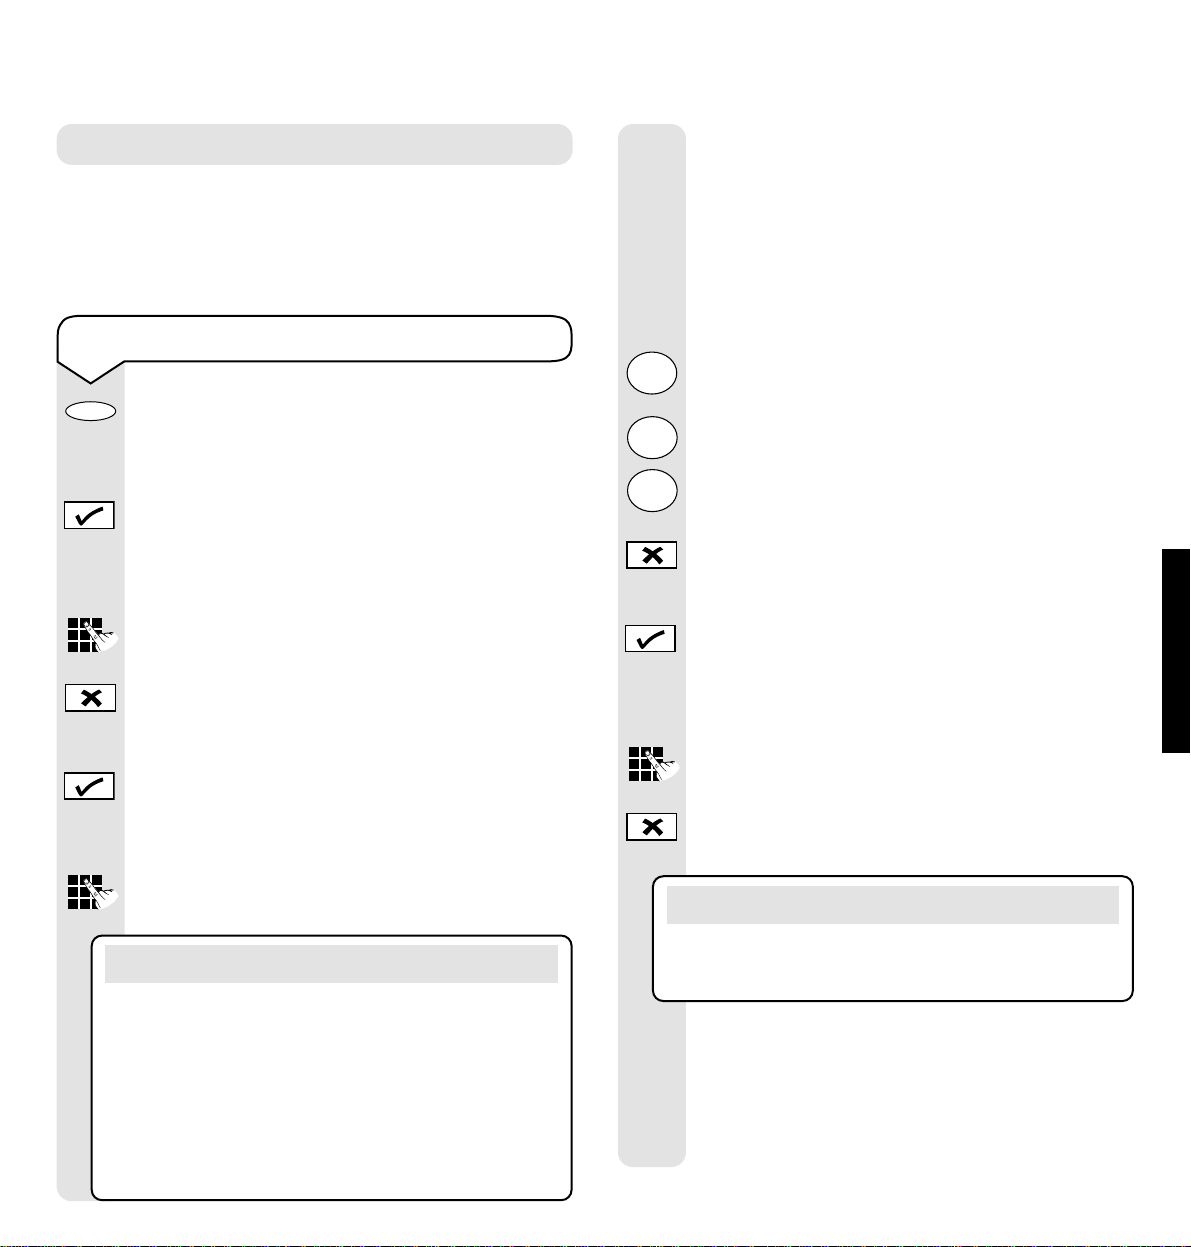
Making and receiving calls
To make a call
Pick up the handset.
Listen for the dialling tone.
Dial the number you want.
Preparatory dialling
Without lifting the handset, enter the number
to be dialled. The number is shown on the
display. If you make a mistake, press the
✘
button to remove any incorr ect digits.
If you have entered the number corr ectly,
press the Dial button to dial the number.
The display shows LIFT HANDSET.
The number will be dialled automatically
3 seconds after lifting the handset.
Note
If the handset is not lifted within 6 seconds, your
Relate SMS will automatically return to the standby
screen.
Dial
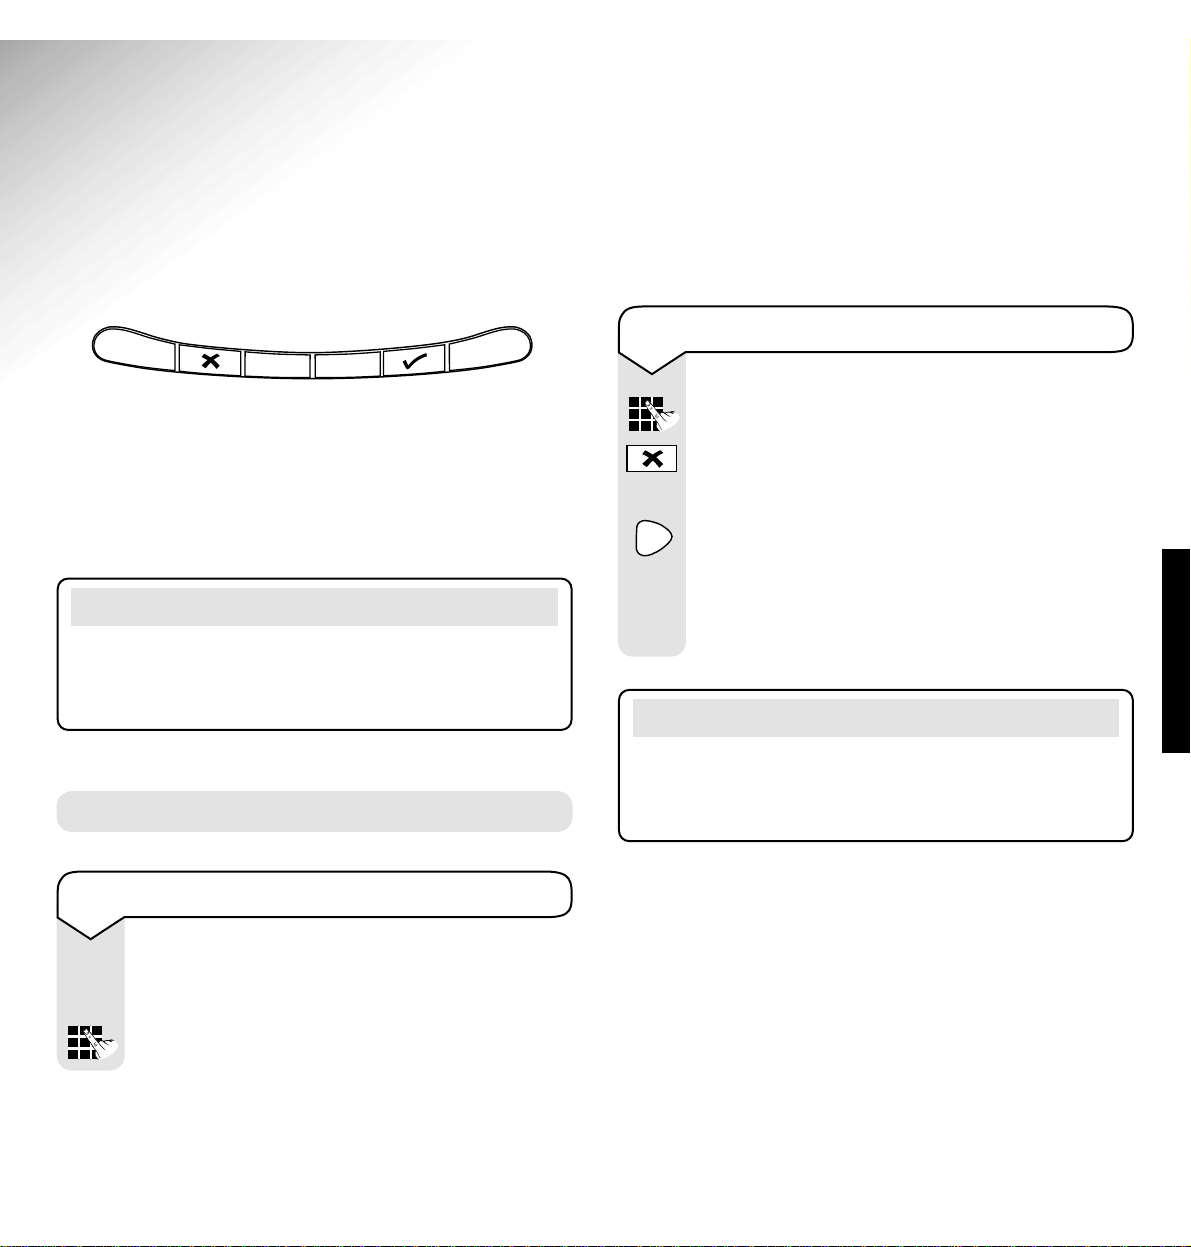
Your Relate SMS has a menu driven display. The
and buttons allow you to scroll through the menu
and the
✔ button allows you to select options within
each menu.
Undo
Menu
Relate SMS User Guide ~ Issue 2 ~ 2nd Edition ~ 20th August ’03 ~ 5538
USING YOUR PHONE
11
To receive a call
When the phone rings:
The red calls light flashes and the handset
display will show EXTERNAL CALL.
Or, if you have subscribed to a Caller Display
Ser vice it will show your caller’s telephone
number or name if you have stored it in your
directory (unless the number has been
withheld or is an international number).
Lift the handset to answer the call.
To automatically redial one of these numbers
Press the Redial button repeatedly to scroll
through the last 5 dialled numbers.
When the number you want to redial is
displayed, press the Dial button.
The display shows LIFT HANDSET. The
number will be dialled automatically 3 seconds
after lifting the handset.
Redial
Your Relate SMS automatically saves the last
5 telephone numbers dialled into a redial list.
Each redial number can be up to 32 digits long.
Ringer Volume
Move the switch on the underside of your Relate SMS
to your preferr ed position, Hi, Low or Off.
Note
If the handset is not lifted within 6 seconds, your
Relate SMS will automatically return to the standby
screen.
Note
The ringer volume switch is located on the underside
of your Relate SMS, underneath the desk plinth.
Call timer
Your handset will automatically time the duration of
all external calls. The bottom line of the display
shows the call duration both during your call and for
a few seconds after it is completed.
To end a call
Replace the handset.
Redial
Dial
Relate SMS User Guide ~ Issue 2 ~ 2nd Edition ~ 20th August ’03 ~ 5538
USING YOUR PHONE
12
To set the display contrast
Press the Menu button.
The display shows SET CONTRAST.
Press the
✔ button.
The display shows PRESS < or >.
Press the
or button to select from 6
contrast settings.
Each time you press
or
the display
will alter to show you the current contrast
setting.
Press the
✔ button when the contrast you
want is displayed.
The display shows SET CONTRAST
COMPLETED.
To switch Secrecy on and off
To switch on during a call:
Press and release the Secrecy button.
The secrecy icon X will be displayed and
your caller will be put on hold.
While secrecy is on you can talk to someone
in the same room without your caller hearing
you. You will still be able to hear your caller.
To switch of f during a call:
Press and release the Secrecy button again
to return to your caller. The secrecy icon
will disappear from the display.
Secrecy
When on a call you can talk to someone in the same
room without your caller hearing.
Secrecy
Secrecy
Menu
To set the 12/24 Hour Clock
When receiving your first incoming call the
Caller Display ser vice will automatically set
the clock.
However, if you wish to set the clock manually
then follow the steps below.
Press the Menu button.
The display shows SET CONTRAST.
Press the
or button to scroll to
12/24 H FORMAT.
Press the
✔ button.
The display flashes the current setting.
Press the
or button to select either
12 HOUR or 24 HOUR.
Press the
✔ button.
The display shows 12/24 H FORMAT
COMPLETED.
Your Relate SMS retur ns to the standby
screen.
Menu
Note
The year setting must be selected manually as this
is not set by the Caller Display service.
Relate SMS User Guide ~ Issue 2 ~ 2nd Edition ~ 20th August ’03 ~ 5538
USING YOUR PHONE
13
To set the time and date on the display
Press the Menu button.
The display shows SET CONTRAST.
Press the
or button to scroll to
SET CLOCK.
Press the ✔ button.
The display shows TIME: and the current
hour setting flashes.
Press the
or button repeatedly to
scroll to the corr ect hour setting.
Press the
✔ button.
The current minute setting flashes.
Press the
or button repeatedly to
scroll to the corr ect minute setting.
Press the ✔ button.
The display shows DATE: and the current
date setting flashes.
Press the
or button repeatedly to
scroll to the corr ect date setting.
Press the ✔ button.
The current month setting flashes.
Press the
or button repeatedly to
scroll to the corr ect month setting.
Press the ✔ button.
To set the SMS message audible alert on or off
When you receive a new SMS message you
will hear a series of 3 beeps to aler t you.
The default for this setting is ON.
Press the Menu button.
The display shows SET CONTRAST.
Press the
or button to scroll to
AUDIBLE ALERT.
Press the
✔ button.
The display shows the current setting.
Press the
or button to select either
ENABLE (for ON) or DISABLE (for OFF).
Press the
✔ button.
The display shows AUDIBLE ALERT
COMPLETED.
Your Relate SMS retur ns to the standby screen.
Menu
The current year setting flashes.
Press the
or button repeatedly to
scroll to the corr ect year setting.
Press the ✔ button.
The display shows DATE: COMPLETED.
Your Relate SMS retur ns to the standby screen.
Menu
Note
If using the 12 hour clock format you should
ensure that the correct am/pm setting is showing.
Note
You may need to set the current year manually as
your product is pre-set to 2003 and the year is not
provided by the Caller Display service.
Relate SMS User Guide ~ Issue 2 ~ 2nd Edition ~ 20th August ’03 ~ 5538
USING YOUR PHONE
14
To store a direct memory
Press a memory button (M1 to M5).
If the memor y location is empty, the display
shows NEW?
Press the
✔ button.
The display shows TEL: followed by a
flashing cursor.
Enter the telephone number using the
keypad buttons.
If you enter a digit incorrectly use the
✘
button to delete it and then enter the correct
digit.
Press the
✔ button to confir m the number.
The display shows NAME: followed by a
flashing cursor.
Enter a name using the keypad buttons.
The first letter of any entr y will be in upper
case and subsequent letters will be lower case.
Pressing the
#
button will change new text
to upper case, another press will retur n to
new text being in lower case.
For example, if you wish to enter the name
Tom:
To enter the letter T, press the 8 button. The
cursor will automatically move to the right.
To enter the letter o, press the 6 button
three times.
To enter the letter m, press the 6 button.
If you enter a character incorrectly use the
✘ button to delete it and then enter the
correct character.
When you have entered the name corr ectly,
press the
✔ button.
The display shows MOBILE: followed by a
flashing cursor.
Enter the mobile number using the keypad
buttons.
If you enter a digit incorrectly use the
✘button
to delete it and then enter the correct digit.
When you have entered the mobile number,
press the
✔ button to confir m.
The display shows RECORD SAVED!
Your Relate SMS will then automatically
return to the standby scr een.
5 Name and number direct memories
You can store five of your most frequently used names,
telephone and mobile numbers in the memor y. Please
note that numbers can be no more than 16 digits long
and names no more than 16 characters.
Note
You can change between upper and lower case by
pressing the
#
button. To insert a space between
characters press the 0 button or the
button and
the cursor will automatically move to the right
ready for you to enter the next character. Use the
1 button or the
✱
button for other punctuation
characters (see character map on page 15).
Note
If you do not want to store a mobile number, press
the
✔ button when the display shows MOBILE:
T
U
V
8
M
N
O
6
M
N
O
6

Relate SMS User Guide ~ Issue 2 ~ 2nd Edition ~ 20th August ’03 ~ 5538
USING YOUR PHONE
15
Character map
These are the characters you can use when storing a
direct memory or directory name entr y, or when
writing a text message.
1,.?!’@&():;_
abc2джвабвз
def3èéêë
ghi4ìíîï
jkl5€
mno6сцтуф
pqr s7
tuv8ùúûü
wxy z9
Space 0
✱ #+ - / =£%$<>
to switch between upper and lower case
to skip backwards through the characters
to skip for war ds thr ough the characters
0
9
W
X
Y
Z
8
T
U
V
7
P
Q
R
S
6
M
N
O
5
J
K
L
4
G
H
I
3
D
E
F
2
A
B
C
1
Note
Stored numbers can include switchboard and
network services that use the
✱
and #buttons as
well as PAUSE and RECALL functions. Please note
to use
#
in a memory name or text message, you will
need to press the
✱
button twice, you cannot enter a
#
by pressing the #button.
To enter a pause in a directory number, press the
Pause button.
To dial a direct memory
Without lifting the handset:
Press a memory button (M1 to M5).
The stored name and telephone number will
be displayed.
If you want to dial the mobile number, press
the
or button to scroll to the mobile
number.
When the number you want to dial is displayed,
press the Dial button.
The display shows LIFT HANDSET. The
number will be dialled automatically 3 seconds
after lifting the handset.
Note
If the handset is not lifted within 6 seconds, your
Relate SMS will automatically return to the standby
screen.
Dial

Relate SMS User Guide ~ Issue 2 ~ 2nd Edition ~ 20th August ’03 ~ 5538
USING YOUR PHONE
16
To edit a direct memory
Press a memory button (M1 to M5).
The stored name and number will be
displayed.
Press the Menu button.
The display shows EDIT?
Press the
✔ button.
The display shows the stored telephone
number followed by a flashing cursor.
Use the
or buttons to move
backwards and forwards through the digits.
Use the
✘ button to delete any unwanted
digits.
Enter the new digits using the keypad
buttons.
Press the
✔ button to confir m the number.
The display shows the stored name followed
by a flashing cursor.
Use the
or buttons to move
backwards and forwards through the
characters.
Use the
✘ button to delete any unwanted
characters.
Enter the new characters using the keypad
buttons.
Press the
✔ button to confir m the name.
The display shows the stored mobile number
followed by a flashing cursor.
Use the
or buttons to move
backwards and forwards through the digits.
Use the
✘ button to delete any unwanted
digits.
Enter the new digits using the keypad
buttons.
Press the
✔ button to confir m the mobile
number.
The display shows RECORD SAVED!
Your Relate SMS will then automatically
return to the standby scr een.
To copy a number from a direct memory
to the directory
You can copy a direct memory number into
the directory for quick and easy dialling in
the future.
Press a memory button (M1 to M5).
The first entr y will be displayed.
When the entr y you want to save is
displayed, press the Menu button.
The display shows EDIT?
Press the
or buttons to scroll to
SAVE TO DIRECTORY?.
Press the
✔ button.
The display shows RECORD SAVED!
To dial this number in the future, you should
follow the section, ‘To dial a name and
number in the directory’ on page 18.
Menu
Menu

Relate SMS User Guide ~ Issue 2 ~ 2nd Edition ~ 20th August ’03 ~ 5538
USING YOUR PHONE
17
100 Name and number directory
You can store entries for up to 100 callers in your
phones directory. For each caller you can store a
name, telephone and mobile number for quick and
easy dialling. Please note that numbers can be no
longer than 16 digits and names no longer than 16
characters. Directory entries are stored alphabetically
by the name.
Note
If you want to exit the directory and retur n to the
standby screen at any time, press the Undo button.
If you do not press a button for more than 20 seconds
your Relate SMS will automatically return to the
standby screen.
To store a name and number in the directory
Press the Directory button.
If no entries are present NEW will be
displayed, other wise the first alphabetical
entr y will be displayed.
Press the Menu button to enter the directory
menu.
The display shows NEW?
Press the
✔ button.
The display shows TEL: followed by a
flashing cursor.
Enter the telephone number using the
keypad buttons.
Menu
To delete a direct memory
Press a memory button (M1 to M5).
The stored name and number will be
displayed.
Press the
✘ button.
The display shows DELETE?
Press the
✔ button to confir m.
The display shows RECORD DELETED!
Your Relate SMS will then automatically
return to the standby scr een.

Relate SMS User Guide ~ Issue 2 ~ 2nd Edition ~ 20th August ’03 ~ 5538
USING YOUR PHONE
18
When you have entered the name corr ectly,
press the
✔ button.
The display shows MOBILE: followed by a
flashing cursor.
Enter the mobile number using the keypad
buttons.
If you enter a digit incorrectly use the
✘
button to delete it and then enter the
correct digit.
When you have entered the mobile number,
press the
✔ button.
The display shows RECORD SAVED!
Your Relate SMS will then automatically
return to the standby scr een.
Note
If you do not want to store a mobile number, press
the
✔button when the display shows MOBILE:
To view and dial a name and number in the
directory
Press the Directory button.
The first alphabetical entr y in the dir ectory
will be displayed (if there are no entries in
the directory the display will show NEW?).
Use the
or buttons to scroll through
the directory to find the entr y you want.
Or
If you enter a digit incorrectly use the ✘ button
to delete it and then enter the correct digit.
Press the
✔ button to confir m the number.
The display will show NAME: followed by a
flashing cursor.
Enter a name using the keypad buttons.
The first letter of any entr y will be in upper
case and subsequent letters will be lower case.
For example, if you wish to enter the name
Tom:
To enter the letter T, press the 8 button. The
cursor will automatically move to the right.
To enter the letter o, press the 6 button
three times.
To enter the letter m, press the 6 button.
Note
Pressing the #button will change new text to
upper case, another press will return to new text
being in lower case. To insert a space between
characters press the 0 button or the
button
and the cursor will automatically move to the
right ready for you to enter the next character.
Use the 1 button or the
✱
button for other
punctuation characters.
If you enter a character incorrectly use the
✘ button to delete it and then enter the correct
character.
For more detailed information on entering
characters, refer to the character map, on page 15.
8
T
U
V
6
M
N
O
6
M
N
O

Relate SMS User Guide ~ Issue 2 ~ 2nd Edition ~ 20th August ’03 ~ 5538
USING YOUR PHONE
19
To edit a name and number in the directory
Press the Directory button.
The first alphabetical entr y will be displayed.
Use the
or buttons to scroll through
the directory to find the entr y you want to
edit.
Or
To search alphabetically, press the relevant
keypad button, for example to find Tom,
press the 8 button to display the first entry
beginning with T and then use the
or
buttons to scroll through the entries under T.
When the entr y you want to edit is displayed,
press the Menu button to enter the directory
menu.
The display shows NEW?
Press the
or buttons to scroll to
EDIT?
Press the
✔ button.
The display shows the stored telephone
number followed by a flashing cursor.
Use the
or buttons to move
backwards and forwards through the digits.
Use the
✘ button to delete any unwanted
digits.
Enter the new digits using the keypad
buttons.
Press the
✔ button to confir m the telephone
number.
8
T
U
V
Menu
To search alphabetically, press the relevant
keypad button, for example to find Tom,
press the 8 button and to display the first entry
beginning with T and then use the
or
buttons to scroll through the entries under T.
When you have viewed all the directory
entries END OF LIST! will be displayed.
To dial a displayed entry, press the Dial
button.
The display shows LIFT HANDSET. The
number will be dialled automatically 3 seconds
after lifting the handset.
Note
If you have stored a telephone and mobile number
for a name, then the display will show the name
and telephone number on one screen followed by
the name and mobile number on the next screen.
Note
If the handset is not lifted within 6 seconds, your
Relate SMS will automatically return to the standby
screen.
8
T
U
V
Dial

Relate SMS User Guide ~ Issue 2 ~ 2nd Edition ~ 20th August ’03 ~ 5538
USING YOUR PHONE
20
The display shows the stored name followed
by a flashing cursor.
Use the
or buttons to move
backwards and forwards through the
characters.
Use the
✘ button to delete any unwanted
characters.
Enter the new characters using the keypad.
Press the
✔ button to confir m the name.
The display shows the stored mobile number
followed by a flashing cursor.
Use the
or buttons to move
backwards and forwards through the digits.
Use the
✘ button to delete any unwanted
digits.
Enter the new digits using the keypad
buttons.
Press the
✔ button to confir m the mobile
number.
The display shows RECORD SAVED!
Your Relate SMS will then automatically
return to the standby scr een.
To copy a number from the directory
to a direct memory
You can select and save a directory entr y into
a direct memory for quick and easy dialling
in the future.
Press the Directory button.
The first alphabetical entr y will be displayed.
Use the
or buttons to scroll through
the directory to find the entr y you want to
save to the one-touch memor y.
Or
To search alphabetically, press the relevant
keypad button, for example to find Tom,
press the 8 button to display the first entry
beginning with T and then use the
or
buttons to scroll through the entries under T.
When the entry you want to save is displayed,
press the Menu button to enter the directory
menu.
The display shows NEW?
Press the
or buttons to scroll to
SAVE TO (M1 – M5)?
Press the
✔ button.
The display shows PRESS (M1-M5).
Press the memory button (M1 to M5) where
you want the number to be saved.
The display shows RECORD SAVED!
To dial this number in the future, you should
follow the section ‘To dial a direct memory’ on
page 15.
8
T
U
V
Menu

Relate SMS User Guide ~ Issue 2 ~ 2nd Edition ~ 20th August ’03 ~ 5538
USING YOUR PHONE
21
To delete all directory entries
Press the Directory button.
The first alphabetical entr y will be displayed.
Press the Menu button to enter the directory
menu.
The display shows NEW?
Press the
or buttons to scroll to
DELETE ALL?
Press the
✔ button.
The display shows SURE?
Press the
✔ button again to confir m, the
display shows ALL DELETED!
Your Relate SMS will then automatically
return to the standby scr een.
Menu
To delete a directory entry
Press the Directory button.
The first alphabetical entr y will be displayed.
Use the or buttons to scroll through
the directory to find the entr y you want to
delete.
Or
To search alphabetically, press the relevant
keypad button, for example to find Tom,
press the 8 button to display the first entry
beginning with T and then use the
or
buttons to scroll through the entries under T.
When the entr y you want to delete is
displayed, press the
✘ button.
The display shows DELETE?
Press the
✔ button to confir m.
The display shows RECORD DELETED!
Your Relate SMS will then automatically
return to the standby scr een.
Note
When you delete a Directory entry, the name
telephone and mobile number for this entry will
all be deleted.
8
T
U
V

CALLING FEATURES
22
Relate SMS User Guide ~ Issue 2 ~ 2nd Edition ~ 20th August ’03 ~ 5538
BT Calling Features
Caller Display
Calls list
The Calls list holds details of the last 30 callers’
numbers and they are stored in the order they were
received. The caller’s details are stored whether you
answered the call or not. If a new number is received
when the list is full, the oldest entr y will be deleted
automatically.
The Calls list can store numbers up to 16 digits long
and names up to 16 characters long.
In standby mode, when you have ‘new’ calls in the
Calls list, the red calls light will flash and the number
of calls will be shown in the middle line of the display:
IMPORTANT
To use Caller Display you must first subscribe to
the service from your Network Provider. A fee may
be payable. For more information on BT’s Calling
Features call BT free on 0800 800 150.
If you have subscribed to your Network Provider’s
Caller Display Ser vice, you will be able to see your
caller’s number on your phones display (provided it is
not withheld) prior to answering the call. If you have
your caller’s name and number stored in the
directory you will see the name on the display as well
as the number.
For example, your display will look like this:
Note
The Calls list shows the last call received from each
number, the time and date details of earlier calls fr om
the same number being overwritten.

Relate SMS User Guide ~ Issue 2 ~ 2nd Edition ~ 20th August ’03 ~ 5538
CALLING FEATURES
23
Once you have viewed all the new calls the red calls
light will go out and the standby screen will show the
total number of calls stored in the Calls list:
You can access all the Calls list menu options by
pressing the Calls button followed by the Menu
button. The available options are listed in the
following sections.
To view and dial a number in the Calls list
To view a number in the Calls list:
Press the Calls button.
The most recently received number or name
will be shown in the display.
Use the
or buttons to scroll through
the list.
When there are no more calls to view END
OF LIST! will be displayed.
When all new calls have been viewed the red
calls light will go out.
To dial a number in the Calls list:
When a number you want to dial is displayed,
press the Dial button.
The display shows LIFT HANDSET. The
number will be dialled automatically 3 seconds
after lifting the handset.
Note
If the handset is not lifted within 6 seconds, your
Relate SMS will automatically return to the standby
screen.
Calls
Dial

Relate SMS User Guide ~ Issue 2 ~ 2nd Edition ~ 20th August ’03 ~ 5538
CALLING FEATURES
24
To copy a number in the Calls list to the
directory or to a direct memory
Press the Calls button.
The most recently received number will
be shown.
Use the
or buttons to scroll through
the list to the number you want to copy.
When the number you want to copy is
displayed, press the Menu button.
The display will show SAVE TO?
Press the
✔ button to save the number to
the directory.
Or
Press a memory button (M1 to M5) to save
the number to the direct memories.
The display shows TO TELEPHONE?
Either (to save as a telephone number):
Press the
✔ button if you wish to stor e the
number as a telephone number.
Press the
✔ button to confir m the telephone
number.
The display will show NAME: followed by a
flashing cursor.
Enter a name using the keypad buttons (as
shown on page 17, “To store a name and
number in the directory” ).
Press the
✔ button.
Then, if not saved as a mobile number, the
display will show MOBILE: followed by a
flashing cursor.
If you wish you can use the keypad to save a
mobile number with this entr y.
Press the
✔ button to confir m the mobile
number.
Or (to save as a mobile number):
If you wish to store the number as a mobile
number, use the
or buttons to display
TO MOBILE? and then pr ess the
✔ button.
The display shows TEL:
Press the
✔ button without entering a
telephone number.
Now you will need to store a name.
The display shows NAME: followed by a
flashing cursor.
Enter a name using the keypad buttons.
If you do not enter a name the entr y will be
Note
If you do not want to store a mobile number, press
the
✔ button when the display shows MOBILE:
Note
You can edit the number from the calls list when
it is shown followed by a flashing cursor. To edit
use the
buttons to move backwards and
forwards through the digits and use the
✘ button
to delete unwanted digits.
Calls
Menu

Relate SMS User Guide ~ Issue 2 ~ 2nd Edition ~ 20th August ’03 ~ 5538
CALLING FEATURES
25
To delete a number from the Calls list
Press the Calls button.
The most recently received number will be
shown.
Use the
or buttons to scroll through
the list to the number you want to delete.
Press the
✘ button.
The display shows DELETE?
Press the
✔ button to confir m.
The display will show RECORD DELETED!
and then return to the next entry in the
Calls list.
Press the Undo button to return to the
standby screen.
To delete the whole Calls list
Press the Calls button.
The most recently received number will be
shown.
Press the Menu button.
The display will show SAVE TO?
Press the
or buttons until the display
shows DELETE ALL?
Press the
✔ button.
The display shows SURE?
Press the
✔ button again to confir m.
The display shows ALL DELETED!
Calls
Undo
Calls
Menu
stored as NO NAME before alphabetical
entries.
Press the
✔ button.
Press
✔ button to confir m the mobile
number.
The display shows RECORD SAVED!
Your Relate SMS will then automatically
return to the standby scr een.

TEXT MESSAGING
26
Relate SMS User Guide ~ Issue 2 ~ 2nd Edition ~ 20th August ’03 ~ 5538
SMS Text Messaging
Welcome to the SMS Text Messaging Ser vice on
your Relate SMS product. The SMS Service is being
provided by Bizzyline (Direct) Ltd. Terms and
Conditions of this ser vice ar e supplied after the Help
section of this user guide on page 42.
We recommend that you read these before you send
your first SMS text message. By sending your first
SMS text message you are agreeing to these Terms
and Conditions.
Your Relate SMS telephone can send and receive
messages to any mobile phone (national and
international) and compatible land line telephones.
Each SMS text message sent is charged at 12p inc.
VAT* for the initial connection and then at local call
rate thereafter (typical cost 12p). One text message is
sent per connection. The typical total cost for sending
one message is 12p.
*Correct at time of going to press.
IMPORTANT
You must subscribe to your Network Provider’s Caller
Display Service in order to use SMS text messaging.
A fee may be payable. For this service to work, your
number must be sent (not withheld). To ensure this,
the SEND server number is prefixed with 1470 which
releases your number for the text call, even if your
number is normally withheld.
IMPORTANT
If someone is sending you a text message from a
mobile phone, then they should send the message to
07786 201010 and put your telphone number in the
message between two
#
symbols – see page 37.
To subscribe/register to the SMS text
messaging service
Subscription/Registration is done by sending
your first SMS text message from your
Relate SMS product. When you send your
first SMS message, the ser vice will send you
an SMS message welcoming you. You may
also receive other automated text messages
relevant to the service.
Note
If you use Call Diver t to a fixed or mobile line then
new messages will be held at the messaging server
until you remove diver t and send a message.

Relate SMS User Guide ~ Issue 2 ~ 2nd Edition ~ 20th August ’03 ~ 5538
TEXT MESSAGING
27
Character map
Pressing the buttons for normal message writing gives
you the following characters with each successive press
of the button.
1,.?!’@&():;_
abc2джвабвз
def3èéêë
ghi4ìíîï
jkl5€
mno6сцтуф
pqr s7
tuv8ùúûü
wxy z9
Space 0
✱ #+ - / =£%$<>
to switch between upper and lower case
to skip backwards through the characters
to skip for war ds thr ough the characters
0
9
W
X
Y
Z
8
T
U
V
7
P
Q
R
S
6
M
N
O
5
J
K
L
4
G
H
I
3
D
E
F
2
A
B
C
1
Using SMS
Your Relate SMS has 3 message boxes:
INBOX For all incoming SMS text messages.
The INBOX can hold up to 45 messages.
OUTBOX Where a copy of each message you have
sent is stored. The OUTBOX can hold up
to 45 messages.
DRAFTS Where you can store a message/
par t written message to send at a later
time. Drafts can hold up to 14 messages.
With SMS (Short Message Ser vices) you can send
and receive text messages up to 160 characters long.
There is a maximum limit of 140 characters for each
message sent or received from mobile phones. You
can use any of the characters shown in the table below
when writing your SMS text message.

Relate SMS User Guide ~ Issue 2 ~ 2nd Edition ~ 20th August ’03 ~ 5538
TEXT MESSAGING
28
To send the message:
Press the
✔ button.
The display shows TEL: followed by a
flashing cursor.
Enter the telephone or mobile number to
which you want to send your message.
Press the
✔ button.
The display shows SMS SENDING and then
MESSAGE SENT flashes briefly in the display.
A copy of the message is kept in the OUTBOX.
To save the message to DRAFTS to send at a
later time:
Press the
or buttons to select SAVE
TO DRAFTS?
Press the
✔ button to confir m. The display
shows RECORD SAVED!
Your Relate SMS then automatically retur ns
to standby.
Note
Alternatively, you may select numbers from your
direct dial or directory memories.
To write and send a message
Press the SMS button.
If you have no new SMS messages waiting to
be read, the display shows WRITE MESSAGE?
Press the
✔ button.
The display shows a flashing cursor.
Use the keypad buttons to type in your
message.
Use the
or buttons to move
backwards and forwards through the
characters.
Use the
✘ button to delete any unwanted
characters.
Press the
✔ button when your message is
complete.
The display shows SEND?
Note
If the OUTBOX is nearly full, the display will
show OUTBOX ALMOST FULL. DELETE SOME
MESSAGES. You will still be able to write and
send a shor t SMS message, but then you will need
to delete some old messages from the OUTBOX.
SM S

Relate SMS User Guide ~ Issue 2 ~ 2nd Edition ~ 20th August ’03 ~ 5538
TEXT MESSAGING
29
Using the pre-programmed SMS messages
Press the SMS button.
If you have no new SMS messages waiting to
be read, the display shows WRITE MESSAGE?
Press the
✔ button.
The display shows a flashing cursor.
Press the
or button to view the list of
pre-programmed messages.
Continue to press the
or buttons to
display the message you want to send.
The pre-programmed SMS messages you can
select from are:
– Best Wishes
– Happy Birthday!
– Happy New Year!
– I am at home. Please call.
– I am at work. Please call.
– I can’t answer right now, call me later at …
– I can’t answer right now. I’ll call you back later.
– I love you
– I’m running late. I will be there at …
– Make sure you are home for …
SM S
– On your way home, can you buy some …
– Please call
– See you at …
– To text me from your mobile, add #my
telephone number# to the message and send it
to 07786201010.
– What time are we meeting later?
– What time will you be home?
Once the message you want is displayed, you
can use the keypad buttons to adapt or add to
the message.
Use the
✘ button to delete any unwanted
characters.
Press the
✔ button when your message is
complete.
The display shows SEND?
Press the
✔ button.
The display shows TEL: followed by a
flashing cursor.
Enter the telephone or mobile number to
which you want to send your message.
Press the
✔ button.
The display shows SMS SENDING and then
MESSAGE SENT flashes briefly in the
display.
A copy of the message is stored in the Outbox
and your Relate SMS then automatically
returns to the standby scr een.
Note
The display will only show the last 3 lines of a
message. If you want to view or amend the text in
the message you must first enter a character at the
end and then use the
or
buttons.

Relate SMS User Guide ~ Issue 2 ~ 2nd Edition ~ 20th August ’03 ~ 5538
TEXT MESSAGING
30
Receiving an SMS message
When you receive an SMS message the display will
show RECEIVING SMS and then NEW SMS RECEIVED.
The red SMS light on the base will flash and you will
hear the SMS message audible aler t to let you know
you have a new message.
The display will then show the standby screen:
SMS Warning messages
If you tr y to send a message and the message fails
to send you will usually see one of the following
messages on your display:
TEL LINE DISCONNECTED!
If your telephone line is disconnected. You will
need to reconnect the telephone line, see page 8.
NO SMS PROVIDER!
If you have accidentally deleted your SMS providers
numbers, see page 36 to re-enter the numbers.
OUTBOX FULL.
DELETE SOME MESSAGES!
If your OUTBOX is full, see page 35 for how to
delete SMS messages.
MESSAGE UNSENT
If the message was not received by the SMS
provider. The message is saved to the OUTBOX
so that you can resend it at a later time.
The number of new messages received will remain on
the bottom line of the display until they have been
read.
When all new messages have been read the SMS
light will stop flashing and the standby screen will
show the total number of SMS messages in the
bottom line of the display:

Relate SMS User Guide ~ Issue 2 ~ 2nd Edition ~ 20th August ’03 ~ 5538
TEXT MESSAGING
31
To read SMS messages
When you have received new SMS messages,
the SMS light will flash and the number of
new messages will be shown in the display.
When viewing your messages, you can
dif ferentiate between old and new messages,
as when you have new messages the NEW
icon will be displayed.
If you have messages to read:
Press the SMS button.
Press the
button to scroll to INBOX.
If you have new messages waiting the display
will already show INBOX.
Press the
✔ button to open the INBOX and
read your messages.
If a message has not been viewed before the
NEW icon will be shown in the display.
Use the
or buttons to scroll to the
message you want to read.
For each message the display shows the
sender’s number and the date and time the
message was received.
SM S
Delivery of SMS messages
The SMS Ser vice will attempt to deliver a message to
you three times, but if your line is busy or otherwise
unavailable and the message is undelivered it will be
stored for a maximum of three days. After 3 days the
message will be deleted from the server. If you send
an SMS text message within the 3 day period the server
will attempt to deliver the message to you following
your connection.
If you do not wish to be disturbed at a cer tain time of
the day, you can arrange for your SMS messages to
be delivered between prefer r ed hours. To ar range this
facility, please call 0911 023 5013 and leave a message
clearly stating:
• Your name.
• Your full telephone number (including dialling code)
that your Relate SMS is connected to.
• The start time and the end time for your messages
to be delivered (e.g. star t time 9.00am, end time
10.00pm).
Your SMS account will be updated within the next
48 hours.
IMPORTANT
If you have been sending or receiving SMS text
messages and you then decide to unplug your Relate
SMS from the telephone line or cancel your Caller
Display subscription, we recommend you contact
Bizzyline to ensure your telephone number is deleted
from the SMS server database. (Please see page 47
for Bizzyline contact details). If you do not do this
you may receive automated calls as the server attempts
to send messages to your Relate SMS.
Note
You may notice an additional digit (usually 9)
at the end of numbers in received text messages.
Where it is a 9, it has been added at the SMS
server to indicate that sub-addressing, a feature
that allows more than one SMS phone to be used
on a line, is not being used. Relate SMS does not
suppor t sub-addressing, therefore, those receiving
texts from you will find a 9 added to your number.

Relate SMS User Guide ~ Issue 2 ~ 2nd Edition ~ 20th August ’03 ~ 5538
TEXT MESSAGING
32
To reply to a message
Press the SMS button.
Press the
button to scroll to INBOX.
Press the
✔ button to open the INBOX and
read your messages.
Use the
button to scroll to and display
the message you want to reply to.
Press the Menu button.
Press the
button repeatedly to display
REPLY?
Press the
✔ button.
The display shows a flashing cursor.
Use the keypad buttons to type in your
message.
Press the
✔ button to confir m.
The display shows SEND?
Press the
✔ button.
The display shows the telephone number of
the message sender.
Press the
✔ button to confir m you want to
send your message to this number.
The display shows SMS SENDING ..… and
then MESSAGE SENT flashes briefly in the
display.
SM S
Menu
If this number is stored in your directory
with a name then this will also be displayed.
Press the
✔ button to view the content of the
message. The display will only show the last
48 characters of a message, to view the rest
of the message use the
or buttons to
scroll the display.
Press the Undo button to return to the main
message list
Press the
or buttons to view the
other messages in the list.
When you reach the end of the message list,
the display will show END OF LIST!
Press the Undo button repeatedly to r etur n
to the standby screen.
To read messages stored in the OUTBOX or
in DRAFTS
Press the SMS button.
Press the
button to scroll to either
OUTBOX or DRAFTS.
Press the
✔ button.
The contact details for the first message in
the list will be displayed.
Press the
✔ button again to read the contents
of this message.
If the whole message cannot be displayed,
use the
or
buttons to scroll through
and view the rest of the message.
Press the Undo button to return to the main
message list.
Press the Undo button repeatedly to r etur n
to the standby screen.
Undo
SM S
Undo
Undo
Undo

Relate SMS User Guide ~ Issue 2 ~ 2nd Edition ~ 20th August ’03 ~ 5538
TEXT MESSAGING
33
To edit and send a message saved in Drafts
Press the SMS button.
Press the
button repeatedly to display
DRAFTS.
Press the
✔ button.
The display shows the newest draft message.
Use the
or buttons to scroll to and
display the number of the message you want
to edit.
Press the
✔ button to view the message.
Press the Menu button.
Press the
button repeatedly to display
EDIT?
Press the
✔ button.
The message is displayed followed by a
flashing cursor.
Use the
or buttons to move
backwards or forwards through the message
to the point where you want to edit the
message.
Use the
✘ button to delete any unwanted
characters.
Enter any new characters using the keypad.
When you are happy with the new message,
press the
✔ button.
The display shows SEND?
Press the
✔ button.
The display shows TEL: with a flashing cursor.
SM S
Menu
To forward a message from the INBOX or
the OUTBOX
You can send a message you have received
(that is in your INBOX) or a message that is
in your OUTBOX on to another person.
Press the SMS button.
Press the
button to select either INBOX
or OUTBOX.
Press the
✔ button to r ead the messages in
your chosen box.
Use the
or buttons to scroll to and
display the message you want to for war d.
Press the Menu button.
Press the
button repeatedly to display
FORWARD?
Press the
✔ button.
The display shows the content of the message
you want to for war d.
Press the
✔ button.
The display shows SEND?
Press the
✔ button.
The display shows TEL: with a flashing
cursor.
Enter the telephone number to which you
want to send your message.
Press the
✔ button.
The display shows SMS SENDING ..… and
then MESSAGE SENT flashes briefly in the
display.
SM S
Menu

Relate SMS User Guide ~ Issue 2 ~ 2nd Edition ~ 20th August ’03 ~ 5538
TEXT MESSAGING
34
You may notice an additional digit (usually 9)
at the end of numbers in received text
messages. See the note box on page 31 for
more information. Voice calls from that
telephone will NOT include the sub-address
digit in the Calls list so delete this digit
(use
✘) before saving to a memory. Voice calls
will then match and display the caller’s name.
Press the ✔ button to confirm.
Or…
To store the number as a mobile number:
Use the or buttons to display
TO MOBILE?
Press the
✔ button.
The display shows TEL:
Press the
✔ button without entering a
telephone number.
Now you will need to store a name.
The display shows NAME: followed by a
flashing cursor.
Enter a name using the keypad buttons.
If you do not enter a name the entr y will be
stored as NO NAME before alphabetical
entries.
Press the
✔ button.
If you selected TO TELEPHONE – the display
shows MOBILE: followed by a flashing cursor.
If you wish you can use the keypad buttons
to save a mobile number with this entr y.
Or
Enter the telephone number to which you
want to send your message.
Press the ✔ button.
The display shows SMS SENDING ..… and
then MESSAGE SENT flashes briefly in the
display.
To save an SMS sender’s phone number to
the directory or direct memories
Press the SMS button.
Press the
button to display INBOX.
Press the
✔ button to open the INBOX.
Use the
or buttons to scroll to the
sending number you want to save.
Press the Menu button.
Press the
button repeatedly to display
SAVE TO?
Press the ✔ button to automatically save the
number to the directory.
Or
Press a memory button (M1 to M5) to save
to the memor y.
The display shows TO TELEPHONE?
Either…
To store the number as a telephone number:
Press the
✔ button.
The telephone number to be saved is
displayed.
SM S
Menu

Relate SMS User Guide ~ Issue 2 ~ 2nd Edition ~ 20th August ’03 ~ 5538
TEXT MESSAGING
35
To delete all messages in the INBOX,
OUTBOX or DRAFTS
Press the SMS button.
Press the
button to select either INBOX,
OUTBOX or DRAFTS.
Then press the
✔ button.
Press the Menu button.
Press the
button repeatedly to display
DELETE ALL?
Press the
✔ button.
The display shows SURE?
Press the
✔ button to confir m.
The display shows ALL DELETED!
The display will then automatically return to
the standby screen.
SM S
Menu
To delete individual messages
Press the SMS button.
Press the
button to select either INBOX,
OUTBOX or DRAFTS.
Press the
✔ button.
Use the
or buttons to scroll to and
display the message you want to delete.
Press the Menu button.
Press the
button repeatedly to display
DELETE?
Press the
✔ button.
The display shows RECORD DELETED!
The display will then show the next SMS
message in your chosen BOX.
Press the Undo button to return to the
standby screen.
SM S
Menu
Undo
If you selected TO MOBILE – then the number
to be saved is displayed.
Press the
✔ button.
The display shows RECORD SAVED!
Press the Undo button repeatedly to r etur n
to the standby screen.
Undo

Relate SMS User Guide ~ Issue 2 ~ 2nd Edition ~ 20th August ’03 ~ 5538
TEXT MESSAGING
36
To change the SMS Centre phone numbers
You can change the SMS Centre for sending
and receiving SMS text messages
Make sure you understand the special
features and services of fered by the SMS
Ser vice Pr ovider before you change the
pre-set numbers.
To edit or change the pre-set Service Centre
numbers:
Press the Menu button.
The display shows SET CONTRAST.
Press the
or buttons to scroll to
SMS PROVIDERS.
Press the
✔ button.
The display shows the current send setting
e.g. SEND TEL. NO: 147009110235029.
Use the
✘ button to delete the current
number and enter your new service providers
‘send’ number using the keypad buttons.
When the number is correct, pr ess the
✔
button.
The display shows SEND TEL. No:
COMPLETED and then displays the current
receive setting RECEIVE TEL. NO:
01612745990.
Use the
✘ button to delete the current
number and enter your new service providers
‘receive’ number using the keypad buttons.
When the number is correct, pr ess the
✔
button.
Your Relate SMS retur ns to the standby screen.
Menu
SMS Service Centre numbers
To be able to send and receive SMS text messages
you need the telephone number of your Network’s
SMS Centre. The Bizzyline (Direct) Ltd. numbers are
pre-set in your Relate SMS telephone.
The pre-set number settings are:
SEND TEL. NO:
1470P09110235029
1470
This will ensure that you do not withhold
your number on this call.
P
This inser ts a pause before dialling the number.
RECEIVE TEL. NO:
01612745990
Note
In cer tain circumstances e.g. if advised by Bizzyline
or as a result of information in the troubleshooing
guide you may need to change these numbers.

TEXT MESSAGING
37
Relate SMS User Guide ~ Issue 2 ~ 2nd Edition ~ 20th August ’03 ~ 5538
When replying to a Relate SMS telephone
from a mobile phone
Mobile users should select REPLY on their
mobile phone and anywhere within the text
of their message they must inser t the fixed
line telephone number with a
#
symbol
before and after it.
This will ensure the message is successfully
received by your Relate SMS telephone.
For example, when replying to telephone
number 01234123456 anywher e within the
text of the message the sender should add
#
01234123456
#
.
When sending a new message to a
Relate SMS telephone from a mobile phone
When mobile users compose an SMS text
message they must inser t, anywhere within
the message, the fixed line telephone number
with a
#
symbol before and after it.
The message must be sent to 07786 201 010
in order for the message to be successfully
received by the Relate SMS user.
For example, when sending a message to
telephone number 01234123456 anywhere
within the text of the message the sender
would have to add
#
01234123456
#
. The
SMS text message should then be sent to
07786 201 010.
Sending SMS text messages from
mobile phones
Your Relate SMS telephone can receive messages from
ANY mobile phone (both national and international)
provided you follow the instr uctions below:
See you at nine
#
01234123456
#
Bye
Note
Mobile users are advised to store the Relate text
server number 07786 201 010 in their mobile
phone directory.
New SMS text messages sent from mobile phones are
sent to 07786 201 010 (SMS server) who for ward
the message to the recipient.

GENERAL INFORMATION
38
Relate SMS User Guide ~ Issue 2 ~ 2nd Edition ~ 20th August ’03 ~ 5538
General information
Outside of the 12 month guarantee period:
If your product needs repair after the guarantee
period has ended, the repair must meet the approval
requirements for connection to the telephone
network. We recommend that you contact BT’s
approved repair agent TecLogic on 01672 564444
or a local qualified repairer.
If you have to return your product
Please refer to the Help section on page 40. If you still
feel you have to return your pr oduct, pack the
telephone securely, preferably in the original
packaging. All par ts must be returned, including line
cords and original batteries. (Please note that we can
not take responsibility for goods damaged in transit).
Technical information
How many telephones can you have?
All items of telephone equipment have a Ringer
Equivalence Number (REN), which is used to calculate
the number of items which may be connected to any
one telephone line. Your Relate SMS has a REN of 1.
A total REN of 4 is allowed. If the total REN of 4 is
exceeded, the telephones may not ring. With different
telephone types there is no guarantee of ringing, even
when the REN is less than 4.
It is recommended that you use AA Alkaline batteries
with your Relate SMS.
Guarantee
Your Relate SMS is guaranteed for a period of 12
months from the date of purchase. Subject to the
terms listed below the guarantee will provide for the
repair of, or at BT’s or its agent’s discretion, the
option to replace the Relate SMS or any component
thereof, (other than batteries), which is identified as
faulty or below standard, or as a result of inferior
workmanship or materials. Products over 28 days old
from the date of purchase may be replaced with a
refurbished or repaired product.
The conditions of this guarantee are:
• The guarantee shall only apply to defects that occur
within the 12 month guarantee period.
• Proof of pur chase is provided.
• The equipment is returned to BT or its agent as
instructed.
• This guarantee does not cover any faults or defects
caused by accidents, misuse, fair wear and tear,
neglect, tampering with the equipment, or any
attempt at adjustment or repair other than through
approved agents.
• This guarantee does not affect your statutory rights.
Within the 12 month guarantee period:
Prior to returning your pr oduct, please read the ‘Help
section’ beginning on page 40.

Relate SMS User Guide ~ Issue 2 ~ 2nd Edition ~ 20th August ’03 ~ 5538
GENERAL INFORMATION
39
To insert a pause in a stored number
With some switchboards, after dialling
the access code e.g. 9 you may have to wait
for a moment while the switchboard picks
up an outside line.
If so, when storing a directory or direct
memor y number, press Pause before
entering the telephone number.
To use the recall button
You may need to use the recall function if
you are connected to a switchboard/PBX,
contact your supplier for fur ther
information. The recall function is set
to timed break recall and is also used
for BT Calling Features.
Switchboard compatibility
This product is intended for use within the UK for
connection to the public telephone network and
compatible switchboards, which suppor t tone and
timed break recall. If in doubt please consult your
ser vice pr ovider.
R
Pause
R&TTE
This product is intended for use within the UK for
connection to the public telephone network and
compatible switchboards.
This equipment complies with the essential
requirements for the Radio Equipment and
Telecommunications Terminal Equipment Directive
(1999/5/EC).
If you would like a copy of the Declaration
of Conformity please visit:
www.ateamtech.com/products/doc/relatesms/
BT Accessories and Replacement Items
For a full range of accessories and replacement items
for BT products please call 0870 240 5522, or visit:

HELP
40
Relate SMS User Guide ~ Issue 2 ~ 2nd Edition ~ 20th August ’03 ~ 5538
Help
If you have any problems using your Relate SMS, this section will give you the most
common, easy to follow solutions.
Telephone problems Possible cause Solution
• No dialling tone. Telephone not connected to the Plug the telephone into the
telephone line. telephone line.
• You have dialling tone but the You are connected to a PBX and are See page 39 for more information
telephone will not dial out. not dialling the access code. on switchboard use.
• No Directory name and You may have entered a name and You need to save both a name and
number stored. not a number. number when storing an entry in the
directory, see page 17.
• SMS Messages cannot be sent The telephone line has been You will need to reconnect the
and the screen displays: accidentally disconnected. telephone line before you can send
TEL LINE DISCONNECTED!
any further messages or make
any calls.
NO SMS PROVIDER! You may have accidentally deleted See page 36 to re-enter the numbers.
your SMS providers numbers.
OUT BOX FULL. Your OUTBOX has reached it’s See page 35 for how to delete
DELETE SOME MESSAGES! maximum capacity for messages. SMS messages.
MESSAGE UNSENT The message was not received by The message will be automatically
the SMS provider. saved to the OUTBOX. You can try
to resend it from the OUTBOX at a
later time.
There may be a fault on the line. Check your telephone line is working
correctly.
You may have more than one Remove other products.
product plugged
into the line.

HELP
41
Relate SMS User Guide ~ Issue 2 ~ 2nd Edition ~ 20th August ’03 ~ 5538
Telephone problems Possible cause Solution
•
SMS messages are not received A second SMS phone or incompatible Unplug the other phone or product.
by Relate SMS. product is also connected to your line.
The receive server number may be If Caller Display is usually delivered
incorrect for your line. with a prefix 9 then change the
receive server number (see page 36)
to 901612745990.
•
Not receiving text messages but Your network manages text calls in Change the receive tel no pg 35 to
receiving non voice calls from an a different way to the BT Network. the number which is calling you.
unknown number, typically 0161.
Caller Display is not enabled on
your line. Check with your network provider.
•
Messages are unsent. The send server number may be If a 9 is normally dialled for a network
incorrect for your line. line, change the send server number
(see Page 36) to 914700911023029.
i.e. add a 9 and delete the P.
You may have premium rate numbers Contact your network provider.
barred on your line.
•
SMS messages are not sent and The procedure to send text uses Replace the batteries.
are lost in the attempt to send. more battery power than needed for
idle line displays. The battery low icon
is showing advising batteries need
changing.
•
Other Caller Display products log Intended design feature – the call is Not a problem for solving.
calls from the SMS Server (typically not a voice call. Calls from the SMS
01612745990) but Relate does Server, which match the
not show them. programmed number, are silently
answered by Relate.
•
Calls from the SMS Server cause Cable networks (typically Contact Bizzyline if delivery of text
the ringer to chirp. NTL/Telewest) deliver a single burst messages causes night disturbance.
of ringing before the data which A personal delivery times profile can
identifies the call as a text. be set up.

SMS SERVICE CONDITIONS
Conditions for Bizzyline (Direct) Ltd, Issue 1, 5 July 2001 42
Relate SMS User Guide ~ Issue 2 ~ 2nd Edition ~ 20th August ’03 ~ 5538
SMS Service Conditions
For Bizzyline (Direct) Ltd.
Note
You must read the following conditions before you
register for SMS Service, by registering you have
accepted these conditions.
1. INTERPRETATION
In this Contract:
“Authorised User” means anyone the Customer allows to
use the Ser vice.
“Bizzyline” means Bizzyline (Direct) Ltd. of Warford Hall,
Merrymans Lane, Great Warford, Alderley Edge,
Cheshire. SK9 7TP. Registered in England No. 3308270.
“BT” means British Telecommunications plc of 81
Newgate Street, London, EC1A 7AJ registered in England
No. 1800000.
“Code of Conduct” means the guidelines regarding the
use of SMS issued by Bizzyline for the protection of the
Customer and other users of the Ser vice.
“Contract” means, in order of precedence, these
Conditions and Registration by sending the first SMS
message.
“Customer” means the person using the service.
“Helpdesk” means the helpdesk facility provided by BT to handle
enquiries and administration for the Ser vice.
“Service” means the SMS service and any other r elated or ancillary
ser vices provided by Bizzyline in conjunction with BT.
“Software” means any software provided by BT to enable the Customer
to access or use the Ser vice.
2. DURATION
This Contract begins on the date that the Customer
registers for service by sending their first SMS message
and will continue until terminated in accordance with this
Contract.
3. PROVISION OF THE SERVICE
3.1 Bizzyline will provide the Customer with the Service on
the terms of this Contract.
3.2 Bizzyline will use reasonable endeavours to provide the
Ser vice by any date agr eed with the Customer but all
dates are estimates and Bizzyline has no liability for
any failure to meet any date.
3.3 Bizzyline will provide the Service with the reasonable
skill and care of a competent service provider.
3.4 It is technically impracticable to provide a fault free
Ser vice and Bizzyline does not undertake to do so.
Bizzyline will however repair any reported faults as
soon as it reasonably can.
3.5 Bizzyline cannot be held accountable for loss of ser vice
caused by faults, maintenance or other issues on the
mobile networks which are outside of Bizzyline's direct
control.

Relate SMS User Guide ~ Issue 2 ~ 2nd Edition ~ 20th August ’03 ~ 5538
SMS SERVICE CONDITIONS
43 Conditions for Bizzyline (Direct) Ltd, Issue 1, 5 July 2001
3.6 Occasionally Bizzyline may:
(a) change the technical specification of the Ser vice,
provided that any change to the technical
specification does not materially af fect the
per for mance of the Service;
(b) suspend the Service for operational reasons such
as repair, maintenance or improvement of the
Ser vice or because of an emergency. Bizzyline will
restore the Service as soon as it reasonably can
after suspension; or
(c) give the Customer instructions which it believes
are necessary for reasons of health, safety or the
quality of any ser vice pr ovided by Bizzyline to the
Customer or any other customer.
3.7 Except for Software (if any) provided to the Customer
by Bizzyline as par t of the Service, the Customer is
responsible for providing suitable software and
telecommunications equipment and ser vices necessary
to access and use the Ser vice. This Contract does not
include the provision of telecommunications services
necessar y to connect to and use the Service.
3.8 The Customer is responsible for the acts and omissions
of all Authorised Users in connection with the Ser vice
and is liable for any failure by any Authorised User to
per for m or observe the terms and conditions of this
Contract, including any instructions issued under
paragraph 3.6.
3.9 The Customer acknowledges that he or she is aware of
the Code of Conduct and that the Code of Conduct has
been made available for the protection and safety of the
Customer and others using the Ser vice. The Customer
agrees to ensure that any Authorised Users are aware
of and familiar with the Code of Conduct.
4. SECURITY
4.1 The Customer is responsible for the security and
proper use of all information used in connection with
the Ser vice and must take all necessary steps to ensure
that this is kept confidential, secure, used properly and
not disclosed to unauthorised people.
4.2 The Customer must immediately inform Bizzyline if
there is any reason to believe that information has or is
likely to become known to someone not authorised to
use it or is being or is likely to be used in an
unauthorised way.
4.3 Bizzyline reserves the right to suspend access to the
Ser vice if at any time Bizzyline considers that ther e is
or is likely to be a breach of security.
4.4 Bizzyline reserves the right (at its sole discretion) to
require the Customer to change information used by
the Customer in connection with the Ser vice.
4.5 The Customer must immediately inform Bizzyline of
any changes to the information the Customer supplied
when registering for the Service.
5. USE OF THE SERVICE
5.1 The Service is provided solely for the Customer's own
use (including use by Authorised Users) and the
Customer will not sell or attempt to sell the Ser vice (or
any par t or facility of it) to any third party.
5.2 The Service may be used by individuals who are at
least 18 years of age or by minors who have the
permission of a parent or responsible adult to use the
Service.
5.3 The Customer is solely responsible for evaluating any
goods (including software) or services offered by thir d
par ties via the Service. Bizzyline will not be a par ty to
or in any way responsible for any transactions between
the Customer and third par ties.

Relate SMS User Guide ~ Issue 2 ~ 2nd Edition ~ 20th August ’03 ~ 5538
SMS SERVICE CONDITIONS
Conditions for Bizzyline (Direct) Ltd, Issue 1, 5 July 2001 44
5.4 The Service must not be used by the Customer or any
Authorised User in a way that does not comply with:
(a) the terms of any legislation or any licence
applicable to the Customer or that is in any way
unlawful;
(b) any instructions given by Bizzyline under paragraph
3.6(c); or
(c) the Code of Conduct.
5.5 The Service must not be used by the Customer or any
Authorised User:
(a) fraudulently, in connection with a criminal of fence,
or other wise unlawfully;
(b) to send, r eceive, upload, download, use or re-use
any information or material which is offensive,
abusive, indecent, defamatory, obscene or menacing,
or in breach of confidence, copyright, privacy or any
other rights;
(c) to cause annoyance, inconvenience or needless
anxiety;
(d) to send or pr ovide unsolicited advertising or
promotional material or to receive responses to any
unsolicited adver tising or pr omotional material sent
or provided using the Service by any third par ty; or
(e) other than in accordance with the acceptable use
policies of any connected networks.
5.6 If the Customer, an Authorised User or anyone else,
with or without the Customer's knowledge or approval,
uses the Ser vice in contravention of paragraphs 5.1,
5.2, 5.3, 5.4 or 5.5. Bizzyline may treat the
contravention as a material breach of this Contract
which cannot be remedied for the purposes of
paragraph 10.
5.7 The Customer must indemnify Bizzyline against any
claims or legal proceedings which are brought or
threatened against Bizzyline by a third party because:
(a) the Ser vice is used in br each of the provisions of
this paragraph 5; or
(b) the Service is faulty or cannot be used by that third
par ty. Bizzyline will notify the Customer of any
such claims or proceedings and keep the Customer
informed as to the progress of such claims or
proceedings.
6. CONFIDENTIALITY
6.1 Bizzyline will keep in confidence any information
provided to it by the Customer when registering for the
Ser vice or otherwise under this Contract and will not
disclose that information to any person (other than its
employees, contractors, or professional advisers, or the
employees or contractors of a Bizzyline Group
Company who need to know the information) without
the Customer’s consent.
Conditions for Bizzyline (Direct) Ltd, Issue 1, 5 July 2001 13
6.2 This paragraph 6 will not apply to:
(a) any information which has been published other
than through a breach of this Contract;
(b) infor mation lawfully in the possession of the
recipient before the disclosure under this Contract
took place;
(c) information obtained from a third party who is free
to disclose it;
(d) infor mation which a party is requested to disclose
and if it did not could be required by law to do so;
or
(e) information which has been reduced by Bizzyline
to anonymous, non-personal form before
disclosure.
6.3 This paragraph 6 will remain in effect for 2 years after
the termination of this Contract.

Relate SMS User Guide ~ Issue 2 ~ 2nd Edition ~ 20th August ’03 ~ 5538
SMS SERVICE CONDITIONS
45 Conditions for Bizzyline (Direct) Ltd, Issue 1, 5 July 2001
7. LIMITATION OF LIABILITY
7.1 Bizzyline accepts unlimited liability for death or
personal injur y r esulting from its negligence and
paragraphs 7.2 and 7.3 do not apply to such liability.
7.2 Bizzyline is not liable to the Customer, either in
contract, tor t (including negligence) or otherwise for
direct or indirect loss of profits, business or anticipated
savings, nor for any indirect or consequential loss or
damage or for any destruction of data.
7.3 Bizzyline’s liability to the Customer in contract, tor t
(including negligence) or other wise in r elation to this
Contract is limited to £1,000 for any one incident or
series of related incidents and to £2,000 for all incidents
in any period of 12 months.
7.4 Bizzyline excludes all liability of any kind in respect of
any material which can be accessed using the Ser vice
and is not responsible in any way for any goods
(including software) or services provided by third
par ties advertised, sold or other wise made available by
means of the Ser vice.
7.5 Bizzyline is not liable to the Customer either in contract,
tor t (including negligence) or otherwise for the acts or
omissions of other providers of telecommunications or
ser vices or for faults in or failur es of their equipment.
7.6 Each provision of this Contract, excluding or limiting
liability, operates separately. If any par t is held by a
cour t to be unreasonable or inapplicable, the other
par ts shall continue to apply.
Conditions for Bizzyline (Direct) Ltd, Issue 1, 5 July 2001
8. MATTERS BEYOND REASONABLE
CONTROL
If Bizzyline is unable to per for m any obligation under this
Contract because of a matter beyond its reasonable control
such as lightning, flood, exceptionally severe weather, fire,
explosion, war, civil disorder, industrial disputes (whether
or not involving its employees), or acts of local or central
Government or other competent authorities, or events
beyond the reasonable control of its suppliers, it will have
no liability for that failure to per for m.
9. TERMINATION OF THIS CONTRACT
BY NOTICE
Either par ty may ter minate this Contract on 14 days’ notice
to the other, without prejudice to any rights that have
accrued befor e ter mination. Upon ter mination (for
whatever reason), Bizzyline may re-allocate any
information associated with the terminated Service.
Conditions for Bizzyline (Direct) Ltd, Issue 1, 5 July 2001 15
10. BREACHES OF THIS CONTRACT
10.1 Either par ty may ter minate this Contract or the
provision of Service under it without notice if the
other:
(a) commits a material breach of this Contract, which
is capable of remedy, and fails to remedy the
breach within a reasonable time of a written notice
to do so;
(b) commits a material breach of this Contract which
cannot be remedied; or
(c) is repeatedly in breach of this Contract.

Relate SMS User Guide ~ Issue 2 ~ 2nd Edition ~ 20th August ’03 ~ 5538
SMS SERVICE CONDITIONS
Conditions for Bizzyline (Direct) Ltd, Issue 1, 5 July 2001 46
10.2 If any of the events detailed in paragraph 10.1 occur
because of the Customer or an Authorised User,
Bizzyline may suspend the Ser vice without pr ejudice
to its right to terminate this Contract. At its sole
discretion, Bizzyline reserves the right to suspend or
terminate any Authorised User’s use of the Service as
an alternative remedy to immediate suspension or
termination of the Contract.
This remedy is without prejudice to Bizzyline’s right
subsequently to suspend or terminate the Contract.
Bizzyline may refuse to restore Service which has
been suspended under this paragraph until it has
received assurances satisfactory to Bizzyline that the
breach has been remedied and will not be repeated.
10.3 Termination under this paragraph is without prejudice
to any rights that may have accrued befor e termination.
10.4 If either par ty delays in acting upon a breach of this
Contract that delay will not be regarded as a waiver
of that breach. If either par ty waives a br each of this
Contract that waiver is limited to that par ticular
breach.
10.5 Upon termination (for whatever reason), Bizzyline
may re-allocate any information associated with the
terminated Service.
11. CHANGES TO THIS CONTRACT
Bizzyline can change the Conditions of this Contract at any
time on 14 days’ notice to the Customer.
12. ASSIGNMENT
Neither par ty may assign or transfer any of its rights or
obligations under this Contract, without the written
consent of the other, except that Bizzyline may assign its
rights or obligations (or both) to a Bizzyline Group
Company without consent.
13. ENTIRE AGREEMENT
This Contract contains the whole agreement between the
par ties and supersedes all previous written or oral
agreements relating to its subject matter.
14. NOTICES
Notices given under this Contract may be delivered on-line,
in writing or by SMS message; notices will be deemed
ef fective on the date of publication, or otherwise as notified
to the Customer by Bizzyline. A notice from Bizzyline
which is sent by SMS to the Customer’s
SMS mailbox will be deemed ef fective 3 days after the
date it is sent. A notice from the Customer to Bizzyline will
be deemed ef fective when received by Bizzyline at the
address on these Terms and Conditions.
15. DATA PROTECTION CONSENT
By accepting the terms and conditions of this Contract, the
Customer grants Bizzyline and its agents processing data
on Bizzyline’s behalf, permission, in accordance with the
Data Protection Acts 1984 and 1998, to send the Customer
unsolicited adver tising and promotional material pertaining
to other Bizzyline products and services and to third-party
products and services selected by Bizzyline. The Customer
may revoke permission to Bizzyline and its agents to send
the Customer unsolicited adver tising and promotional
material per taining either to other Bizzyline products and
ser vices or to thir d party products and services, or both,
by writing to us at the address on these Terms and
Conditions.
Conditions for Bizzyline (Direct) Ltd, Issue 1, 5 July 2001

Relate SMS User Guide ~ Issue 2 ~ 2nd Edition ~ 20th August ’03 ~ 5538
SMS SERVICE CONDITIONS
47 Conditions for Bizzyline (Direct) Ltd, Issue 1, 5 July 2001
16. LAW
This Contract is governed by the law of England and
Wales.
17. HELPLINE
If you have any questions relating to the SMS service,
please call 0906 3020069 (calls are charged at 50p per
minute and the helpdesk is open from 9.00am-5.30pm
(Mon-Fri) or email SMSSer vice@bizzyline.net.
Conditions for Bizzyline (Direct) Ltd, Issue 1, 5 July 2001 17
CODE OF CONDUCT:
How should I behave when I use the Bizzyline SMS
Service?
Here are a few guidelines for you to consider when you’re
using SMS, which like any Ser vice, can allow strangers to
meet and chat anonymously.
Remotely, people may not be who they say they are.
You could be putting yourself at risk if you arrange to meet
someone you’ve met through the SMS service. If you do
agree to meet someone, never go alone, always meet in a
public place. Never go in the other person’s car, and do tell
a friend where you’re going and, just as importantly, when
you’ll be back.
Don’t give out your name, address, or telephone number or
ask anyone else for this information via SMS.
Please don’t intimidate others on the SMS ser vice by
sending abusive, menacing or obscene messages – you will
be in breach of the Conditions for Bizzyline if you do.

Relate SMS User Guide ~ Issue 2 ~ 2nd Edition ~ 20th August ’03 ~ 5538
48

WALL-MOUNTING TEMPLATE
49
Relate SMS User Guide ~ Issue 2 ~ 2nd Edition ~ 20th August ’03 ~ 5538
Wall-mounting template
If wall-mounting your Relate SMS,
drill two holes for the screws using
this template and inser t the wall plugs
provided (if required).
74mm

Relate SMS User Guide ~ Issue 2 ~ 2nd Edition ~ 20th August ’03 ~ 5538
INDEX
50
Index
At a glance 1
Audible SMS aler t 13
Batteries
install 7
low warning 7
Caller Display 22
Call timer 11
Calls
end 11
make 10
preparatory 10
receive 11
redial 11
Calls list
copy to directory or direct memor y 24
delete 25
dial number 23
view 23
Character map 15, 27
Cleaning 6
Clock – set 12, 13
Copy
from calls list to direct memory or director y 24
from direct memory to director y 16
from directory to direct memor y 20
Date – set 13
Delete
calls list 25
direct memory name and number 17
directory name and number 21
SMS message 35
Desk mounting 8
Direct memory
character map 15
copy to directory 16
delete 17
dial number 15
edit 16
store 14
Directory
copy from directory to a direct memor y 20
delete 21
dial number 18
edit 19
store name and number 17
view number 18
Display
contrast 12
icons 2
End a call 11
Guarantee 38
Help 40
Location of product 7

INDEX
51
Relate SMS User Guide ~ Issue 2 ~ 2nd Edition ~ 20th August ’03 ~ 5538
Make a call 10
Memory
character map 15
copy to directory 16
delete 17
dial number 15
edit 16
store name and number 14
Menu structur e 3
On/off
secrecy 12
SMS audible aler t 13
Pause – inser t 39
Preparatory dialling 10
Pre-programmed SMS messages 29
Read SMS messages 31
Recall 39
Receiving calls 11
Receiving an SMS message 30
Redial 11
Register to SMS ser vice 26
Reply to an SMS message 32
Returning your product 38
Ringer Equivalence Number (REN) 38
Ringer volume 11
Safety information 6
Secrecy 12
Set time and date 13
Setting up 7
Ser vice Centr e numbers 36
SMS Ser vice Conditions 42
SMS
audible aler t on/off 13
character map 27
delete 35
deliver y of messages 31
edit message 33
for war d message 33
pre-programmed messages 29
read messages 31, 32
receiving messages 30
reply to messages 32
save number to memor y/dir ectory 34
send message 28, 33
sending text messages from mobile phones
to the Relate SMS 37
Ser vice Centr e numbers 36
Ser vice Conditions 42
subscribe/register 26
warning messages 30
write messages 28
Standby screen 2
Store name and number
in directory 17
in direct memory 14
Switchboard compatibility 39
Technical information 38
Telephone line cord 8
Time – set 13
Unpacking 5
Volume – ringer 11
Wall mounting 9
Wall mounting template 49

Relate SMS User Guide ~ Issue 2 ~ 2nd Edition ~ 20th August ’03 ~ 5538
Visit us at www.bt.com
Offices worldwide
The telecommunications services described in this publication
are subject to availability and may be modified from time to time.
Services and equipment are provided subject to British
Telecommunications plc’s respective standard conditions of contract.
Nothing in this publication forms any part of any contract.
© British Telecommunications plc 2003.
Registered Office: 81 Newgate Street, London EC1A 7AJ.
Registered in England No. 1800000.
BT Relate SMS Issue 2 (08/03) 1
Designed and produced by The Art & Design Partnership Ltd.
Printed in Hong Kong
 Loading...