

Page 1

Freestyle 520 Plus
User guide
Page 2

Please turn this page for the ‘At a glance’ guide
to your Freestyle 520 Plus
Page 3

Charging
Page 4

Call Return
Call Waiting
Intercom
Recall
MemoryRedial
Pause
Secrecy
Page 5

3
In this guide
At a glance 1
Introduction 4
Setting up 5
How to use your Freestyle 520 15
Plus cordless handset
How to use your Freestyle 520 22
Plus base unit
Other Features 26
Connecting to a switchboard 32
Help 33
Technical Information 36
Index 38
Hints and tips boxes
In this user guide, we’ve included helpful tips and
useful notes. They are shown in a grey box.
Page 6

Introduction Your Freestyle 520 Plus is easy to use
and made to our high standards.
Thank you for making the right choice.
We expect that you will have many years of
quality service from your Freestyle 520 Plus.
Please read the instructions carefully before
you use your phone and keep this guide to
refer to in future.
For your records
Date you bought your phone:
Where you bought your phone:
Serial number (on the base of the phone):
Price:
(For warranty cover, you will need to provide
proof that the phone is yours. So please keep
your receipt.)
4
Homepoint Plus
You will find the Homepoint Plus logo (shown
below) on your Freestyle 520 Plus. It means that
you can buy up to three extra Freestyle Plus
handsets showing the same logo to extend your
phone system, without having to fit extension
sockets. Please follow the instructions supplied
with each handset you buy.
Please note
Only Freestyle Plus Additional Handsets can
be used with this product. If buying additional
handsets for your Freestyle 520 Plus, please
ensure you purchase the correct type.
Page 7

5
Setting upFollow these steps and your Freestyle 520 Plus
will be ready to use.
Check that your Freestyle 520 Plus is complete.
When you unpack you should have:
• base unit with a telescopic aerial and phone
cord attached;
• cordless handset and charging unit
• corded handset
• two 13-amp mains power adaptor plugs
• bracket for the base unit
• bracket for the cordless-handset cradle
charging unit
• two screws and wall plugs for wall mounting
• spare handset memory labels.
Like all cordless phones, the Freestyle 520 Plus
cordless handset must be charged for 24 hours
before you use it. However, once it has been
connected, you can use the corded handset
immediately.
Important: Before you use your Freestyle 520 Plus
As this product is rechargeable, it is normal that a
certain amount of heat will be produced in its dayto-day operation. Whilst this is entirely safe we
would advise against placing this product on
antique, veneered or wooden surfaces as damage
may occur.
Plan the location of the base unit. The following
points should be considered:
• The base unit should be within two metres of a
power socket and the phone socket. A new-style
phone line socket is needed for this product.
If you do not have one, call us free on
FREEfone 0800 800150.
• There should be enough room for the telescopic
aerial to be fully extended, ideally vertically.
• Ensure that the base unit and the aerial are
away from TV sets, fridges, computers, GSM
telephones, fluorescent lights, radiators, metal
pipes and metal window frames.
• If your Freestyle 520 Plus is your only phone, you
must fit back-up batteries in case of power cuts.
The required battery type is a PP3 Alkaline 9V
(not supplied).
• The back up battery must be fitted before
attaching the base unit to the mounting bracket.
Page 8

Setting up
6
4 Plug the power cable into the
back of the base unit
Plug the power cable into the socket on the
back of the base unit.
Battery
3 Put the battery in the base unit
(for back-up only)
Open the panel under the base unit.
Fit a PP3 9-volt battery and close the panel.
The base-unit battery provides back-up power so
that your Freestyle 520 Plus will work during
power cuts. We strongly recommend you to fit a
battery if the Freestyle 520 Plus is the only phone
in your home.
Like all cordless phones, the Freestyle 520
Plus handset must be charged for
2244 hhoouurrss
before first use.
2 Check your telephone wall
socket
If you do not have a modern socket, call BT
on
Freephone 0800 800 150 and ask for an
engineer to come and fit the right socket within
two metres of a mains socket. This is a
chargeable service.
1 Handset aerial
Y our Freestyle 520 Plus uses an extendible aerial.
When using the handset pull out the aerial to
ensure the best possible signal and reception.
Pull
Page 9

7
Setting up
Warnings
1
Do not try to use any power supply other
than the one provided. This may
permanently damage your Freestyle 520 Plus.
2 Your Freestyle 520 Plus should not be fitted
in wet or damp conditions, for example in a
bathroom. Also, the handset should not be
left out in the rain.
3 There is a slight chance that your phone
could be damaged by an electrical storm.
We recommend that you unplug the base
unit from the mains during storms.
5 Connect the base-unit three-pin
adaptor to a power socket
You can now use the base-unit phone and store
numbers in the memory.
6 Plug the phone into the BT socket
For the best reception
Try to avoid putting the telescopic aerial near
other electrical appliances, fluorescent lights and
large metallic objects such as cookers, radiators
and garage doors as these may cause interference
and reduce the quality of your calls.
7 Extend the base unit telescopic
aerial
Extend the base unit telescopic aerial on your
Freestyle 520 Plus (as shown below) to ensure
the best possible signal and reception.
Page 10

Using the inductive coupler
Your Freestyle 520 Plus has an
‘inductive coupler’ in both of the
handsets to improve the sound quality
for people with hearing aids.
Switch your hearing aid to T and move
the phone ear piece towards your ear
until you get the best sound.
8 Set the base-unit monitor
volume to a suitable level
You can check the volume by pressing the
MONITOR button and then adjusting the
volume control on the side of the base unit.
When you have set the volume to a suitable
level, press the MONITOR button again to
return the phone to standby.
9 Plug the power cable into
the bottom of the cradle
charging unit
Setting up
8
VOLUME
Page 11

10 Clip the cradle charging unit
onto the stand
If you prefer to put your Freestyle 520 Plus
cradle charging-unit on the wall, see page 11.
11 Connect the cradle
charging-unit three-pin adaptor
to a power socket
1
2
12 Put the cordless handset onto
the cradle charging unit
The cradle charging unit’s red charging light
will come on. The cordless handset will
display
HSET 1
.
13 Leave the cordless handset to
charge for 24 hours
Like all cordless phones, the Freestyle 520 Plus
cordless handset must be charged for 24 hours
before you can use it.
Stop the power cable getting in the way of the
stand by keeping it in the centre of the base , away
from the stand clips.
Setting up
9
Page 12
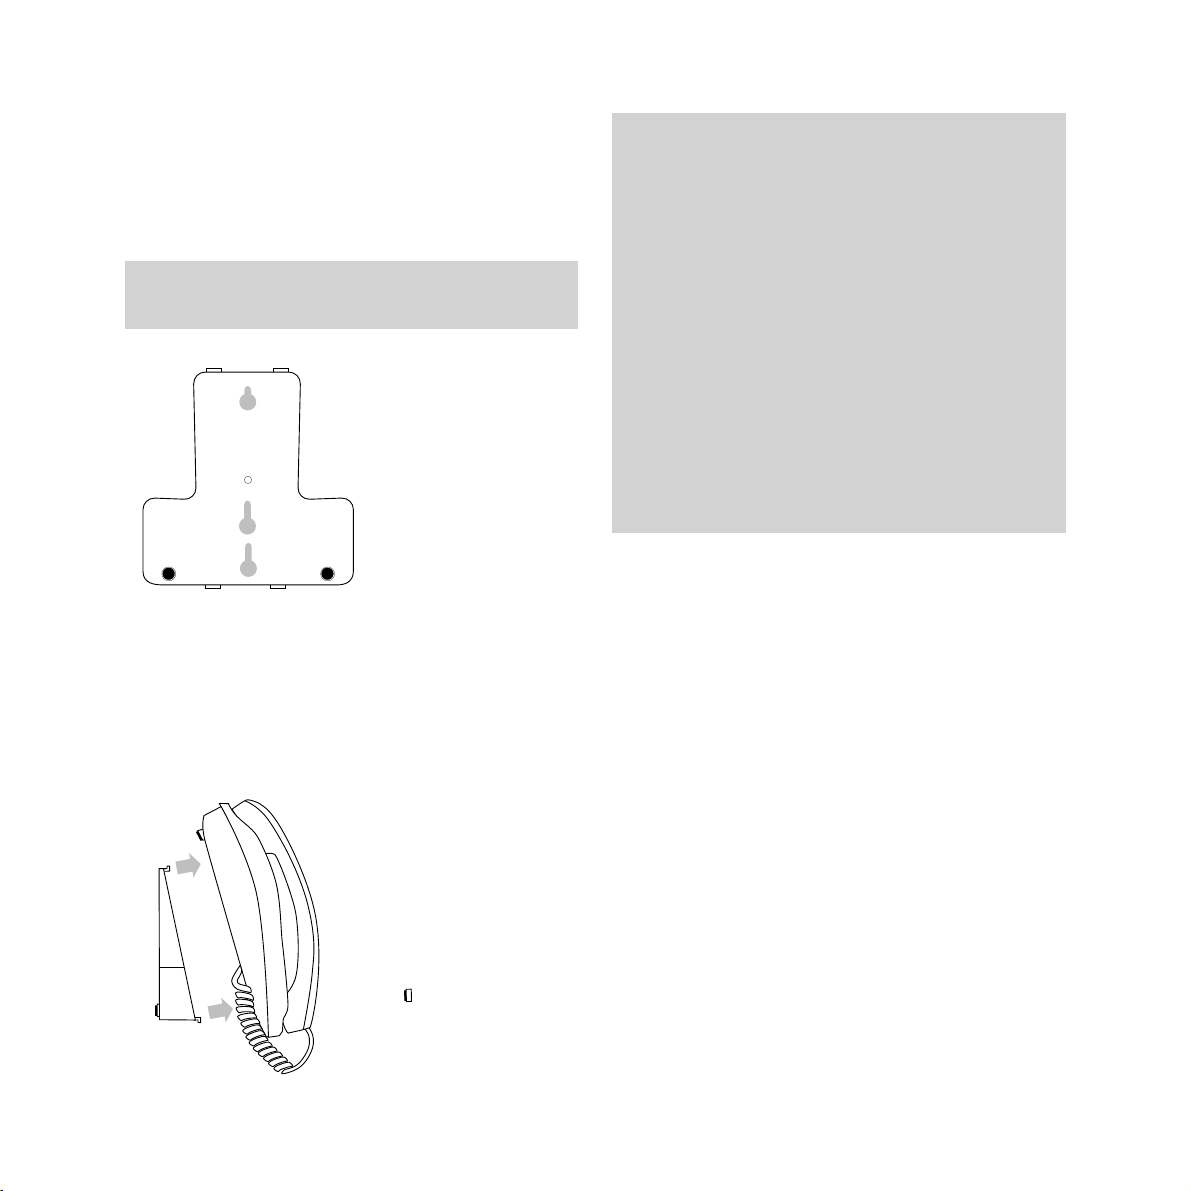
14 Put your Freestyle 520 Plus
base unit on the wall
You can put your Freestyle 520 Plus base unit
on the wall by using the bracket provided.
• Drill two holes for the screws and insert the
wall plugs provided (if you need them).
• Insert the screws leaving about 5 millimetres
sticking out to hang the bracket from.
• Clip the base unit onto the bracket.
• Push the small clip upwards towards the top
of the phone and remove it from its slot.
• Turn the clip around 180 degrees so that the
protruding lip is at the top.
• Slide the clip back into the base unit.
The base unit has a small removable clip that is
used to hang the handset on when the base
unit is wall mounted.
Before you mount the base unit on the wall,
you will need to turn the clip round.
Use the bracket as a stencil to mark where you
will put the screws into the wall.
Before you attach the bracket to the bottom of the
520 Plus base unit, thread the phone line cord
and power cord through the slots on the bottom of
the bracket. The wires are then neatly hidden
beneath the bracket.
Page 13

Wall
Wall plug Screw
Attach the bracket by hooking
it over the screws coming out of
the wall.
• Hang the bracket on the wall as
shown below.
15 Put your Freestyle 520 Plus
cordless handset on the wall
You can put your Freestyle 520 Plus cordless
handset on the wall using the bracket provided.
1
2
• Drill two holes for the screws and insert the
wall plugs provided (if you need them).
• Insert the screws leaving about 5 millimetres
sticking out to hang the bracket from.
• Clip the cradle charging-unit onto the
bracket.
Use the bracket as a stencil to mark where you
will put the screws into the wall.
Setting up
11
Page 14

16 Check the range indicator
This lets you see exactly how far you can take
the cordless handset from the base unit.
Press
0 on the cordless handset. The display
will show
TEST.
After a second or so, if making and receiving
calls is possible, the display will show
IN RANGE.
If you are out of range, you will hear two short
beeps and the display will return to
HSET 1.
Wall
Wall plug Screw
• Hang the bracket on the wall as
shown below.
Attach the bracket by hooking
it over the screws coming out of
the wall.
17 Using the options button to
change the telephone settings
The OPTIONS button allows you to change
your Freestyle 520 Plus telephone settings to
suit your preferences.
Shown below are the settings as they appear in
the display, along with the default settings.
HS RING
ON/OFF
HI/LO/NO
BASE RING
TONE/PULSE
RECALL TB/E
Turns handset ringer
on or off.
Selects the base
ringer volume.
Changes the dialling
mode to suit your
exchange. Most
exchanges require
TONE.
Selects timed
break or earth recall
(for use with
switchboards).
ON
HI
TONE
TB
Display Default
Setting up
12
Page 15

To change the base unit ringer volume
• Press the OPTIONS button repeatedly until
the display shows
HI BASE RING. This is
your Freestyle 520 Plus default setting.
• Press the SELECT button to scroll through
the ringer volume options:
LO BASE RING - base rings quietly.
NO BASE RING - base does not ring.
HI BASE RING - base rings loudly.
• When the required setting is shown in the
display, press the
OPTIONS key repeatedly
until the handset gives a long beep, the
setting is stored and the display returns
to
HSET 1.
To set the dial mode
The dial mode setting of your Freestyle 520
Plus is set to
TONE which works with all
modernised exchanges. If you are on an old
exchange, set the phone to
PULSE.
• While the display shows HSET 1, press the
OPTIONS button repeatedly until display
shows
TONE.
• Press the SELECT button. The handset
display shows
PULSE.
Options
Select
Options
Select
If you are in doubt as to which is the correct setting
for you, contact BT free on FREEfone 0800 800 150
To switch the cordless handset ringer
on or off
• Press the OPTIONS button; the display
shows
SET followed by HS RING ON. This is
your Freestyle 520 Plus default setting.
• Press the SELECT button; the handset beeps
and the display shows
HS RING OFF.
• Press the SELECT button to move between
on and off.
• To exit the menu and confirm all settings
made, press the
OPTIONS button repeatedly
until the handset gives a long beep and the
display returns to
HSET 1.
Please remember that the option shown on the
display before pressing the
SELECT button is
the current setting. For example, if the display
shows
HS RING ON, it means that currently the
handset ring is
ON and pressing the SELECT
button will turn it OFF.
Options
Select
Network
Services
Freestyle
plus
You must lift the cordless handset off the base unit
in order to change any of the options settings.
HS RING ON
Setting up
13
Page 16

• Press the SELECT button to toggle between
tone and pulse.
• To exit the menu and confirm all settings
made, press the
OPTIONS button repeatedly
until the handset gives a long beep and the
display returns to
HSET 1.
Please remember that the option shown on the
display before you press the
SELECT button is
the current setting. For example, if the display
shows
HS RING ON, it means that the handset
ring is
on and pressing the SELECT button will
turn it
off.
If an incoming call arrives while you are part way
through the above procedure, your Freestyle 520
Plus will abandon the process to allow you to
answer the call. Any changes you have made will be
lost, and you will have to start again after you have
finished the call.
Setting up
14
To store the option you have chosen, press the
OPTIONS button until RCL is displayed. Press
the OPTIONS button again and the handset will
beep to confirm your selection has been stored.
The display will then show HSET 1.
Page 17

15
Making and receiving calls
To make a call from the cordless handset
• Pick up the cordless handset, press the
TALK button and listen for the dialling tone.
The handset will display
TALK.
• Dial the number you want. The display will
show the last 12 digits you have dialled.
To end the call
• Press the TALK button, or put the cordless
handset back on the cradle charging-unit.
To receive a call
The base unit rings and, shortly after, the
cordless handset rings. The cordless handset
rings start quietly and gradually get louder.
The handset display shows
CALL.
The red light at the top of the handset flashes.
• Either pick up the cordless handset from the
cradle charging unit and answer the phone
(you do not need to press the
TALK button)
or, if the handset is not on the cradle
charging unit, press the
TALK button.
To end the call
• Either replace the cordless handset on the
cradle charging unit or press the
TALK
button again. In both cases, the handset
display will show
HSET 1.
To redial the last number you
called using a single button
• Press the TALK button.
• Press the
REDIAL button. The display will
show the number and your Freestyle 520
Plus will automatically redial the last number
you called. This saves you time, for example
if the number was engaged when you last tried.
To clear the last number dialled
• Press the MEMORY button followed by the
✱ button. The display will show CLEAR.
• Press the
REDIAL button. A tone will sound
and the last number dialled will be cancelled.
The display will return to
HSET 1.
How to use your Freestyle 520
Plus cordless handset
Talk
Page 18

Using the memory to store and
dial numbers
Putting the most regular or important numbers
you use in the memory means that you can dial
them using just three buttons.
Your Freestyle 520 Plus cordless handset can
store 10 phone numbers, each up to 20 digits
long.
Use the directory label on the back of the
cordless handset to keep a record of the
numbers you have stored in the memory.
To store numbers in the memory
• The display shows HSET 1.
• Press the
MEMORY button and the display
will show
MEM.
• Press a number button between
0 and 9 under
which you want to store the memorised number .
The display will show the number you have
pressed.
• Dial the phone number you want memorised
including the full area dialling code.
• Press the
MEMORY button again to store the
number. You will hear a beep which confirms
that the number has been stored. The display
will show
HSET 1.
To store up to nine other numbers, just repeat
these steps. Remember to use a different
number between
0 and 9 each time you store a
phone number.
Memory
Page 19

How to use your
Freestyle 520 Plus cordless handset
17
You can also mix manual and memory dialling .
For example, you can dial the area code 0181 380
from your Freestyle 520 Plus cordless handset
memory, and then dial the rest of the number by
hand. Remember to let the memory number dial
out completely before you dial the other digits.
The cordless handset and base unit use separate
memories which operate independently of each
other. This means that you can store one set of
phone numbers in the base unit and another in
the cordless handset.
A phone number stored in the memory of the
cordless handset is not automatically stored in the
base unit. You must put the number into each
memory separately.
To remove numbers from the memory
• Press the MEMORY button.
• Press the
✱button followed by the store
number between
0 and 9 of the number you
want to delete. The display will show
CLEAR.
A beep will confirm that the number has
been deleted.
To check the numbers you’ve stored in the
memory
• The display shows HSET 1.
• Press the
MEMORY button.
• Press the number between
0 and 9 under
which the phone number you want to see is
stored. The stored number will be displayed.
• After a few seconds, the display will go back
to
HSET 1.
To dial numbers more than 20 digits long
You can dial two or more stored numbers one
after the other.
• The display shows
HSET 1.
• Press the TALK button and listen for the dial
tone. Thedisplay will show
TALK.
• Press the
MEMORY button and the store
number between
0 and 9 you want.
• Press
MEMORY again and the store number
of the second part of the number you want.
• The display will show the number to be dialled.
Page 20

The directory label
Take the battery lid off the cordless handset and
slide out the clear plastic label cover. Take out
the label and write the person’s name alongside
each number you are storing. (If you use a pencil,
it’s easier to write in any changes in future.) Put
the label, plastic cover and battery lid back on
the handset.
•••••••••
1
MEM
2
MEM
•••••••••
3
MEM
•••••••••
4
MEM
•••••••••
5
MEM
•••••••••
6
MEM
•••••••••
7
MEM
•••••••••
8
MEM
•••••••••
9
MEM
•••••••••
0
MEM
•••••••••
Page 21

19
How to use your
Freestyle 520 Plus cordless handset
Using the intercom
You can use the cordless handset and base unit
as an intercom while the phone line stays free
for incoming calls.
To call the base unit from the cordless
handset
At the cordless handset:
• Press the INTERCOM button.
• The display will show
INT.
• Speak when the person at the base unit
answers.
• To end the call, press the
INTERCOM button.
At the base unit:
• The base unit rings and the display shows
INT CALL and the number of the handset
that is calling (for example
1).
• To answer, simply pick up the corded
handset.
• To end the call, put the handset back on the
base unit.
Intercom
You can use the INTERCOM facility during an
outside call by following the steps shown above.
During the intercom conversation the caller on
the outside line will hear a series of short beeps to
let them know they have not been cut off.
You can contact the emergency services using this
phone by dialling 999 or 112.
Emergency calls
Low-battery indicator on the cordless
handset
When the handset battery pack runs low, the
display shows BATT and the handset beeps. After
another 10 seconds, any phone or intercom call
you are making will be cut off.
To recharge the battery pack, leave the cordless
handset on the cradle charging unit for at least
24 hours.
Your Freestyle 520 Plus is a radio system and is
powered from the electricity mains, so there
are certain situations where you may find you
cannot make an emergency call from the
cordless handset.
These situations are as follows:
• If there is interference from other sources
such as cordless phones, radio station
transmitters, CB radios and so on.
• If the cordless handset battery pack fails.
• If there is a power cut and the base unit has
no battery fitted.
Page 22

Setting up a three-way
conversation
During an outside call, you can set up a
three-way conversation to allow someone from
the base unit and the cordless handset to talk
to each other and the outside caller.
To set up a three-way conversation during
an outside call from the handset
• Press the cordless handset INTERCOM
button.
• The display will show
INT.
• The base unit will ring and its display will
show
INT CALL and the number of the
cordless handset that is calling.
• Pick up the base unit handset and press the
MONITOR button.
• All three phones are connected.
• To end the three-way conversation but keep
the cordless handset connected to the
outside call, press the cordless handset
TALK button or put the corded handset back
on the base unit.
• To end the three-way conversation but keep
the corded handset connected to the outside
call, press the
MONITOR button on the base
unit or the
INTERCOM button on the
cordless handset.
• To end the three-way conversation and the
phone call, put the corded handset back
on the base unit and then press the
TALK
button on the cordless handset.
Clear reception
Your Freestyle 520 Plus has eight channels and
automatically selects the best option to give you
the clearest reception.
When you make a call from a cordless handset,
the base unit will display the number of the
handset you are using (for example, 1).
20
How to use your
Freestyle 520 Plus cordless handset
Page 23

To transfer a call from a cordless handset to
the base unit
• Press the INTERCOM button on the cordless
handset.
• The base unit will ring and its display will
show
INT CALL followed by the number of
the cordless handset you are calling from.
• Answer the call at the base unit as normal.
• Press the
INTERCOM button on the cordless
handset. The call will be transferred to the
base unit.
• If the base unit does not answer the
INT
CALL the call will be taken off hold and
returned back to the cordless handset.
21
How to use your
Freestyle 520 Plus cordless handset
Transferring a call between the
base unit and a cordless handset
During a conversation you can transfer the call
between your base unit and cordless handset.
To transfer a call from the base unit to a
cordless handset
• Press the INTERCOM button on the base
unit followed by the number of the
handset you want to transfer the call to
(for example
1).
• The outside call will be put on hold.
The caller will hear two beeps every few
seconds.
• The cordless handset will ring and its
display will show
INT CALL.
• If you press the cordless handset
INTERCOM button, the base unit will be able
to communicate with the cordless handset.
• Press the cordless handset
TALK button to
take the call.
• If you do not want to take the call on the
cordless handset, press the
INTERCOM
button on the base unit or the cordless
handset to return the call to the base unit.
Intercom
Intercom
Page 24

22
Making and receiving calls
To make a call from the base unit
• Pick up the handset and wait for a
dialling tone.
• Dial the number you want and wait for the
ringing tone. The display will show the last
12 digits you have dialled.
To end the call
• Put the handset back on the base unit.
On-hook dialling
For more convenience, you can dial a number
on your Freestyle 520 Plus when the handset is
still on the base unit.
• Press the
MONITOR button then dial the
number as normal. If the number dialled is
engaged, just press the
MONITOR button
to stop the call. When your call is answered,
you must pick up the handset to talk.
To receive a call
• Pick up the handset and answer as normal.
• At the end of the call, put the handset back
on the base unit
How to use your Freestyle 520
Plus base unit
Monitor
To redial the last number you called using a
single button
• Pick up the handset.
• Press the
REDIAL button. The display will show
the number and your Freestyle 520 Plus will
automatically redial the last number you
called. This saves you time, for example if the
number was engaged when you last tried.
To clear the last number dialled
• Press the MEMORY button followed by the
✱ button. The display will show CLEAR.
• Press the
REDIAL button. The display will
show the last number dialled.
• Press the
MEMORY button and a beep will
confirm that the last number dialled has
been cleared.
For more convenience, you can use the redial
function while the handset is still on the base unit.
Press the MONITOR button followed by the
REDIAL button. Your Freestyle 520 Plus
automatically redials the last number you called.
The display will show the number. When someone
answers the call, just pick up the handset and talk
Redial
Memory
Memory
Redial
✱
Page 25

Using the memory to store and
dial numbers
Putting the most regular or important numbers
you use in the memory means that you can dial
them using just two buttons.
Your Freestyle 520 Plus can store 10 phone
numbers, each up to 20 digits long.
Use the directory label on the inside of the
handset to keep a record of the numbers you
have stored in the memory.
To store numbers in the memory
• Do not lift the handset when storing or
removing a number from the memory.
• Press the
MEMORY button and the display
will show
MEM.
• Press a number button between
0 and 9
under which you want to store the
memorised number. The display will show
the number you have pressed.
• Dial the phone number you want memorised.
• Press the
MEMORY button again to store the
number. You will hear a beep which confirms
that the number has been stored.
To store up to nine other numbers, just repeat
these steps. Remember to use a different
number between
0 and 9 each time you store a
phone number.
Memory
Memory
23
How to use your
Freestyle 520 Plus base unit
To dial numbers stored in the memory
• Pick up the handset or press the MONITOR
button.
• Press the
MEMORY button. The display will
show
MEM.
• Press the number between
0 and 9 under
which you have stored the number you want.
• The phone number will be displayed and
dialled automatically.
• If you pressed the
MONITOR button, you must
pick up the handset when your call is answered.
• End the call as normal.
To put a pause in the memory
For such services as home banking,
you may need to use the PAUSE
function. Storing this in the memory is simple.
Start programming in your number as shown.
Where you need a pause, press the PAUSE button.
The display will show P. Continue the rest of the
memory programme as normal.
Pause
The cordless handset and base unit use separate
memories which operate independently of each
other. This means that you can store one set of
phone numbers in the base unit and another in
the cordless handset.
A phone number stored in the memory of the
cordless handset is not automatically stored in the
base unit. You must put the number into each
memory separately.
0- 9
Memory
Memory
0- 9
Page 26

You can also mix manual and memory dialling.
For example, you can dial the area code 0181 from
your Freestyle 520 Plus’s memory, and then dial
the rest of the number by hand. Remember to let
the memory number dial out completely before you
dial the other digits.
To remove a number from the memory
• Do not lift the handset when storing or
removing a number from the memory.
• Press the
MEMORY button.
• Press the
✱ button followed by the store
number between
0 and 9 of the number you
want to delete.
• Press the
MEMORY button again. A tone will
sound and the stored number will be
deleted.
To check the numbers you’ve stored in the
memory
• Press the MEMORY button.
• Press the number between
0 and 9 under
which the phone number you want to see is
stored. The stored number will be displayed.
• After a few seconds, the display will clear.
To store numbers more than 20 digits long
For very long numbers, you can run two or
more stored numbers together.
• Do not lift the handset when storing or
removing a number from the memory.
• Press the
MEMORY button and the number
between
0 and 9 under which you want to
store the memorised number.
• Dial in up to 20 digits. The display will show
the numbers you have dialled.
• Press
MEMORY again to store the number.
• To store the rest of the phone number,
press the
MEMORY button again and the
next store number between
0 and 9.
• Dial in the rest of the phone numbers.
The display will show these numbers.
• Press
MEMORY again to store the rest of the
phone number.
To dial numbers more than 20 digits long
• Press the MEMORY button and the store
number between
0 and 9 under which
the first part of the phone number you want
is stored. The display will show the stored
numbers.
• Press
MEMORY again followed by the
store number under which the second part
of the phone number you want is stored.
24
How to use your
Freestyle 520 Plus base unit
Memory
Memory
Redial
✱
Memory
0- 9
Memory
Memory
0- 9
Page 27

To stop your caller hearing a
private comment
You can talk to someone else close by without
the person on the other end of the line hearing
what you say.
• When you are using the phone, press the
SECRECY button and your caller cannot
hear anything you say.
• The display will show
SECRECY.
• Press the
SECRECY button again to continue
your phone conversation.
Using the monitor during a
conversation
You can allow someone to listen in to your
phone conversation using your Freestyle 520’s
monitor.
• During your conversation, with the handset
lifted, press the
MONITOR button. Your
conversation will come through the monitor.
• You can adjust the volume of the monitor
using the volume control on the side of the
base unit.
• To end the monitor function, press the
MONITOR button again. You can then
continue your conversation as normal.
The directory label
Lift out the clear plastic label cover on the
handset. Write the person’s name alongside each
number you are storing. If you use a pencil it
makes it easier to write in any changes in future.
Put the plastic label cover back on the handset.
1
MEM
2
MEM
•••••••••••••••••••••••••••
3
MEM
••••••••••••••••••••••
4
MEM
••••••••••••••••••••••
5
MEM
••••••••••••••••••••••
6
MEM
••••••••••••••••••••••
7
MEM
••••••••••••••••••••••
8
MEM
•••••••••••••••••••••••
9
MEM
••••••••••••••••••••••
0
MEM
••••••••••••••••••••••
•••••••••••••••••••••••••••
25
How to use your
Freestyle 520 Plus base unit
Secrecy
Monitor
Page 28

Other features These pages show how to make the
most of your Freestyle 520 Plus using a BT modern exchange.
In talk mode
In talk mode the following features are
available:
• call transferring
• base unit listen
• channel change
• recall
The list above shows the standard menu order.
Each time you use one of the options, that
option goes to the top of the menu. But when
the handset returns to standby, the menu
options return to the standard menu order.
To select call transfer
Call transfer is only available if you have more
than one handset. You can buy handsets with
the Homepoint logo to use with your Freestyle
520 Plus.
• While you are on a call, press the
OPTIONS
button until the display shows TRANSFER.
• Press the
SELECT button followed by the
number of the handset you want to transfer
the call to.
• The handset dialled will ring and its display
will show
CALL. The call can now be taken
on that handset.
• If the call is not answered, your handset will
ring and you must answer the call as normal.
• Press the
TALK button to answer the call and
return to the caller.
As well as transferring a call from handset to
handset, you can also transfer from handset to
base by pressing
TRANSFER 0.
If you do not answer the call after about 20
seconds, the call will end automatically.
Options
Select
Network
Services
Freestyle
plus
26
Page 29

Using Network Services from the
cordless handset
Network Services are available to customers on a
modern digital exchange. Apart from Call Return,
you need to pay a small fee every three months to
use these services. Tiay d1t7Suse these se,e months to
yoTc0 Twss0(i)20(e)-20(t)]TJ/F14 1 Tf165.04 353 146.12 409111 Tm-0.022 Tc[67etwork Services
Page 30

• You can switch between the two callers as
many times as you like. If the call you are
on ends, you are not automatically
transferred to the other caller. The handset
will ring again and you can return to the
other caller by pressing the
TALK button.
To use Call Divert
With Call Divert, your Freestyle 520 Plus
automatically transfers incoming calls to a phone
number where you have arranged to be reached.
• To divert all incoming calls to another
number, press the
TALK button.
• Press the Network Services button
until the display shows
CALL DIVERT.
• Press the
SELECT button and wait for a
recorded message. Follow the instructions
on the message which will explain how to set
the number you want your calls diverted to.
• At the end of the message, press the
TALK button again. All your incoming calls
will now be diverted to the number you have
chosen until you cancel the instruction.
To cancel Call Divert
To cancel the service, follow the instructions
(shown above) for receiving a recorded
message. The message will tell you what
to do. When you have finished, press the
TALK button.
Advanced Network Services
When your Freestyle 520 Plus is connected to
a modern digital exchange, you can enjoy a
range of valuable facilities.
Call Minder
Call Minder turns your local exchange into a
personal answering machine. When people call
you and you do not answer or your line is
engaged, Call Minder plays a message inviting
callers to leave their name and a message of up
to five minutes.
This service is available for a small charge
every three months.
Other services
• Hold a three-way conversation - ideal for
businesses or families. Three-way calling
lets you speak to two other callers at the
same time.
• Reminder call - turns your Freestyle 520 Plus
into a 24-hour alarm clock.
• Charge advice - instantly tells you the exact
cost of any call you have just finished.
These and many other useful services are
available if you are connected to a modern
exchange. For more information about
advanced Network Services, call BT on 152. If
you are not on the BT network, please ask your
supplier for information on their services.
28
Other features
Network
Services
Select
Page 31

To turn the base unit listening function
on or off
While you are on a call using the cordless
handset, you may want someone to listen in to
your conversation from the base unit.
• To switch on the base unit speaker, press the
OPTIONS button on the cordless handset
until the display shows
LISTEN ON.
• Press the
SELECT button and the base unit
speaker will be switched on. The display
will clear.
• At the end of the call, your Freestyle 520 Plus
will switch off the base unit speaker.
• To turn the base unit speaker off while you
are still on a call, press the
OPTIONS button
until the display shows
LISTEN OFF.
• Press the
SELECT button and the base unit
speaker will be switched off.
To change channel
If you are on a call, or about to make a call, you
can tell your Freestyle 520 Plus to search
through itschannel frequencies and find the
best one.
• Press the
OPTIONS button on the cordlesss
handset until the display shows
CHANNEL.
• Press the
SELECT button. The display will
clear and your Freestyle 520 Plus will scan
the channels and pick the one with the least
interference.
To set Recall
If you have an ordinary phone extension to a
PBX switchboard, you will normally use the
RECALL button to pick up a call on hold and
transfer it to another extension. If your
Freestyle 520 Plus is connected to a PBX as an
extension, you can do the same thing from the
OPTIONS menu.
• Press the
OPTIONS button until the display
shows
RECALL.
• Press the
SELECT button. The display will
show
r.
• Dial the extension number you want to
transfer the call to.
29
Other features
Options
Select
Options
Select
Options
Select
Page 32

These buttons save you having to remember
special BT Network Services codes for Call
Return and Call Waiting.
Call Return is free and lets you hear the
number of the last caller.
Call Waiting tells you that another caller is
trying to get through and lets you put your
current conversation on hold while you take
the other call. This service is available for a
small charge every three months. For details,
call us on
FREEfone 0800 800 150.
To use Call Return
• Pick up the handset or press the MONITOR
button.
• Press the
CALL RETURN button.
• You will hear the number of the last person
who called you.
Using Network Services from the
base unit
Call Return
Call Waiting
Call Waiting
Call Return
If you are making a call and do not want your
number recording on the other person’s Call
Return, dial 141 before you dial their number.
You need to do this even if your number is
ex-directory.
To use Call Waiting
If another person dials your number when you
are already on the phone, you will hear a beep
every few seconds.
• Press the
CALL WAITING button.
The display will show
CALL WTG.
• You can now talk to the other caller while
your first caller is on hold.
• Press the
CALL WAITING button again to
return to your first caller.
• End the call as normal.
Using the intercom
You can use the cordless handset and base unit
as an intercom, while the phone line stays free
for incoming calls.
To call the cordless handset from the
base unit
At the base unit:
• Press the INTERCOM button on the base unit
followed by the number of the handset you
want to call (for example 1).
• When the person on the cordless handset
answers, the base unit will ring. The display
will show
INT and the cordless handset number .
• Lift the base unit handset to speak.
• To end the call, put the handset back on the
base unit.
30
Other features
Intercom
1
eg
Page 33

• Press the cordless handset INTERCOM button.
• Press the base-unit
MONITOR button.
• All three phones are connected.
• To end the three-way call, press the base-unit
MONITOR button or the cordless handset
INTERCOM button.
Transferring a call between the
base unit and a cordless handset
During a conversation you can transfer the call
from your Freestyle 520 Plus base unit to a
cordless handset.
To transfer a call from the base unit to a
cordless handset
• Press the INTERCOM button on the base
unit followed by the number of the
handset you want to transfer the call to
(for example, 1).
• The cordless handset will ring and the
ringing indicator will flash. The display
will show
INT CALL.
• To answer, press the INTERCOM button on
the cordless handset.
• Then press the
TALK button to take the call.
• Put the handset back on the base unit.
• End the call as normal.
At the handset:
• The ringing indicator will flash and the handset
will ring. The display will show
INT CALL.
• To answer, press the
INTERCOM button.
• To end the call, press the
INTERCOM button.
The display will return to
HSET 1.
Setting up a three-way conversation
During an outside call, you can set up a
three-way conversation to allow someone from
the base unit and the cordless handset to talk to
each other and the outside caller.
To set up a three-way conversation during
an outside call from the base unit
• Press the base unit INTERCOM button
followed by the number of the cordless
handset you want to call (for example, 1).
The display will show
INT 1.
• The cordless handset will ring and its display
will show
INT CALL.
You can use the INTERCOM facility during an
outside call by following the steps shown above.
During the intercom conversation, the caller on
the outside line will hear a series of short beeps to
let them know they have not been cut off.
Intercom
1
Intercom
Intercom
31
Other features
Monitor
eg
Intercom
Page 34

Using Recall with a switchboard
When the Freestyle 520 Plus is connected to
a switchboard, you may need to set
RECALL to
use the range of services available.
• Press the
TALK button.
• Press the
OPTION button until the display
shows
RECALL.
• Press the
SELECT button. The display will
show
TALK and R.
To change Recall for use with a switchboard
With small switchboards you may need to set
the recall mode to time break recall or earth
recall.
• While the display shows
HSET 1, press the
OPTION button until the display shows
RCL TB or RCL E.
• Press the
SELECT button until the
option you prefer appears on the display.
• Press the
SELECT button again to set your
selected option. A beep will confirm your
setting. The display will show
HSET 1.
• To change the setting again, just repeat
these steps.
Talk
Options
Select
Connecting to a switchboard
If you are connecting your Freestyle 520 Plus to a
switchboard or PBX switchboard, you may need
to change the dial mode. If you are not sure
contact your switchboard supplier or
communications manager. Your Freestyle 520
Plus is only approved for use with suitable
switchboards. If you have any problems, phone us
on 154.
Confirming of selected options
To confirm any change made under the
OPTIONS menu, press the OPTIONS button
repeatedly until the handset gives a long beep and
the display returns to HSET 1.
To connect to a switchboard
Your Freestyle 520 Plus allows you to use the
facilities available on a modern switchboard.
For a list of suitable switchboards, phone us
on 152.
However, even with a suitable switchboard,
we cannot guarantee that your Freestyle 520
Plus will work correctly under every possible
condition. If you have any problems, contact
your communications manager for advice.
Connecting to a switchboard
Using your Freestyle 520 Plus with a switchboard or PBX switchboard
32
Page 35

Help If you have any problems using your Freestyle 520 Plus,
this section will give you the most common, easy-to-follow solutions.
No dialling tone
The base-unit display should show BASE. If
not, the phone may have become unplugged or
switched off at the mains.
The cordless handset may need recharging.
Put it on the cradle charging unit or, if
necessary, replace the battery pack. (You can
get batteries from your BT stockist.)
Make sure your Freestyle 520 Plus phone line
cord is plugged into the phone socket.
You may be out of range of the base unit. Try
again nearer the base unit.
Is the base unit aerial fully extended? This will
help you get the best possible range for using
the cordless handset.
You dial and nothing happens
You may be out of range of the base unit. Try
again nearer the base unit.
The handset does not ring
Have you turned the ringer off?
See page 13.
Are there too many phones, answering
machines or fax machines plugged in which
could be overloading the sockets?
See ‘Ringer equivalence number’ - page 37.
There is noise or interference on the
cordless handset
You may be almost out of range of the base
unit. Try moving nearer.
The base unit or cordless handset may be too
close to other electrical equipment and metal
objects. (Occasionally, overhead power lines
can cause interference when you use the
cordless handset outdoors. If this is the case
try again nearer the base unit.)
If your Freestyle picks up conversations from
other cordless phones, you can change the
channel during a call. See page 29.
33
Page 36

Try resetting the phone by unplugging it from
the mains and taking the battery pack out of
the cordless handset for a few seconds.
Now reconnect the battery pack, plug in the
base unit, put the cordless handset back on the
cradle charging unit and try again.
Recharging the handset battery pack
When fully charged and in good condition, the
handset battery pack in the cordless handset
will last for up to five hours of continuous use. If
the battery pack is running low , the handset will
display a flashing BATT warning message. If you
are making a call, the handset will give a series
of beeps and the BATT warning message will
stay on the display. Y ou will have approximately
10 seconds before the call is cut off.
Leaving the cordless handset on the cradle
charging unit to recharge overnight will
usually keep it working properly during
the day.
If in time you find that the battery pack is not
holding enough charge, you can get a new
battery pack from BT shops or your supplier.
To change the handset battery pack
• Slide open the battery cover on the back of
the cordless handset. Disconnect the
connector and take out the old battery pack.
• Put the new battery pack in the
compartment. (Remember to plug in the
battery pack connector.)
• Put the battery pack cover back on, and put
the handset on the cradle charging unit.
• Leave the cordless handset to recharge for
24 hours.
Battery Pack
Connector
Battery-saving tips
To extend the life of your cordless handset battery
pack, it is a good idea to take the cordless handset
off the cradle charging unit for around two hours
every day or let the handset run down completely
once every six months.
The handset seems to be ‘dead’
Check that the mains power to the cradle
charging unit is switched on.
Make sure the cordless handset battery pack is
fully charged.
34
Help
Page 37

Service
Outside guarantee
If your Freestyle 520 Plus is more than 12
months old, you will need to phone one of the
following numbers for it to be repaired:
01737 789 300
01672 564 444
You can phone these numbers between
9am and 4.30pm, Monday to Friday.
You will have to pay for this repair service.
Or you can take your phone to your nearest BT
shop. They will send it for repairs. (There will
be a postage charge for this.)
Some suppliers offer an extended guarantee
scheme for longer than 12 months. Please ask
your supplier for details.
Protecting your Freestyle 520 Plus
Most electrical appliances are affected by
thunderstorms. Cordless phones are particularly
at risk. To protect your Freestyle 520 Plus,
unplug it from the mains power supply and
phone line during thunderstorms.
Customer helpline
If you have any other problems, please call our
helpline on Lo-call 0345 697330.
Page 38

Technical information
Official approval
Freestyle 520 Plus is tested and approved for being connected to
the UK Telecommunications Network, as long as it is used in line
with the guidelines in this booklet.
Connecting your phone
You may connect your Freestyle 520 Plus to:
• direct exchange lines
• extensions with new plug and socket arrangements provided
with these direct exchange lines
• some switchboards.
You must not connect your Freestyle 520 Plus to:
• shared service (party) lines; or
• a payphone.
This phone is designed for use in the UK only. If you use it
abroad you may be breaking local radio laws.
How you can use your Freestyle 520 Plus
This phone has been approved for use with the following
facilities:
• standard phone
• cordless phone
• time break recall or earth loop recall
• automatic storage of last number dialled
• loop disconnect and MF signalling
• microphone secrecy
• PABX providing secondary proceed indication
• memory to store of up to ten numbers
• mixed mode dialling
• operation in absence of proceed indication
• Network Services.
If you use your phone with any other facilities, it will no longer
meet the standards by which we approved it.
You should only use the base unit with the mains adaptor
supplied. Otherwise it will no longer meet the standards by
which we approved it.
Call security
Your Freestyle 520 Plus has its own digital security code that
prevents other cordless-phone owners from using your phone
line. This means that you are only charged for calls using your
phone.
However, all approved cordless phones use radio to
communicate between the base and the cordless handsets. So it
is possible that your conversation could be overheard by other
people on their cordless phones, or on ordinary radios that use
the same radio frequencies. This problem applies to all similar
cordless phones currently available in the UK, so we cannot
guarantee call privacy.
36
Page 39

Handset battery
When fully charged and in good condition, the handset battery
will last for up to five hours of calls or 48 hours if the phone is
switched off.
Ringer equivalence number (REN)
Although you may have any number of phone sockets, it is
important to limit the number of phones and other phone
equipment such as fax, answering machines, etc. connected to
the line by those sockets to make sure that each phone will ring.
Every phone product has a ringer equivalence number (REN). In
most cases a standard phone line should provide enough current
for two or more products (if the RENs add up to more than 4).
Freestyle 520 Plus has a REN of 1. Any phone we provide will
have a REN of 1 unless the base shows a different REN. Even if
you limit the number of phones, there is no guarantee that
different types of phone on the same line will ring.
Guarantee
We guarantee Freestyle 520 Plus for a year, as long as:
• you only use the phone for the purpose it was designed;
• you do not abuse or damage the phone;
• you do not have the phone altered or repaired other than by
us, our staff or our agents.
If your phone goes wrong during the first 12 months, please take
it back to where you bought it from with your receipt. Your
supplier will repair or replace the phone for free.
This guarantee does not affect your legal rights.
NB: Your machines are not the only other apparatus that have a
REN value.
Transmission frequencies
This phone has been designed to use radio frequencies which
have been set aside for cordless phones. As the use of cordless
phones becomes more widespread, the quality of service you
receive may be reduced.
Transmission frequencies of available channels:
Channel Base Unit Portable Unit
(MHz) (MHz)
1 31.0375 39.9375
2 31.0625 39.9625
3 31.0875 39.9875
4 31.1125 40.0125
5 31.1375 40.0375
6 31.1625 40.0625
7 31.1875 40.0875
8 31.2125 40.1125
37
Technical information
Page 40

Index
Aerial
base unit
7
handset 6
Battery, base unit 6
Call Divert 28
Call Minder 28
Call transfer 26
Call Return 27, 30
Call Waiting 27, 30
Channel, changing frequency 29
Charging the handset 9, 34, 35
Customer helpline 35
Dial mode 13
Dialling
cordless handset
15
base unit 22
Directory label 18, 25
Emergency calls 19
Help 33
Homepoint Plus 4
Inductive coupler 8
Intercom 19, 30
Listen in at base unit 25
Low-battery indicator 19
Memory
storing numbers
16, 23
dialling 16, 23
removing 17, 24
checking 17, 24
Monitoring a conversation 25
Network services 27, 30
On-hook dialling 22
Pause 17, 23
Phone socket 6
Power cable 6, 8
Range indicator 12
Recall 29, 32
Receiving calls 15, 22
Redial
cordless handset
15
base unit 22
REN 37
Ringer volume
base unit
13
cordless handset 13
Secrecy button 18, 25
Service 35
Switchboards 32
Technical information 36
Three-way conversation 20, 31
Transferring a call 21, 31
Volume 8
Wall mounting 10, 11
38
Page 41

Page 42

APPROVED for connection to
telecommunication systems specified
in the instructions for use subject to
the conditions set out in them
503597
CE compliant to 89/336/EEC
(EMC Directive) & 73/23/EEC
(Low Voltage Directive)
Offices in Europe, North America,
Japan and Asia Pacific.
The telecommunications services described in this publication
are subject to availability and may be modified from time to time.
Services and equipment are provided subject to British
Telecommunications plc’s respective standard conditions of contract.
Nothing in this publication forms any part of any contract.
Touchtone™ is a registered trade mark of
British Telecommunications plc in the UK.
© British Telecommunications plc 1997.
Registered Office: 81 Newgate Street, London EC1A 7AJ.
Registered in England No. 1800000.
Printed in Thailand. Freestyle 520 Plus Issue 1 (11/97).
Designed by The Art & Design Partnership Limited.
 Loading...