

Page 1
Freehand
User guide
Page 2
2
2 ABC
5 JKL
8 TUV
0
3 DEF
6 MNO
9
WXYZ
1
4 GHI
7PQRS
✱
RECALL
HOLD
REDIAL
VOL
Freehand
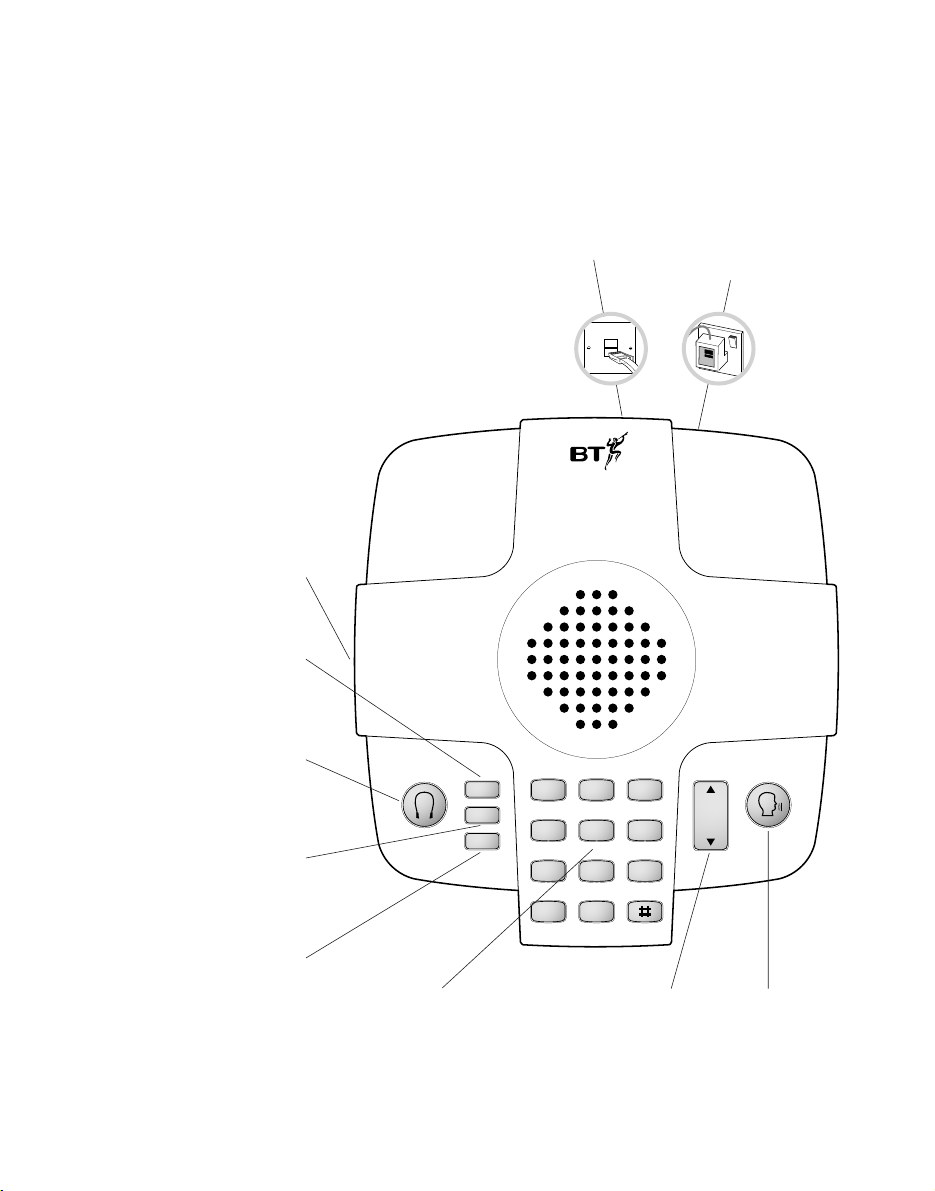
Headset socket
Plug in headsets here.
see page 10
Recall button
Use with BT’s Call Waiting
Select Ser vice
see page 9
Headset button
Use to make or receive calls
when using a headset.
see page 11
Hold button
Use to put a caller on hold
or to mute the call.
see page 9
Redial button
Redials the last
number dialled.
see page 9
At a glance
Keypad
Use to dial numbers.
Telephone line socket Power socket
Plug in power supply here.
Volume button
Use to adjust the
ringer and speaker
volume.
see page 7
Speak button
Use to make and
receive calls.
see page 8
Page 3

3
In this guide
At a glance 2
Introduction 4
Setting up 5
Using your Freehand 8
Help 12
Technical information 13
Index 15
Wall-mounting 16
Hints and tips boxes
In this user guide, we’ve included helpful tips and
useful notes. They are shown in a grey box.
Customer Helpline
Should you have problems with your Freehand,
call the BT Helpline between 9.00am and 5.30pm
Monday to Friday on Lo-call 0845 7697330.
Calls will be charged at local rate.
Page 4

Introduction Your Freehand has been
designed for ease of use and made to the very high standards
set by BT.
We thank you for making the right
choice and expect that you will have
many years of quality ser vice.
Please read the instr uctions car efully
before use and keep this user guide
for future reference.
For your records
Date of purchase:
Place of purchase:
Serial number:
(on the underside of the machine)
Purchase price:
For warranty purposes, proof of
purchase is required, so please keep
your receipt.
Emergency calls
The emergency services can be contacted
in the UK by dialling 999. You may also
dial 112, which is valid in any country
that is a member of the European
Community.
You may not be able to make an
emergency call in cer tain situations:
• If there is a power cut or if the phone
is disconnected from the mains.
• If the telephone line is disconnected.
• If there is a fault on the line from
your phone or on the network.
If your Freehand is connected to a PBX
(switchboard), you may have to dial an
access number before 999 to contact the
emergency services.
Some switchboards cannot dial out
during a power failure.
4
Page 5
Check that your Freehand is
complete. When you unpack, you
should have:
• Freehand telephone unit.
• Telephone line cord.
• Mains power supply unit.
• Wall-mounting bracket.
Setting up Follow these steps to get your
Freehand ready for use.
Electrical storm warning
1
During periods of electrical storm,
you are advised to disconnect your
apparatus because damage may
occur.
2 If a fault occurs during the 12-month
warranty period and it is due to
accidental or wilful damage
(including lightning and electrical
damage), BT will not replace or
repair free of charge.
Important
A cer tain amount of heat will be
produced in your phone’s day-to-day
operation. While this is entirely safe, we
advise against placing this product on
antique, veneered or delicate wooden
sur faces as damage may occur.
5
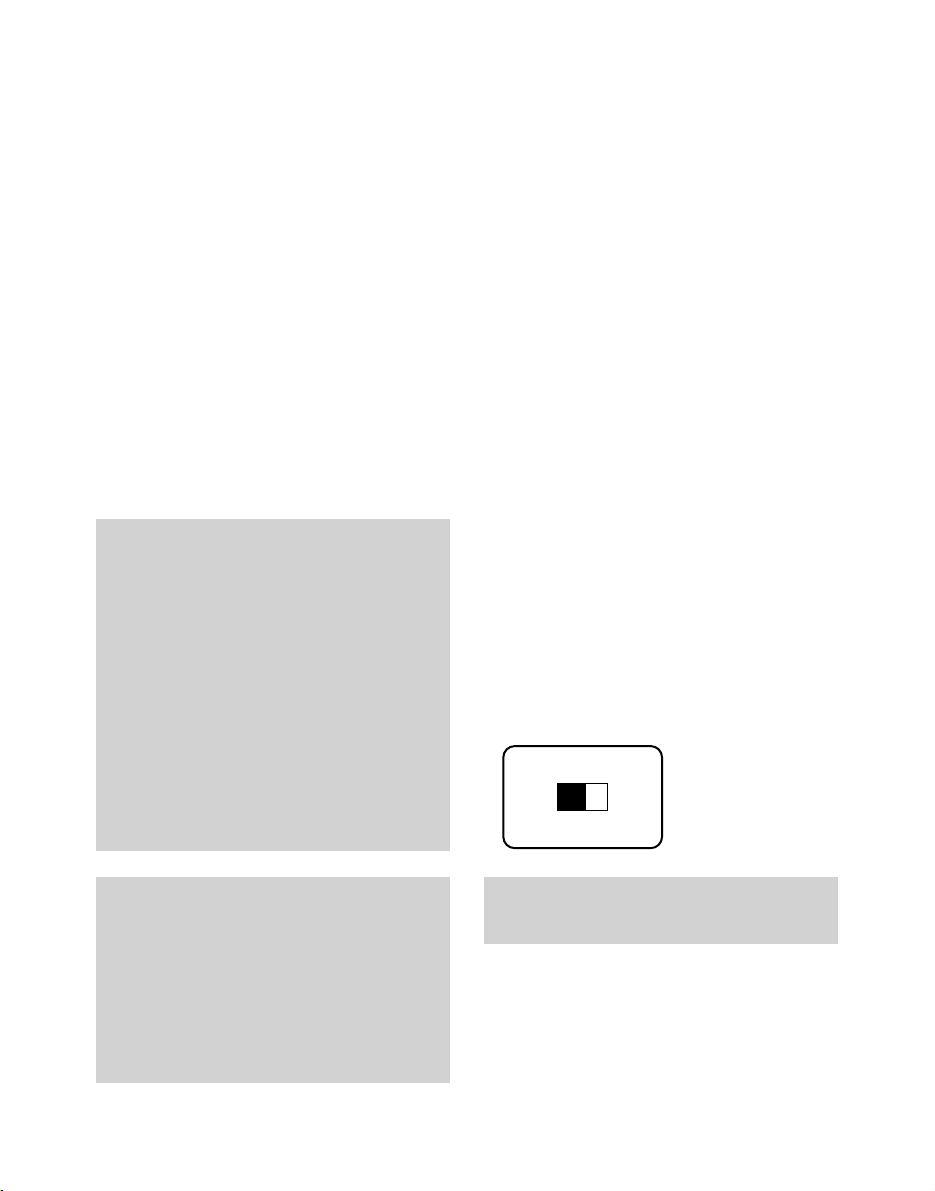
1 Setting the recall mode
Your Freehand has been designed
for use on modern exchanges. Set
the recall mode using the switch on
the underside of your Freehand.
• If you are not using your Fr eehand
through a switchboard, set the
recall mode to
T-TB.
• If you are using your Fr eehand
through a switchboard, set the
recall mode to
T-TB for Time
Break Recall or
T-E for Ear th
Loop Recall.
T-TB/T-E
Note
Your Freehand uses Tone dialling only.
Page 6
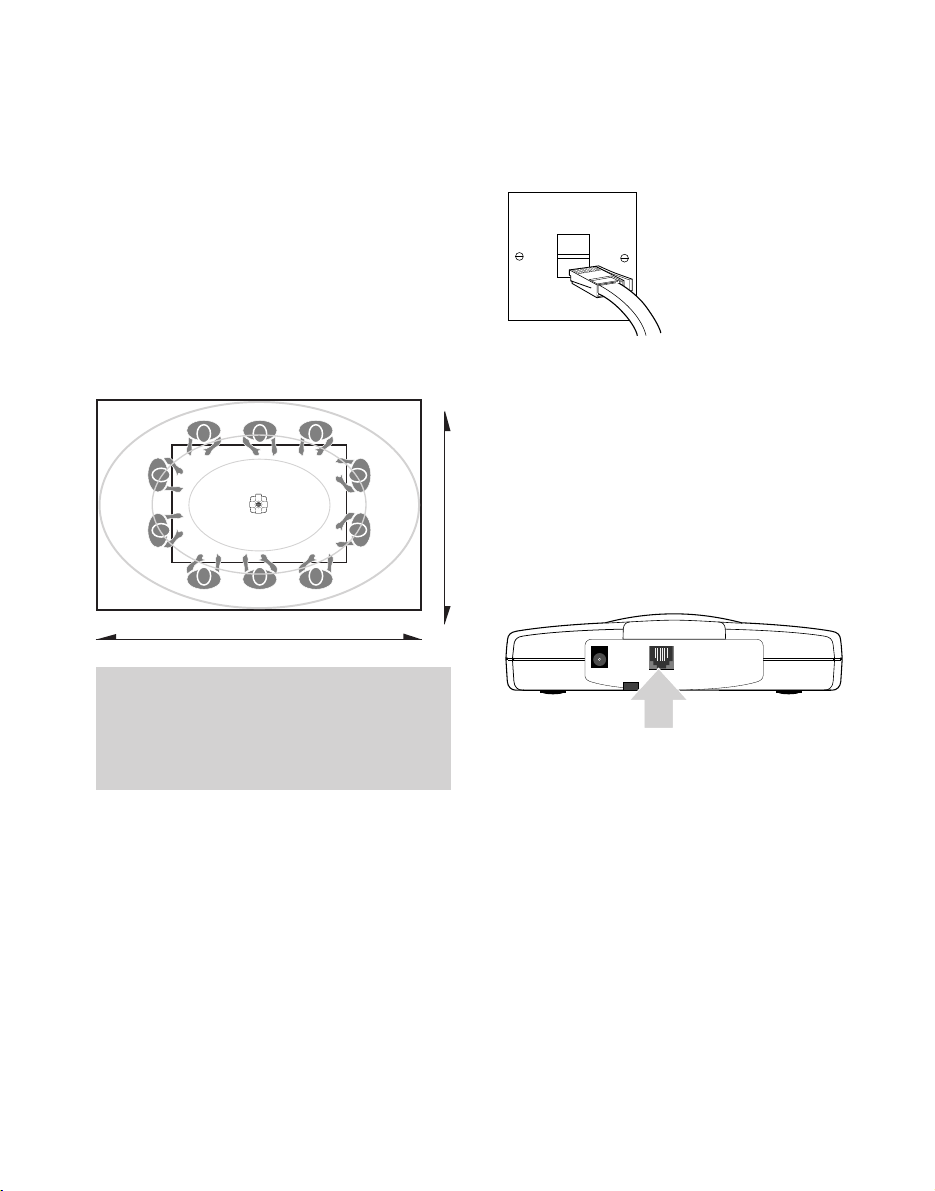
3 Plug the telephone line
cord into the phone socket
If you do not have a modern-style
socket, call Freefone 0800 800
150 and ask for a BT engineer to
come and fit the correct socket.
This is a chargeable ser vice.
4 Plug the telephone line
cord into the unit
The socket for the telephone cord is
at the back of the phone. Push the
plug in gently until it clicks into place.
Setting up
6
Plug in here
2 Plan where to situate
your Freehand
The phone must be able to reach
the power socket and the telephone
line socket with the cables provided.
A caller can distinguish up to 10
voices during a call, for example,
around a conference table.
Some echo of speech may be
experienced with this unit. This can
be minimised by reducing the
speaker volume (see page 7). It is
not always possible to remove all
echo on loud speaking units.
Your Freehand can be wall-mounted.
For more details on how to wallmount your Freehand, see ‘Wall-
mounting’ on page 16.
5m
3m
Voices too far away from the Freehand
will not transmit clearly. Make sure
everyone who needs to be in range is
close enough.
Page 7

5 Plug the mains power
cable into the unit
The socket for the mains adaptor is at
the back of the phone. Push the plug
in firmly to ensure it is fully inserted.
6 Switch on the mains
power to your Freehand
The unit will produce a burst of
noise followed by a confirmation
beep. While setting up the unit the
HEADSET button and SPEAK button
may flash alternately. This is due to
poor positioning. In this event
Plug in here
Warnings
1
Do not tr y to use any power supply
except the one provided, as it may
permanently damage your Freehand.
2 Your Freehand should not be
situated in wet or damp conditions,
for example in a bathroom.
3 There is a slight chance that your
phone could be damaged by an
electrical storm. We recommend
that you unplug the unit from the
mains during storms.
reposition the unit and repeat the
setup procedure.
Your Freehand is now ready for use.
7 Setting the speaker/
ringer volume
The ringer and speaker volume of
your Freehand can be altered using
the
VOL (volume) button.
• Press the ▲ par t of the VOL
button to increase the volume.
• Press the ▼ par t of the VOL
button to decrease the volume.
As you press the
VOL button,
your Freehand will generate a ring
that indicates the new ringer
volume.
VOL
Setting up
7
Changing the speaker volume during
a conversation
Increase or decrease the speaker volume
during a telephone conversation, using
the same procedure as above. When the
volume is set to a maximum or
minimum position the SPEAK button
will light up, if an intermediate level is
chosen the button will only illuminate
after releasing the VOLUME button
Page 8

Making and receiving
calls
To make a call
• Press the SPEAK button. The
SPEAK button will light up and you
will hear a dial tone.
• Dial the telephone number using
the keypad.
• When the call is answered, speak
into your Freehand.
To end a call
• To end the call, press the SPEAK
button.
Receiving a call
You can receive calls using your
Freehand either manually by
pressing the
SPEAK button or
remotely by simply clapping your
hands.
Receiving a call manually
• When the phone rings, press the
SPEAK button. The SPEAK button
will light up.
• Speak into your Freehand.
• To end the call, press the SPEAK
button.
Using the Freehand
If you do not hear a dial tone, you may
need to set the ringer volume to an
audible level (see ‘Se tting the
speaker/ringer volume’, page 7).
When your Freehand receives an
incoming call, it will ring and the
SPEAK button will flash.
8
If the person you have called hangs up
before you do, you don’t have to press a
button to end the call. Your Freehand
will automatically hang up after a
shor t time.
Page 9

Receiving a call remotely
• Calls can be received r emotely by
tapping or clapping twice during
the silence between rings. The call
will be answered automatically.
• Speak into your Freehand.
• To end the call, press the SPEAK
button.
To redial the last number
Your Freehand stores the last
number dialled so you can redial
that number with a single button.
• Press the SPEAK button and wait
for a dial tone.
• Press the REDIAL button. The
number is dialled automatically.
Important
When answering your Freehand remotely,
any sharp noise repeated twice will
answer the unit but the noise must be
made during the silence between rings.
Recall
If you subscribe to the Call Waiting
ser vice which is part of BT Select
Ser vices, you can use the
RECALL
button to switch between calls.
Secrecy
During a telephone conversation you
can talk to someone else in the room
without the caller hearing you.
However, you can still hear the caller.
• During your call, press the HOLD
button once.
• The SPEAK button will flash rapidly
and the call is muted. You can hear
the caller but they cannot hear you.
• To resume the call, press the
SPEAK button. You can now
continue the call as normal.
When a call is muted, you hear the
caller at a slightly reduced volume.
RECALL
HOLD
Using the Freehand
9
REDIAL
Page 10

Music on hold
You can put a caller on hold during a
conversation. When on hold, the
caller will hear music generated by
your Freehand.
• During your call, press the HOLD
button twice.
• The caller is put on hold and will
hear music generated by your
Freehand.
• To resume the call, press the
SPEAK button. You can now
continue the call as normal.
When a call is put on hold the SPEAK
button will flash slowly.
HOLD
Using a headset
For additional privacy you can attach
a headset (not supplied) to your
Freehand. When using a headset,
your calls cannot be heard via your
Freehand’s speaker.
Connecting a headset
Plug the headset into the socket on
the side of your Freehand.
Please note:
A headset is not supplied with your
Freehand and must be purchased
separately.
Freehand headsets can be purchased
from BT shops or other major retail
outlets or you can Freefone
0800 800 150.
Check that the headset you purchase has
a plug size of 2.5mm.
Using the Freehand
10
Plug in here
Page 11

Making calls using a headset
• Press the HEADSET button. The
button will light up and you will
hear a dial tone.
• Dial the telephone number using
the keypad.
• When the call is answered, speak
into your Freehand. The person
you are talking to will only be
heard through the headset and not
through the speaker.
• To end the call, press the
HEADSET button
Adjusting the headset volume
The headset volume can be altered
using the
VOL (volume) button.
• With the headphones
connected, press the ▲ par t of
the
VOL button to increase the
volume.
• Press the ▼ par t of the VOL
button to decrease the volume.
Make sure the headset is properly
connected.
During a call, you can change between
using a headset and the speaker.
When using a headset during a call:
• Press the SPEAK button. The
conversation can now be heard over
the speaker.
• Press the HEADSET button.
The conversation returns to being
heard only through the headset.
VOL
Using the Freehand
11
Page 12

Telephone problems Possible cause Solution
Help If you have any problems using your Freehand, this
section will give you the most common, easy-to-follow solutions.
• No dialling tone.
• Phone will not dial out.
• Phone cannot receive calls.
Phone is not connected to phone line.
Mains power is disconnected.
There is a power cut.
The speaker/ringer volume is not set
to an audible level.
Plug the phone into the phone socket.
See ‘Setting up’ page 5
Plug the phone into the mains power
socket.
Wait until the power is restored.
Increase the speaker/ringer volume.
See page 7
• Speaker/ringer volume too low.
A phone on another extension may
be off the hook.
Check any other phones on the same
line.
• You have dialling tone but
the telephone will not dial
out.
The mode switch may be set to the
wrong mode.
You are connected to a switchboard
and are not dialling the access code.
Set the recall mode switch to
T-TB if
your Freehand is not connected to a
PBX (switchboard). If it is, set the
switch to
T-E.
See page 5
Use the switchboard access code.
• Phone does not ring.
The speaker/ringer volume is not set
to an audible level.
Check the REN. If you connect too
many phones or devices to your line,
they may not all operate correctly.
Phone is not connected to the phone
line or mains (or both).
Increase the speaker/ringer volume.
See page 7
If the REN exceeds 4, disconnect 1 or
more phones or devices.
See ‘Technical Information’ page 13
Plug the phone into the phone socket
and/or mains power socket.
Need more help?
Call the BT Helpline on Lo-call 0845
7697330 where fully trained staf f can
help you from 9.00am to 5.30pm
Monday to Friday (calls charged at
local BT rate).
It is not permitted to interfere with the
main BT socket or wiring. If you have
a problem, contact BT on Freefone
0800 800 151 for residential or
Freefone 0800 800 154 for business
lines.
12
Page 13

Technical information
Choosing a position
Your Freehand should be kept clear of dust,
moisture, high temperature and vibration and
should not be exposed to direct sunlight. Do not
install it close to radiators or air-conditioning
outlets or in excessively warm, humid or dusty
places.
Warning
The apparatus is designed to be operated only in a
normal of fice or domestic environment wher e the
relative humidity does not exceed 60%. It should
not be used in bathrooms or near water.
Connecting to the UK network
Freehand is tested and approved for connection to
the UK network, provided it is used in accordance
with the guidelines in this booklet.
How many phones you can have
Your exchange line provides only a small current
to make your telephone ring. Although you may
have any number of sockets, it is important to
limit the number of telephones and other items of
apparatus connected to the line by these sockets.
This ensures that each telephone will receive
enough current to ring.
Ever y telephone or item of apparatus has a Ringer
Equivalence Number (REN). In most cases a
standard line should provide enough curr ent for
two or more telephones or items of apparatus, if
the REN’s add up to no more than 4.
Your Freehand has a REN of 1. Any telephone
provided by BT may be assumed to have a REN of
1 unless other wise stated on the base. Even
where the number of telephones has been limited,
there is no guarantee that the differ ent types of
telephone on the same line will ring.
While the apparatus may work initially, changes to
or modernisation of the network may result in the
apparatus being connected to a network ser vice
with which it is not designed to be compatible.
Failure of the apparatus to work under these
circumstances may not be the responsibility of the
network operator.
In the unlikely event of such problems occurring,
the user should contact the supplier or maintainer
of the apparatus.
Approval
BABT Certificate Number/Approval for the
Freehand APPROVED for connection to
telecommunication systems specified in the
instructions for use subject to conditions set out
in them. CE compliant to 89/336/EEC (EMC
Directive) and 73/23/EEC (low voltage directive).
You may NOT connect it:
To shared service (party) lines.
This apparatus may be used on
telecommunications systems employing MF
signalling only.
Any other usage will invalidate the approval
of the apparatus if, as a result, it then ceases
to conform to the standards against which
approval was granted.
13
Page 14

Connecting to switchboards
Your Freehand is approved only for use with
compatible switchboards including those which
do not provide secondar y proceed indication.
If you do not have a compatible switchboard, it
cannot be guaranteed that the Freehand will
operate correctly under all possible conditions of
connection.
If you have any dif ficulties, contact
BT on Lo-call 0845 7697330.
Safety warning
Interconnection circuits should be such that the
equipment continues to comply with the
requirements of 4.2 of EN 41003 for TNV circuits
and 2.3 of EN 60950 for SELV circuits, after
making connections between circuits.
Interconnection directly, or by way of other
apparatus, of ports marked Safety Warning:
Use with ports so marked or not so marked may
produce hazardous conditions on the network.
Advice should be obtained from a competent
engineer before such a connection is made.
Technical information
14
Page 15

Index
15
At a glance 2
Connecting to switchboards 14
Connecting your Freehand
phone socket 6
mains power socket 7
Electrical storm war ning 5
Ending a call 8
Following on a call 9
Headsets
connecting 10
using 10
Headset volume 11
Help 12
Helpline 3
Hold, putting a call on 10
HOLD button 9
Last number redial 9
Mains power adaptor 7
Making a call 8
Music on hold 10
Phone socket 6
Positioning your Freehand 6
Range 6
RECALL button 9
Recall mode 5
Receiving a call
manually 8
remotely 9
REDIAL button 9
Redialling the last number 9
REN (Ringer Equivalence number) 13
Ringer volume 7
Secrecy 9
SPEAK button 8
Speaker volume 7
Technical information 13
Wall-mounting 16,17
Page 16

16
Your Freehand can be wall-mounted
using the bracket provided.
You can use the bracket as a
template to mark where the screws
should go into the wall.
• Drill two holes for the screws and
inser t the wallplugs provided (if
required).
• Drive the screws into the wall,
leaving about 4mm free on which
to mount the bracket.
• Hook the bracket over the screw
heads to check if it fits correctly,
then remove again.
• Make sure that the power supply
and the telephone cables are
connected to your Freehand, then
fit the cables into the channels on
the bottom of the phone.
• Clip the bracket onto the phone as
shown on the next page. Push the
four clips into their slots on the
back of the phone and slide the
bracket towards the top of the
phone.
• Hook the bracket with the phone
attached over the screw heads.
Wall-mounting
Spare par ts for your Freehand are
available from your BT shop or
supplier, or you can contact us on
Lo-call 0845 7697146 between 9.00am
and 5.30pm Monday to Friday.
Before you wall-mount your Freehand,
check that:
• the wall can support the weight of the
phone;
• the phone can reach the power socket
and the telephone line socket with the
cables provided;
• the position you choose leaves
suf ficient space so that the phone
(which is larger than the bracket) is
clear of any obstruction on the wall,
such as a shelf or cupboard.
Attach the bracket by
hooking it over the screws
protruding from the wall.
Page 17

17
Wall mounting
WALL
WALL PLUG SCREW
83mm
Page 18

18
Page 19

19
Page 20

APPROVED for connection to
telecommunication systems specified
in the instructions for use subject to
the conditions set out in them
CE compliant to 89/336/EEC
(EMC Directive) & 73/23/EEC
(Low Voltage Directive)
Offices in Europe, North America,
Japan and Asia Pacific.
The telecommunications services described in this publication
are subject to availability and may be modified from time to time.
Services and equipment are provided subject to British
Telecommunications plc’s respective standard conditions of
contract. Nothing in this publication forms any part of any contract.
TouchTone is a registered trade mark of
British Telecommunications plc in the UK.
© British Telecommunications plc 1998.
Registered Office: 81 Newgate Street, London EC1A 7AJ.
Registered in England No. 1800000.
Printed in Korea. Freehand Issue 2 (04/98).
Designed by The Art & Design Par tnership Limited.
 Loading...